


Thistle17
-
Posts
1,053 -
Joined
-
Last visited
Content Type
Profiles
Forums
Gallery
Events
Posts posted by Thistle17
-
-
Tom I seem to be on the same trajectory as you regarding transitioning from full scale woodworking to model ship building although I cannot bring myself to let go of the shop tools just yet. Nonetheless, ship modeling is such a pleasant way to while away the hours. The 'rub' is your 'mind's eye always seems to raise the bar on the quality of the work product. So it is a never ending pursuit especially around this august body! Welcome to the group.
Joe
-
-
-
Brian can you supply a bit more info before one responds? For instance what is the lumber size (finished ) you need? lengths? This material is relatively expensive so you are well advised to have the proper staring point in terms of saw blades etc if you plan on milling yourself.
Joe
Joe
-
Hmmm. I believe I am looking aft towards the stern, am I correct? If so that curved metal works shown do not show up on the Patriot Point Mark I. I will confer with our member who has the archive of photos they sent to see if we can respond. I have not seen tha configuration before.
We just heard from a member of the 720th MP Army Battalion, 180th Company which gave fire support to the 458th Transportation Company that had PBR's. He alludes to the many in-country mods that were made to these craft. Hence in my opinion the "as built" craft didn't hold up over time.
Joe
-
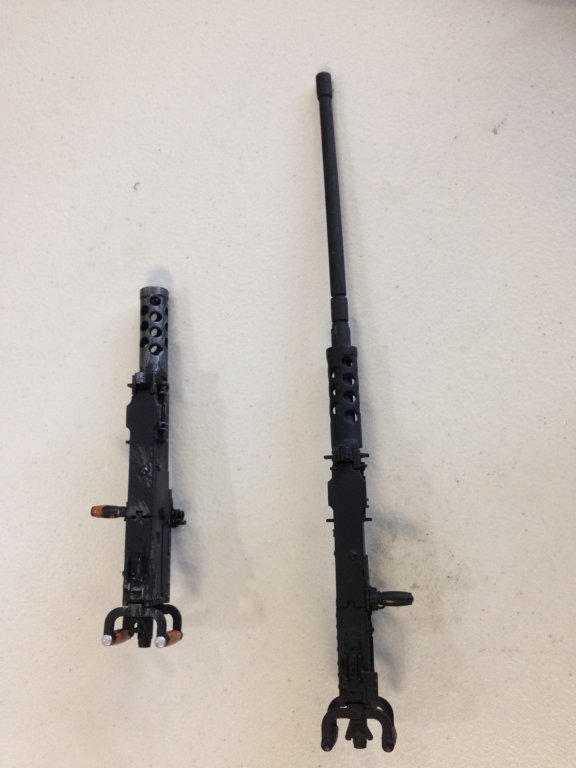
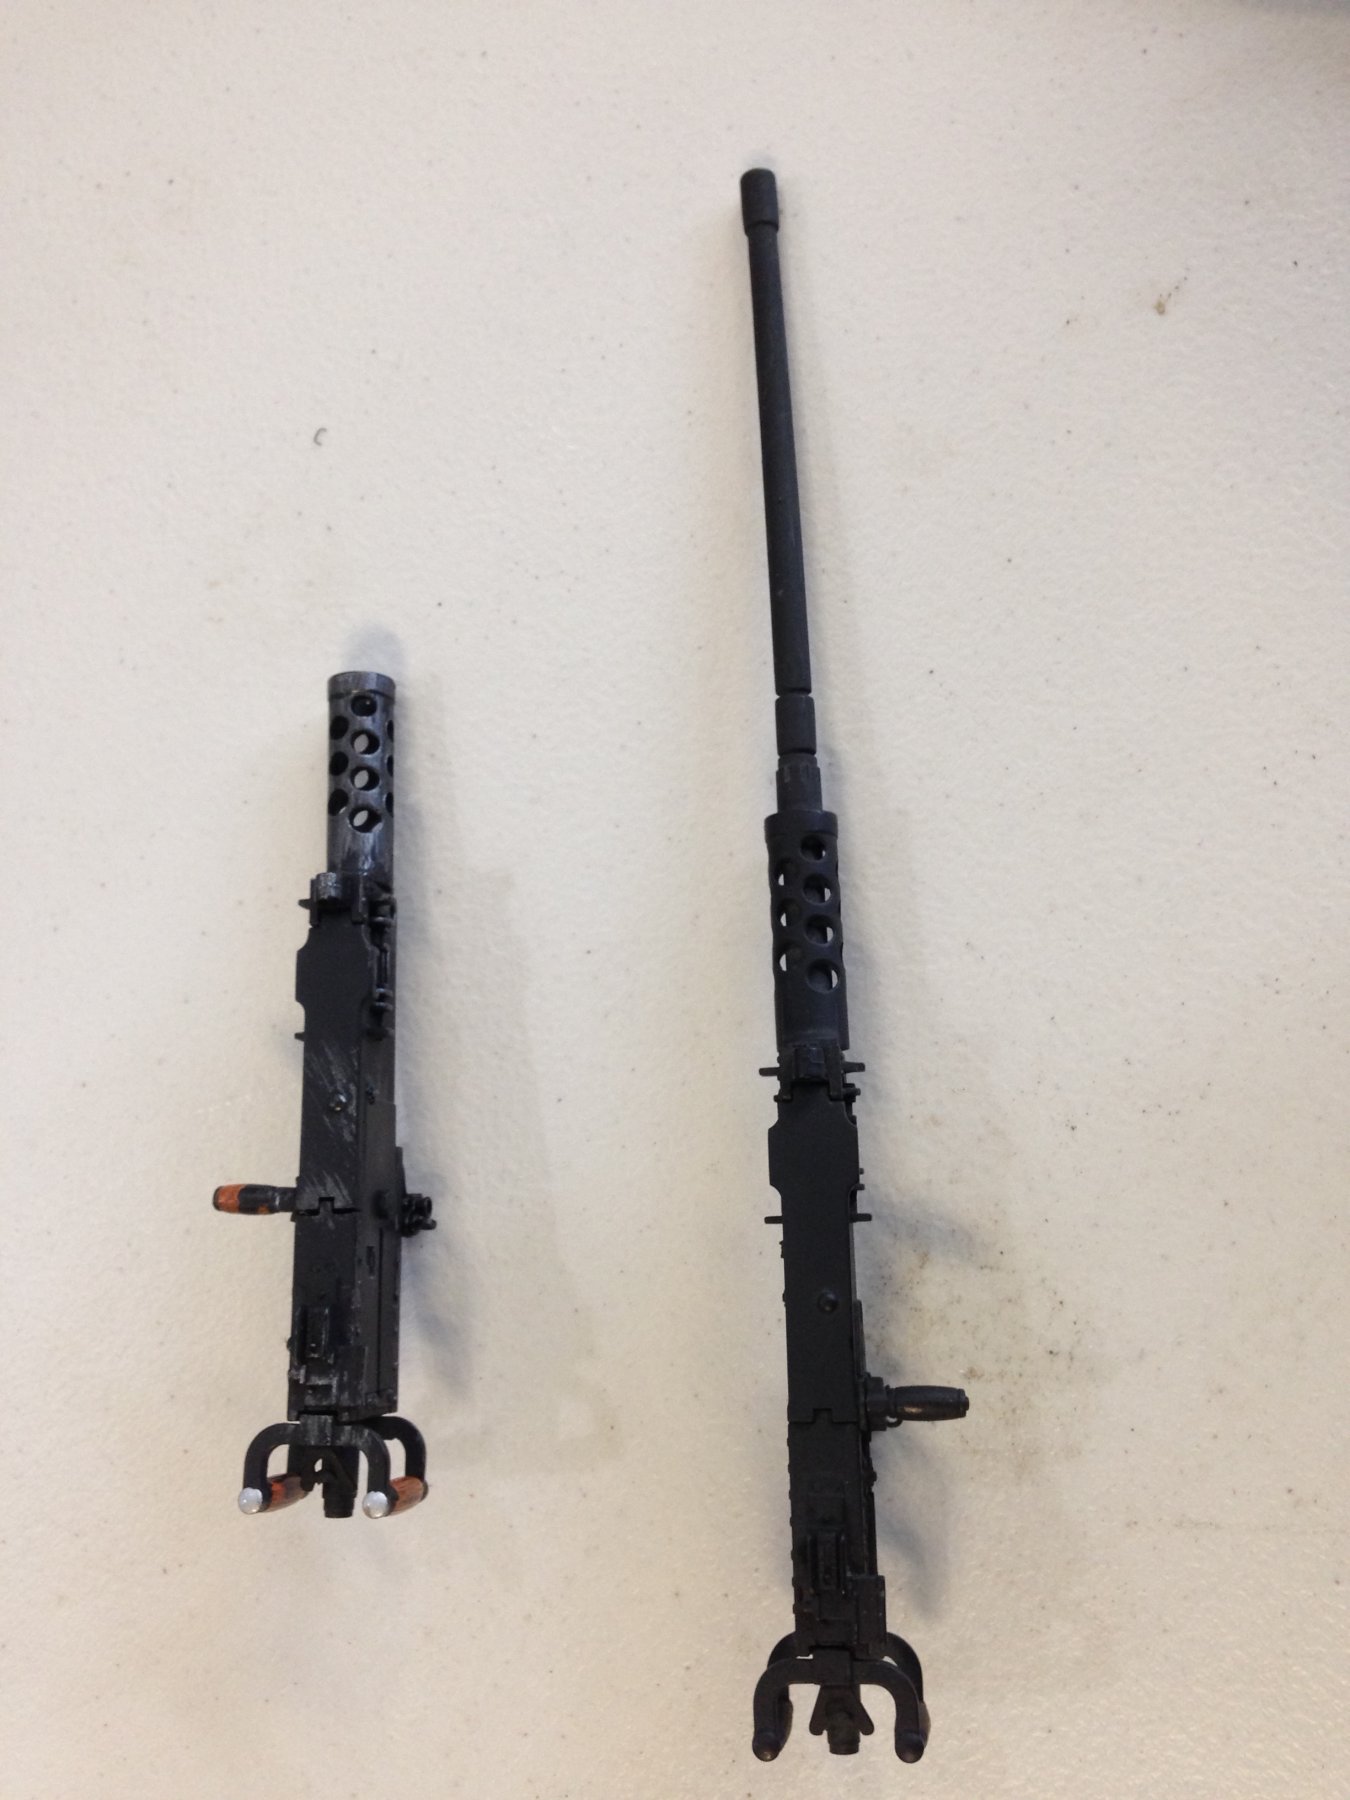
CapnMac82 thank you for the input. After a tumultuous summer I think we will be back at the build with more intensity. One of our modelers did convert the scale 50's to a' handed' version. I will pass on your input to the team. In the mean time here is a picture of the nearly completed 50's he came up with.
We managed to complete the skinning of the transom and now are concentrating on fairing in the bow and getting it ready to skin. Hope to have some supporting photos soon.
Joe
-
Simply lovely! Making your own tools can be just as satisfying as the modeling. I made the Lie Nielson inlay tools a short while back in part because of cost but mostly for the challenge of creation. They are a joy to use as I am sure you are experiencing..
Joe
-
I do not think you will be happy with staining bass wood. It is just too soft and any glue residue will pop. If you are fixed on a wood like treatment you might experiment with a wiping varnish/oil tinted instead. In any event try it out on some sacrificial stock first.
Joe
-
I may not add any wisdom to this thread but I have made some observations over some 40 plus years of woodworking and modeling. A kernel of thought started some 30 years ago when I witnessed an Irish cabinet maker visiting his daughter. He had to repair a Period High Boy chest he had made for her sometime past. He had a basket of tools; a saw, chisels, a couple of planes and measuring tools. He had to remake a drawer that was damaged. His repair was outstanding with this basket of hand tools. He is gone now but I still marvel at his skill.
Over time that memory has influenced my purchasing of tools more and more. I began observing what tools I used the most. It wasn't the gee whiz tools. It was the basic tools in measuring, shaping, trimming and the like. I do have a decent shop of power tools and I have to admit I have and love my Byrnes, Sherline and Lee Valley products and use them frequently. But by and large it is the basics that get used over and over.
Don't get caught up in that fever.
Joe
- Moab, russ, pontiachedmark and 5 others
-
 8
8
-
This isn't the last word on which kit but do visit this site for possibly more "insight".
Joe
http://historyofmassachusetts.org/uss-constitution-model-ship-kit/
-
Sorry I haven't been able to answer any questions lately. We had a family need that took me away for the last 2 weeks. Now don't chuckle too much but I completely damaged the false keel and frames in the interim and am having to start over. My lack of focus and limited time got me in big trouble. You seem to be disciplining yourself and I need to do the same. You can't just swoop in and work on any model and then hastily retreat without consequences. Slow and steady with a clear mind is required.
Joe
-
You have a storied ancestry with I am sure stories to tell. Welcome to this incredible shipyard. We have some lineage in our group as well, a descendant of Donald McKay, the Canadian, who settled in America, ultimately building ships out of Newburyport Mass. It all adds to the nature of this wonderful pursuit.
Joe
-
-
I also have this kit and recently started it on vacation. I have built models before but because of its size and the delicate nature of the frames/bulkheads I had to adjust my methods a bit. The bass wood elements are easy to break when sanding during the hull fairness. Be careful. I did have to lightly file the slots in the false keel and bulkheads so I got a decent fit. Be careful with the depth of the slots so that they do not drop below the rabbet area. Once you are ready to fasten the frames/bulkheads to the false keel I built a simple jig to keep the false keel straight. It was a piece of mdf with 2 laterals that made up a false keel slot. Starting at the stern I walked my way forward fastening the frames. Checking as I went for level, port and starboard, and perpendicularity to the false keel. As you proceed make sure the frames are as parallel to each other as possible.
In sanding the hull for fairness one of the frames broke. I think it may have been cracked from the get go. After repair I fastened a 1/16 strip about 1 1/4 wide down the middle of the top of the frames (not interfering with the actual members that will be left behind, just in the break away part of those frames). That kept the frames pretty steady for the sanding. Once the hull is planked this can be removed. I also did this with an extension atop this member to make the transom more rigid.
I hope this helps. Everyone has their methods and some are less heavy handed than I am.
Joe
-
-
You are a unique individual Michael. Your journey was a delight to follow. I would imagine there were mixed emotions in its "sailing".
Joe
- thibaultron, cog, mtaylor and 2 others
-
5
-
I helped my grandson build a Dumas vessel with wood and PVC hull. We had to fair in the chine against the side planking and we used both Rage and 3M 2 part mix that sands easily and gives an incredibly smooth finish. I (we) found it worked better than Nitro Stan putty as it does not shrink when dry and it is a dry sand process rather than a wet sand which can be tricky near, for example, the wooden planked sides.
Joe
-
You have dwelt where very few have had an opportunity to witness and study the masters of their time. They were an inspiration to all, past and present. I suspect "living" within in this realm you may calibrate your work against theirs. It is hard not to do. Also when it is a work project one cannot always take the time you would otherwise invest if it were your own.
Within this forum there are modern day masters that we all, at times, compare ourselves to. For myself I have been inspired by and learned from them.
Welcome to MSW.
Joe
- hollowneck, tarbrush, mtaylor and 2 others
-
5
-
I was just reviewing Bill Short's book on ornamental carving this AM and his preface regarding tools was not as positive on Demel tools compared to others. From memory I recall that he advises one purchase the foot switch for better speed control and use of the flex shaft attachment. Other comments align with what has been said. Again his comments are related to ornamental carving.
Joe
-
Welcome to the forum Glenn "y'all gonna love it here" as they used to say to me when I lived in Denton.
Truly this is one of the best things that has happened to modeling of ships. It has something for everyone, skilled to just getting started. In addition to the tutorials on the site please visit our web site ww.modelshipwrightguildwny.org. Look under Resources/Shop Notes/Planking as it is our attempt to integrate much of what one can find here in this forum but also delves into the planking graph a bit further which is an aide to the process.
Joe
-
Your observation about this scale certainly does open up opportunities. Dovetails and raised panels my, my. Your imagination and execution of the stand is intriguing to me as I just went through a struggle to come up with one for a 1:20 scale model that weighed 45 pounds. Nice work Michael!
Joe
- mtaylor, druxey and popeye the sailor
-
3
-
-
Thanks Chuck I too am waiting patiently for the release outside your club.
Joe
- EJ_L, Canute, thibaultron and 1 other
-
4
-
Chuck as I follow along I am entranced, but find myself losing track of the end product that will define the kit. Is your kit offering changed or is it going to be pretty much like Cheerful? Please, please, don't say as my wife says to me all the time..."Haven't we had this discussion before?"
Joe

Tools, tools and more tools....
in Modeling tools and Workshop Equipment
Posted · Edited by Thistle17
Since I last entered this thread on tools I purchased a new tool. One can never go wrong with measuring tools and I am sure all would agree this is one category that we use continuously in one form or another. I have come away from the "dark side" finished the Atlantis ABS plastic hull and model and have re-entered the realm of hull planking (on my Cheerful) I have had to do a good deal of plank measurement and retrim.
I have a number of calipers, both dial and digital. I find them useful for many tasks and I have been using them to trim boxwood planking for the Cheerful hull. I find that they can be a bit clumsy when measuring with one hand holding the plank and the other the calipers. Zeroing in on the measurement and then removing it to measure further along can be a tad cumbersome. Recall of the measurement often is a repeated process.
I happened on a tool I had seen before but had never thought that useful. It is the iGAGING Snap Thickness Gauge. I thought I would give it a try after arguing with myself..."Really! You don't need another tool!" It was just about $30 with shipping so it was not going to break the bank.
Here is what I really like about it:
1. It is easily a one handed tool.
2. It has a flat headed measuring anvil that easily slides along the plank to measure thickness.
3. It has a HOLD button that retains the measurement when the device is withdrawn from the object
4. Here is what I really liked...it has an ABSOLUTE button that measures difference from whatever one chooses as a reference on the part.
5. It's accuracy is supposedly +/- 0.0015 inches
6. It has a ball anvil to replace one of the flat anvils that improves access in tight spots.
The 0 to 1 inch range for the work we do does not seem a problem, at least not yet. It did not come with directions which I found odd but is easily mastered after about one minute of playing. I measured it against my dial and digital calipers and it was right on the mark. Like calipers you do have to be deliberate in placement as one can measure the trapezoidal effect of inaccurate placement.
I always look at the reviews on line and the most disparaging comment was life. Now I have found if these units are kept in a humid environment they can indeed give flaky results. So a word to the wise. Put them in a sealed plastic bag if it is to reside in such an environment.
Joe