


Thistle17
-
Posts
1,042 -
Joined
-
Last visited
Content Type
Profiles
Forums
Gallery
Events
Posts posted by Thistle17
-
-
I would suggest you describe your episode as accurately as possible to Jim Byrnes as it could have been any number of things including the motor itself (faulty field winding, capacitor start circuit), your power source (brown out conditions), loading i.e. rate of feed, how much you tried to remove in a pass.
Joe
- druxey, Canute, Jim Rogers and 1 other
-
 4
4
-
I too stumbled into this thread and was amazed at your mastery of wood tools of hand. You are truly gifted and I might add "fearless" to have attempted such a model, at this scale, as your second subject! I believe there are just a few women in this pursuit and gauging your skill level there are but a few that have achieved your level so quickly. Portia Takakjian probably was the most prominent, but she is gone, so keep doing what your doing and continue to grow. Your work has my admiration.
Before I sign off let me say this is not about being female or male. I just marvel that you found a passion in this as I believe the rest of us have.
Joe
-
Denis I was looking more closely at earlier images and your rendering is so detailed. Lighting through the gratings and down the companion way, wood grain, shadows its mind boggling. Its no wonder the GPU is staring to struggle. Nonetheless you are an artist of noteworthy talent. You have my admiration.Joe
-
Your work is itself a work of art. I have seen convincing computer graphic images but your turned the application of the practicum on its head! It would be a joy to watch you work. In one sense its like painting with sand like the Tibetan Buddhist...oh so beautiful, so intricate, so artful, so amazing but so vulnerable. I do hope you have backed up those files.
Joe
PS what is the platform you are running on i.e. the memory, graphics, speed?
-
-
-
I got this address from druxey Mike.
Hi. I should emphasize that these are for experienced miniature carvers. They are, in the small sizes, very delicate tools, easily broken if misused. However, if you are up to it, they will make a superb investment. Michail's contact info:
mihail.kirsanov@mail.ru
Regarding handles is a matter of prefrerance. For fine work I would prefer the palm handle version for close in work. Go to Woodcraft and handle their miniature palm set for a similar sense of that style.
Joe
- Landlubber Mike, druxey, mtaylor and 1 other
-
4
-
-
Rok I have no experience with this mill but I did have a Grizzly import about 8 years ago. It was a bench top model which I ended up selling because of its limited use to me at the time (had not returned to ship modeling yet). The one problem I had with it was that it had nylon gears and one of them failed. I bought the replacement gear set and it appeared to be a relatively straight forward repair. So my one word of caution besides accuracy concerns is I would steer away from any machines that have nylon gears if you plan on other besides modeling. I noticed the Micro Mark web site here in the US also sells heavy duty gears for its lathe so maybe that is a standard practice to use the cheaper gears. See https://www.micromark.com/product/7990
Joe
-
Thanks guys. I tend to shy away from CA for wood to wood application but could not clamp the particular element so I resorted to the CA. Yellow glue for me as a rule. I have found the DAP Insta Cure (all purpose) has worked better. You can even remove it to re-position it within the 1st 30 seconds with good adhesive results in the end. They also make a wood only version I have yet to try. Why I didn't reach for that bottle is beyond me as an alternative.
Joe
-
This may be a misplaced entry on the topic of CA adhesives. Specifically I am suspect of my CA, namely bsi Insta Cure, Gap Filling, 5-15 sec adhesive. As a matter of expedience I used the CA to glue Castello box wood to Castello box wood. I noticed it wasn't too hard to pry it off after about 5 days of application as I had made a mistake. Now I am concerned about future loose parts over time. The CA glue is about 7 months old and is still very viscous. Its container is immediately sealed even during use. The box wood is silky smooth as it comes from the supplier. Any similar episodes out there and what have you done to combat this problem?
Thanks, Joe
-
Rusty has shown the "Winne" to our group. It is a beauty and much desired by a number of us. The starter kit, as Cheerful, with accessories makes it a no brainer for me. I am hooked on this method of building a quality model within a reasonable time frame. It is a most desirable way to go for many of us. I will wait patiently.
Joe
- Canute, Seventynet, Elijah and 3 others
-
6
-
For my vote I would put the Chebacco at #1 but would not be disappointed to see Pegasus take the first place spot. I happen to be very fond of working craft as much as fighting ships. They were the backbone of our early nation's commerce and some still ply our waters. Your Chebacco is truly an interesting double ender craft.
Joe
-
Sam, so this is what you are doing these days in your spare time. Would be nice to have you visit the group, when the weather is nicer, and show us the work, in person, on this great project. I know all would like to see you and your work. You could share your experiences with us as I know a number of us are thinking about this project for themselves.
Joe
-
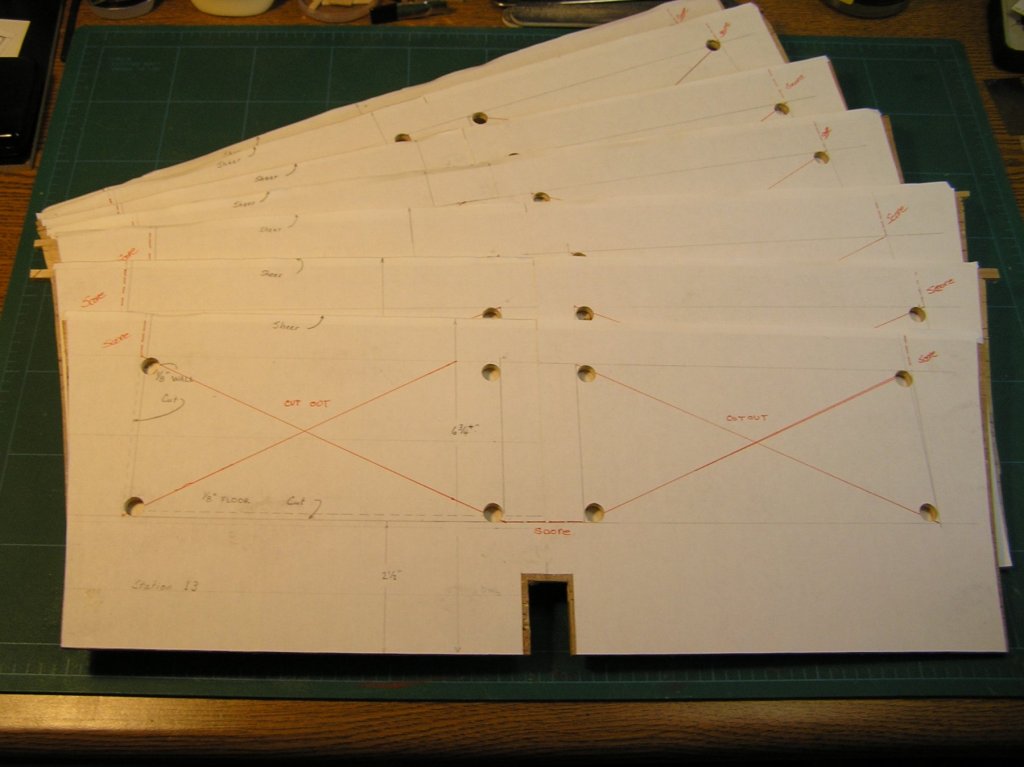
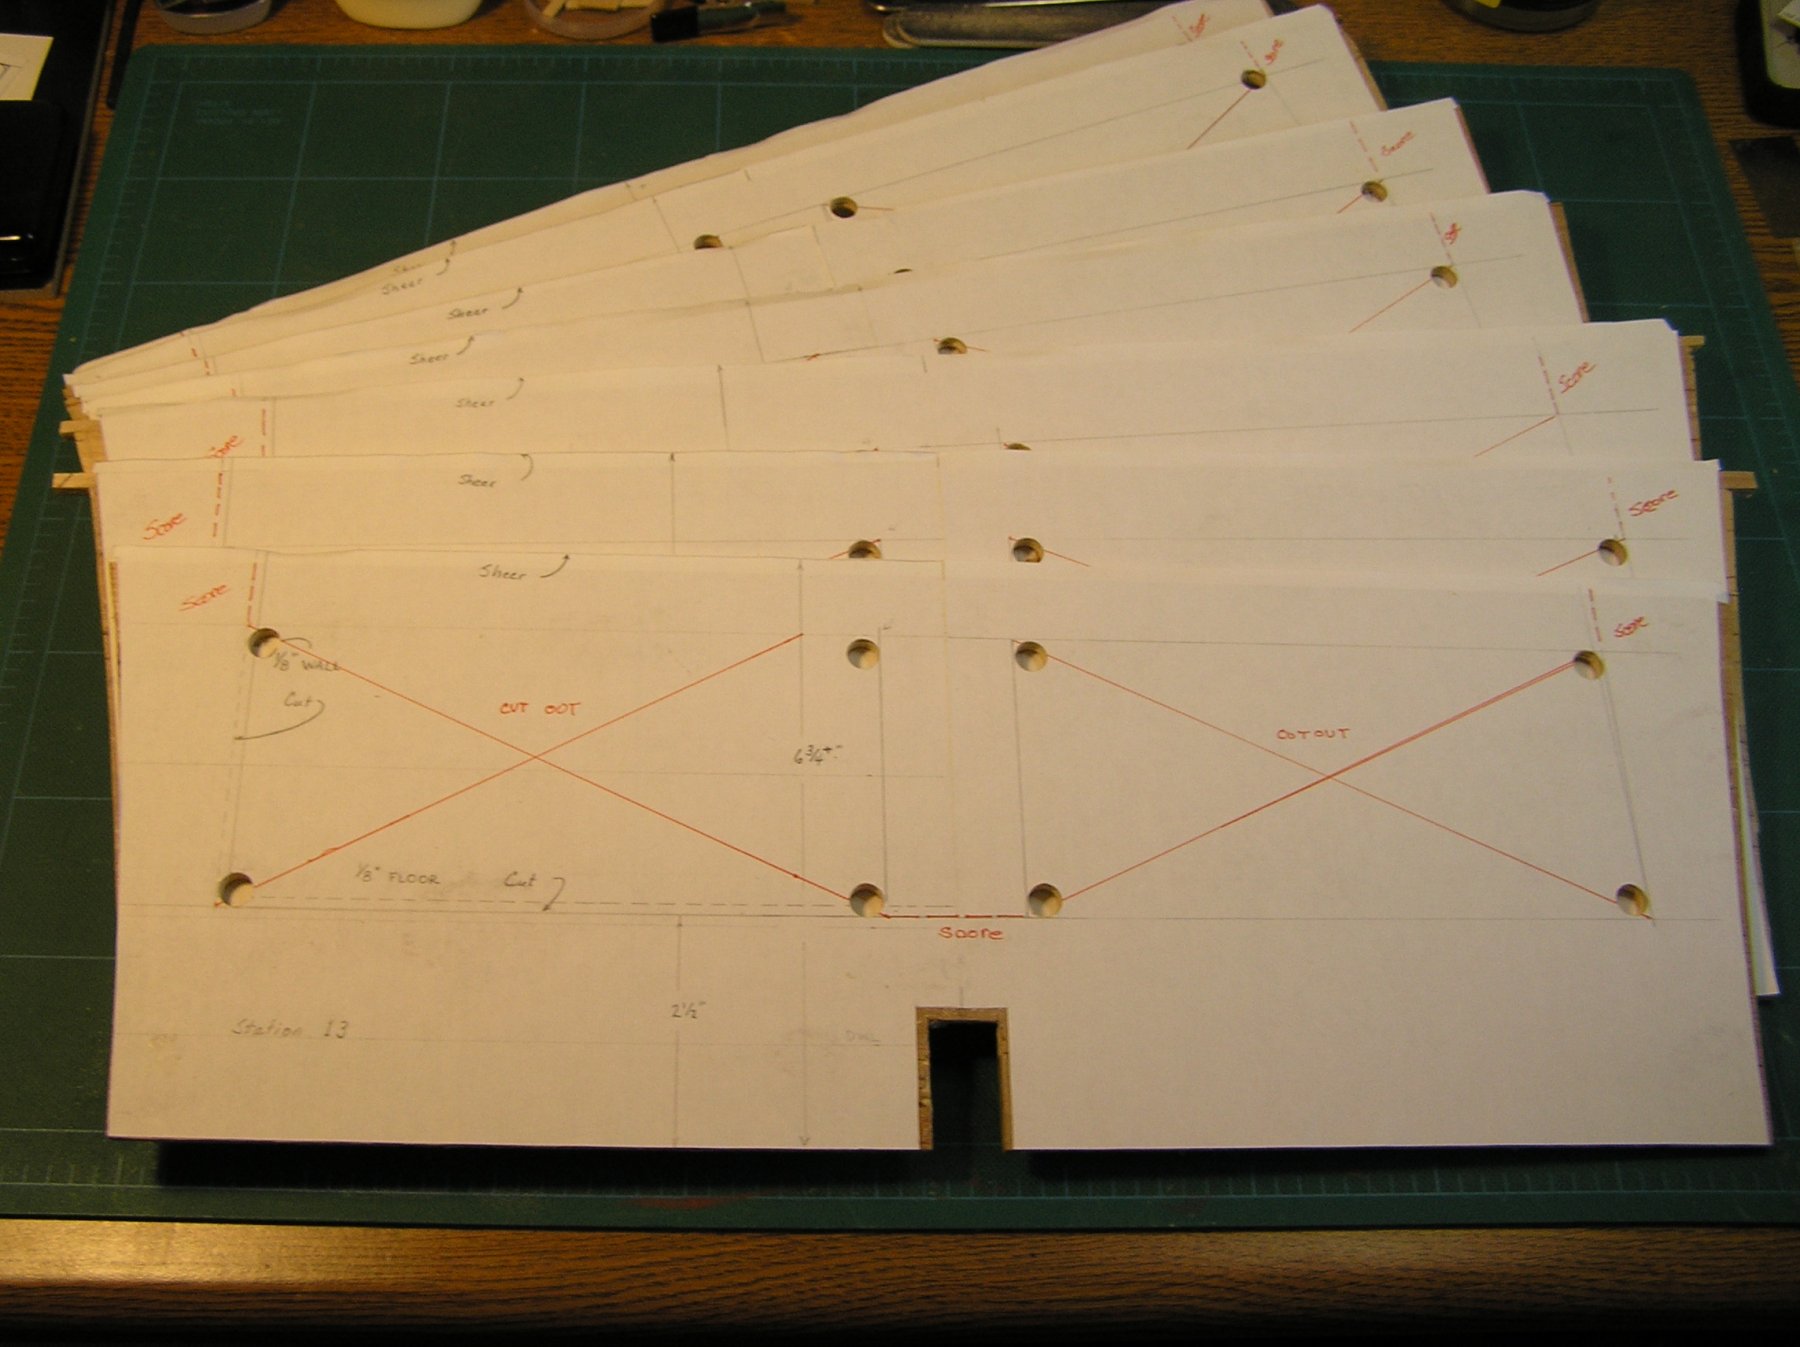
A good deal of prep work has gotten us to a stage where the group build with "volunteers" in the club can participate. Thanks to our very able, retired Navy member, bulkhead patterns were drawn up that included a size reduction to allow for the 1/16" planking to be applied. These have been affixed to the over sized bulkheads and are ready for initial trim and fairing to the pattern outlines. Shown in the attached photo are bulkheads 9 through 15 which all require a cutout to the pilot and aft deck level. Note there will be some preliminary "off keel" cutting out of the bulkheads, but saving some stiffener material until the hull is fully planked. When it comes time to remove the stiffeners earlier scoring, as shown, will ease removal. The transom requires special treatment due to its convex shape and slanted rise. At this point a jig is being considered that will support a vertical "stave" construction that can be carved and sanded to shape and attached much as the stem has been treated. I believe at this point the hull material will be bass wood as the team thinks we should be resin coating the entire hull.
-
-
-
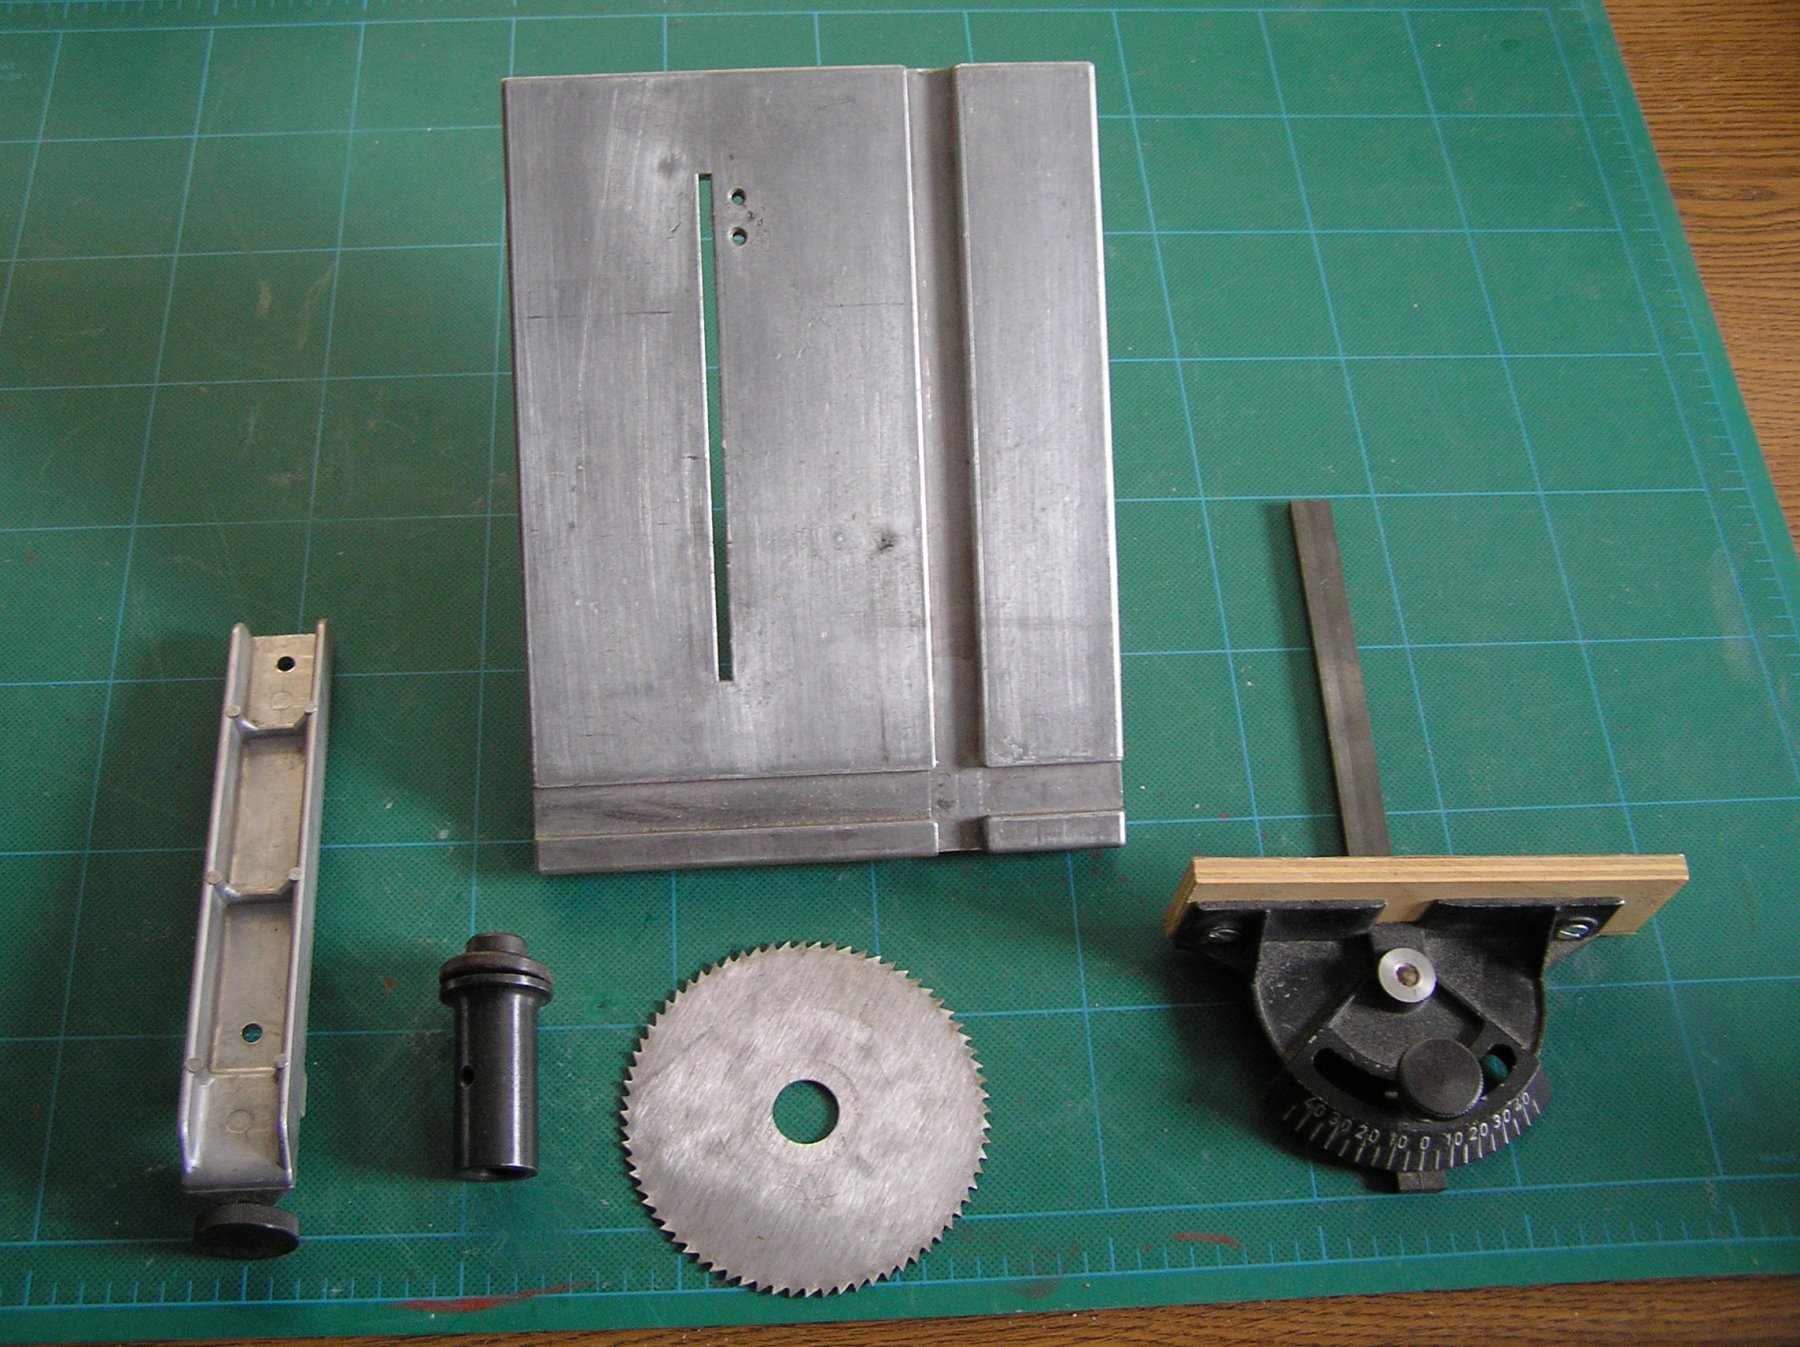
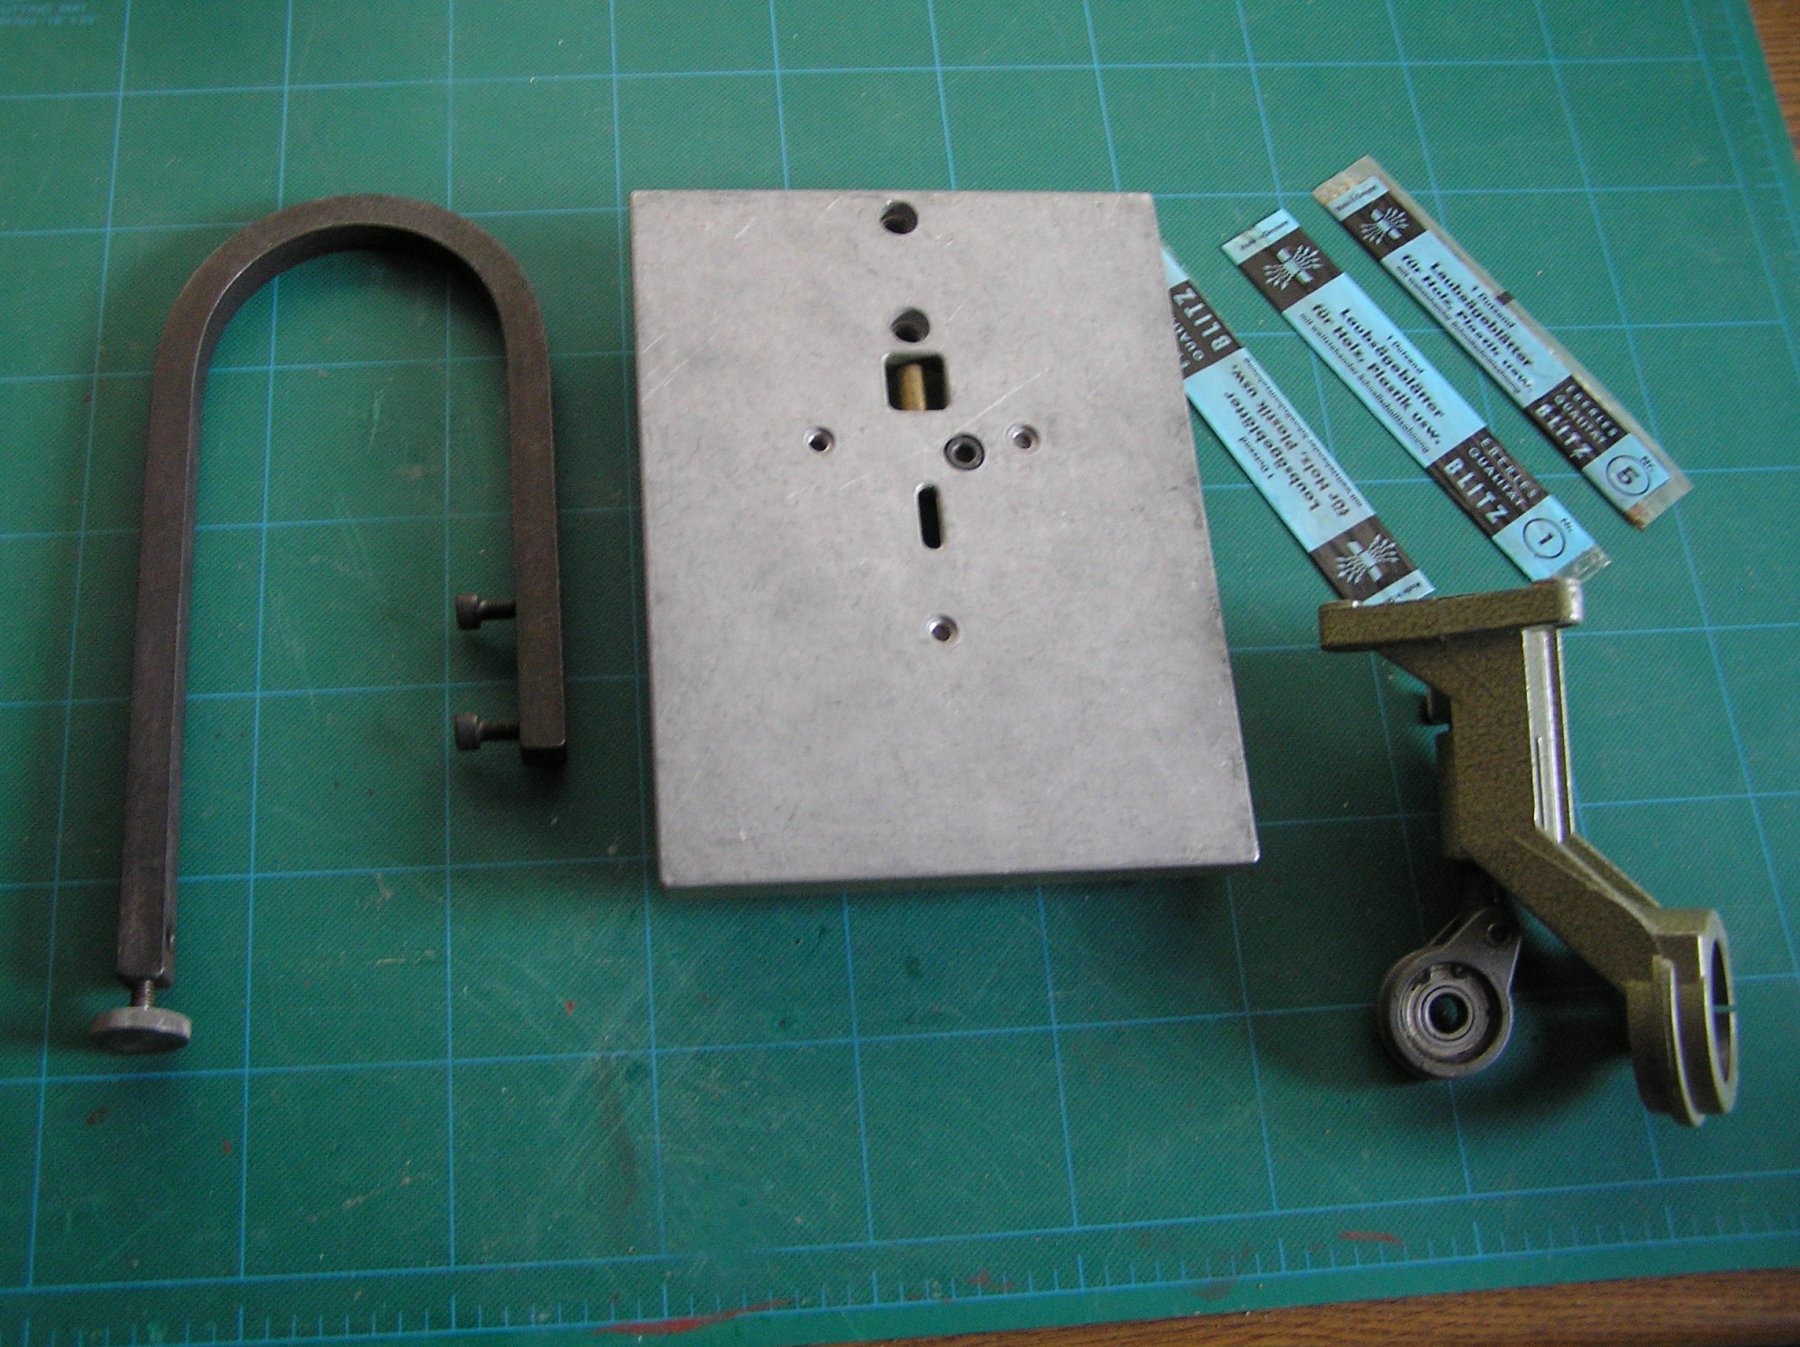
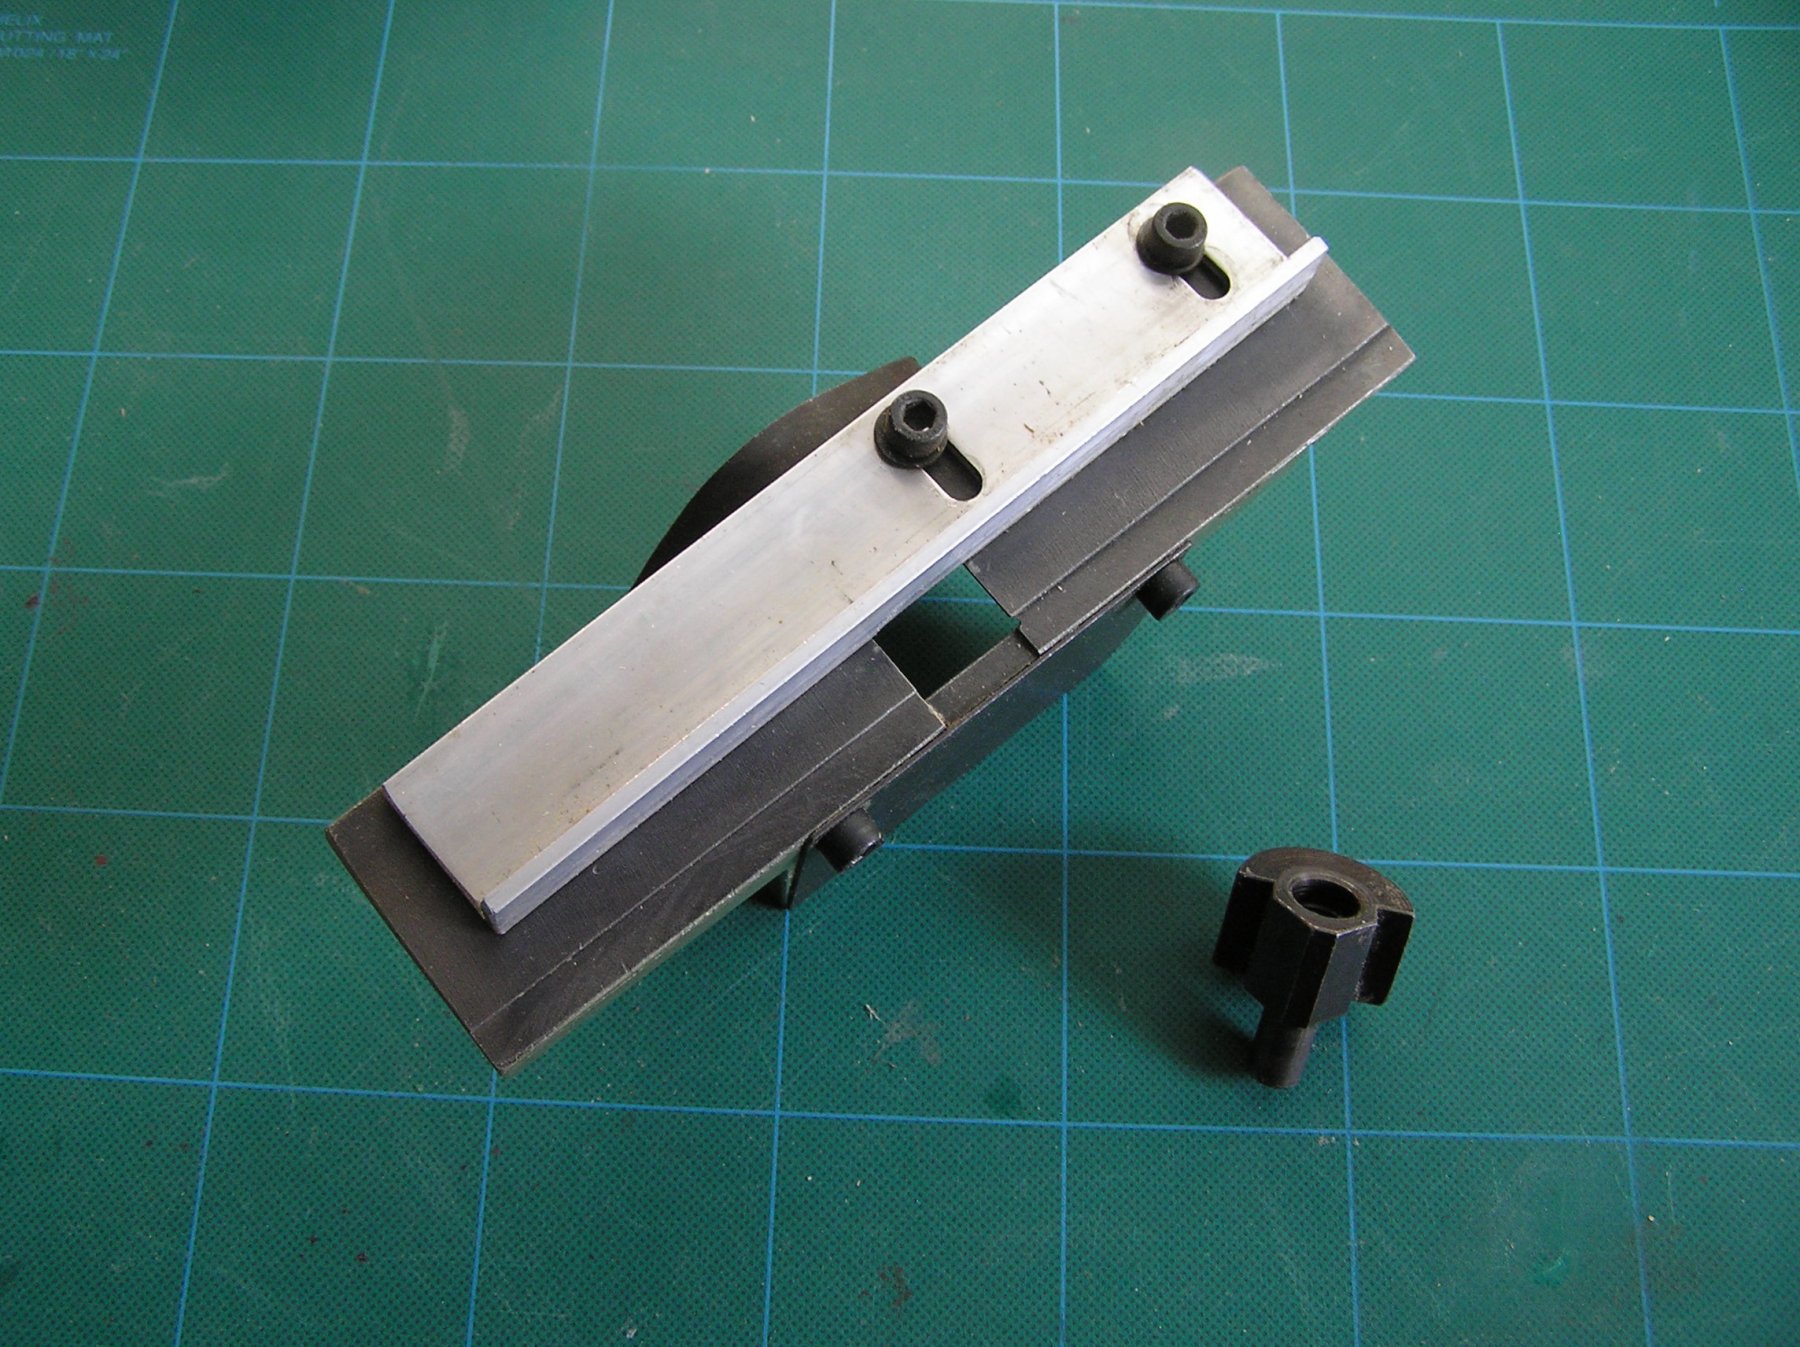
With the new year came an assessment of my normal size shop tools and some of my modeling tools. I have a Unimat SL1000 lathe that I have used since I bought it in the 1980's. Sometime after that I bought the following Unimat accessories/attachments:
1. Table saw with miter gauge, fence and spindle attachment for blade; Used very lightly, next to new
2. Jointer with cutter; Used very, very little, next to new
3. Fret Saw; Never used; still in the oil wrap
4. Flex coupled attachment; Next to new; just can't recall if I ever used it still in the box
The vintage is the hammered green finish.
I cherish my tools and they are well kept. None of these accessories show any signs of abuse or rust. Some still in their original oil wrapping. Cherish them I do believe me but there comes a time when we have to push back and take a horizon view of these treasures. I am willing to sell them singly or as a package. Please contact me through the e-mail channel if interested. I can send photos to interested parties.
This an update pictures follow. I mislabled the sabre/jig saw. It is a fret saw. The jointer, fret saw and flex drive still have the original boxes.


- Landlubber Mike, mtaylor and Canute
-
3
-
Incredible work on one of my favorite work craft. Certainly a candidate worthy of a museum home!
Joe
- Canute, thibaultron, mtaylor and 3 others
-
6
-
I am going to need to see a therapist. I still have to continue the work on Cheerful and now my mind is racing ahead to The Barge. I am hopelessly addicted. I will be in your fulfillment log this year after I order the remaining Cheerful parts. Good to see more upbeat news from you!
Joe
-
Antonio I used Tamiya Acrylic paint in a brush on mode straight out of the bottle. I had primed on a light grey and the white just didn't cover. I then sprayed on Tamiya white primer and it still took 4 coats of the white overcoat to satisfy me. I too could still see a slight grey through the white primer. The thinning just didn't work for me. I did not apply heavy coats
Here is a reference to a painting guide via model railroaders that we posted on our web site:
https://www.modelshipwrightguildwny.org/resources-shopnotes
See Painting Shop Note and look at the second PDF. I would give you the direct reference address but I forgot how I got it. It is a free publication.
Joe
- Canute and thibaultron
-
2
-
The US of A and Europe are not a perfect marketplace but by and large one can be assured that the work products hold up to quality and integrity checks. Not so with China and a few others. Stealing one's intelec or by passing tried and true manufacturing practices seems to be a way of life for certain earth dwellers. Case in point beyond the pirating you have read about on this web site is the recent discovery that Lumber Liquadator's was purchasing laminate flooring from China only to find buyers here were getting sick from it, due, if I recall, incredibly high formaldehyde out gassing. The manufacturer lied ( and so did the reseller) about the product to inspectors. In our economy we do not need to deal with such problems. You were wise to reconsider!
Joe
-
You have a gift! More than one I should say! Your miniature carving capability is magnificent and your tooling is equally so. I was intrigued with your copper plate bench top tool. Is the die replaceable for different scale and patterns? And what thickness copper do you normally use as the tool looks pretty formidable. I would like to try to make one. Thanks.
Joe
- FrankWouts, BETAQDAVE, mtaylor and 1 other
-
4
-
Atlantis by Thistle17 - FINISHED - Robbe
in RC Kits & Scratch building
Posted · Edited by Thistle17
Grammar
Hard to believe I am finally approaching the end of the deck cabins for Atlantis. They have been mini projects in themselves that never seemed as though there was an end in sight. Fundamentally the deck furniture woodwork is done save the main cabin sky lights and handrails for this and the aft cabin. The body wood is boxwood and the roof and some trim is mahogany. They have been coated with Minwax wiping varnish. The last appointments will be the running lights, air vents and hatch handles. I have not decided how to treat the porthole and cabin "glass" quite yet. I was reading McCaffery's book and he suggests .025 microscope slide glass. Only timidity I have is how do I accurately cut the porthole glass. Secondly the back side has to be opaque as I did not finish the interior of cabins.
One final note. I took some stylized liberty with the furniture. Call it aesthetic license or whatever they just looked better to me. Note the "gauges" on the helm (aft cabin). I went on line and found an actual boat panel I liked, then modified it and reduced it to scale. Maybe that is why it has taken me way too long to get to this point!