ccoyle
-
Posts
10,594 -
Joined
-
Last visited
Content Type
Profiles
Forums
Gallery
Events
Everything posted by ccoyle
-
 Very nice work, and congratulations on your finished model!
- 26 replies
-
- 6
-

-
- muscongus bay lobster smack
- Model Shipways
- (and 1 more)
-
New to ship modelling? But what do you build first?
ccoyle replied to MSW's topic in Wood ship model kits
Based on your photos, I believe I can safely say that you have joined the ranks of those doing the blowing away! -
Tachikawa Ki-9 'Cedar' by Javlin - Nichimo - 1/48 - PLASTIC
ccoyle replied to Javlin's topic in Completed non-ship models
Nice! I have been eyeing this same aircraft in card in 1/33 scale. I'm a sucker for brightly colored biplanes. -
Welcome aboard! Is your kit the old Gertrude Thebaud kit?
-
Your craft knife, commonly referred to as an X-acto knife in the US (though that is a brand name) can accept a variety of blades -- the #11 blade in your picture is the most commonly used type. As you have discovered, #11 blade tips do not hold up well to too much pressure and are thus a poor choice for cutting the tabs in plywood frets. A pin vise is designed to be held in position by an index finger while the barrel is turned with a thumb and middle finger. The bit is held by a collet, which in turn is held in place by tightening the two or three pieces of the barrel (one part of it is threaded to fit into the other part). The collet normally has different-sized openings at either end to accept a wide range of bit sizes. This is harder to explain than to actually do -- play around with the vise for awhile and you'll quickly figure it all out. Cheers!
-
A 1/64 scale seventy-four would quite literally fill a huge gap -- in anyone's display space! 😬
-
We also have a card modeling tutorial based on a WW1 torpedoboat -- different, subject but same basic techniques. The guy who wrote it seems to have a rudimentary grasp of the subject.
-
Longer than I've been doing card models, actually. 😉
-
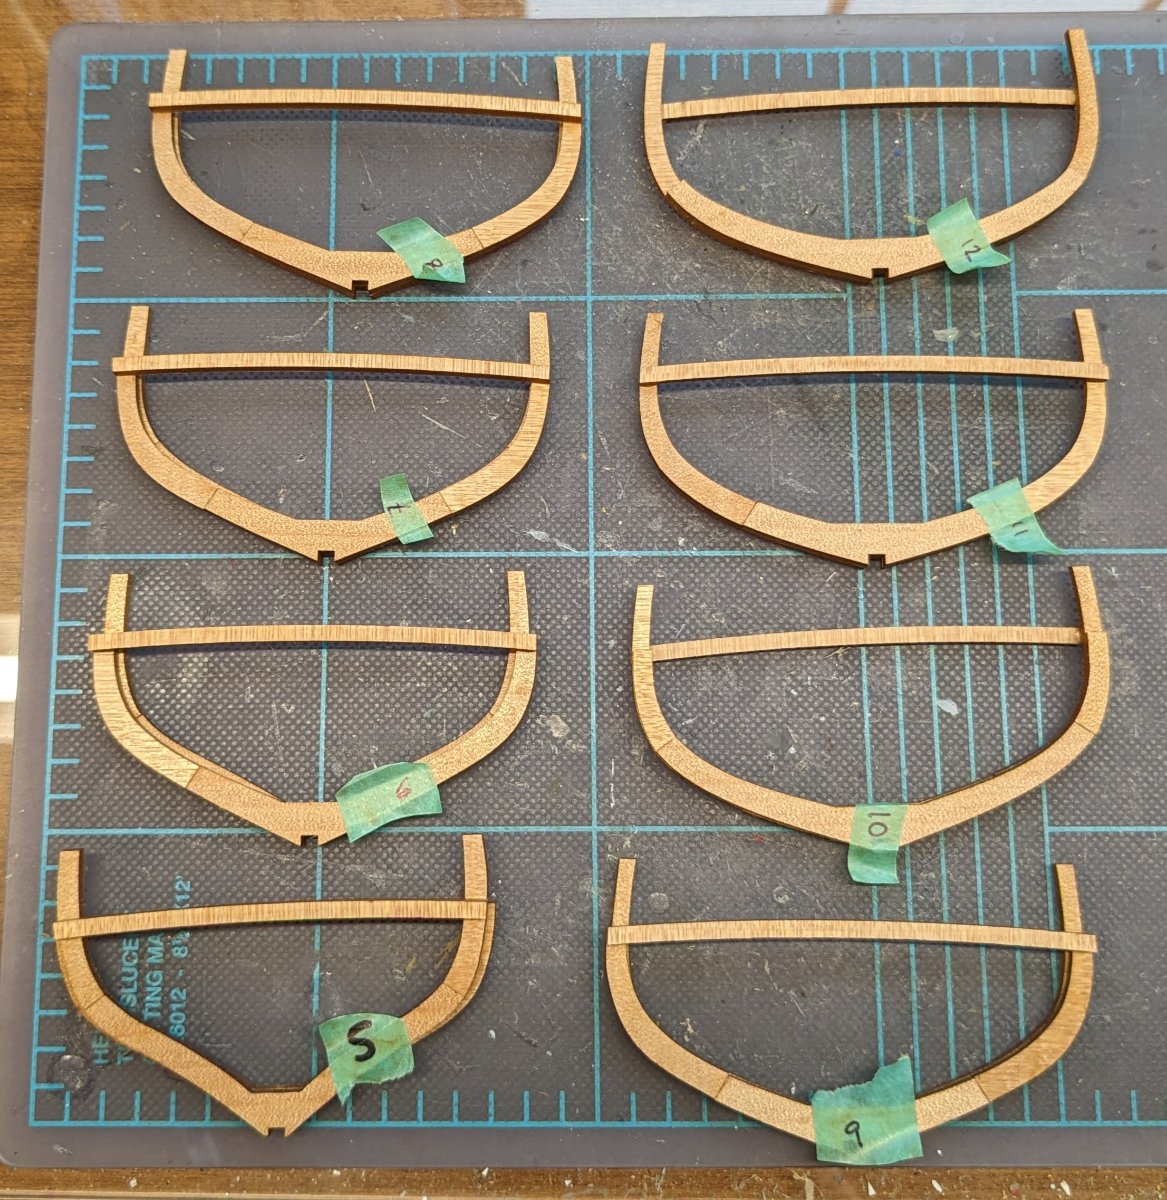
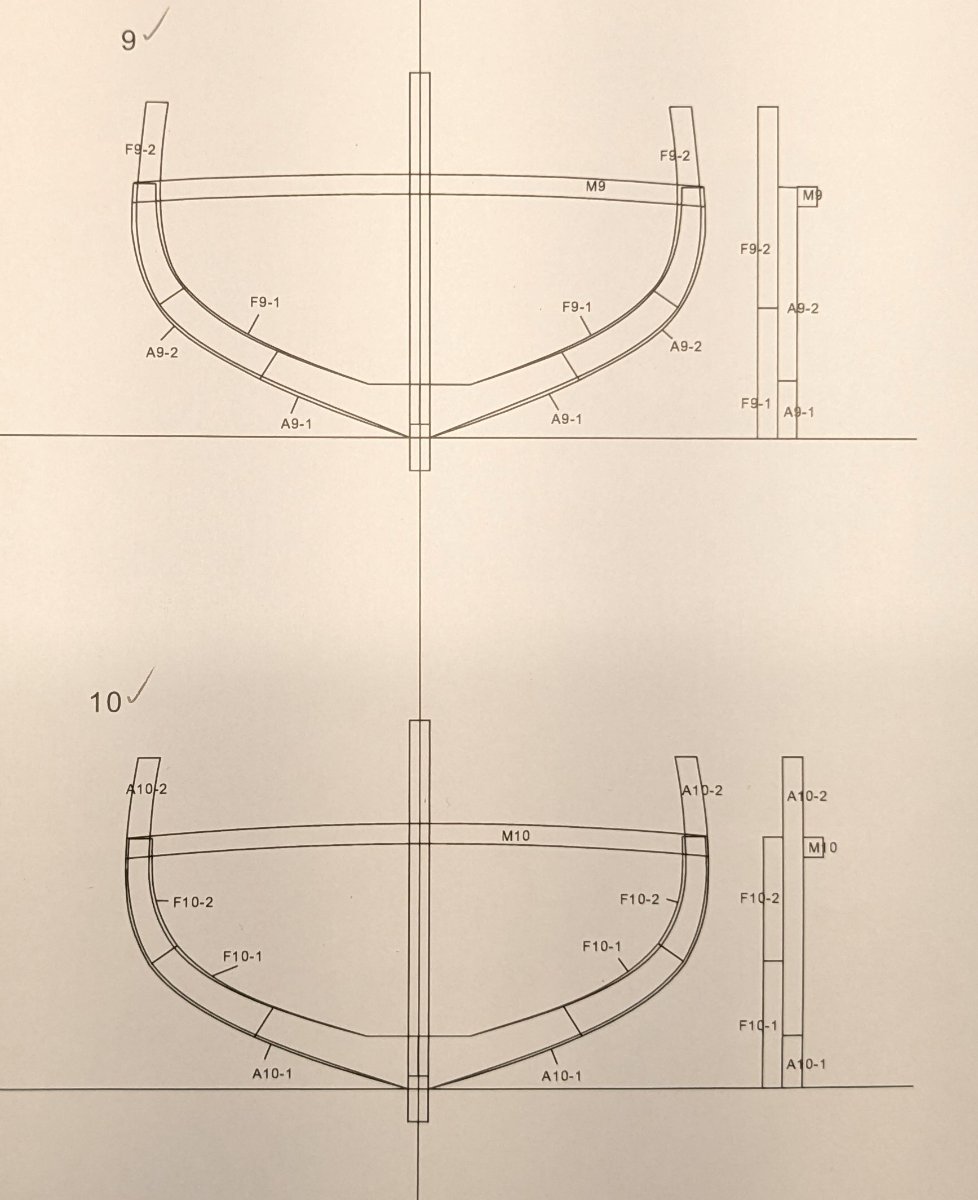
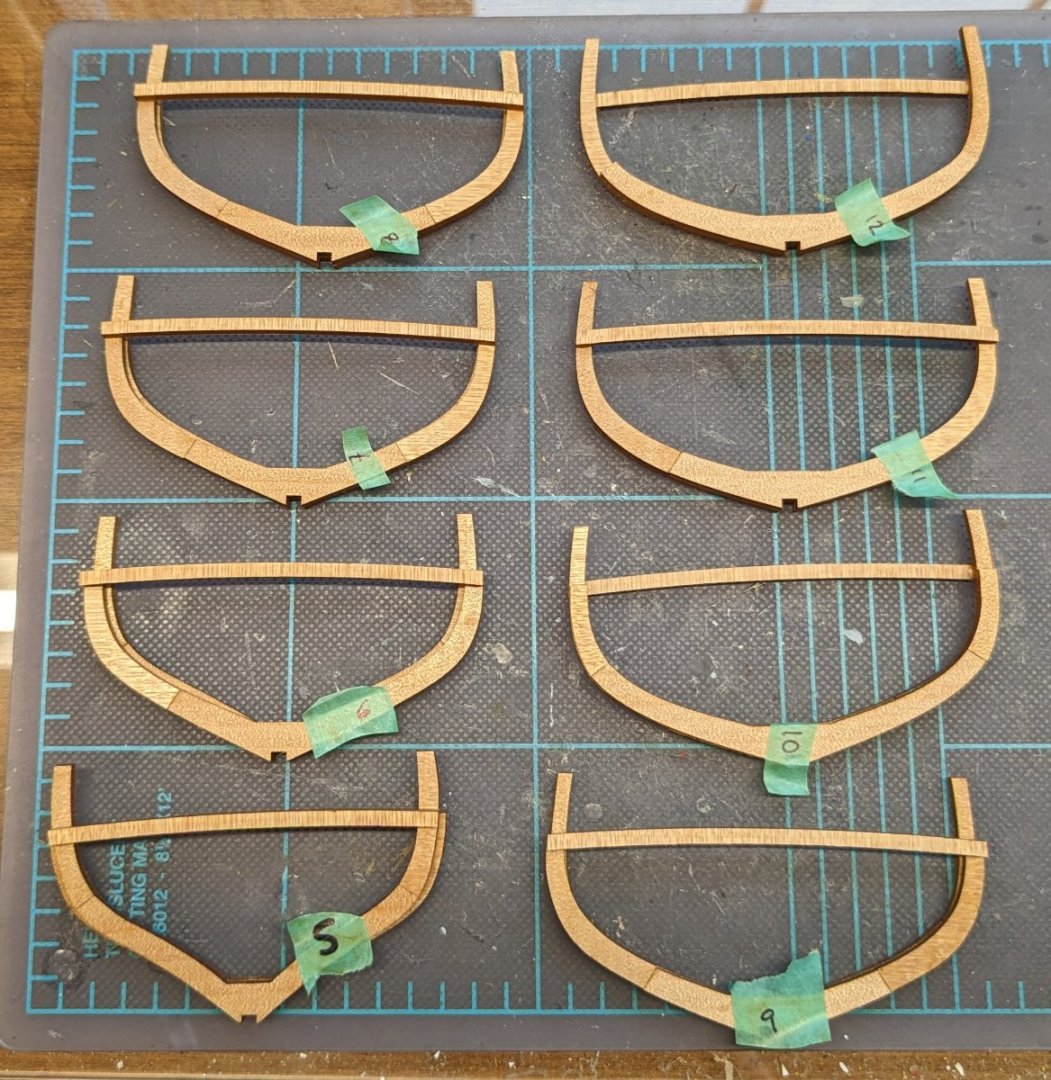
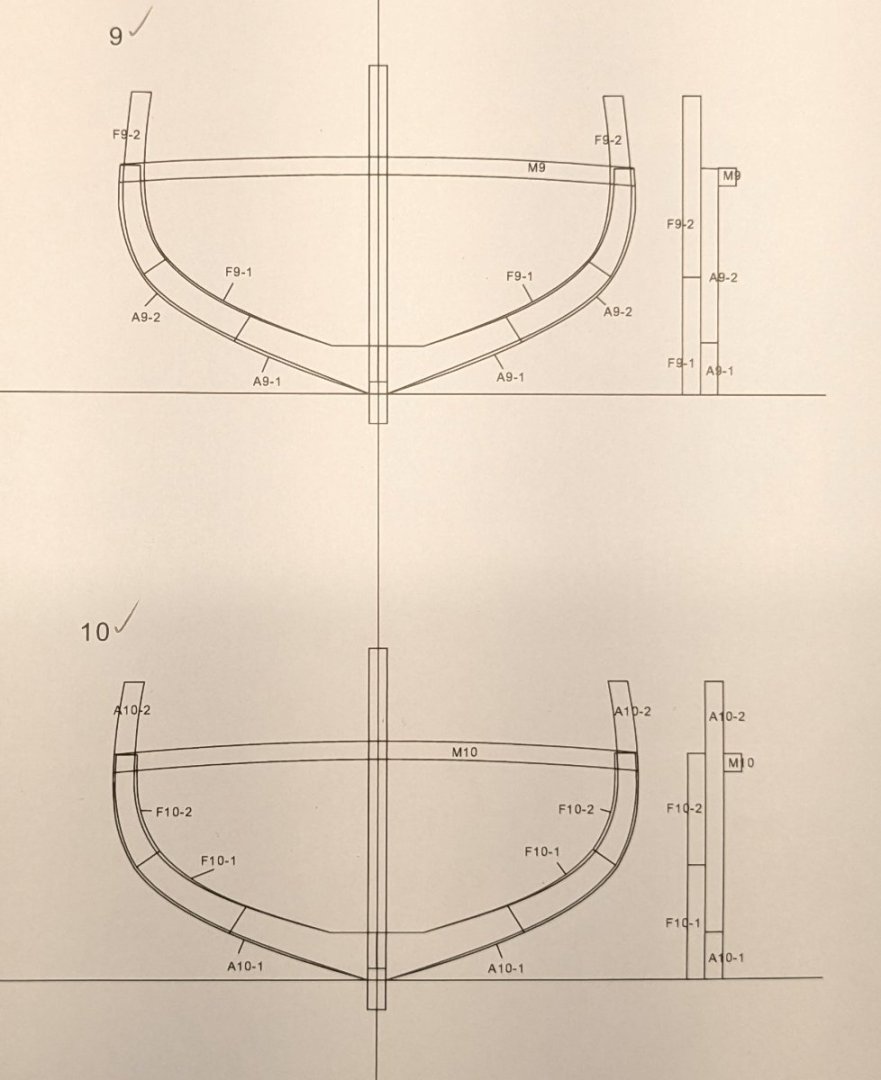
I have a nice little collection of frames going. Like most repetitive tasks, I'm discovering some techniques that make the assembly process go a bit quicker. One thing for potential builders to look out for is that between frames 9 and 10, the transverse beam shifts from spanning the short pair of futtocks to the longer pair. This is due to the positioning of the gun ports. Back to work!
-
HMS Renard 1872 by Draque - 1/24 - POF
ccoyle replied to Draque's topic in - Build logs for subjects built 1851 - 1900
That's a very handsome subject, and not a type that we normally see around here. -
It's a sad compromise made necessary by economic reality. I intend to replace all of the kit-supplied line on my next rigged model.
- 111 replies
-
- 4
-
-
- Nonsuch 30
- Model Shipways
- (and 1 more)
-
Welcome aboard 'Vitus' (not the original, I presume!) and good luck with your project!
- 248 replies
-
- 1
-
-
- Cutty Sark
- Revell
- (and 2 more)
-
So, to wrap up today's little adventure, here is the finished frame. There are 26 more frames to build up, and they all look more or less like this one, so in the absence of much in the way of variety, I may not post much in the near future (and will be out-of-town for ten days, too). Cheers!

-
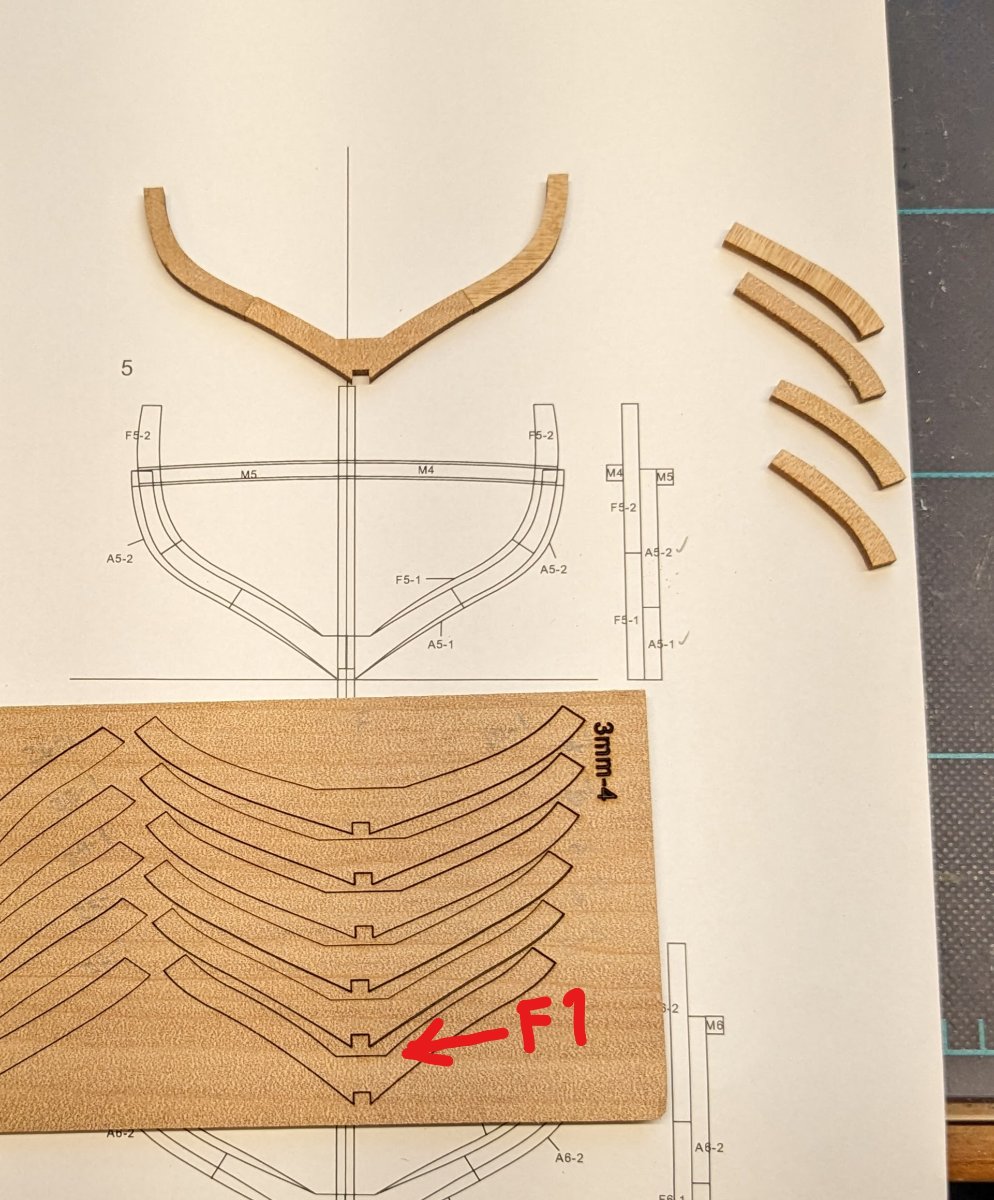
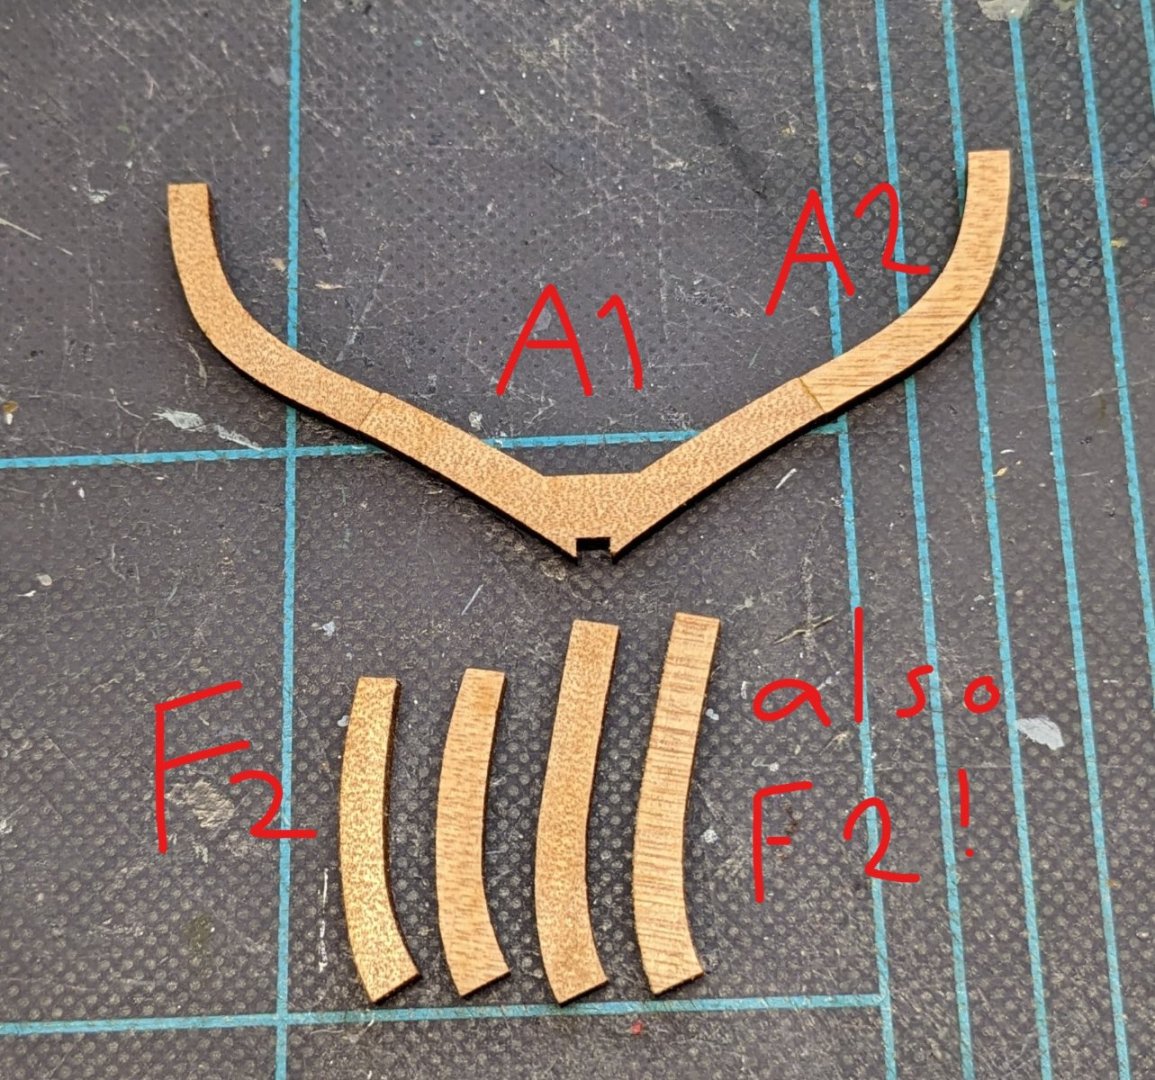
The construction of this kit is proving less straightforward than one might have hoped, as seen in the following set of images. Frame 5 is the first full-width frame. Parts A5-1 and A5-2 (forgive me for forgetting to add the '5' part to all of the labels on the photos!) were easy enough to find on their sheets and assemble, but then we ran into a mystery with parts F5-1 and F5-2. First of all, there are four parts labeled as F5-2 on the parts sheets, but only two are needed, and, as you can see, the pairs of F5-2 parts are not all the same length. No problem, I figured -- one of the two pairs must be F5-1. The shorter F5-2s matched the dimensions on the frame diagram, so I deduced that the longer pair must be F5-1. Except the F5-1s did not match the frame diagram contours at all. After some head-scratching and additional fret searching, I found the real F5-1. It all made sense now. Except . . . now it appears that I have a surplus pair of futtocks (F5-1)?? Mysteries and more mysteries! Back to head-scratching!

-
There can be no argument that Surprise would be a hot seller, and of course the Watton household needs to eat, but I will argue every day of the week and twice on Sunday for one of the American sloops-of-war, e.g. Peacock, or the matched set of Shannon & Chesapeake. But any VM kit will be a winner.
-
HMS Granado by ir3 - CAF - 1:48 - POF
ccoyle replied to ir3's topic in - Kit build logs for subjects built from 1501 - 1750
No harm in setting it aside for now and coming back to it when you feel better prepared. -
Yup. Gonna need a whole lot more information.
-
Welcome, Andre! Stunning helicopters!
-
Witam, Pitr! You are doing such a lovely job with this model. I realize you are modifying the basic kit, but it still makes me want to give one of the Shipyard models a try someday. Cheers! Robisz cudowną robotę z tym modelem. Zdaję sobie sprawę, że modyfikujesz podstawowy zestaw, ale mimo to mam ochotę kiedyś wypróbować jeden z modeli Shipyard.
-
To tack on to what others have said about this kit, one thing that can be said for Model Shipways kits in general is that they don't engage in hand-holding -- they assume that the builder is bringing a certain amount of skill and knowledge to the party. If you don't know how to do a task like strop a block, for example, Model Expo instructions do not usually tell you how to do it; you will need to consult some outside resources, such as books on 18th century rigging practices. Also, Model Shipways kits have far fewer pre-cut parts than other kits; oftentimes, you are given only the requisite wood materials and are expected to take the dimensions off the plans (proportional dividers are handy for this task). Same goes for things like determining the position of the wales, locating scuppers, etc. -- that information is provided in the plans and is not described in any great detail anywhere. If you don't mind my asking, since you are new here and you say this is your first intermediate kit, what kinds of kits have you finished before this one? Don't be fooled by the word "intermediate" on this kit -- that term is relative. It's certainly intermediate compared to tackling an ornately decorated 17th-century ship of the line, but it still has plenty of elements (e.g. guns, three masts, square-rigged) that a modeler may find very challenging, and it is certainly more challenging than other types of models that have less of those elements and are therefore more intermediate-friendly, such as a brigs, cutters, or schooners. Your answer to this question may suggest that a simpler model would be better suited to your current skill level. Kind regards,
-
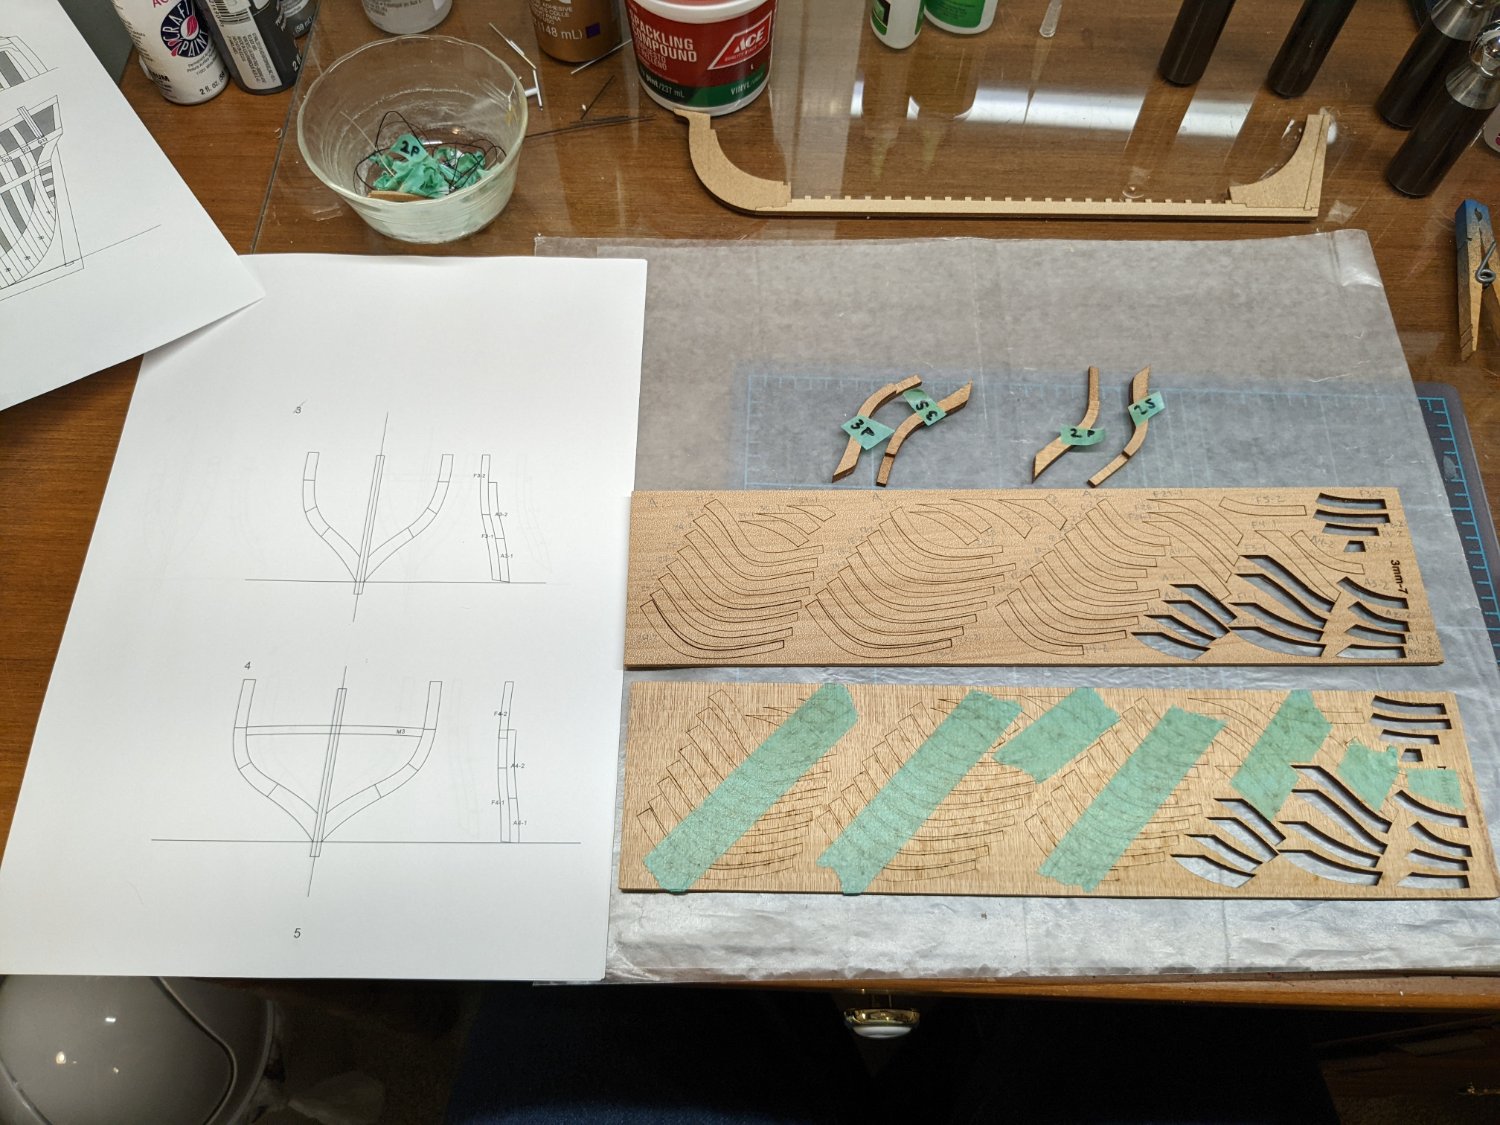
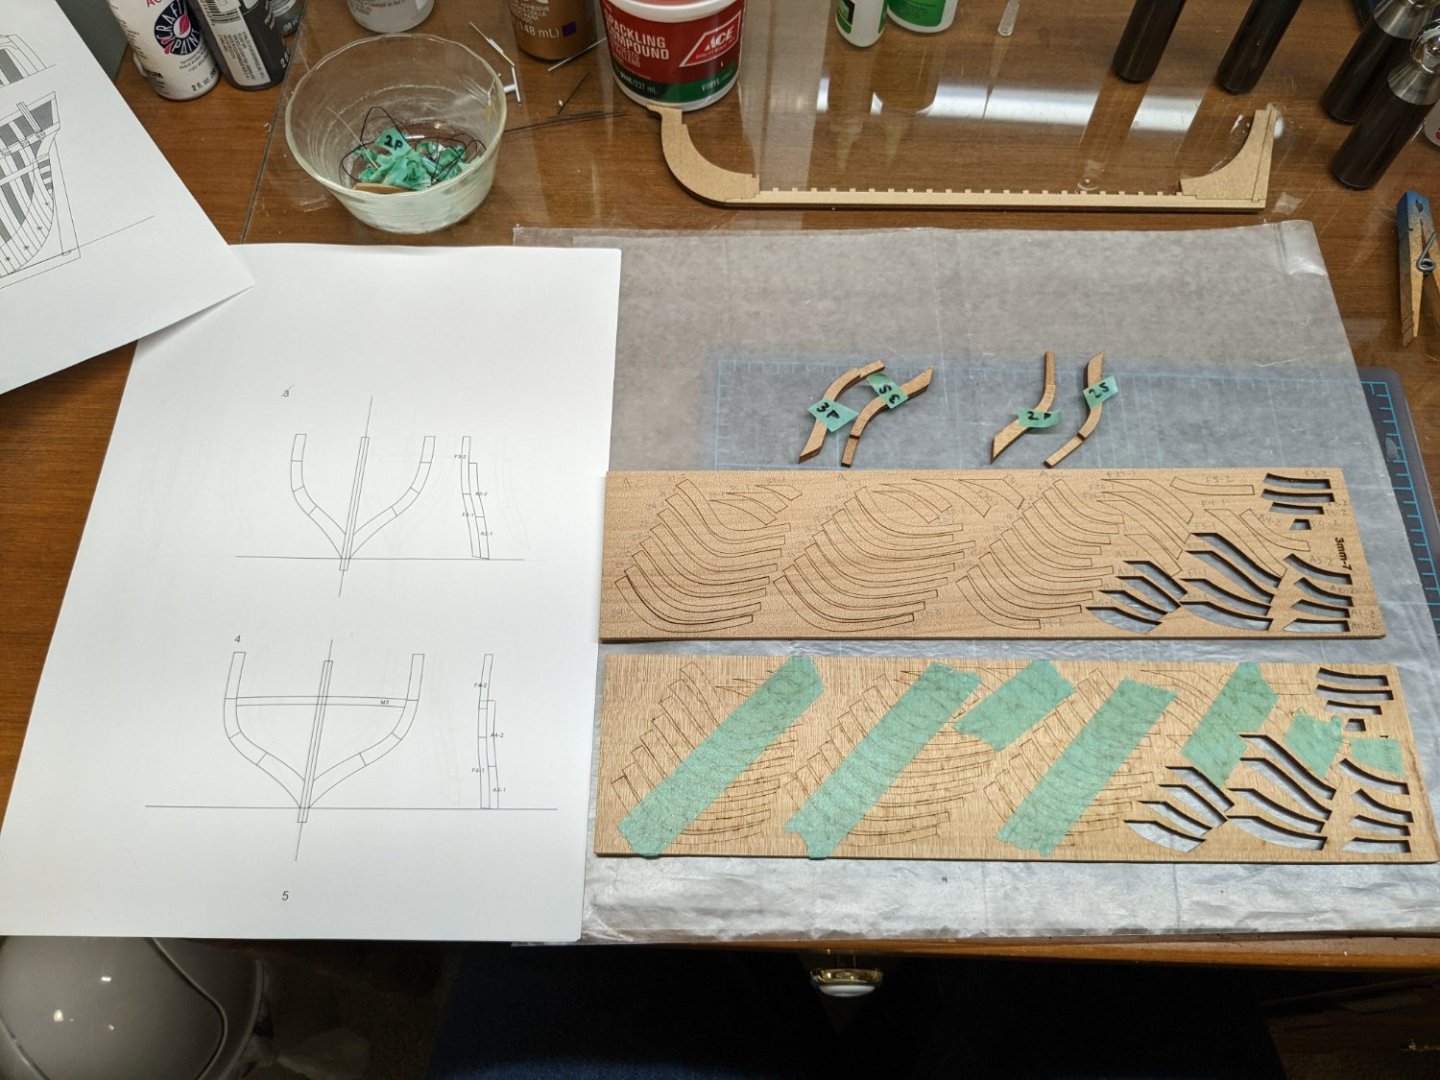
Here's a quick update. Each cant frame is made of four pieces. The laser-cut parts have no tabs and literally drop right out of their frets, which is why the manufacturer has taped the back side of each fret. It would obviously be foolhardy to remove the tape all at one go; instead, I remove only as much as is needed to release each part. There are 31 frame stations along the hull, so as I complete each frame, I use some leftover tape to label it with its station number and, for cant frames, which side it goes on. This process worked well until I got to cant frames #4 and discovered that two of the futtocks for these frames are missing (the same part for each side). I checked all of the frets three times and then checked the parts sheet drawings as well. Yep -- that part # somehow did not get included. I'm going to have to make replacement parts from some scrap material. I think that Mr. Dremel Tool and I will be able to make short work of this task, but it is mildly annoying when one discovers that a kit is missing some parts.
-
Coincidentally, our family also has a Bean (it rhymes with her given name, Kathleen), although I'm probably the only one who calls her that with any regularity. Ironically, her dog is also named Maisy.
-
Greetings from North Carolina
ccoyle replied to PostCaptainAubrey's topic in New member Introductions
Welcome aboard from your neighbor to the south!