ccoyle
-
Posts
10,578 -
Joined
-
Last visited
Content Type
Profiles
Forums
Gallery
Events
Everything posted by ccoyle
-

F4U-1A Corsair by DocRob - FINISHED - Tamiya - 1/32
ccoyle replied to DocRob's topic in Non-ship/categorised builds
Very nice, Rob! And good on you for the perseverance on this one! -
Only a very small subset of the staff here has the know-how to handle the technical side of the forum, and they might not be checking in regularly to see messages during the holidays. I wouldn't consider any answer to be definitive at this point.
-
Check and see if any of these build logs can shed some light. Good luck!
-
I am neither condescending nor troublesome, but as a moderator of this forum I am tasked with taking appropriate actions with regard to any new member who cannot be bothered with familiarizing himself with the rules and expectations of the public forum he has just joined and who, upon not receiving the desired response to a question that has already been asked and answered dozens of times on this site (which might have been discovered by the new member had he attempted even a modest amount of research before posting the question), immediately pitches a fit and treats the staff shabbily. You will note that I have indeed taken appropriate action in this instance. Kind regards,
- 13 replies
-
- 10
-

-
Have you read this topic? I hate to break it to you, but what you have there is a mass-produced decor model -- it is neither a clipper nor a sailing frigate. Such a model is a flight of fancy, bears only a passing resemblance to any real ship, and would require as much effort to correct its shortcomings as it would take to build a completely new model. Sorry, but there it is. And please note that I have split your inquiry into its own separate topic, so please do not add photos to the other thread -- that is considered thread hijacking and is frowned upon. Please have a look at our guidelines here.
-
hello -old shipbuilder signing in for first time
ccoyle replied to manning16's topic in New member Introductions
Hi, John. You can send a private message to any member simply by hovering your cursor of the member's username or avatar, then selecting the 'message' option at the bottom of the pop-up window. -
A big consideration is the question of whether you want a historically accurate model or just an awesome-looking one. Neither of the two kits you mentioned is historically accurate, particularly with regard to the stern carvings -- compare images of the kit sterns to the SoS stern seen in the well-known Peter Pett painting. Don Dressel spent ten years building his SoS based on (if I recall correctly) the Mantua kit, but basically using only the hull formers and scratch-building everything else. As I recall, besides the carvings there were significant issues with the armament and rigging.
-
Actually, just click the tag at the top of this page, but yes, there are many other whaleboat build logs available.
-
Such an interesting contrast seeing your snowy diorama out on your sunny balcony!
-
Valeriy, Not only is this simply a stunning model, but the circumstances under which it has been created make it doubly impressive. Cheers, friend, and I hope that 2023 will bring better things!
-
Good luck with your project and with school!
-
If I ever get up that way, there is zero possibility that I will just drive by and snap a pic. 😋 I will declare some kind of travel emergency that simply demands a pit stop of several hours' duration. Of course, I have lived in South Carolina for seven years now and have so far never driven farther north than Charlotte, so a road trip to New England would seem an unlikely event.
-
Welcome aboard! Your work looks great.
-
Very nice work, and congratulations on your finished model!
- 26 replies
-
- 6
-
-
- muscongus bay lobster smack
- Model Shipways
- (and 1 more)
-
New to ship modelling? But what do you build first?
ccoyle replied to MSW's topic in Wood ship model kits
Based on your photos, I believe I can safely say that you have joined the ranks of those doing the blowing away! -
Tachikawa Ki-9 'Cedar' by Javlin - Nichimo - 1/48 - PLASTIC
ccoyle replied to Javlin's topic in Completed non-ship models
Nice! I have been eyeing this same aircraft in card in 1/33 scale. I'm a sucker for brightly colored biplanes. -
Welcome aboard! Is your kit the old Gertrude Thebaud kit?
-
Your craft knife, commonly referred to as an X-acto knife in the US (though that is a brand name) can accept a variety of blades -- the #11 blade in your picture is the most commonly used type. As you have discovered, #11 blade tips do not hold up well to too much pressure and are thus a poor choice for cutting the tabs in plywood frets. A pin vise is designed to be held in position by an index finger while the barrel is turned with a thumb and middle finger. The bit is held by a collet, which in turn is held in place by tightening the two or three pieces of the barrel (one part of it is threaded to fit into the other part). The collet normally has different-sized openings at either end to accept a wide range of bit sizes. This is harder to explain than to actually do -- play around with the vise for awhile and you'll quickly figure it all out. Cheers!
-
A 1/64 scale seventy-four would quite literally fill a huge gap -- in anyone's display space! 😬
-
We also have a card modeling tutorial based on a WW1 torpedoboat -- different, subject but same basic techniques. The guy who wrote it seems to have a rudimentary grasp of the subject.
-
Longer than I've been doing card models, actually. 😉
-
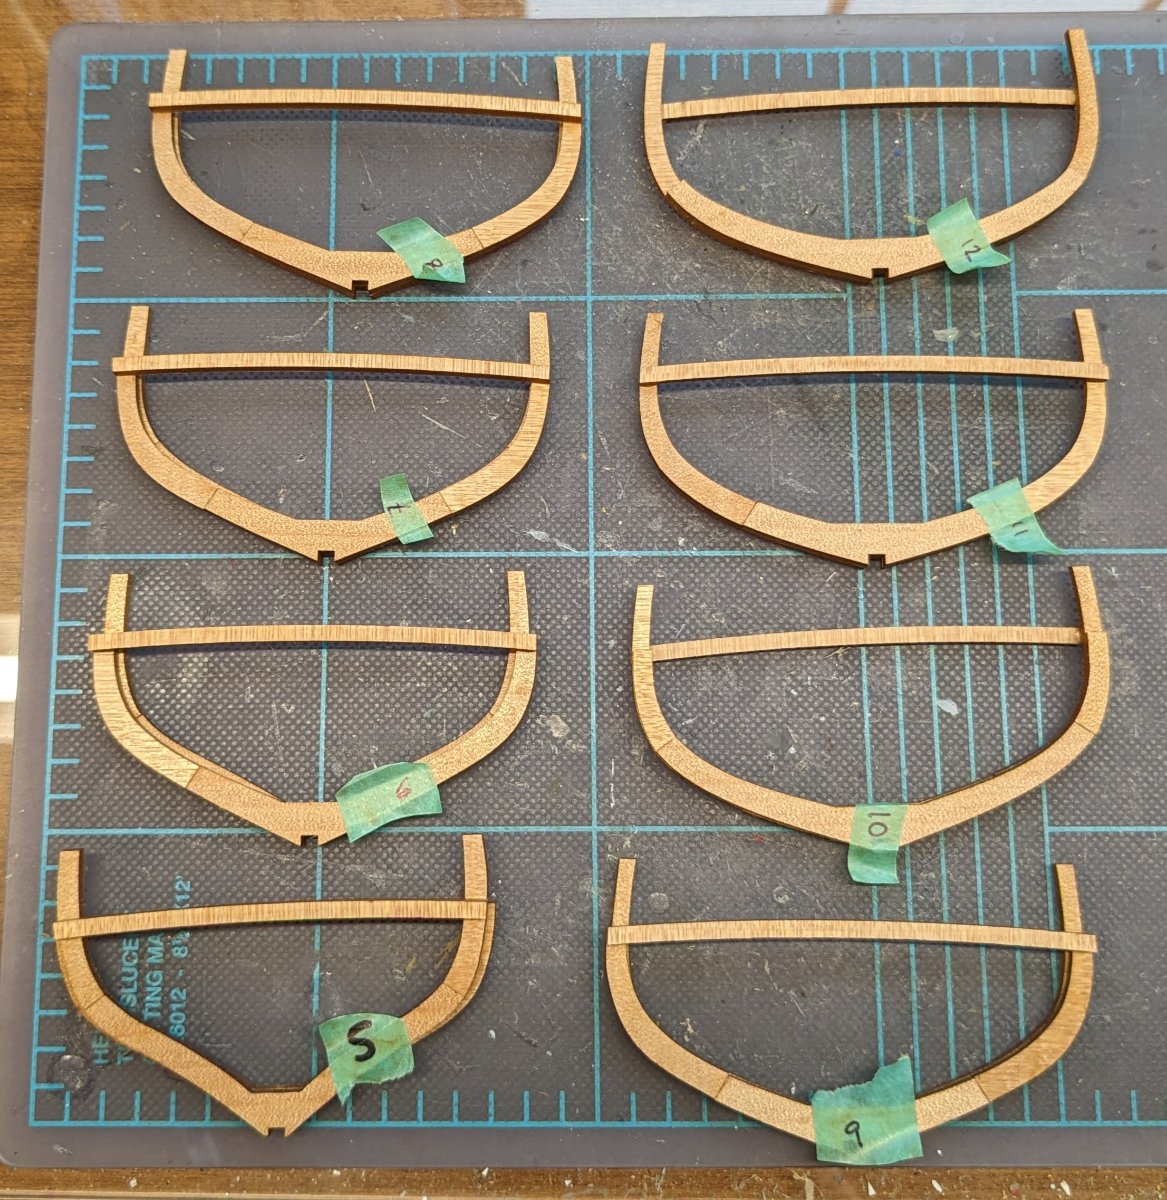
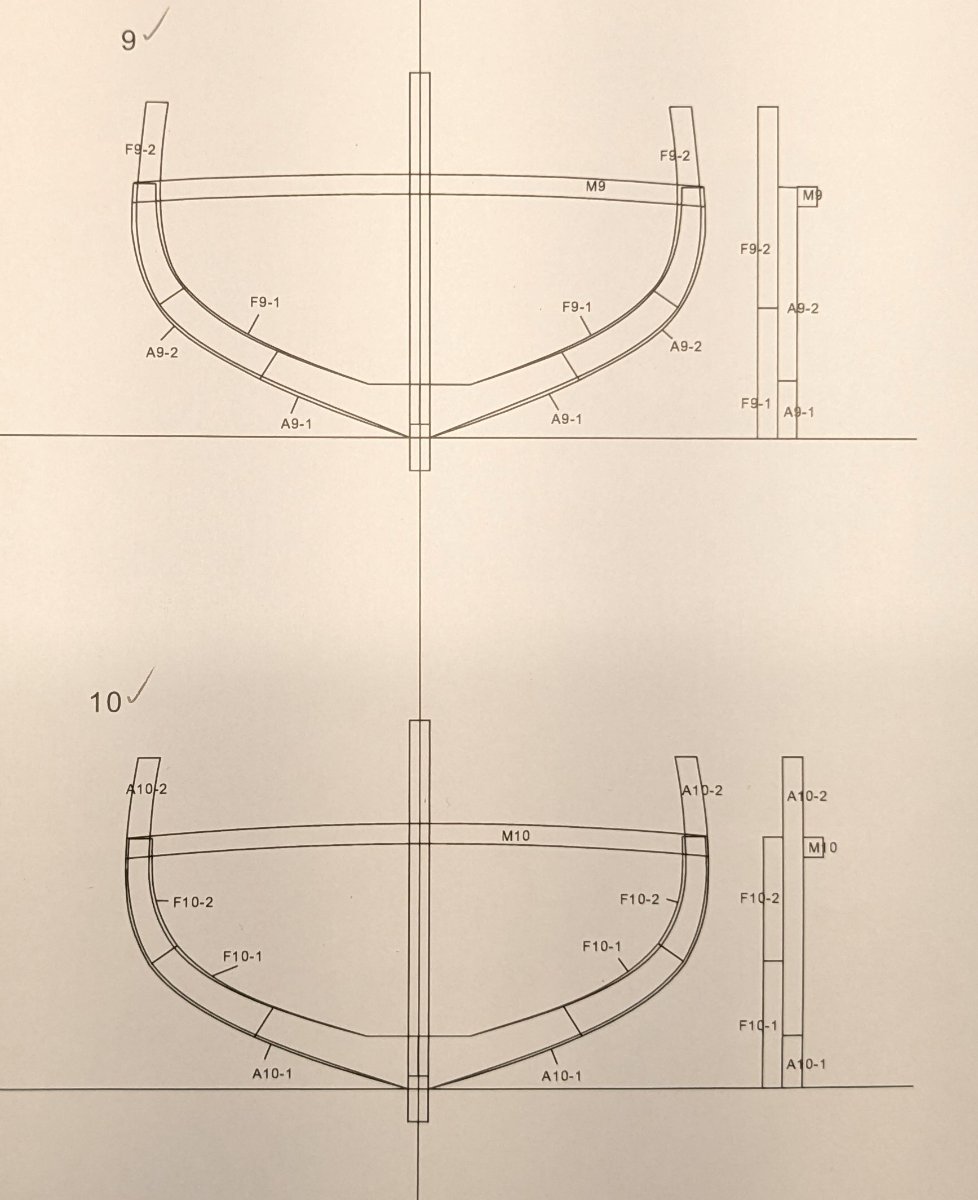
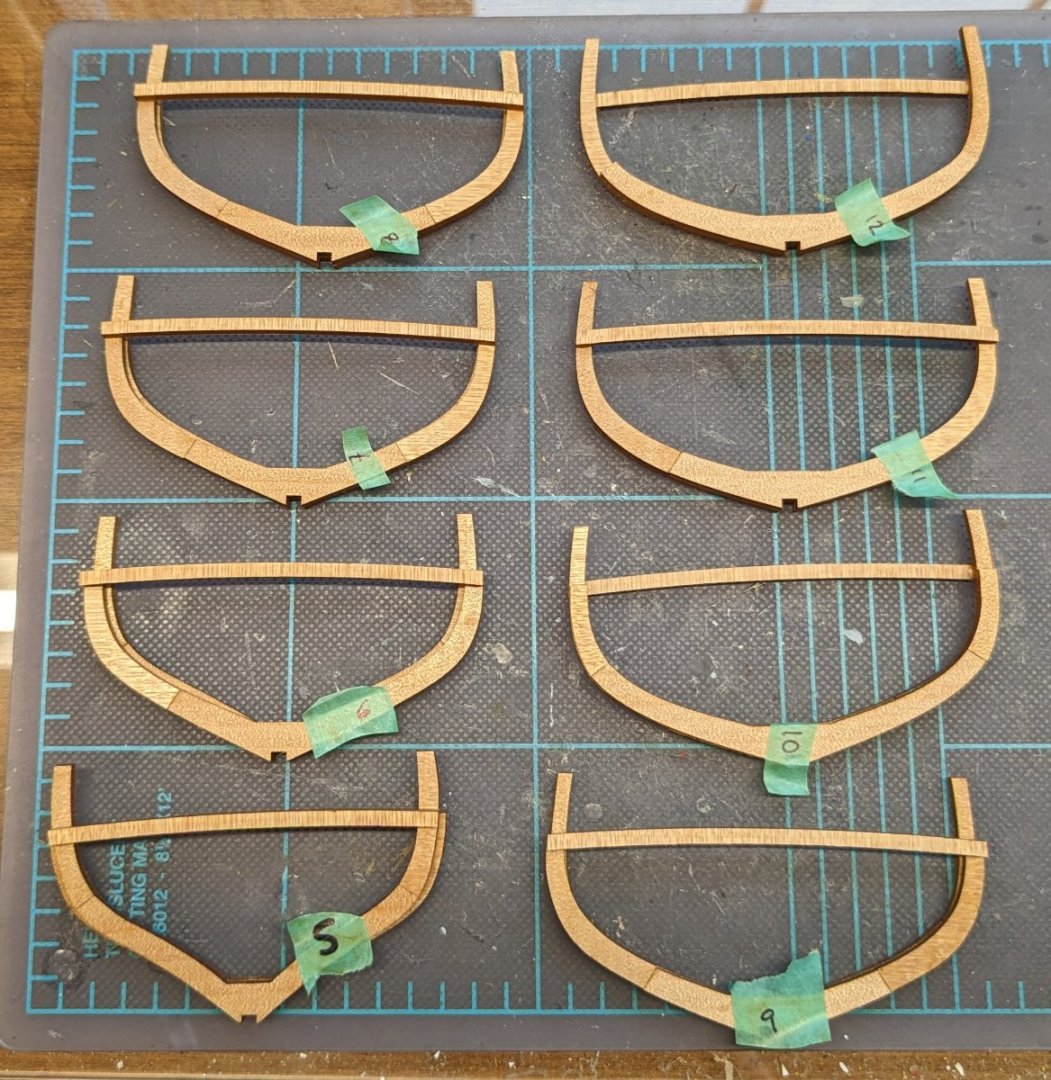
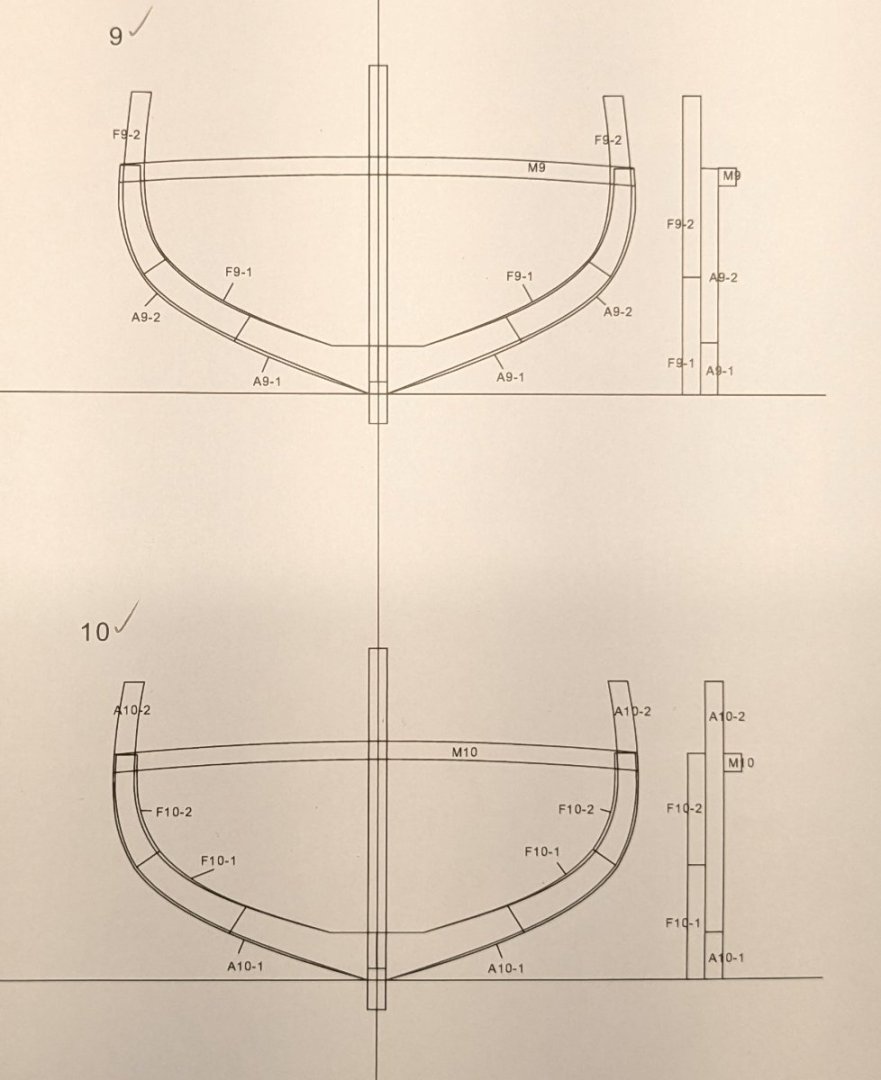
I have a nice little collection of frames going. Like most repetitive tasks, I'm discovering some techniques that make the assembly process go a bit quicker. One thing for potential builders to look out for is that between frames 9 and 10, the transverse beam shifts from spanning the short pair of futtocks to the longer pair. This is due to the positioning of the gun ports. Back to work!
-
HMS Renard 1872 by Draque - 1/24 - POF
ccoyle replied to Draque's topic in - Build logs for subjects built 1851 - 1900
That's a very handsome subject, and not a type that we normally see around here. -
It's a sad compromise made necessary by economic reality. I intend to replace all of the kit-supplied line on my next rigged model.
- 111 replies
-
- 4
-
-
- Nonsuch 30
- Model Shipways
- (and 1 more)