


russ
-
Posts
3,086 -
Joined
-
Last visited
Content Type
Profiles
Forums
Gallery
Events
Everything posted by russ
-
Cross-section by russ - FINISHED - 1/48 scale
russ replied to russ's topic in - Build logs for subjects built 1751 - 1800
Some more progress. Here is the ceiling taken up to the lower deck clamps. And here is the outer planking completed with some finish on it. More later. Russ- 69 replies
-
- 3
-

-
- frigate
- cross-section
- (and 1 more)
-
Just take a piece of poster board and rule lines across it at the intervals of the ratlines. Clip it in place on the back side of the shrouds so that it is properly aligned and rig the ratlines to match the lines on the poster board. Any such material will work. A piece of a file folder would do it. I think I use poster board and a paper clip. I reckon a small clothes pin will do as well. Russ
-
Cross-section by russ - FINISHED - 1/48 scale
russ replied to russ's topic in - Build logs for subjects built 1751 - 1800
Here I have attached the bulwarks planking and the wales. The wales have been painted. I also started the bottom planking. Questons and comments welcomed. Russ- 69 replies
-
- 2
-
-
- frigate
- cross-section
- (and 1 more)
-
Andy: The rigging is looking pretty good so far. Painting the blocks makes a big difference. In the photos, they actually look like they are stropped. Nice work. Russ
-
Cross-section by russ - FINISHED - 1/48 scale
russ replied to russ's topic in - Build logs for subjects built 1751 - 1800
Mark: This is very generic. It is supposed to be a smallish vessel from about the late 18th century. I designed it myself just to get some experience in framing and planking. I designed this model before I really knew very much about how these early ships were built. Russ -
This is a model I posted on a bit on the old site. I am presenting here as a build log of sorts.I built this model back in 2003 as a learning experience. It worked. I learned a lot about how to build a model and also how not to build a model. There are a few things I like about this model as well as a good deal I do not like. One thing I am proud of is that the entire model is treenailed. That was important to me. There are numerous mistakes in the size of timbers, as well as the way they are joined. Still, this model taught me a good deal and it sits on my shelf and it has survived the last ten years quite well. Here is how the model began. Note that the framing is all double frames. Also note that the keel and keelson are a tad small, and that the mast step is just plain wrong. It works, but it could have been some much more accurate. On a positive note, those fillers stiffened the framing well and made it easy to sand it out fair. More later. Questions and comments are welcomed. Russ
- 69 replies
-
- 3
-
-
- frigate
- cross-section
- (and 1 more)
-
Gerty: As soon as I can find some time to do some more work on her, the deck will be the first thing,. Russ
-
Stain for deck?
russ replied to Rich_engr's topic in Painting, finishing and weathering products and techniques
Do not sand the conditioner at all. Follow the instructions on the can. Put it on, wait about 10 minutes, wipe off the excess, and then stain within a couple of hours. I would stain it right after you wipe off the excess conditioner. No sanding in between conditioner and stain. Russ -
Bob: Sorry to say, the best way to repair that area is to take the jaw off and replace it. Use dowels to fasten it to the gaff and that way you will not have any problem with future repairs should they become necessary. Those metal fastenings are in your way. I would also also get some harder, denser wood to make your jaws next time. Not sure why that area failed, but if it is soft wood, that is probably part of the problem. Russ
-
Bob: Do the plans not indicate what those blocks were used for? Russ
-
I usually get the Elmer's brand and have never had a problem with it. Once it has been opened, it does have a shelf life, but mine usually lasts the better part of a year. Climate may play a part in that, though. Russ
-
Rubber cement is a good idea. It is really easy to clean up and it dos not distort the patterns. The paper peels off and what is left can be rubbed off either with your fingers or, if it is really on there tough, then an eraser will work. What bothers me about the paper glue is that it looks like typical PVA glue and that can distort the patterns. Please be careful that the individual shapes are not distorted in any way. Russ
-
Sherry: Thanks for looking in and for those kind words. Russ
-
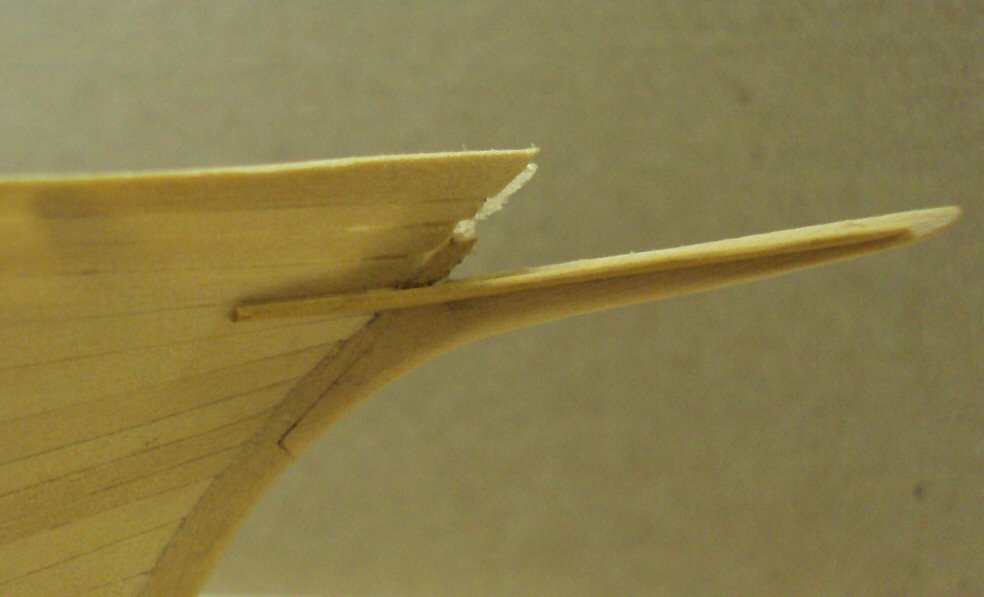
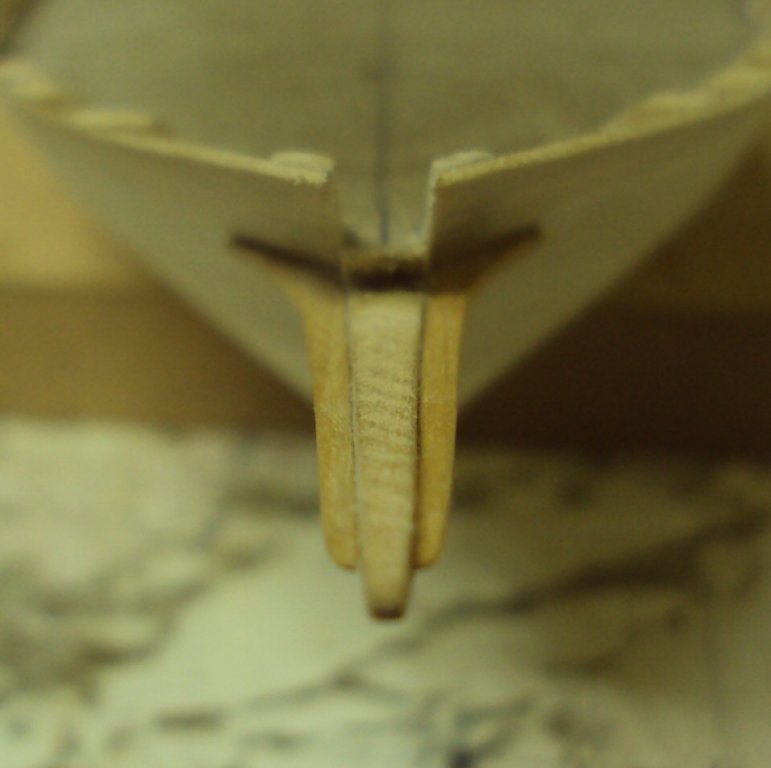
Here are a couple of photos from the old log that I forgot to post. This is the trim along the stem. This will blend into the rub rail that will eventually be placed along the outboard edges along the hull, just below the deck line. These are made in boxwood. Questions and comments welcomed. Russ
-
Mark: I could not see any real difference in the trucks from front to back. They look about the same size. But you right that there should be larger trucks forward and smaller in back. However, I think that if he pulls the quoin a bit further back, that might do the trick. Russ
-
The lighter weight thread should be used in the upper rigging, with the larger thread used further on down. That is a general rule of thumb. When given a choice between to sizes, quite often smaller is better for the scale effect. Russ
-
We provided drawings for every part of the cross section, including the guns and the carriages etc. These are available to the members of the Triton build group. For dimensions of guns, we used Lavery's Arming and Fitting and for carriages we used the excellent article in Nautical Research Guild's Shopnotes. Very nice guns and carriages, Grant. Good work. Russ
-
Stain for deck?
russ replied to Rich_engr's topic in Painting, finishing and weathering products and techniques
I am not sure about the size of the prestain conditioner. I have a large can of it and that may be all that they have. Russ -
Drawing Programs v's Cad Programs.
russ replied to michael mott's topic in CAD and 3D Modelling/Drafting Plans with Software
Michael: I am not sure I understand all of that, but that is okay. I am sorry I could not help answer your question. Russ -
Stain for deck?
russ replied to Rich_engr's topic in Painting, finishing and weathering products and techniques
Okay, for basswood, I use Minwax prestain conditioner and then the stain. You apply the conditioner and it will create a surface that will absorb the stain evenly. Otherwise you could have a blotchy appearance. I have used this routine on basswood with good success. The typical sanding sealer may not do the trick. I have seen some cases where people had uneven results using a sanding sealer. You should definitely create a small mock up of your planking and test before you do it on the actual model. \ Russ -
Drawing Programs v's Cad Programs.
russ replied to michael mott's topic in CAD and 3D Modelling/Drafting Plans with Software
In ACAD 2000i, I upload a scanned jpeg into the ACAD program and then scale it. I can assign that jpeg to any layer I want. Once I have it scaled, I can trace it etc as I need to. I am not sure why you cannot do that with your ACAD program. Russ -
Finding a log
russ replied to Robert Watzke's topic in Using the MSW forum - **NO MODELING CONTENT IN THIS SUB-FORUM**
There are only four pages of scratch build logs currently. It does not look like Gene has had time to repost his log after the crash. You might PM him and ask him about it. Russ -
Stain for deck?
russ replied to Rich_engr's topic in Painting, finishing and weathering products and techniques
I think a clear coat would be fine, unless you want to change the color of it. I have had good luck with Minwax polycrylic, but others will probably have some better ideas. Russ -
The planking looks good so far. On the bowsprit hole, you have the stanchions on the inside of the bulwarks to help. The two that go just to either side of the bowsprit are the knightheads. They will support the bulwarks where the bowsprit goes through. Russ
-
Nice work on the torpedo. No one would ever guess all that went into making it. It looks very good. This kit must have a good deal of photo etched material. That really makes a difference in a kit. Russ
