


Cathead
-
Posts
3,526 -
Joined
-
Last visited
Content Type
Profiles
Forums
Gallery
Events
Everything posted by Cathead
-
 Good point on not waiting too long, wefalck, especially with soft basswood. I'll try that.
- 599 replies
-
- 3
-

-
- sidewheeler
- arabia
- (and 4 more)
-
Brian, I'm using wood glue because (a) I've heard mixed reviews about the longevity of CA and (b) it's more benign to be around, which is important to me. CA gives me a headache pretty quickly, while I can use wood glue all night long. Unlike Chaperon, I'm not gluing planks to a smooth surface but just to the very thin cross beams above the main deck, so spreading glue along the bottom of the plank would (a) waste a lot of glue and (b) create a really ugly under-surface as the boiler deck can be seen from below. So what I'm doing is placing small dots of glue on each beam and then settling the plank over it. What's happening isn't seepage directly up through the plank, it's bits of glue squeezing upward in the seams between planks, then soaking in from the side or top. It creates the little darker patches you can see if you look closely at the planking photos. The best approach is just to be really careful in how much glue is used, but sometimes I get it wrong or it gets up there anyway. Also, early on I made the mistake of trying to wipe it up right away, which just spread wet glue further over the absorbent surface and made the spot bigger. I think it's better to let any beads dry and then scrape/sand them away. The core problem is that the planks aren't sealed in any way, and soft basswood is really absorbent. But that's the price of doing the individual planking the way I like it done in this case (i.e., without paint). Given that most of this will be under another anyway and only seen in partial shadow from the side, I don't think most people will notice. It would cost me points in any model competition for sure, but as that's not my goal it's ok. Thanks for the feedback, it's nice to have other steamboat modellers on board. My brain is already working ahead to thinking about trying Chaperon and customizing it various ways to backdate it to a mid-century Missouri River sternwheeler, and the more build logs there are the more I learn about the kit.
- 599 replies
-
- 5
-
-
- sidewheeler
- arabia
- (and 4 more)
-
Interesting question. I have a very linear mind and tend not to have several things running in parallel. I only work on one model at a time and then only one one step at a time. In theory it would be more efficient to jump around and build other parts ahead of time while working on an earlier step, but my mind just doesn't work like that. I like to think about the context of what I'm doing with each step and I can't do that if I'm way ahead (for example, building some bit of superstructure before the hull is finished). Part of this is that I've learned that I often like to change my plans as I go along, or adapt details to the way a project is going, so if I build ahead, I may end up with something I don't actually like or want when it's time to use that bit. Building every step to fit the model in front of me helps guarantee that I'll get what I want each step of the way. I couldn't handle more than one project at once, though I'm quite susceptible to "dreaming ahead" when I'm not even halfway through a given project. Plus, I like to finish what I start and doing more than one thing at once seems to guarantee endless projects.
-
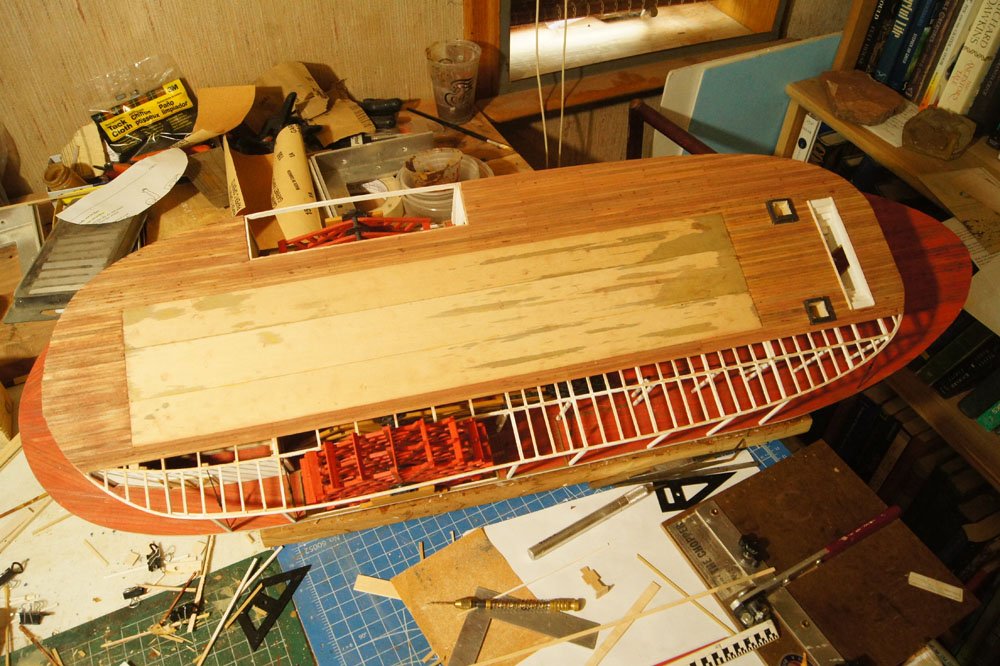
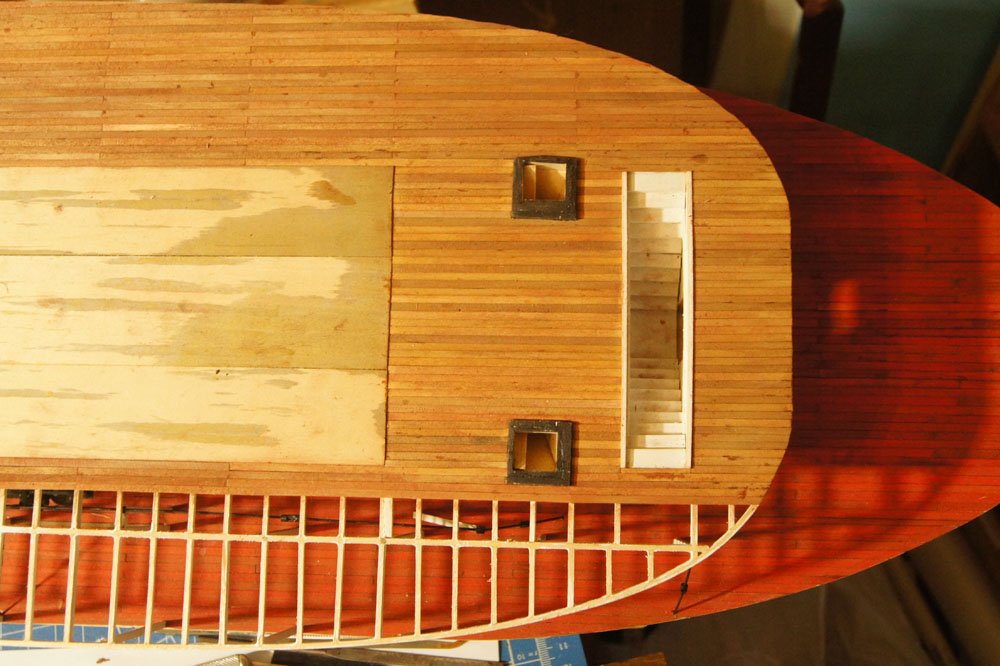
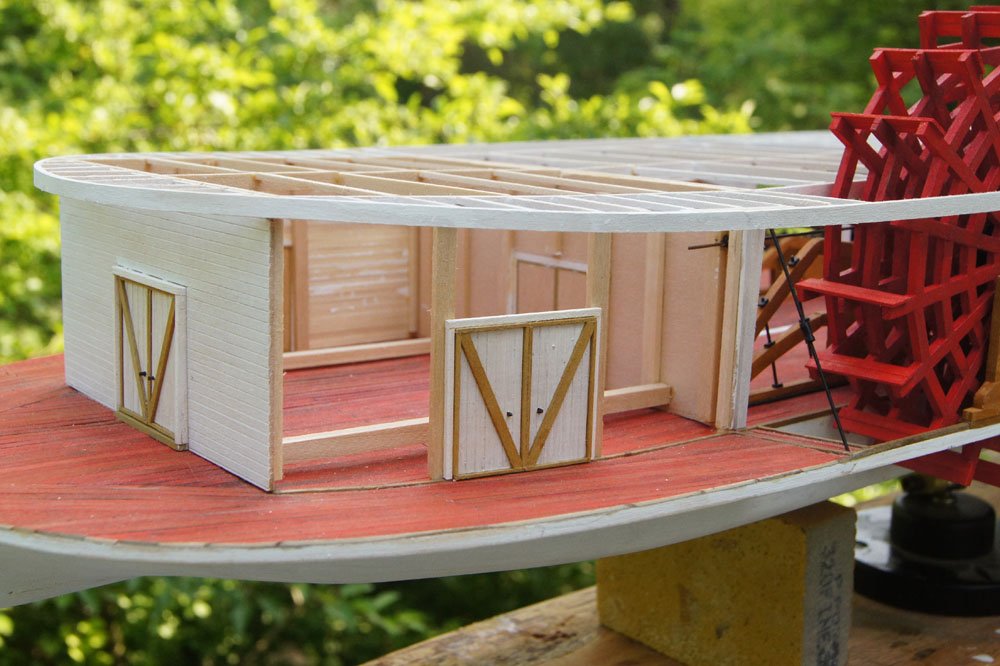
Boiler deck planking is mostly done: The blank spot in the center is where the cabins will go, I'm not showing the interior of these so there's no need to plank this carefully. As the underside of the deck is vaguely visible if you look from just the right angle, I used sheets of pre-scribed wood for this to mimic just enough planking in the shadows. For the visible planking, I stained the individual strips using the same vinegar/rust mixture I've used before on this model, then rubbed each plank with subtly different shades of pastels. This produced a nice variation effect and was a lot faster than painting. I'll sand the whole surface down when it's done, blending them together a bit more. If you were wondering why this deck isn't red, too, there are three reasons. First, this is the only other deck that will be visibly planked (everything above this will be covered with tar paper), and I thought it would look interesting in a more raw wood state, a bit of visual variability. Second, as this deck is mostly covered by the decks above and doesn't get as much use as the main deck (for things like cargo handling), I decided it didn't need the extra coat of red paint. Third, I'm out of red paint and don't want to buy another whole bottle when I might not use the rest for a year or more. Here's a closer look at the foremost part of the boiler deck, showing where the chimneys and main stairwell come through. You may notice that the former look a bit off-kilter. That's because they are. I didn't get the boilers lined up perfectly and these were not quite aligned the way I wanted them, so I built up the area around them to make them parallel again. This will be entirely invisible once the chimneys are sitting on top. You can also see some places where glue leaked through the planking. I was trying to be careful, but using unpainted thin wood makes it super-sensitive to glue spills. I don't think it'll be very noticeable once the next deck is covering this and all the railings are one. I was still annoyed by this, though, no matter how hard I tried the occasional bead came seeping up through and trying to wipe it off just made the area bigger. Along with this, I'm starting to lay out the main cabin superstructure. It's quite complicated and will take me a while to get right, along with probably some annoying mistakes and do-overs. I'll try to take more photos; I didn't take many of the planking process because it's so straightforward. Thanks for reading. We're heading for the first real heat wave of summer here, so maybe some extra focus on modelling for a bit.
- 599 replies
-
- 17
-
-
- sidewheeler
- arabia
- (and 4 more)
-
I like to use a pair of flush cutting nippers for trimming rigging like that. They're not expensive and are widely useful. They let you get really close to the knot without danger of cutting into it. Nice work!
- 50 replies
-
- 1
-
-
- model shipways
- 18th century longboat
- (and 1 more)
-
I like to decide early on which side of a model is the "display" side and always work on the other side first to ensure I figure out any bugs before doing the "good" side. Your work certainly looks nice to me.
- 104 replies
-
- 3
-
-
- revenue cutter
- BlueJacket Shipcrafters
- (and 1 more)
-
I love Duluth and would definitely attend a conference there. One branch of my family is Norwegians from the Iron Range. I second Roger in that it's the Midwest's turn again.
- 599 replies
-
- 4
-
-
- sidewheeler
- arabia
- (and 4 more)
-
Any chance the NRG wants to hold a convention in KC before 2026? The Arabia museum and the WWI museum are world-class attractions and the Bertrand museum near Omaha could be a long day trip. The KC convention center is even built to look like a steamboat (I realize it's bigger than the NRG would need)!
- 599 replies
-
- 6
-
-
- sidewheeler
- arabia
- (and 4 more)
-
Kurt, Yeah, I've actually known about this for a while (note the 2018 date on the linked story). It's such a big story that I've been wanting to write up something properly about, and keep not getting to it. Meanwhile, you finally scooped me! There are multiple inter-related storylines happening here: The Arabia museum is outgrowing its space in the current downtown KC location; they don't have enough room to display anywhere near their full collection, much less expand. The lease is up soon (2026) and there's no room to expand on-site. Hawley has known where the Malta is for quite some time, but doesn't want to excavate it until he has a clear home for it, including processing, storage, and display space. That can't happen at the current museum's location. There's a nascent movement to create a National Steamboat Museum in Jefferson City, MO (the state capitol, a lovely small city located on a blufftop over the Missouri River). See, for example, this passionate column from local journalist Bob Priddy and detailed followups on the current challenges here, here, and here (such as opposition from the casino industry for a proposed tax to pay for this idea). In theory, this could all come together to create an amazing new space for multiple excavated steamboats on a blufftop property (he claims the owners are willing to make it available) in downtown Jeff City (as we locals call it). For example, here's a rendering Priddy shared that he attributes to Dave Hawley: I find this idea super-exciting, but so overwhelming I haven't been able to get my head around how to write about it here or elsewhere. It's a really cool idea, but Missouri hasn't exactly been known for investing in the future lately (for example, our infrastructure is crumbling, but voters rejected a modest gas tax increase even though it's lower than most neighboring states and the legislature doesn't have the guts to pay for this anyway). EDIT: Meant to add a link to this set of now-dated posts by Dave Hawley about the early search for Malta and some background info.
- 599 replies
-
- 5
-
-
- sidewheeler
- arabia
- (and 4 more)
-
Brian, Yes, the wheels add a massive amount of weight that's entirely supported beyond the hull in either case You're right that the hulls themselves aren't much different, but where you mount the wheels makes a huge difference in the weight distribution both laterally and longitudinally. There are a lot of reasons to choose either design. Sidewheelers were more maneuverable but their wheels were more prone to damage from river debris, which is one reason most upper-river or shallow-water boats (especially on the Missouri) tended to be sternwheelers. The sternwheel also made it easier to push or pull the boat over or off sand bars, not an issue in the lower rivers where sidewheelers predominated. Also, the placement of the engines and wheels on sidewheelers helped counteract the long, thin hull's natural tendency to hog (sag at bow and stern, rise in the middle), which was a huge problem for sternwheelers, especially with the wheel levering itself off the back end of the hull. That's one reason most sternwheelers had much larger longitudinal chains (sticking up way beyond the decks), while sidewheelers needed more transverse chains instead. Finally, sternwheelers tended to have narrower guards (the main deck extensions beyond the hull), so they didn't need as much lateral support. On the crates, I "cheated" too, just didn't take photos of doing so. I didn't add rear handles to any crates that wouldn't show them and didn't scribe the front boards on any non-visible angle. I also used particularly crappy wood for the hidden parts (all of those were made from shop scrap); if you could see the other side of that stack, you'd see gouges and other damage in the wood. The way I wanted to display them meant that I had to have the full crate length because you'd be able to see around the edges of the stack, so I couldn't just use a false front as you did. Plus, there will likely be two small windows into that area (take a look at the original painting at the beginning of this log), so I needed solid crates there too. Overall, I decided it wasn't any extra work to make all the 3D crates from the same template rather than designing various different "false" styles. All I did was cut square stock to the length of each crate and glue flat pieces top and bottom, after scribing a fake front/back plank on the stock. The handles are just scrap stock glued on. Nothing fancy and didn't take long to make.
- 599 replies
-
- 4
-
-
- sidewheeler
- arabia
- (and 4 more)
-
Mark, it's a good general idea and in a more solid model you'd likely be right, but as I'm just leaving the whole starboard side open, I don't think I need any glass. The support posts add enough structural integrity and any glass would probably detract from the view inward due to reflection and distortion. It'll look almost realistic anyway as the lack of walls is somewhat subtle given that much of the infrastructure is open anyway. I think the presentation will become more clear over time. Adding the deck will cut down on the light getting into the detailed area, but I can always supply a flashlight to shine in there.
- 599 replies
-
- 6
-
-
- sidewheeler
- arabia
- (and 4 more)
-
I've never done coppering, so I have no advice, but your approach makes sense as it's basically the same idea as proper planking. If an item already has the shape it's supposed to, it'll be more likely to hold that shape when being glued. My other suggestion would be to read through build logs of similar kits using that style of plates and see what they did.
- 104 replies
-
- 1
-
-
- revenue cutter
- BlueJacket Shipcrafters
- (and 1 more)
-
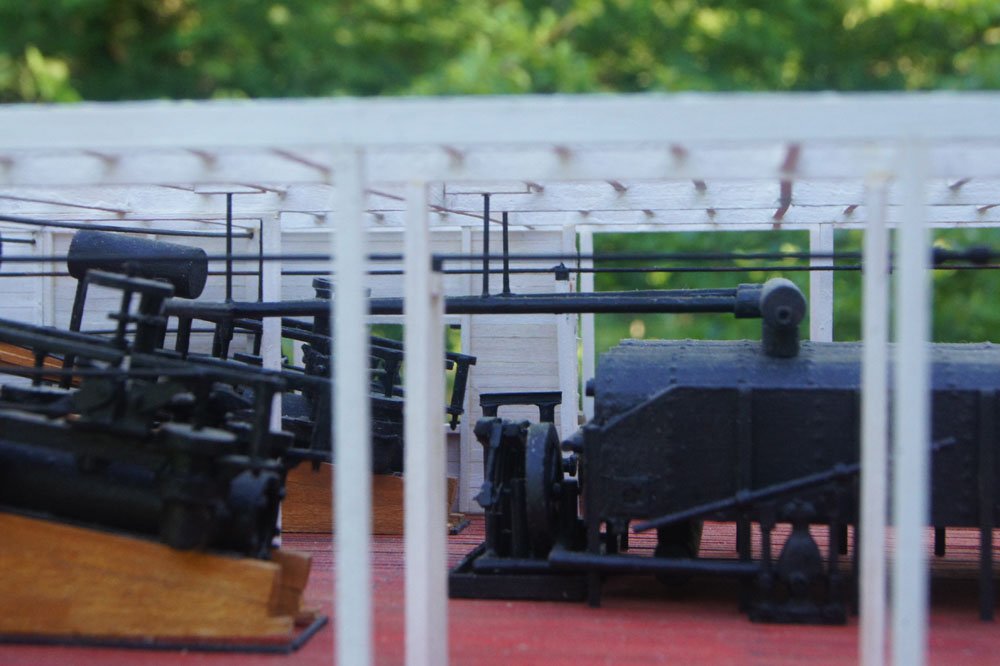
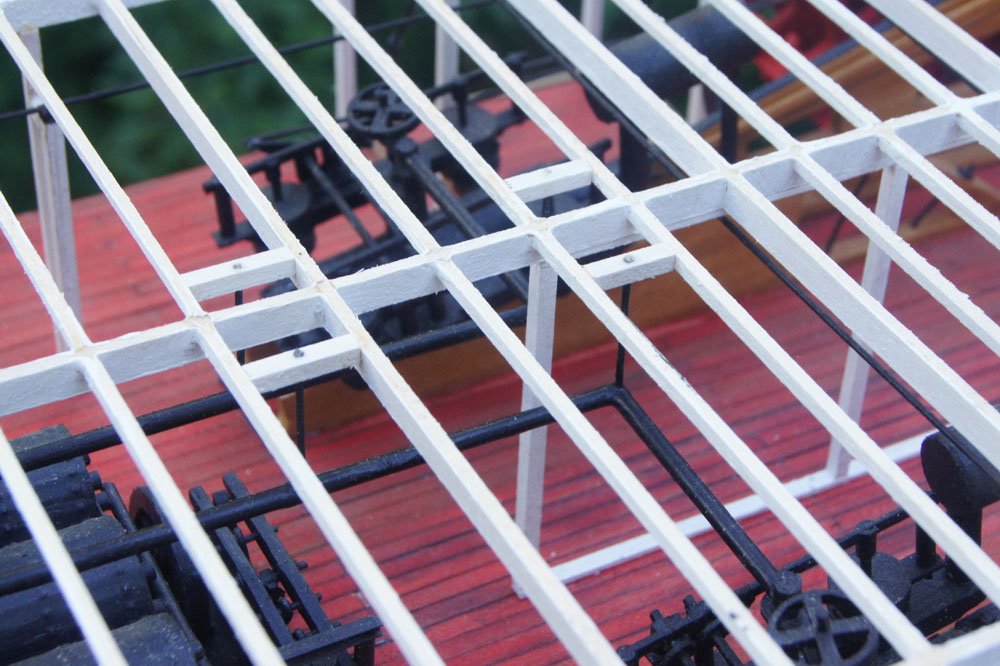
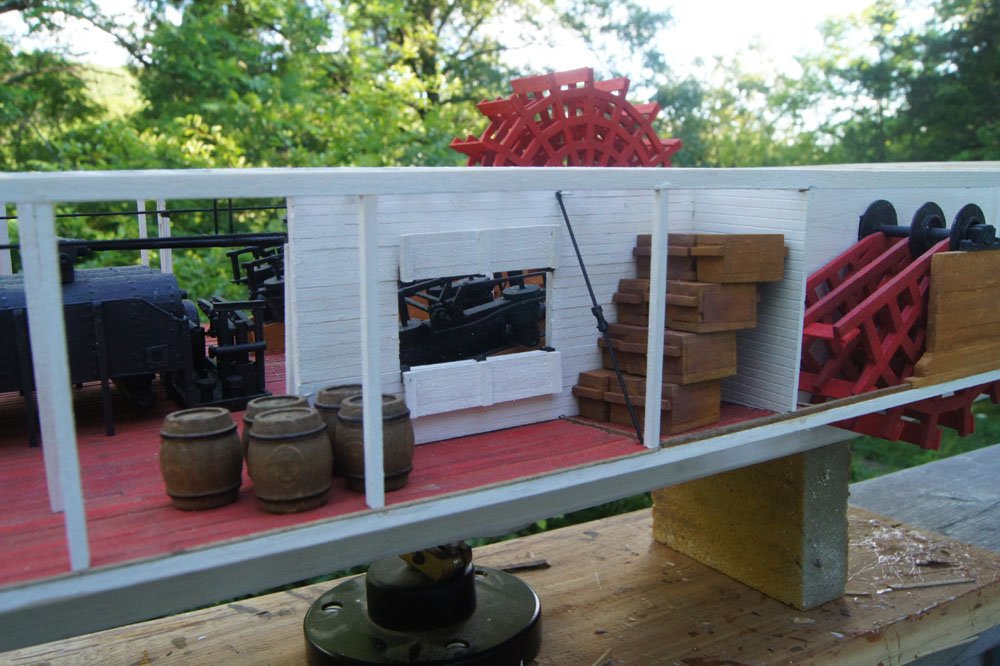
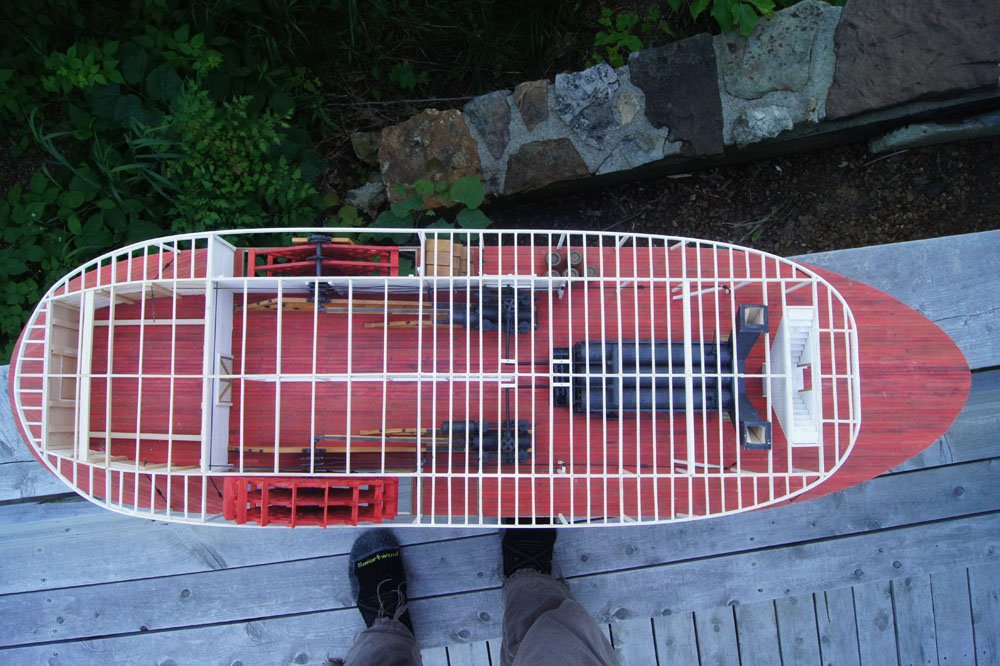
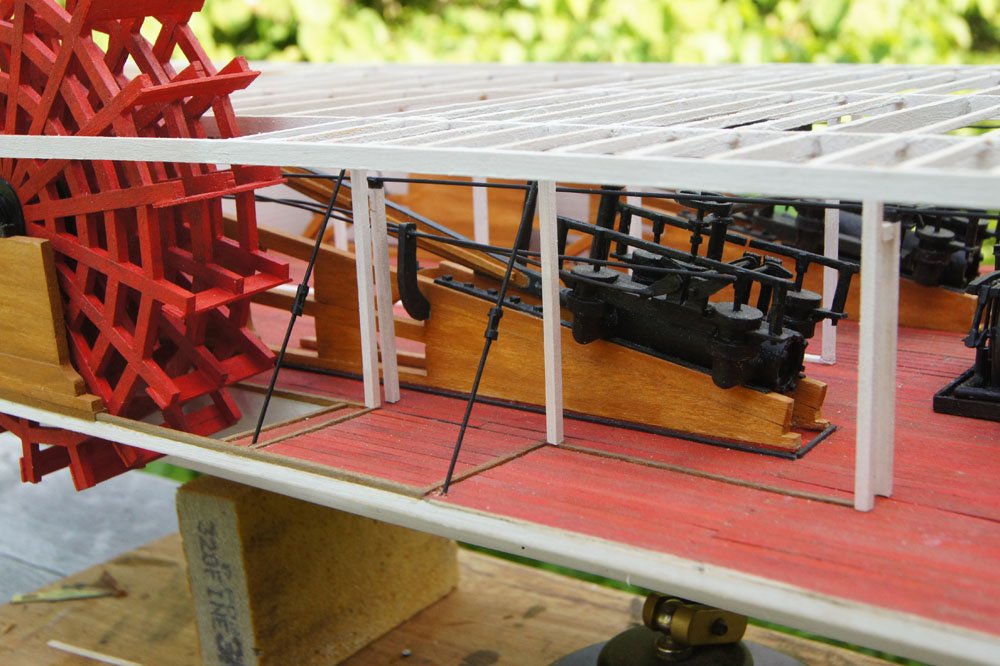
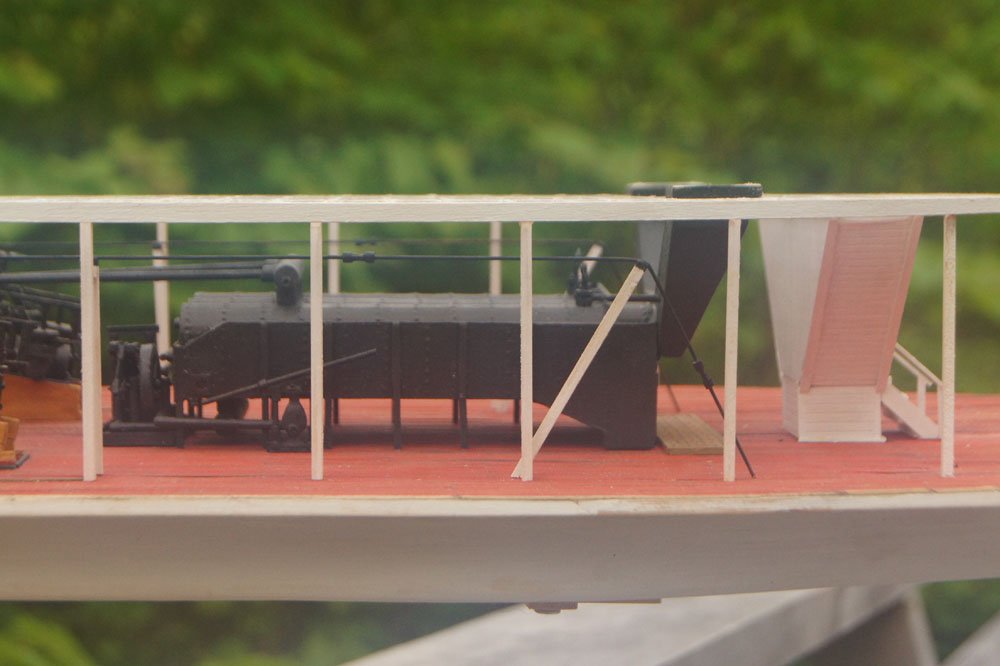
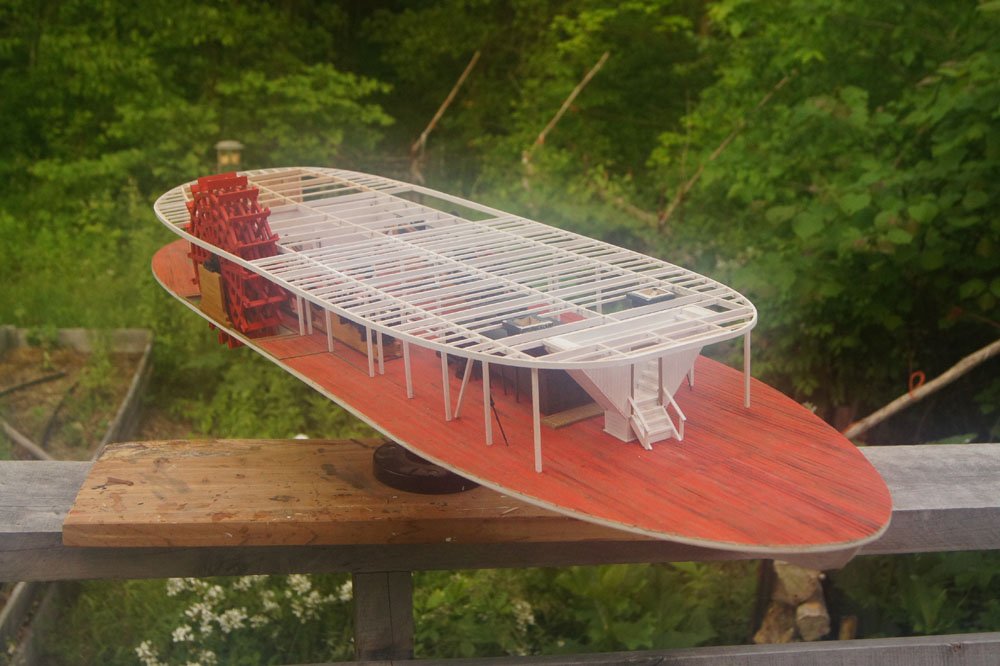
I've managed to fill in some useful details in the last few weeks. First, I added a few support rods dropping from the boiler deck to hold up the steam lines between the boilers and engines: Next, I started adding the outer support posts between the main & boiler decks. First, the stern: Then, a sequence from the bow: You may also notice that I added another transverse chain right in front of the main stairwell. Kurt had suggested this, and I decided it was a good idea as the main deck extends pretty far from the hull here with very little support from above (as both the boiler deck and the hull curve sharply inward). It adds some nice visual detail, too. Next, I started filling in the port wall in front of the paddle box. At the last moment, I couldn't bring myself to fully block off the view of the port engine, so I borrowed an idea from many sternwheelers and included some ventilation/access hatches next to the engine. No idea if this is accurate for sidewheelers, but I think it looks pretty neat. I also built a set of basic crates to fill in the cargo area here. Below, they're loosely stacked in what's likely their permanent arrangement. There will be an outer wall here from the paddle box to the first support post, so they'll only really be seen from the front, thus it doesn't matter if there's nothing at the bottom of the stack. I based these on Google Image searches for Civil-War-era crates (I chose the easiest design to replicate for a detail that will be mostly hidden). In the background of the previous photo you get another hint of what the "loaded" vessel will look like. And last, here's an overhead view of the current model. I think the next step will be starting to lay down the boiler deck, so this may be the last unobstructed view of the main deck. There's a lot of detail left to add to the main deck, but all of it is toward the outer edges where I can do it when the model is closer to being finished. In other news, I had a pretty neat experience over the last month. A few years ago, when I first started building wooden nautical models, I built a rough version of an upper Missouri River keelboat, the kind commonly used by fur trappers and other rivermen to float goods down from the mountains (like furs, gold, etc.). These were usually knocked together from rough lumber, took one trip, then were sold for their lumber upon reaching St. Louis. Mine was based on a variety of images, including some of the full-size replicas used in the 1952 film The Big Sky. Here's a nice, long article with lots of images for those interested in these craft. Anyway, here's the model: A fellow browsing MSW saw this model in its gallery and got in touch with me through the NRG. I assumed he was just interested in learning more about keelboats (or was maybe an expert who wanted to correct something), but it turns out he's a huge fan of the film mentioned above and was interested in buying the model! We came to an easy agreement and I carefully packed and shipped off the model. I never thought I'd actually sell a model, and it's a really neat feeling to know that my work is making someone other than me happy! Fun note, the sails are made from scrap fabric left over from Mrs. Cathead's wedding dress, 11 years ago. Next up, I'll be working on the boiler deck and casting deep shadows over all that main deck detail. Enjoy it while you can! Thanks for reading.
- 599 replies
-
- 19
-
-
- sidewheeler
- arabia
- (and 4 more)
-
Nice job, congratulations on finishing! Depending on the nature of the ex, you can always put a log through the bow and display it canted over at a 30° angle...
-
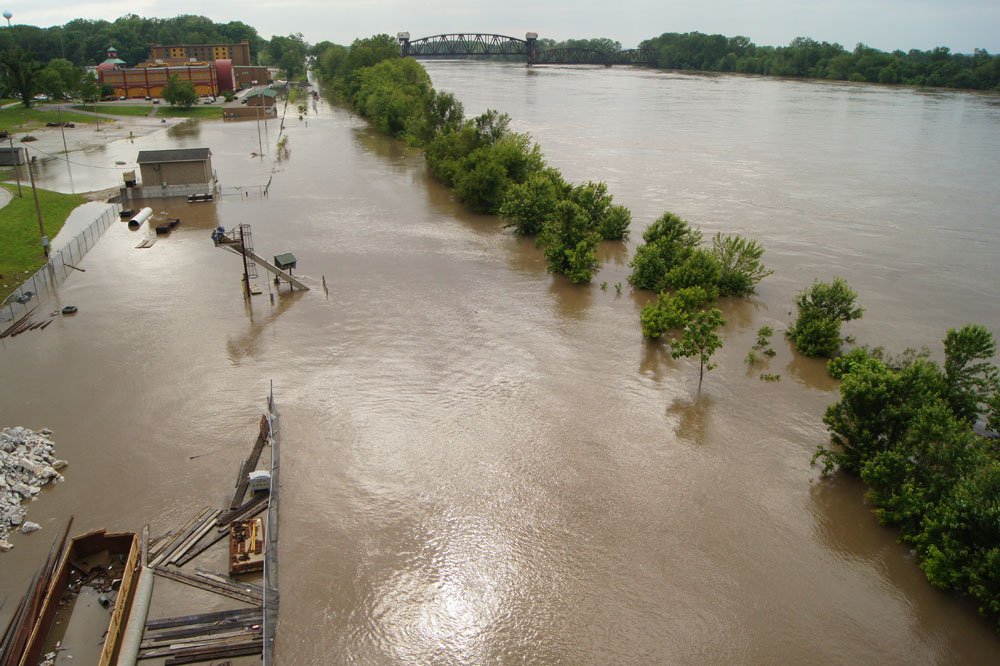
Depends on how you define it. We actually haven't had rain in a few days, but the big rivers are carrying so much water that that doesn't matter much. The Mississippi will crest in St. Louis on Sunday (here's what it looked like a few days ago, from the National Weather Service). The Missouri is holding steady or slightly falling, but there's so much floodwater that it's going to take a long time to draw down even if the whole region turns dry, which isn't in the regional forecast. Once water gets past levees and floods the bottoms, it gets trapped there by those same levees because it can't get back out again easily. Another downside to the levee system; a natural floodplain would drain itself.
- 599 replies
-
- 4
-
-
- sidewheeler
- arabia
- (and 4 more)
-
That's awfully nice of you, Chris. My own work looks pretty rough to me, in comparison with the precision of many other modelers here, but I've learned to be comfortable with what my skill set allows for any given project. Otherwise it would cease to be fun. I do agree that a great deal of the appeal of modelling (to me) is learning about and understanding the subject, not just the actual building or viewing.
- 599 replies
-
- 5
-
-
- sidewheeler
- arabia
- (and 4 more)
-
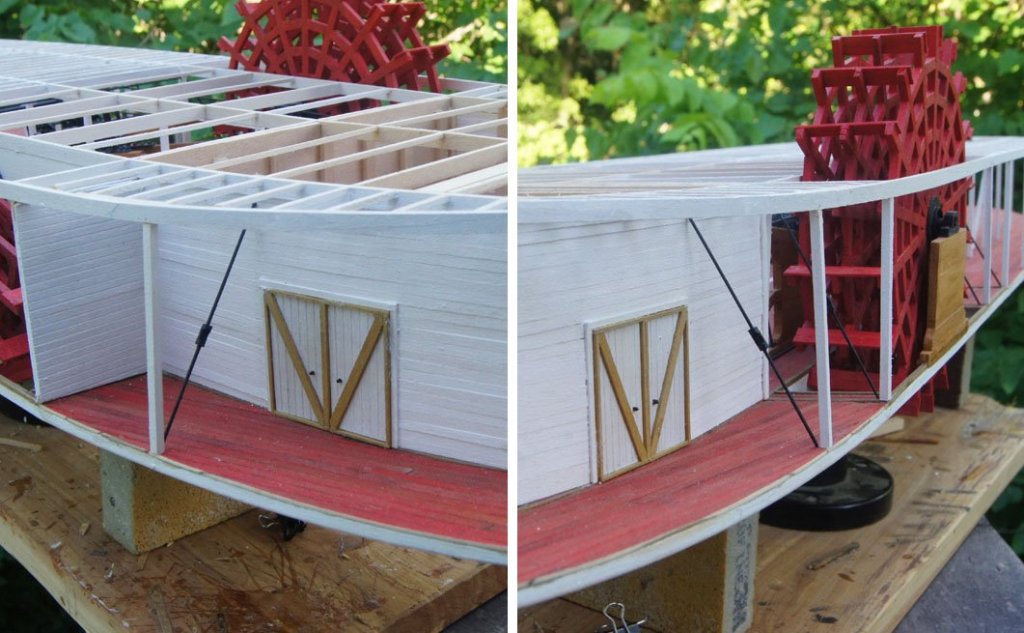
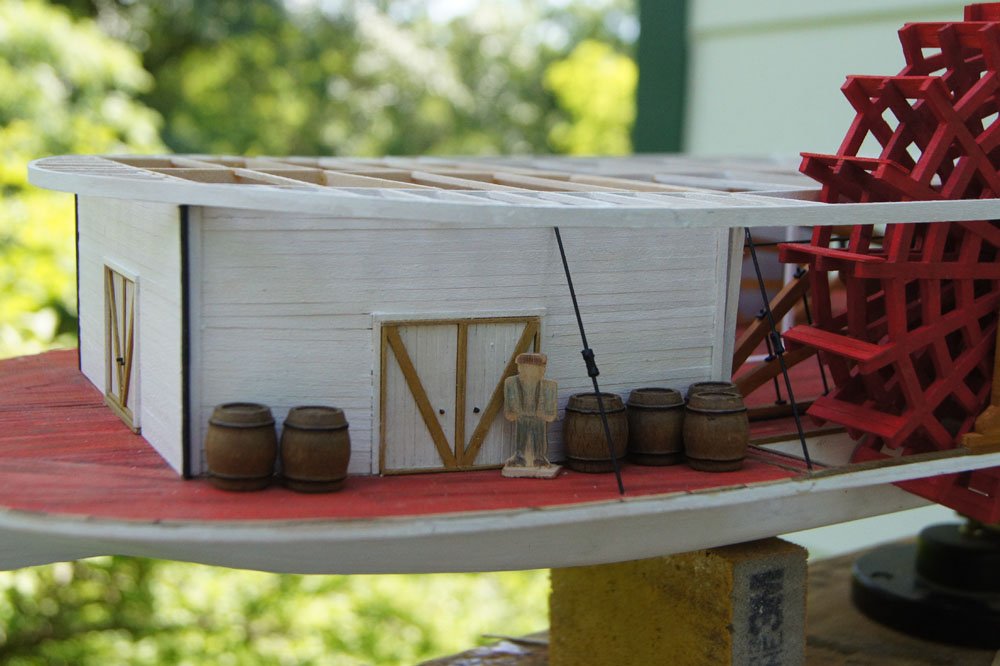
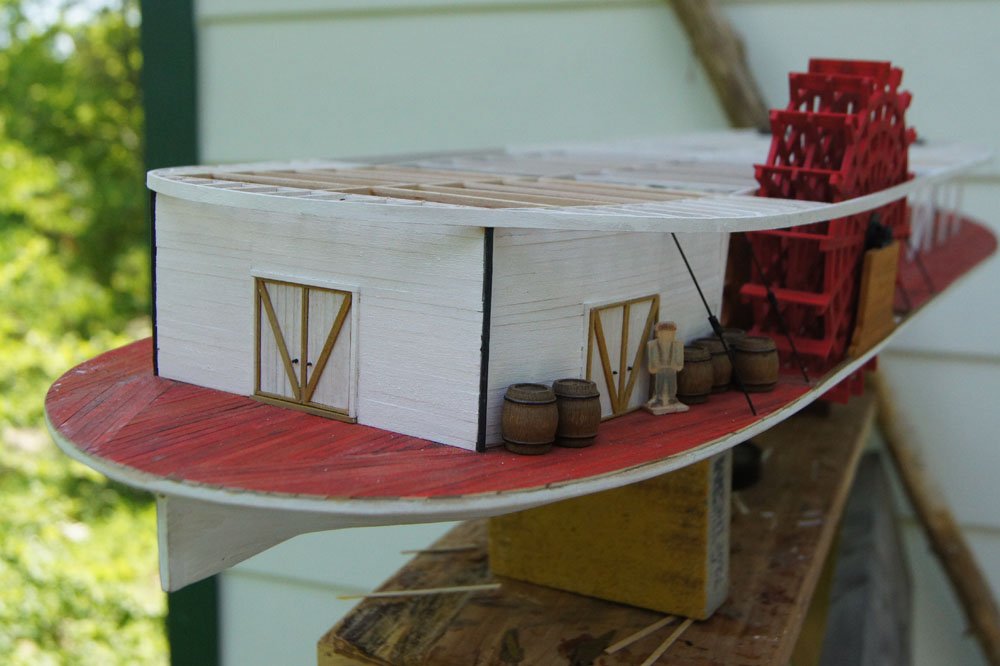
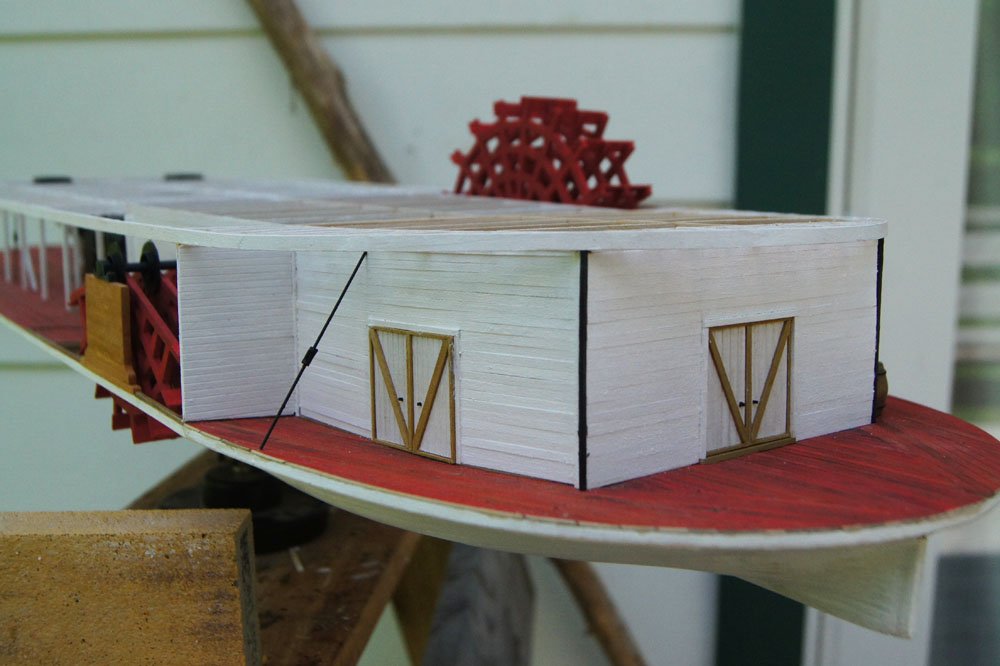
I finished off the starboard side of the aft superstructure this week, using the same methods as the port side. Once it was done, I added the other transverse chains on both sides. I placed a few barrels and a figure for photographic interest. Once this was done, I decided I really didn't like the contrast between the manually planked sides and the scribed-planked aft (see photos in last post). Mulling it over, I realized that I'd left myself the ability to plank over the aft wall because the door there protruded enough to accommodate thin planks. So I went ahead and did that; the whole structure now looks a lot more uniform: Doing this created a mismatch at the corners, though, which I fixed with the time-tested method of installing a pipe along each corner. I'm calling them gutters draining the boiler deck; they actually come out over the guards (rather than into the hull), so this is at least plausible. I like the replanked aft for two reasons: (1) it's more consistent with the sides, and (2) it's most consistent with the model's style overall. The decks and other areas are slightly rough rather than perfectly crisp, which won't win any modelling awards but gives the model a distinct "feel" and conveys the rough-and-tumble nature of upper-river boats in a way I like. So now the presentation is more cohesive. Lesson learned on trying to take a shortcut. For reference, here's the port side again, which hasn't changed except for the installation of the transverse chain. The photo has a strange color balance between the two walls, but that's just a trick of the light. Not quite sure what I'm going to do next, there are various ways to move forward from here. Thanks for reading.
- 599 replies
-
- 19
-
-
- sidewheeler
- arabia
- (and 4 more)
-
I agree with Kurt, and it's a good reminder that I need to do this on my own build as well. Like the crates as well.
- 133 replies
-
- 3
-
-
- chaperon
- model shipways
- (and 2 more)
-
More progress! Here are the two forward transverse chains on the starboard side. These cross to the port side (as that's visible from the outside) but don't descend back down to the deck on that side (as they'll be hidden from view in the superstructure. Again, the starboard side is remaining open to view so I can show off details like this. Next, I began filling in the aft superstructure. First, I built two more cargo doors (one for each side, built the same as the aft one described earlier in this log) and installed them with some extra vertical braces. Then I started filling in walls. I've gotten as far as finishing the port side so far. This work is pretty basic stuff so I don't know that much detailed description is needed. You can see one transverse brace just behind the wheel. There will be another one further aft at the same spacing as the forward two, but I won't add that until the walls are built. The one by the wheel won't be seen on the port side as it comes down within the paddlewheel well. But the aft-most one will be visible on both sides. In this photo, it's more obvious than I expected that I used pre-scribed panels for the walls in some places and individual planks in others. Stuff like that really jumps out on screen. I hope the difference won't be so obvious once there's other detail in the way, like all the support posts between the two decks, various cargo, shadow from the boiler deck, and so on. Following up on the last comment, the forward of the two aft chains would be just behind the wall of the wheel well (and thus hidden in the final model), while the after one will come out just forward of the cargo door. Other responses: I really like understanding the context of a model or a subject, it's just so much more interesting when you understand how, why, and where a vessel was designed and used. Thanks for being interested. Yeah, I've been through that area, visited the Atchafalaya control structure, and so on. As a geologist with a particular interest in river and landscapes, that area is like catnip. Interesting to hear your personal perspective. On 5/26 I wrote that the river at St. Louis was forecast to crest at 43'. After another week of storms in the basin (including one that spawned a huge tornado near Kansas City), it's now forecast to crest at 46' this coming Thursday (1993 record is 49.58'). And it's just entering June, in 1993 the river didn't peak until August. The Missouri continues to surge. Multiple levees have now broken and there are countless roads and bridges closed. If you don't know the area, it's hard to explain how difficult it is to get around. The river is so high that it's backing many miles up every tributary, closing all sorts of routes that normally wouldn't be affected. And levee breaks are closing fairly major roads across the state. Here are a couple more photos I took the other day of the Missouri River near its current peak. Here's the river at Glasgow, Missouri. It's hard to tell from the photo, but the far bank is a levee that's at least ten feet above the bottomland beyond, and the river is about a foot from the top. The road and rail line crossing the river here are closed because they cross the floodplain for a mile after this and are underwater further back where it's not protected by the levee seen here. These bridges are a major corridor across this part of the state and you have to go a really long way around to find another way across. Here's the Missouri River at Boonville, MO. The bridge in the background is a historic railroad bridge that's partly open to pedestrians; the water is really close to the actual bridge structure. In the foreground you can see the river overtopping the bank and coming up the hill into the lower parts of town. The corridor stretching straight back is another busy railroad line that I'd estimate is 5-8 feet underwater based on my knowledge of the area and what's left of the signals poking out. There isn't much to flood here other than the rail line, the rest of town is on higher ground. The building in the background is a casino and I could care less if that floods. However, just across the river from here, a major levee just broke and is now flooding a section of bottomland that's at least ten miles long, inundating another major road through the region. Pretty wild times here in the American Midwest. I haven't even mentioned the Arkansas River, which has surged past its record level. Thanks for reading, as always.

- 599 replies
-
- 15
-
-
- sidewheeler
- arabia
- (and 4 more)
-
Today is Memorial Day in the US, when we remember fallen veterans. I was fortunate that both my grandfathers survived WWII. One made it through North Africa and Sicily before taking a severe leg wound in central Italy. The other spent the war in a sub in the Pacific, despite being well over 6' tall. It wasn't just the men in my family directly affected; my father's family had lived in the Philippines since the early 20th century and some still do (both my grandfather and father were born there), having come over for business following the Spanish-American war. My grandfather was in college in the US when the war broke out, and joined the Navy. Meanwhile, his whole family were trapped in the Philippines as the Japanese approached. I've read a series of letters from my great-grandmother to her son as the noose gradually tightened; the last few mention things like the first sightings of Japanese bombers overhead, then the mail abruptly stopped. The whole family went into Japanese internment camps; we were lucky that everyone came back out again at the other end, despite severe suffering; many families were less fortunate, both Filipino and American (especially the former). My grandfather spent the whole war having no idea if his family was dead or alive, while serving close to the Philippines but never able to do anything directly about it until the liberation. If you've read the book Unbroken (and you should), you've read a parallel story to my family's. They don't appear by name in the book, but were part of the community it describes and almost certainly knew many of the main characters. Although my specific line all survived that war (and all those that have followed), knowing their story helps me remember all those who didn't, both veterans and civilians, and how what they suffered contributed, in the end, to the world being a better place than it was then.
- 599 replies
-
- 10
-
-
- sidewheeler
- arabia
- (and 4 more)
-
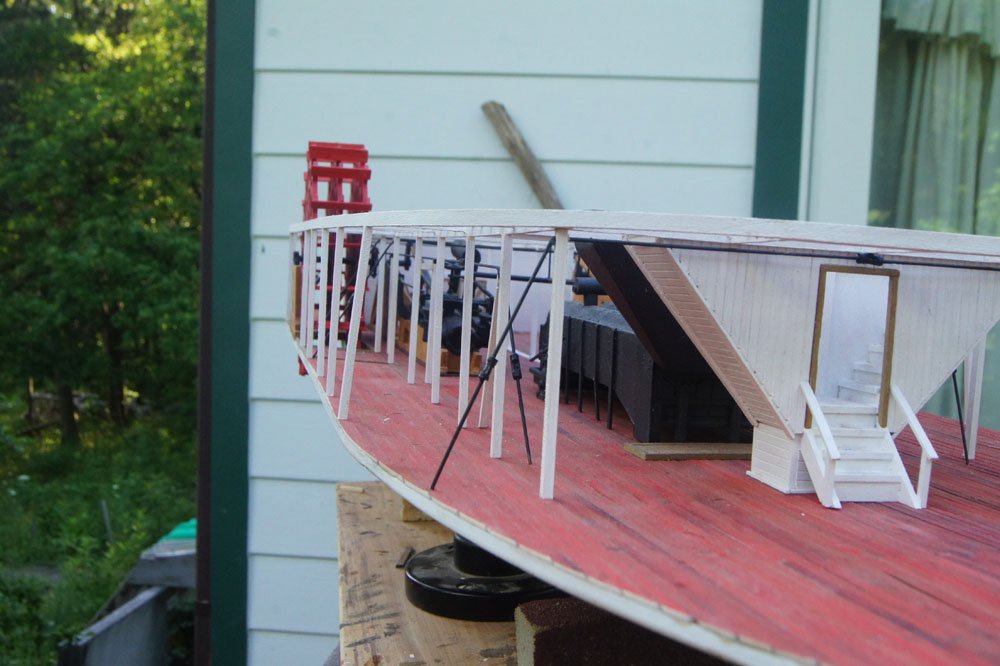
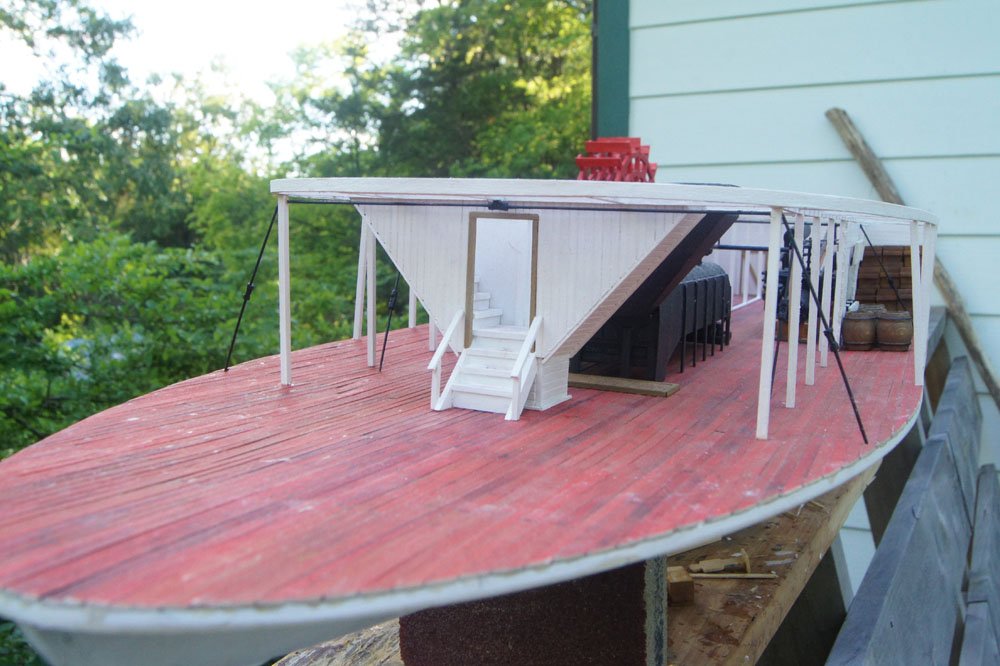
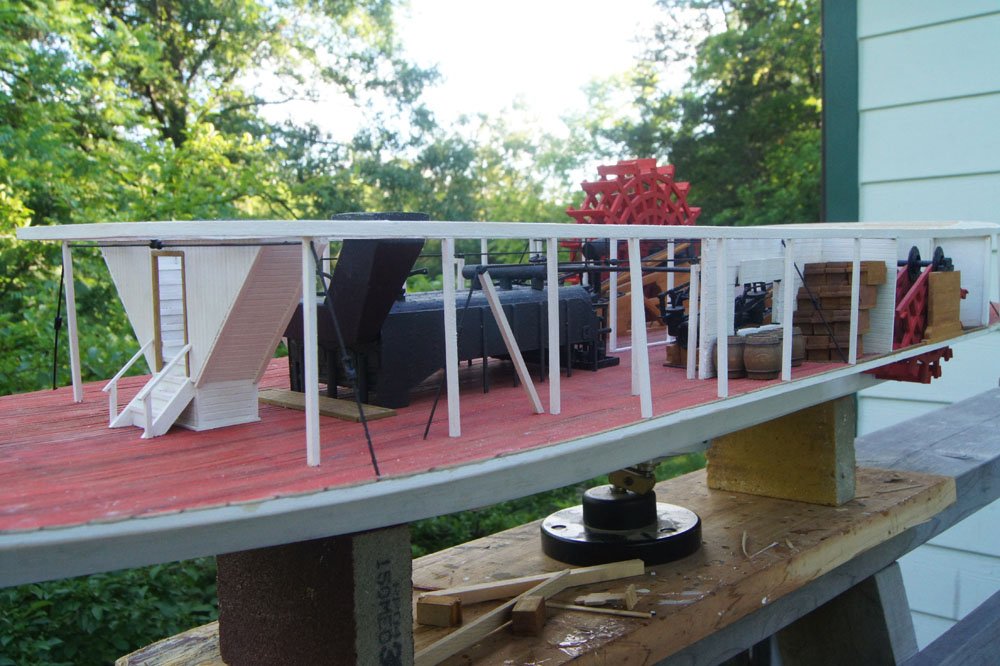
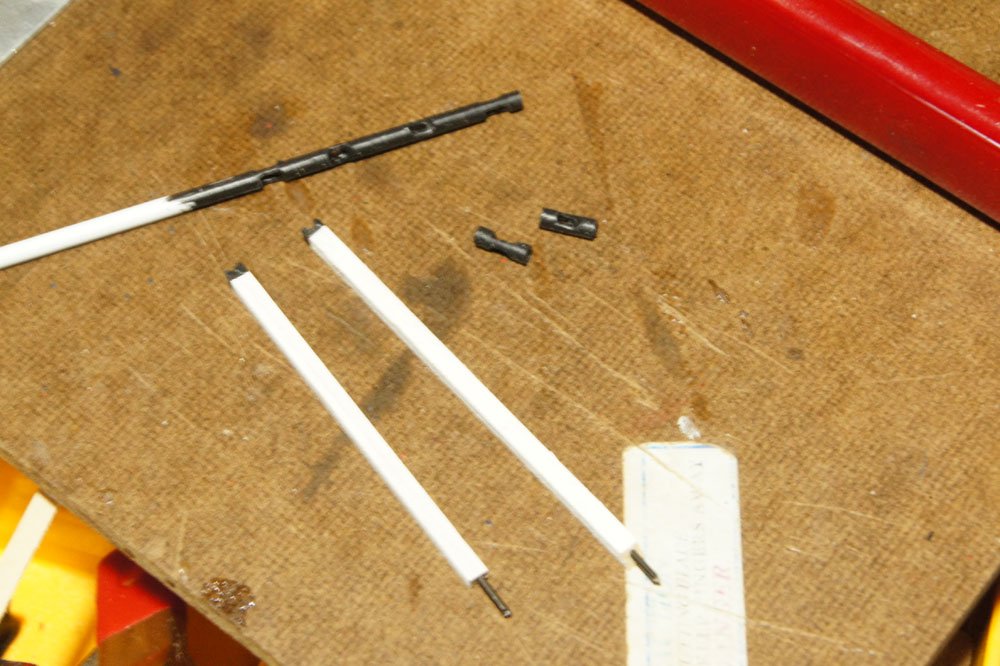
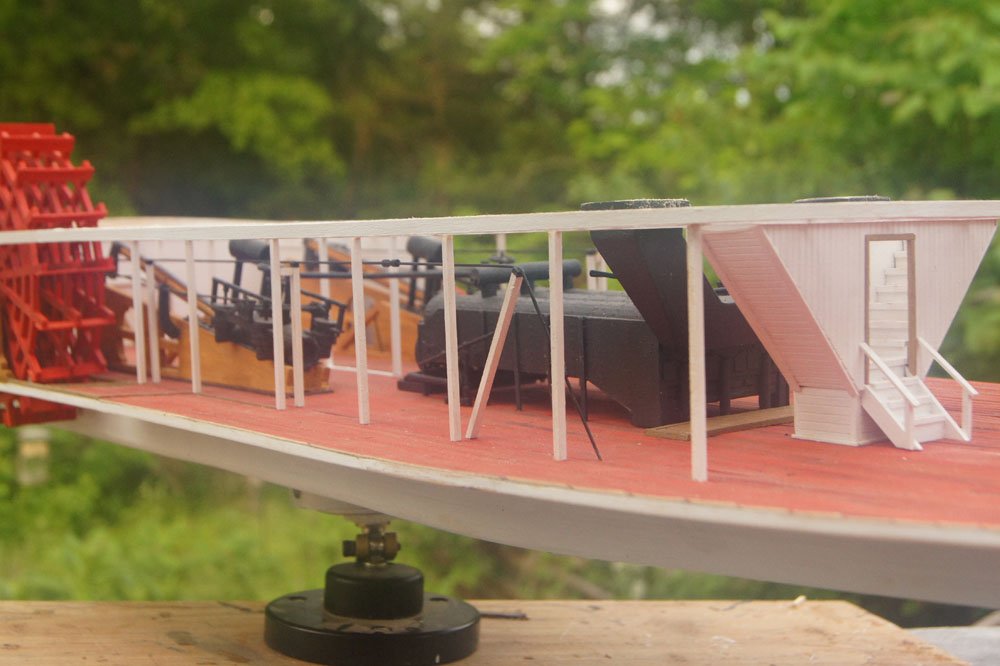
And, as promised, an actual model update. After permanently attaching the boiler deck, I started installing the main support posts under the forward area (that has no other superstructure under it other than the main stairwell). I cut posts to length, then drilled a hole in the base of each and inserted a short length of wire. I drilled another hole in the deck where the post needed to go. This helped me align them properly and hold them in place while the glue dried, while providing more strength. I did the same for the posts supporting the two longitudinal hog chains (one line on each side, just inside the width of the hull as these would be extended down to the hull's framing). The photo below shows two hog chain posts ready to go, with slots filed in their tops to hold the chains and the tips painted black to simulate a metal cap. Bates describes a variety of ways for chains to interact with posts, including holes through the post, metal caps, and slots in the post, so I chose a hybrid of the last two. This also shows how I made turnbuckles for the chains by filing portions of a hollow styrene tube flat before painting the tube and cutting each turnbuckle out. Sorry for the poor image quality, I took this at night, but I think you can see sufficient detail to understand the method. Once these posts were installed, I used lengths of steel piano wire for the chains as this is stiff and strong. I'd tried other wire but it wouldn't lie straight. I used pewter blacking to partly blacken the steel wire, then installed it and carefully painted it black afterward. For the actual installation, I laid the wire into the slots on each post and used clamps extending from the deck beams above to hold it down. Then I just added drops of CA to each post. At the stern, the hog chains run into the superstructure and vanish. In reality, they'd descend into the after hull just like they do forward, but as this area will be out of view on the finished model, I didn't bother extending them back down to the deck. Here are two views of the starboard hog chain (with turnbuckles); the port one looks exactly the same as you can see in the blurry background. And here's an overall shot as of this evening. Next up are the transverse cross chains that support the wheels, and possibly one further forward. Thanks for reading.
- 599 replies
-
- 21
-
-
- sidewheeler
- arabia
- (and 4 more)
-
Mark, The Mississippi at St. Louis is currently forecast to crest at 43' on Friday. For reference, here are the three highest crests on record at St. Louis: 49.58 ft on 08/01/1993 43.23 ft on 04/28/1973 42.52 ft on 01/01/2016 So as currently forecast, it'll be the third-highest on record and very close to the second, with more rain to come. The official river forecasts only take into account the next 24 hours of rainfall, so with five days before the currently predicted crest and more storms predicted for Wednesday and Thursday, this could easily go up to second. For context, the Coast Guard usually orders the closing of river shipping at 38', so this is well past that and nothing is moving on the river. The link above has a nice list of what effects happen where at what river levels in the area. The Missouri and Mississippi aren't the only Midwestern rivers experiencing severe flooding. Check out this video of two fully loaded fertilizer barges breaking free and slamming into an Oklahoma dam on the badly swollen Arkansas River.
- 599 replies
-
- 7
-
-
- sidewheeler
- arabia
- (and 4 more)
-
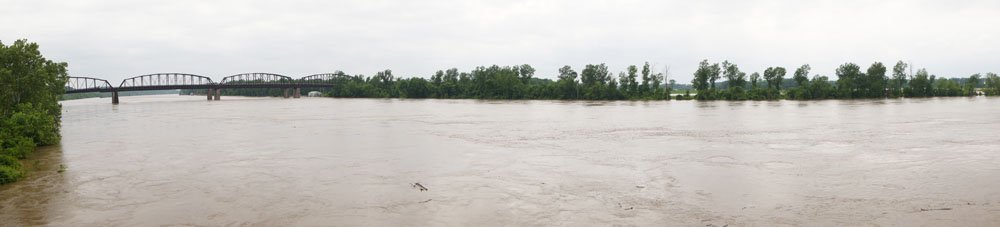
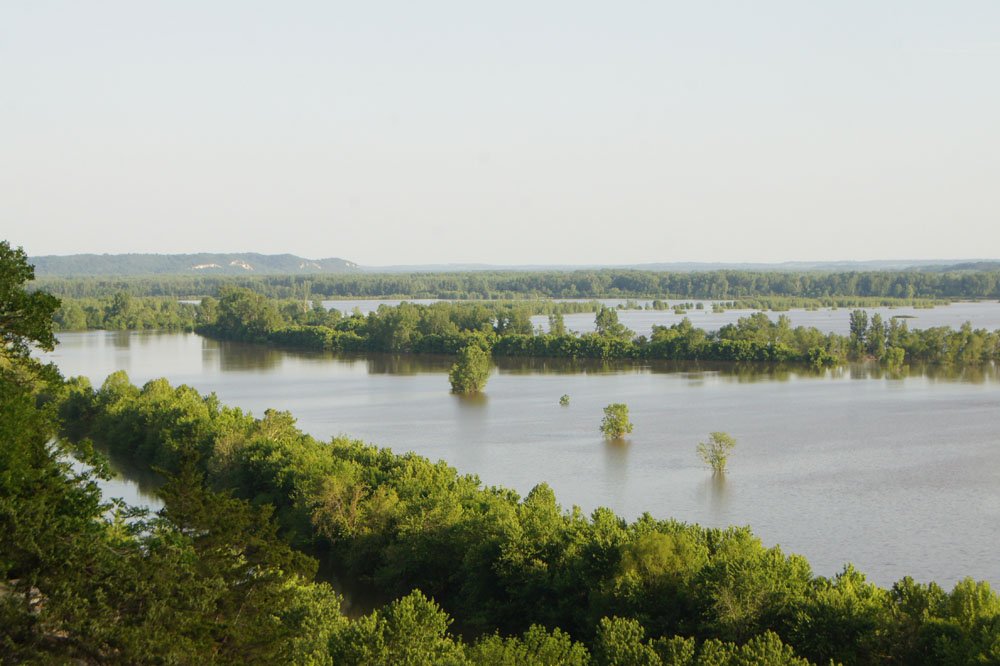
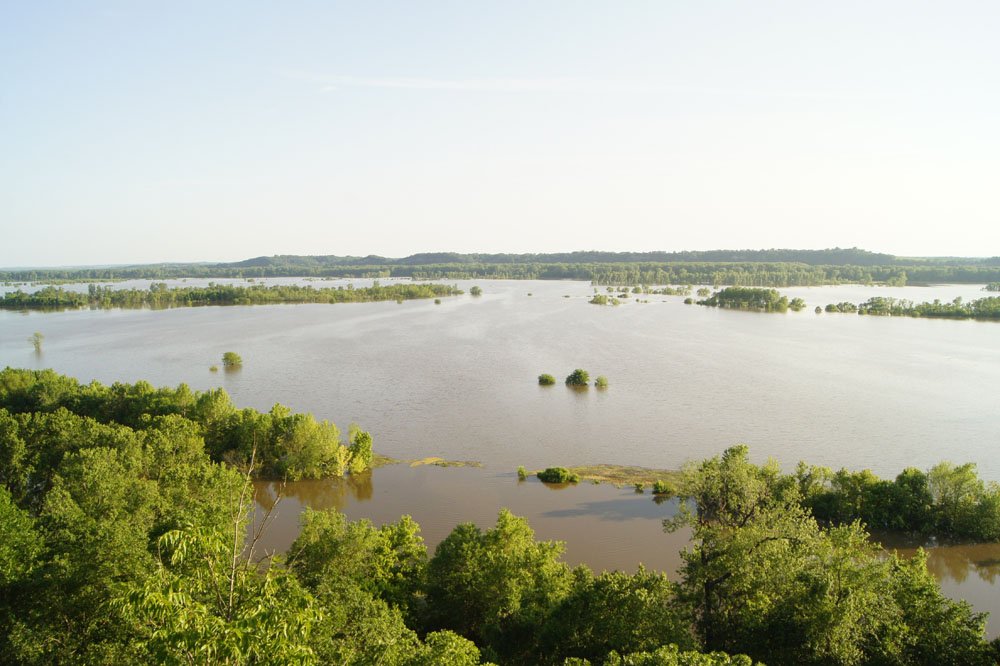
There will be an update on the Arabia soon, as I've been making progress on the chains, but first some Missouri River news. The river is flooding heavily now, following a spring of heavy rains throughout much of its huge drainage basin (it collects water from about 1/6 of the continental US). For example, May in Kansas City has already been the 8th-wettest month in the 131 years of records (for any month of the year), and there's nearly a week left to go with lots more rain in the forecast. One of the basic problems in this basin is that the river's channel has been heavily modified. In Missouri, for example, the river's floodplain is around a mile wide, and the natural river had many channels and easy access to its floodplain, so that when spring floods happened the water easily took multiple routes downstream and could spread out into the floodplain. It takes a LOT of water to cover a mile-wide floodplain with even a few inches, and when that effect is extended for hundreds of miles along natural floodplain lined with trees and vegetation, even major floods can be partially absorbed by the landscape. However, the river was heavily modified for navigation and development. Now, throughout Missouri, it follows a single narrow & deep dredged channel with high levees on both sides that trap all the river's water in that single channel. It doesn't have access to its floodplain anymore, so when floods do happen, the actual water level in the channel rises a lot faster and higher than it would otherwise, creating an arms race between ever-higher levees and ever-worse floods. Worse, the destruction of prairies and deep prairie soil for modern agriculture leads to far more runoff from the landscape, as the former held lots of water on the landscape while the latter sheds most of it straight into drainages. The few exceptions to this are a string of state conservation areas and federal wildlife refuges along the river that are managed for natural habitat and to absorb some floodwaters in a more natural way. With the river near its highest peak since the record floods of 1993 this weekend, Mrs. Cathead and I hiked out to a blufftop overlook above one of these areas (Eagle Bluffs Conservation Area) to get a look: Above, you're looking across about a mile of floodwater that I would guess ranges from a few feet to at least ten feet deep, based on my extensive knowledge of the landscape here (I go birding here all the time, this area is one of the top birding destinations in the state). You can't see the actual river; the current channel is at the far side of the valley, just below the higher bluffs on the horizon (the thick, horizontal line of trees below those bluffs are the riparian forest on the near riverbank). Eagle Bluffs covers around 4400 acres (~17 square km) and I'd guess that at least 2/3 of it are underwater. Below is a view looking downriver; the river still can't be seen (here it's cutting across the valley behind the thick line of trees at center) but there are some typical limestone bluffs shining in the distance in the late day sun. The reason I post these, in addition to just loving the Missouri River and both its natural and human history, is that this is a rare chance to envision what this valley might have looked like during the steamboat era (before modern development destroyed its natural state). A flood this big would have shut down steamboat navigation, but you do get a sense of what the landscape would have looked like in 1856, and there would have been various channels and lakes in the otherwise tree-covered floodplain even during normal navigation conditions. As a final note, the bluff we took these shots from was topped by a large Native American burial mound, likely from the Woodland Period (about 1000 BCE to European contact). These mounds are ubiquitous at high points along the river and its major tributaries in this part of Missouri, likely forming a line-of-sight network in which multiple mound sites could be seen from any one location along the river. The biggest earthworks (and biggest known Native American city) in North America lie just downstream of the confluence between the Missouri and Mississippi rivers near St. Louis (about 120 miles from here). Just a reminder that this river supported civilization long before Europeans got here; diseases brought by early explorers (including early steamboats) played a major role in destroying these cultures before they had a chance to adapt or resist. Thanks for reading (or at least skimming) my lecture. In another day or two I'll have proper photos of the actual model progress.
- 599 replies
-
- 11
-
-
- sidewheeler
- arabia
- (and 4 more)
-
Roger, I think the reasoning I posted when you first shared that image still stands: I don't think it'd be wrong to do as you say, either, as Arabia does fall into that grey zone of development (early in the period when designs really stabilized for the next few decades). But overall I seem to be modelling her as a relatively modern vessel incorporating most of the new design ideas of the 1850s onward rather than as a throwback to rapidly evolving 1840s designs, so in that sense I think I'm comfortable keeping the transverse chains below the boiler deck. I really appreciate your input, though, it's helpful to be challenged to think through and justify the choices I'm making (if only to myself).
- 599 replies
-
- 5
-
-
- sidewheeler
- arabia
- (and 4 more)
