Cathead
-
Posts
3,556 -
Joined
-
Last visited
Content Type
Profiles
Forums
Gallery
Events
Everything posted by Cathead
-
 Just now ran across your build, so glad to see another Chaperon underway. Your work looks great so far. The deck extension is highly true to the spirit of a real riverboat; they were hard-working vessels that were always getting dinged up, repaired, adjusted, and altered as circumstances warranted. As for the rudder question, you can find more photos of Arabia's rudder in the design thread I wrote up for my current project scratchbuilding her. Her rudder was all-wood, held together by several iron rods threaded through the assembly and the wood sheathing nailed on. I believe Bertrand's were done the same way, one of the few other steamboats to have been excavated. These were both decades prior to Chaperon, and I can't say for sure that's how it was done on the latter. Western river boats tended to have thick, strong rudders that could withstand being knocked about by snags and other debris, and the reason for all-timber construction was easy repair. On a remote river where repair facilities are few and far between and damage fairly common, a rudder made primarily of wood with a minimum of metal was much easier to repair/replace than one with lots of special iron banding and other metalwork. Arabia's could be rebuilt with a tree, an ax, and a few iron rods. You're certainly right about dirty hands and white paints, I've had the same problem on all my riverboats. Although, if you manage it right, some natural dirt and grime adds to the realism, especially for a coal-powered vessel like yours. Keep up the great work!
- 133 replies
-
- 2
-

-
- chaperon
- model shipways
- (and 2 more)
-
Most lovely work, sir. As the Bard wrote,
- 48 replies
-
- 7
-
-
- queen anne barge
- Syren Ship Model Company
- (and 1 more)
-
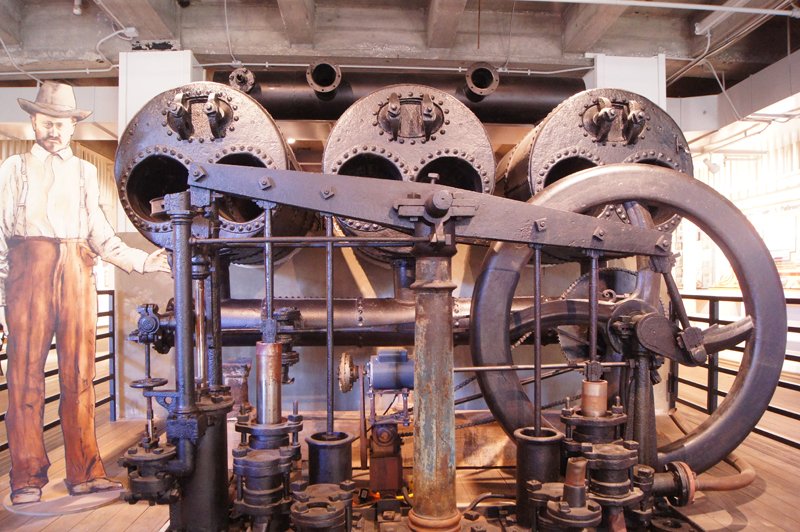
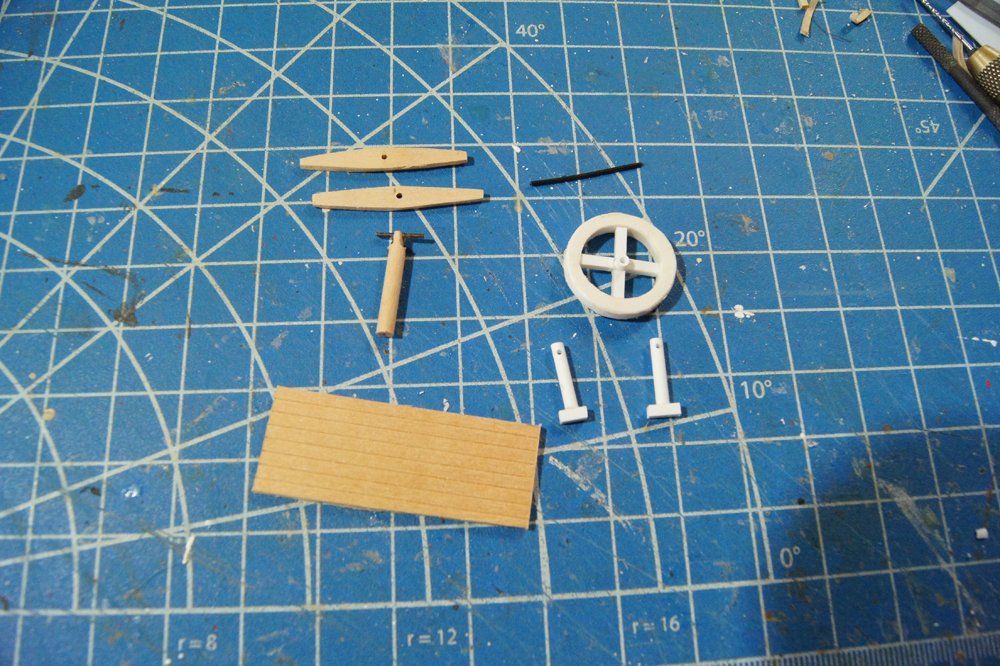
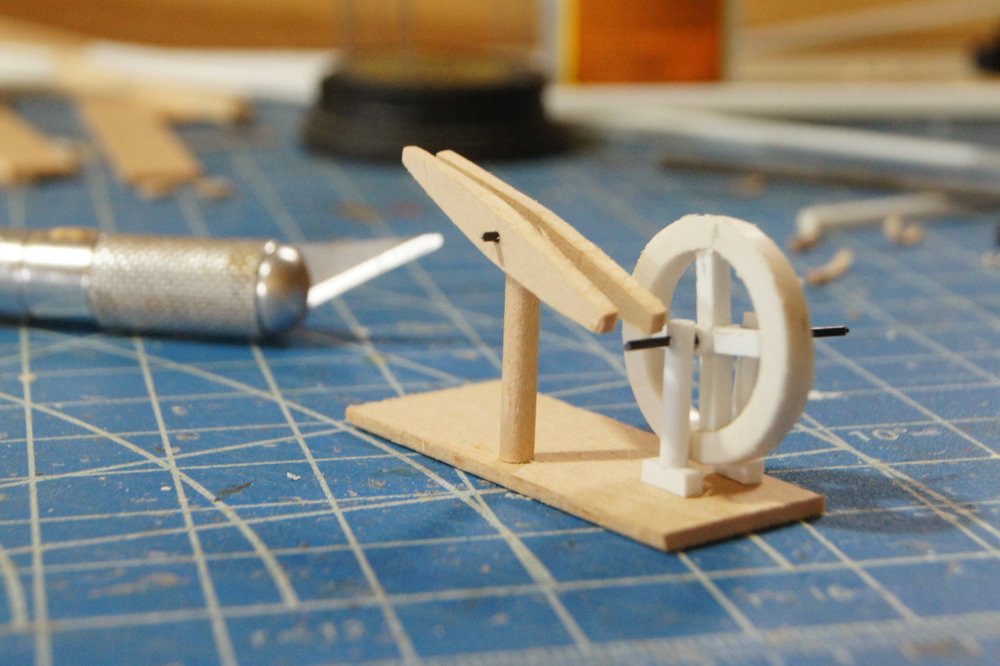
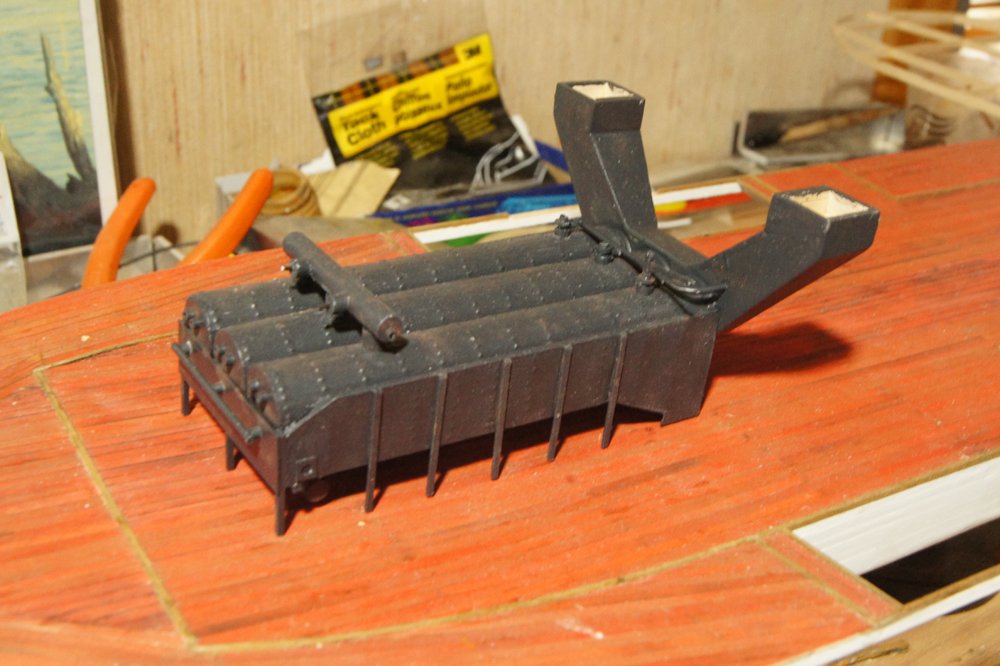
The next mini-project involves the two main pumps next to the boilers. These have to be finished and installed before I attach the next deck. The big on is the "doctor" pump, which draws river water to feed the boilers and for any other major water needs. The odd name comes, supposedly, from the fact that its invention cured a variety of problems in riverboat boiler/engine development. Here's a reminder of what Arabia's doctor pump looked like: As with the other machinery, I knew that (a) I wouldn't be able to craft a perfect replica and (b) it wouldn't be fully visible anyway, so my goal was to craft a reasonable representation of the general idea. There's a lot of stuff going on with this pump, but after some rummaging and head-scratching, my scrap box and other sources around the house turned up some good-enough material. I started by making the main flywheel, for which I used a ring cut from a length of PVC pipe left over in our barn. It's not quite to scale but it was the closest ring-like item I could come up with. I then carefully made the central axle and spokes, not trying to mimic the beautiful swirled shape of the original because I felt it would be beyond me. I used a hollow section of styrene tubing for the central part so I could string this on a piece of wire, making it easier to assemble the whole thing later on. The supporting stanchions are more of the same styrene, drilled to accept the wire "axle". The parallel pump "handles" (not sure just what those are actually called) I shaped from two pieces of wood, then filed and drilled a dowel to hold another piece of wire that would, again, make these easier to mount. So here they are loosely test-fit on a base. I think with some sanding, painting, and finishing detail, they'll blend into a fairly decent representation. This will only ever be seen from the side through parts of the superstructure, in partial shadow. Not sure if I'll get any farther this weekend, got a variety of commitments coming up, but I'd like to get back to more regular updates so figured I'd show this much.
- 599 replies
-
- 14
-
-
- sidewheeler
- arabia
- (and 4 more)
-
Thanks, all. John, Mrs. Cathead and I are very much on the bird-watcher end of the spectrum. We have only basic camera equipment that we rarely use to try to photograph birds (more often wildflowers and things that don't move). We could easily get sucked deeper into photography, Mrs. Cathead in particular, but we've never really dedicated the budget to it and are generally happy to appreciate others' efforts in that regard. In a parallel way, though, Mrs. Cathead really enjoys recording and analyzing bird vocalizations and has been building up a nice library of "audio photographs" if you think about it that way. We are not twitchers in that we don't care all that much about obsessively building up a life species list, and we're far more interested in observing, studying, and appreciate birds and other flora fauna than we are about listing them. We're reasonably skilled birders and are quite active in our local Audubon Society, editing and producing its newsletter, leading field trips, giving programs, etc. In fact, we're giving an "Introduction to bird vocalization" talk in a few weeks over in Kansas City (a few hours from our rural location). We consider ourselves serious amateur naturalists who are interested in ecology as a whole over any given aspect of it (i.e., we pay attention to wildflowers, mushrooms, insects, native plants, mosses, etc.). We keep a loose life list as it's interesting to know what we've seen, but we consider birding just one aspect of our overall interest in ecology rather than an end unto itself.
- 599 replies
-
- 5
-
-
- sidewheeler
- arabia
- (and 4 more)
-
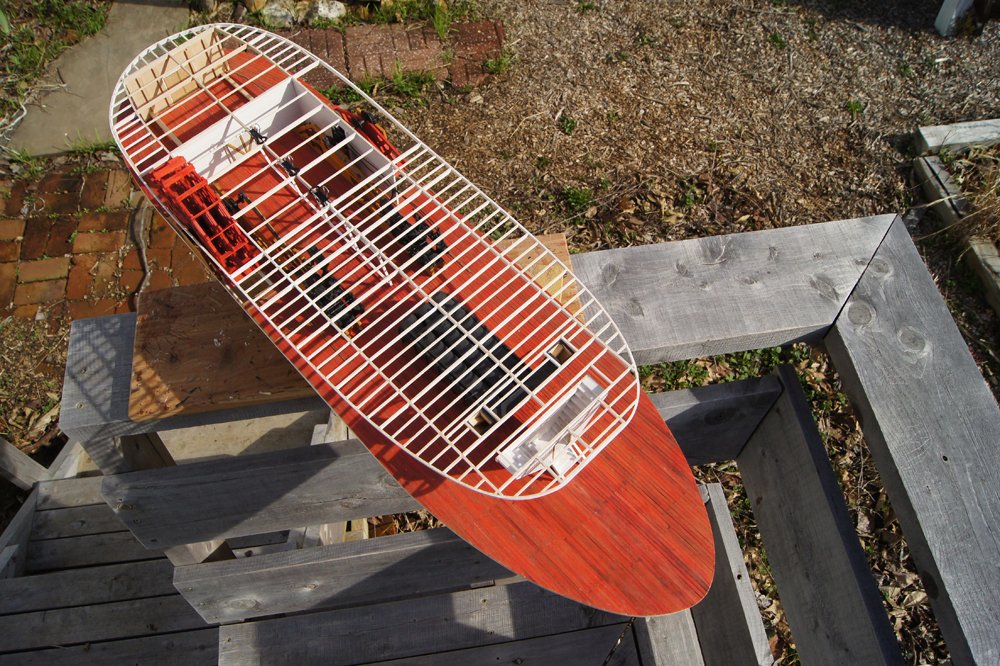
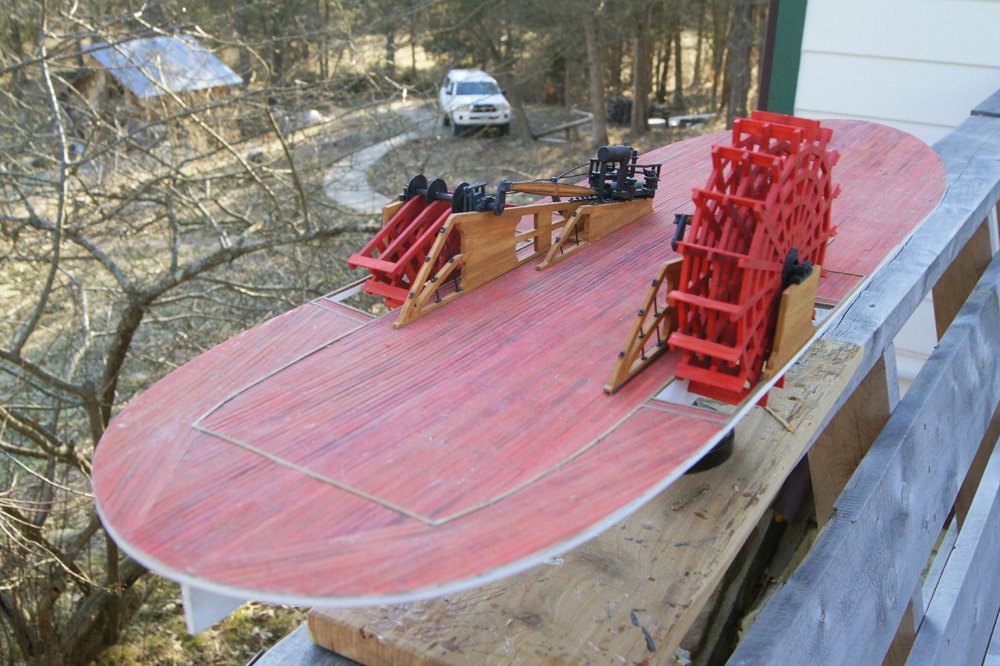
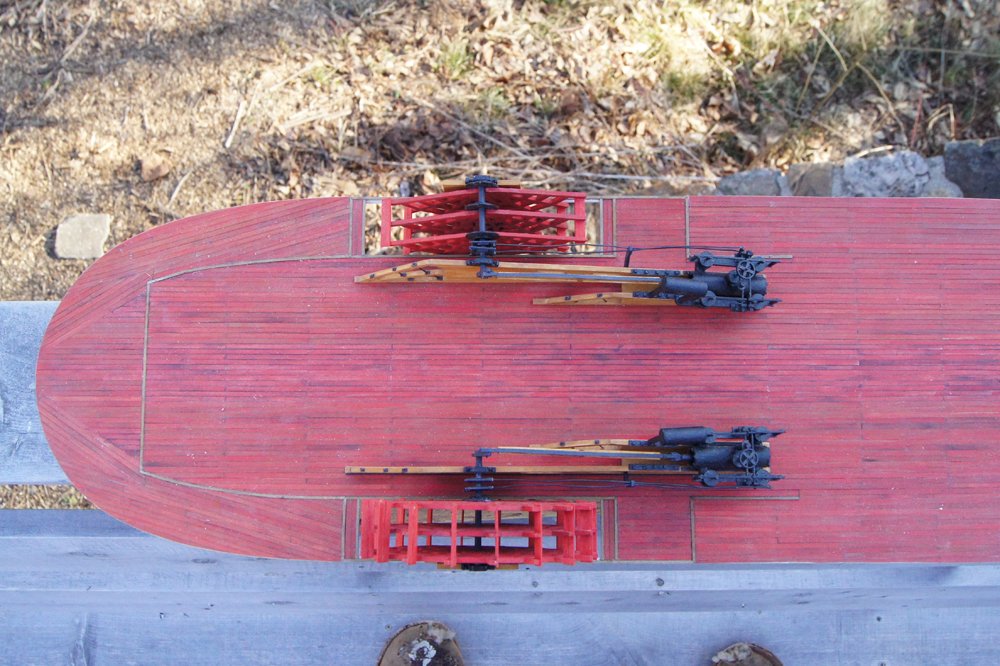
I've quietly been working on developing the main deck superstructure in relation to the boiler deck. The downside to pre-building the latter is making sure everything fits just right when it's finally attached to the main deck. I've been doing a lot of measuring and test-fitting. Below are a few images of the current state. This is all test-fitted, not attached permanently (except the wheels and engines), but it gives a nice hint of where the model is going. In the last image, you can see proof that this is a test fit, because the internal stanchions down the center-line are clamped to the boiler deck but don't reach the main deck (and are at a cock-eyed angle)! This is because the former was built flat but will flex with the slight sheer of the main deck once it's installed for good. Before I attach all this permanently, I need to be sure I've got any details I want installed on the main deck. For example, I haven't built the various ancillary pumps that go with the boilers. I will also need to install some of the piping connecting the boilers with the engines. The current plan is to deal with that stuff, take a deep breath and attach the boiler deck, then fill in the rest of the superstructure between the two decks. Progress has been and will continue to be slow. With spring here (compare the outdoors conditions in my last post, three weeks ago, with these) and there's a lot of competition for my non-work time between needs (orchard pruning, final firewood cutting and splitting, fence repair, etc.) and pleasure (spring birding, seasons underway for American soccer & baseball). Thanks for reading, and for patience with my slow progress and intermittent updates.

- 599 replies
-
- 20
-
-
- sidewheeler
- arabia
- (and 4 more)
-
Looks real nice so far. I love this style of ship and BlueJacket makes a far better kit than the Corel version I built.
-
I ordered my copy and it's fantastic. Definitely a great reference for steamboat enthusiasts. I wish this kit would get more attention than the crappy, toy-like European "riverboat" kits.
-
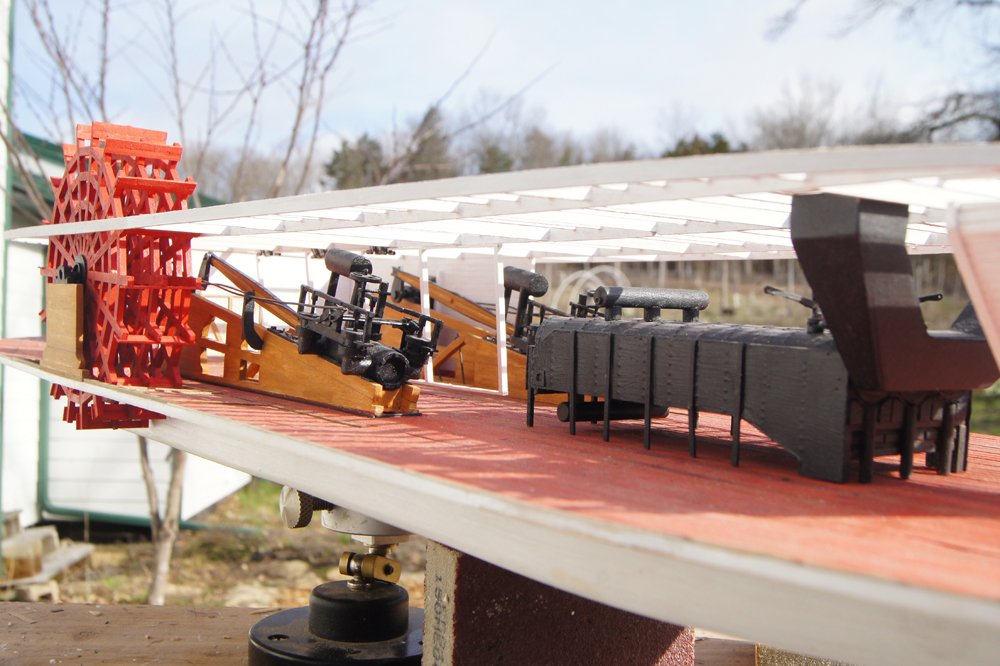
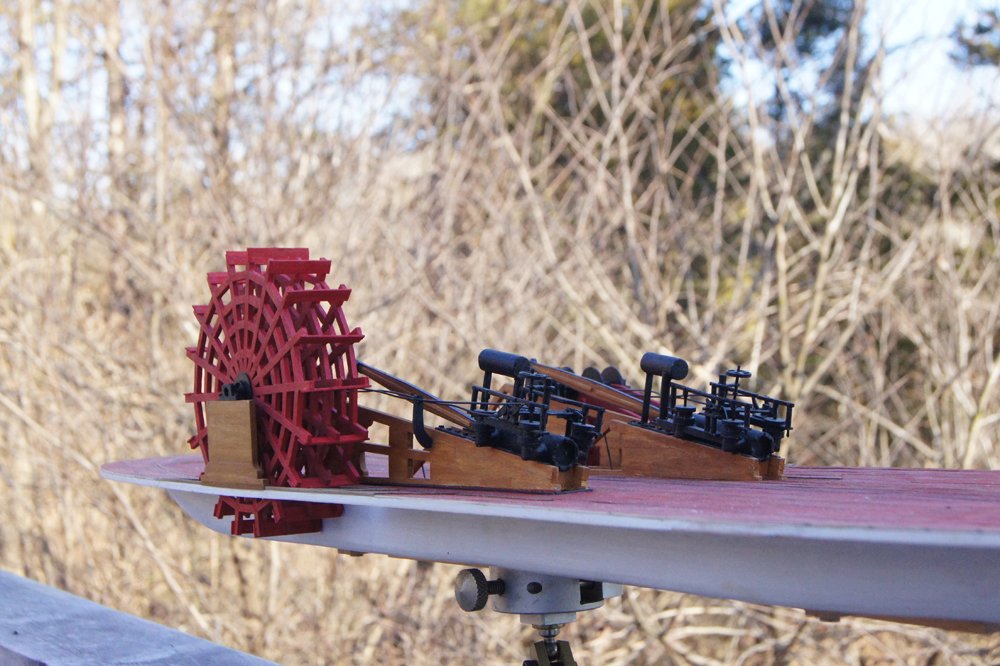
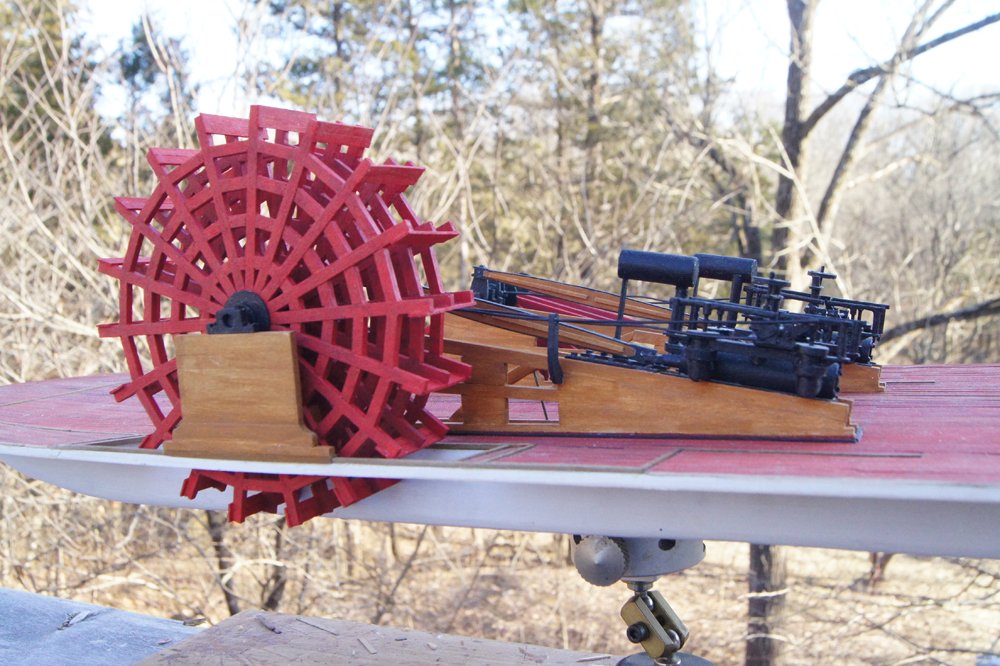
Once again, thanks for all the kind thoughts. We'll always miss our friend, but life does move forward overall. This build got put off even longer by a last-minute trip down to Arkansas to help out my in-laws for almost a week, but I finally made some progress on an important step: permanently installing the wheels and machinery: I took some photos outside since the weather is finally sunny and pleasant. Our region has not gone above 65 °F (~18 °C) for 138 straight days, which is a record going back to the start of data in the late 1800s. Most of that has been cloud, too, our solar panels have been performing well below last year's production. We may finally stop this streak next weekend, but it's not certain. Everything you see is now there to stay. Hopefully I didn't (or don't) screw anything up. Sharp eyes may notice that I didn't include the metal u-bolts that hold each paddle bucket (the horizontal planks) to the frame. I experimented off-model with various ways to do these and couldn't get anything to look right. I finally decided they'd look better without them rather than with crappy, out-of-scale ones. Plus, it'd be a ton of detailed work since there are two u-bolts for every spoke, i.e. 6 per plank, 12 per spoke x 18 spokes just for one wheel. You get the idea. I decided that only experts would notice their absence. Now that this is done, it's time to go back to working on the boiler deck and getting ready to install it. That'll change the look of things dramatically. Thanks for reading, and apologies for the slow progress and intermittent updates. EDIT: Forgot to mention, if you haven't seen this yet, Kurt Van Dahm now has his full series on building the sternwheeler Chaperon available on CD. I ordered a copy and it looks really neat, lots of good info and photos. Even if you're not planning on that specific kit, it's a good resource for learning about building steamboat models in general. I strongly recommend getting a copy.

- 599 replies
-
- 15
-
-
- sidewheeler
- arabia
- (and 4 more)
-
Looks fantastic. Great job and thanks for sharing your work.
-
I use regular clothes pins (pegs) or small metal clamps for the same purpose, works great.
-
Mark, I know what you mean on the "like" button. I tend to think of it as a "support" button instead, in that it's ok to hit it when someone posts a mistake or a frustrating part of a build. I feel like it lets me say "I'm reading, I'm interested, and I support you in this project". Though I'm obviously not offended when someone doesn't "like" a post like the one above. Carl, thanks for sharing that, what a particularly awful memory to have. It's so easy to be angry about stupid things like this. Sounds like this guy had been involved in hit-and-run aggressive driving incidents before and was still driving! Not only that, he was released from police custody and is now missing with an arrest warrant out. WTF? druxey, as I said for Carl, thanks for sharing. Life is stupid and awful sometimes and it's the rare person who hasn't been through something like this sooner or later.
- 599 replies
-
- 9
-
-
- sidewheeler
- arabia
- (and 4 more)
-
This past week has been one of the worst of my adult life. On Sunday one of our good friends was killed by a driver fleeing the scene of another accident; she was 37 and an absolutely wonderful person, the kind who made everyone around her better. Subsequently, a whole series of other things have piled on that I don't really feel like explaining. Nothing else as permanent as losing a friend, but collectively pretty crushing. Just one of those stretches that hits everyone sooner or later, I can think of only one other week like this in the last 15 and I had hoped never to repeat it. Haven't had much focus for anything this week, work or recreational. I just did some basic filling-in of boiler deck beams because it didn't take any thought, mostly while listening to an audio book to take my mind even further away. Here's how she looks now; the center-aft areas where the beams are further apart are areas that won't be directly visible, so the beams are just there for support and I decided not to waste time and material filling the rest in. Not sure when I'll get back to this. Probably reasonably soon, but I need to be able to focus to be sure I don't make any mistakes once I start doing permanent things. Luckily Mrs. Cathead and I are really close and draw a lot of strength from one another. Don't really mean to dump on you all, but sometimes semi-anonymous communities are easier to talk to than people in real life feeling the same losses and stresses. So thanks for reading, as always, and hopefully the next update will be better.
- 599 replies
-
- 10
-
-
- sidewheeler
- arabia
- (and 4 more)
-
Mark, I can certainly empathize to a certain extent as I'm going through a rough patch at the moment that's making it hard to focus. I've learned so much from following this log and appreciate all that you've put into sharing your skills and knowledge with us.
-
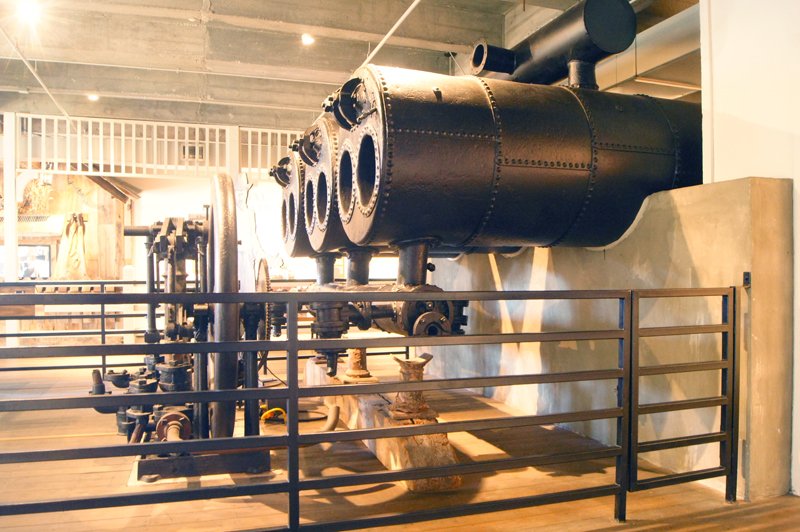
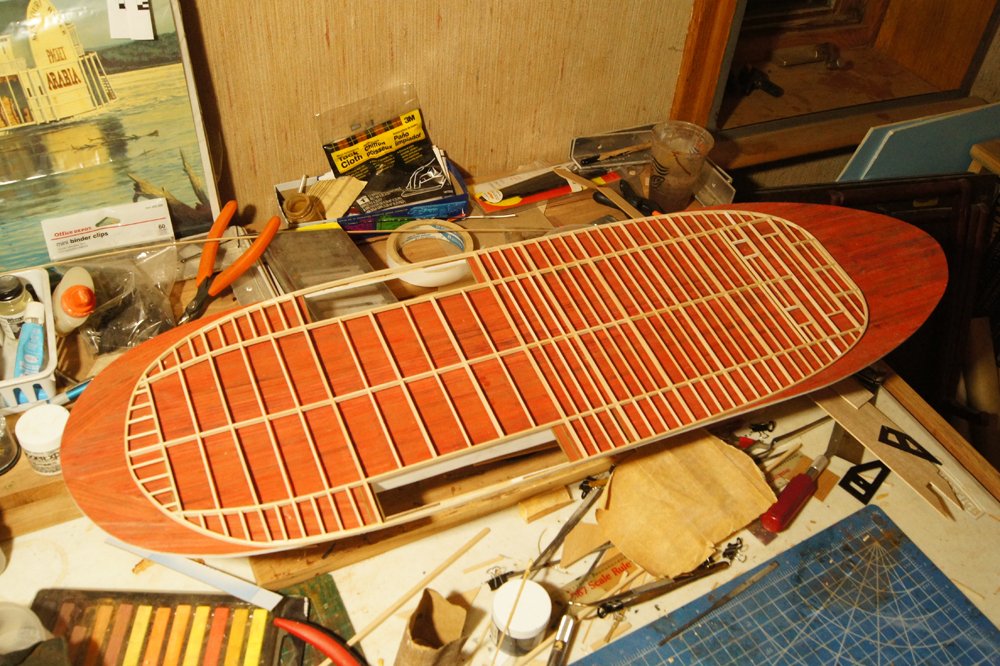
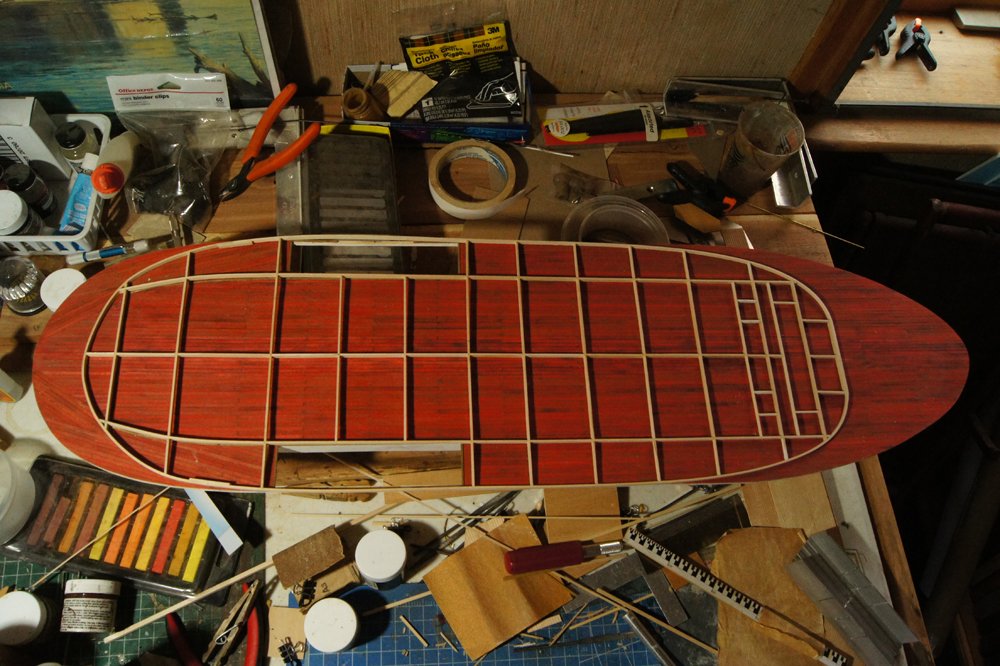
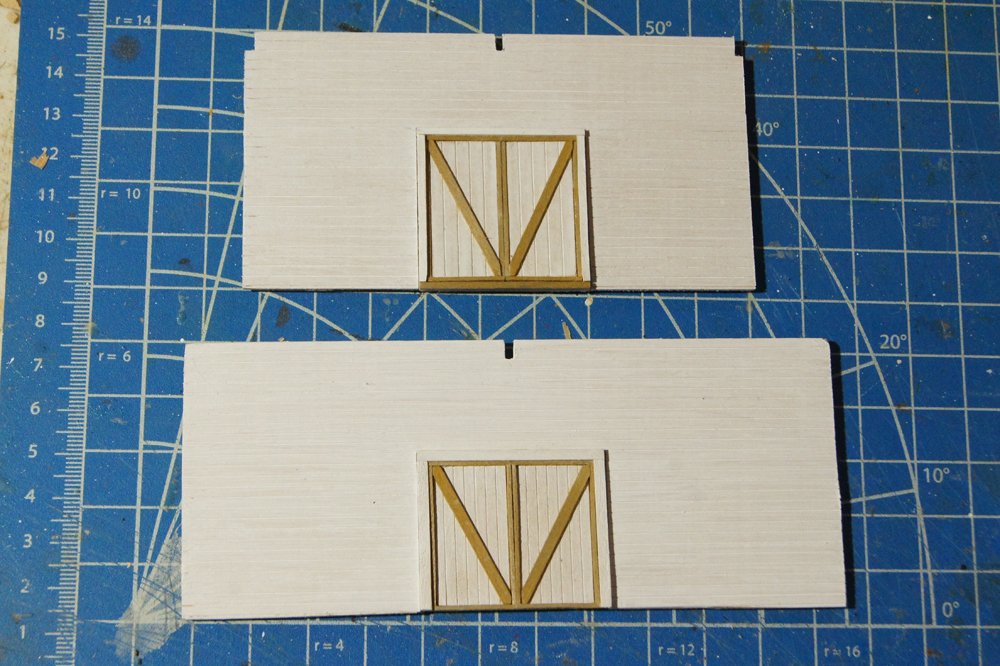
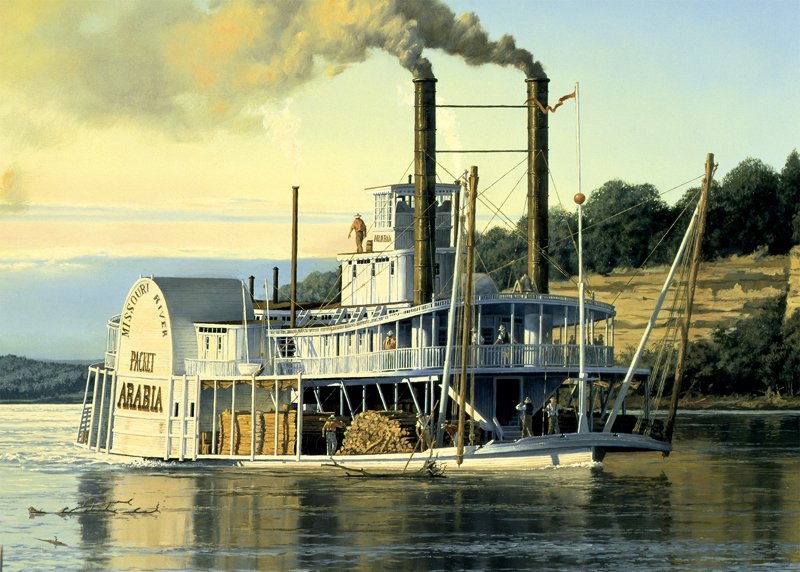
The unanimous vote for a stepped stern means you'll all be pleased; even Mrs. Cathead voted for that option. I was initially leaning toward the other version, in part to maintain the appearance of the painting and in part because I'd seen more photographic examples of that design. But the more I thought about it, the more I liked the visual appeal of the more complex stern. Also, the Arabia was an upper-river boat where it would be exposed to high winds and shallow water, so even a little bit of lower-profile superstructure would have been beneficial. So here's the latest progress now that that hurdle has been cleared. The final layout of the boiler deck. As I might have mentioned earlier, I decided to build this off-model as one integrated part for greater structural integrity and quality. I wasn't sure I could build a flat deck with complex curves in place on spindly vertical supports. This guarantees I've got a smooth and solid base for laying the next deck, and that the aft walls will be square between both decks. Technically this should have been built in two layers, thicker longitudinal beams below and lots of thinner lateral deck beams on top. But it'll be barely noticeable on the finished model and I'm a lot happier with the structure this way from a practical point of view. I built a few walls off-model, too, again to ensure they were straight and square. The upper one is the aft-most wall (facing the last bit of the exposed stern) while the lower one is its counterpart in the other direction, right at the aft edge of the paddlewheel boxes. The idea is to separate all the lower superstructure aft of the wheels into an isolated cargo area, leaving the area between the wheels as engineering space. I have no idea if this is how they did it, but neither does anyone else. I need to put hinges and handles on these doors but I like how they came out. Changing subject slightly, here's the updated boiler assembly, with the smaller chimneys attached. Looking closely, you'll also see that I solved the safety valve problem by adding a valve on each boiler and running a single line over to vent into the right-hand chimney. This matches a drawing by Alan Bates and I like how it looks. In other news, we had a rare warm & sunny day on Valentine's Day, so Mrs. Cathead and I fired up her present (a new electric chainsaw) along with my regular gas saw and did some much-needed tree work. It's the first time I've been able to do such work since hurting my shoulder two months ago, and it felt really good. The joint was a bit sore that night, but it's recovered since. Sigh of relief. Thanks for reading. Next up, I need to do anything else necessary before permanently attaching the engines, boilers, and other deck fittings and starting to build upward.
- 599 replies
-
- 15
-
-
- sidewheeler
- arabia
- (and 4 more)
-
Chris, how's this build coming? I hope you're still at it.
-
Canadians are so trusting. You Aussies really ought not lead your family fellow colonials astray like that.
-
Anna, If you like steamboats, I'd strongly recommend Model Shipway's Chaperon kit. It's far more historically accurate than most steamboat kits and has a number of good build logs to follow. A long series on building it was also published in (now-defunct) Ships in Scale magazine; the writer is a frequent MSW contributor, Kurt Van Dahm. You could message him to find out more, I think he's planning to release that series on CD.
-
Kurt, you're correct. I did some Google Image searching and found the text of the mule sign and skull on TripAdvisor: These photos of the Arabia Steamboat Museum are courtesy of TripAdvisor.
- 599 replies
-
- 7
-
-
- sidewheeler
- arabia
- (and 4 more)
-
Steamboats and other rivercraft - general discussion
Cathead replied to Cathead's topic in Nautical/Naval History
That's the idea I came up with, too. It took me a while to un-see what initially seemed like a tubular ring around the bow, but I'm now convinced it's just a grasshopper spar stowed sideways as you say. The perspective is perfect for the initial optical illusion. Also, great eye for the cross-trees on the jackstaff that appear to be for supporting the spars. I hadn't noticed that, and such a thing isn't present on some other boats I've seen. It's a great detail and I may add it to the Arabia.- 281 replies
-
- 1
-
-
- Steamboats
- riverboats
- (and 3 more)
-
Steamboats and other rivercraft - general discussion
Cathead replied to Cathead's topic in Nautical/Naval History
I don't think either is any kind of bumper, specifically because they don't extend around the wheel housing. The only things steamboats interacted with at that height were other steamboats, when tied up together, and they usually had vertical bumpers meant to separate the two where that was a concern. In addition, superstructures almost always inclined inward slightly, making it even less likely they'd need a bumper to fend anything off. The dark tube doesn't appear to have any supports except at the front of the boiler deck and at the jackstaff, which isn't enough to protect against any kind of impact. As for scuppers, I can't think of any reason they'd run scuppers parallel to the boiler deck and out over the bow rather than just draining laterally as most decks did. One hint as to my explanation for #2 (the dark object); I think the photo's perspective is playing a serious optical illusion on the viewer.- 281 replies
-
- 2
-
-
- Steamboats
- riverboats
- (and 3 more)
-
Steamboats and other rivercraft - general discussion
Cathead replied to Cathead's topic in Nautical/Naval History
Here's an identification question. In looking up images to illustrate a design question for my Arabia, I ran across this image of the Ben Campbell. There are two unusual tubular structures that I can't figure out. First, the edge of the boiler (2nd) deck seems to consist of a fat, possibly tubular feature that runs all the way around. Is that just an odd decorative edging to the deck, or something else? There are also some extra-large deck supports that seem unusual, too, especially the foremost one. Second, and even odder, is the dark tubular structure projecting forward from the boiler deck to roughly parallel the curve of the bow, appearing to extend around the front of the jackstaff. I cannot figure out what it is. Actually, you know what, I think I just figured out point 2. Curious if it's more obvious to others or if there are other ideas before I spring my answer.- 281 replies
-
- 3
-
-
- Steamboats
- riverboats
- (and 3 more)
-
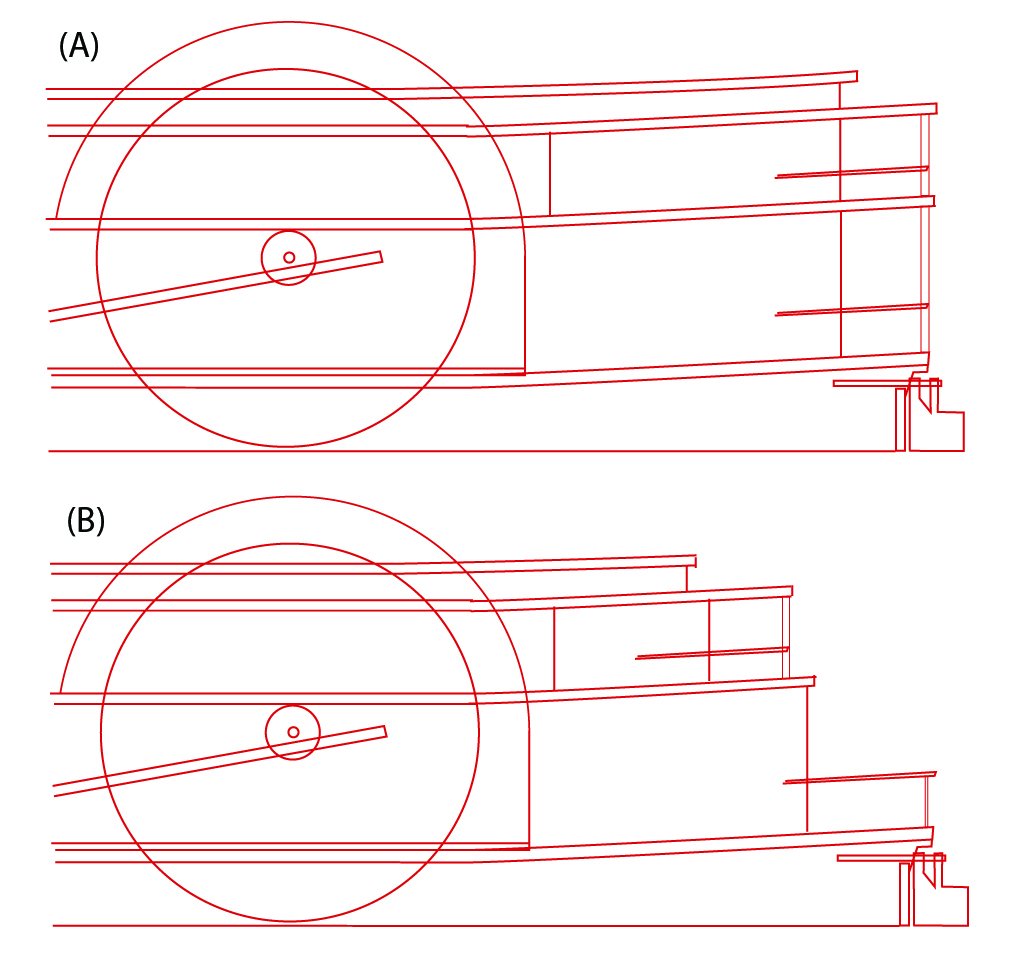
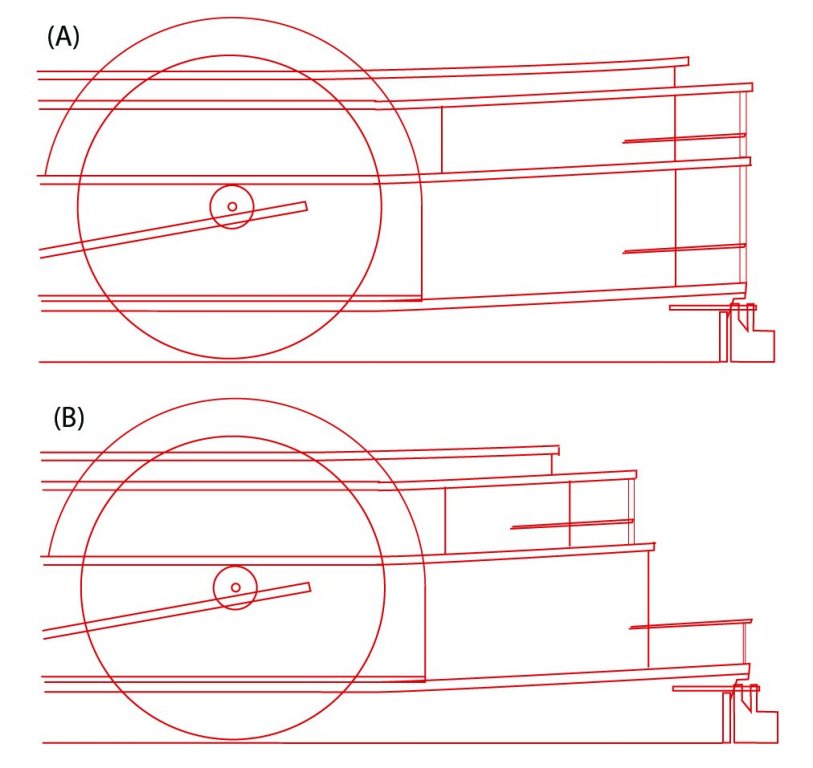
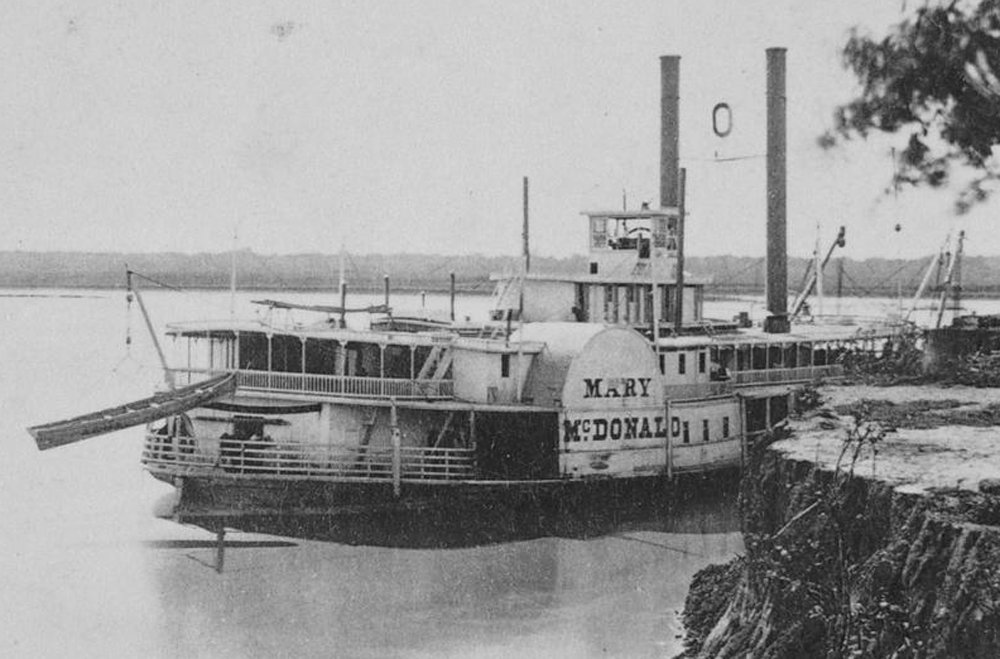
Jan & Carl, I agree the angle isn't definitive, but what I see is that the supports connecting the main (1st) and boiler (2nd)decks are nearly vertical; there's only a tiny bit of set-back there even as the deck curves well around toward the stern. If you look at the top of the boiler deck, there's only a foot or two setback before the railing starts, and again it's nearly vertical up to the hurricane (3rd) deck. So I see that as implying a nearly vertical stern, because if the boiler deck was set back, say, 10 feet or more from the main deck, you'd see the boiler deck curving inward a lot more quickly and any vertical support connecting the two would either have to be at a far sharper angle, or have its base set well inboard from the edge of the main deck. I see it as looking a lot like this (Library of Congress photo from a public-broadcasting site): Or this: http://w3.marietta.edu/~burdissa/display_wall/images/riverboats/rvb002.JPG Compare the above image to the Mary McDonald, where there's clearly ~10 feet of open main deck before the aft-most portion of the boiler deck, which seems to end right where the main deck superstructure ends instead of extending out over the last bit of the main deck. Notice how the boiler deck on the Mary McDonald curves inward sharply from the wheel housing, whereas on the painting and the Campbell above it pretty much parallels the main deck as far as the eye can see, again both levels starting from the outer edge of the wheel housing. That's the difference I'm pointing to. My drawing above may be a little too literal in showing a completely sheer stern; I could add a foot or two of step-back. But there's still a big difference between a slightly stepped stern (A) and open aft-most main deck (B). The overhead photos of the wreck give little to no indication of the superstructure's design, especially as much of the main deck is torn off. There certainly isn't any evidence for the boiler deck's layout, which is what's really in question here. Technically, it's possible that the entire aft area of the main deck was enclosed (no railings or open-air area), you can find images of that style too, but I don't think that's as likely and I don't like the look of that for sure, so I'm sticking with the two options already noted. Great questions and thoughts so far.
- 599 replies
-
- 10
-
-
- sidewheeler
- arabia
- (and 4 more)
-
John, To my knowledge the painting is an artist's impression, the museum could give me no information regarding what references the artist used. There are a few things I don't quite like about it but it is the dominant visual of Arabia that's out there and so forms most people's idea of her appearance. We have no actual knowledge of what she looked like above the main deck other than general designs of the period, of which my two options are both representative. Kurt, There was a mule (the only casualty), indeed the museum makes much of it and as I recall has the skull on display. However, I don't recall that it was on the aft deck and the museum's site says only that "All aboard were saved except for a solitary, forgotten mule that remained behind, tied to a piece of sawmill equipment on the deck." Jan, The stepped-back design is based on the Mary McDonald; the flat-backed design is based on the painting. Steven, Thank you!
- 599 replies
-
- 4
-
-
- sidewheeler
- arabia
- (and 4 more)
-
I have a design question to think through, and am interested in input. There are two ways I could arrange the stern superstructure. The museum painting (which is not necessarily accurate) shows each deck extending all the way to the stern, for a fairly sheer aft: However, I could also arrange the stern so to leave a more open space on the main deck, with the superstructure stepping back (toward the bow) at each level. This idea is based on the overall similar Mary McDonald, whose images I've been using as an alternate reference: To simplify, I adapted my initial plans' side views as shown below, in which (A) represents the painting's style and (B) represents the Mary McDonald's style: This is essentially an artist's choice situation, since there's no actual information about Arabia above the main deck. So I'm curious if anyone else has thoughts or opinions about which looks or seems better. I can find plenty of photographic evidence for sternwheelers with both kinds of sterns and various approaches in between. I have a personal leaning, but am curious about others' before I show my cards.
- 599 replies
-
- 7
-
-
- sidewheeler
- arabia
- (and 4 more)