


Cathead
-
Posts
3,523 -
Joined
-
Last visited
Content Type
Profiles
Forums
Gallery
Events
Everything posted by Cathead
-
 I had been missing you and wondering. I'm sorry to hear that, but it takes courage and good sense sometimes to know when something isn't working. I look forward to hearing about your next project.
 -
Chris, for a scribed deck, you might still be able to use pastels to subtly vary the individual planks after painting and vinegar staining. In the deck shown above, I went back over the surface using pastel on a fingertip and rubbed a bit of darker color on a few planks where the overall color seemed too uniform. You could probably also use a cotton swab if your fingertips are stubbier than mine. I'm not sure whether vinegar staining would warp a solid deck; weighting it down might introduce discoloration to the surface as it dries unevenly. You might experience with some cheap scribed wood sheets first. Maybe if you laid the stained deck facedown on a towel so that the stained surface pressed evenly into that, and placed weights on the back? Ken, yeah, I tried the brush method first and found it tedious; quick experimentation showed that dipping was a lot faster and had no problematic effects (like warping or uneven color). Actually, looking back at the photos above, you CAN see the difference between pure pastel weathering and the vinegar weathering (plus subtle pastel in places). There's a clear strip down the middle where the color isn't quite as yellow-brown; that's the non-stained area. It's more obvious in the photo than it is in person.
- 599 replies
-
- 4
-

-
- sidewheeler
- arabia
- (and 4 more)
-
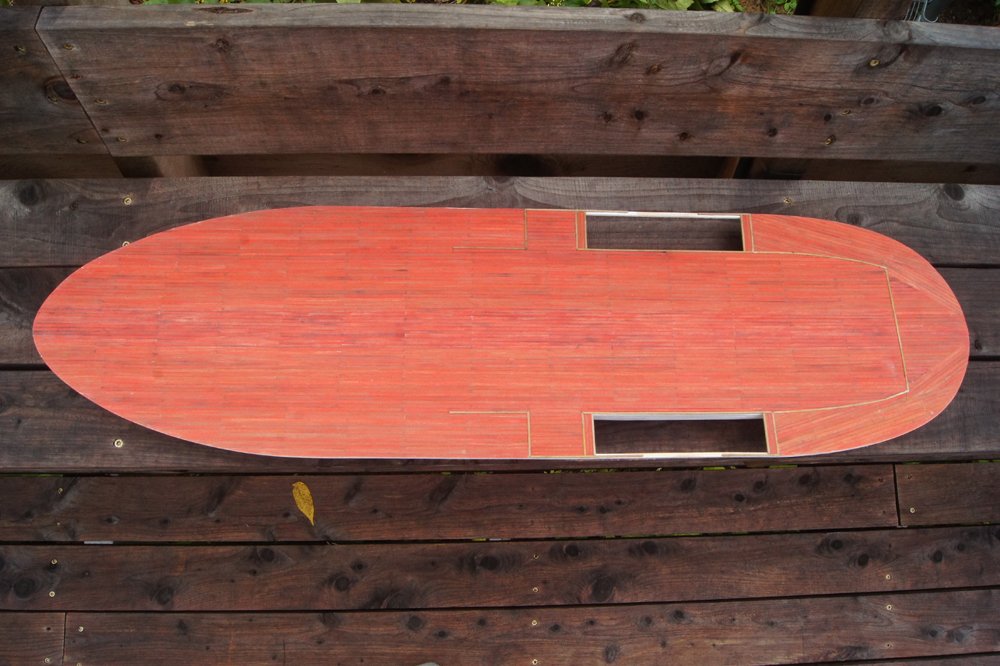
Chris, The individual planks are first painted with diluted Model Expo Bulwarks Gun Red (MS4802). M-E paint tends to be rather thick, but diluting it works well in this case to let some color soak into the wood. This is partly why I had to be careful not to let it soak in too much and come out the other side, at least for the guard planks that are exposed at the bottom. I'd think any reasonable shade of red would be fine, especially if you're going to weather it down some. Then each plank was dipped briefly into a staining solution I made by dissolving a chunk of steel wool in white vinegar. I didn't let the planks marinate; each got literally a one-second, in-out dip into the solution, then was laid out to dry on a cloth. I wiped excess liquid off the surface, or else it gets little droplet stains. If you leave it in longer, you get progressively darker color, but one second is enough to dull the bright red paint and give the exposed underside a suitably weathered look. You have to be careful with this solution as it stains everything; I "ruined" a pair of pants by absent-mindedly wiping my hands, creating a permanent rust stain (they're still perfectly wearable, but not for going out to dinner). As you may recall, I started by using pastels to darken the paint instead of the solution, but switched over after a few lines of planking. I still used some pastel to individually darken stained planks further, giving the deck a bit more local contrast. For this, I just rubbed a finger along a dark grey pastel stick and then along the stained and dried plank surface. I have to say, I'm very pleased with the final appearance of wood treated in this way.
- 599 replies
-
- 8
-
-
- sidewheeler
- arabia
- (and 4 more)
-
Thanks, Kurt. I wasn't clear on the weathering: I absolutely don't intended to leave the hull shining pristine white by the end when the rest of the model will be more weathered. I haven't done the hull weathering yet because I figured the hull's finish would get beaten up sooner or later during the rest of construction so wanted to be able to sand out or paint over any faults, which will be a lot easier before final weathering is applied. I just meant that I was still trying not to have to do that by keeping the hull clean in the first place until I was ready to weather it, and hadn't decided whether to just dull it down overall or specifically add a muddy waterline. I started laying out the paddlewheels today. They may not be as bad as I thought; the larger scale than Bertrand is already clear in terms of having bigger pieces to work with. Plus, on a sidewheeler, it's easier to turn the "bad" side of a wheel or competent inward to hide it!
- 599 replies
-
- 4
-
-
- sidewheeler
- arabia
- (and 4 more)
-
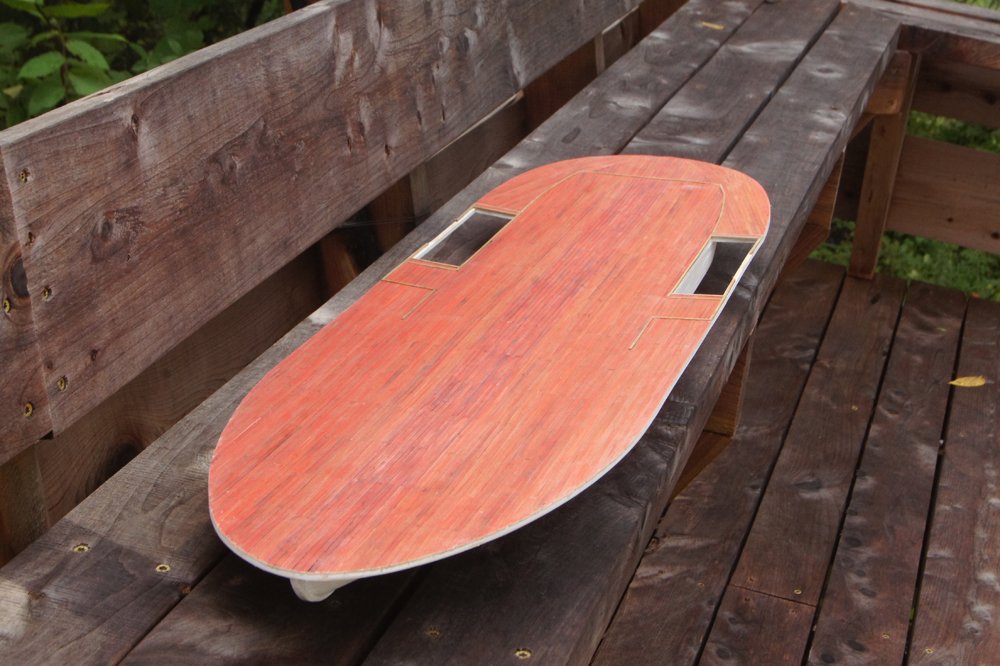
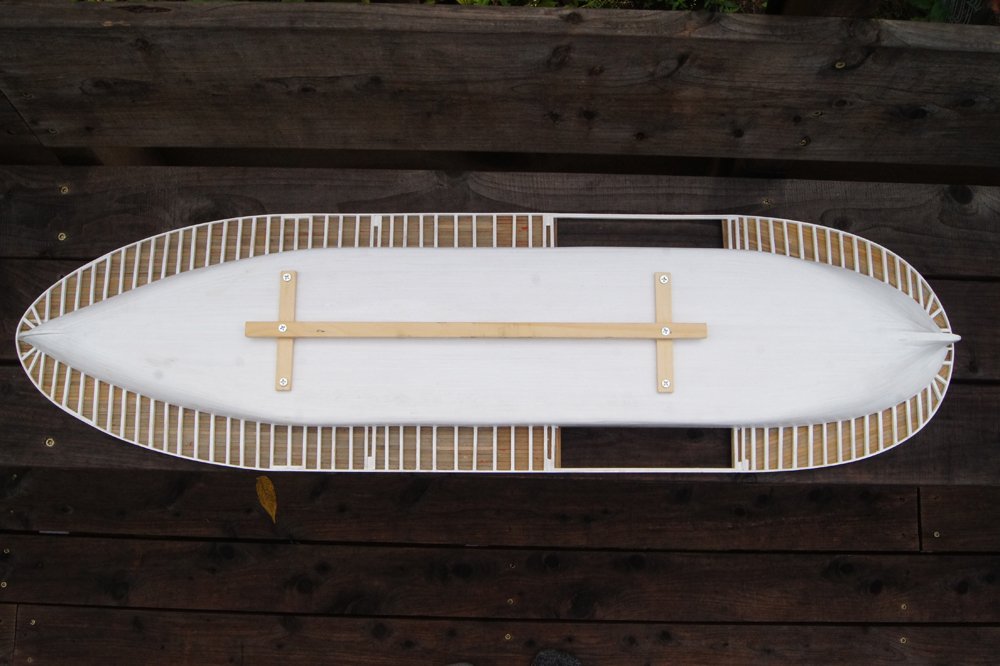
The main deck is planked! Apologies for no updates in a while. Planking is slow and tedious and there really isn't much to show as it progresses. Plus, August was my busiest-ever work month so I was particularly disinclined to get on the computer for any other purposes. Sharp eyes may have noticed that my deck planks are a bit wider than they appear to be in the original wreck photos. That's intentional; I knew I wanted to paint and stain each plank individually, and thought I would go absolutely crazy if I used really narrow scale planks. As it is, this deck took me over two months to complete. I think it captures a realistic feel and honestly that's more important to me than exact replication. I remain really happy with the steel wool & vinegar stain I've been using on all these planks. It darkens the paint just the right amount and gives any exposed raw wood a nice weathered tone. The underside of the deck, though it will be difficult to see on the completed model, has a nice appearance to my eye: Look closely and you'll see that a couple of red paint blobs seeped through here and here (particularly just forward of the port wheel). I tried to check each plank before installation, but obviously got sloppy in a couple places. I can't fix it, and again this is an angle that won't be seen on the finished model, so I'll live with it. Trying to keep a pure white hull clean during the building process is also proving to be a challenge; just too easy to grab her with pastel-grubby hands or accidentally smear stain. I'm considering whether to stain/pastel the lower hull brownish to simulate a river-mud waterline. Next up, I return to machinery work. I need the wheels and boilers built and installed, along with the engines, before I do any superstructure work so I can be sure they all work together properly. Gotta say I'm not looking forward to building the wheels! Thanks for reading and for putting up with the long delay.
- 599 replies
-
- 16
-
-
- sidewheeler
- arabia
- (and 4 more)
-
There are two ways to get planks to lie "horizontally" as if they were parallel to the deck. Either you edge-bend them, so that they curve both sideways and up-and-down, or you spile them, meaning you cut the complex shape needed out of a wider piece of wood. It's not otherwise possible to make a straight strip of wood follow the flow of a hull, especially on bluff bows. Kit instructions (especially European ones) tend to be awful at explaining how to do this; I suggest you consult some of the excellent planking guides on this site to learn more about how to do this before you start laying your final layer.
-
Cool project; nice work so far. In figuring out your balance, have you considered/tested how top-heavy she's going to be when fully finished? Getting the fore-aft balance right is certainly important, but there's a real danger of any wake or ripple tipping her laterally, just like the real thing. To answer an earlier question you asked, by Chaperon's era most steamboats had converted to coal. Wood was the fuel of choice when it was abundant along the riverbanks, but after the Civil War wood became increasingly hard to come by, improving transportation meant coal was more widely available, and it was a more efficient fuel. Same reasons railroads switched over. As for stateroom size, that depends on your point of view. Steamboat staterooms were tiny, but not any smaller (and in some cases bigger) than those offered on modern overnight trains both in Europe and the US. Of course, in those cases it's one or two nights, not one or two weeks (or more) for riverboats depending on the length of journey. Plus, people back then were quite a bit shorter and generally thinner.
-
Par for the course for these kits. Of course, no in one Australia will know the difference, just as no one here in the American Midwest will ever recognize all the various faults in my Corel revenue cutter!
-
In fairness, new sails existed too, or they couldn't have become old sails. And there's nothing wrong with displaying a model as if it were just outfitted with a new set if you're trying to show the ship in an ideal state, as most models tend to do anyway. I mean, even in your photo, that jib looks a lot newer than the rest.
-
Oh, geez, I hate to be a party pooper, but is the signage the original from the kit? It should read "Natchez", not "Netchez", at least if it's meant to refer to the real Mississippi River port. There's no "Netchez" that I know of, and a branch of my family's lived in that area for over a century.
-
Steamboats and other rivercraft - general discussion
Cathead replied to Cathead's topic in Nautical/Naval History
Ironically, I didn't fully appreciate the experience because I was 18 and knew almost nothing about steamboats despite being a history buff. I though the wrecks were cool, took a few pictures, poked around, and moved on. Of course, 38 year old me wishes I'd spent a day documenting every aspect of their construction. Teenagers are dumb, what can you do?- 281 replies
-
- 2
-
-
- Steamboats
- riverboats
- (and 3 more)
-
Oops, Carl, I completely misunderstood you! Sorry to ruin your joke. It was a reasonable enough question under the other interpretation...
-
Cog, not that I know of. Smaller, unpowered riverboats used oars, but I haven't heard of steamboats doing so. The current was generally too swift for sweeps to be of any use driving that bulk upstream, and downstream they'd still be unlikely to provide enough thrust for steering or navigation. Really, to make any difference in a riverboat, you'd need a giant crew to man them, way more than these boats carried even with passengers. The machinery and cargo were way too heavy. Chris, most American riverboats operating within the Mississippi River system were built along the upper Ohio River, near the ironworks needed for the machinery and the dense forests of the Appalachian Mountains. Some were built further downstream in places like St. Louis. There were established yards that built most boats, but individual craft tended to be artisanal in the sense that there weren't necessarily blueprints or standard designs, they were just built in place according to whatever design and plan the builders wanted. This may have become more standardized toward the end of the era (Chaperon is relatively late), I'm referring to the 1840s-1860s primarily. The yards could be highly established and skilled, but they weren't traditional shipyards in the coastal sense. They tended to be built fast and loose, using rough wood and as light framing as they thought they could get away with, given that the average life of these boats was so short and their operating conditions so rugged. As for paint, my guess would be a basic whitewash and a basic red, probably locally produced and not too high-value. Kurt or Roger are the best ones to answer that detail, though. The tradeoff here is that the owners wanted the boats to look flashy even if they weren't, so there was some impetus to have enough solid color on there not to look trashy. Chaperon came along late enough that maybe more high-end paint was available or used, I'm not sure. Personally, I think perfect, bright paint jobs tend to look a bit fake on a model even if they're accurate, so I'd go with a more faded look anyway, but that's obviously modeler's choice. Again, Kurt or Roger may well correct some or all of the above and are welcome to do so. Definitely looking forward to your Chaperon.
-
Steamboats and other rivercraft - general discussion
Cathead replied to Cathead's topic in Nautical/Naval History
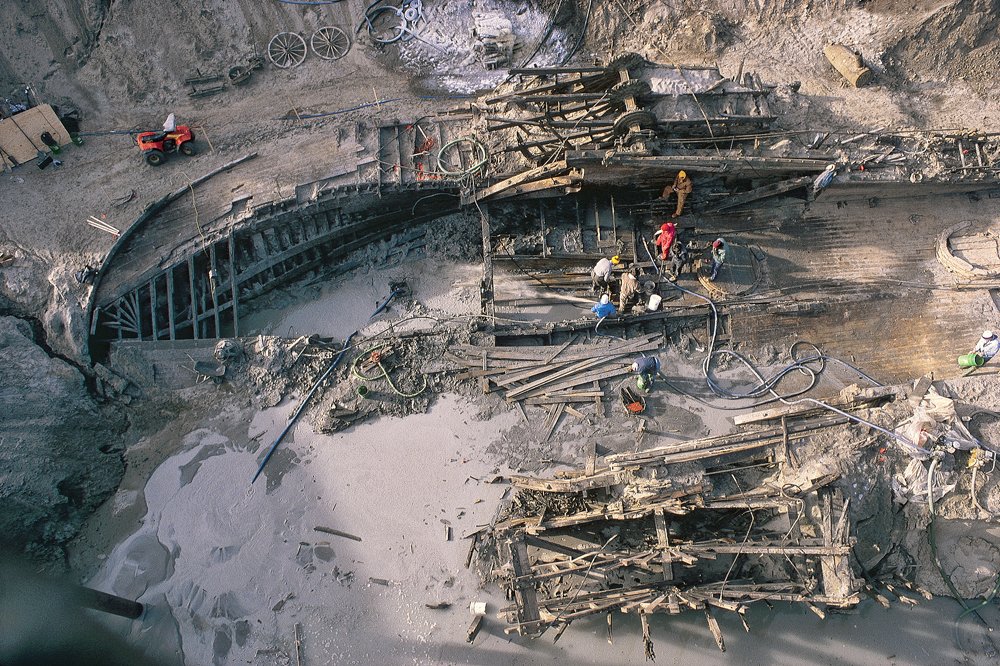
LJP, I have some of the nearly exact same photos somewhere in my print collection, taken in 1998. Fun to see yours.- 281 replies
-
- 2
-
-
- Steamboats
- riverboats
- (and 3 more)
-
Rain, what a novel concept. Here we're classified as Extreme Drought and on the edge of Exceptional Drought (the scale doesn't go higher). I agree that cameras and harsh lighting are the modeler's enemies. I really like the curtain effect behind the other details. For what it's worth, the stacks were normally called chimneys on these riverboats.
-
I'm sorry to hear that, best wishes with getting through treatment. We'll all look forward to your work when you get back.
-
Agreed, nicely done. Glad to see you're keeping at it.
- 362 replies
-
- 2
-
-
- active
- revenue cutter
- (and 1 more)
-
As a geologist, I love the idea of building the Beagle someday, so I'll happily follow along with this. I like your lumberyard; I did something similar by gluing a series of short PVC pipe sections into an upright cluster; the wood flop around more but it takes up less space on my workbench.
-
Cool, you're using the Doctor from Arabia as a guide. Your result will certainly look nicer than mine will!
-
The fact that you felt the transom did not have problematic movement during fairing while braced that way supports the view that a few top braces are all that is required for the rest of the hull. Glad it worked fine for you.
-
If this is your first ship build, what have you been doing with that fine workshop up until now? Whatever it was, I hope you enjoy this fun hobby.
- 34 replies
-
- 5
-
-
- kearsarge
- first build
- (and 1 more)
-
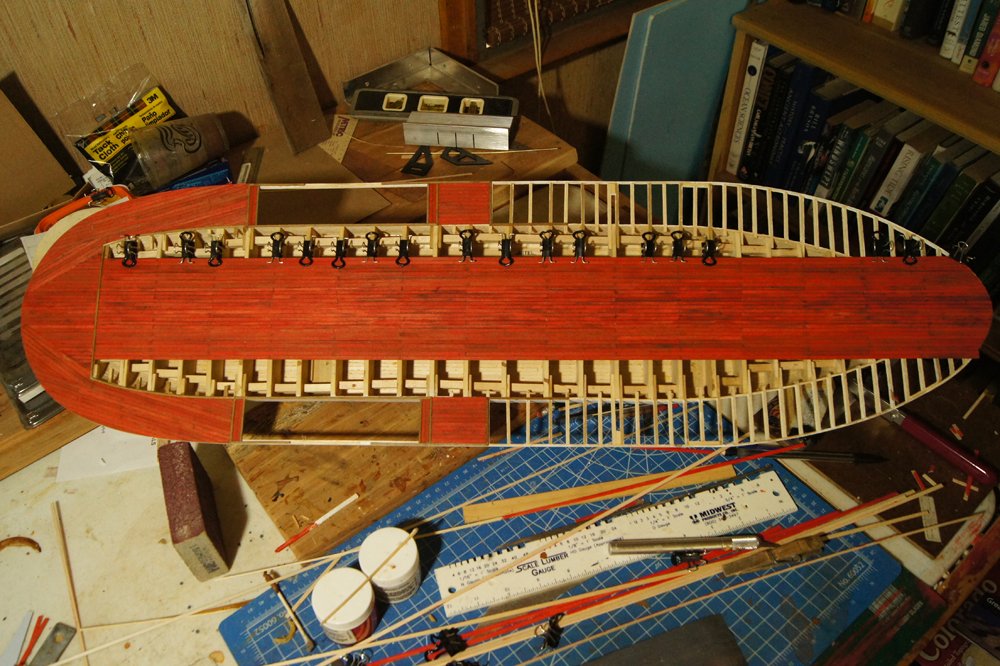
A quick update as planking progresses: I've developed a steady and efficient approach to this tedious task. Every so often I pre-paint a bunch of planking strips so they're available in bulk, doing this lightly enough so the paint doesn't soak through to the bottom where it would look wrong on the underside of the guards. I've been working from the inside out, one side at a time. In a given work session, I do the following: Measure and cut a full hull's length of individual planks along one side. Dip these in my dissolved steel wool & vinegar solution, wipe excess liquid free to avoid spotting, then set aside to dry. This darkens the paint and stains the underside a weathered brown. Take the strips I previously cut & soaked for the other side (in the last session), sand smooth any rough spots on edges or ends, rub on varying amounts of dark pastel (sometimes none) to vary the coloration and texture, then glue in place. This makes for a consistent rhythm and a manageable set of tasks whenever I can sit down at the desk. For example, in the photo above, the top (port) planking line has just been laid in place, while off-screen the pre-cut planking for the bottom (starboard) line is drying after the vinegar soak. It'll start going a bit faster once I each the guards, as half of the hull's length is already done from then on. Progress will slow down for a few weeks as I'll be out of town visiting family in western NY, and may even get to attend part of this neat event hosted by the Model Shipwright Guild of Western NY.
- 599 replies
-
- 16
-
-
- sidewheeler
- arabia
- (and 4 more)
-
Bob, your points are well taken, but it does really come down to modeler's preference. The vast majority of us aren't building for museums and public display. I'm not sure what you mean by a "serious" modeler, but plenty of folks willing to devote years to a detailed and reasonably accurate model still aren't doing so for the museum curator crowd, but for family/friend home display. To non-sailors or non-enthusiasts, a ship with sails often looks far more interesting and recognizable, as the web of rigging goes right over their head anyway but the sails are more easily comprehended. Speaking personally as a moderately skilled amateur, I'm happy to learn about what's considered "perfect", but may still not choose to apply that standard to even a "serious" model if my goal is to please a less picky audience and work to a standard that makes me happy rather than drives me crazy.
-
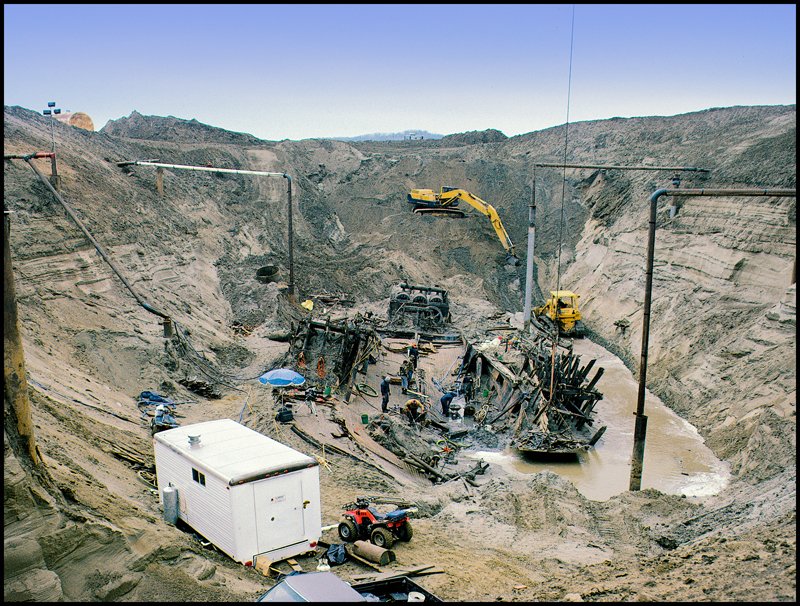
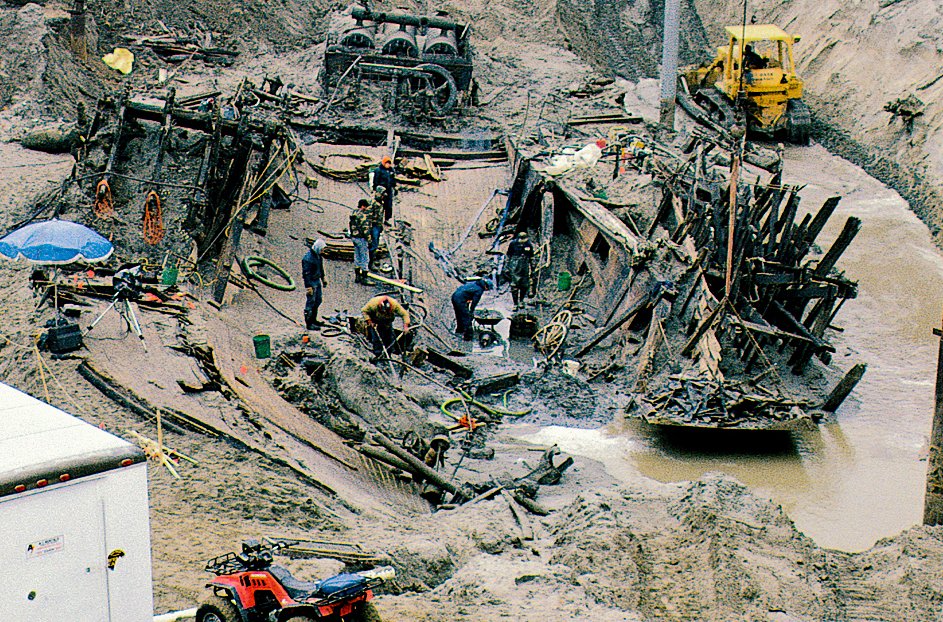
Michael, you're not kidding. For those who never saw the original, the photo I used above was cropped to emphasize the actual wreck. Here's the full context of the excavation; notice all the pipes constantly pumping out water. Remember, this is in the Missouri River floodplain and well below the groundwater table (one reason it was so well-preserved).
- 599 replies
-
- 9
-
-
- sidewheeler
- arabia
- (and 4 more)
-
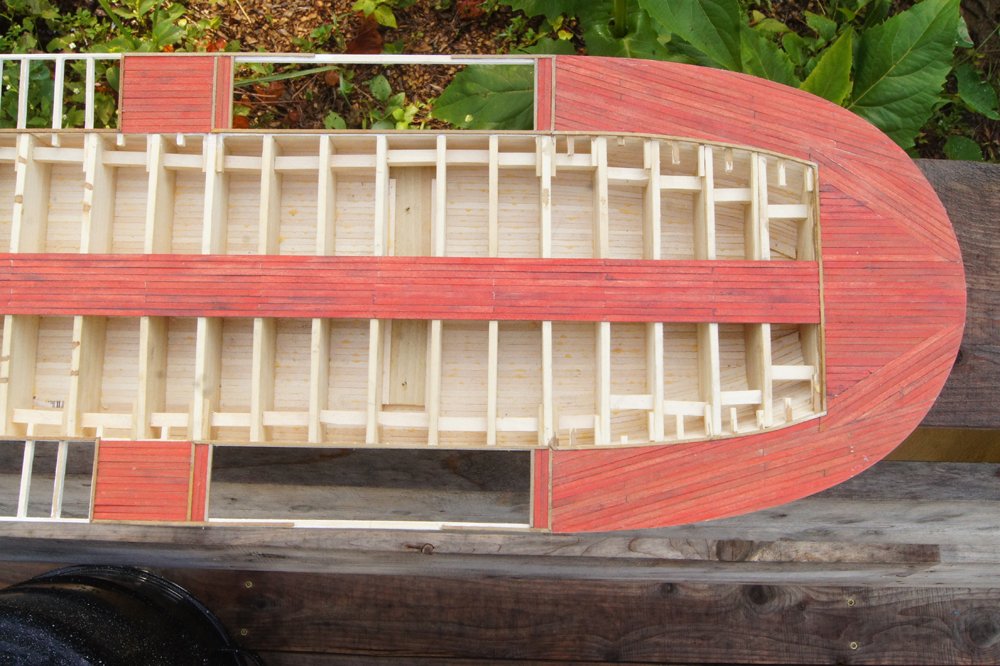
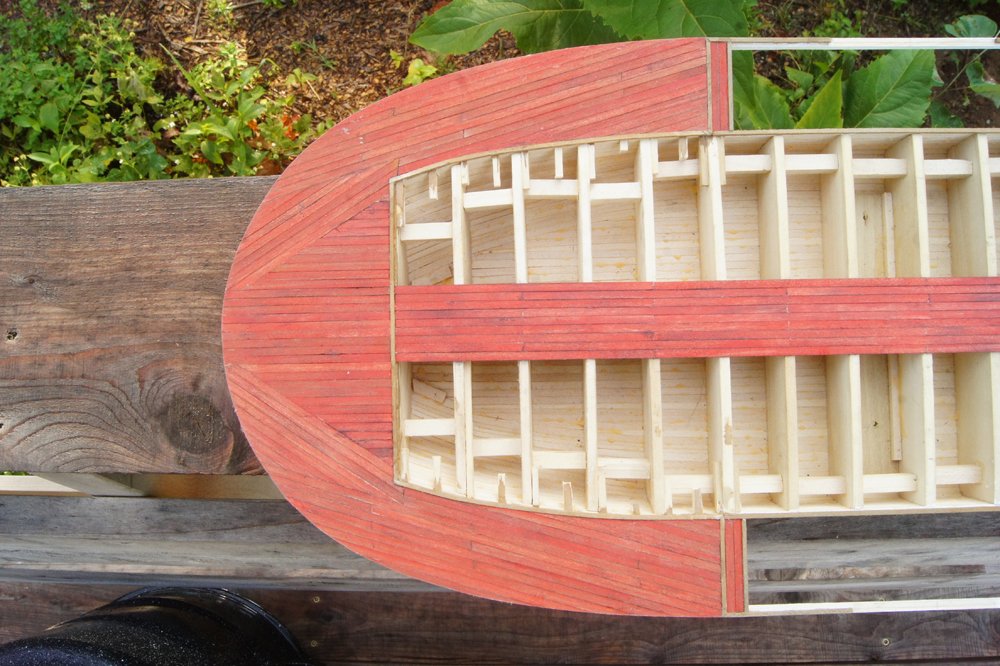
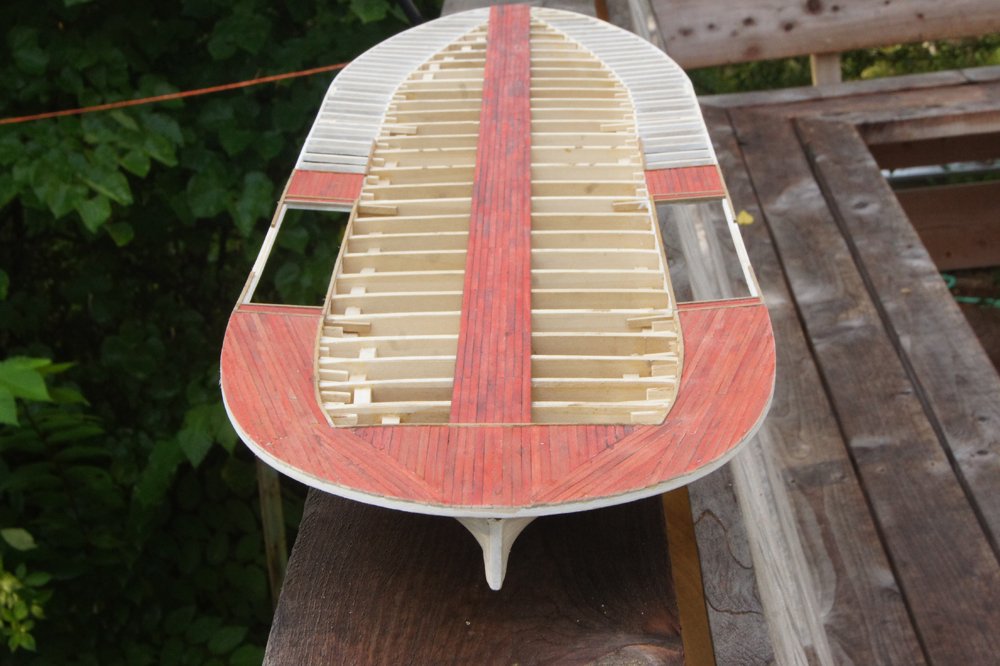
I've finished the stern guard planking and am quite pleased with it. I think it captures the feel of how this area was done nicely. You'll also see that I've started planking in front of the paddle boxes as well. Here's another view that focuses on the area of earlier discussion at the same angle, with the original photo below it for comparison: And here's a view forward from the stern, again with a comparable excavation photo below. Things will get easier for a little while here, as I simply progress slowly with filling in the nice, straight hull planking. If you're wondering what happens at the bow, well, there are no photos or records to my knowledge of the Arabia's bow, but other boats I have more evidence for (like Chaperon or Bertrand ) didn't do this sort of angled planking at the bow; everything just ran straight. So that's what I'm going to do. I'll give another update when significant progress has been made. Thanks again for all the input to that lively discussion of how to get the stern right. I hope you're reasonably pleased with the result. EDIT: I meant to thank Steve (steamschooner) specifically for reminding me of that last shot's existence. I had used it in my design thread but forgot that it gave a useful perspective on the stern decking.
- 599 replies
-
- 12
-
-
- sidewheeler
- arabia
- (and 4 more)