


Cathead
-
Posts
3,523 -
Joined
-
Last visited
Content Type
Profiles
Forums
Gallery
Events
Everything posted by Cathead
-
 Hah, Mark, you're funny. This is the US we're talking about, we have a $13,000 deductible and very limited access to affordable "medical types". There's no way I'm going for medical advice unless this gets MUCH worse. It takes a lot of pain before I'll start spending my hard-earned, self-employed money funding doctors' and health insurance executives' lifestyles. Plus our insurance company will change on January 1st due to more brilliance in the American medical system, so if I go in now I'm going to end up fighting with two difference insurance companies. Much better to just wait two weeks and see what happens; if it isn't healing on its own by then, at least I'll only be dealing with the 2019 company.
- 599 replies
-
- 5
-

-
- sidewheeler
- arabia
- (and 4 more)
-
Exploring the maritime history and geography of Chile
Cathead replied to Cathead's topic in Nautical/Naval History
Yeah, I was referring to areas further south like Chillan and Concepcion with regard to the earthquake. Just mean that Chilean cities have rebuilt from a variety of disasters. Sorry for the unclear phrasing. -
Exploring the maritime history and geography of Chile
Cathead replied to Cathead's topic in Nautical/Naval History
Honestly, you'd never know the fire had happened unless you knew the area beforehand. Similar to the areas devastated by the 2010 earthquake (8.8), they've done a great job cleaning up and rebuilding. -
Hello all, we're back from spending a month exploring Chile. I've started a separate thread about the maritime history and geology of Chile because we collected so many photographs and so much information that I think will be of interest to many MSW readers. So please feel free to go check that out. In the meantime, I'm not sure when I'll be getting back to the Arabia. Not only do the next few weeks look especially crammed as I get back to work in what is traditionally a very busy period for me, but I also hurt my shoulder in the mountains of Patagonia when a very strong gust of wind literally plucked me off my feet and threw me about 10-15' onto some rocks. I get strange pain and numbness when I try to use my right arm for many motions from chopping vegetables to washing dishes to lifting things, so model work is out for the moment. Luckily, typing holds the shoulder steady and doesn't seem to cause problems, and I'm hoping that a week or two of relative inactivity (i.e. not carrying backpacks around South America) will heal it. That's especially unfortunate as Chile has given me a whole new set of interesting modeling topics to consider, and I'm itching to finish the Arabia and move on to one of them! I think my original estimate of getting back to the project after the New Year is still realistic. Sorry for the ongoing delay, hope the Chile series is of interest in the meantime.
- 599 replies
-
- 6
-
-
- sidewheeler
- arabia
- (and 4 more)
-
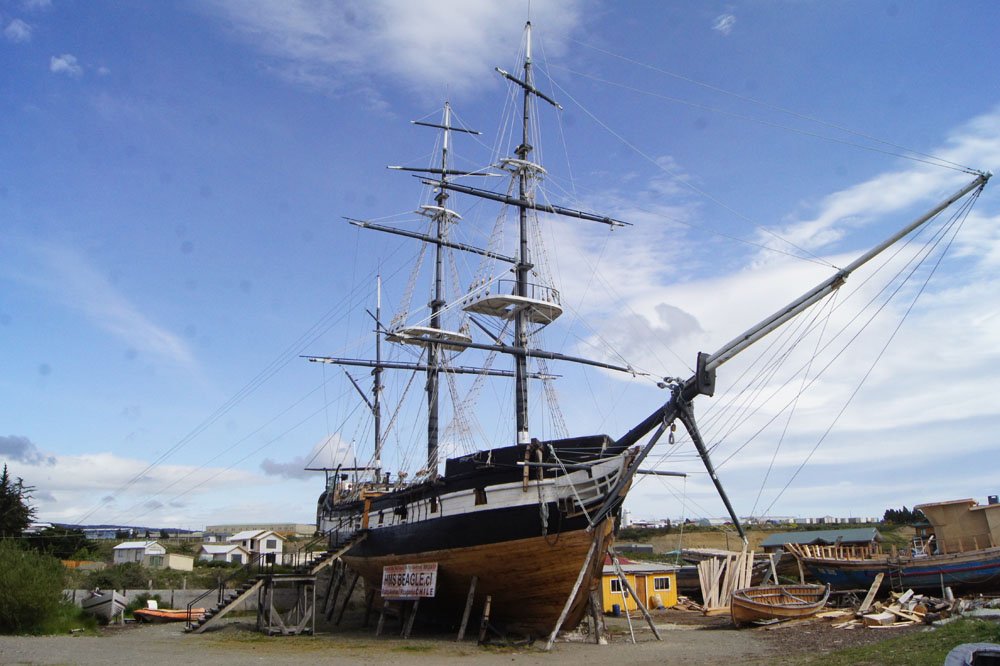
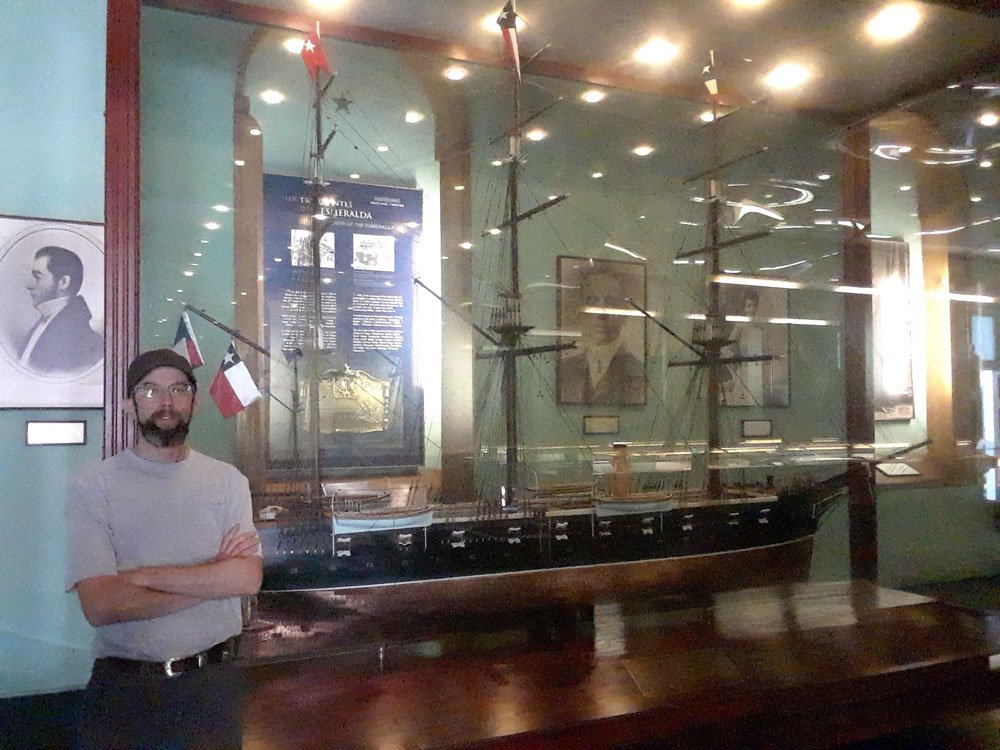
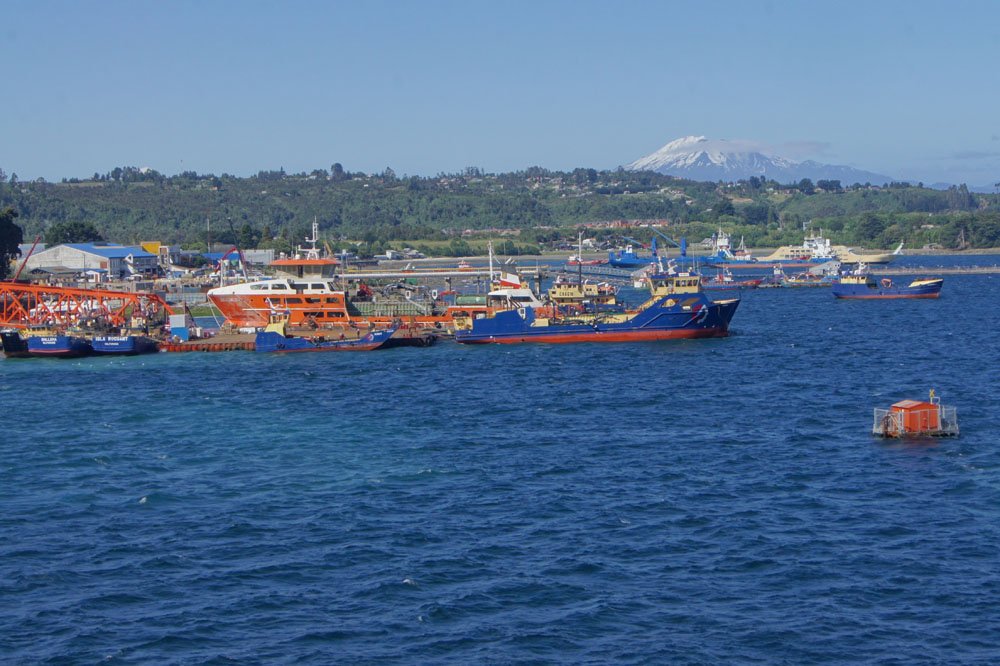
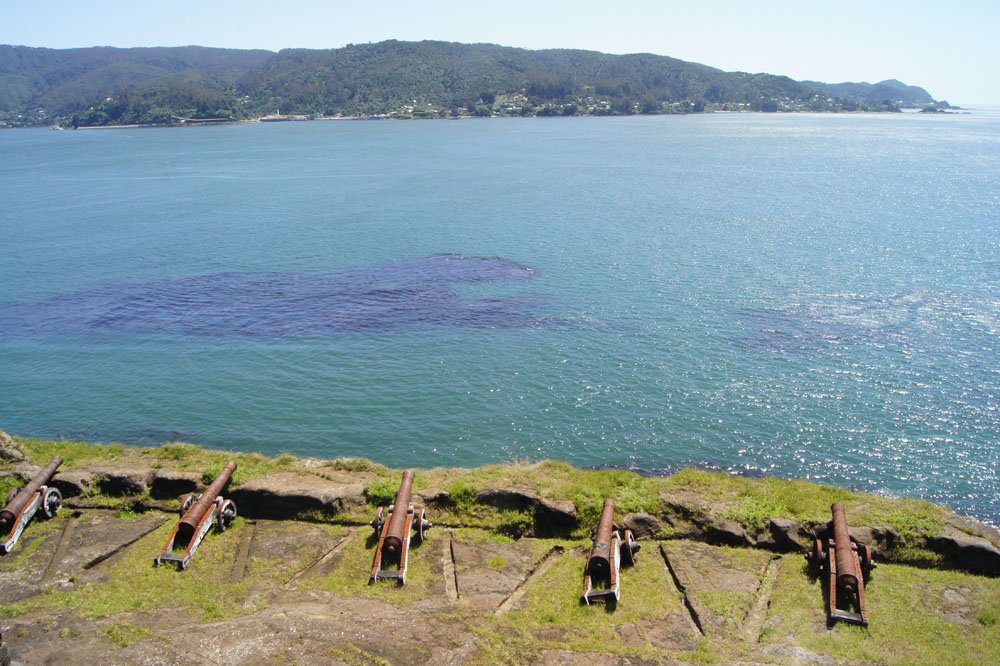
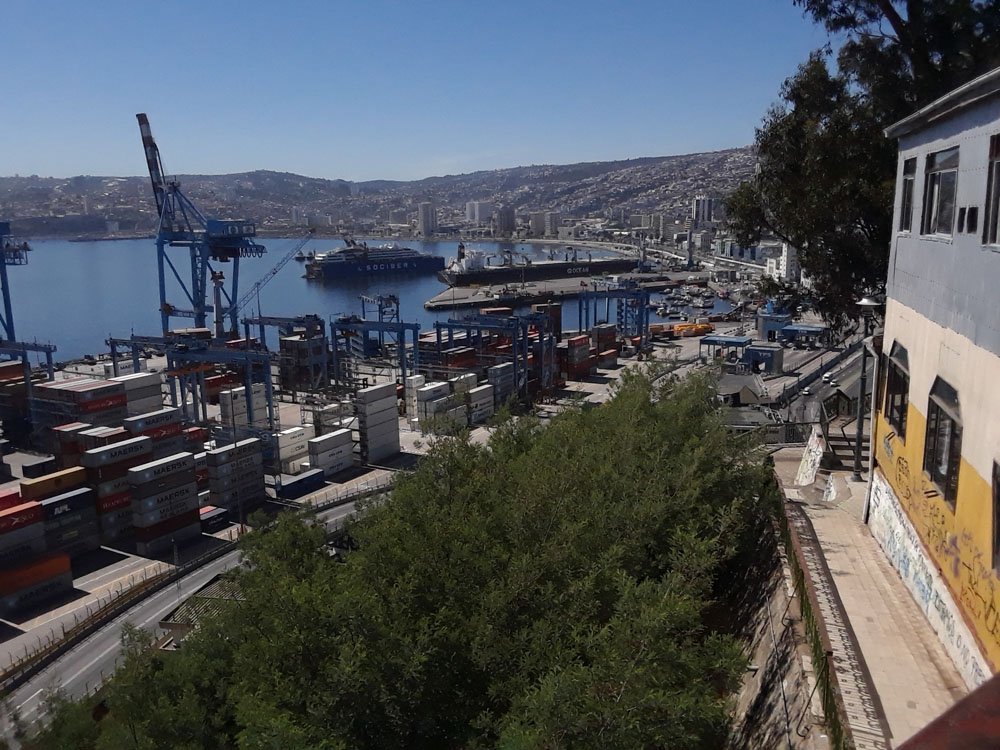
Chile’s coastline extends more than 4,000 km along the Pacific Ocean, wrapping around to the South Atlantic in southern Patagonia (not to mention Chile’s territorial claims in Antarctica). The country has a fascinating and diverse maritime history, including the unique boats used by indigenous peoples, its largely naval War of Independence against Spain (strongly influenced by British involvement), its later naval victory over Peru that cemented the region’s modern boundaries, its prominent role in influencing Charles Darwin’s evolving understanding of natural and geological history before he ever reached the Galapagos, its little-appreciated role in the final rescue of Shackleton's stranded crew in Antarctica, and the vast maritime resources such as rich fisheries available to the modern country. Mrs. Cathead and I recently spend a month exploring the southern half of Chile (from Santiago to southern Patagonia), living out of our backpacks while using local buses and hostels to get closer to the landscape and people. We encountered and investigated many locations of maritime interest, and will share some photos, stories, and information in this thread in hopes of inspiring others to learn more about (and visit) this nautically fascinating country. This won’t be a full travelogue (for example, I’ll be leaving out all the time we spent hiking in the Andes and otherwise botanizing and geologizing inland), but a series of posts focusing on specific locations and/or themes of potential interest to MSW readers. Here are a few images as teasers, all of which will be expanded upon in subsequent posts. Valparaiso, Chile's main seaport and a great place for modern ship-watching as well as host to a fantastic naval museum. The place is absolutely marinating in nautical history and diversity. Ship models are everywhere in Chile, including this huge example of the Esmerelda, perhaps Chile's most famous warship. She sank in 1879 while engaging the more modern Peruvian ironclad Huáscar during the Battle of Iquique, sparking a patriotic furor that drove Chile's subsequent victory in that war as well as immortalizing her captain, Arturo Prat, to near-godlike status in Chile. View south across Corral Bay from the Castillo de Niebla, a beautifully preserved Spanish coastal fortress. On the far shore lie the remains of five other Spanish fortresses stormed in 1820 by Chilean forces under the command of Lord Thomas Cochrane (model for Patrick O'Brien's Jack Aubrey) during the Chilean War of Independence. This action was fictionalized in the final novel of Bernard Cornwell's excellent Sharpe series. Diverse shipping in Puerto Montt, with Volcán Calbuco in the background. Modern Chile features a fascinating array of interesting ships of many sizes and uses, far more varied than most US ports I've visited. A full-scale replica of HMS Beagle, the first in the world to my knowledge, in southern Patagonia. Part of a private museum featuring other full-scale replicas of famous vessels including Magellan's Nao Victoria and Shackleton's James Caird. I hope readers will enjoy the subsequent entries in this topic. I'll try to answer any questions that may arise, or perhaps someone more knowledgeable will chime in (and correct me if necessary). This trip certainly provided me with a series of new modeling possibilities, more than I'll ever be able to tackle.
- 16 replies
-
- 18
-
-
Just so you all know, there won't be any updates to this build for a while. Mrs. Cathead and I are about to leave on an overseas vacation (first time we've left the country in 14 years), and have been extra busy preparing for that. I thought I might get a bit more done beforehand, but that hasn't happened. I don't think I'll be returning to this build until close to the New Year given this trip and various other commitments. Sorry to leave you all hanging. I will have some stories and photos of nautical interest to share when I return. Thanks so much for reading and for being patient with the long upcoming delay.
- 599 replies
-
- 11
-
-
- sidewheeler
- arabia
- (and 4 more)
-
Yes, you should be able to bend them first. In fact, many folks recommend fully bending planks before doing any gluing; the idea is that the bent plank should hold its shape and need almost no clamping once you're ready to glue it on. That's how I do it. Be careful pre-painting, as the paint's moisture can change the curve if you use too much.
-
Catching up on this log, you've certainly discovered some of the ways that Corel finds to drive modelers mad (like poor quality materials and instructions). As for your rigging line, the standing rigging certainly would have been tarred. I'd recommend replacing it with something higher quality than what Corel provides (such as line from Syren). As for bending tough planks, I've found that doing it in several stages can help. Soak the wood first, then bend it through part of the curve off the model by setting up a template or other bending station. Let it dry and take that gentler curve, then resoak and work it toward the tighter curve. I use a hair dryer once the wet wood is clamped in place, the extra heat dries it fast and seems to help set the fibres in their new position. This kit certainly looks like a challenge, between the small scale and the manufacturer. You're soldiering on admirably!
-
Mark, you're thinking of the 1811-1812 New Madrid earthquakes (for what it's worth to other readers, pronounced by locals as MADrid with the first syllable rhyming with dad or glad). River channel movement is common in any system that has a relatively low gradient and isn't constrained by bedrock. It's dramatic in the history of the Mississippi River basin, but it's certainly not confined to that system, it's a completely normal geologic process. EDIT: I'd meant to mark the one-year anniversary of this build on October 22, and just realized that I completely missed it. Luckily I'm far better with real anniversaries. I'm not as far along as I thought I'd be, so who knows how long this will take to complete. There's a lot of intricate work yet to be done.
- 599 replies
-
- 9
-
-
- sidewheeler
- arabia
- (and 4 more)
-
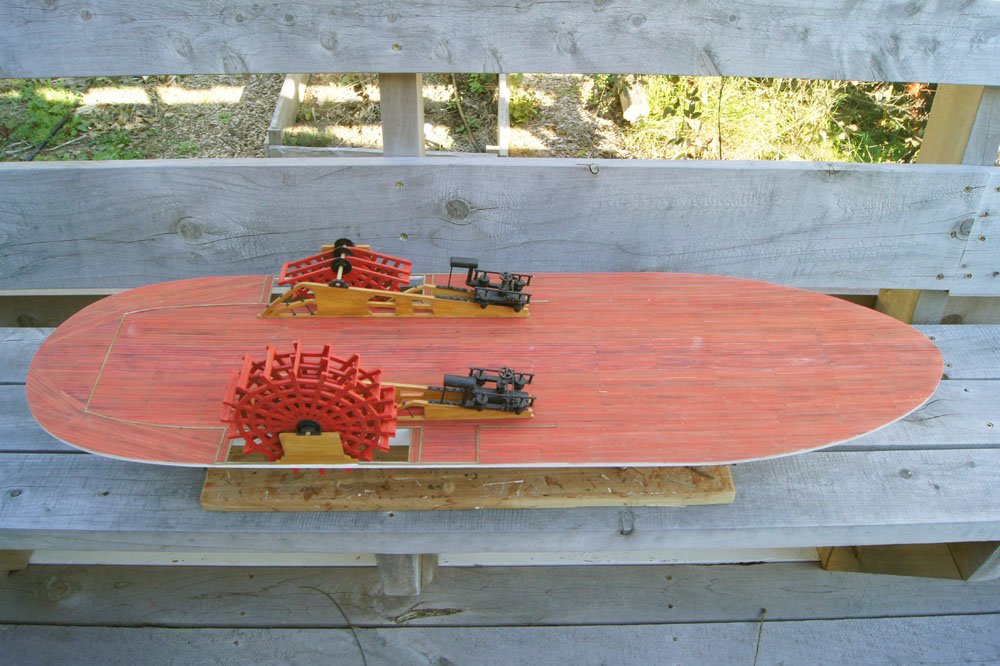
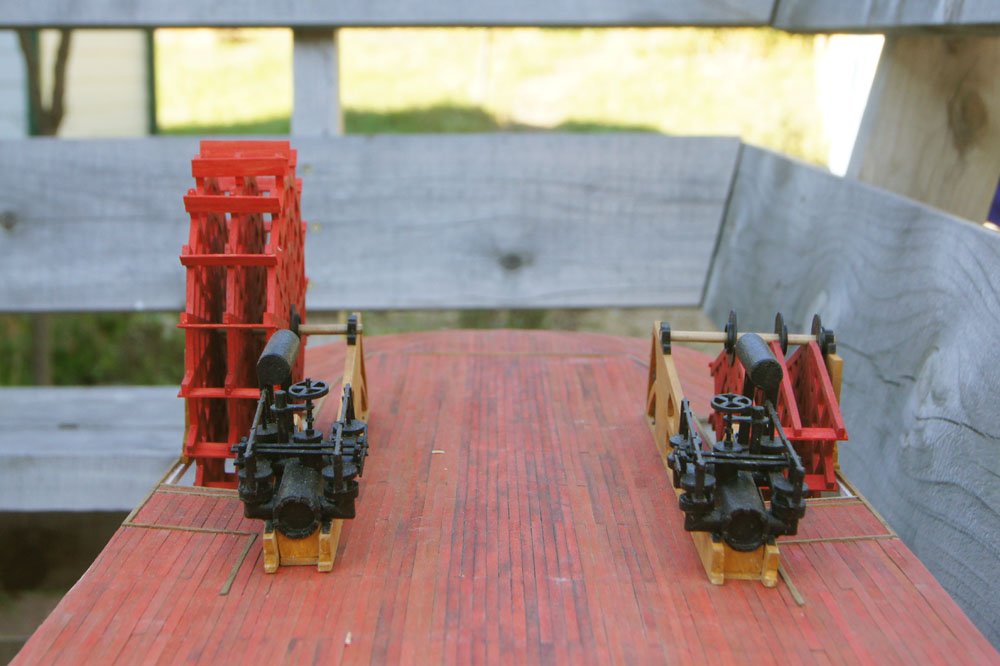
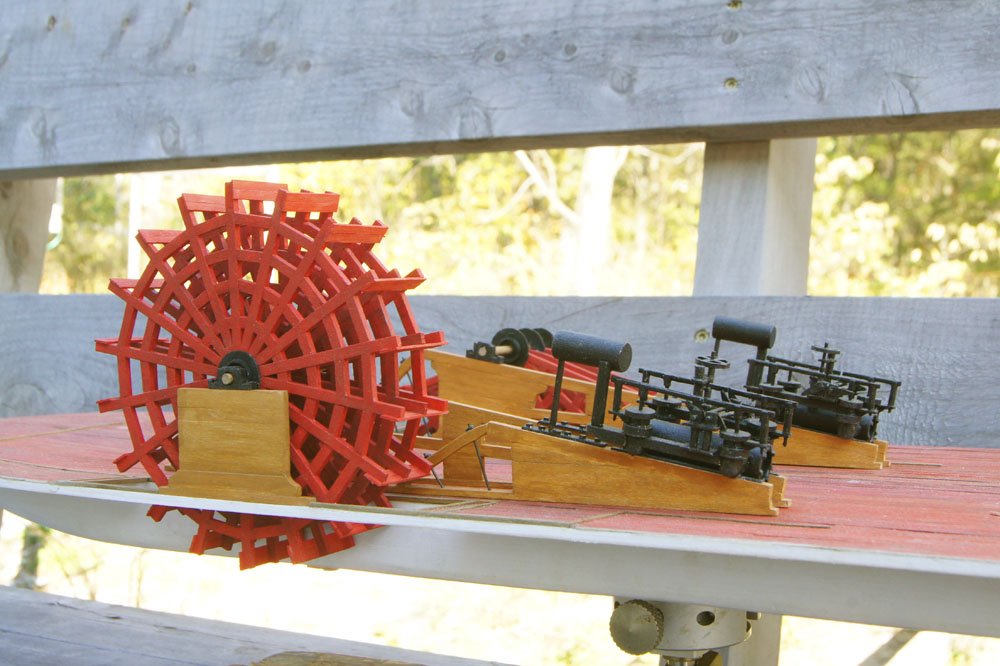
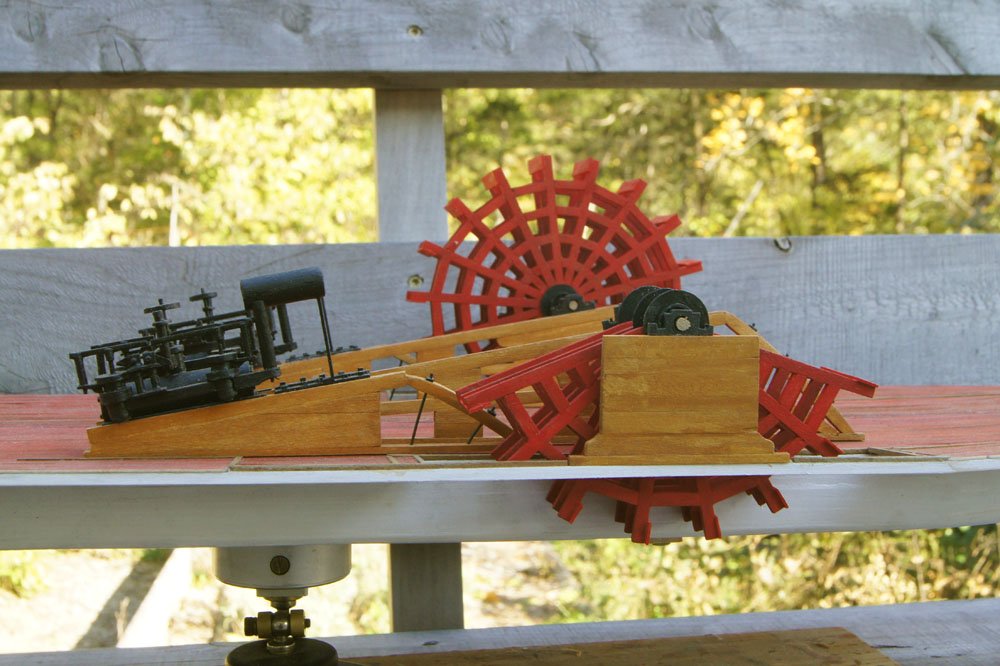
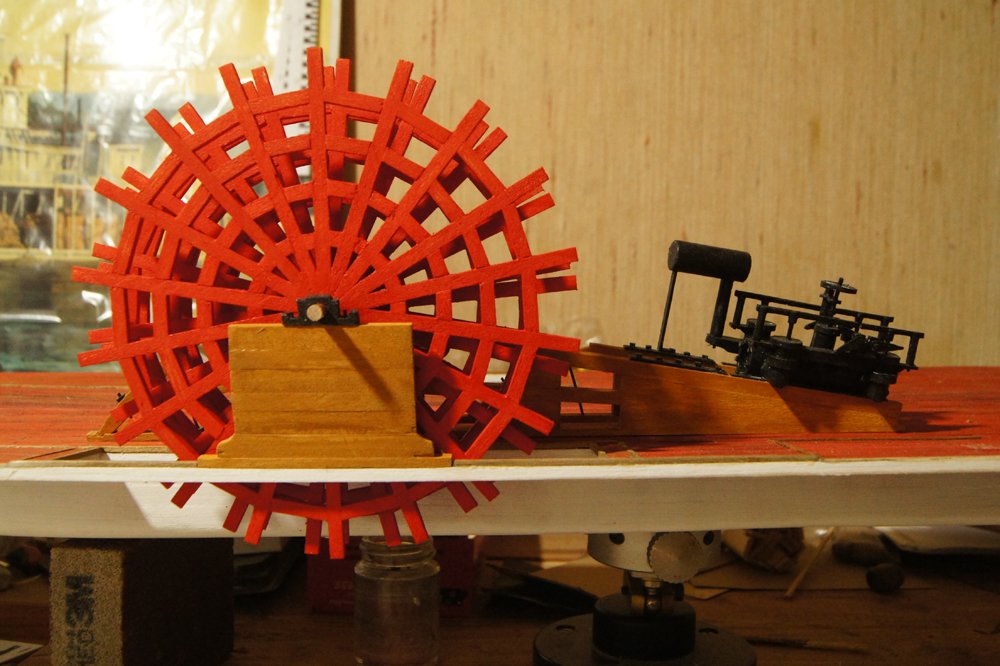
The wheels are mostly done. Assembling the three rings into a coherent, well-aligned whole was extremely difficult. It was made worse by the fact that I wasn't as precise as I thought in keeping all three built to the same pattern; even very slight misalignments of the spokes led to difficult problems. First, I made spacers to hold the rings the proper distance apart, and spent lots of time spinning and testing the rings to find the best alignment. Some spokes needed filing or filling to get the buckets (the paddle planks) reasonably aligned. These changes looked terrible as I made them but they really fade into the background with painting and with the complexity of the wheel as a whole. Plus, I made a point of not modifying the outer ring, the only one that's really visible. As previously discussed, I built the port wheel at about 40% completion as everything above that will be invisible. Here are four pictures of the completed 1.4 wheels test-installed on the model. I think they look pretty good for scratchbuilt wheels, and am very, VERY glad to be past this portion of the project. I want to do some more weathering and I haven't yet decided how to install or simulate all the iron bolts that hold each bucket to each spoke. More on that later. Thanks for reading!
- 599 replies
-
- 23
-
-
- sidewheeler
- arabia
- (and 4 more)
-
Planking is definitely a major part of a build. Don't underestimate the sheer time slog and detail of rigging, but it's also more forgiving in that you're not fighting against the material, just carefully installing detail one step at a time.
-
Purpose of tall mast on bow of riverboat
Cathead replied to Shotlocker's topic in Masting, rigging and sails
Chuck is correct, it's a navigational aid. The forward mast isn't for gauging obstacle height; by the time that encountered a bridge the boat wouldn't have time to stop or turn before knocking the stacks off. Once bridges became common, steamboats started being built with hinged stacks that could be lowered while passing underneath. In the meantime, the legal battles between railroad and steamboat interests over bridges were epic and bitter. The R.E.Lee was a Mississippi River boat that would have had no need for grasshopper spars as that river was deep enough to avoid the need; grasshoppers were a unique feature of the Missouri and other shallow Western (i.e., Plains) rivers. There were some differences in design between Mississippi and Missouri River boats, in that upper Missouri (i.e beyond Omaha) boats tended to be sternwheelers (better for shallow water and more protection for the wheel from copious river debris), have much narrower or non-existent guards (extensions of the deck beyond the hull), and/or have stripped-down superstructures to reduce their draft and exposure to high winds. Good initial question, and nice looking model! -
I have no experience with decals, sorry. The one time I put a name on a ship's stern, I did it by printing out a full nameplate and affixing that to a thin sheet of wood. See the linked build log for the revenue cutter in my signature. Maybe not authentic but looked better than anything else I tried.
-
Ozark, you're getting bombarded with advice here, hope it's not overwhelming. I think it's important to realize that it's very easy, once you start into model shipbuilding, to go down rabbit holes of upgrading. People will be suggesting that you buy ever more tools, ever more materials, etc. If you have the budget and interest that's fine, but you shouldn't feel obligated or pressured to go off the upgrade deep end. It's perfectly reasonable to build your model with the original yards/masts and the kit-supplied line. That being said, the reason that pressure can exist is because there really is a huge range of material quality out there. A lot of kits/manufacturers use substandard materials to keep the cost down to lure in beginners or just sell more kits. Others start with quality from the beginning. So you'll certainly notice the difference if you upgrade to Syren line (I agree, by far the best out there) but whether or not you do should be up to you and not because anyone else has different standards. I have a couple plastic Revell sailing ships on a shelf that I now think are hopelessly below my current standards, but that virtually every other viewer thinks look great (it helps to live in rural Missouri where no one knows anything about ships). They were built out of the box as a beginner and I have no regrets. If I ever build another plastic sailing model I'll likely discard just about everything but the hull and put in real wood decks, masts, and yards, upgrade the rigging, etc. but I'm not a beginner anymore and trying to do that the first time might well have driven me out of the hobby. Do what you think will make you happy in your current state, and have fun! That's the most important part. If it's stressful, you're missing out.
- 49 replies
-
- 4
-
-
- constitution
- revell
- (and 1 more)
-
Agreed on the fairing lines, I've seen them before too and they're great. Pros can disregard them if they like, but it doesn't hurt to have them on there. Steamboat hulls always look like some kind of snake vertebra model at this stage.
-
You don't necessarily need a cutting mat as long as your work surface is one you're comfortable getting cut, scratched, painted, sanded, etc. One benefit to a proper mat is that it can help blades stay sharp longer, and sharp blades make a lot of work a lot easier. But they're not that expensive and awfully handy. Depending on your location, you don't have to mail order them as box hobby stores like Michaels or Hobby Lobby stock them too (if visiting a store is easier than mail-order; for me it's not). As for the yards and masts, the point to consider isn't just the current warp but how they respond to tension from different directions as you start to rig the model. Plastic bends easily and you have to be extra careful to balance all your rigging tension. Nothing wrong with that and you shouldn't feel pressure to switch to wood, just something to think about as the wood will take more rigging tension before it begins to bend. Balancing the delicate plastic yards will teach you more about the complex nature of keeping a real rigged ship operational!
- 49 replies
-
- 2
-
-
- constitution
- revell
- (and 1 more)
-
Regarding the warped yards, if you struggle to get them straightened out, you might consider replacing them with wooden dowels that you sand to the proper taper. Could be something to consider for the masts, too. One problem with plastic masts/yards is that they bend pretty easily under tension, meaning it can be hard to get the rigging right without deformation, whereas wood is a lot less flexible. Looking forward to your progress on this.
- 49 replies
-
- 2
-
-
- constitution
- revell
- (and 1 more)
-
Mark, good idea, except that I intend to leave this side of the vessel open to interior view so I need a full wheel on this side (i.e. 1.5 wheels total).
- 599 replies
-
- 4
-
-
- sidewheeler
- arabia
- (and 4 more)
-
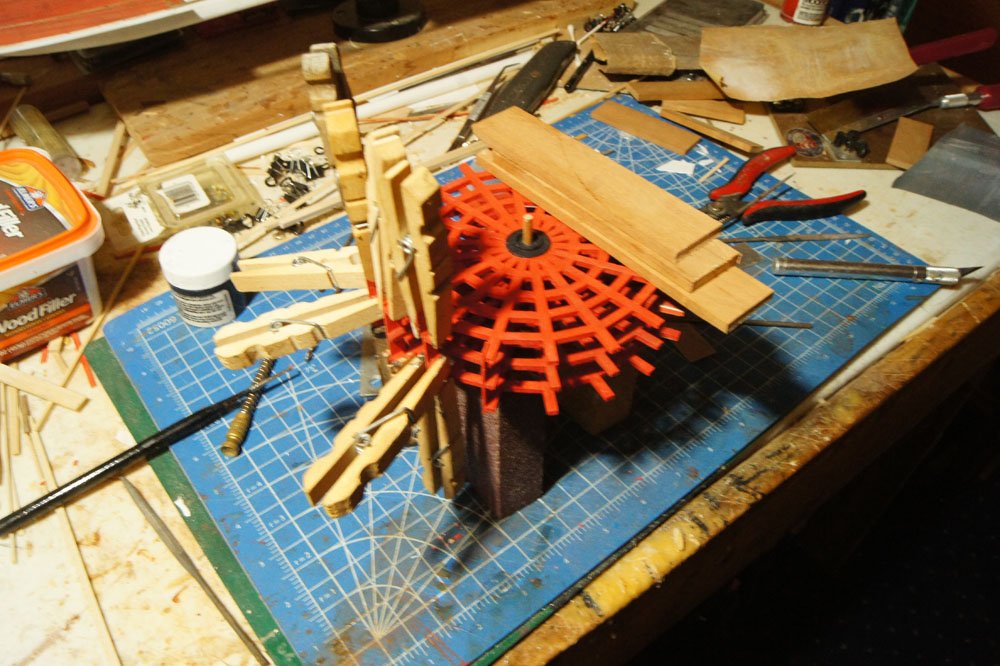
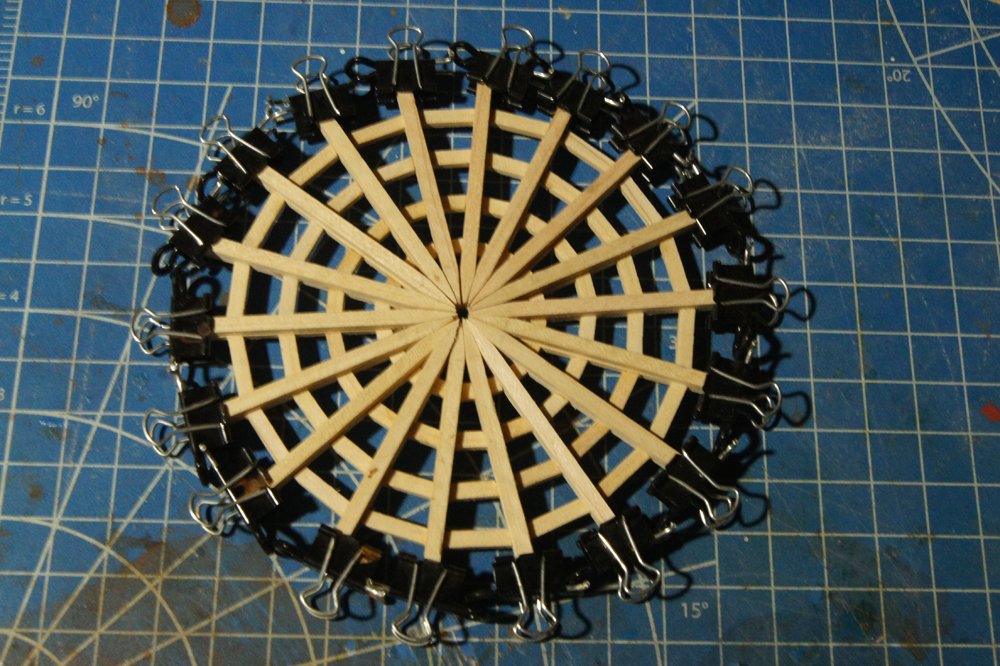
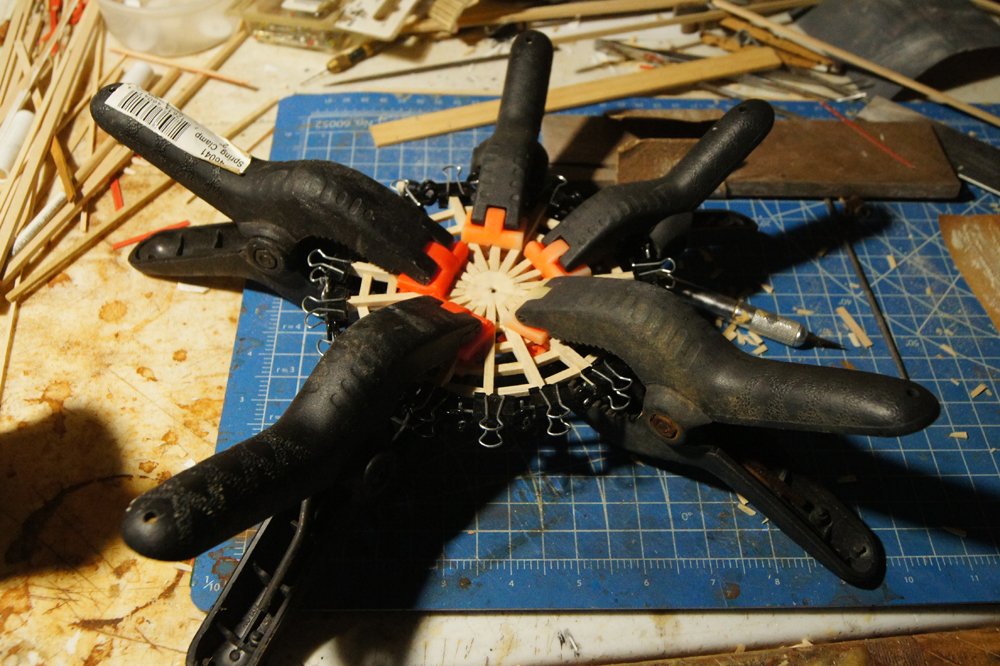
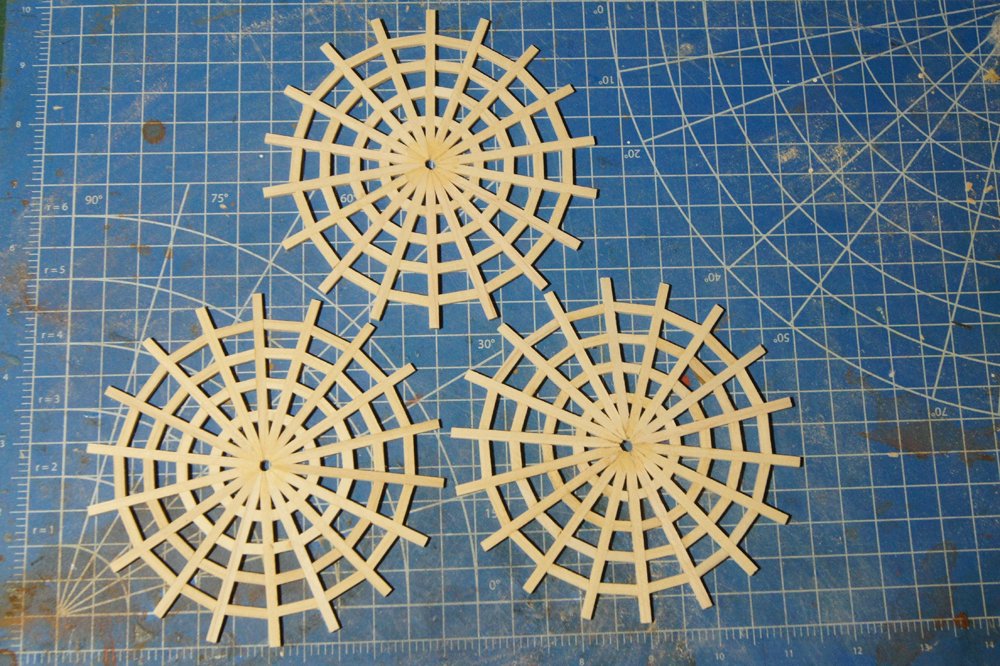
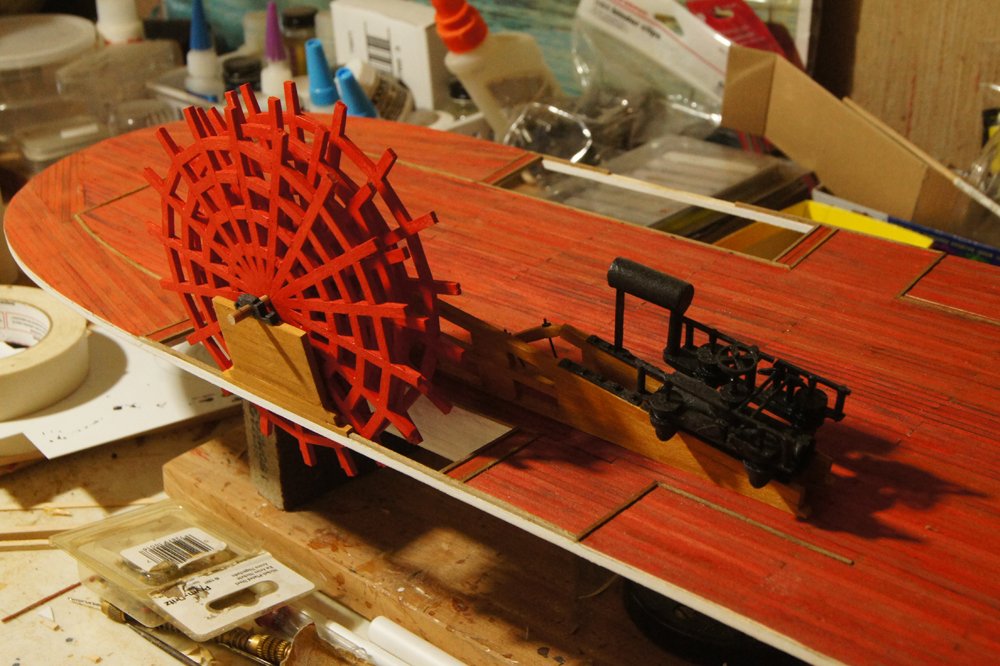
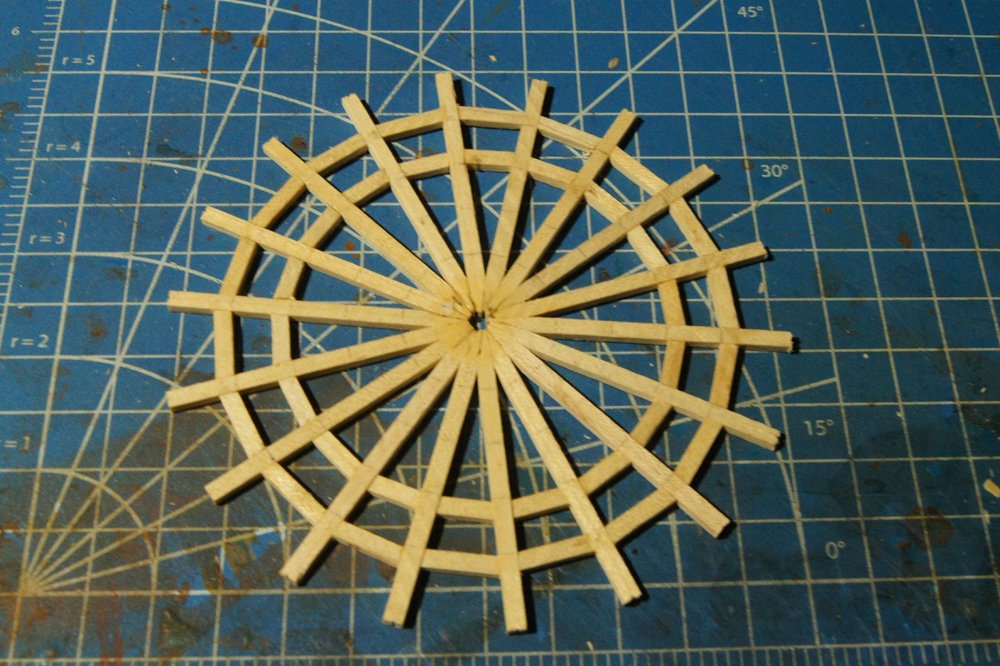
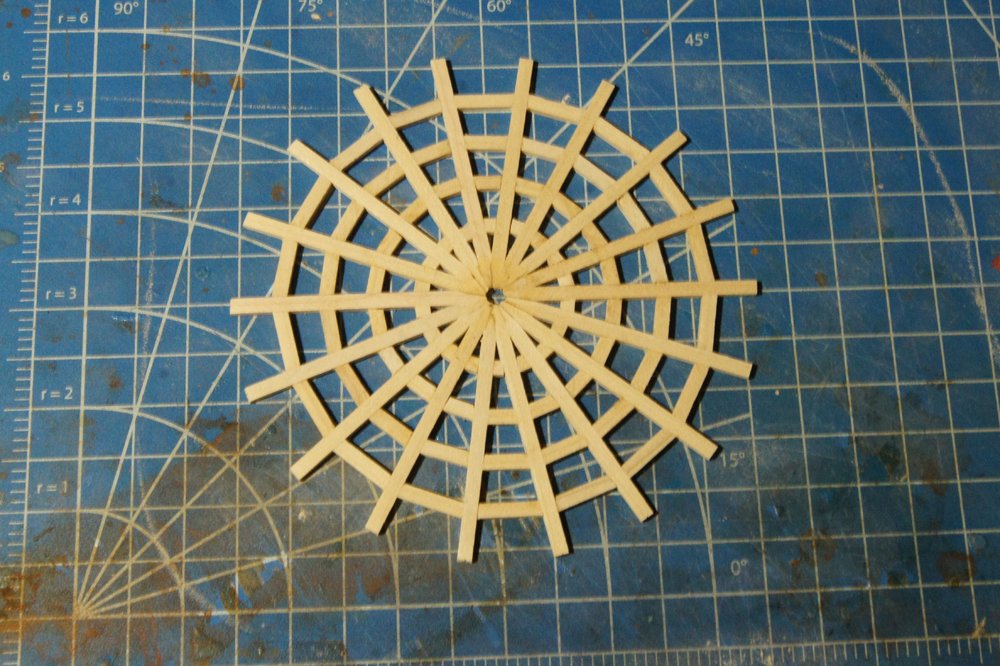
To finish one wheel assembly, I needed to make two more identical sets of rings. My first plan was to build these on the paper plans just like I'd done the first one, but I was afraid that would enable too much variability. So I hit on the idea of building the next rings right on top the first one. After cutting the next 18 spokes, I clamped each one to its counterpart on the original: The end clamps made the spokes warp up a bit in the middle, so I used large clamps to hold the whole assembly in place and flat: Next, I used the same approach as before and smeared wood glue into the central area, being sure not to overdo it so none leaked down to the original ring below. This worked great; once it dried, I had a solid set of spokes following the same pattern as the original. I flipped this over, treated the other side the same way, then set about completing it just as described above. I did this a third time and ended up with three nice wheel rings, shown below after sanding. This was MUCH faster than laying the first wheel out on the paper plan using pins. In case you were wondering, I marked the end of one spoke of each piece so that I'd know where to line them up again. These look nice in the photo but they're certainly not perfectly symmetrical (I'm not that good a craftsman), so it's important to know how best to align them. Next I painted them, which took longer than I expected. There are so...many...nooks and crannies in these darn things that all have to get color! Below are two shots of the three rings temporarily threaded on an axle and placed loosely on the model just for visual interest (no attempt to line them up perfectly or join them); I wanted to see what they'd look like in place. They're obviously pretty bright and need to be toned down. I tried the vinegar/rust soak I used for the decking, but as these are painted on all sides it didn't really do anything (no raw wood to soak into), so I used a thin wash of black paint to dull the color. I don't have a photo of that but they look a lot better now. Next up, cutting and painting all the bucket boards (the horizontal pieces connecting the rings) and working out the best way to build this complex structure so that everything lines up (including both the buckets and the axle holes). I think it's going to be tricky. Also, Roger mentioned the difficulty of building half a wheel. I think that, using the methods above, it'll be fairly straightforward to lay out half a wheel on the paper plan, glue the spokes in place at the center, then duplicate that twice using the clamping method. If I then attach wheel hubs and string them on an axle, the half-wheel will naturally hang down into the visible part of the wheel housing, and no one will ever be able to see up into the upper half. That's the current thinking, anyway. This was a nice stage to reach this weekend. Thanks for reading.
- 599 replies
-
- 20
-
-
- sidewheeler
- arabia
- (and 4 more)
-
Wooohooo, just noticed you've officially started this. I'm fully onboard with realistic steamboat builds here on MSW. Very excited to see what you do with her, especially with regard to upgrading the decks and so on. For what it's worth, technically those boats aren't really "lifeboats", they're primarily workboats used by the crew. They could certainly be used to save a few passengers in a wreck situation, but I don't think that's their primary purpose (maybe Kurt will correct me if he finds this, he's the resident Chaperon expert). Safety wasn't much of a consideration on these boats, especially earlier in the era (the Chaperon is a bit later than my core knowledge). Moreover, wrecks were rarely deadly for lots of people as most rivers were fairly shallow and steamers that hit a snag just tended to settle to the bottom or make it to shore before truly sinking, meaning those on board could retreat to the upper decks and await developments. Most steamboat wrecks that killed lots of people involved boiler explosions, and at that point the boats were often kindling anyway.
-
Welcome to MSW from a fellow Missourian. There aren't that many of us here. I got my start in model shipbuilding with the smaller Revell Constitution (1:196?), which still sits on a shelf in my office even though my skills have developed well beyond it. I hope you enjoy diving back into this hobby.
-
Thanks, Roger, that means a lot coming from you. I know what you mean about building a half-wheel, but I think I've figured out a proper solution. Stay tuned.
- 599 replies
-
- 4
-
-
- sidewheeler
- arabia
- (and 4 more)
-
Lovely work, Daria. It's so satisfying to reach a goal one has worked toward for so long. Thanks to you and your dad for sharing your work!
-
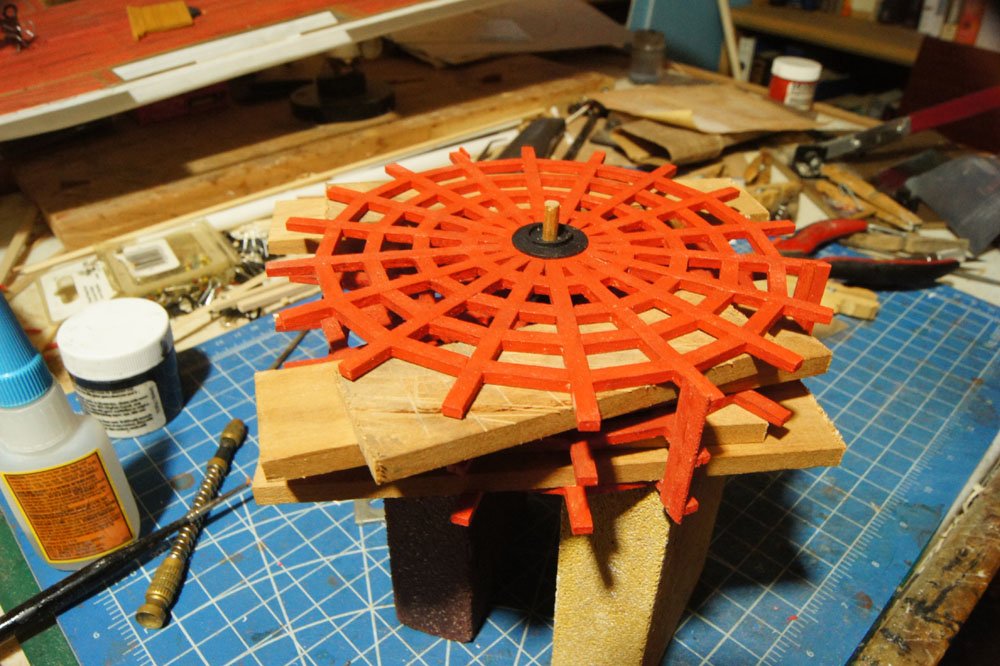
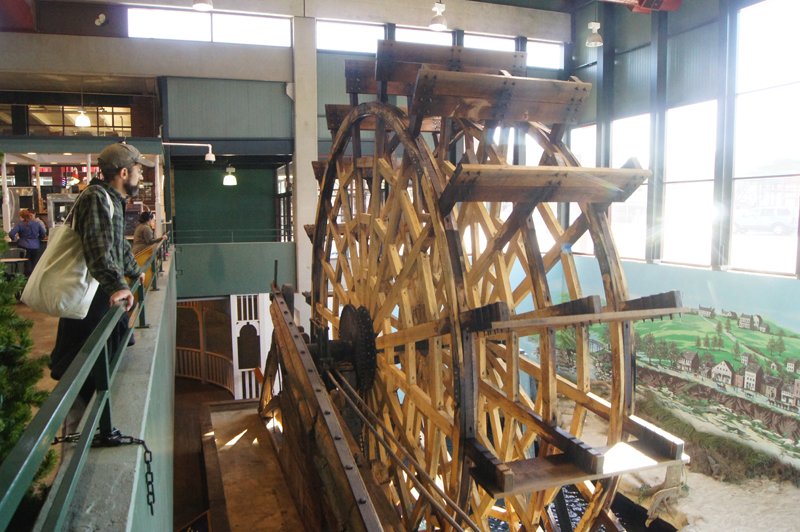
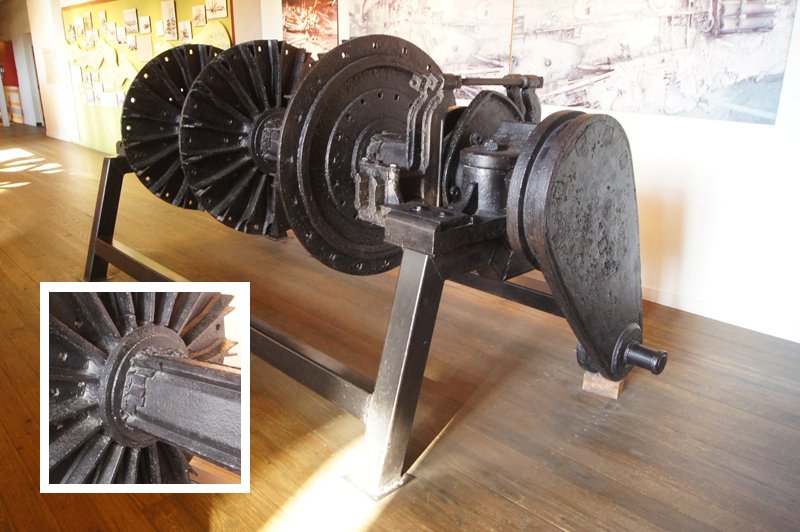
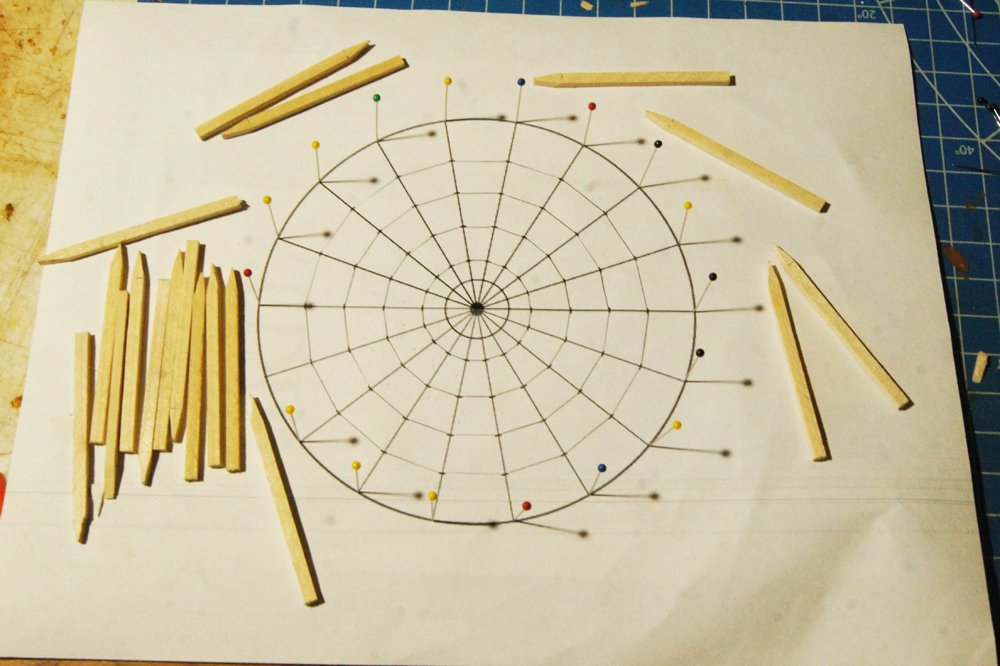
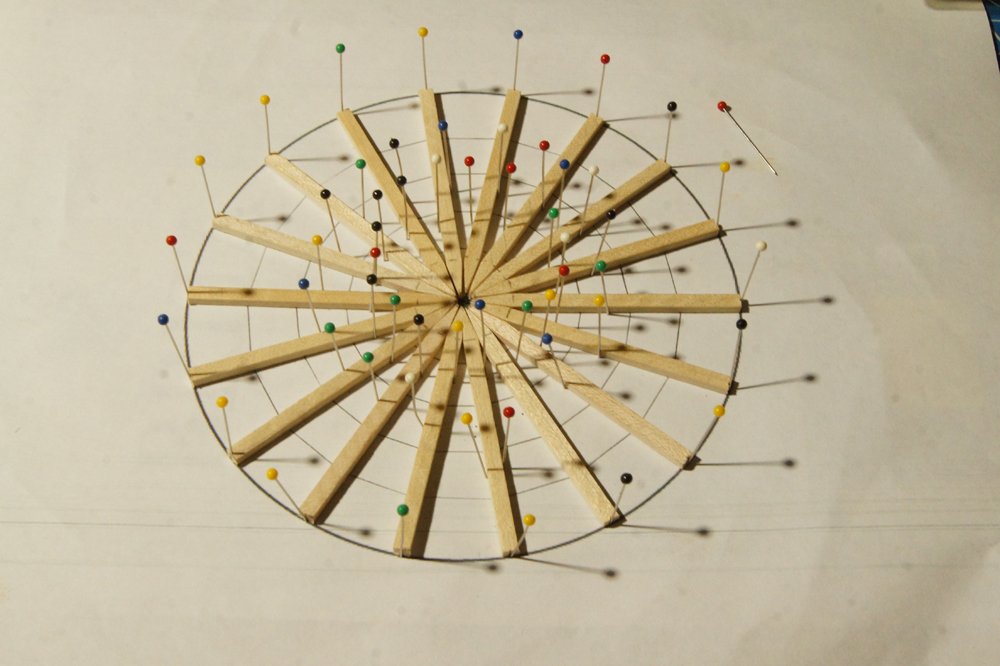
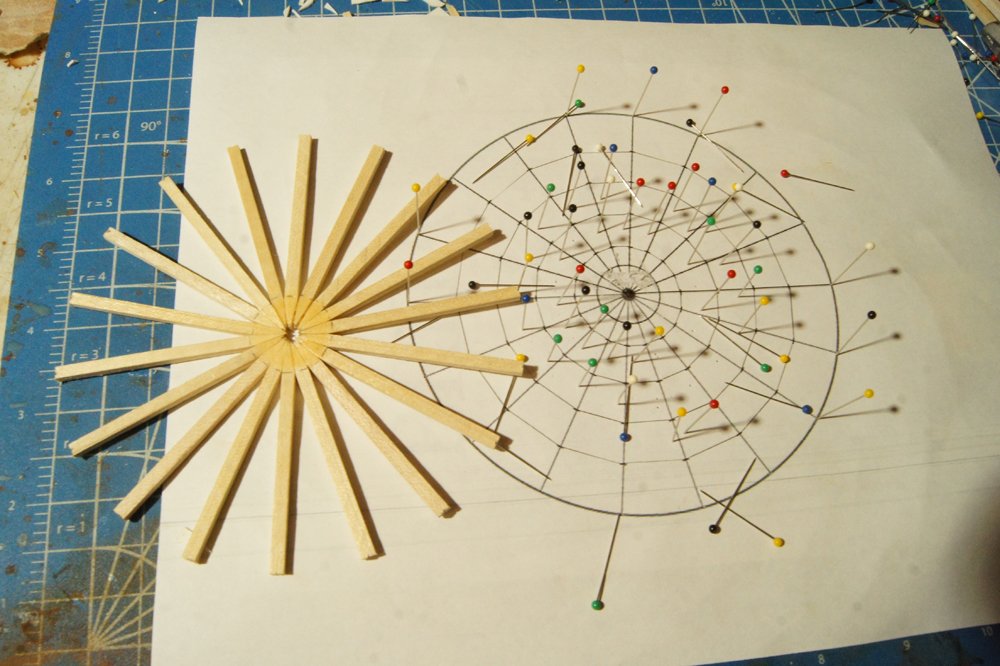
Working on the paddle wheel has been a refreshing change of pace. As a reminder, here's one shot of a restored wheel at the museum (with me for scale); there are many more in this post from my design thread. I couldn't measure the wheel directly, but sources say it's 28' (~8.5 m) in diameter. I know the width exactly because one of the axles is on display within the museum and I could photograph and measure it up close (see photo later in this post). I estimated the overall layout of the wheel by visual inspection of my photos, then drew up a plan on my computer that I could print out and use as a template. Luckily, the Arabia has 18 spokes, making a nice easy 20° angle between each. For contrast, Bertrand had something like 13 spokes, meaning none of them lined up properly and were harder to lay out cleanly. To actually build the first ring, I drew on techniques I used to use when building Guillows balsa-frame aircraft. I laid the plan on a piece of cardboard and used sewing pins to mark the end of each spoke along the outside circumference: I "sharpened" the end of each spoke at roughly the correct angle for all to fit together. On the real thing, each spoke's end would fit into a precisely cast iron hub, like this: But I felt that my skill set wasn't up to trying to manufacture such a detailed piece, especially having to make three identical ones (so all the rings lined up). So I decided to fudge it by assembling the wheel spokes as a solid mass and placing a flat hub along the outside. Notice how all the spoke flanges face inward on the axle; this means they'll be barely visible on the finished model anyway, so my approach should simulate the right effect. I may even draw in some faint black lines or shading to suggest the presence of the flanges separating the spokes. Given that choice, I laid out all 18 spokes on the plan and used more pins to hold them in place. I filed a slight notch at the outer end of each spoke so they'd sit against the end pins more securely. Once I was happy with the layout, I smeared wood glue within the central "sharpened" zone so it would sink into the slight gaps between spokes and bind them together. When that dried, I flipped the assemblage and repeated the process. I was careful not to use too much so that it wouldn't drip down and bind the spokes to the paper plan. I kept the glue within the rough area that would be covered by the wheel hub, to minimize any change in appearance of the finished wheel. This worked great; the wood absorbed the glue and held fast as a tight structure with no reinforcement necessary: Next, I started filling in the rings. I started with the outermost one, figuring that it would hold the spokes in the proper alignment while the rest were filled in. Starting from the inside out had too much potential to deform the spokes and end up with an uneven and unsightly pattern. This was the correct decision. I cut each piece using a combination of sharp hobby knife, sharp blade on a "chopper" type platform cutter, and a small razor saw. I used files, sandpaper, and the hobby knife to adjust the end angles until I was satisfied, then glued the piece in place. Some weren't perfect and there are subtle differences in spacing between spokes, but they're all but invisible in the collective view. Here's the wheel with the first two rings completed: And here's the finished wheel, sanded to a smoother finish: I'm quite happy with how this turned out. Of course, now I have to make at least two more. It was a fun project the first time, we'll see how I feel after repeating it. I say "at least two more" because each wheel consists of three such assemblages, so in theory I need six of these. However, I'm only planning to leave one side of the Arabia open to view, as I did on Bertrand, so I need one fully developed wheel. As the other side will be enclosed, it seems unnecessary to build a full wheel that will be 90% hidden within the paddlebox. So right now I'm considering only building the lowest part of a "dummy" wheel for that side and hiding it in fully planked paddlebox. I think by the time I build three of these, that will feel like the right decision. It took a week to build this first one, but perhaps the next two will go a bit faster now that I've worked out my methods. In any case, it was nice to celebrate my birthday today with a finished mini-project. It's raining here, so we're having a quiet indoor day with good food, which is just fine with me at 39. We're making fried rice with garden produce and homemade sweet-and-sour-sauce for lunch, then German potato pancakes, homemade breadstick-pretzels, and pear sauce (fruit from our orchard) for dinner with a coconut-lemon rum cake. Will probably open a bottle of homemade mead to celebrate. Thanks for reading
- 599 replies
-
- 21
-
-
- sidewheeler
- arabia
- (and 4 more)