HOLIDAY DONATION DRIVE - SUPPORT MSW - DO YOUR PART TO KEEP THIS GREAT FORUM GOING! (Only 20 donations so far - C'mon guys!)
×


UpstateNY
-
Posts
466 -
Joined
-
Last visited
Content Type
Profiles
Forums
Gallery
Events
Everything posted by UpstateNY
-
 Welcome aboard John, Ken and PAnderson, good to have you along on this voyage. I'll certainly need everyone's keen eyes to help me along the way. PAnderson...no deck swabbing needed...that will actually be my job as I try to keep the dust down to manageable levels! My thanks to all who hit the like button as well...very much appreciated! Cheers, Nigel.
 -
Great to have you aboard again Captain Steve! ! Thanks to Don for the kind words and to all for the likes!
-
Hi Paul, Really interesting to see your build with the links back to the archaeology work at the wreck site. Your model looks beautiful and so looking forward to future updates. Will follow along as well if you don't mind. Cheers, Nigel.
-
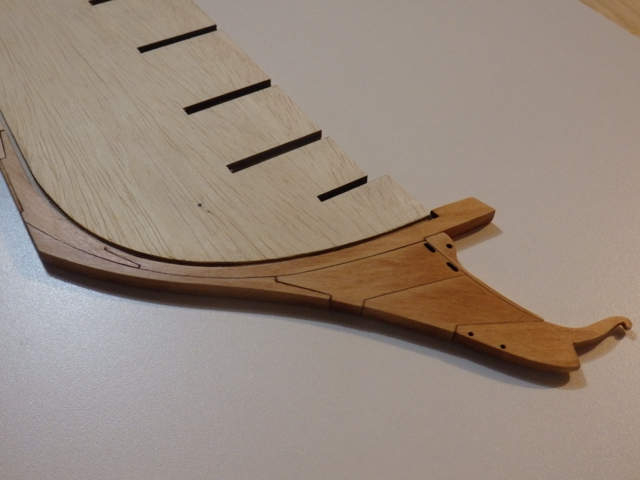
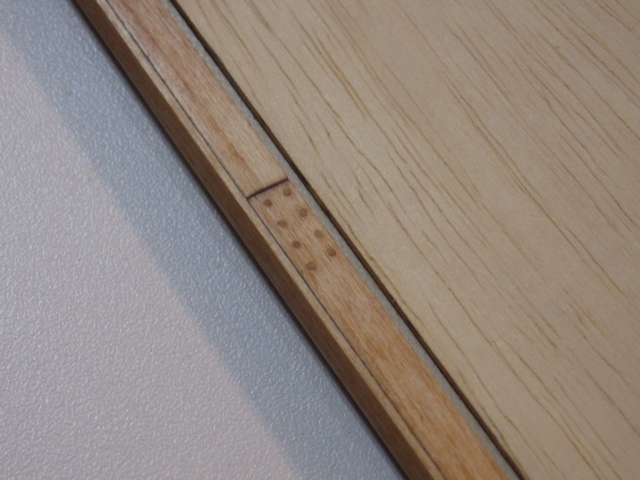
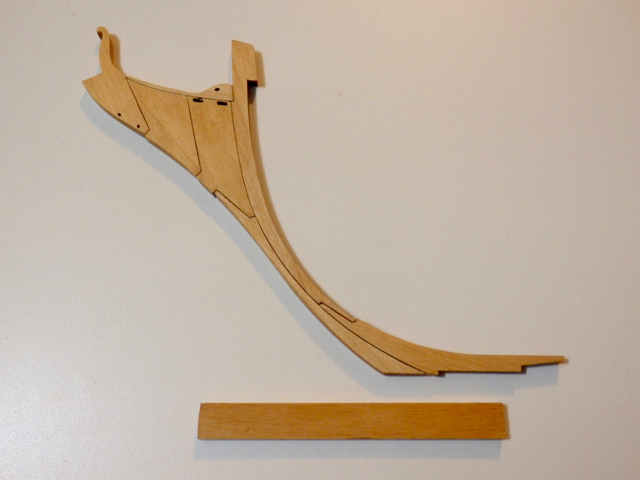
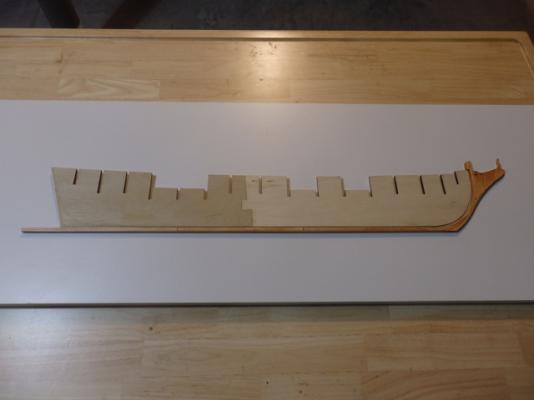
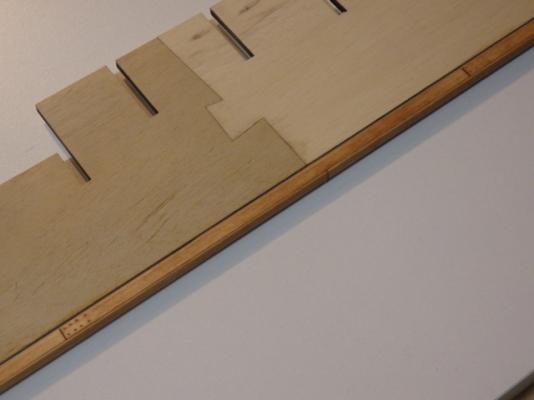
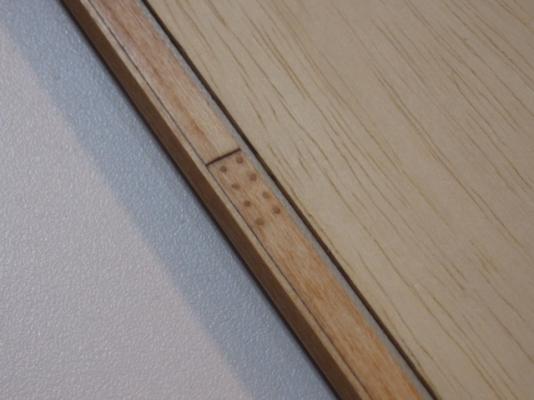
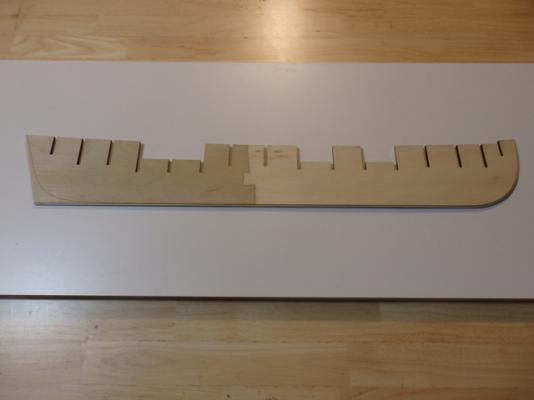
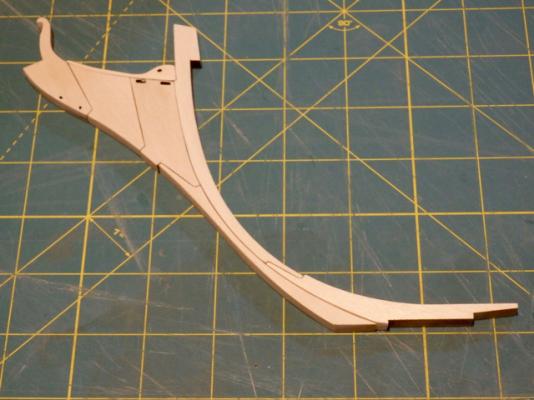
Hi All, Thanks again for the kind comments and the likes. Assembly of the bulkhead former, keel and stem has been completed which finishes Chapter One of the instructions. Former was sanded to the thickness of the rabbet strip at the bow and stern following the provided bearding lines. Stem was then tapered to 1/8in thick where the figurehead will sit and was glued to the former after re-staining and a coat of protective poly. Keel was assembled with the scarf joint being filed to fit in the same way as the bow and the false keel was added. All keel parts were initially stained and poly'ed before assembly. Scarf joint bolts were simulated using a #70 drill to make the 2 sets of 8 holes and the tips of toothpicks glued into the holes. The tips were then sawn off and sanded smooth before a light staining to darken the end grain and a final coat of wipe on poly. Images below and next up is assembling the bulkheads and numerous filler pieces to start Chapter 2. Cheers, Nigel.

-
Hi Druxey, I hadn't realized just how small this model will be until the last couple of photos. Wonderful stuff and so precise. Greatly enjoying following along. Cheers, Nigel.
- 641 replies
-
- 4
-

-
- greenwich hospital
- barge
- (and 1 more)
-
Hi Max, Looks great...lovely work! One thought is if you are concerned about the staysails as missing, perhaps show them furled so they don't prevent the view of the deck and rigging? Cheers, Nigel.
-
Welcome one and all and very glad for all the company! Better make yourselves comfortable as this won't be a fast build! Yep Sal, no "cooling off"! Quite apart from the fact, I've been itching to start the Lady Confederacy for months, modeling is what helps me "cool off" after the usual work day challenges! Cheers, Nigel.
-
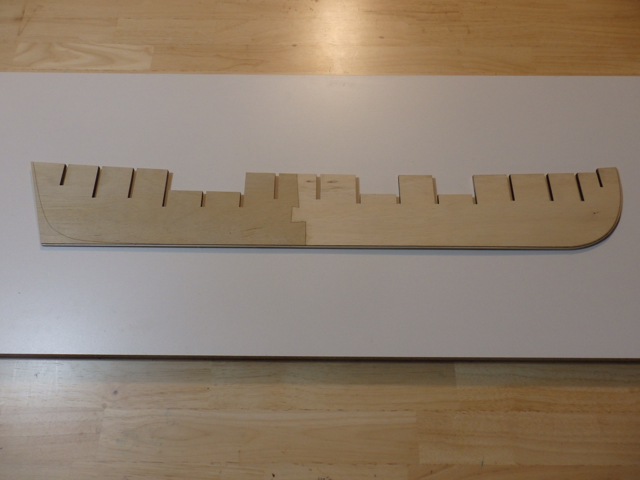
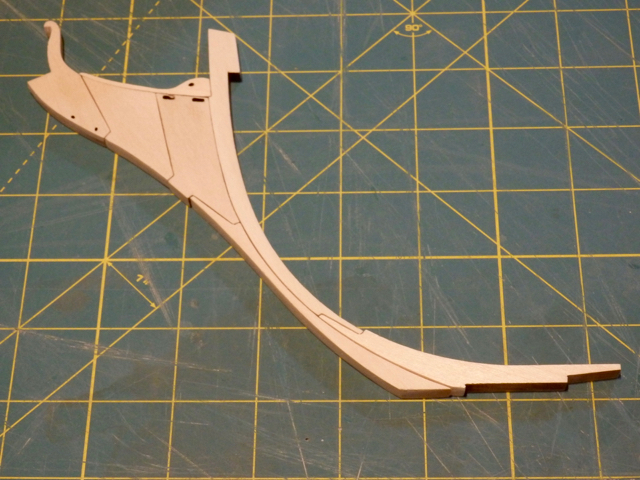
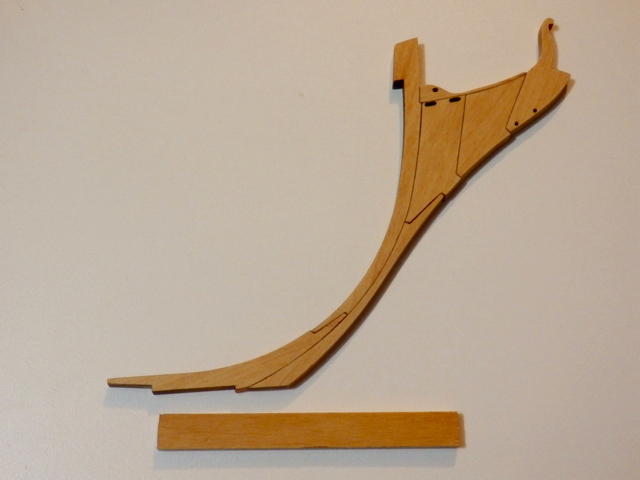
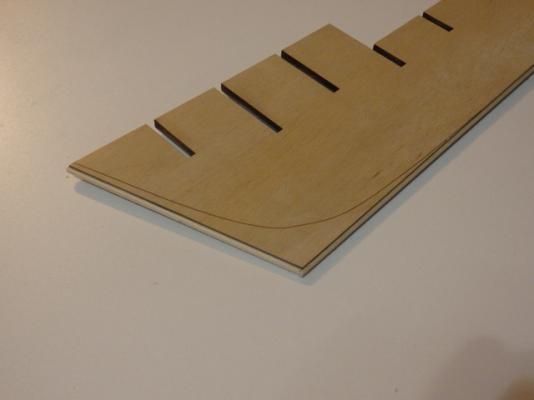
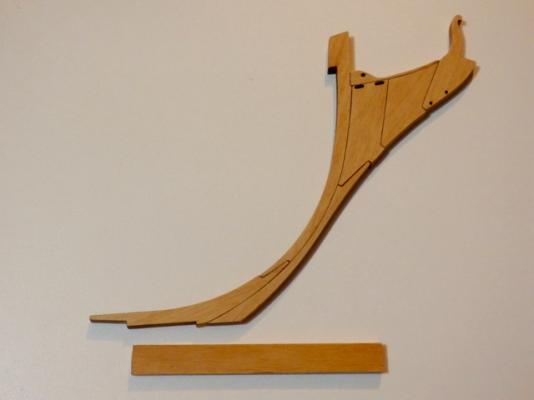
Hi All, Firstly, thank you Don and Nick for stopping by and of course to all for the likes. Nick, looking forward to seeing the start of your build....please start soon! So, some progress as the bulkhead former has been assembled. Took a few days to remove a slight warp in the pieces by dampening them and weighting them down on a flat board. The rabbet strip was glued to the center of the former after shaping it follow the bow shape using some light heat. While the former was being flattened, the stem was assembled. It took some time to remove the angles formed on the cut faces by the laser cutter so they would fit together evenly. Shaping was slowly done using needle files and often checking both sides for fit by holding them together flat on a glass plate. The 3rd image shows the pieces in a test fit. Following Chuck's instructions, I then stained all the pieces before gluing. I already had some Minmax Golden Pecan stain so tried a test piece after a light sanding to clean up the basswood surface. After 2 coats, with each left 15 mins before removing the excess, the basswood was a nice warm red/gold color. I hope you like it! The last two pictures show the stem after staining and glueing along with my reference piece. I plan to use this reference through the build to try and keep the color consistent. Cheers, Nigel.

-
Hi Phil, 100% agree w Patrick. Yes...Nils work is just beautiful and like the other master builders on MSW, there is no way I can match his work. But I let their work teach and encourage me and I simply enjoy following along as they work on their masterpieces. So, please, find a nice, starter kit that you love, really want to build and then start your build log if you haven't already. Then the MSW community can watch, enjoy your build and also help here and there if you need it! I'll watch for your log! Cheers, Nigel.
- 2,625 replies
-
- 10
-
-
- kaiser wilhelm der grosse
- passenger steamer
- (and 1 more)
-
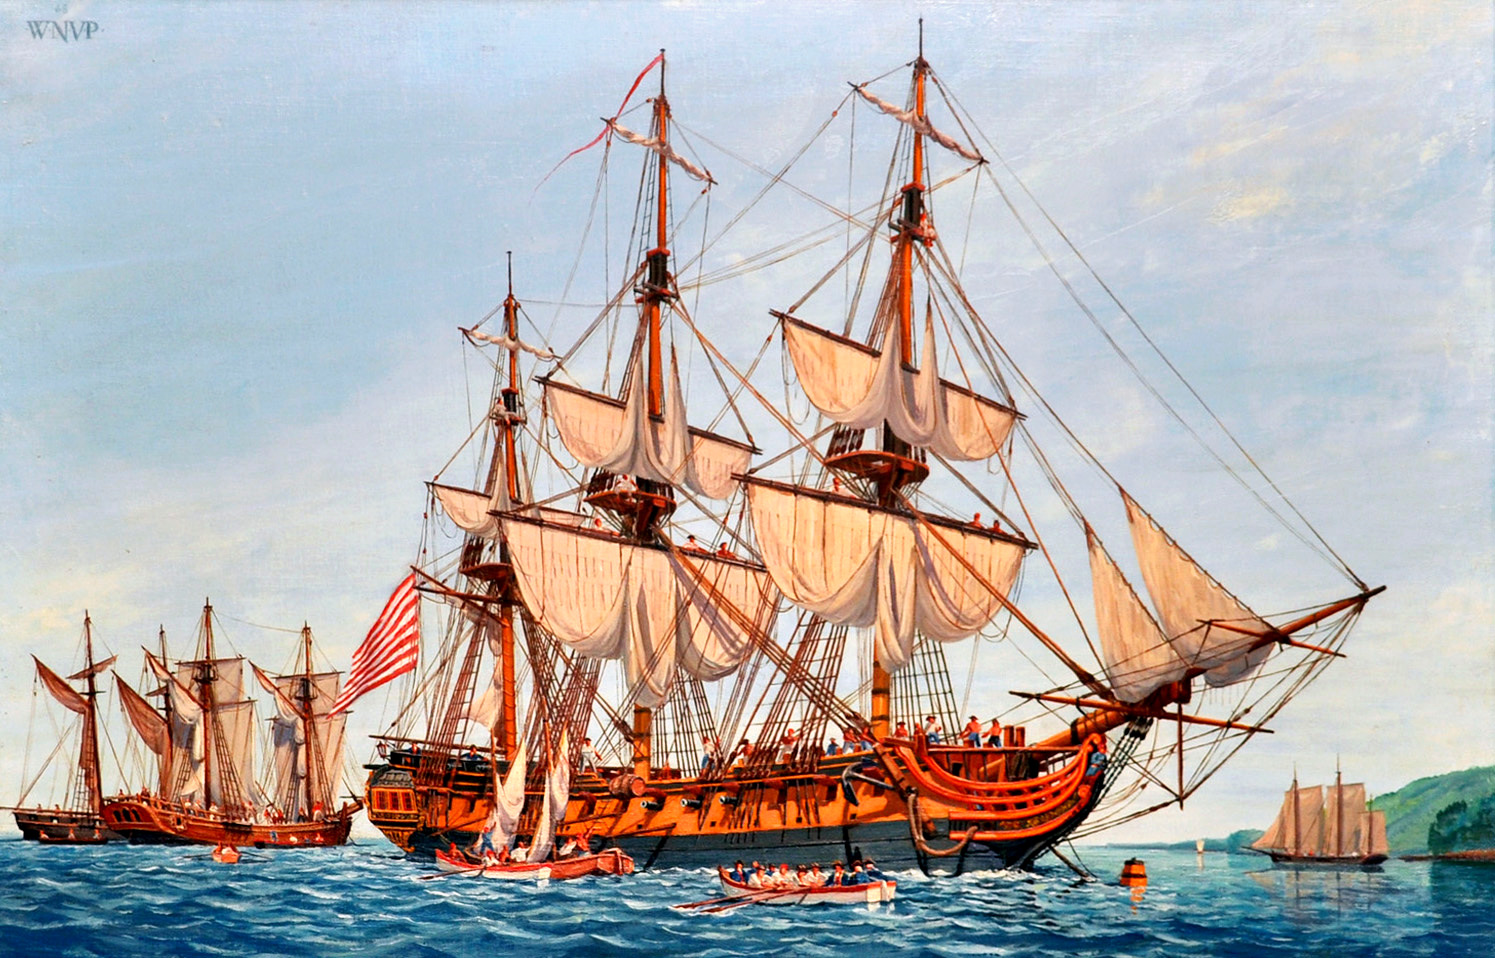
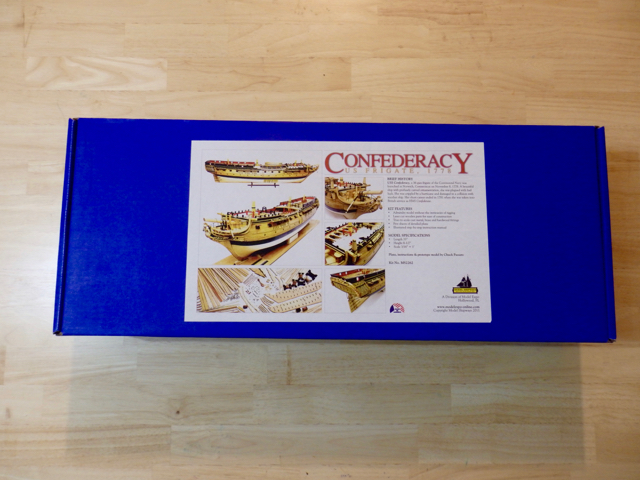
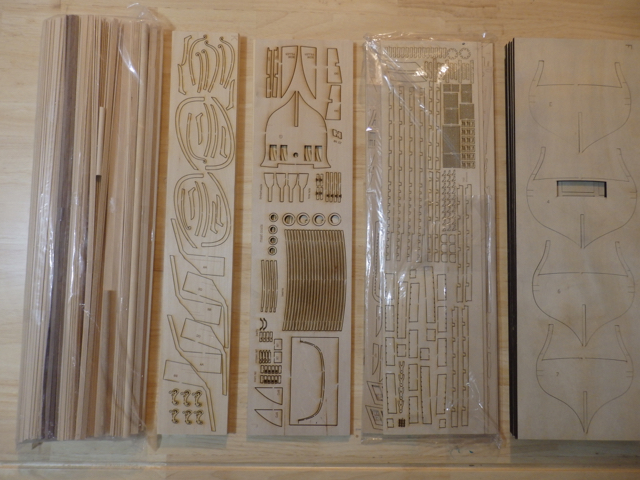
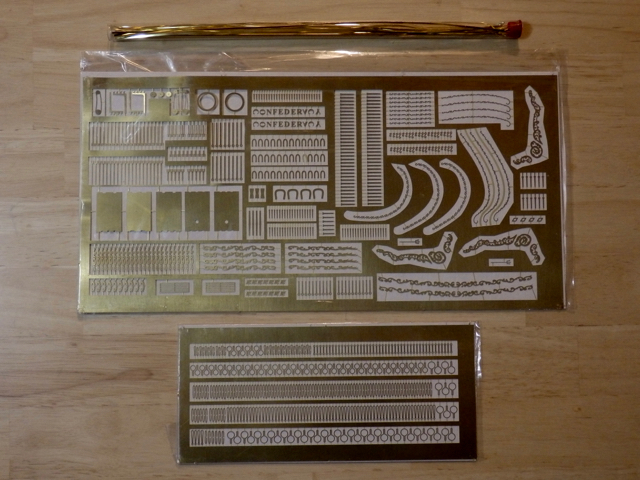
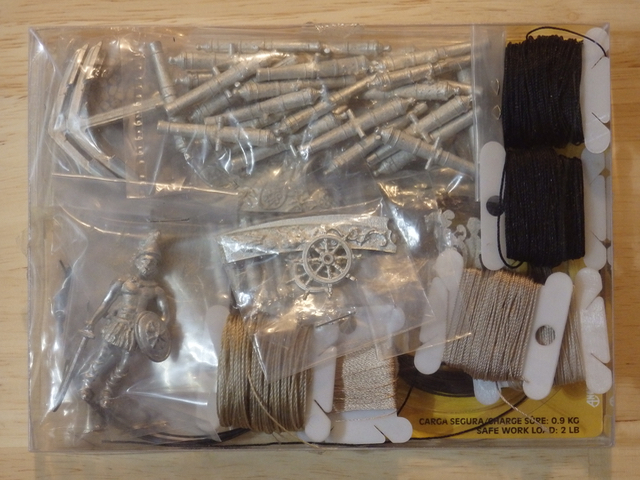
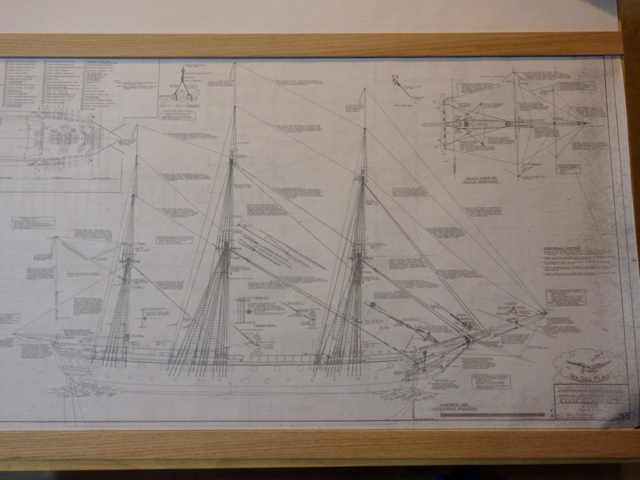
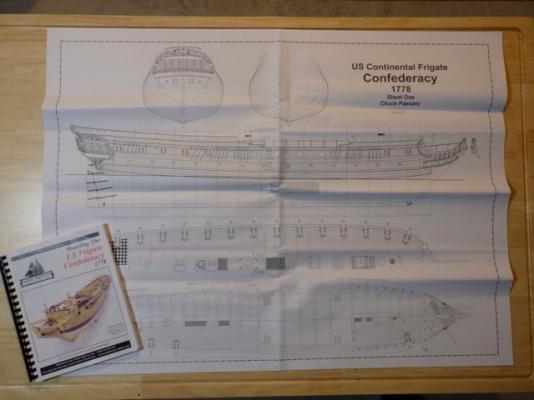
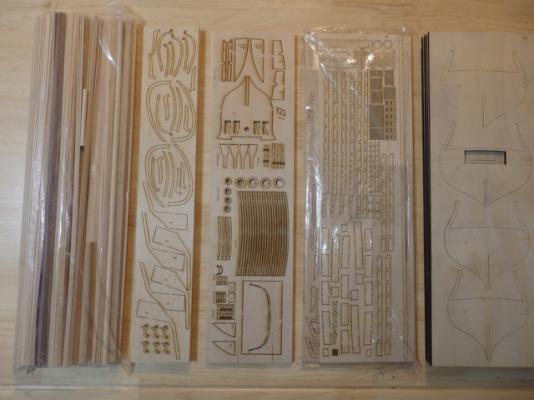
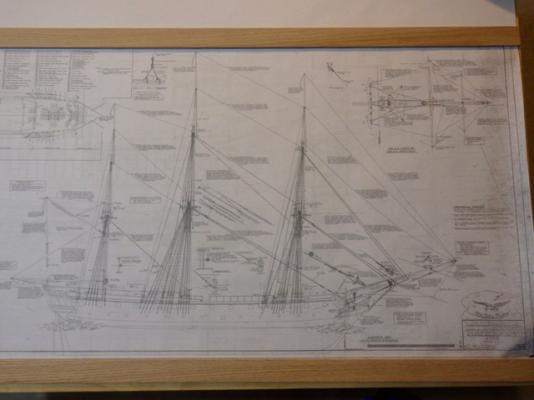
Hi All, Welcome to the start of my build log of the USF Confederacy from Model Ship Shipways as designed by Chuck Passaro. Her full history has been summarized in Chuck’s fabulously detailed instructions which can be downloaded from the Model Shipways site. Suffice it to say here that the Confederacy was an unlucky ship, surviving some actions, hurricanes and collisions before being captured by HMS Roebuck and Orpheus in April 1781 and taken into the British Navy as HMS Confederate. However, while only 2 years old, inspections showed a great deal of rot, probably due to the use of green timber during her construction. She was then broken up, but her lines were at least preserved by the British Admirality. Below is a Revolutionary painting of the Confederacy from the Navy Art Gallery at the Washington Navy Yard. My impressions of the kit are very favorable. The kit arrived very well packaged with all items present. I’ve already mentioned the great instructions, but the plan sheets are also extremely clear. All the wooden parts are laser cut and the etched brass and cast metal parts are nicely detailed. I am perhaps fortunate as all the more fragile parts are intact, like the figurehead and ships wheels. Images of kit contents and parts are below. The Confederacy’s rigging plan has not survived, but I do plan to fully rig her following the plans by Crothers. The exception are the belaying points as Chuck has kindly warned me the Crothers belaying plan is incorrect. So, following his advice, I will be working out the belaying points using other contempory frigates as a guide. This will be a long build and all advice and help will be most appreciated. I will certainly be referencing all the other great Confederacy build logs to help me along the way so my thanks in advance here! My dream for this build is to try and bring the Navy Art Gallery painting to life! I hope you find some time to stop by and enjoy this voyage with me! Cheers, Nigel.


-
Thanks Jeff and Sal! Glad you are going to try carving Sal...they are a lot of fun to do and I've no doubt they will turn out looking great. Cheers, Nigel.
-
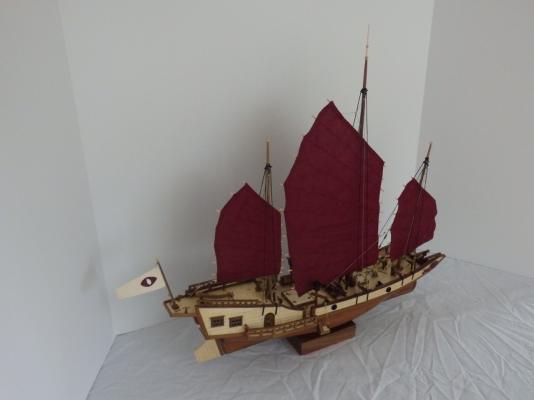
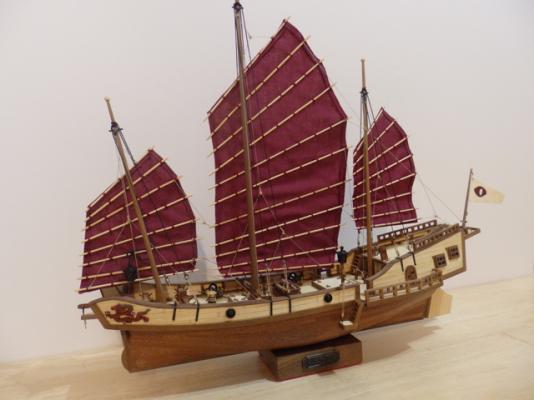
Hi All, Below are just a few final images to complete my Red Dragon build. My sincere thanks to everyone for their generous advice and support over the past year. I hope to see you all as I begin my USF Confederacy build as well as restart work on my Triton cross-section. Thanks again. Cheers, Nigel.


- 270 replies
-
- 7
-
-
- red dragon
- artesania latina
- (and 1 more)
-
Hi Martin, Thanks for stopping by and for the compliments. Please also pass on my thanks to the "boss"! I certainly will be pulling up a chair to watch your Dragon build and would be delighted if you find anything I've done worth reusing. Given your beautiful Revenge, I am sure you'll build a really unique and gorgeous Red Dragon. Cheers, Nigel.
- 270 replies
-
- 1
-
-
- red dragon
- artesania latina
- (and 1 more)
-
Hi Dimitris, Many thanks...glad you like the way she turned out. Hopefully what I've learned will stand me in good stead for my next build. Cheers, Nigel.
- 270 replies
-
- 2
-
-
- red dragon
- artesania latina
- (and 1 more)
-
Really fun stuff Popeye...your grandkids are going to love it... . Cheers, Nigel.
- 44 replies
-
- 6
-
-
- black diamond
- revell
- (and 2 more)
-
Hi Dave, Richard and Ken, As always, many thanks for the nice compliments and the support! Cheers, Nigel.
- 270 replies
-
- 1
-
-
- red dragon
- artesania latina
- (and 1 more)
-
Cheers Jack...many thanks for the kind words!
- 270 replies
-
- 2
-
-
- red dragon
- artesania latina
- (and 1 more)
-
Thank you Dave...appreciate the insights. Cheers, Nigel.
- 962 replies
-
- 6
-
-
- sovereign of the seas
- ship of the line
- (and 1 more)
-
Lovely work Dave and thank you for sharing the reinforcement tip. Does hard maple hold the details as well as boxwood? Cheers, Nigel. PS...Sorry to hear about Smokey.....
- 962 replies
-
- 5
-
-
- sovereign of the seas
- ship of the line
- (and 1 more)
-
Thank you very much Don...it's certainly a nice feeling to have finished a model!
- 270 replies
-
- 2
-
-
- red dragon
- artesania latina
- (and 1 more)
-
Thanks Patrick and Lionfish for the very kind works. Patrick, I am really pleased to have finished my first build and very happy with the way she turned out. Learned a lot and certainly will learn even more on my next build! Lionfish, understand your time problem...I have it as well, but I just chip away with an hour here and there. Hang in there! Cheers, Nigel.
- 270 replies
-
- 4
-
-
- red dragon
- artesania latina
- (and 1 more)
-
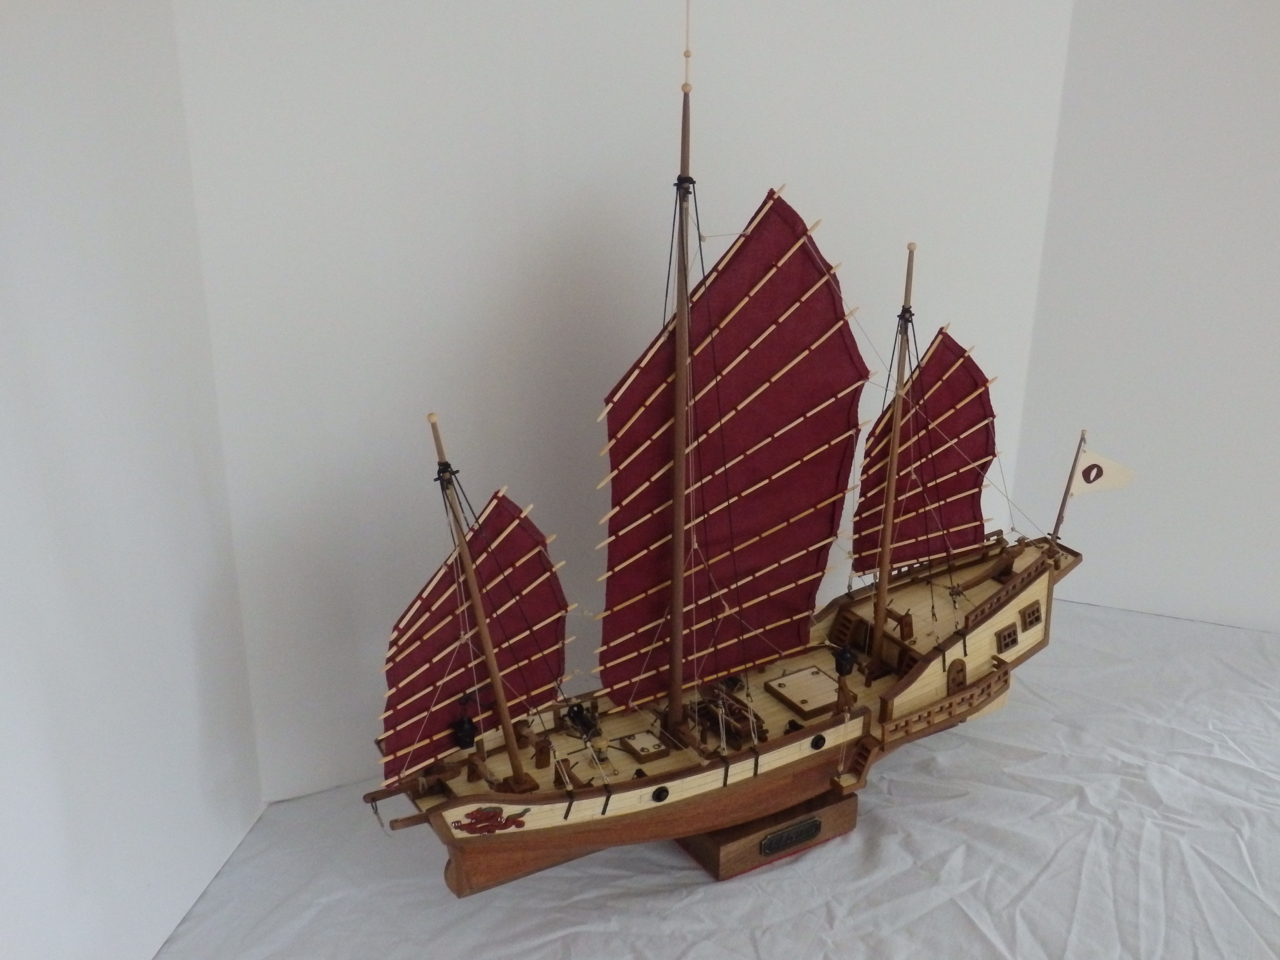
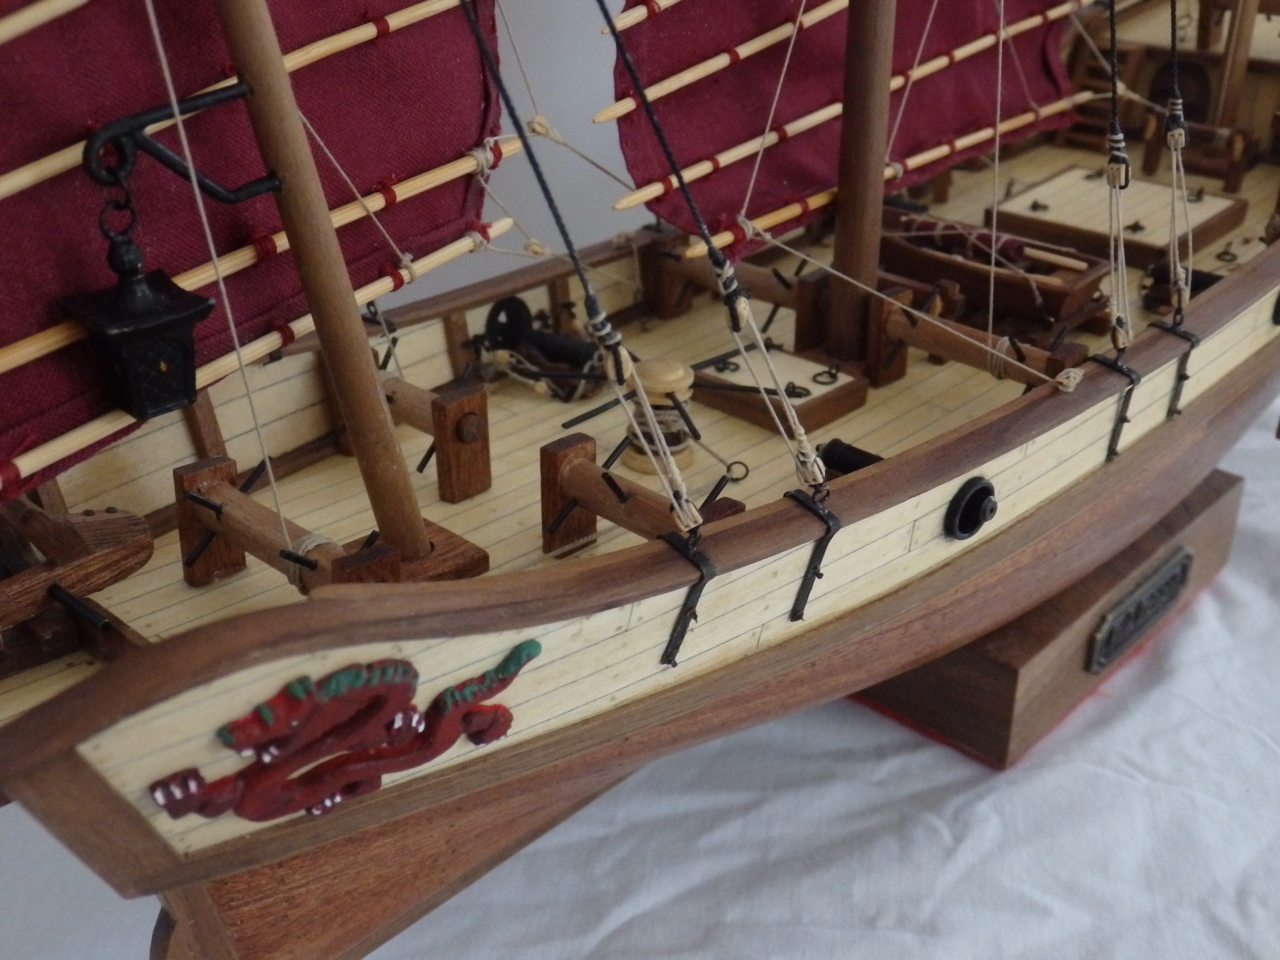
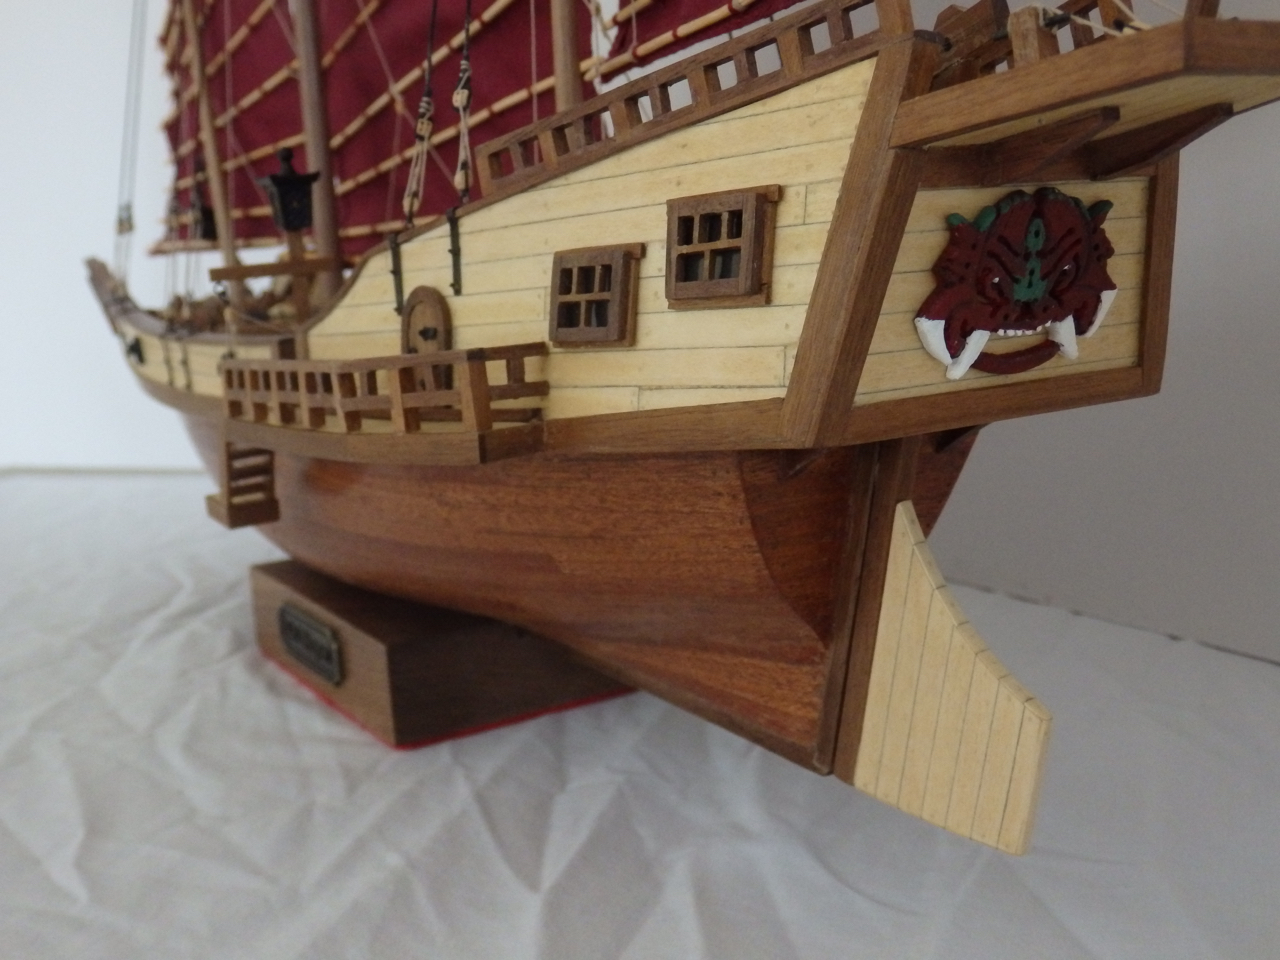
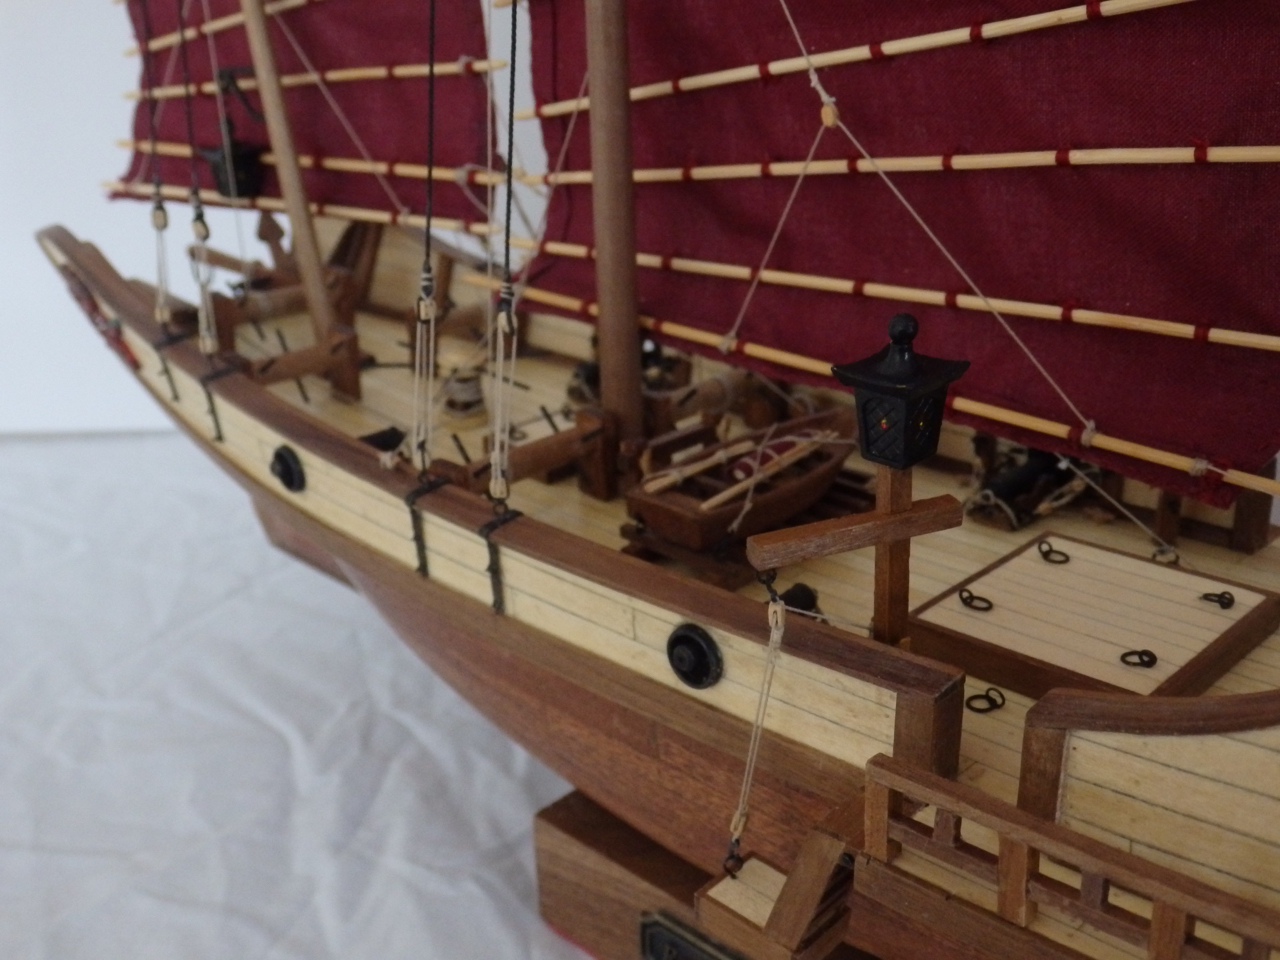
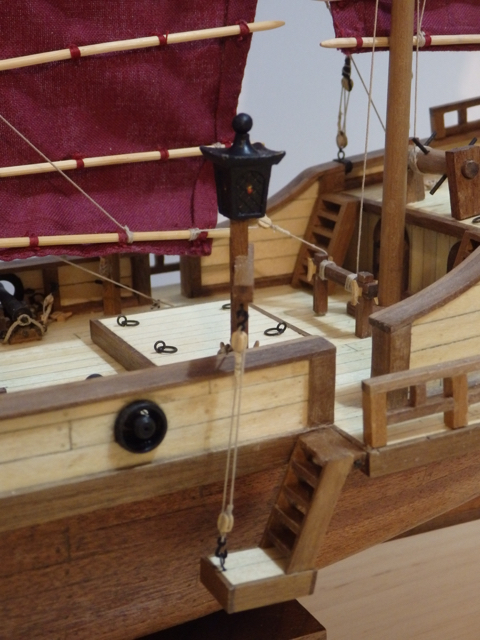
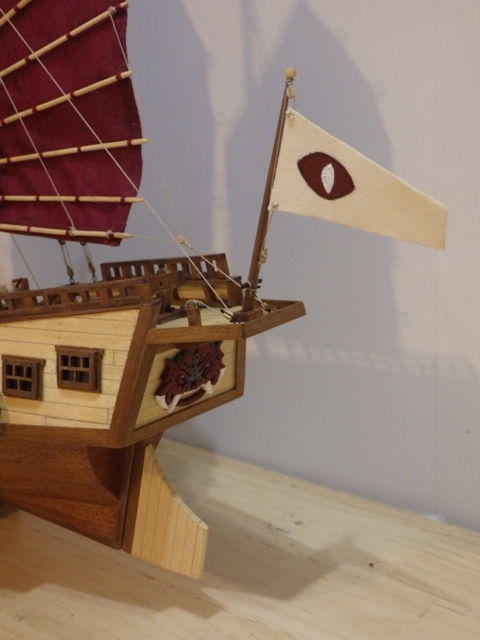
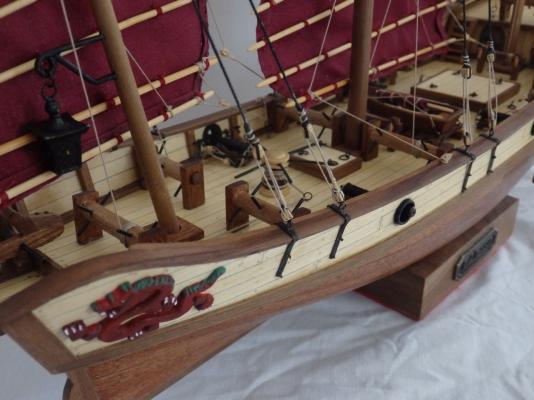
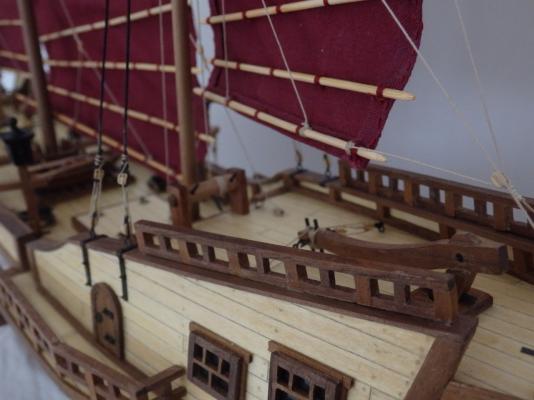
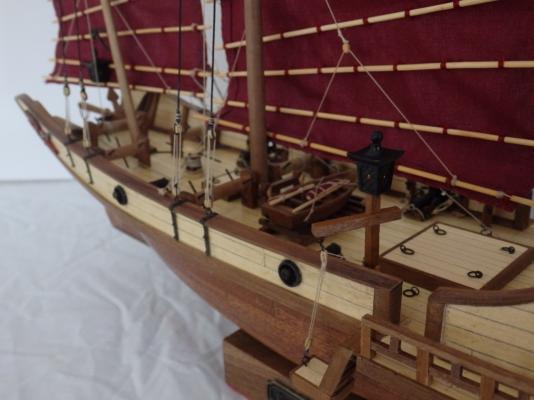
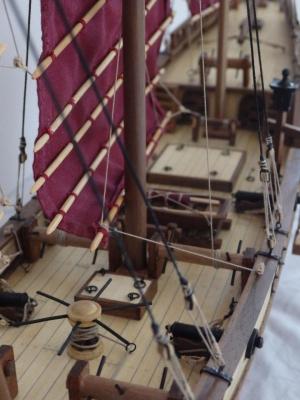
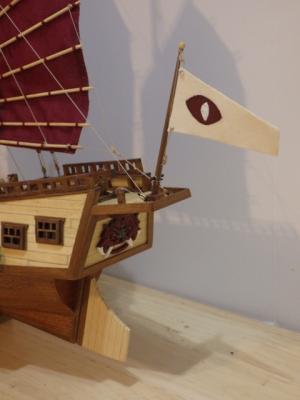
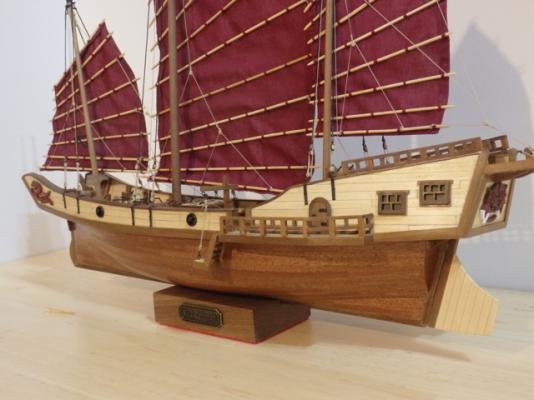
Hi All, The last few details are now done! The kit lanterns were painted and either hung or glued in place. I also replaced the kit flag as the very bright red color on the kit flag didn't look right somehow next to the sails. The new flag was made from the kit sail material and a red eye painted onto the fabric using the same FolkArt paints I used to paint the dragons. So all that is left is to clean off the dust, straighten out some of the standing rigging which has twisted slightly and then take some final shots in better light in her final resting place! As always, thanks for reading, for the likes and the kind comments. Images below as usual! Cheers, Nigel.

- 270 replies
-
- 10
-
-
- red dragon
- artesania latina
- (and 1 more)
-
Many thanks Captain, Carl and Jeff! Appreciate all the kind words and of course all the support and the likes! Cheers, Nigel.
- 270 replies
-
- 3
-
-
- red dragon
- artesania latina
- (and 1 more)
-
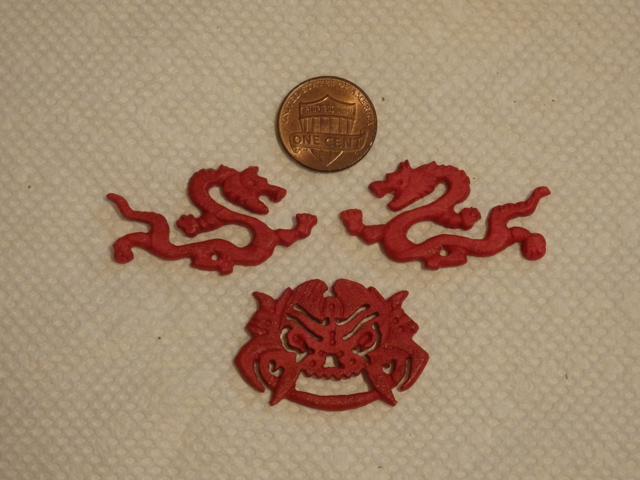
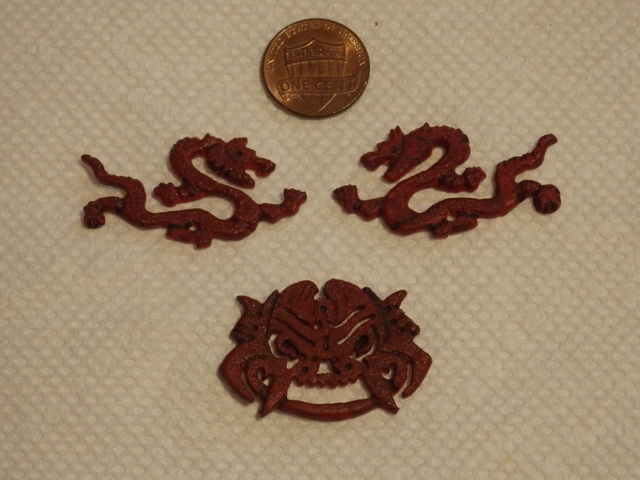
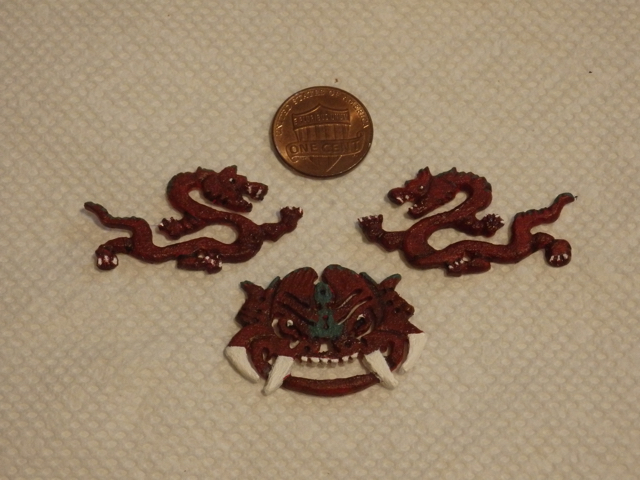
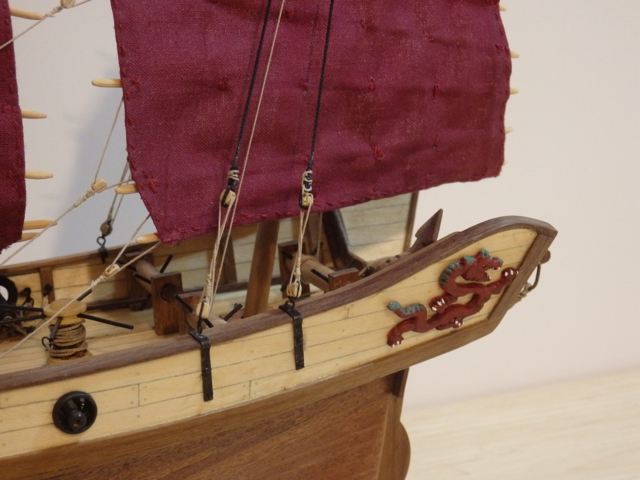
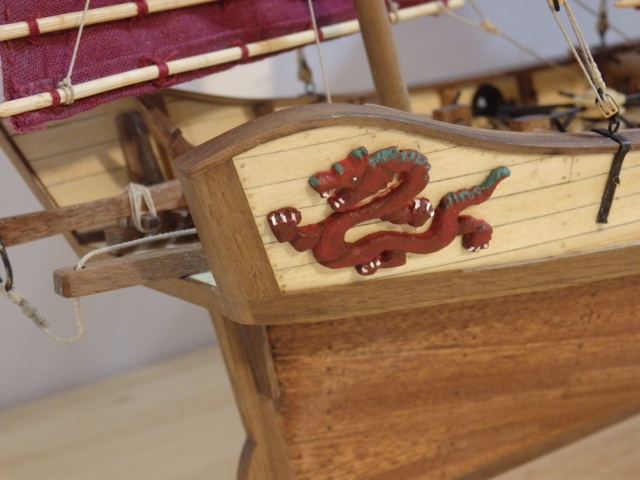
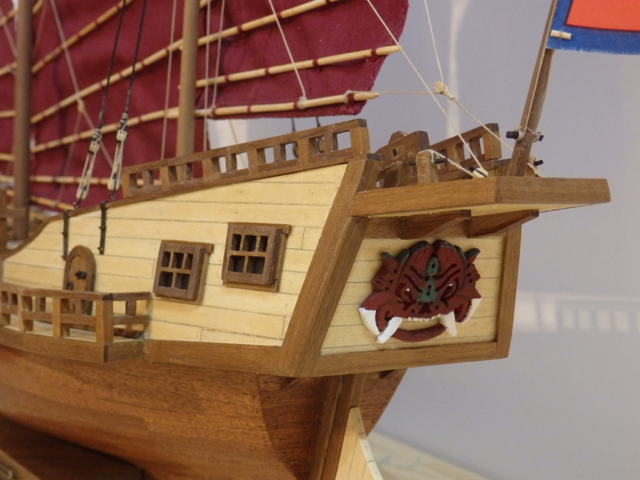
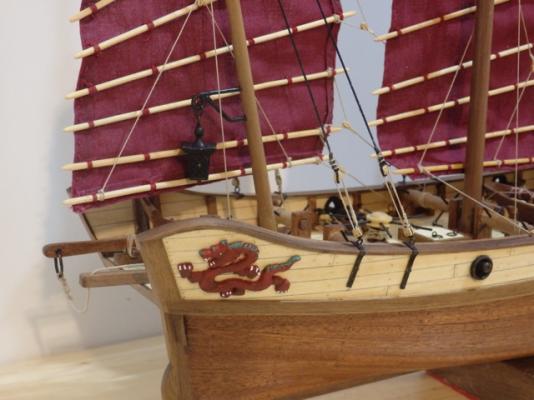
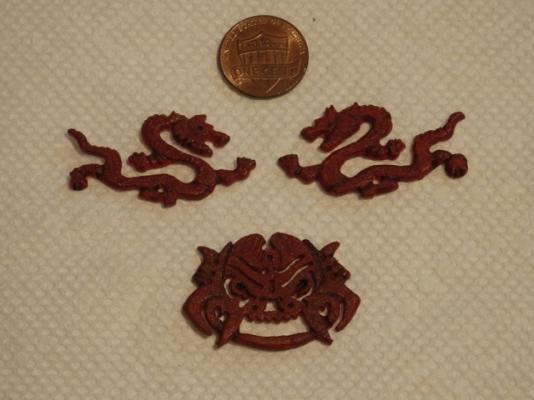
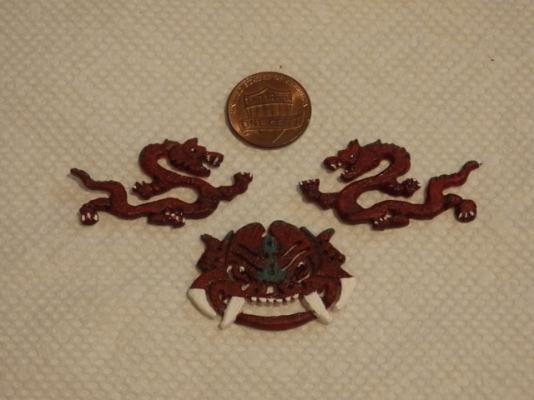
Hi All, I hope you all had a great New Year! Dragon carvings have now been painted using some FolkArt brand paints I found at the local craft store. Firstly, a base red coat was applied and then some black paint was used to darken the detail lines. I then mixed up a deeper red to match the sail color and stippled it onto the carvings in several thin coats. I used a stipple finish to try and add some extra texture. Finally, some white and green was added for the final details. The carvings were then glued on to the bow and stern. Overall, I am pretty happy with how they turned out... . Cheers, Nigel.


- 270 replies
-
- 7
-
-
- red dragon
- artesania latina
- (and 1 more)
-
Hi Mark, Congrats and I especially love the first picture. Wonderful to see her the correct way up...must be a great way to end the year after so much work. I know Admiral's orders specified full planking on the outside...I am keeping my fingers crossed, those same orders allow that great interior framing work to remain visible! Happy New Year! Cheers, Nigel.