HOLIDAY DONATION DRIVE - SUPPORT MSW - DO YOUR PART TO KEEP THIS GREAT FORUM GOING! (Only 13 donations so far - C'mon guys!)
×


UpstateNY
-
Posts
466 -
Joined
-
Last visited
Content Type
Profiles
Forums
Gallery
Events
Everything posted by UpstateNY
-
 My congrats as well Dave on the completion of your Cheerful! I am also really looking forward to what the next couple of weeks allows you to do on the decoy! Cheers, Nigel.
- 209 replies
-
- 8
-

-
- cheerful
- Syren Ship Model Company
- (and 1 more)
-
What Matt and Jesse said! Lovely work! Cheers, Nigel.
- 389 replies
-
- 4
-
-
- scottish maid
- artesania latina
- (and 1 more)
-
Hi Julie, Thanks for posting the pictures of how you interlocked the clamps...very interesting technique. Enjoying your build and certainly looks like a challenging hull to put together to say the least. Cheers, Nigel.
-
Hi Jeff, Really nice work...she is coming together beautifully! Cheers, Nigel.
-
Hi Dimitris, Lovely work on the masts and fast work as well! I'd still be doing the bowsprit! How are you prep'ing and painting the wood and metal to get such a nice finish? Cheers, Nigel.
-
Thanks for the kind comments guys I am really pretty happy with how the foresail turned out and I am glad you like it too! The mainsail is about 3 times larger so it may take me a while before that one is done! Cheers, Nigel.
- 270 replies
-
- 3
-
-
- red dragon
- artesania latina
- (and 1 more)
-
Hi Mark, Sad to read of your Admiral's back problems.... take care of her and yourself as well. Will say another quiet prayer for a speedy recovery. Cheers, Nigel.
-
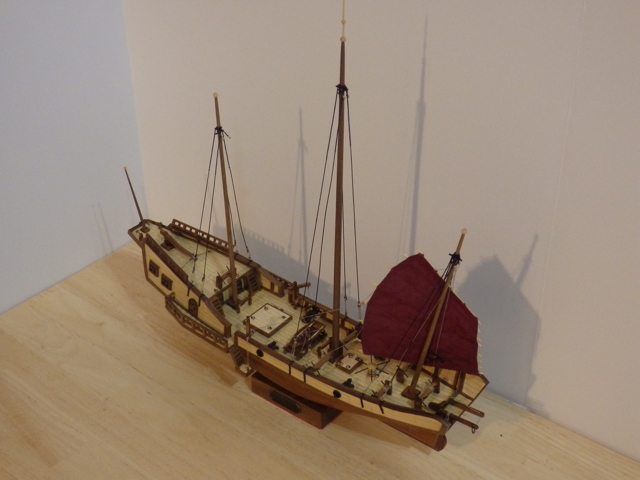
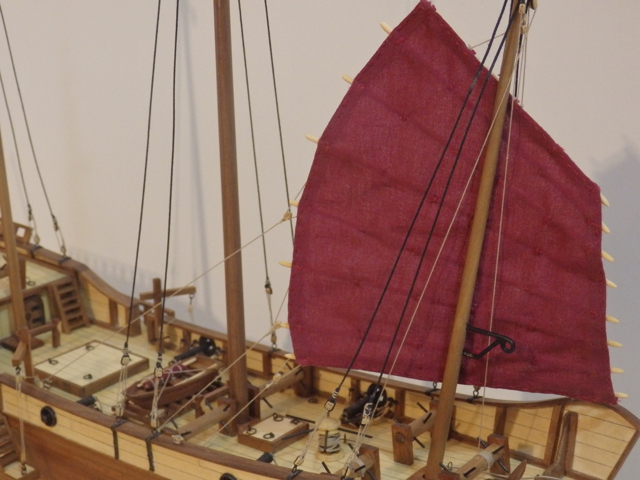
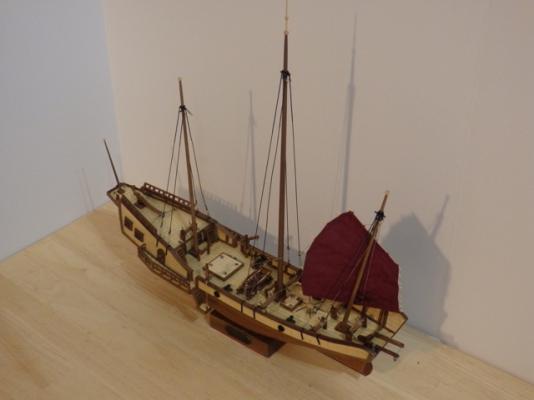
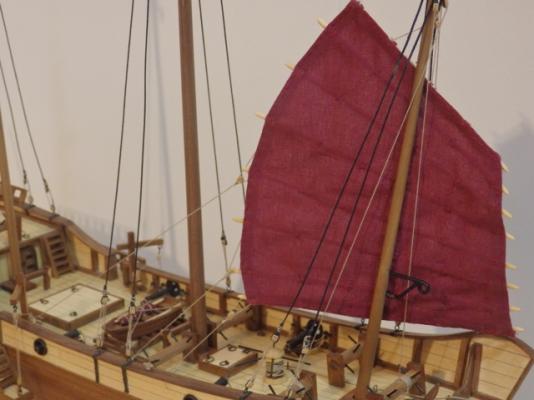
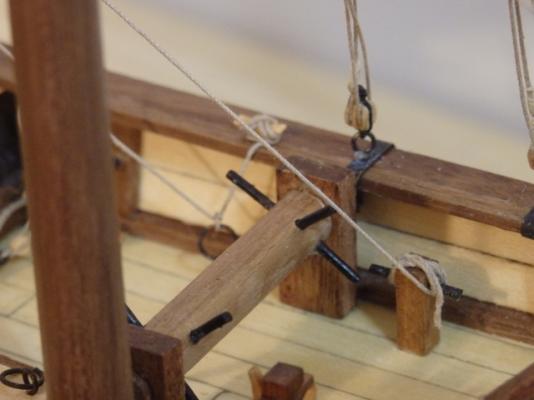
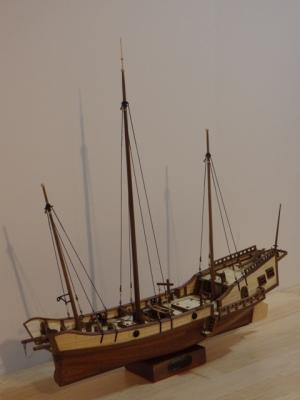
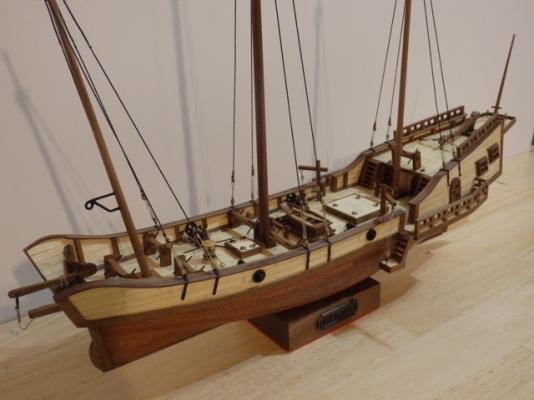
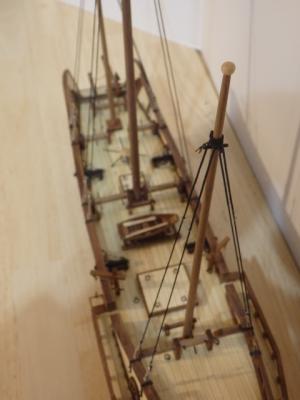
Hi All, Follow on post to show you how things look after rigging the sail onto the foremast. The pairs of single blocks attached to the foremast were used to rig the foresail halyard and lift. They were then tied off to the different windlasses. Bowlines were then tied off either through the deck ring bolts onto Syren cleats or directly to the deck bitts. Good to see the first sail rigged and I am really happy with the deep red color. Images below and thanks for reading and of course for the earlier "likes". Now onto the main and mizzen sails! Perhaps I am just starting to see the finishing line emerging.... Cheers, Nigel.
- 270 replies
-
- 12
-
-
- red dragon
- artesania latina
- (and 1 more)
-
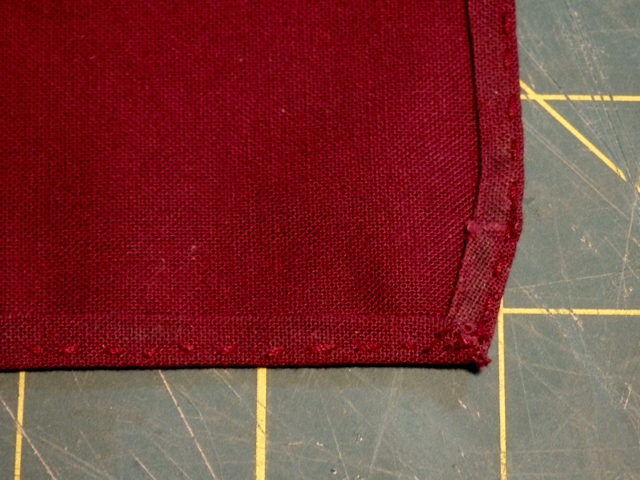
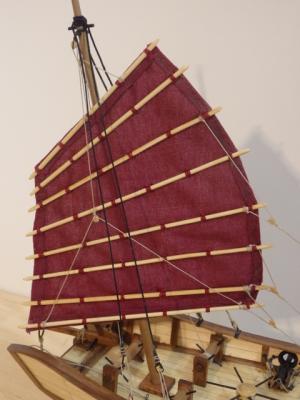
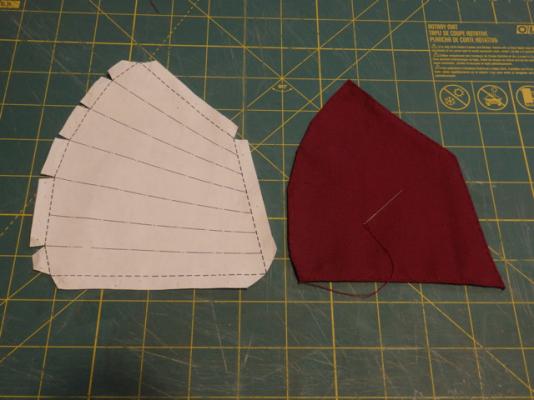
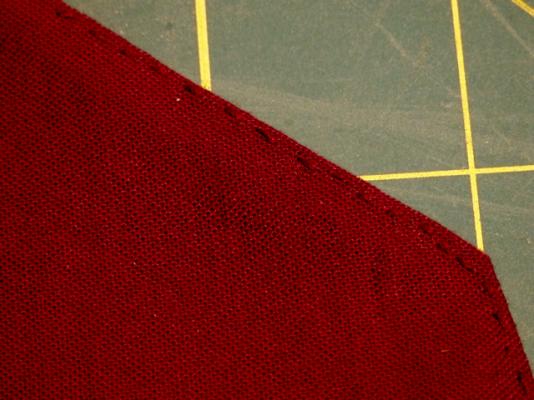
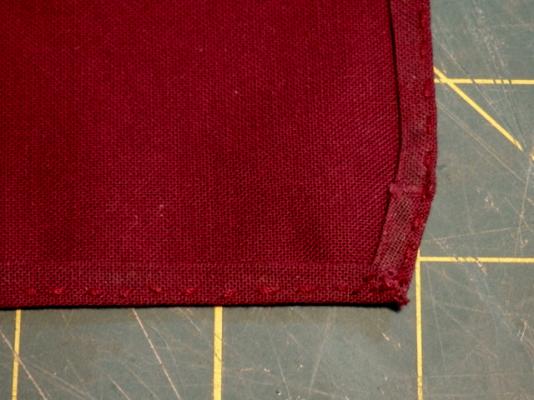
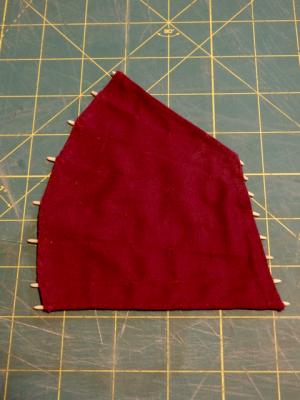
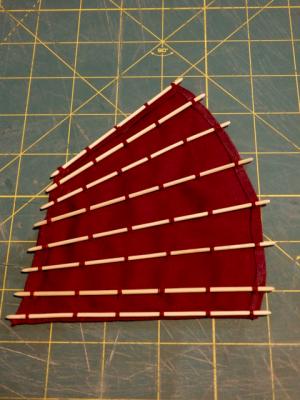
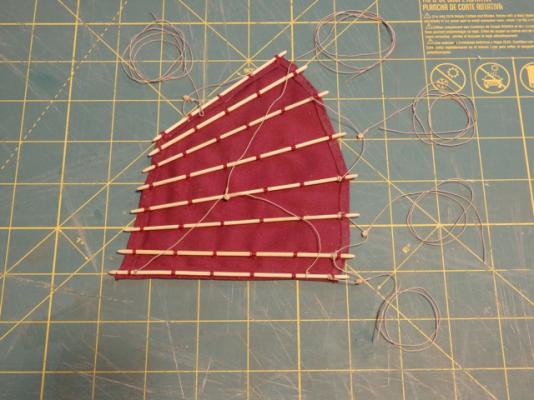
Hi Janet, Firstly my best wishes for a speedy recovery Janet...I hope you are soon up and about, feeling much better and able to get back to your great Dragon. Thank you for your kind words. Hi Captain Steve, Thanks the encouragement...hope you like the below post As for the red sails, well here is my first effort! Needless to say given all the sewing, I have now donated the required amount of DNA to my build...now you know why I chose red sails! Sails were cut from the fabric by cutting out the pattern after pinning the pattern to the cloth. The sail edges were double hemmed using iron on adhesive hemming tape so the cut edge was fully sealed. I then sewed around the edges of the sails to try and add some detail. Foresail pawls were then cut to length and the ends rounded off. Each pawl was then attached to the sail by stitching through the sail several times to form evenly separated loops. Finally, the foresail halyard, lift and bowlines were assembled using Syren single blocks and 0.012in rope and tied to the pawls. Not the neatest job, but I am pretty happy given it is my first sail. Images are below and the next post will show the sail after attaching to the foremast. Cheers, Nigel.

- 270 replies
-
- 8
-
-
- red dragon
- artesania latina
- (and 1 more)
-
Hi Ed, Been enjoying your build for quite some time now so I figured it was about time I said thank you for the detailed log with all the how to's! Build is of course spectacular and I am looking forward to the rest of the build very much. Cheers, Nigel.
- 3,618 replies
-
- 6
-
-
- young america
- clipper
- (and 1 more)
-
Hi Julie, I will follow along as well if you don't mind...I love the lines on these yachts! Cheers, Nigel.
-
Hi Vic, As always, a wonderfully clean and beautiful build and great to see her starting to gain some height in the last shot. I hope you keep posting to show us your progress on the rigging. I know I've been looking forward to watching this! Cheers, Nigel.
-
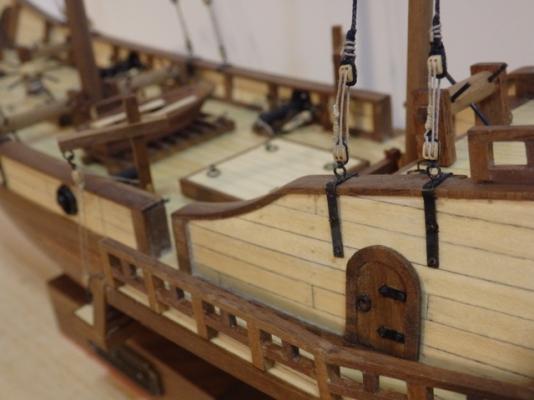
Hi All, Thanks for kind comment Hamilton and to all, my thanks for the "likes". Well, as a break from stabbing my finger with a sewing needle as I try to make some sails, last night I finished off the ships boat. I made a small sail and then lashed the mast/spar I made earlier to it. I also lashed the oars together and finally tied the boat down to the deck support using some eyebolts and Syren hooks, rope and boxwood cleats. Hope you like the deep red color I chose for the sails. Now back to sewing practice..... Cheers, Nigel.


- 270 replies
-
- 10
-
-
- red dragon
- artesania latina
- (and 1 more)
-
Hi Ken, Expected you to take a few days off for a well deserved break after completing your Niagara, but great to see you already starting on your Constitution. The pinnace looks great and I am pulling up a chair! Cheers, Nigel.
-
Sweet work Dimitris...the pattern made by those bowsprit nets looks really cool! Give your eyes a rest and perhaps enjoy an ouzo...I think you've earned it. Cheers, Nigel.
-
Hi All, Thanks to all everyone for the kind comments and the likes....I know I am repeating myself here, but all the encouragement is truly appreciated. So over the past week, I managed to finish off the fore and mizzen mast shrouds. Exactly the same process was used as for the main mast and thankfully with the practice, things went a bit faster. So, the Dragon's standing rigging is done and now it is on to making the sails...should be fun! Thanks for reading and pics below as usual. Cheers, Nigel.
- 270 replies
-
- 12
-
-
- red dragon
- artesania latina
- (and 1 more)
-
Hi Ken, My congratulations as well...you have built a stunning model that I hope you enjoy for many years to come. Thank you for all the shared building tips and I am already looking forward to your Constitution build! Cheers, Nigel.
- 440 replies
-
- 4
-
-
- niagara
- model shipways
- (and 1 more)
-
My best wishes as well..and like everyone, I just hope you are feeling better! Cheers, Nigel.
- 2,191 replies
-
- 4
-
-
- confederacy
- Model Shipways
- (and 1 more)
-
Glad to see you back in the shipyard Patrick! Great progress on the hull...this will be a fun build to follow! Cheers, Nigel.
-
Hi Brian, Just want to add my congratulations on a truly wonderful looking model. I hope you enjoy displaying her for many years to come. Cheers, Nigel.
- 831 replies
-
- 5
-
-
- Armed Virginia Sloop
- Model Shipways
- (and 1 more)
-
Hi Vivian, Sorry to hear life has been a bit hard over the past few months. My best wishes as well and I am very much looking forward to seeing how your Red Dragon now looks. Cheers, Nigel.
-
Hi Nigel and Robb, Many thanks for your encouraging comments...I can't say I am finding this rigging stuff easy, but things are slowly speeding up as I practice. I am hoping to finish the remaining shrouds this week. Then the sails will be pretty much the last really big job. As for fall, we are unfortunately past the best of it now up here, but there are still a few lovely patches here and there to enjoy. Cheers, Nigel.
- 270 replies
-
- 5
-
-
- red dragon
- artesania latina
- (and 1 more)
-
Wonderful work Dimitris...she is looking fabulous. Also amazed at your fast progress...you have to be getting close to starting the masts or am I missing a few steps here? Cheers, Nigel.
-
Hi Lionfish, Yes, I am already using the upgraded rope, boxwood blocks and cannons from Chuck at Syren. The cannon comparison vs the kit cannons is back on page 6 post 110 in case it helps. I am using his rope in tan and black at 0.008, 0.012 and 0.025in depending on what is being rigged. Blocks are his 1/8th single and double blocks, but I went down to his small 2mm blocks for the cannons. Note the kit provided 4mm blocks which look just too large given the 1/60th scale. The link to the Syren webpage is below, but it is of course on the top page of the site along with all our other sponsors (my thanks to them all!) http://www.syrenshipmodelcompany.com Thanks for the kind word Dimitris and to those who hit the like button! I certainly plan on having a good day as I have a day off today! Cheers, Nigel.
- 270 replies
-
- 5
-
-
- red dragon
- artesania latina
- (and 1 more)
-
Hi Lionfish, Thanks for stopping by and for the kind comment. "looks great, how would you rate this kit so far?" It is a fun kit and a good one for a first build. Planking is not too hard as the bow is not very bluff and of course the rigging is not very complex. The kit also offers lots of scope to add fun extra details. I've been pretty happy w the wood quality but as usual, some of the kit fittings like the cannons, rope and blocks are worth upgrading. Cheers, Nigel.
- 270 replies
-
- 3
-
-
- red dragon
- artesania latina
- (and 1 more)