HOLIDAY DONATION DRIVE - SUPPORT MSW - DO YOUR PART TO KEEP THIS GREAT FORUM GOING! (Only 20 donations so far - C'mon guys!)
×


UpstateNY
-
Posts
466 -
Joined
-
Last visited
Content Type
Profiles
Forums
Gallery
Events
Everything posted by UpstateNY
-
 HI Chuck, Build is fantastic and I love the finish on the guns. Thanks for yet another great tip! On the truck colors, I am glad ivory is out, but for me any of the other colors could look great so a test would be very interesting! One question if you don't mind...what are the brand and shades of the paint you use on the Cheerful please? Cheers, Nigel.
- 1,051 replies
-
- 4
-

-
- cheerful
- Syren Ship Model Company
- (and 1 more)
-
Hi Jack, The ice yacht Storm King is up at the Lake Champlain Maritime Museum in Vergennese and on display. She look great when I saw her this summer and I expect they would be happy to let you take measurements if you called ahead. They were all very friendly when we visited and there are many other interesting exhibits as well. Cheers, Nigel.
- 203 replies
-
- 4
-
-
- artesania latina
- marie jeanne
- (and 1 more)
-
Great work on the rudder coat Jesse....my best wishes for a fast recovery as well. Cheers, Nigel.
- 1,306 replies
-
- 8
-
-
- syren
- model shipways
- (and 1 more)
-
Hi John, Your paint finishes looks very even and I like the color...be interesting to see it against the decking. Enjoying following along....I really like how this model looks and goes together. Cheers, Nigel.
-
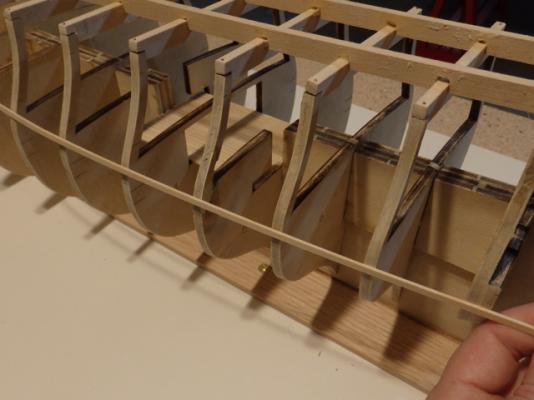
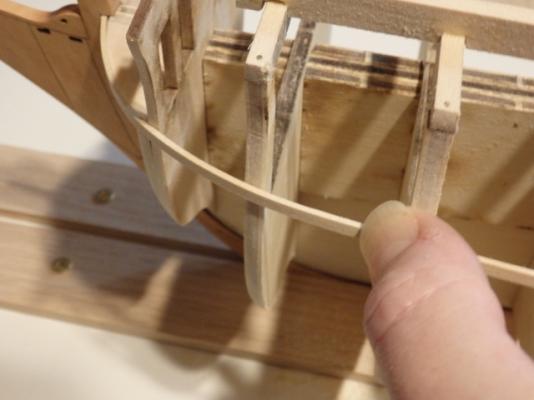
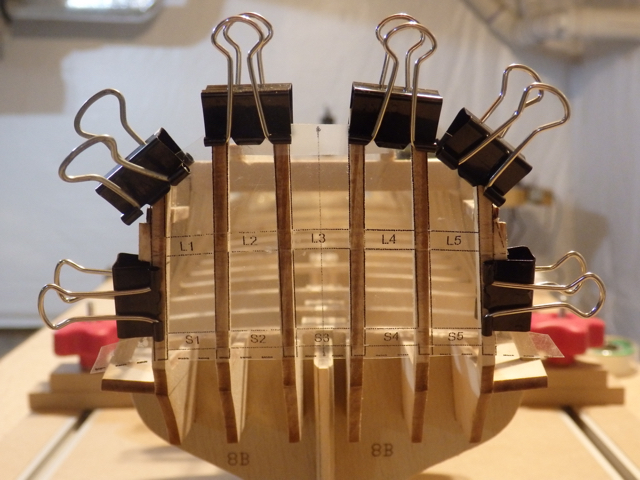
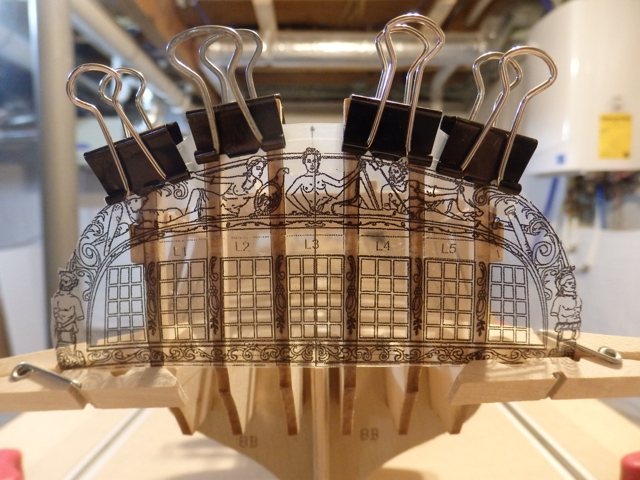
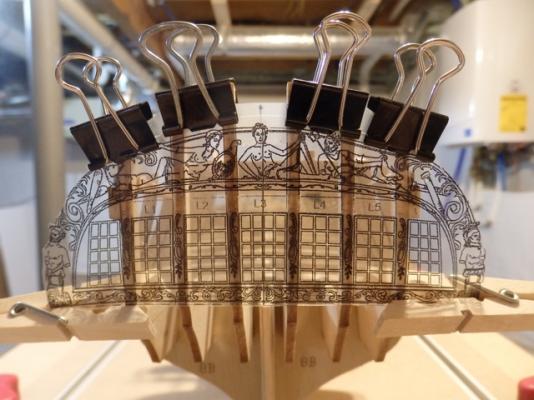
Hi All, A small update as I've finished the first part of the stern framing. First step as usual was the clean off the laser char and here I went very light given the stern timbers have complex curves I didn't want to alter by mistake. The stern timbers were then glued in place, making sure they were firmly seated against bulkhead 8 and that their angles matched the template. I copied the paper templates onto clear transparency film so I could see the timbers completely and so line them up easily. I did double check there was no scale offset when I copied them as Chuck warns in his instructions. The film is also much stronger than paper so I could use clips to hold the template against the frames without risk of tearing. The upper side pieces were then chamfered so they fit snugly against the stern timbers and, together with the hull frames, were glued in place following the laser etched reference lines. I used my steel rule to make sure the upper pieces were not tilted in or outboard, again as warned in the instructions as these pieces form the bottom sills for the aft cannon ports. Once the glue set, my final check was to overlay the window template to double check the spacings. Seems to be OK, but please sing out if you see anything amiss so I can correct it! Next up is some careful fairing of the upper pieces and then adding the sills and lintels to complete the window framing. Thanks for reading and again for all the kind comments and "likes". Cheers, Nigel.

-
Thanks for showing how you use these patterns Druxey...really helping me learn. Your build is just staggering....I love that last shot showing all the framing against the planking patterns. Cheers, Nigel.
- 641 replies
-
- 2
-
-
- greenwich hospital
- barge
- (and 1 more)
-
Hi Alde, I am no planking expert, but your runs look pretty good to me. I'd just make sure the battens are symmetrical on each side and then see how things look once you done your tick strips! Cheers, Nigel.
-
Cutty Sark by NenadM
UpstateNY replied to NenadM's topic in - Build logs for subjects built 1851 - 1900
Dear Nenad, My deepest sympathies to you and your family at this time. My thoughts are with you all. Nigel.- 4,152 replies
-
- 5
-
-
- cutty sark
- tehnodidakta
- (and 1 more)
-
Congrats Jack on a great build....love those final outside shots! Very much enjoyed following along and looking forward to your next build! Cheers, Nigel.
- 203 replies
-
- 4
-
-
- artesania latina
- marie jeanne
- (and 1 more)
-
Love the bow Dave and I especially like the last shot showing the full hull. Just amazing to see all these carvings in place! Good luck at the Doc's today! Cheers, Nigel.
- 962 replies
-
- 10
-
-
- sovereign of the seas
- ship of the line
- (and 1 more)
-
Thanks for the nice compliments Carl, Elijah and John and to all for the likes! Stern framing has begun, but I will be taking this slow so I get all the angles and curves correct! Cheers, Nigel.
-
Beautiful work Phil on both the hull and cabin. I also really like your solution to the "chain plates" problem! Cheers, Nigel.
-
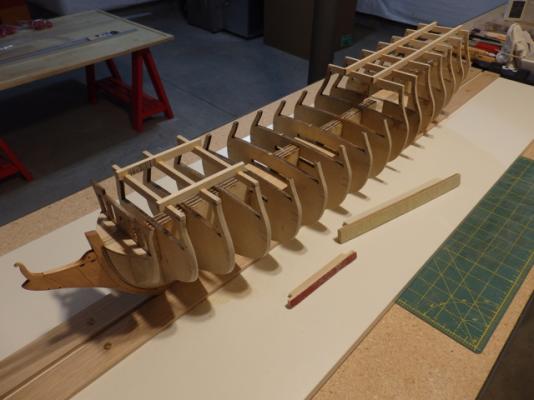
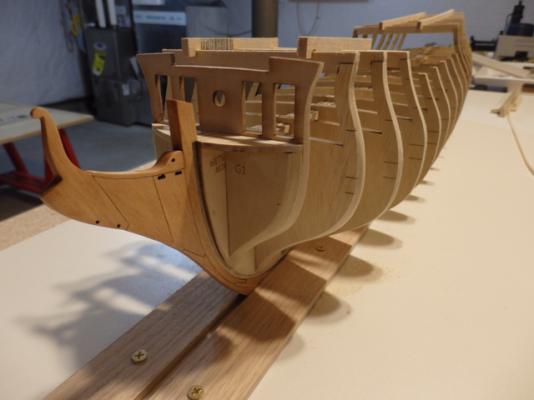
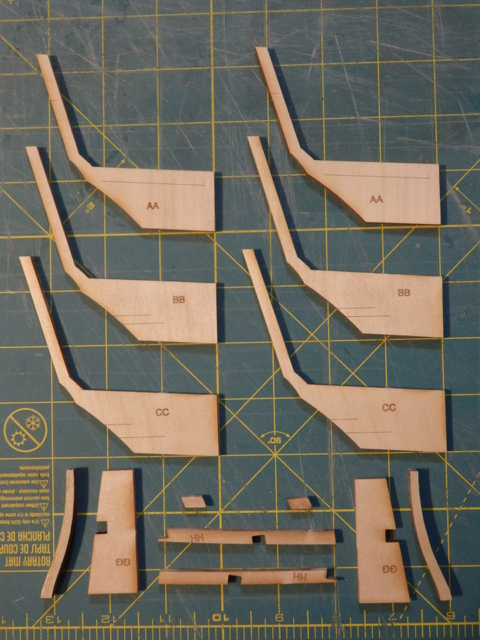
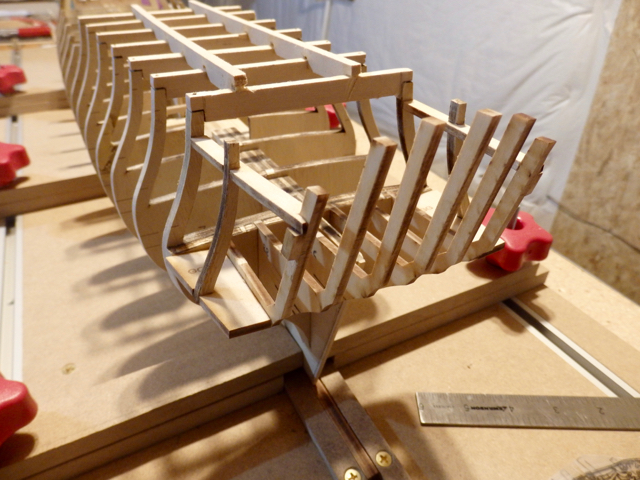
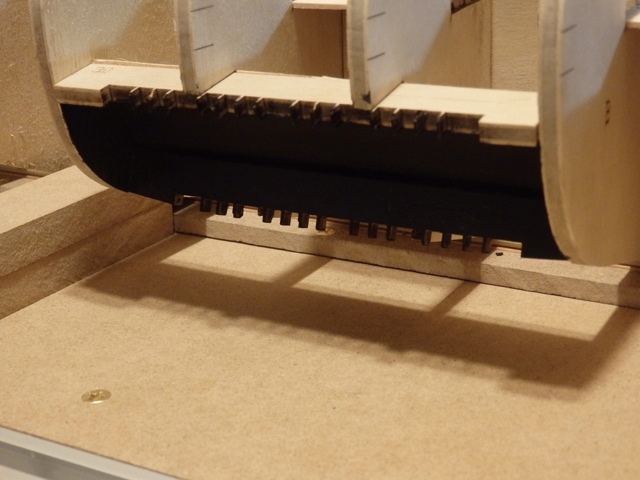
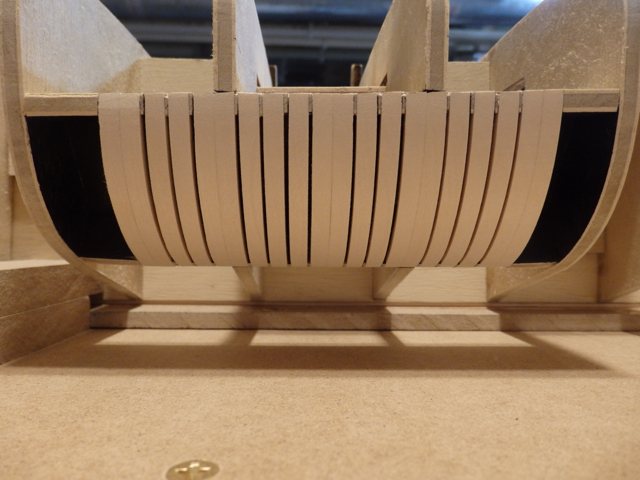
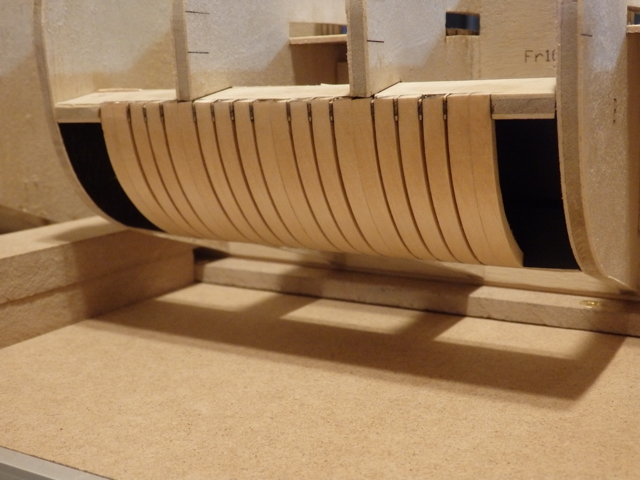
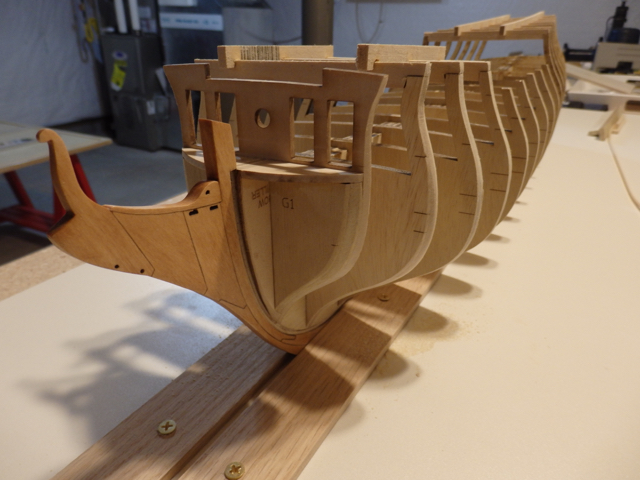
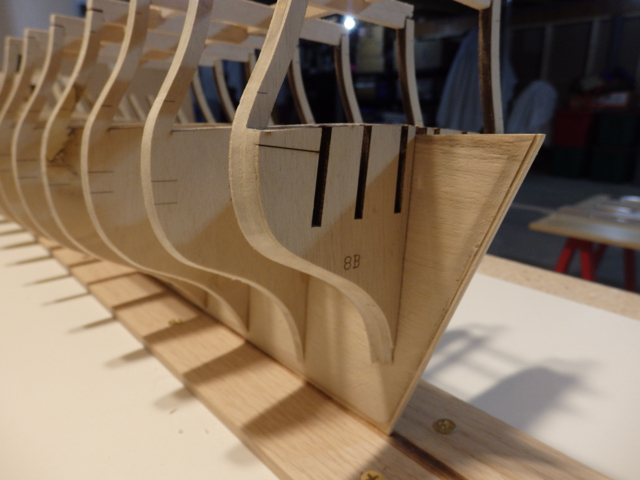
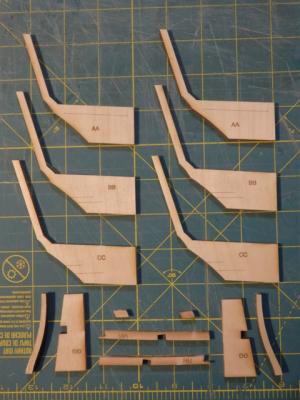
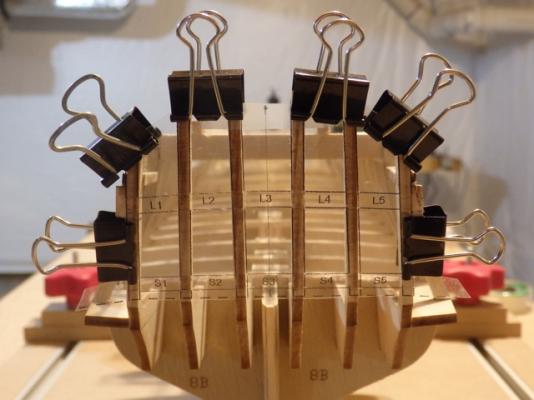
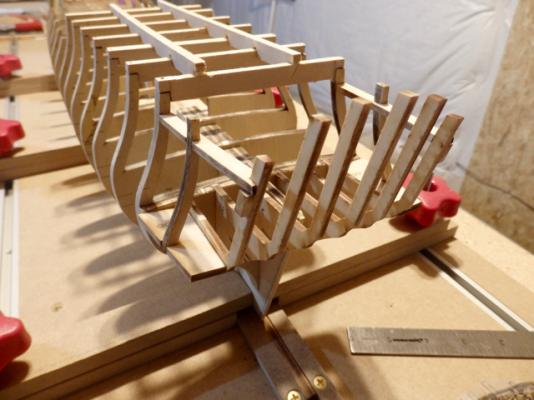
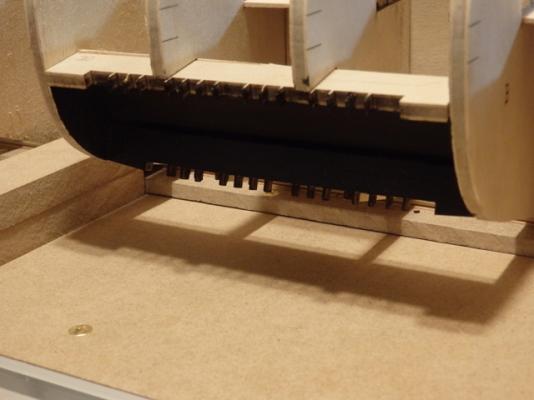
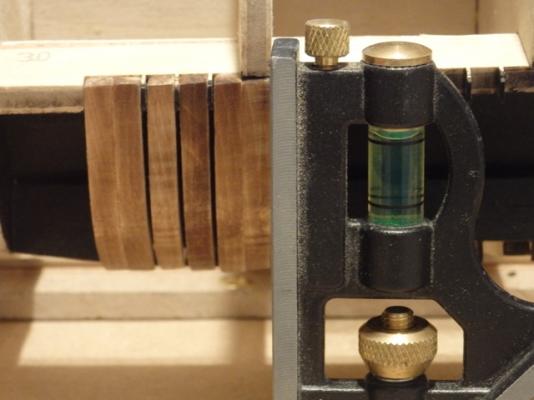
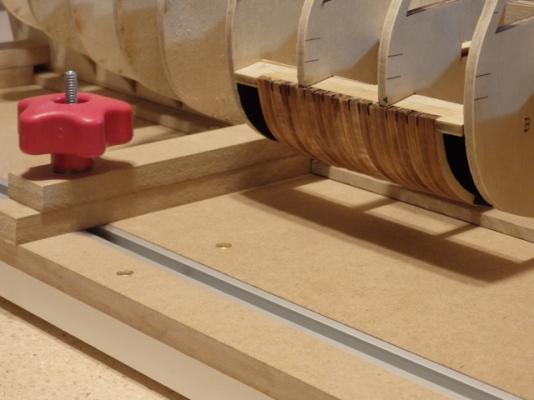
Hi All, Welcome Kevin and I really think you'll be very happy with this kit...she's a beauty! My thanks to all as well for the kind comments and the likes! One of the really nice design features of this kit is that it can be built showing some exposed hull framing. First step is to build a shadow box from the laser cut pieces. Two of these have very fine spacers to set the framing separation. A heads up to anyone with this kit is many of the spacers were not cut all the way through especially at the corners in my kit. It took quite some time to safely release them using my finest Xacto knife as the spacers are quite fragile. After sanding and gluing in place, the shadow box was painted matt black. The double frames were glued up making sure the tops matched up and then all the frames were glued into place. I used wood glue as this gave me time to try make sure the spaces were even and the frames vertical using my small square to guide my eye. Fairing to the bulkheads was done using my sanding sticks and 220 grit paper. I thought about staining the frames to match the keel, but there was quite a lot of grain visible so I decided against it. I am really glad I left well alone as the frames still took on a really nice, deeper color after a protective coat of poly. Seems when I select planks for hull and deck planking, I will need to really watch how the grain is running and perhaps pre-stain or add a light coat of poly to help match the finish. One last thing is I decided to copy Ed Tosti's board design (link below to his fabulous Young America log) and added T track's to my board. I can now hold the hull firmly using the simple clamps you can see in some pictures and they also let me square the hull to the board which should be helpful given next up is Chapter 3 and the stern framing! Thanks for reading! Cheers, Nigel. Link to Ed Tosti's Young America log. http://modelshipworld.com/index.php/topic/3453-young-america-by-edt-extreme-clipper-1853/page-1


-
Hi Alde, I'd like to follow along as well if you don't mind. Nice job on pairing up the two halves of the hull...looks really good. Cheers, Nigel.
-
Lovely work Denis and the I really like the stain color you chose. The deck fitting also looks great and rather nice to see her gaining some height! Very much enjoying following along with your build. Cheers, Nigel.
-
Hi Don, I'll follow along as well if you don't mind. She's looking great and seems like she is going to be a really fun and unique model to build. Looking forward to seeing these interior details you mentioned! Cheers, Nigel.
- 653 replies
-
- 6
-
-
- trabakul
- marisstella
- (and 1 more)
-
Cutty Sark by NenadM
UpstateNY replied to NenadM's topic in - Build logs for subjects built 1851 - 1900
That is some really lovely detail work Nenad...you can see the hours needed to create those pintails in the results. Cheers, Nigel.- 4,152 replies
-
- 6
-
-
- cutty sark
- tehnodidakta
- (and 1 more)
-
Thanks for the kind word Carl and welcome...I certainly hope everyone enjoys this voyage! I know I am! Cheers, Nigel.
-
Hi Don, I certainly hope the fairing work pays off...this is a very big hull for any planking redo's! Hi Dave. Thanks for stopping by and your extremely kind words. I totally agree with your comments on the wonderful kit design, instructions and plans. They are the major reason I felt I could take on a build this size along with simply loving the way this model looks when completed as your Confederacy and the other builds here on MSW show so well. Cheers, Nigel.
-
Looks fabulous Dave...the last shot is my favorite yet. Cheers, Nigel.
- 962 replies
-
- 7
-
-
- sovereign of the seas
- ship of the line
- (and 1 more)
-
Me too....so I PM'ed him a couple of weeks back...unfortunately no reply so I just hope all is well. Cheers, Nigel.
-
Great stuff Patrick....really fun to follow along with you and I knew you would do a great job on the jet skis! Cheers, Nigel.
-
Sorry about this issue Ken, but thank you for the very helpful post. Never a dull moment when modeling indeed.... Interesting that the Flying Fish roll had this much color difference as I think you purchased this kit at the same time as your Connie and Niagara. Be very interested to see the results of your tests with Brasso if you need to go there, but hoping a little time will take care of this problem for you. Cheers, Nigel.
-
Lovely work indeed Sal...very precise I also really like those Syren shroud cleats! Cheers, Nigel.
- 659 replies
-
- 4
-
-
- syren
- model shipways
- (and 1 more)
-
Hi All. Well, the bulk of the fairing work has been completed. Safety timbers were added to brace the bulkhead extensions as recommended in the instructions. I also added some lengthwise bracing to add more strength as one bulkhead extension was especially weak due to a knot. These lengthwise timbers also raised the hull and protected the delicate stem assembly while the hull was inverted. Fairing was mostly done using 220 grit paper and sanding sticks that would always bridge across three bulkheads. The 220 grit made the fairing slow going, but I hoped it would stop me removing too much wood. A shorter, thinner stick was used at the bow given the very sharp curves and to avoid sanding the stem. Battens were used to check the hull during fairing, especially at the bow and stern. At the bow especially, a lot of wood needed to be removed given the filler pieces and sharp curves so here I also checked the distances to the bulkhead former to makes sure things were staying symmetrical. There is still some tune up work to be done, but I need to complete the shadow box and cut away section with the false hull frames in place before tackling that. Hopefully the fairing is good as this will make planking go much easier down the line! Images below and as always thanks for all the kind comments and the likes. Cheers, Nigel.