HOLIDAY DONATION DRIVE - SUPPORT MSW - DO YOUR PART TO KEEP THIS GREAT FORUM GOING! (Only 20 donations so far - C'mon guys!)
×


UpstateNY
-
Posts
466 -
Joined
-
Last visited
Content Type
Profiles
Forums
Gallery
Events
Everything posted by UpstateNY
-
 Thanks so much for kind words Patrick and Carl. I certainly hope doing the carvings rather than using the kit stickers pays off. Just need a steady hand with the paintbrush now...so another skill to try and learn... . I've been working on the Dragon for a few days shy of a year now...so time certainly flies! Finish line is in sight! Cheers, Nigel.
- 270 replies
-
- 2
-

-
- red dragon
- artesania latina
- (and 1 more)
-
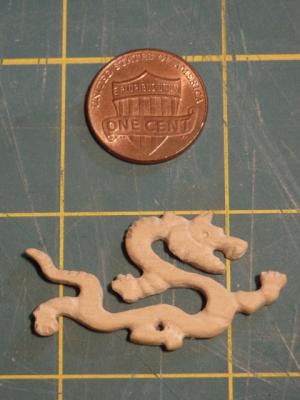
Hi Jeff, Sorry for misunderstanding your earlier post and many thanks for your imprinting suggestion. Very interesting idea and I will have to try it out. I am a bit worried I would to use to much pressure especially I've just finished thinning down my carvings! I think it would work great if I'd used a modeling clay like Scuply rather than a hardwood as you could imprint a detailed pattern before curing. Hi Dave, Thanks for the kind word. Material is Castillo Boxwood which is so much nicer to carve than the basswood I practiced on. From re-reading your recent carving posts, the techniques seem very similar other than I used a hand drill to make and then connect the holes. I don't have the control yet to use a Dremel. Cheers, Nigel.
- 270 replies
-
- 3
-
-
- red dragon
- artesania latina
- (and 1 more)
-
Hi Captain Steve, Those stern timbers look great to me...looks like all that thinking and careful work is paying dividends! Looking forward to the next update! Cheers, Nigel.
-
Hi Jeff and Dimitris, Many thanks...glad you like them! Happy New Year to you both as well. Jeff, Like so many things in this hobby, the first tries are always hard as the learning curve is always so steep, but it is all part of the fun. These took me over 2 weeks to get them this far and I did a test a few months before that! Next try will hopefully be a little better as I get more experience. I bet your carvings were really good given how great your Constellation is coming along! Cheers, Nigel.
- 270 replies
-
- 2
-
-
- red dragon
- artesania latina
- (and 1 more)
-
Thanks Sal...appreciate the kind words. Happy New Year to you and your family as well! Hope the weather in Connecticut is better than here...rain/ice over snow up here today! Cheers, Nigel.
- 270 replies
-
- 3
-
-
- red dragon
- artesania latina
- (and 1 more)
-
Hi Lionfish, I just used a small hand drill to start my mast holes and then slowly widened them using progressively larger drills. Final sizing of the holes can be done using fine sandpaper on a tapered rod which is slow, but avoids any rip out. Hope this helps. Cheers, Nigel.
-
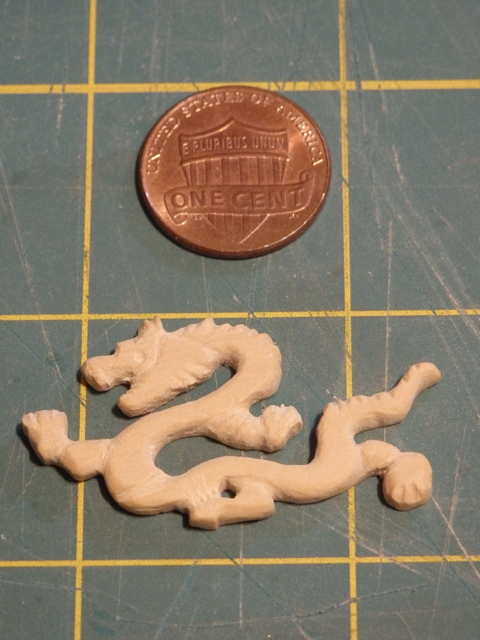
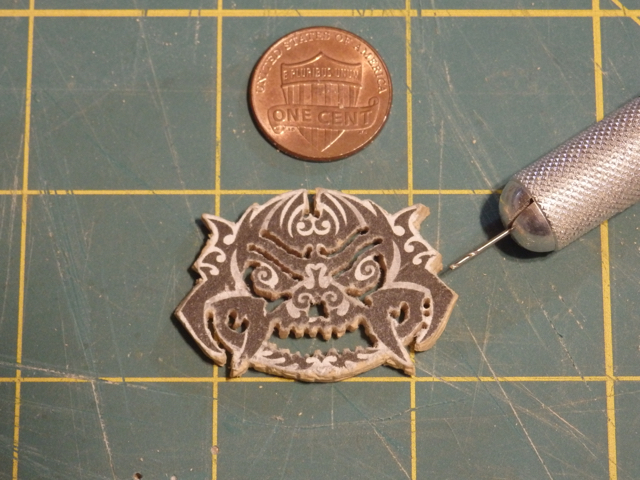
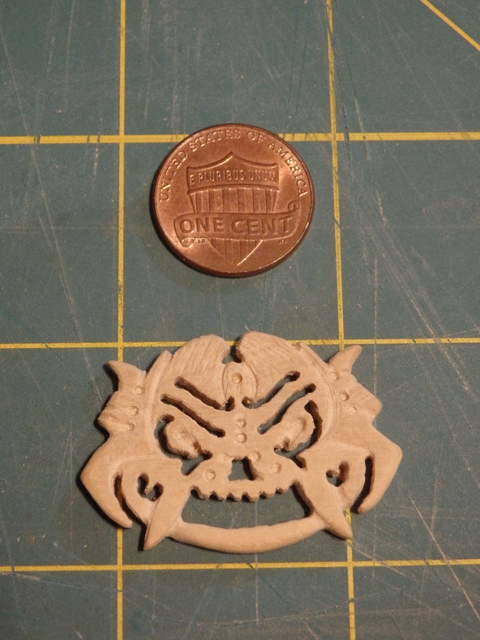
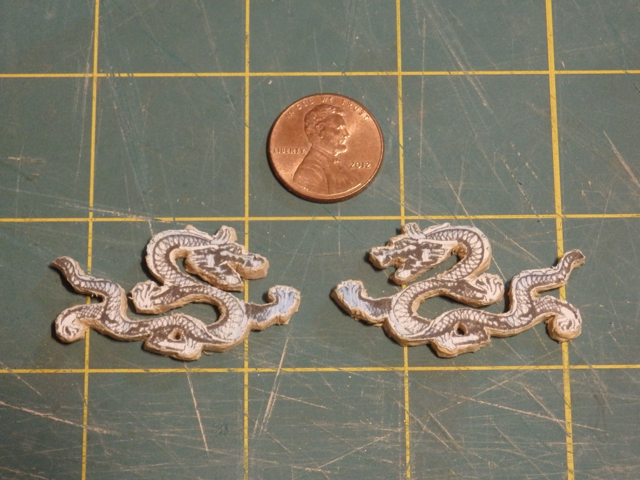
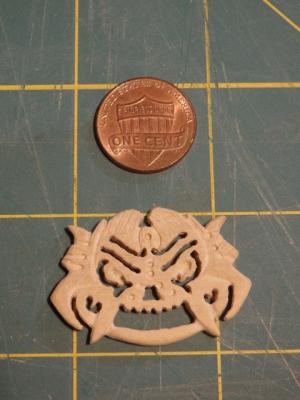
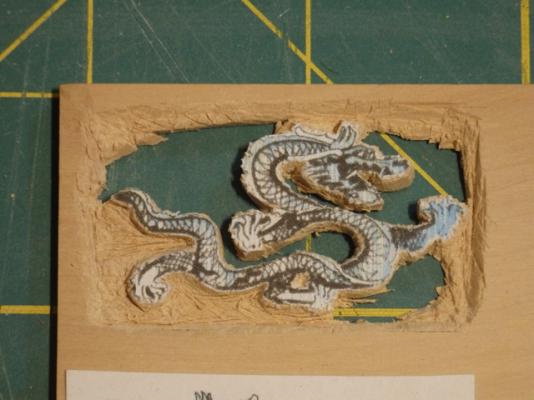
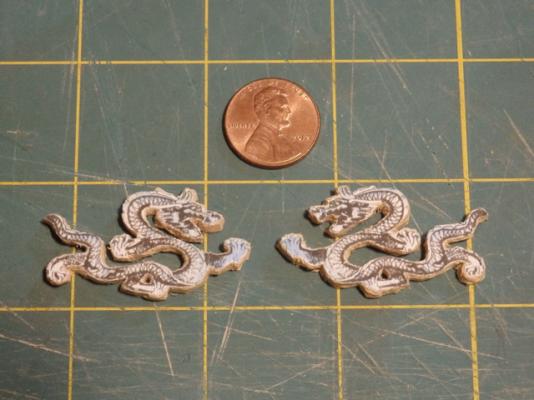
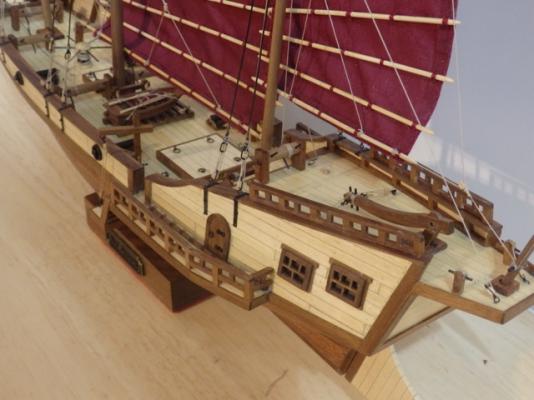
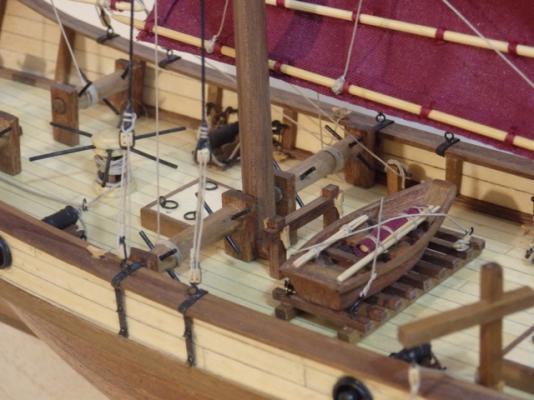
Hi All, Firstly, I hope everyone had a wonderful Christmas. Over my holiday, I managed to complete the carvings for the bow and stern. For the bow carvings, I used my round, flat and triangular needle files to slowly round off the profiles and cut in the details. For the stern, I found a dragon head pattern on the web that I liked better than the kit pattern. I initially used a fine drill to make a series of holes along each lines and then used the side of the drill as a file to join up the holes. You can see this in progress on the right side in the 3rd image. I then simply rounded off the edges and cut in the surface details as for the bow carvings. There is a lot more detail I know an expert could add to these, but I decided to quit before I broke off a tail or a fang! Next steps are to thin the carvings down a bit and then try to paint them. Images below and thanks for reading.....Happy New Year everyone! Cheers, Nigel.


- 270 replies
-
- 7
-
-
- red dragon
- artesania latina
- (and 1 more)
-
Hi Patrick, Really been enjoying seeing your mock up work come together...very interesting to watch how you are puzzling out how include the complexity of accessing the interior decks. She's going to be a real beauty as the mock up already looks great! Have a great Christmas and a Happy New Year! Cheers, Nigel.
-
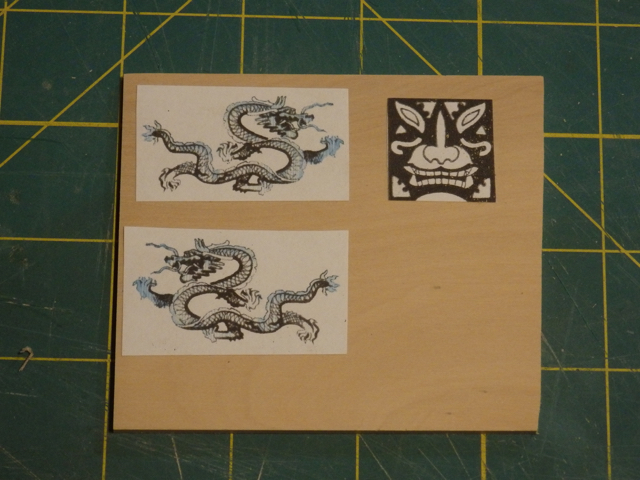
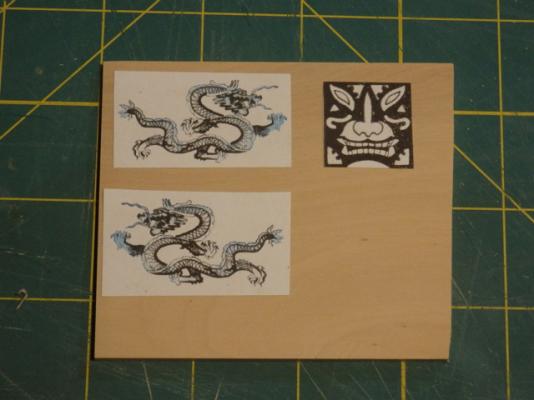
Hi All, A small progress update as I've started on the Dragon bow carvings. Process is the same as the tests I did back in post #68, but I am using 3mm thick Castillo Boxwood rather than basswood. I will have to thin it back to 1-2 mm before adding to the bow, but I wanted the extra rigidity as I carve out these small patterns. Next steps are to clean up all the edges and start to carve in the line details...takes a long time, but really fun to do. There is also a carving to do for the stern, but I may find another design than the square one shown in the first image as I am thinking it is a bit small. Finally, my best wishes for the holiday season and a Happy New Year to you all. Thank you for all the support and encouragement over the past year. Cheers, Nigel.
- 270 replies
-
- 7
-
-
- red dragon
- artesania latina
- (and 1 more)
-
Hi Ed, Thank you for the very clear explanation...much appreciated! Cheers, Nigel.
- 3,618 replies
-
- 5
-
-
- young america
- clipper
- (and 1 more)
-
Hi Ed, Astonishing work on the windlass.... Perhaps a dumb question from someone who has no milling skills, but is there any way to make the gears from wood if you pay attention to the grain direction and so on? Cheers, Nigel.
- 3,618 replies
-
- 5
-
-
- young america
- clipper
- (and 1 more)
-
Thanks to everyone for the kind comments and the likes!
- 270 replies
-
- 3
-
-
- red dragon
- artesania latina
- (and 1 more)
-
Hi Sal, Lovely clean work and I especially like the rigging work on open hearts. Your longboat is also a beautiful model in it's own right. Cheers, Nigel.
- 659 replies
-
- 3
-
-
- syren
- model shipways
- (and 1 more)
-
Many thanks Jack...appreciate the insights! Cheers, Nigel.
- 203 replies
-
- 4
-
-
- artesania latina
- marie jeanne
- (and 1 more)
-
Hi Jack, Marie Jeanne is looking wonderful! If you don't mind a question on paint, what is your view of Testers brand? Cheers, Nigel. PS. Your carved bird is awesome. Detail in the feathers is just unbelievable!
- 203 replies
-
- 4
-
-
- artesania latina
- marie jeanne
- (and 1 more)
-
She is looking absolutely fabulous Dimitris. Hope your rigging line comes in soon! Cheers, Nigel.
-
Hi Jack, Many thanks...and yes...I am hand sewing the sails. Cheers, Nigel.
- 270 replies
-
- 2
-
-
- red dragon
- artesania latina
- (and 1 more)
-
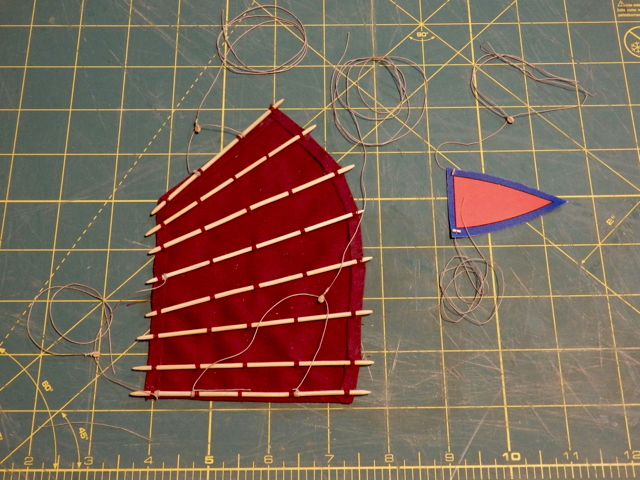
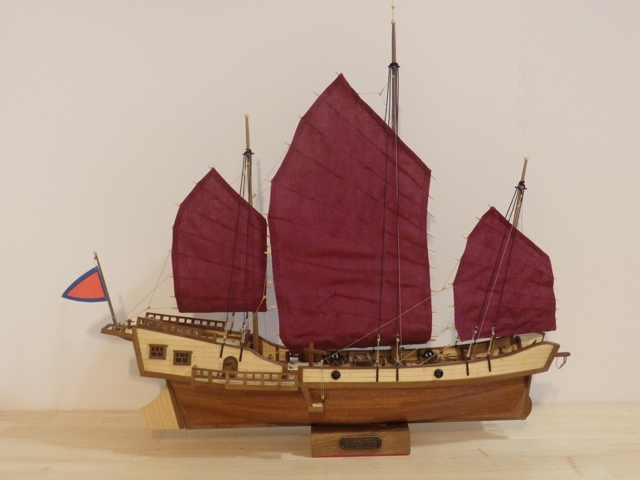
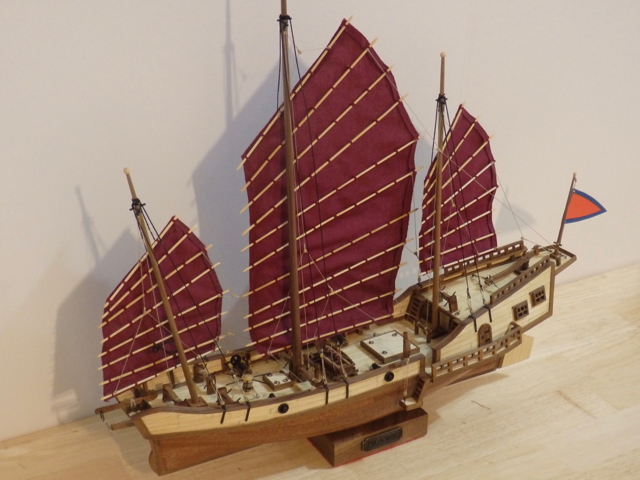
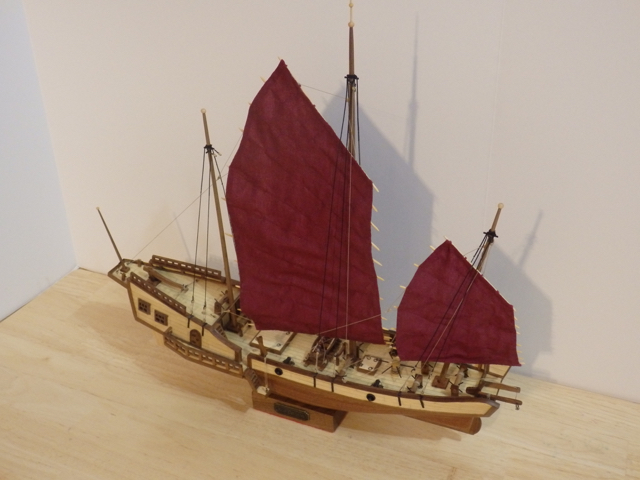
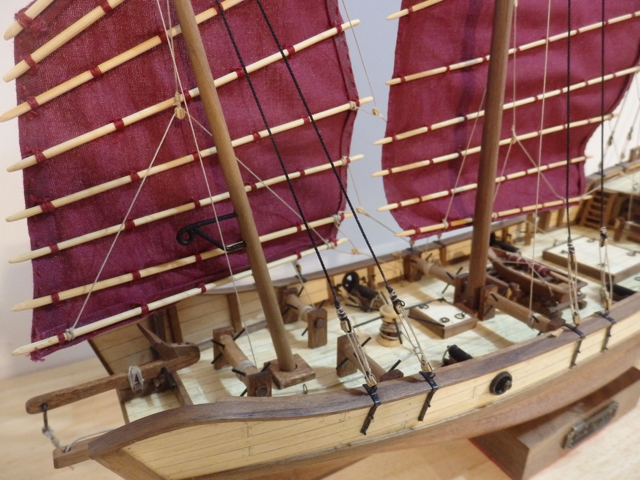
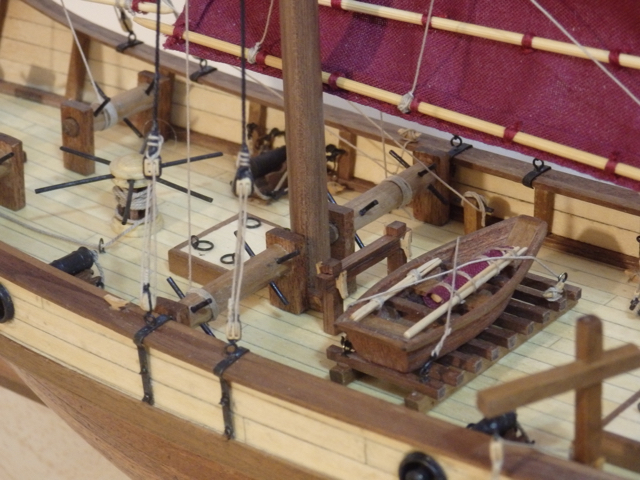
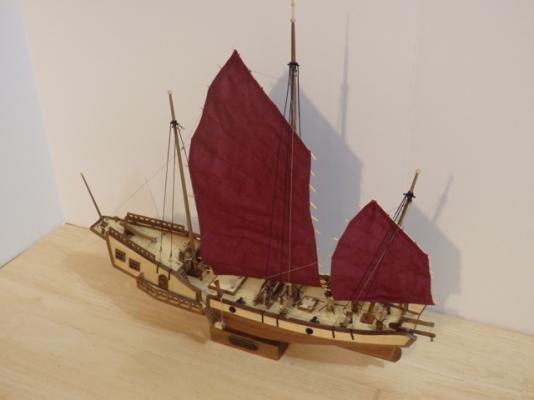
Hi All, Many thanks to all for the kind comments and of course the likes! Things have been a bit slow in the shipyard as we enjoy the Christmas season, but I finally completed the mizzen sail and rigged the kit provided flag. I also redid some of the foremast and mainmast lines to improve their runs. So, all the rigging items are now done! Doing the sails has certainly been the hardest part of this first build for me. To make them look good you have to stitch very neatly and also make sure the tension is even across the entire sail so they hang correctly. You can see some pulling where I didn't get the tension right, but overall I am happy with how all they turned out. The learning will give me a good place to start for the future. I love the way the models look with sails, especially when rigged with a mix of furled and unfurled so you can still see all the decking features clearly. Perhaps next time! So, all that is left now are a few final details like the lanterns and then my Red Dragon is done. A few images are below and as always, thanks for reading! Cheers, Nigel.


- 270 replies
-
- 10
-
-
- red dragon
- artesania latina
- (and 1 more)
-
Hi Nils, Just found this build over the past week or so...truly beautiful. I especially like the way the sails look. Cheers, Nigel.
-
Hi Mick, She is looking great to say the very least and thanks for all the detailed pictures and explanations. I am taking careful notes . Wonderfull work and enjoying following along. Cheers, Nigel.
- 504 replies
-
- 2
-
-
- washington
- galley
- (and 1 more)
-
Congrats Dave...I hope your Doc enjoys his cutter for many years to come. Thanks to you for sharing your build as well. Cheers, Nigel.
- 209 replies
-
- 8
-
-
- cheerful
- Syren Ship Model Company
- (and 1 more)
-
Continental Frigate Hancock by wyz
UpstateNY replied to wyz's topic in - Build logs for subjects built 1751 - 1800
Hi Tom, As both Mark's have said...a really interesting story behind this build. Pulling up a chair to enjoy following along as you bring your Hancock to life. Cheers, Nigel. -
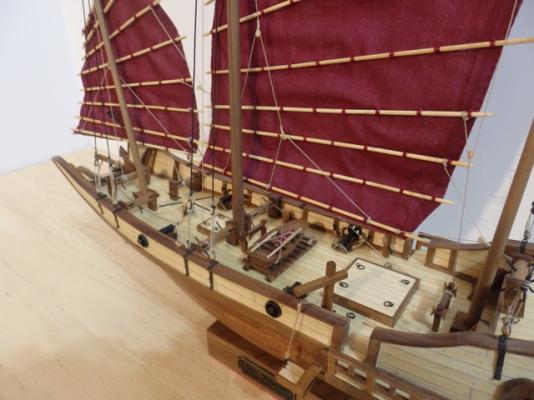
Thanks for the support guys...really glad you like the sails as the learning curve here for me is pretty steep. Getting the battens right is the hardest part. There seems to be a very fine line between pulling the sewing thread tight enough to hold the battens firmly, but not so tight the sail material pull in to hard against the batten and so distorts the sail. Cheers, Nigel.
- 270 replies
-
- 5
-
-
- red dragon
- artesania latina
- (and 1 more)
-
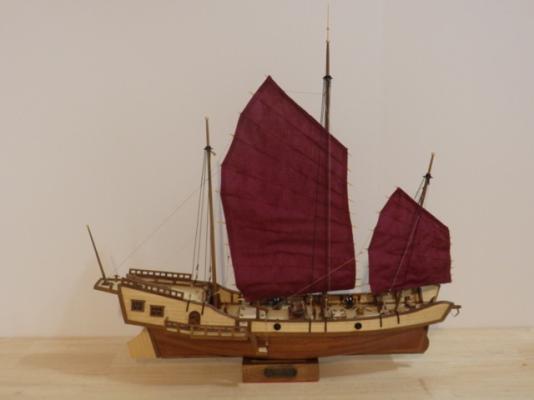
Hi All, Well finally finished the mainsail. Process was the same as used for the smaller foresail, but as expected it took me a lot longer to complete. I still have a bit of work to help the sails hang more naturally, but I will wait to see how the mizzen sail hangs all the sails and lines interact before tackling this. Images below as and of course, my thanks for all the kind comments and the likes. Cheers, Nigel.


- 270 replies
-
- 13
-
-
- red dragon
- artesania latina
- (and 1 more)
-
Cutty Sark by NenadM
UpstateNY replied to NenadM's topic in - Build logs for subjects built 1851 - 1900
Hi Nenad, An excellent recovery is always a cause for celebration! Been enjoying following along and your scratch built deckhouses all look wonderful. I really liked the full deck image of them all in place. Cheers, Nigel.- 4,152 replies
-
- 8
-
-
- cutty sark
- tehnodidakta
- (and 1 more)