


G.L.
-
Posts
1,553 -
Joined
-
Last visited
Reputation Activity
-

 G.L. reacted to giampieroricci in HMS PEGASUS by giampieroricci - Scale 1:36 - Swan-Class Sloop from plans by David Antscherl & Greg Herbert
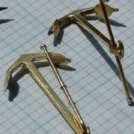
The breast hooks and the aft crutch:
I started the construction of the aft platform:
-
G.L. reacted to Ras Ambrioso in AMAPÁ 1907 by Ras Ambrioso - FINISHED - scale 1:64 - Brazilian Customs Cruiser
Hope y'all had a great holiday. I did. Continuing my build, it was about time to remove the masking tape that protected the ships bottom while I worked on the deck planking. To my delight the waterline came perfectly delineated and the results show in the next picture. First time I use Tamiya masking tape for this job.
I also installed the brass porthole rings that have been glazed with Gorilla glue. They came out all right but I had do a little of damage control with a wood filler wash.
More pictures to show the progress to date. I continue working on the upper structures and started to use a mix media of cartuline and wood veneer to complete the trim of the cabins.
Next I was looking on how to fabricate the miniature fire buckets. I tried using brass tubing been swaged with a punch. The one shown is about 3/16'' OD but the final set will be 5/32".
And thats all folks!
Thanks for watching and appreciate your comments.
-
G.L. reacted to VTHokiEE in HM Sloop Echo 1781 by VTHokiEE - 1:48 - Cross-Section
A belated Happy New Year to everyone following along! Santa was generous this year and I found myself with a Proxxon MF70 under the tree. With any tool (at least for me) there is a learning curve and I have spent some time becoming acquainted with my new toy (before this is all said and done I imagine I'll be making another order for cedar from Joe). I finally was able to get a (slightlyt) improved start on the dead flat and I think I'm ready to continue on. The mill is nice, it certainly is helping speed along sanding the internal curves of the frames, but my first attempt (in post 91) wasn't that much worse than where I'm currently at (but it certainly is a fun toy and I'm excited to have it).
-
G.L. reacted to giampieroricci in HMS PEGASUS by giampieroricci - Scale 1:36 - Swan-Class Sloop from plans by David Antscherl & Greg Herbert
I passed a first coat of shellac:
-
G.L. reacted to Vegaskip in Ship paintings
Fleet Oiler USS Pamanset AO85 in heavy weather
w/c 11.75" X 8.25"
-
 G.L. got a reaction from FriedClams in SMS WESPE 1876 by wefalck – FINISHED - 1/160 scale - Armored Gunboat of the Imperial German Navy - as first commissioned
Imperfections? ... I only see perfection.
Beautiful work!
-
 G.L. got a reaction from mbp521 in SMS WESPE 1876 by wefalck – FINISHED - 1/160 scale - Armored Gunboat of the Imperial German Navy - as first commissioned
Imperfections? ... I only see perfection.
Beautiful work!
-
G.L. reacted to Some Idea in Le Rochefort by No Idea - 1/24th Scale - First POF Build
Thanks Albert 🙂
As with all builds I've had a bit of a set back today through my own inexperience. I had made the first two half frames which come off of the wing transom and also the angled chocks that secure this assembly even further.
It was only when I made the extension top timbers for the fashion pieces did I realise that I had set the first set too far apart from each other. So in essence the stern was too wide at that point. There was no saving it the pieces needed to be removed which I have now done. Its not nice taking a saw to your model but it was wrong so so be it. What I need to do is run something from stem to stern to use as a datum to check that all is well. Lesson learnt and luckily I've got away with it.
I'll have another go next weekend 👍
-
G.L. reacted to Wintergreen in Kågen by Wintergreen - FINISHED - 1:30 - Swedish clinker-built cog work boat - SMALL
Thank you Per and a Happy New to you as well!
I was hoping to have all sails set today but then some friends showed up incognito. Coffee, biscuits and some relaxed time.
Well, then one of the wounds started bleeding again so I called it a day several hours prior to what I'd liked. Don't feel to well either today so it was just as well to call it quits.
Anyway. When sailing you always (almost always at least) start with the aft most sail. In this case a mizzen spritsail.
It took a while to figure out how the little boom and the sprit poles were attached to the mast. In the book it is described as a "hank", might be the same in English. It's an endless loop, wrapped around the mast and the boom/pole end rests in the loop. Thanks to friction (in the real case, CA-glue in model case) the hank stays where it is put on the mast. I did not fabricate an endless loop, instead tied it neatly away.
Also the lashing that holds both sails to the mast is held in place thanks to friction and a timber hitch (and CA of course).
Also managed to set the main sail. Both mizzen and main halyard are belayed on a pin under nearest thwart. These are bamboo trunnels I just drilled in from above. Can be seen as a dark spots. Four around the main and two around mizzen.
Mizzen.
And main.
Main sheet is belayed on a cleat on the lower block.
Mizzen is belayed on a cleat on the boom. That little cleat is secured with a bamboo nail as well.
Stay sail and jib left to set, but that will be another day.
Til next time, ta!
-
G.L. reacted to KeithAug in Germania Nova 1911 by KeithAug - FINISHED - Scale 1:36 - replica of schooner Germania 1908
Happy new year to you all. Christmas went off to plan with all the immediate family making it home disease free. We were lucky.
Thank you to all of you who visited my posts over the festive season and a particular thank you for the comments and likes.
I managed to get some work done on Germania but it was a bit erratic which unfortunately means the posts will be a bit rambling.
Most of the time went towards making the main and foremast booms. They are both circular with tapers towards each end. I won't bore you with the details but basically I turned down dowel and then sanded tapers on each end.
Before sanding the tapers I machined the dowels to take the end fittings and tracks for the sail sliders. I used my mill with the dowel clamped in a square collet block to facilitate machining of the features at right angles.
Slots were cut using end mills for the track and gooseneck attachment brackets. The high attachment features were filed to shape and drilled.
Hoops were turned, drilled and slipped into place.
The track was made from model railway train track. This was glued into the axial slot previously machined.
A few more shots follow showing the details of the end bracket fabrications.
Once the brackets were fixed in position the outer surfaces were rounded to match the curvature of the boom.
The hinges were made and attached to spigots which inserted into axial holes in the booms.
And then the hoops were positioned and fixed with brass pins.
-
G.L. reacted to EricWilliamMarshall in USS Perry by EricWilliamMarshall - BlueJacket Shipcrafters - Scale 1/96
News flash: I’m not fast at the copper!
-
G.L. reacted to DanB in Norwegian Sailing Pram by DanB - FINISHED - Model Shipways - 1:12
Painting past few days. Added floor boards and thwarts today.
-
G.L. reacted to kayakerlarry in Nimblet by Kayakerlarry - FINISHED - Scale 1:24 - Cape Cod Knockabout
Well as it is a new year it is time to wrap up my 100th reunion camp project with the completion of the last two boats - the Gull and Falcon. Finished with the two Maxwell House bailing cans yesterday and placed the completed models in the case. The rigging and set up of the sails was modeled on the two pictures - I did buy 1:24 scale people but in my wife's words - they looked freaky so opted to just leave natural. So here are a few of the final pictures including the final resting place on my bureau along side the plans of the Howard W. Middleton that was completed several years ago (see link below). I'll be back - probably get back to the New Bedford Whaleboat.
-
G.L. reacted to KORTES in Brig Le FAVORI 1806 by KORTES - 1:55
Greetings dear Rudolf I have learned this from an excellent Maitre Dmitriy Shevelev. In order to highlight the joints, I used, just like Dimitriy, a dull needle, and afterwards, on advise of my friend with much experience in this field, i worked on the joints using a small triangular broach file. But there's one nuance. Before putting the covering I took away a small bevel from the edges of the upper part of each plank. The most important is not to let the glue get on the end face of the plank during the plating .
My best regards
-
G.L. reacted to Wintergreen in Kågen by Wintergreen - FINISHED - 1:30 - Swedish clinker-built cog work boat - SMALL
Greetings from a gloomy Sweden! Thanks for likes and comments 🙂
Started off 2022 with some minor tasks. A stand for example. The constructions stand did not allow the bowsprit to be extended and that I need for setting the jib. After some thinking I concluded that a regular cradle will do. It is a working boat, so a "working" stand will be just perfect.
Wood dimensions translates to 4 by 4", 2 by 4" and 1 by 4-5". The stand is not "perfect" since these cradles were just hammered together with what was at hand. Also it is marked with owner (that's me 😉 ) and phone number (fake of course on the model).
And most important "För" is Swedish for Stem or Forward.
First a messy progress picture. I try to have the pictures free from debris, but it is just show and not how my shop really looks like.
Without boat.
And with boat.
Tomorrow I can do the rigging. Probably not really accurate to have sails set while on the hard. But the owner might just check everything out on a calm, cold, sunny day in March prior to launch.
Til next time, ta!
-
 G.L. got a reaction from jlefever in Clipper d'Argenteuil by G.L. - scale 1/15 - POF - SMALL
Many thanks, Hakan and Roger.
Not much has happened in the workshop this week. Yesterday the whole family came to help eat the Christmas turkey, so most of the time was spent preparing the feast.
Now the dishes are done and I can look back at what was accomplished this week.
2. Cleats
I need also some cleats on the deck, on the bits and on the spars. I make them all at the same time to make them as uniform as possible. I may have a few too many, but that gives me the option to pick the best.
Just like for the blocks, I use mahogany to make the cleats.
roughly sawing the cleats.
Filing into shape.
After they are varnished.
Thank you very much for reading this log and for your likes and for your constructive comments.
Till soon!
-
G.L. got a reaction from jlefever in Clipper d'Argenteuil by G.L. - scale 1/15 - POF - SMALL
Chapter II. Spars and rigging
1. Blocks
To rig this clipper d'Argenteuil a certain amount of single blocks in three sizes is needed. There is no general inventory of the amount of each kind of blocks which will be used. That will become clear during the rigging, therefore I will make a dozen blocks of each size and kind. If there are more needed, I can always make some more later.
I start with making the sheaves for de blocks.
To make the single block, I start with a thin strip of mahogany.
I glue blocks of mahogany on it at equal intervals.
Above that comes another strip of mahogany.
The method is identical for double blocks, only a thin strip of mahogany veneer is added between the two parts.
Drilling holes for the shaft of the sheaves.
The next step is cutting individual blocks from the glued strips.
Now every block is filed into shape.
, 342
The sheaves are placed in it with a copper shaft.
The last thing to do: file a groove for the noose.
Now I have a small supply of blocks of each size. They are about the same size as on the plan, but I can't manage to make them as thin.
Thank you very much for reading this log and for your likes and for your constructive comments.
Till soon!
-
.thumb.jpg.6fd4c1b78768bb3efd745ab810936005.jpg) G.L. got a reaction from vaddoc in Safety first, second and third. What to never forget.
G.L. got a reaction from vaddoc in Safety first, second and third. What to never forget.
I suddenly feel very brave: soon I'm going to spend a day in my workshop full of murderers who all want to get to me.😕
-

 G.L. got a reaction from Canute in Safety first, second and third. What to never forget.
I suddenly feel very brave: soon I'm going to spend a day in my workshop full of murderers who all want to get to me.😕
-
 G.L. got a reaction from dirkske in Marie Jeanne by dirkske - Billing Boats - 1:50
The start of a new project is always an exciting moment. I signed up to follow your log.
Zeer veel succes toegewenst (Wishing you a lot of success)!
-
 G.L. got a reaction from BobG in Clipper d'Argenteuil by G.L. - scale 1/15 - POF - SMALL
Many thanks, Hakan and Roger.
Not much has happened in the workshop this week. Yesterday the whole family came to help eat the Christmas turkey, so most of the time was spent preparing the feast.
Now the dishes are done and I can look back at what was accomplished this week.
2. Cleats
I need also some cleats on the deck, on the bits and on the spars. I make them all at the same time to make them as uniform as possible. I may have a few too many, but that gives me the option to pick the best.
Just like for the blocks, I use mahogany to make the cleats.
roughly sawing the cleats.
Filing into shape.
After they are varnished.
Thank you very much for reading this log and for your likes and for your constructive comments.
Till soon!
-
 G.L. got a reaction from Roger Pellett in Clipper d'Argenteuil by G.L. - scale 1/15 - POF - SMALL
Chapter II. Spars and rigging
1. Blocks
To rig this clipper d'Argenteuil a certain amount of single blocks in three sizes is needed. There is no general inventory of the amount of each kind of blocks which will be used. That will become clear during the rigging, therefore I will make a dozen blocks of each size and kind. If there are more needed, I can always make some more later.
I start with making the sheaves for de blocks.
To make the single block, I start with a thin strip of mahogany.
I glue blocks of mahogany on it at equal intervals.
Above that comes another strip of mahogany.
The method is identical for double blocks, only a thin strip of mahogany veneer is added between the two parts.
Drilling holes for the shaft of the sheaves.
The next step is cutting individual blocks from the glued strips.
Now every block is filed into shape.
, 342
The sheaves are placed in it with a copper shaft.
The last thing to do: file a groove for the noose.
Now I have a small supply of blocks of each size. They are about the same size as on the plan, but I can't manage to make them as thin.
Thank you very much for reading this log and for your likes and for your constructive comments.
Till soon!
-
G.L. reacted to dirkske in New & beginner 'dirkske'
Aarschot small little town along the Demer river. I live out of center in the old dunes that have turned to 'iron stone' over the centuries.
-
G.L. got a reaction from dirkske in New & beginner 'dirkske'
Hello Dirk, welcome to the MSW forum. Where in Belgium are you from?
-
G.L. reacted to dirkske in Marie Jeanne by dirkske - Billing Boats - 1:50
Current state, next will be an attempt to make/recess that bearding line.