Chuck
-
Posts
9,703 -
Joined
-
Last visited
Content Type
Profiles
Forums
Gallery
Events
Everything posted by Chuck
-

HM Cutter Cheerful 1806 by Erik W - 1:48 scale
Chuck replied to Erik W's topic in - Build logs for subjects built 1801 - 1850
That looks very good....yes it looks weird but it will all come together. Very neat planking job. Chuck -
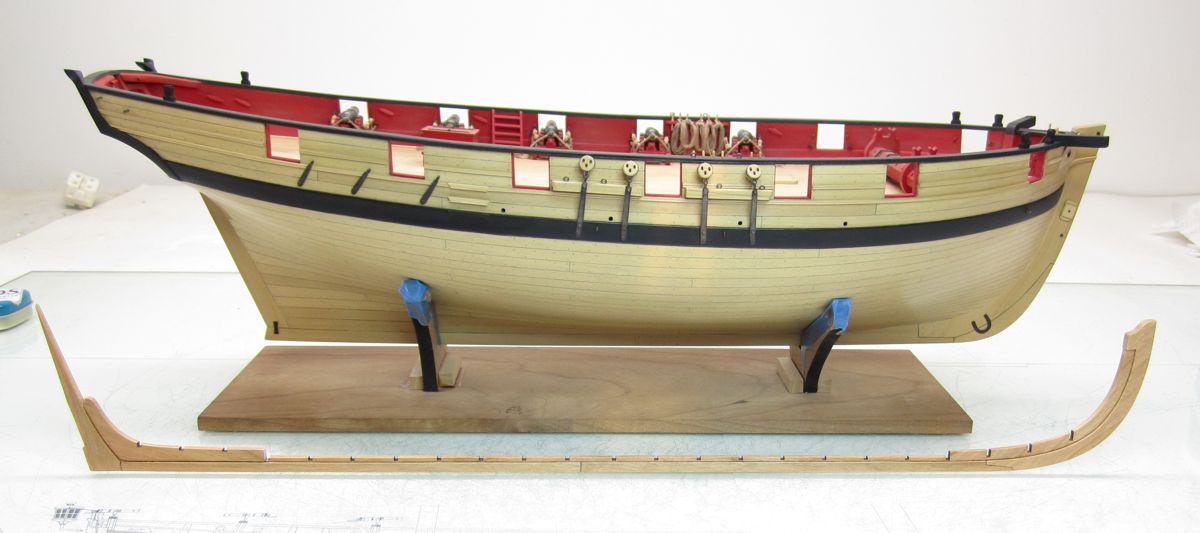
Thank you all very much.....got tired with the repetition of making cannon carriages today....soooo I had prototype keel parts cut out for a while and they were staring at me.....so one project that is slowly getting started is a kit prototype for a Queen Anne style Admirals Barge or Shallop 1700ish. I am testing some wood choices and here is a look at the keel assembly in cherry in comparison to the Cheerful for size...its 1:24 scale. Now back to those carriages...sorry to digress but I had to get that out of my system ....it was bugging the heck out of me just looking at the parts sitting on the table. Chuck

- 1,051 replies
-
- 25
-

-
- cheerful
- Syren Ship Model Company
- (and 1 more)
-
Very nice!!! Isnt the repetition fun??? I am doing teh same thing and it drives me nuts.
-
Thats looking excellent Pat. Nicely done Love the quarter badges!!!!
- 517 replies
-
- 3
-
-
- Endeavour
- Artesania Latina
- (and 1 more)
-
Thank you very much. My guess is that yes the cutter would have had a king plank possibly...but I have never seen one on a contemporary model or on a plan. So rather than guess what it would look like I went with a straight up center plank the same size as the others. These were very small ships so either way would work in my opinion. Chuck
- 1,051 replies
-
- 7
-
-
- cheerful
- Syren Ship Model Company
- (and 1 more)
-
Thanks!! That is a common misconception with carronades. Especially on revenue cutters. Along with the notion that all revenue cutters were clinker planked. You would be surprised how many variations there are.
- 1,051 replies
-
- 8
-
-
- cheerful
- Syren Ship Model Company
- (and 1 more)
-
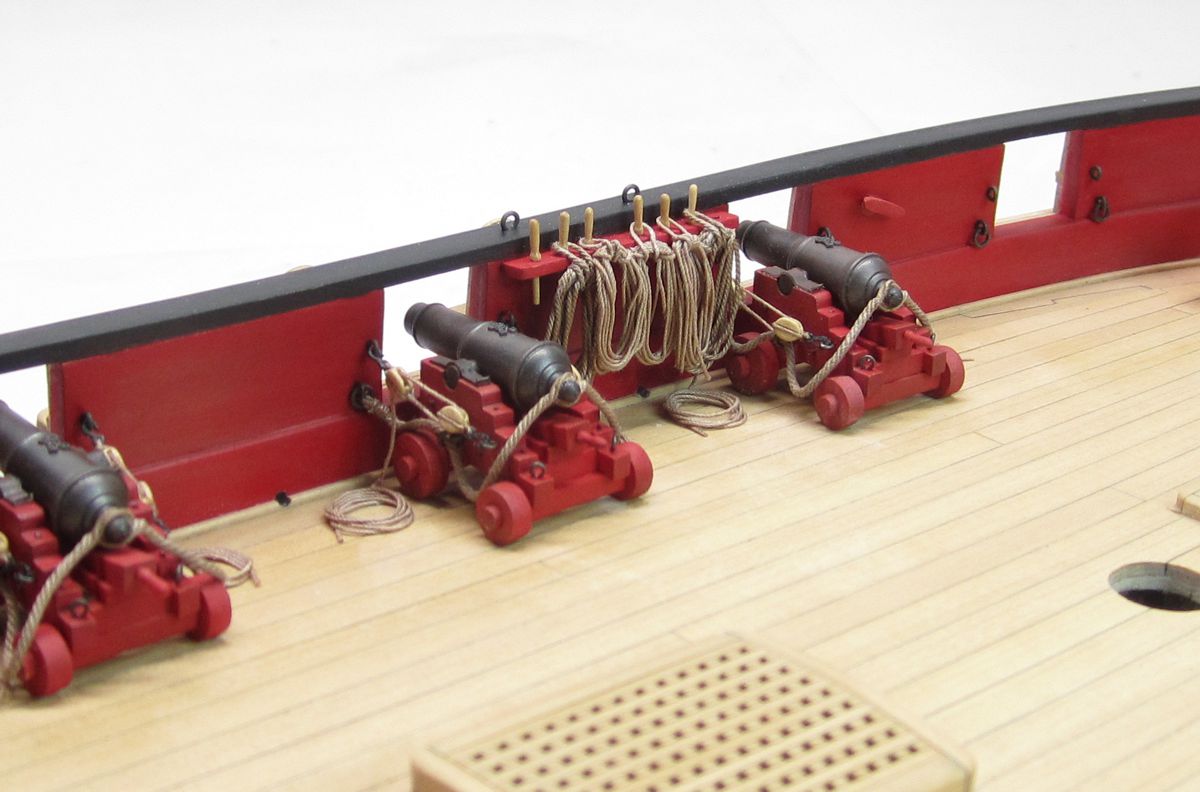
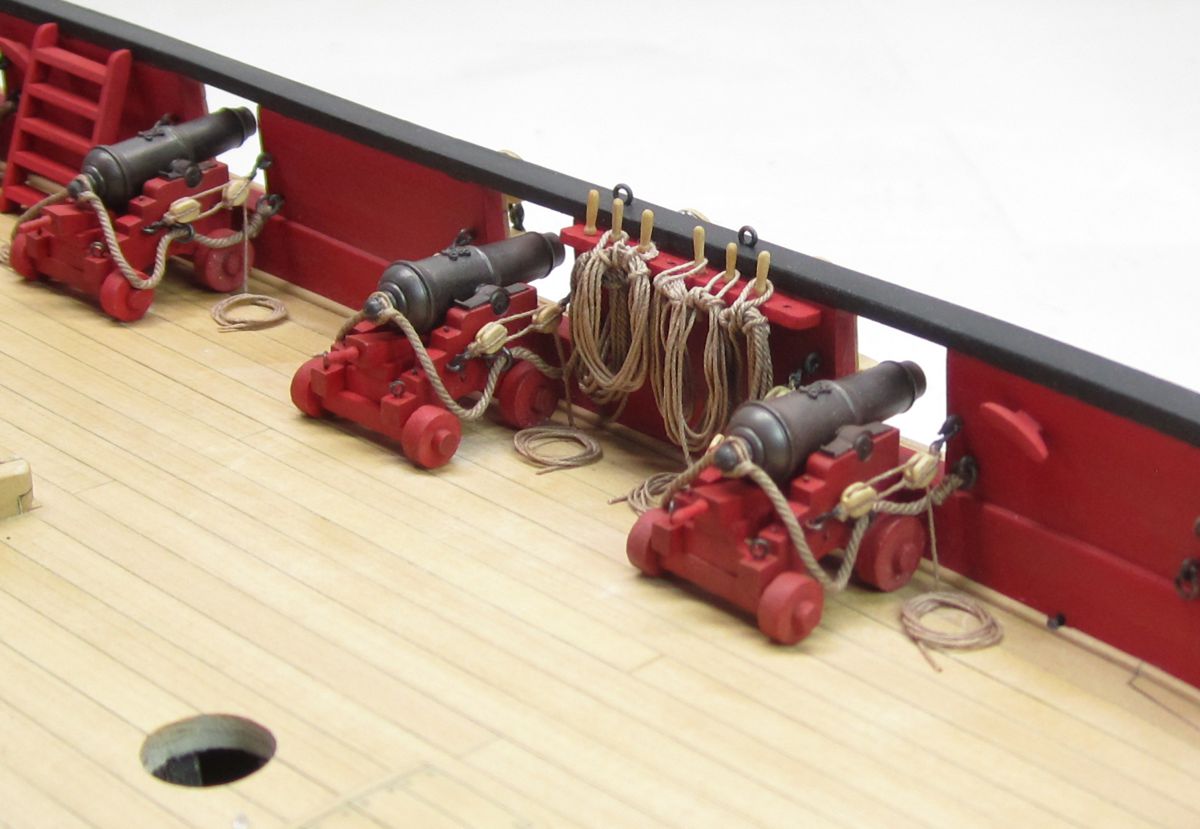
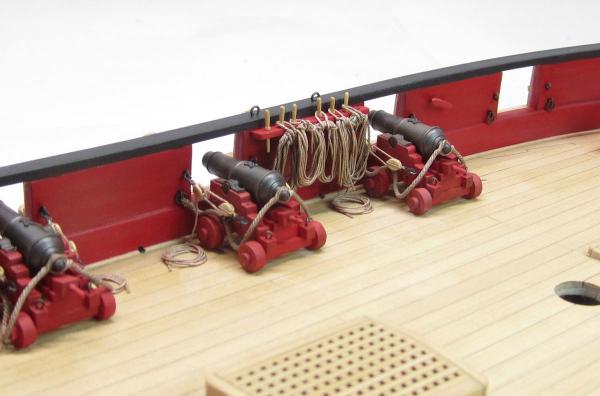
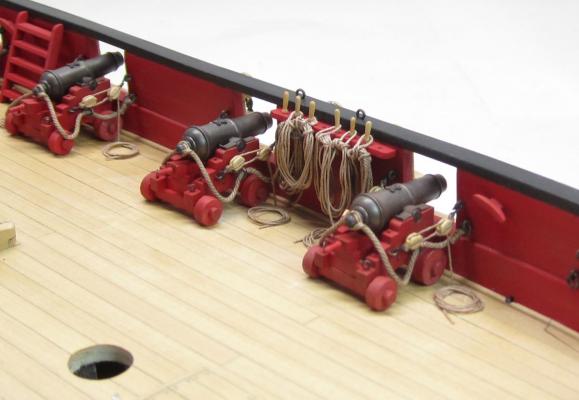
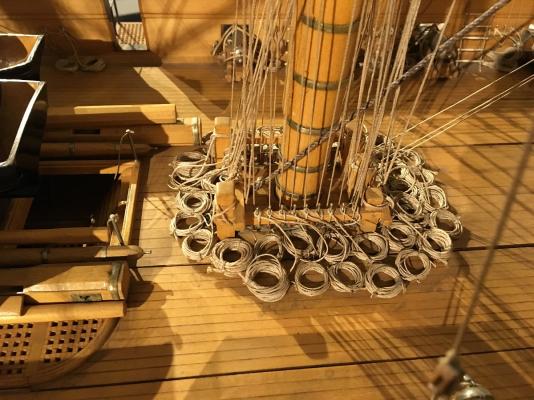
Thanks Ken....maybe a future tech session at the club. But there really isnt much to say. Its done the same exact exact way that so many folks make them. I just wrap the rope around a dowel. I try and use the smallest amount of white glue...just on the top of the coil. Thats the real trick....try not to handle them too much and certainly less glue is better...watered down white glue. Otherwise the rope gets mashed and you stick to it and pull fuzz up from it. Keep your rope clean. Less handling is key with clean fingers. Then I take one of the hanging coils and wrap it around the top tightly to form the handle....so-to-speak. Wrap it around the coil from the inside. Twice around does the trick. By the way, none of the belaying pins are glued into position yet. These coils are just temporary placed on top of them at this point...I will eventually just pull them off and store them in a box until rigging begins. Also its just a great idea to experiment and make them well ahead of time. You will need to use more than just one size. Test them out before rigging begins. Here are the five or six coils I will eventually hang on this rail. You need to use thicker rope sometimes...how does it effect the rope its hanging next to? How do you need to bend it so it hangs nicely in front of or in back of the coils next to it? Should I vary the length of the coils a bit so its not to uniform? Does it look too messy and hap-hazard? These are the questions I am pondering at the moment. I am just fumbling through it like everyone else. The rails will fill up quickly and it gets harder to make them look natural. Better to have a test run now rather than when you have all of that rigging.....shrouds....and backstays.....in the way. Its just too frustrating then. It becomes an after thought almost. Because such a large grouping of rope on these pin rails becomes an important focal point...its a good idea to spend more time on it rater than wait. Otherwise it will detract from all of the other hard work you did. Take a lot of photos of your test run from various angles as well. Its a huge help. I am still fussin....these close-up photos are brutal. It often looks so much better just viewing the model first hand. The naked eye can never see this level of detail as shown in the macro shots. Chuck

- 1,051 replies
-
- 44
-
-
- cheerful
- Syren Ship Model Company
- (and 1 more)
-
Yes indeed its a pain....but I am happy with the overall appearance...better than most attempts. Hopefully I can repeat the process for consistency.
- 1,051 replies
-
- 6
-
-
- cheerful
- Syren Ship Model Company
- (and 1 more)
-
Rope coils take two......I hate waiting for repair guys to show up so in the spirit of trying all things to show folks different looks. Here are some less then perfect deck coils. Not too much difference but maybe enough to make it presentable.
- 1,051 replies
-
- 18
-
-
- cheerful
- Syren Ship Model Company
- (and 1 more)
-
Thanks....for all the comments. I am not a big fan of the frapping. I also dislike the french coils on deck. I prefer the simple coil on deck. Hopefully I can get in the shop soon to start the other five guns. Waiting on an electrician at the moment and then I will start back on making rope and blocks. Chuck
- 1,051 replies
-
- 3
-
-
- cheerful
- Syren Ship Model Company
- (and 1 more)
-
I am not sure I agree with you Kester. But I do think that is what makes the hobby interesting. For now the coils will stay as is. I think they look head over over heels better than most other attempts I have seen and I can live with them. There is always the next model too!!! I have never seen so much scrutiny on rope coils. I am just glad they came out neatly. Most times I see them modeled they look like they been smashed together from over handling and too much glue. Just getting a clean coil for a change is a welcome thing. Chuck
- 1,051 replies
-
- 11
-
-
- cheerful
- Syren Ship Model Company
- (and 1 more)
-
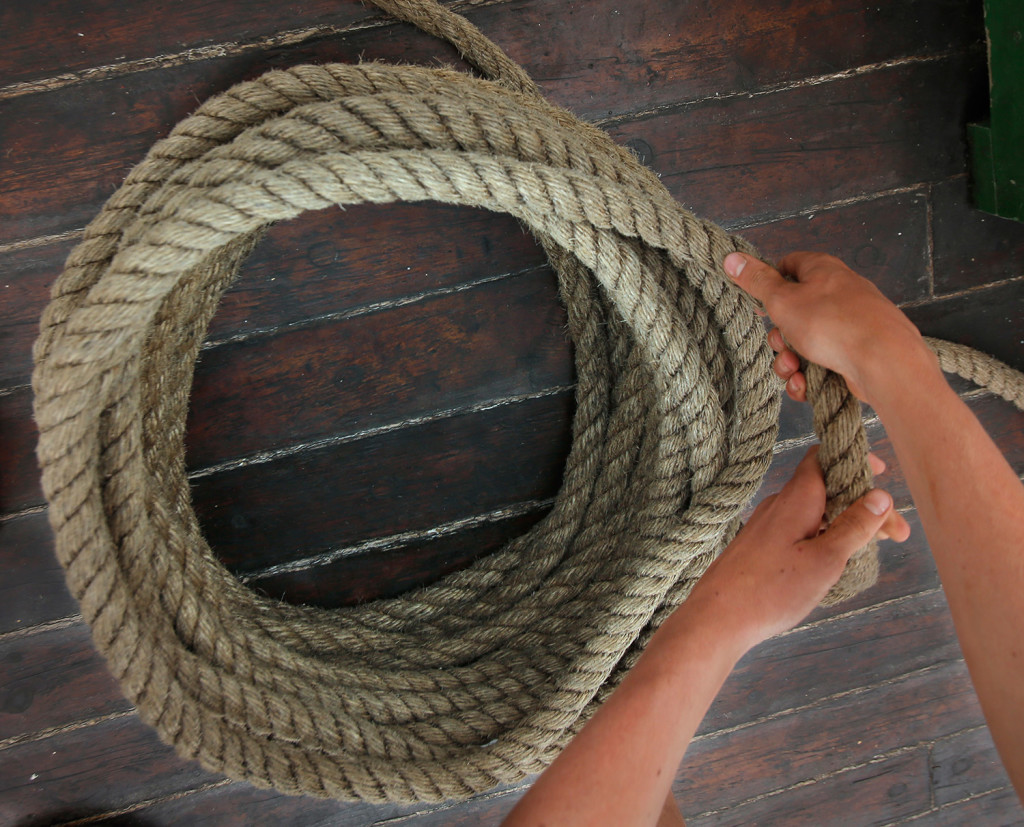
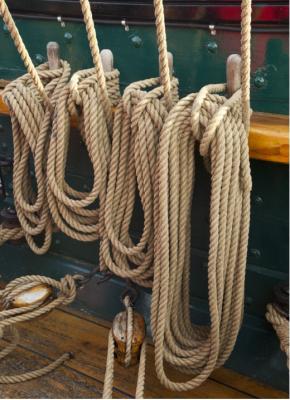
The lines I have hanging are in much larger coils and may hang more naturally...I have images of hemp rope on ships looking like that. BUT having said that...rope coils made on deck and meant to be kept neat....well that may be different and why I thought to make them tighter and more circular. Take a look at this. This is actually a training session in Maine on board a sailing ship. I believe they may have been handled differently but I agree the old rope may have been very stiff indeed. But who knows in the end. The only real way to make the coils on deck more natural would be to make them very sloppy as if a drunken sailor made them. If they coiled them like this fella it looks pretty plausible. And pretty easy to make a good circle of coils. I imagine the sailors got quite good at it very quickly. vs. hanging and my interpretation for comparison... Chuck

- 1,051 replies
-
- 27
-
-
- cheerful
- Syren Ship Model Company
- (and 1 more)
-
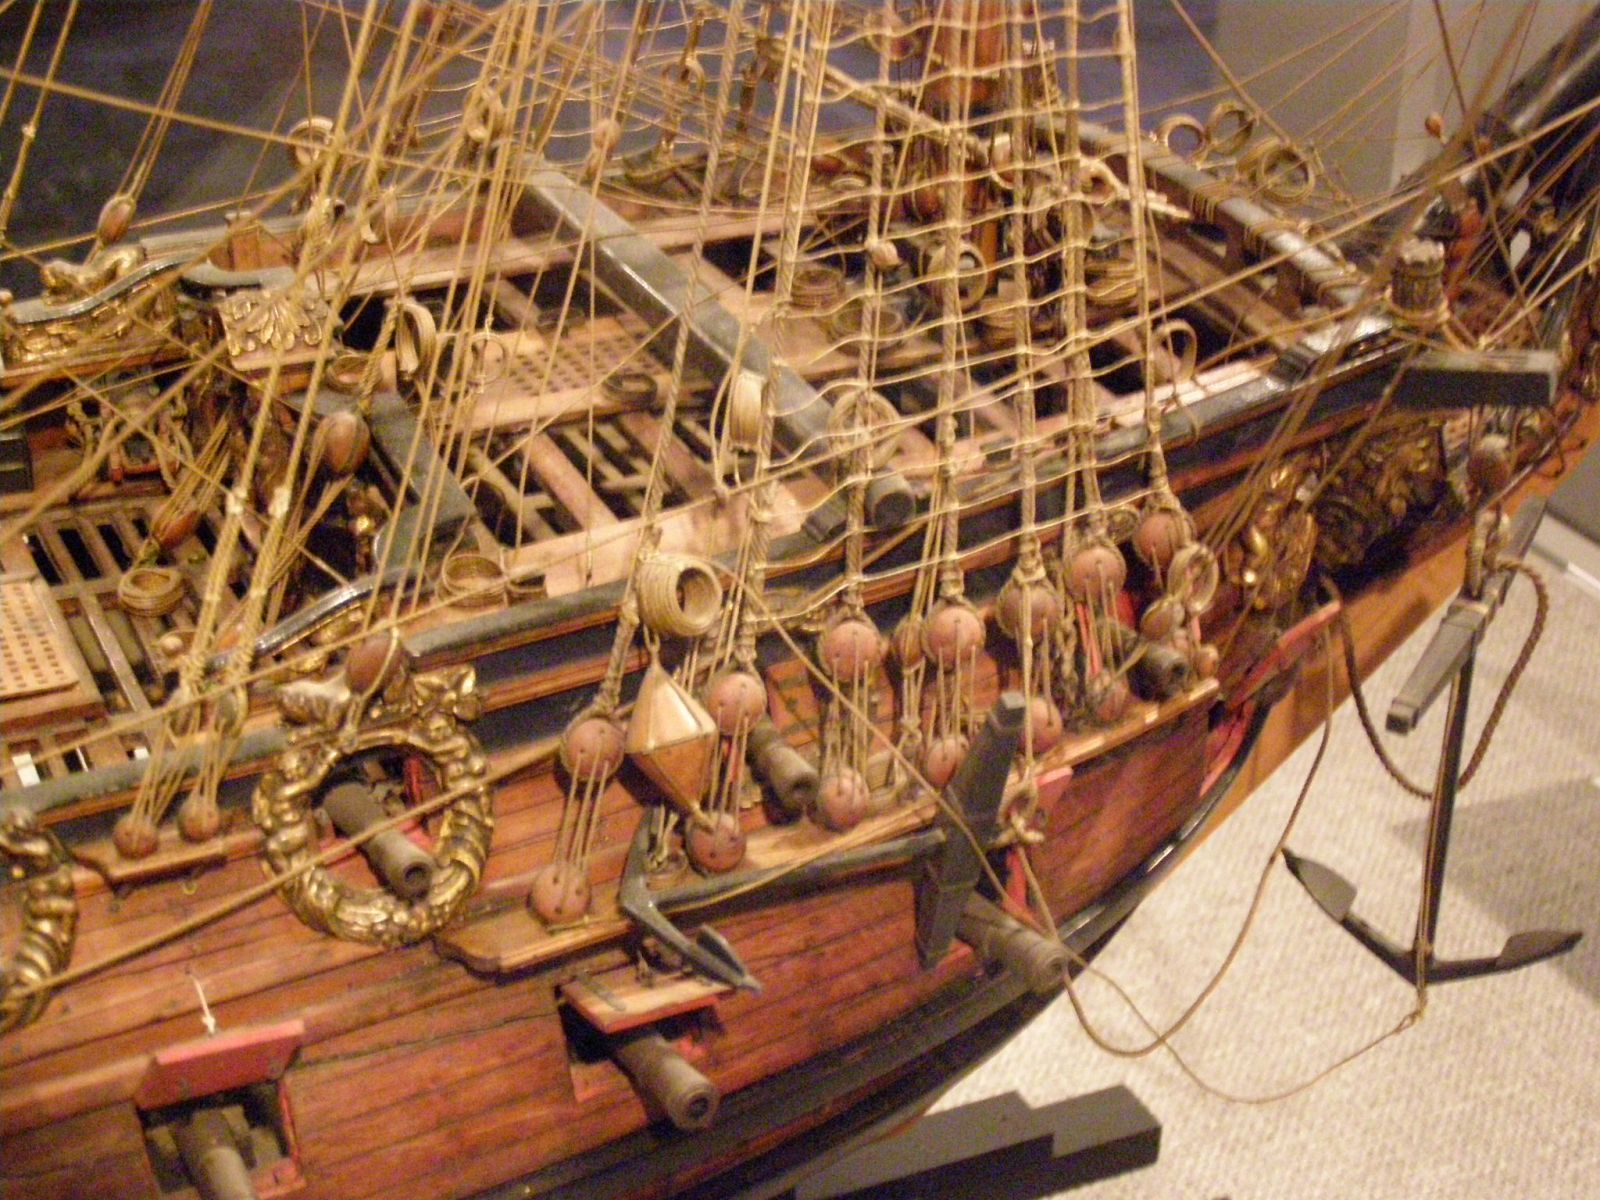
It depends on what your going for....Take a look at these rope coils. Odd yes but pretty typical on contemporary models. I have looked at a whole bunch and these will be easy enough to swap out....should I go relaxed or should I go contemporary??? I am still pondering. I am trying to experiment and then choose after doing some pretty serious study of contemporary examples. Rope coils for me are a challenge. But I am trying hard to give this model some of that old-time contemporary feel. Having said that....the relaxed coils on the pin rails do look good to me and would be very different if I was going to stick with these contemporary stylings. I know modern rope bends and flexes but maybe the old rope in those days was much more stiff, hence the look of these contemporary rope coils. So many contemporary models have them its hard to ignore. Click on that last image and really take a look at them. Its very different than the natural coil I have hanging on the pin rail. Which is more correct??? I have no idea. I will go with one or the other after living with it for a while. If you have Grant Walkers new book on the Rogers Collection, I urge you to flip through it and see how the rope coils look on some of those models. There are some fantastic close-up images in that book in addition to these which I got from our gallery and my own collection. I believe these are mostly contemporary but some of the Rogers stuff was rigged buy Culvers I think...back in the 20's. He was masterful. I have dozens more that look just like these. Go figure. So...relaxed coils or structured coils. Chuck

- 1,051 replies
-
- 9
-
-
- cheerful
- Syren Ship Model Company
- (and 1 more)
-
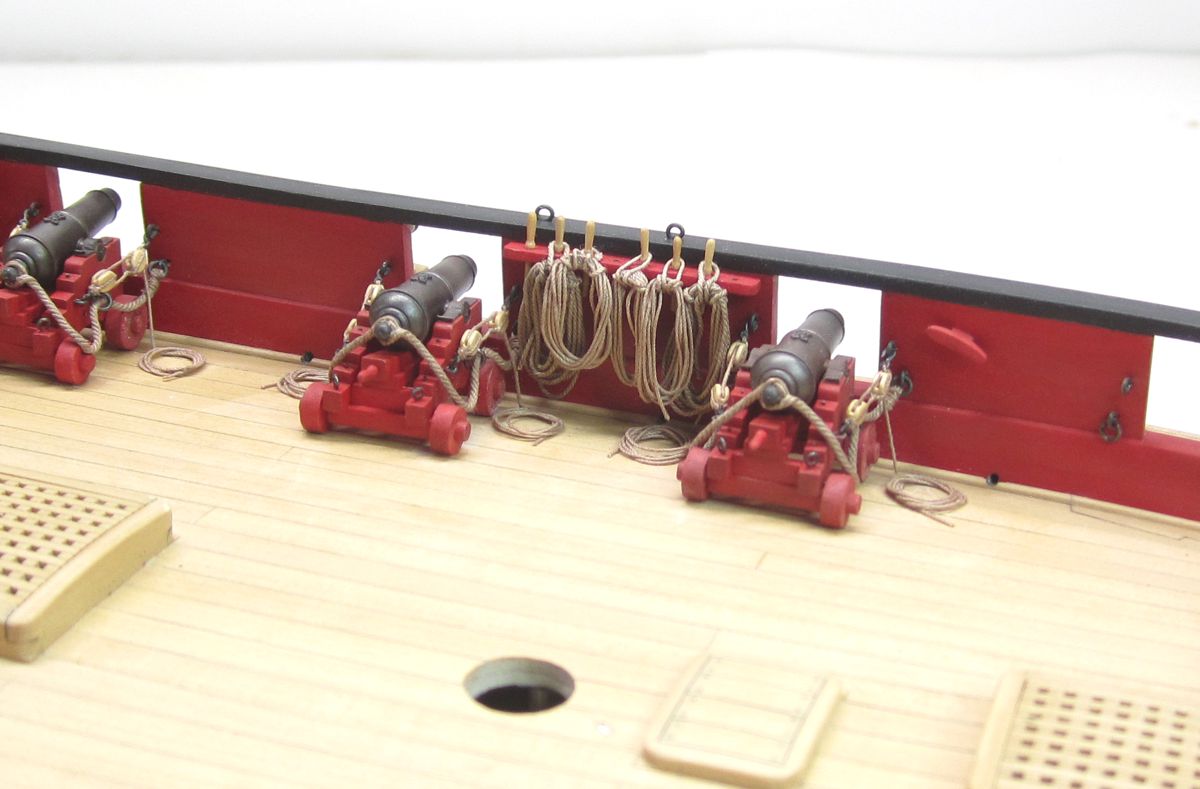
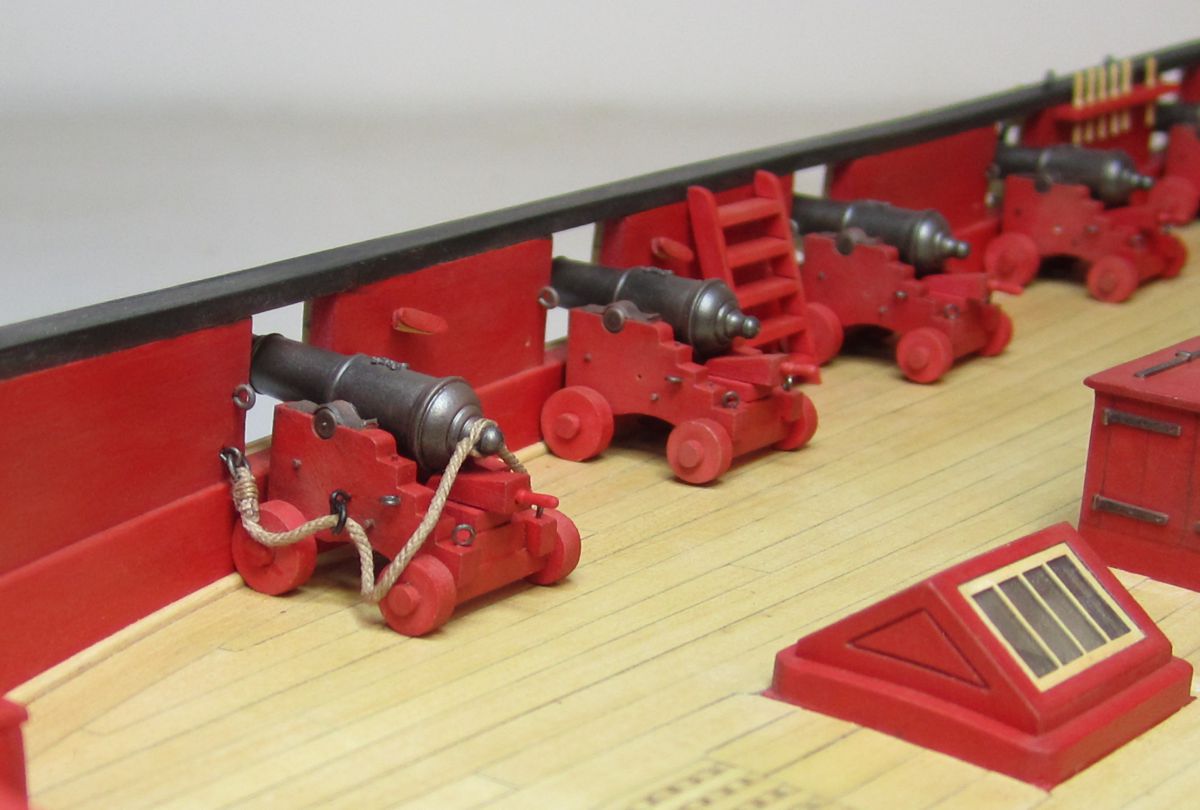
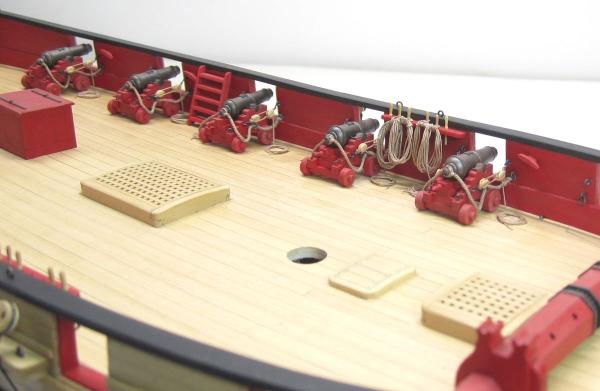
Had some time today to rig the carriage tackles. I used 1/8" single blocks and .012 light brown rope. I also used my 3mm hooks. These were all made off the model and took some considerable time to make. They fixed in position and the end of the tackle glue to the deck. Then a small rope coil was glued on top of that. I also took the time to experiment with a few rope coils for the pin rails. I wanted to improve my abilities here and there is no time better than now. With no rigging in the way I can experiment with different lengths and techniques and see how they will look. I think these look pretty good. I tried about a dozen different sizes and configurations. The goal of course is to make them look somewhat natural without making my crew get in trouble for being so sloppy and undisciplined. Now to go through the whole process again on the other side. Yikes.


- 1,051 replies
-
- 35
-
-
- cheerful
- Syren Ship Model Company
- (and 1 more)
-
Cutter Cheerful 1806 by rafine - FINISHED
Chuck replied to rafine's topic in - Build logs for subjects built 1801 - 1850
Looks great Bob. Nice work!!! You are in the home stretch- 525 replies
-
- 5
-
-
- cheerful
- Syren Ship Model Company
- (and 1 more)
-
Very inspiring. I still cant get over how small the model is and how much detail you are managing to put in there. Well done.
- 641 replies
-
- 7
-
-
- greenwich hospital
- barge
- (and 1 more)
-
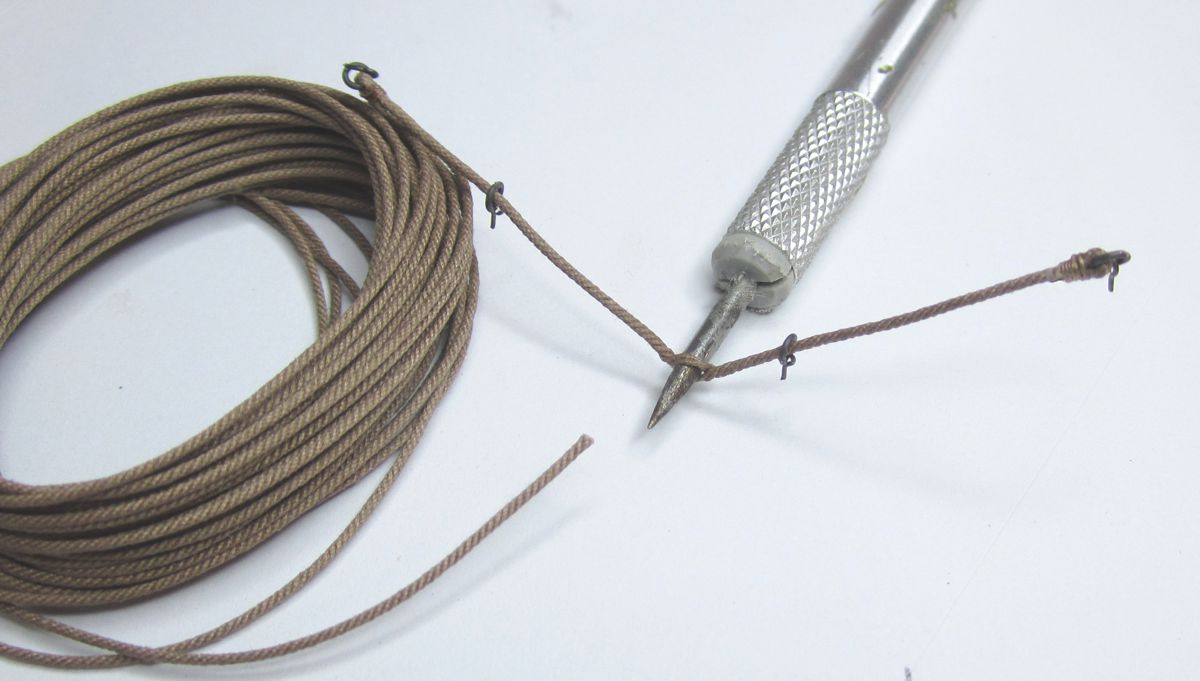
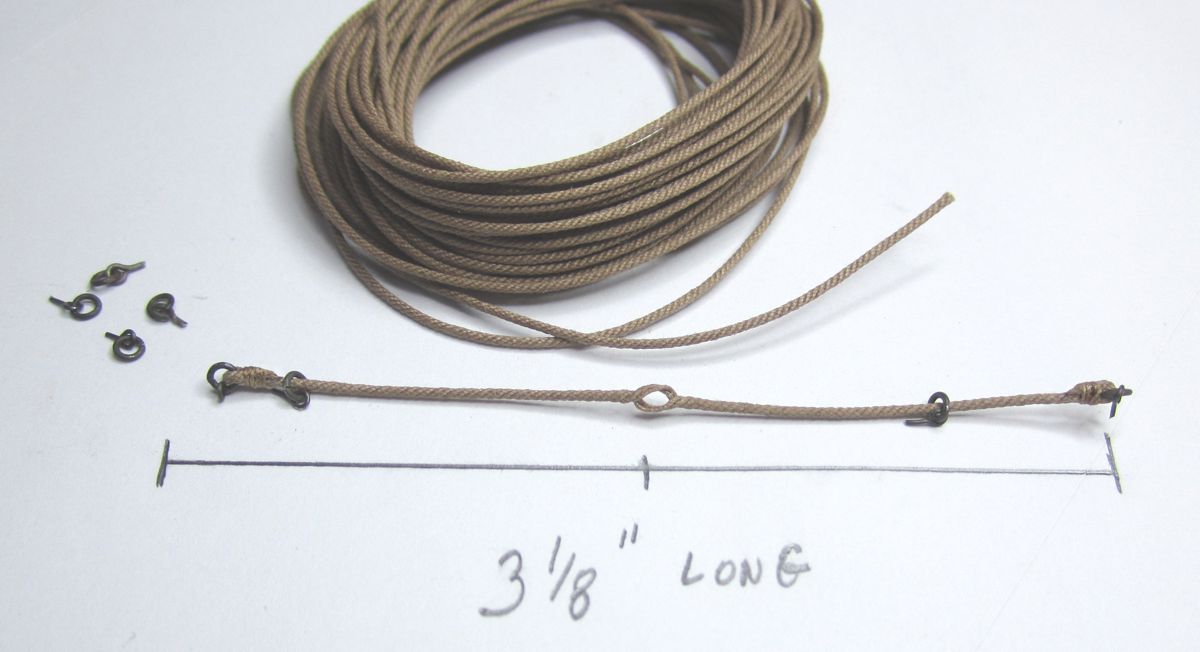
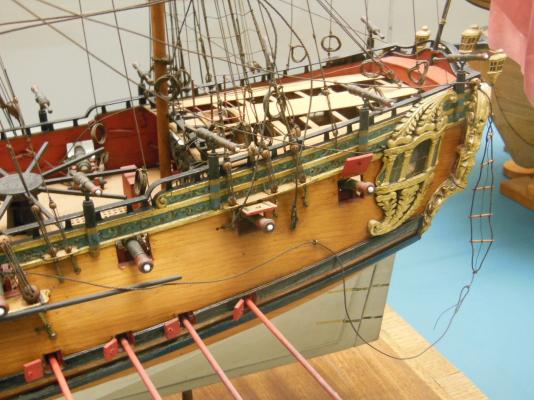
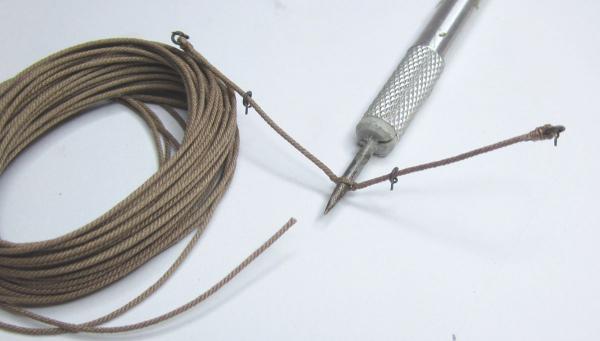
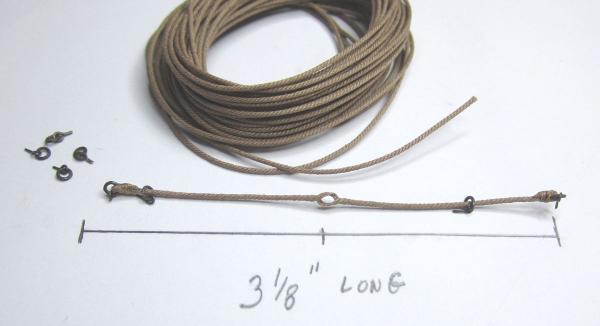
The breech rope was made using a technique I saw on an actual contemporary model. The splice for the button of the Carronade was simulated. As mentioned I am using Syren .035 light brown rope. All of my .035 size rope is four strands. I dont think it would look as nice otherwise. Four stranded rope just make it work nicely. But essentially, the entire breech rope is made to length....3" long. (addendum) After consideration I think the breech line should be no longer than 3". It looks a bit long in the photo. The eyebolts and rings were slipped on before the end was finished off. You can see that in the photos. The eyebolts were 28 gauge wire while the split rings were 24 gauge. Then I used a sharp but wide awl to simulate the splice. It has to be large enough that the splice will fit over the button of the carronade or cannon. In the center of the breech rope I pushed the awl through so there were two strands on top and bottom. Hence the need for four stranded rope. Then I applied some watered down white glue and let it dry. Once dry the simulated splice stayed to shape. I have seen many real splices attempted and they just look to big and out of scale. I couldnt pull that off convincingly. Even though this is a cheat, I think it looks better because it stays smaller. I could have just gone with the usual wrapping once around the button of the carronade...but that is tough to do in my opinion. It wont stay in place and you must use glue so it wont come undone. This ends up pulling the finish off the barrel etc. In the end it just looks too sloppy for me. So I gave this a try. No glue is needed at all. It slips right on the button and wont come off. This allows you more control to set the other eyes into the brackets of the carriage and then place the whole thing on deck. Hope that makes sense. I also stiffened the line with the watered down white glue before starting. Let it dry. I just find it easier to work with when its a bit stiffer. At least with the breech rope anyway. I started with about a 5" long piece of rope. Chuck

- 1,051 replies
-
- 42
-
-
- cheerful
- Syren Ship Model Company
- (and 1 more)
-
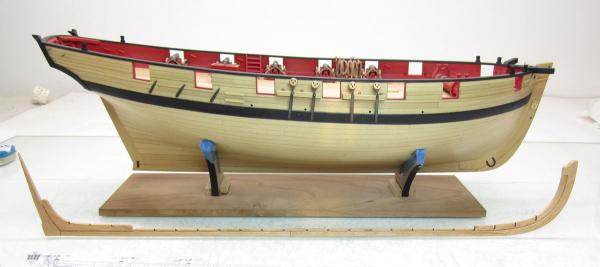
Nicely done...she is a fun hull to plank...much better than those huge frigates dont you think. Chuck
- 310 replies
-
- 6
-
-
- cheerful
- Syren Ship Model Company
- (and 1 more)
-
Thank you!!! Here is a first crack at a breech rope. I am using my .035 light brown rope. I think it looks pretty good. This was just a first attempt to go through the motions and now I will detail how I did it. You can spend endless amounts of time tweaking how this rope falls so it looks natural. After a while one has to say it look good enough. Four more to go and then the tackles are next. Note to self.....paint the underside of that cleat. LOL Chuck

- 1,051 replies
-
- 37
-
-
- cheerful
- Syren Ship Model Company
- (and 1 more)
-
Effie M Morrissey by allanyed
Chuck replied to allanyed's topic in - Build logs for subjects built 1851 - 1900
You have been busy......less time on the golf course. That is looking just great Allan. Looking forward to seeing progress. -
Funny Allan....I am itching to see pictures of the Litchfield!!!! Lets see what you are working on bud. Move out of Jersey and I cant get any updates....
- 1,051 replies
-
- 5
-
-
- cheerful
- Syren Ship Model Company
- (and 1 more)
-
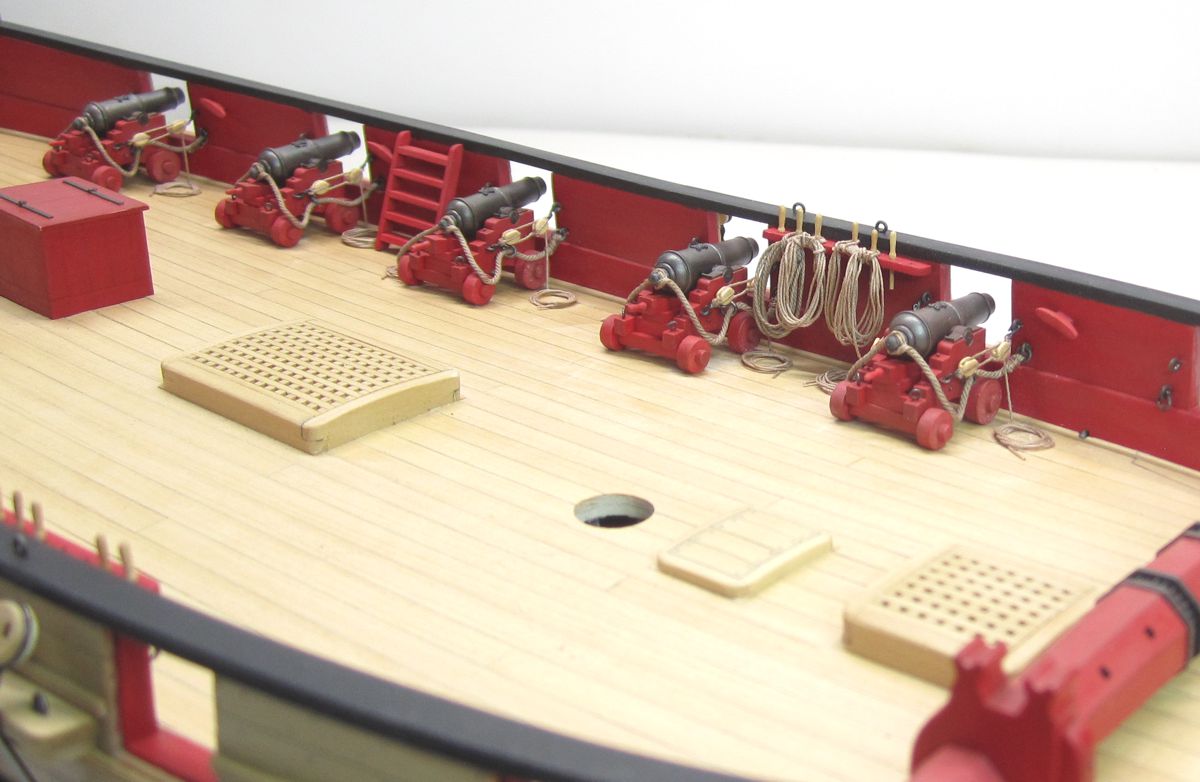
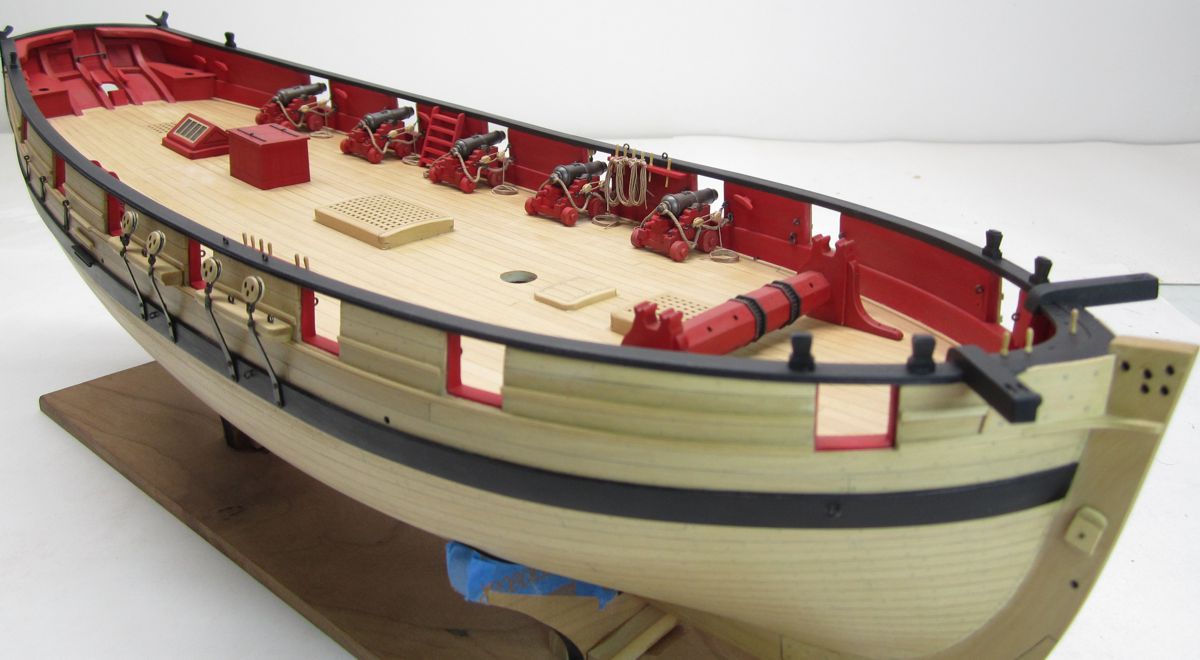
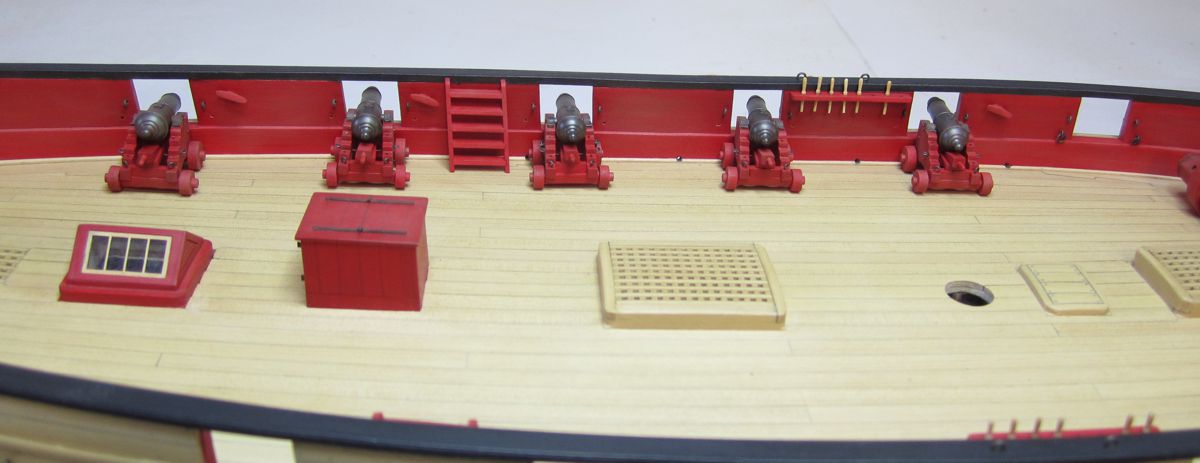
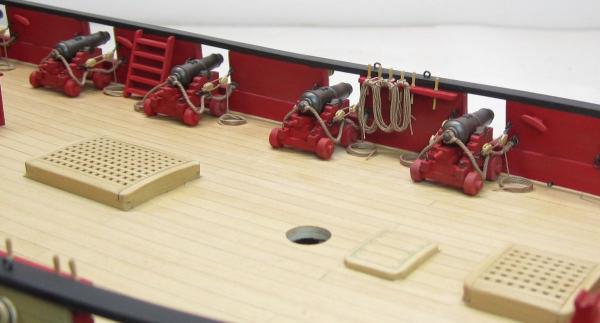
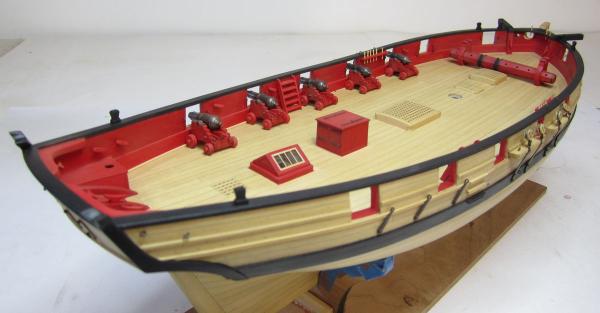
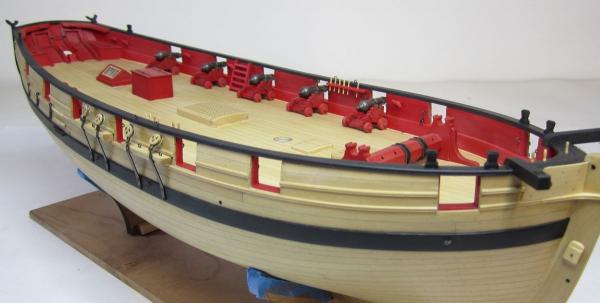
Its an interesting discussion. Well, I think we have a winner. Here is the model with the trucks painted red. I do in fact like this much better than the bright trucks. Thanks Greg!!! I know its just a matter of personal tastes but I think I will pursue this approach from now on. I think its more pleasing and less distracting actually. Although I will leave the black trucks to someone else to experiment with. I see the bulwarks are very dusty...much touch up to do. I will wait until after a rig these which is what I think I will do next. It will be a nice break from building another five carriages.

- 1,051 replies
-
- 30
-
-
- cheerful
- Syren Ship Model Company
- (and 1 more)
-
Thanks guys. I have actually switched to Grumbacher paints for this model. Just to try them out. They are from a tube and acrylic. I am using Mars Black and Crimson. Thats it.
- 1,051 replies
-
- 8
-
-
- cheerful
- Syren Ship Model Company
- (and 1 more)