

PeteB
-
Posts
183 -
Joined
-
Last visited
Content Type
Profiles
Forums
Gallery
Events
Posts posted by PeteB
-
-
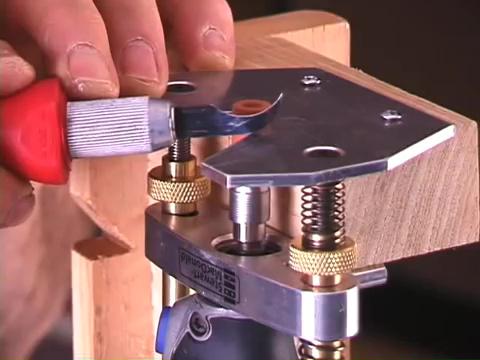
Thanks for the Heads Up - This looks to me to be a very attractive alternative for finishing frames to size using it mounted upside down with either a router or sanding drum. I note its made by a Guitar builder and the video appears to show some pretty fine adjustment for the cut. Included a screen shot from the video just need to counter sink the attachment screws for what I need.
As I'm setting up a workshop from scratch being a long time plastic modeller the up front cost is pretty steep but this at US$55 looks pretty attractive. I've been lucky enough to buy a used Byrnes Table saw from a member in Canada but the freight was 50% of the purchase price so for the time being I've decided to buy a VandaLay Mill which uses a dremmel as well which I hope will take me through till I can afford something better.
Don’t want to hijack your post so I'll post a separate one for the VendaLay – thanks again for the Heads Up very much appreciated– Cheers Pete
- thibaultron, Canute and mtaylor
-
 3
3
-
-
Hi Jim welcome aboard from another fairly new member - Glue marks on canopy's and windscreens are how I discovered fingerprints as a kid. Seriously though I hope you find as I have that there isn't another site with the expertise and generosity to share as you'll find from the guys here. Cheers Pete
-
-
Giampiero - My wife has lined me up for the knitting lessons as promised - but seriously mate what can I say other than superb craftsmanship - just beautiful work and a joy to the eye - Congratulations pete
- giampieroricci and mtaylor
-
2
-
Superb work again Giampiero not only the carving but shaping that Ebony insert as well – although I think it impossible I am resigned to the fact that you are going to inlay the three Flue de Lys in mother of pearl - after which I will give up modelling and take up knitting - Cheers Pete
- mtaylor and giampieroricci
-
2
-
I could look at these photographs all day!!!
Took the words right out of my mouth - the first one gives me almost a 1:1 scale perspective of the distance bow to stern. Beautiful work. - cheers Pete
- aviaamator, Obormotov, Nirvana and 3 others
-
6
-
As for rope, all of it is from Chuck Passaro's Syren Company. You can find a link on this website. All of the size references are to his products.. I also purchased all of the blocks, open and closed hearts, brass hooks and wooden cleats from him. I have been able to mill my own bullseyes.
I have probably doubled the cost of the kit with all of the aftermarket parts, but the quality is outstanding, makes the end product look much cleaner and sharp, and therefore in my opinion, worth the cost.
We are absolutely getting hammered with a winter storm this weekend in NE Ohio. It is a good time to work in the shipyard.
Hi Darren
Thanks for the info re the rope - should have picked it to come from Chuck - you may have doubled your cost with the aftermarket price but I can assure you that you have lifted the model many times more than that by using them. Given the results you have been getting Ill be going to the same source.
Hope you're out of harms way with that storm coming in - be happy to trade places for a month or two as we have been going from 22C to 40C not quite the white Xmas you guys get plus you've got the bonus workshop time - Best wishes to you and yours and all the guys on the site - Cheers Pete
-
Hi Darrell
Enjoyed following your build and have to say your rigging looks immaculate. Could I tag on to Mikes question above but maybe a bit more specifically. I've noted your comment in post 384 and 385 about the rope sizes you are using - "I used a heavy .018 tan lanyard for the sling." and "025 black rope for the shrouds" and "a .012 tan lanyard to the bullseye". - the line that you are using looks very clean with no fur or lumps could I ask are you making your own rope or buying it in and if so where do you source it. The whole vessel is really starting to take form now - great looking build - congratulations. Cheers Pete
-
Mate you have done it again that Stern Lantern looks like it grew there- lovely work - cheers Pete
- mtaylor and giampieroricci
-
2
-
Giampiero - Your carving is masterclass as well - bravo - cheers Pete
- aviaamator, giampieroricci and mtaylor
-
3
-
Coming along nicely - I admire the simple yet effective way you constructed the copper bow sprit fitting - Your work keeps reminding me of how the eye gets caught time and again by detail - I've commented on the precision of your tree nailing in a previous post but looking at your second last photo showing your progress on the bulwarks I just can't stop my eyes from going back to the beautiful job you have made of the planking and tree nailing - Cheers Pete
- mtaylor and aviaamator
-
2
-
Giampiero - You might like to try using what Railway and aircraft modellers use its a liquid that dries clear and would be ideal for the individual panes in the Lantern - Just dip a tooth pic in the fluid and run it around the edges If you don't like the effect its easy to dissolve I know Testors make one and Model Master do as well. - Cheers Pete
Here's a link to the testors with some tech tips http://www3.towerhobbies.com/cgi-bin/wti0001p?&I=LXHN89&P=M
couldn't find one for the model master one buts I think its a bit better from memory.
- giampieroricci, mtaylor and aviaamator
-
3
-
Looking good - the contrast between the thick and thinner wire seems more prototypical - great work - look forward to seeing it cleaned up. Cheers Pete
- giampieroricci, mtaylor and dgbot
-
3
-
-
Giampiero - Fabulous work again - I've been trying for a few days to put together some words to reflect my admiration of your work on the forepeak Timbers and cheeks and then you upped the anti by inlaying them with ebony? - I suspect your mastery of those curves has something to do with the beautiful women of your country
 I noted a thread in your inverted shot of the Lantern are you going to light that as well ? Congratulations again beautiful work - Cheers Pete
 -
But, otherwise, I am using existing plans. Vessels that have already been designed - a long time ago. I find a drawing
program to be more useful. I have found a way to avoid having to loft individual frames to do POF. A drawing program
gets me there and I only use a small fraction of the program tools. The important part is that it allow large files with a
ton of layers and not crash. You do not really need to learn more that a limited number of functions. The bulk of the tools
deal with painting and photo manipulation and color distortion - none of which are relevant to our needs
Hi Jaager - I'm in Mark Ps league if you have the time I would appreciate a brief summary of what you use and how you use it? - Cheers Pete
-
Hi Ed – I have followed your work on the Naiad and now this project, from inception to where you are at the moment. I have gone from - maybe I can do that, to How Could I Possibly Do That - each post just keeps getting better and better and the standard you have set is right off the scale past magnificent heading stellar.
Its not just your work that stands out, its also your most generous and inclusive build log. Your posts show that the amazing is achievable, your explanations by way of a the sequenced photos and text give some of your more mortal followers some hope of achieving a result that we are able to live with having the benefit of your build log and of course the books and plans which themselves are incredible.
I have some favourite pieces of music which always give me great enjoyment. I now get double my moneys worth listening whilst I browse back through the posts and admire the joinery and finishes of your work.
One final comment with tongue firmly in cheek - Your last picture with the masts stepped has made me realise just how large she is going to be fully rigged – knowing how you plan ahead I wondered if you had any draft designs of the Taj Mahal to do her justice yet?
Cheers and thanks Pete
-
Giampiero Your metal work is just as spectacular as your joinery - I delight in stopping by to take in your progress as it makes my day. I invariably go back through your previous posts to follow the transition from wood to art. Congratulations again mate.- Cheers Pete
-
Hi Kees
Great to see you back - now that's a man cave I would be proud to hibernate in - "she who must be obeyed" would have a hard time digging me out of that - Cheers Pete.
- kees de mol, Omega1234, cog and 4 others
-
7
-
Hi Guys
After weeks of what became an almost daily fix reading first Ed Tosti's fabulous build logs of Naiad and now both Young American builds my interest in clippers has significantly increased and I came across a model of the clipper Thermopylae on the Australian Power House Museum site (officially the Museum Applied Arts & Science I think) built by a gentlemen Cyril L Hume.
What caught my eye was the two cannon lashed to the deck which I have never before seen on models of this type. The accompanying information on the model states he built the model entirely from information gathered from ex crew during the 1930's Depression in Sydney. The information on the site quotes Cyril in part -
“The coastline south of Hong Kong was often the location of pirate attacks from junks. Cyril said that "Thermopylae" was well prepared with two small guns lashed to the main deck and various other weapons including 20 Tower Hill muskets, 20 cutlasses, 20 boarding pikes, 20 round shot and 20 grape shot located around the mizzenmast below deck.”
For me this is the first I have heard of any of the clippers carrying anything bigger than small arms? There is some very interesting detail information on the Vessel and crew are well as some very nice photos of a beautiful model if you have a spare moment.
http://www.powerhousemuseum.com/collection/database/?irn=211834
Cheers Pete
- thibaultron, dgbot, Archi and 3 others
-
6
-
I know I'm doing an Oliver Twist but I've been reflecting on my comments in my last post effectively writing off younger beginners which is not what I'd like to see happen. Maybe the way is to harness their mastery of computers and see if they can be tempted to put some skin in the game by physically constructing an object they have created on the "Dark Side" ie CAD modeling ?
-
Name of Ship - No particular vessel in mind but would like to see something with similar lines to La Jacinthe through to a composite steam/sail or steam luxury yacht – type that you would see anchored off Nice or Rhode Island late 1800s to1930s- eg Imperial yacht Standart (1893) being built by Alex Baranov in the current build logs.
Scale - depends on size but prefer 1/48
Country of Origin - not important just fit the bill for appeal.
Material Choice –Very Important to me being located here in Australia as it is difficult to source the nicer wood such as pear/boxwood/cherry etc especially in thick sheets or billets would pay what it takes to get the wood supplied in say 24”x 4-6”W by 2”D or in smaller sheets that is dressed to get around our quarantine.
Style - Either POB or POF or possible (Hybrid see below) but not solid hull – reason again is mainly location and cost of mail to ship the weight. Probably also an issue internally in the US? It may be worth considering a Hibrid hull choice which would help both the newer modeller and those that do not want to spend the length of time on a full frame. I thought something like the build of Toms10 HMS Leopard POB/POF/POB. For those new to full framing you could offer all the easier square frames and POB for the more difficult cant and stern frames? Also may appeal to those that are looking for a shorter 12 month build. It would for me as I intend to start with an accurate kit probably POB to get my eye back in before I tackel Eds Naiad but would love a hibrid to cut my teeth on frames.
Build time – I would be prepared to put in around what it takes to build an Naiad as I want to leave something of me behind when I move on but I also normally have a couple of projects on the go for when I hit the wall on the main one. So another POB or Hybrid would fit the bill there as a 12 mth project.
Price range - depends on the timber supplied but if it came in large planks as mentioned above whatever they are worth plus the design time and plans – realistically probably up to $850 – $1000. Having just spent around $450 for a used Byrnes a third of which was shipping cost that would seem reasonable.
Advanced or beginner......something in-between? - Maybe the hybrid design could address this problem – one lot of research same detailing for both with three hull construction choices? In regard to a kit for beginners I think we have to acknowledge that we have a passionate but pretty narrow field of interest compared to the real and virtual world out there.Not many kids these days know what a chisel is let alone how to use one – this is in no way a critism of them its just that they have grown up in a disposable world and the thought of repairing something let alone building something is completely alien to them. If you accept that thought then it seems to me (generally) that the new entrants to our hobby will be those now aged mid 40s who have built models of some sort in their youth and are looking to re-engage rather than abinitio.
My two bobs worth – hope I'm not out of order. - Cheers Pete
-
Just came across your build and very pleased that I have.
I find it refreshing to see someone practising a different approach to building, one which offers a shorter journey while still displaying all the external accuracy and which results in a model anyone would be proud to exhibit.
Love your carronades and especially your Treenailing which is a joy to look at - your choice of woods giving just the right contrast. Congratulations looking forward to seeing the finished project.
Cheers Pete
- mtaylor and aviaamator
-
2
Precision router base for Dremel 4000 etc.
in Modeling tools and Workshop Equipment
Posted
Thanks Steve - The construction of the StewMac one looks pretty sturdy and adjustment more precise and easier but will certainly give the Bunnings one the Mark 1 eyeball test - Thanks again - cheers Pete