-
Posts
2,552 -
Joined
-
Last visited
Content Type
Profiles
Forums
Gallery
Events
Everything posted by JeffT
-
Looks great! I like the shade of blue that you used. What color and make is it?
- 81 replies
-
- kingfisher
- lauck street shipyard
-
(and 1 more)
Tagged with:
-

The Ghosts of the Mary Rose - moved by moderator
JeffT replied to Steve D's topic in Nautical/Naval History
Very interesting story. Thanks for posting. -
I agree with Adrieke, I've had very unpredictable results using mine. Sometimes the pin will go in smoothly and other times it takes a lot of force. I drove mine right through the hull a couple of times, so I gave it up.
-
The Syren is an awesome kit! I hope you have a lot of willpower.
- 773 replies
-
- san francisco ii
- artesania latina
-
(and 1 more)
Tagged with:
-
The carriages turned out well. That's a good way to make sure they all match.
- 384 replies
-
- san francisco ii
- artesania latina
-
(and 1 more)
Tagged with:
-
I agree with Andy. I've used the Tamiya primer on wood, metal, and plastic with good results. I just wish they would sell it in a bigger container because I go through a lot of it.
-
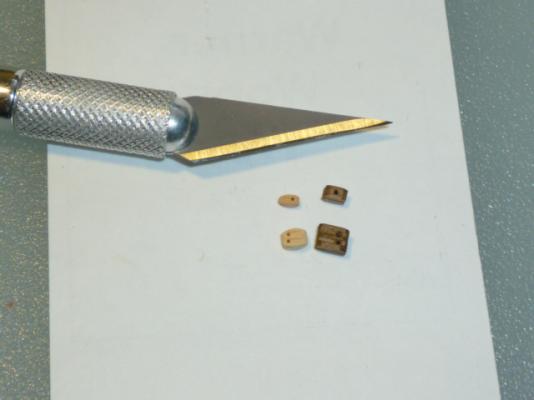
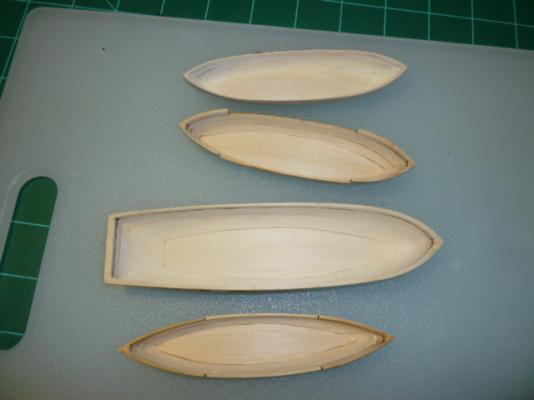
I received my new blocks from Warner Woods today and below is a picture to show the comparison between them and the ME blocks. The blocks are 3/32" and 1/8". I included the number 11 exacto in the picture for scale. Following that is a picture of the current state of the ships boats. They are shaped and ready for some wood filler to hide all the imperfections before painting. Here are the blocks, 3/32 at the top and 1/8 at the bottom: Boats:
-
Very well done on the bowsprit Jay. Looks like a professional job to me.
- 732 replies
-
- constitution
- model shipways
-
(and 1 more)
Tagged with:
-
Very clean work! All of you Kingfisher builders have set the bar high for me.
- 81 replies
-
- kingfisher
- lauck street shipyard
-
(and 1 more)
Tagged with:
-

CALDERCRAFT ADMIRALTY PAINTS - WHERE TO BUY IN USA
JeffT replied to samueljr's topic in Modeling tools and Workshop Equipment
check with ageofsail.com I don't see them on their website but they do have some on ebay. maybe give them a call. -
Thanks for posting. Its a beautiful model!
- 81 replies
-
- kingfisher
- lauck street shipyard
-
(and 1 more)
Tagged with:
-
It never hurts to have extras around.
-
Me too!
About us
Modelshipworld - Advancing Ship Modeling through Research
SSL Secured
Your security is important for us so this Website is SSL-Secured
NRG Mailing Address
Nautical Research Guild
237 South Lincoln Street
Westmont IL, 60559-1917
Model Ship World ® and the MSW logo are Registered Trademarks, and belong to the Nautical Research Guild (United States Patent and Trademark Office: No. 6,929,264 & No. 6,929,274, registered Dec. 20, 2022)
Helpful Links
About the NRG
If you enjoy building ship models that are historically accurate as well as beautiful, then The Nautical Research Guild (NRG) is just right for you.
The Guild is a non-profit educational organization whose mission is to “Advance Ship Modeling Through Research”. We provide support to our members in their efforts to raise the quality of their model ships.
The Nautical Research Guild has published our world-renowned quarterly magazine, The Nautical Research Journal, since 1955. The pages of the Journal are full of articles by accomplished ship modelers who show you how they create those exquisite details on their models, and by maritime historians who show you the correct details to build. The Journal is available in both print and digital editions. Go to the NRG web site (www.thenrg.org) to download a complimentary digital copy of the Journal. The NRG also publishes plan sets, books and compilations of back issues of the Journal and the former Ships in Scale and Model Ship Builder magazines.


