tkay11
-
Posts
1,829 -
Joined
-
Last visited
Content Type
Profiles
Forums
Gallery
Events
Everything posted by tkay11
-
There have been quite a few who have given up on even those kits labelled as simple. I'm not sure that there is an even simpler kit for them. It may be more that the hobby is just not for them. Tony
-
 Isopropanol or isopropyl alcohol are excellent for dissolving PVA. You can buy it in large quantities from eBay very cheaply. I bought half a litre which is still going strong. As Brian suggested, it's worth keeping it soaked for a while. CA glue dissolves better in acetone, also available from eBay. Tony
- 69 replies
-
- 3
-

-
- lady nelson
- victory models
- (and 1 more)
-
Thanks for all the likes and comments! Spyglass: That's really interesting, so thanks for the insight. However, I'm not going to dismantle or change the rig now. I'll keep the tip for some future time. Gregor: As I said to Dirk, it's thanks to the continued stimulus provided by you and others that have helped me come this far. I'm now feeling more confident about doing a build as a result, and as I'm beginning to see how all the aspects interconnect and function together. I'm especially pleased that the belaying pin rack by the stem has worked so well in terms of the logic. I'm still tempted to be agitated by the roughness of the work though ... Tony
- 269 replies
-
- 1
-
-
- Caldercraft
- First build
- (and 3 more)
-
Attaching a Cutter's foresail to its horse rail
tkay11 replied to tkay11's topic in Masting, rigging and sails
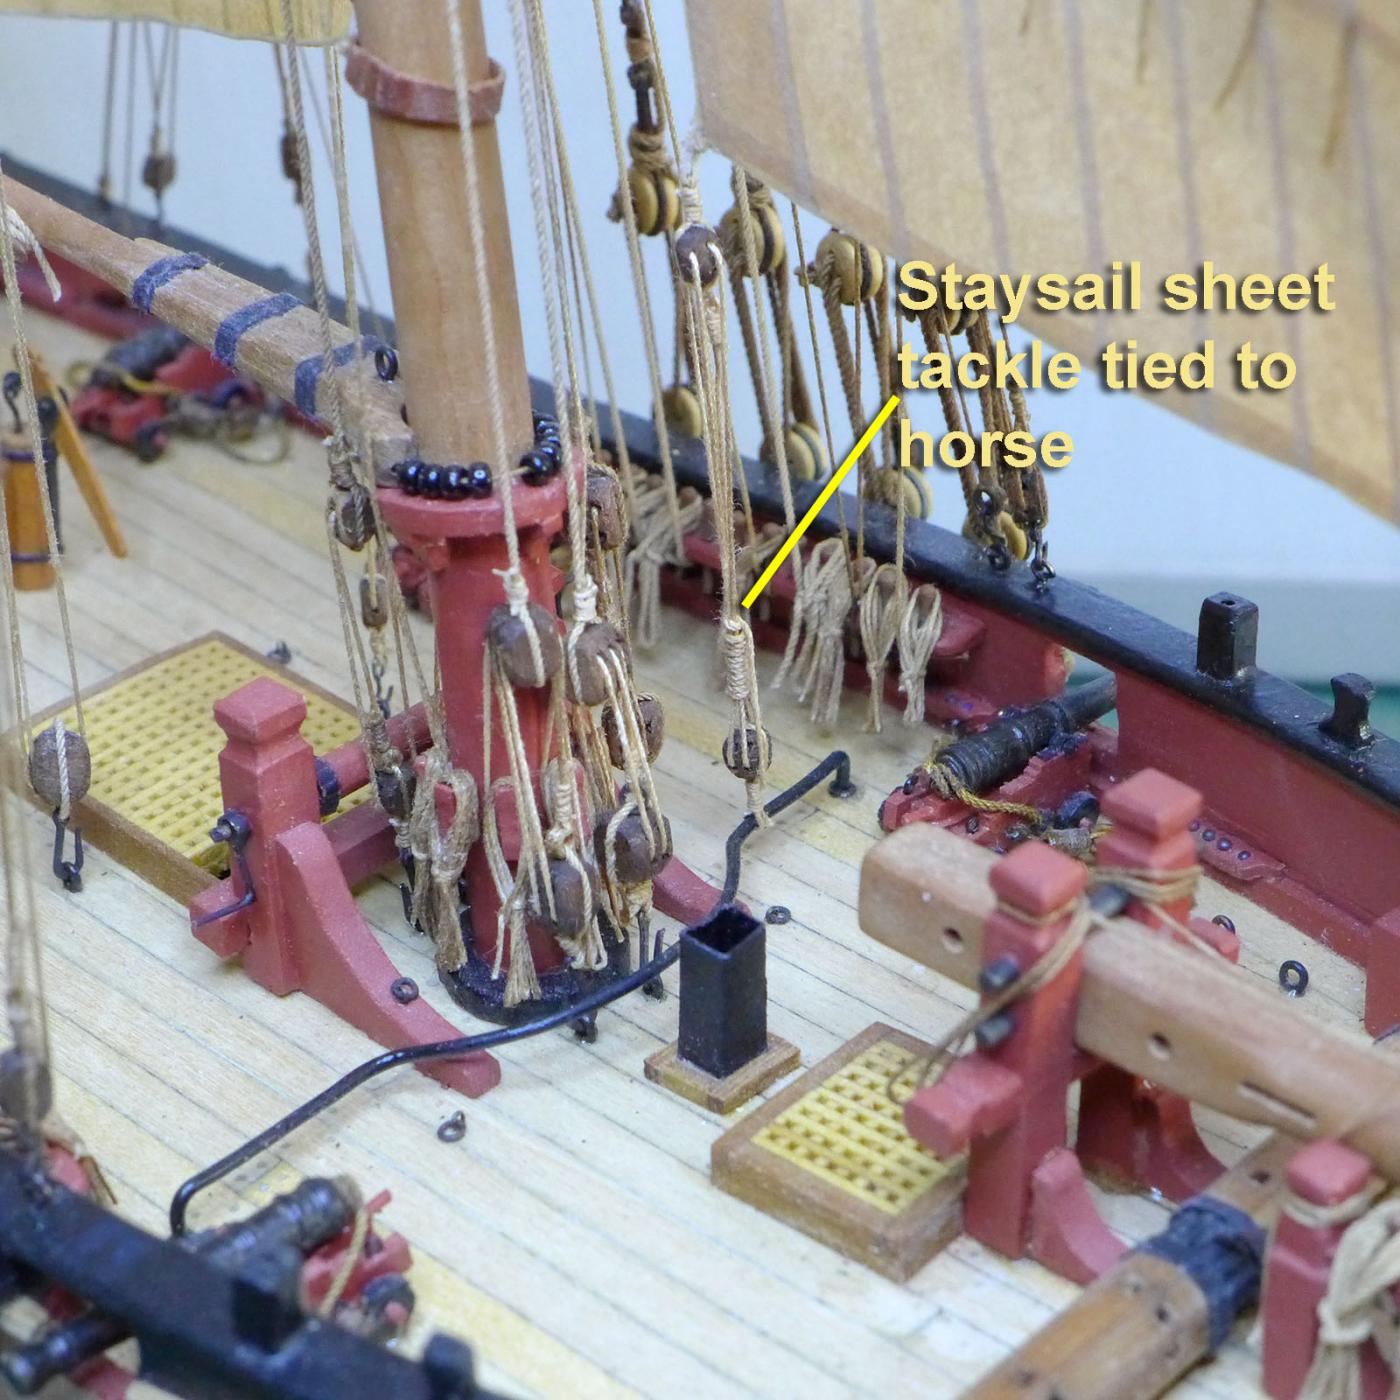
Just as an update to this thread, I eventually decided to make a horse of the type shown on the model of the Diligence at http://www.shipmodel.com/models/diligence-full-hull-nav- The result is: You can see this as part of my build log at http://modelshipworld.com/index.php/topic/335-hmc-sherbourne-by-tkay11-–-caldercraft-–-scale-164-1763-a-novice’s-caldercraft-sherbourne/?p=420946 Thanks again to everyone for their help. Tony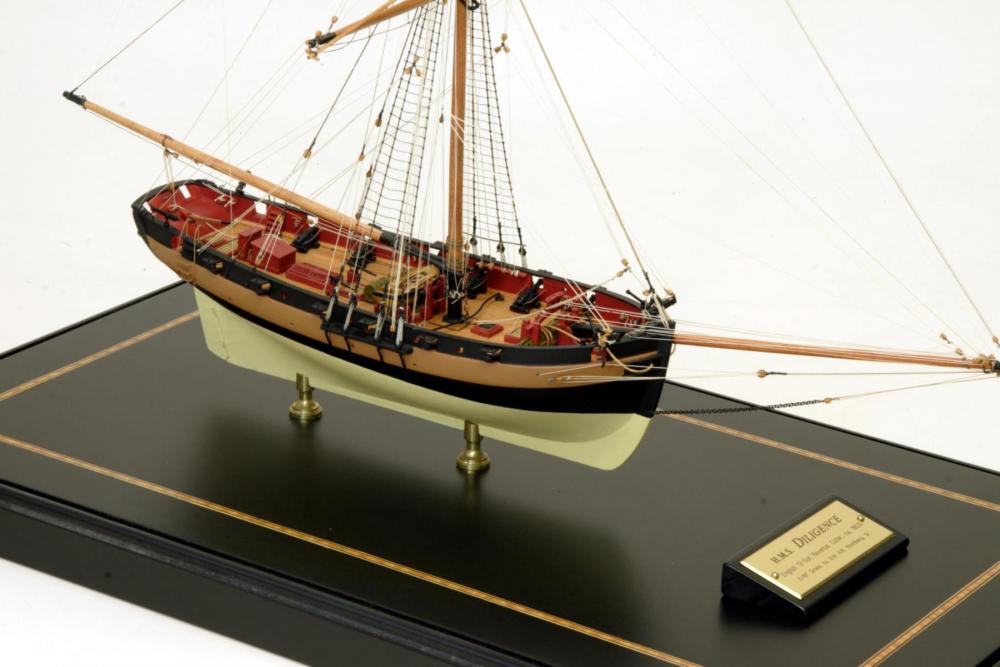

-
Thanks a lot, Wayne. Your post prompted me to look at your Cruizer brig, and that really is a magnificent undertaking. I'll be following that from now on. Tony
-
As usual, my dear mentor Dirk, I am at a loss when you say such kind things. All I can say is that I deeply appreciate them and thank you! It shows what a good teacher you and others have been for me on this forum! As to the hull, I already know your's is going to continue to turn out far better than anything I can do. Thanks again for your continued encouragement! Tony
- 269 replies
-
- 3
-
-
- Caldercraft
- First build
- (and 3 more)
-
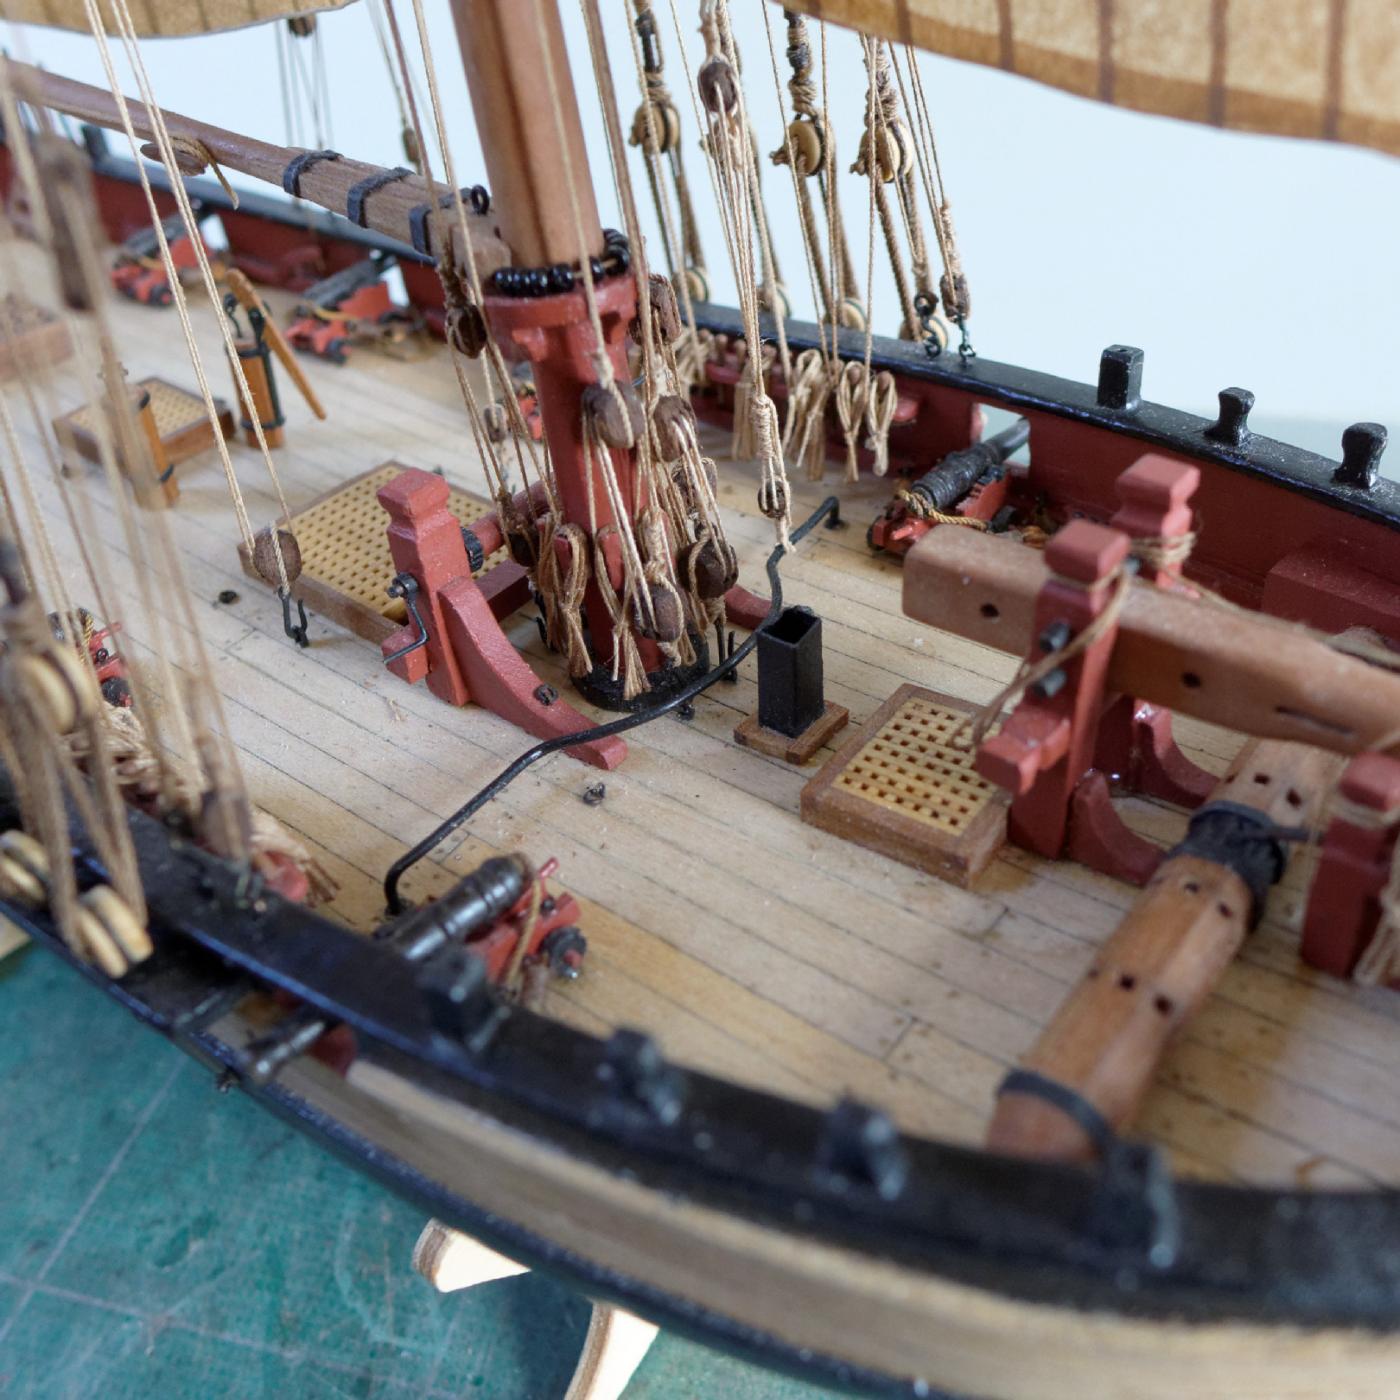
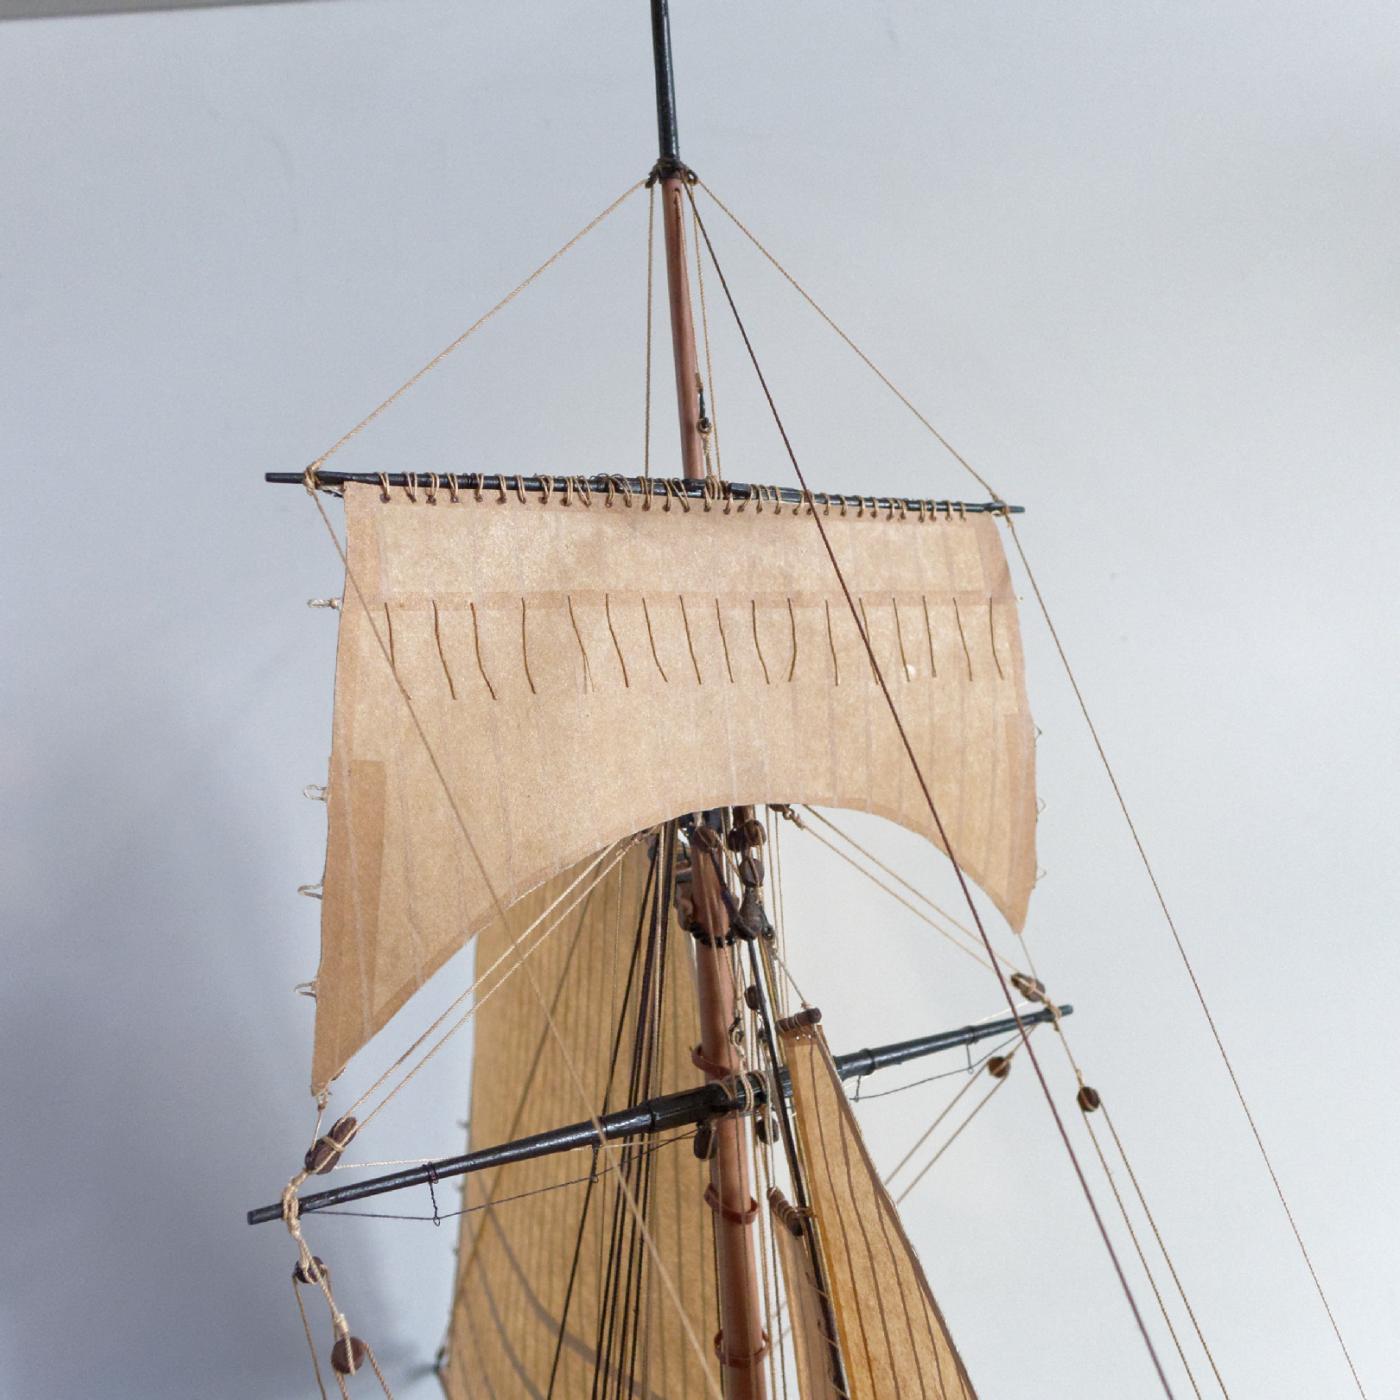
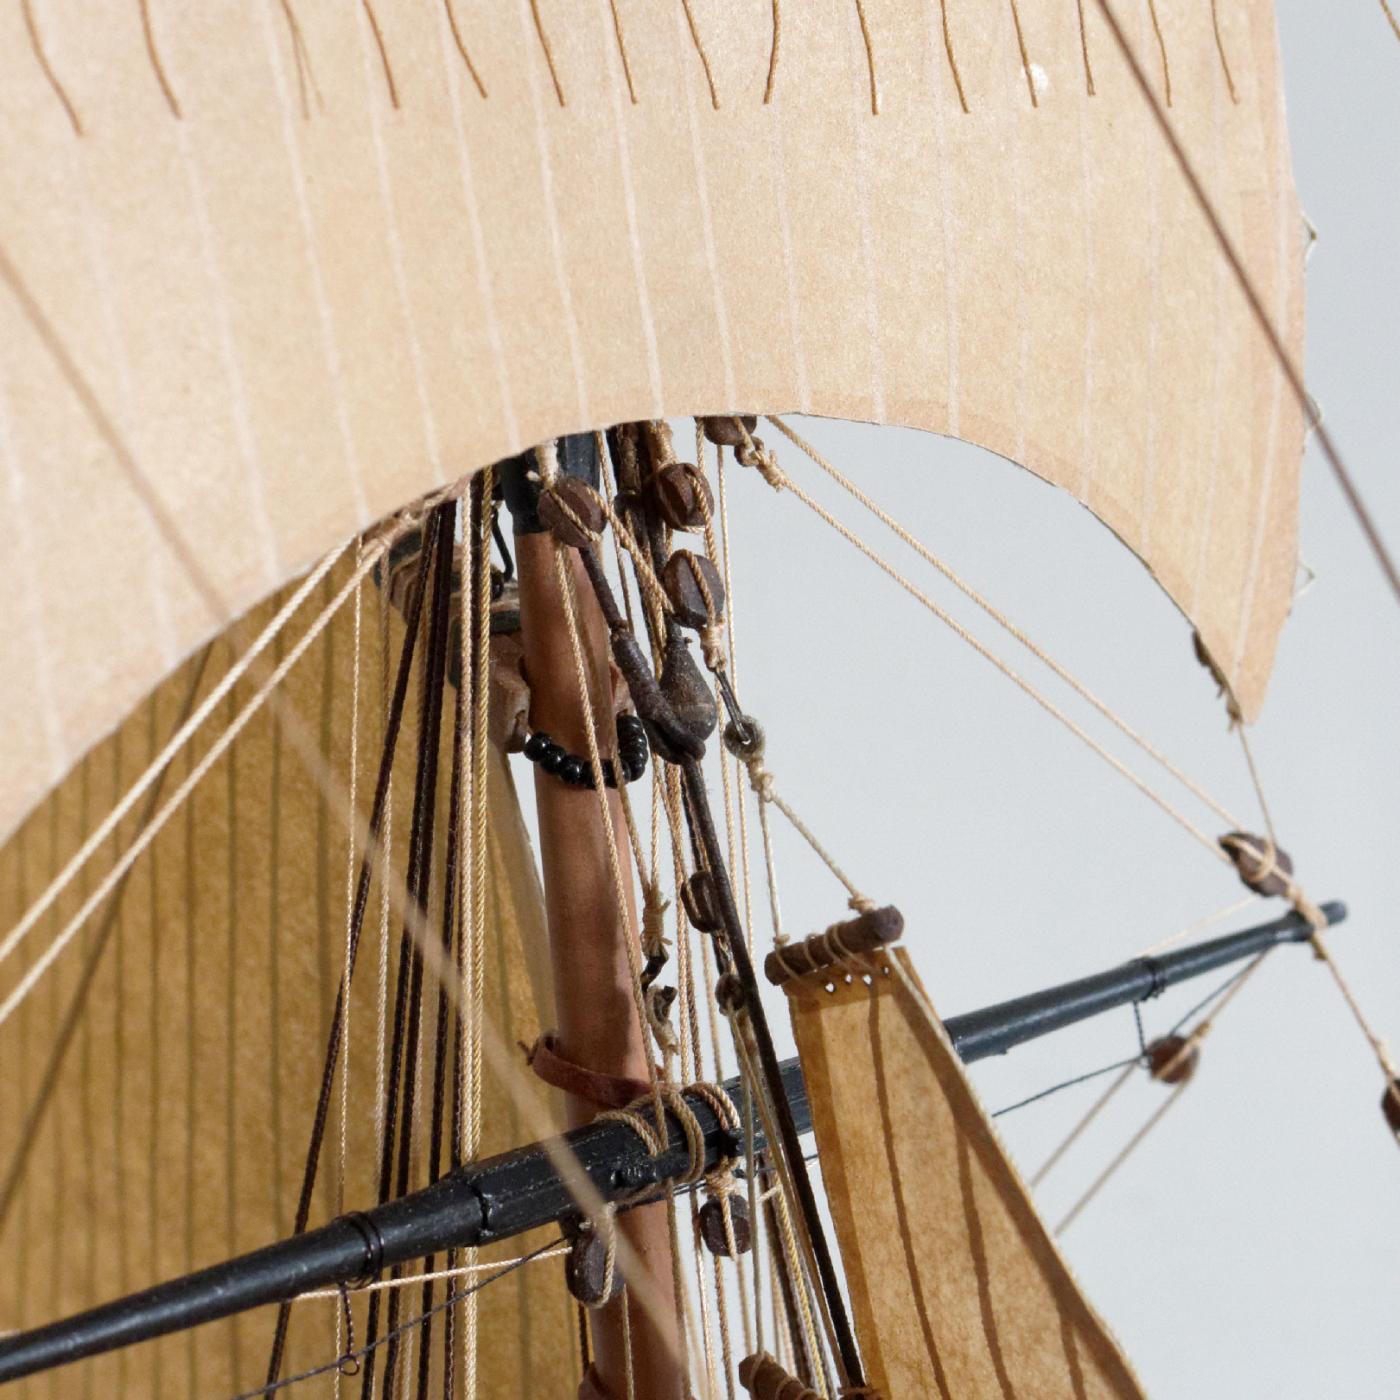
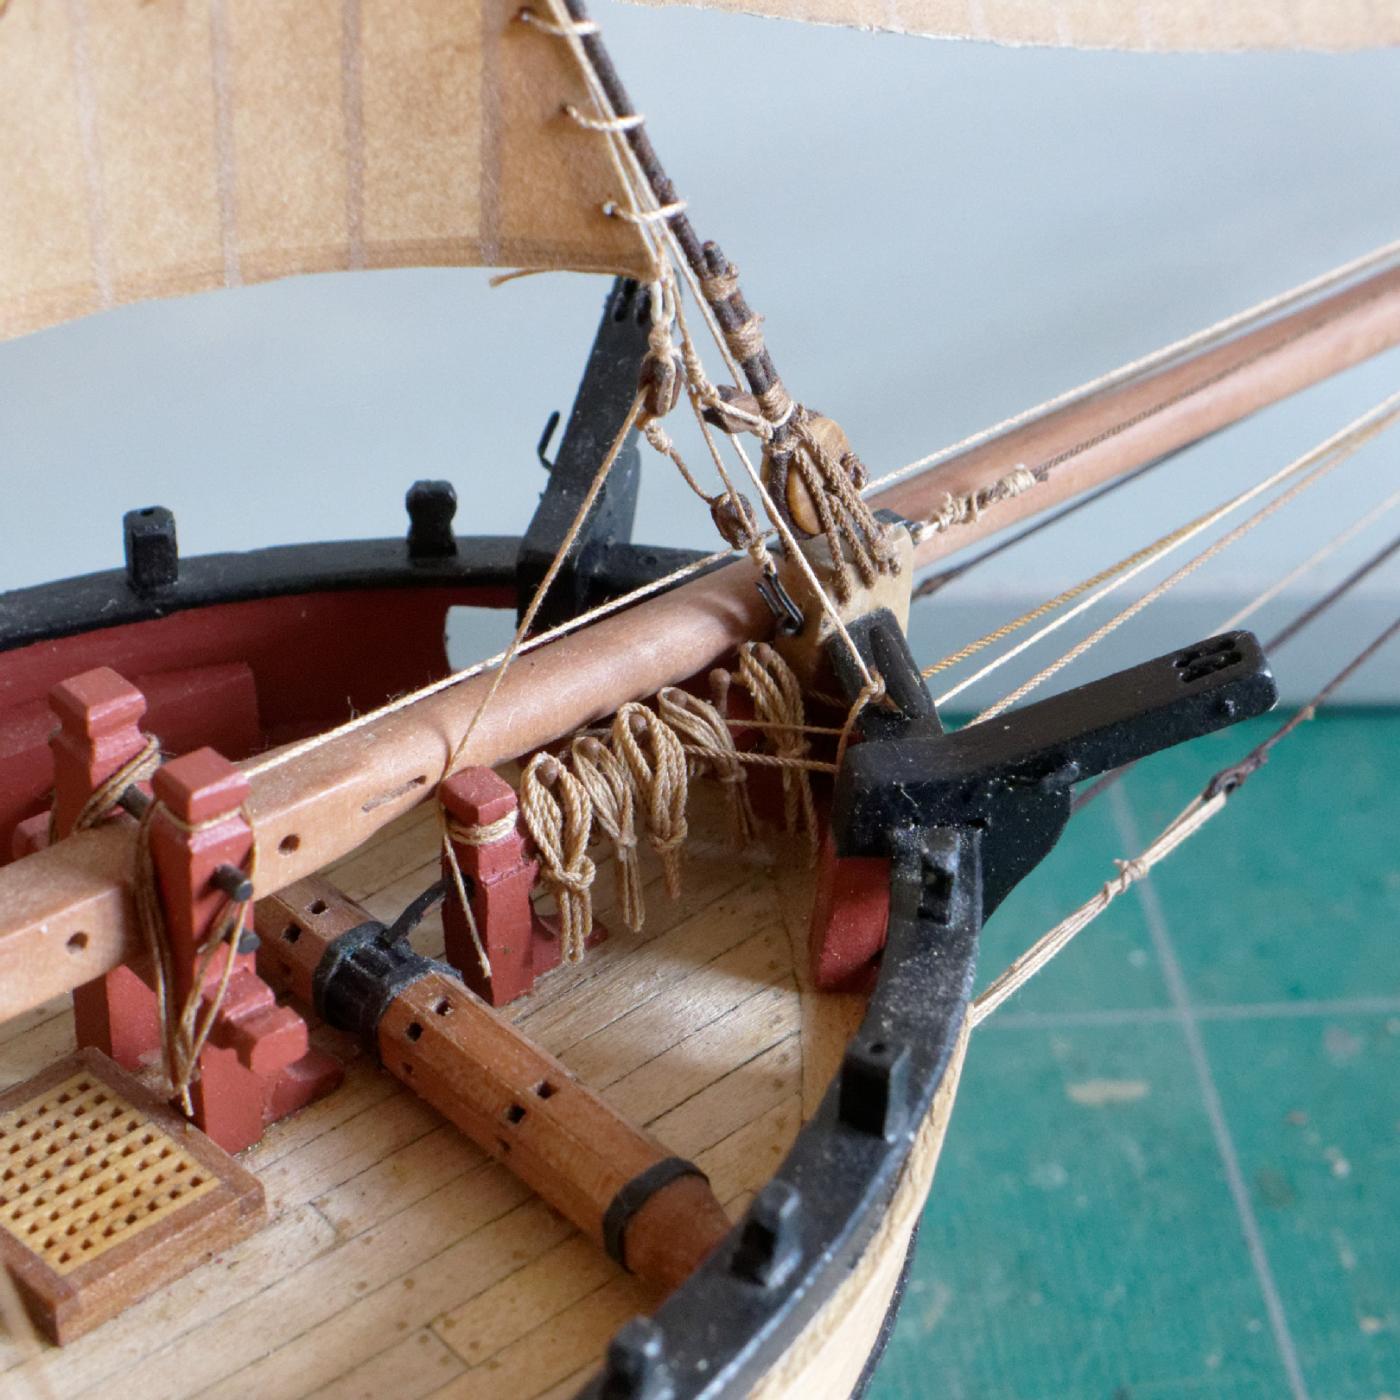
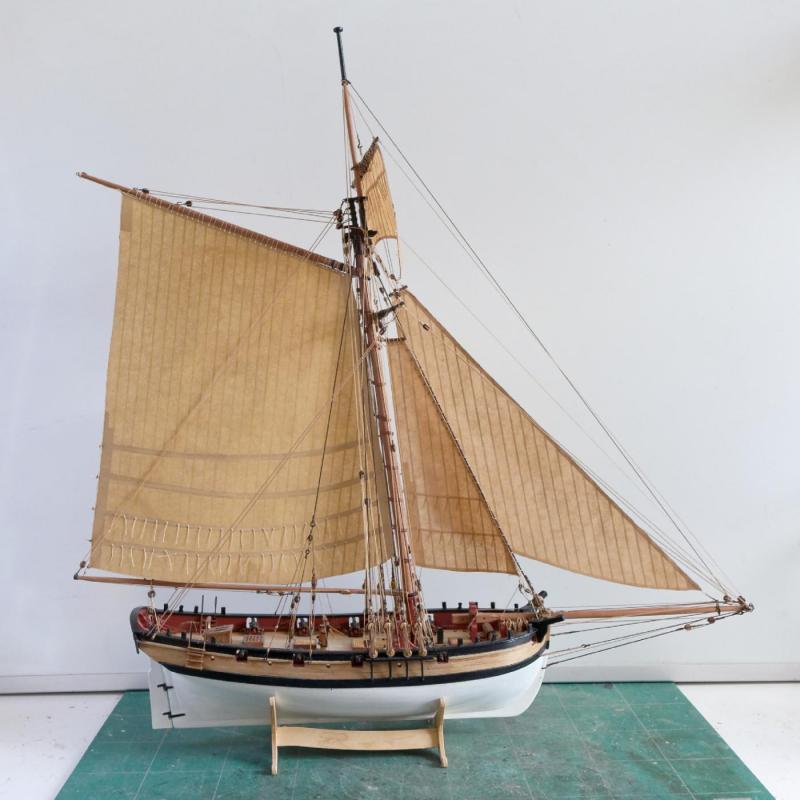
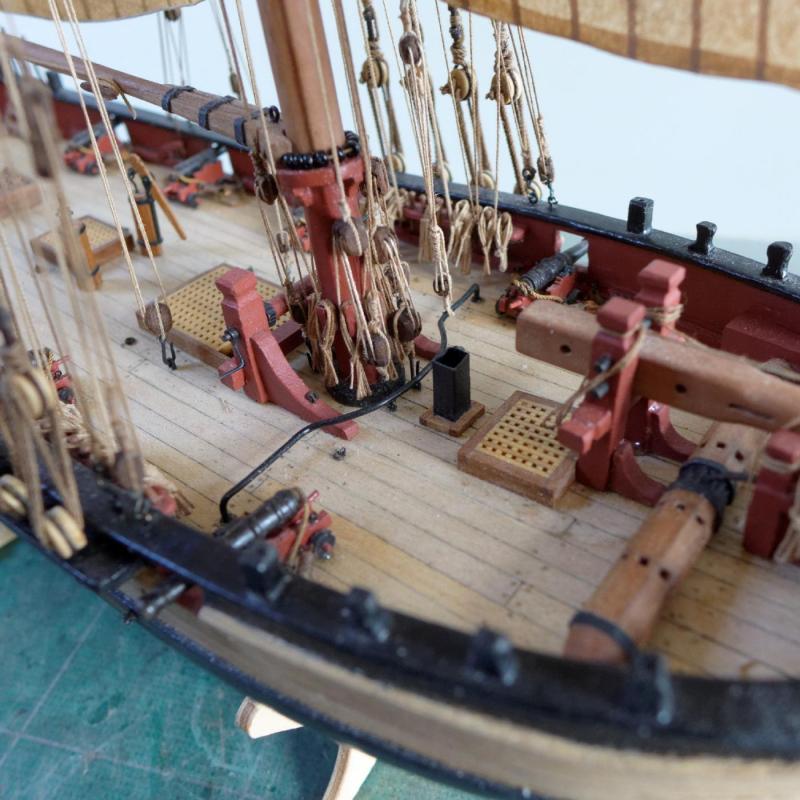
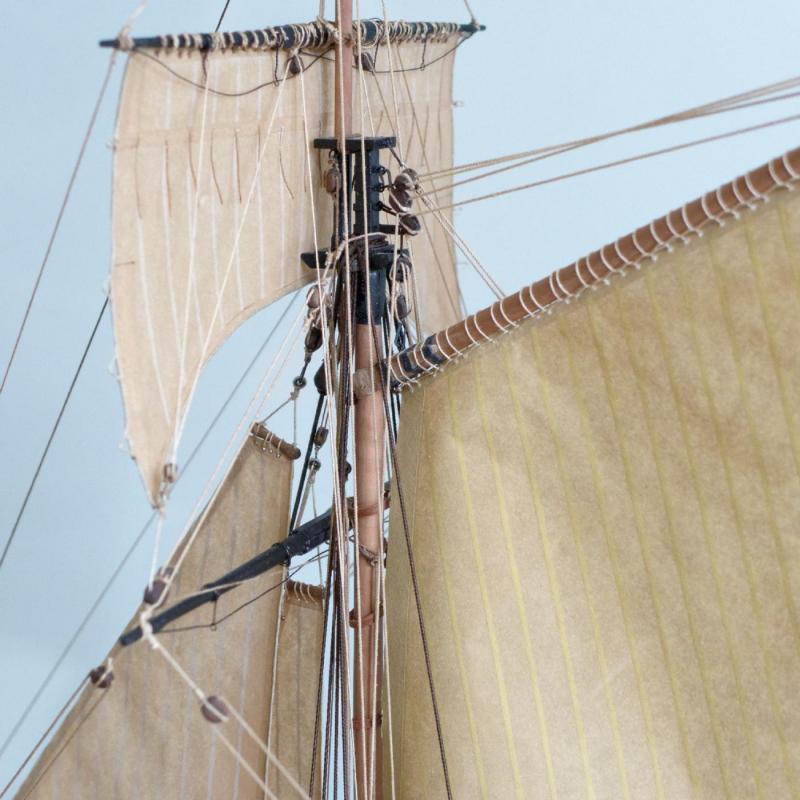
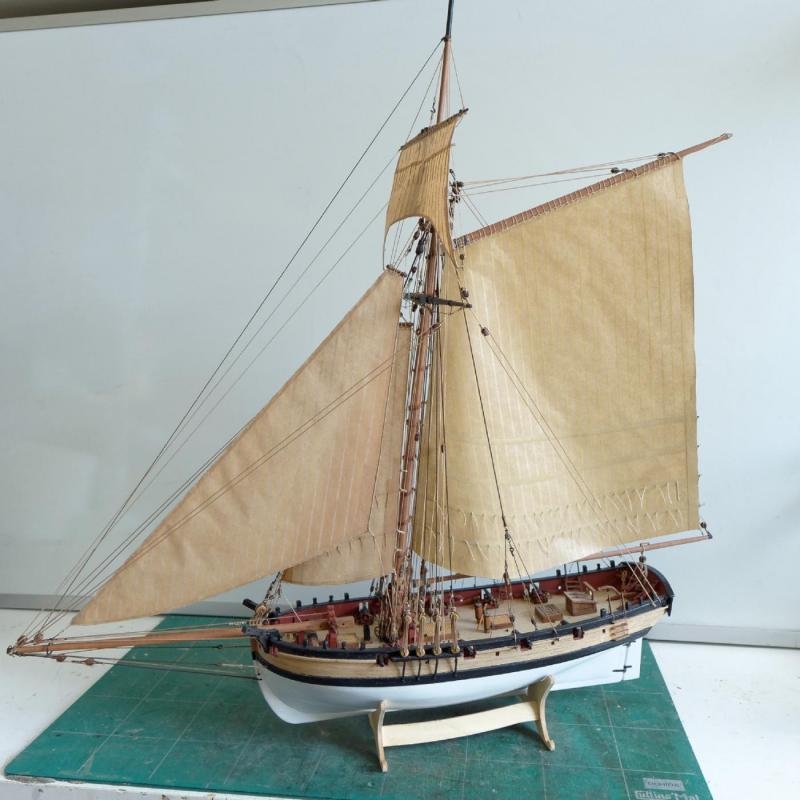
GENERAL APPEARANCE TO DATE The following pictures show the general appearance as it is now. Once I am back from my next trip I’ll work on the ratlines, the swivel guns, the anchors and the flags. That should complete the model. Tony


- 269 replies
-
- 16
-
-

-
- Caldercraft
- First build
- (and 3 more)
-
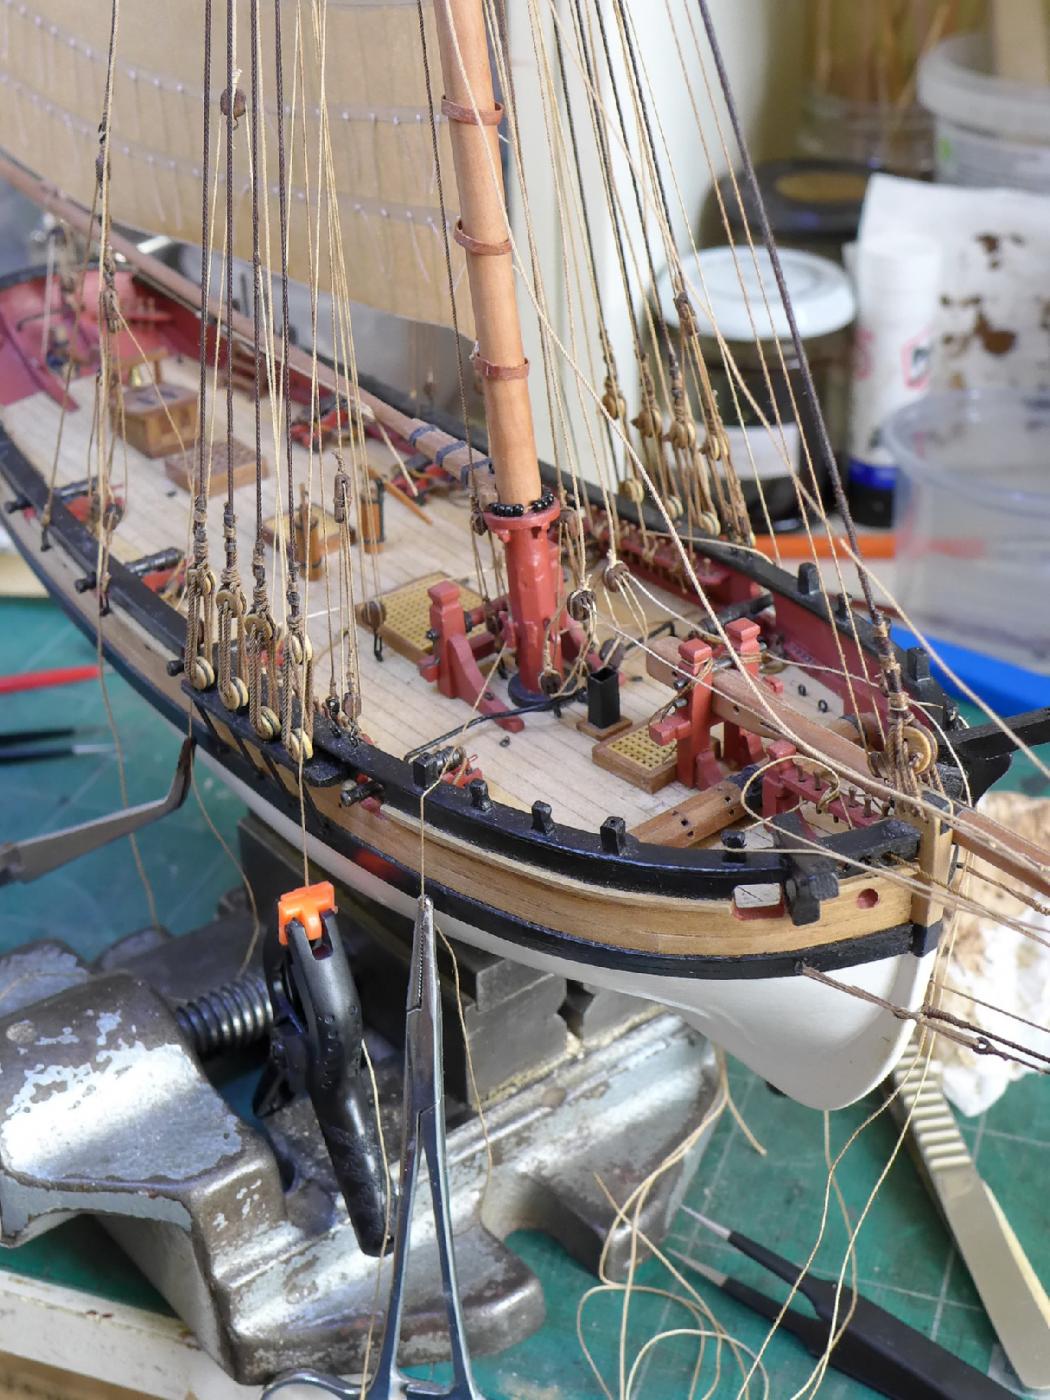
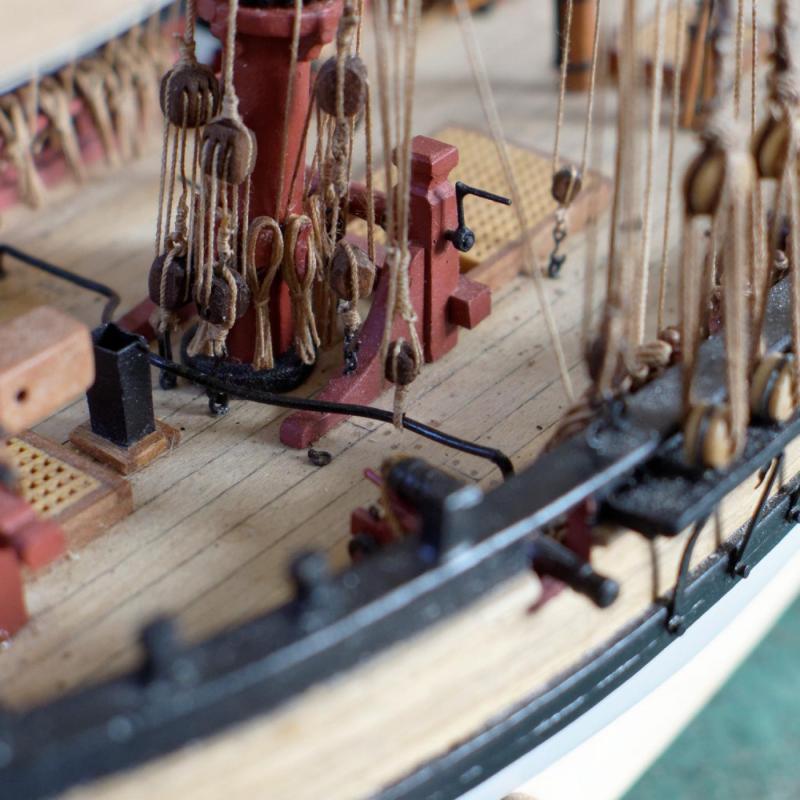
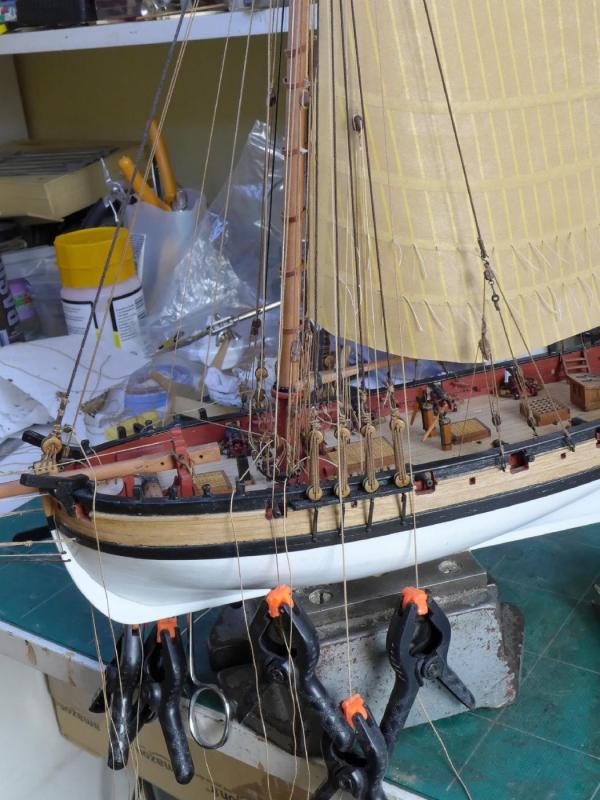
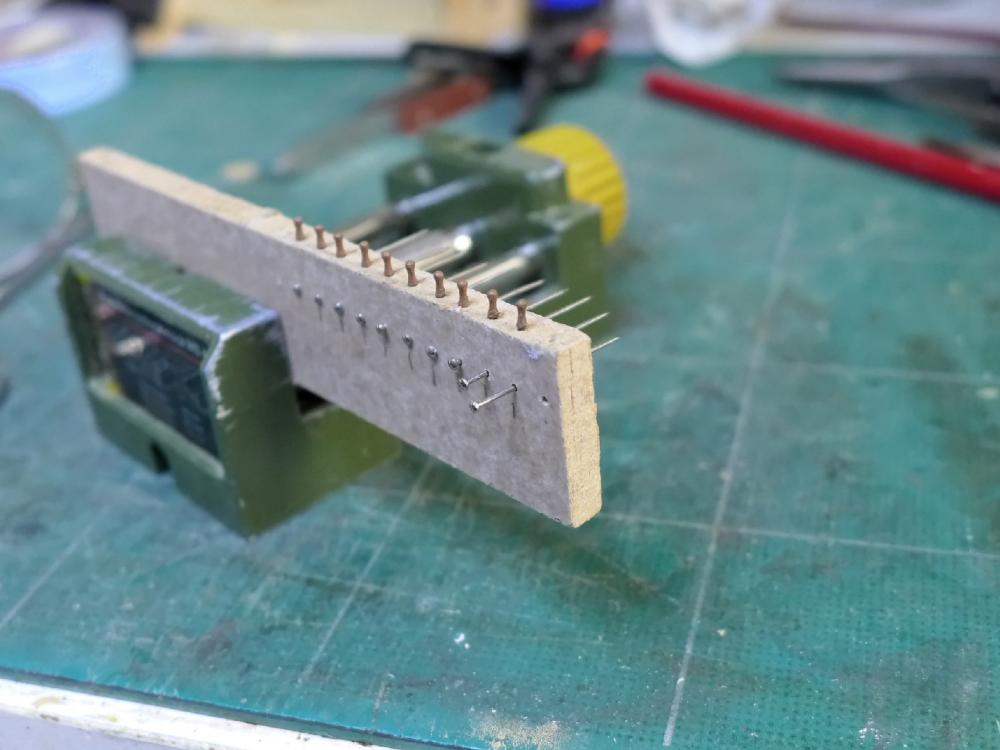
PREPARING THE BELAYING Just to show how I approached the rigging, I held the various lines down with clamps 1. to keep them separate 2. to hold them taut against belaying pins whilst the knots were drying after being dabbed with dilute PVA. Next up: Overall appearance Tony

- 269 replies
-
- 7
-
-
- Caldercraft
- First build
- (and 3 more)
-
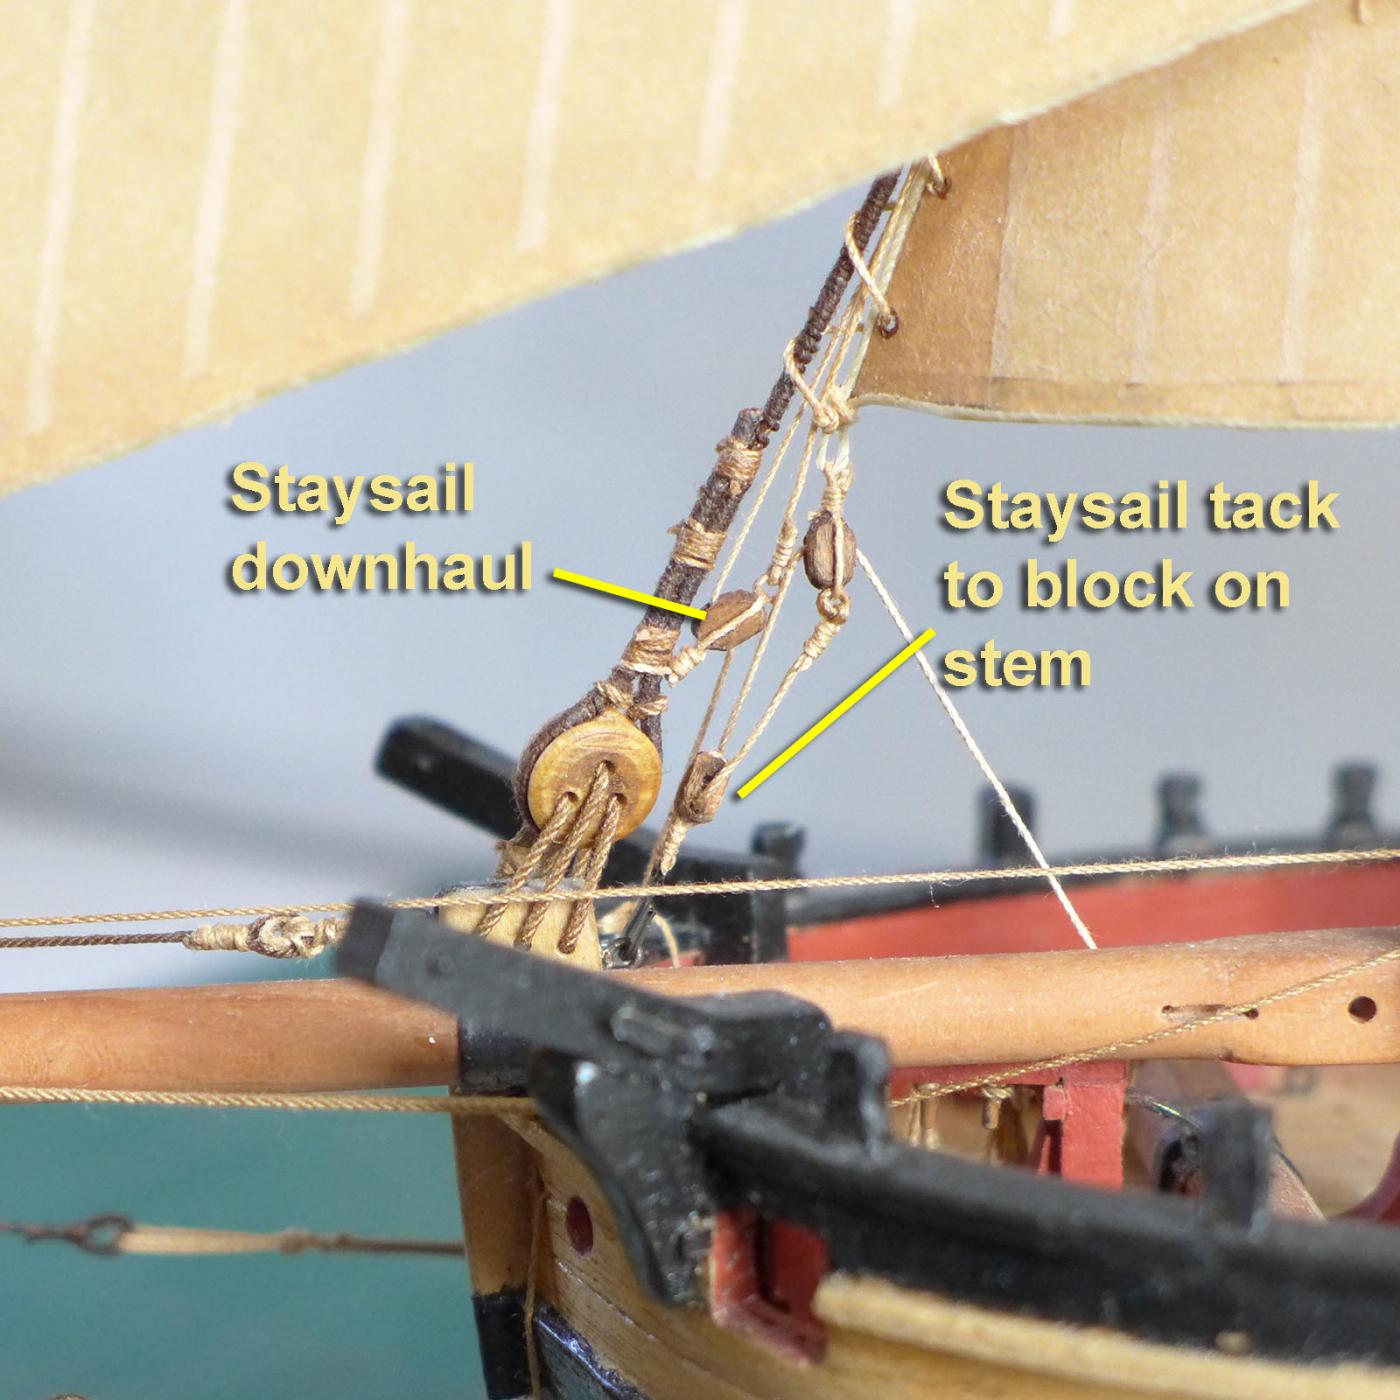
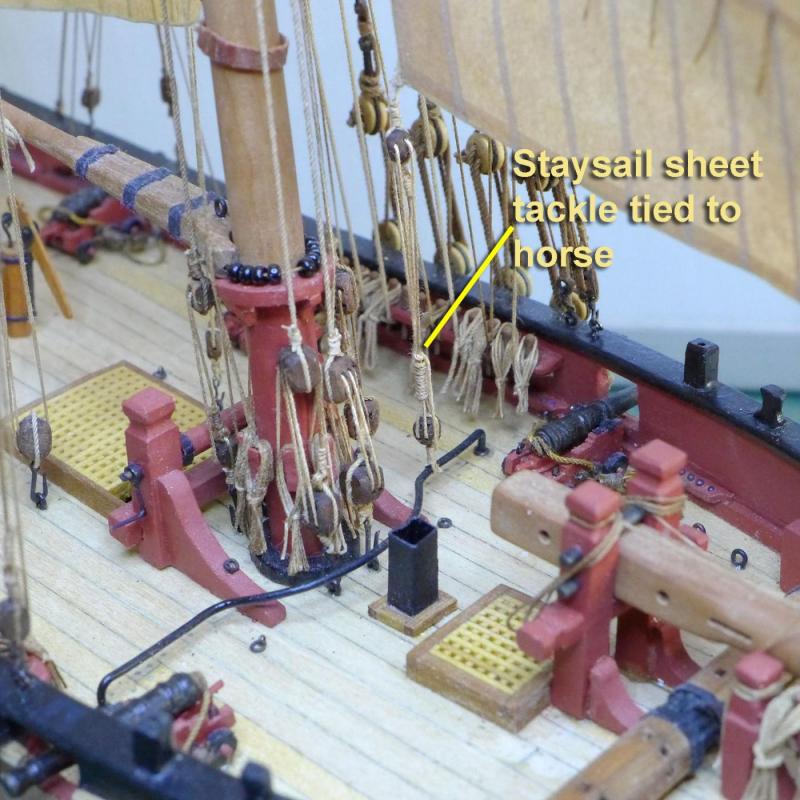
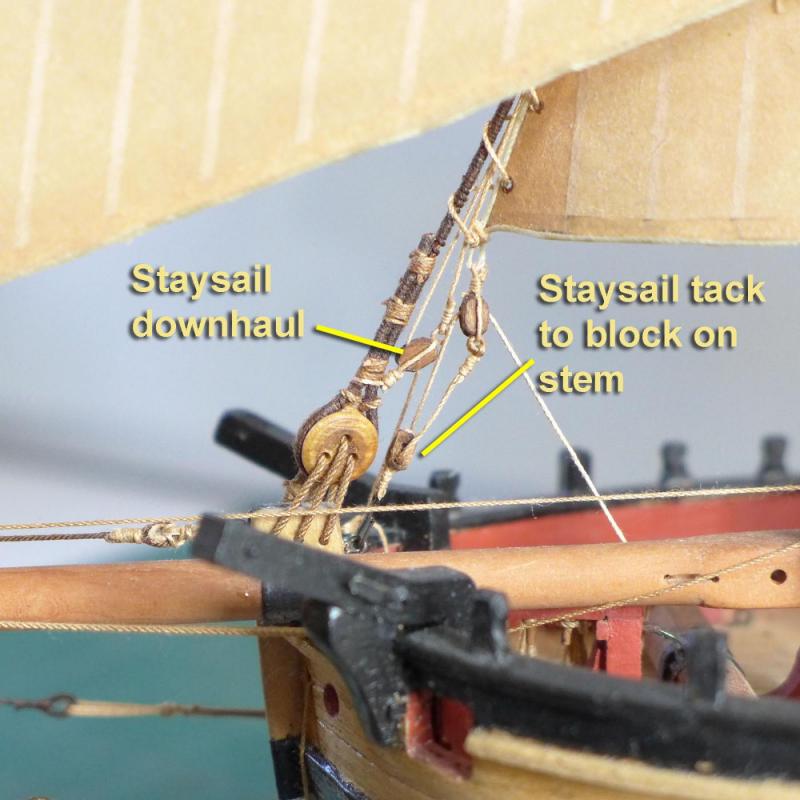
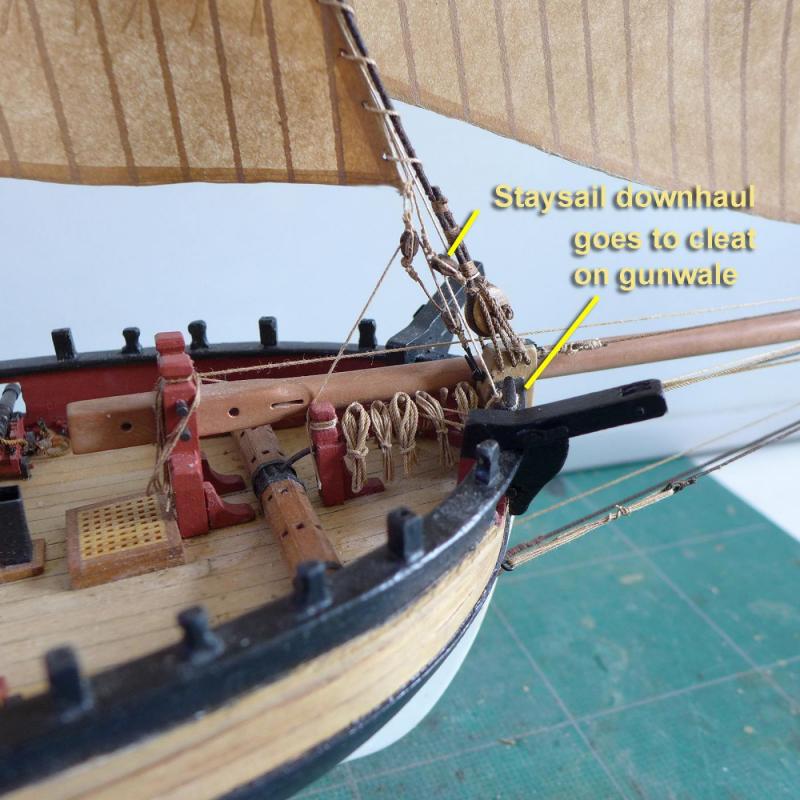
STAYSAIL In addition to the discussion about the type of horse to use for the staysail sheet, I spent some time trying to figure out the rigging of the tack tackle and the downhauler. Eventually I worked out Steel’s descriptions as follows: Next up: Preparing the belaying Tony
- 269 replies
-
- 9
-
-
- Caldercraft
- First build
- (and 3 more)
-
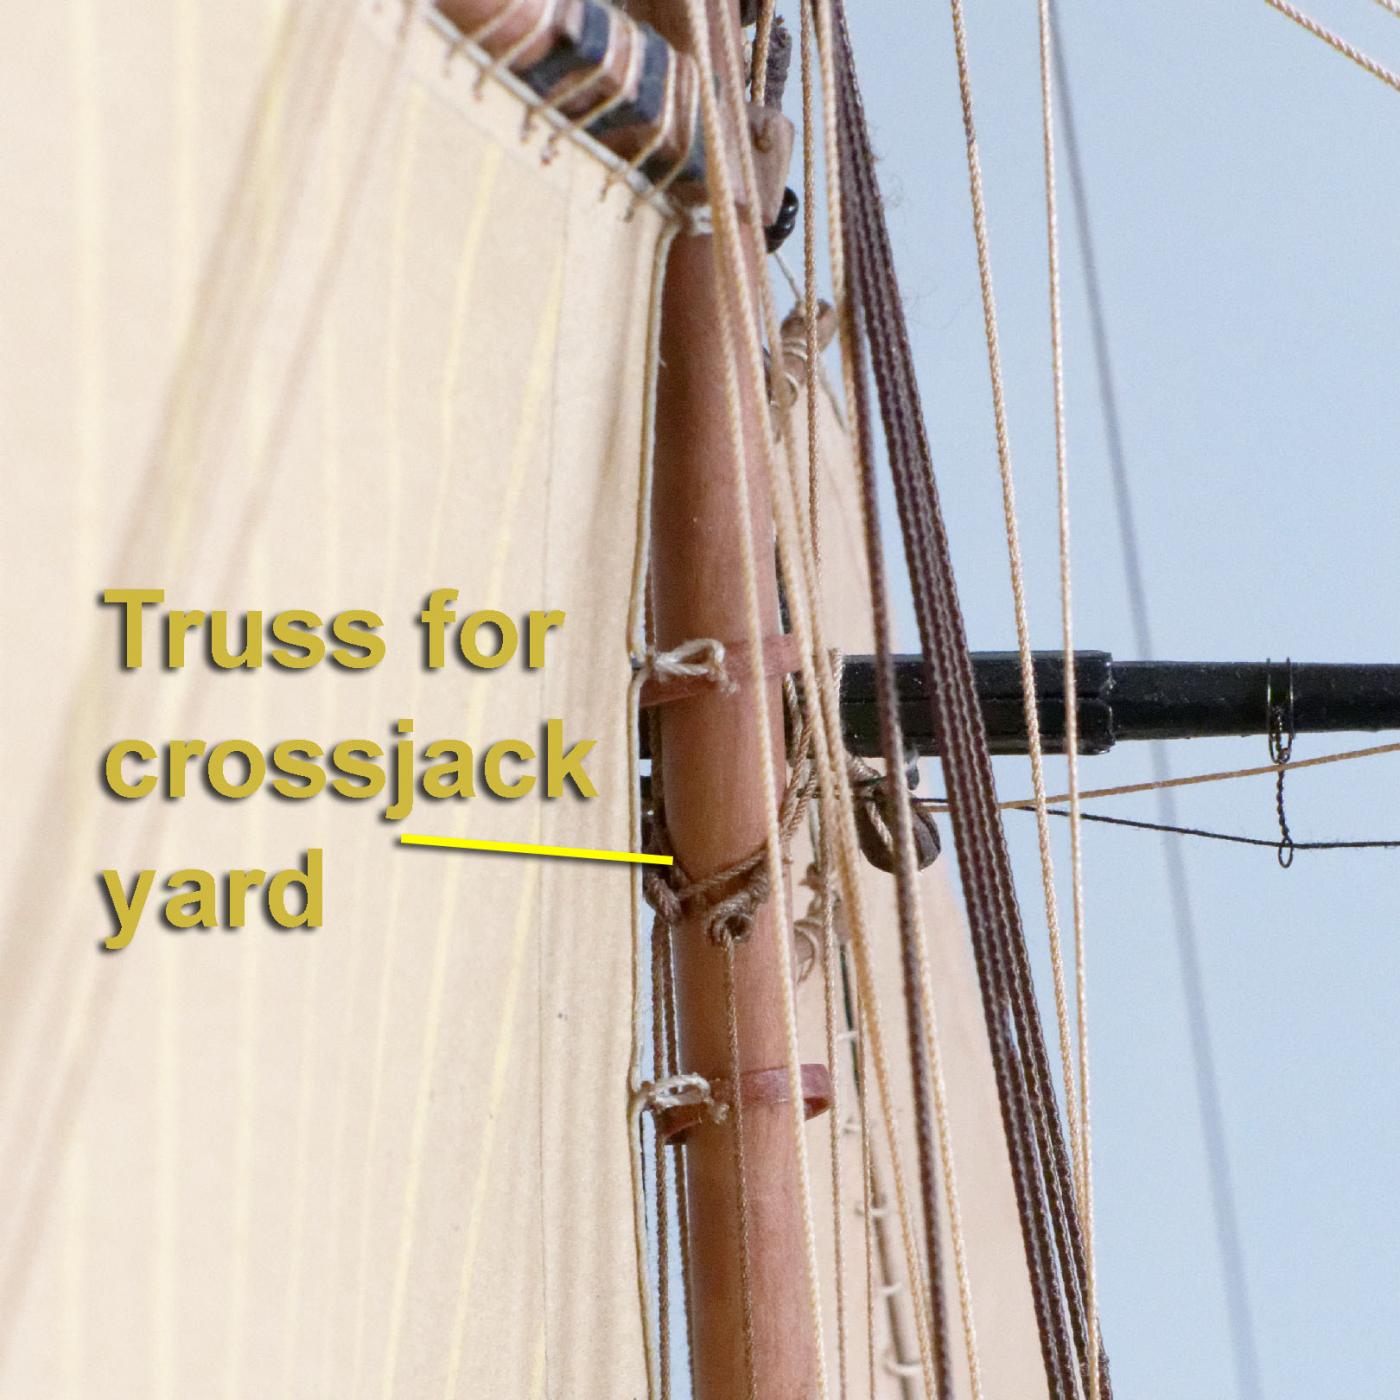
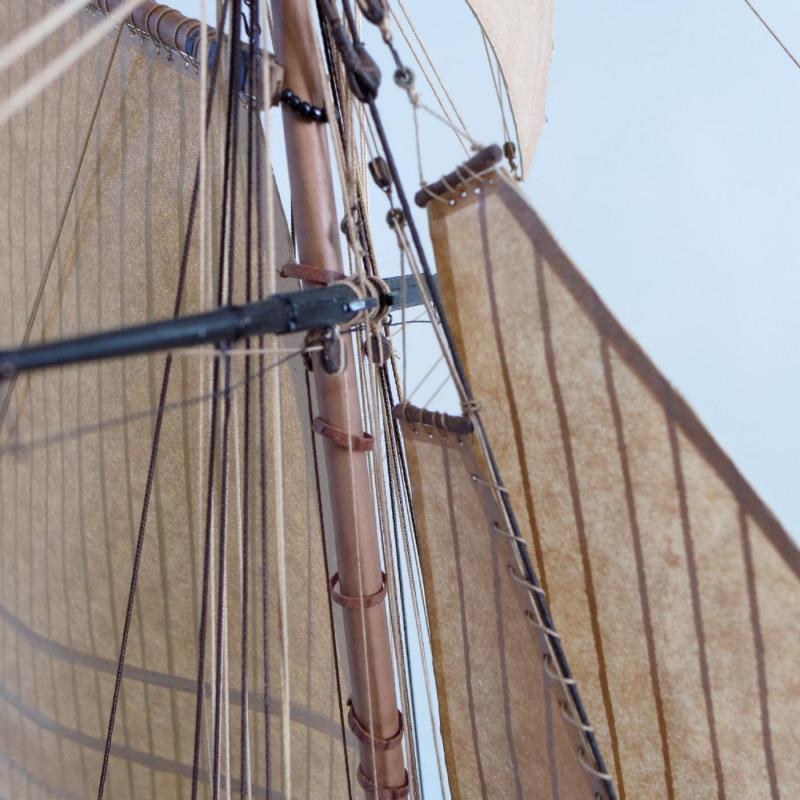
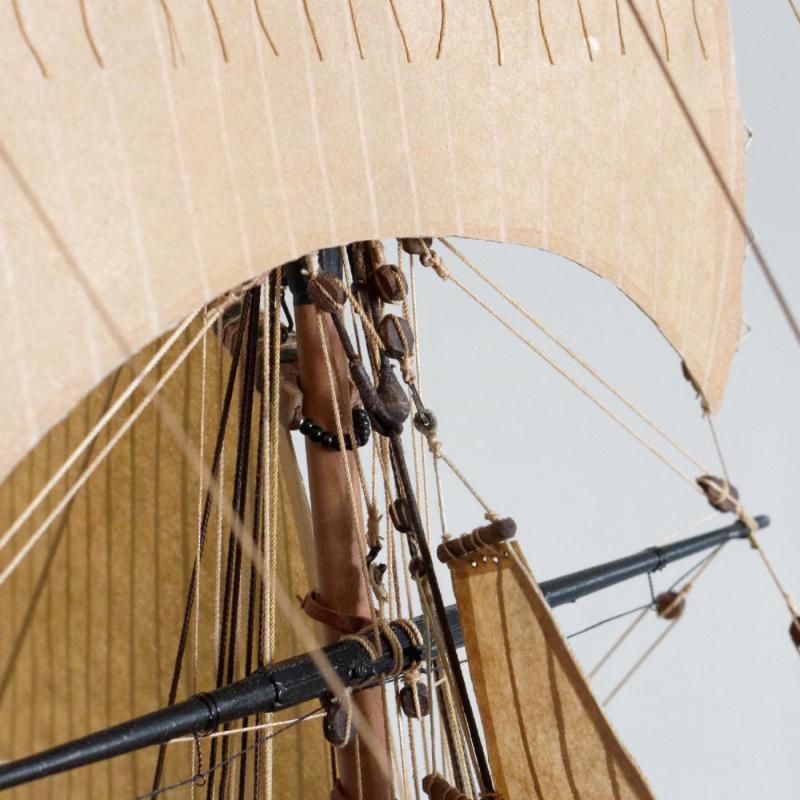
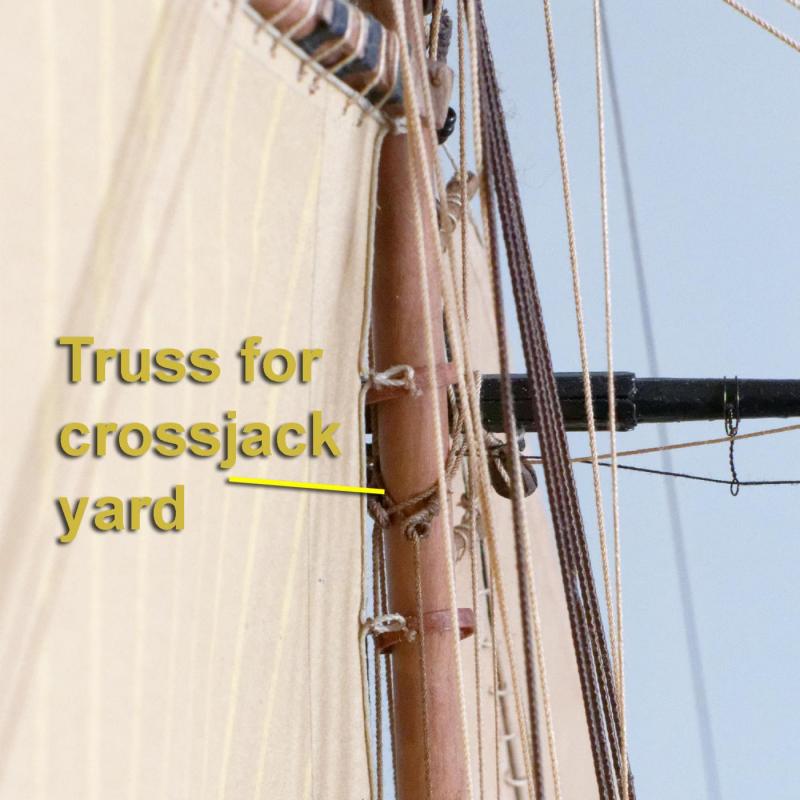
TRUSSES One thing that amazed me was how strongly the yards attach to the mast using just trusses and braces. I used the simple truss described by Marquardt for the crossjack yard, reeved through blocks on the deck as follows: The topsail yard has an even simpler truss which is not reeved through blocks on the deck. Next up: about the staysail Tony
- 269 replies
-
- 4
-
-
- Caldercraft
- First build
- (and 3 more)
-
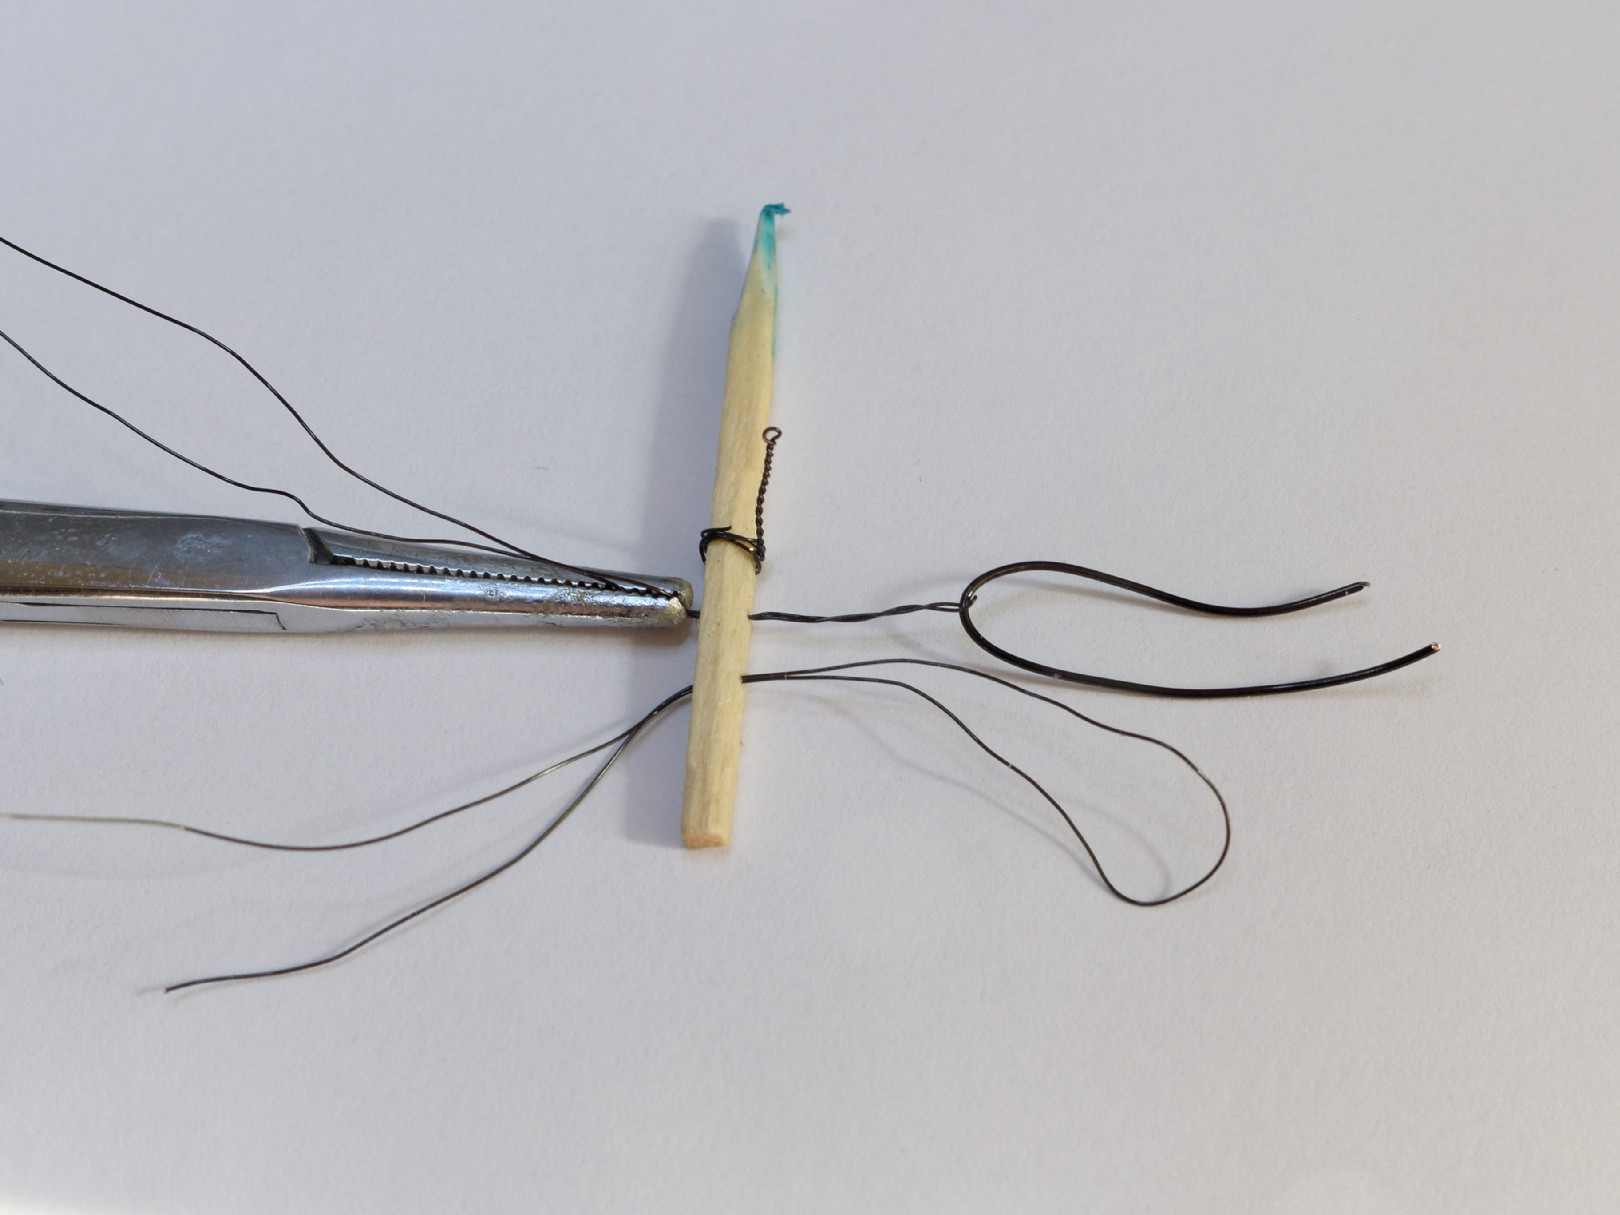
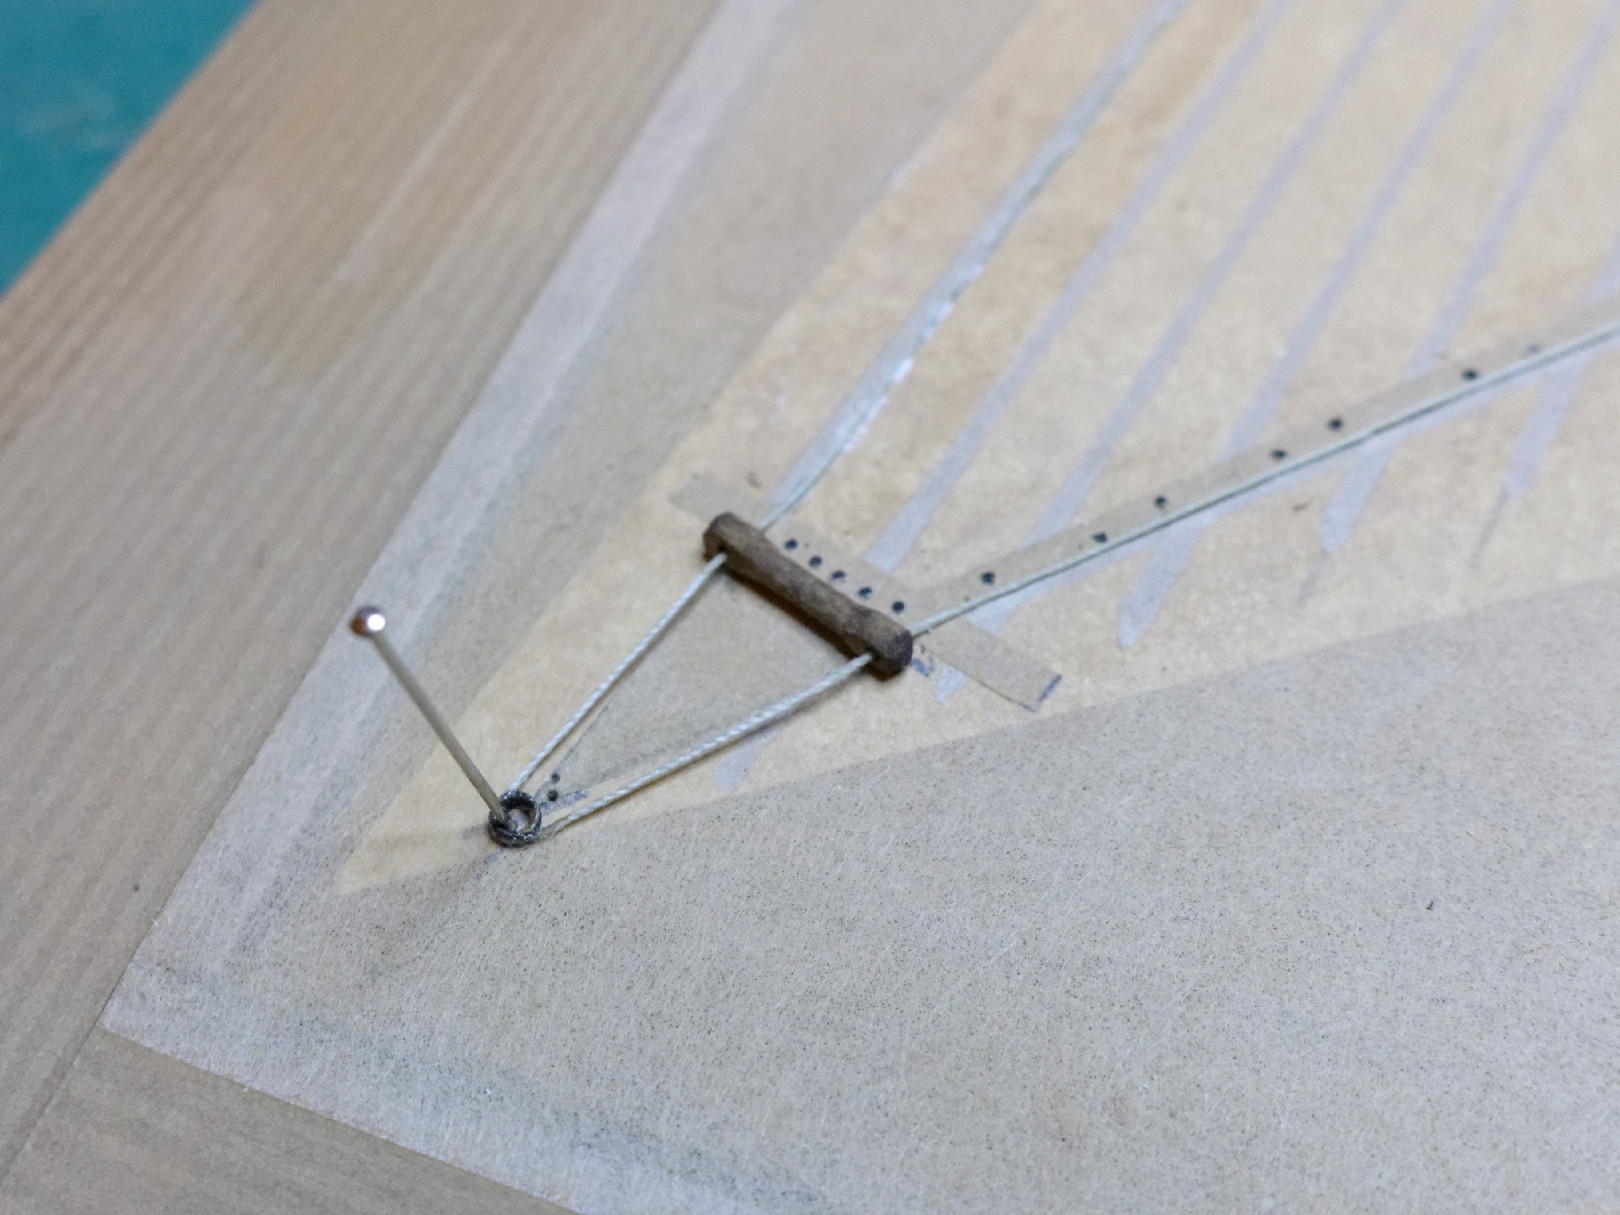
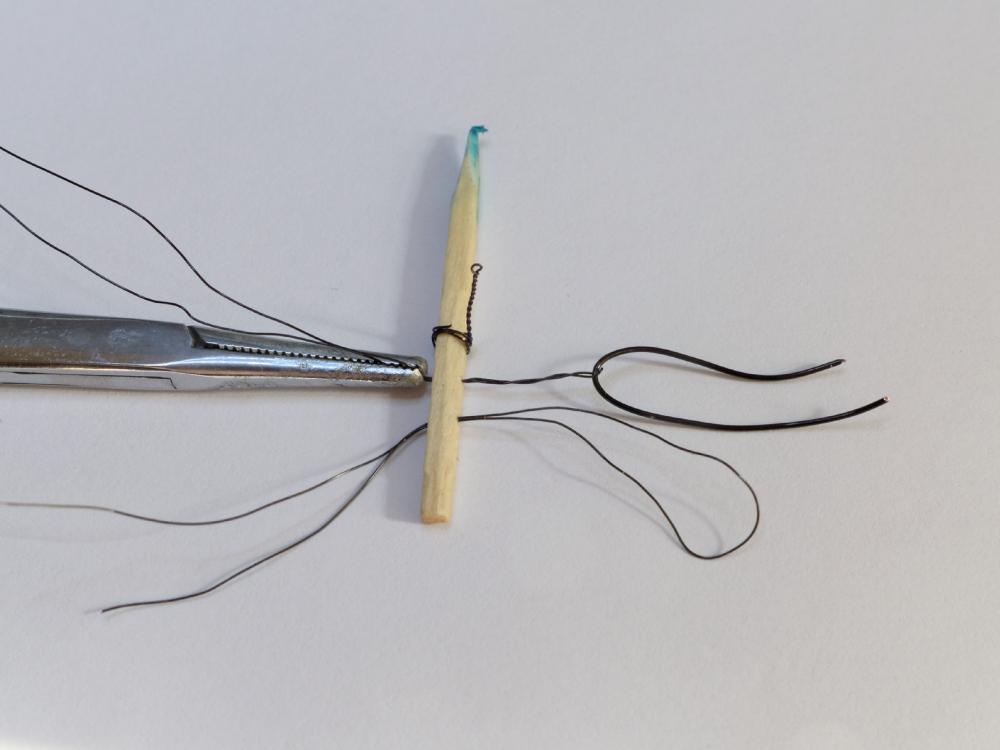
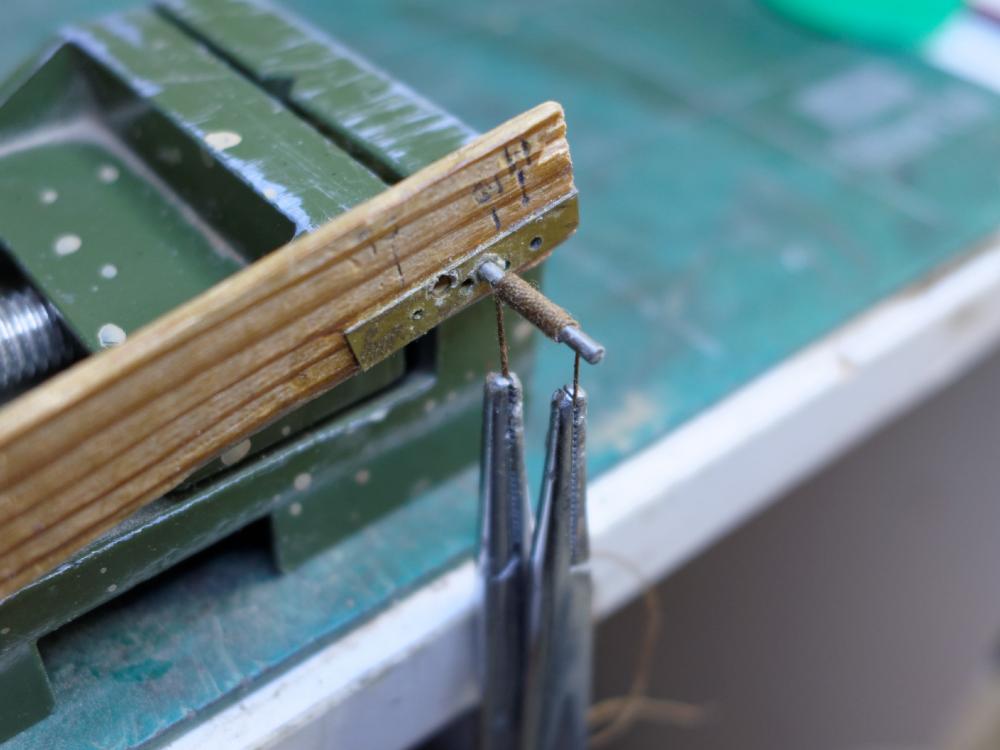
YARD HORSES I used 0.2mm black wire twisted round itself and passed through the back of the yards as follows (the picture shows the practice I did on a matchstick): Next up: Trusses Tony
- 269 replies
-
- 3
-
-
- Caldercraft
- First build
- (and 3 more)
-
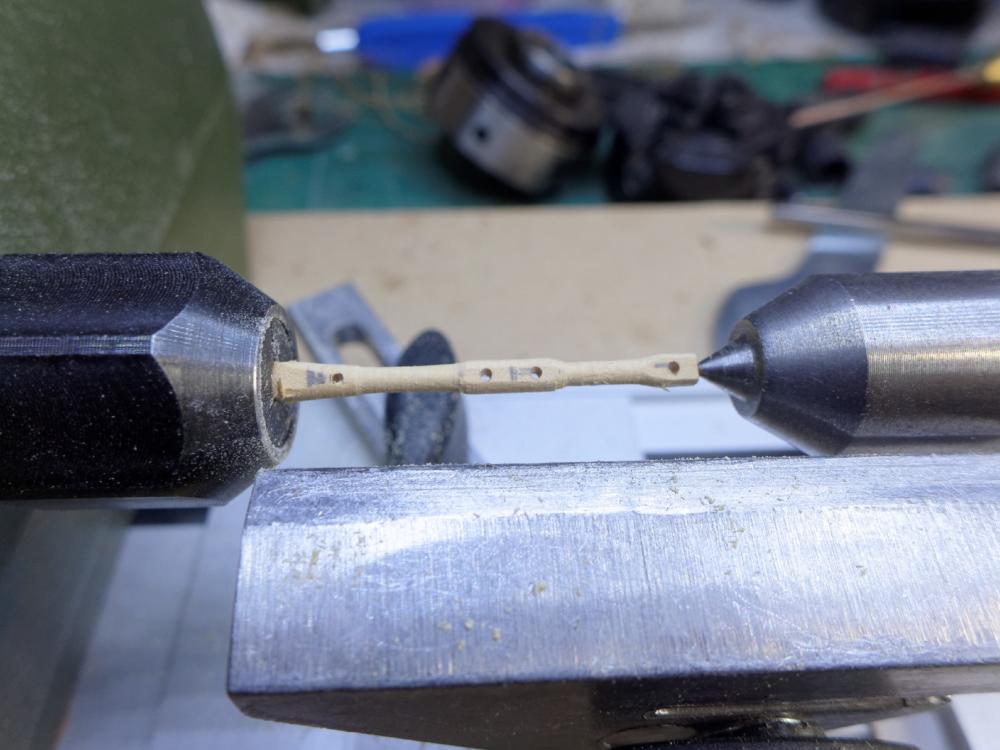
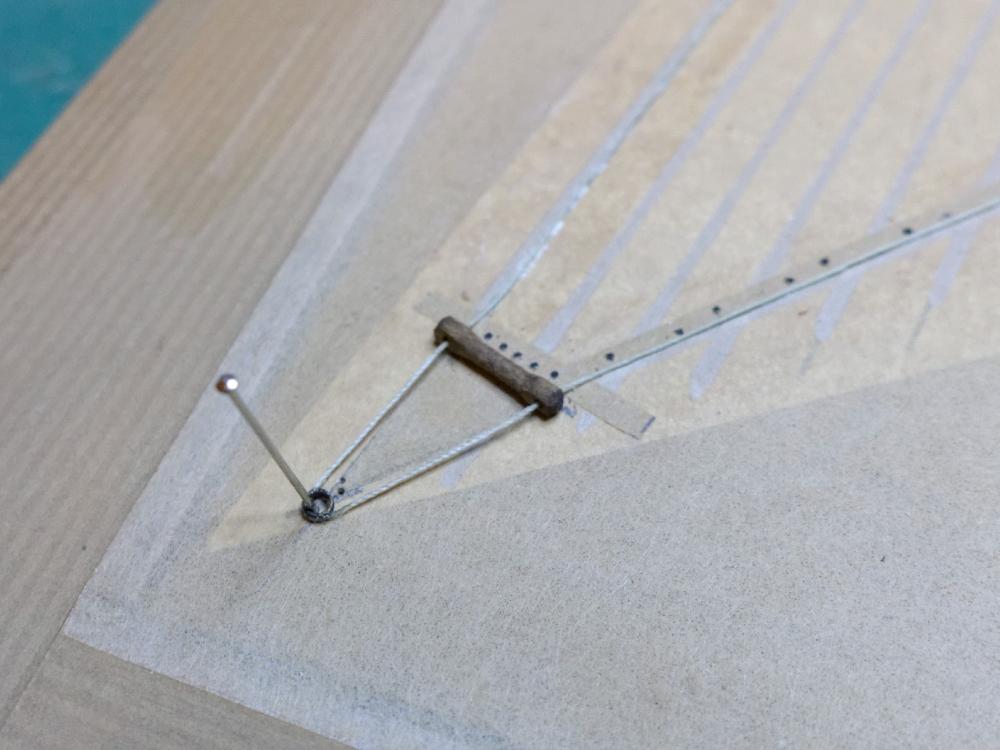
STAYSAIL AND JIB HEAD STICKS Following Steel’s diagrams I used Head Sticks for the jib and staysail. I made the headsticks using my Proxxon wood lathe as follows: Then, using the same techniques described earlier for the making of the mainsail, I attached the headsticks as follows: Next up: the making of the yard horses Tony
- 269 replies
-
- 5
-
-
- Caldercraft
- First build
- (and 3 more)
-
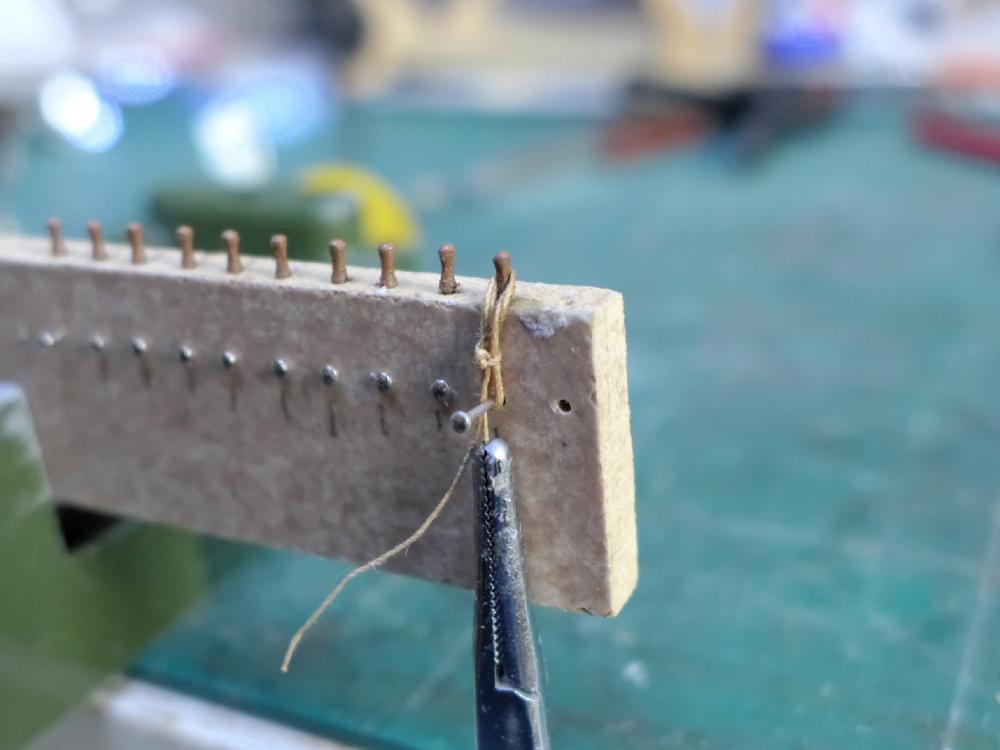
TYING TO BELAYING PINS I used a simple jig as shown below. Note that the holes for the dressmaker pins are over-sized to allow simple removal Next up is about Head Sticks for the Jib and Staysail Tony
- 269 replies
-
- 5
-
-
- Caldercraft
- First build
- (and 3 more)
-
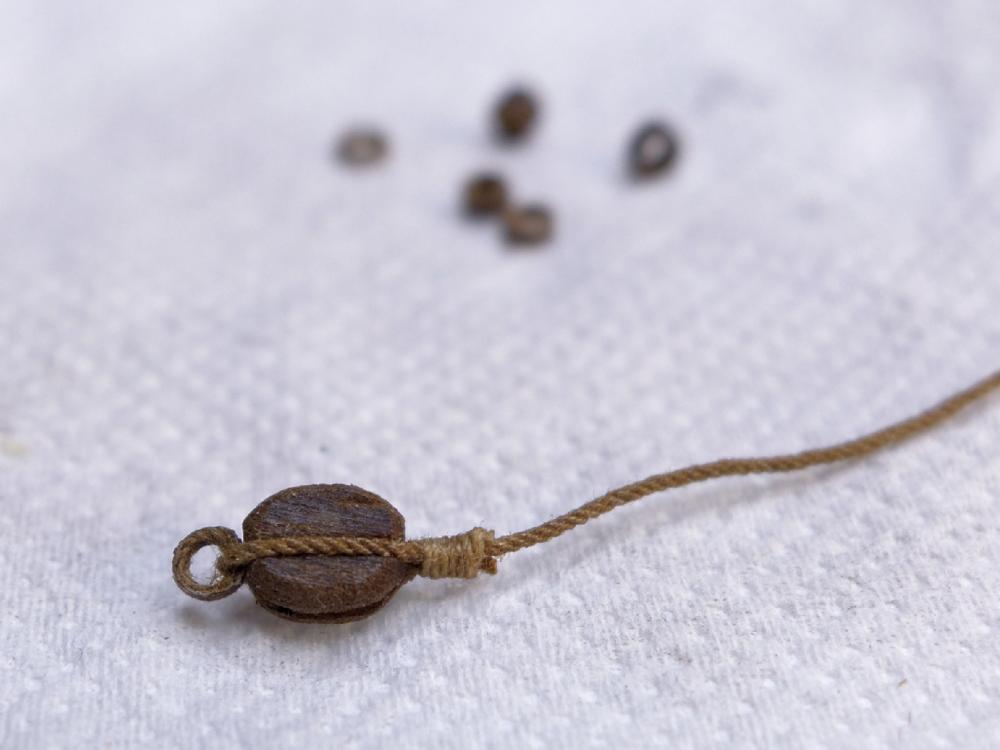
THIMBLES Instead of cutting brass tubing, I decided to make my thimbles from coiled rope soaked in CA glue and then cut into sections. I did this for two reasons: 1. It allows me to make any size thimble I want 2. It has a similar colour to wood You can see the process in the following pictures: Next up is about belaying pins
- 269 replies
-
- 6
-
-
- Caldercraft
- First build
- (and 3 more)
-
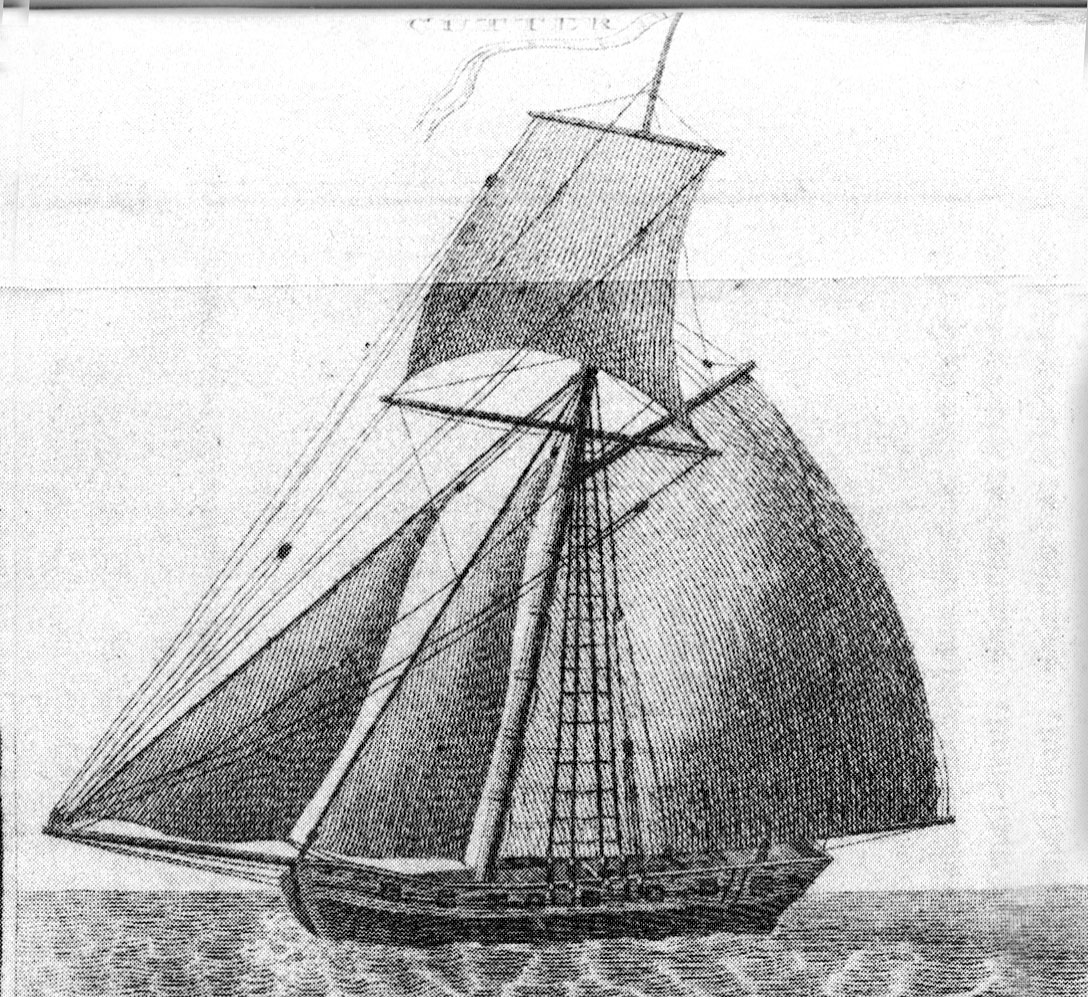
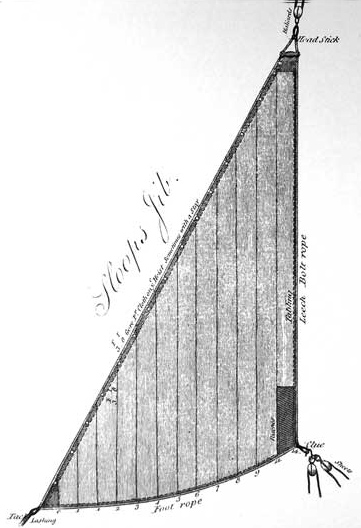
RIGGING PLAN The general plan I followed was that depicted in a plate in Volume 3 of David Steel’s Elements and Practice of Rigging, Seamanship, and Naval Tactics. One advantage of this (i.e. not having a squaresail or topgallant) is that it leaves the model more open and lighter in appearance, as well as making it look (to my eyes) speedier. In addition, and after the lengthy discussion about the horse for the staysail, I adopted the style of horse used on the model of the Diligence which I found at http://www.shipmodel.com/models/diligence-full-hull-nav- I also found Marquardt’s book on 18th Century Rigs and Rigging really useful for the diagrams. Next post is about making thimbles Tony


- 269 replies
-
- 5
-
-
- Caldercraft
- First build
- (and 3 more)
-
Looking forward to it. Tony
-
Glad you're making progress, and looking forward to the photos -- but not too gruesome of the injuries! Tony
- 69 replies
-
- 1
-
-
- lady nelson
- victory models
- (and 1 more)
-
That was really funny! It shows that I'll have to learn to read the headers as well as the text! Tony the Dodderer
-
I'm also looking forward to this build. It looks great so far. What scale are you using? Tony
-
Another thing that might help at the very early stages is not to fix the stem, keel and sternpost until you have finished the planking. That way you will not damage those parts when sanding down and finishing off the planking. I had to spend ages taking off the scratches on all three once I had done my planking. This applies especially to the stern post as you have to make a bearding line and place the edges of the planks in line with the edge of the sternpost. There are lots of things like this that were not covered in the instructions given with the kit I'm building. It may be that the Lady Nelson instructions are slightly better, but as they are from the same company and have a very similar construction, I'm taking the liberty of giving my own experience! Tony
- 69 replies
-
- 2
-
-
- lady nelson
- victory models
- (and 1 more)
-
Looking forward to your log. There's no shortage of cutters now on this forum, so you'll get plenty of interest and as much information as you want. The first steps may be the most daunting but you should soon find your feet. As Antony said,don't be afraid to ask about anything you find puzzling. There's no such thing as a stupid question here. Everyone has at some stage gone through the same learning process and very happy to help others through the inevitable problems that arise. Just one word of advice which may make no sense now but you should pin somewhere for future reference: it's better to leave the mast cap off until you've finished the shrouds and other ropes that have to go over the top. I really wish someone had given me that tip for my own model as right now it's proving very fiddly to tie ropes between the mast and topmast. Tony
- 69 replies
-
- 5
-
-
- lady nelson
- victory models
- (and 1 more)
-
Topsail yard tie rig on 1763 cutter (Sherbourne)
tkay11 replied to tkay11's topic in Masting, rigging and sails
Thanks, Henry. My confusion was that I didn't see how the direction would be changed since the channels are about the same height as the gunwale. So the line from a block which is raised from the channels would then feed to a block that is attached to the gunwale and then to a timber-head which is also at the same height. I hadn't seen any advantage over simply pulling the line inboard from a block that was already at or near gunwale height when it was placed on a channel. I hope that helps you see why I was confused! Tony- 4 replies
-
- 1
-
-
- cutter
- Sherbourne
- (and 1 more)
-
Topsail yard tie rig on 1763 cutter (Sherbourne)
tkay11 replied to tkay11's topic in Masting, rigging and sails
Yes, Dave, that is of help. It also tallies with Petersson's drawings in Rigging Periood Fore-and-Aft Craft, where the fall goes directly to the deck. Thanks very much! Tony- 4 replies
-
- 1
-
-
- cutter
- Sherbourne
- (and 1 more)
-
Topsail yard tie rig on 1763 cutter (Sherbourne)
tkay11 posted a topic in Masting, rigging and sails
Another question while I try to figure out the rigging for my yards. I'm trying to figure out how to rig the topsail yard tie. Steel says the following: "Tie reeves from aft, through the sheave hole in the mast-head, comes down, and clinches round the slings of the yard: the other end has a double block spliced, that connects by its fall to a single block hooked in the channel; the fall leads through a leading block on the gunwale, and belays to a cleat or timber-head." I'm ok as far as the single block hooked in the channel, but I can't work out the subsequent route of the fall. Thus I see it as: So could someone help me as to how the fall would go to the timberhead? The way I see it is that if it does go through another block on the gunwale, there would be no mechanical advantage at all. Of course I may be missing something obvious, so that's why I'm asking the professionals! Thanks Tony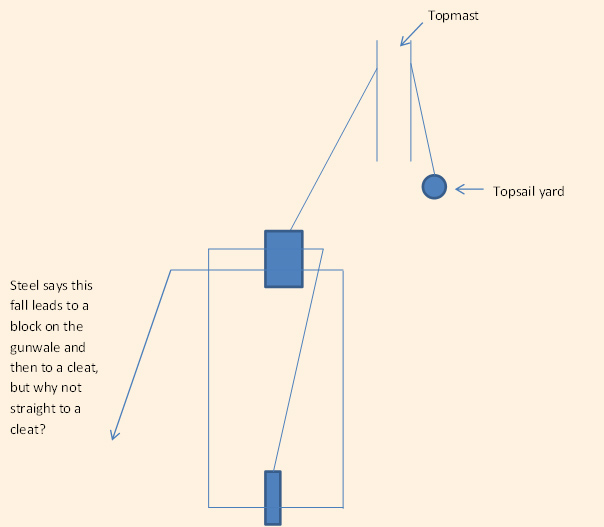
- 4 replies
-
- 1
-
-
- cutter
- Sherbourne
- (and 1 more)
-
I agree with Druxey. But let's have a hypothetical to see if that helps any further. Suppose you were to dismantle everything, start all over again, correctly place the scarf, etc. Then, a few weeks down the line, oh no! You find yet another mistake of the same order that only you have noticed. AAAARGH! Would you then yet again dismantle the whole thing and start again? I don't think I have ever seen any build without a booboo somewhere. But indeed, yes, some people do go and start again -- but generally once lots of others comment on the difficulty, or when it makes future progress impossible. Then you have to think about how accurate it all is. Was that treenail 0.01mm out? Are the frames exactly spaced as the original? (Well, no, they're the wrong size to start with since they're at scale, and you then worry you can't get the grain to scale, and you haven't seen how the original plans were interpreted fully). Of course, only you can decide on your level of acceptance, and, as others have said, along with the great unlikelihood of anyone else ever noticing whilst standing in awe at the beauty of your craftmanship. Tony
- 649 replies
-
- 11
-
-
- dunbrody
- famine ship
- (and 2 more)