


tkay11
-
Posts
1,829 -
Joined
-
Last visited
Content Type
Profiles
Forums
Gallery
Events
Everything posted by tkay11
-

A ship's stove too small to print? (For La Jacinthe)
tkay11 replied to tkay11's topic in 3D-Printing and Laser-Cutting.
@Mldixon: That is absolutely amazing! It gives me much hope. I'll do as you suggest and try to alter the details to make them more pronounced. I don't think I'd need to adjust those on the top plate, as the details there seem pretty good to me. Perhaps a little more work on the front stove door would be enough. I'll let you know once I have it done. In relation to finding a printing firm, I think I'll just ask if they can do the same resolution. There must be one. Thanks very much indeed for your time. I hadn't realised printing such a small object would take so long, but with a 0.1mm setting I now understand why. Just in case I go down this route more fully, is your printer an Anycubic Photon Mono 4k? Should I succeed, I'll post the results. Tony- 17 replies
-
- 2
-

-
- ancre
- CAD print resolution
- (and 2 more)
-
A ship's stove too small to print? (For La Jacinthe)
tkay11 replied to tkay11's topic in 3D-Printing and Laser-Cutting.
@mtaylor: I fully agree about the lack of stuff for the French ships. Perhaps there's more in Europe, though I haven't researched that yet. It's only natural that nationals prefer models from their own maritime history. Also I've found that the Ancre monographs are mostly used by those who build at 1:48 or 1:32, occasionally 1:72. So maybe there's not sufficient market for them. I'll start digging around. Thanks for the thought. @Mldixon: That's a really nice lantern. Sounds like a good idea to draft at full scale and then re-size. I'll try that in future. In the meantime I'd be glad to take up your kind offer of trying my own design out on your printer so that I could know what's possible. It should give me a very good idea of how to approach small scale prints in future. I attach the OBJ file but can send the STL if that's better. I'll also have a bash at making it with wood, card and perhaps thin copper sheet. Tony Stove v24.obj- 17 replies
-
- 4
-
-

-
- ancre
- CAD print resolution
- (and 2 more)
-
A ship's stove too small to print? (For La Jacinthe)
tkay11 replied to tkay11's topic in 3D-Printing and Laser-Cutting.
Thanks, Mark. You can be relied on for a good and helpful response! I think making the basic block from wood would be just as easy, though, as well as saving on the expense. You're right about it being more suitable for larger sizes. Tony- 17 replies
-
- 2
-
-
- ancre
- CAD print resolution
- (and 2 more)
-
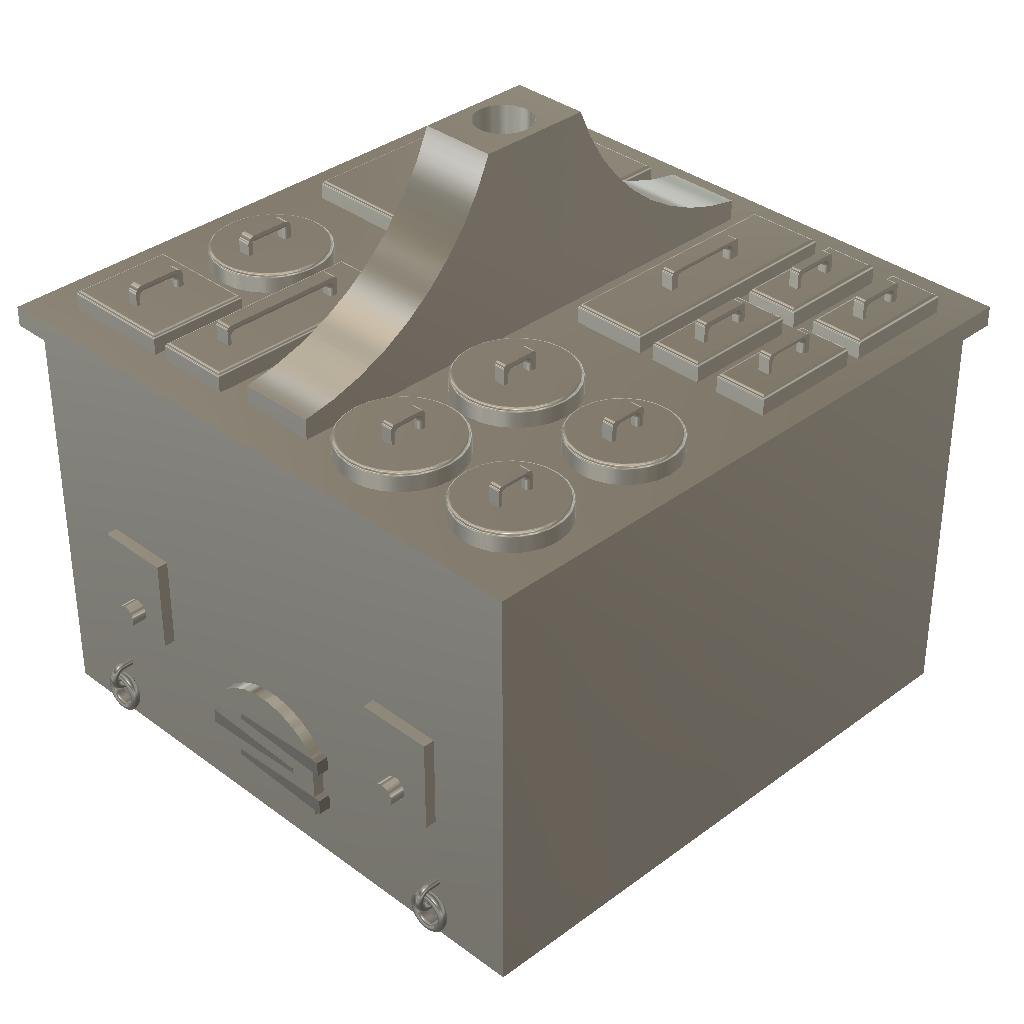
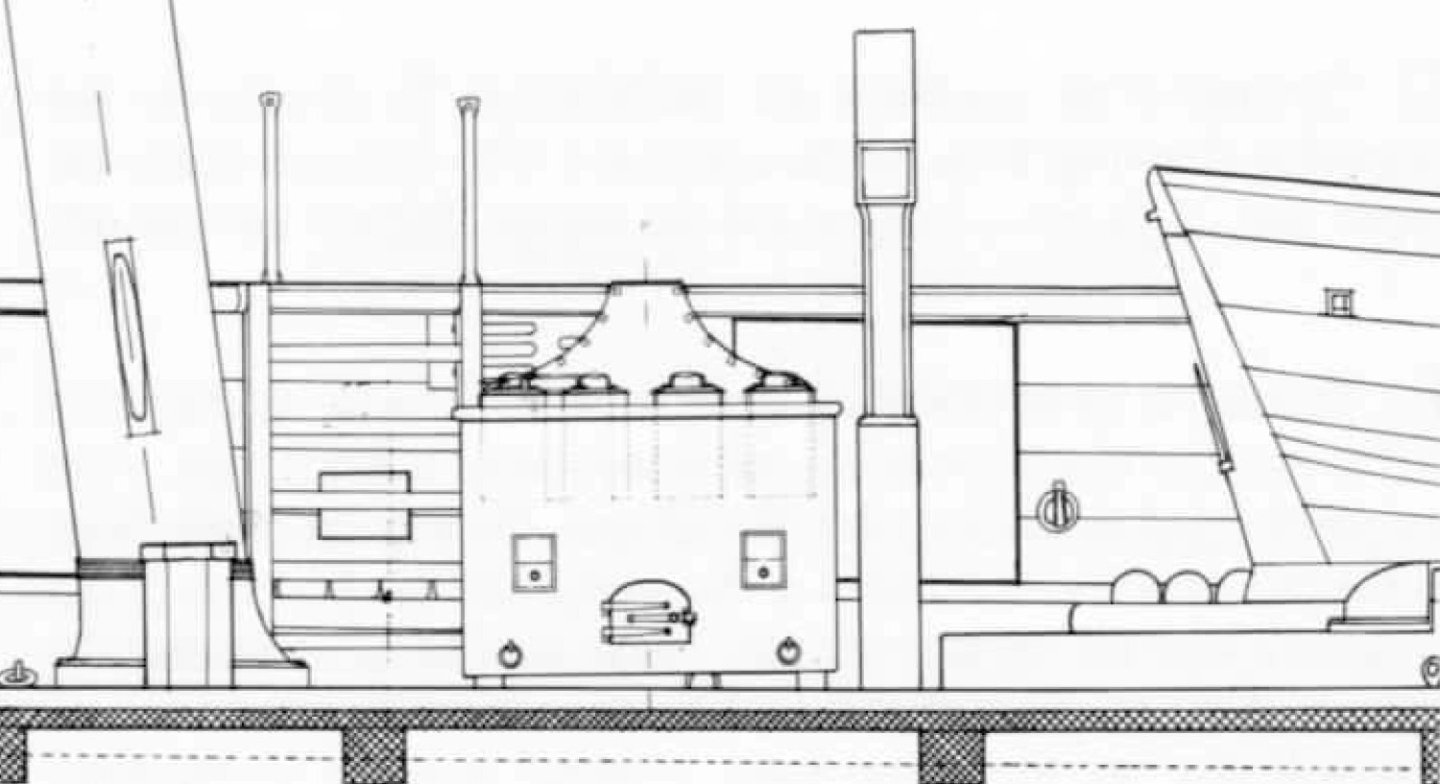
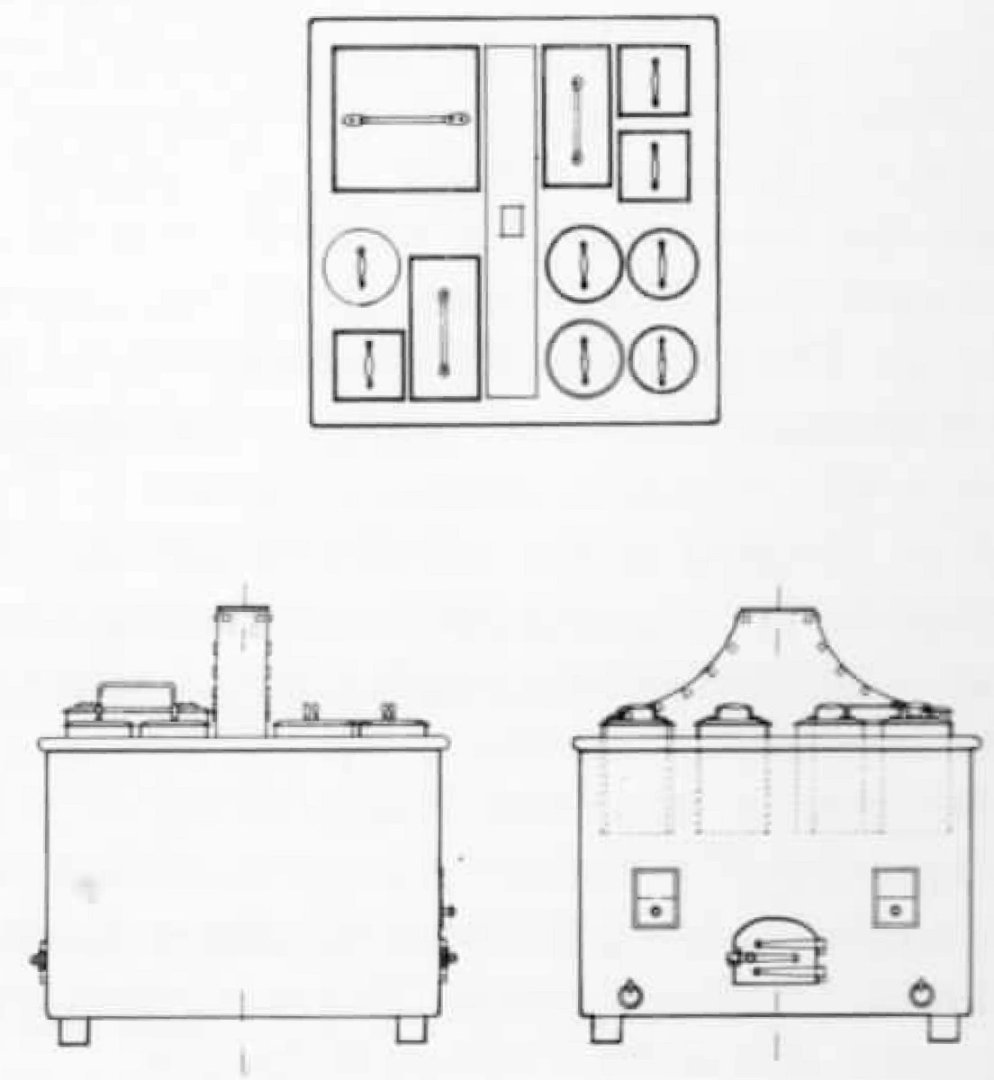
OK, folks, now that @henrythestaffy started me on the road to CAD 3D with his enormous help for my carronades, I set out on the path of learning the free version of Fusion 360, and built the ship's stove based on the pictures in Boudriot's monograph (shown below).The tutorials provided on YouTube by Product Design Online and Arnold Rowntree were very useful indeed for this. I attach a picture of the end result. The problem is that, at a scale of 1:96, it is basically a cube of approximately 8mm square. The handles of the oven tops are in the order of 0.2 x 0.5mm thick, while some of the other surface protrusions are as little as 0.1mm. The first printer service I tried told me they couldn't achieve such resolution. I think I picked up somewhere (possibly from Paul with his topic on the 3D printing process) that the best resolution available might be 0.2mm. I'd be grateful if anyone could advise me on whether I should modify the drawing by, for example, making the handles solid and attaching the fixing rings to the sides. Would that be something that would give a worthwhile print? Or is there some way of making it printable? If the advice is to give up, then I'll be happy to give the drawings to anyone who is interested so that they can re-scale for a 1:48 or even 1:24 model of La Jacinthe or others who need a stove of similar design. In any case, should my quest be impossible, I can always make it using wood and paper, and there is no loss as it has been a delight to explore the possibilities of 3D drawing with such an nice to use programme as Fusion 360. Tony
- 17 replies
-
- 2
-
-
- ancre
- CAD print resolution
- (and 2 more)
-
Will you be strengthening the card with glue/CA/varnish/cellulose to avoid fraying etc? Tony
-
Process for 3D printing of carronade
tkay11 replied to tkay11's topic in 3D-Printing and Laser-Cutting.
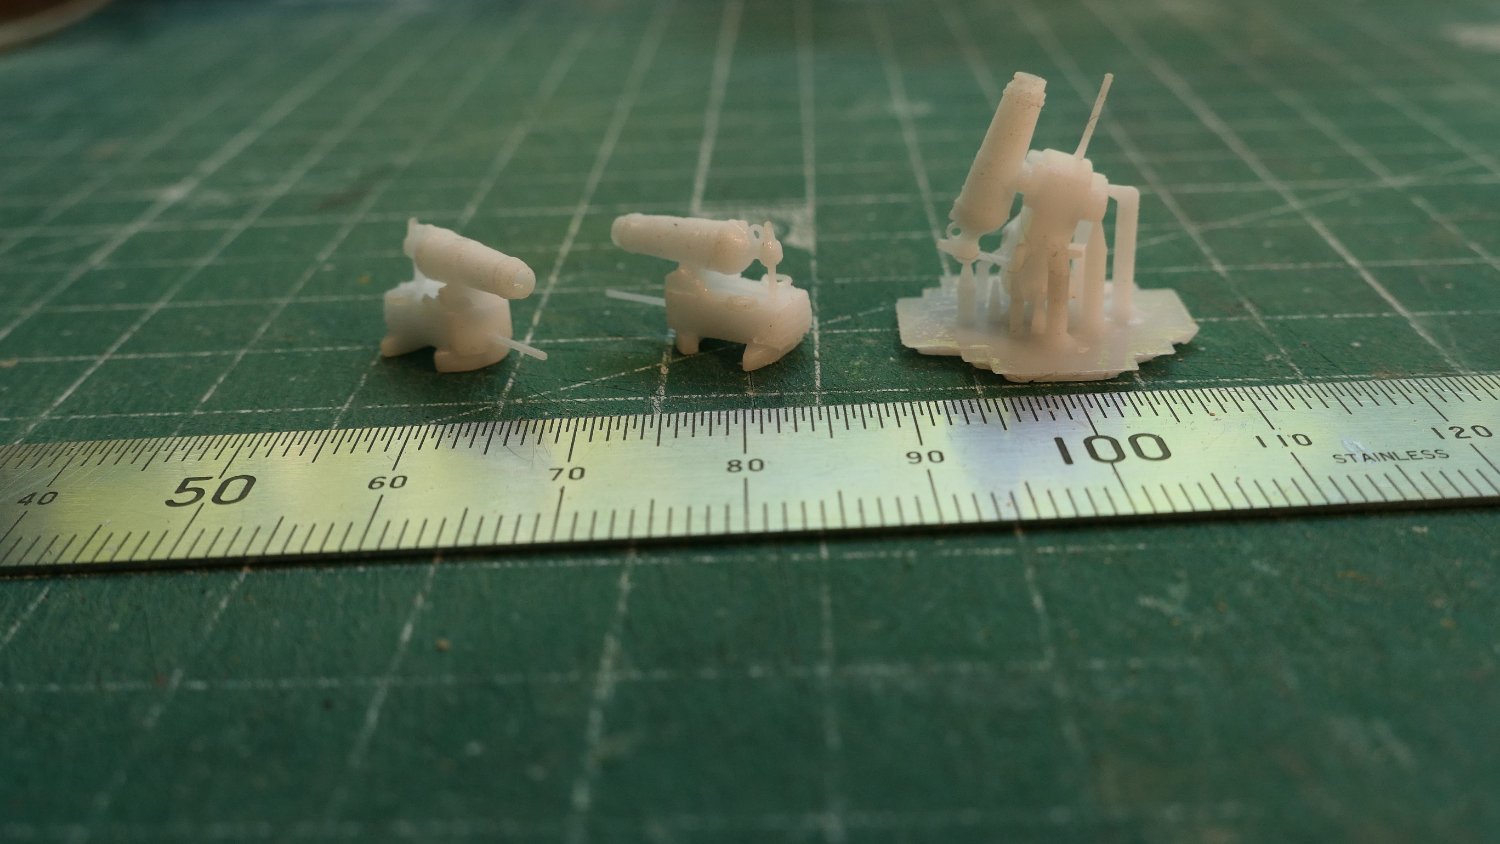
@henrythestaffy very kindly sent me the printed version of these carronades, for which I am extremely grateful. This has been a very useful conversation for me indeed. It enabled me to look at a number of options and interesting ideas, to learn about stl files, the 3D development process (especially the need for care with the supports) and more on how to use Fusion 360. I can't afford a 3D printer yet, but I think I will shortly be able to send difficult parts to the printers for the time being, given my growing understanding. So thanks to everyone for chipping in, and particularly to Paul who has been so generous with his time and the prints. Tony
-
Thanks for posting this wonderful journey, George. Miniature modelling is fascinating to me and I am very interested in your use of materials. Just one question: What is 'melted spruce'? It would be good if you have the time to describe in more detail some of the techniques you have used in assembly, e.g. about the cannon assembly and the gratings. Thanks, Tony
-
This may be a stupid addition to the discussion, but it is noticeable that the warp is to the laser-cut side. Would there be a possibility that the extensive small longitudinal grooving caused by the laser cut creates a weakness that would tend to bend the wood that way, in addition to any natural tendency? And might that be prevented if the piece were to be held on a curved surface as soon as it was received (too late for that, of course!)? Tony
-
Running Rigging _ Running in Circles....
tkay11 replied to USNCHief's topic in Masting, rigging and sails
Petersson's books, for all their faults, are good in isolating sections of the rigging so that you can get a good idea of positioning, belaying and function for each type. Tony -
@Egilman : Any further progress on this? Tony
-
HUGE card model gallery -- eye candy galore!
tkay11 replied to ccoyle's topic in Card and Paper Models
@dancooper: Thanks for the link. Very interesting. Note that the link doesn't make it clear that the crucifix sundial is made of paper and based on the accompanying woodcut. All the same, I did a search and it is correctly described elsewhere on the web, e.g. at Paper modellers . I also read about his life which is found on the English Wikipedia, in case others are also interested. Tony -
HUGE card model gallery -- eye candy galore!
tkay11 replied to ccoyle's topic in Card and Paper Models
I wonder how far back using paper to make models goes. I suppose it could be from the time paper was invented. Would many of the architectural models have been made from card or paper in, say, the 16th Century? I used to make boats from folded paper to float on ponds in the 50s, after my father showed me how to do it. There would also be a variety of designs for such in comics and boys' books. However, I admit these were not based on any particular boat, so I don't think those would enter into the category of 'models'. Tony -
Process for 3D printing of carronade
tkay11 replied to tkay11's topic in 3D-Printing and Laser-Cutting.
@henrythestaffy: That looks perfect, Paul. I wonder if you think it would be worth it to make a little log of the stages through which you developed this? Of course, it may be something that I am just behind the curve and don't know what so many others now take for granted, but if you think there are others who might pick up some tips as to how you did this, then it might prove enlightening for some of us who have yet to catch up. In particular I would like to understand the process of converting photos and 2D drawings into 3D files for printing. So far I have only really used CAD for 2D planning. If you think this is all too basic, I'd be glad of some pointers on the web as to how to learn. I've seen some tutorials for Blender and Fusion, but the ones I have seen don't seem to cover this initial conversion. As with many others you have helped on this forum, I am very grateful, Thanks Tony -
Process for 3D printing of carronade
tkay11 replied to tkay11's topic in 3D-Printing and Laser-Cutting.
@henrythestaffy: Wow, Paul! That's simply astonishing! I had no idea you could do that from a photo. I'll PM you in case you're still willing to post the PST file. I suppose all I would then have to do is send that to be printed. Thanks very much indeed for spending time on this. I can begin to see the magic and usefulness of 3D printing. Tony -
Process for 3D printing of carronade
tkay11 replied to tkay11's topic in 3D-Printing and Laser-Cutting.
Very neat! Great ideas for the construction. Thanks! Tony -
Process for 3D printing of carronade
tkay11 replied to tkay11's topic in 3D-Printing and Laser-Cutting.
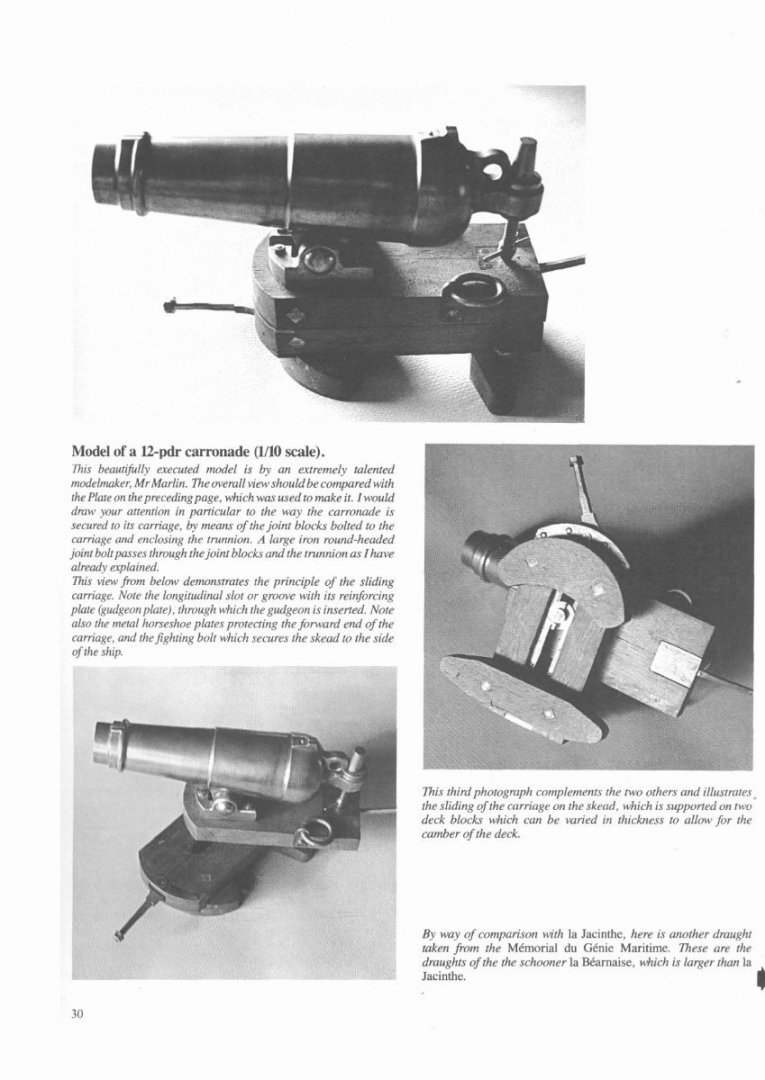
@Lieste: Thanks for that very detailed reply. I see that the accuracy would depend on the printer resolution. I attach a screenshot of the plans I am working on (traced from Boudriot's monograph of La Jacinthe) as well as a photo shown in that book of a model of a 12-pounder carronade of the same design. Do you think a FDM 3D printer could make a solid model of the entire carronade (perhaps without the supporting wooden blocks) at the scale dimensions I show in the screenshot? Although I have already separated components in the tracing for study purposes, I wouldn't attempt to have all the details of the revolving mechanism, just the curved base). @John Fox III: That's an intriguing idea, to make it from paper. Having seen your excellent work on Polaris I am not sure I would be able to match your skills (even at the larger scale I am working on)but am open to all suggestions. It would be really valuable to a lot of people if you could share your methods as you suggest. I can certainly see the sense of your making the carronades simpler in construction as at that scale trying to detail them further would make little sense. Thanks, Tony.thumb.jpg.f1aedf9b2561fadd965269e9c94aca33.jpg)
-
Process for 3D printing of carronade
tkay11 replied to tkay11's topic in 3D-Printing and Laser-Cutting.
@henrythestaffy: That's wonderfully generous of you, Paul, and I may well take you up on that. Before I do so, though, I want to be clear about the process of asking a 3D printing house how to generate the model at the correct size. Do I just specify the overall length, or is that something that should be done when generating the STL file? Thanks Tony -
I would like to obtain a 3D print of a carronade in the UK, but don't know how to go about it. It would have to be at 1:96 scale (13mm long, 3mm barrel). I don't think I have the skills to make such a complex object at this scale, although I certainly could have a go. I had a search through the fora for hints about going to 3D print shops but couldn't find anything, perhaps because I didn't search correctly. The idea is to find a UK supplier who would print out one of the carronade stl files that seem to be available for download. As I don't know whether you can specify sizes for printing or whether the files have a size embedded, it would be a great help if someone could offer me some advice as to how to specify such a 'thing' for printing. It would also help if a particular UK-based 3D printing shop could be suggested, and whether having just two copies of such a small object would be both cost-effective and accurate. With thanks for any suggestions or pearls of wisdom! Tony
-
Even Kondzik resorted to putting wooden strips in small beams. See his card Allège d'Arles build. He also has some excellent tips on modelling in card. Tony
-
18th and early 19th Century cutter models
tkay11 replied to tkay11's topic in Nautical/Naval History
Thanks, druxey. Of course the gunport idea was crazy for a sweep port (which I had used Marcus' term for) but just thought for a blindingly silly moment they might be ok to allow water to escape. So thanks for pointing this out! Tony- 42 replies
-
- 2
-
-
- Cutter
- 18th Century
- (and 4 more)
-
18th and early 19th Century cutter models
tkay11 replied to tkay11's topic in Nautical/Naval History
Sorry, Marcus, all I can say is that these are contemporary models and some seem to show one or the other type or both, and others don't. Contemporary plans may show scuttles and/or oar-holes, and the NMM plans for the 1763 Cutter Endeavour do show oar holes but no scuttles. The NMM plans I have for the Sherbourne (an English cutter) don't seem to show either type, although the Caldercraft kit of the Sherbourne has oar holes. I don't know if oars would be redundant on some cutters as they could perhaps be pulled by their longboats. Perhaps the low gunports might be regarded as adequate to act as scuttles. Is this something that would be assumed by the builder or requested by the purchaser? I'll leave that for others who are far more knowledgeable to comment. Tony- 42 replies
-
- 2
-
-
- Cutter
- 18th Century
- (and 4 more)
-
Kester had mentioned somewhere at the time that he was going to write a book. Glad it's surfaced, and thanks for bringing it to our attention! Tony
- 1,039 replies
-
- 1
-
-
- ballahoo
- caldercraft
- (and 2 more)
-
Just FYI for anyone following: Sketchup Free cannot load Extensions, and so cannot action Unfold. The subscription Sketchup is £95 per year. Tony
- 17 replies
-
- 1
-
-
- Vistula barge
- card
- (and 1 more)
-
Thanks, Tomek. I've been wondering about how to use the simpler 3D programmes to unfold surfaces to a single plane. I'll start exploring! Tony
- 17 replies
-
- 1
-
-
- Vistula barge
- card
- (and 1 more)
-
Thanks, Tomek. Very impressive use of software and design. I hadn't thought of using a CAD programme as I had forgotten the sides of the boat, being card, are solid rather than fully planked. I asked because I am trying to build a 6 metre ship's boat at 1:96, and having difficulty in planking it properly. I was trying to think of other ways of doing it, including card. Do you think having a 3D CAD programme is more helpful than a 2D one in preparing such a model? I can see that it helps in visualising, but does it help in constructing it? Unfortunately Rhino is far too expensive for me, and I'd probably have to get a new graphics card as well. Although I think I have to stick to 2D for the while, I'd be very interested in your thoughts on the value of a 3D programme. Tony
- 17 replies
-
- 1
-
-
- Vistula barge
- card
- (and 1 more)


.jpg.a1606c955e010e519dc822429f8c1b4e.jpg)
