HOLIDAY DONATION DRIVE - SUPPORT MSW - DO YOUR PART TO KEEP THIS GREAT FORUM GOING! (78 donations so far out of 49,000 members - C'mon guys!)
×


tkay11
-
Posts
1,829 -
Joined
-
Last visited
Content Type
Profiles
Forums
Gallery
Events
Everything posted by tkay11
-
 I would just add that there is some flexibility in the various dimensions, so there's no need to stick rigidly to the plans. The most important thing to check is the centre mark for the upright, which can be done by putting a pin in the centre of the smallest collet in the headstock, and pushing an initial template card onto it. I am sure each machine will have a slight variation, and there's the thickness of the card base of the upright to consider. Tony
 -
@jfhealey: Fred, I bought the extension some years ago directly from BriMarc Tools & Machinery, Unit 10 Weycroft Avenue, Axminster, Devon EX13 5PH. They're an offshoot of Axminster. It was about £35 and mighty useful. @hollowneck: Thanks, Ron. I picked up CAD when I started ship modelling a few years ago. I am not an engineer, just a CAD user. Tony
-
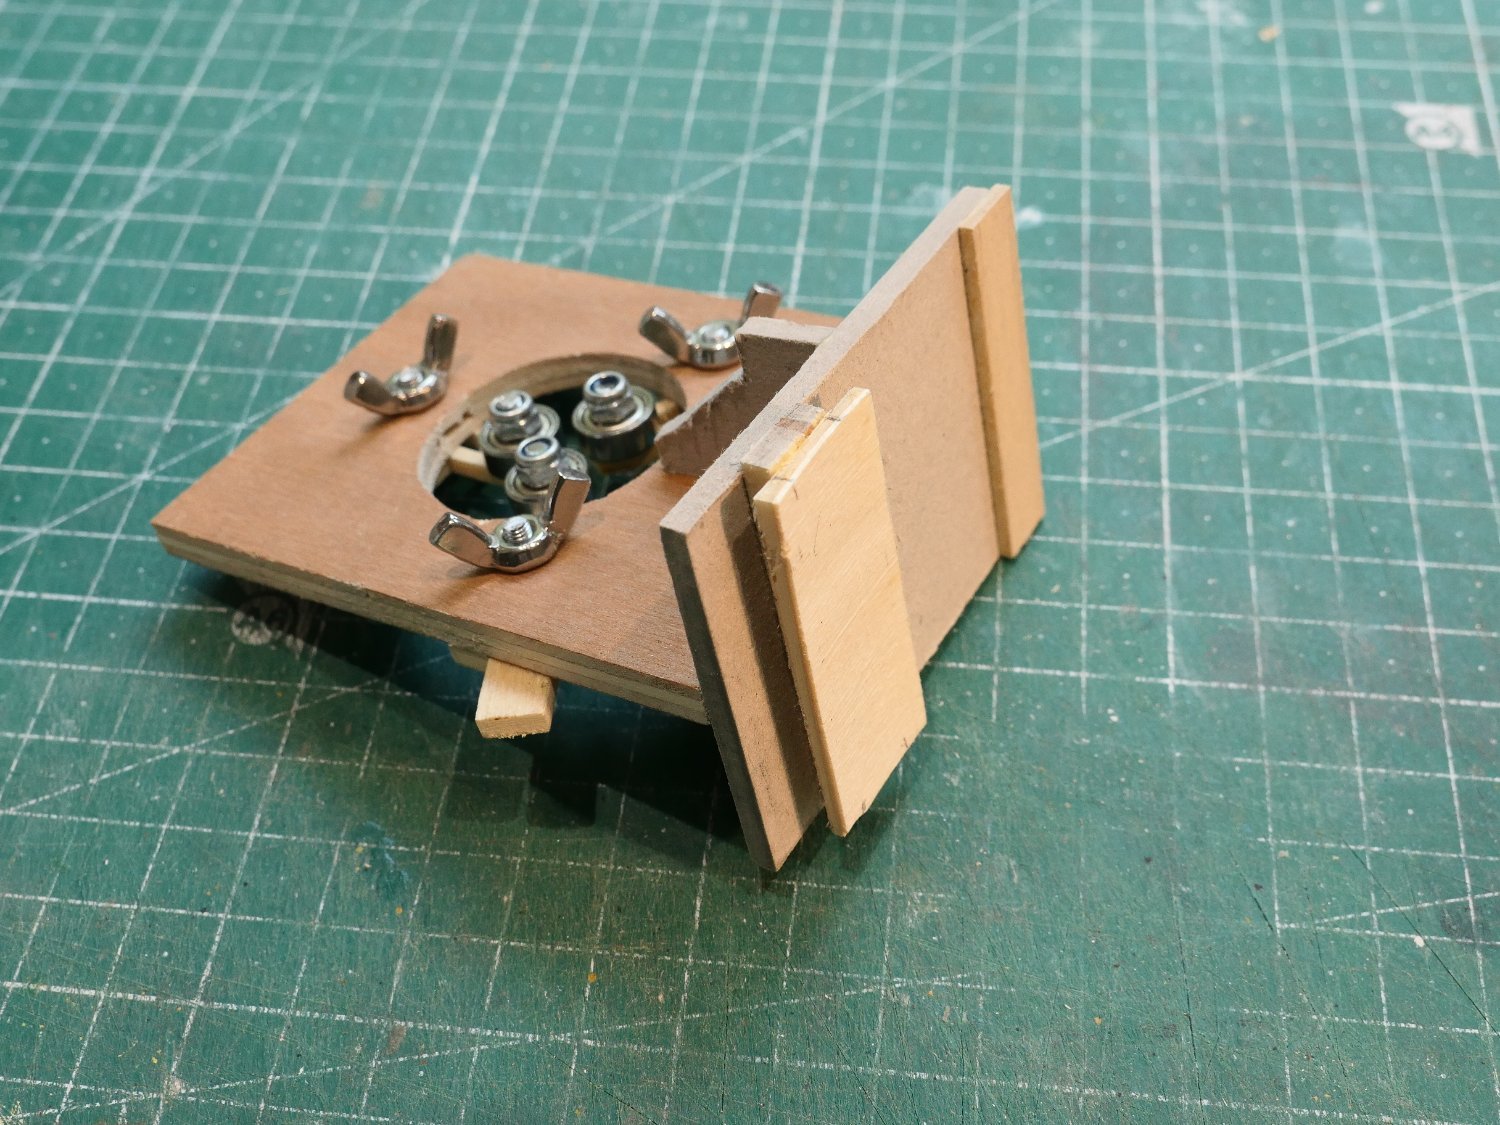
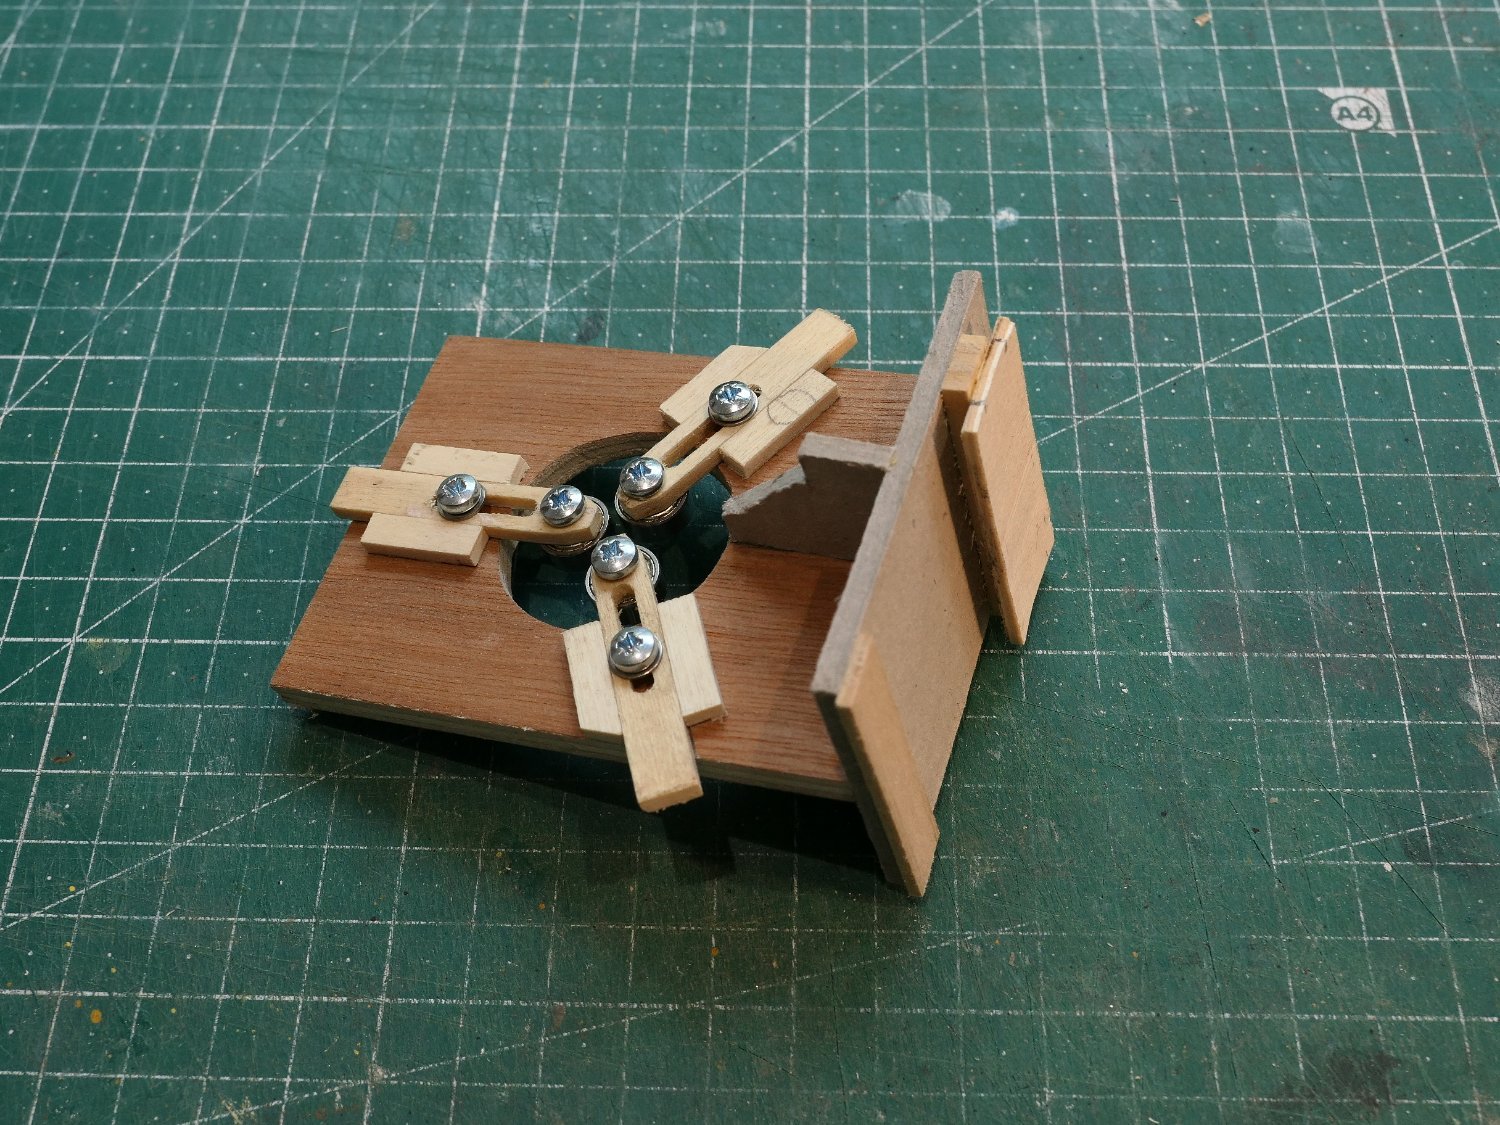
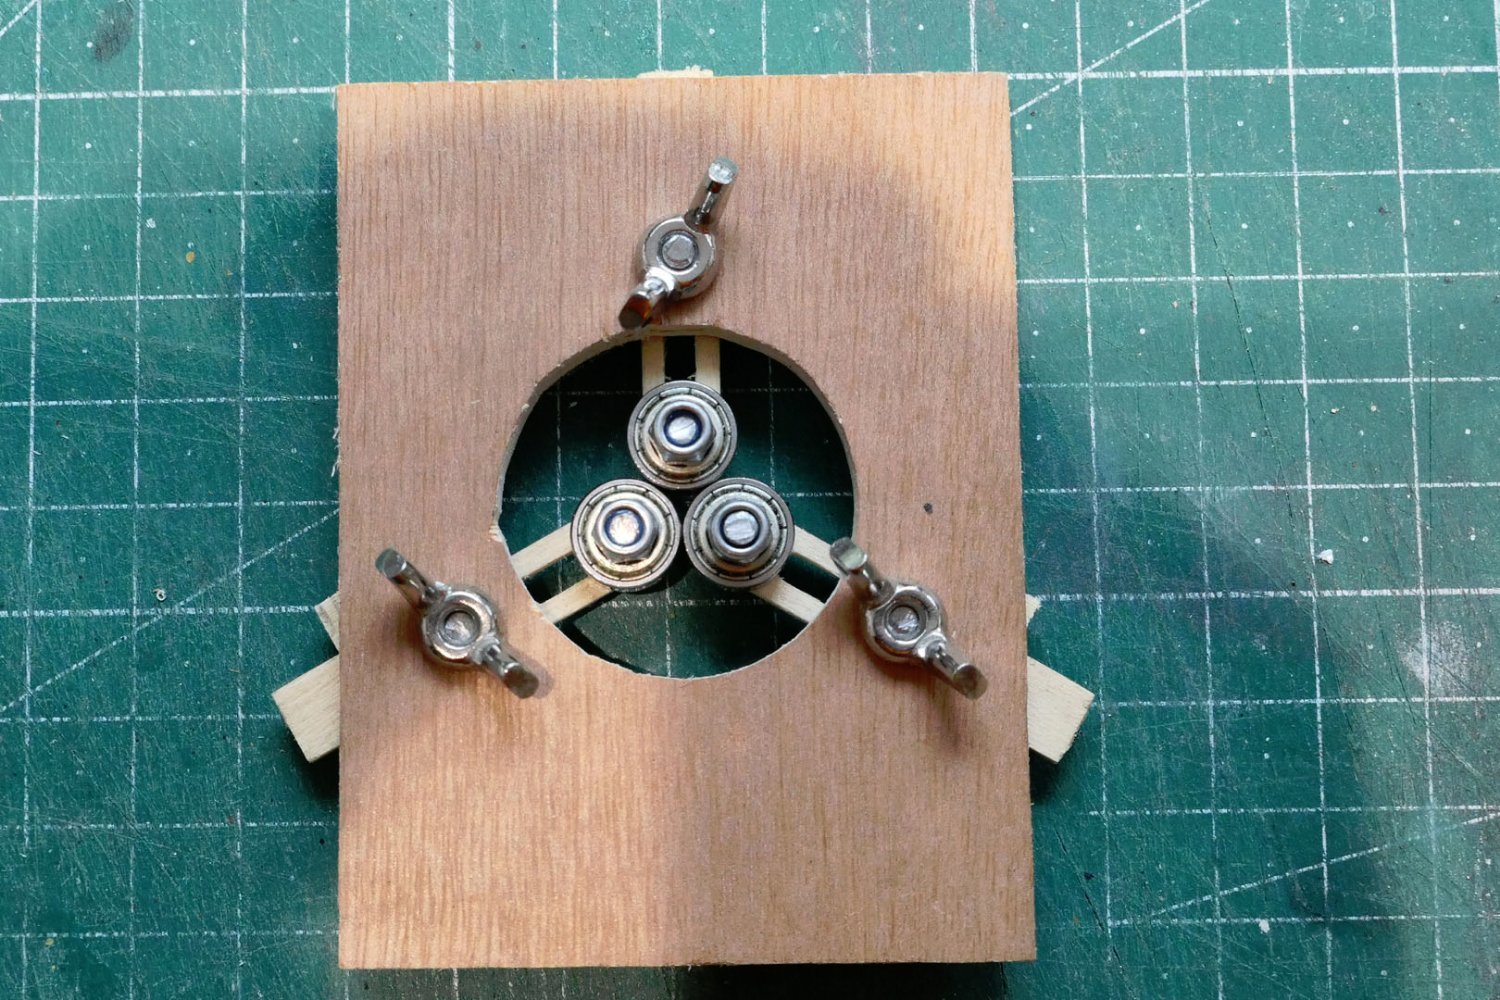
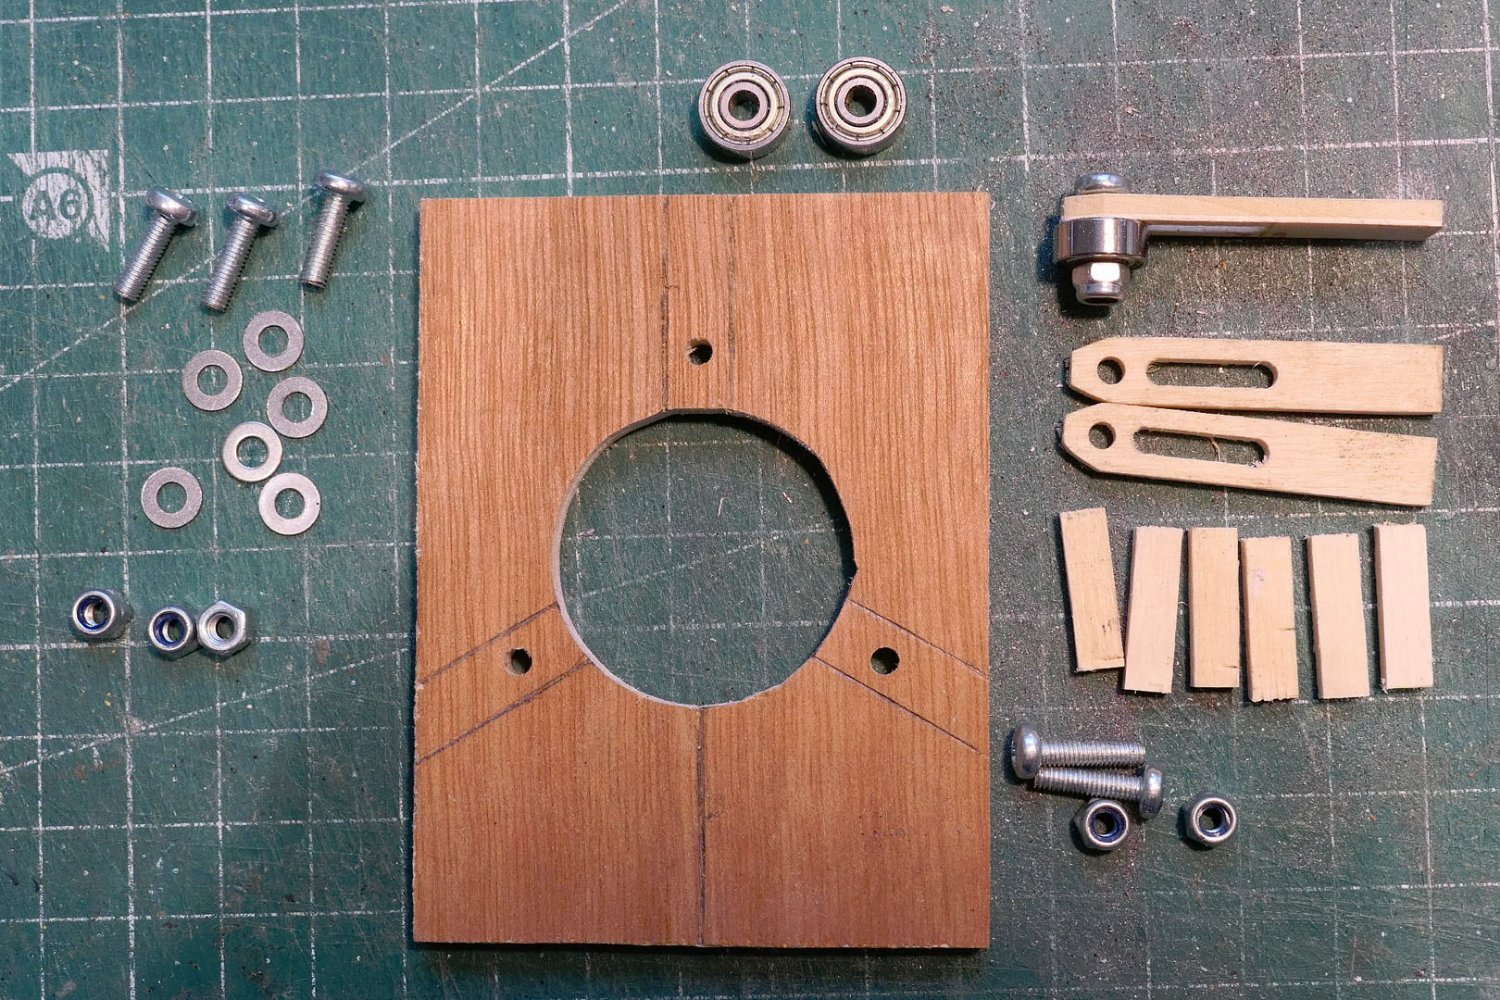
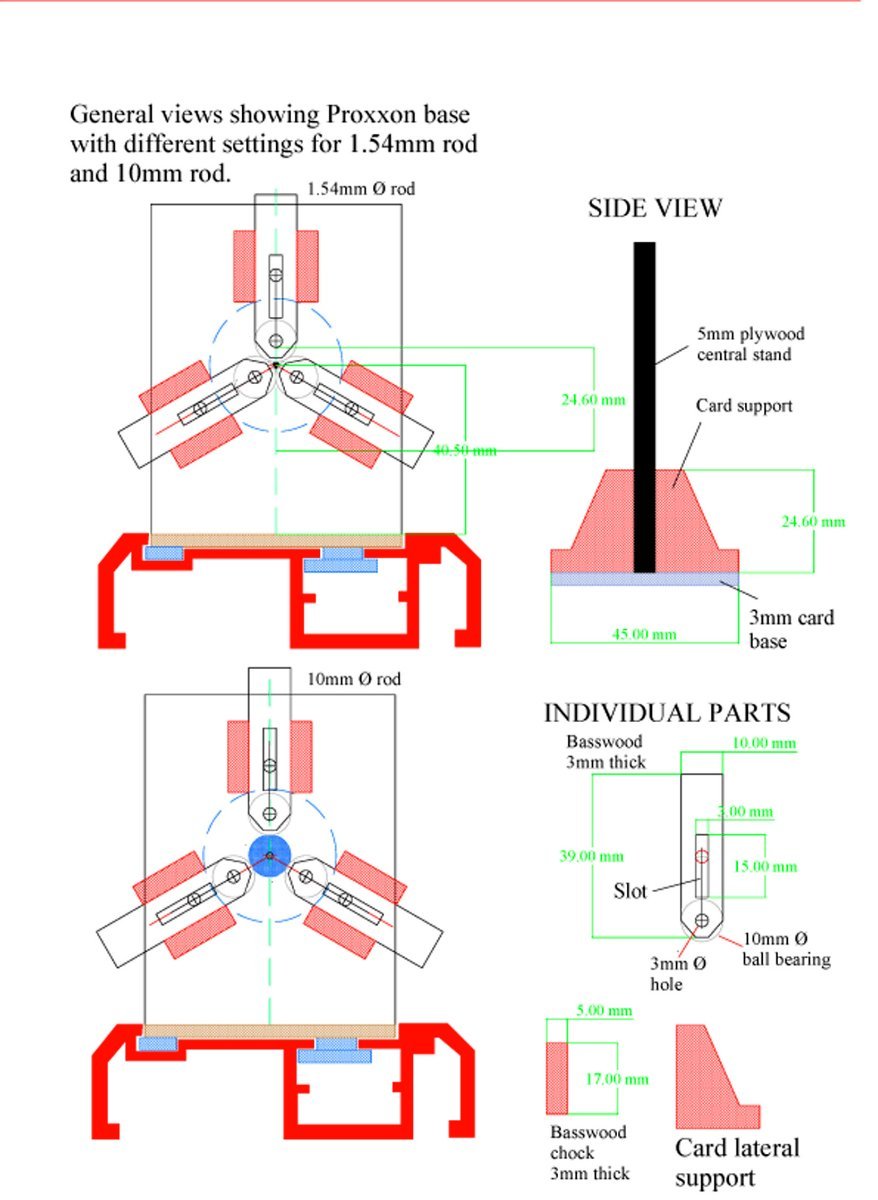
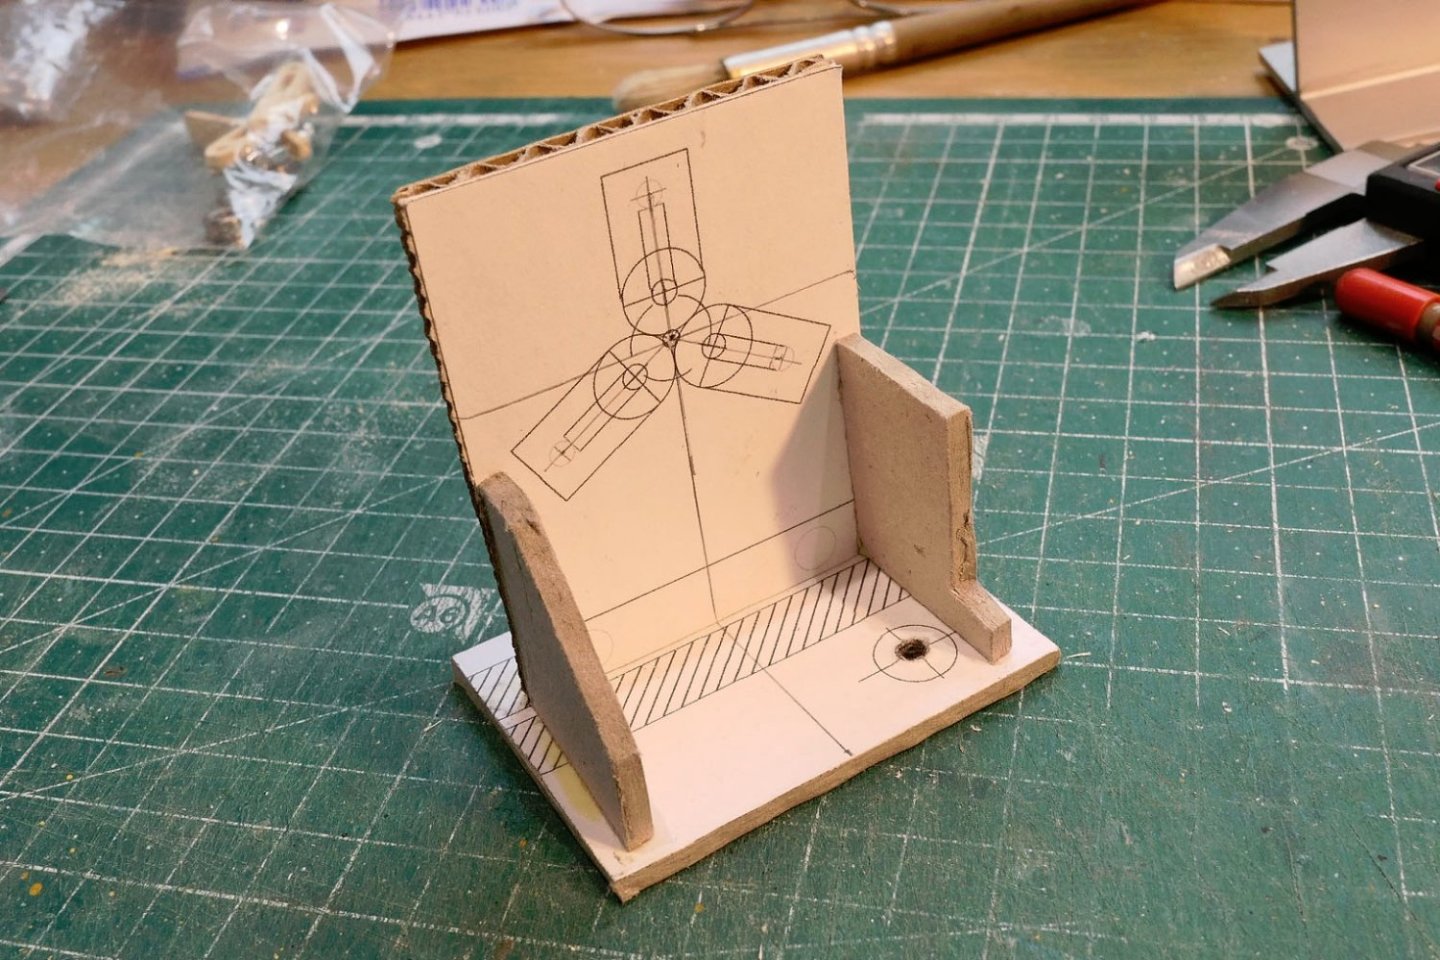
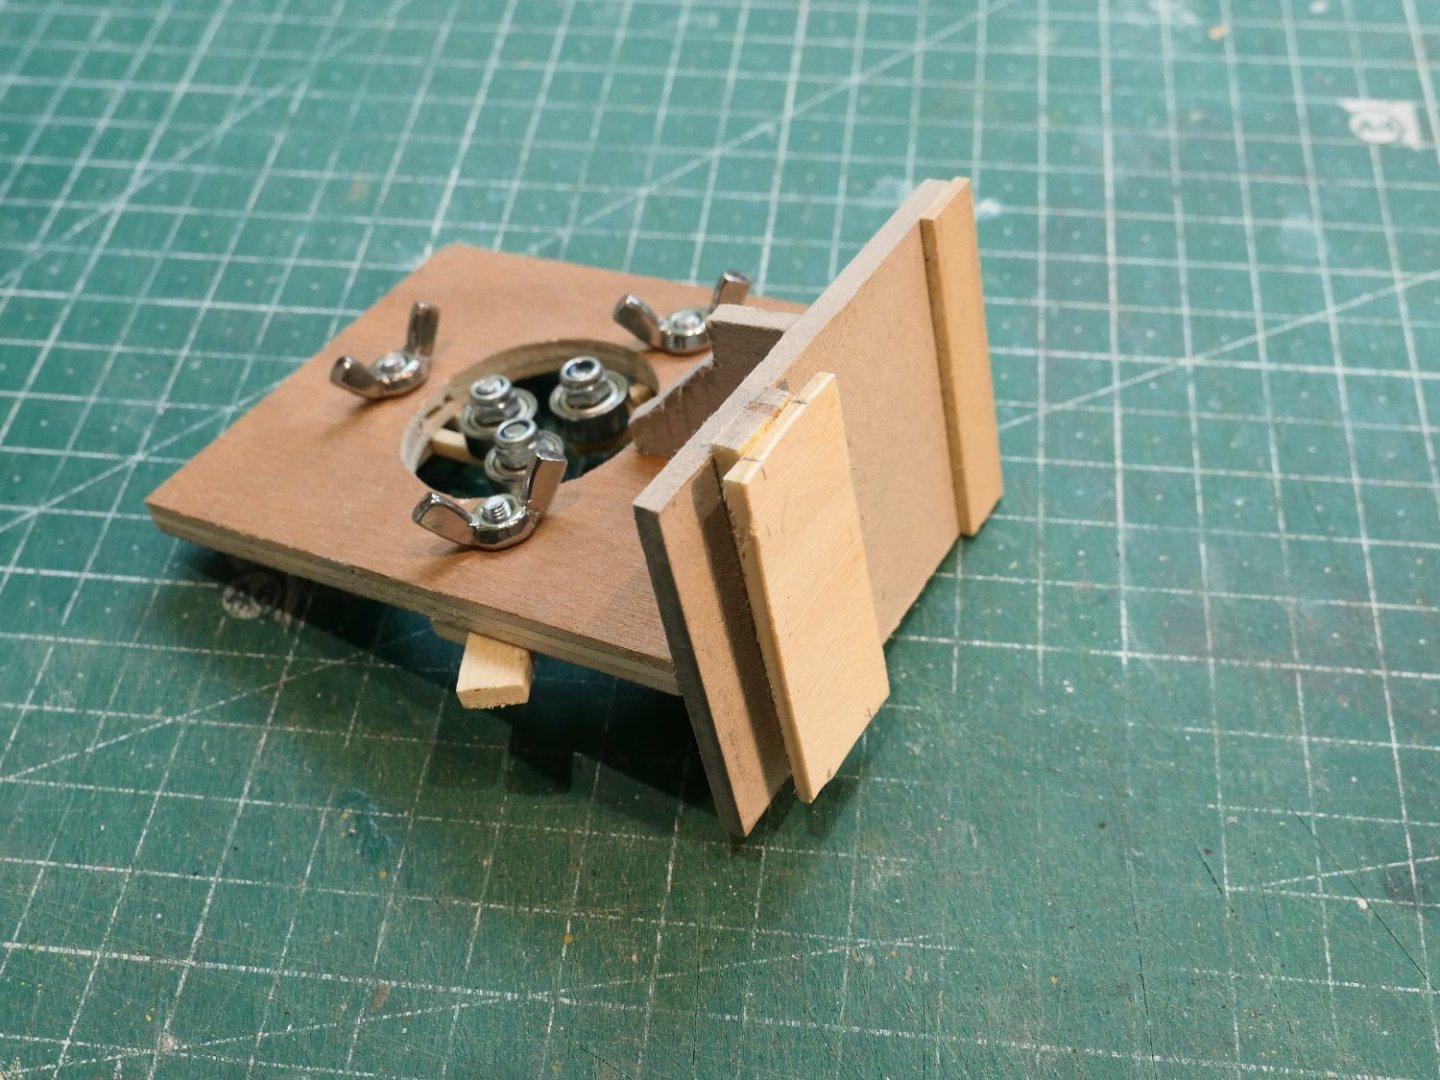
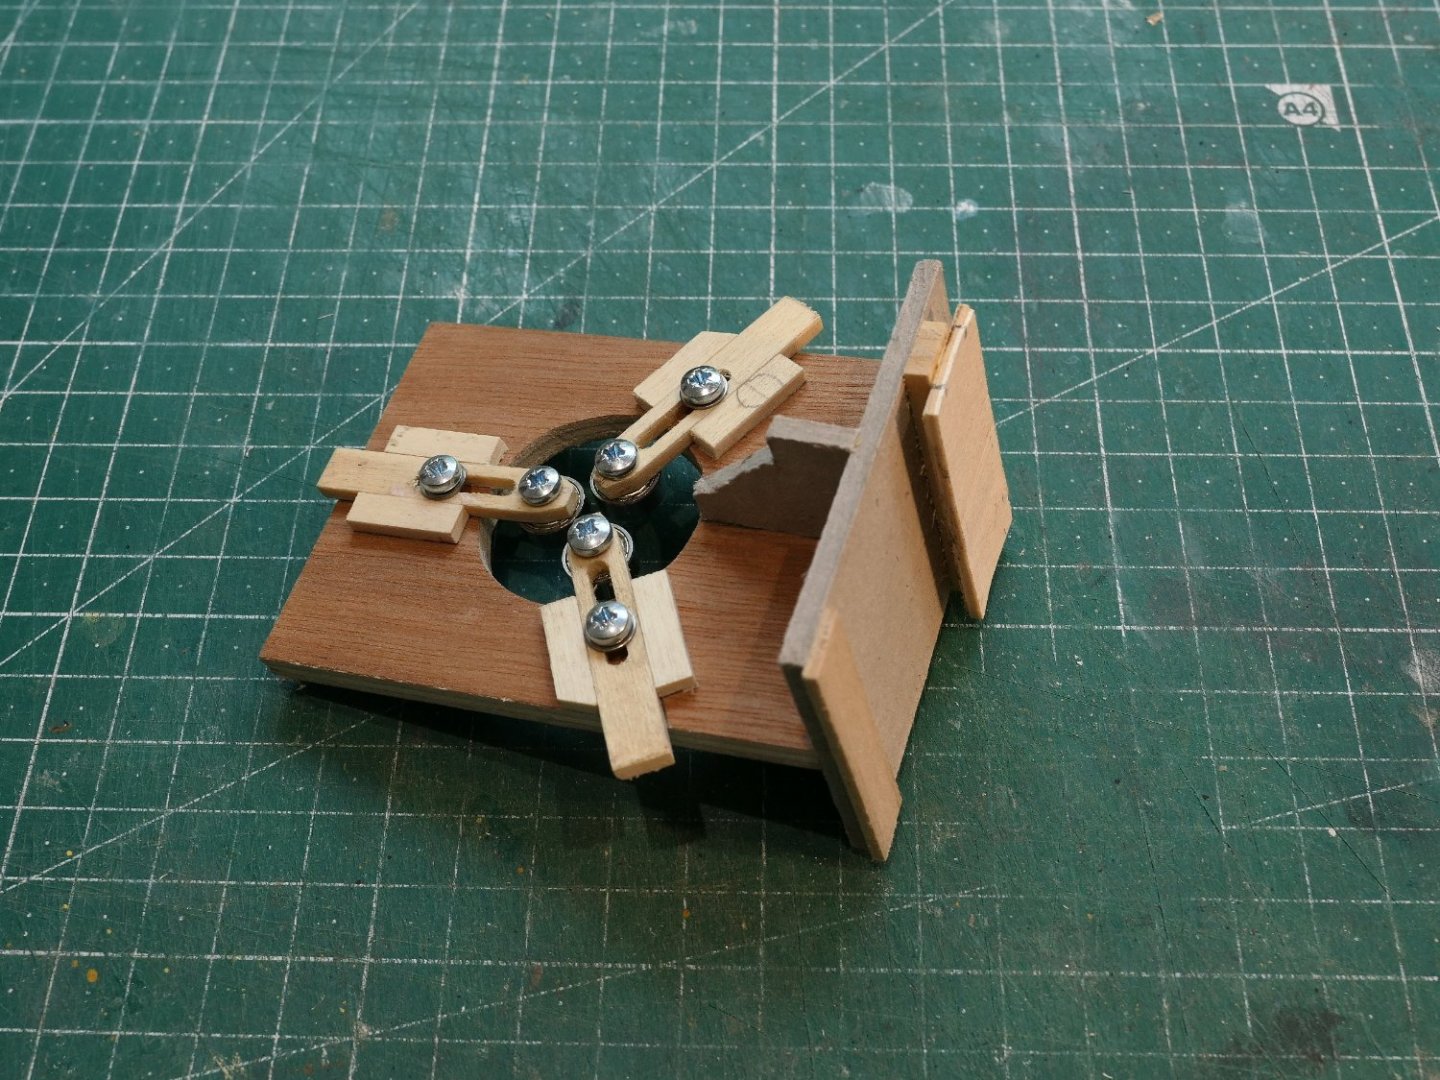
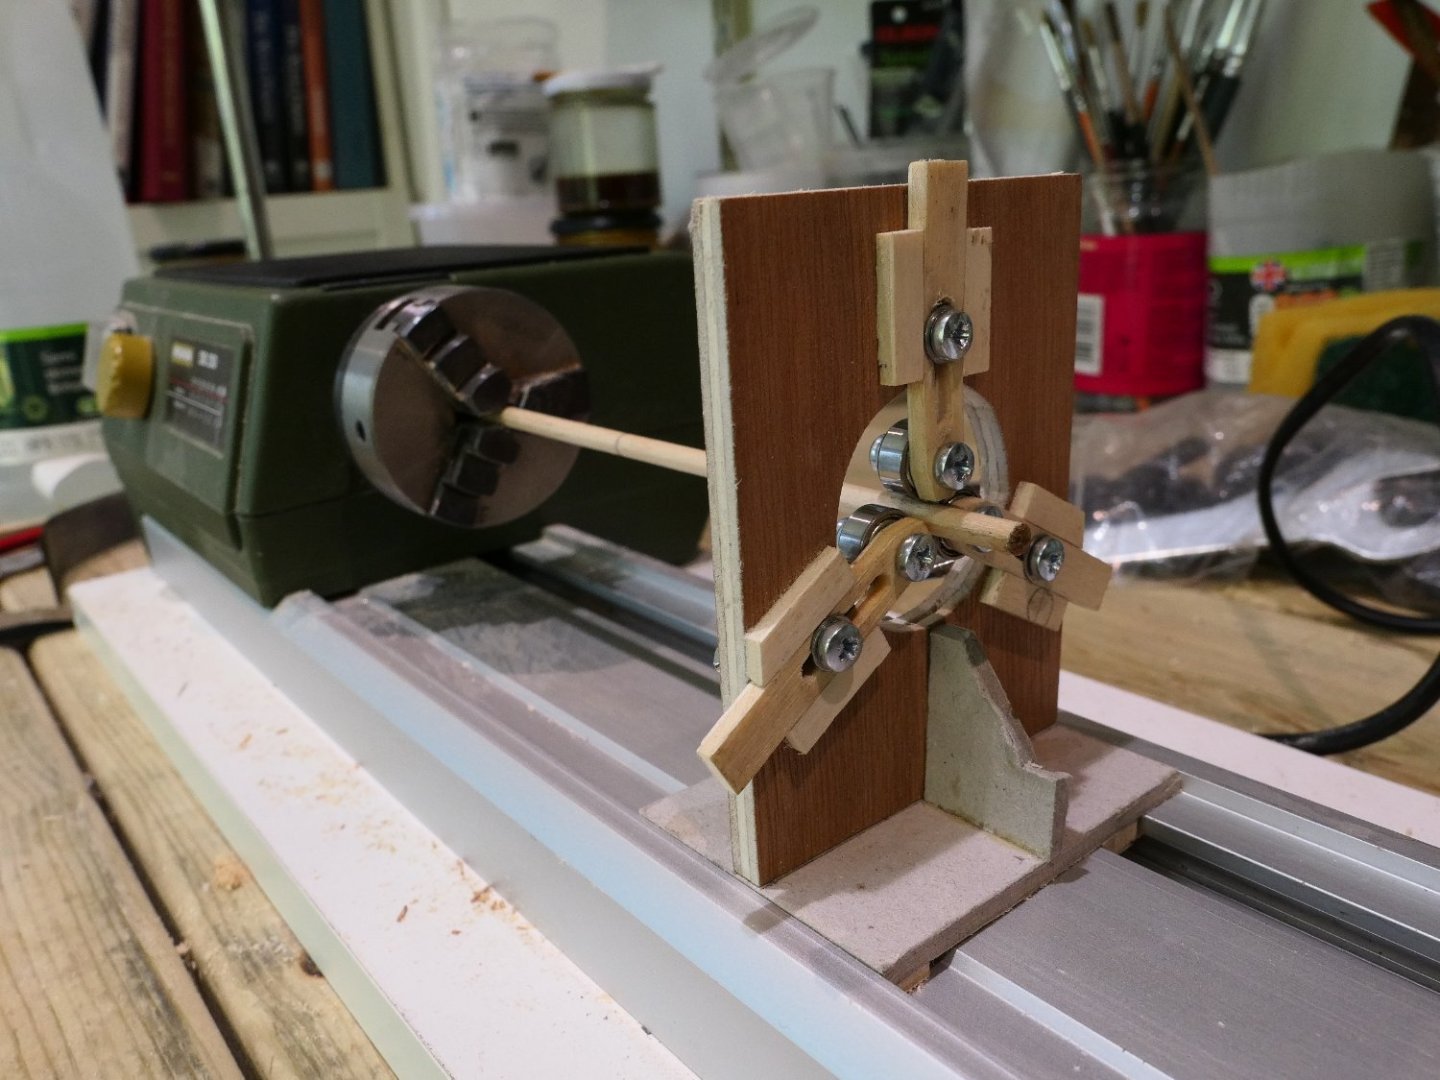
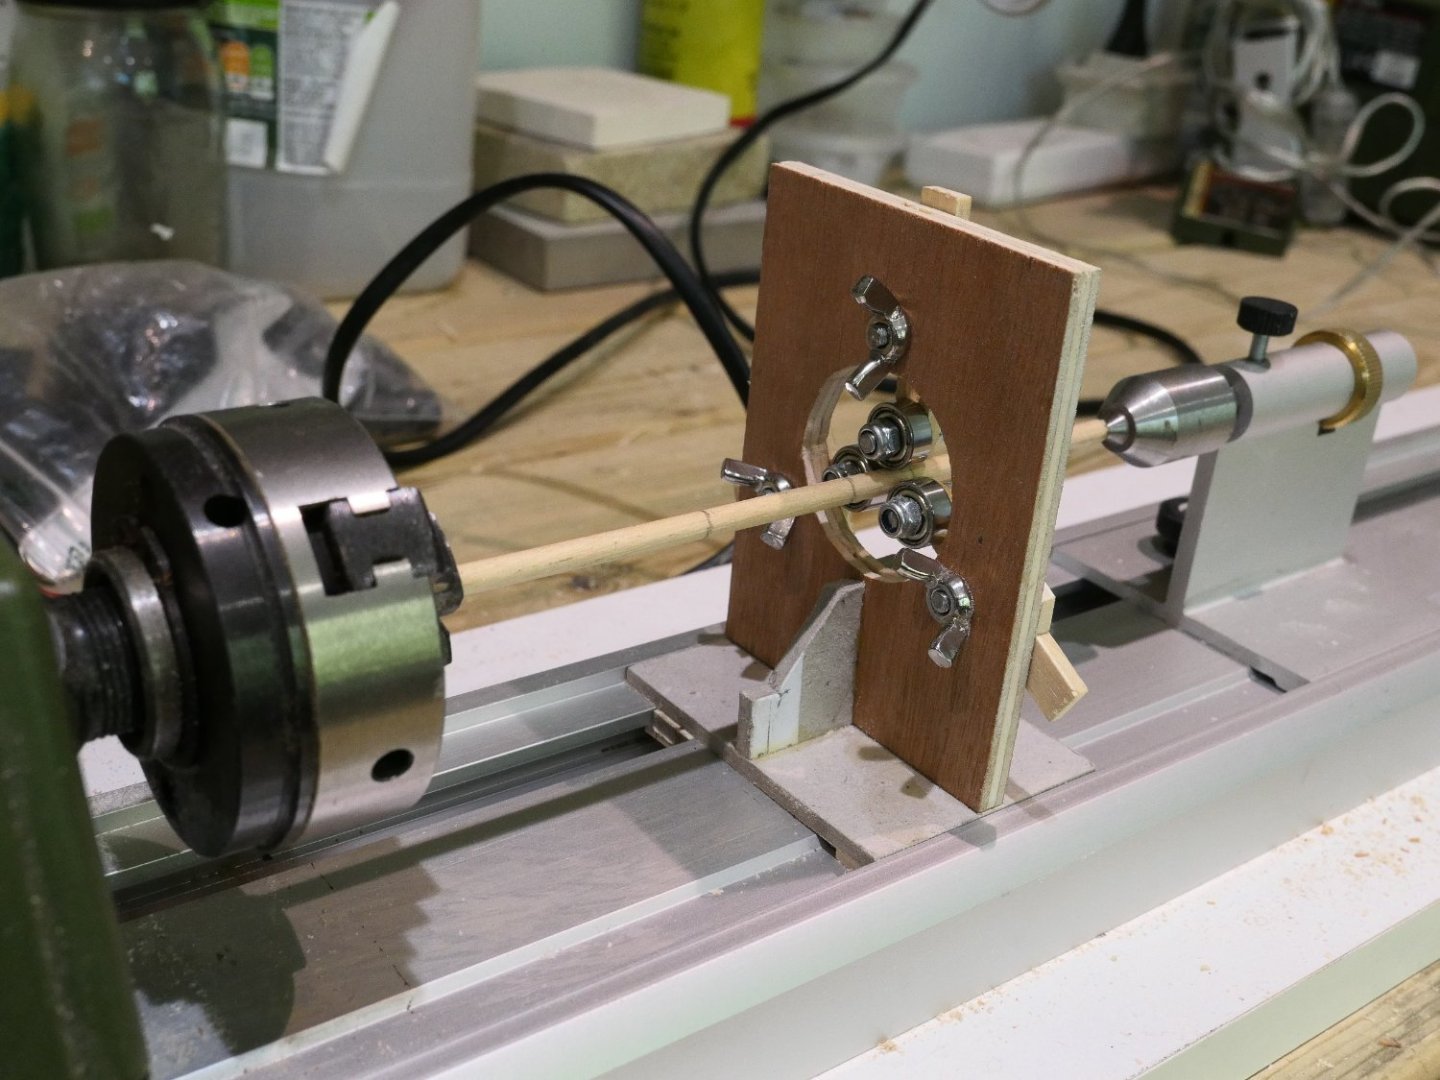
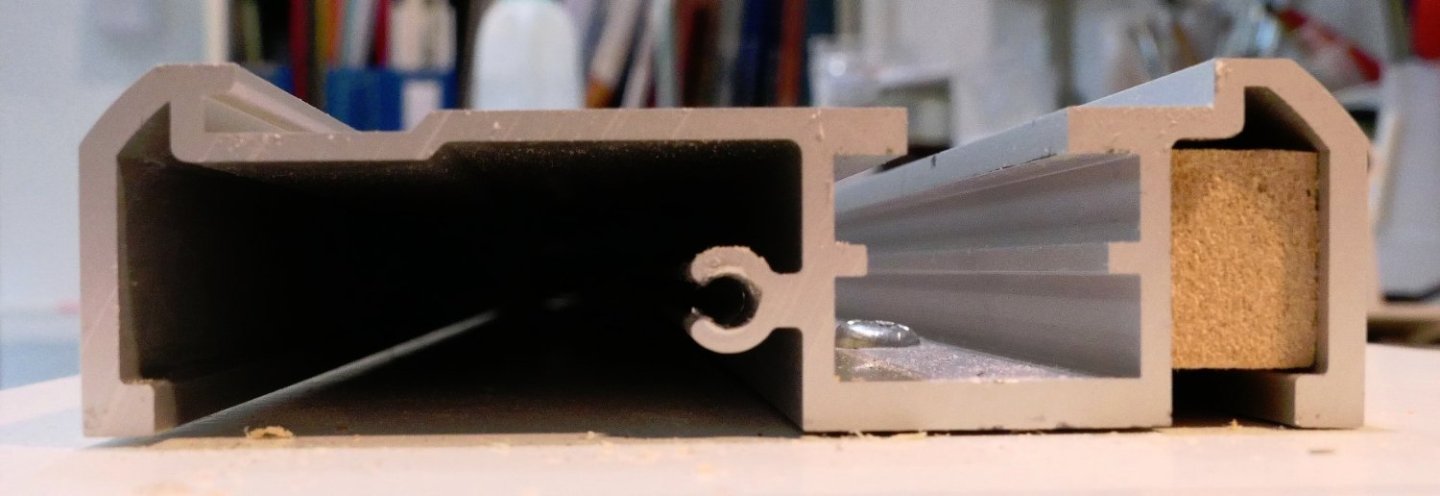
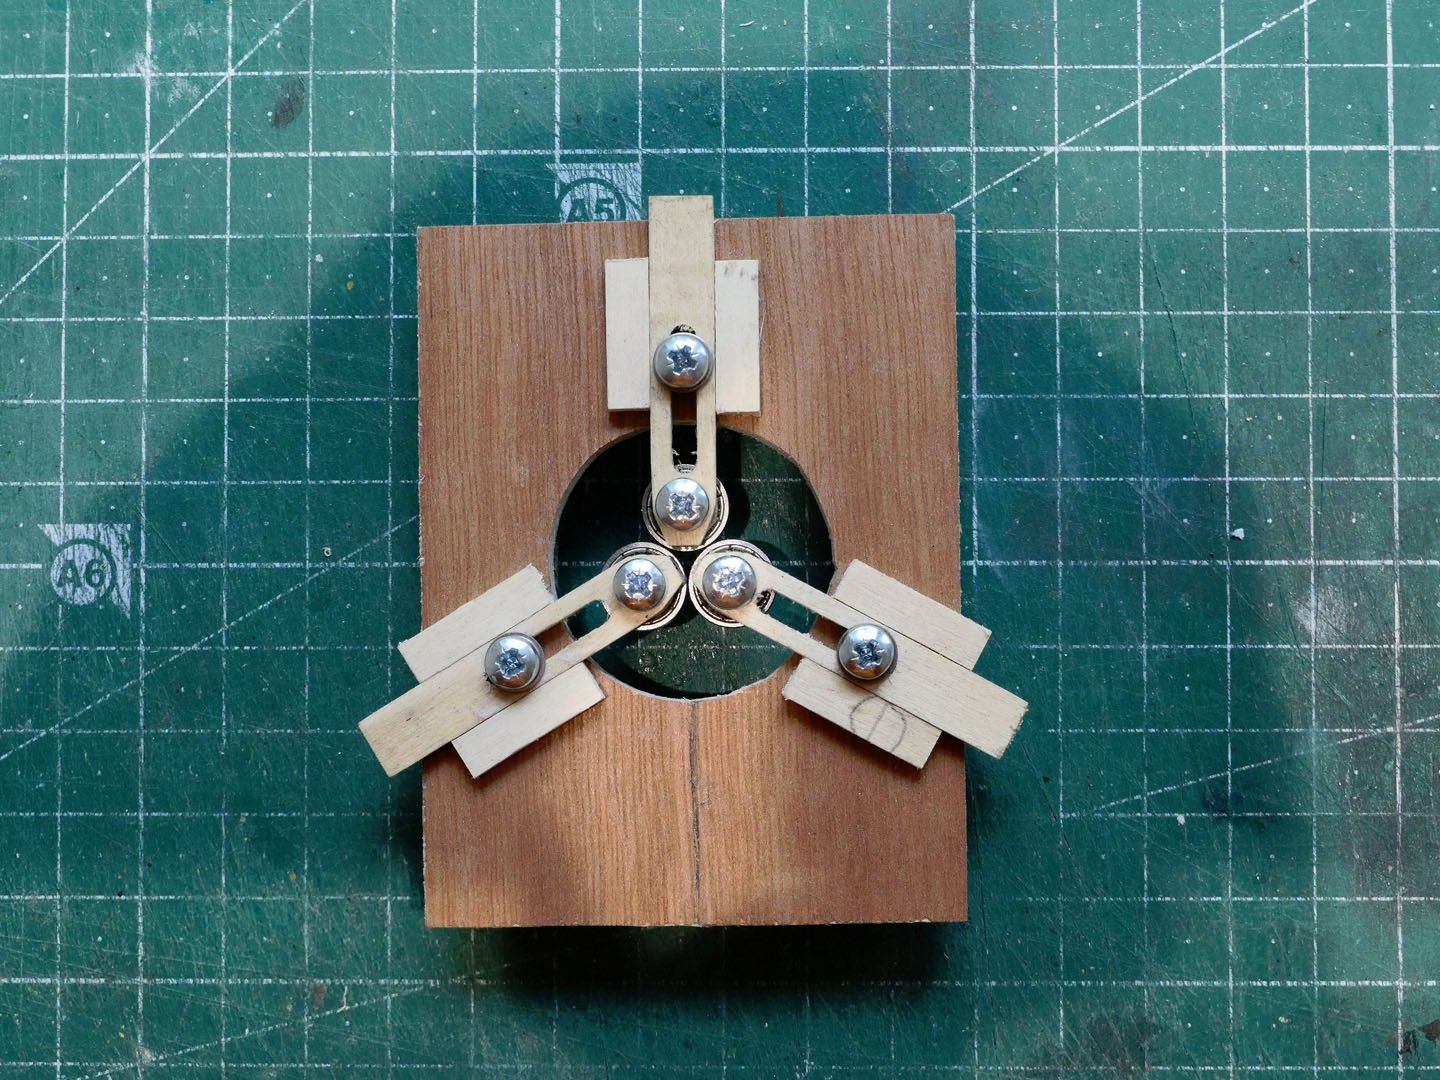
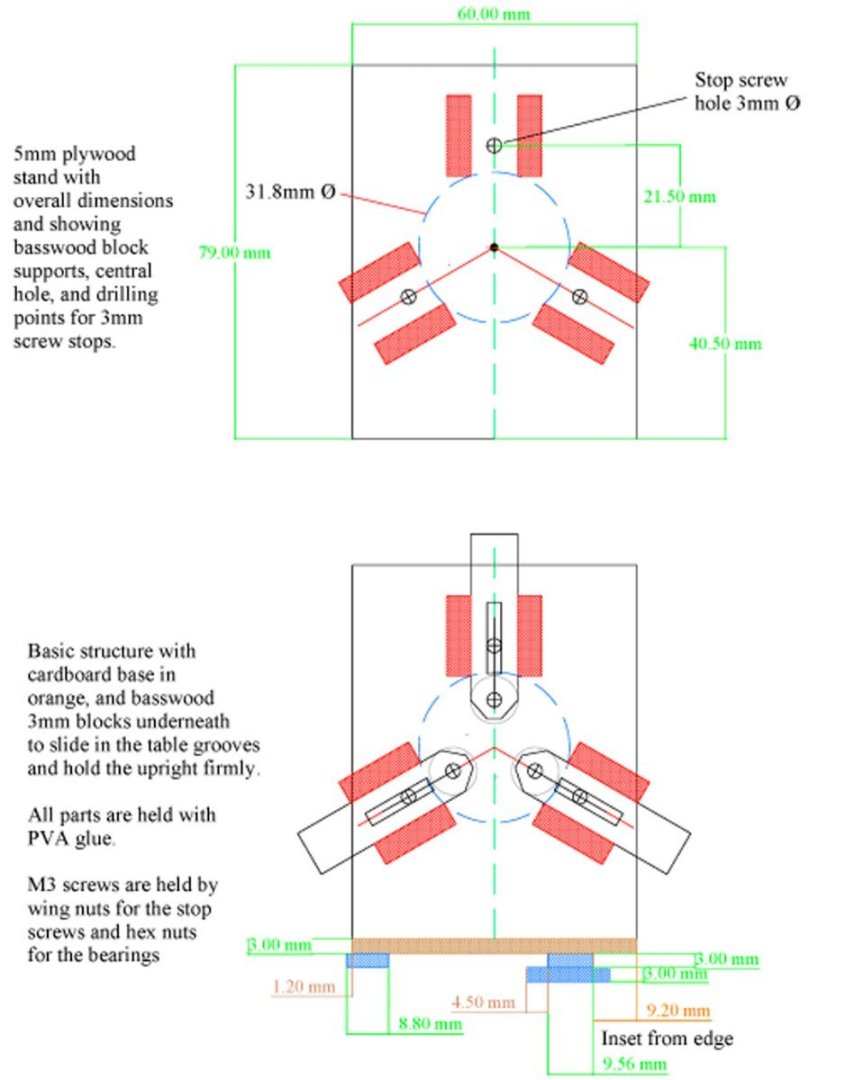
After studying Johann's @archjofo posting on how to make a steady rest for the Proxxon wood lathe, I thought I would make one using just the materials I had to hand, His rest was made with a metal upright and metal holdings for the ball bearings. I didn’t have any metal plate, and, in any case, I thought it would be quite difficult to machine the parts in metal. So I settled on a mix of card, basswood and plywood, and all I had to buy were the ball-bearings. These were SKU bearings size: 623-ZZ - 3x10x4mm, for a total of £6. I first took Johann’s plans but found the measurements didn’t quite match my Proxxon, especially as I wanted to have a range from about 2-10mm Ø for the various rods I would be using. So I took the measurements from the lathe directly – the most important being the height of the centre point and the width of the slot, I started by making a cardboard mock-up to check the measurements. Having thought about Johann’s method of using a screw fixing to hold the steady rest to the bed, I thought I might instead change the idea so that I could just use battens glued to the underside of the rest’s base. The depth of the base should have been 2.8mm, but as I only had 3mm card, I used that. The upright was made from 5mm plywood, the lateral supports from 3mm card; the battens and bearing supports were made from 3mm basswood. The individual parts for the upright and bearings are shown in the next photo. The lathe bed section requires some careful measuring for the battens holding the base to the bed. The battens were fixed as follows using PVA glue. Note the wing nuts for the stop screws, which were to be held on the inner part of the rest, so that a screwdriver could be used to turn the screw from the outer side. When fitted to the bed, it looks as follows, and works very well. If you want to use the plans, I have printed them to PDF and attach them. The JPGs are: Naturally, this is not nearly as elegant as Johann's, and quite clunky, but it does the job I want it to. I'll see how well it lasts! If you want the PDFs, please contact me by Personal Message. Hoping this has been of interest, Tony Steady rest Proxxon 1.pdf Steady rest Proxxon 2.pdf


- 6 replies
-
- 14
-

-

-
I was lucky with one plan for another Ancre monograph: when I reported it to Ancre they quickly sent a corrected pdf. So you may be lucky. These boats do make lovely models. I'll be following your build with much interest. Tony
- 61 replies
-
- 3
-
-
- ancre
- Santa Caterina
- (and 1 more)
-
Hmm. I think I rushed to judgement in my excitement. Now that I've had time after supper, I had a more careful look at the Dutch translation. I think that the French-Dutch translation just repeats Boudriot's idea, and doesn't provide a direct translation of 'brajart'. The English translation of the French 'foc' is 'jib', as I had originally translated. So I'll keep trying. Tony
-
@Baker: Thanks, Patrick. What a clever idea. That's the best yet. Sounds very likely. Perhaps near closure. I'll keep this open for the while in case there's confirmation, but it sounds as though Boudriot had the same idea, which is pretty confirmatory for me. Tony
-
Croak, croak, or do I mean groan, groan. 20ft, so could be a shark, then. Provençal seems the likeliest at the moment, though none of the current Provençal-French online dictionaries have provided anything, although brajà can mean 'brague' in French or 'breeching rope' (which could be 20ft long but possibly not 4ins diameter for a 50ft long barque with 4-pounders). Tony
-
Sorry for those lost 20 minutes, Allan, but thanks as well. Well found, Bruce, at least it's a start with a variety of meanings related to brajà. Gracchiatore seems to mean 'croak' in Italian but it must have had a different meaning in the 17th century. Does it signify that brajart was a Niçois word? Jaseur I cannot find yet either. Tony
-
I have been reading the monograph of La Créole and Boudriot makes reference to a 'brajart' while describing a long barque of the 17th Century. He said he could not find the exact meaning, but made a guess based on the context. I thought it might be of Dutch origin, but couldn't find the word online, and wondered if any of our multi-lingual members might provide a more accurate translation. The paragraph in French is as follows, my own translation subsequent to it. "Parmi les éléments, il est cité « un petit brajart » de 20 pieds de long, 4 pouces de diamètre et 6 pouces de ton. Je suppose que cet élément de mâture sous un nom que j’ignorai est un arc-boutant permettant d’établir un foc, latéralement à l’allure vent arrière ou grand largue et par beau temps." "Amongst the elements, reference is made to “a small brajart” 20 feet long, 4 inches in diameter and 6 inches at its head. I presume that this element of masting, whose term I don't know, is a boom that could be used to establish a jib laterally for a following wind or when sailing quarter to the wind and in good weather." I would be very interested in the etymology of this term, and, if anyone knows, its accurate meaning. Thanks for any interest! Tony
-
Thanks very much for spelling it out, guys! I love these ideas which are so clever in their simplicity. Tony
-
That looks great, @firdajan. Unfortunately I don't seem clever enough to understand how he got the serrated edge to the paper. Sorry to be dumb, but could you explain the process. In this case some words will for me be a thousand times better than the image! Thanks for any assistance, Tony
-
Your wooden kit progression - go big, or keep learning/practicing?
tkay11 replied to Esap's topic in Wood ship model kits
I suppose it depends on expectations and the types of interest people have. As a boy I had put together many plastic kits, starting with Airfix aeroplanes, and ending with Thermopylae and Constitution. It was the complexity that I had been attracted to as well as the satisfaction of ending up with something that pleased me. I stopped when about 16 as I was drawn into studying. When later, in 2012, I was thinking about how to transition from retirement I looked for something that would occupy mental and practical skills. I remembered the complexity of rigging and I thought that I might dip in to wooden ship modelling to test it out. Research came first. I quickly found MSW and a couple of books, decided on a kit (because I didn't want to spend too much on tools in case I didn't find it suited me), chose one that had lots of people making it and the very few who took the time to explain how they approached each step and overcame the problems, and quickly found how to modify it using original plans. I was hooked, and immediately after completing it decided to build only using plans. It suited me in all the ways I had wanted. So my thoughts on this discussion, a discussion that has reappeared often and in different guises since when I joined MSW, are that it is not so much starting with a kit that counts (although that can play a part) but why a person chooses and continues with it as a hobby in the first place. People try out and either continue or not with all sorts of activity all the time. People have been making models of ships with or without plans for millennia and also learned from others as well as their own experience. Many of those would have given up after their first attempts. This may have had nothing to do with complexity or difficulty. Some people just don't find it interesting, or suitable to their temperament and skill. They may take up hobbies that are just as complex, such as Russian Icon painting, or metal train modelling, or translating, or pottery, or playing a musical instrument. Or they may just sigh and settle down to a nice evening's sitting in front of the telly. Ship modelling (as a hobby or as a profession) is, and always has been just a niche interest, and there is no harm in that. Tony -
Just caught up with your build. Very helpful and beautifully done. Thanks. Tony
-
I'd love to do a 1:48 model of a ship, but don't have the space. In fact it was an early ambition of mine. I don't even know where I'll put the 1:96 model I'm working on. Even the longboat I did at 1:36 only just fit the remaining space available in our flat. I'd love to see you do a 1:48 should you decide so, Mark. Tony
- 505 replies
-
- 6
-
-
- vanguard models
- Sphinx
- (and 1 more)
-
I keep having these, but in my case they're "one last great act of pleasure". Keep going strong, Mark. Tony
- 505 replies
-
- 5
-
-
- vanguard models
- Sphinx
- (and 1 more)
-
History of an American merchant brig in 1812
tkay11 replied to georgeband's topic in Nautical/Naval History
Thanks, George. Very interesting. So many countries adopted the practice for commercial as well as war reasons, there must be many such stories to be told. Tony- 1 reply
-
- 2
-
-
Thanks for a really interesting and great build. I really agree about the possibilities of perspex as a base. Looking forward to the next build! Tony
- 857 replies
-
- 5
-
-
-
- Sphinx
- Vanguard Models
- (and 1 more)
-
I've only just found your build, and want to say how refreshing it has been to read it. I very much appreciated your approach to the bulkheads without the use of an electric saw and the continuing care you apply to the work with its consistency and attention to detail. I'm sorry if I missed it, but it would be nice to know how thick your thinnest planks are, and how you achieved that thickness. Was it again by first using your handsaw and then the electric sanding drill in the way shown on the first page? Did you end up buying any other power tools? Anyway, I'm going to follow the rest of the build with avid attention as it really is a delight! Many thanks, Tony
-
sail plan for Ballahoo (Fish class) topsail schooner
tkay11 replied to georgeband's topic in Masting, rigging and sails
That's not only excellent, George, it'll be enormously useful to many. Thanks. Tony- 22 replies
-
- 1
-
-
- caldercraft
- jotika
- (and 4 more)
-
Yes, belaying plans are such fun! Tony
-
Much enjoyed the build. A lovely model. Thanks! Tony
-
Bristol Beaufort by AJohnson - FINISHED - Airfix - 1:72
tkay11 replied to AJohnson's topic in Non-ship/categorised builds
Great topic! I used to love the kits as a 10-year old, and agree about the poor quality -- but only in retrospect when I see the quality of the newer Beaufort which I also put together at that time. I'm tempted to do another kit now, just as a way of reminiscing. There was a time when the regular model exhibition at the Olympia in Kensington had an Airfix stand where kids were given a model to make as long as they put it together at the stand. I would go every day as Olympia was just at the end of the road where we lived, and kids' entry was cheap. Tony -
A ship's stove too small to print? (For La Jacinthe)
tkay11 replied to tkay11's topic in 3D-Printing and Laser-Cutting.
@thibaultron: Thanks for bringing this to my attention, Ron. I'll definitely start paying an interest now! @Mldixon: Thanks for the compliment. At least I'm on the path, but there's a long way to go! With every new model there are more challenges. That's what makes it all such fun, as well as keeping brain and hands busy. Tony- 17 replies
-
- 3
-
-
- ancre
- CAD print resolution
- (and 2 more)
-
A ship's stove too small to print? (For La Jacinthe)
tkay11 replied to tkay11's topic in 3D-Printing and Laser-Cutting.
@Mldixon: I'm thinking about it! Tony- 17 replies
-
- 2
-
-
- ancre
- CAD print resolution
- (and 2 more)