HOLIDAY DONATION DRIVE - SUPPORT MSW - DO YOUR PART TO KEEP THIS GREAT FORUM GOING!
×


EJ_L
-
Posts
2,246 -
Joined
-
Last visited
Content Type
Profiles
Forums
Gallery
Events
Everything posted by EJ_L
-
 Didn't you see the memo about a 10 seat a day minimum! Seriously, those seats look great! I know what that is like doing a very tiny, highly detailed part and then having to repeat the process many many time. It does indeed hurt the eyes and can quickly become tiresome. The results are worth it and those seats are going to look fantastic when you get them all made.
- 473 replies
-
- 6
-

-
- greek bireme
- dusek
- (and 1 more)
-
Those inserts look sharp. Well done!
-
Welcome to MSW Bob! Glad you came back to give model ship building another go. We all have those projects that were stopped for one reason or another and yes a lot of times it was because something got messed up. No shame in that especially when you try again! You have found a great place to learn and hopefully work through those tough spots so you don't have to give up again. Best of luck to you and I look forward to seeing your build!
-
Nice work on all those pieces. Looks better and better with every update.
- 701 replies
-
- 5
-
-
- phantom
- model shipways
- (and 1 more)
-
Truly inspirational and educational work. As I have been moving into the rigging stage on my la Couronne, your build log has been a great source of information on rigging as they are close enough in design to answer many of my questions and your pictures are nice and clear providing up close shots of a lot of details that I often cannot find. Thanks for sharing your build with us!
- 249 replies
-
- 1
-
-
- billing boats
- vasa
- (and 1 more)
-
La Couronne is looking good and will be an impressive ship no matter how historically accurate she may be. Your Confederacy is also a fine looking model. Excellent job on that one too.
- 213 replies
-
- 3
-
-
- la couronne
- 74 gun
- (and 2 more)
-
It would certainly take a few tries but then maybe they could find all my missing pieces and parts.... A few years back I had flown back out to California to visit a buddy from the Navy. We were going to do some serious work on his model railroad and so I packed up a tool box with all the model tools I thought I would need. A few days before my trip the admiral asks if I thought I could actually get all those sharp objects to pass security. I stopped and looked at the dozens of knives, carving tools, spare blades, sharpeners, wire cutters, pliers etc. and thought nope. That box went overnight on Fedex as I figured I would end up spending some time in a white interrogation room with all that hardware.
- 608 replies
-
- 4
-
-
- la couronne
- corel
- (and 1 more)
-
Go slow, check, double check and check again to make sure everything fits. Have all the tools needed ready, glue at hand and hope that your knee or the dog doesn't hit the table! It really is just a lot of being patient and trying not to rush. I do knock things down or break those little parts but I think I shoot more pieces across the room out of my tweezers than anything. A few weeks ago I was packing up the old ship yard for the move and I picked up dozens of eyebolts and blocks from past builds that I thought were lost forever to the carpet jungle. lol
- 608 replies
-
- 4
-
-
- la couronne
- corel
- (and 1 more)
-
Outstanding! That finish is beautiful. I'm loving all the oar ropes and tension cables. They are adding another layer of detail that makes this build more and more incredible.
- 473 replies
-
- 5
-
-
- greek bireme
- dusek
- (and 1 more)
-
That has always been my thought. Some of the places they would have to shimmy out on and the heights of those masts. When you think that gallants and royals could put you easily 40-50 feet or even more above the deck which could be 20-30 feet above the water on a first rate and then factor in the pitch and rolling of the ship plus rain and wind, that make those sailors either extremely brave or equally crazy! Maybe they are one in the same.
- 608 replies
-
- 3
-
-
- la couronne
- corel
- (and 1 more)
-
Yes it is. I've had a couple of scares already with my tweezers getting caught on a shroud. I love my OptiVisor but it is easy to lose track of the back end of your tools when looking at the business end and what you are doing. I've manged to snip off the wrong bit or rope when trimming up the lines and have had to run a new piece. That is not fun either in the confined space. Still, the end result is worth the work required.
- 608 replies
-
- 5
-
-
- la couronne
- corel
- (and 1 more)
-
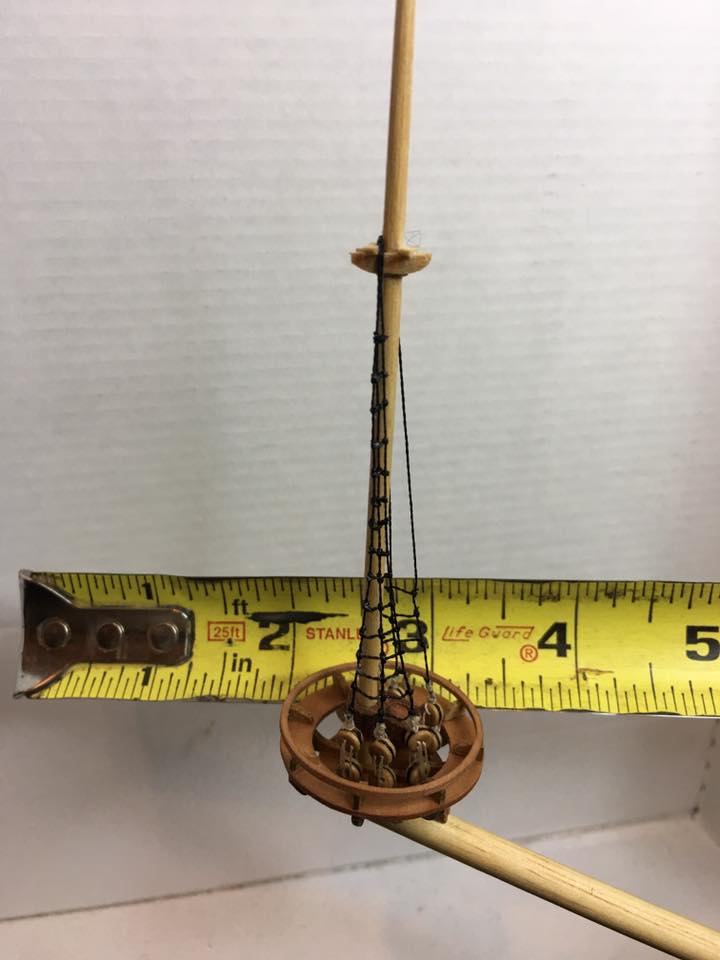
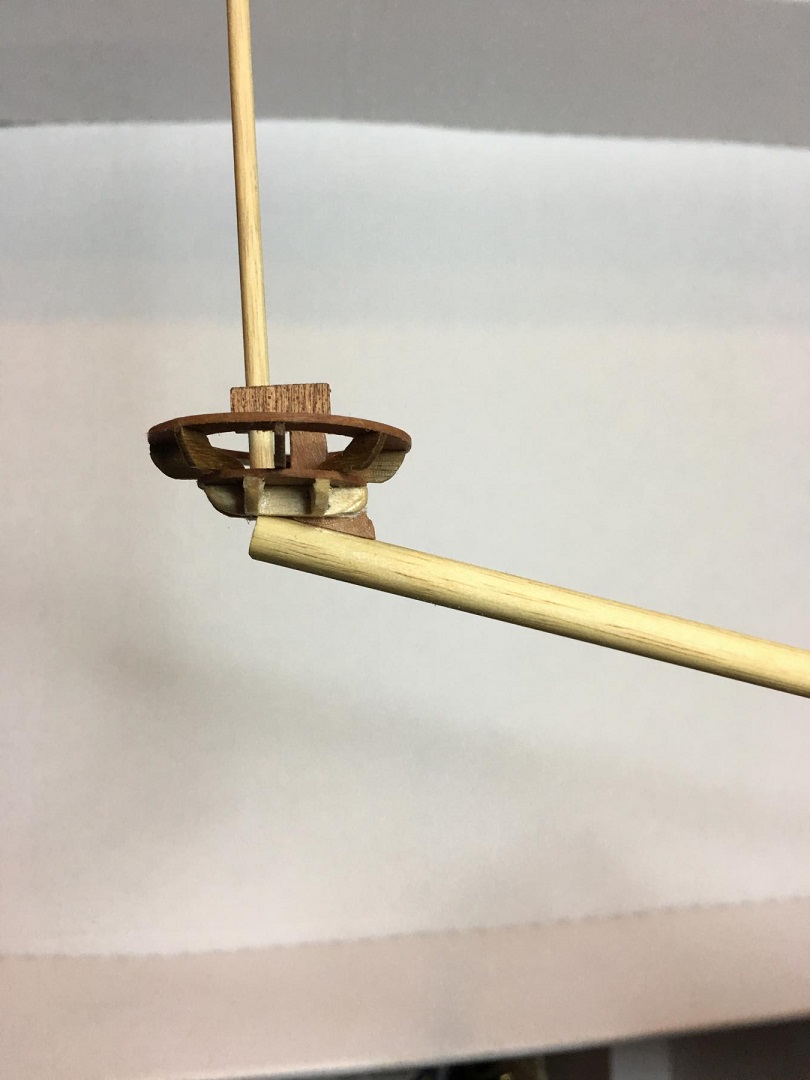
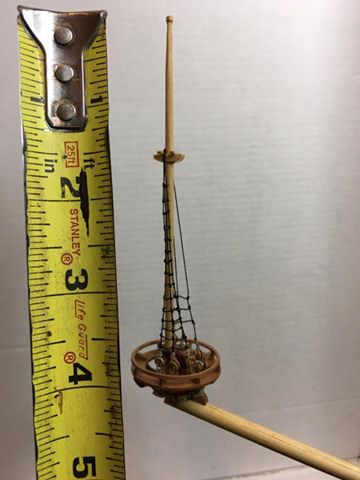
Spritsail topmast is coming along rather well. Got it stepped into place and the deadeyes rigged. One side of shrouds and ratlines has also been completed and the other side started. I also added the cross tree to the top of the mast. Couldn't find what would have been there to hold the shrouds into place. Some references say a ring or collar, others a cross tree and even looking at other ships of the era has not left me with a uniform decision and so I made the executive ship yard decision. I'm happy with the look and it will aide the rest of the rigging better I think than a collar would have. Took these pictures with a tape measure in the background for size reference. Family and friends keep asking for that so they can put it into perspective easier. It does help to do that from time to time as with all the close up pictures it is easy to forget just how small some of the individual components are. Enjoy the photos and once it is all done I will take some better pictures.

- 608 replies
-
- 12
-
-
- la couronne
- corel
- (and 1 more)
-
Brian, good to hear that you are stepping back and working on improving your planking. You will be much happier that you did. I'm looking forward to seeing how she turns out.
-
Those ribs are an excellent addition. It is always amazing at how something as simple as a frame can make the whole ship look even better. I am with you on quality over quantity when it comes to what goes in my glass.
- 473 replies
-
- 5
-
-
- greek bireme
- dusek
- (and 1 more)
-
Sorry to heat that. Hope the damage wasn't too bad and that you can get it fixed.
-
Mostly that huge rail that runs around it. To me it looks as though it would be a tripping hazard or at the very least a major pain in the shins. In low visibility and rough water I could see a lot of falling down over that thing. Then again, I guess like most things if you are around it all the time you would get used to it.
- 701 replies
-
- 6
-
-
- phantom
- model shipways
- (and 1 more)
-
Excellent job on the cockpit and especially that wheel. Much better than the cast one. I also was thinking that the cockpit is a strange design. Im sure there is a reason for it but I wonder why?
- 701 replies
-
- 6
-
-
- phantom
- model shipways
- (and 1 more)
-
You got it. Those are all the things to improve on. The next time around it is easier. Now that you can see the bad results, a lot of what the tutorials are saying should hopefully start to make better sense. As to the tapering, it should start further back. That is the importance of measuring the spacing on each frame. By doing that you will see when and where the spacing begins to shrink down and that is where the taper needs to start. Often it will be across many frames not just one or two.
-
This is a normal problem with planking a ship. You are taking a straight piece of lumber and making it bend in two different directions as we as taper to fit into many different dimensions. This is why making sure the hull is properly faired and that you take the time to do a proper layout and you stick to it. With only having the one picture to go off of and not being there to see what and how you are building, please forgive me if I state obvious things that you may already be doing. Also please keep in mind I am not criticizing to be mean or to put down your work but to help you out so that you can learn, fix and improve. I will start with the first thing that it looks like I am seeing and that is all of your planks appear to be the same width the entire way through front to back. This is why you are running out of room. The stem and stern of a ships hull have less space than the center due to the way the center widens out for stability. Your planks will be at their widest here and will taper down narrower at the stern and especially the bow. Often this taper will be as much as half the width of the plank. This is why taking the time to measure and lay out the plank pattern on the edges of the frames is vital to a successful planking. For example, you may have planks that are 5mm wide in the center and from the center frame they will begin to taper till they are only 2.5mm at the bow and 3mm at the stern. If you do not do this you will run out of room just like you are at the bow and stern and have a big gap in the middle. So how to fix this. There are really only three solutions. The first is to rip it all off and try again. Depending upon the glue you used or the spare material available will help you decide on this option. The second is to just fit in the planks as best you can, sand it smooth and paint over it all to help hide the mistakes. The third is to read up on using stealers and drop planks which are common to see in models to solve this problem. Try not to fee l bad as this is something we all had to learn our way through. My first wooden ship model has a lot of this same issue as I didn't know what I was doing and worse yet, I didn't have this site, or anyone else for help. To the problem of running out of attachment points, again mostly see above. If the planks were all measured and tapered properly they would all fit on the frames front to rear. This is also why filler blocks are recommended for the bow and stern areas. With the extreme curvature and the smaller space, filler blocks give extra attaching points to help hold the planks in place. That is still an option for you if you choose to just fill in the missing planks as best you can. Get some scrap wood to glue between the frames and now you have a place to glue your planks. There are a few more issues that are need to be addressed as well, fairing the hull and how the planks are tapered to form tight joints but unless you are planning to start over I will skip those for now. If you have not found it, here is the link to a group of very good tutorials and how to's. Basically everything I have been saying is in here plus some drawings and more great information. You should read them all as they all are good however I recommend to start with A Primer on Planking, Simple Hull Planking and Planking Tutorial - Lining Off a Hull. The first two deal with the basics of planking and explain drop planks and stealers though they both explain that with the proper planing neither should be needed. The last one deals with ensuring you won't need drops or stealers and introduces spiling which is a planking method that deals cutting the planks to a curved shape before bending them to guarantee a smooth and easy fit and taking care of all the problems you are now encountering. I know this is a lot of information to throw at you but that is why we say take your time. I know it is exciting and easy to get carried away but slow up and things will come together. In a way you are fortunate that your mess up ison the bottom of your ship as that is the easiest spot to hide.
-
Very smart with the rubbings to get the curvature you need. I had a similar conversation on spending money on tools I don't use and so my admiral now has a really nice jewelry box, pen holder, candy bowl, custom picture frames and a huge supply of pens and pencils. Now she buys me gift cards to places that sell the tools I want.
- 473 replies
-
- 6
-
-
- greek bireme
- dusek
- (and 1 more)
-
Yancovitch, Bob & Don thank you as always for stopping in and the kind words and to all the likes as well. The reddish wood is Pear and the brown is Walnut.
- 608 replies
-
- 2
-
-
- la couronne
- corel
- (and 1 more)
-
Excellent job on that first planking. Shouldn't take much to get her ready for the second.
-
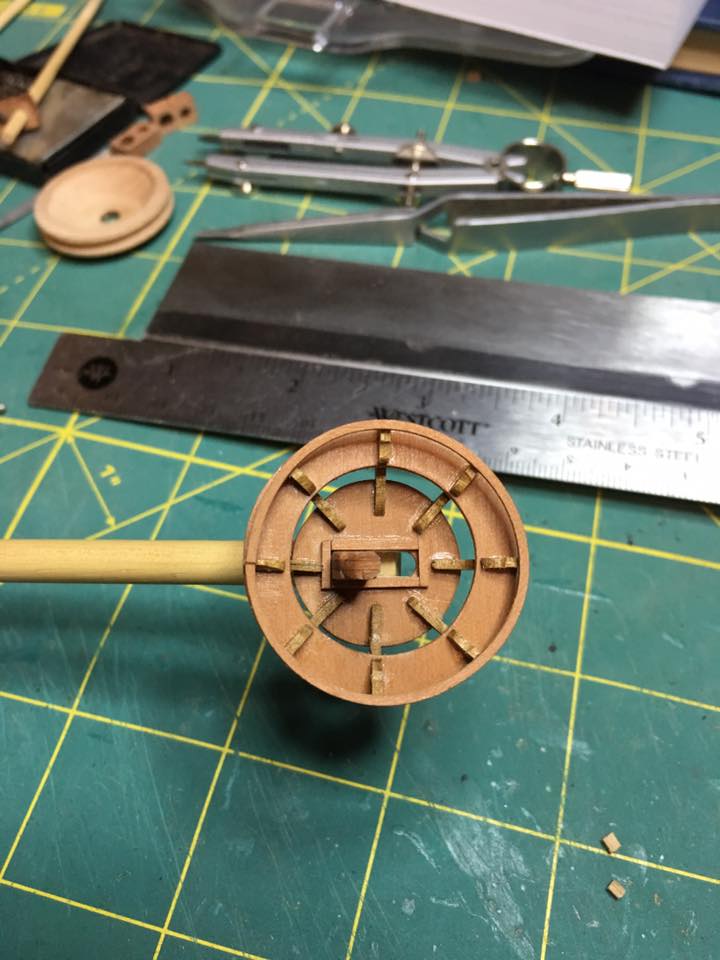
So somehow I have managed to have one of those rare and highly successful nights in the shipyard. Now I am kind of worried about either what I forgot to do or what will go wrong next time... Oh well, deal with it then. So my good fortune came in the form of getting the top railing onto my spritsail top in both one piece and in one try. That completed the woodwork portion of the top and now I can focus on getting the various rigging components ready to go and installed. I think I have a plan for everything now after spending a lot of time reading and looking at pictures trying to decipher the hows, wheres and whys. I shall find out soon. I'm trying to get as much built on the bowsprit as possible before I install it onto the ship for ease of access. I'm thinking I should be able to get the topmast on and the shrouds as well as eyebolts and even some of the blocks before I will be stuck till the foremast is up. As a comparison, you can see the kit supplied top in the upper left corner of the picture. While it would have been usable I know that I can do better than that one and am very glad that I chose to make new ones from scratch. One final note, I have rolled over 600 hours tonight on this build. It is now my longest build in terms of hours worked on it. Previously that record was held by the U.S.S. Constitution in my signature at 585 hours. I meant to post that when it actually happened but it slipped my mind then.


- 608 replies
-
- 10
-
-
- la couronne
- corel
- (and 1 more)
-
Depending on the scale of your build tulle may be a good solution. It is the fine mesh commonly used for wedding dresses and veils.
-
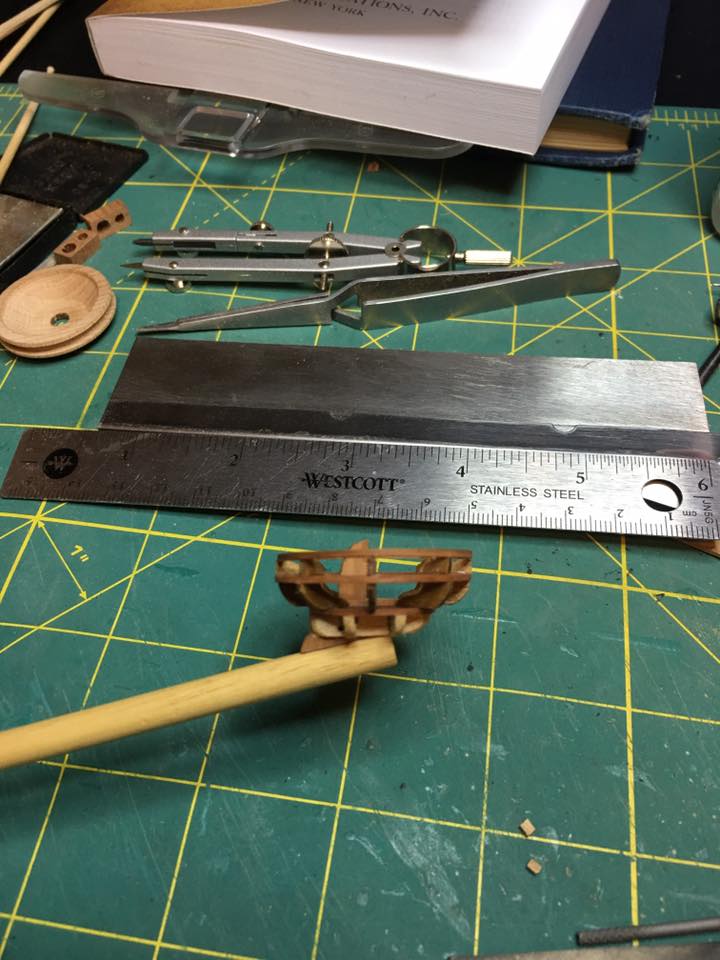
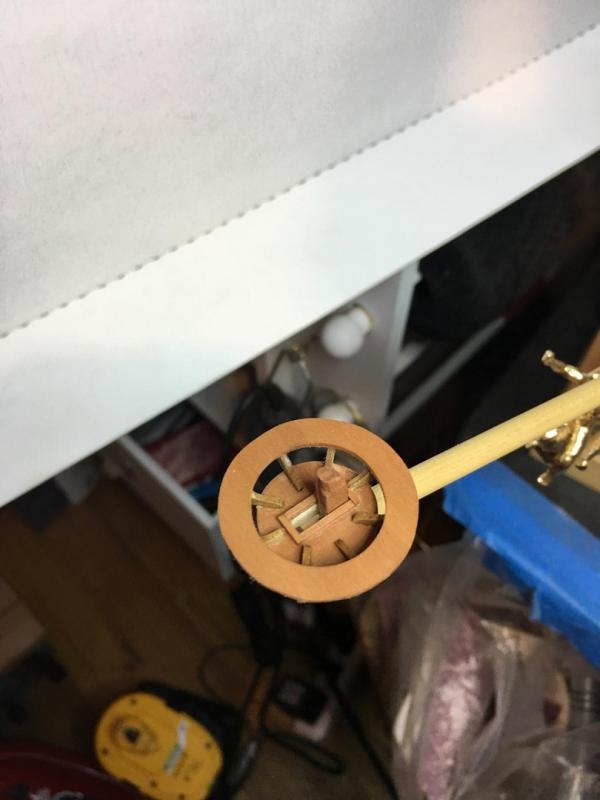
Productive night on the spritsail top. Got the lower rail installed and now to make the upper rail. This one is very thin which will be fun bending into a circle. Slow and easy and it should go. The stantions will be another matter but I think I have a plan for those. We shall see tomorrow.


- 608 replies
-
- 8
-
-
- la couronne
- corel
- (and 1 more)