


EJ_L
-
Posts
2,246 -
Joined
-
Last visited
Content Type
Profiles
Forums
Gallery
Events
Everything posted by EJ_L
-
 It is always amazing how something so simple can make such a huge difference.
- 213 replies
-
- 3
-

-
- la couronne
- 74 gun
- (and 2 more)
-
Planking is one of the more trying aspects of model ship building especially the first couple of times around. Honestly you did fine and since you will have copper plating to cover the vast majority a lot of those not so great parts won't be seen. Well done and even more so that you stuck it out. That is one of the main ways people lose interest in the hobby is when they begin to see just how hard and frustrating planking can be. The main thing is that hopefully now after experiencing planking and how the shape of the hull acts on the alignment of each strake you will begin to understand the different techniques and methods that are used to make better planking jobs on future builds. To me this is one of those things that is easier to understand after you see it on a model than on paper diagrams and words. Most wood glues and CA glues will bond to the wood filler without any problem. I have not yet had an issue with it and there is a considerable amount in between the planking layers on my build. Again, well done Hervie! You are now over one of the big hurdles so relax, regroup and keep on doing what you are doing and you will end up with a nice model to be proud of.
-
I was expecting something a little bigger... Very cool. Thanks for sharing that with us.
-
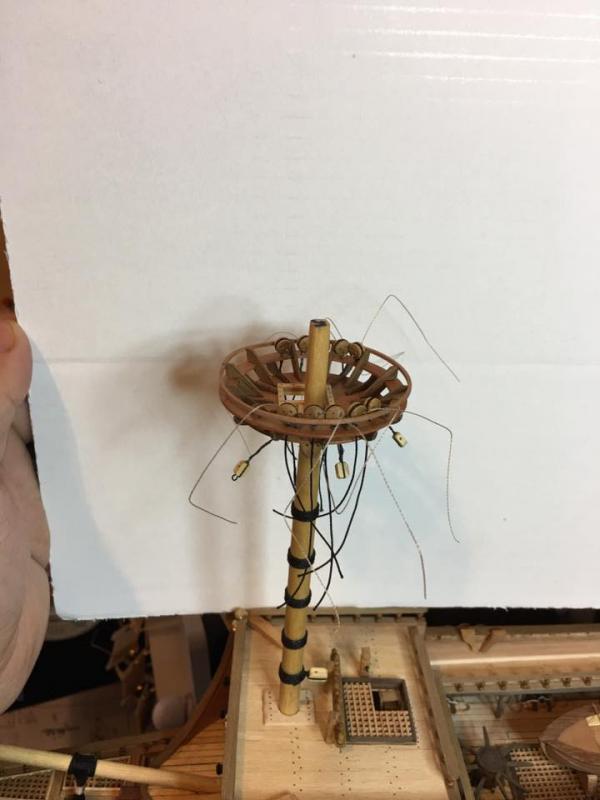
With a little actual blood, sweat and tears, (after stabbing myself in the finger with a hobby knife last night), I managed to get in several hours to work on the foremast. Got all the blocks installed, deadeyes for the foretopmast set and the mast has been stepped into position and is now ready for shrouds. I think I am going to get some free time Sunday to do more work so I am hoping to get a good start on the shrouds. I need to do a little more research though and make sure I have all the blocks and eyebolts on the deck under them before they get in the way. I think I may be missing a couple at the base of the mast. I can always install them later if I do miss something but it is nice right now with no rigging in the way.
- 608 replies
-
- 11
-
-
- la couronne
- corel
- (and 1 more)
-
Your getting there! I see a very nice collection of oars ready to start rowing your ship out to sea.
- 473 replies
-
- 4
-
-
- greek bireme
- dusek
- (and 1 more)
-
Another update and she grows a little more. Always interesting to see what parts you get each month.
- 305 replies
-
- 2
-
-
- deagostini
- vasa
- (and 1 more)
-
That is going to be a very nice shop and what a view! Great things will happen in there!
- 653 replies
-
- 6
-
-
- trabakul
- marisstella
- (and 1 more)
-
May not be a very exciting phase of construction but it is a vital one. I've told my boss that I would let him have one of my models if he would let me work on it while I was at work. He told me that I could as long as I was done with all my actual work. Unfortunately, my actual work never stops.... I really need a clone...
- 305 replies
-
- 2
-
-
- deagostini
- vasa
- (and 1 more)
-
Incredible work Don! I love all the small details you put in there and working hinges also! Nicely done. That kind of work more than makes up for you putting off the important deck work....
- 653 replies
-
- 4
-
-
- trabakul
- marisstella
- (and 1 more)
-
No, you were not seeing things. The pucture was posted sideways and since I was trying to post from my phone I couldn't edit it to rotate it correctly. I switched over to my computer and fixed it but I accidently deleted the entire post in my hurry so the same post ended up under yours. Or maybe you are seeing things.... we may never know...
- 608 replies
-
- 2
-
-
- la couronne
- corel
- (and 1 more)
-
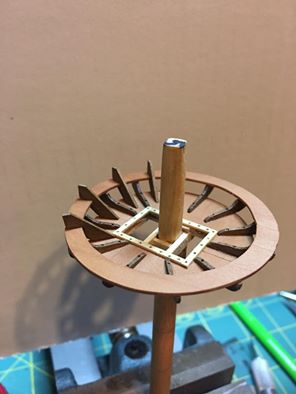
Got in a little time tonight to continue my work on the fore top. Building the supports for the upper rail now. I did notice that I had not posted my other work that I had done with the lower rail so I figured I could do a quick update. Although time will still be limited over the next few weeks, I am hopeful that I can get an hour in here and there.
- 608 replies
-
- 9
-
-
- la couronne
- corel
- (and 1 more)
-
Thanks Robin! I don't know if anyone is more anxious to see me return to building than I am but on the plus side, when I do sit down I will have the itch big time and good things tend to happen then. Plus, the move means that I get the new ship yard which means I will finally have the room to start Le Soleil Royal which has been sitting across the room tormenting me since July.
- 608 replies
-
- 5
-
-
- la couronne
- corel
- (and 1 more)
-
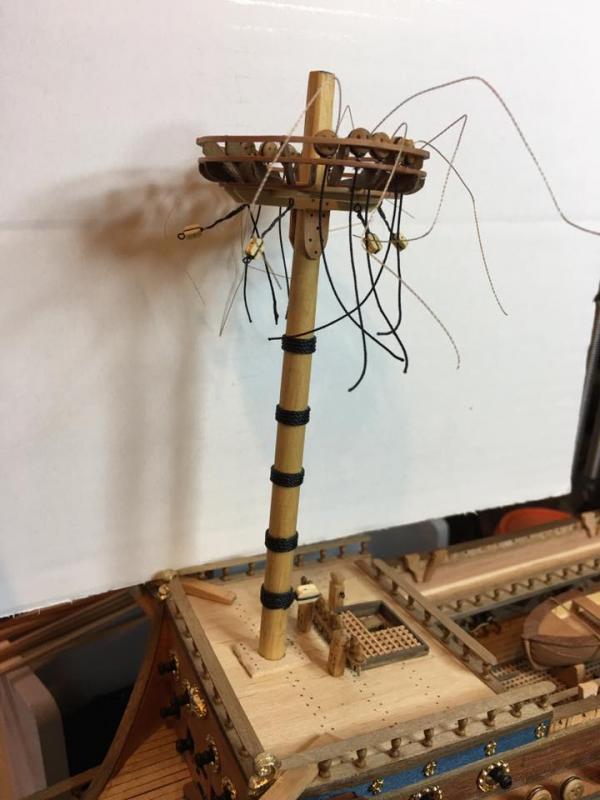
I know it's been a little while since my last update but I've been around just not in the shipyard as much this past week. We are under three weeks till we start moving so I'm having to spend more time packing and getting things ready to go. Of course to add to the fun work has picked up as we just started four jobs and picked up two more this past week. I'm hopeful that I will get some ship building time in the near future, maybe tonight if I'm lucky! The foremast is coming along nicely. I've finished the top platform and the lower rail is in place. I have to make the supports for the upper rail and then the rail itself. It will be some time before I can step the foremast as it does have a lot of blocks that will need to be installed first. I made the mistake long ago of trying to install the blocks to the mast after the shrouds were on and swore I'd never make that mistake again. If I can get some more done I will try to update with some new pictures in the next couple days.
- 608 replies
-
- 6
-
-
- la couronne
- corel
- (and 1 more)
-
The more I look at your pictures the more I think you may be right. With the spacers crooked it is throwing of my perspective of what is square. If I cover them up then it looks much better! I don't see much out of place with your frames fairing either as all the planks seem to be laying down flush across the frames and I don't see any frame in or out more than the others. Always double check but I think you may be good to go! Have fun!
- 108 replies
-
- 4
-
-
- mamoli
- constitution
- (and 2 more)
-
Steve, it looks like you are off to a good start with your framing. I think I'll pull up a seat and follow along.
- 291 replies
-
- 1
-
-
- bounty
- billing boats
- (and 1 more)
-
Steve, good decision on the cross section. They give you just enough to experience a little bit of everything without becoming overwhelming. As for your planking running slantwise across the frames, I would recommend trying to straighten them out before you get too far. The easiest way would be to cut an angle across one plank that will bring the others back into place. Try to do it somewhere that won't be noticed and no one will know. It is more of a cosmetic issue than function but as it is an easy fix to something that may continue to bug you later I would do it. Also, make sure you pay out the exterior planks so this doesn't happen there. The interior isn't as visible once all the furniture and accessories are in place but the exterior will always be seen. A little extra time measuring will pay off huge later on. I'll pull up a chair and follow along. You have made a good start on her and I'm looking forward to seeing more as you progress.
- 108 replies
-
- 3
-
-
- mamoli
- constitution
- (and 2 more)
-
Sometimes it is just easier to push through and do a bunch at a time. Monotonous yes but then you are done! Off to a good start and I know that when you are done they will be another great addition to your bireme.
- 473 replies
-
- 4
-
-
- greek bireme
- dusek
- (and 1 more)
-
Your picture looks like mahogany on the lower hull, box wood for the white and walnut trim. Not sure how acurate this is but it will get you in the right ballpark.
-
I'm not certain just by looking at the pictures however, typical light colored woods are maple, and boxwood. Again, there are no set rules for this that have to be followed it is up to the individual builder and what looks good to their eye. My hull has mahogany on the lower part with maple for the white stripes and dyed boxwood for the blue. The wales and trim are done in walnut and the interior has pear for bulwarks and bulkheads with boxwood decks and walnut and pear for the trim.
-
My guess is that mahogany is what you want to use for a darker hull color. That is what I used on my current build and was very happy with it. I have not used oak on a model nor do i think many have. The grain pattern in oak would not look very good on a scale model. You want to try to stick with woods with little grain pattern as the grain looks very out of place on a model. You can really use any wood you want. There are no rules only suggestions. My current build has I think 6 or 7 different wood species on it. When you are using the woods natural character instead of paint it is common to have many different types to get all the various color details. As for thickness, both layers of my hull are 1mm thick planks. I do have some .5mm but that is mostly on trim. If you get to thin, you have nothing to sand without going completely through the wood. If you are planing on making furniture as well then I would get a variety in a few different thicknesses.
-
That nail set should work just fine for setting those nails. It's what I would recommend using. Dashboard looks incredible! All those switches, knobs and levers look like you could drop right down inside her, fire her up and go for a ride! Windshield came out great and nice touch with the black rubber wiper blades. A very successful build day!
- 414 replies
-
- 5
-
-
- riva aquarama
- amati
- (and 2 more)
-
Nice quick lesson in oars. Thanks for that information and once again I have learned something new on this site. Now to repeat that process many, many times.....
- 473 replies
-
- 5
-
-
- greek bireme
- dusek
- (and 1 more)
-
On planking layout there can be variances between the different countries and eras of the ship. If you are wanting to get historically accurate then you will need to do research on your ship to see what the building practices were during that time of construction by that country. As for a quick and simple answer that will work for most builds, you are on the right track. The following layout will work on a P.O.B. build like the one you are doing. Butt joint, three strakes then another butt joint. Just keep moving your butt joints down one frame on each strake and the fourth strake bring the butt joints back into alignment. A simple way to achieve this is to measure the planks for 4 frame spaces. Split the first frame so two planks can butt together on it, span the next two frames and split the 4th for another butt joint. Then on the next strake up shift the first plank one frame forward and by the time you are on the 4th strake your butt joints will be back in alignment. No, this is not 100% to scale nor fully accurate construction but, it will allow you to get the fundamental planking practices down and will create a very good planking layout that will be in the correct ball park for planking practices.
-
As David says, yes, that is the best thing to do. The smoother, straighter and more level you can make the first layer the better the 2nd planking will be. The goal is to not have to use any filler on the 2nd planking. As to wood selections, check out Crown Timberyard. They are listed in the sponsors section on the front page. I have ordered from them a couple times now and have had great service. I highly recommend them and the will do custom orders of both size and wood species.

