EJ_L
-
Posts
2,246 -
Joined
-
Last visited
Content Type
Profiles
Forums
Gallery
Events
Everything posted by EJ_L
-

La Santisima Trinidad 1769 by Liberto - 1805
EJ_L replied to Liberto's topic in - Build logs for subjects built 1751 - 1800
Breathtaking! Your work really is top notch. -
Good start to your planking. The step by step pictures are nice and is something that is easily overlooked and forgotten by many of us, myself included. I always say I will do that and then I go and build something and when I take the picture of it completed I realize that I forgot to take progress pics again. As for planking, just keep checking your measurements and don't assume you are still correct. Often time small gaps or curves will throw off the original layout but if you constantly check then those whoops can usually be blended in and no one will see. Looking good!
- 291 replies
-
- 1
-

-
- bounty
- billing boats
- (and 1 more)
-
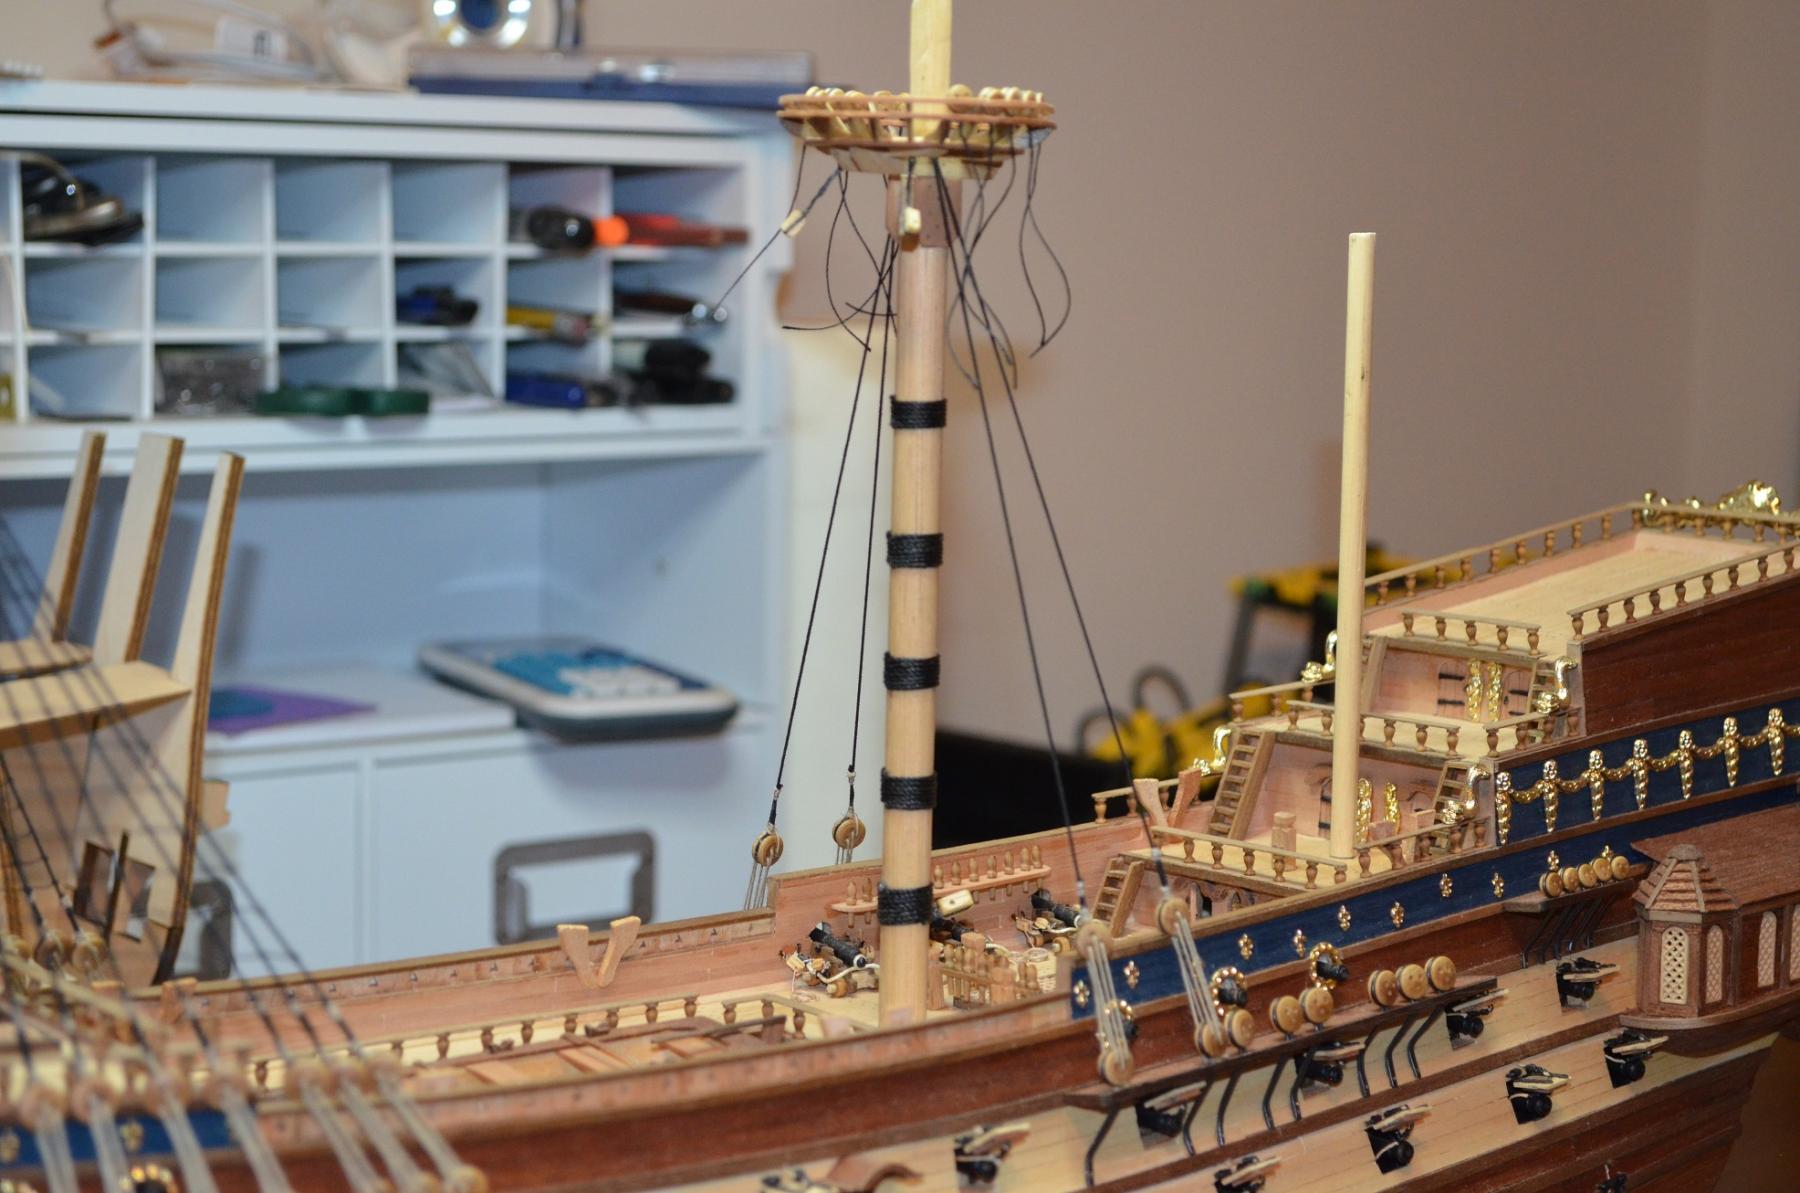
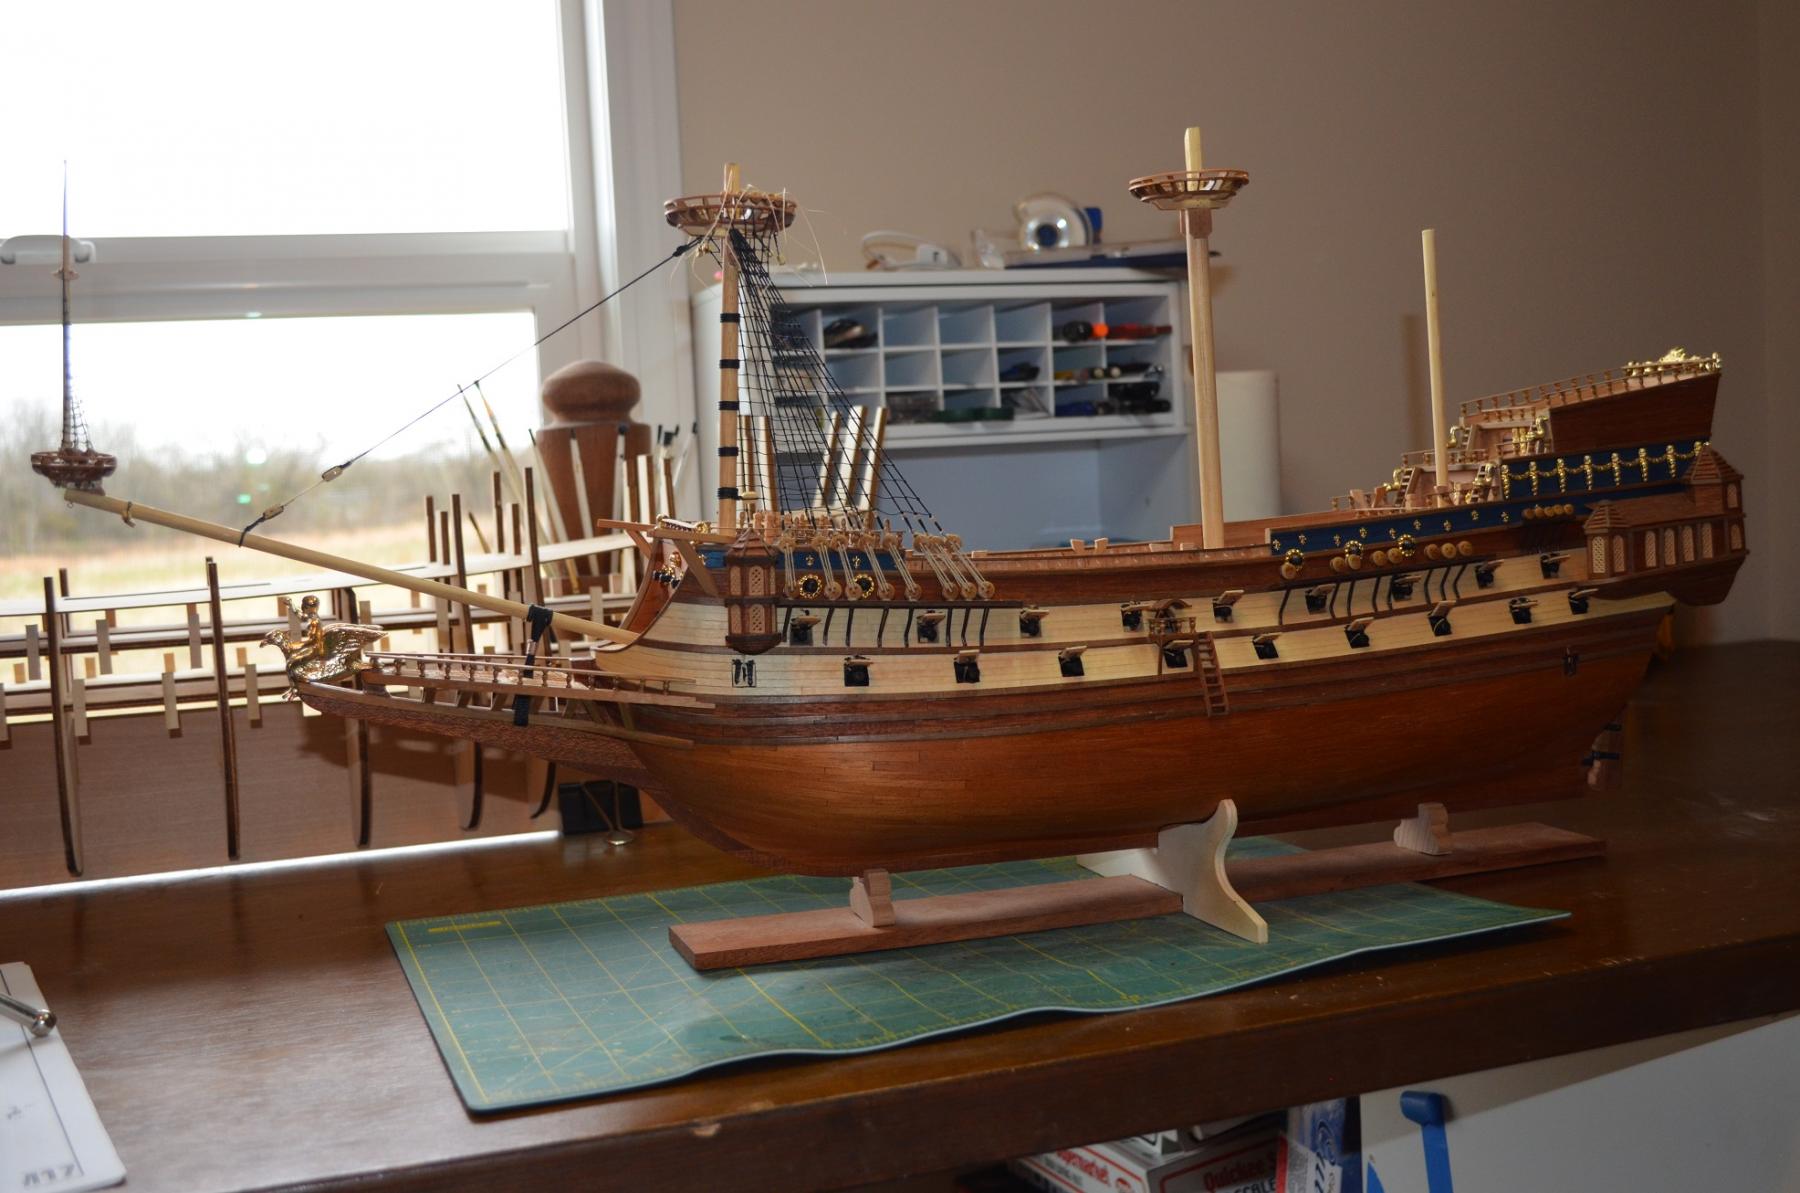
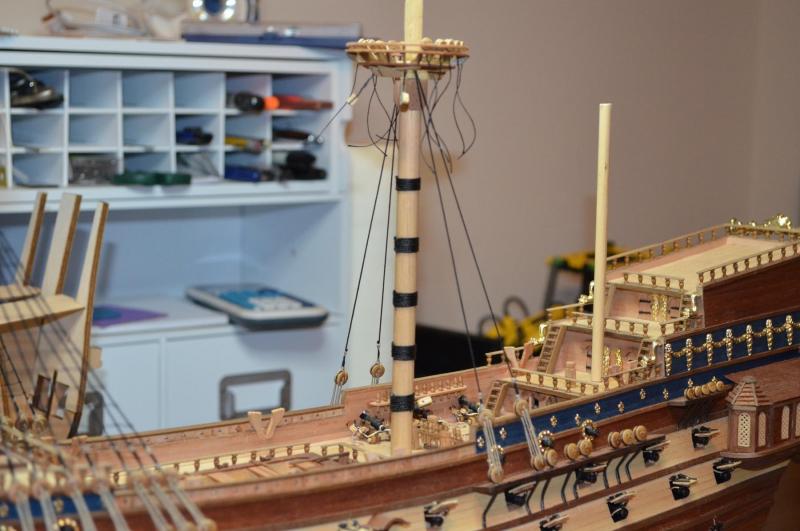
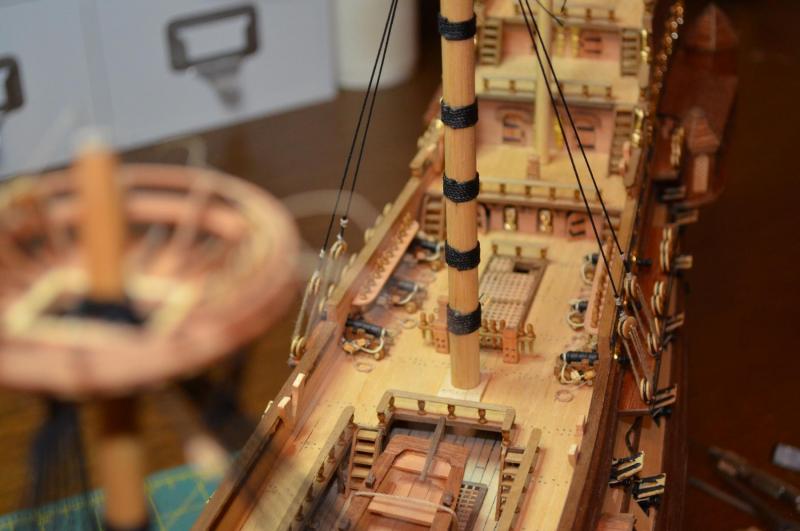
Main mast is built and stepped in place. Built the two pin rails for the main mast rigging and started running shrouds. This set is going a bit better and slightly faster than the foremast set. Now instead of a full hour for a pair of shrouds it's maybe 50 minutes! I guess that means I have learned something... My plan is to finish up with the shrouds and the main fore stay and then I will switch builds back to SR for a little while. I like having two ships going at the same time. It allows me to set smaller checkpoints to reach and then switch to the other build instead of having to finish the entire ship before switching. It is definitely keeping me seated in the ship yard longer although, when you consider that La Couronne just hit 670 hours in a little over 10 months, I think I have been plenty busy... Ok, enough talking enjoy the pictures!
- 608 replies
-
- 9
-
-
- la couronne
- corel
- (and 1 more)
-
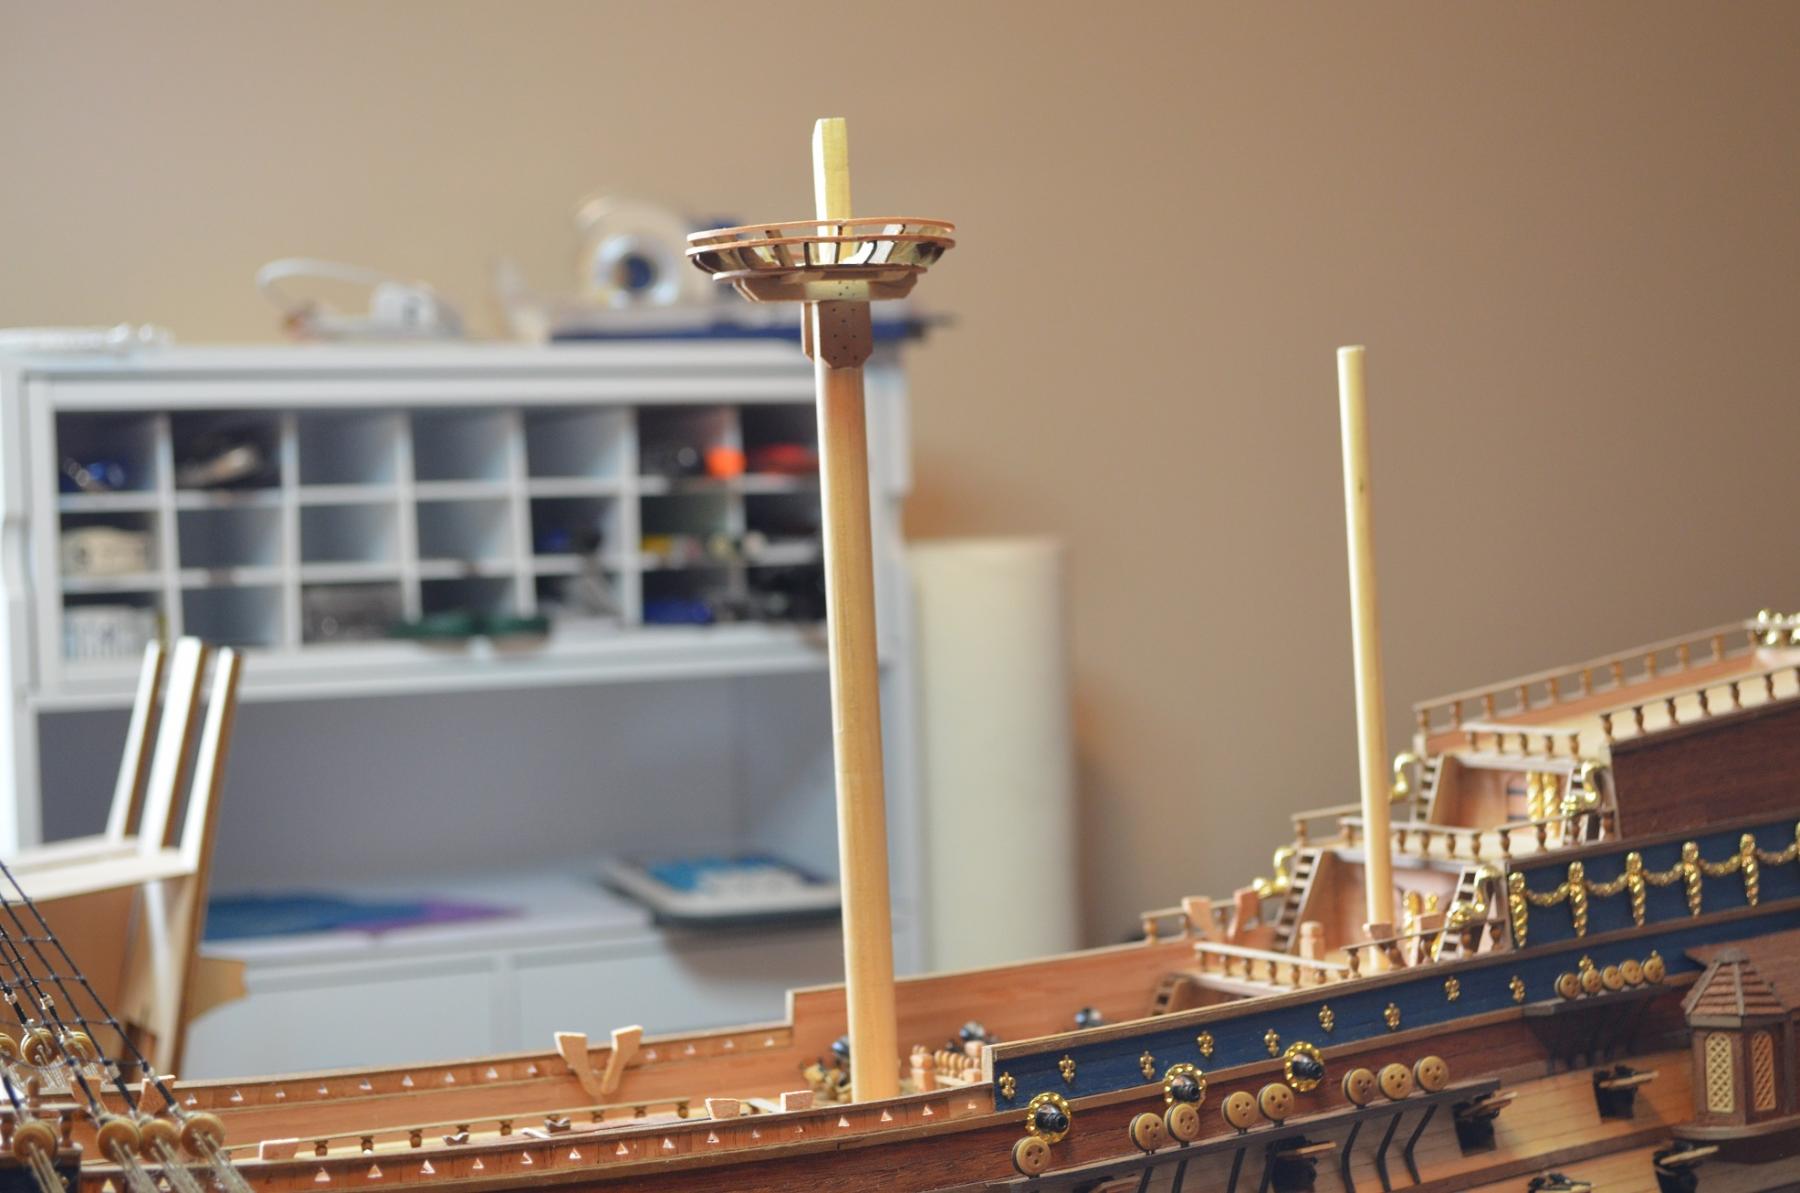
That I cannot say for certain. I have measure it off of the plans and it matches that. I think what may be making it look longer is the lack of the rest of the rigging. Once it is cluttered with all the rigging for bowsprit top mast and the rest of the forestays on the foremast it will probably look more appropriate. Right now with just the one forestay it does look rather long.
-
Even the Empire had to rebuild their Death Star once. Hopefully your rebuild has a better outcome then theirs did....
-
Looks like a nice kit to get your feet wet with and start learning about model ship building. I look forward to watching both the ship's and your progress as it comes together. Good Luck!!
- 74 replies
-
- 3
-
-
- Marine Model Company
- Joe Lane
- (and 2 more)
-
Thanks! The nails are made mostly with partially drilled holes with pencil lead then wipe on poly over it all. There are a few that I will insert monofilament line, wire or even wood if I am looking for extra strength or bonding but most are completely fake.
- 608 replies
-
- 4
-
-
- la couronne
- corel
- (and 1 more)
-
Welcome Gary! I agree that overall the kit is of excellent quality and to build it straight from the box would make an outstanding model, something that cannot be said about all kits. The blocks provided in kits are typically like the instructions, usable but could be a lot better. Rigging thread often only comes in maybe 3 sizes. That is fine and again usable but as you said, there are more that 3 sizes used on ships. Many more in fact. Ultimately it comes down to personal preference and skills. 99% of the people who would view the completed model would not know, or even care about historical inaccuracies. So how do you as a modeler feel and to what degree do you want to take your model? If I built this ship straight from the box, I would be proud of it. I would have an outstanding model that all my friends and family would ooo and ahh over. However, while I am no means anywhere near a master at this hobby, my mind tells me that I want and can do better than what is before me. So that being said, more time, more money and more head scratching is before me as I take this excellent model and attempt to make it better, whether that is historically better or just my own imaginings remains to be seen. Gary, by the way I took a look at the pictures of your SR and you did make an wonderful model. Very impressive and I am sure I will be looking at your pictures for guidance at times.
-
Welcome aboard Marc, good to have you here also. Update on the build, found my filler bocks today while setting up the wood shop. Going to finish up the main mast rigging on La Couronne then I will switch back to SR for a time and get them shaped and installed. Should have some new pictures in the next few days.
-
So on to another update. I have been building the main mast and top this week. Wood construction is now done and I am ready to start adding the blocks, dead eyes and other bits of the rigging before stepping the mast in permanently. I also cut the mizzen mast to length and set it in place without glue just to see how she would look with all three of her masts in place.


- 608 replies
-
- 10
-
-
- la couronne
- corel
- (and 1 more)
-
Yep, working for me again too. website must of been down earlier.
- 608 replies
-
- 2
-
-
- la couronne
- corel
- (and 1 more)
-
Great pictures!! Love seeing you next to her as we can now really see how truly large you are building her. Well done indeed! You are making a gorgeous ship and I really enjoy seeing another Couronne being built along with mine. Seeing the different ways we have taken the builds has been very fascinating and educational. Looking forward to more!
- 213 replies
-
- 2
-
-
- la couronne
- 74 gun
- (and 2 more)
-
Thanks! That will certainly get me started and it is much more than I previously had.
- 2,699 replies
-
- 1
-
-
- heller
- soleil royal
- (and 9 more)
-
Michael, thanks for that! I have seen that site before but lost it when my laptop bit the dust. Always good to post or re-post those links for others as well. Something I should do more... I don't know why it does not seem to be linking right now though. Marc, thanks for dropping by! I saw your post on your log so I hope you enjoy the rest of the build when you get a chance. lol
- 608 replies
-
- 2
-
-
- la couronne
- corel
- (and 1 more)
-
Thanks for the compliments and that is indeed a great find on the decor! Even if it is not what was actually used it should prove close enough and at least be period and country appropriate. That is a lot of my reasons for leaning towards the RL. It hits the end of the century and yes, the documentation and references for it are much more plentiful than the previous two. I have been toiling with the idea of making that one a fully framed model when I do build it. I am hoping to do a smaller full frame build first though for more practice. I will be checking out your pinterest page for sure for that! I have a feeling I will find many more gems there too!
- 2,699 replies
-
- 1
-
-
- heller
- soleil royal
- (and 9 more)
-
Marc, that publication of VA Paris is on my wish list. Trying to get my Admiral to "surprise" me with a Christmas present. It does appear to have a lot of valuable information and while my French is rusty, I have a lot of family members that speak it and I planned on getting their help with translating. Royal Louis is one of the ones I'm thinking of for the third ship of my collection but I probably won't be making that decision for quite some time yet. Both my build logs can be accessed through my signature and both are active builds. La Couronne is in her rigging stages and I'm building her main mast now. SR only has her bulkheads and blocking for dummy canons installed. I am still looking for my bag of filler blocks that I want to use for additional supports. I would like to attempt to detail the cabins and run lighting so they can be viewed so I am trying to figure out the layout of the various spaces and then decide what/how I want to model them. I know most of that work will be fantasy as there really is no records of her interior that I have come across but it will still be fun to try. I'm also certain that historically La Couronne is not accurate in some areas. There were a lot of questions that I could never get a solid answer on one way or the other as every new bit of information I uncovered seemed to either contradict or add something completely new! As I rarely found two sources that agreed I decided to just make executive decisions and go with what I liked. While I am all in favor or research and accuracy, (one of the things that makes this so fascinating in my opinion) I do still want to build. Please come on over and follow along! in put is welcome and hopefully we can create some beautiful ships!
- 2,699 replies
-
- 4
-
-
- heller
- soleil royal
- (and 9 more)
-
Wow! You have yourself one heck of a project! I too am just starting out building SR as the second ship in my line up of 17th Century French ship Progression. I hope to do a third to represent the end of the century at some point. La Couronne fills the position of early 17th. I will definitely be following along with your log as I have a feeling we may be able to help each other out on this great ship. I do hope that the museum gets back with you and can give a little more insight into some of those questions you have. I know I struggled with the lack of information of this period with La Couronne also. They just did not do a good job of preserving the information of how these ships were built and as you have shown above, even artist renderings of supposedly similar dates/places can vary greatly. Contradictions are many and the only people who could give a truthful and accurate answer are long gone and lost to history. Looking forward to seeing more of what you learn and how you transform that kit!
- 2,699 replies
-
- 2
-
-
- heller
- soleil royal
- (and 9 more)
-
Planking pieces is correct. A strake is a row of individual pieces that go from stem to stern in an unbroken row. That is, the row or strake does not become i terrupted by another strake before reaching the opposite end of the ship. That is my fault for confusing you. Sometimes this is hard to explain in writing. Some modelers do use a full length strip though to plank and will come back afterwards and scribe in the breaks for individual planks. Personnally, I prefer to cut my planks into their component pieces and then install similar to what you have done. As for where to get replacement lumber there are a couple of good places that are on the home page in the lower right side. Crown Timberyard and Wood Project Source are two excellent companies that specialize in milled lumber specifically for model ships. I have bought material from Crown a couple of times now and they have great service. I have heard fantasic praise about Wood Project Source as well so you will be well served with either. Before you do that though and even before you remove any of the work you have done, I would try to practice some of the techniques from the tutorials on the other side. Start by making sure that you have it sanded smooth and all the low spots are filled in. From the pictures it looks like you have done this. Next, draw on the hull the vertical lines of the bulkheads. I am assuming this was a plank on bulkhead model? If not or if you are unsure of where they are at, simply divide the hull up into sections about 2-3 inches apart. This gives you reference lines. Now go to the line that is at the widest part of the ship. This should be about the middle of the hull. Measure down along the reference line from the keel to the wale or in this case the deck will work. Take that number and divide it by the width of the lumber you are using to plank the hull. This will give you the number of strakes needed. Now go to the next reference line and measure again. Now take that number and divide it by the number of planks that you found you needed from the last line. This number is the width of the planks at that reference line. Mark those widths down the reference line like tick marks to be used as guides for planking. Repeat this process on all reference lines on your hull. You will notice that as you move towards the bow and stern that the numbers should be getting smaller while the number of strakes stay the same. At the bow you can easily be half the width as mid ship. This is the crucial first steps in laying down correct planking. Once all your measurements have been laid out on the hull it is time to plank. There is no right or wrong in starting at the keel and going up or the wale and going down. Builders choice. I go keel up so that is how I will explain. As you lay planks down across your tick marks you will see how much material you need to sand off to make it fit in the space. Be aware of one more issue while sanding. When laying two square objects next to each other on a curve,such as the hull, the bottom or face that touches the hull will he the edges of the planks touching but the top face will have its edges pulling away from each other. To close this gap to make a nice tight fit simply taper the long edge on the bottom side Inward and the tops will close nice and tight. When installing the planks, they should lay down on the hull in place and correct with minimal pressure. If you have to force the wood it needs some more bending or tapering to allow it to lay nice and easy. Most of this process is trial and retrial. If you take your time through this process, when done the planks should only need a minimal sanding and hopefully no filler. I hope this is helping and not making things worse. I can show pictures of my first plank job and it is horrible. The pride I have for that ship is more that I finished as it is in no way "good". Hopefully we can make yours good and get you through it with pride also.
-
A strake should run from stem to stern in an uninterrupted row much like your deck planking. This is achieved by tapering the ends of the strakes at the bow and stern where the spacing for them becomes much more narrow. In addition to tapering, the planks often need to be bent on the edges and not just the flats. Some woods can be edge bent rather easily in the same manner that you would bend along the flat. Other times it is easier to use a wider piece of wood then a typical plank and cut a curve into the wood to create the bend needed. This method is called spiling. While a little harder to do and it creates a lot more waste, it does make for a very nice planking job. With the way you have planked your hull, drop planks a stealers will be needed in order to fill in the gaps. This is an acceptable way to plank a model ship though not really accurate. These planks are used to converge two planks that are closing in on each other into one plank or fill in between two planks where they widen out. One thing to keep in mind is that there should be no triangle shaped planks. Gaps should be squared off to allow for a plank to attach to a frame. I believe some of those tutorials cover a lot of this in better detail than what I am saying. Ultimately you want to get your planking to lay down across the hull in nice even rows with no drops or stealers needed. This requires a lot of measuring and layout drawn on the hull prior to planking in order to start and maintain the spacing needed.
-
First off I will give you a link to a bunch of valuable tutorials on planking here and the link to the thread where that link plus others can be found is here. I hope these will help you out in the future and while I know they can be confusing as it is a lot to take in, don't let it overwhelm you as we will help you through it and it does become easier with some practice. Now onto your build and the current planking. Honestly, for a first attempt with what I am assuming is little or no help and guidance, it is not that bad however, of course it is not that good. Ok, now that the uncomfortable part has been said, I will ask a couple of questions to you and see where that leads. First, is only the port (left) side on the second layer of planking? If so then make that the "bad" side of the display. Most models when displayed can only be fully viewed on one side. The bad side is often the experimental side and gets placed facing a wall. That is an option that will allow the planking to be finished up easily on that side and then a new, nicer job on the good side. Second, how do you feel about removing the planking you have done and starting over? Not all of it as obviously the first layer is fine and even on your second, the first 4-5 strakes (a row of planks from stem to stern is called a strake) look usable. However, if you are ok with removing them and buying some new planking material that would give the best finish in the end. Sometimes starting over is what is needed. See almost any build log for proof. In short yes, your ship is perfectly salvageable. I would spend some time and read through those tutorial links as there is a lot of good information. Also read through some build logs on here, not only of the Bounty but others as well as planking is done about the same way on every ship. Many of them show lots of good pictures and explanations on how they did the planking. Of course you will have questions and please ask them. That is what we are here for. The Bounty is a nice ship and you do have a good start and foundation to work with. I hope some of this helps and I will keep doing what I can to help you out.
-
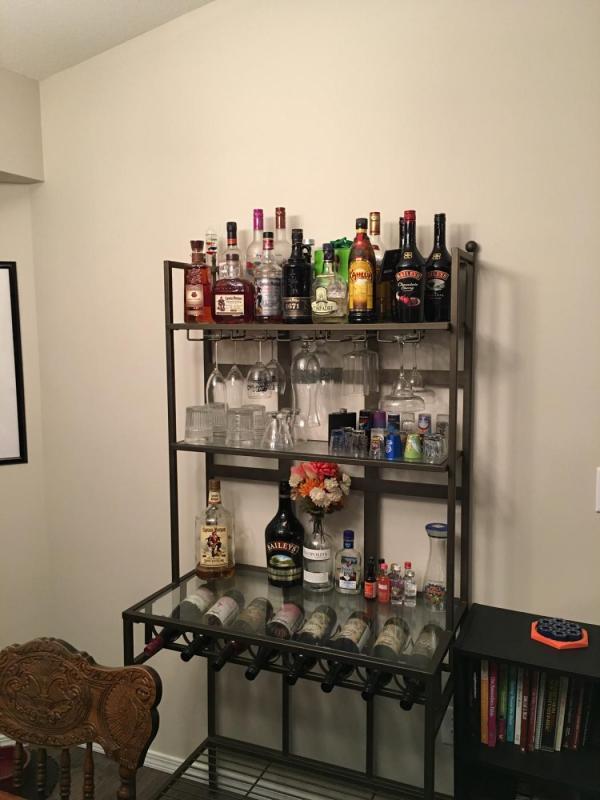
Ah yes the good spirits cabinet. Well as I now have a dedicated shipyard I no longer have to share space in the living room with the bar. Therefore it is now in the dining room where it belongs and I can make a drink to take with me to the shipyard. This also gives me a good reason to get up and walk around every so often so I can refuel...
- 961 replies
-
- 21
-
-
Yep! Had to verify that I was going crazy by doing not just one crazy big project but two!
-
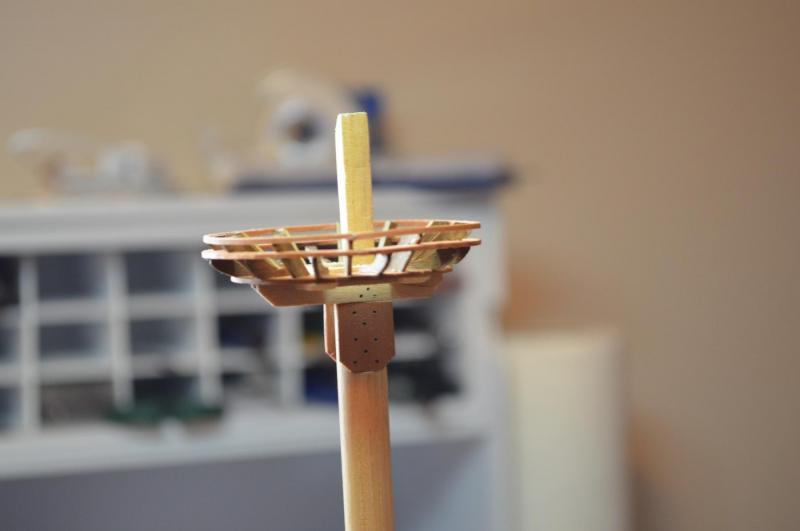
Very nice ship's wheel! It is almost a shame that it won't be mounted on a ship that uses it.
- 653 replies
-
- 6
-
-
- trabakul
- marisstella
- (and 1 more)
-
Thanks Brian! I know the feeling of "original sin" only too well. La Couronne suffers from that as I should have taken more time to straighten out the false keel better or simply cut a new one. While I have managed to cover and conceal most of the issues, she is still lopsided and it has bugged me now for 10 months! Live and learn and I have made sure the new build does not suffer the same fate.