HOLIDAY DONATION DRIVE - SUPPORT MSW - DO YOUR PART TO KEEP THIS GREAT FORUM GOING!
×


EJ_L
-
Posts
2,246 -
Joined
-
Last visited
Content Type
Profiles
Forums
Gallery
Events
Everything posted by EJ_L
-
 Looking good. I too am partial to the fruit wood stain. I always try to finish woods as naturally as possible and to build in ways that can utilize their natural colors as much as possible. Can't always do that especially when modeling something that was painted but, I try as much as possible.
 -
You are doing a great job on her. Going to be on awesome ship when you get her done.
- 213 replies
-
- 4
-

-
- la couronne
- 74 gun
- (and 2 more)
-
I ran into the same problem when rigging my canons of the blocks being too large and coming together when rigged. I ended up leaving them that way but it has been one of those things that constantly bugs me.
-
An xy table is high up on my list of future buys. I have access to a milling machine but as it is across town at my wife's grandfather's place, it is not very convenient and there are a lot of parts I would like to start custom building myself. I have a nice drill press so all I really need is the xy table and I would be set for a lot of the stuff I would like to do.
-
Sometimes the best way to build something is to mess it up a few times. You definitely gain a lot of experience that way. Nice home made lathe too. Looking forward to seeing how she turns out.
-
That is actually the very reason my wife actually doesn't mind me spending the money on model ships and accessories. Yes, I tend to buy expensive kits and tools but the tools are a one time purchase. I'm not buying a completely new set each build. Just adding a few as needed. The builds themselves, like you said when broken down into the amount of hours I get to spend on them work out to often around 50 cents an hour if not less. There isn't much that can give me that kind of value.
- 608 replies
-
- 5
-
-
- la couronne
- corel
- (and 1 more)
-
I have been gathering a lot of information on her. That is part of the reason I bought the kit so early to my start time. Aside from having to stock up on future projects and materials before all my spare money goes into the new house, I wanted to have plenty of time to go through the kit and really look at what was provided so I know what I need to bash and what I want to do with her. Plus this is giving me a lot of lead time to research her and gather what I can on how she should look. Like most ships of that century, there is little surviving information and accounts, pictures and models are rarely in agreement with each other. Fortunately, unlike la Couronne there is a bit more available which is helping tremendously. Plus there have been a few more models built of her that I can use for ideas. Since she is a larger scale than la Couronne at 1:77 compared to 1:100, I will have a little more room for better detailing and easier building. I intend to bash a lot of the kit and am toying with the idea of adding LED lanterns in the cabins as well as detailing the cabins with furniture and such. I always say that I try to push myself to do better than the previous model and as le Soleil Royal is one of my dream builds I really want to take my time and make sure that I get in every element I want and that she looks like I want with minimal settling for good enough. It will help that I will be building her alongside la Couronne. I will have another ship to work on which will help keep me from wanting to skip difficult things or settle for less than my best in order to keep building. Instead when those times hit I can back off of Soleil Royal and keep working on la Couronne which I anticipate will probably be entering into rigging about that time.
- 608 replies
-
- 3
-
-
- la couronne
- corel
- (and 1 more)
-
Welcome home! You do have a nice set up there for building. I'm looking forward to seeing more as it develops.
- 473 replies
-
- 3
-
-
- greek bireme
- dusek
- (and 1 more)
-
Your bowsprit looks nice. I have always found it to be one of my favorite pieces of a ship. It seems to have a proud defiant nature about it as it juts out over the bow. It appears to defy gravity and and make a bold statement of daring someone to approach. Or maybe I'm just a romantic when it comes to ships. In any case, your work is looking fantastic. Great job!
-
My next ship, which will be the first in the new ship yard when we finish building our house, is going to be le Soleil Royal, 1:77 by Sergal. I will be building it alongside la Couronne and hopefully starting it in November-December.
- 608 replies
-
- 6
-
-
- la couronne
- corel
- (and 1 more)
-
Thank you to everyone for the kind words, likes and just looking in. Ships like this are with out a doubt massive undertakings. Hundreds to thousands of hours spread out over months to years and yes, lots of money. They are not to be taken on lightly. I hear all the time from people when they look at my models, be it ships or the train layout and they always say "I don't have the patience for that." I always say in response that you do have the patience if it is where your passion lies. I love building models. That is why I have the patience to do what I do. Other people may love sports and can sit through miserable cold and wet weather to watch their team play. I cannot do that. I can barely be bothered to turn on the game and watch it. That is not my passion so I do not have the patience for it. My dad rebuilds classic Mustangs and can do it in his sleep. I never had the patience to learn more than basic repairs. That was his passion not mine. The biggest piece of advice I give to anyone who thinks of starting a model of this size is to make sure that this is what you are passionate about. It has to be the thing that brings you joy to work on even when you are stressed from life. If it is just a passing hobby, (of which there is nothing wrong with and I have many of those myself) then I strongly recommend sticking with the smaller kits. Otherwise there is an extremely good chance that you will spend a lot of money and end up with a box full of scrap wood that sits in a closet never to see completion. Now to get back to work on la Couronne and in a couple of months I get to start on the next massive undertaking which is sitting across the room from me just begging to be built.
- 608 replies
-
- 7
-
-
- la couronne
- corel
- (and 1 more)
-
Beautiful finish, brings out the color of the wood very well. I like the look of her a lot.
- 414 replies
-
- 4
-
-
- riva aquarama
- amati
- (and 2 more)
-
This is an ongoing debate I constantly have with myself is wether or not to invest in the miniature power tools when I already have all of them in full size. I can see the usefulness of the the minis but I can save a lot of money by modifying my set up with my full size tools. Saving the money allows me to buy kits and materials to continue modeling. Yet every time I see one of these threads talking about the different minis I start adding and thinking about buying them. Maybe one day. Till then I will keep watching and reading on how to set up full size saws to cut those small sizes.
-
It is not so much building the stand as that is fine but it it requires the boat to be permanently mounted to it then I would hold off on that. If it is just a cradle type stand where the boat can be removed easily then go ahead. The main thing to think about before mounting your ship is what work still needs to be done? If there is work that is easier to do with the ship on it's side then mounting it on a stand should wait. However, if all of the hull work is complete so that you do not need to turn it onto a side then go ahead and mount it. You decide how you want to build and what is comfortable to you. I have had some models that I mounted on a permanent stand just as soon as the hull was built. My current one is in a temporary cradle to hold it upright but I can still pick it up and turn it over if needed. The final stand has not been built for it yet and probably won't be until I am getting ready to start rigging.
- 701 replies
-
- 4
-
-
- phantom
- model shipways
- (and 1 more)
-
San Martin by augustus
EJ_L replied to augustus's topic in - Build logs for subjects built 1501 - 1750
Beautiful work! She sure is looking great. -
These layouts are always nerve racking to me as so much relies on it being correct. The canons help a lot to make sure things are right. Looks like you are off to a good start!
- 37 replies
-
- 2
-
-
- sovereign of the seas
- model space
- (and 1 more)
-
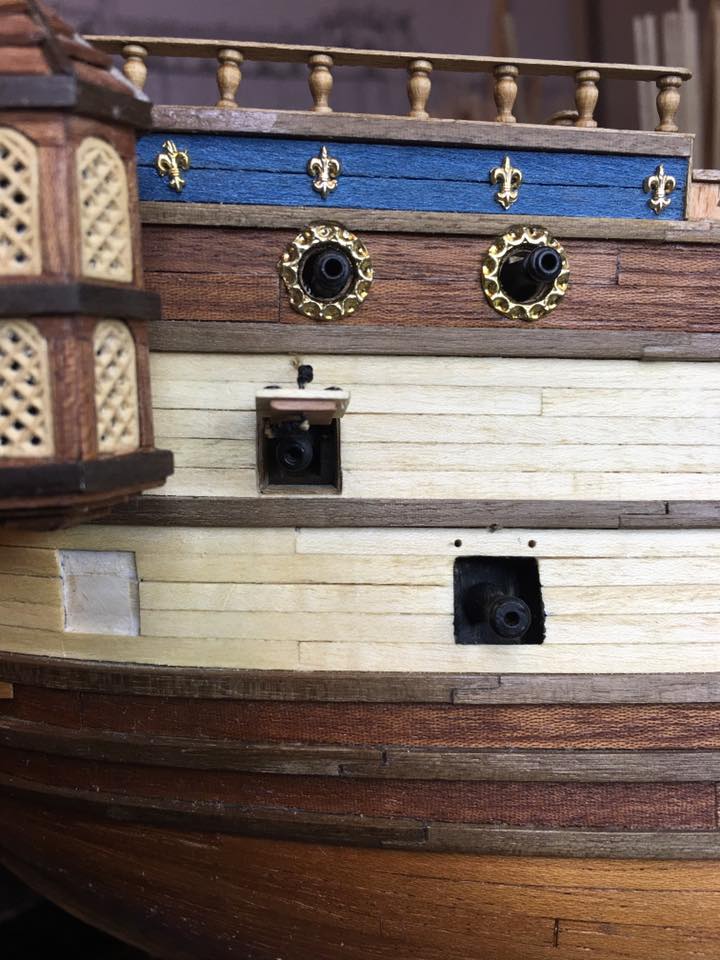
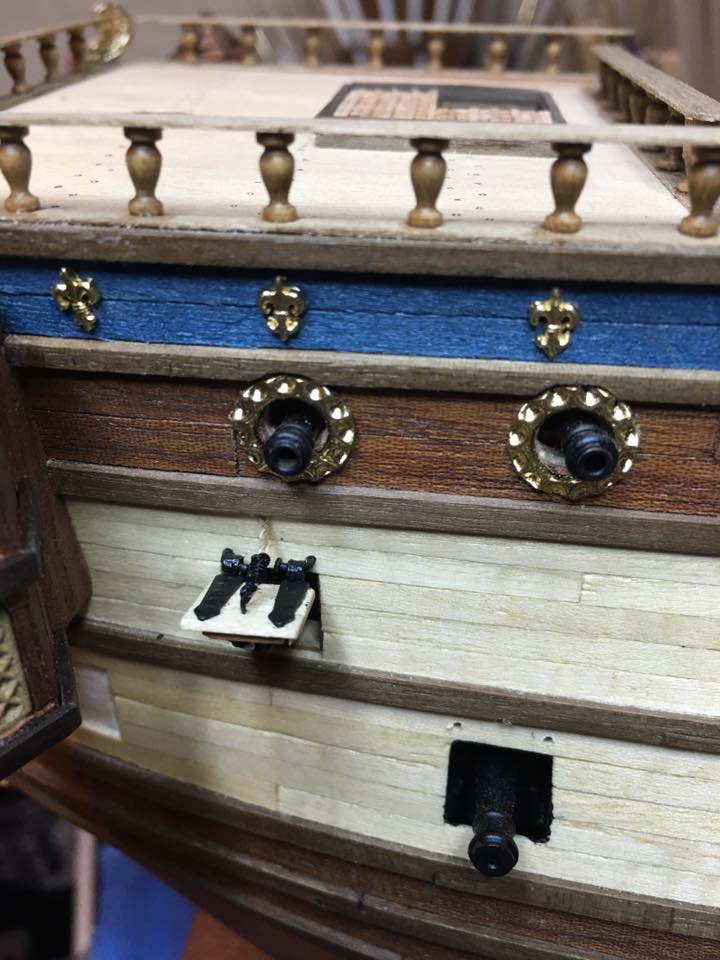
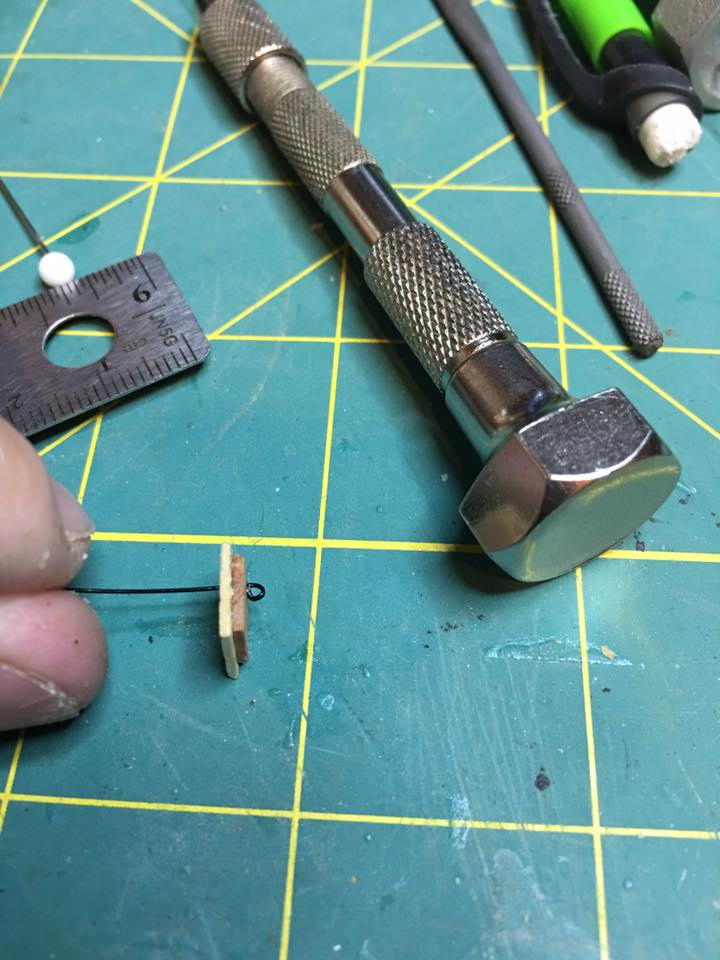
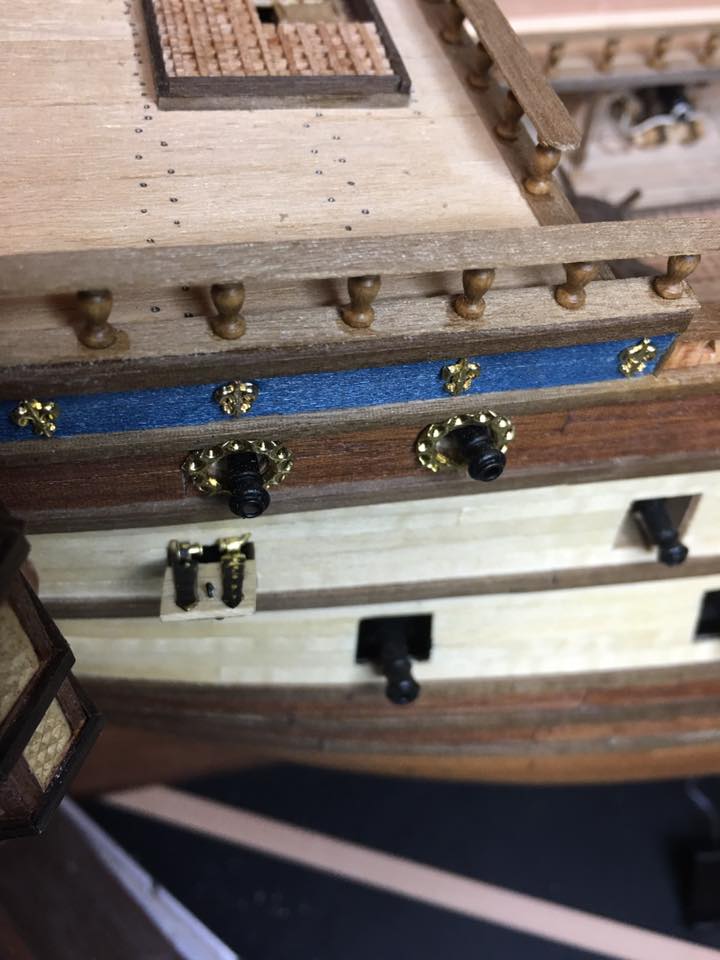
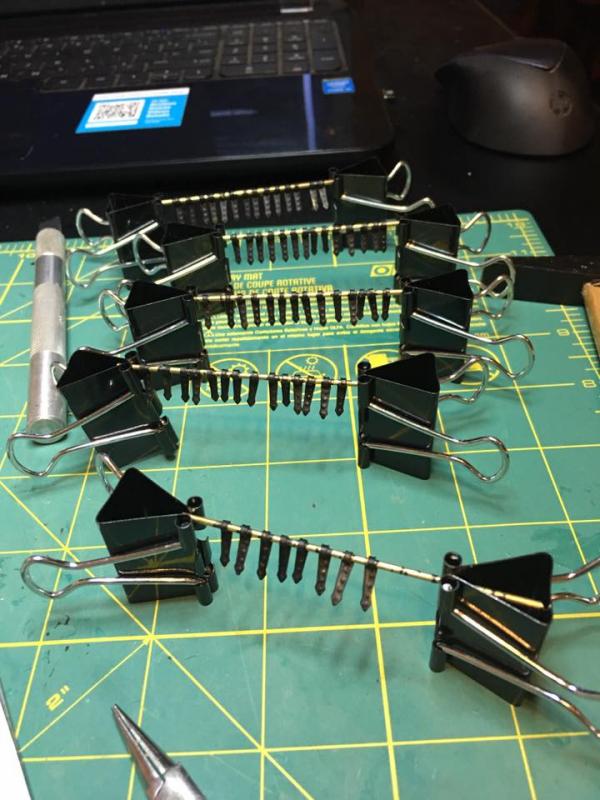
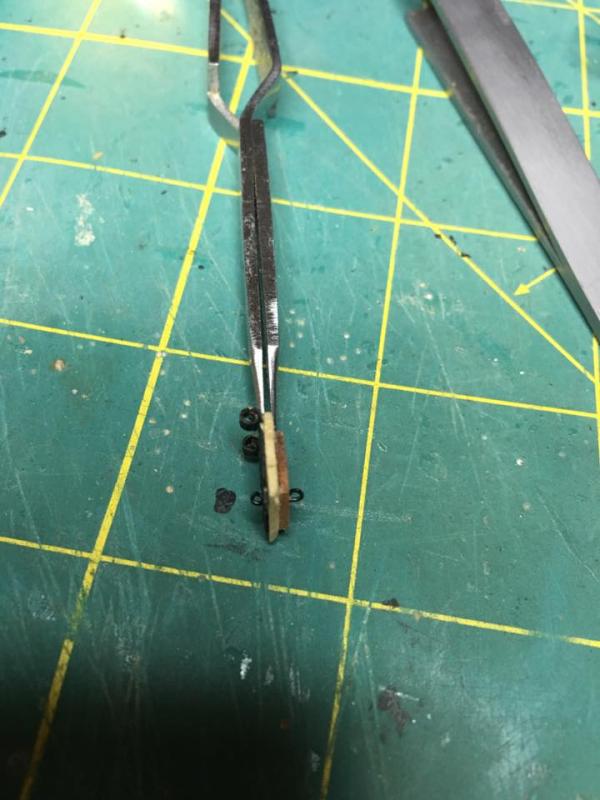
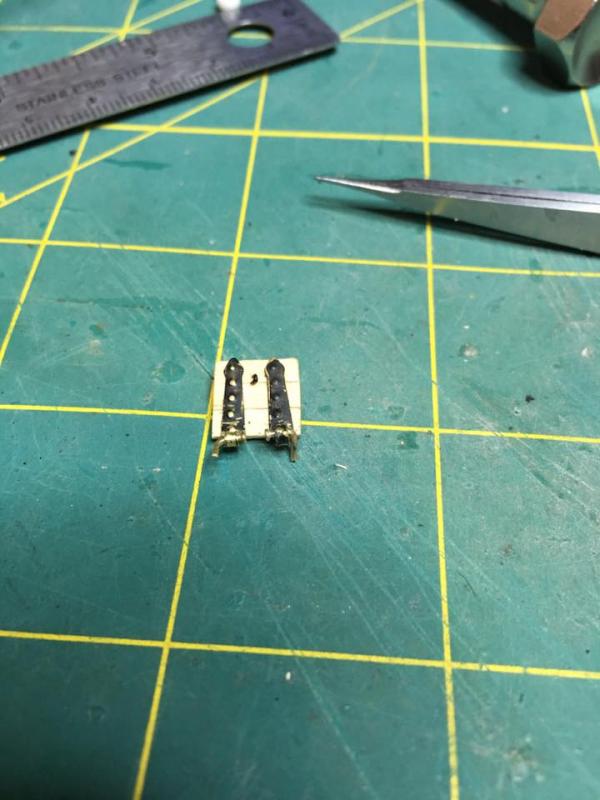
Well work slowed down last week as I spent almost all of it very sick. However, this week I am recovering well and getting back at the build. Gun port lids is the theme this week. A lot of them. I got the hinges painted with the first coat of paint and about half of the lids built so I thought I would start assembling them to begin figuring out how I want to build them. I took some pictures of the steps I took but it is fairly simple just time consuming. First after I built the lids themselves I drilled a hole for the eye bolts. These are custom built out of some black .014 diameter jewelry wire. I threaded the wire through the hole and made a loop on one end. Using a small pin I applied a tiny drop of CA glue to the wire and pulled it tight to the lid. Cutting off the wire leaving just enough to make another eye bolt I repeated the process and now have both eye bolts for the pull ropes. I next attached the hinges by simply gluing them into place but first I had to mash down the hinge pin pockets as they were oversized for the pins I will be using. The kit didn't come with any pins so I made some using some small nails. I held the nail behind the head where the thickness of my pliers' jaw was the correct width of the pin length. Then I bent the nail over the jaw to create a 90 degree angle and snipped off the excess length. Then I drilled the holes in the hull for the pins and test fit to make sure everything fits. Once I have a few of these done I will touch up all the paint and add the pull ropes. That will be most of my evenings and time this weekend as this is a time consuming step but I love seeing all the gun port lids opened up and ready for action. It will be worth the time.


- 608 replies
-
- 12
-
-
- la couronne
- corel
- (and 1 more)
-
Always a nice day when you can finally start to recognize all those pieces as a ship and not just a pile of funny shaped wood. Looking good!
- 473 replies
-
- 3
-
-
- greek bireme
- dusek
- (and 1 more)
-
Those falconets came out looking great! I love all the little details you put on them. They are going to look right at home aboard your ship.
-
Those stanchions look great and you did an excellent job on the rudder also. I will second getting the foam to hold your hull. I use a couple things for mine. First I used a rotating bench vise so I could roll the ship to whatever position I needed for planking. Once the planking was complete I built a temporary stand to hold her upright. When I needed to work on a side I used foam that I had carved out an indention to hold the ship. This allowed her to lay on a side without damaging anything. Very important with canon barrels sticking out. It also helps to prevent the hull from getting scratched up.
- 701 replies
-
- 5
-
-
- phantom
- model shipways
- (and 1 more)
-
Down at my family's fishing camp in Louisiana, it is common to see barrels lashed on a boats deck with either chains or rope. Often just depends on what is available to the boat owner at the time. As thereare dozens of uses for metal barrels on a boat I think they are a great addition.
-
I have seen several discussions on tree nails on here and I have begun to lean to the side of are they really worth it at the correct scale? To make the tree nails of the appropriate size for the scale of the ships, unless you are modeling in 1:48 or larger, the nails would be so small that they would barely be seen. This brings up the question of is it worth spending the time to model something that would not be seen or do you enlarge the nails but then have out of scale nails covering the model and putting thousands of oversized dots on the ship? Personally I have gone back and forth and even in my current build I modeled the ones on the decks but not the hull. After looking at it and looking at other ships and reading the debates about it I now lean towards not modeling them on any ship that the scale is too small to easily show them. A good point was made of why ruin a model that you will spend lots of hours and effort into making sure everything is built correctly with oversized dots covering the decks and hull? We all know the nails would be there and the focus should be on the rest of the model.
-
Looking good! Those seats are fantastic and all that time and effort will make your ship look outstanding.
- 473 replies
-
- 3
-
-
- greek bireme
- dusek
- (and 1 more)
-
Welcome to MSW! As Chris said, you should be able to find some answers in another build log on here. If you get the chance would love to see pictures of your build. Start up a log and share as I'm sure others would enjoy it as well.