HOLIDAY DONATION DRIVE - SUPPORT MSW - DO YOUR PART TO KEEP THIS GREAT FORUM GOING!
×


EJ_L
-
Posts
2,246 -
Joined
-
Last visited
Content Type
Profiles
Forums
Gallery
Events
Everything posted by EJ_L
-
 Thanks for the advice. I'm not sure about 1:60 off hand. If you know what the actual size is I use an app on my phone for conversions. It is free by Woodland Scenics called Model Scaler. As it is made for model railroading it comes set up with all the common model railroad scales but it has a spot to enter and save custom scales. I have all the ones that I am currently using in there. It is great for scaleing both up and down and will convert between imperial and metric units. I know that for my 1:100 I need them no bigger than 3mm (1/8") diameter and no more than 1.5mm (1/16") thick for a single. Honestly, a little smaller than that would really be better as in some cases that would be very tight to fit in the openings. My next build at 1:77 gives a little more room fortunately but they will still be small.
- 608 replies
-
- 4
-

-
- la couronne
- corel
- (and 1 more)
-
Thanks Bob and Don for you input. That has been what I was leaning towards so I'm thinking that will be where it goes. Had a night of learning on the bits last night. Made great progress on the posts but the belaying pins have been a nightmare. The ones supplied in the kit look great but are a bit oversized. Not horribly but enough that they have been causing alignment and spacing issues. After many split pieces of wood and restarts I think I now have a workable solution. Unfortunately I probably won't get to find out till tomorrow as today is going to be yet another busy day of packing up the house to get ready for the move. I'm glad I only have two of these to make. I do have a few pin rails to build though. Oh well, all part of the fun! On a side note, does anyone know a good source for the small pulleys that can be used inside of sheave holes and blocks? Right now I am carving them into the posts of the bits and they don't look too bad and honestly won't be seen once the rigging is in place but, I wouldn't mind putting something better in and especially on the next build which is a larger scale and will be more noticeable.
- 608 replies
-
- 2
-
-
- la couronne
- corel
- (and 1 more)
-
Looks like you have found a method that works good for you and are off to a good start! My word of caution to you would be to remember that your space will narrow at the bow and often at the stern as well. Make sure you are tapering your planks in those areas so they will all fit otherwise as you continue you will run out of space and will end up with short planks and planks that end in funny spots. Looking forward to your updates as your ship is shaping up nicely!
-
Clamps of various types are often needed to help pull everything together. I would recommend looking through the planking section under building tips. There are many good threads there to read and links to some videos as well. Fairing the frames is a crucial first step. To do that you will lay a plank across the edges of the frames. The plank should lay flat and flush with no gaps between the plank and the frame. Where the gaps exists, sand the high sides until the plank lays completely on the frame. You also may want to practice bending the wood supplied. All wood bends a little differently so a practice piece is recommended so you can get familiar with it. Learning to lay out your planking so you get the strakes correct in both number and widths is another thing to learn. To do this you need to first determine the width of the planks you are going to use. Once you have the width of the plank you need to measure the most center frame from keel to the wales. The center frame is the bigges frame and so it sets the maximum number of planks. That dimension divided by the width of the plank will give you the number of strakes needed. Now measure each frame in the same manner. As you get closer to the bow and stern the dimemsions will get smaller. Take the dimension of each frame and divide that by the number of strakes that you established earlier. This will give you the width of each strake at each frame. Again, the strakes should get narrower at the bow and stern. I know this is a lot to take in and framing is one of the most complicated parts of building. Again, read through some of the tutorials and check out some build logs for help. Practice and take your time and it will come together.
-
I have to hand it you making all those oars Robin. I need to make four for my launch and I've been putting them off. Then again, I'm currently carving bits and sheave holes in 1:100 scale so I guess we all enjoy torture in some form.
- 473 replies
-
- 4
-
-
- greek bireme
- dusek
- (and 1 more)
-
Alright! I see you are off and running with your build. I've got my drink in hand with plenty more to share. I'll pull up a chair and follow along. Your kit looks like it has nice clean parts in it so hopefully that holds true. I will offer a few words of caution at the start. With those frames, make sure they get installed square to the false keel. This is very important as if they are not then your hull could build out of shape. Double check them with a square and don't rely on laser cut pieces to be accurate. Also take you time and fair the frames properly so that all your planking will lay flat and true. This is not a race so those extra hours that you take now will pay off in a huge way later. I know that excitement of wanting to build quickly and I can tell you first hand about the pain that comes from rushing. My current build suffers from not taking a few extra steps in that my false keel was warped. I made effort to straighten it up but I reached "good enough" earlier than I should have so I could move on and now the bow of my ship is slightly twisted. I have had to make a lot of adjustments ever since to make it look good. Lesson, do it right from the start. I'm looking forward to watching you move along in your build!
-
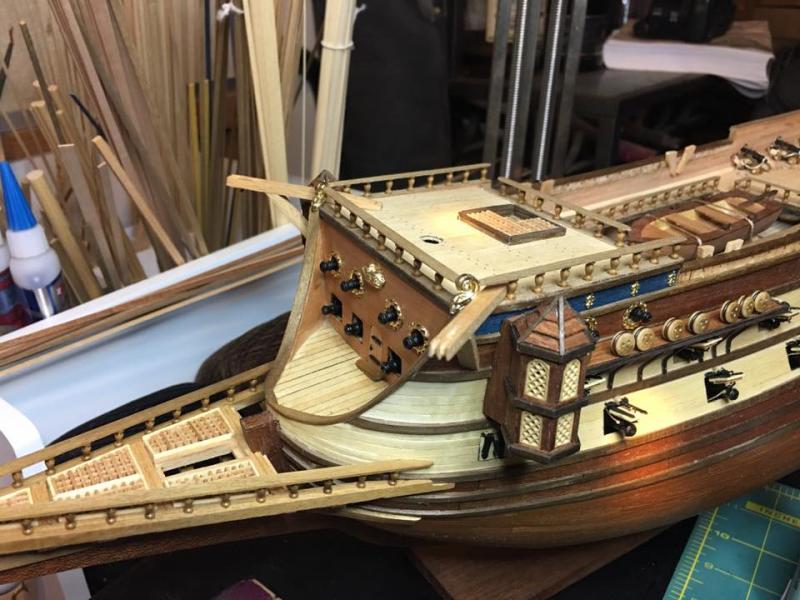
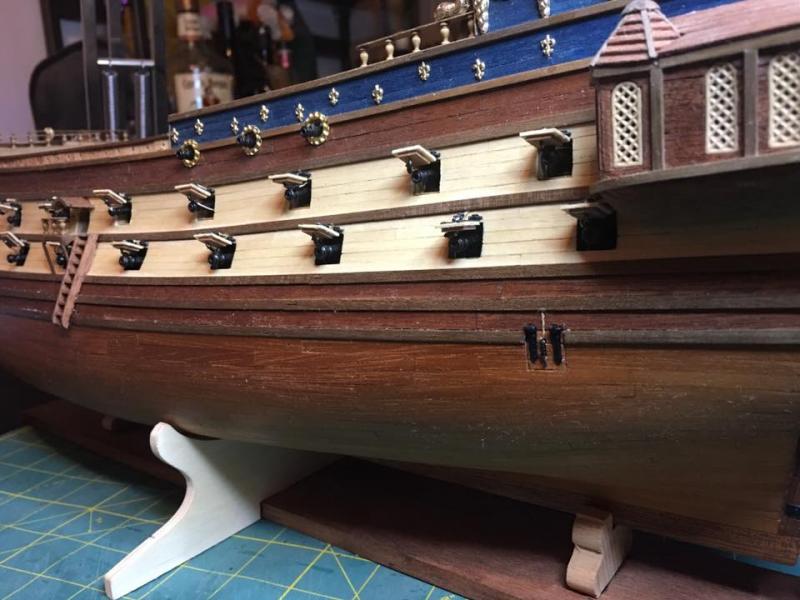
Don, Robin, Frank, thank you all for the compliments and thank you to everyone for the likes and just stopping in to take a look. Got the catheads installed last night. Still trying to figure out where the cleat to tie off the rigging will go. Plans do not even show the catheads let alone the rigging or tie off points for the anchors. I know how the rigging will run and how to do that after searching through other plans and build logs but I'm still not certain on the placement of the cleat. I have seen many different places, the deck, back of cathead beam and even a few that have it tied off to a belaying pin on the rail. I'm currently leaning towards a cleat on the back of the cathead beam but I am open to suggestions. I also installed the kevals, which you can see a pair of in the picture. I almost forgot about them until I was looking at the picture to upload. I will take a better one of them later. Meanwhile, enjoy the picture!
- 608 replies
-
- 10
-
-
- la couronne
- corel
- (and 1 more)
-
Great work Elijah! I will second the comment to replace the ships wheel with a custom built one. It would be a fun project for you to do and it sounds like you have a great club to help you out. Plus you can always fall back on the cast one if you need to. I always like having the scale figures to put on models. Adds a bit of life to them and the reference points that they provide make putting into perspective the size of these vessels easier. I typically prefer my sailors to have clothes though...
- 701 replies
-
- 6
-
-
- phantom
- model shipways
- (and 1 more)
-
Lots of great detail pieces! Those doors and windows are excellent and I like your fix to the oversize holes. Paint and weathering is well done also.
-
There are many decent video tutorials on YouTube. Are you looking for something specific? Typically you will find them sorted out by a certain thing. Planking, rigging, canons, paint, stain etc.. What I will do is use the search bar and type in something like "planking a model ship" or "rigging a model ship" and that will bring up a long list of good videos. I would recommend watching several of them as everyone has a different technique and you may find one that you understand and like better than others.
-
Hi Don! Found your log this morning and I must say that you are making a nice little skiff. Great work so far, I'll be looking forward to seeing more as she progresses.
- 120 replies
-
- 1
-
-
- crabbing skiff
- Chesapeake Bay crabbing skiff
- (and 3 more)
-
Almost any ship in 1:48 scale will be huge. Personally I am a fan of huge ships as they provide a great opportunity to really make some outstanding details. As Mike said though, think ahead about the space requirements both to build her and then to display her. The ship size is big to begin with but a display case will ad several inches more to all of your dimensions. Fortunately, the long build time gives you plenty of time to figure out what to do. Good Luck!
-
Wow! That is truly impressive! Seeing her out in the sunlight really enhances all the fine work you are doing. I hope that table is on wheels to help you move her around or do you have help? How heavy is she?
- 213 replies
-
- 2
-
-
- la couronne
- 74 gun
- (and 2 more)
-
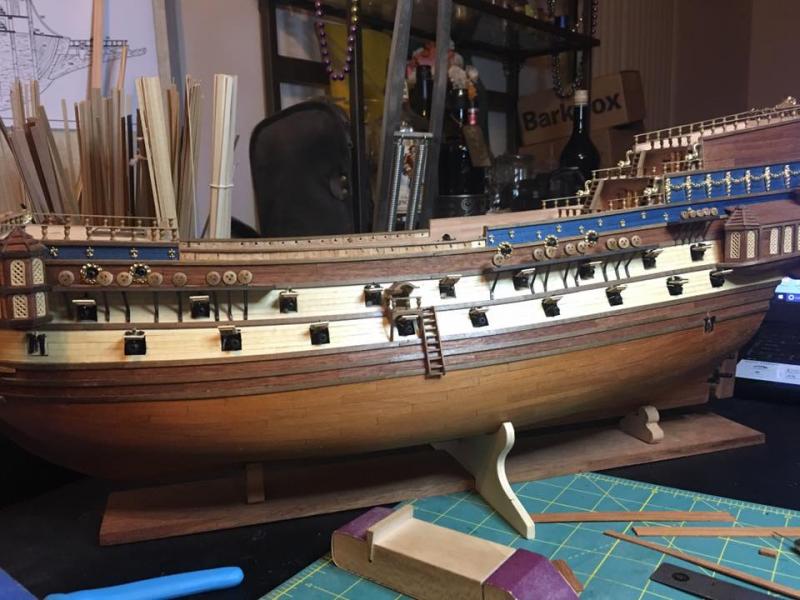
After what was a very slow build week last week, Sunday proved to be very fruitful with a nice 8 hour build. So what did that time give me? Port side channels and deadeyes. Starboard side are all prepped and ready and should get installed later this week.
- 608 replies
-
- 10
-
-
- la couronne
- corel
- (and 1 more)
-
Robin, your ship is looking fantastic! There may be flaws but the good quality and craftsmanship you are showing far outdo any flaws. I had to do a double take on your first picture as I thought your ship was flying! I'm no history major but I was fairly certain that the ancient Greeks, nor the modern ones for that matter learned to make a ship fly. Maybe I'm more tired after today than I thought.
- 473 replies
-
- 5
-
-
- greek bireme
- dusek
- (and 1 more)
-
I too get the stray dog hairs on my work. Found one glued to a port lid the other night. Must have gotten right in there when I was installing and I overlooked it. I don't mind those as much as when I see one of mine and I start feeling feeling for that receding hairline that runs in my family. As too the hatch covers, I would think that they would be rather heavy duty in order to both stay as water tight as possible and not to easily come unseated in rough seas. I could easily see two people having to lift them up and out of the way. Large rings would be a benefit here so that a sailor could get both hands into the ring to lift it. Either way, hatch looks great!
-
Nice work on your planking Don. She is starting to show her shape now and it is looking good. That is one of the nice advantages of paint and copper plating the hull is that you don't have to worry as much about smaller imperfections or double planking. Just sand smooth to the right shape and cover. It is still a lot of work but it looks like you are handling it well.
- 50 replies
-
- 2
-
-
- cutty sark
- artesania latina
- (and 1 more)
-
That hatch is excellent. I may have to give that blackening agent a try.
-
Nice work! I love all the little details you have been including. They make for a much more incredible ship and like you said, the nice thing about modeling in 3D is that you are not trapped by physics in your build. You can add, remove and place anything, anywhere at anytime. I don't think you can post videos directly here but if you upload them to YouTube, you can link them to your posts that way. I have seen many posts done that way.
-
Beautiful coloring you are achieving on her Robin. I agree with you in that the staining looks better than paint. She is turning out to be a fine vessel.
- 473 replies
-
- 5
-
-
- greek bireme
- dusek
- (and 1 more)
-
Bob, Yancovitch, thanks for the visit and compliments and thanks to everyone else for al the likes and following along. Woodo, welcome to the build! Always a pleasure to have someone else join in and enjoy the journey. I don't know if "mail ports" were always what they were called. I saw them labeled as such on one drawing and as I have not seen a different name and it makes sense I have kept it. Basically yes, they were a water level port that could be used to load or unload anything that would fit through it, people or supplies. Although it would be a port that would only be opened in fair seas or risk water pouring in, I can see the advantage of having them on these extremely tall ships where the spar deck could easily be 20 feet or higher above the water line. Every thing would either have to be carried up the ladders or craned in which would be a lot of work for small items. The other advantage is if the ship had to lighten herself in a hurry, supplies and cargo on the lower decks could be easily thrown out this port instead of being hauled up to the gun deck and then pitched overboard.
- 608 replies
-
- 3
-
-
- la couronne
- corel
- (and 1 more)
-
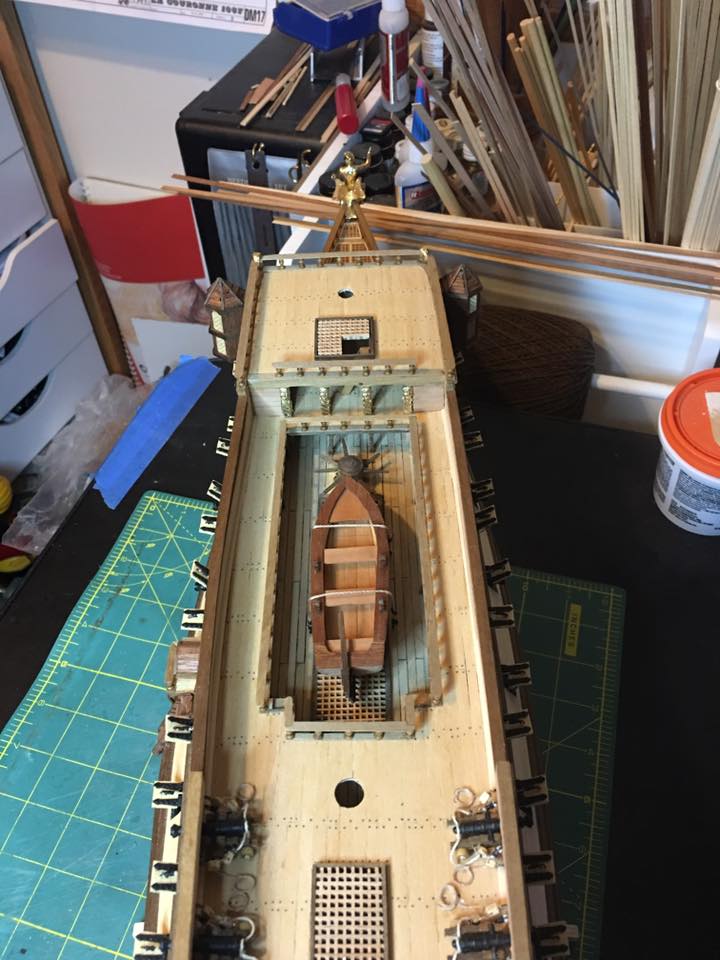
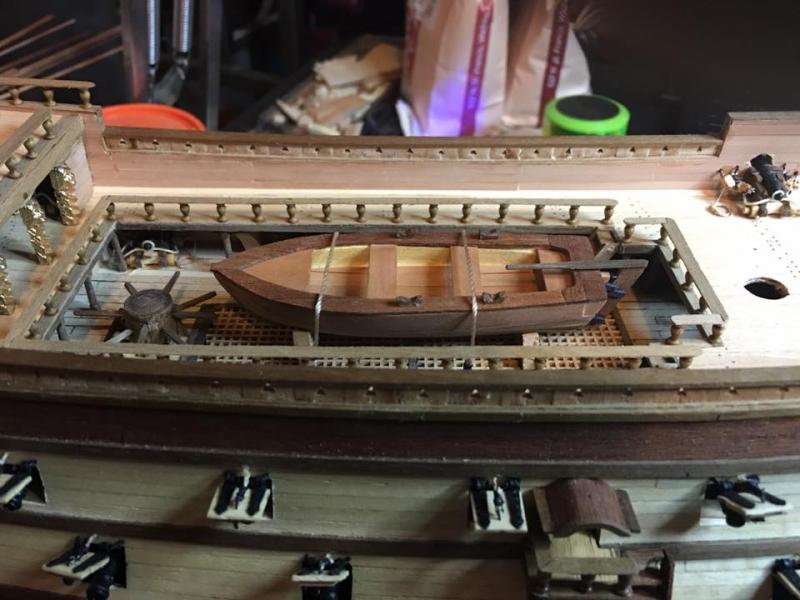
Slowly but steadily I have been getting more done on her. Getting things ready for the move to the new house has been taking up a lot of my free time plus work decided to pick up again so longer days and being tired more has also slowed things down. Still, progress has been made with the installation of the ship's launch. I ended up using the preformed launch, though modified of course, instead of scratch building one. I had every intention of scratch building it and even have the keel and all the frames drawn out on a sheet of wood ready to be cut out but then I realized that my scroll saw is completely buried in my wood shop which has now been mostly packed up and is now doing duty as a box storage facility while I pack the house up. So, that one will have to be put on hold for a while till the new shop is set up. Not wanting to wait I turned to the backup plan and now a temporary launch is in place and I can move on. I also realized that I had forgotten to cut out the mail ports on the lower hull so I cut those in and installed the lids. I had always meant to add them in later and as I was looking at the plans on the wall this morning I new something was off and after about 10 minutes of scratching my head I figured it out. Guess I need to get stronger coffee in the morning. Took some time today too to clean up the table. Now that every thing is swept up and put away I am ready to begin making the next mess. Channels are up next as well as the bits, kevels and pin rails. I have also noticed that the Corel plans do not show any catheads. Looking at other plans of her they do exists and honestly I have no idea how they would have hauled up that anchor to secure it to the forward channel without one so my Couronne will be getting catheads. Honestly, with those forward turrets in the way, I do not envy the crew who had to hoist the anchor to the channel. That could not have been an easy task. Thanks for stopping by and enjoy the pictures.

- 608 replies
-
- 9
-
-
- la couronne
- corel
- (and 1 more)
-
I don't think you can build a model ship without blood, sweat, tears and some glued skin. Those bulwarks look great. Prepainting is always a good idea. Keeps the paint where it belongs and you can always do small touch ups if needed.
-
Those look a lot like the same platforms that Corel put in my Couronne kit. Always knew that I wanted to replace them with scratch built ones and now seeing yours and theirs side by side I will definitely be building my own.
-
Excellent work and thanks for the step by step photos. I've got to build similar platforms in the nar future fir my build and that will help a lot with figuring out how to build them.