

Jsk
-
Posts
279 -
Joined
-
Last visited
Content Type
Profiles
Forums
Gallery
Events
Posts posted by Jsk
-
-
Thanks, everyone. I'll sit back and contemplate my next build. While I've got the Dusek bireme staring at me it will require sanding which I'll need to do outdoors. So I might wait until late winter to start that. Meanwhile I started designing a card Skipjack years ago which I abandoned. But the force is strong with this one!
- Louie da fly and Bryan Woods
-
 2
2
-
This is such a cool enhancement. Thanks for sharing your idea!
- Canute, thibaultron and mtaylor
-
3
-
FINISHED!
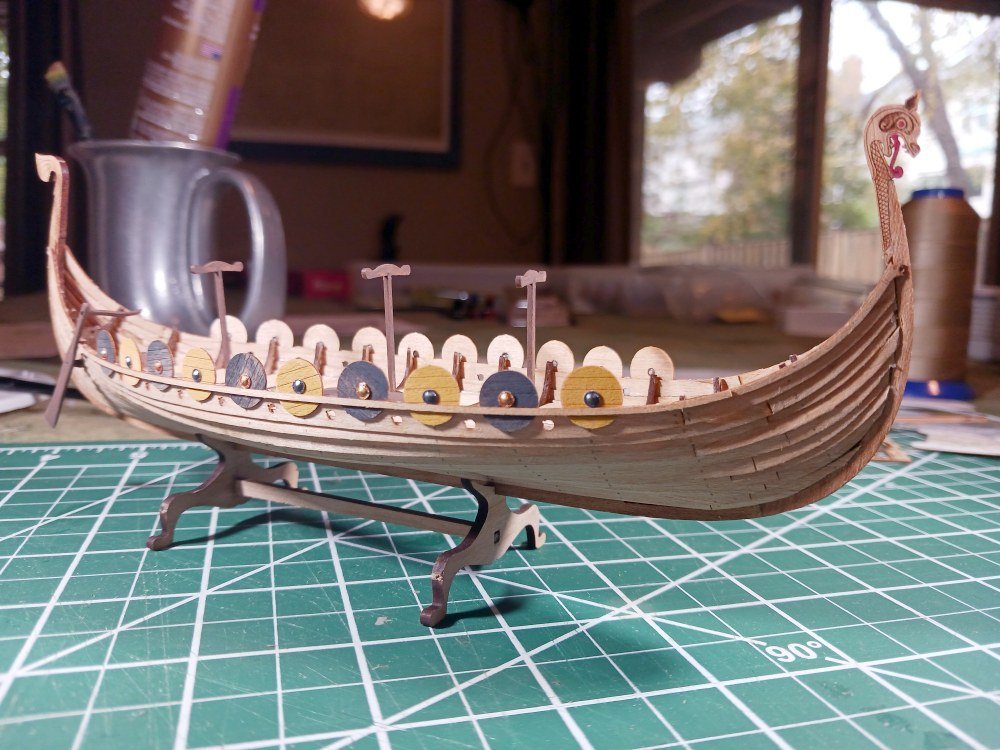
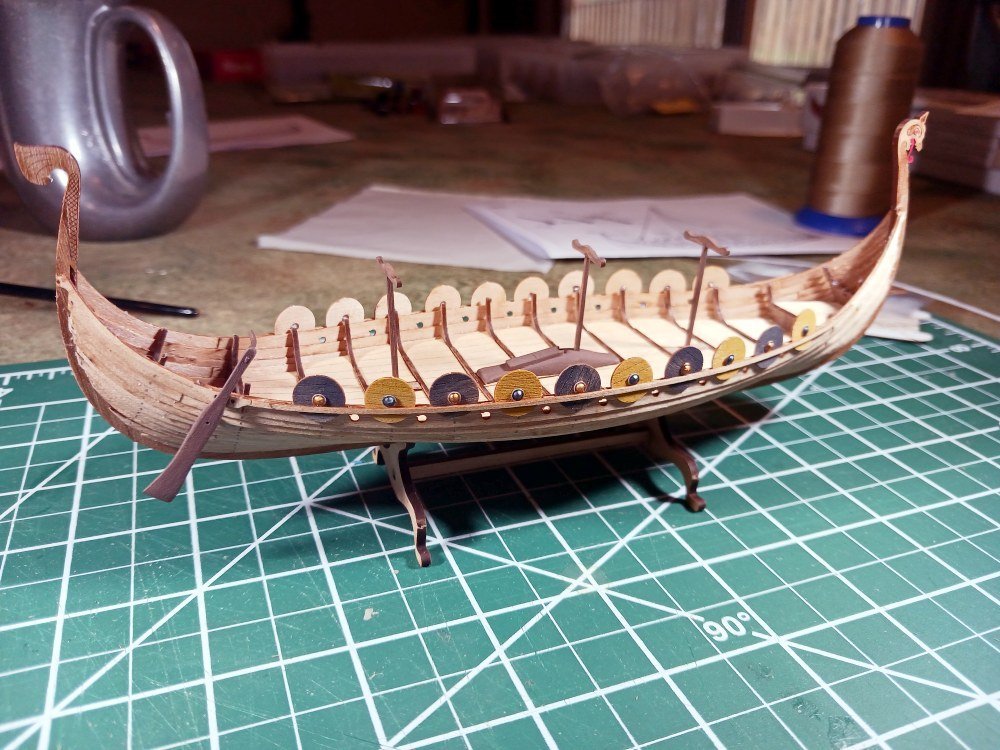
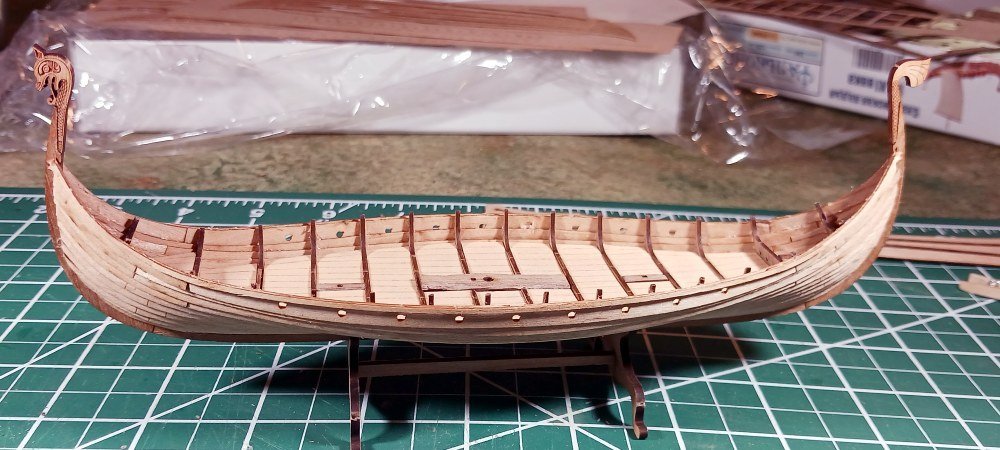
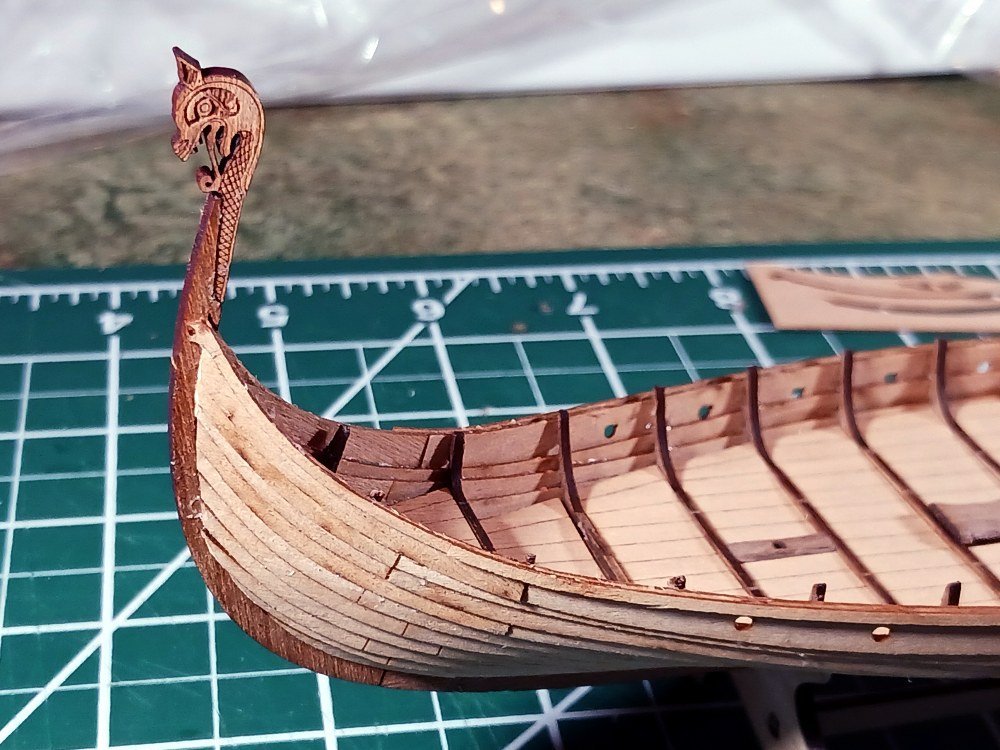
Took a bit longer than anticipated but finishing the build was important to me. I can be a bit like a hummingbird with my hobby projects.
I didn't take pictures of the rigging process. I found the rigging frustrating. I can't imagine trying something more complex rigging-wise for quite some time. Some of the challenges are non-negotiable--like my eyesight--but having better tools and materials would probably help. I used string which I had on hand but I couldn't tell that it was any different than what was provided in the kit. Plus, mine was on a spool rather than wrapped around a card and had less kinks in it. However, my string is nylon and I found that knots slipped too easily and the thread always wanted to resume its curl. Basically, it was difficult to manipulate. I also found that the thread unraveled if I looked at it cross-eyed and once I clipped an end the thread tended to fray.
Tool wise... I've only got one pair of tweezers small enough for this work so last night I found myself looking at surgical needle holders on-line. I think those will help. I also need a better way to cut the string. I have a little pair of squeeze scissors but unless the string is under tension they tend to chew through the string rather than cut it. Overall, I think my rigging is pretty rough. Especially the lines attaching the sail to the spar. I keep telling myself that this is a learning project and I learned a lot!
What I did find very helpful is that I've got two LED lights on flex-stands that stick out over the work surface. Having the ability to hang lines from the light supports proved beneficial. I could even cut a number of lines and drag the ends through CA then drape the lines over the lights to let them dry. It kept them out of the way until needed. Same thing for my 'helping hands' with alligator clips. Just being able to keep tension on the lines by clipping them with the alligators and setting the 'hands' off to the side was helpful.
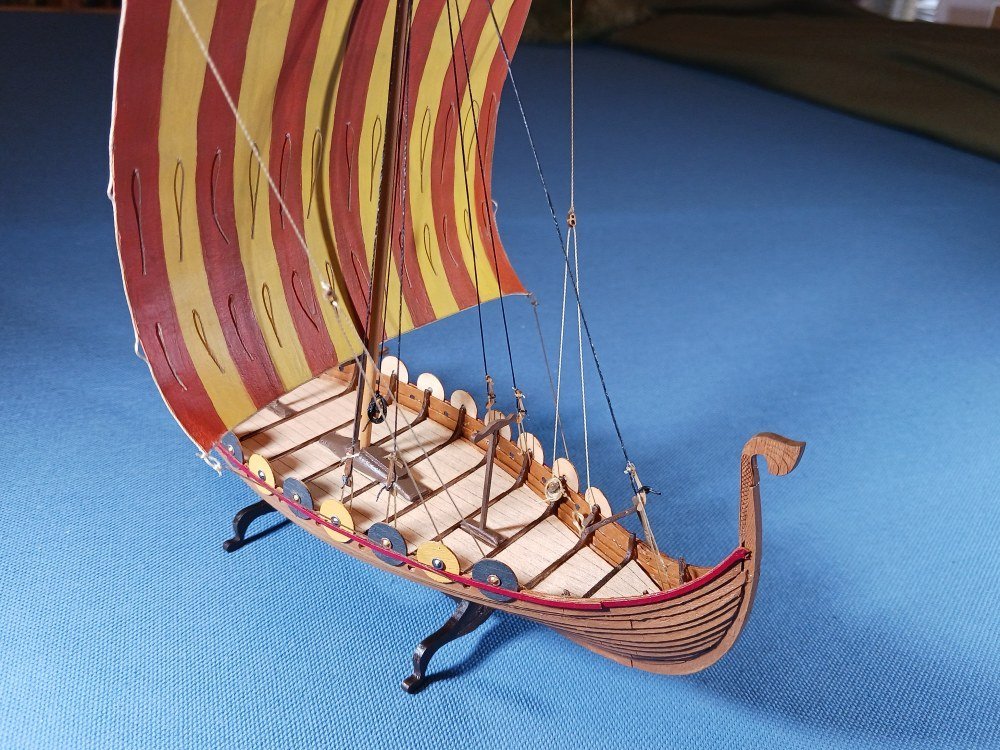
Anyway. I'm calling this one finished. Overall, I'm pretty happy with it. It's been a (mostly) enjoyable voyage. I'd recommend this kit to others at a beginning level. I might even see if I can find some 1/72 scale Vikings to crew her!

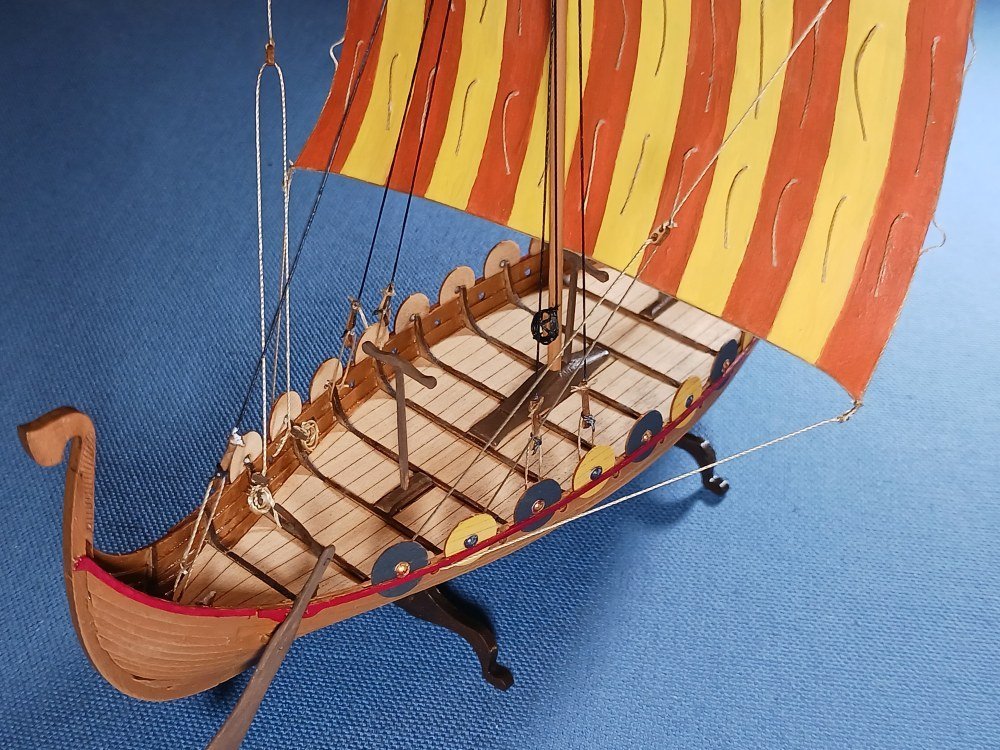
- JacquesCousteau, grsjax, Bryan Woods and 11 others
-
12
-
 2
2
-
Yeah, I've seen the diamond shape lines on the rock carvings. I always assumed they were probably some type of netting to provide strength to the sail. I did (briefly) consider doing something like that but I'm glad I didn't!
-
-
Great job, Martes!
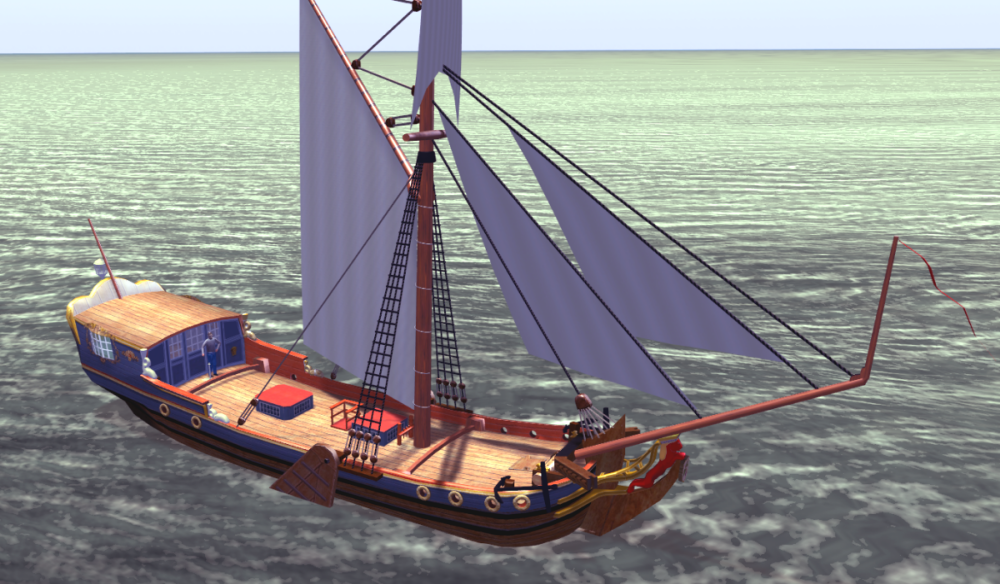
I think we've traveled parallel paths in regards to sail simulators. I got started in 3d modeling long ago making models for the proprietary but mod-friendly Virtual Sailor--version 2 if I remember correctly. I eventually got tired of being limited by a closed system and started looking for alternatives. Every sim system seems to come up short on capabilities or it veers off into fantasy in the search for marketability. Most recently, though, I've been tinkering with the open source fight simulator FlightGear but with boats. (I call it FloatGear.) So far I've imported some of my old models into the simulator with various levels of success and various features. Granted, there's a steep learning curve and I've barely scratched the surface--the challenge is really in the scripting and programming realm rather than the modeling.
I consider everything I've done so far simply to be proof-of-concept stuff but I'm convinced Flightgear can be a decent sailing simulator. 'Real Life TM' has temporarily derailed me from working on it for the past couple of months but I do intend to get back to it. Most recently I was working on implementing waves in the simulator.
Anyway... You might consider looking into it.
I posted a couple in-sim screenshots when I joined MSW:
- mtaylor and 3DShipWright
-
2
-
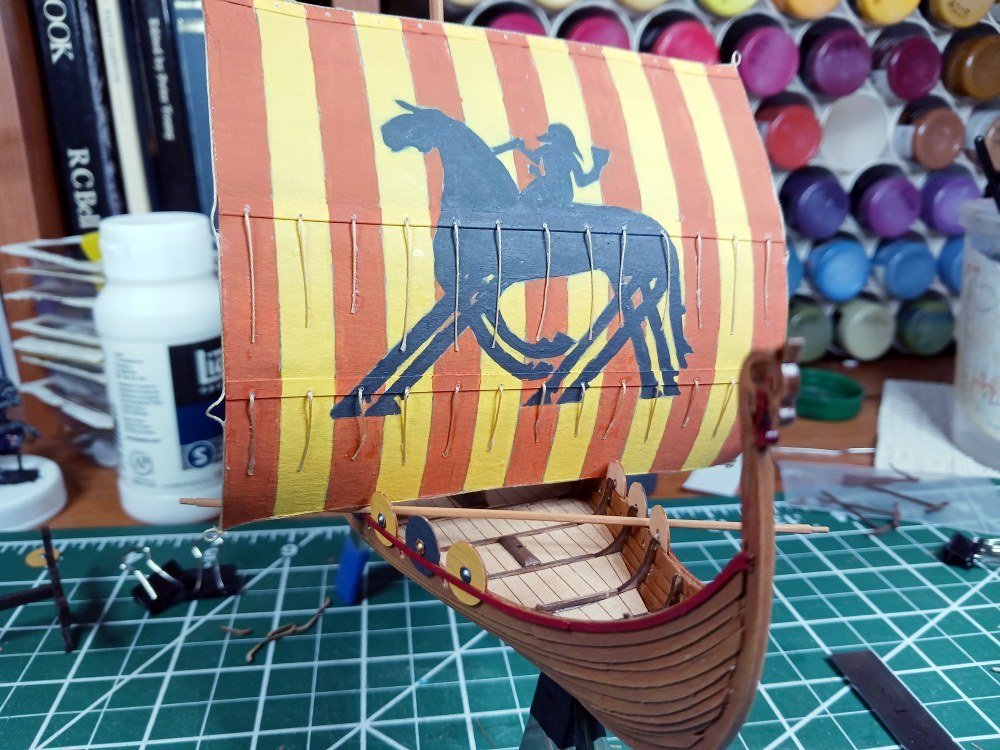
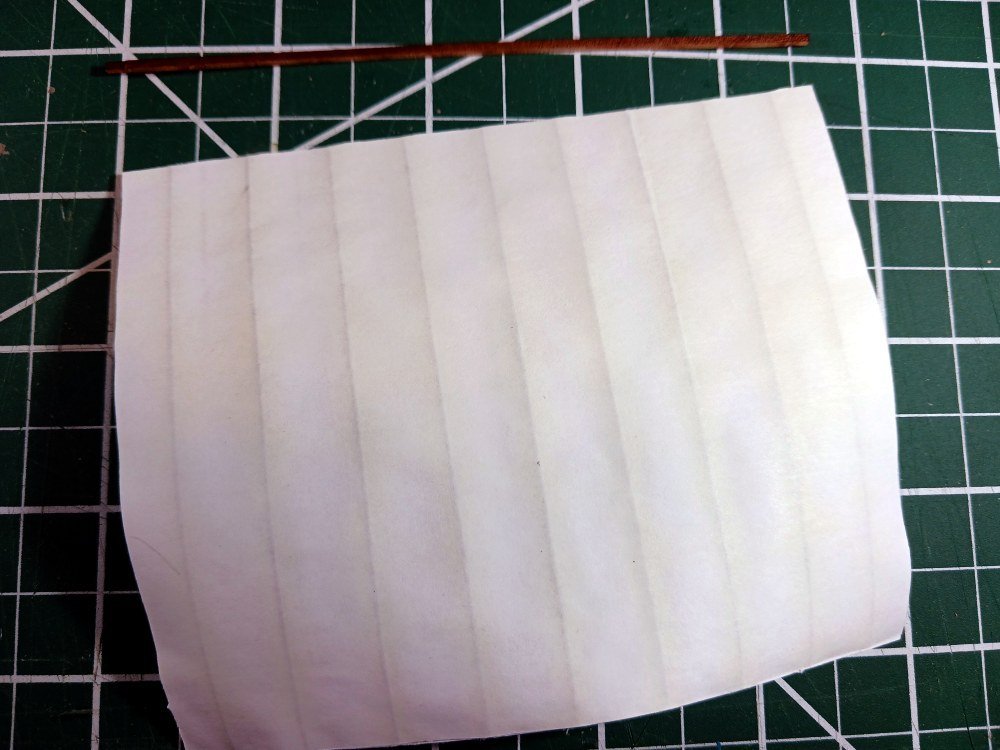
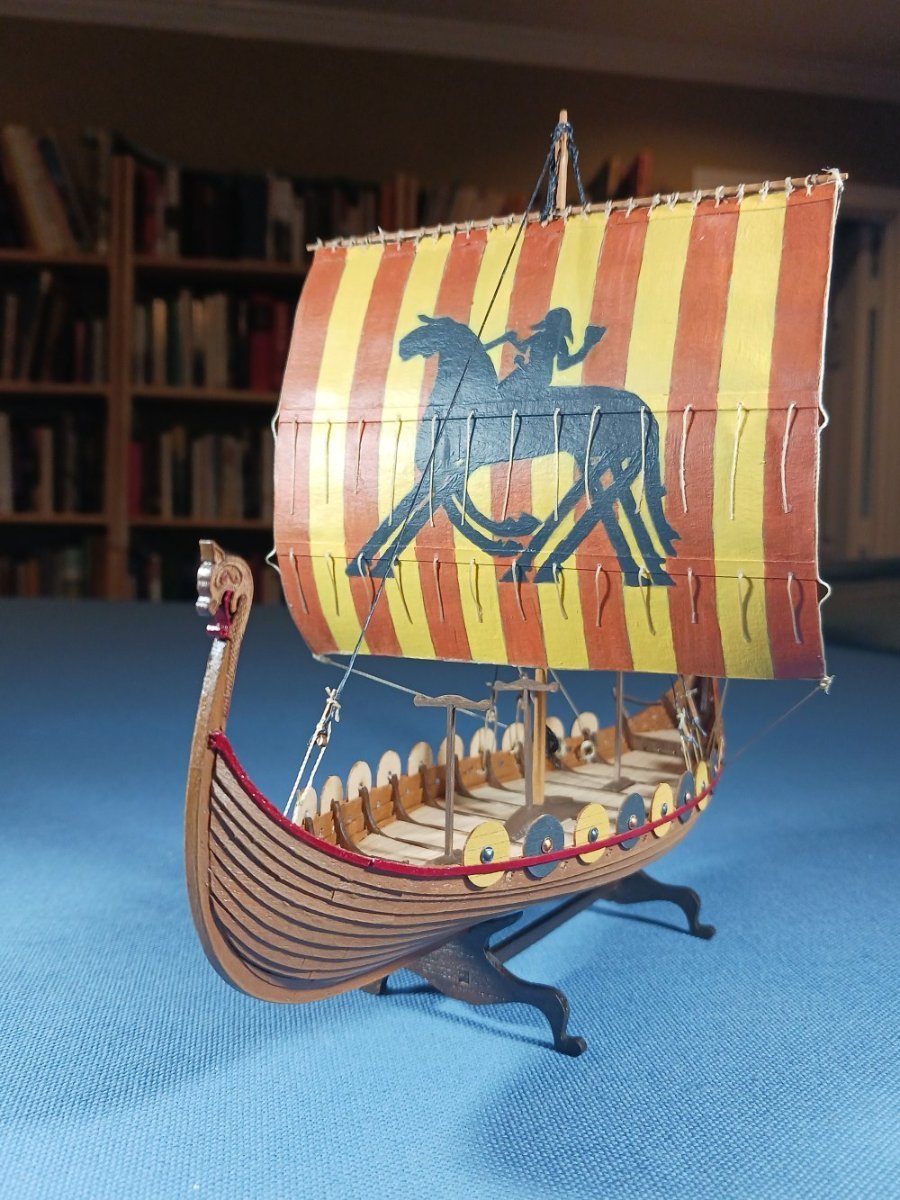
Instead of installing the standing rigging I decided to see what I could accomplish with the sail. Since I wanted to paint the sail I knew that regular 20# paper wouldn’t work as it would simply buckle with the application of water-based acrylic paints. So, I ordered some ‘mixed media’ paper. Turns out this is 120 lb, 200 g/m2 drawing paper which took the acrylic paint just fine. I had drawn up the design on the computer and simply printed out the outline on the new paper. I then painted it in with craft acrylics.
I thought about impressing the vertical panel lines into the sail after painting but decided they probably wouldn’t be noticeable within the vertical stripes. I did cut and glue small strips to represent reefing bands. I guess it’s somewhat debatable as to whether Viking ships used reef points but I figured if the Danish Viking Museum is using them on their reconstructions… it’s good enough for me.
The next step was to give the sail some shape. For this I used a broad paint brush to moisten both sides of the sail with water, placed it between two sheets of wax paper and then used rubber bands to wrap it around a one gallon bleach bottle. I quickly noticed that while the moisture didn’t affect the acrylic paint, the same was not true of the printed outline. The ink quickly ran and muddled up the sail. To be honest, though, this didn’t bother me. I thought the colors were too bright and the washed out ink toned them down a bit. The sail was left bound to the bleach bottle for 24 hours to dry.
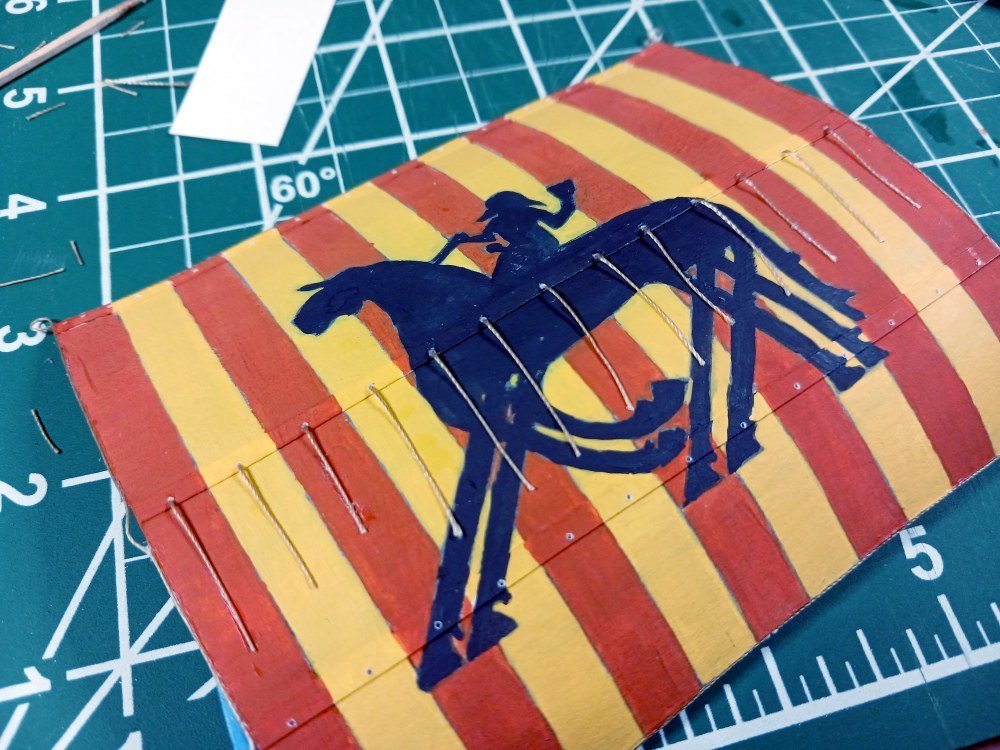
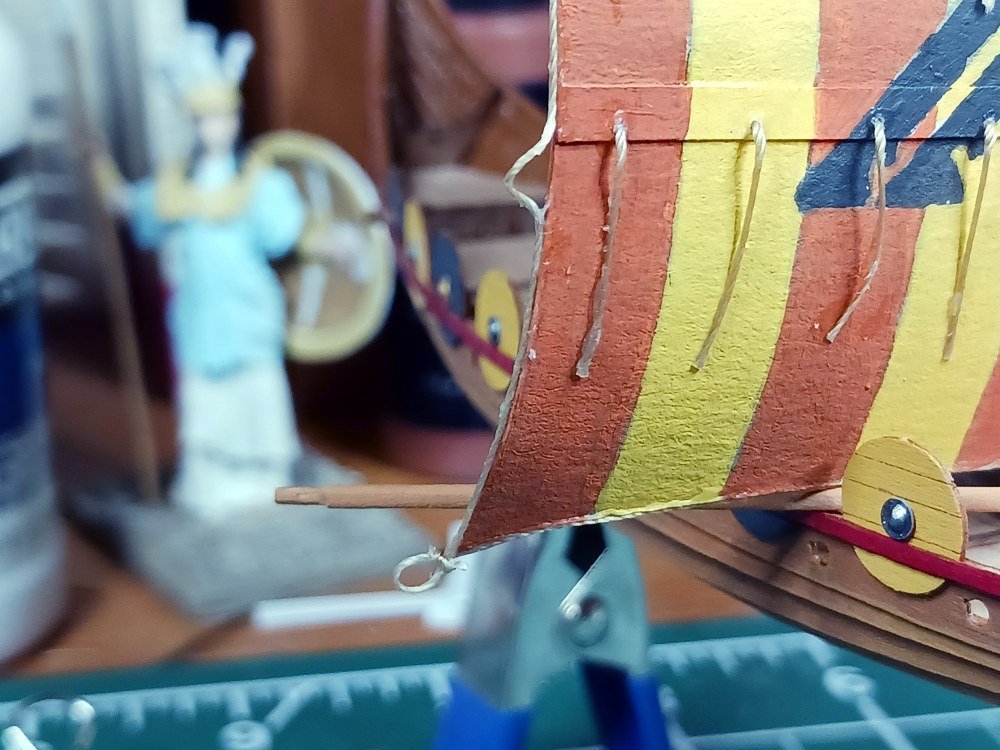
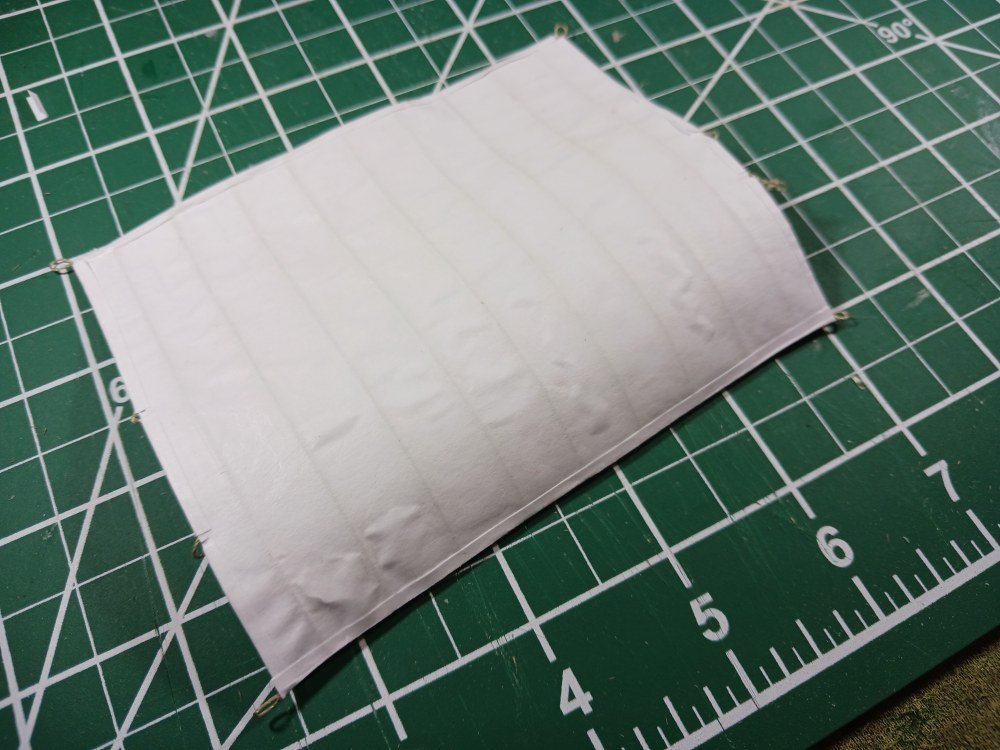
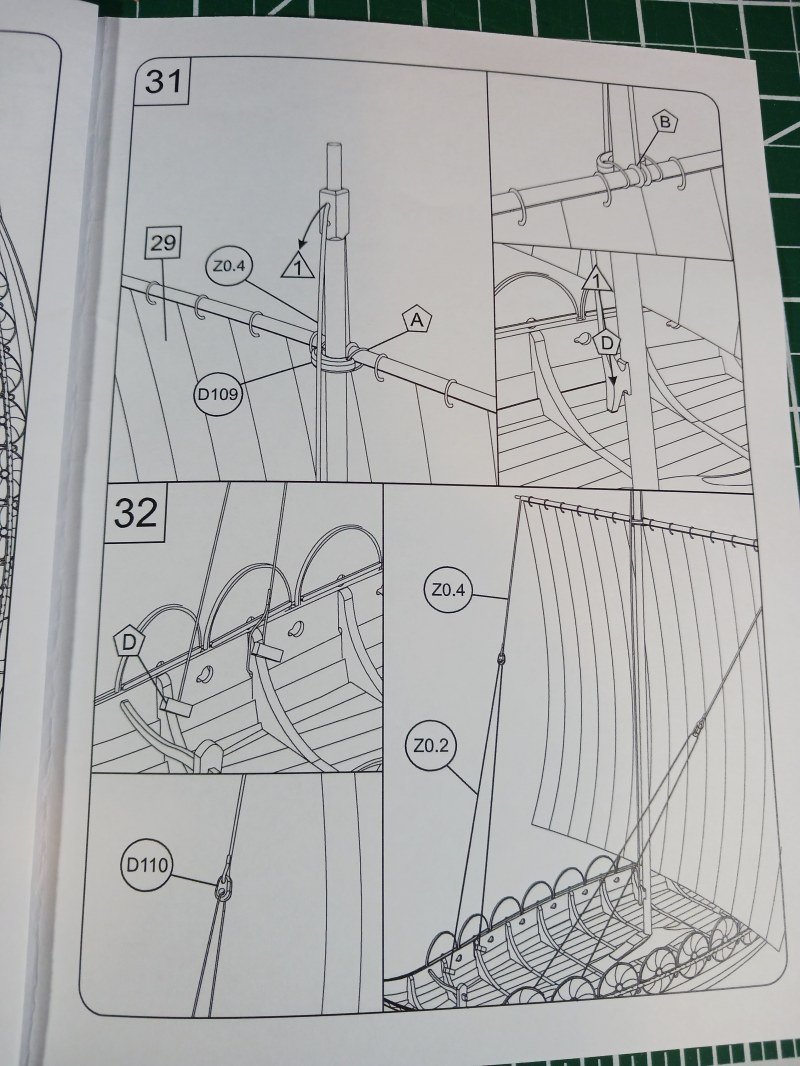
On to the rope work! I used some tan nylon thread left over from a previous project. I first stretched the thread by attaching a binder clip to one end of it and letting it hang from an elevated point. While it was hanging I worked some diluted PVC glue into the thread with my fingers and let it dry over night. This takes the curl out of the thread and makes it easier to work with. I also smeared PVC over the edges of the sail and let that dry to enable a quick bind when gluing the rope to the sail edge. Finally, I glued the thread to the head of the sail, looped it at the corners to form the cringles and then down the sides and foot leaving loops for clews. Bolt rope complete.

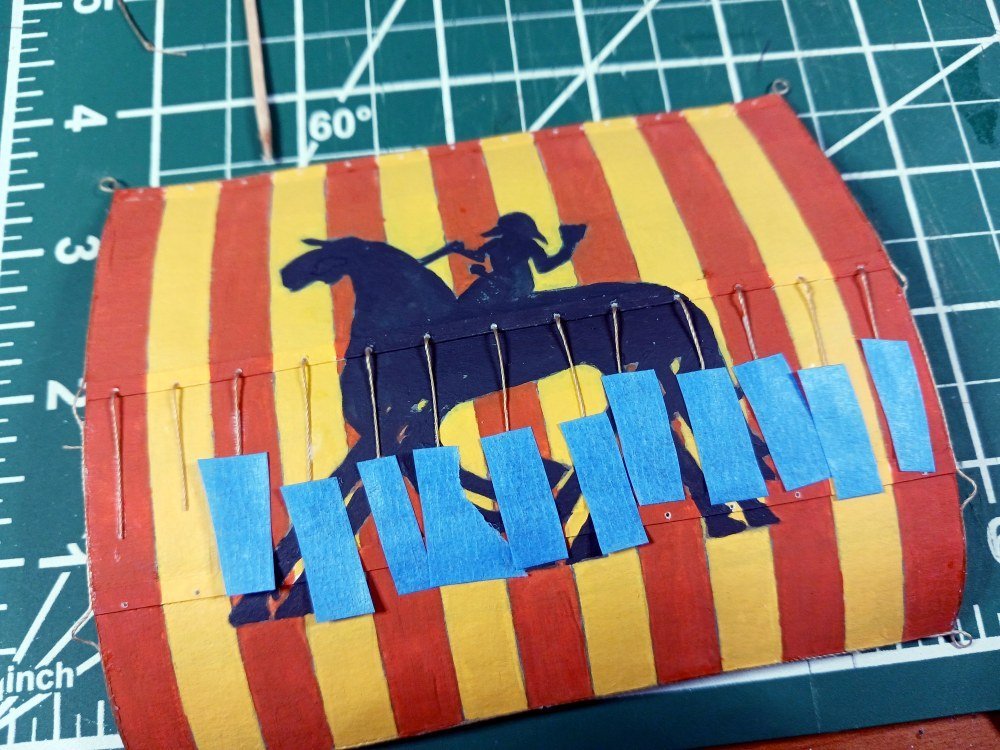
I then drilled holes for the reef points using a pin vice and ran short lengths of thread through the holes with a dab of PVC to keep them in place. Getting the reef points to lie down was a PITA but I eventually dabbed some PVC to the underside and held them in place with painter’s tape until dry. Notice that I wasn’t very successful in trimming the reef points to consistent size.
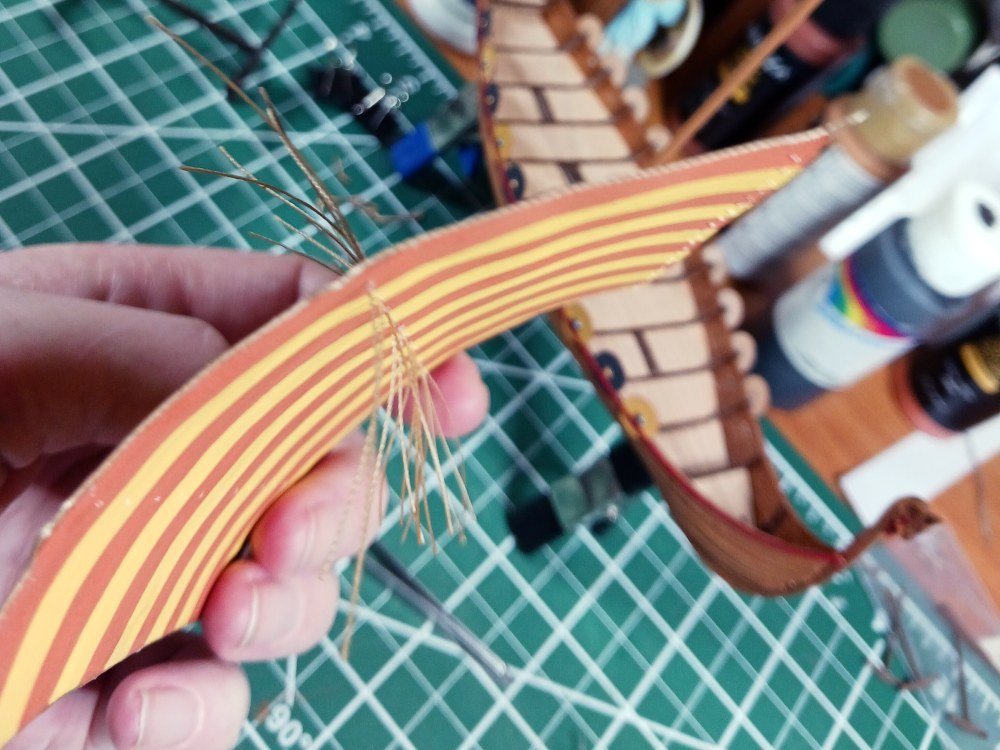
The final step was to coat the entire sail with acrylic matt medium to give it a consistent finish. I’ve found that I’m not terribly neat with my application of PVC and the matt finish hides the telltale signs of shaky hands and poor eyesight!
- Bryan Woods, sirdrake, GrandpaPhil and 1 other
-
4
-
A great looking no-sew cloth sail! Thanks for posting that. You've got my wheels spinning now.
- WizardOfOs and druxey
-
2
-
Thanks, Frank.
I've been enjoying the build and enjoying learning about Norse vessels.
The sail as provided was just a swatch of off-white cloth. No stitching, no hem, no bolt rope. There's nothing in the instructions about preparing the sail but the first appearance of the sail in the instructions does show the bolt rope.
C'est la vie!
But I'm happy to experiment with making a paper sail. In fact, I have a card skipjack I was designing a few years back that stalled because I didn't know what to do for sails so there's 'additional value' to this project.
- Archi, Bryan Woods, GrandpaPhil and 1 other
-
4
-
Pulling up a chair to watch! I'm still considering this model as a second build so it's nice to watch someone else's progress.
- AJohnson, FortressHarris and robert952
-
3
-
After spending a lot of time at the Vikingeskib Museet boat collection web site I decided that the bare wood of the model would look better with more color than I had originally intended. So, I painted the Sliepnir with the acrylics I had on hand.
I've been studying the rigging instructions and the photographs at the museum and I'll probably start rigging today or tomorrow. I was shocked that I was able to drill the required holes in the comma-shaped pieces that are used to tighten the lines. These holes are parallel to the surface of the wood, through 1mm thick pieces. I'm still not convinced I'll be able to run lines through them but we'll see! I've rigged a fair number of 1/600 scale AOS ships but I think the larger 1/72 scale will be a bit of a challenge. The earlier ships were war-gaming models so it mostly just running thread from point to point. Not much in tying things off realistically.
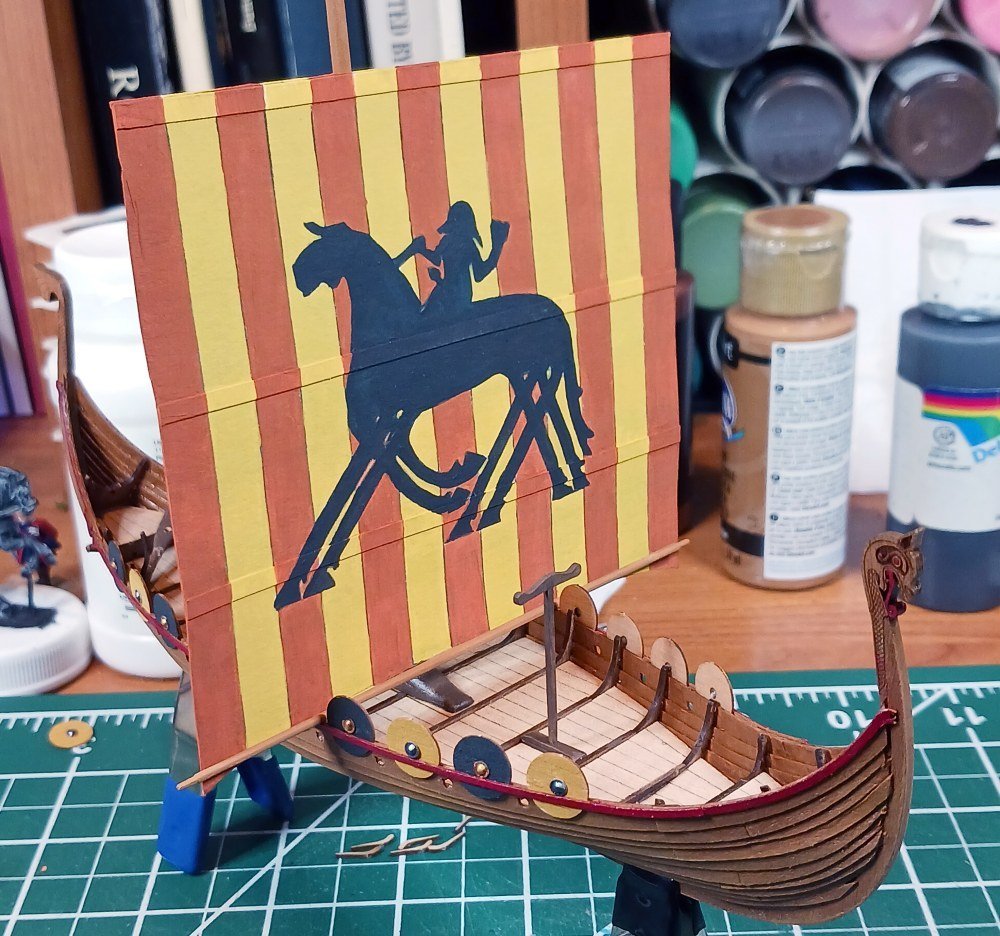
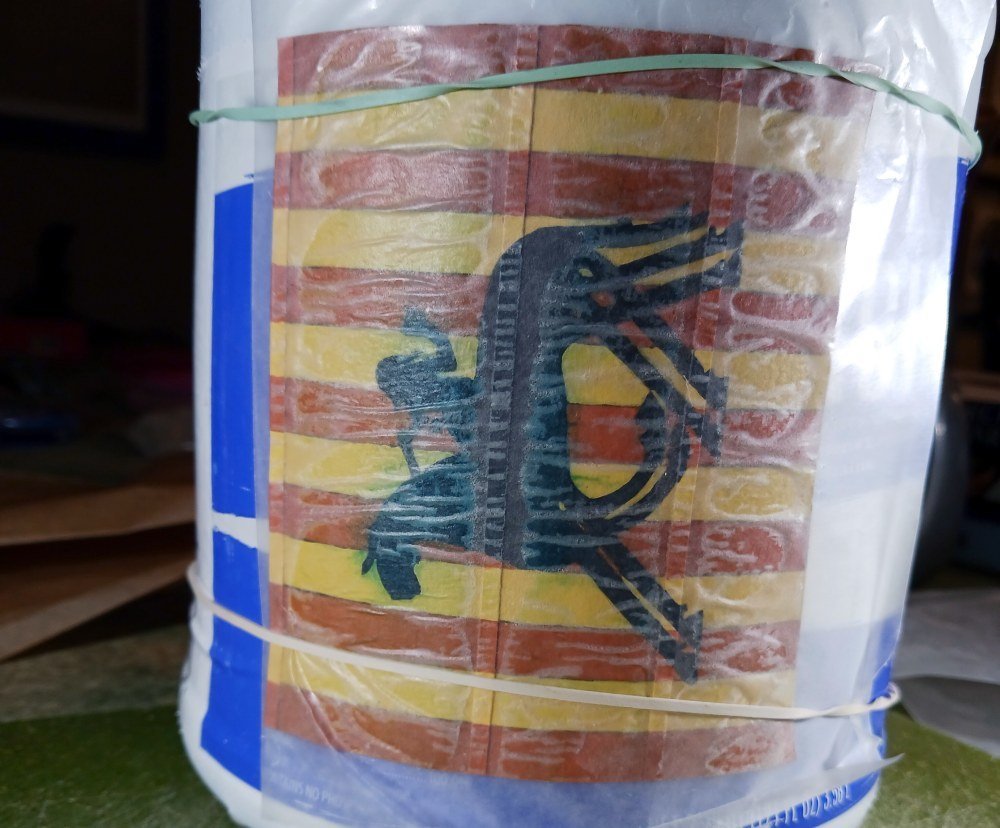
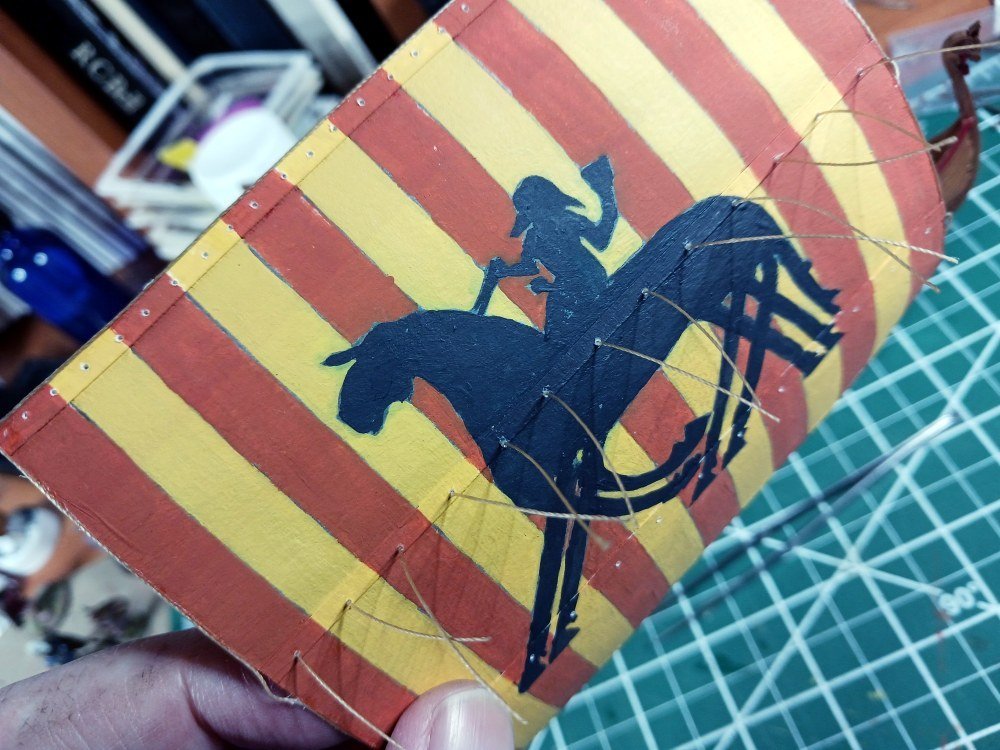
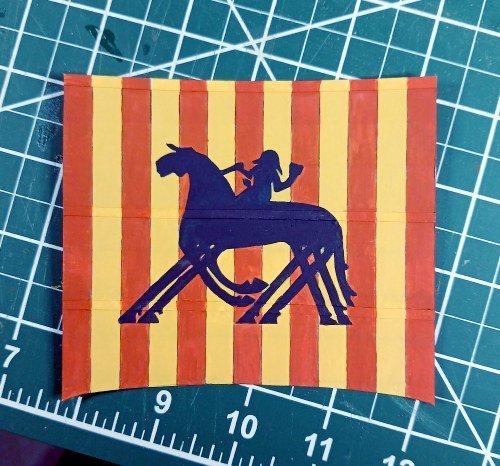
I'm still working on the sail. I've decided on a design for the sail, and I have the materials ready but I've not yet decided exactly how to do it. I have decided to create a paper sail, striped with ochre and terra cotta (my test can be seen in the overhead shot below). Superimposed overall with be a silhouette of Odin's horse, Sliepnir.

- sirdrake, Bryan Woods, Archi and 2 others
-
5
-
Thanks for the link to the hulk build, Steven. That was fascinating. The rudder withy attachment makes so much sense! Knock a wedge out to loosen the withy and you have a universal joint. One of the drawings in the thread also showed me that the rudder did have an airfoil cross section similar to modern rudders. I was wondering about that, too.
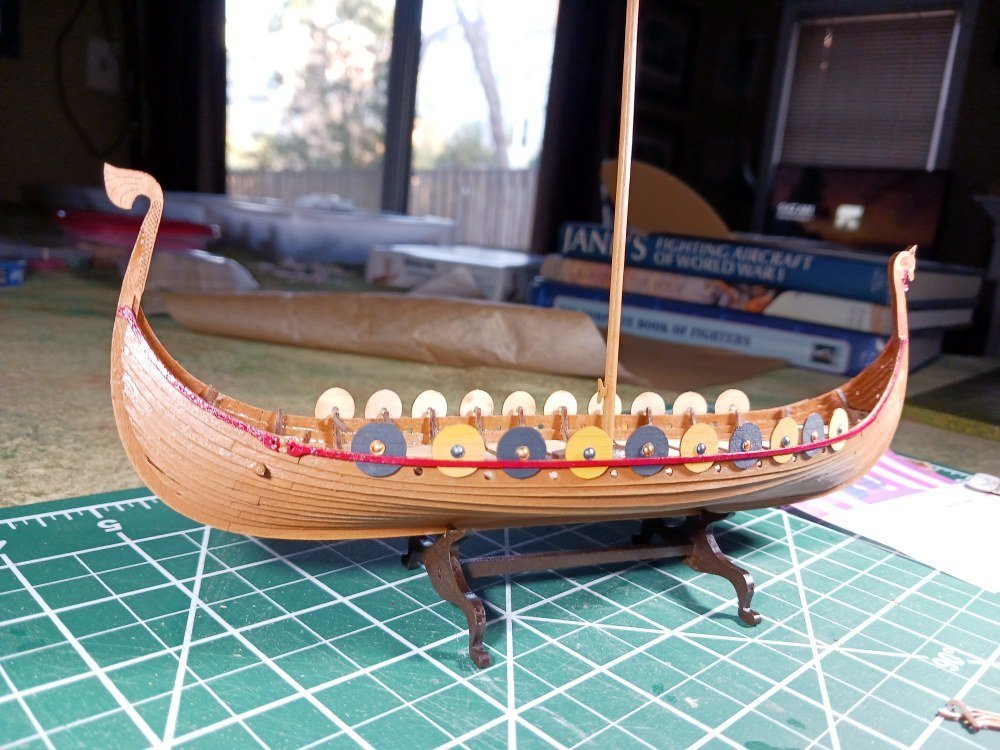
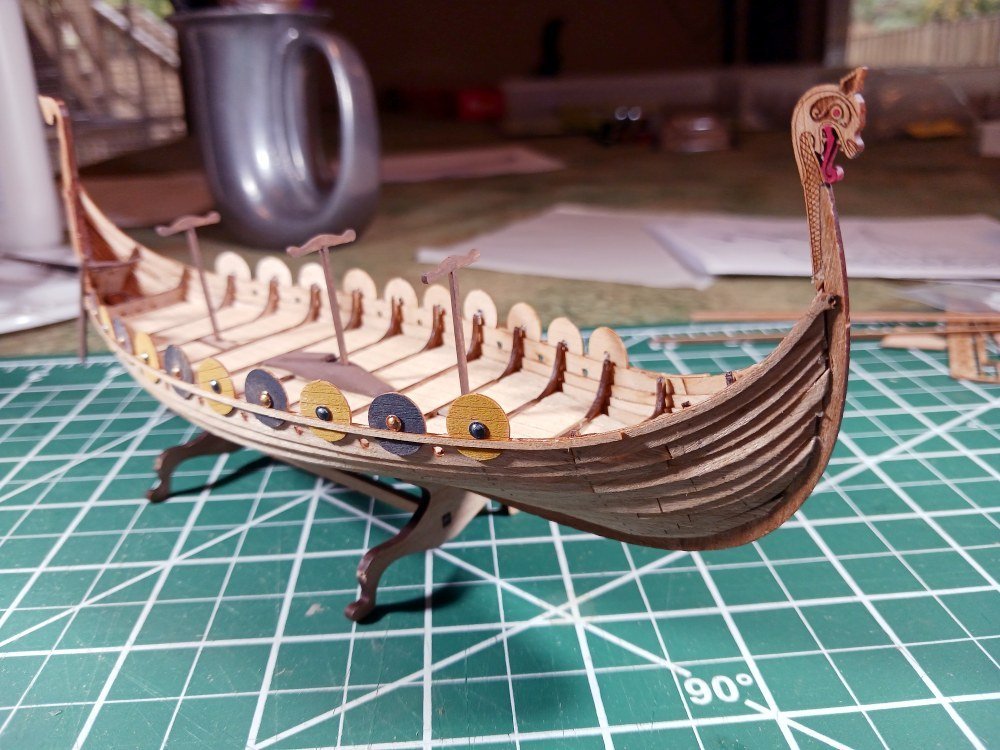
I've only done a little work on the model this week. I painted the shields, assembled the center-line racks (for oars or spars, I presume) and attached the rudder. The greatest effort was shaping the mast step. I neglected to take before pictures but it was in pretty rough shape. I did quite a bit of sanding and filing to make it presentable. I'm not sure I'm happy with the shield colors but I definitely need to add some color to their back sides to differentiate them from the hull strakes.
I did get a chance to try out my laminating scheme for a sail. I can't really call it a success but my 'prototype' shows enough promise to lead me to continue experimenting. I think I'll dump the hot-iron-and-plastic laminating and revert to glue. For this first attempt I just used 20 pound bond paper from my printer. Not quite the texture I want but I think I've got an old all-media sketch book around here which should provide a bit thicker, better textured paper. I folded strips of paper to edge the sail and the bolt rope is sandwiched in the edge strip. I'm not sure that's correct. Would sail bolt ropes be sewn inside a strip like that or were they always sewn to the outside edge of the sail?
Preparing for laminating, this shows the back side of the sail and the strings before having a sheet of plastic and then another sheet of paper (the front side of the sail) put in place:
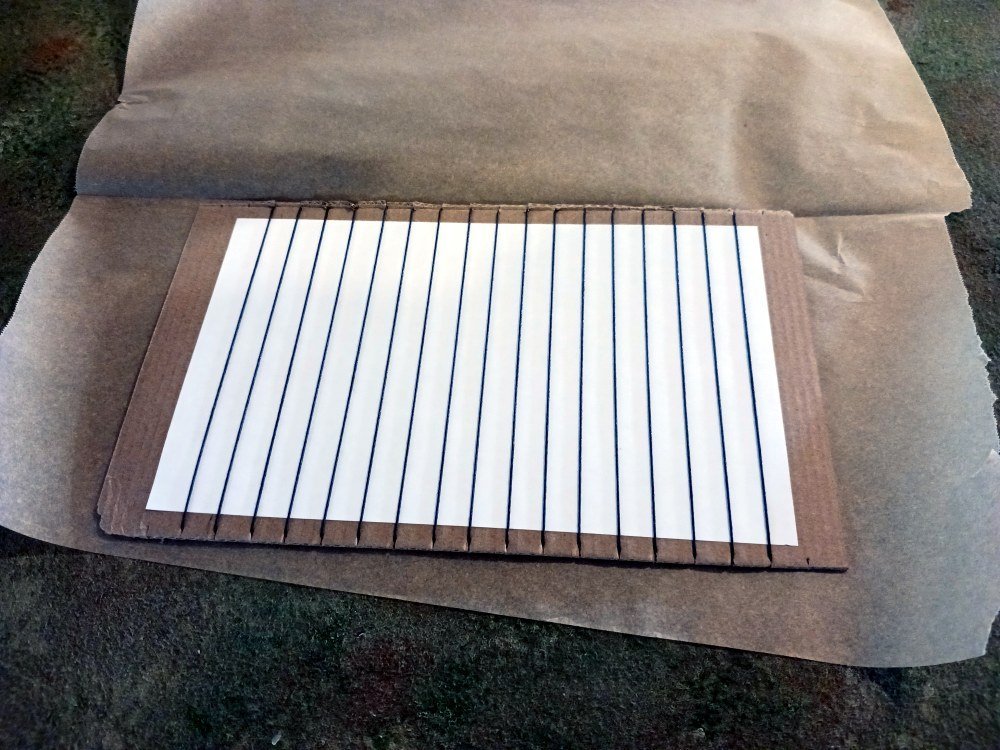
Sandwiched in parchment paper in preparation to ironing:
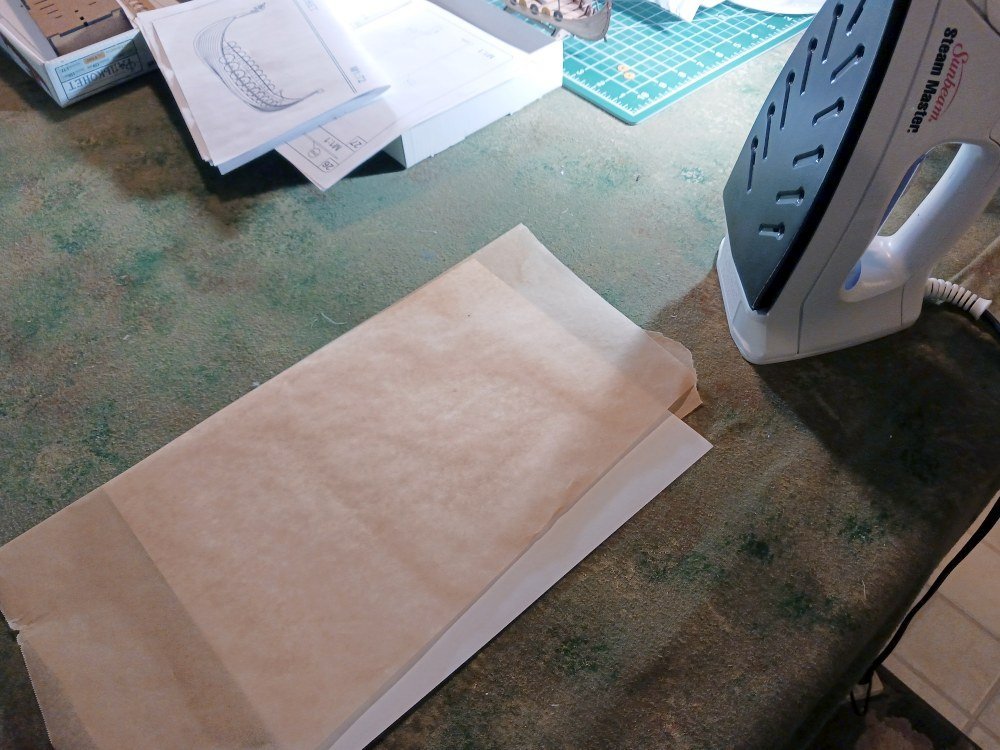
The laminated sheet:
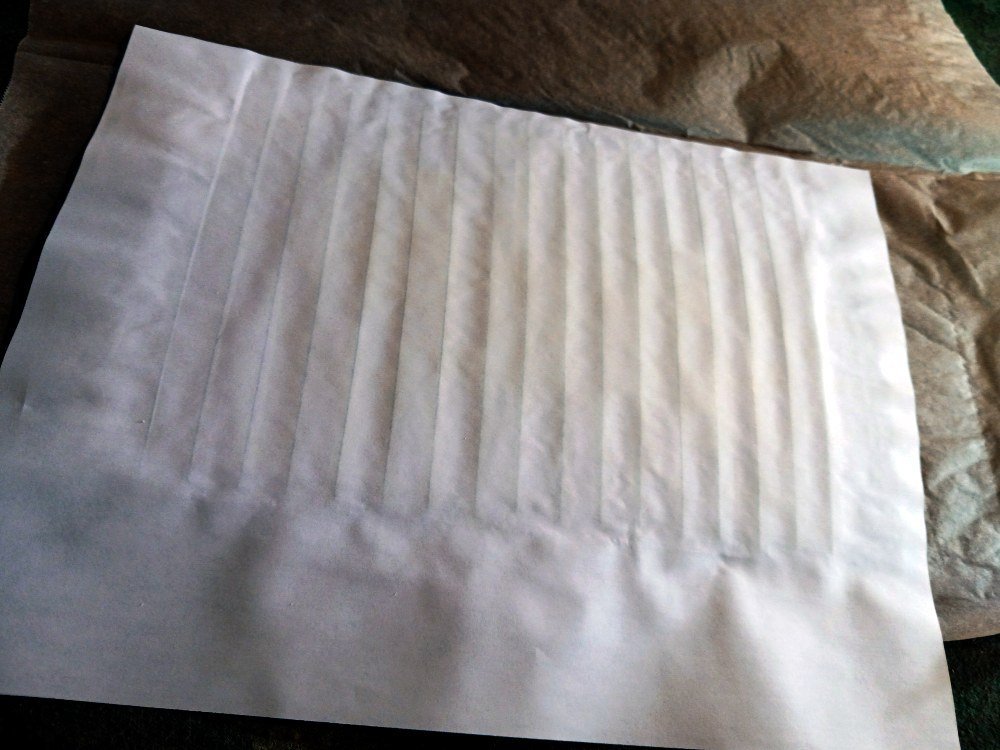
Cut to size:
With edge strips and bolt rope and clear matt varnish applied:
Frankly, the laminating didn't connect front and back together enough to avoid bubbling. But, I think if I can simply glue the sheets rather than laminate this might produce a usable sail.
- GrandpaPhil, BobG, sirdrake and 5 others
-
8
-
Thank you, Steven and Frank for the comments. While model building is a solitary activity it is so motivating to know that others are following along!
Thank you, Frank, also for the tip on the ‘lanyards’. I had, indeed, overlooked that in the instructions. And yes, I had blocked one of the openings. Forewarned is forearmed, as they say! And viewing your gallery of this model was a deciding factor in my decision to give it a try.
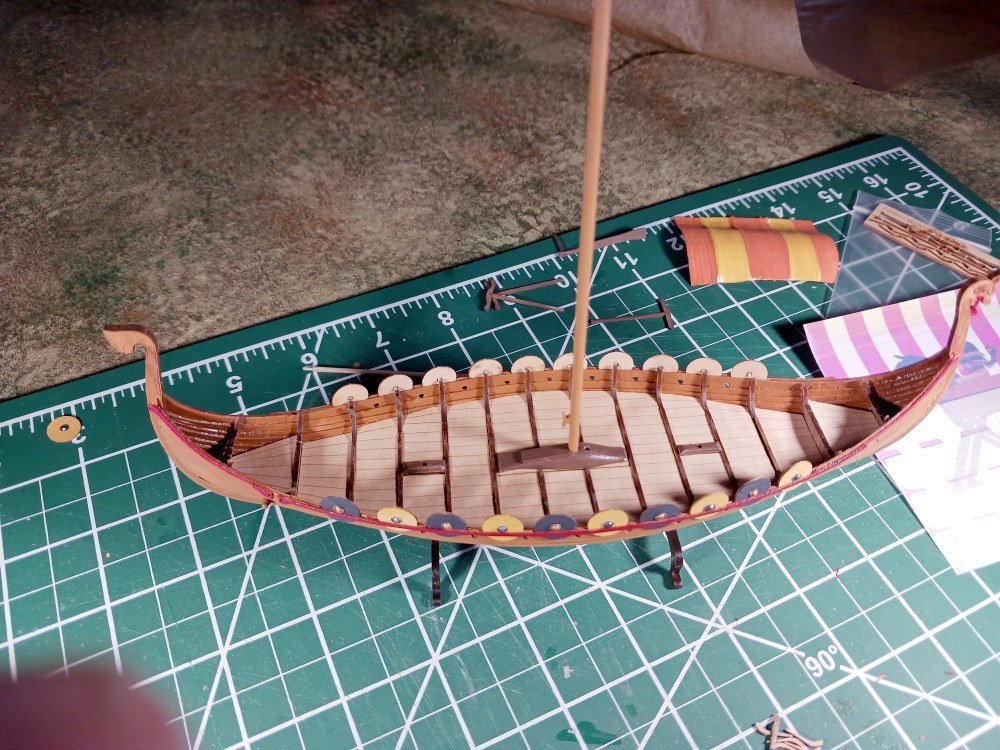
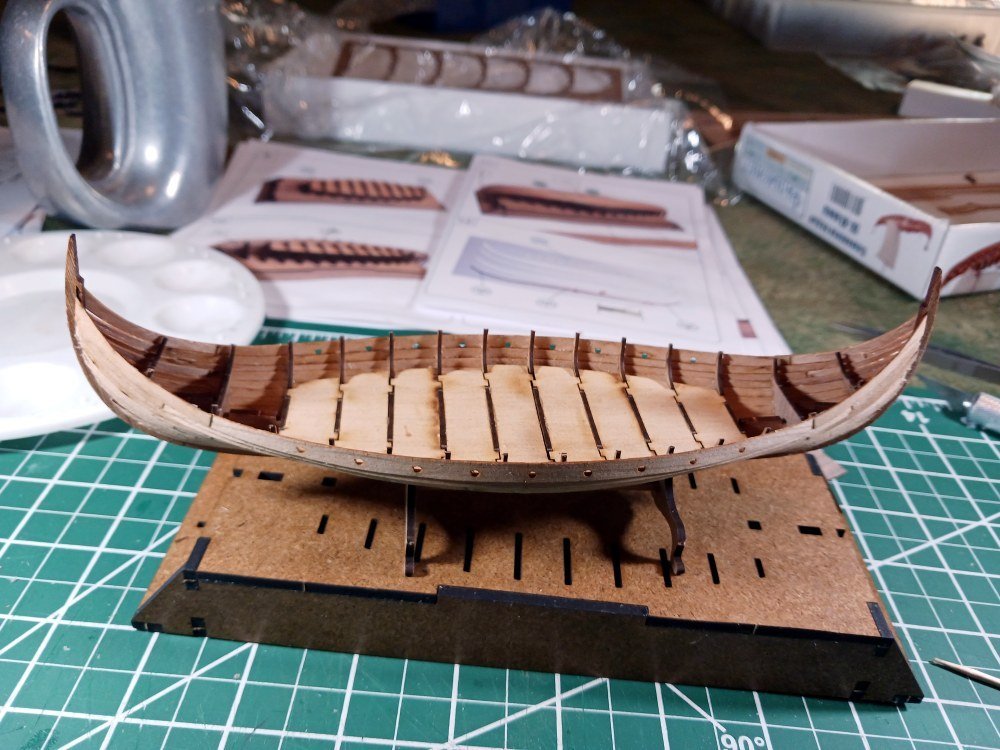
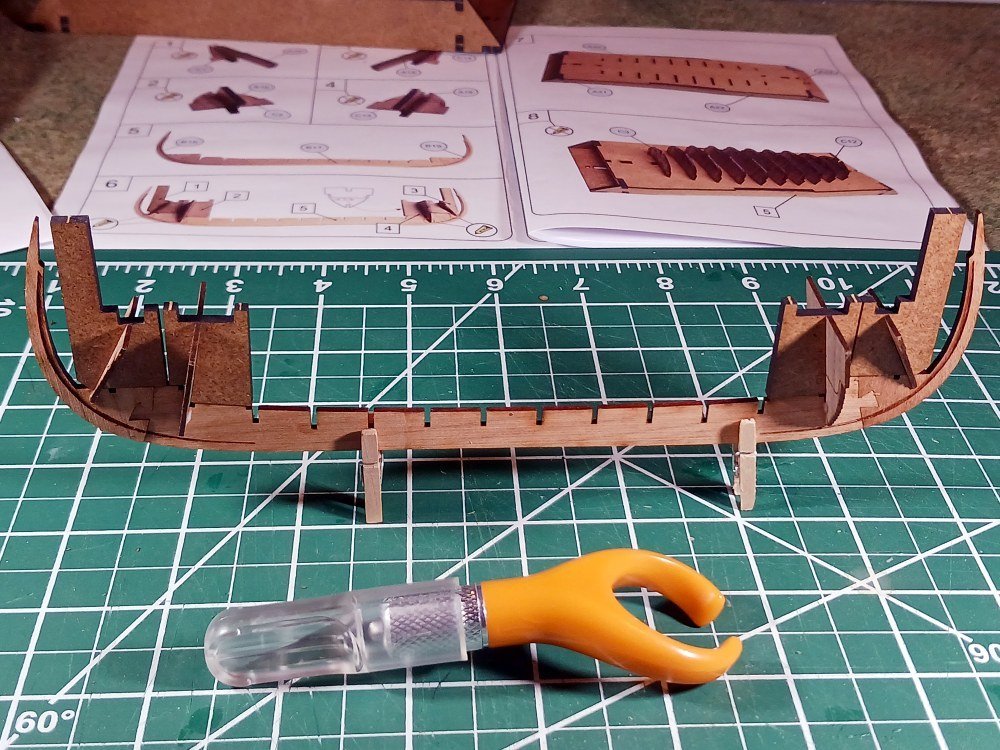
This week’s build activities have been smooth so there’s not much for me to whine about. I’ve installed the decking which looks okay. I considered slicing it up and installing it as individual planks but decided that at this scale it probably wouldn’t make much of a difference. I’m sill considering adding a few pieces since the supplied decking doesn’t quite conform to the hull planks as the hull narrows at the bow and stern. On the other hand, the additions might look out of place and disrupt the smooth lines of the decking. Hmmm….
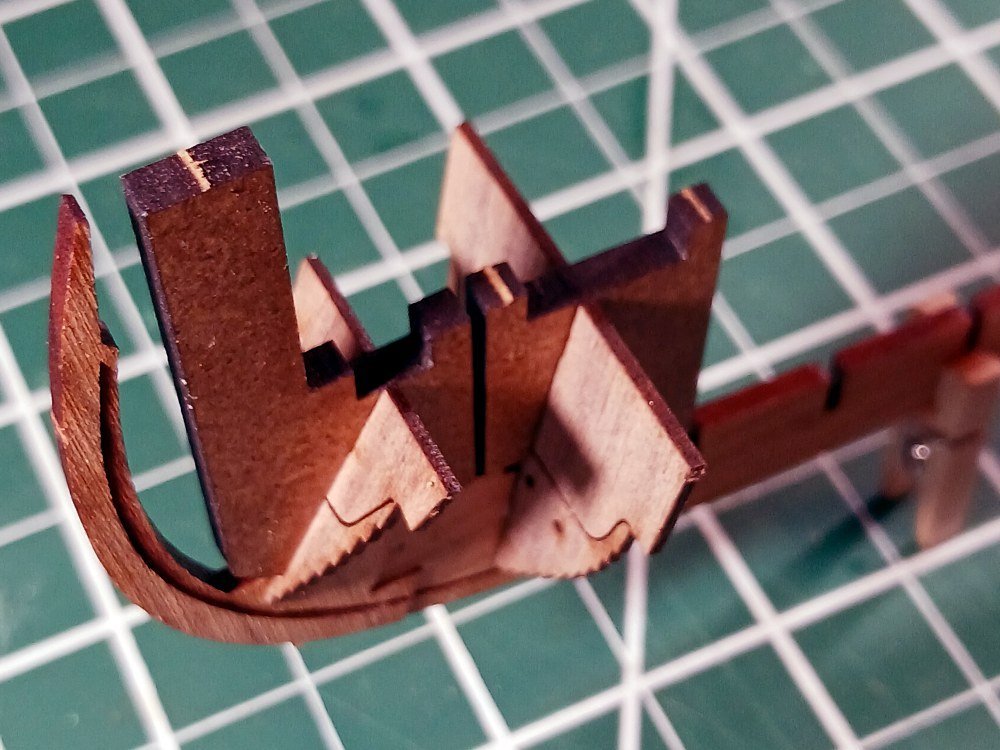
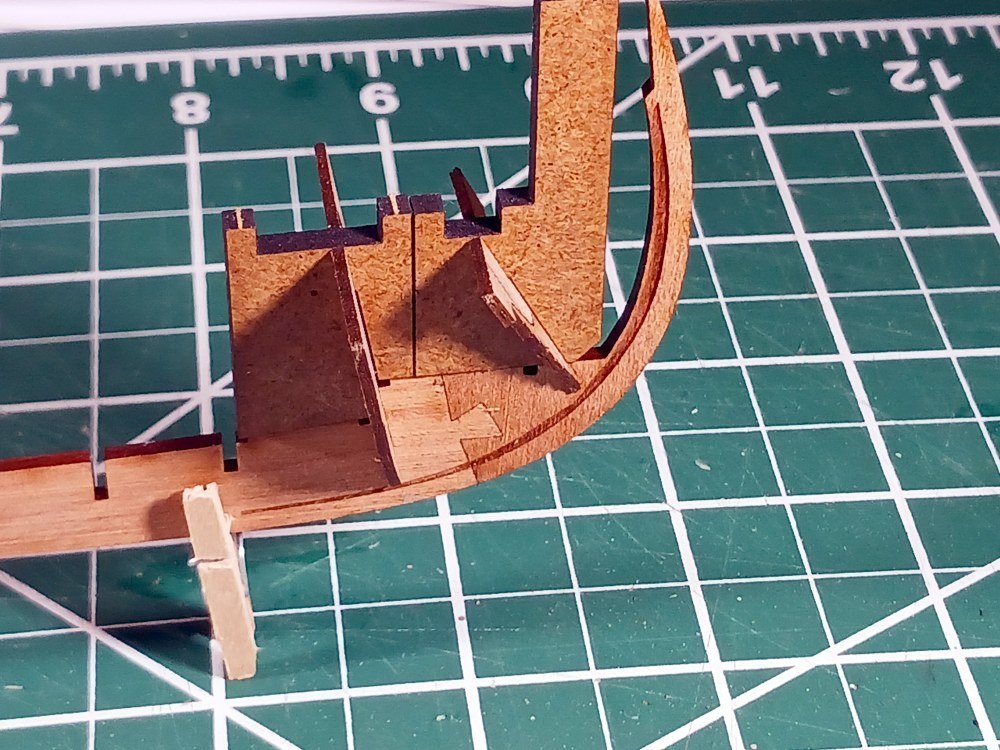
I also attached the figurehead and tail and finally the shield rack. Again, these were pretty uncomplicated and fit well. The next step in the instructions is to install the oar racks but I think I’ll hold off on that. I feel my chances of inadvertently breaking them off in subsequent steps is pretty high. I think I’ll take on the rudder next. That may be challenging. I’m a bit surprised by its method of attachment. Really? The only thing that keeps the rudder from floating away is a big knot that prevents a rope from slipping through a hole in the rudder? Is there an historic basis for this?
I’ve also been thinking a lot about the sail. To be honest, the sewing involved with a cloth sail may very well be outside of my skill set (and visual acuity). I’d like to introduce color to the model on the sail since my intention is to leave the rest of the model ‘bright’ (to use an anachronistic term). My previous experiments at painting on cloth have been disappointing. In addition, I only have supplies for a single cloth sail. If I screw it up I’d need to have a contingency plan. Consequently, I’m seriously considering constructing a sail from paper. I’ve read a couple of build logs here on MSW where impressive paper sails were constructed and I think that’s within my skill set.
When I tinkered with card models a few years ago I experimented with laminating card by sandwiching plastic ‘cling’ film between the sheets and then using an iron to melt the film. The process worked quite well and avoided introducing moisture into the card which inevitably caused warping. However, while I’m not too concerned with warping in a sail, I think if I lay thread over the film (between two sheets of paper) I can create panel seams with three dimensional presence. I’ll probably glue on strips of paper to represent the reef lines and edge seams embedding the bolt rope in the latter. If this works I think it will be easier for me than gluing together individual panels. In addition, I’m sure the paper will take paint better than cloth. I’m not sure if the sail will have color stripes but I do want an image of Odin’s eight legged horse, Sleipnir, on it.
Looking at the sails on various Viking ship models has me wondering how much we actually know about them. For example, is there proof that Viking sails were reefed? I thought reefing was a technique developed in Tudor times and that before that sails typically were shortened by removing bonnets? Given the Viking presence in Britain I can’t believe the practice of reefing would have faded away only to have been rediscovered later.
Anyway, I’ve been getting enough enjoyment with this build that I’ve already lined up another. Along with some tools to help it along. (By the way, what you see as inexpensive plastic calipers, I see as spring loaded bar clamps… well once a rubber band has been introduced!)
- GrandpaPhil, Archi and Knocklouder
-
3
-
Welcome Cristian!
I've only been on this forum a short while but your post reminded me of a book I purchased years ago: 'American Ship Models and How to build Them' by VR Grimmwood. (https://www.abebooks.com/servlet/SearchResults?kn=american ship models and how to build them&sts=t&cm_sp=SearchF-_-topnav-_-Results&ds=20)
Definitely old school (published MCMXLII) but I suspect just as good an introduction to basic scratch building today as it was back then. I don't think there were any kits at all when the book was published so if a person wanted to learn how to build a ship model they didn't have much of a choice!
I suspect, though, that most people would be better off starting with one of the novice kits.
- Macika, mtaylor and Keith Black
-
3
-
Yeah, I suspect the Slav/Rus debate is not one where I'm qualified to have an opinion. But given the range of operations for the 'Vikings' in Eastern Europe I'm fine with the description. Just like we almost always call it a 'Greek Bireme' but IIRC the two-tiered rowing system was probably a Phoenician invention. Technology spreads.
The shields for this model are wood with a resin or plastic boss. The template is used to paint a consistent spiral pattern on them. I'll probably go with something else, though.
I'd agree about Alfred. Just finished a second book on him. The first 'The Anglo-Saxon Kingdom' was a bit of a grind. I wasn't terribly impressed. It was OK for what it was but the author seemed more concerned with the lineage of the various Anglo-Saxon kings than the Kingdom of Wessex, Alfred and the Danish invasions. I learned quite a bit but it was a slog. The second book, 'The White Horse King' was the opposite end of the spectrum. Much more readable, though less deep. Between the two I redeveloped my admiration for Alfred the Great.
-
Welcome, Louie! Enjoy the show.
Three lessons from my latest efforts at ship modelling: 1) Errors are cumulative; 2) You never have enough clamps; 3) Patience is a virtue.
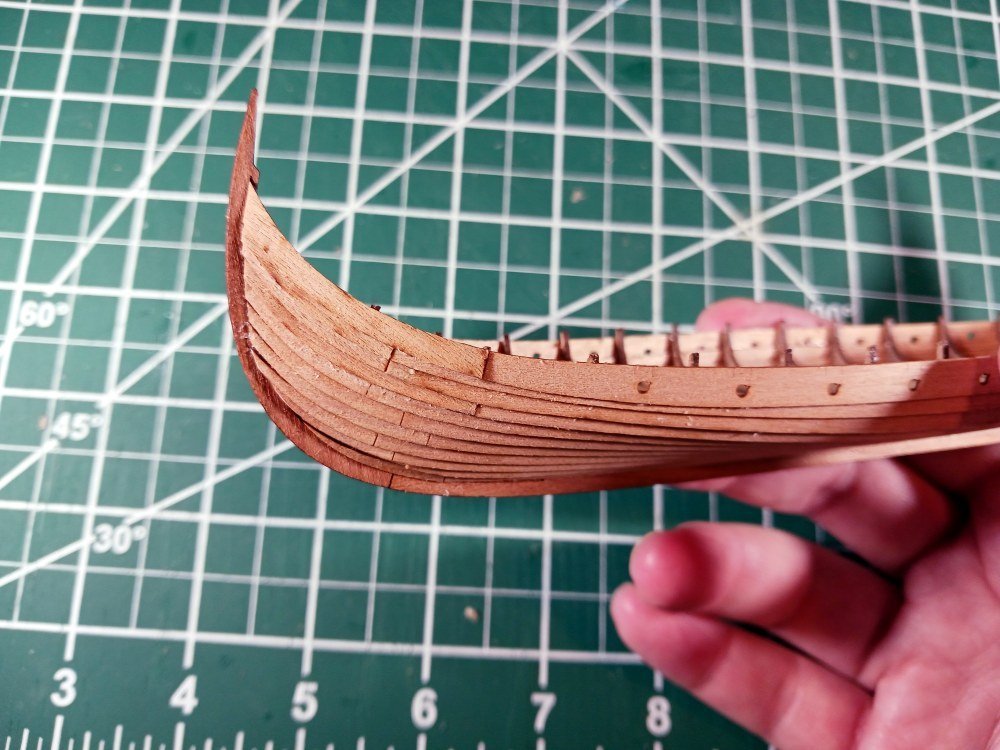
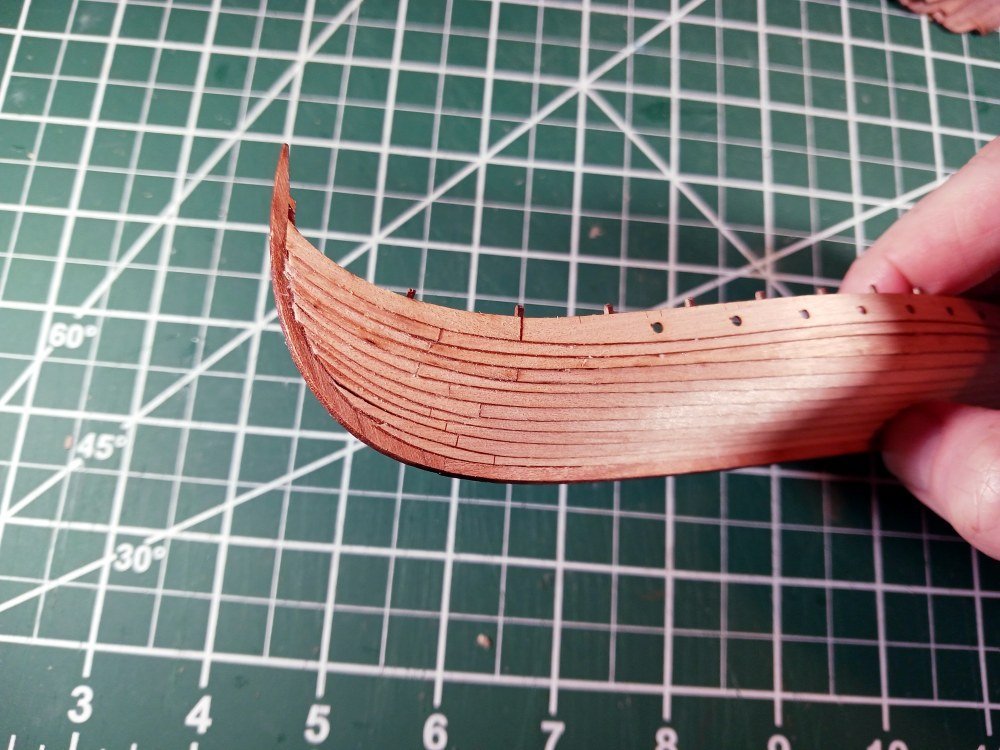
Planking the hull was going, well… almost swimmingly. The first seven strakes on each side of the hull all had the aforementioned lines engraved into the wood to simulate scarf joints in the strakes. These continue to be a problem as the (unnecessary!) lines weakened the piece enough that the strake usually snaps when forming it to the hull. Hoping to avoid breaking it I applied a thin coating of glue to the strake to reinforce it before detaching the strake from the sheet. That did help, but in fact about 50 percent of the time I ended up reattaching the ends after the strake was glued to the hull. Frustrating, but not a show stopper.
The last four strakes were designed with separate ends and actually had a 3/16 inch overlap area for a scarf joint which produced a much stronger piece. This is how Falconet should have designed all the strakes if they thought representing the scarf was so darned important! Falconet did provide a plastic template/jig for scarfing the strakes. While I was doubtful about this it proceeded quite well.

By the time I attached strake 7, though, the hull and jig exceeded the width of my ad-hoc Bread-Bag-Twist-Tie Clamping System (BBTTCS – patent pending) so I removed the hull from the jig thus providing access to the inside of the hull. This allowed me to use my precious four (count 'em, 4) mini clothes pins to clamp the strakes in place while the glue tried. But with only four pins I could only clamp about 1/3 of the length of any one strake—but I could use the BBTTCS for the ends. No problem, just an exercise in patience.
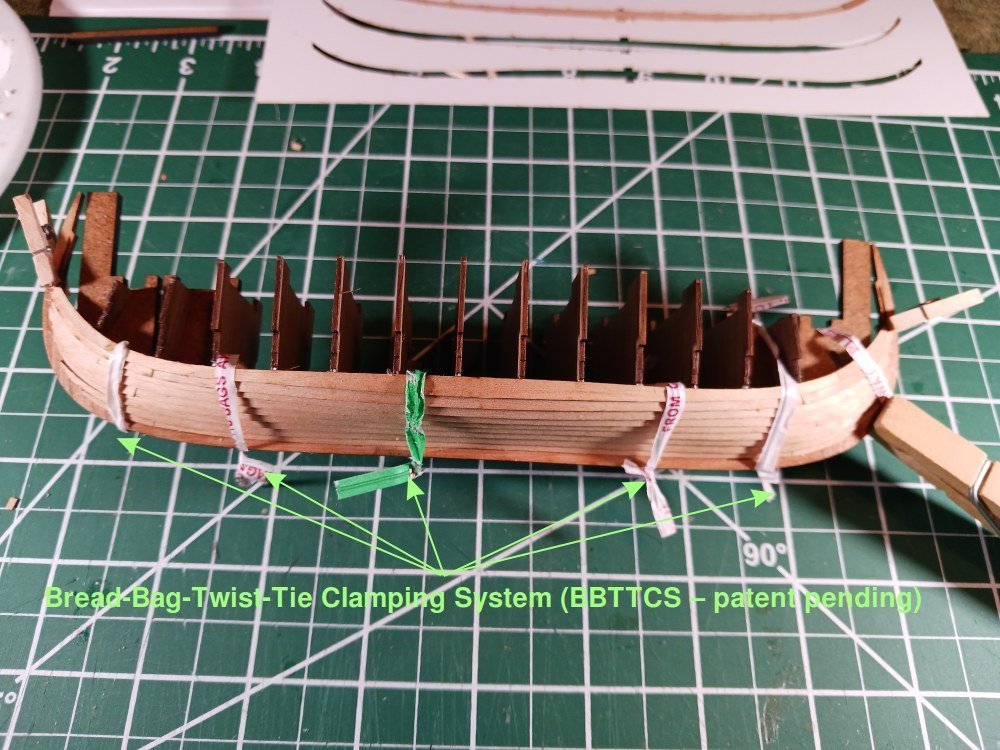
Turns out my stock of patience is smaller than my stock of mini clothes-pins! I got in a rush, didn’t notice a gap forming in the center of the strake as I tightened the ends. So, my Viking ship is going to need more caulking that most. Actually, I don’t think most people will even notice it. But I know it’s there.
I started planking by alternating between sides so that the hull remained symmetrical. However, since strakes 8 through 12 had to be scarfed I did 8 through 12 on one side before the other. When I reached number 12 I found that I had not gotten the vertical placement correct. My ship was going to have a little less freeboard than intended. I’ll have a little bit of a rabbet to fill at a later time. I’ll also need to shave down the bulkheads a bit since they now extend slightly above the final strake. Again, not a major issue—I don’t think most people will even notice it. I’m not sure where I got off track but by the time I reached the final strake the error was noticeable. With such a small model small errors are quite visible!
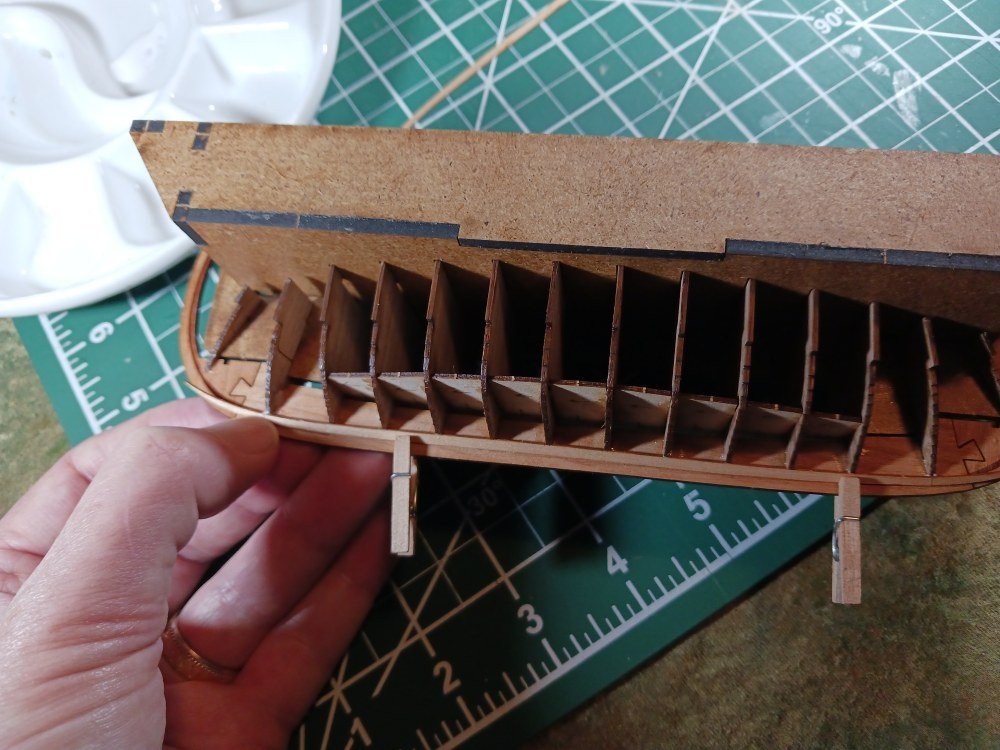
I’ve also noticed a challenge to come. The end bulkheads fit into slotted guides which keep them in place while planking. Once I removed the hull from the jig I thought I’d remove the guides to give myself a bit more working room when clamping. However, the guides cannot be removed until after the bulkhead extensions have been removed—which really needs to be done after planking is complete. Not a real problem (I hope). Just something that caught me by surprise.
More disturbingly I also broke off one half of an end bulkhead in trying to apply the BBTTCS. (I may or may not have been traumatized by this event which led, I believe, to my not noticing the gap forming in the strake. I least that’s the story I’m going with.) Turns out I wasn’t getting a good contact between the strakes and that bulkhead. I’ve saved the tiny sliver though and will carefully reattach it once the planking is complete and I have more open access to the interior.
Once all the planking was complete it was time to remove the bulkhead extensions Not knowing how strong the bulkheads actually are (especially after breaking one of them!) I was a little nervous about this. So I carefully cut the remaining holding tabs that I could reach before gently wiggling the extension fore and aft to snap any remaining attachments. You can also see in this picture how far off my vertical placement of the strakes is. At least I presume they should end at the top edge of the strake.

Many years ago I lost vision in one eye and developed permanent floaters in the other (not to mention night blindness)—consequently, I have virtually no near-depth perception. And with the passing of years I have grown more and more far sighted—not unusual for people my age. While I’ve grown accustomed to my vision and adapted my hobby activities to it, building this boat has been a real visual challenge. But I am enjoying it. Nevertheless, my second build will be something a little bit bigger. Let’s just say that ships in bottles ain’t on my horizon!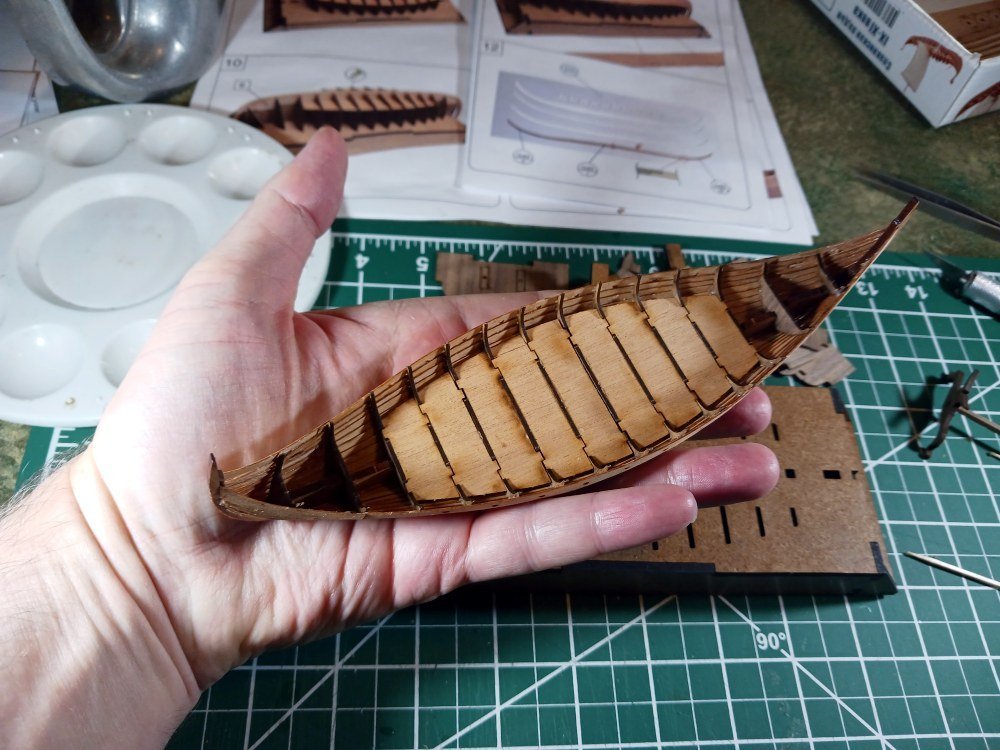
- BobG, Bryan Woods, Ondras71 and 7 others
-
10
-
Thanks for the likes!
My materials on hand for this build are fairly limited. They are essentially, Elmer’s white glue, Aleene’s Tacky glue, thick CA glue, toothpicks, full size clothes-pins, four (4!) mini clothes-pins (I swear I had more!) and, of course, a selection of hobby knives. Aleene’s has been my go-to glue for most projects for years now and I saw no reason not to try it for this build. I thought about using the CA but to be honest I don’t think I’m going to paint this model and I don’t think I can be accurate enough applying the CA to keep the outside of the model looking clean. The Aleene’s can be rubbed off with an eraser if I get too exuberant. Granted, this build is very much about figuring out how to do things so I’m fully prepared to call myself an assortment of not-very-complimentary names for making bad choices!
Gluing the garboards was not difficult though I did wonder how to place them precisely. While the bulkheads are notched to guide with the vertical placement I did not see a way to ensure a proper horizontal placement. Then I noticed a vertical line towards the ends of the garboards and they seemed to align with the penultimate bulkheads. Aha! Quite clever. Wrong….
Nevertheless, I proceeded. Knowing that glue sticks best to glue, I used a paintbrush to apply watered down glue to the edges of the bulkheads and the inside of the garboard. After letting that dry I applied unadulterated glue to the bulkhead notches for the strake I was attaching and carefully placed my precious mini clothes-pins to hold it in place. So far, so good. I let it dry for an hour and then placed the other garboard. Maybe having so few usable clamps will force me to be patient during planking!
It was not until I was test fitting the second strake that I realized the lines had nothing to do with placement. They seem to be purely for aesthetic purposes to represent a feature of the full size ship. (In fact, these lines came back to haunt me.)

However, while inspecting the strakes while wearing my magnifying headpiece I did notice that they actually were marked! Each strake has a pair of microscopic marks indicating where they align with bulkheads seven and eight. Aha! Quite clever. If only they could be seen with the naked eye!

It was at this point that my clamping strategy went awry. I’ve been applying glue to the center bulkheads and attaching the strakes. Once the center section dries, only then do I tackle the bending at the bow and stern.
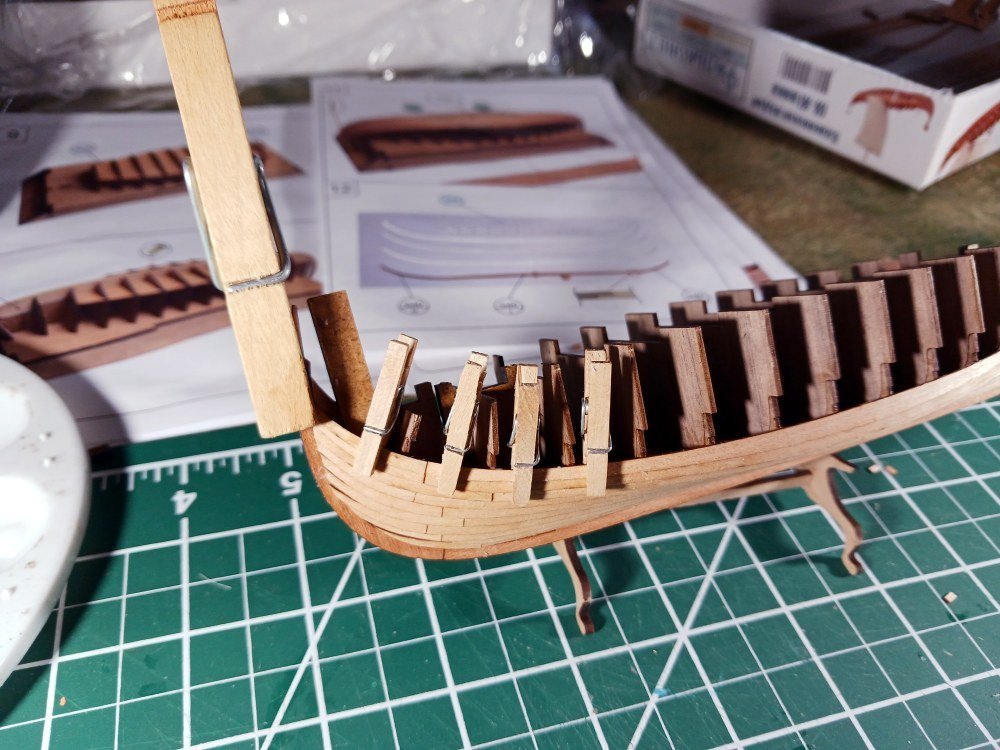
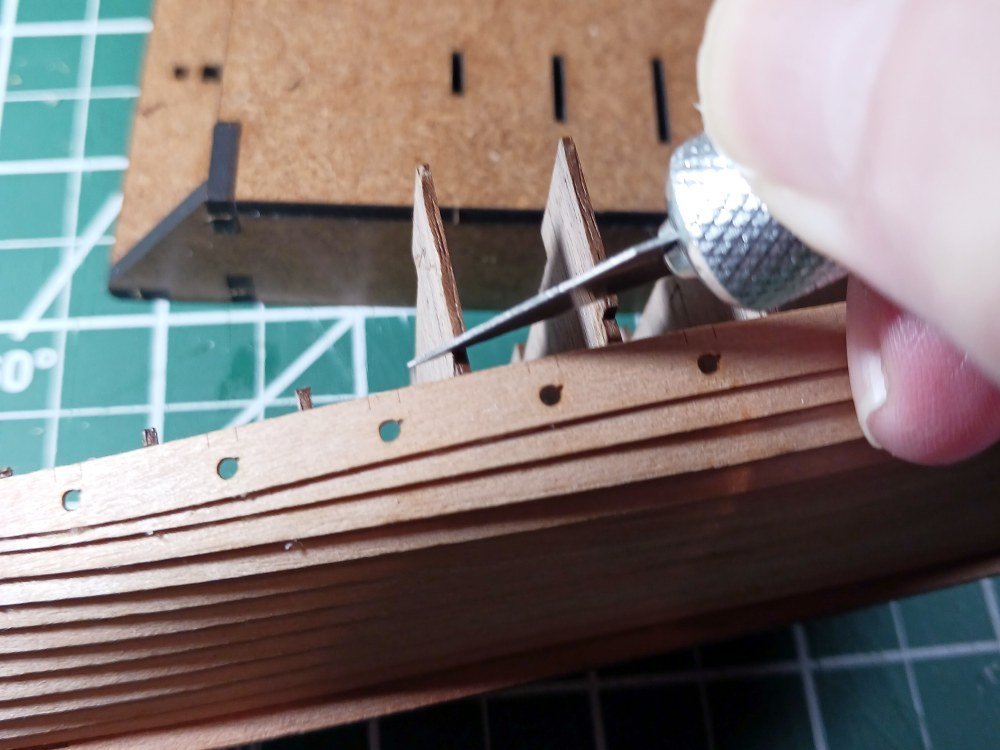
After the garboards it became apparent that the mini clothes-pins did not have the reach to be usable in holding further strakes to the bulkheads. And, to be honest, they were a bit too strong for the delicate pieces of this model. I looked in vain for blue painters’ tape or some other way to clamp the strakes. I even considered bread-bag twist-ties. I’m afraid to use pins as I suspect they will simply split the wood. Ultimately, I think I’ll just have to use my clumsy finger-clamps. (Which is a challenge for someone as fidgety as me!)
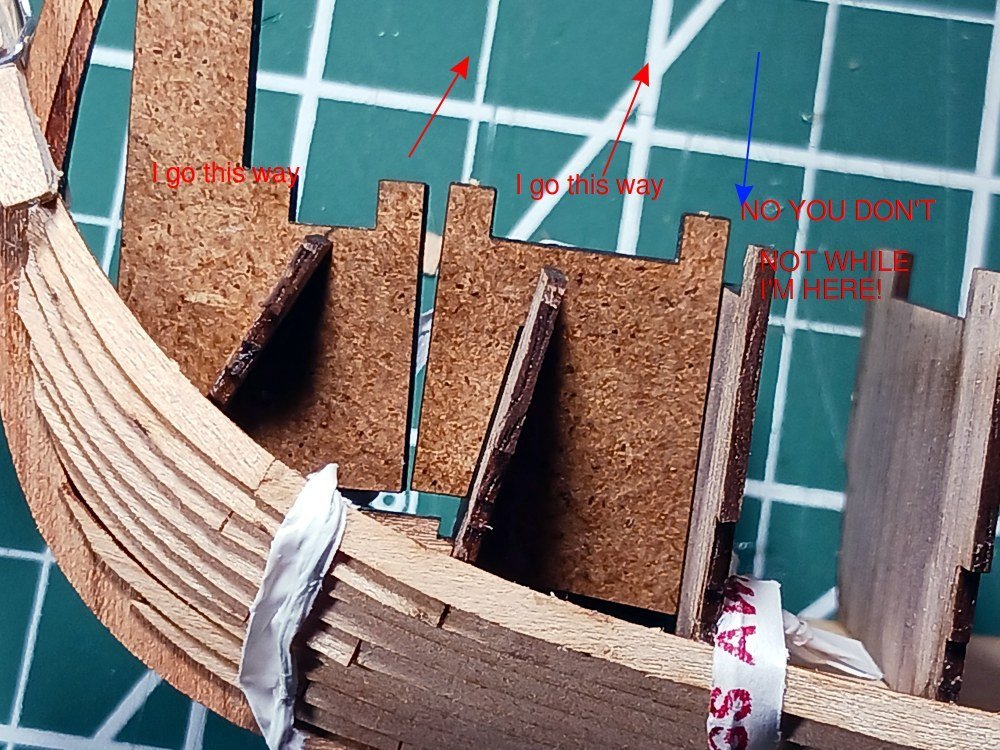
This is a delicate model. That delicacy has been compounded by some design choices by Falconet. Remember the lines which I first assumed indicated strake placement but did not? Well, since they cut about half way through the wood they definitely increase the fragility of the pieces. Any pressure (including a gentle clamp) on the end sections tends to detach the end of the strake from the main body. This line also weakens the strake just where it needs to bend and twist. This has caused a couple of issues as illustrated in the next two pictures.
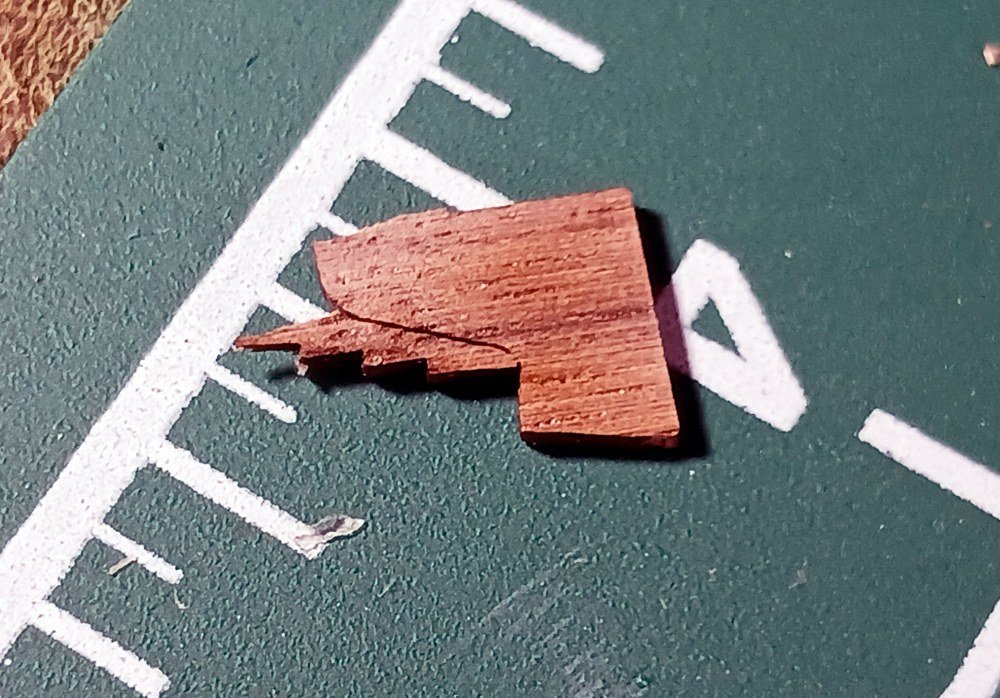
The first picture shows where the end of strake two has snapped off under pressure of a mini clothes-pin. I thought I had propped it back into position before the glue had dried but when I came back to the project the next morning I found that it had shifted. Hmmm…. I may yet be able to use a section of toothpick to wedge it back into position but it will be a delicate exercise. Micro-surgery skills required.
This second picture shows where strake three has bent at the cut rather than form a curve. I’m sure this is due to where I was applying pressure as I held the model while the glue dried. But, frankly, I can’t see what’s going on underneath my fingers.

Well… like I said: This build is about figuring out how to do things and that includes eliminating ways to NOT do things! It does certainly raise my concerns when I get to the upper strakes. These are actually designed with separate end pieces which need to be scarfed into the body of the strakes. I have my doubts about that. But I definitely need some blue painters’ tape to help hold thinks in place. While I don't currently have a way to bend planks--and I don't think it would work on such delicate pieces--for future reference (on more robust models) I think I'll need to learn that fine art.
- Archi, Bryan Woods, sirdrake and 1 other
-
4
-
This is the first wooden ship model kit I’ve ever built. Over the years I’ve built quite a few plastic models (mostly planes) and designed and built a few card models so I’m not a total neophyte. Wood’s a new medium for me, though.
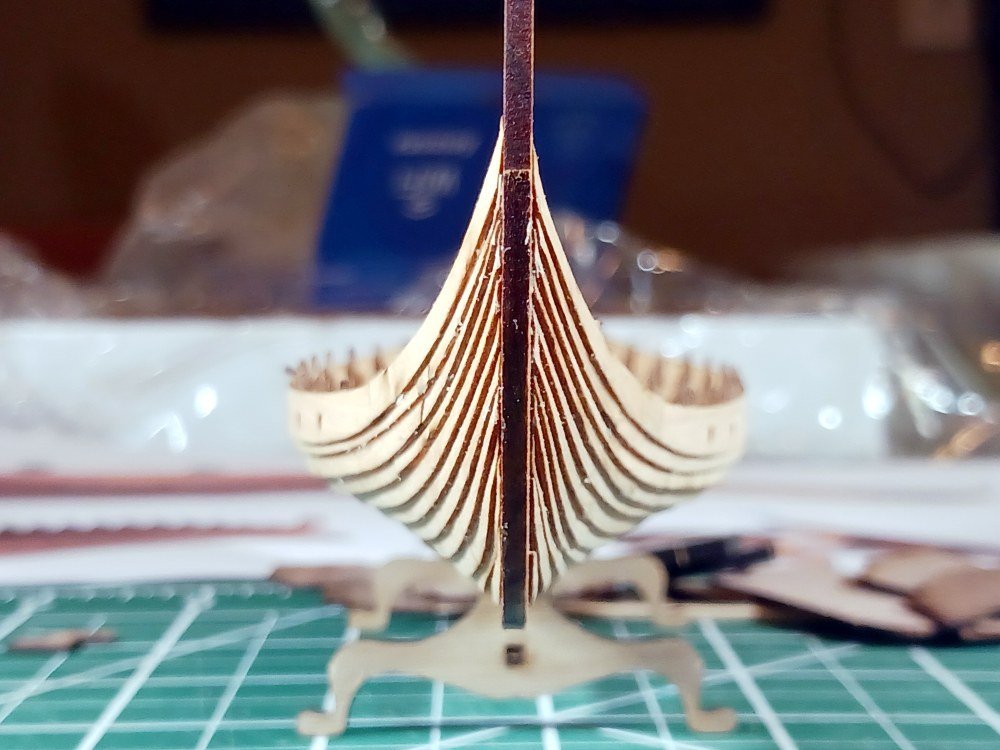
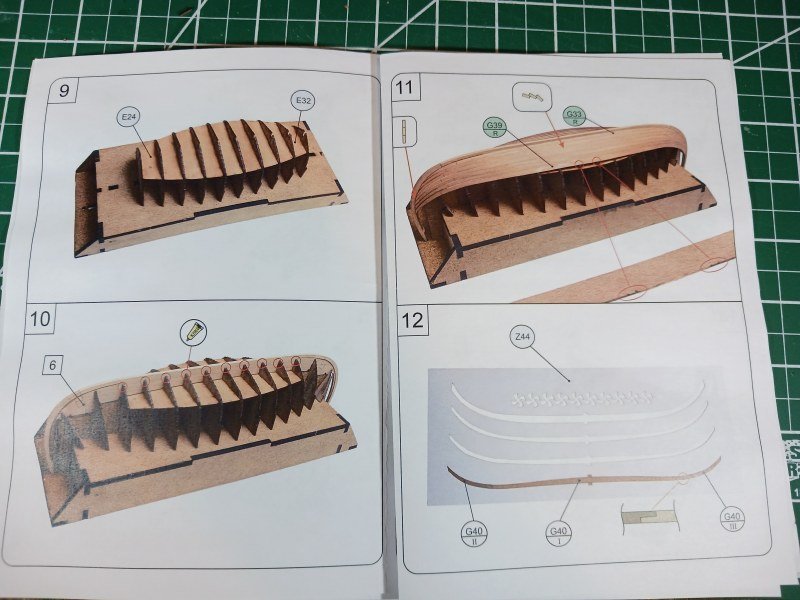
The first thing that struck me about this kit is how delicate the wood is. The wood varies from 1mm to 0.5mm for the hull strakes.
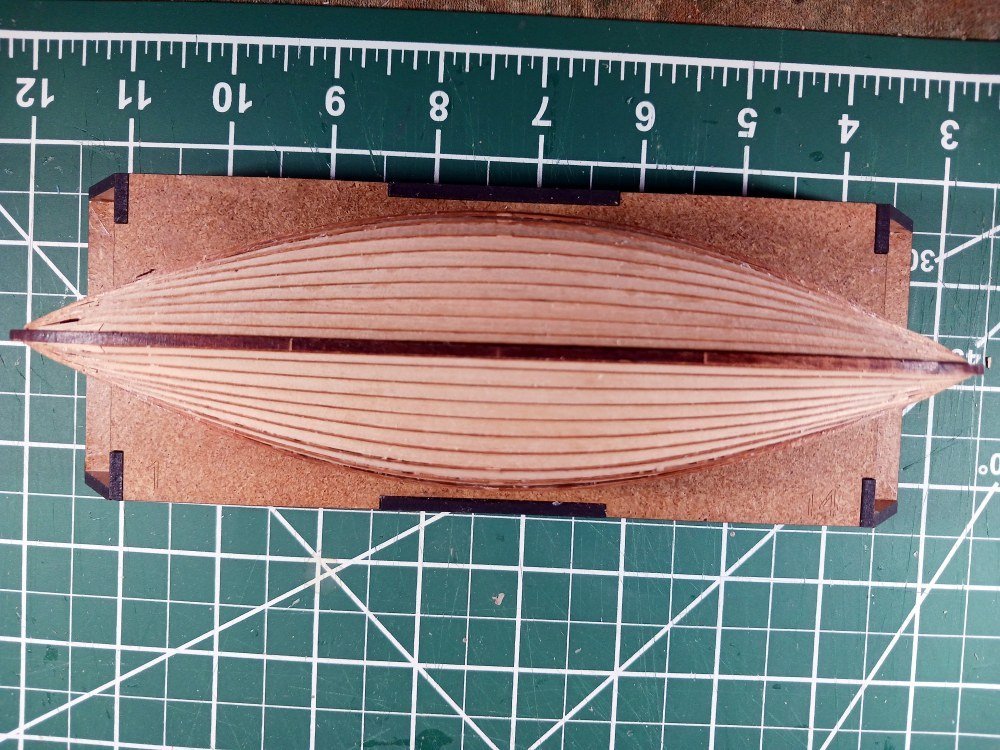
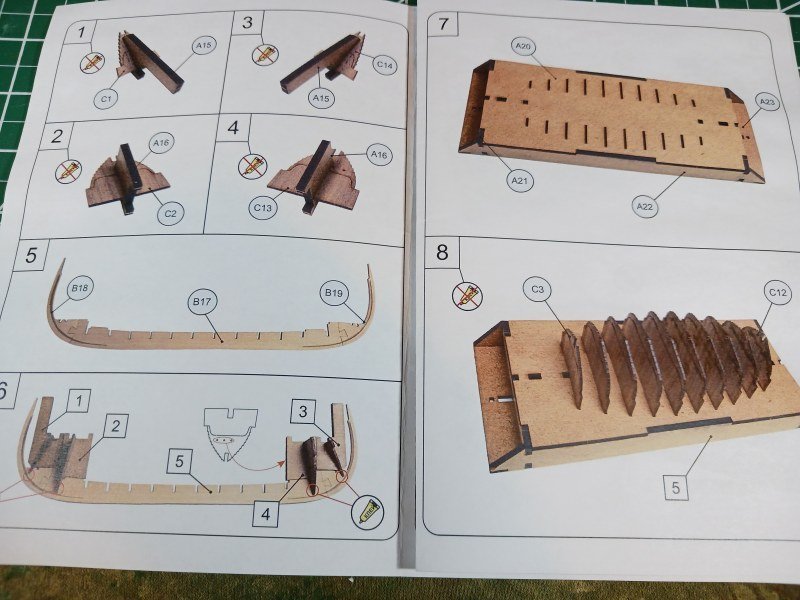
Assembling the jig, keel and bow and stern bulkhead assemblies was quite straight-forward. The bulkheads just slide into mdf holders and are fairly loose—not even snug enough to hold the bulkheads in place if the holders are turned upside down.
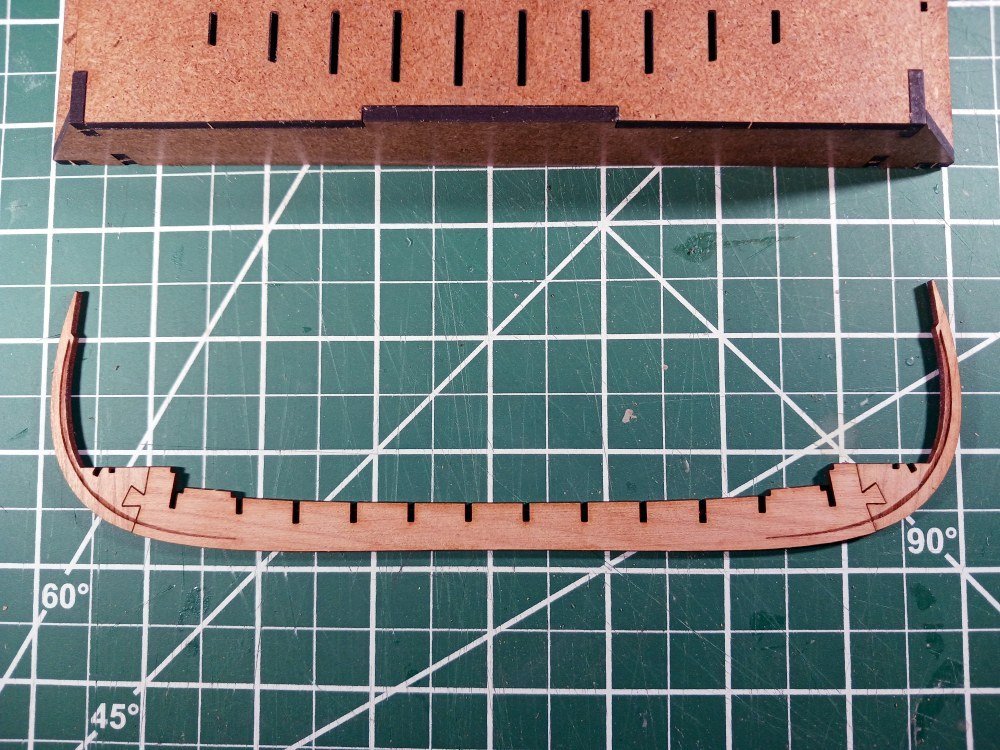
Sliding the bulkhead assemblies unto the keel was also easy but it does raise some concerns as the wood-to-wood contact between the keel and the bulkheads is quite minimal.
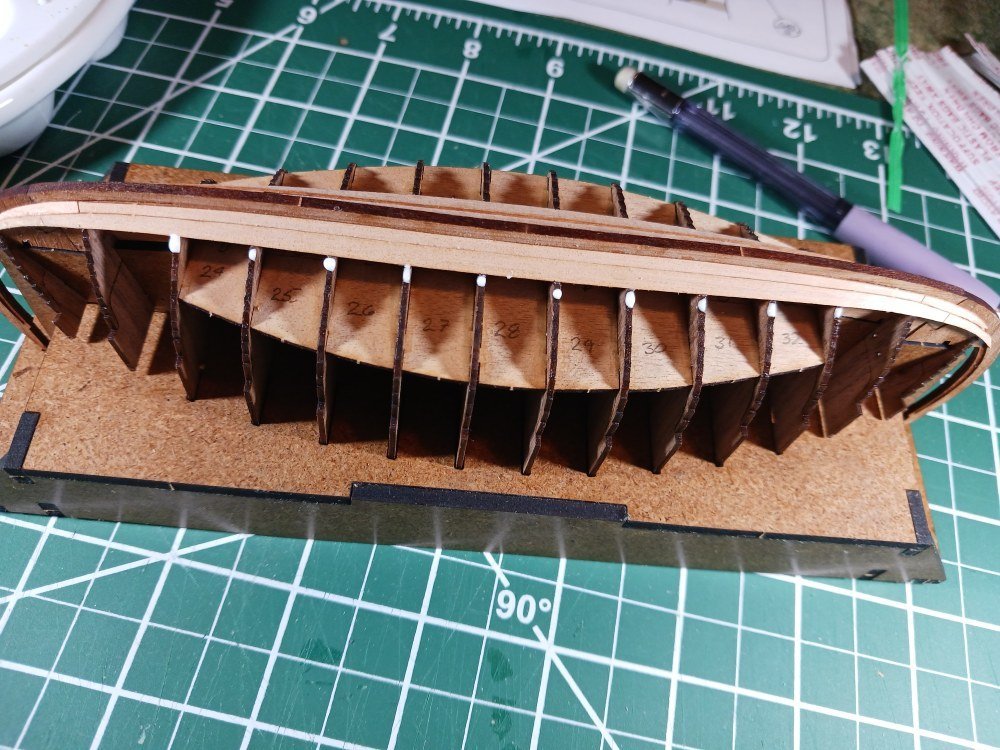
After assembling the keel the next step was to remove the rest of the bulkheads from the sheet and insert them into slots in the jig in preparation of installing a sub-deck. The bulkheads are quite a bit larger at this stage than their finished size. They have an upward extension which will eventually be removed. However, at this stage the extension is needed as that is the portion of the bulkhead that fits into the jig.
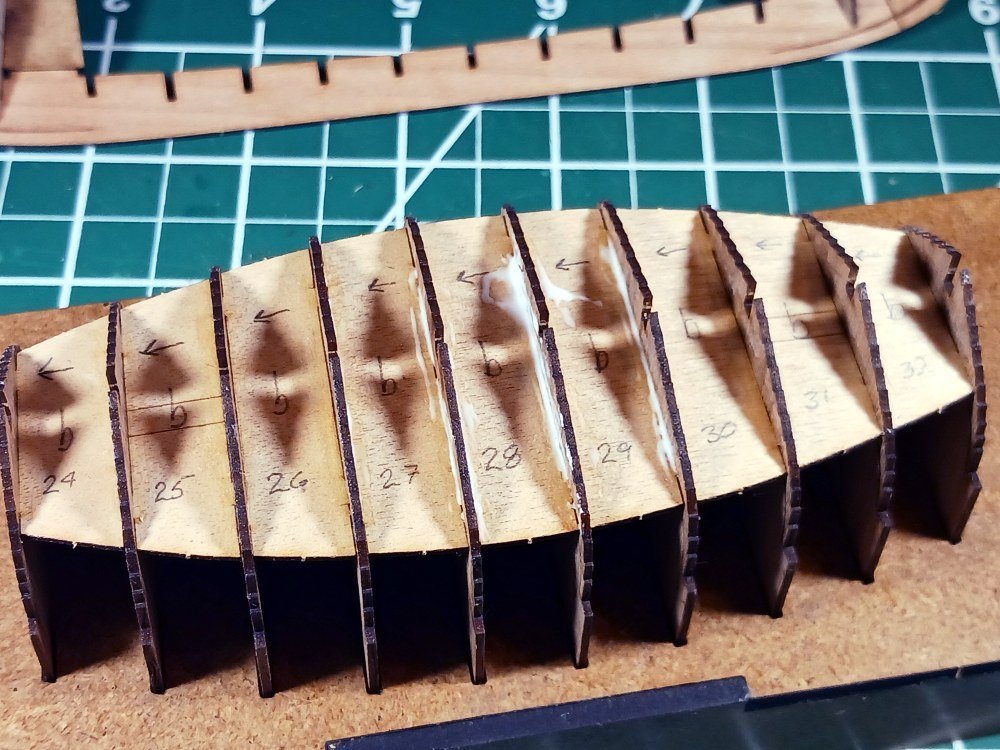
The sub-deck consists of nine pieces that tab into slots in the bulkheads and ensure the proper spacing. I marked the sub-deck sections with their part numbers and indicators to ensure that I installed them at the correct place and in the correct orientation.

Care must be taken when gluing in the sub-deck. The tabs in the sub-deck sections fit into a slot in the bulkheads which is at the same location as the dividing line between the bulkhead proper and its upwards extension. Sloppy glue work could easily glue the extension to the bulkhead and cause considerable difficulties later on.
I installed the sub-deck sections starting from the ends and working towards the center.
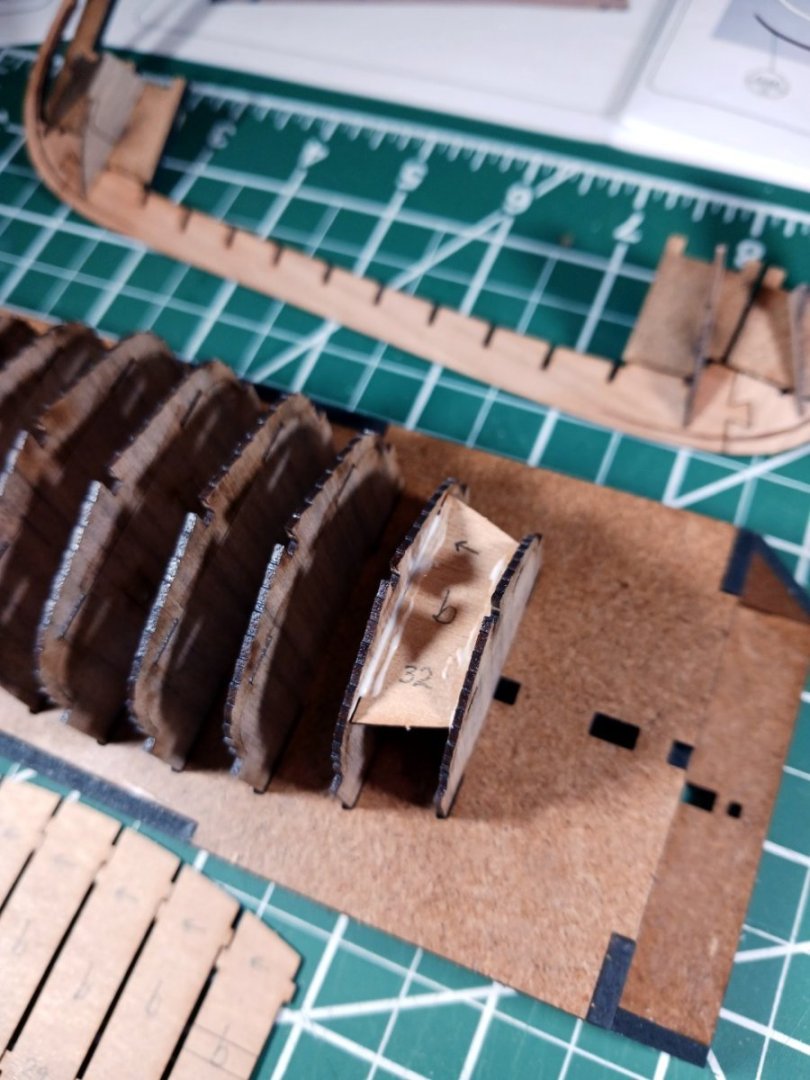
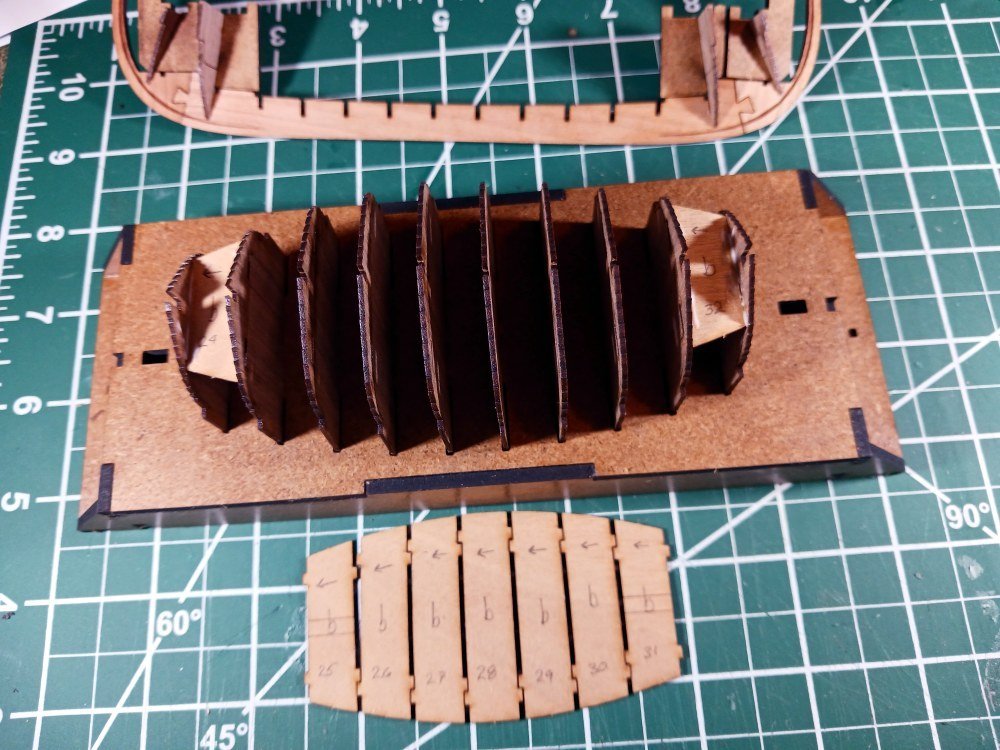
I was quite sparing when applying glue. In fact, I only applied glue to the bottom seams using a toothpick. I did not want to risk gluing the sub-deck to the bulkhead extensions.
The final step for today was fitting the keel assembly to the bulkhead/sub-floor section. Again, I used a toothpick to spread glue along the joins.
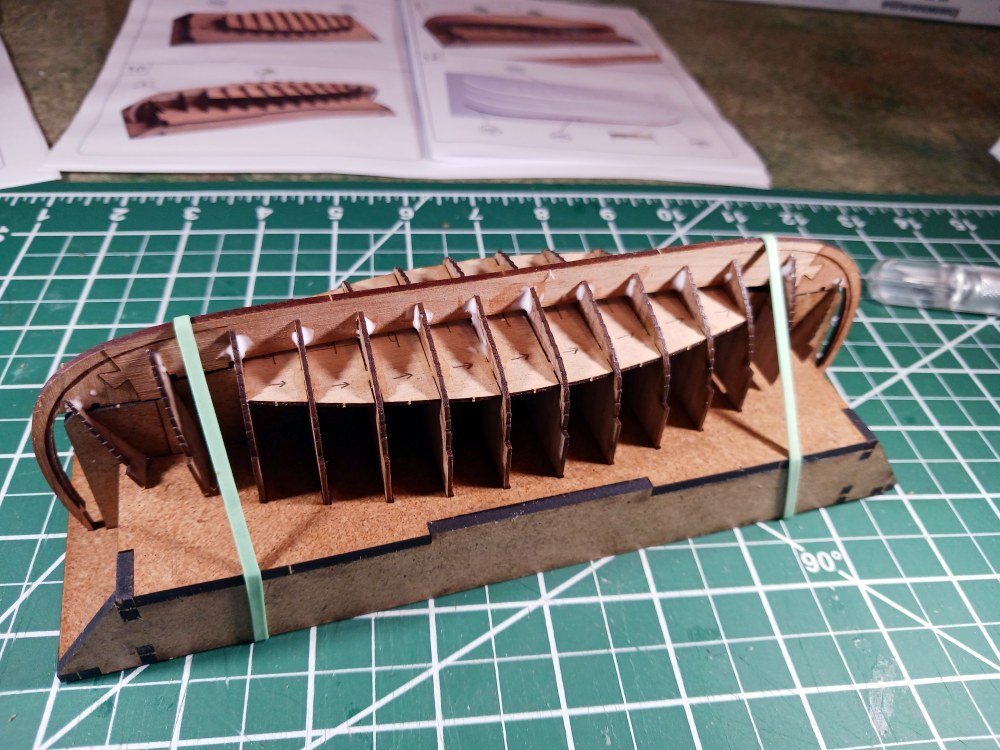
The completed structure does not have a great deal of rigidity. I noticed that the keel had a tendency to hog lifting the ends off the jig. I used a couple of rubber bands to hold the whole thing flush to the jig while the glue dried. The following photo still shows a gap but once I doubled up the rubber bands that provided enough force to pull the ends down flush to the surface of the jig.
The next step will be planking the hull. since the pieces are so delicate I'll save that for a day when I'm not feeling too ham-fisted!
- Louie da fly, BobG, Knocklouder and 5 others
-
8
-
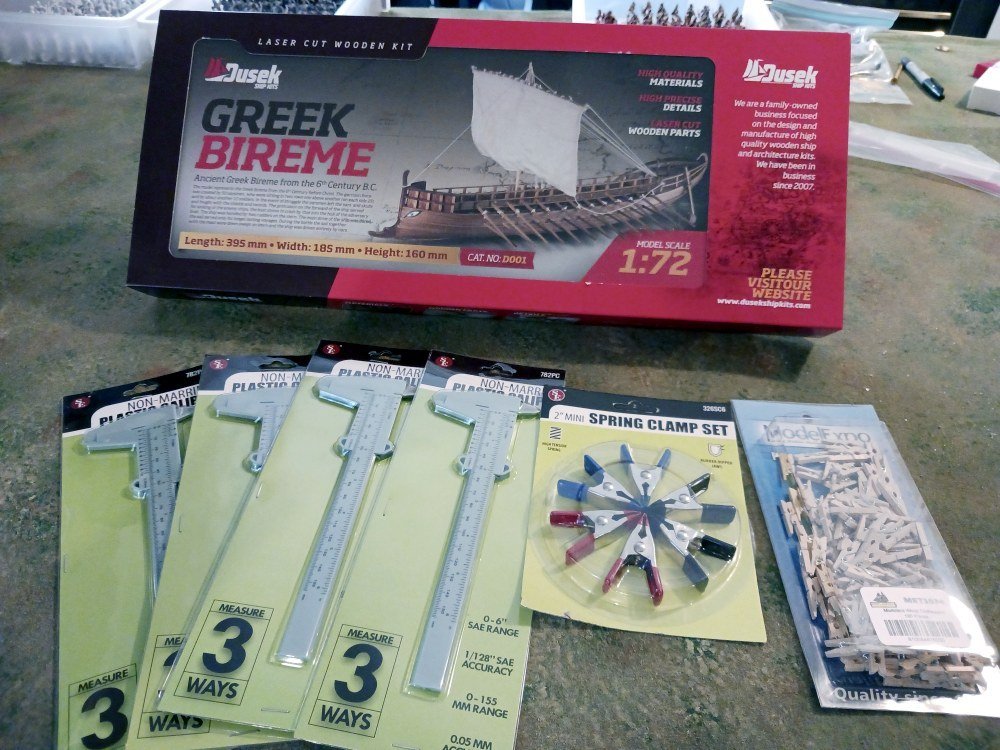
After ordering the 'Slavic' Longboat from MSW supporter The Crafty Sailor on Sunday, September 10th, I received it on Friday, September 15th. I retrieved the package from the mailbox on my way home from work, walked into the house and declared, 'Honey, we can retire! My ship's come in!' 'That's nice, dear,' she mumbled as she went back to work.
Nevertheless, I'm excited. This is my first wood ship kit and my first kit review. This Russian kit by Falconet is packed in a sturdy corrugated cardboard box. The text is in Russian but on one end of the box there is some consideration of English speakers where the model is described as a 'Viking ship of IX - XI century.' Slightly different from the Crafty Sailor description as a '9th Century Slavic Longship.' I mention this only in case someone is confused. I don't believe Vikings would be historically considered a Slavic people but since they were quite active exploring the rivers of and trading throughout eastern Europe I have no doubt that Viking vessels were common in Slavic lands.
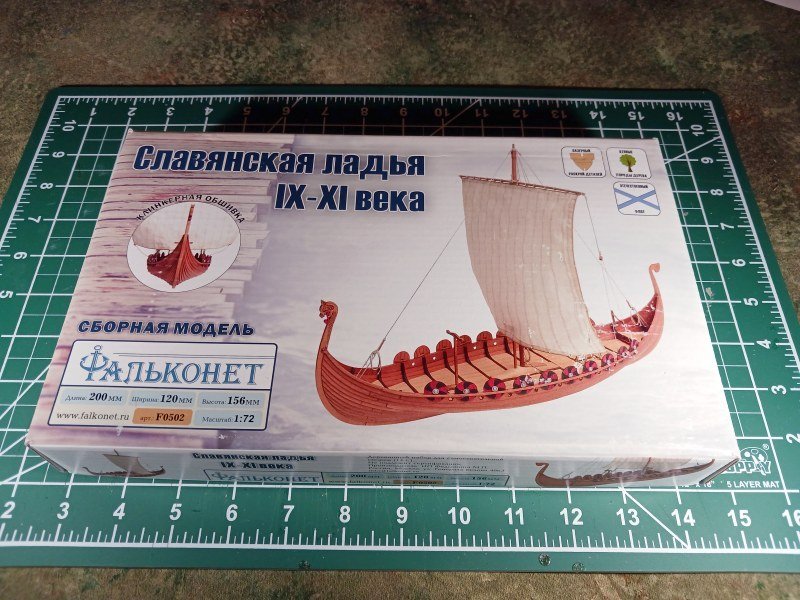
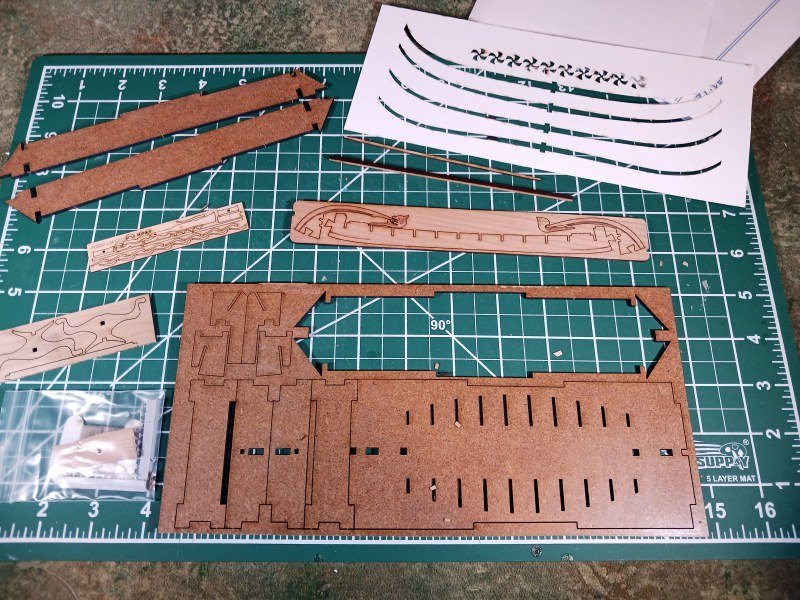
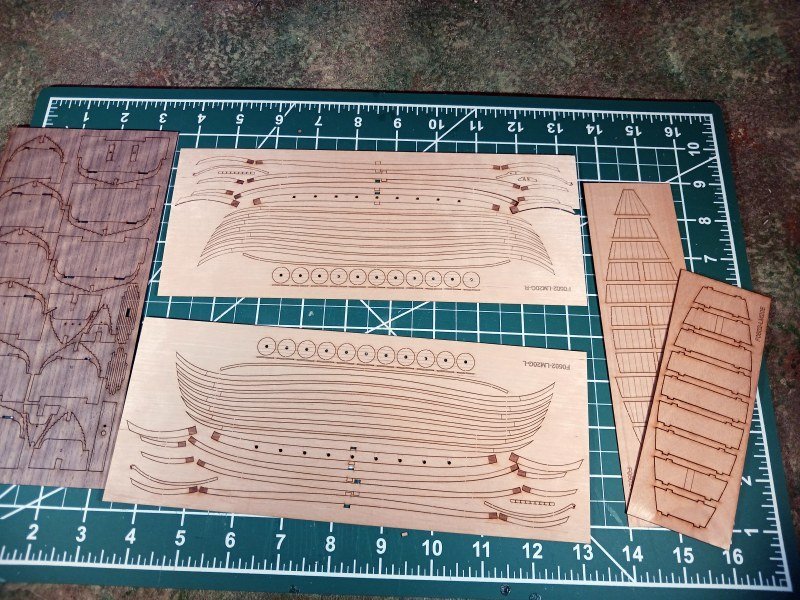
Upon opening the box one finds two sets of drawings on A4 paper. One set focuses on hull construction, the other on rigging. There is a very brief explanation in Russian and English and from that point on all instructions are simply illustrations with call-outs indicating the part numbers in each step. The wood and MDF parts themselves are securely wrapped in plastic cling film and appear--to my untrained eye--to be of high quality.
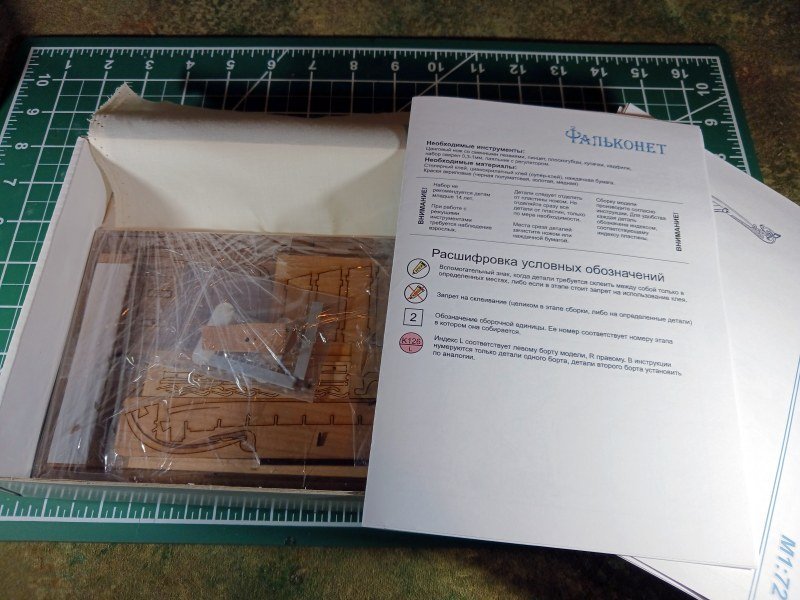
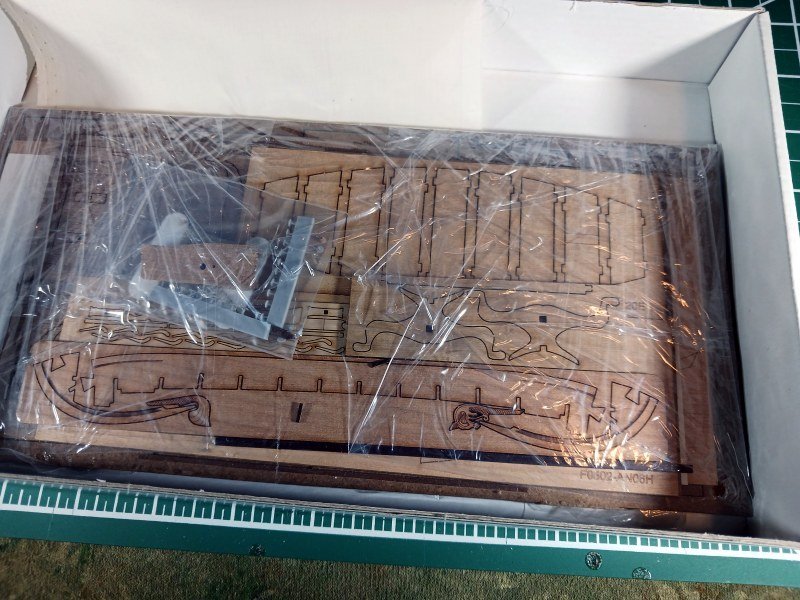
The two exceptions to this is a piece of light weight fabric for the sail and a heavy paper sheet with cut out stencils for the shield painting. I believe the stencil also provides a guide for assembling the last four hull strakes out of three separate components each. (This is more implied rather than described in the instructions.) The sail cloth is entirely unfinished and there are absolutely no instructions on how to prepare it. When it first appears in the instructions it has a bolt rope around the edges. Lastly, there is a small zip lock bag containing extra-small pieces such as the mast cleat, shield bosses and rigging thread. The mast step is also in here and it is quite rough--it will need delicate sanding to finish it.
Overall, the instructions leave a little to be desired but I believe I'll be able to figure them out--even as a total land-lubber in the world of wooden ship model construction.
The parts themselves are on 8 sheets of laser cut wood of various thicknesses and 1 sheet of MDF. Note that the sheets are referred to as plates in the instructions. And while there is a diagram of parts per 'plate' in the instructions, there are very few identifiers on the sheets themselves. Nevertheless, in the instructions each sheet is illustrated and each part is numbered and prefixed with the sheet number so finding particular parts should not be an issue. Unless the part has become detached from its sheet. I will certainly take care not to detach parts from their sheets until needed! That may be more difficult than it seems. The laser cutting is very fine. The sheets containing the strakes (G, left and right) are quite thin and fragile and the parts need only the gentlist persuation to separate from the sheet. The final last two bits of the model are the mast and the spar. These are supplied square so they will need some sanding to round them off. I do have some concerns here as the parts are quite thin and vigorous sanding would be detrimental. Care, care, care, is called for. I do wish oars had been included with the kit, though. Maybe I should consider that an opportunity for a little scratch building.
So upon final inspection I believe this is a good first model (for me). The greatest challenge, I think, is the delicate nature of the model. The entire model is less than eight inches in length, assembled. Luckily, however, I am used to hobby time spent wearing a magnifying visor while working at fine scales--being a painter of war-gaming figures. I think I have all the tools I'll need for this model which may not have been the case for something more complex (though I may have to shop around for some suitably delicate clamps.)
I did have difficulty choosing a well suited beginner's model. This model looks like it can be accomplished in weeks, not months. I know myself well enough to know that once I have figured out how to do something, I often lose interest in actually doing it--especially if it is a time consuming task. I really wanted to avoid a more expensive, time consuming project, particularly if I had little interest in the actual vessel. For me, hobby time is tightly related to learning the history of whatever I'm modelling. Consequently, the purchase of the viking ship model has inspired me to re-acquaint myself with the history of Alfred the Great of Wessex. One of my favorite childhood history interests.
I do intend to start a build log once I start knocking together the longship.
- Knocklouder, yvesvidal, ccoyle and 3 others
-
6
-
Old Rentner,
I built this kit about 17 years ago and, like you, received it second-hand. IIRC, it did not contain instructions or all of the parts but it was enough to make the build enjoyable. Not enjoyable enough to keep it when we downsized, though.
Looks like you're making good progress. And... if a first kit isn't all about learning what not to do then I don't know what the point is!
--jeff
- Knocklouder and Ryland Craze
-
2
-
Yep, that's the one.
- Keith Black and mtaylor
-
2
-
Thanks, all. That confirms what I suspected regarding the boats.
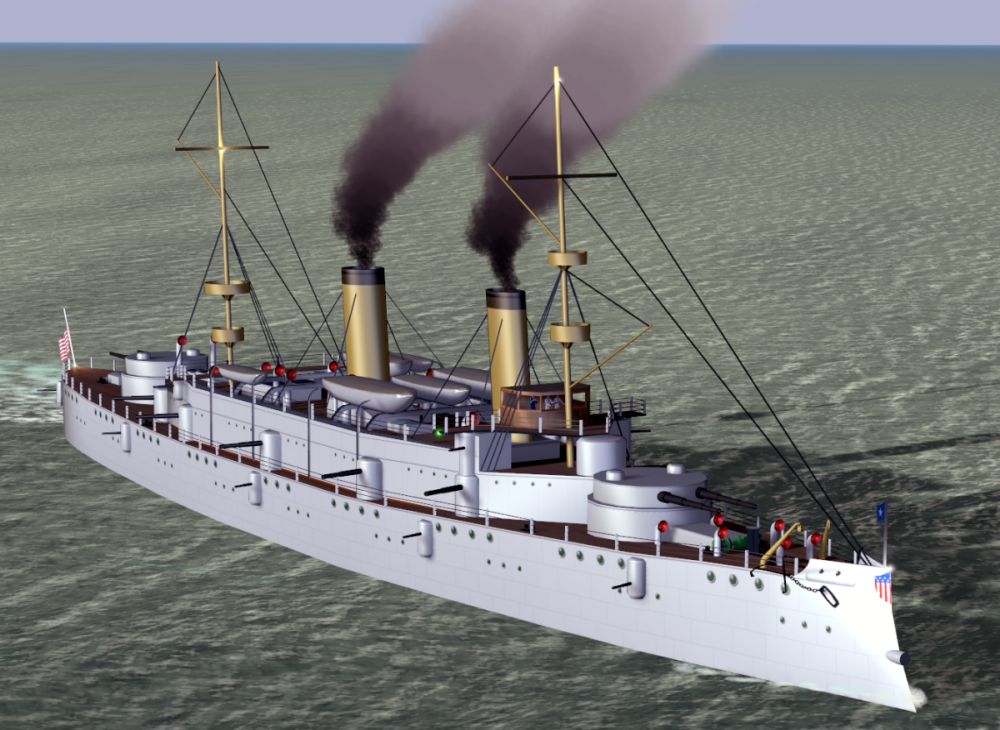
@GrandpaPhil That's a great picture of the Brooklyn!
Changing topics... Does anyone have any opinions regarding Falconet's 9th century Slavic Longboat as a beginner's first kit? I saw some earlier postings linking the company with possible infringement but on the other hand the model is offered through a MSW sponsor so I'm not quite sure what to think. On the third hand... the model fits my price-point, interest level and probable skill level so I'm thinking of giving it a go.
Thanks,
--jeff
- mtaylor, GrandpaPhil and Keith Black
-
3
-
So... apparently I created an account on this forum in 2015. Who knew? I didn't. A few weeks ago I stumbled upon the forum and have had a great time reading and looking at wonderful builds. What a great place. Thank you to everyone for making this such a wonderful resource! Downright inspiring.
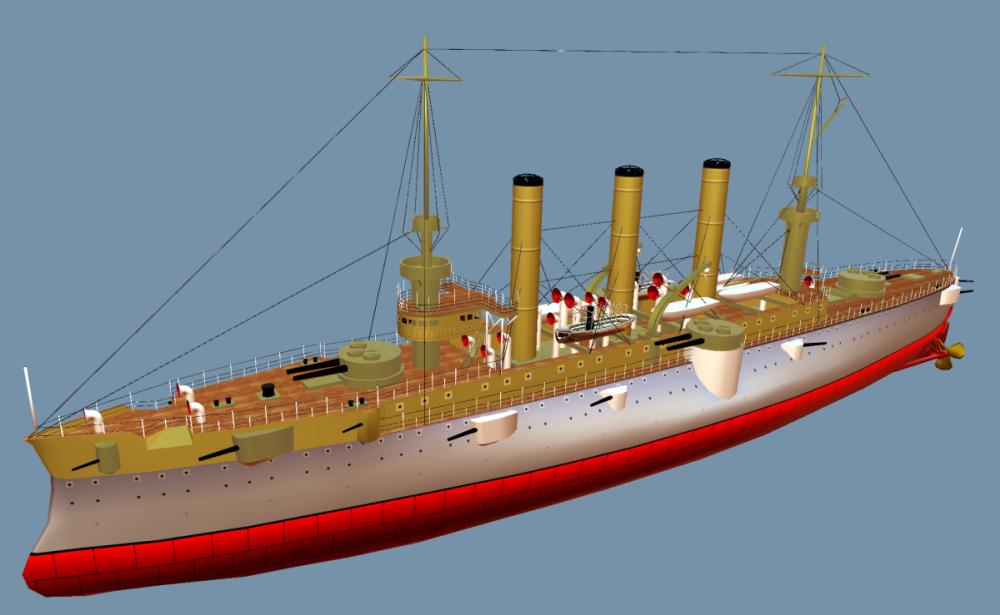
I've had a passion for ships and boats for many years but never really had the space to do much modeling. Well, other than small scale stuff (mostly for miniatures gaming). While the temptation to start a wood model comes and goes, over the years I've dabbled in plastic and card models. Most of my ship building work has been virtual, though. Lately, I've been trying to see if I can create operable boats and ships for the open source flight simulator FlightGear. I call my proof-of-concept work 'FloatGear' 😁 .
Today I was working on the USS Brooklyn and a question came to mind: Wouldn't most vessels have canvas covers over their boats during operation? I never see this modeled. I've adopted it in my virtual models primarily to save polygons but I'm not sure it's accurate.
Anyhow, here are some screen shots of my work. The Olympia, Jacht and Kathryn are all in-sim.
--jeff

- GrandpaPhil, Baker, BenD and 3 others
-
6


Grand Banks Dory by FortressHarris - FINISHED - Model Shipways - 1:24 - first build
in - Kit build logs for subjects built from 1851 - 1900
Posted
Yep, right there with you. That first build is more about learning what you didn't know but thought you did!
Congrats on finishing. On to number two.