HOLIDAY DONATION DRIVE - SUPPORT MSW - DO YOUR PART TO KEEP THIS GREAT FORUM GOING! (Only 68 donations so far out of 49,000 members - Can we at least get 100? C'mon guys!)
×


FriedClams
-
Posts
1,368 -
Joined
-
Last visited
Content Type
Profiles
Forums
Gallery
Events
Everything posted by FriedClams
-
 Splendid work as always, Valeriy. I agree with Tony on his assessment of the small hooks, in fact I'm still wiping the drool from my chin. Nice jig for the prop which come out wonderful. Gary
 -
Nice update on Twilight, Craig! Quite a bit of progress has been made on her and she's looking great. Coming along nicely! Gary
-
Recently found your new project log and have read through it in its entirety. Excellent research and an interesting read. Question - did you choose acrylic glass over polystyrene because you had a readily available cache of it, or does it machine and hold edges better? As you know styrene is a favorite of many model makers for its available thicknesses, workability and solvent welding. Not questioning your decision of course - simply curious. Looking forward to following this project and watching you perform your tiny scale magic! Gary
-
Another fantastic SIB, Glen! I can only repeat what others have already said. As always, an exceedingly creative project expertly executed. I stated previously that your Banshee was my favorite, but now, well . . . Wonderful model and a fun build log - keep them coming! Gary
- 185 replies
-
- 5
-

-

-
- Flying Dutchman
- Black pearl
- (and 2 more)
-
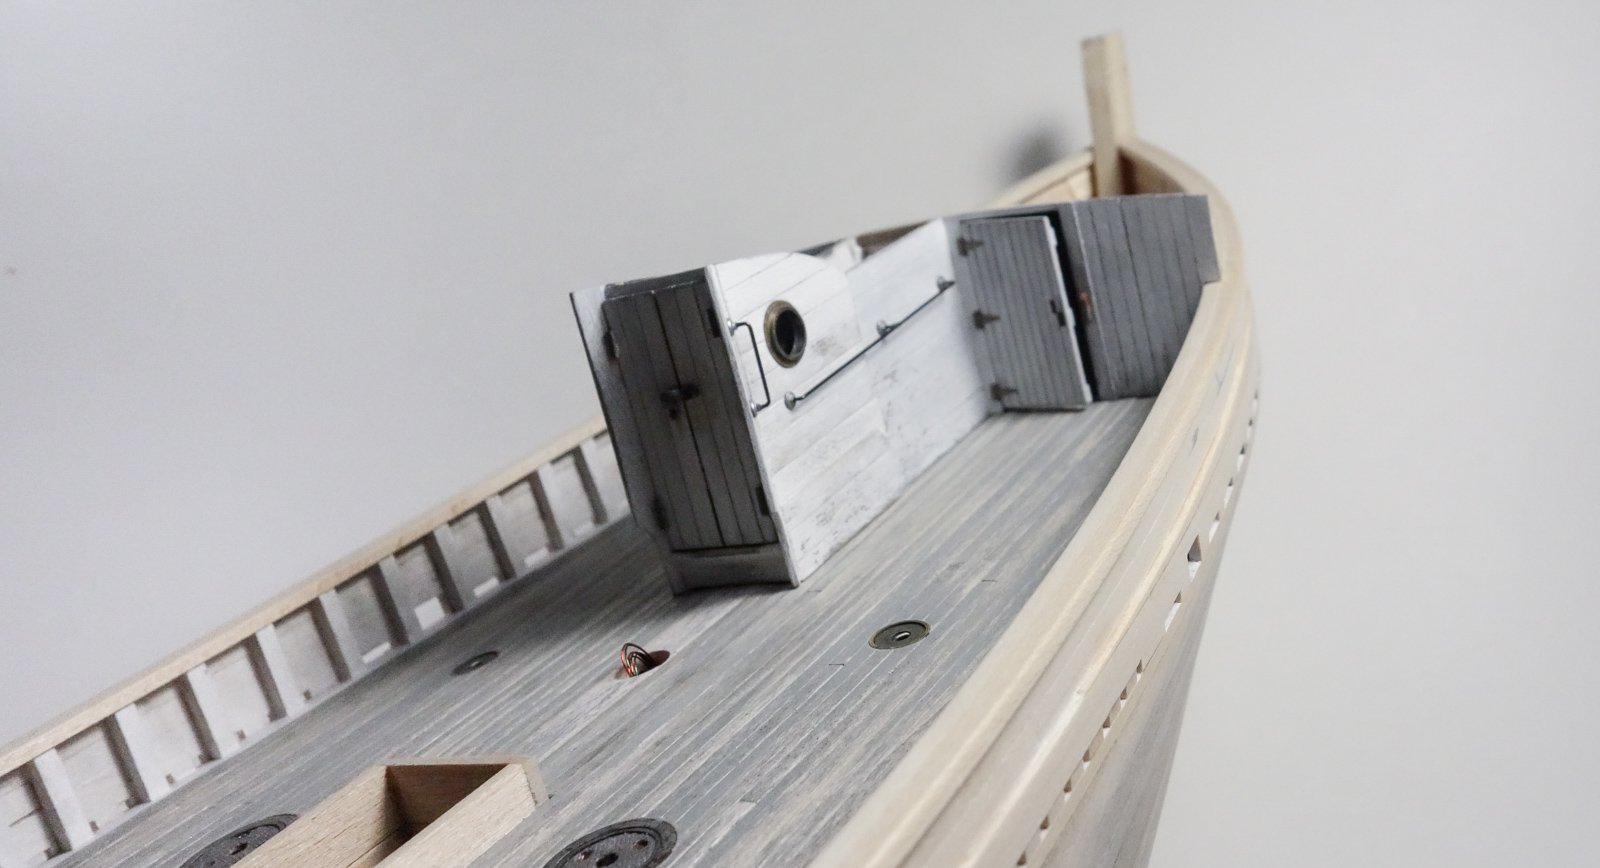
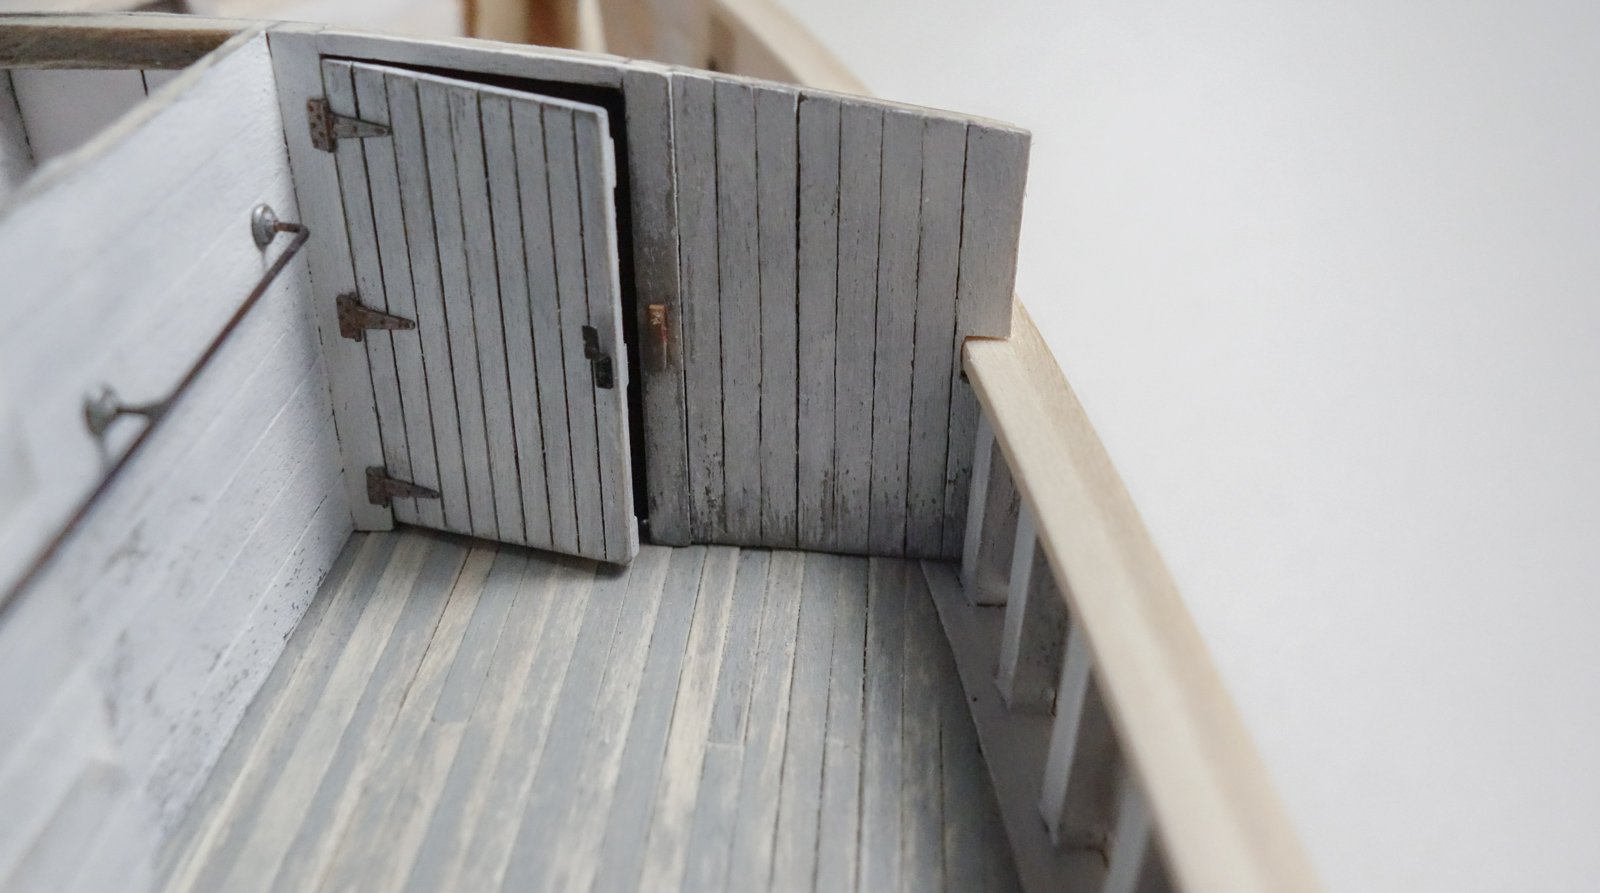
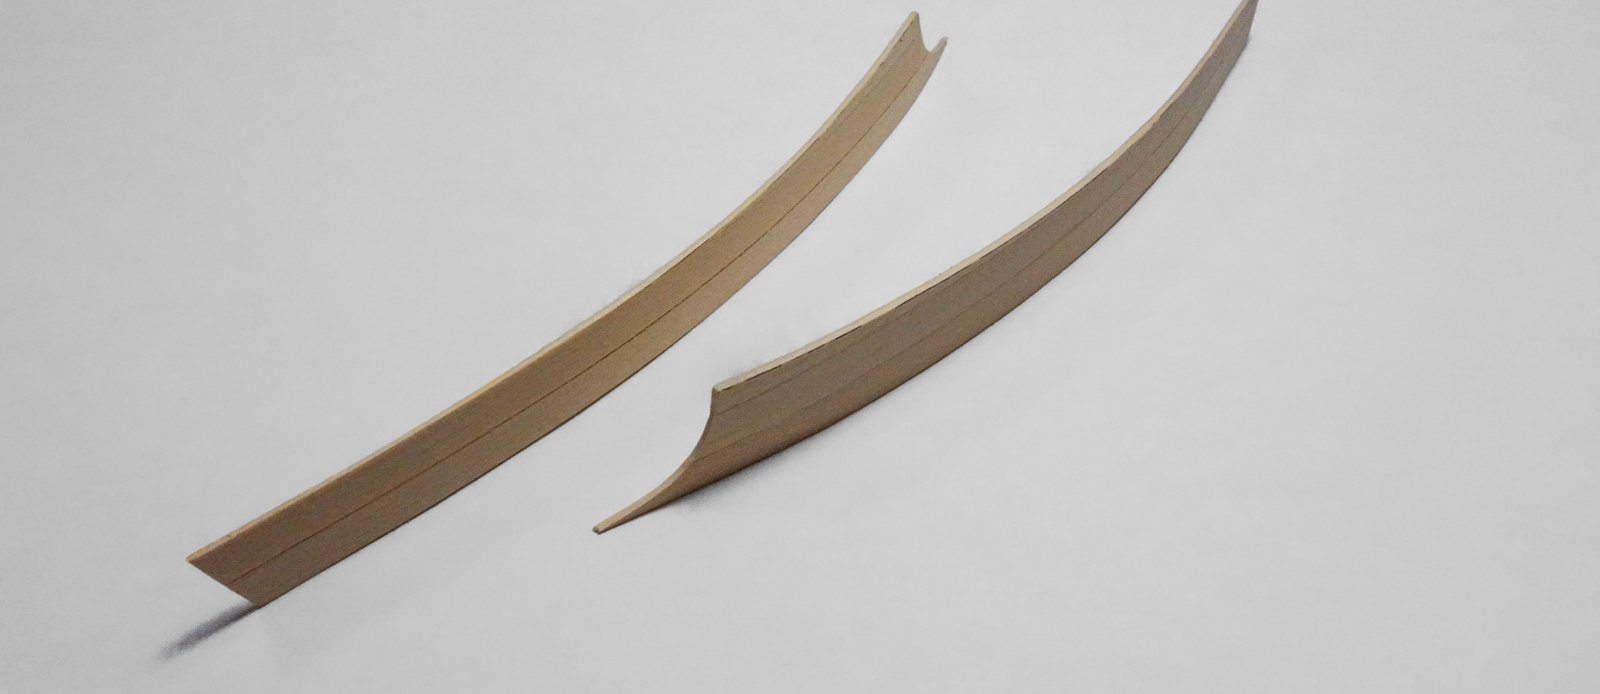
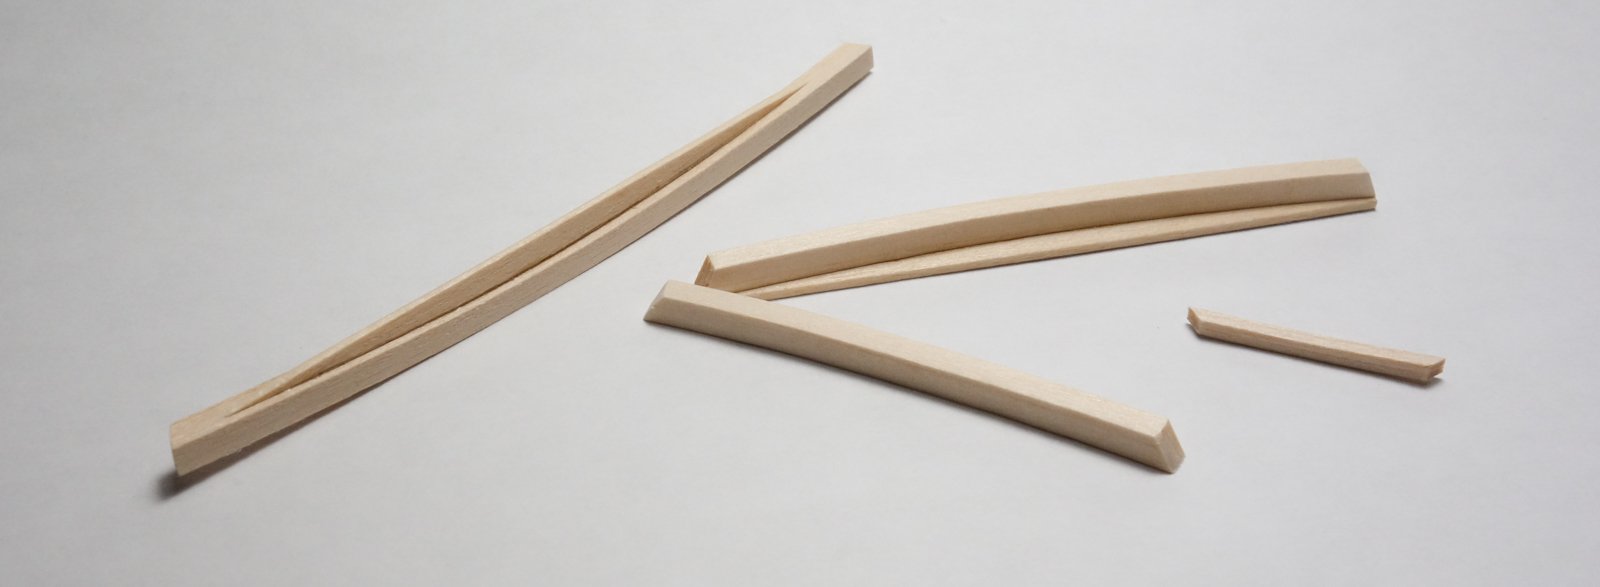
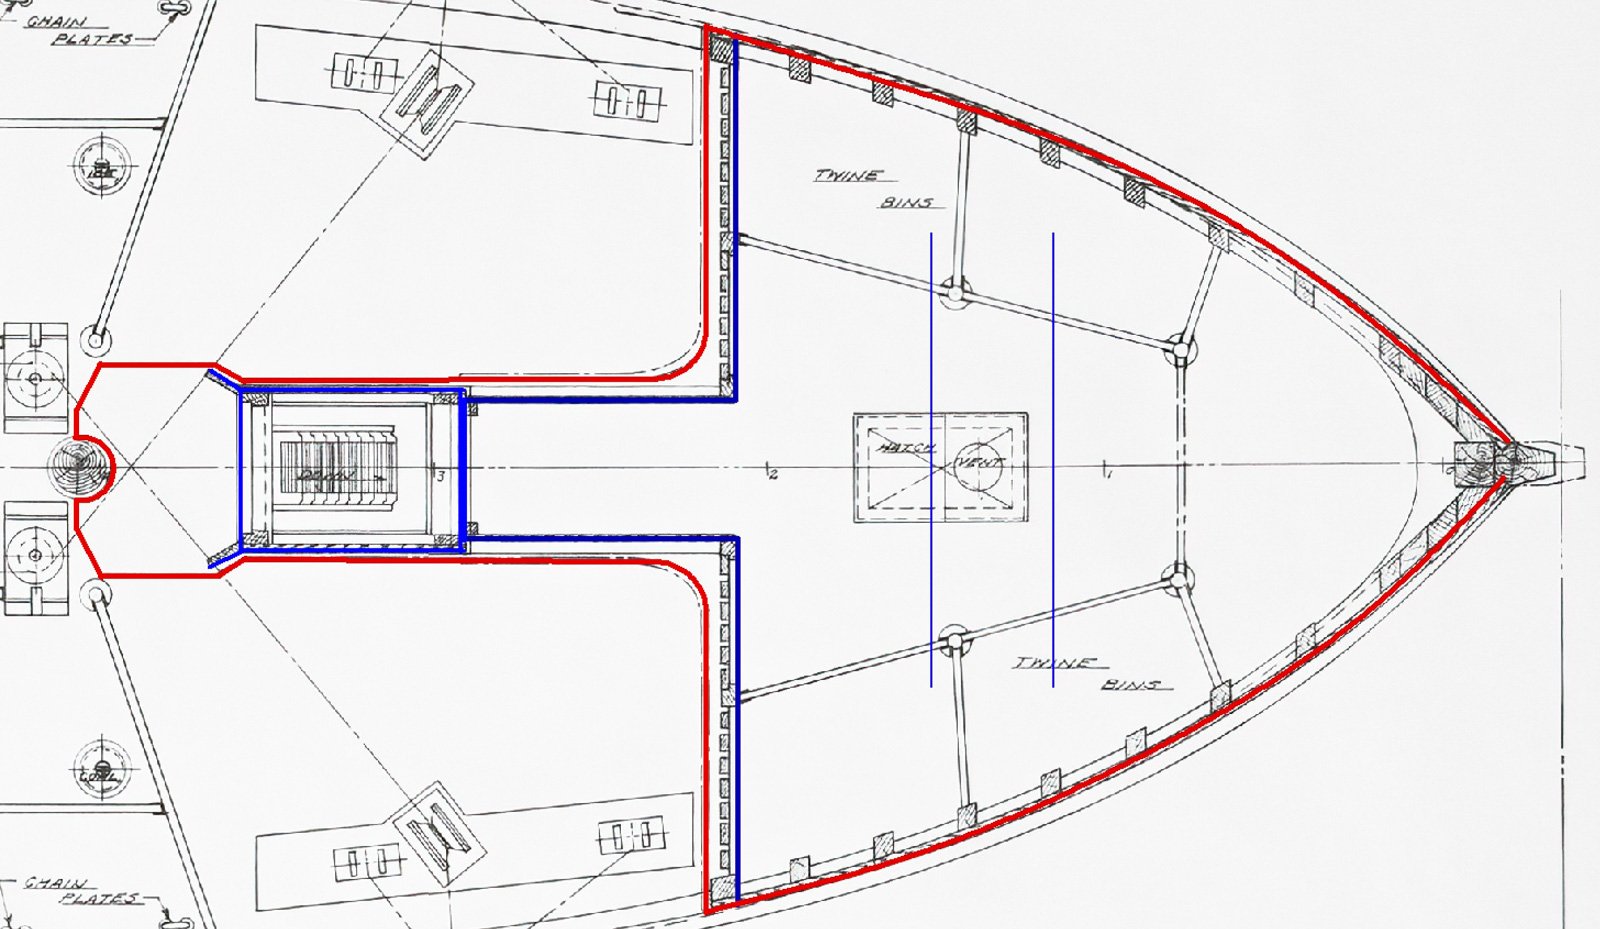
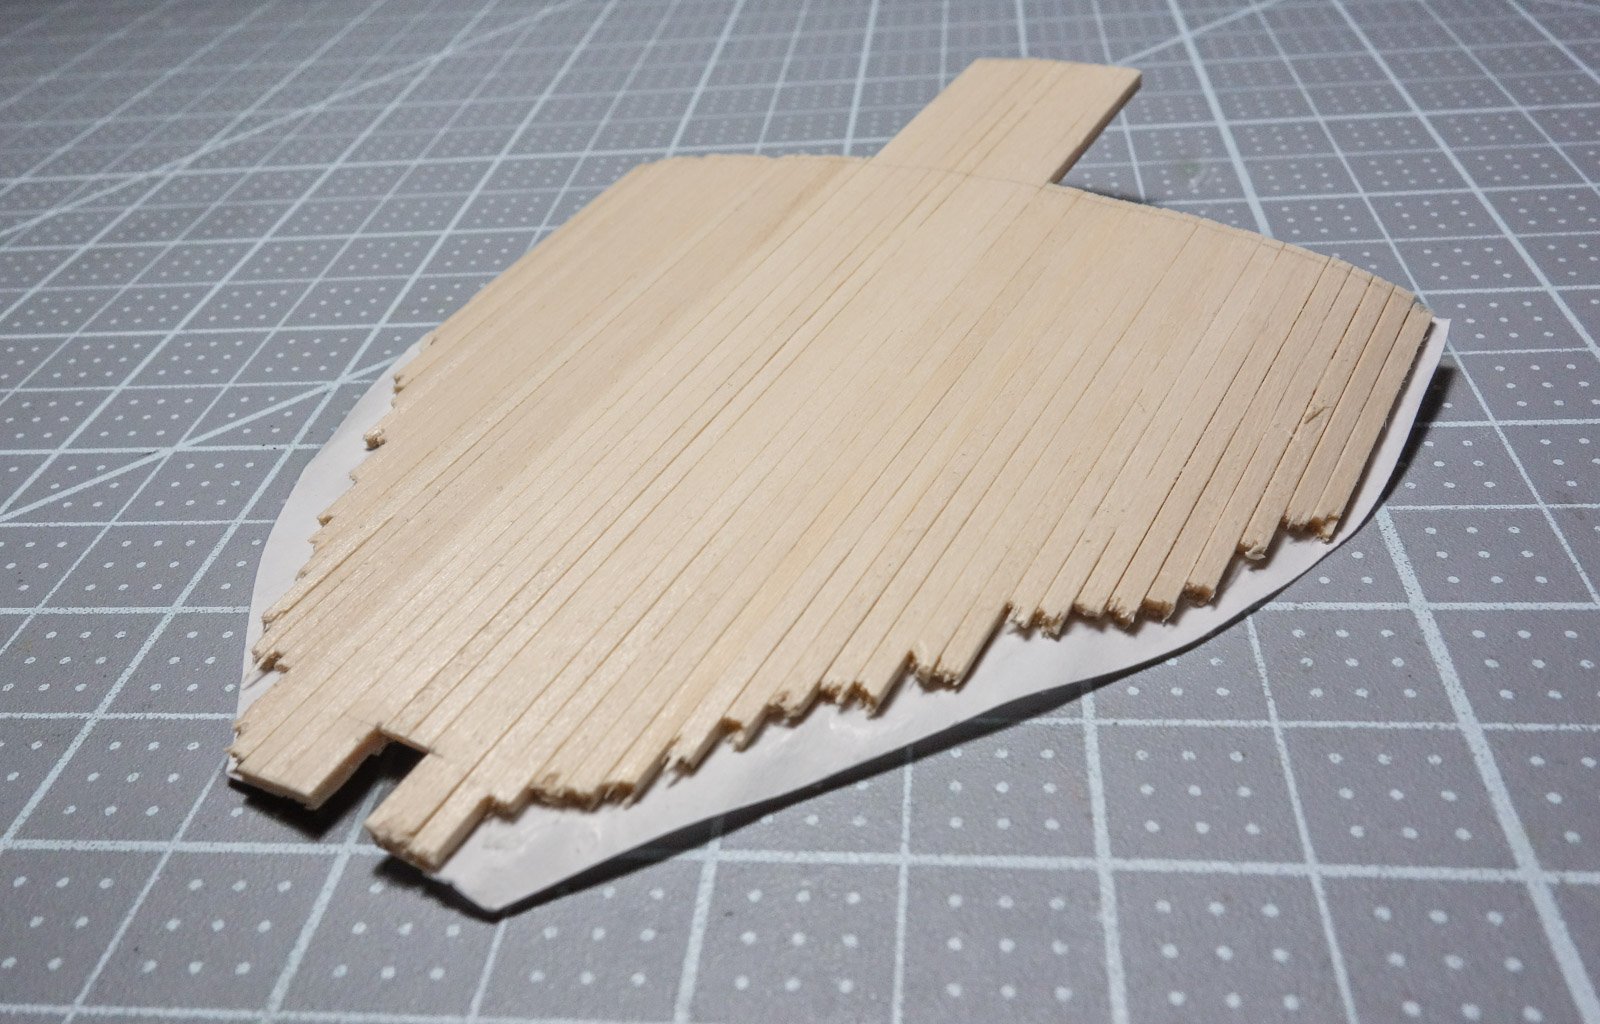
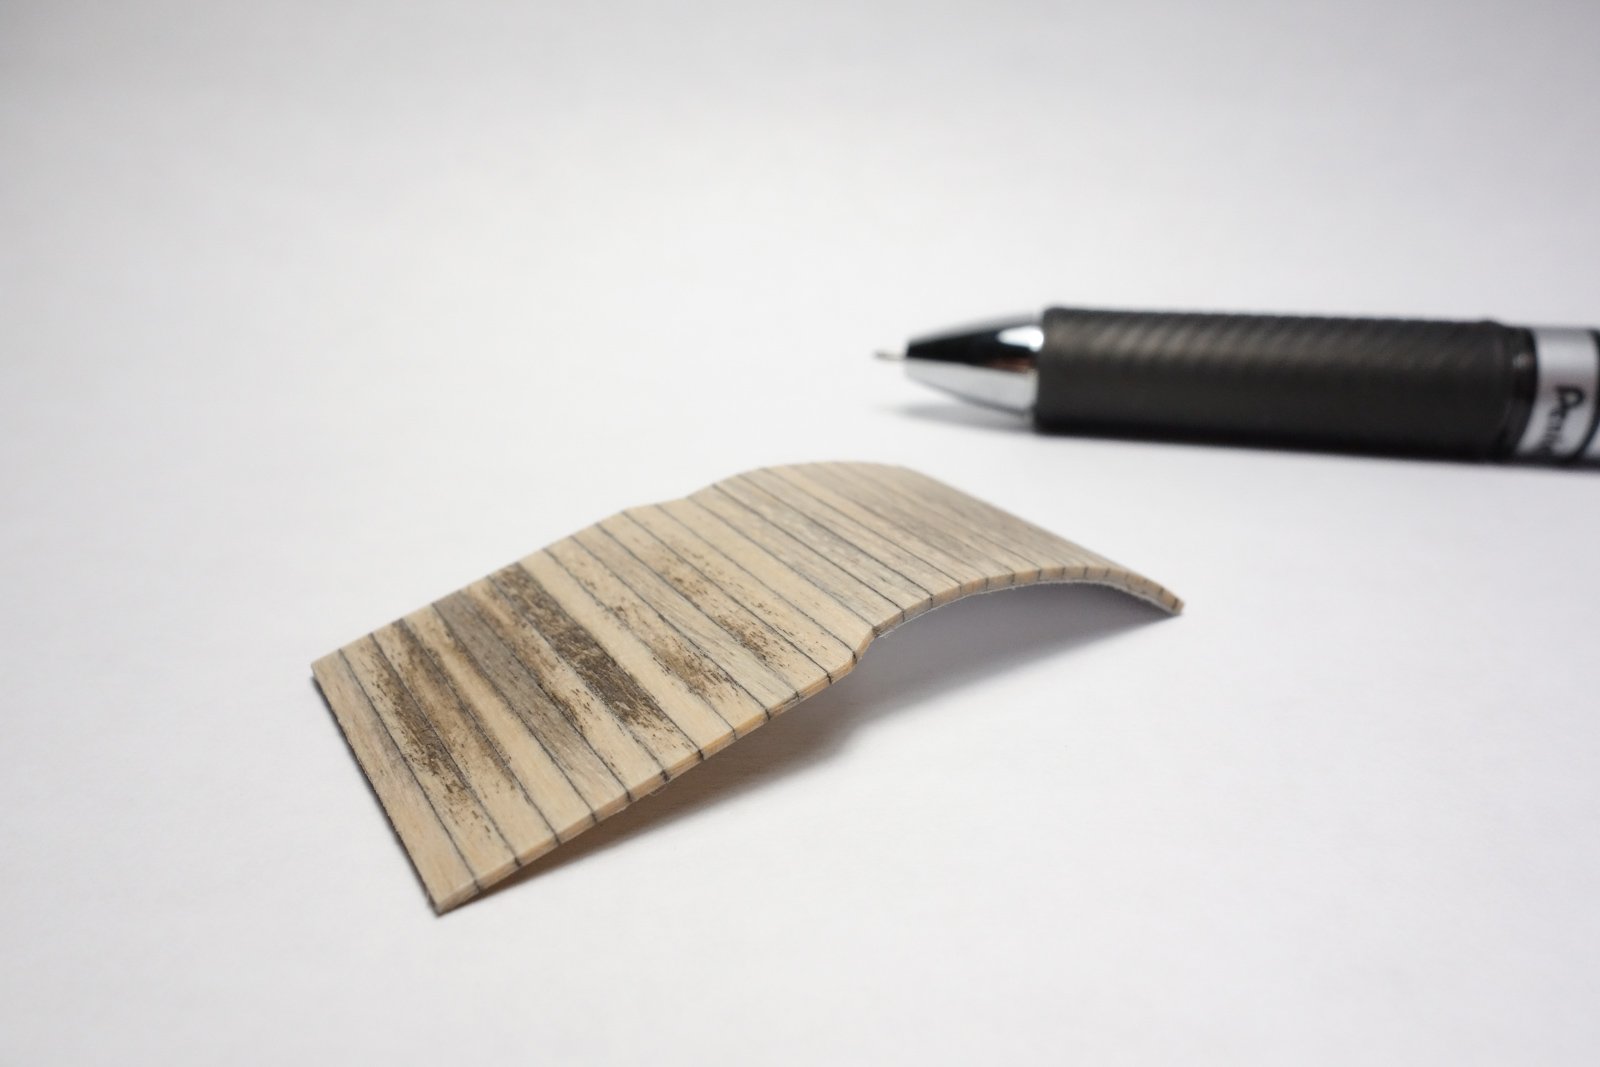
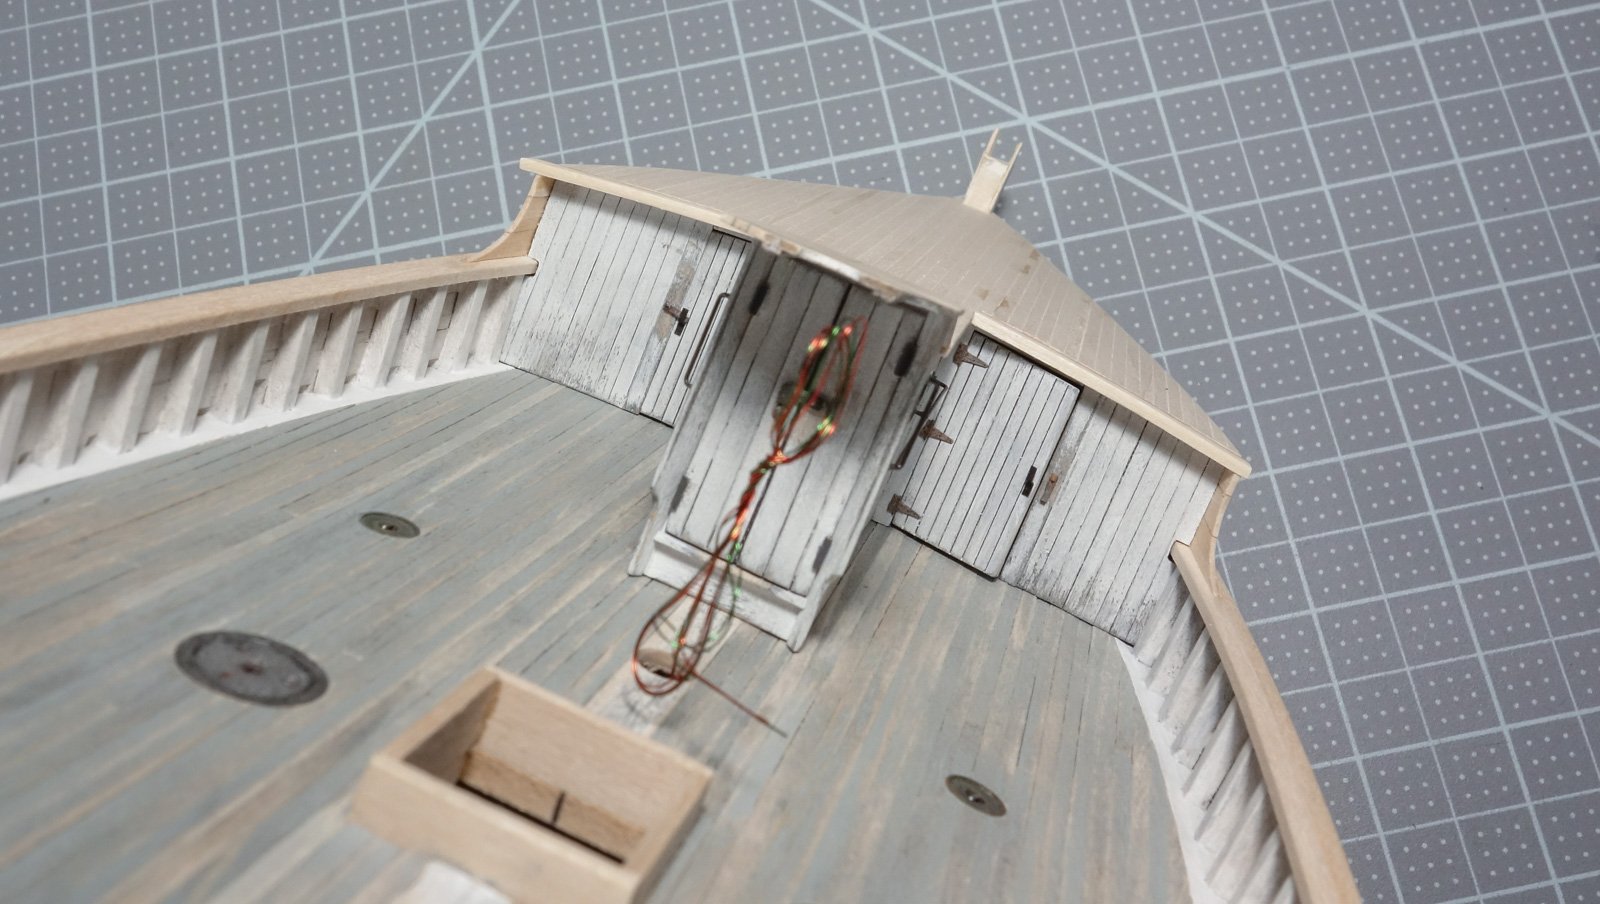
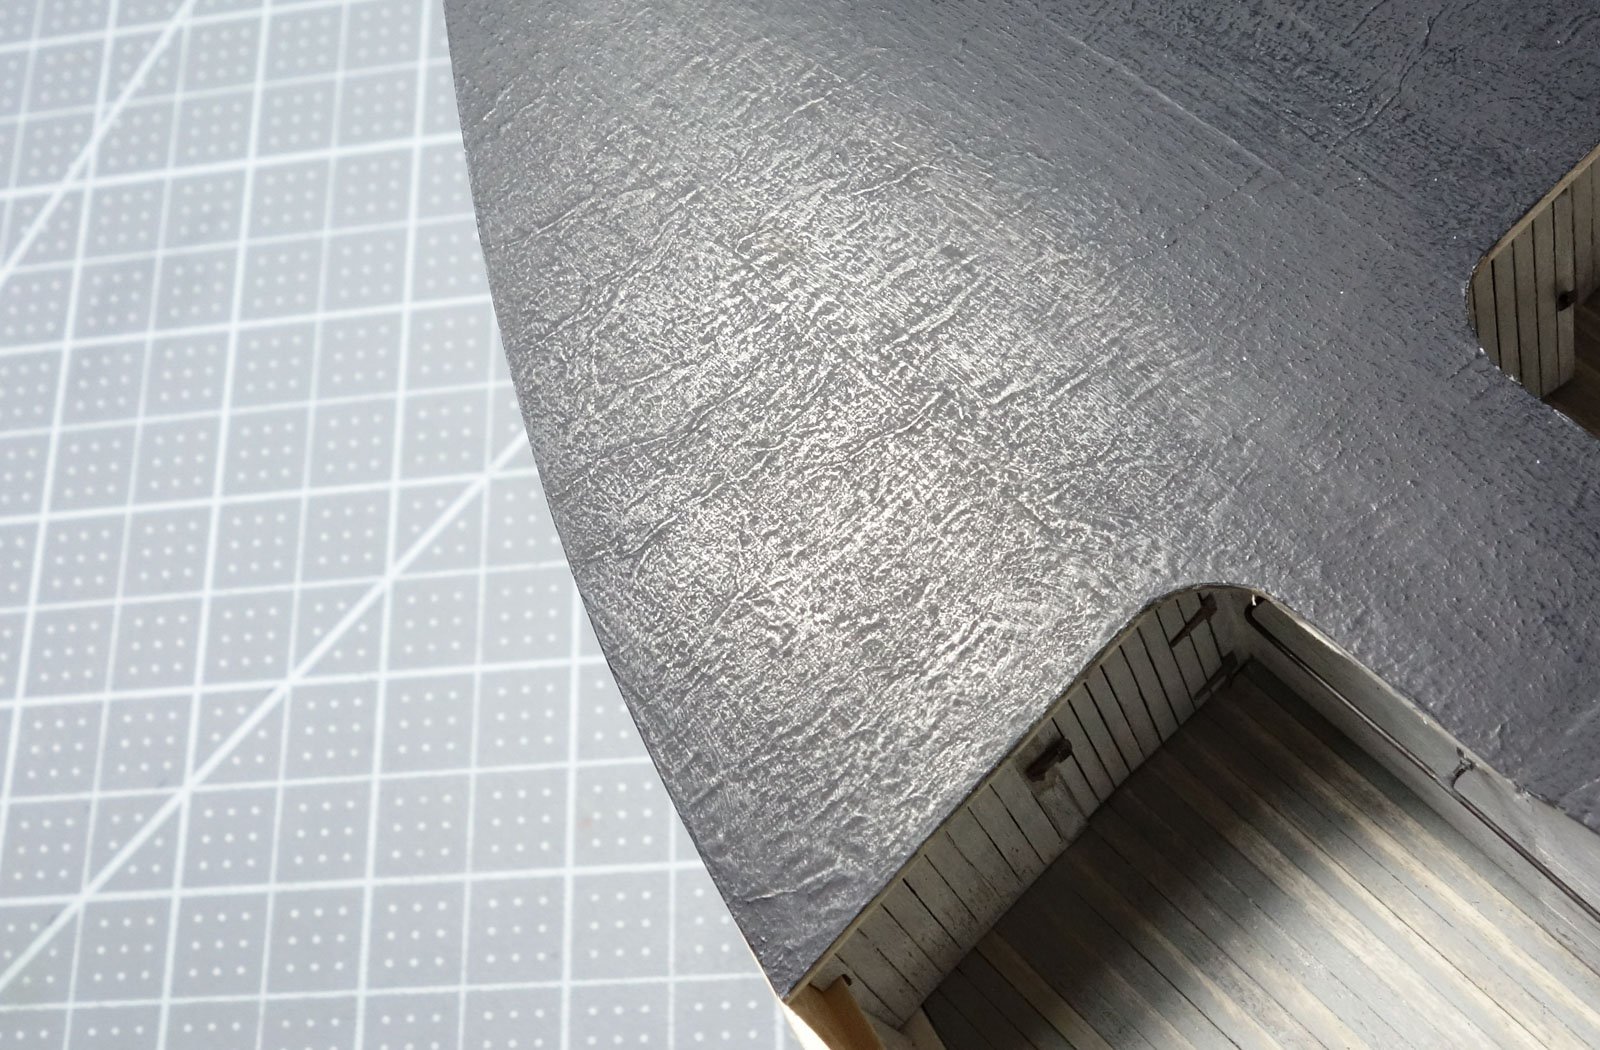
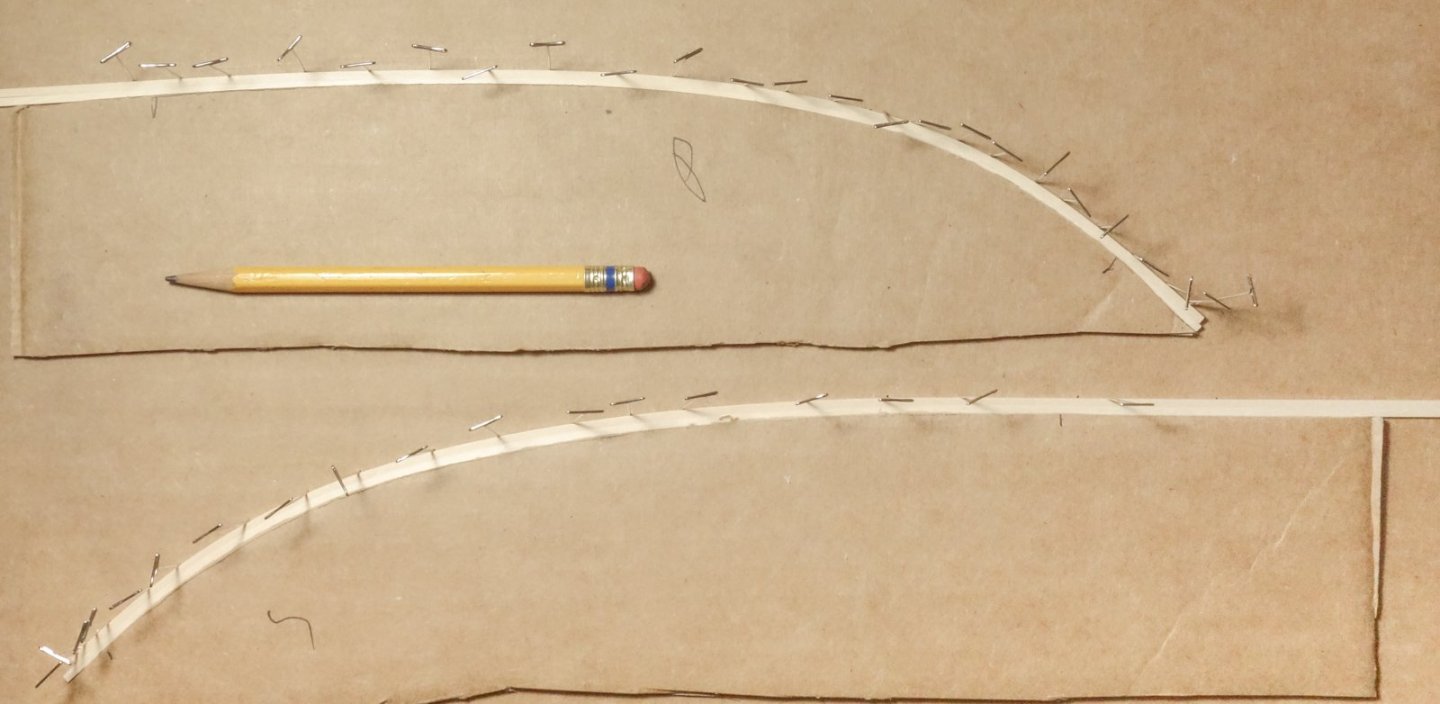
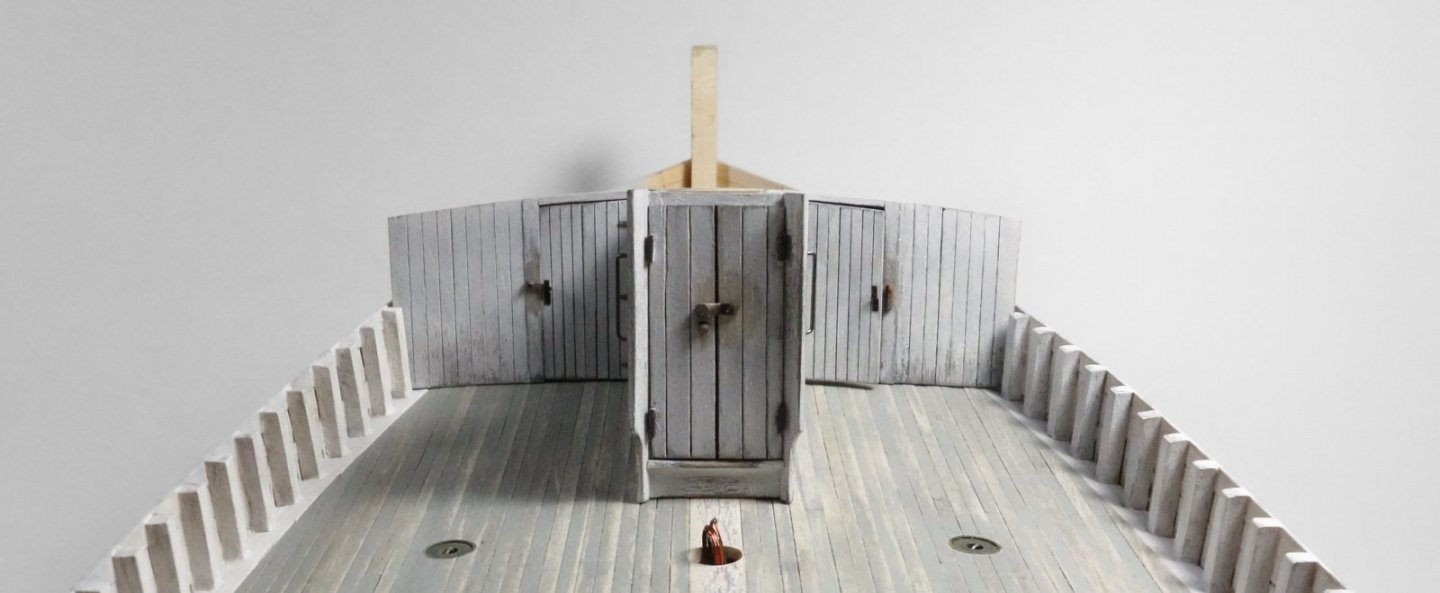
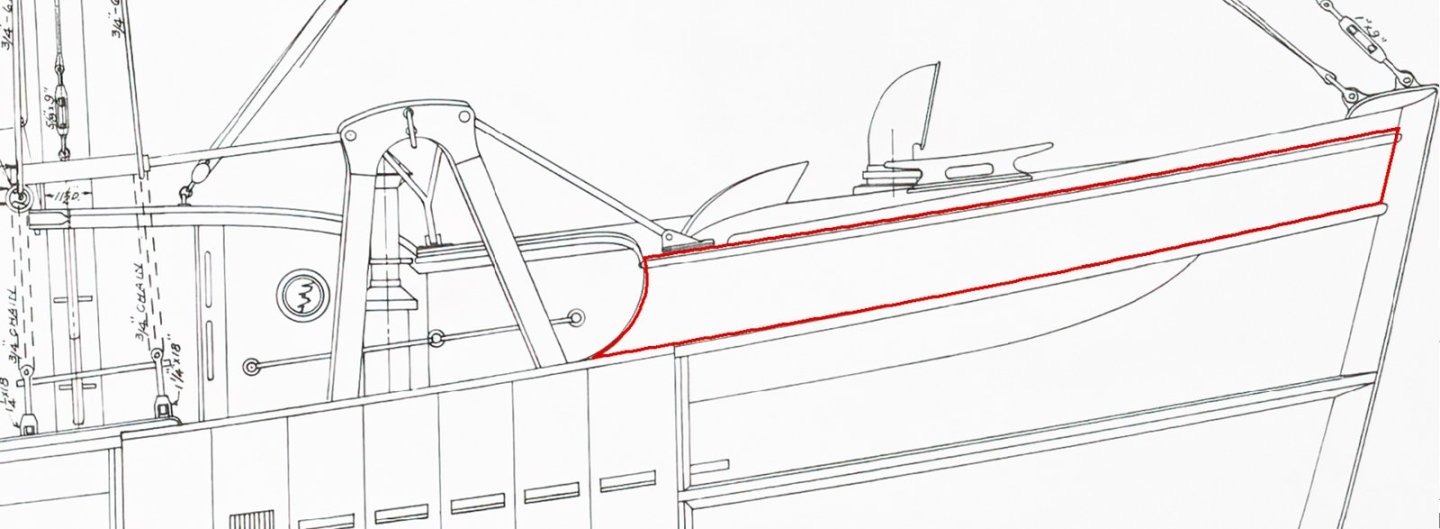
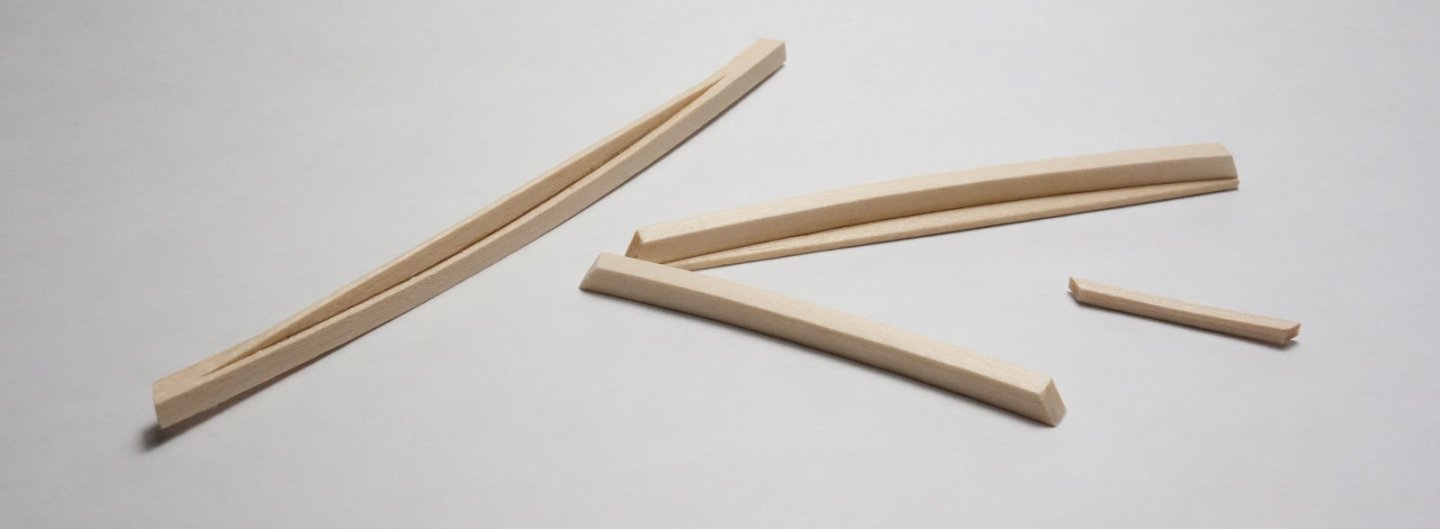
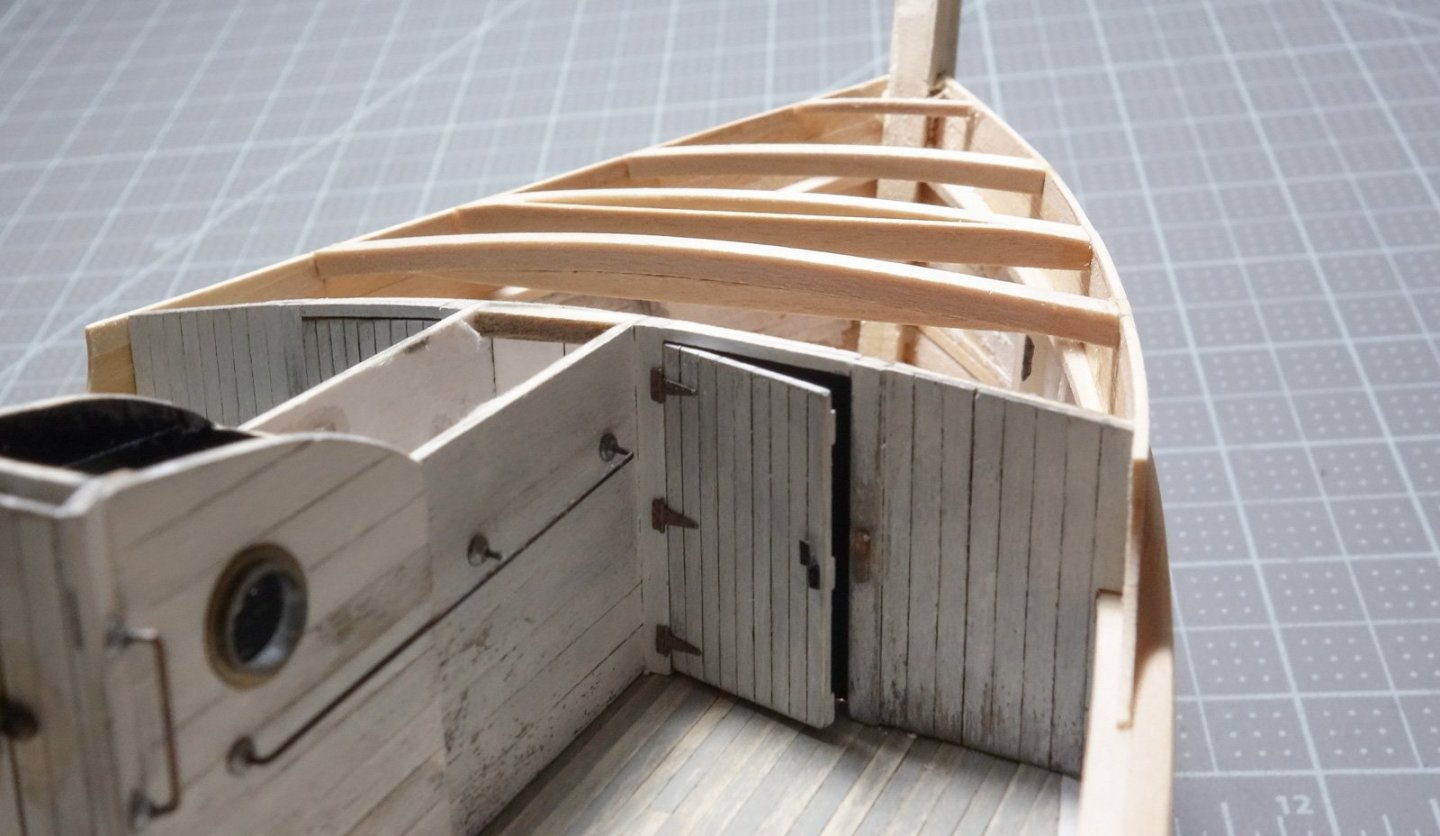
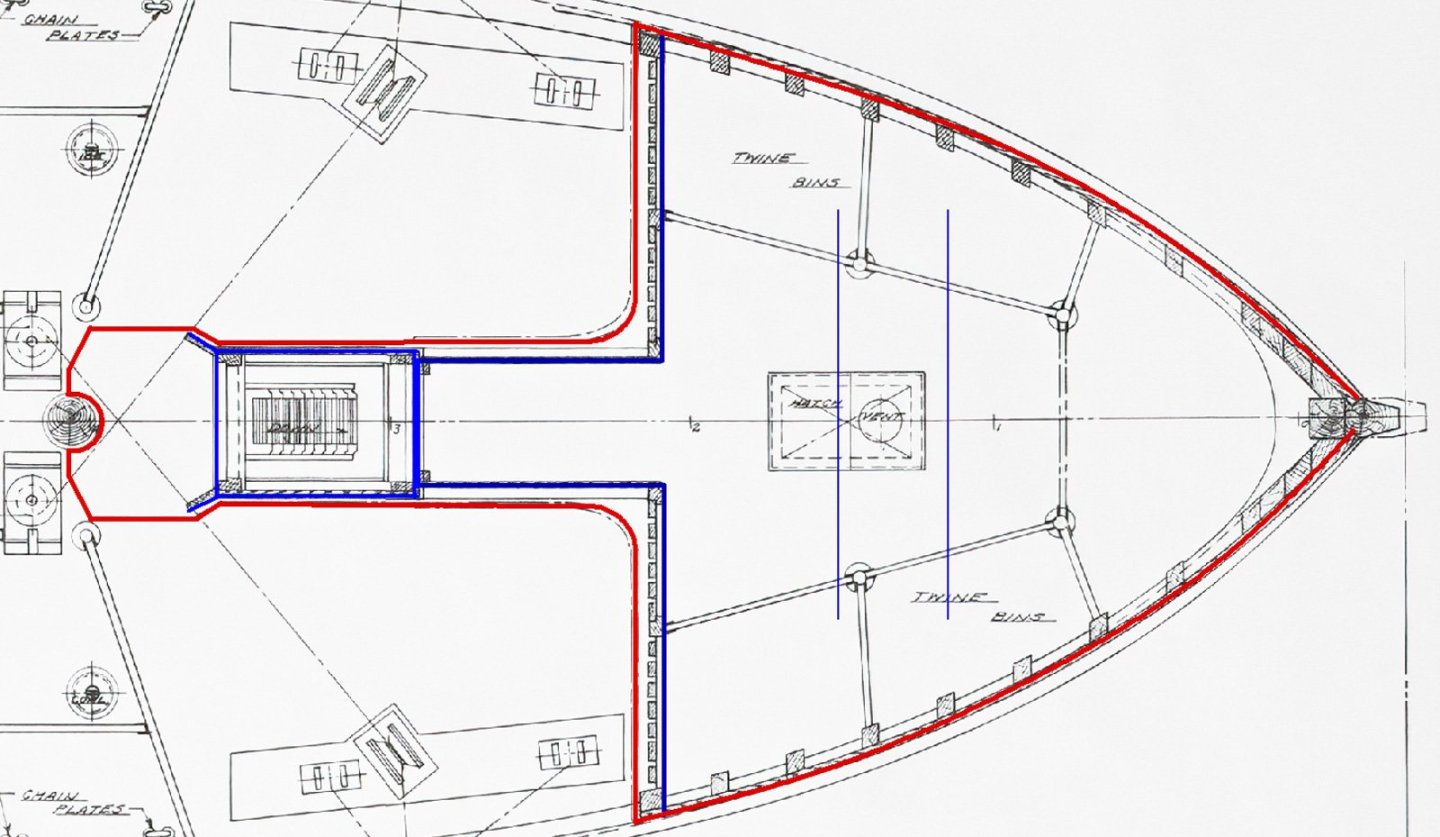
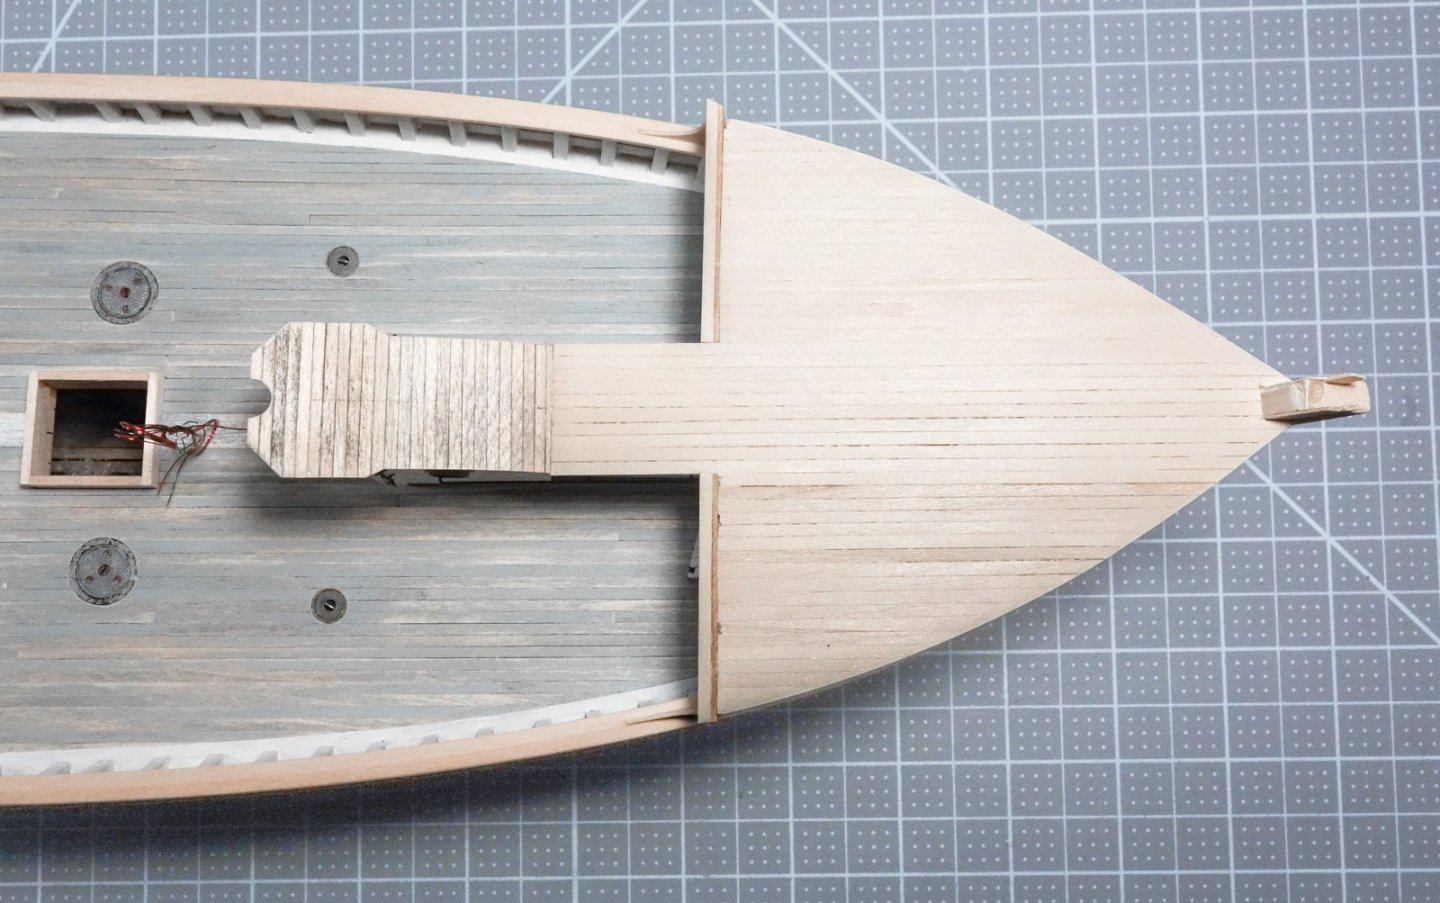
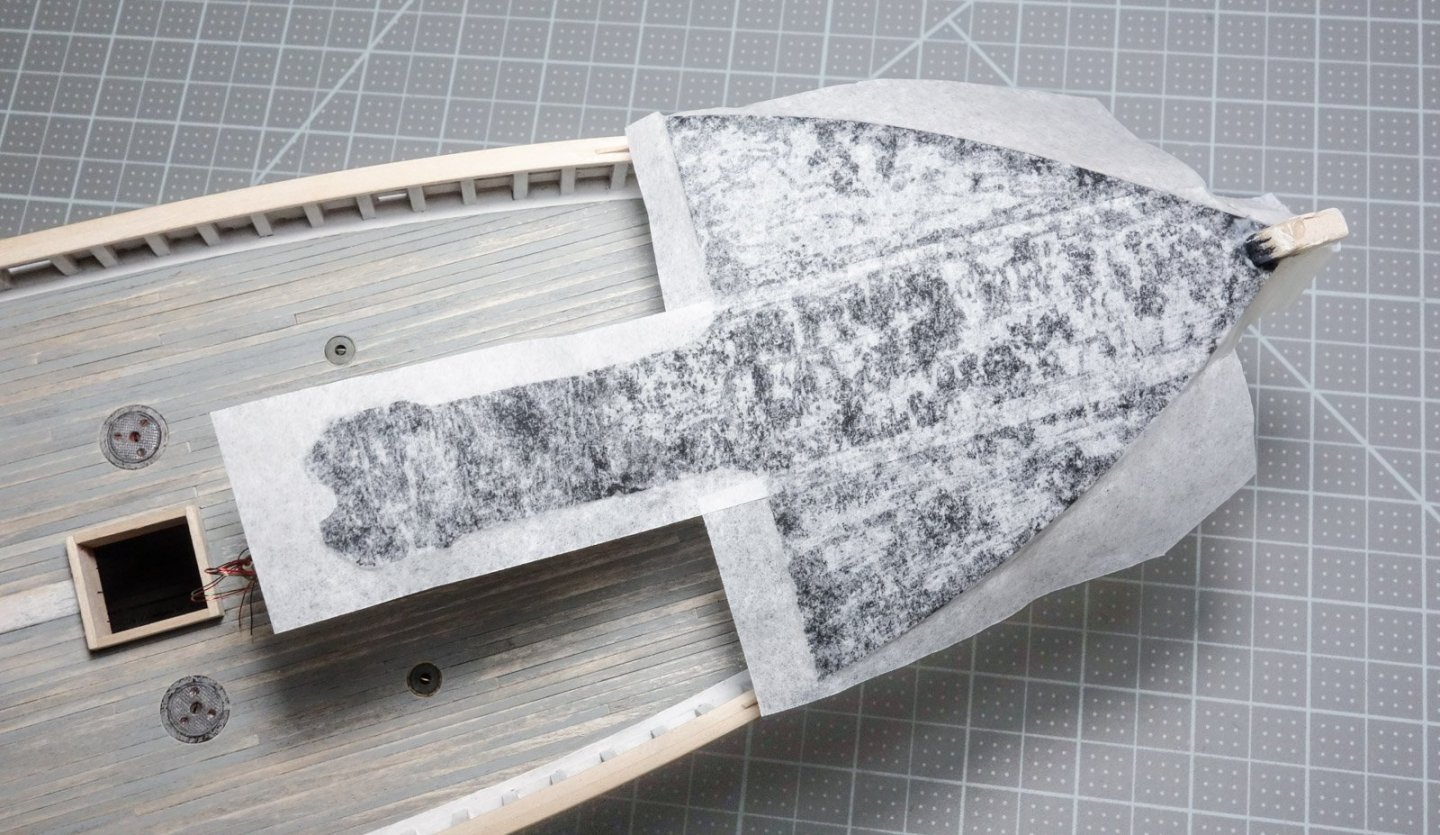
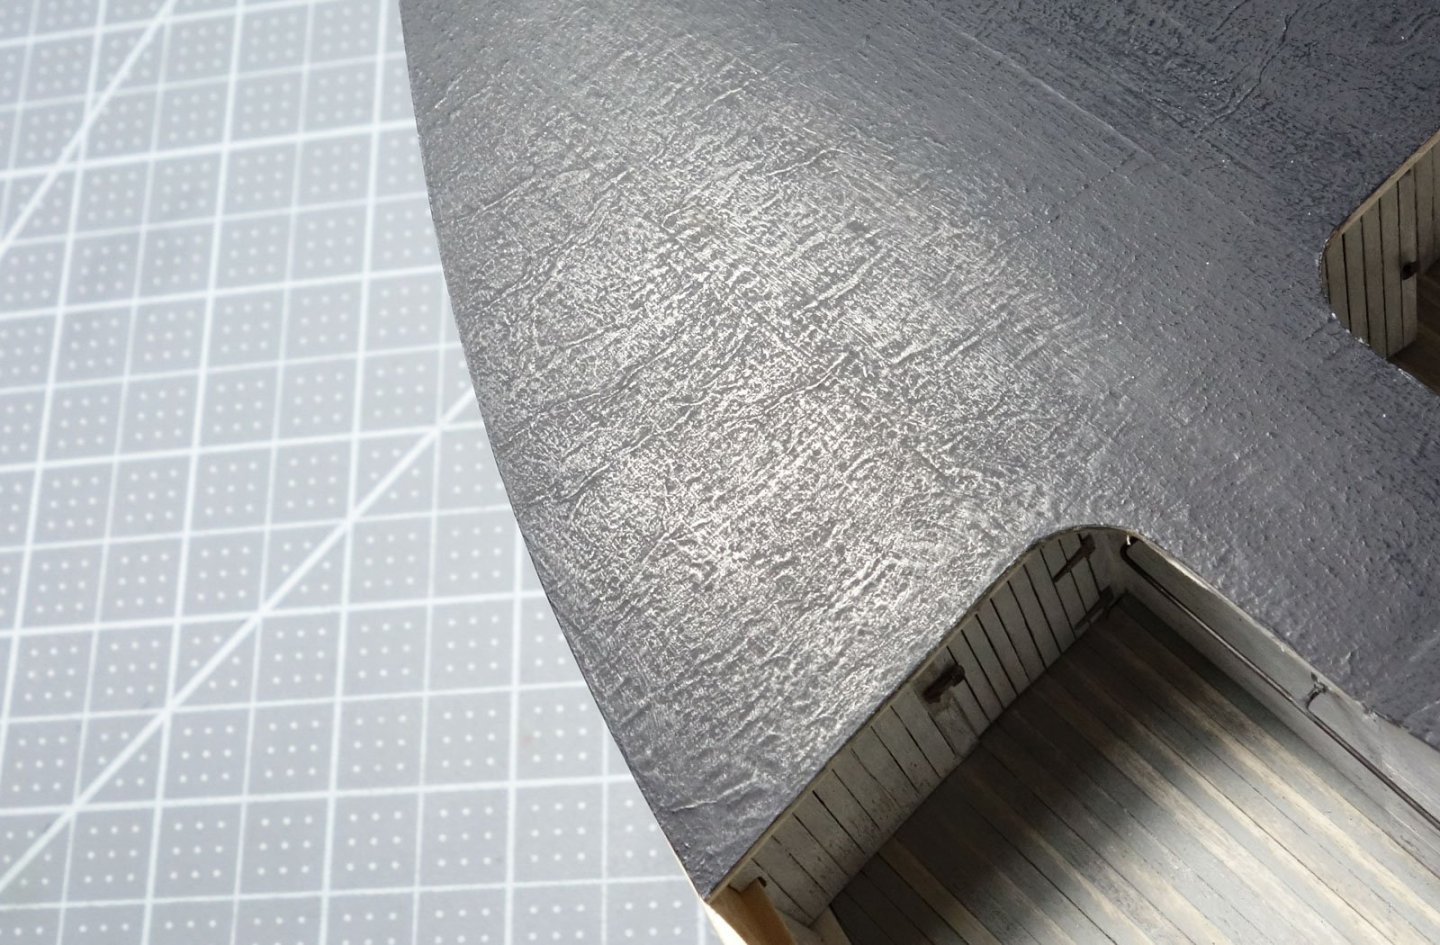
Greetings friends. Thanks to all for your visits, the kind comments and the "likes". It is great to be able to share a hobby with such folks as you and I hope you all have a great 2025. @Keith Black - please forgive my negligence in thanking you for your holiday wishes. You are very thoughtful, and I sincerely wish you and Maggie a happy and healthy new year. Whaleback Continued Well, I haven’t accomplished a great deal on the Pelican since the last posting a month ago, but here’s what I have got done. Continuing on with the bow whaleback, I’ve enclosed the structure with side planking and roofing. But before I was able to do that, I first needed to install the main rail for it to sit on. The rail is made of two wood strips laminated together which together scale to 9” in width by 3”. Even though this lamination creates a seam down the rail’s center, it will eventually be covered buy additional rail, caps or in the case of the whaleback, planking. I cut profiles of the forward rails from corrugated cardboard and glued them to a larger flat piece of corrugated. The wood strips were glued together with PVA and pinned against the cardboard profiles. They were then attached to the boat. In the photo below the aft wall of the whaleback is already in place but getting it in there was an unanticipated fight. Before the rail, the section simply dropped straight down in. After the rail was attached, one end of the wall had to be fitted around it and then the other end swung into place. But the opposite end could not swing into place because it couldn’t clear the bulwark stanchions no matter how I tried to bend and wedge the wall past it. I ended up breaking the wall into two pieces, fitting the opposite end in and then gluing it back together. The break can be seen below in the vertical siding. Next, the P/S side planking. Each was made of three individual planks edge glued together, then cut to shape and finally heat bent. Four roof/deck beams were bent and cut. I added gussets to the longest two so the bend can’t relax. The roof is outlined in red in the drawing below. Note that it overhangs the front of the companionway doghouse and extends to (and partially surrounds) the forward mast. This roofing structure was made off the model and in two pieces. The main section of roof/deck is scale 3” x 2” boards glued to paper but not to each other. The doghouse section is made of thinner material of the same width. The flat overhanging portion is edge glued and will eventually have visible underside structure. The sections are glued to the boat with generous amounts of PVA and the main roof is trimmed and sanded flush to the side planking. Wood that was bent to match the slight arc of the roof was attached to the square cut boards to extend the overhang and provide structure for the fascia and other trim that will be added in the future. Below, the ends are still untrimmed. In the era this boat was built, there were three ways wooden boat roofs were typically waterproofed. One was to mop hot tar or pitch on it. A second method was a covering of canvas tarps treated with oil-based paints. And finally with sheets of thin rubber membrane. I don’t know for certain how the Pelican’s roofs were done, but I’m going with rubber for its durable and also because the other two methods seem antiquated this late in the period. But what do I know? I began by painting everything flat black. Once that was dry, I smeared a 50/50 water/PVA mix on and then laid down three strips of tissue paper (gift wrapping type) before it had a chance to dry. To be accurate, I actually did this in three sections. I painted on glue to the port side and then laid a single tissue strip over it. Then I did the starboard side and finally a strip down the middle and over the doghouse. I might have been able to lay it all in one go, but this process gave me the time to fuss with the tissue paper and obtain the consistency of wrinkle I was after. Letting it sit overnight, I then painted the tissue a charcoal black acrylic followed by a faint and heavily diluted wash of dirty white pigments. The waist edges were then trimmed off with a razor blade. Some of the roof boards telegraph through the tissue and the overlapping seams are obvious yet don’t look out of scale to my eye. This image also shows the quarter circle roof corners that I didn’t think to photograph when I installed them earlier. There is much more to do on this whaleback - many details and finishes - lots more. Thanks for taking a look. Be safe and stay well. Gary


-
Oh yea, that's going to look cool, Glen! Gary
- 185 replies
-
- 5
-
-
-
- Flying Dutchman
- Black pearl
- (and 2 more)
-
Very nice work at this tiny scale, mcb! Looking great. Gary
-
Excellent work on those fences, Paul. Also, I like your process on the fairleads and the windless gypsy heads turned out great. Going to miss your updates when this model is done. Gary
- 201 replies
-
- 4
-
-
-
- Oyster Sharpie
- first scratch build
- (and 1 more)
-
Nice work on the hand pump, Keith. I agree with you the handles are a bit large, but not absurdly so. As John suggested, a piece of wire would work nicely or maybe a piece of thread pre-stiffened with CA. Alternatively, you could just explain that the boilerman is a knuckle dragging neanderthal and the handles were enlarged expressly for him. After the housing is installed, how visible will it be? Gary
- 732 replies
-
- 7
-
-

-
-
- Lula
- sternwheeler
- (and 1 more)
-
She is progressing very nicely, John. Looking great! Gary
-
Wonderful scrollwork, Keith! Beautiful. Gary
-
Beautiful exacting work as always, Håkan. Gary
-
Catching up, Glen and the whirlpool turned out great and no question about what we're looking at with the ships positioned around it. Very cool. Looking forward to the base. Gary
- 185 replies
-
- 5
-
-
-
- Flying Dutchman
- Black pearl
- (and 2 more)
-
Such a charming model of an interesting craft - superbly built. Congratulations on completing both of them. Gary
-
Catching up after a few weeks away, and good grief you have been busy. Your beam engine looks fantastic and the fact that it's in 1:120 makes it flat-out incredible. The weathering turned out great and there is no shame in going back and reworking what didn't turn out to your liking. I find weathering to be a process rather than a one-and-done. The engine sitting atop the penny is a telling image, however the engine makes the coin look bigger than it is. I have a penny on my desk and looking over at it makes me appreciate how small that engine really is. Wonderful modeling, Keith. Good start on the boiler, also. Gary
- 732 replies
-
- 7
-
-
-
- Lula
- sternwheeler
- (and 1 more)
-
Congratulations on that milestone of getting the epoxy in successfully, Glen - nerve wracking, no doubt. And I Like your improvised figurehead. Always good to have a junk box to turn to. Gary
- 185 replies
-
- 6
-
-
-
- Flying Dutchman
- Black pearl
- (and 2 more)
-
Nice progress, Andy, and planning is part of the build process be it minimum or extensive. I would be intimidated as all get-out if I had those ship builders watching my every move, so for that reason alone, I understand your determination for the utmost accuracy. I remember that the wood for this build came off your property, but I didn't realize it was from your own plantings. Very cool. Gary
- 174 replies
-
- 4
-
-
- Vigilance
- Sailing Trawler
- (and 1 more)
-
Yes, those ultra small drill bits (#80 through #70) are real frustrating. They don't really cut - more like wearing through the material via friction. Just the same, your anchor turned out very nice indeed. Gary
-
Such great work, Ras! Congratulations on completing this fine model. As others have mentioned, the bright brass really sings. Looking forward to your next San Pablo build. Gary
- 128 replies
-
- 2
-
-
- zulu
- sternwheeler
- (and 1 more)
-
Nice score on the wheels, Keith. Seeing the object for what it is and not what it's supposed to be is like Glen stated - a "great eye". I also like your layout plan. Looking forward to your next steps. Gary
- 732 replies
-
- 6
-
-
-
- Lula
- sternwheeler
- (and 1 more)
-
What Keith said. Simply wonderful work, Paul! Gary
- 201 replies
-
- 4
-
-
-
- Oyster Sharpie
- first scratch build
- (and 1 more)
-
Creative process, Glen - and convincing as well. Gary
- 185 replies
-
- 5
-
-
-
- Flying Dutchman
- Black pearl
- (and 2 more)
-
No, it's a product that one would place on a shelf or the bottom of a draw to keep items stationary and organized. Works great in rolling metal toolboxes so your open-end wrenches/spanners stay put and in order. People use it under scatter rugs on slippery hardwood floors. Many uses in the woodworking shop. Amazon - non-slip lining So would I - if I had one. Thanks for your comment Wefalck and for swinging by to take a look. Gary