FriedClams
-
Posts
1,368 -
Joined
-
Last visited
Content Type
Profiles
Forums
Gallery
Events
Everything posted by FriedClams
-
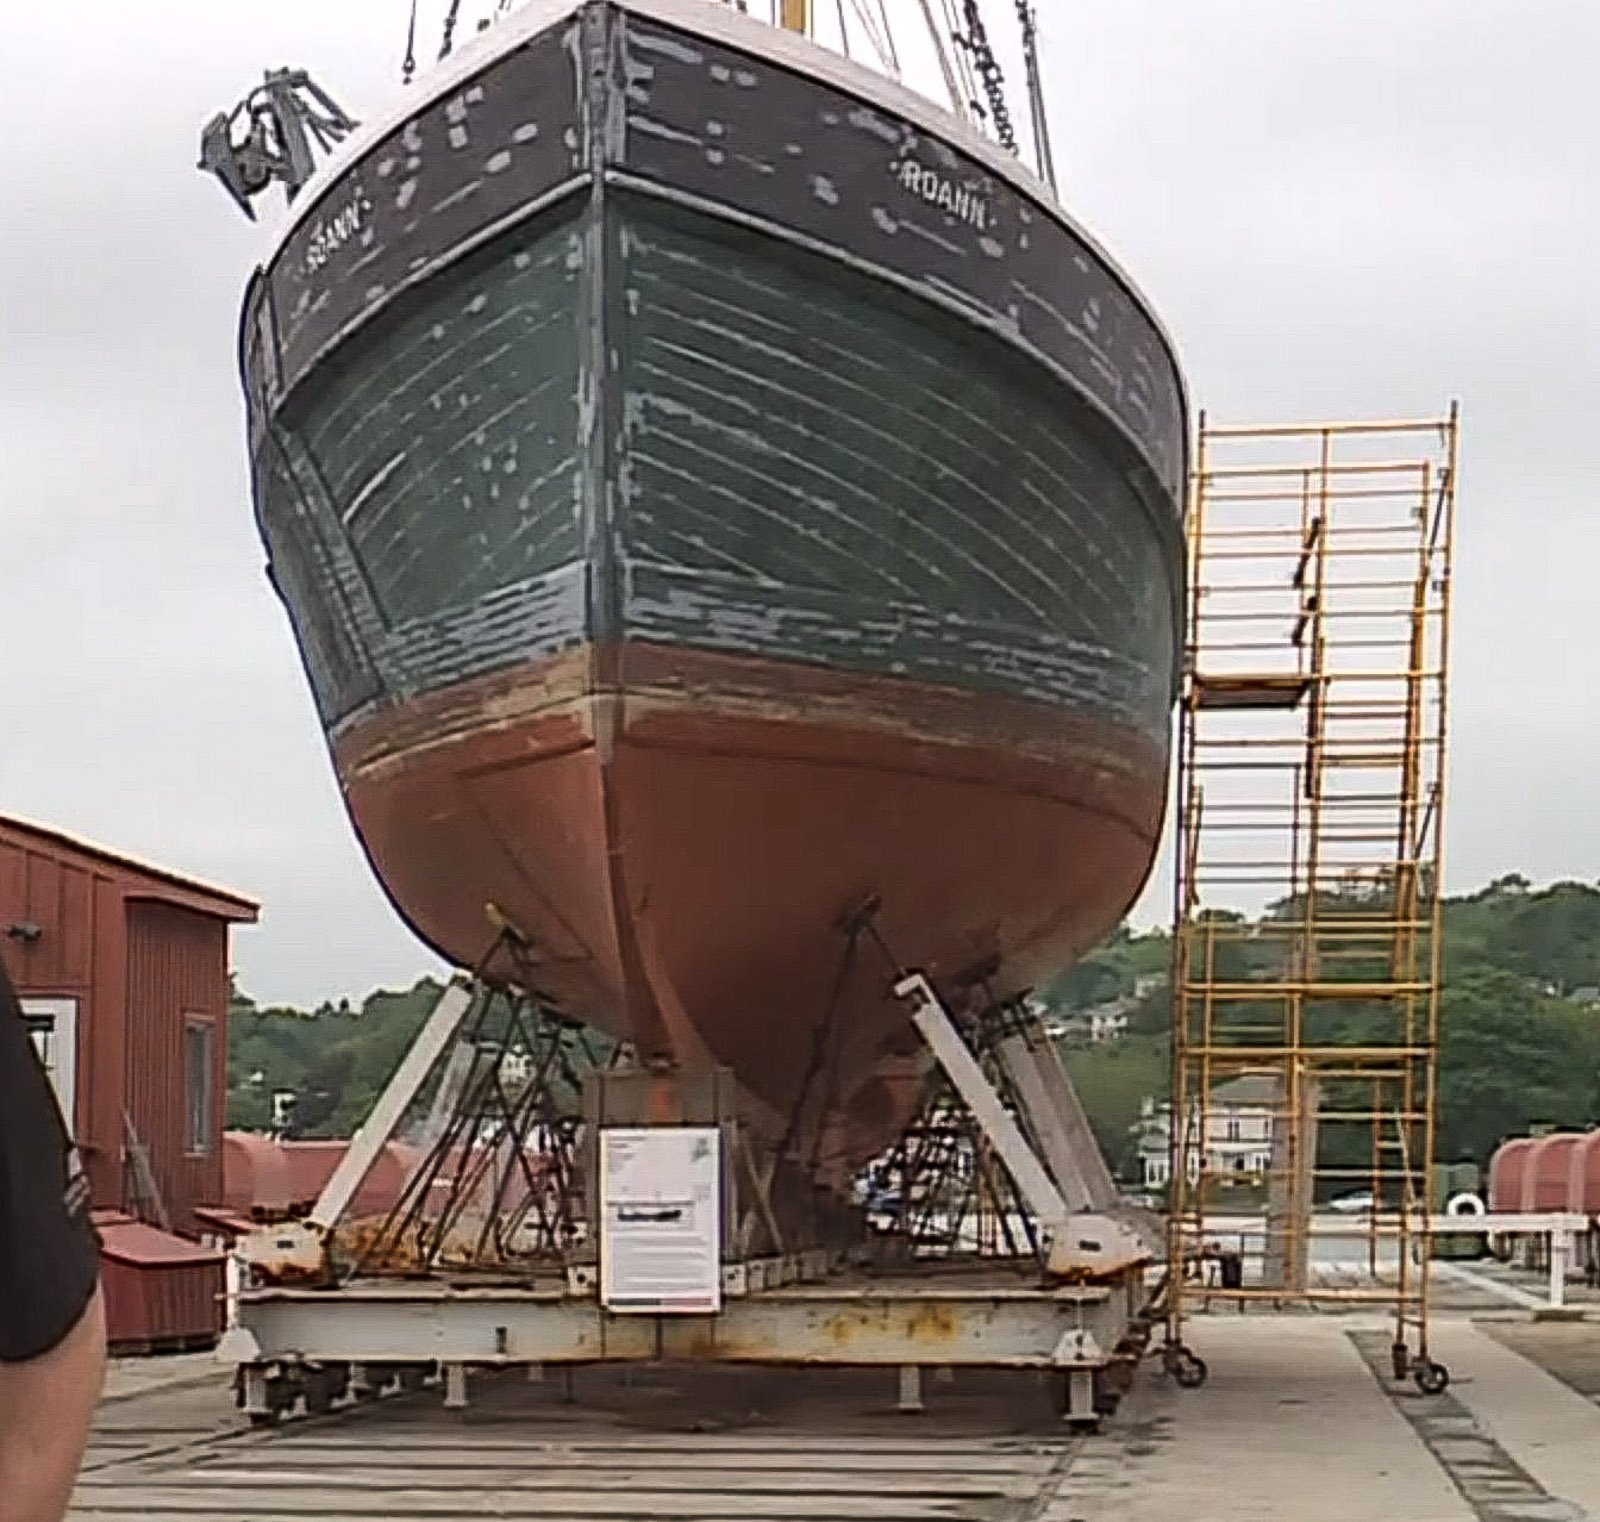
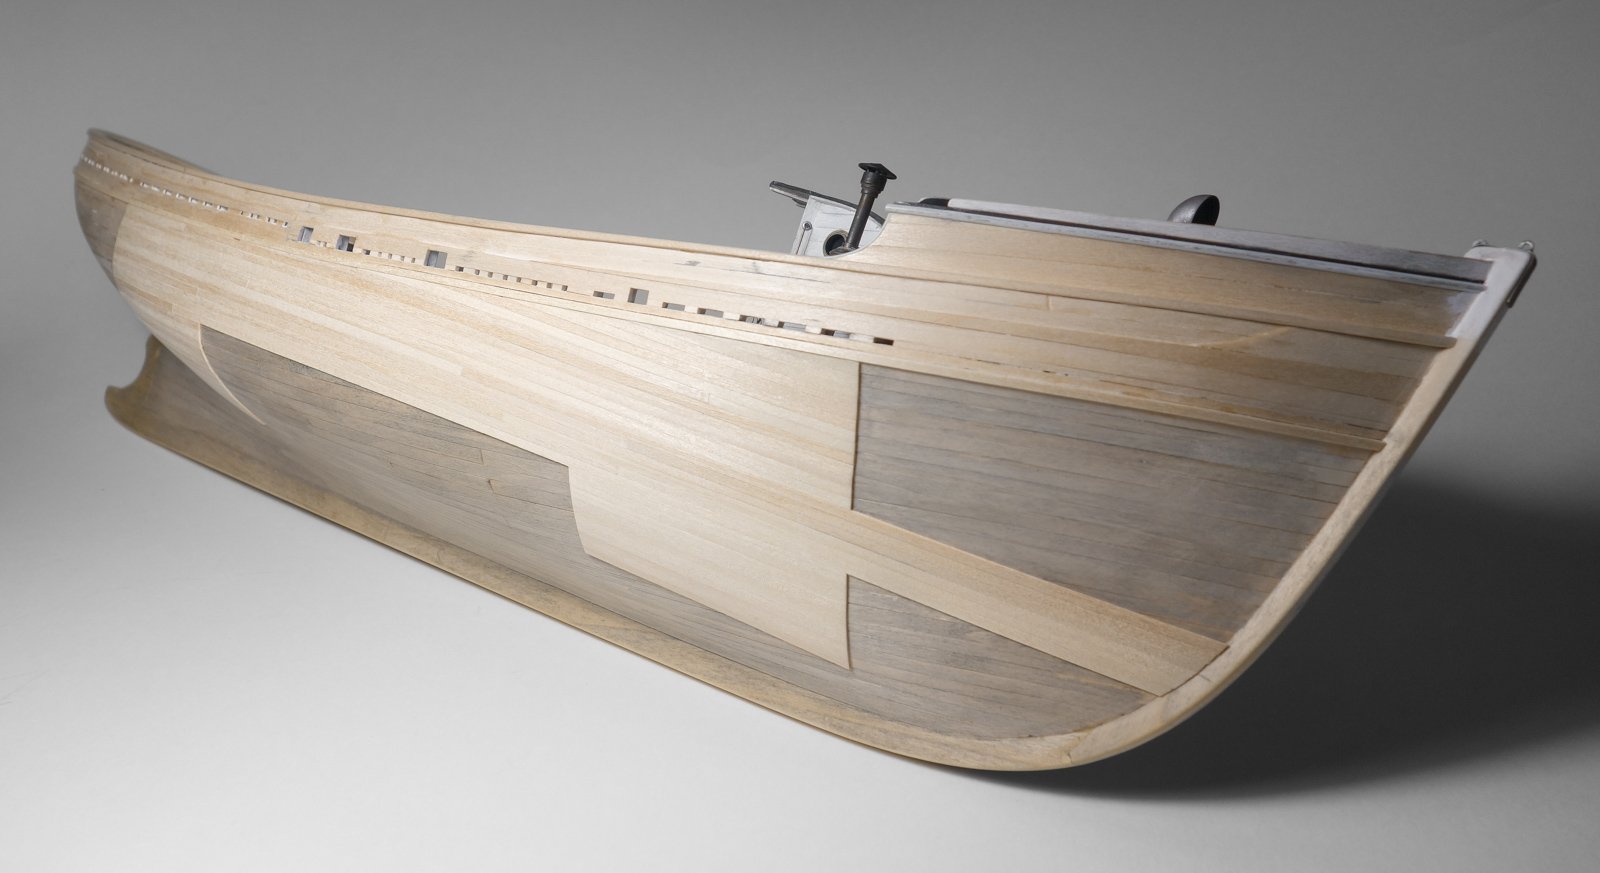
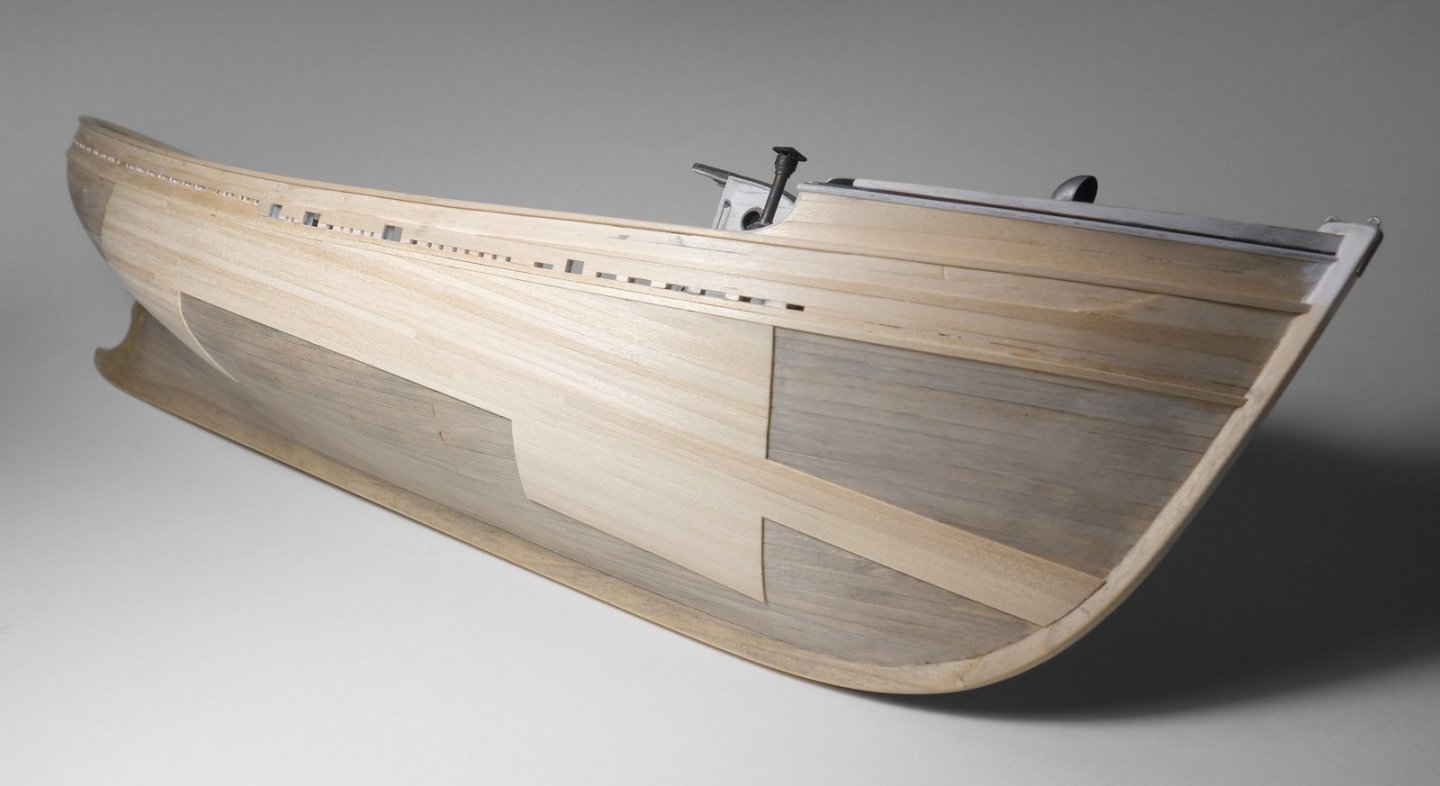
 Just catching up, Phil and you're doing some very nice work on this model. I have never seen anyone install this type of sheathing on a boat before - except that this is exactly what I'm currently doing on my F/V Pelican. How coincidental. So, I can offer what I know as it pertains to mid-century wooden F/V in New England. The sheathing was installed below the gallows frames and extended down well below the waterline. The sheathing was ¾” oak and protected the hull from the heavy steel edged “doors” (otter boards) when the trawl gear was deployed and retrieved. This sheathing is sacrificial and was replaced/repaired as needed. They are not tapered and there are no gaps between boards. The Roann (built in 1947) is a small eastern-rig dragger and part of the Mystic Seaport Museum collection. In the image below, one can see that the starboard sheathing not only covers the hull below the gallows but also extends in a narrow band at the waterline forward to the stem. On port side, there is only the narrow band which extends to midships because there are no port side gallows frames on this boat. My understanding is that because this class of offshore F/V fished year-round, the forward waterline sheathing is there to protect the hull from floating slabs of ice in a time when harbor freeze-overs were not uncommon. Here’s is the sheathing that I've applied to the Pelican as per the plans and images of other vessels by the same designer. This is complete minus the trim to protect the end grain, and the waterline band still needs to be extended onto the stem. Because this boat had four gallows and could drag off either side, I will be sheathing the port side identically. If not helpful, I hope this is at least interesting. Gary
- 492 replies
-
- 6
-

-
- minesweeper
- Cape
- (and 1 more)
-
Watched your videos the other night and really enjoyed them, Eric - thanks! Your layout bluff coloring looks very authentic. Gary
-
Coming along nicely, Paul. That straight on view of the bow shows how well the P/S planks are lining up to each other at the stem. Nice. Gary
-
The fact that the surgeon felt no urgency sounds like pretty good news, Keith. Hang in there my friend, we're all thinking of you and hoping for the best possible outcome to whatever course of action is recommended. Gary
- 732 replies
-
- 4
-

-
-
- Lula
- sternwheeler
- (and 1 more)
-
Catching up on your monumental project, Eric. This is more like empire building than modeling. It's very interesting to follow along in the planning and to get some insight into the choices that must be made when building a model RR. I lived in Colorado for decades and did considerable hiking and "peak bagging" and have always found geology, even at my amateur level, to be fascinating. So, I encourage you to "nerd out" when the impulse arises. Gary
-
Beautiful work, John and progressing very nicely! Gary
-
Just catching up, Siggi. I find this model of yours to be extraordinary. Such delicate details perfectly executed by a master modeler. So very good!! Gary
-
Congrats on finishing this beautiful wherry, Mike. There's just something about an open boat that warms my heart. As others have already stated - fantastic paint and stain combination - nice contrast. Excellent work! Gary
- 47 replies
-
- 4
-
-
-
- Annapolis Wherry
- Chesapeake Light Craft
- (and 1 more)
-
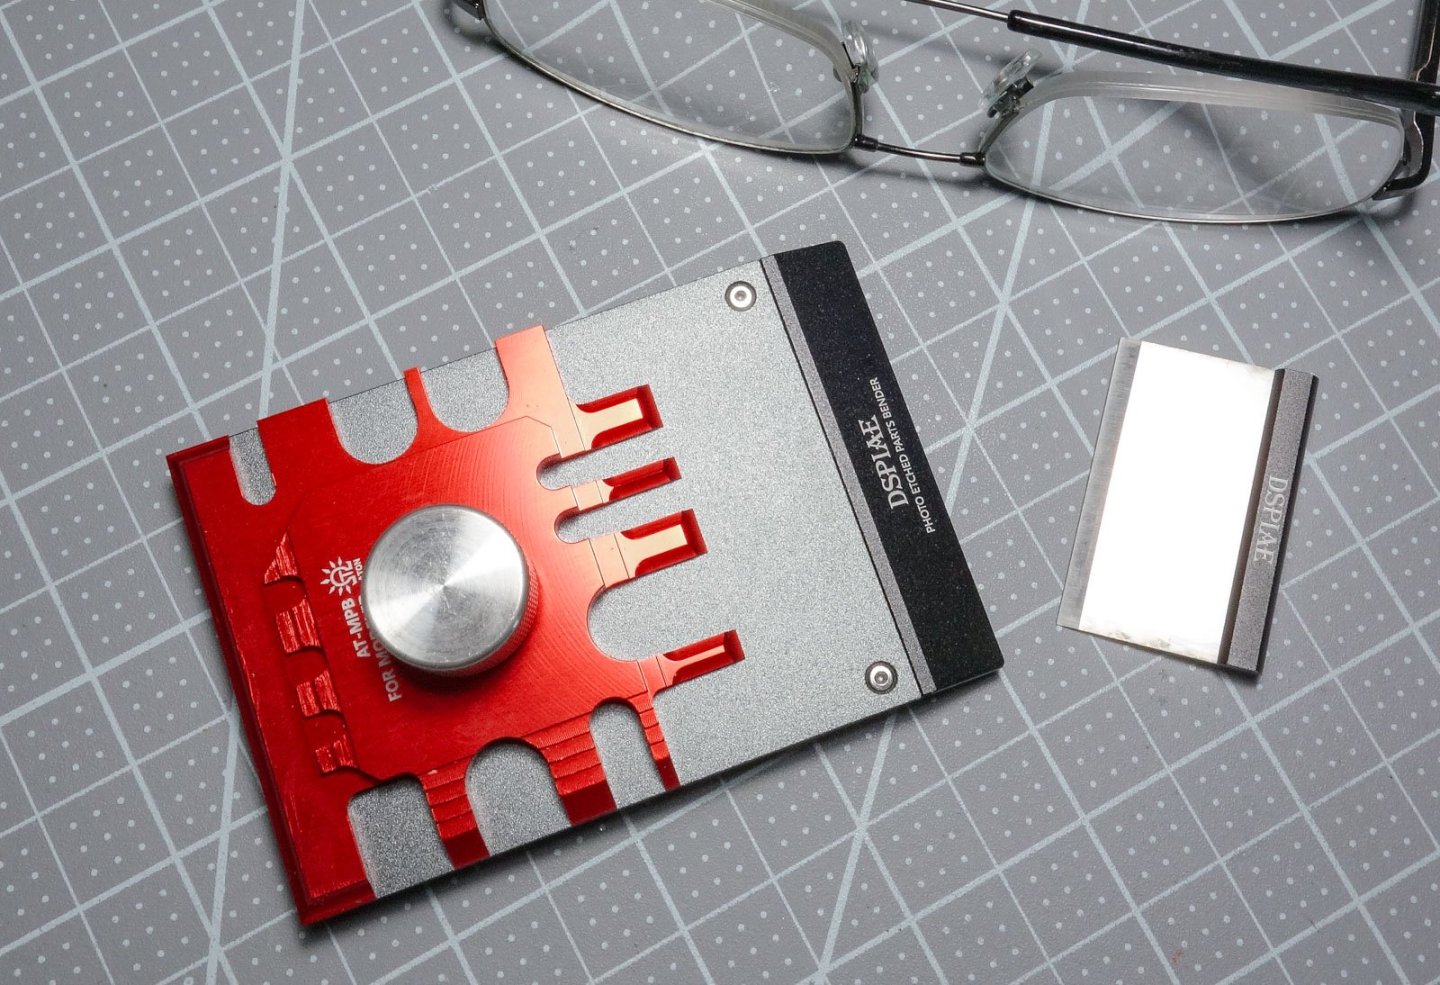
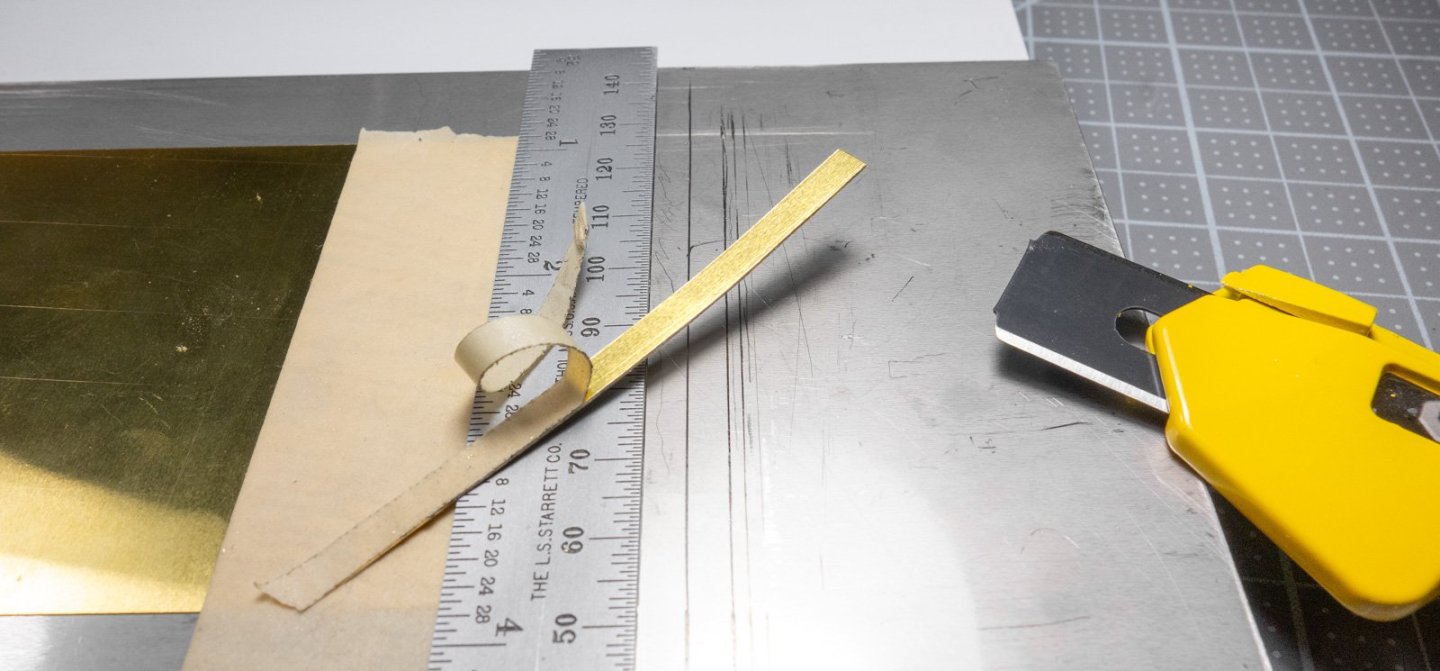
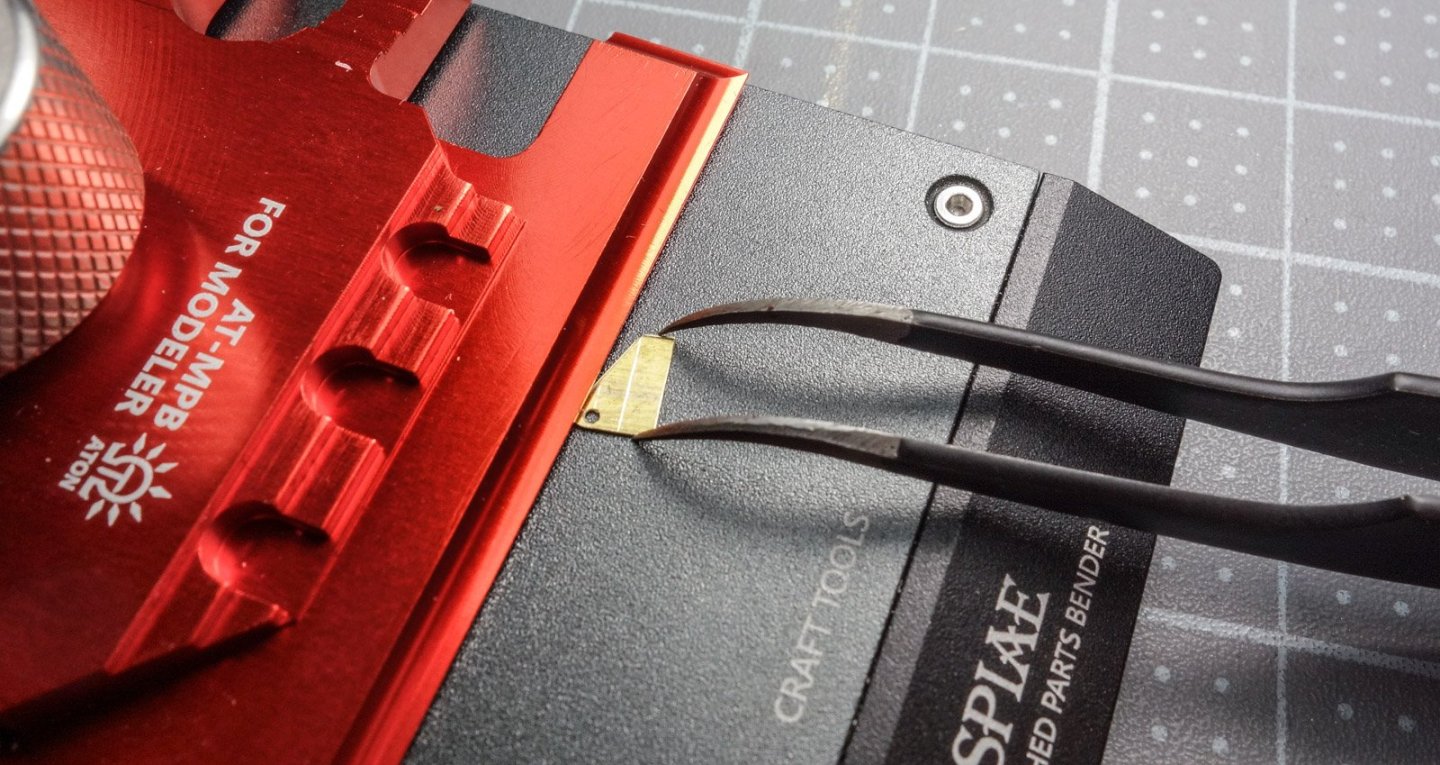
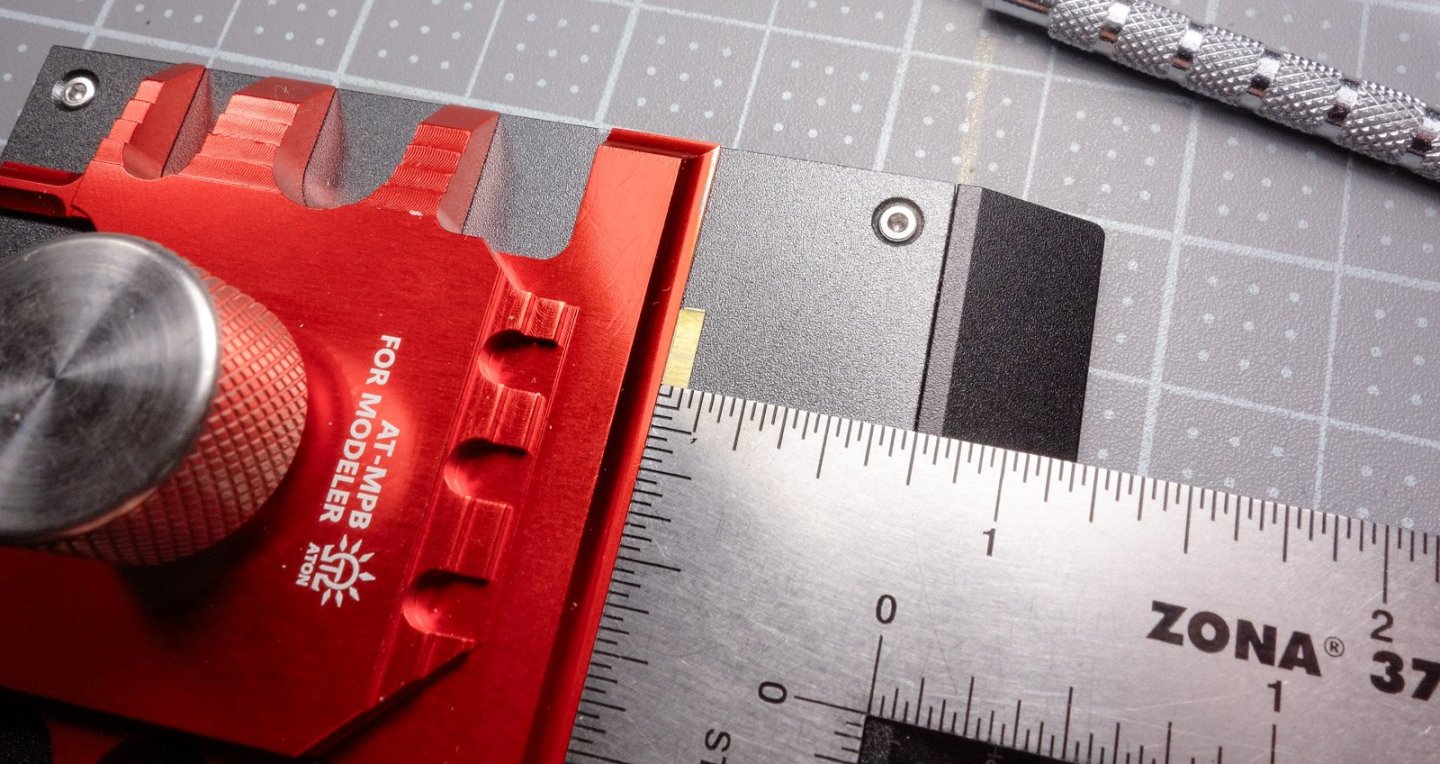
Thank you, Glen, Paul, Keith, John, Phil and Wefalck for your comments and support. It is so appreciated, and I thank all for the "thumbs up". I want to clarify that when stripping the brass, both layers of the two-sided tape are being cut, and the strip remains taped to the stainless. The only way I know the cut is complete is when the blade glides smoothly across the stainless. A single edged razor blade is then used to release it from the stainless plate. Paul and Phil - they are indeed handy, and it provides precision when folding such parts. It's great for making angle iron and such from aluminum beverage can sidewall. But of course it is limited to thin, soft materials. It is a DSPIAE model # AT-MPB - just shy of $30 US. It's a quality tool that I've seen military modelers use. They work with a lot of PE so I figure they must know. The top clamp (red) can be lifted and turned as needed. Hmm, never thought of that. Must give that a try sometime, especially with slightly thicker material. Thanks. Gary
-
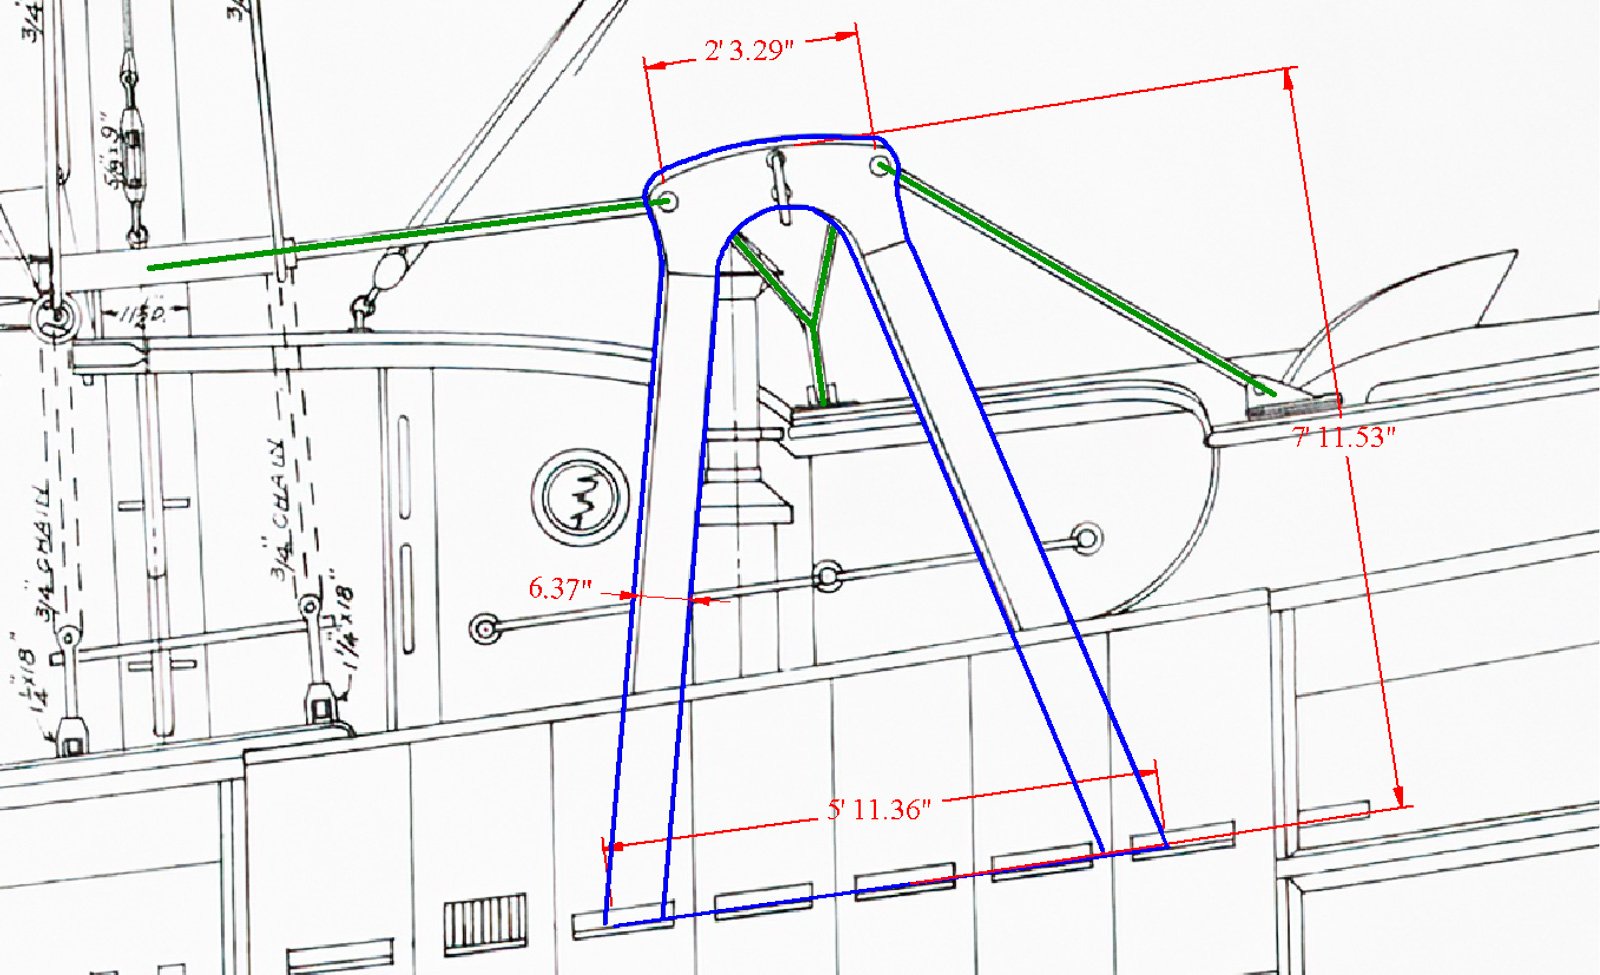
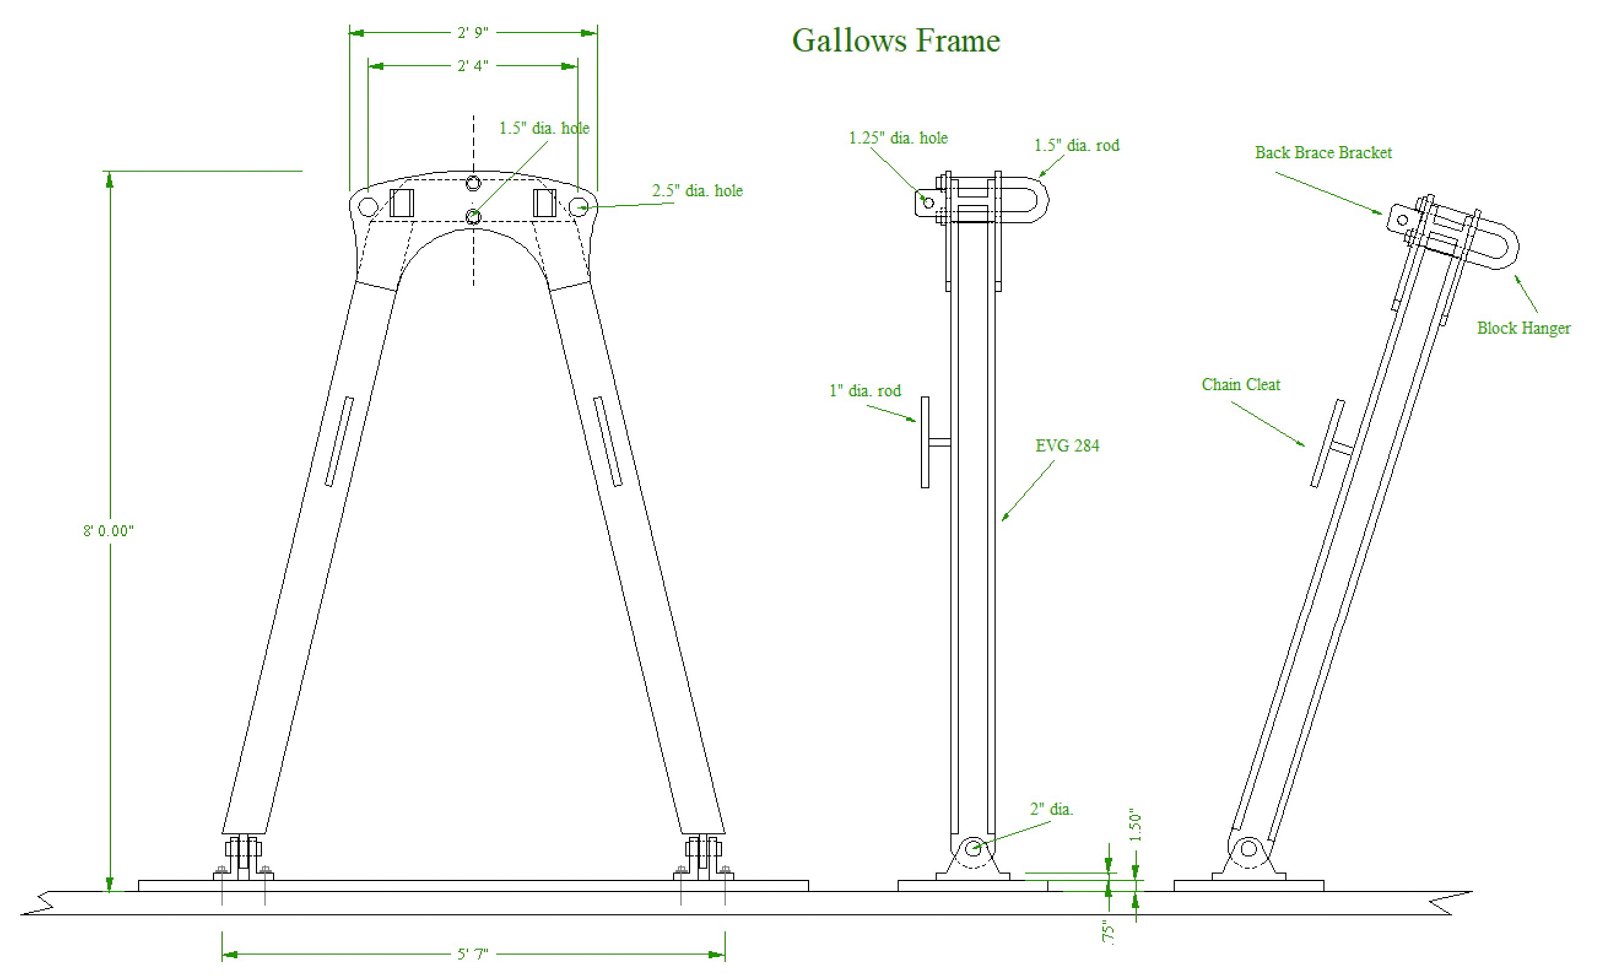
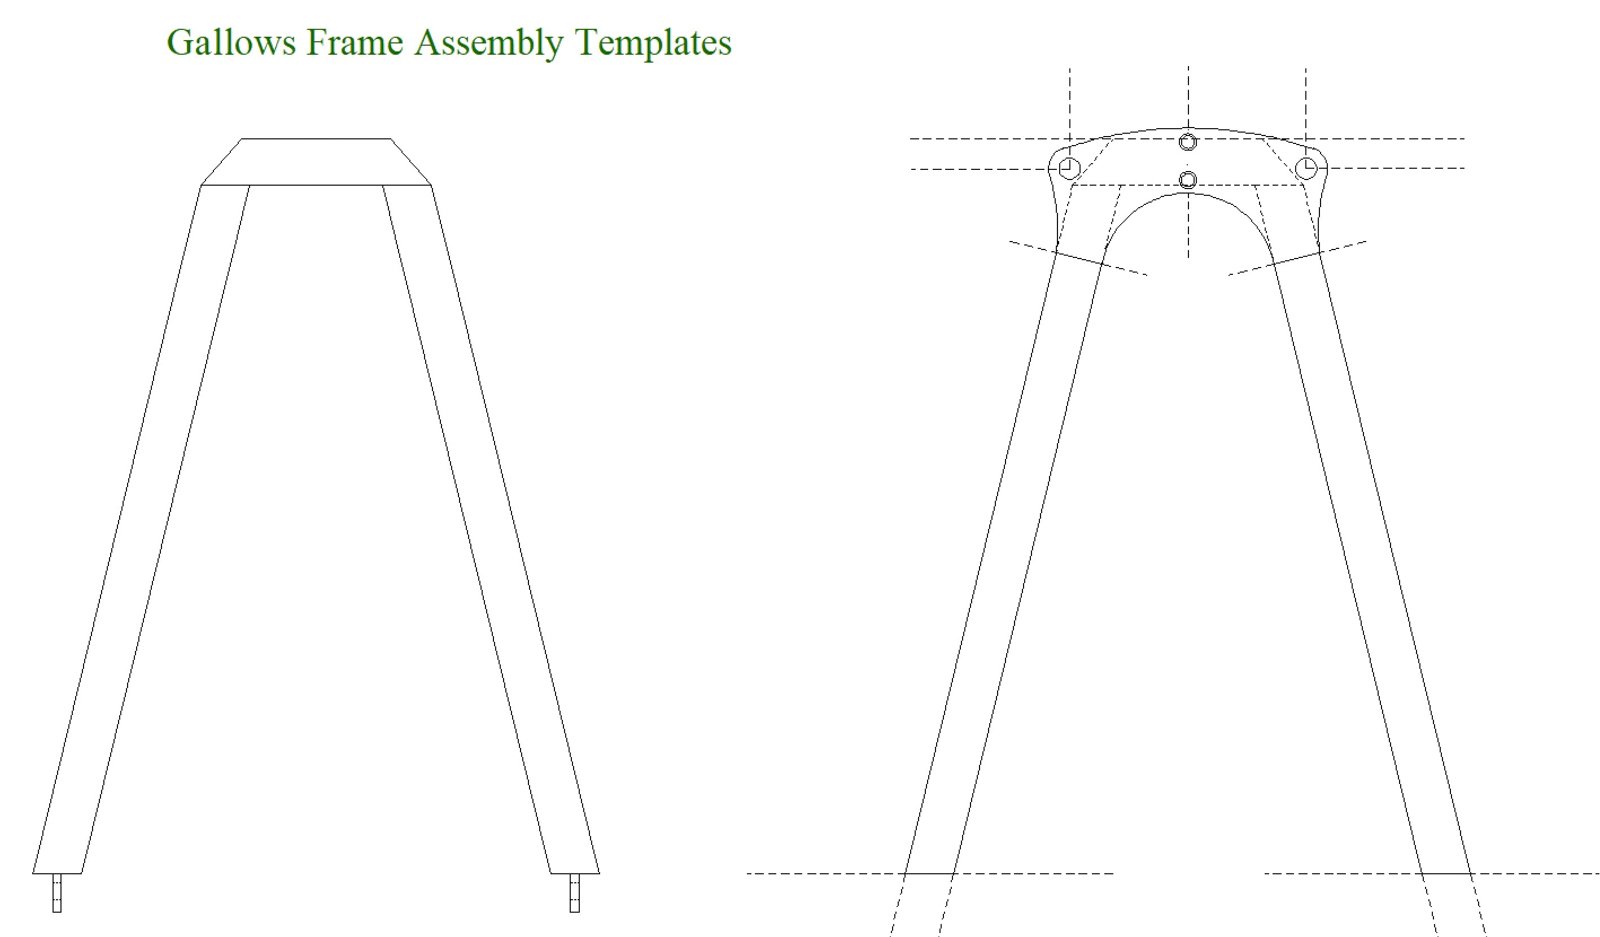
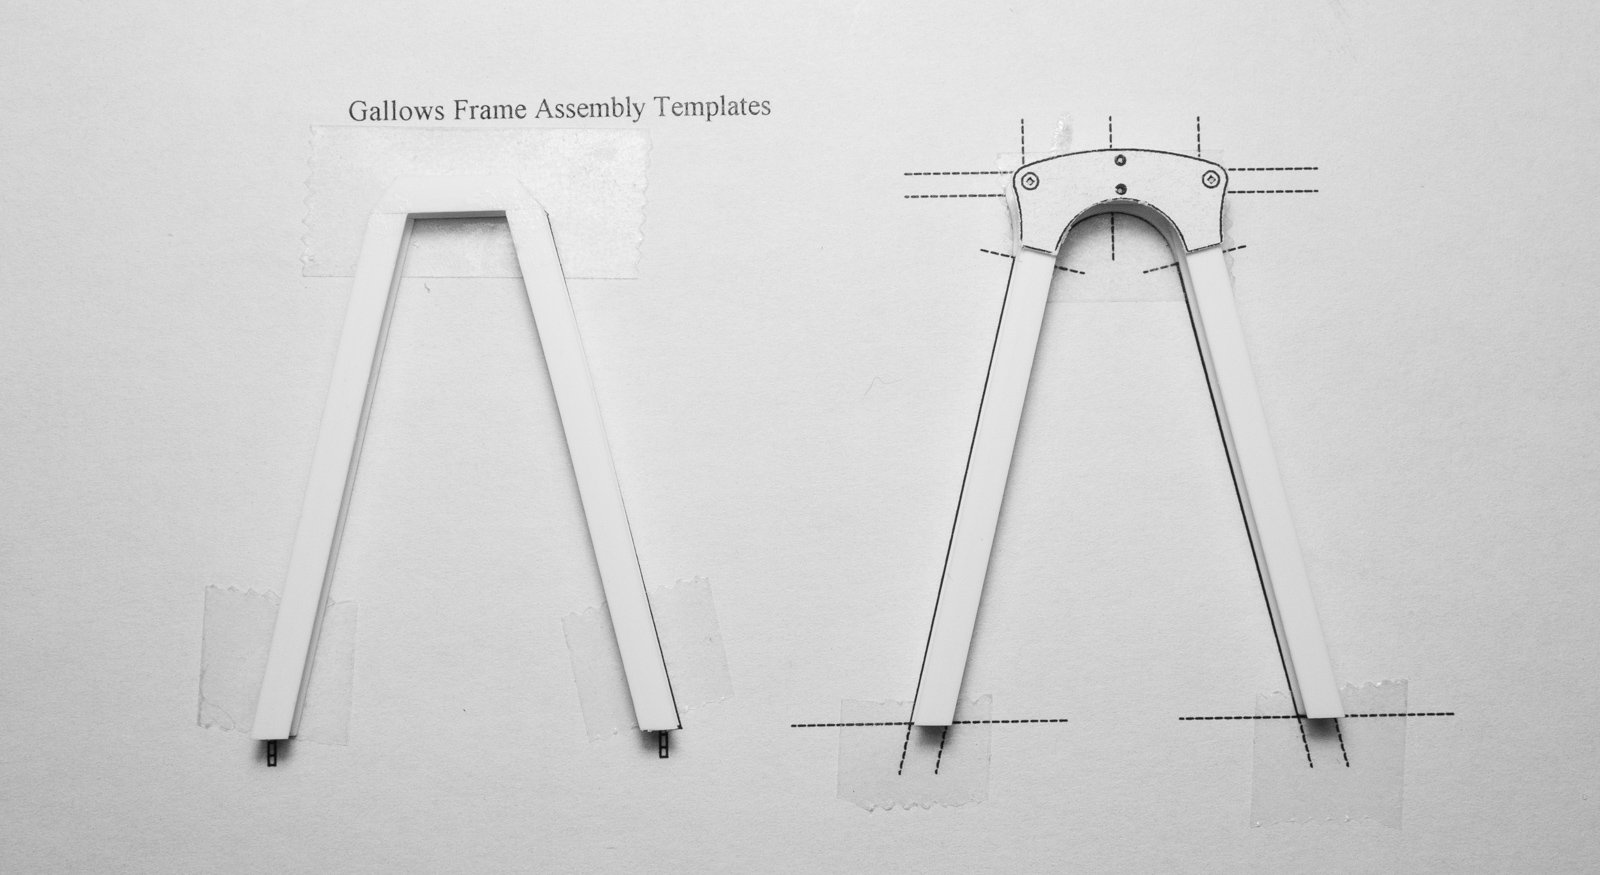
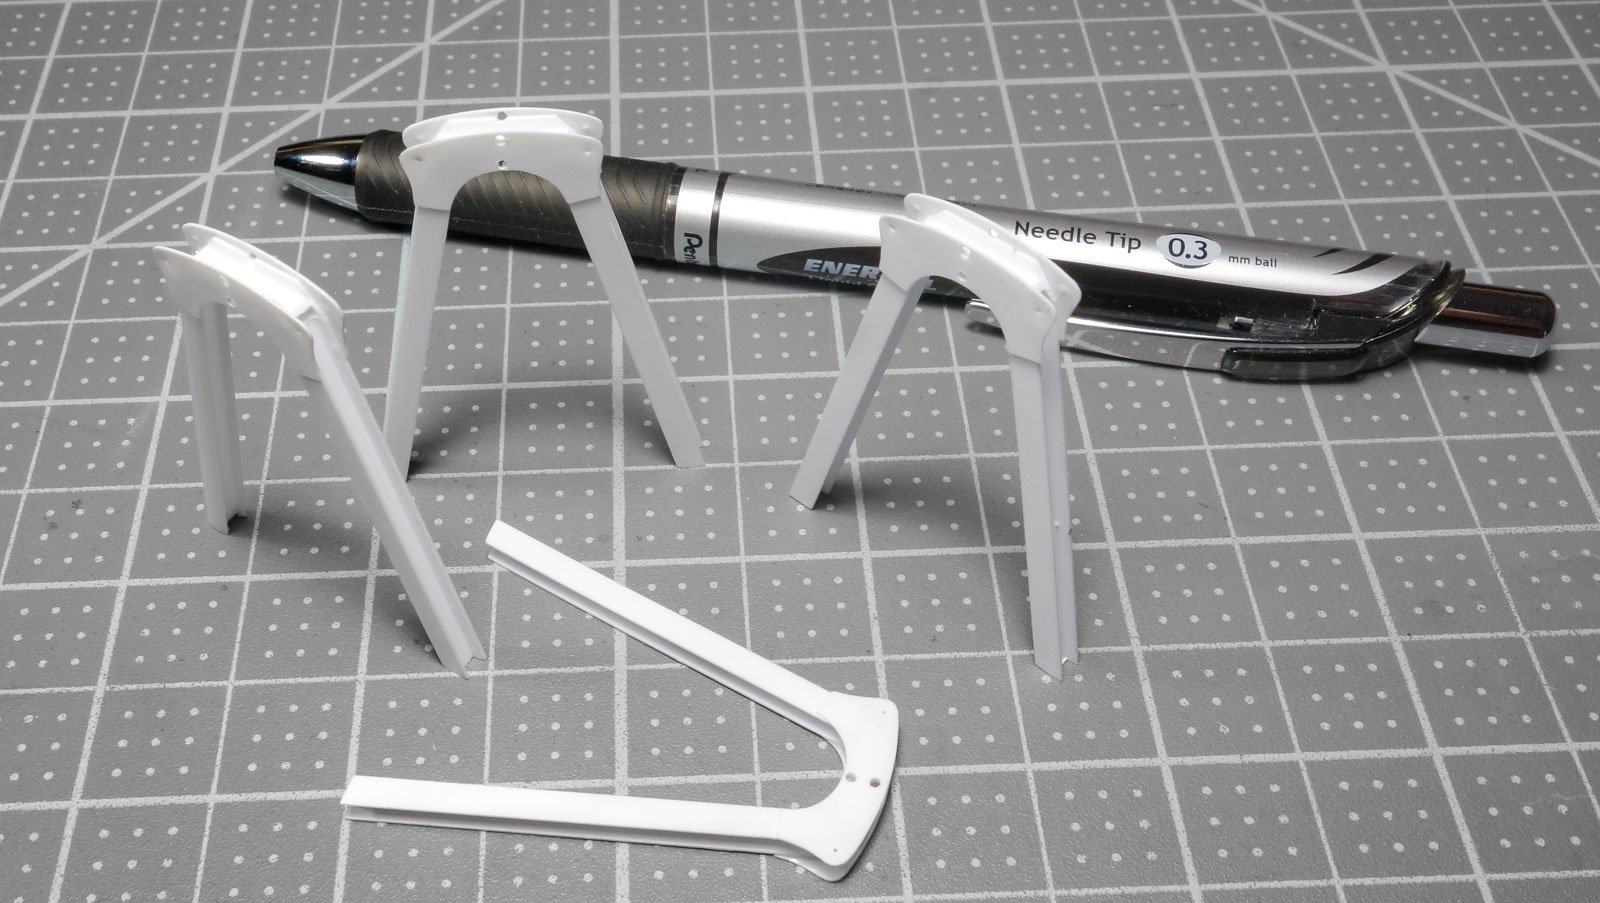
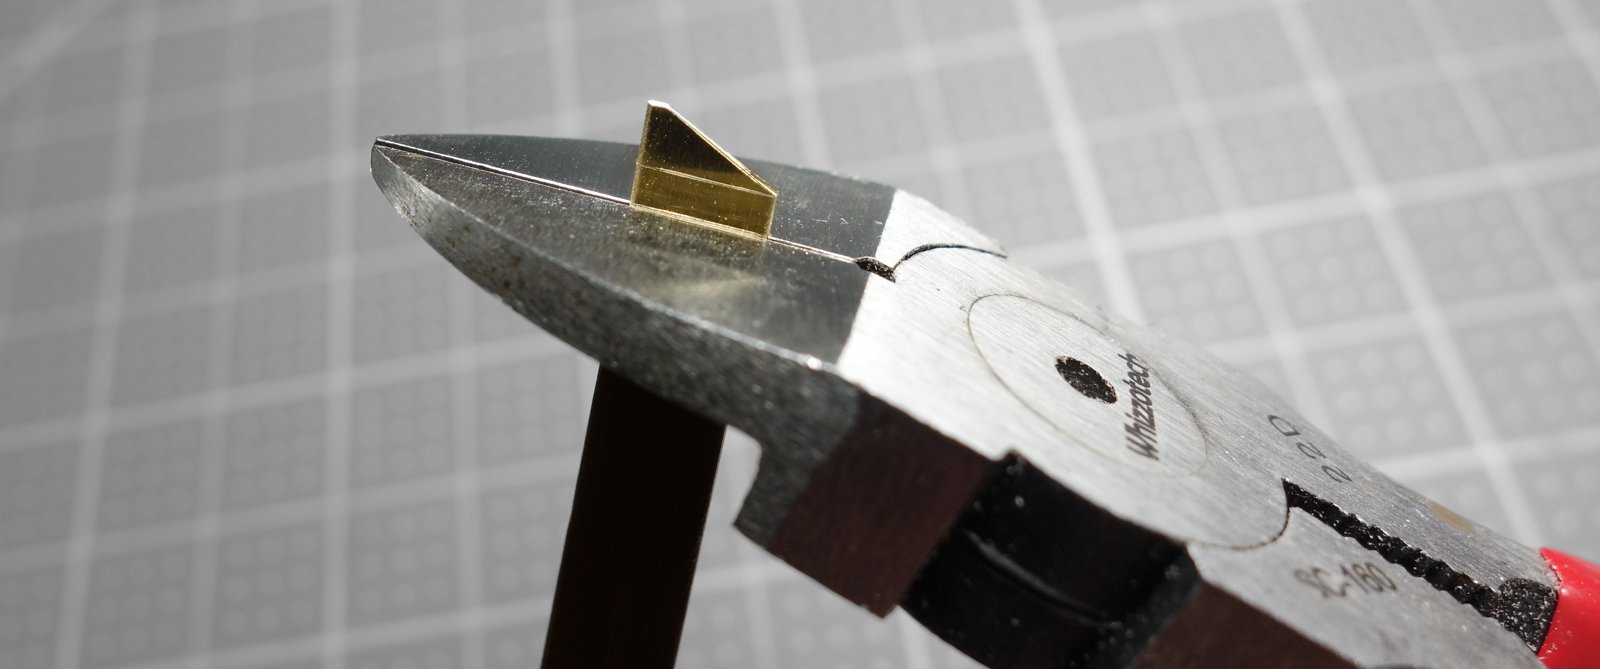
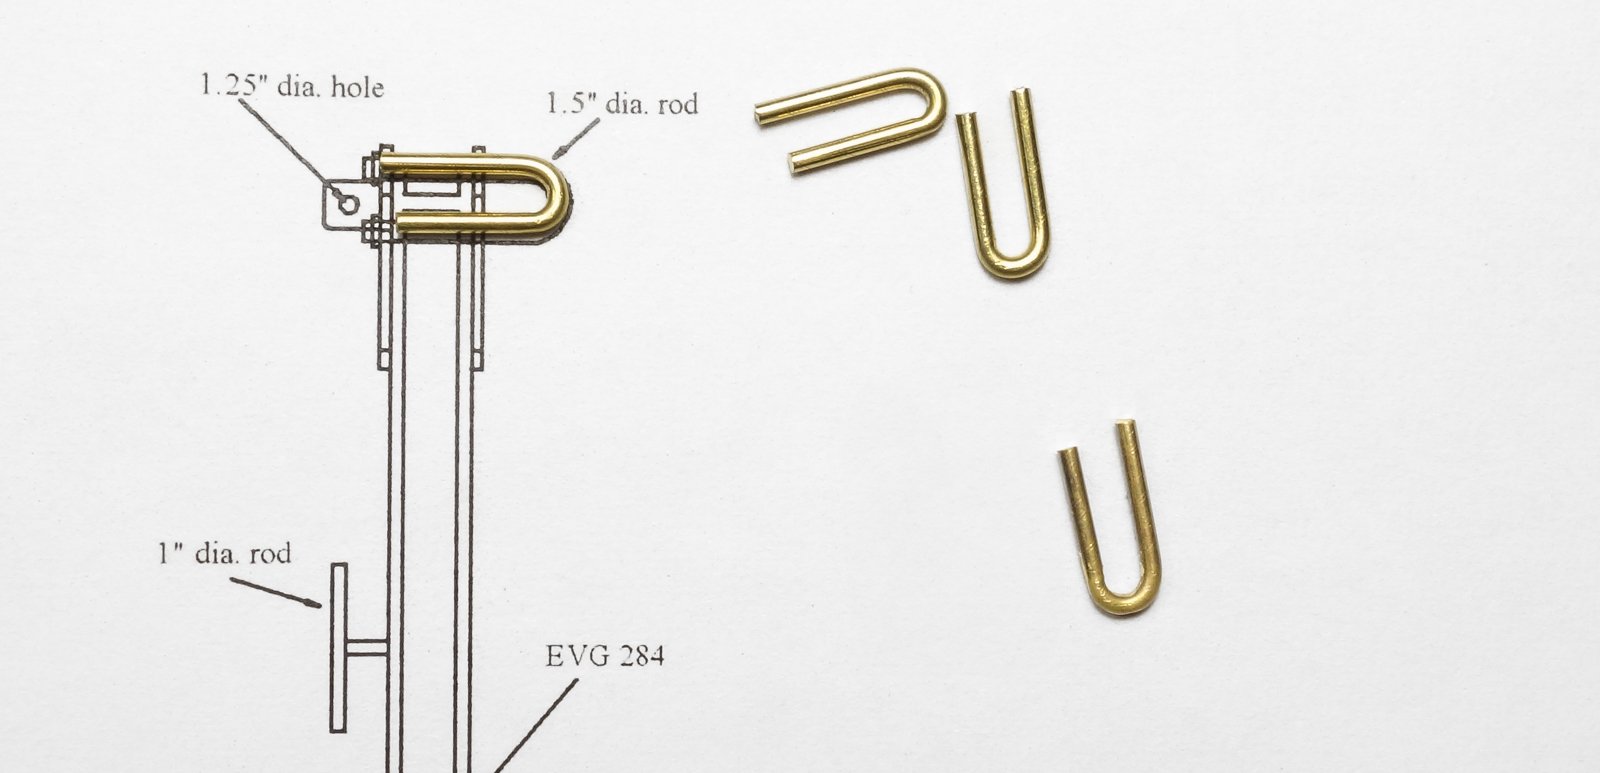
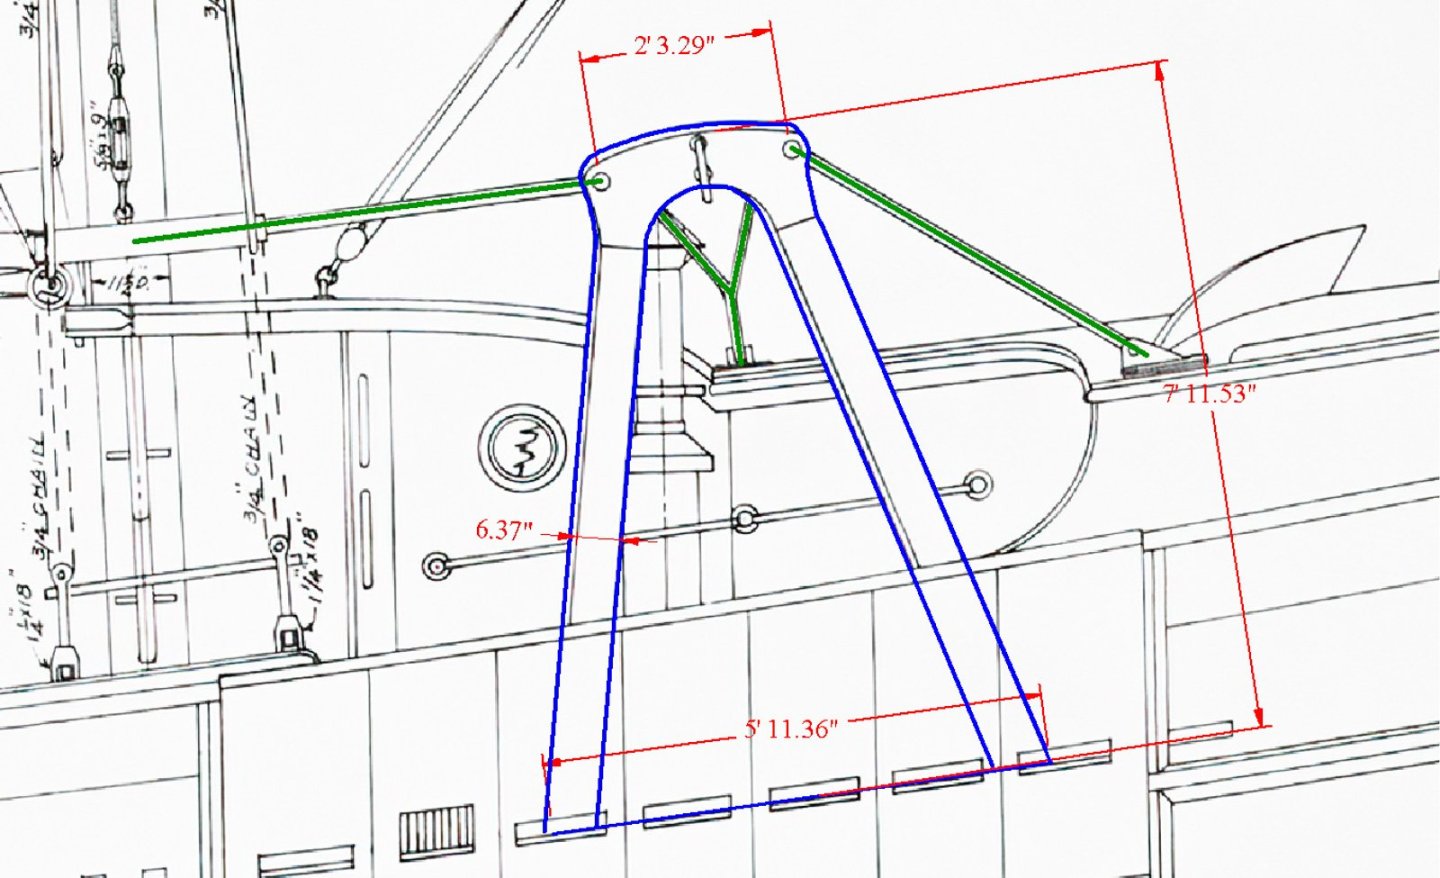
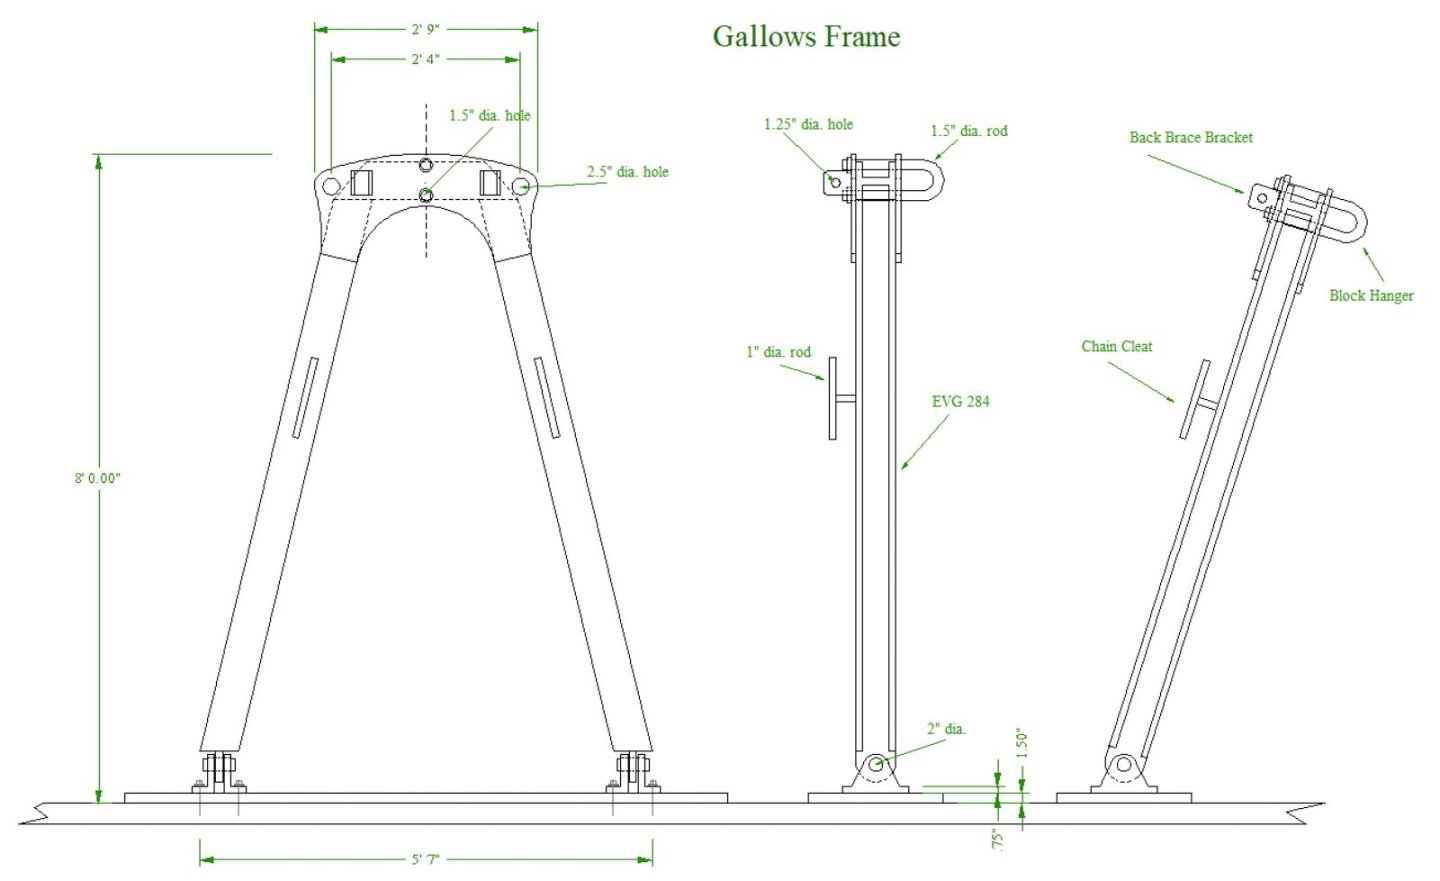
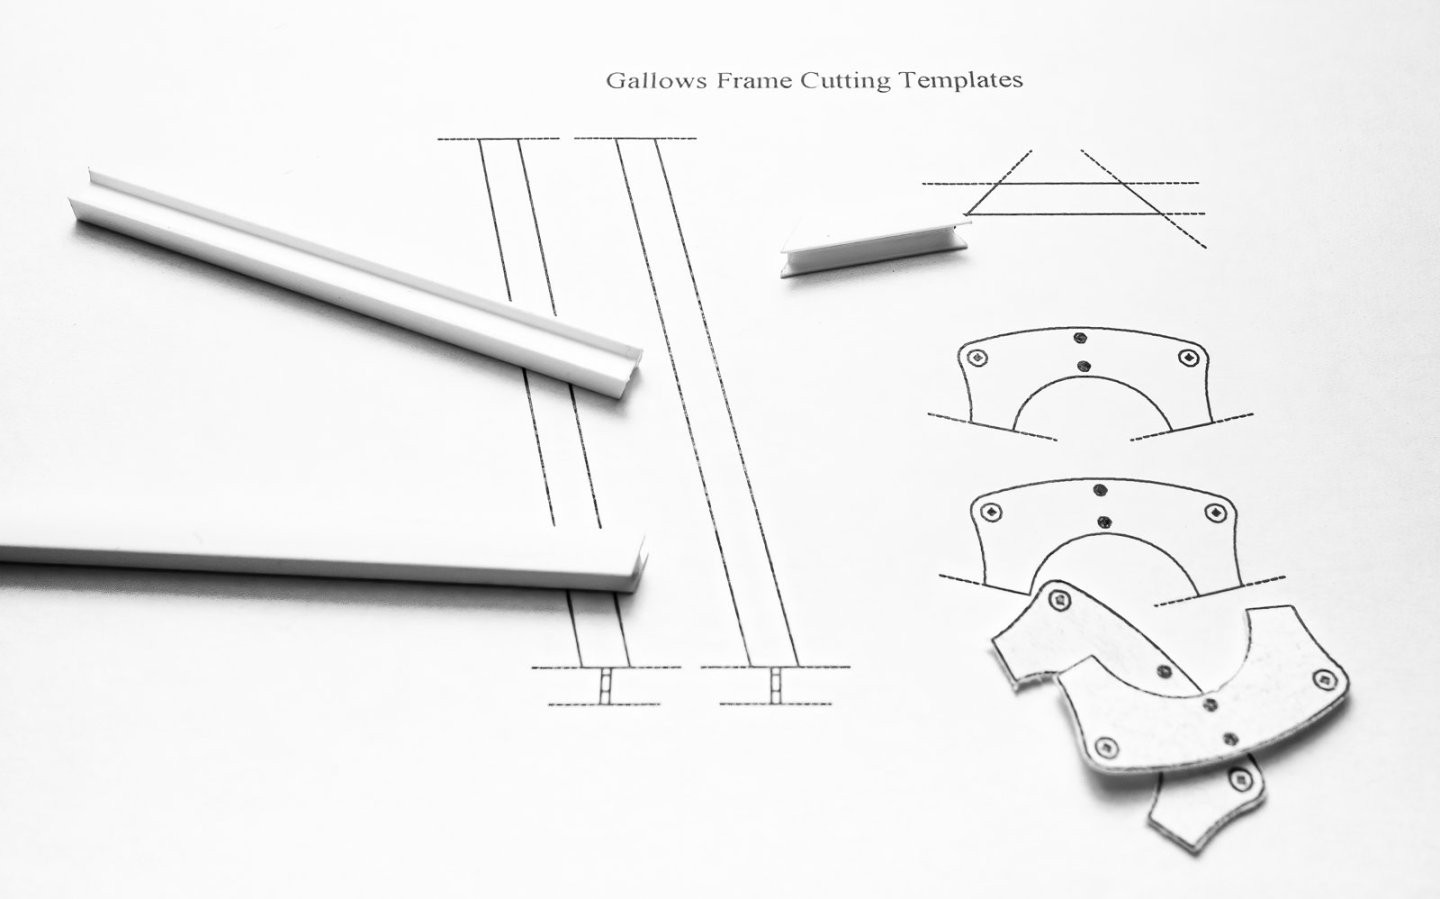
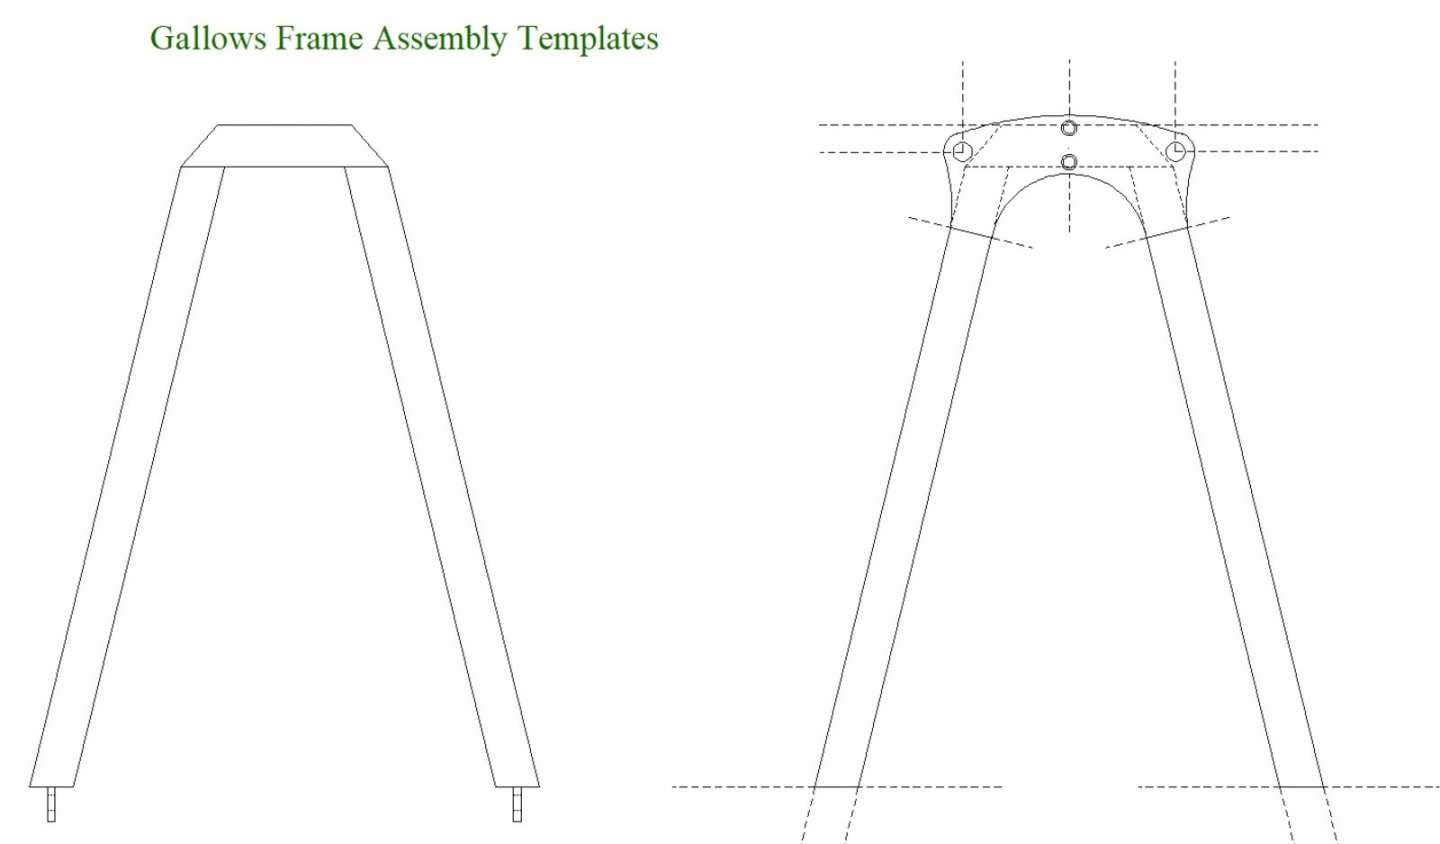
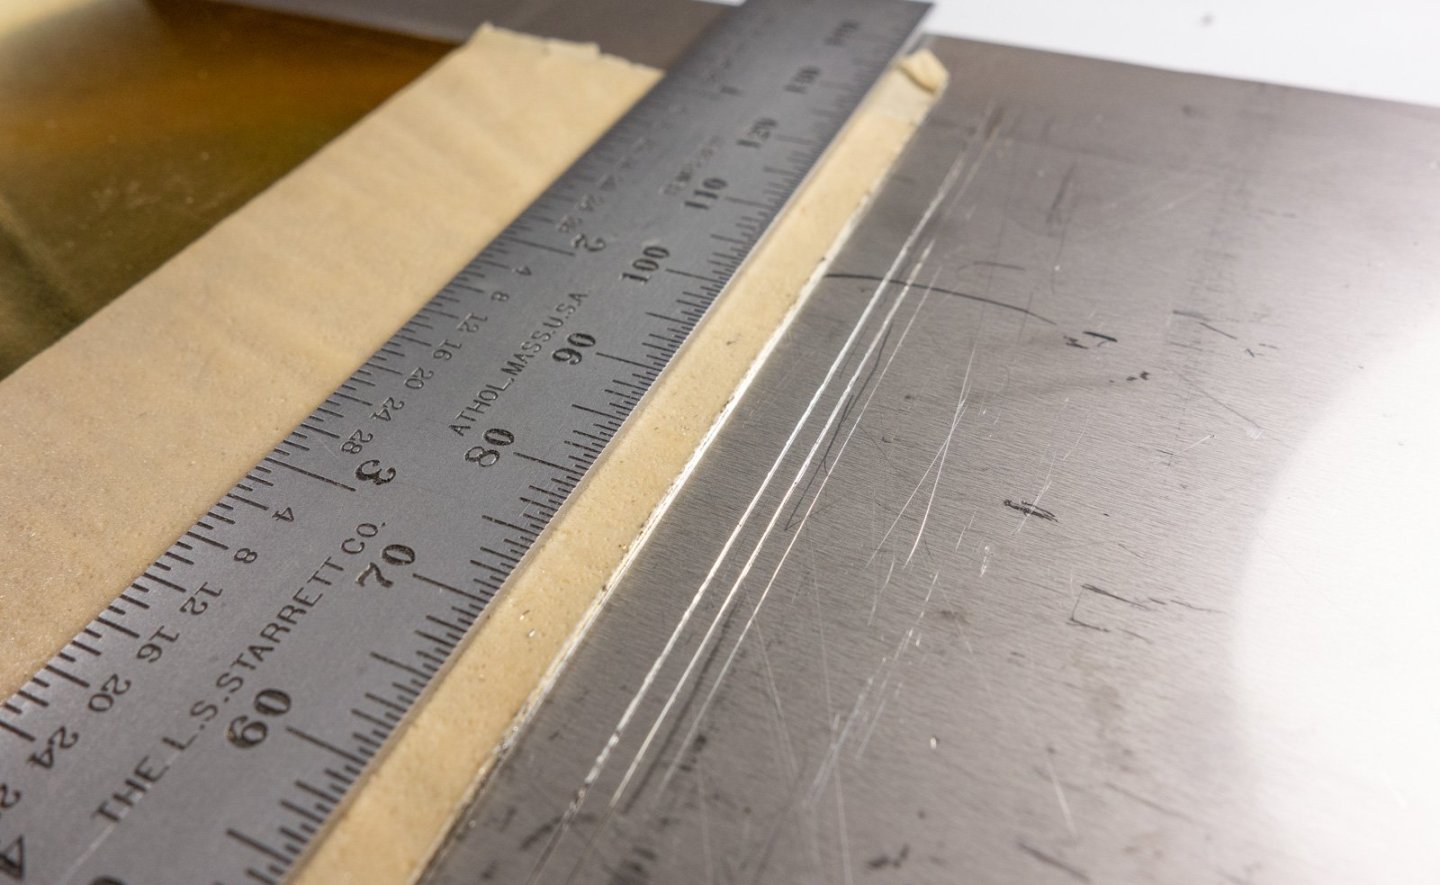
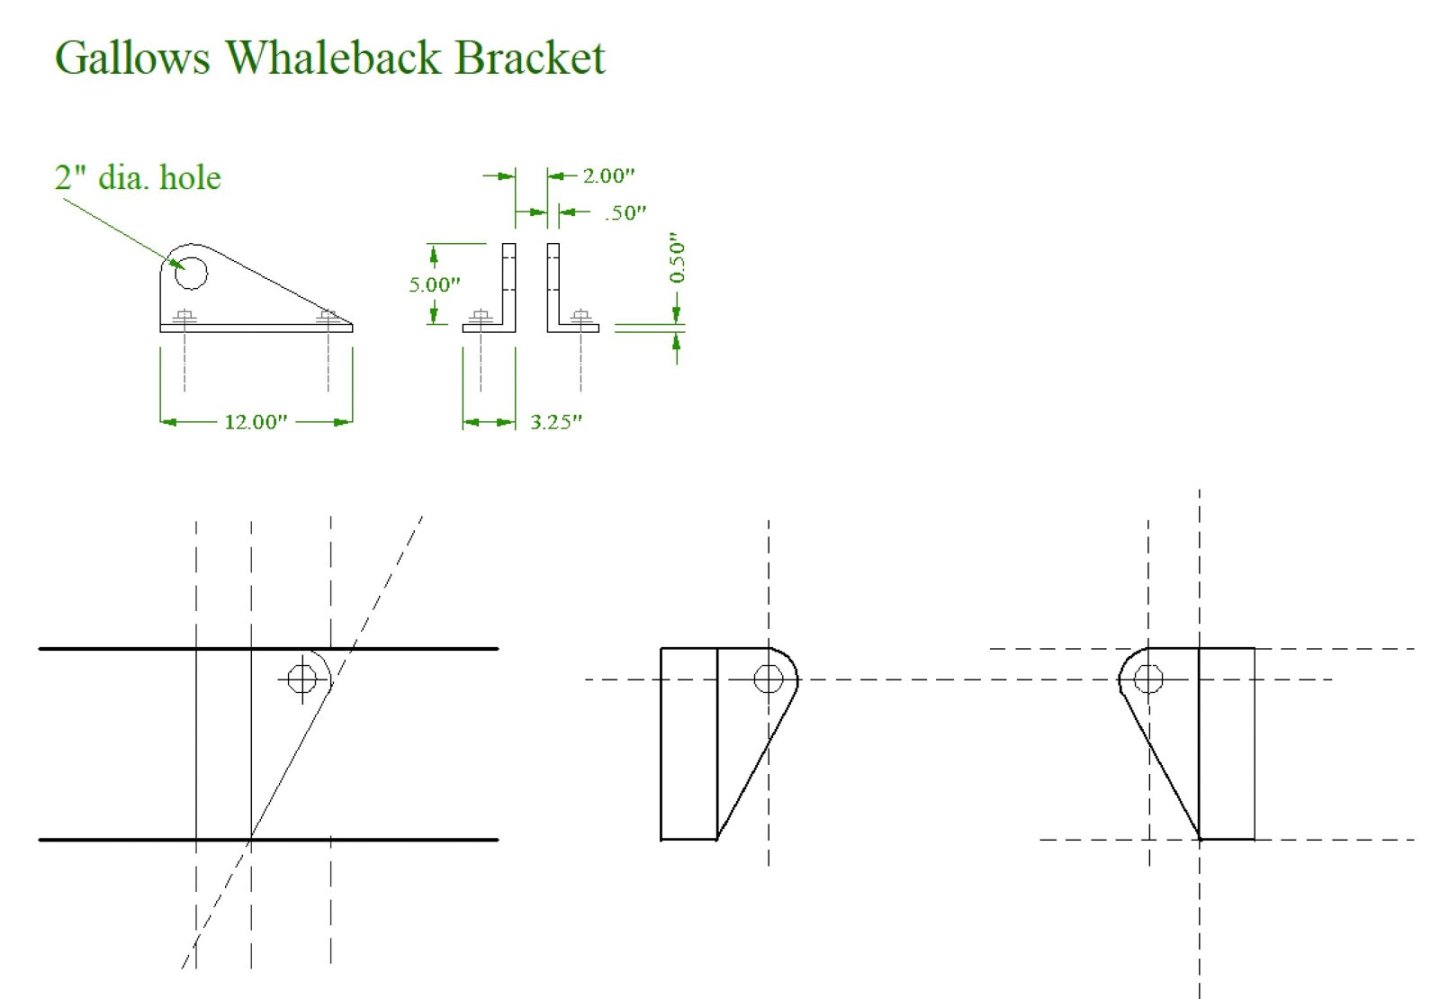
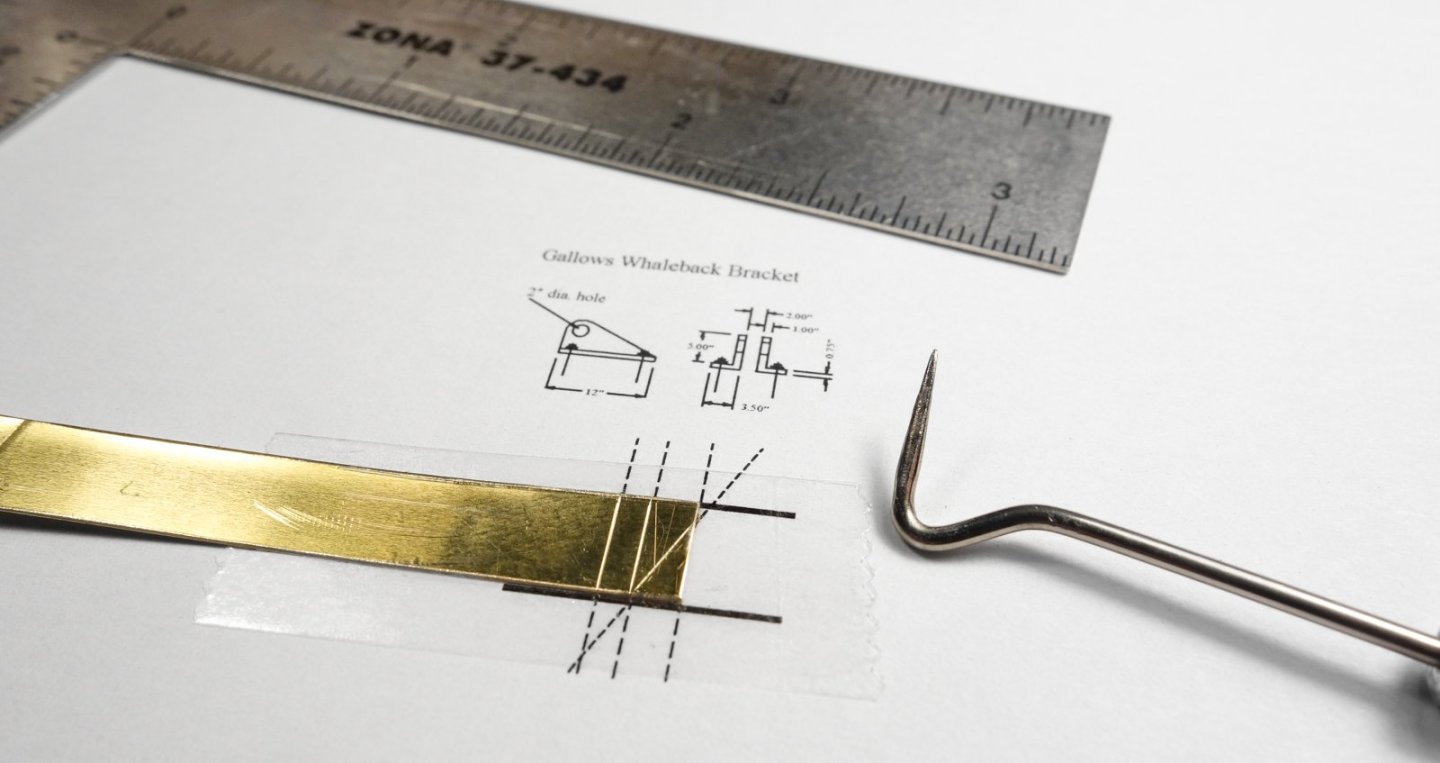
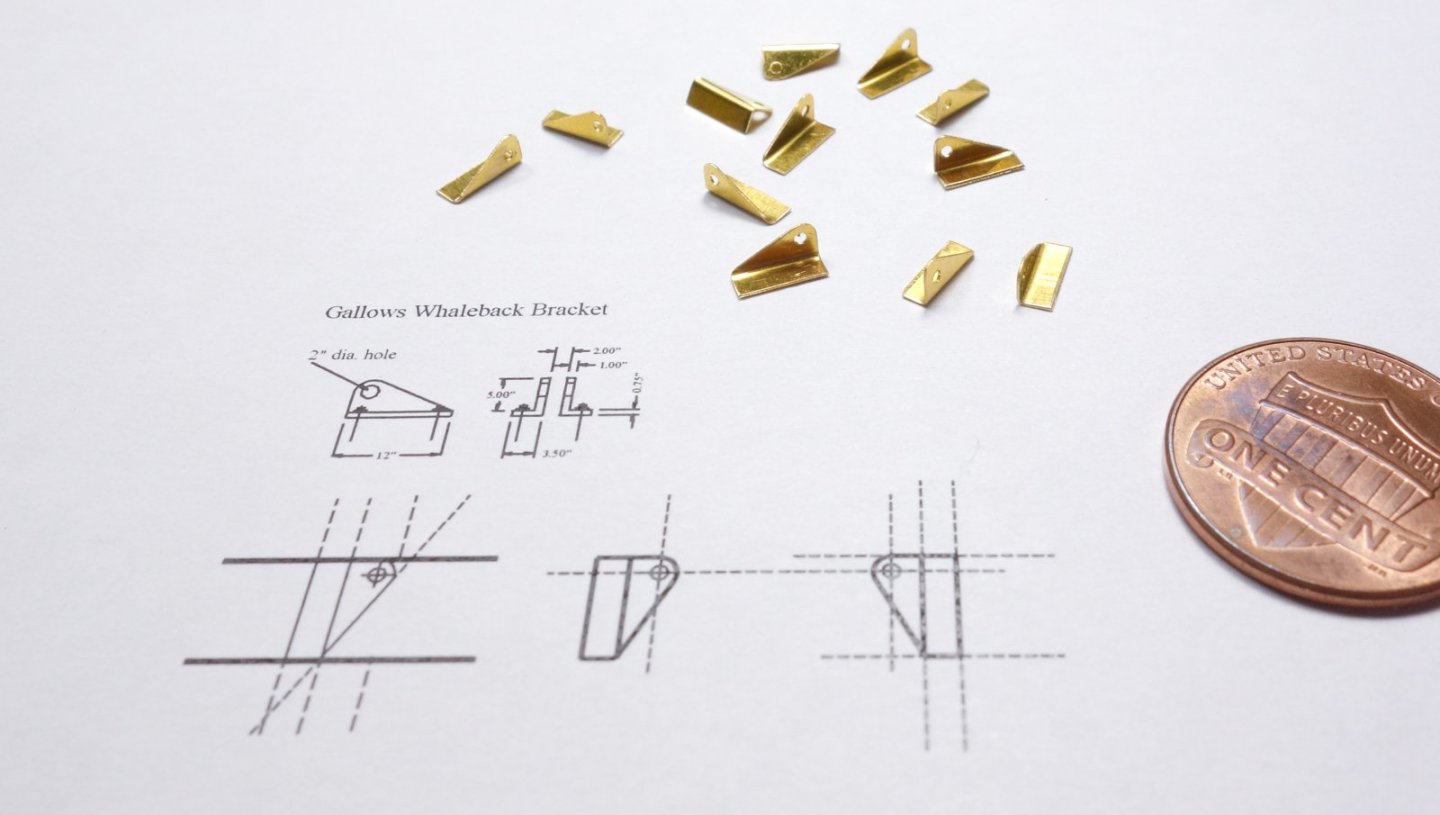
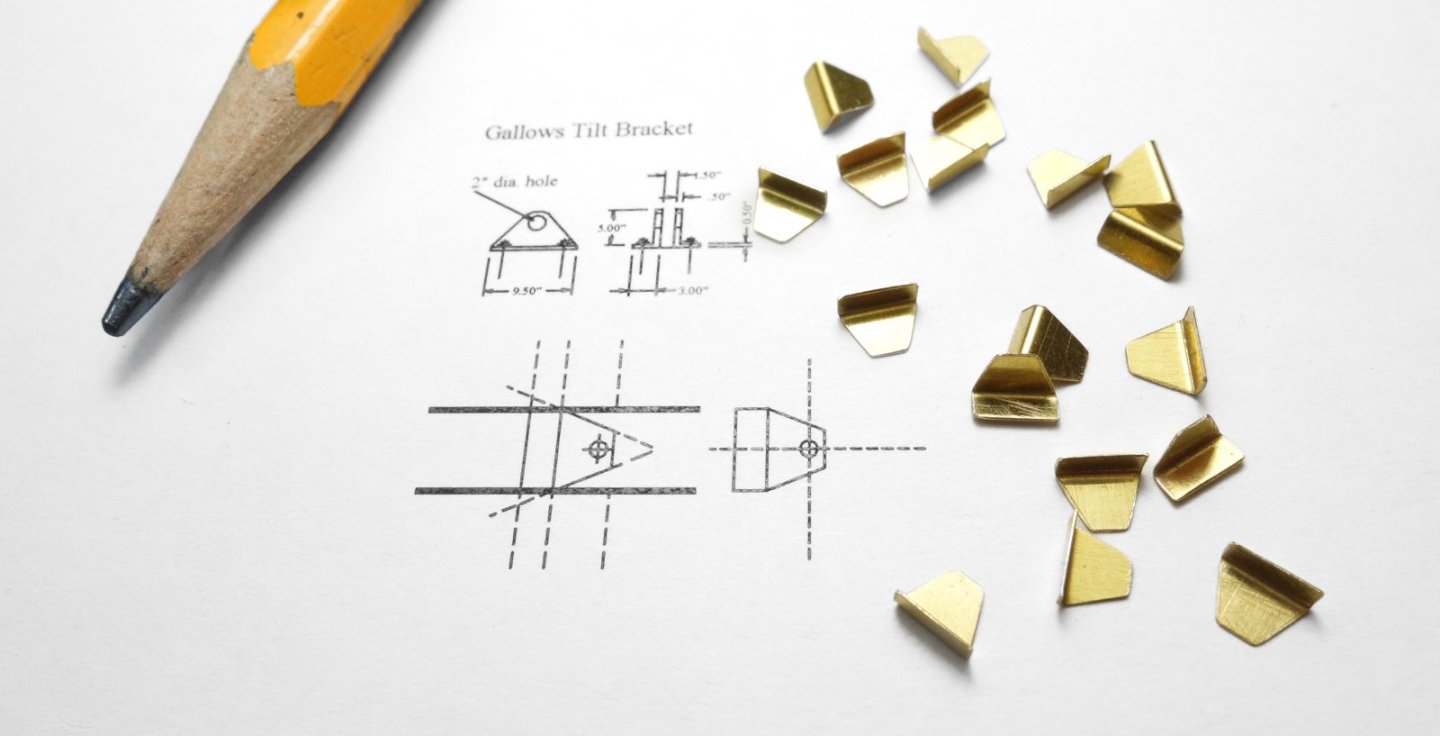
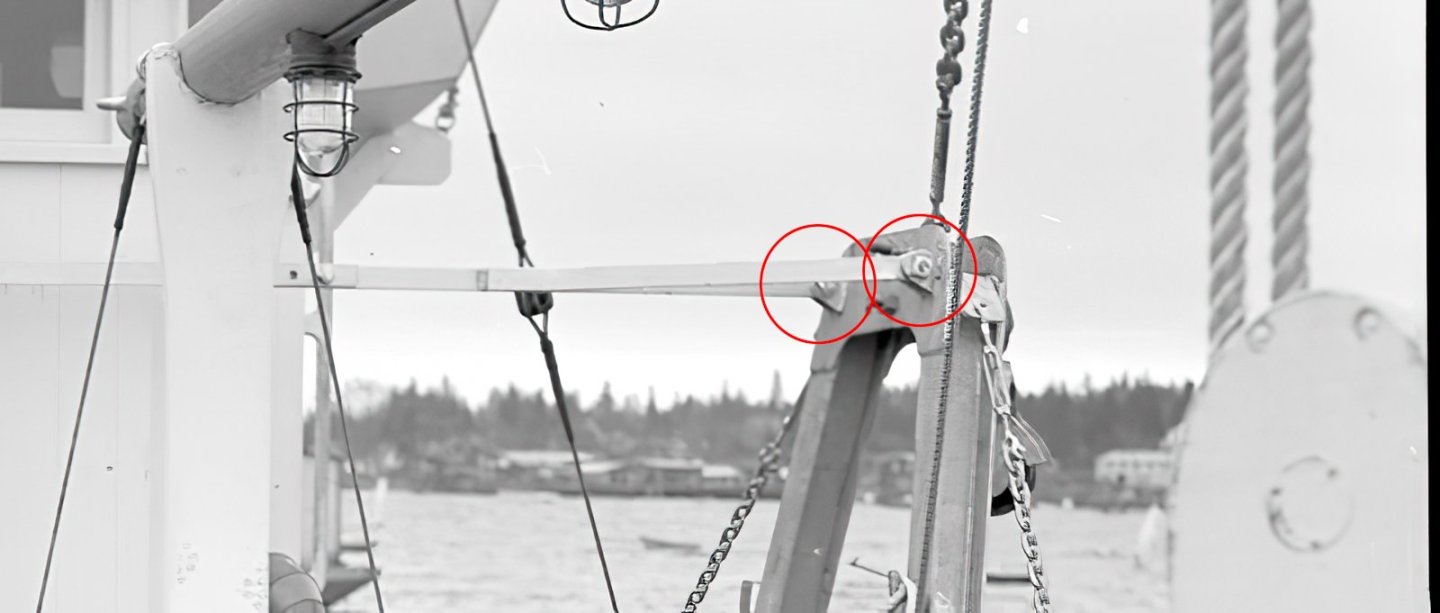
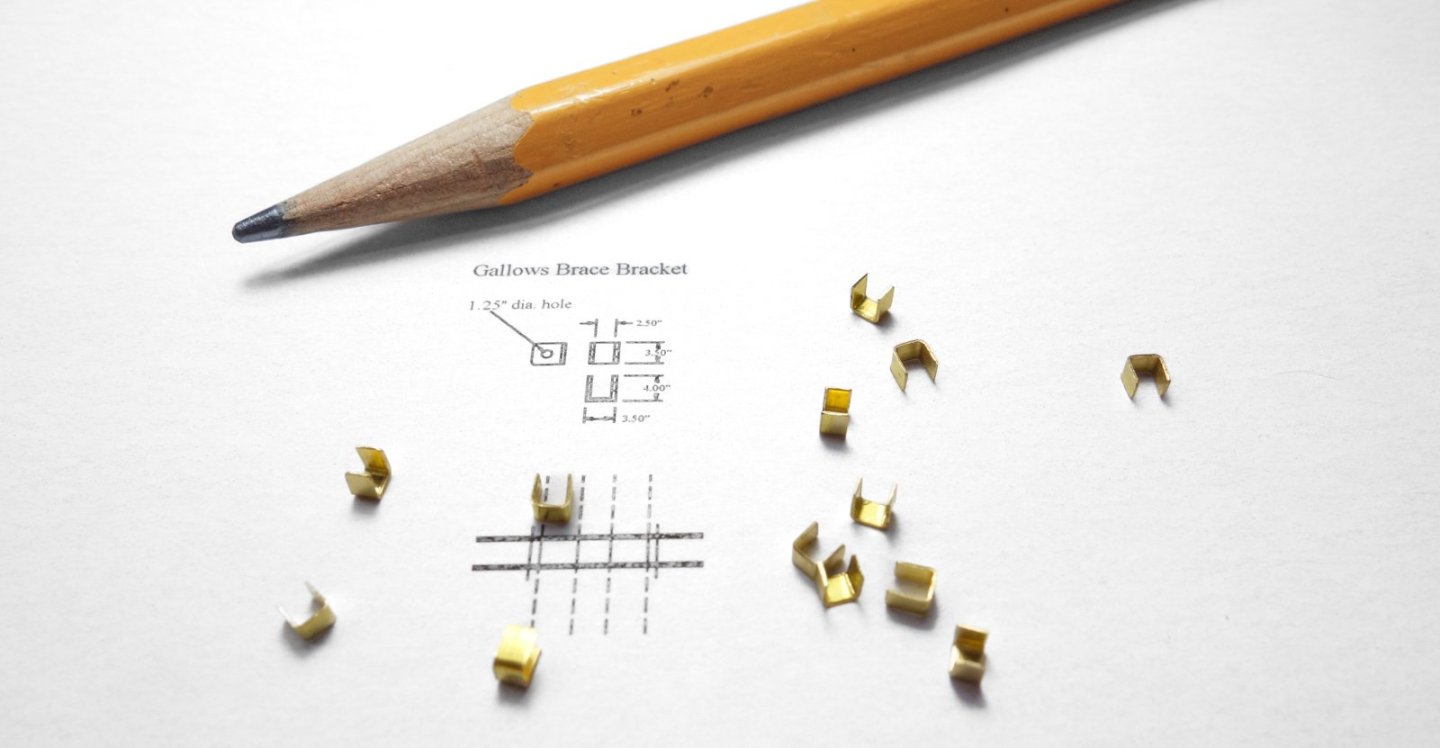
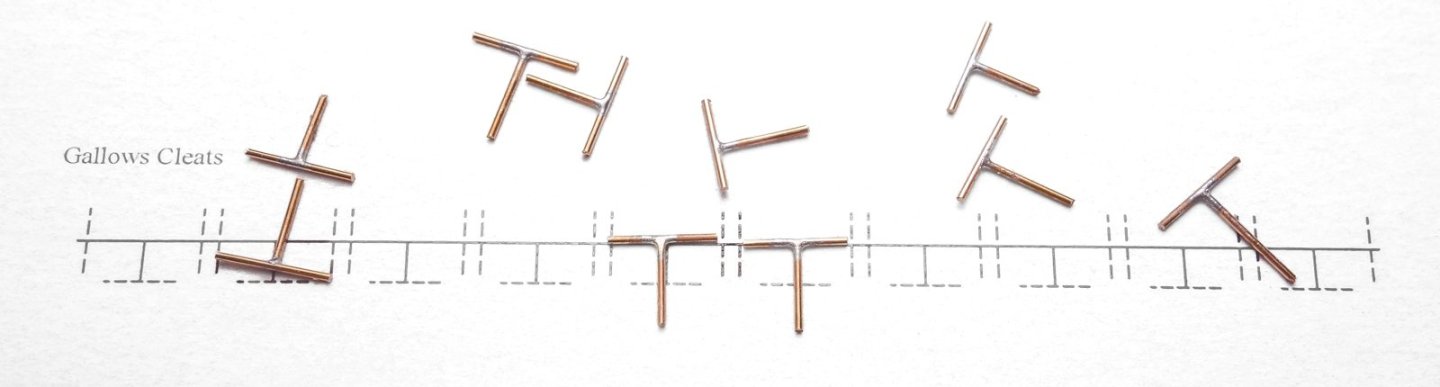
Thank you, Keith A, Paul, Jacques, and Keith B, for your comments and support! And thanks to all for the "thumbs up". I’ve begun work on the Pelicans’ four gallows frames and this post describes some of the preliminary work. The purpose of these frames is to hang the heavy tow blocks slightly over the side of the boat at about 4 to 5 feet above the main rail. The blocks function as tow points for the trawl and are also used to deploy and retrieve the gear with the main winch. The screenshot below shows one of the frames outlined in blue. The green lines point out three braces that structurally secures the frame to the boat. There are no details of these frames provided on the plans, so I drew up my own from a few basic dimensions I pulled from the plans and from photos of period boats. I took the drawing apart to provide cutting templates for the individual components. The main legs are Evergreen styrene “H” columns, and the top plates were cut from .010”(.25mm) styrene sheet. The pieces were arranged on the assembly templates and solvent cemented together. There are several different types of brackets required for each frame and I made them all from brass. After drawing them in CAD, I began by slicing brass sheet into strips of the required widths. In the past I’ve made strips using shears (which curls and deforms them), or by scoring and bending until it fatigue breaks. I’ve even used a guillotine style paper cutter that in certain situations works fairly well. But these methods are not very precise and with some of these strips being quite narrow (.073”(1.8mm)), I wanted to try something a little different. I used a stainless steel sheet (cutting surface), a carpet knife, a stout straight edge, and 2” wide double sided masking tape (sticky on both sides.) The secret sauce is the heavy duty masking tape. One piece of tape holds the brass to the stainless and a second piece holds the straight edge to the brass. The tape holds everything very tightly in place to the extent that the straight edge is quite difficult to remove and reposition for the next cut. One could easily bend and ruin a thin metal straight edge doing this. The setup below is ready for slicing off a quarter inch strip, and as you see from the score marks in the stainless, I’ve already cut several strips of various widths. The carpet knife is sharp, hard and stands up to abuse like this far better than a hobby knife blade. And due to its geometry, the blade is less likely to chip off, but needless to say I wore proper eye protection. I found repeated light cuts produces a better edge than trying to blast through it with only a few. The brass here is .008” (.2mm) thick, so it only took about seven passes to free the strip from the sheet. The passes feel sticky until the stainless is reached at which time the blade glides easily through. This does leave a bur along the cut edge, but a few swipes with a fine flat diamond file licks them right off. First to be made are the six bracket pairs (12 total) that secure the gallows frame bracing to the whaleback or pilothouse structures. The strip is stuck to the template with two-sided cellophane tape and the fold and cut lines are scratched on. The bracket is clipped from the strip with flush-cut diagonals and the edges are eased with a diamond file. A bolt hole is drilled through with a pin vise. The piece is placed into a photo etch bender. Positioned and squared up. Then bent. The gallows have brackets at their feet to allow them to tilt out over the rail. Eight pairs (16 total) of these will be needed. Holes for the bolt shanks will be drilled later. A pair of brace brackets on the back side of the frame. A total of eight brackets are needed. Each frame gets two chain cleats. Soldered phosphor bronze. The rod that extends from the center of the cleat will be clipped to length once installed. And the rod loop which the tow blocks will hang from. More prep work to be done on these frames, but that's it for now. Thanks for looking. Stay well. Gary


-
Another interesting subject for a SIB build, Glen. And you're off to a great start. I'm amazed you were able to split that hull through the keel so cleanly! Well done and nerve wracking, no doubt. I once built a model that I was so unhappy with that I wanted to cut it half, but in the end decided using it for kindling was easier. Gary
- 106 replies
-
- 4
-
-

-
- Kentoshi-Sen
- bottle
- (and 1 more)
-
They are indeed a handsome couple, and I concur with Eric that Lula is "a delightfully quirky little vessel." And dripping with charm I might also add. It's good to hear your sister will be visiting for support, but hopefully you won't need surgery, or perhaps a simpler solution/procedure is recommended. Try to stay positive, Keith - I know, easier to say than do. Gary
- 732 replies
-
- 4
-
-
-
- Lula
- sternwheeler
- (and 1 more)
-
Looking really good, Craig! I agree with Keith - like you could walk right into it. The map on the navigation screen is a nice touch. Gary
-
Excellent work on those mast decks. I have a few Veritas mini tools; block plane, chisels, etc. - nice tools. Now I'm thinking maybe I need their worktable, clamps, stops . . . . . Really nice progress, Jack. Gary
-
Fantastic work. Model painting at your level, Dan is not just painting - it is elevated to a form of art. So good! Gary
-
Very nice progress, Ras! I like the jig for rows of rivets, and the mosquito net does a good job of simulating diamond plate. Did you paint the netting first and then attach it to the fantail, or did you paint it onto the surface? I must try this sometimes. Gary
-
Excellent detailing on the tower, mcb. Nice authentic look and feel. Gary
-
Such unique and complex modeling, Roel. Tremendous level of detail and so extensive. Bravo! Gary
-
Looking so good, John! Gary
-
Brig Le FAVORI 1806 by KORTES - 1:55
FriedClams replied to KORTES's topic in - Build logs for subjects built 1801 - 1850
Wonderful warm finish on a stunning hull. Gary -
Very nice progress, Paul! Like all your work, everything is meticulously thought out and executed. Good call on the brass pattern for the scuppers - that's going in my notes folder. The planking around the stern looks great. Oh, and I'm having pangs of clamp envy. Gary
-
Just catching up, Glen and wow! Such fantastic work all around. Very nice, Me too. Gary
- 301 replies
-
- 3
-
-
-
- Constitution
- Bluejacket Shipcrafters
- (and 1 more)
-
Stay positive and strong, Keith. You're in my thoughts and wishing for the best possible results of your upcoming scan. Gary
- 732 replies
-
- 4
-
-
-
- Lula
- sternwheeler
- (and 1 more)
-
Really nice progress, Paul, and nice start on the deck house. Your prep and pre-planning work is very admirable. Gary
-
Excellent work, Keith! The crane turned out very nice and the two models look great together. Gary
- 732 replies
-
- 5
-
-
-
- Lula
- sternwheeler
- (and 1 more)