


aliluke
-
Posts
1,358 -
Joined
-
Last visited
Content Type
Profiles
Forums
Gallery
Events
Posts posted by aliluke
-
-
-
Hi Maurice
That old penny colour can be naturally achieved...It's holding strong on my Fly and has improved further with age. (Must get back to it - finish that ship).
Your Harpy and the copper is looking very good.
- Blue Ensign, Mr Whippy and Ryland Craze
-
 2
2
-
 1
1
-
Hello Francois
It is great to see another trabaccolo underway! I have been absent from my work on this for months; family, work, travel and, more recently, a leg injury (broken kneecap) which makes it very hard to get down my steps into my building place.
I'm a bit ahead of you but not by much. As you say, the interior planking is a real challenge when working between the frames. Yours looks very clean, cleaner than mine. I was a bit more casual as so little of it will ever be seen.
When my kneecap is better, I will get downstairs and get on with it. It is a great subject, a stunning kit and Marisstella's support is fantastic.
-
-
The biggest mistake that I sense with breeching ropes in models is enough slack in them to let the recoil position to allow for reloading. The movie, Master & Commander, shows it. You can't reload if the barrel is still sticking out of the port. Where the bolts are is less relevant IMO. An overly tight rope is a worse mistake!
- cotrecerf, thibaultron and mtaylor
-
3
-
No stains. The planking for the upper deck is matai - a New Zealand native species of red pine. I used a veneer sample to do it. Super thin. I think it is nice to distinguish this element. The main deck is holly I think? (I can't remember). The rest is straight out of the box. The main deck, which once looked white, has turned yellow/brown over time and looks better for it. Everything was just clear finished.
-
Agree with CiscoH. The deck needs to be an arch for the stern plus the finishing planking layer. Don't mean to hijack but you kind of want it to look like this in terms of shape:
- Ryland Craze and SkiBee
-
2
-
It really is such an extraordinary kit! I'm feeling very tempted to try but will finish what I have on the bench first.
- yvesvidal and bdgiantman2
-
2
-
Those windows look very good to me! So much better than my effort with the kit supplied ones and even the wonkiness of my effort doesn't bother me anymore.
- CiscoH, Paul Le Wol, robert952 and 2 others
-
5
-
I'm just a scalpel - number 11 blade - and sandpaper guy. Hasn't let me down on six hulls to date.
- Knocklouder, Canute, GGibson and 1 other
-
4
-
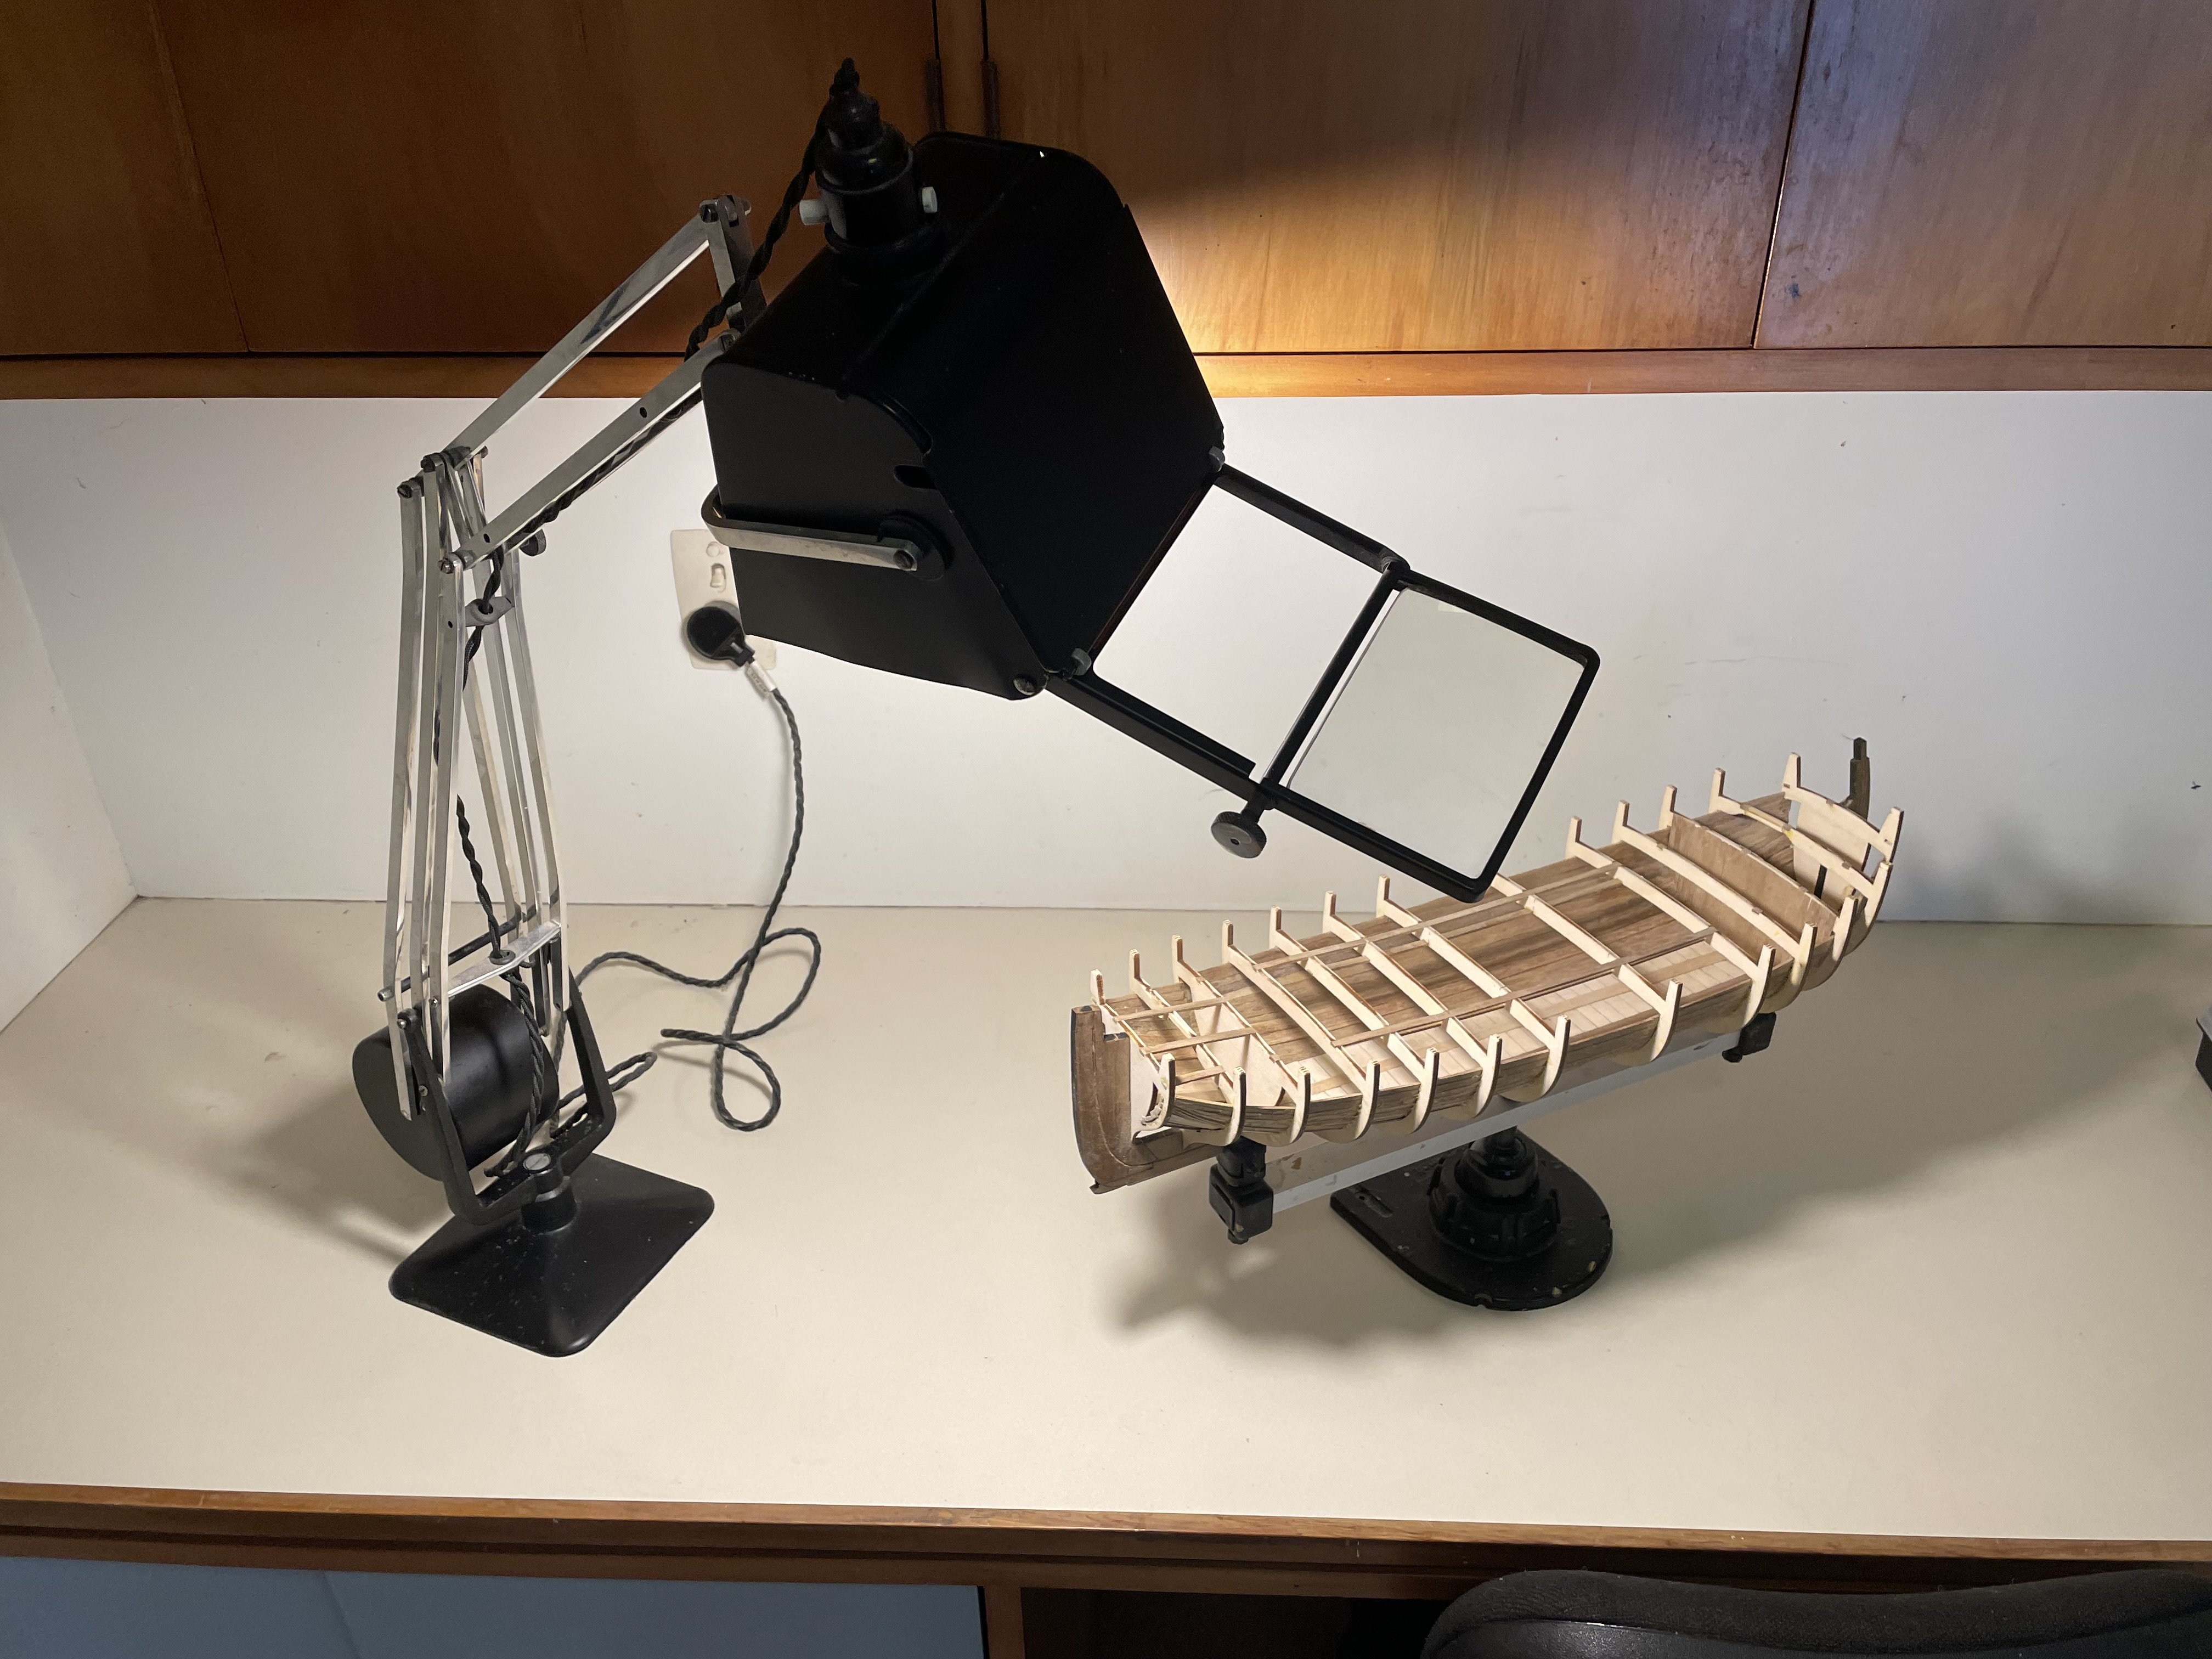
On the topic of work lights. I have a Hadrill Horstmann Pluslite English industrial angle poise from the 1940s. It was for reading maps so has a foldout magnifying glass. It is endlessly adjustable and perfectly counterweighted. The multiple arms are chrome plated. If you can find one, I highly recommend but they are very rare. They are beautiful to look at in their own right.

- Knocklouder, Charter33, grsjax and 2 others
-
5
-
-
I recall all of these issues. It's the nature of the thing. Keep going and it'll iron itself out in the end.
-
-
Thanks.
Didn't mean to hijack this topic but it all pertains.
- mtaylor and thibaultron
-
2
-
On a similar matter...if I was a 19th century cargo ship carrying barrels as cargo would I carry barrels vertically in the hold or lie them on their sides? I'm building a trabaccolo and want to populate the hold with a cargo of barrels.
- mtaylor and thibaultron
-
2
-
-
I'm an architect by trade. I have always loved drawing and model making. I have made many models of buildings that I designed both in physical form and on the computer. It allows me to to test the aesthetics of what I am designing. Computer modelling is now very sophisticated with programmes like Rhino, Grasshopper, Revit, Enscape and SketchUp and physical modelling has been supplanted by 3D printing. So the use of the hands in architecture is now confined to a keyboard. Having started and spent the majority of my career on a drawing board with a pencil, I miss the physicality of drawing and building cardboard models but marvel at what we can achieve on the computer.
I made plastic models when I was a kid. Took a break in my teenage years and returned to it in my twenties. Since then (I'm now in my sixties) I have always had a model on the go be it a building, a plane or a ship. I'm always driven by the aesthetic of the subject. So for a while it was the crazy racing planes of inter-war years and then the equally crazy planes of WWI. I also enjoy researching the history of the things I make. Wooden ships have the most appealing aesthetic for me. They are, unlike my architecture, curved and flowing. They are imbued with history and become beautiful objects in miniature.
Why do I make physical models? Mostly for meditation, partly for using my hands on something other than a keyboard, partly for learning the history of the subject and finally for the challenge of assembly. I can't say I completely prefer wood over plastic but I certainly like the greater sense of challenge in turning a bundle of wooden strips into an object that curves and flows. I also prefer the smell of wood! It is the making more than the outcome that drives me to keep modelling but I do like the object that is created and knowing it came from my hands.
-
I'll keep an eye on this too! I did two of these kits - you can see them in my HMS Fly log - and they are very good as is VM's support. Fiddly but perfectly doable with care. They are very fragile at certain stages of the build.
- AJohnson and Ryland Craze
-
2
-
Hi
Can't figure out how I missed this log! A wonderful looking build and I like your alternative colour scheme. One day I'll get back into my HMS Fly but I am diverted to a Trabaccola - a very different subject - at the moment.
-
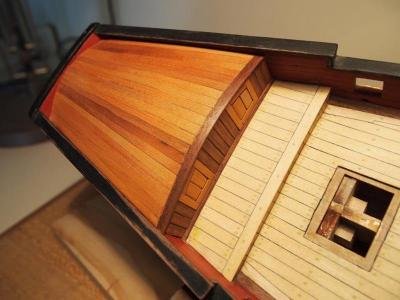
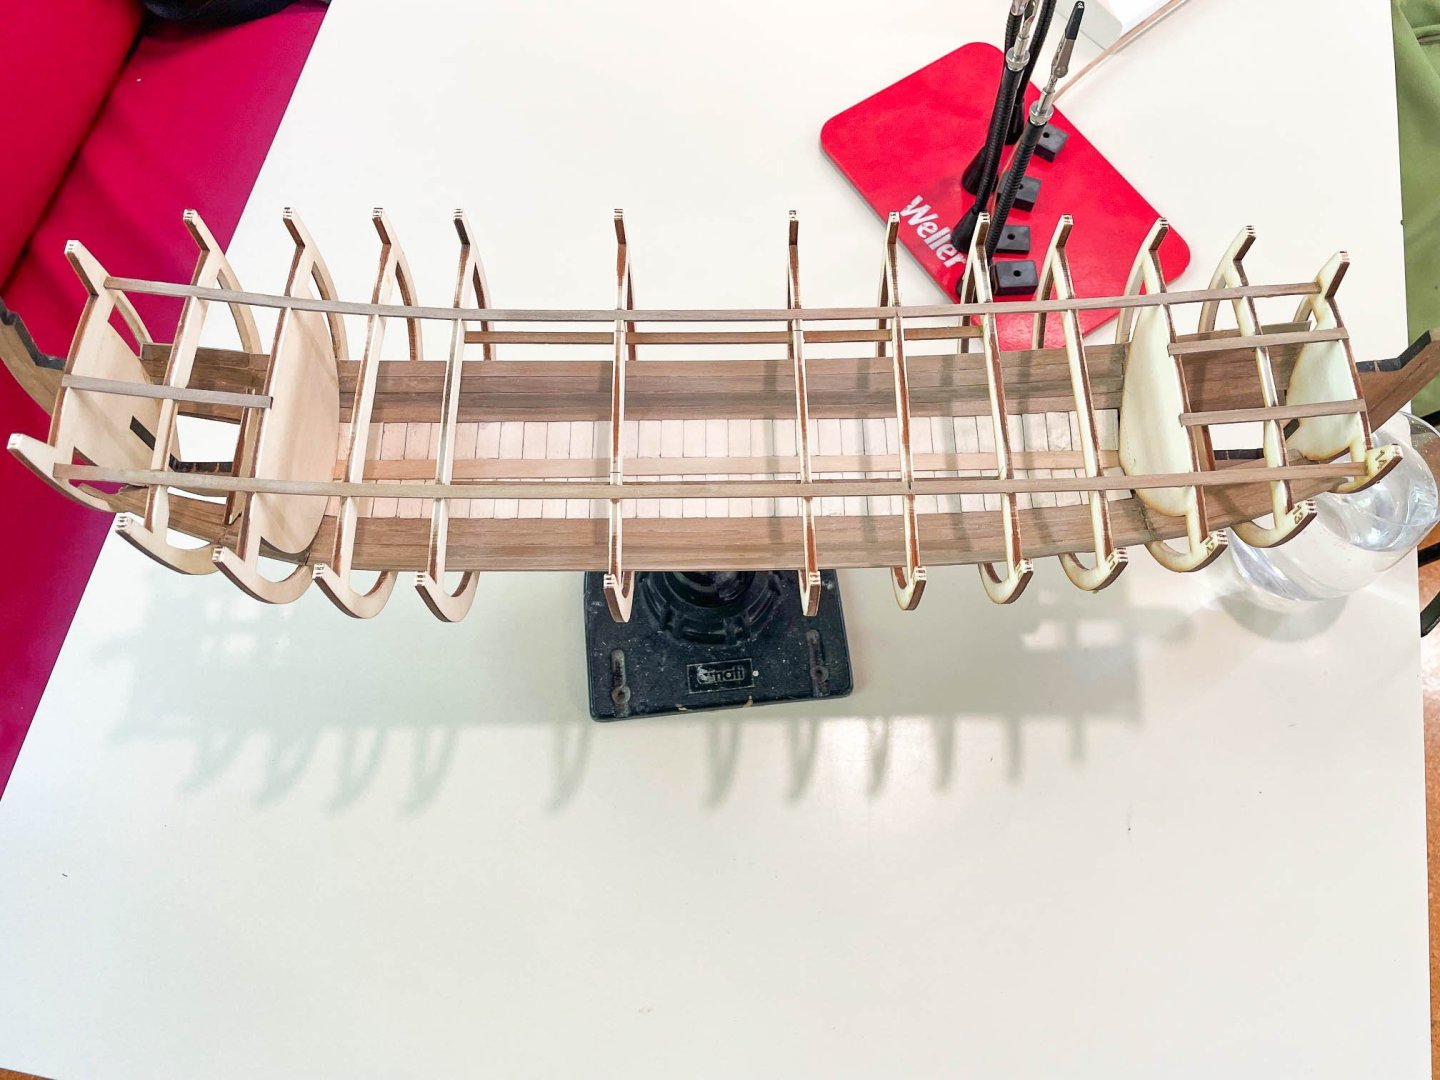
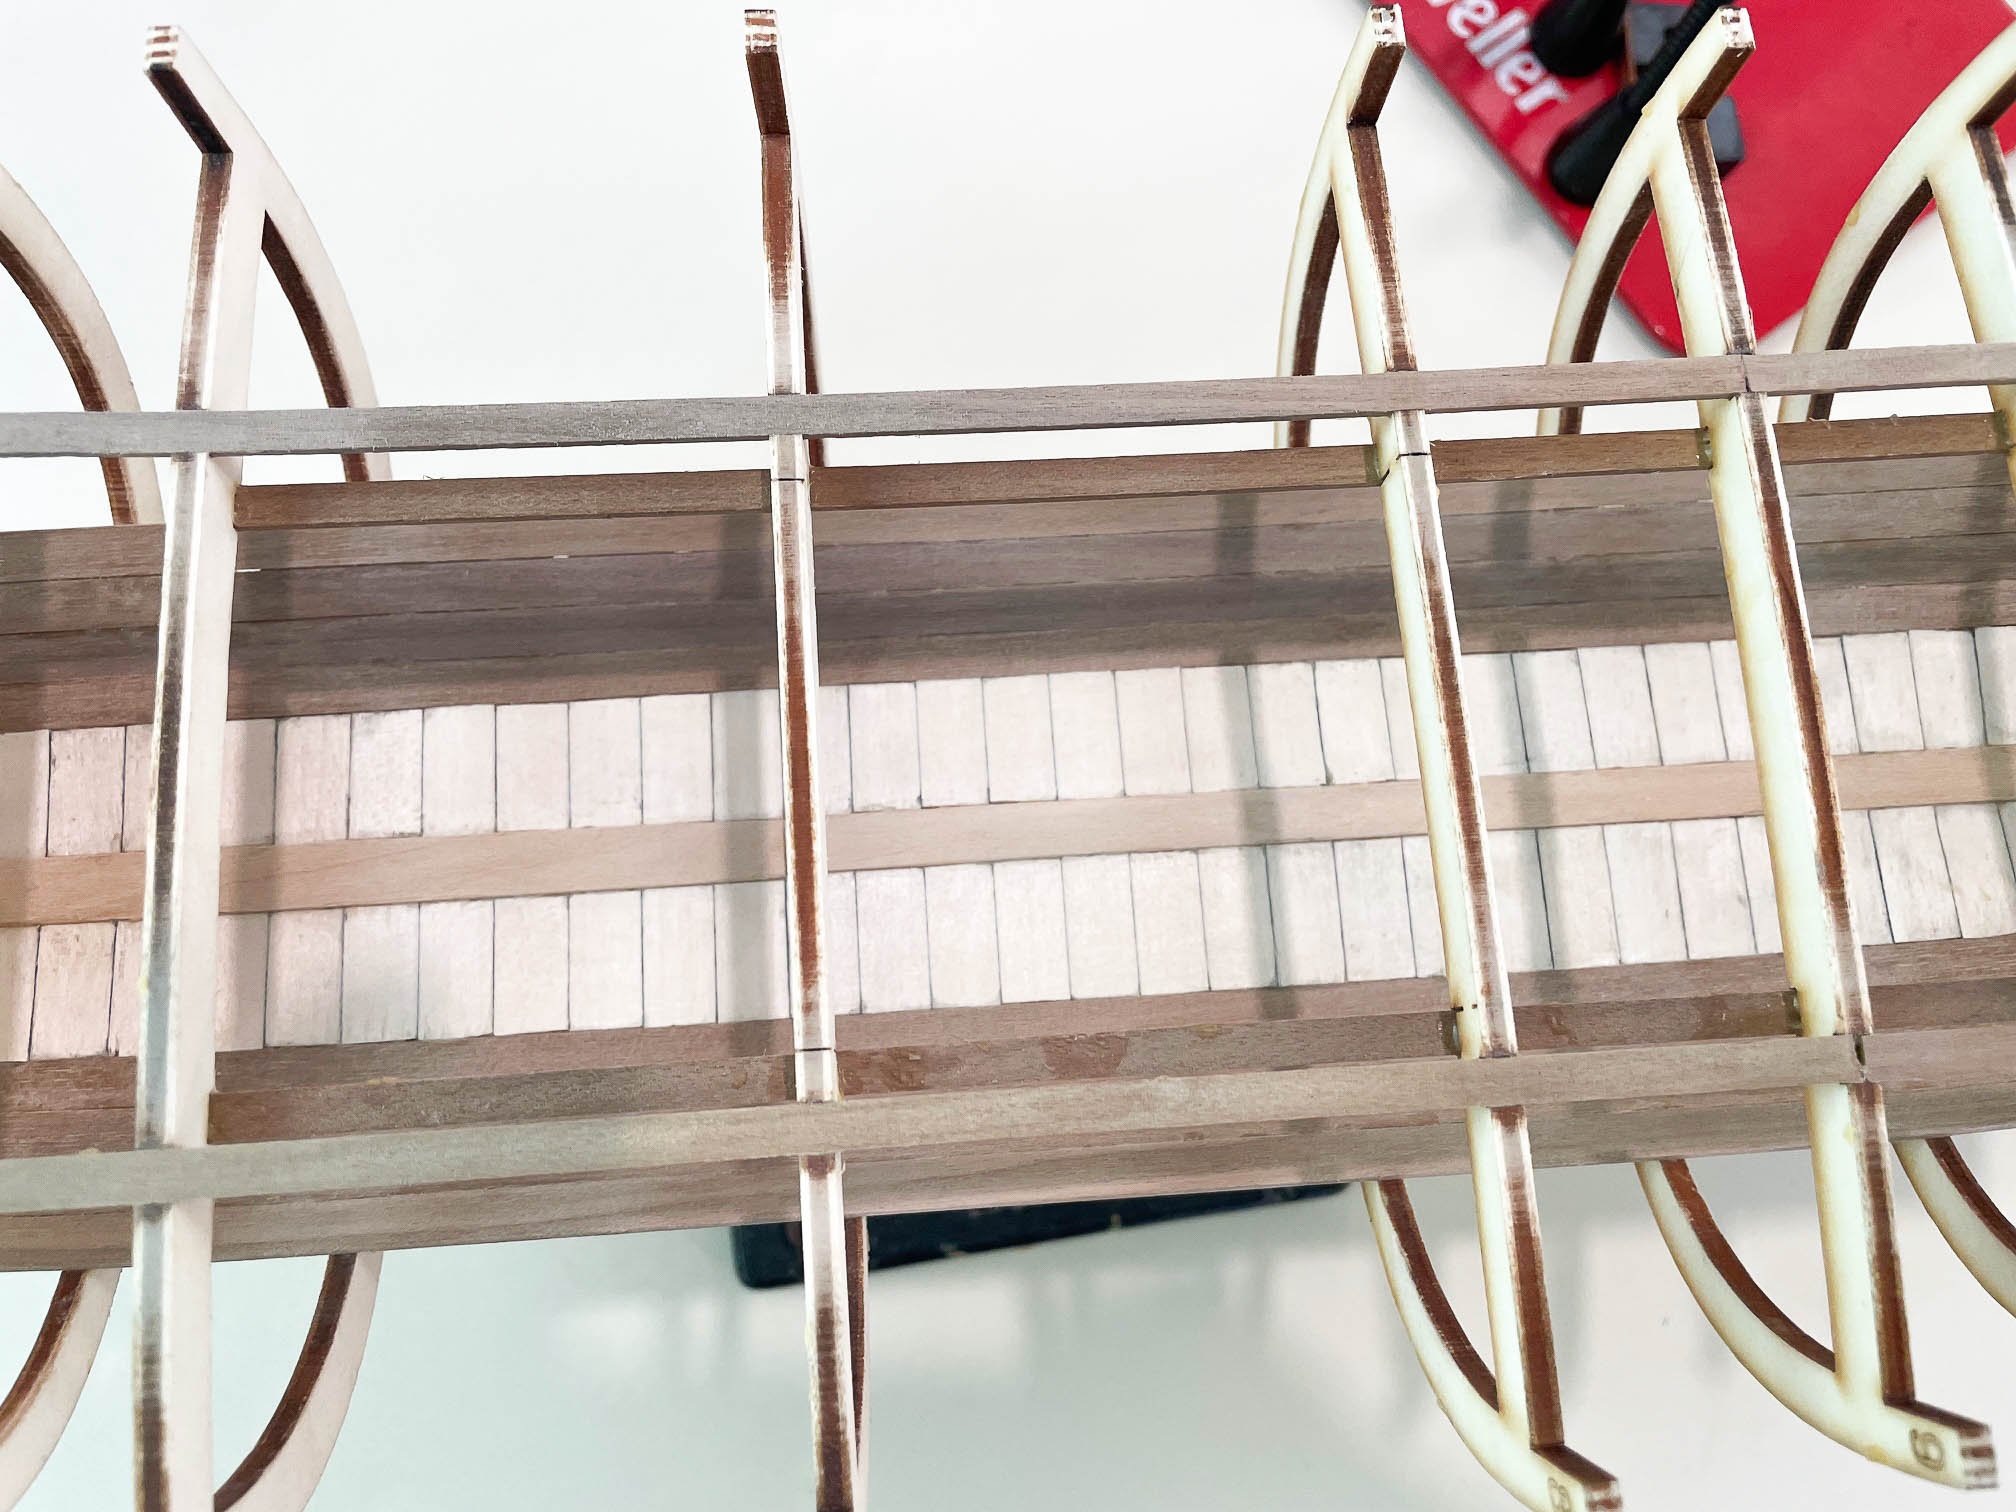
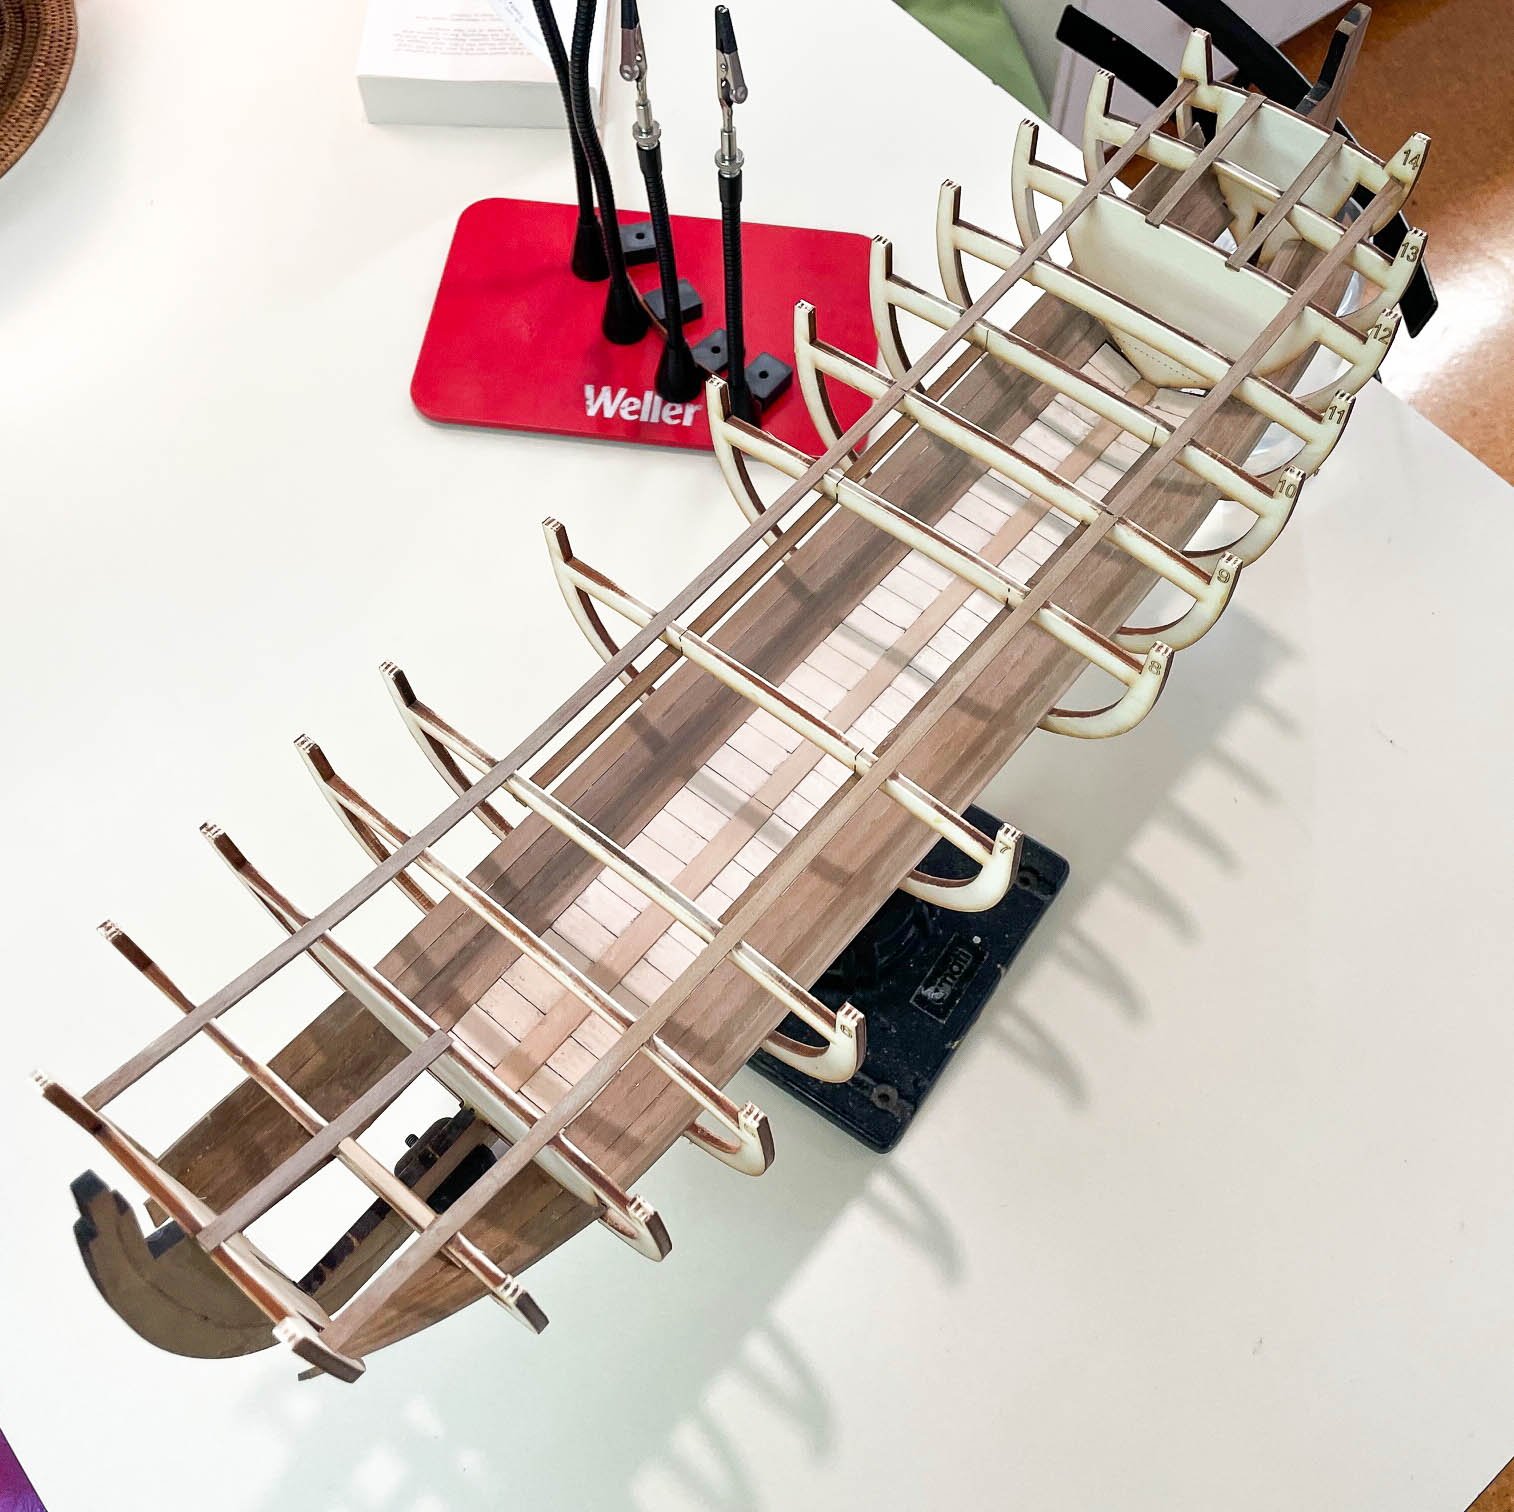
One of the unusual aspects of the kit is lining the interior. This is well in hand - torture for planking strips - and access between the frames to sand and correct is really tricky. Almost all of this won't be able to be even seen. You wonder why you bother - but you do don't you? Loving this kit!!!


- ccoyle, Paul Le Wol, JpR62 and 7 others
-
10
-
That makes my search skills look pretty bad...😶 Found some at my local hardware store. Brush on and not wipe on but I'll give it try.
Thanks!
- Keith Black, Knocklouder, mtaylor and 1 other
-
4
-
That is really impressive! Especially when we see your thumb and realise how small these windows are. The alignment of the outer windows with the stern was also my problem - the kit supplied windows that go there end up looking crooked. I didn't try to fix that but it remains a vague irritation every time I look at the bum of my AVS.
-
Hello
Miniwax Wipe on water based Poly is a favourite here on MSW. You can not get it in New Zealand for reasons I don't understand. You can get oil based Miniwax products here but not water based - I can't figure that out. Is there anyone who is willing to assist me by selling and shipping to me - at my cost of course - this product? Thanks.
- mtaylor and Keith Black
-
2

Il Trabaccolo by François de Saint Nazaire - MarisStella - 1:32
in - Kit build logs for subjects built from 1851 - 1900
Posted
That is superb planking! I'm just back from 3 months in Eastern Europe and ready to return to my Trabaccolo build. I went to the excellent maritime museum in Piran, Slovenia and took some photos of their models of trabacolo's for reference. Happy to share more with you if you wish. Do you have a colour scheme in mind?