DONATION DRIVE - SUPPORT MSW - DO YOUR PART TO KEEP THIS GREAT FORUM GOING!
×


aliluke
-
Posts
1,359 -
Joined
-
Last visited
Content Type
Profiles
Forums
Gallery
Events
Everything posted by aliluke
-
 In antipodean parlance we'd call this: 'Done like a dog's dinner.' Or perhaps the UK shares that phrase?
- 648 replies
-
- 2
-

-
- Indefatigable
- Vanguard Models
- (and 1 more)
-
My vote is don't copper. The planking is just too good to be covered. But, you are masterful enough for either to look fantastic.
- 648 replies
-
- 5
-
-

-
- Indefatigable
- Vanguard Models
- (and 1 more)
-
Hi Dan This is looking great! Every time I see this ship I like it more. For breeching ropes I use 0.6mm Morope which feels about right to me. For accelerating the aging of copper I use a radical technique, which you can see in my Fly log, but there are other ways of doing it which might be more pleasant...
- 105 replies
-
- 2
-
-
- Grecian
- baltimore clipper
- (and 4 more)
-
I have just been through your log - wonderful work all round and the finish line must feel great.
- 218 replies
-
- 1
-
-
- Victory
- Caldercraft
- (and 1 more)
-
Very nice!!! Hopefully I can get Fly to the same level of finish. I'll be very happy if I do so.
- 69 replies
-
- 5
-
-
- fly
- victory models
- (and 2 more)
-
Superb! I look forward to the finishing straight.
- 166 replies
-
- 4
-
-
- Maine
- BlueJacket Shipcrafters
- (and 1 more)
-
Hi Dave Yes I have seen that alternative method - top two rows of plates being parallel to the waterline. But I think that was a later technique than would apply to Diana. Perhaps the best reference to coppering in the 18thC is the coppered model of Bellona at the NNM https://www.rmg.co.uk/collections/objects/rmgc-object-66299 This stunning model was used to demonstrate the practice of copper sheathing to King George III in 1778 and definitely does not show the later method. That is reference that I used for Fly based on the AOTS of Bellona but I don't know if Fly was even coppered - it is just a look I like! Also have a look at
-
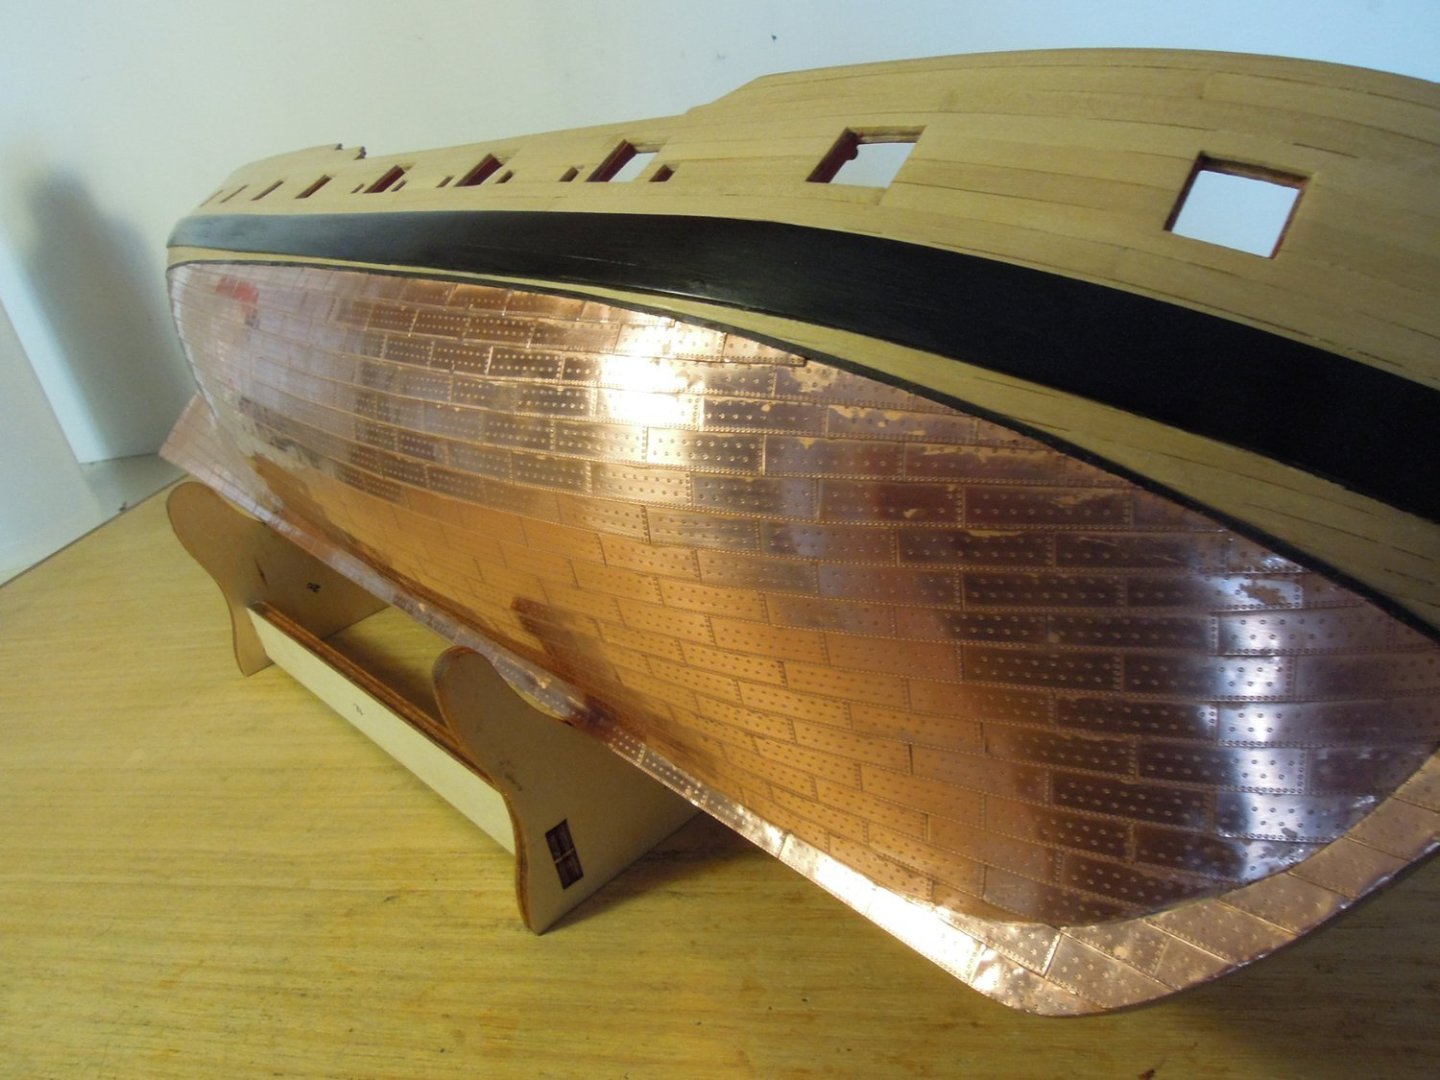
Hi Dave I wouldn't normally post a photo on another persons log - feel free to ask me to delete it - but the one below isn't in my log - there is one of the stern there. It is a long time ago since I did this coppering exercise. There was trimming and, perhaps, some tiny overlaps? You can see in the photo where the top line of rivets might will have been trimmed and more severe trimming as the curve rises. i always trimmed the top of the plate not the bottom, otherwise the flow heads in the wrong way. I installed the top PVC trim at the waterline first to work up from the keel towards it, keeping the plate curves gently rising at the stem and stern. With copper tape you can trim to the waterline later but with plates I think that'd be very difficult if not impossible. In my original log someone suggested that the plates should start parallel to the waterline and then work down. This is completely wrong - parallel to the keel and then work up, keeping that rising curve going. Don't leave gaps - trim using the rivet lines as a guide. Overall my outcome is not as smooth as sanded planking but is smooth enough that it looks to eye to be completely smooth. Hope that helps?...
-
It all looks great Ron. I presume those boat kits come with the main kit? They look bloody hard to plank. Hope that goes well. I used the excellent Vanguard Models kit for my boat but they'd be the wrong scale for Victory.
-
To copper or not to copper? I can't remember which plates I used but was fine with them. Given the perfection of your planking, Maurice, I wouldn't copper but...the final aesthetic suggests I might. I had the same, self, question with a well laid, to my eye, second layer of boxwood planking and decided to copper to learn how to do so, plus liking the look of your Pegasus. You already have learnt. That doesn't help at all does it!? Either way it'll be stunning. Me, I'd copper for the contrasts, the planking is proven, but it's not my ship...
- 648 replies
-
- 3
-
-
- Indefatigable
- Vanguard Models
- (and 1 more)
-
Just found this log by a master. As a mere maker of kits with hand tools only, your work is humbling and awe inspiring. After that I am lost for words. Incredible won't even do.
- 589 replies
-
- 3
-
-
- le gros ventre
- cargo
- (and 1 more)
-
I used the Amati plates for HMS Fly. As Jason says you can lay them in strips and then break them into single, double or whatever units to get the curve sometimes with just minor trimming. This is not visible and I didn't overlap them. I have seen them being overlapped on a one or two models and it seems to be messy to my eye and out of scale. My aging technique is as seen in my Fly log. Not for the faint hearted but it worked really well and, after sealing, has held up for years now.
-
Agree with Andy - amazing planking on a very big hull where things can stray and go pear shaped very quickly. You arrested that early which is good lesson for plankers. I got a bit of strife here after covering the boxwood planking on my HMS Fly - it is just about how you want the end result to look like isn't it? Either way, this will be a masterpiece.
- 648 replies
-
- 4
-
-
-
- Indefatigable
- Vanguard Models
- (and 1 more)
-
That's very good work. Very clean and tidy. I plan the same - mast stubs only should I ever wish to rig but that'll be a distant day...For now (well, when I get to where you are) I'll also be happy with just a hull.
- 69 replies
-
- 5
-
-
- fly
- victory models
- (and 2 more)
-
Beautiful work ECK in all aspects. The stove is superb. I admire your dedication to a fully rigged cannon - never again for me! Breeching ropes only from now on. I don't know what airbrush you use but my Iwata Eclipse has never missed a beat in years...but these are tools that need very careful cleaning and care.
- 233 replies
-
- 3
-
-
- Indefatigable
- Vanguard Models
- (and 1 more)
-
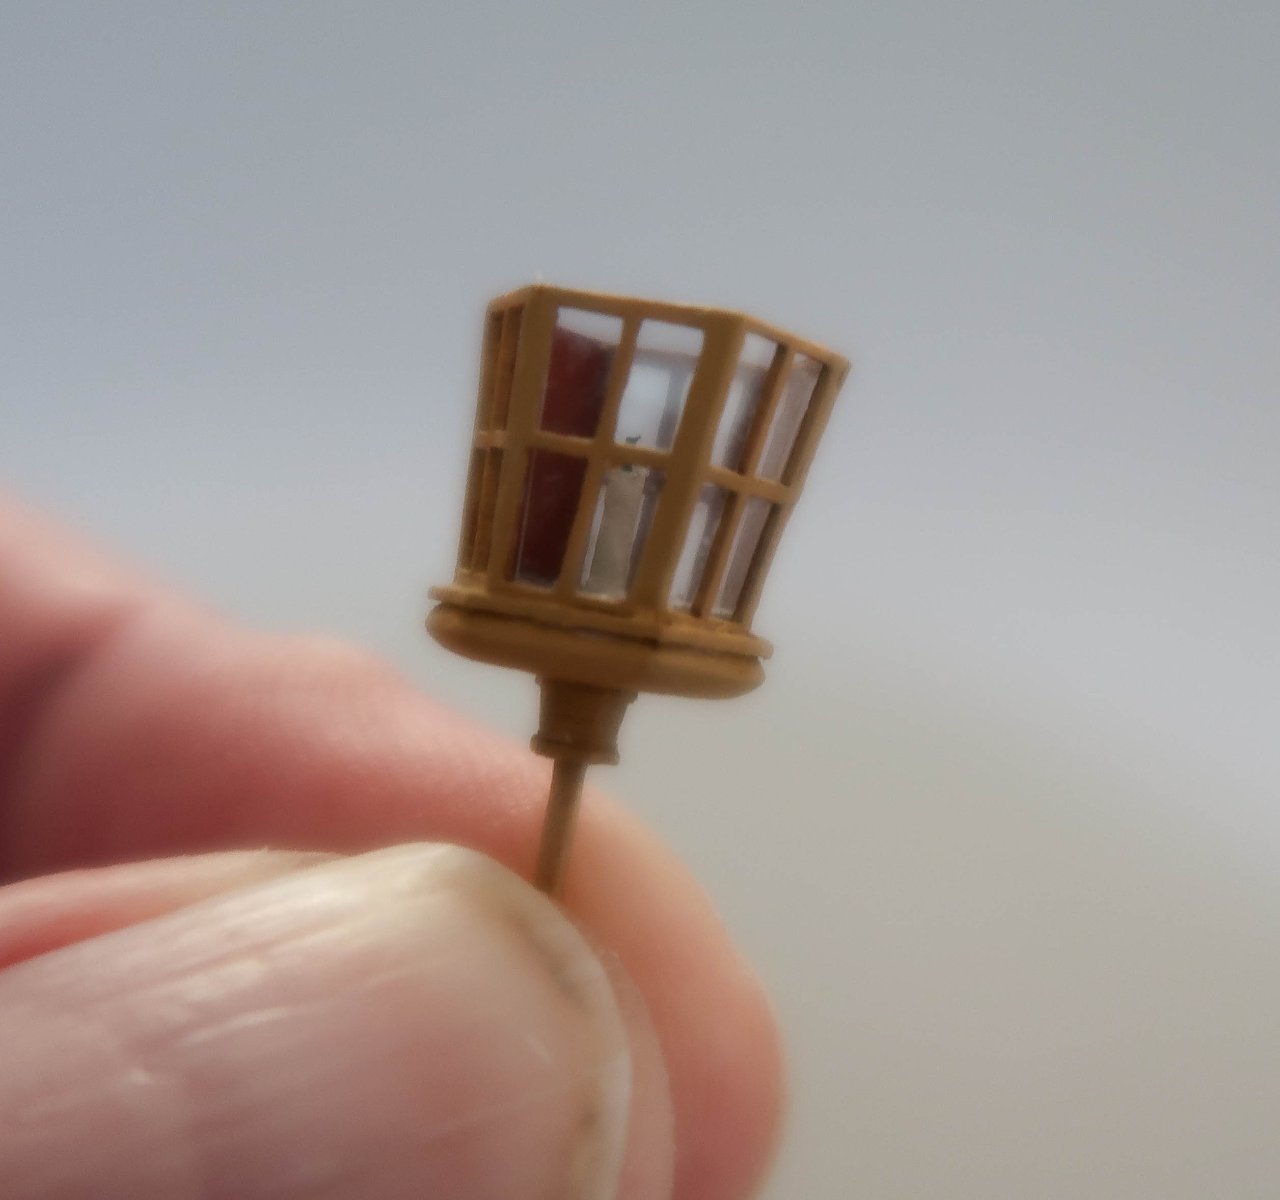
Thanks for the Likes Thanks Jason. I can't imagine you having any problem with this little kit! The wick is just a length of the wire supplied in the kit, glued into a hole drilled in the top of the candle and then snipped down to a sensible height.
-
What a rip off! A sad start to getting into wooden ship modelling but, I must say, that as long us the maker and designer is still in business, buy it directly from them. It helps their business and that gives us more of their developments and kits by them. It might cost more but you get the back-up and support when you get stuck, when things are missing or even when you make a mistake. Chris Watton is an exemplar of this support. A harsh first landing for you and a shame.
- 16 replies
-
- 3
-
-

-
- Lady Nelson
- Victory Models
- (and 1 more)
-
I have only just caught up on this - completely extraordinary!!! I swear I am looking at the real thing under sail. Also, being an architect, admiring the backdrop of your concrete walls - very nice.
- 366 replies
-
- 2
-
-
- bellerophon
- victory models
- (and 2 more)
-
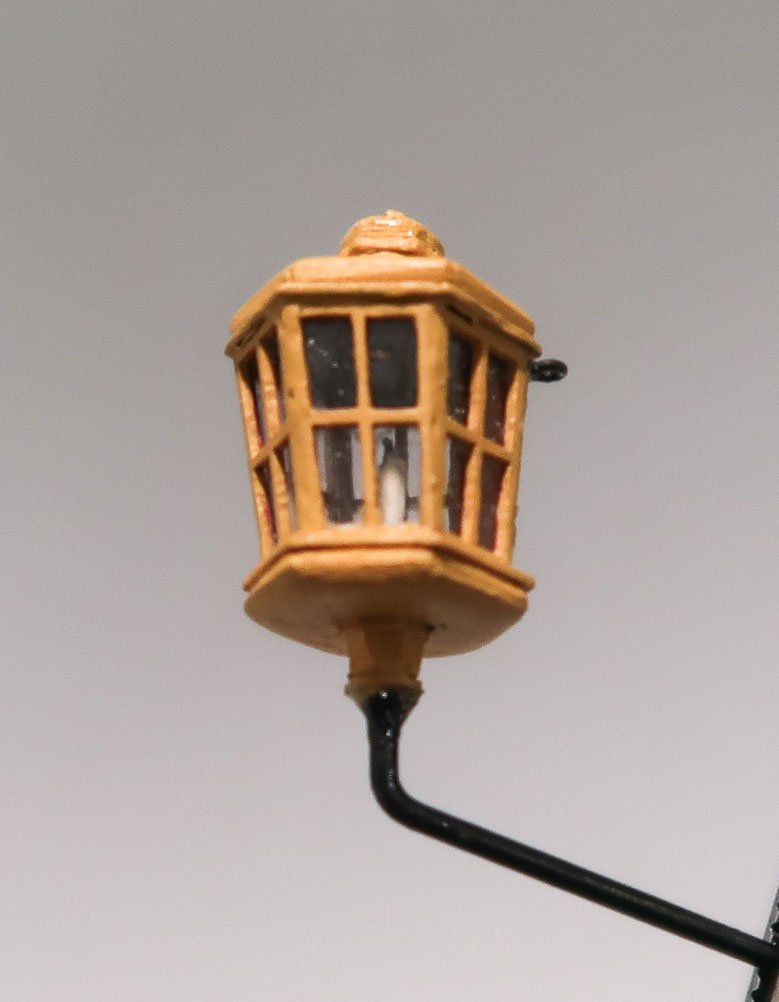
Hi I am going very slow...Next little thing to make was the stern lantern using the Syren Model 1/64 version. A truly brilliant mini kit but very tricky to build. To call this small is very much an understatement - it is tiny and some parts ridiculously so. The macro photography takes you way beyond beyond what you can see. For absurd detail, I added a wick to the candle. The only panic was popping a glazing panel inwards during handling after fixing the top on. I drilled a hole through the door and gently pushed it back into place with a wire. First rule when modelling at this size and breaking something - don't panic and find the fix. Only departure from the kit is the crank - basswood in the kit but I replaced with 1mm diameter solid brass rod which is fitted into a hole drilled into the base parts. It feels much more solid than a bit of wood glued to the base. The lantern catches the setting sun as HMS Fly sails out of Dusky Sound, Fiordland, New Zealand - the background photo is taken by me in Dusky Sound and is my computer wallpaper (it is not is not blurry in reality!)


- 49 replies
-
- 10
-
-
Hi Kevin Been watching from the sidelines. This is all coming up really well!! If you don't like shiny copper there is a way to make it otherwise - see my Fly log. User beware...
- 443 replies
-
- 4
-
-
- Indefatigable
- Vanguard Models
- (and 1 more)
-
Thanks Al Very tempted but terrified by the shipping cost. Keen now to see how this USS Maine progresses. I have been back through Rich's log and it is very impressive - so many innovations but so many tools that I don't have. Please keep the updates coming Rich, I'm loving this log and build! A
- 166 replies
-
- 5
-
-
- Maine
- BlueJacket Shipcrafters
- (and 1 more)
-
Hi I just strayed into this log as it isn't a part of the forum that I usually roam. A stunning build is unfolding! I have coveted battleship kits of this era and at this scale and I'm frustrated that they are unobtainable now. I'd leap into one. Hey Ryland - want to sell USS Olympia? I'm only half joking...but back to the main, Maine build - a really informative log with great techniques and results. I'll follow along from now.
- 166 replies
-
- 5
-
-
- Maine
- BlueJacket Shipcrafters
- (and 1 more)
-
Thanks Allan It is always good to improve my knowledge of ship matters to make a more authentic rendition in a model. I will bide my time looking for a fix and may settle for the more elegant VM pinnace when I build that. Certainly it is a single piece in the model but takes nothing away from the quality of the kit for me, as a purist would spot it and fix it with ease. It's good to know that someone with your keen eye finds the rest of the kit so good.
-
I did see the thickening of the davit on another kit like this. I planned to do that but quite simply forgot when I fixed it in place! Now that I am reminded, I might see if I can remove it. Yes Maurice I recall your pinnace - the launch was a practice and the plan is for the pinnace which I'll do later. The only problem is that the VM version is 28' which may be a tad long (I recall that yours is 26'). When it comes to it, I'll have a choice as I'm happy enough with my practice launch.