DONATION DRIVE - SUPPORT MSW - DO YOUR PART TO KEEP THIS GREAT FORUM GOING!
×


aliluke
-
Posts
1,359 -
Joined
-
Last visited
Content Type
Profiles
Forums
Gallery
Events
Everything posted by aliluke
-
 Great work Brian I did say my method might not be accurate and you've proved it so! Despite the brilliance of your rigging I'll leave mine be and learn for the next time. Cheers Alistair
- 831 replies
-
- 6
-

-
- Armed Virginia Sloop
- Model Shipways
- (and 1 more)
-
Hi Martin Went back into my own Fly log to remind myself about the cannons. Certainly centering the barrel in the port is the key. I used the Syren carriages combined with the RB barrels. What size Syren carriage are you using? Is that the issue? I had no issue with the fit of mine for centering so can't understand where yours comes from as everything else looks just fine. Any way I'm dipping my toes back into the Fly/Pegasus forum with a view to getting back into my own model. Time is not on my side but with you and Vitus catching me up/passing me and Blue Ensign pulling well ahead and all of them looking so bloody good the juices are flowing again. It isn't a race but your logs remind me that there is all sorts of great things to challenge, make and meditate upon as the building of ship model unfolds. May be next year if I can get rid of the weekly travel... Your Fly looks great - sort those cannons - I'm sure you will. Cheers Alistair
- 467 replies
-
- 5
-
-
- fly
- victory models
- (and 1 more)
-
Beautiful rigging Brian Just popped around the corner (into my dining room that is) to look at my own and realise how the serving of the ropes on yours makes it look so much more real and properly scaled. That'll be a new learning curve for me next time.
- 831 replies
-
- 6
-
-
- Armed Virginia Sloop
- Model Shipways
- (and 1 more)
-
Welcome back Vitus. My Fly is still on hold - just no time to spare. You are well past me now and it is looking great as well. Cheers Alistair
-
Brian You are headed for completing the definitive version of this great kit - it looks absolutely fantastic. You have taken it much further than I did with results that speak for themselves. I look forward to seeing more. Shame we are not nearer by and I could look over it in reality. Buckeye is a wee bit far away...
- 831 replies
-
- 9
-
-
- Armed Virginia Sloop
- Model Shipways
- (and 1 more)
-
Beautiful work Chuck. Every time I see this model I know I have to attempt it one day - it is a stunner.
- 1,051 replies
-
- 2
-
-
- cheerful
- Syren Ship Model Company
- (and 1 more)
-
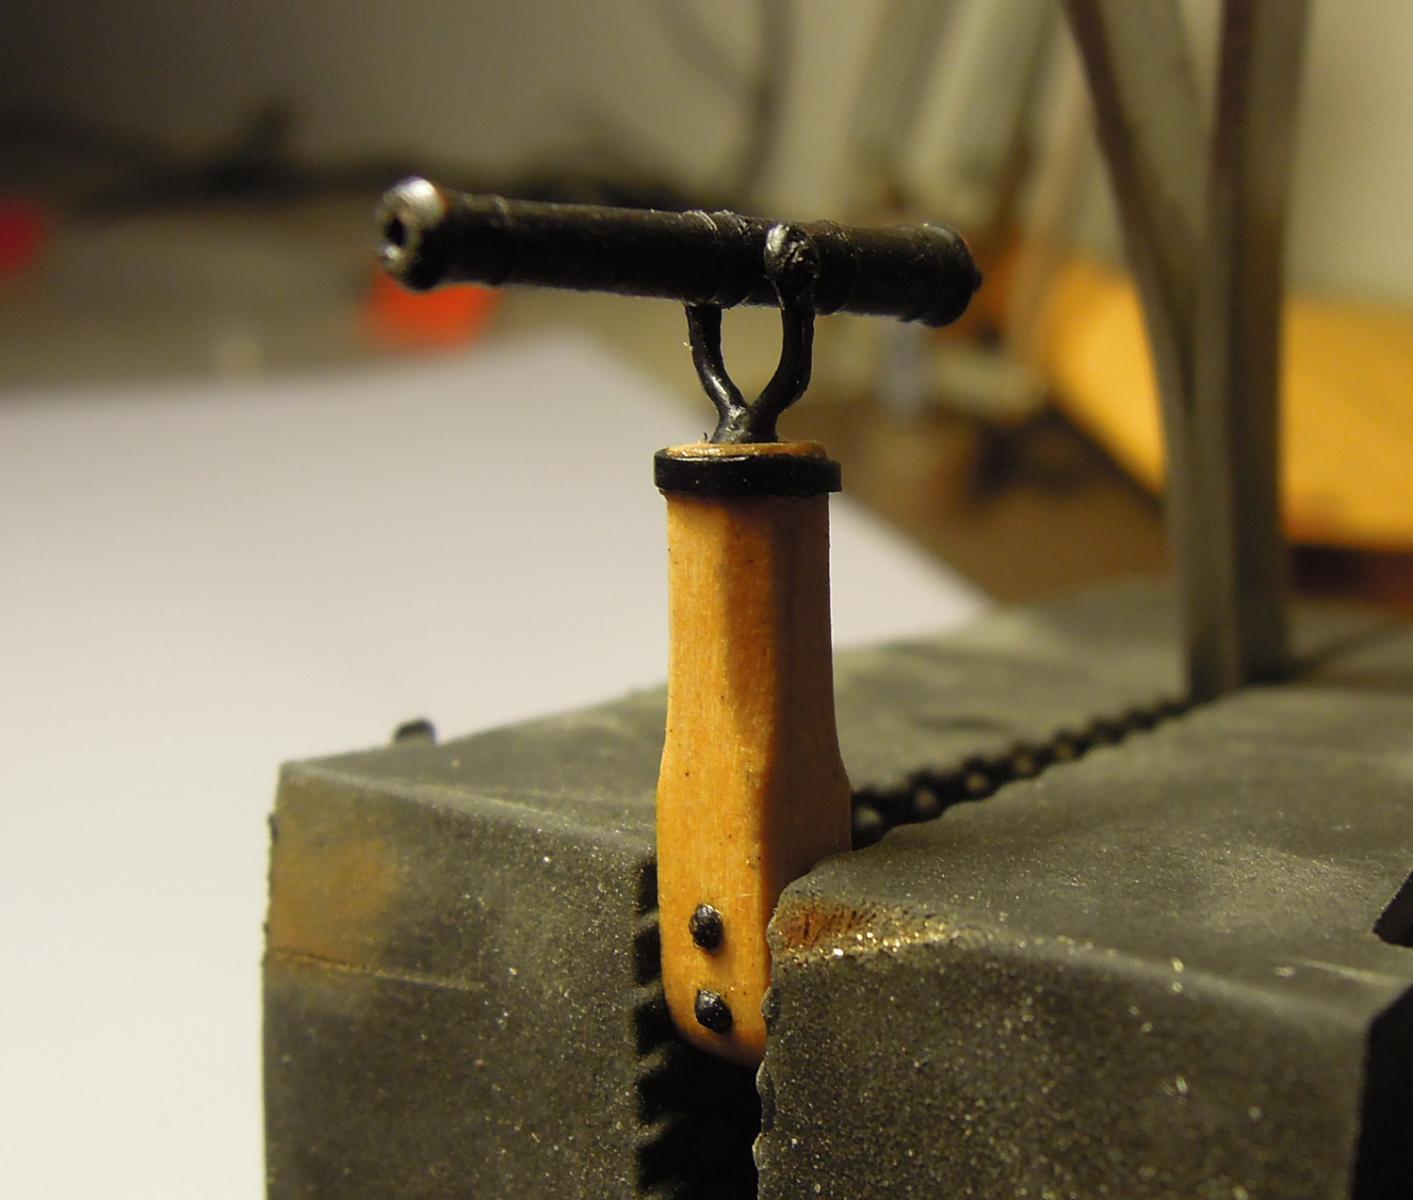
Hi Brian An alternative method for the yoke is to use PE brass hooks straightened out. I just think it looks a bit cleaner and more realistic than what you have done. The method is well explained in Blue Ensigns Pegasus log and I attach a picture of my go at it for my Fly build (will delete this in a few days time to avoid confusion). It is bloody hard to do! The barrel is one of Chucks and is blackened but the yoke is painted. Although I haven't touched my model for nearly a year it is one of those repeat processes that I don't look forward to. I just used the white metal kit supplied swivels on my AVS but wish I had upgraded them now. The kit ones for the Fly are truly bad - an upgrade was definitely needed! Another wee trick I did on my AVS was to wrap a bit of rope around the joint between the mast and the mast wedge at the deck. When painted this looks authentic as I believe this item was covered in canvas to seal the junction and the rope wrap covers up any gaps in the joint. Cheers Alistair P.S. I think I have enough PE brass hooks for yokes to send you some if you want to go down this route...

- 831 replies
-
- 16
-
-
- Armed Virginia Sloop
- Model Shipways
- (and 1 more)
-
Really great work Brian I can quickly nip around the corner from my computer to look at my AVS and you should be confident that the ropes cover up many things. The sheaves on my jib boom were drilled holes and a slight etching to mimic the sheave. Even that small effort is lost to the eye when the rope is threaded through. None the less your work on the mast and spars is much better than mine was and I think it'll shine through in the finished ship. Probably said it before but when that sprit and main mast goes in the dimensions of the overall ship make you go WOW!
- 831 replies
-
- 7
-
-
- Armed Virginia Sloop
- Model Shipways
- (and 1 more)
-
Hi Brian I still look into MSW now and again. Your sloop is looking really good. Fantastic sweep ports and scuppers - way better than mine. I reckon a little enhancement to the swivel posts is worth it. I just did a wee wrap of blackened paper around them to look like a strap tying them back to the rail. I also left the swivel post that sits among the shrouds dry fitted only until the shrouds were done so that I could adjust its position to fit with the shrouds. Some people leave this post off altogether because it is so hard to get right in relation to the shrouds but dry fit and later adjustment worked for me. Well done on the sprit too - this was really hard in my memory especially to get it sitting down on the deck combined with its rake being at 90 degrees to aft rake of the mast. You've done a beauty with the shaping. The next phase of this build is the best with the masts and sprit in you really get the sense of extension from the hull of these parts and it takes on a whole other dimension and comes to life. It suddenly looks like the speed demon that it was. I did a clean on my AVS a few weeks back - with all the dust gone I really like the way it has aged. You're doing this cool little model real justice - it'll be a stand out - keep enjoying! Cheers Alistair
- 831 replies
-
- 7
-
-
- Armed Virginia Sloop
- Model Shipways
- (and 1 more)
-
Superb Brian I well remember the angst that this part of the kit gave me. You've cracked it with style!!!
- 831 replies
-
- 1
-
-
- Armed Virginia Sloop
- Model Shipways
- (and 1 more)
-
Hi RMC I'm so far out of the loop here on this site.Work has interfered with my entire life and as much as it draws me, I haven't touched my model for months now. I really like what I see on your Vanguard. It looks brilliant and, as you say, it looks like a real ship. Keep it up - you inspire me to pick up the tools again....
-
Totally smart moves in all respects! Good stuff and a great result. Now I have to rebuild my ladder and coaming to a similarly good outcome...
- 831 replies
-
- 1
-
-
- Armed Virginia Sloop
- Model Shipways
- (and 1 more)
-
Hi Brian I've been away from the forum and my model for a while. Your work looks superb except for that hatch and grating...I've just ripped out the aft ladder and hatch coaming on my model - destroying them both. The ladder was wonky within a good coaming but they all had to come out. Your grating and the coaming needs to be re-built otherwise they'll annoy you for ever after. A pain it is but we all go through it. Try, as Frank said, to get an edging around the grating. You could also try to combine the grating with the stove flue - a trick I borrowed from an earlier AVS - Pete Jaquith's??? As Russ says you've got to get it right to your eye otherwise it is like an itch that will need endless scratching.
- 831 replies
-
- 2
-
-
- Armed Virginia Sloop
- Model Shipways
- (and 1 more)
-
Looking really good Martin I'm intrigued by your carving for the wales at the stern counter. I didn't have to go through that - I just twisted those last pieces in a compound curve by double wetting. Carving seems like a tough pathway to a similar result. But whatever - the result seems much the same and doing the anchor stock pattern is a great add - even though mine needs a bloody magnifying glass to see it!!!
- 467 replies
-
- 1
-
-
- fly
- victory models
- (and 1 more)
-
Nice work on the planking Mike. Sanding with mittens...gulp. A couple of thoughts: - At the bow/stem I found it quite easy to get every plank through to the stem without stealers or joggle planks. You just have to start your taper further back on the hull I reckon. No need for spiling either. - just a simple tapered planks and none need (or should) come to a pointed end. - At the stern I completely sanded away the first layer from the bearding line all the way to the stern post. Otherwise the centre keel plus the first and second layer is too thick for the post. Spyglass had the same issue but smarter than me (and you perhaps ) he didn't even plank that area on the first run of planks. Sanding it right back isn't a biggy as long as you have thick mittens (or you could pop down here to do your sanding under cloudless skies, no wind and 28 degrees C).
-
Hi Jay Good to see you back. I've been away on summer holidays for a few weeks and missed your return. As always your suggestions are welcomed whether for the Connie or ship models in general. Happy new year my friend!
- 732 replies
-
- 1
-
-
- constitution
- model shipways
- (and 1 more)
-
Great work Joe. Calling you a fast builder - which you are - would undermine the extremely high quality and accuracy of what you do. Great to watch and with all that extra space we, who are snail paced, will be afraid...very afraid ...
- 302 replies
-
- 1
-
-
- granado
- caldercraft
- (and 1 more)
-
Really nice work Jesse - you can't be far away from the finish line! And with those sails she's going look magnificent.
- 607 replies
-
- 1
-
-
- scottish maid
- artesania latina
- (and 1 more)
-
Hi Caroline I didn't use any triangular fillers at all. According to the FFM they weren't used on a hull of this size. See page 17 onwards in my log. B.E went the same way. You start at the keel and work upwards using overlaps to to increase the upward curvature at the stem and stern as you go. I tried to follow the lines of the planking and I think there is a stern shot in my log that shows this. Sometimes I had to trim the end of a strip to get a good flow to the next strip. I worked in strips of two to three tiles for the bigger overlaps but used strips of five tiles for the straighter runs. I sort of just felt it out as I went. The only tiles I cut into triangles were those that met the bead at the waterline. Also worth noting that there are port and starboard tiles - the rivet positions are different for each. I wasted a lot of tiles to start with but once I got into a groove it became much easier and wastage disappeared. Any way best bet is not to triangulate at all but to overlap. I trust B.E agrees! P.S. Happy to take some close ups of the pattern if that'd help but it would have to be soon - off on holiday shortly...
-
Hi Caroline It's great to see you cracking on with Pegasus again. Your log was one I followed and studied when I started and I look forward to your updates. Aside from your amazing cabin details (too late for me to add) we are at about the same point in the build I think. Any way, having another Swan Class build in progress on the forum is great.
-
That last shot in your post is amazing Ken. A blue sky behind it and it could be the real thing. Congratulations on your model - finished yet or not. It is a stunner. Happy new year! And I look forward to your next project whatever it is.
- 455 replies
-
- 1
-
-
- fair american
- model shipways
- (and 1 more)
-
Happy new year to you to Martin. Looking forward to your Fly updates next year. I'm kind of stalled on my build right now but chipping away at wee bits...
- 467 replies
-
- 1
-
-
- fly
- victory models
- (and 1 more)
-
HMB Endeavour by mikec - Eaglemoss
aliluke replied to mikec's topic in - Kit build logs for subjects built from 1751 - 1800
Hat elastic! Brilliant and looks great - going to try this. Where does your wife buy it? Spotlight? -
Sanity and our craft do not go together. Amazing work by you and we are all mad as maggots !
-
Just found your log Rob. Amazing work and great to see some of our native timbers in there. How is kauri like to work with at a small scale? I'll stay in touch with your Blanche as she moves along.