DONATION DRIVE - SUPPORT MSW - DO YOUR PART TO KEEP THIS GREAT FORUM GOING!
×


aliluke
-
Posts
1,359 -
Joined
-
Last visited
Content Type
Profiles
Forums
Gallery
Events
Everything posted by aliluke
-
 You're one crazy guy. Fast as. I won't point out any mistakes or issues from here on because I just like that you are having fun and that's what it's all about...Manitoba - been there, Winnipeg at minus 15C - on Monday I go to Brisbane - looking at 35C, 90% humidity and I hate heat. Give me frozen streets. Rock on mate.
- 261 replies
-
- 5
-

-
- Victory Models
- Pegasus
- (and 3 more)
-
Good on you for looking for a fix and wishing you the best of outcomes for that. I posted on Knocklouder's log before re-visiting yours. Otherwise your ship is looking very fine. I definitely recommend the copper plating and you can probably just plate over the copper paint rather than removing it?
- 49 replies
-
- 1
-
-
- Pegasus
- Victory Models
- (and 1 more)
-
Ah - okay. Maybe the instructions are different between the kits. For HMS Fly page 6 says Remove the exposed bulkhead tabs above deck level when 2nd planking is complete. Sand the remaining stub flush with the deck. There is a drawing showing this and it is done before you plank over the false deck. The next drawing shows no stubs above the planked deck. But perhaps, like Bob, you just paint the stubs black and the issue kind of disappears? It'd otherwise be very hard to correct and who's going to really notice?
- 261 replies
-
- 3
-
-
- Victory Models
- Pegasus
- (and 3 more)
-
No the instructions are fine - I'm effectively building the same kit - HMS Fly. Anyway, Bob, they kind of disappear now that you have painted them black. And good on you for fixing up the cannons.
- 261 replies
-
- 4
-
-
- Victory Models
- Pegasus
- (and 3 more)
-
Hey Knocklouder You are ripping through this at high speed and doing really well. Couple of thoughts though: - There shouldn't be any frame ends penetrating above the decks. This may be difficult to change? - You have gouged some of the bulwarks to fit the cannons. Why do the barrels sit at different heights? I'd correct this and fill the gouges - it isn't too late for that. Up to you of course, but those two things stick out to me as worthy of correction. Otherwise you are rocking and rocketing.
- 261 replies
-
- 3
-
-

-
- Victory Models
- Pegasus
- (and 3 more)
-
Extraordinary the way that life flows. My admiral invited me back into the kitchen to build as she missed me disappearing downstairs. Ed Harris! What a great actor - 'The Right Stuff'. I could tell you stories about ship model making for Master and Commander and King Kong here in Wellington but that diverts. Wow - an amazing thing to come out of your amazing dedication and your amazing work.
-
The planking looks fantastic, almost like ivory or bone. I look forward to seeing it after sanding and finishing. I didn't pay much attention to pedestals - just plain brass on a plank of kauri ( a beautiful NZ native timber) but I like your leaning - makes it more 'period'. Keep it up!
-
Always good to see another AVS underway. Looking good so far and I'll keep looking in.
-
Like you, Richard, I'm picking up my kit from years ago. I also got the RB barrels to replace the kit guns which were hideous, all-in-one things. The replacements might not be spot-on historically but they are miles better than the kit supplied product back then and only the very best ship historian is going to spot the inaccuracy, whatever it might be. Keep it up - it's a challenging build but a very sleek little ship. If you want a boat for it, I definitely recommend the Vanguard Models pinnace which I've just finished.
- 49 replies
-
- 2
-
-
- Pegasus
- Victory Models
- (and 1 more)
-
It's looking good. Will be a benchmark for this kit when finished I reckon. Your very good efforts make me glad I painted my rendition - planking was easy as it was all covered up at the end!
-
Stunning! Thanks for sharing your great log. I'd love to try one but shipping puts it out of reach...
- 166 replies
-
- 5
-
-
- Maine
- BlueJacket Shipcrafters
- (and 1 more)
-
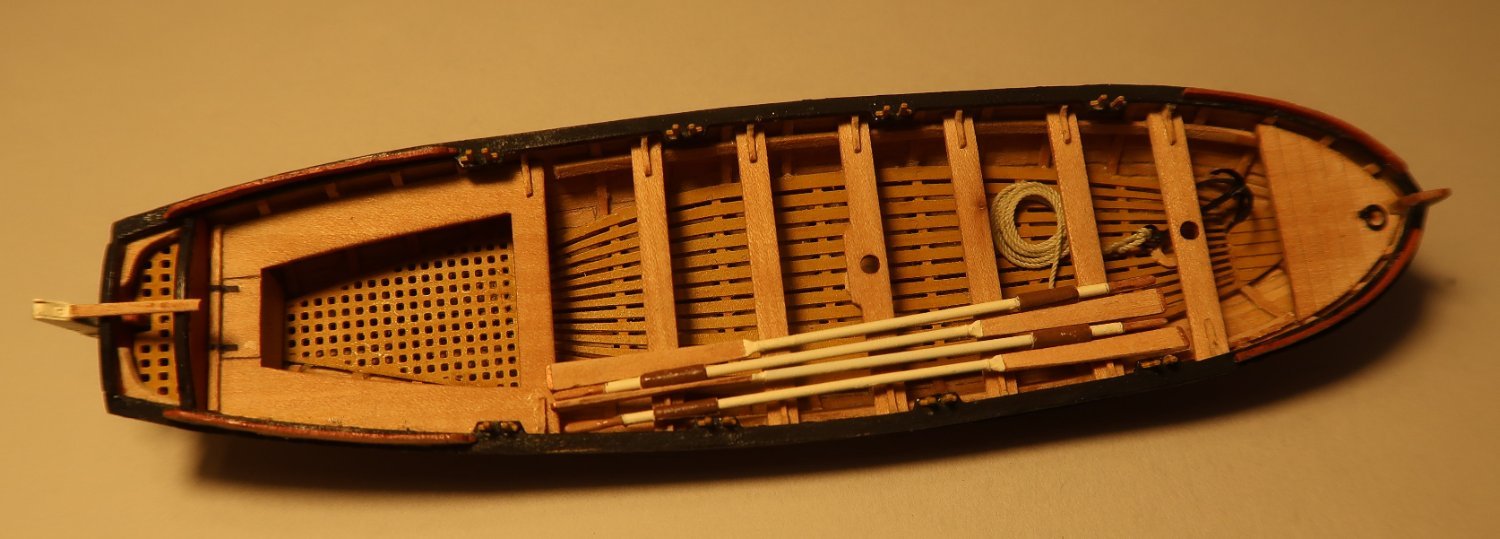
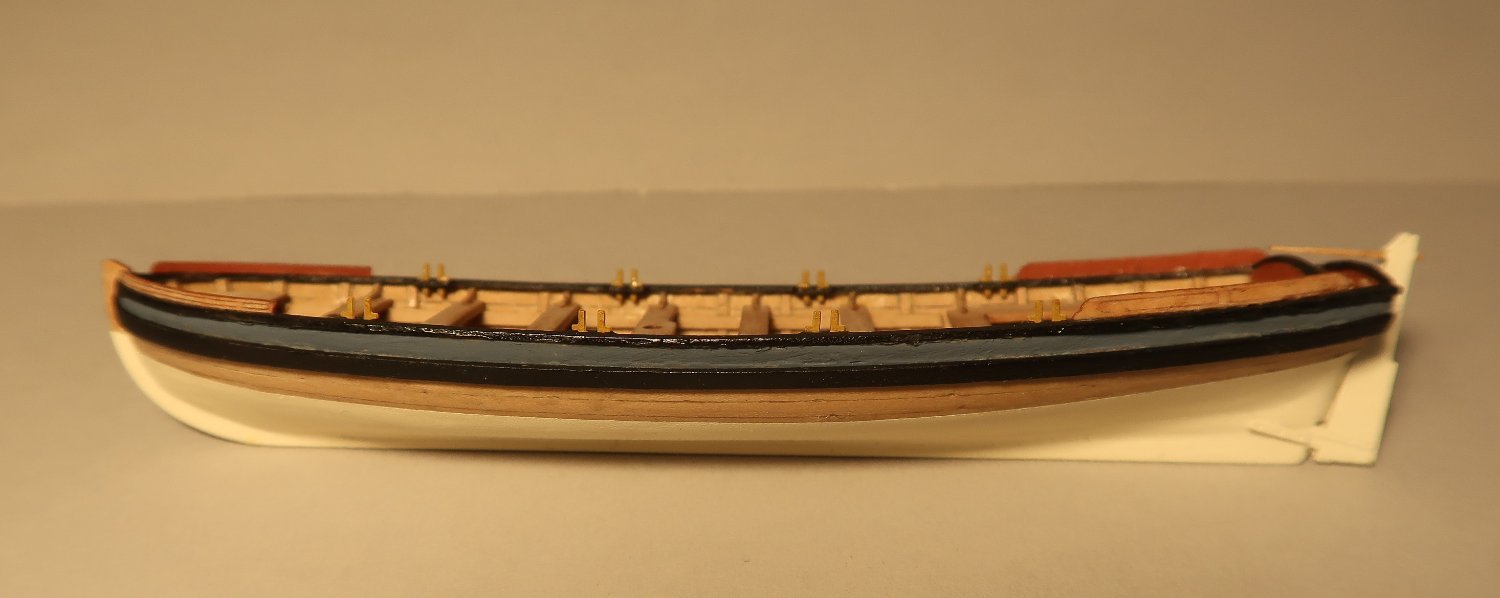
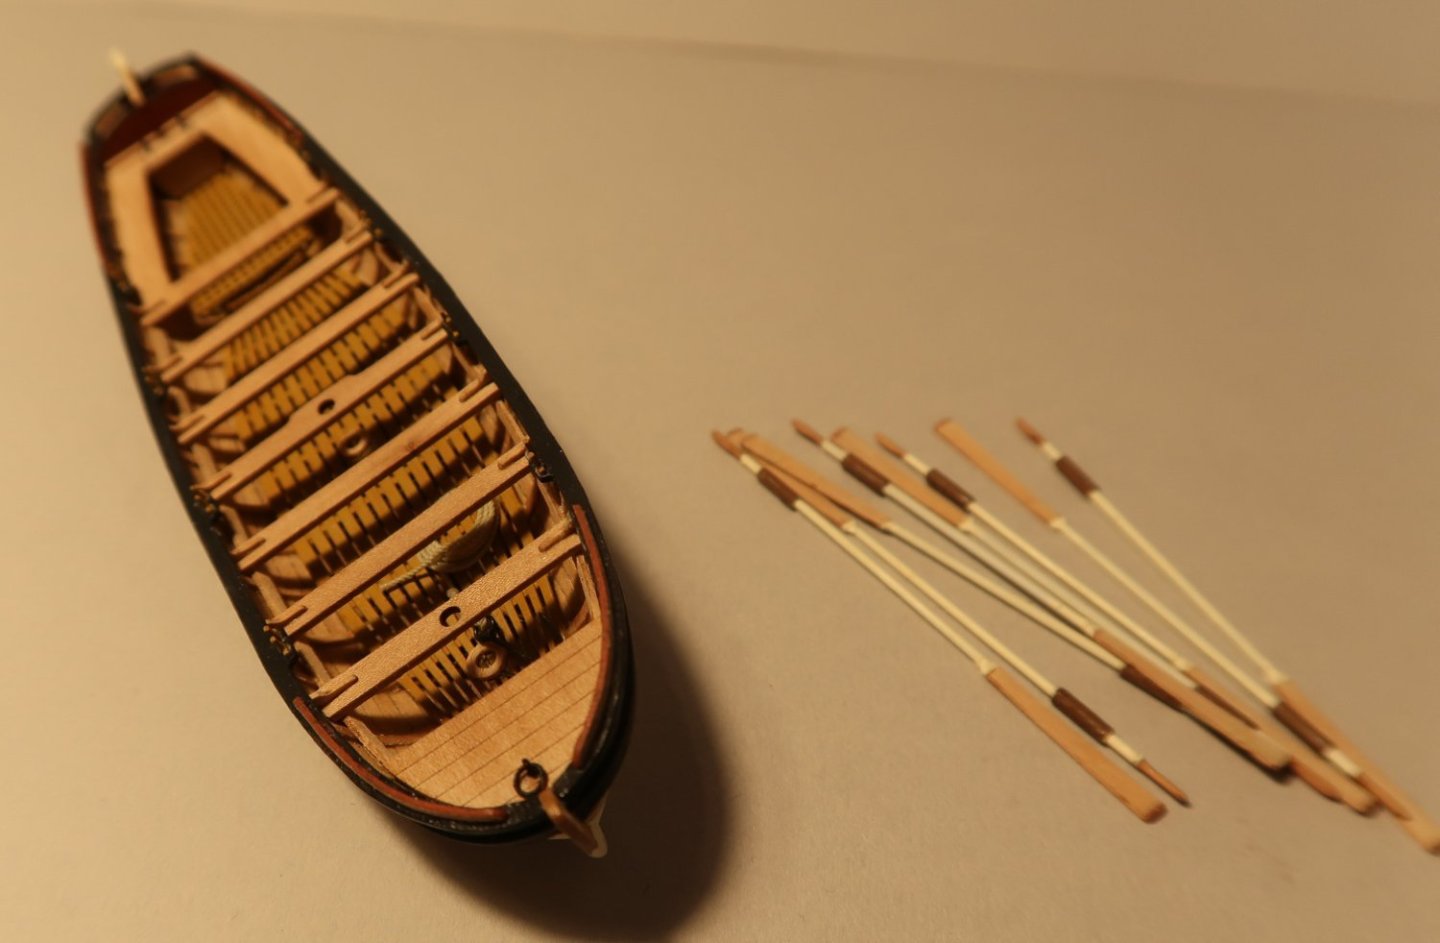
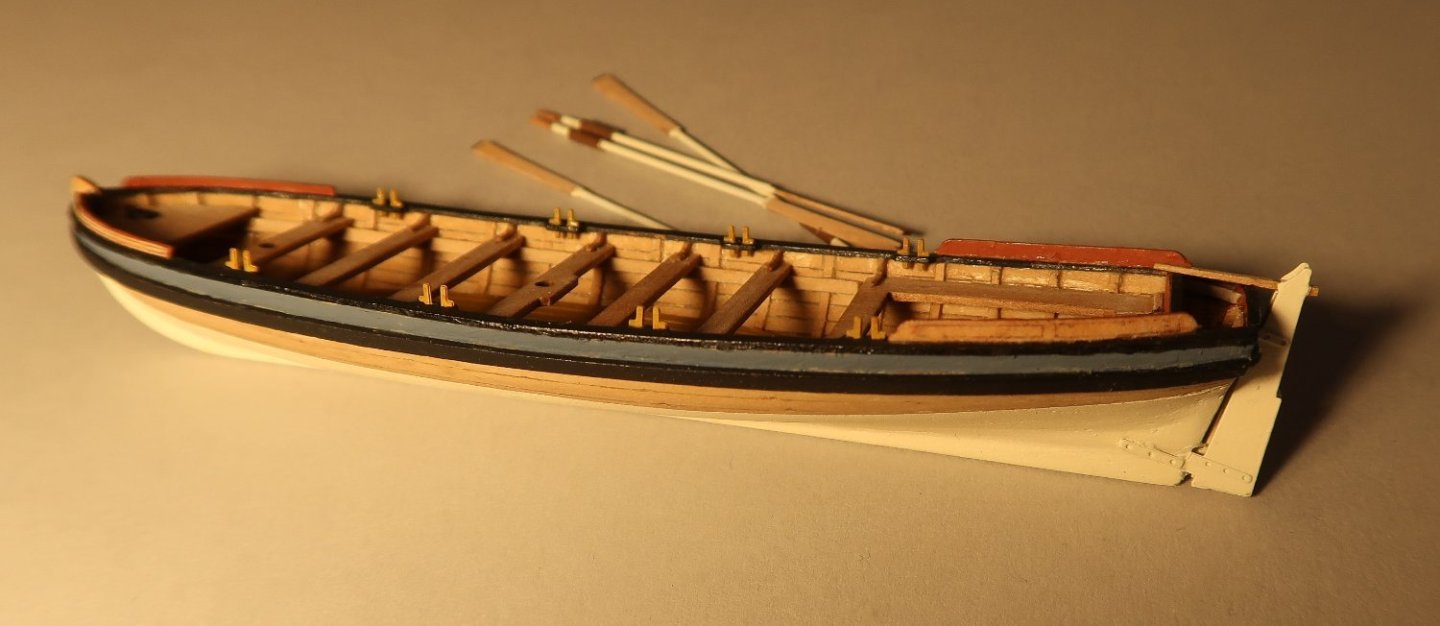
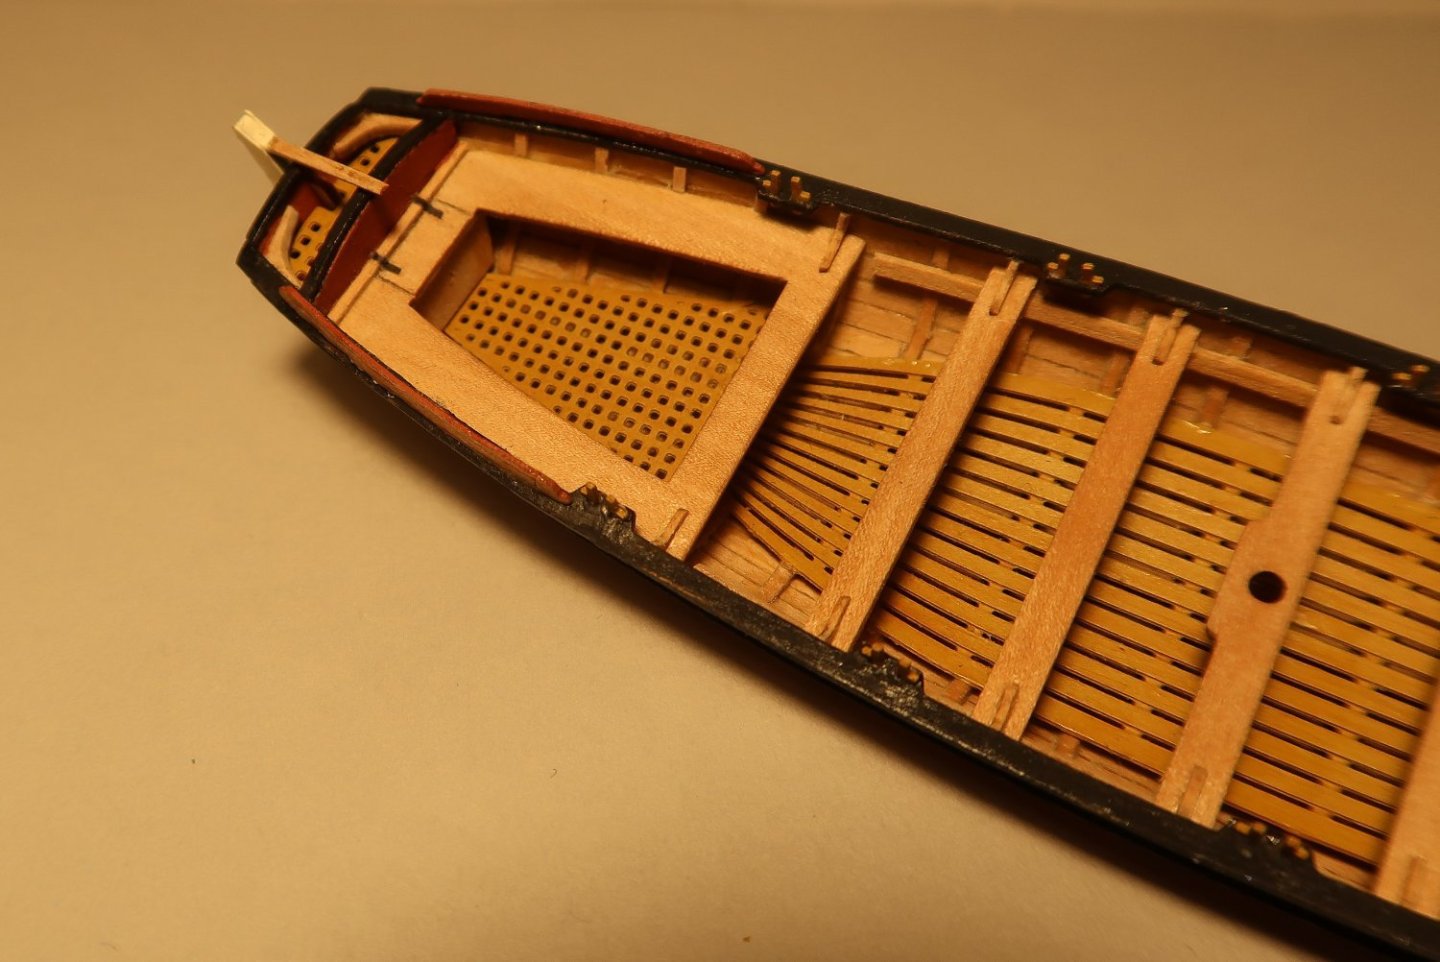
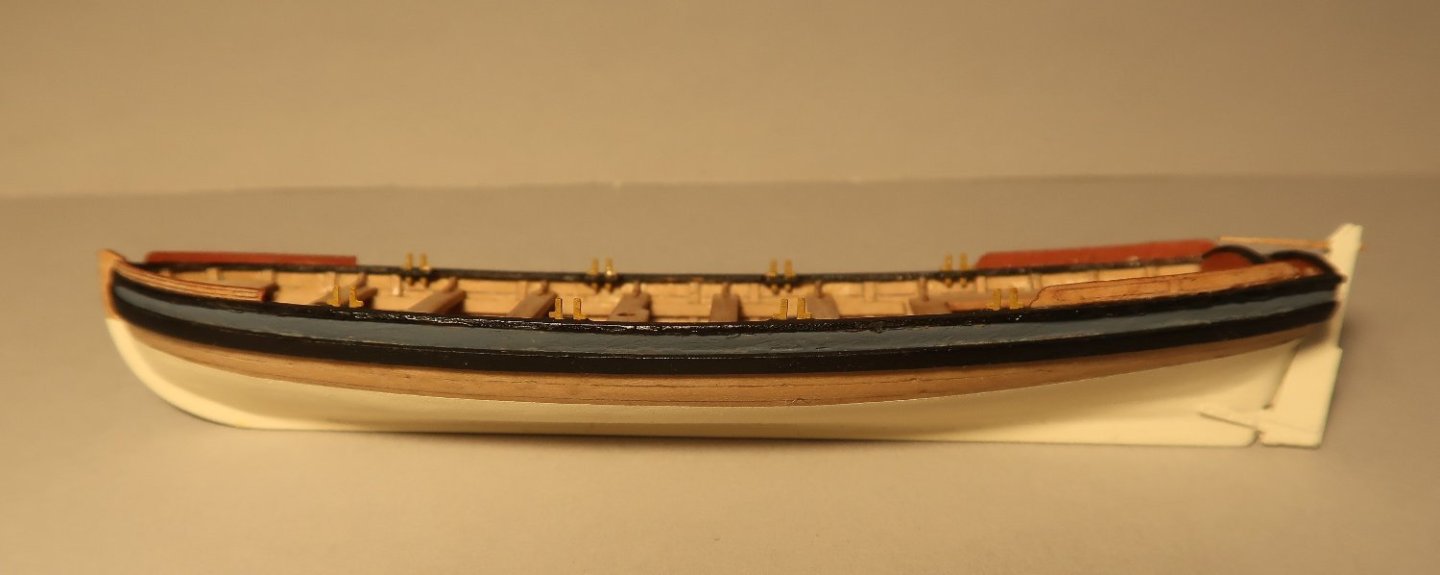
Hi It's been a while. I've had major health setbacks which I won't bore you with but they taken away time to work on Fly. I have managed to finish the 28' pinnace by Vanguard Models. An amazing little kit but trickier to build than the VM launch. Some minor changes to the kit that I made: - Added mast steps - Added ringbolt to the front eyebolt - Added locker to the stern seat - Added capping rails to the stern transoms - Added anchor rope The colour scheme is just my choice. I know there are some historical inaccuracies but I'm mostly building out of the box and looking for ease rather than historical perfection. I stole the oars from the launch... Slight annoyance - there is a knot in the third thwart from the bow. Nothing I can do about that but it looks like a stain...

- 49 replies
-
- 12
-
-
I'd buy one but given the driving distance, I have to pass. I lived on Cape Cod three times - South Dennis, Dennis Port - working in a fish market and as a stern man on a lobster boat out of Harwich Port fishing in Nantucket Sound with Harry Hunt Jr. (a legend) on the Gertrude H. Cape Cod would be a drive away but was thirty years ago. Postage is a killer...
- 166 replies
-
- 5
-
-
- Maine
- BlueJacket Shipcrafters
- (and 1 more)
-
WOW!!! WOW!!! That is a triumph, reflecting your skills and the quality of the kit. Brilliant from all angles.
- 166 replies
-
- 5
-
-
- Maine
- BlueJacket Shipcrafters
- (and 1 more)
-
I have no idea what the term is but your work is perfect eye candy, an amazing build - gold standard - and a pleasure to follow.
- 562 replies
-
- 3
-
-
- vanguard models
- alert
- (and 2 more)
-
It's impossible not to like this ship, the kit and your rendition of it. The bowsprit says purpose, sail and speed. The array of guns - watch out, we are fast and dangerous! Lovely work.
- 105 replies
-
- 5
-
-
- Grecian
- baltimore clipper
- (and 4 more)
-
I can see your thinking but do you need to cut a test pattern for the quarter deck as well before committing? That way you can see the overall look? Just a thought.
- 648 replies
-
- 1
-
-
- Indefatigable
- Vanguard Models
- (and 1 more)
-
There is nothing not to like about this! Seriously good - an amazing ship wonderfully rendered. I look forward to your finish line.
- 166 replies
-
- 4
-
-
- Maine
- BlueJacket Shipcrafters
- (and 1 more)
-
Have a look at my HMS Fly log Blue Ensigns HMS Pegasus log - nothing wrong with copper if you get it right and when you do it looks great! I used copper strips - sort of like a tape but you can snap off the individual plates to tune it to the curves. I disagree with Keith, the scale is fine but you have get it right as once you start there is no going back. Other choice, if you don't want all natural, is paint in off white/cream. Unless the planking is immaculate, see Blue Ensigns logs (his planking is always immaculate), copper or paint hides all of the ills of us less skilled. I also used an unusual aging technique for my copper plating. The outcome looks good to my eye but it does need a leap of faith...
- 261 replies
-
- 6
-
-
- Victory Models
- Pegasus
- (and 3 more)
-
Excellent model! That is exactly as far as I intend intend to take HMS Fly although that still feels a long way away...
- 104 replies
-
- 3
-
-
- pegasus
- victory models
- (and 2 more)
-
Superb! Such a great rendition of a great subject. Love it.
- 166 replies
-
- 5
-
-
- Maine
- BlueJacket Shipcrafters
- (and 1 more)
-
Speed definitely doesn't equal poor work in your case Dan. It looks superb.
- 105 replies
-
- 2
-
-
- Grecian
- baltimore clipper
- (and 4 more)
-
You are very organised! For the cannons have a look at my Fly log or Blue Ensign's Pegasus log. Mine were from RB. For the swivels I used Syren. There are many more alternatives out there these days with 3D printing coming on stream...but the RB version is just fine in my opinion. The kit supplied versions are a shocker.
- 261 replies
-
- 6
-
-
-
- Victory Models
- Pegasus
- (and 3 more)
-
Hi Bob This is a great kit designed by Chris Watton I believe. Since it was produced things have changed. The cannons are not up to scratch but these are details. Heaps of logs for Pegasus here, but "Blue Ensign" is the definitive one that I'd refer to. As said, it is a brilliant kit and even without incidental upgrades it will turn into a beauty - upgrade the cannons though - the kit ones supplied are shockingly bad. Blue Ensign's and my Fly log give you advice on that. Enjoy the build - a great kit choice!
- 261 replies
-
- 10
-
-
-
- Victory Models
- Pegasus
- (and 3 more)
-
2023 Donations drive
aliluke replied to James H's topic in Using the MSW forum - **NO MODELING CONTENT IN THIS SUB-FORUM**
I tried to make a donation through all the channels and then get this screen message: Then I wonder if my donation has been processed after all - details were taken. I'm very confused...