Hubac's Historian
-
Posts
3,316 -
Joined
-
Last visited
Content Type
Profiles
Forums
Gallery
Events
Everything posted by Hubac's Historian
-
 As is everyone else, here, I am sorry that you are facing such a difficult time, Mark. My hope is that you will find the strength and support you need to get through it all with your spirit and heart intact.
 -
Hi Chris - funny visual with the Rolls! Yes, I certainly feel that one can take a few liberties with decor and coloring, as long as they are historically plausible. The use of lapis-based ultra-marine would have been sparing, at best - even on the most prestigious first-rates. As a general rule of thumb, you can count on the backdrop to the arms of France as being ultra-marine. If you wish to use ultra-marine elsewhere, I think that less is more, however, I see no reason why you couldn’t incorporate it above the tafferal carving. As long as what you decide upon is balanced and presents some kind of logic, then I think it should be just fine. On the other hand, I personally would be dis-inclined to represent areas above the waterline as “natural”, because of the French practice of using iron fasteners, as opposed to tree-nails. An un-painted French ship would soon look like your streaky Rolls Royce, up there, with the added embarrassment of loose planking, as the iron nails corrode and lose their integrity. In response to AnobiumPunctatum’s question, I think the issue of whether to aggressively kit-bash or build from scratch, depends upon a builder’s perspective, their circumstances, and their conception of a challenge worth pursuing. From my perspective - while there are certainly problems with the Heller hull it is, in fact, a very close copy of Tanneron’s model; simply by raising the waterline on the Heller kit by a 1/4”, or so, helps one to arrive at something that looks much fuller and more plausible. Despite its problems (many of which can be corrected or mitigated without too much trouble), though, the Heller hull has quite a lot going for it as an example of late 17th C. practice. As Chris says, it is a tremendous benefit to have a ready-made hull form, even if one must build up the stern and quarter galleries from scratch. Another thing that I personally love is the flexibility of plastic as a medium for scratch-work. Unlike wood, it is much easier to scrap an attempt at executing some detail, if it doesn’t look right, and start anew. Plastic is also a benefit to people like myself, who have no shop space to speak of. I work off of my kitchen table, just as I did when I was a boy. When I’m done for the evening, the model is stored in its purpose-made box until the next evening, or whenever I have time for it. Lastly, it is tremendously rewarding, I think, to push the boundaries of what is possible in reverse-engineering this kit to represent a more specific point in her career, or another French ship, altogether. When I started my Soleil Royal project, I had an idea about making the hull wider, in order to incorporate the missing sixth stern light; it was going to involve some complicated plastic surgery, and I really wasn’t sure whether I would be able to pull it off. When I succeeded at that, it felt like a major accomplishment, and it motivated me to keep going. So, keep going I did. For some, these kinds of builds may seem like exercises in pure tedium. For others, though, they are an opportunity for experimentation, and skill development. For me, it’s just satisfying fun, and I really enjoy watching what other builders do with her.
- 244 replies
-
- 3
-

-
- heller
- soleil royal
- (and 1 more)
-
I hear what you’re saying here, Chris, but in all fairness even the St. Philippe project is a bit of a forensic re-construction. In my opinion, the detail is appropriate for the time period, and I am not surprised that Lemineur is taking a bit of a boilerplate approach to the small things like this. If there were Van de Veldes of the SP, that clearly showed the detail, I might feel differently. As it stands, though, there is very little documentary reference to the French style of chesstrees in the latter 17th C. Take heart - it was still money well-spent😁
- 244 replies
-
- 3
-
-
- heller
- soleil royal
- (and 1 more)
-
That is excellent advice, EJ & OC! It sounds as though the key is to not lock in your belaying points until all of the rigging is in place. And, as you say EJ, to take a balanced approach to the work.
-
Hi EJ, Have you found that there is a particular order of rigging a model like this that prevents line-sag as you work your way up? My first attempt at rigging SR started well, but before I knew it, my line tension was all off, and the topmast and t’gallants were raking aft at an un-natural angle; more like violin bows. The fact that the masts were made of plastic was a contributing factor, but I’ve seen plenty of plastic modelers succeed in smaller scales without their spritsail topmast looking like a fish-hook. Any advice on that front?
-
Well, this is a good one! I will happily follow along for the remainder of the project.
-
Your grain paint looks terrific, Chris! Highly realistic!
- 244 replies
-
- 2
-
-
- heller
- soleil royal
- (and 1 more)
-
Hey, Chris! Thank you for sharing this model of Soleil Royal. It is an interesting amalgamation of period 17th and 18th century details; the modeler gave her Victory’s beakhead bulkhead, the Napoleonic-era styling of the gun strakes, and a pretty faithful recreation of Tanneron’s stern. I had never seen this model before, and like all models of Soleil Royal, it is an attempt at reconciliation. To answer your question, the decks will be incorporated into the build as I go. I must first create a flat base plate from 1/16” styrene sheet, which will delineate the outer parameters of the model, while establishing the new round-up of my custom fabricated stern. The hull halves will be joined at their stem and cemented to the base plate, with an appropriate opening left at the stern, into which I will frame and plank (all with styrene sheet and strip) the new lower transom. On the interior, the joint between the hull halves and base plate will be heavily reinforced with alternating 1/8” blocking and fitted gussets, at spaced intervals. These gussets will become the attachment point for transverse (no camber) deck beams. The hull/plate joint will be further reinforced with epoxy. I will probably also glue in a 2-3” band of transverse doubling of the base plate, at the fore and main mast locations. At the moment, I can’t remember where the mizzen mast steps on the stock kit, and I haven’t decided, yet, whether to also use the plastic of the lower mizzen, as I will do for the fore and main masts. I may make tue mizzen entirely from wood. For the lower and middle decks, I will use the kit supplied decks, which I have separated, on both sides, along the raised lip that establishes the depth placement of the gun carriages. Because I have no intention of shifting the mast locations, it is convenient to take advantage of the mast locations that are pre-cut into the kit decks. I may increase the aft rake of the main mast by a degree, but that will require a little mocking up to see how that affects the relationship between the shrouds and the main deck guns. More gusseting and false beams will support the middle deck. The difference will come at the main deck level. Starting at the main deck level, I will introduce camber to the false beams that will support the new decking. This new decking will be made from 1/16” styrene sheet, which will be laid out and scribed with a more period-correct arrangement of butt shifts and tapering plank widths. The good news is that I am close to completing the painting of the lower hull, which means I can soon start assembling it into a THING!
- 2,699 replies
-
- 3
-
-
- heller
- soleil royal
- (and 9 more)
-
Hi Cedric! I’m sorry to hear you’ve had a few health problems, but I’m glad to see you back on MSW. Welcome back!
- 244 replies
-
- 2
-
-
- heller
- soleil royal
- (and 1 more)
-
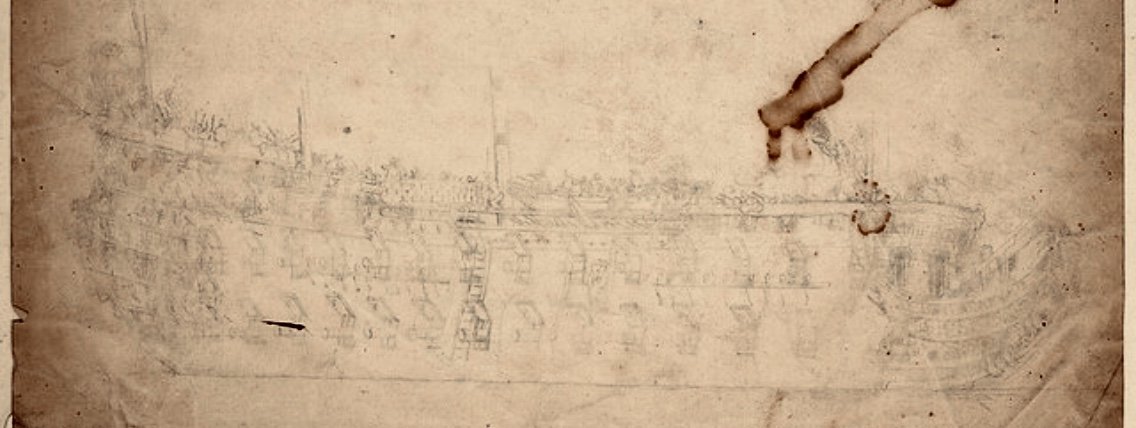
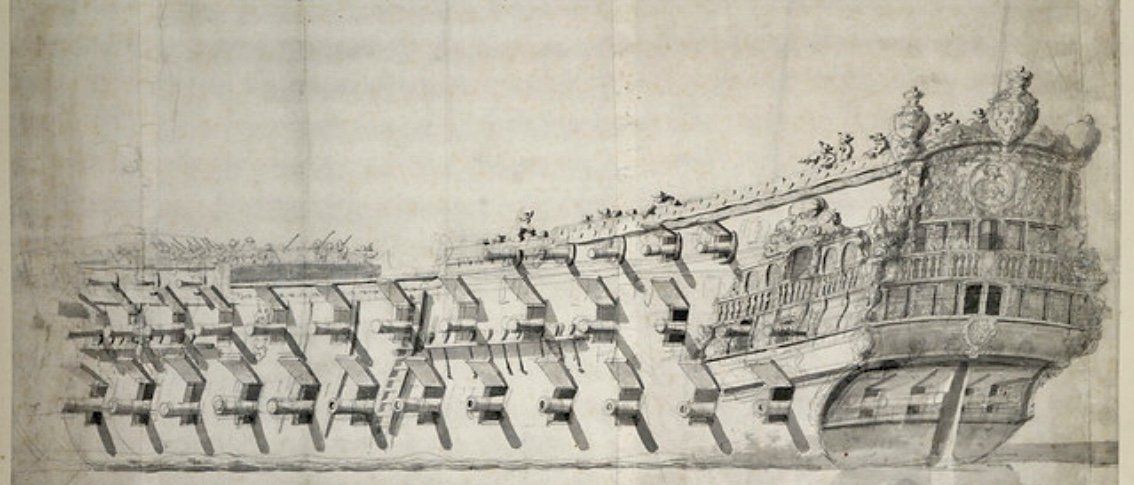
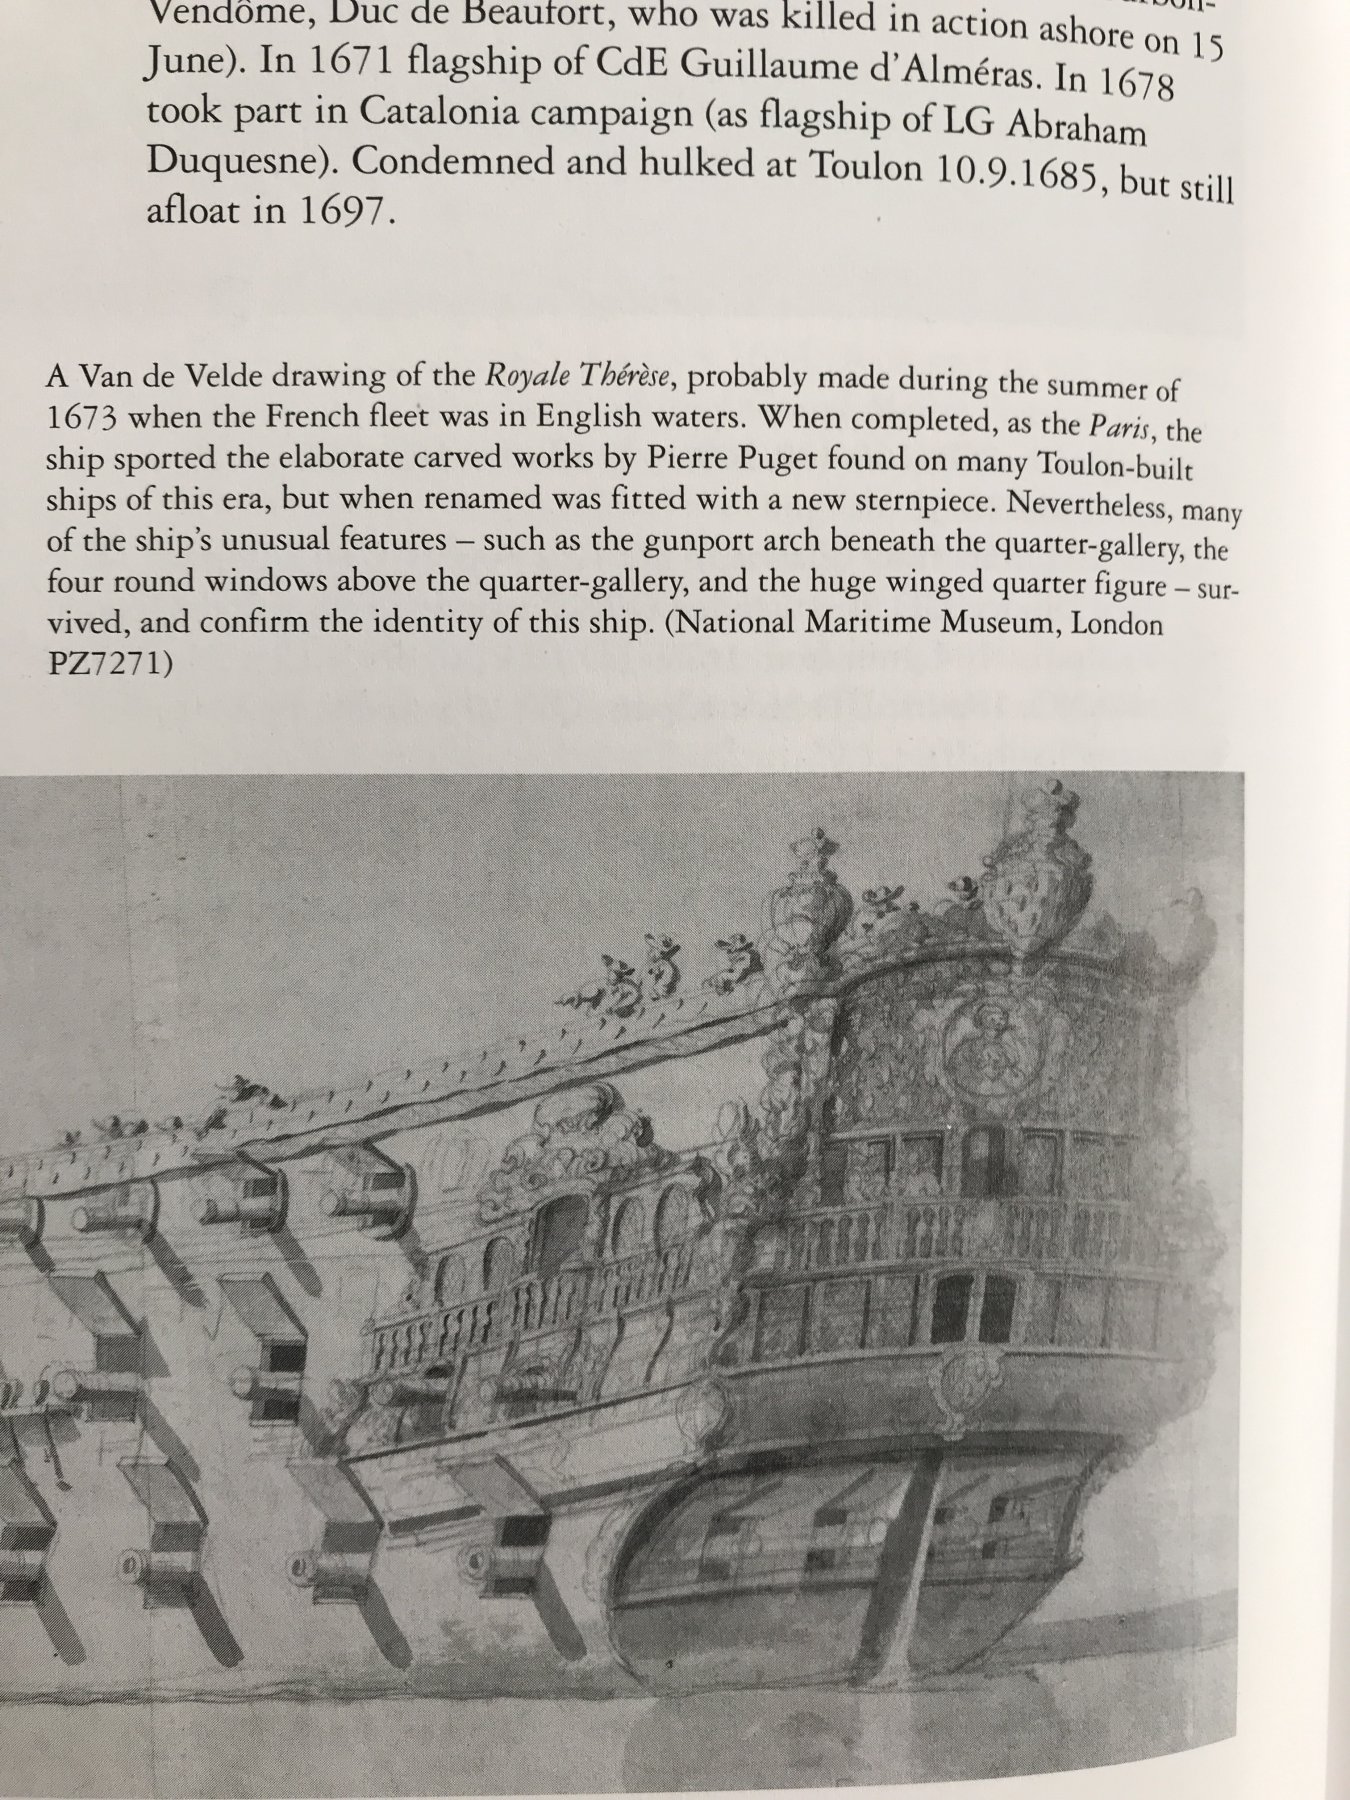
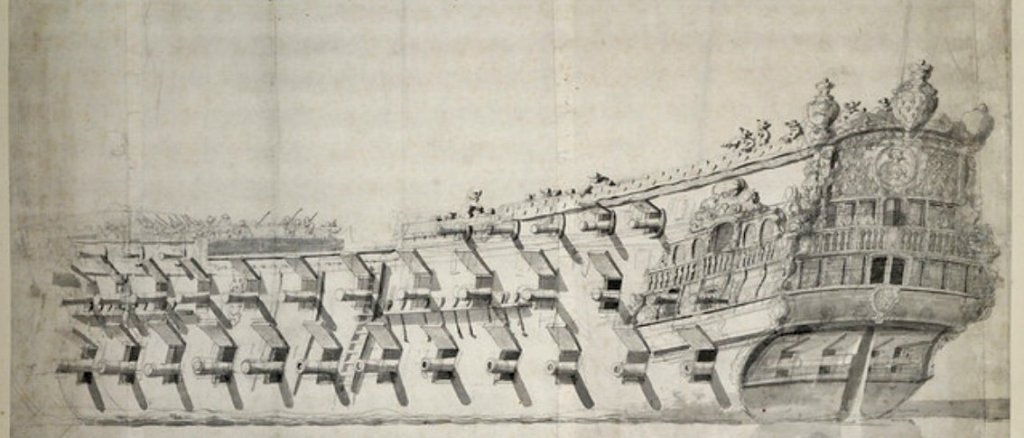
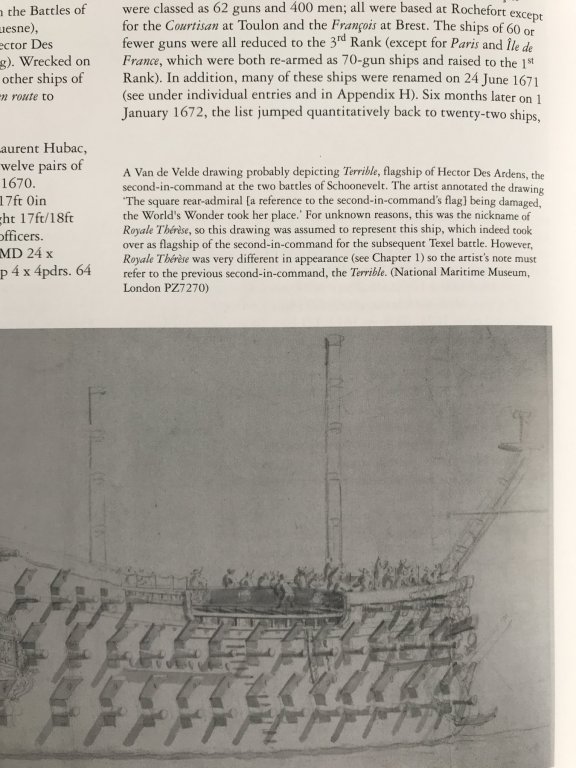
Okay, so in reference to Chris's post just above: Winfield and Roberts identify the first ship as very likely, the Terrible, and not the Royal Therese. Believe me, I have no magical abilities, but I trust their reasoning in making that identification. The second ship, the three-decker, is La Reyne. The third portrait is one that I personally believe to also be the Terrible, and not the Royal Therese, as it is often labeled. In my view, although the general aspect seems lower in the water than the first portrait (starboard quarter view), the guns match up, and certain details of the stern and quarters appear to correspond. The Royal Therese has a very distinct appearance. The very unclear starboard bow portrait of a large two decker may also be the Terrible. I suspect that it is. Unfortunately, the image is just too vague to read for detail.
-
Oh, okay, got it! As for the VDV drawings, there definitely seems to be only the suggestion of the top, lower main wale and the top, upper main wale (at main deck level), in most of these portrait drawings that they did. To them, I suppose, the actual run of the wales, in between, could be worked out between those delineations. Most of these VDV drawings, detailed though they are, are more suggestive than photographic. I am highly fascinated by the following vague drawing, which I also suspect is Le Terrible: It is confusing, though, how the starboard aspect of this portrait may agree with the port side of this portrait, which I also believe to be Le Terrible: There are definite similarities in the overall architecture. It seems to me, though, that the vague upper portrait is a better and more realistic representation of a French 2nd-rate, than the lower portrait which seems a little more stylized, at the stern. These are both VDV portraits, so the question, for me, becomes one of artist’s perspective, relative to the subject, at that moment in time.

- 244 replies
-
- 3
-
-
- heller
- soleil royal
- (and 1 more)
-
Just superb planning and draughtsmanship!
-
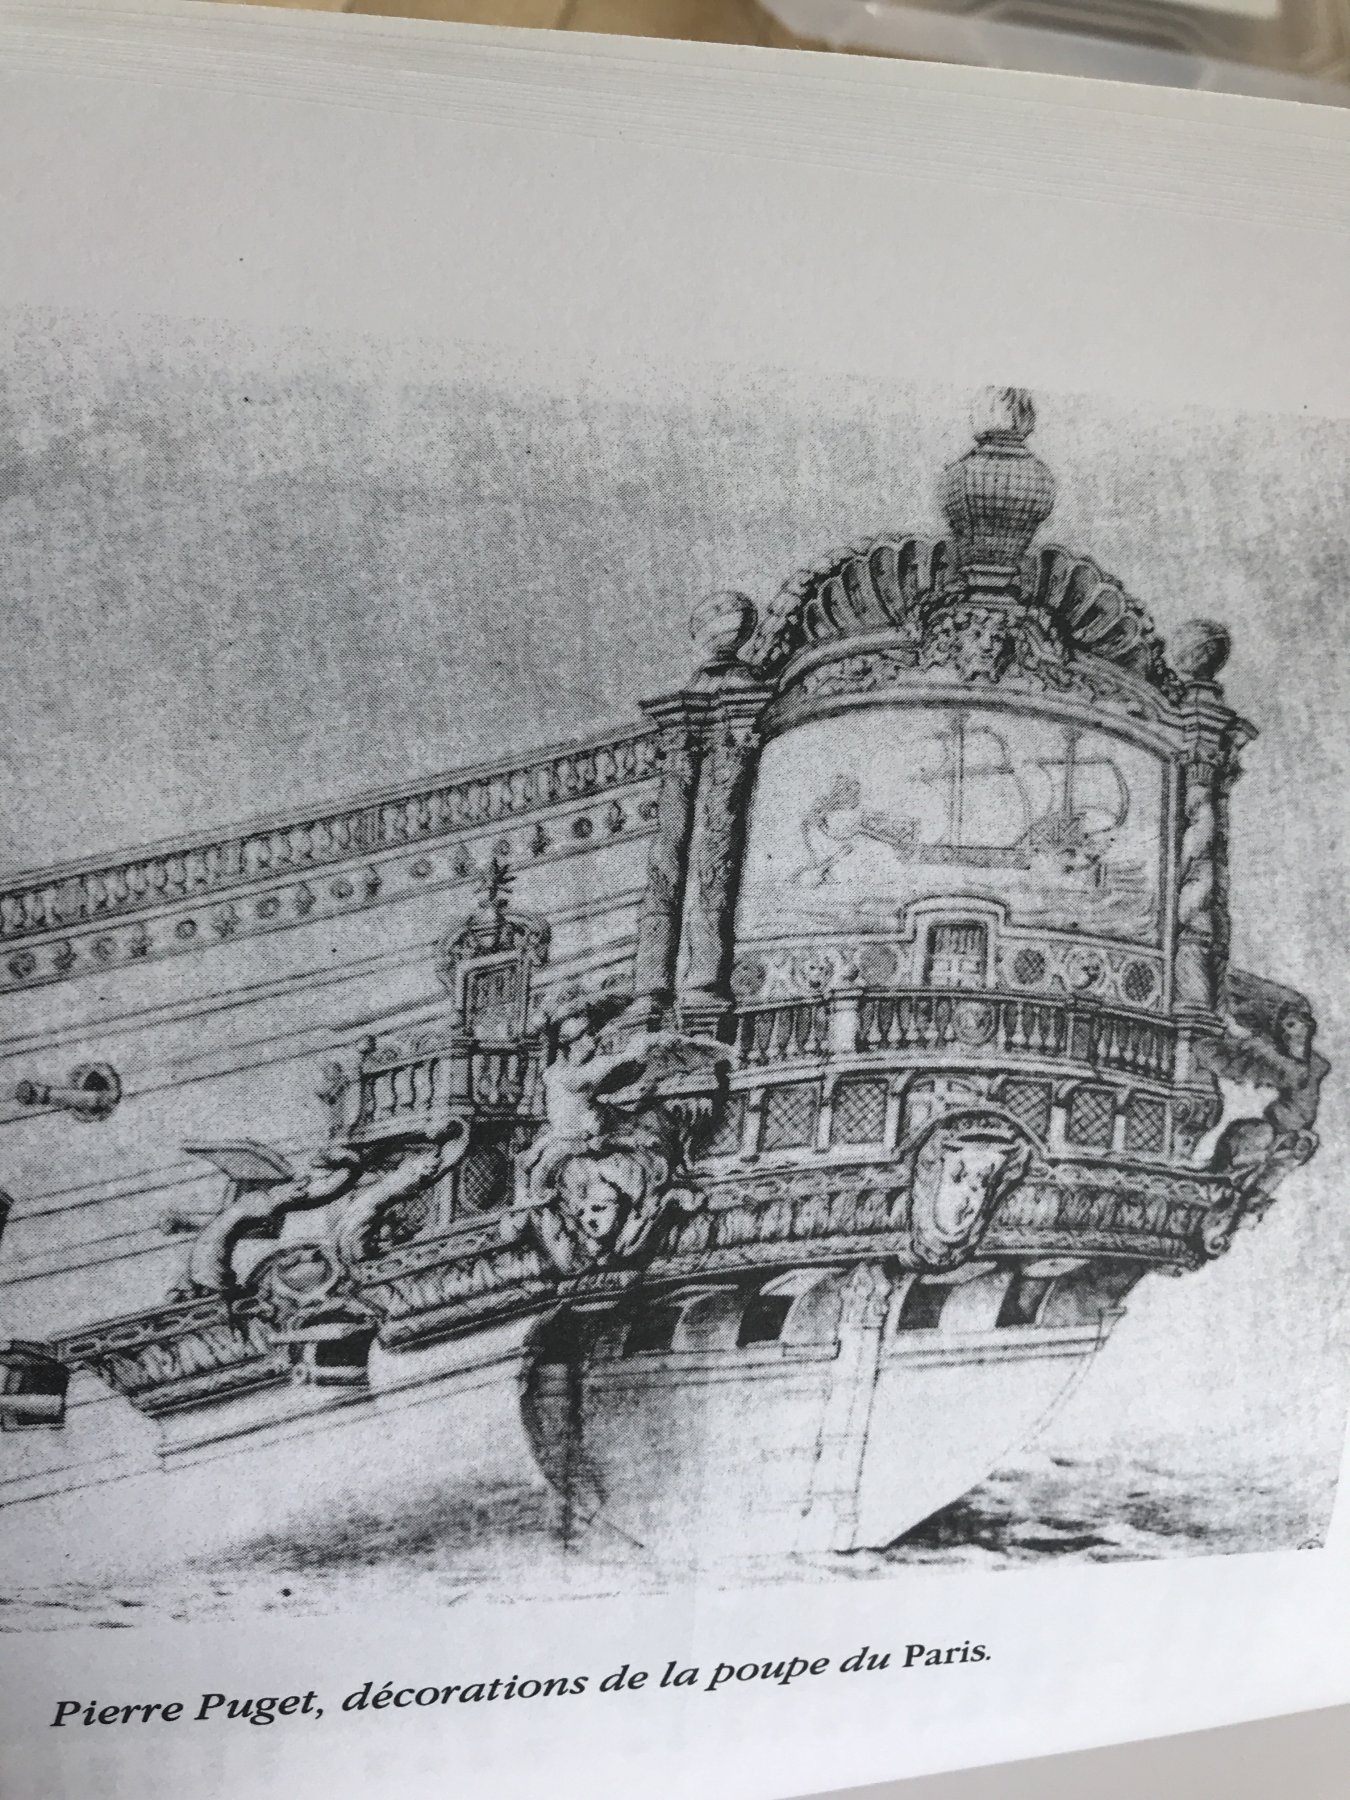
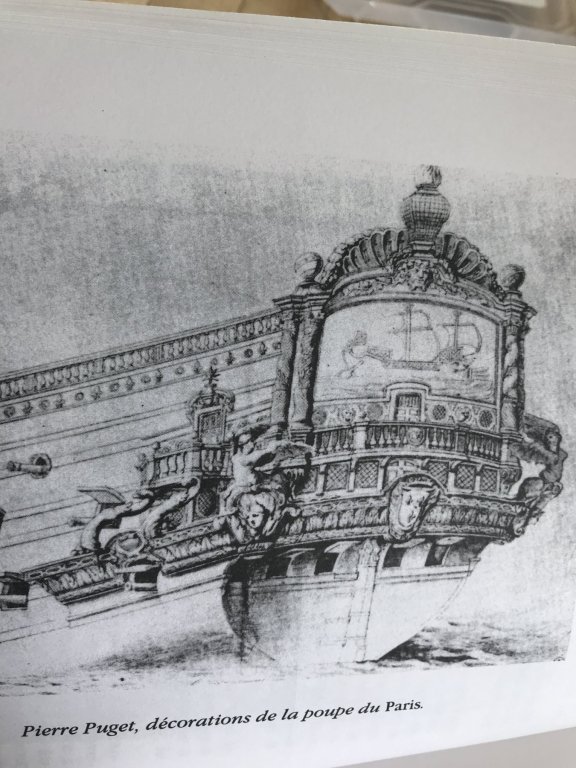
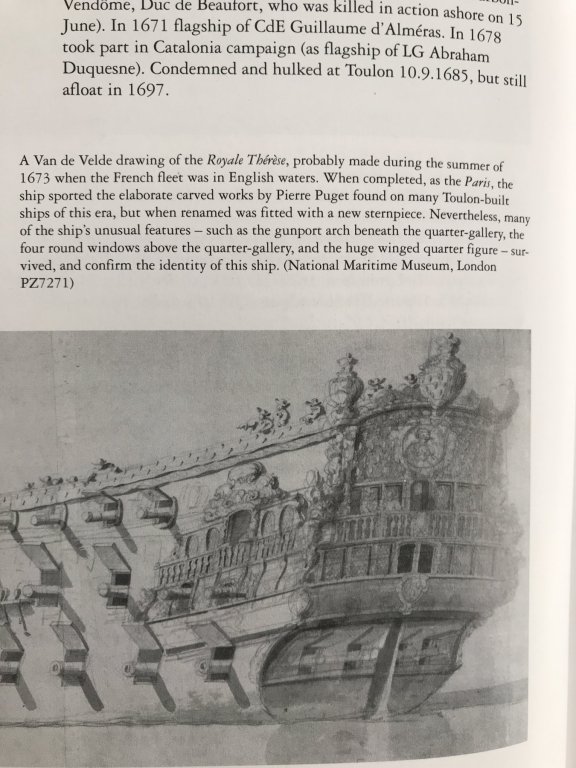
For the sake of comparison, here is Puget’s portrait of the Paris, as she was before re-naming/decorating to the Royal Therese: They’re obscured by the projecting side gallery, but the four round windows are present, as R and W say.
- 244 replies
-
- 3
-
-
- heller
- soleil royal
- (and 1 more)
-
Here is the Royal Therese: Winfield and Roberts have convinced me that this is so: As for modeling the round-up of the transom - I would model the transom shape and plank up to it. I’m confused as to what your approach will be, here, Chris. Are you going to plank over the cardboard patterns with styrene strip, or are you going to cut new decks from styrene sheet and plank over those? As for taking on another Heller conversion build, La Reyne is the best candidate, IMO, because she was a near sister ship to the original SR: same yard, same builder, same rate, only a year apart in construction, and with only minor differences in size and armament. I think Cedric may have abandoned his model because he is un-willing to accept certain compromises in the kit architecture. Perhaps, with all of the research he has done - and it is quite significant - he is drafting plans for a full scratch-build. I hope he is. On the other hand, if you can accept the forward sheer of the Heller wales, and if you can accept the layout of Heller’s guns, and if you can reverse engineer the older style of head rails onto the Heller architecture, then, there is no reason whatsoever that one can’t make a very satisfying facsimile of La Reyne from the Heller kit.
- 244 replies
-
- 3
-
-
- heller
- soleil royal
- (and 1 more)
-
Thank you very much EJ! I have some ideas about how I’ll pull it all together, which are largely inspired by Drazen’s amazing build of De Zeven Provincien. His work on the quarter galleries begin with post #440:
- 2,699 replies
-
- 1
-
-
- heller
- soleil royal
- (and 9 more)
-
I may be more singularly obsessed than amazing, but I will gratefully take the compliment, Victor. Thank you! And thank you to everyone else for tour likes and looking in.
- 2,699 replies
-
- 2
-
-
- heller
- soleil royal
- (and 9 more)
-
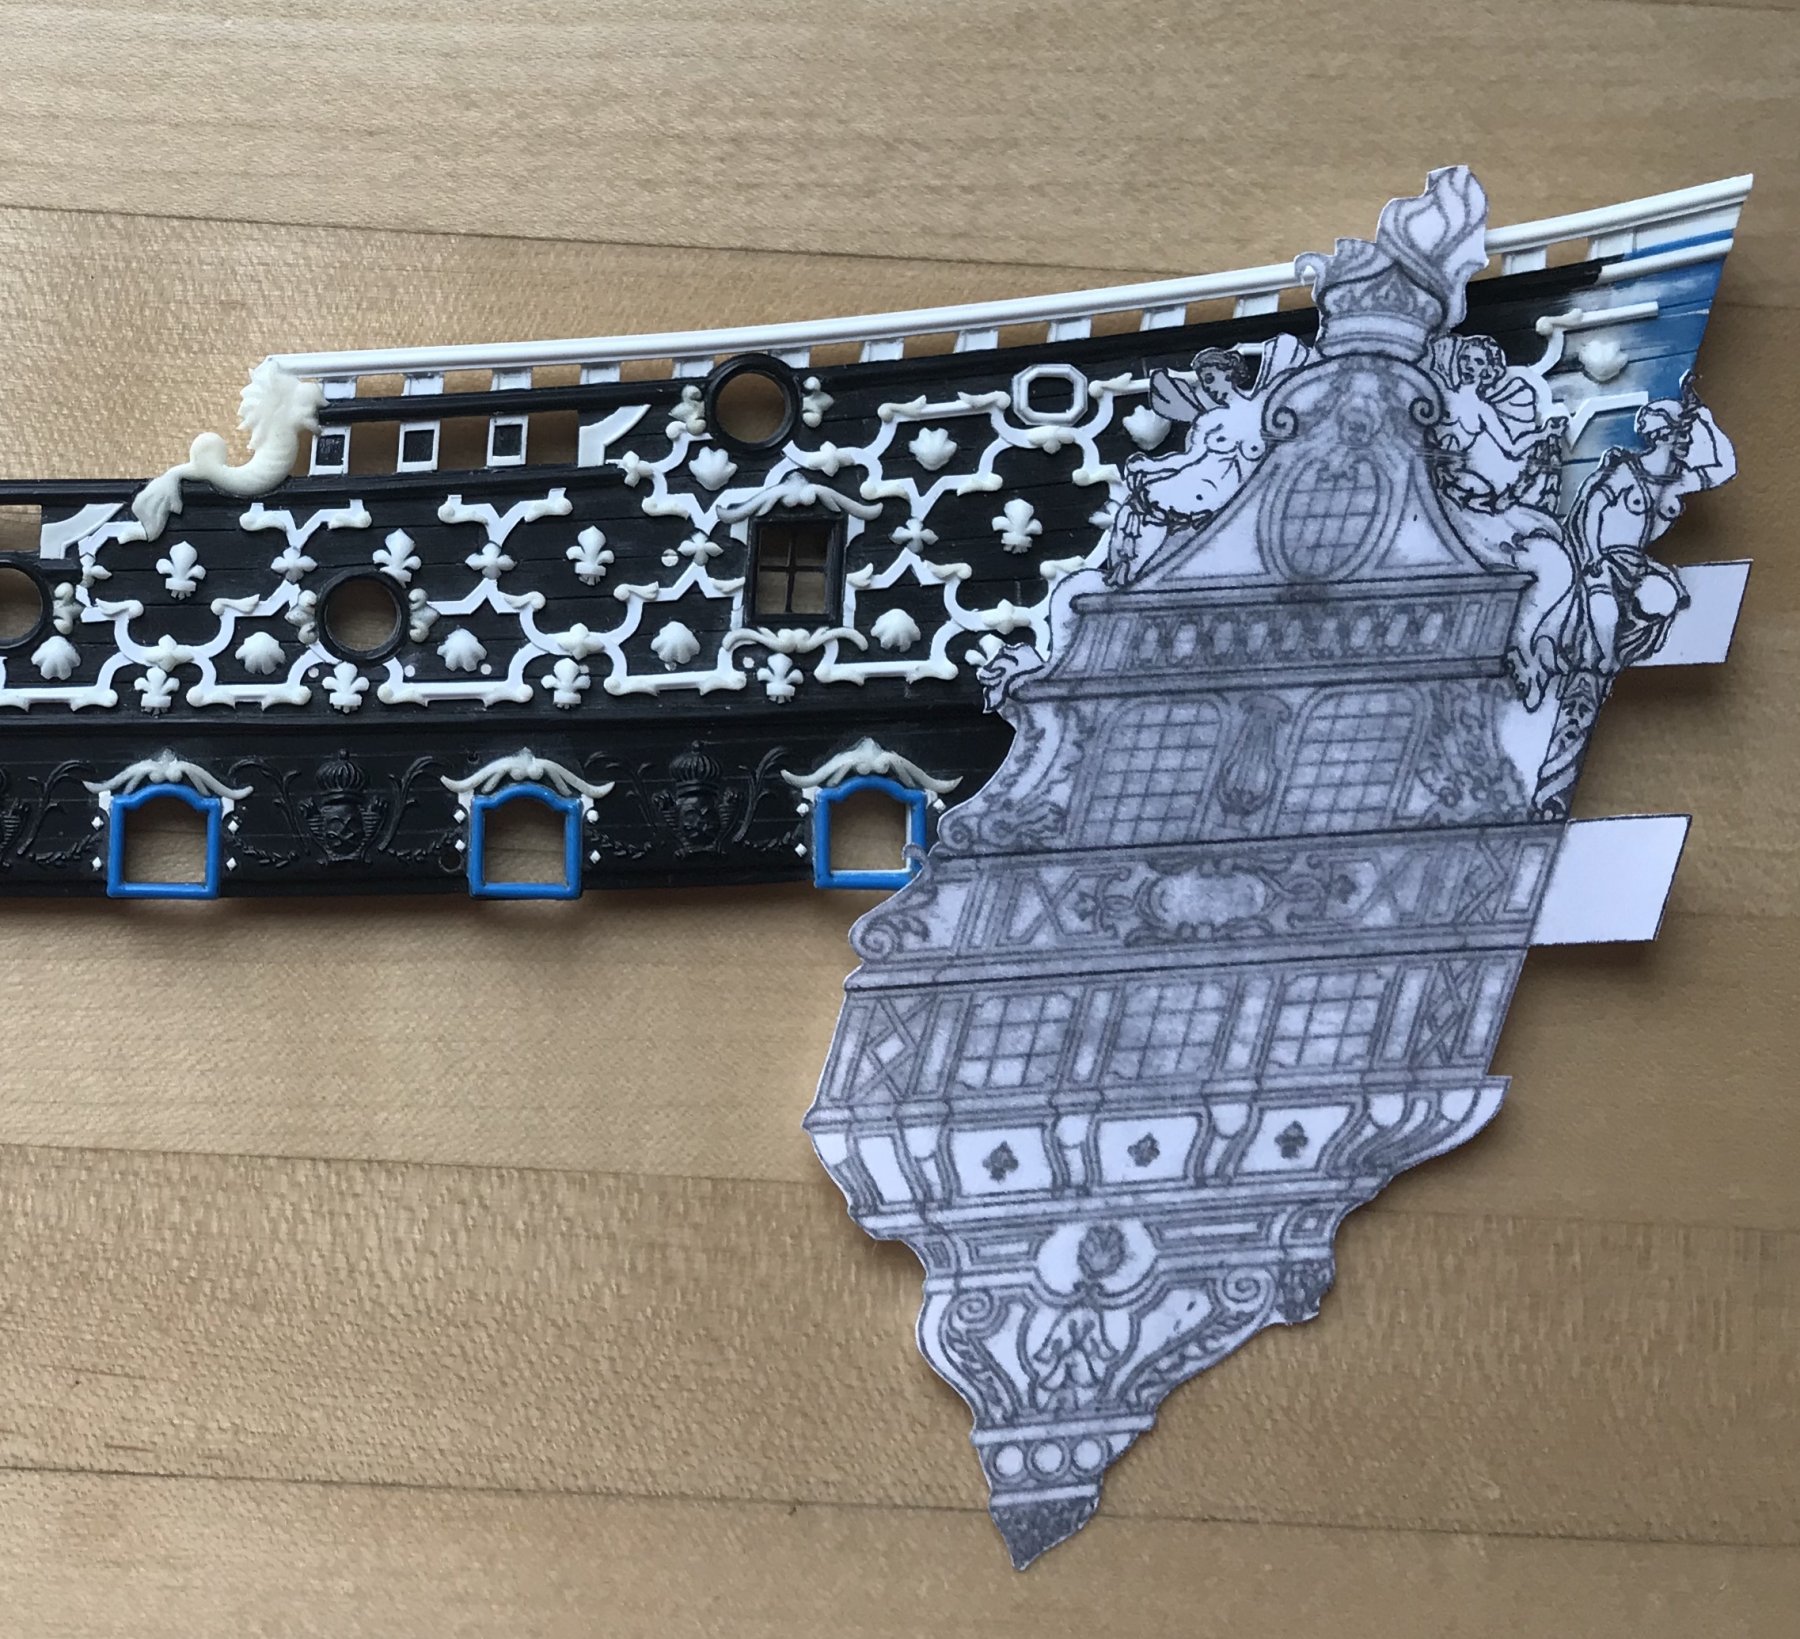
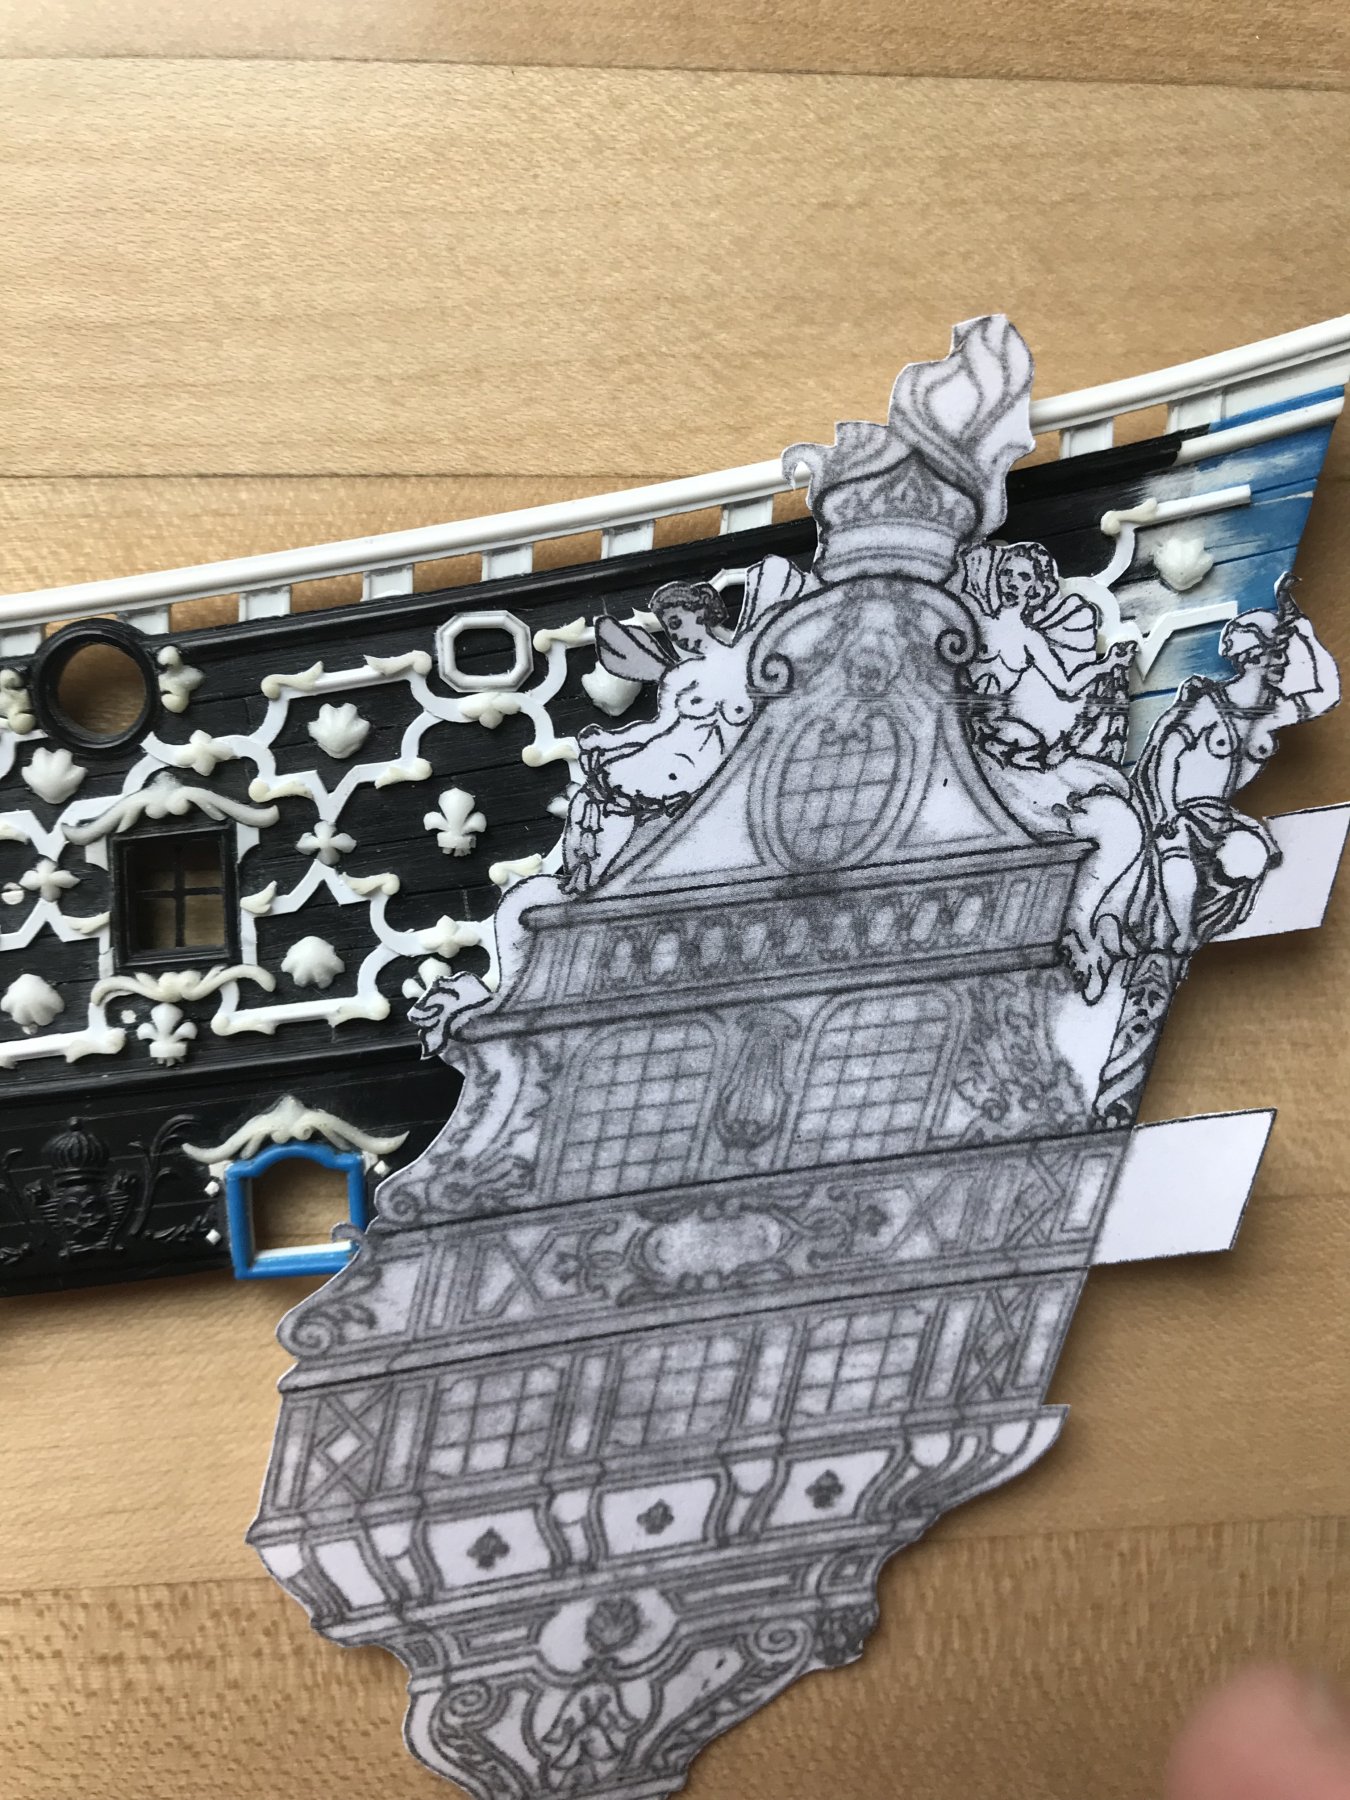
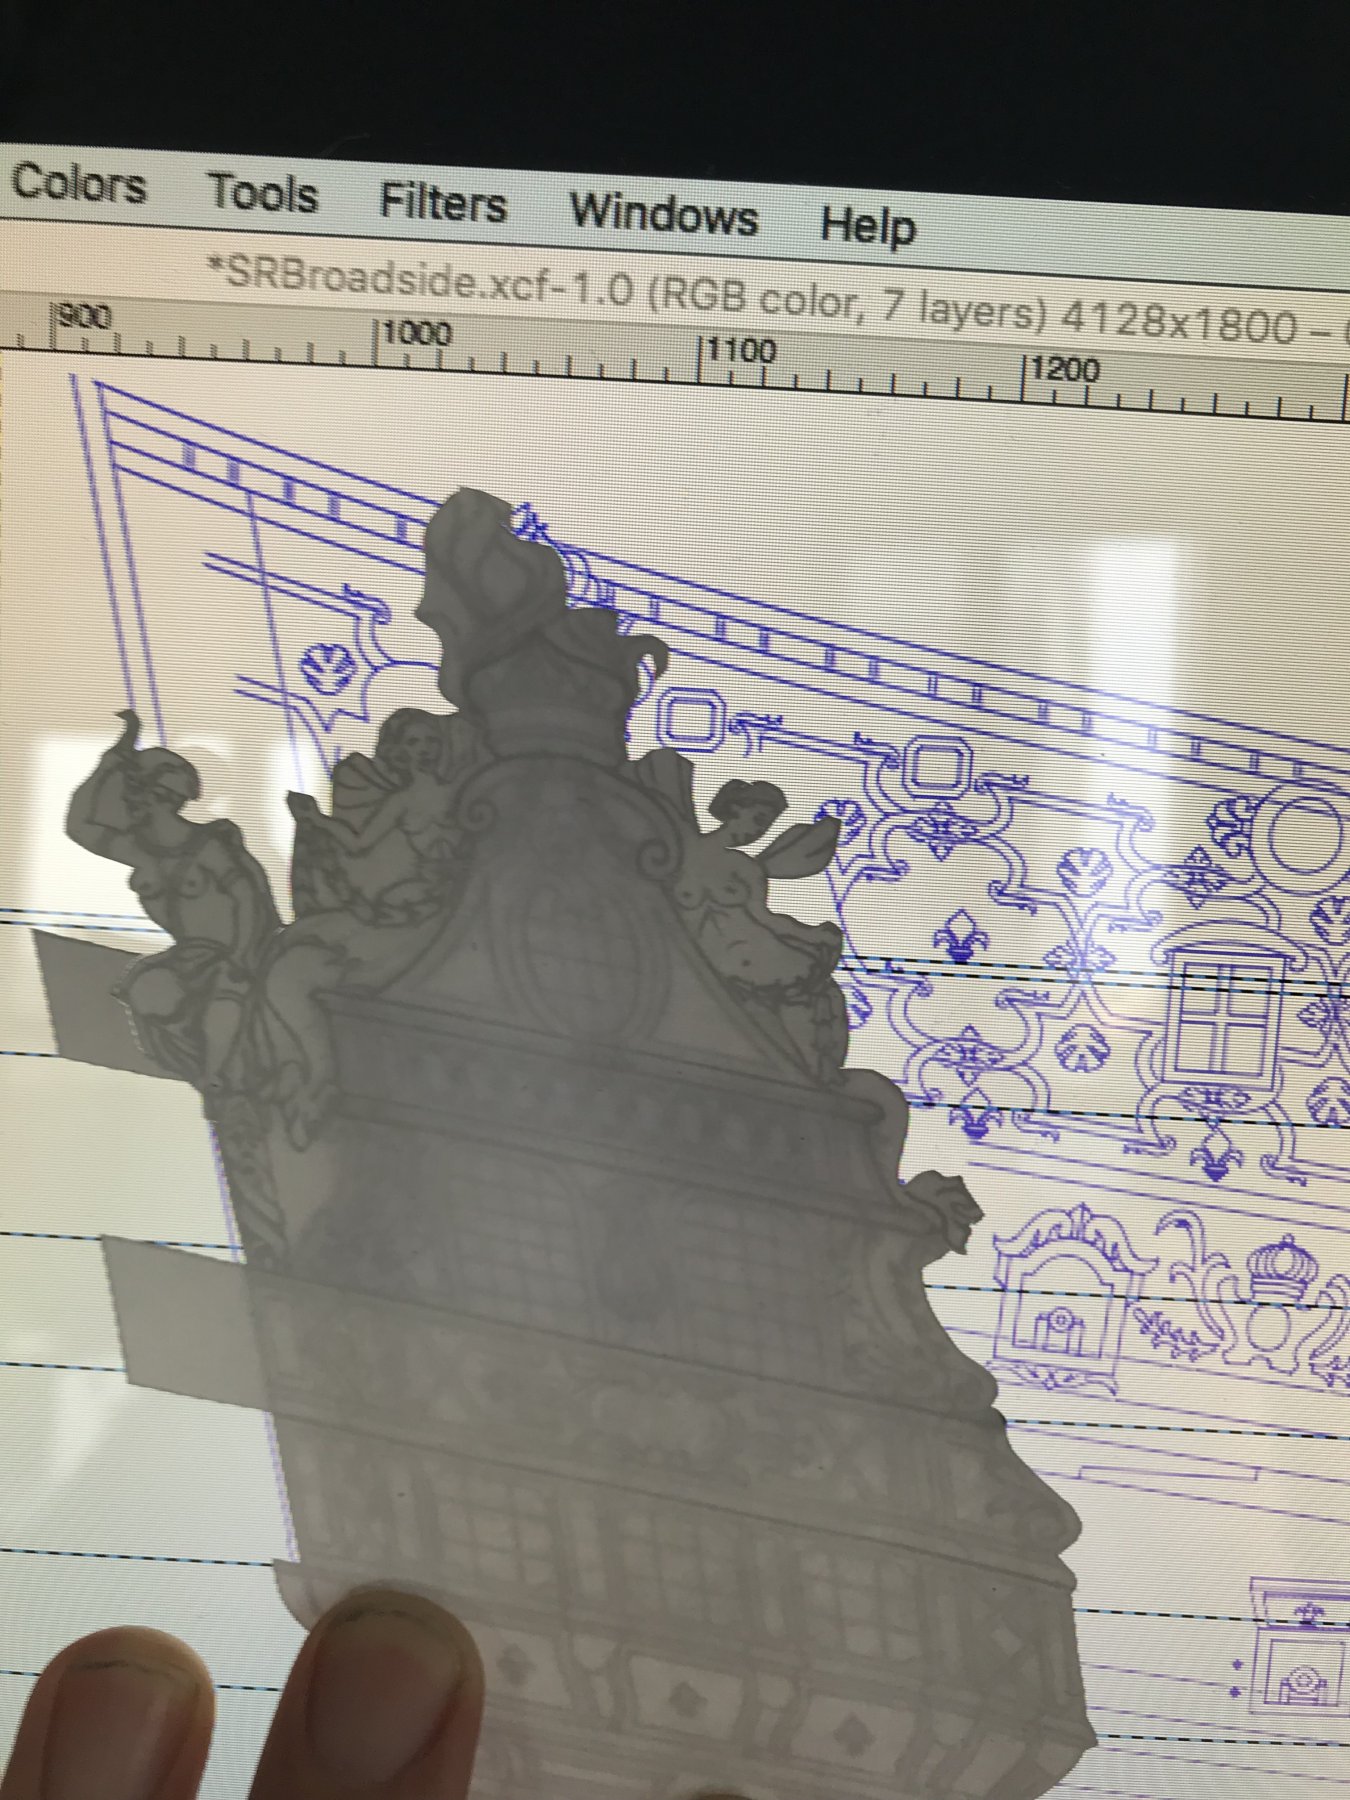
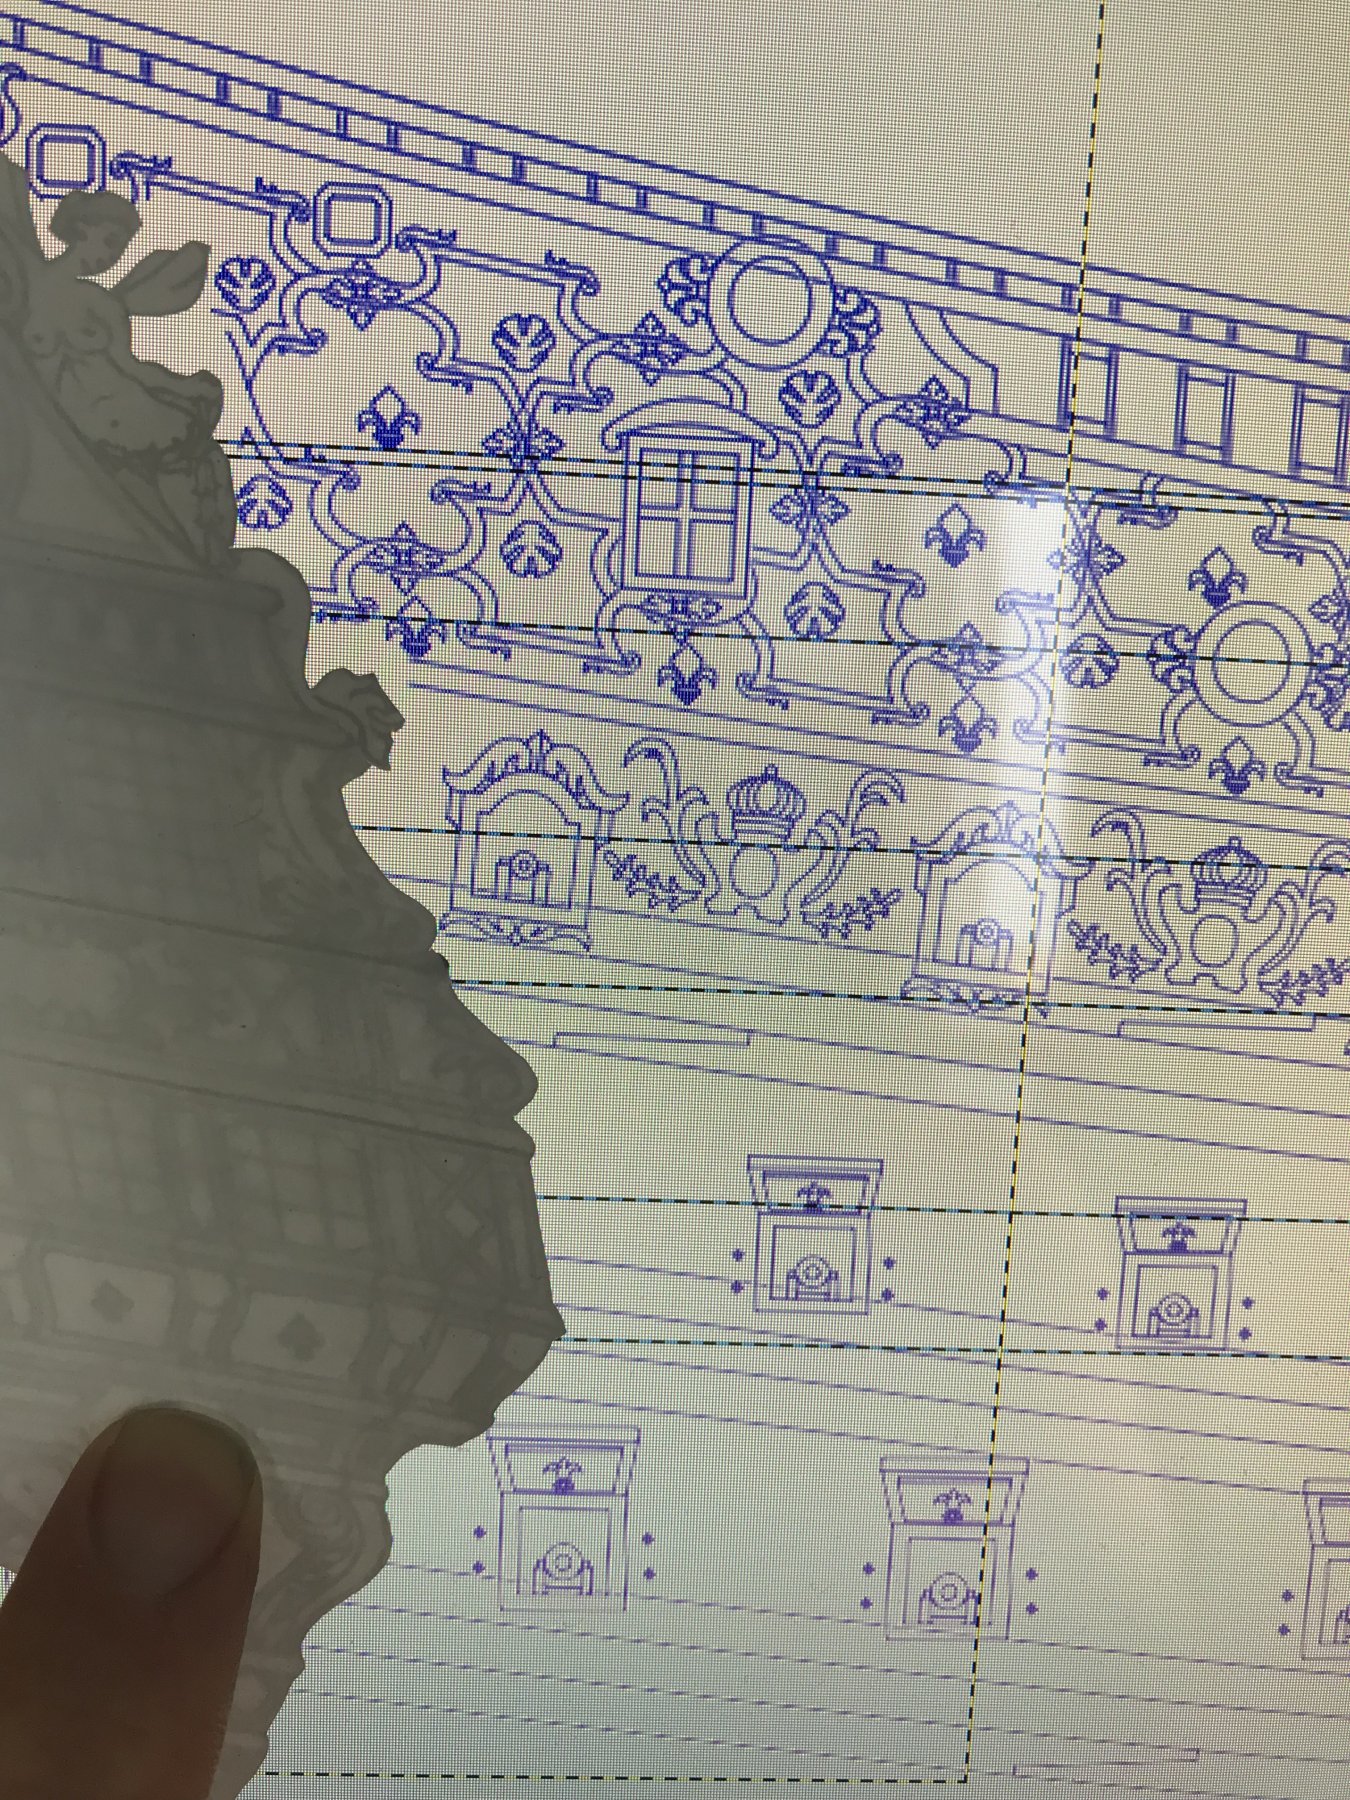
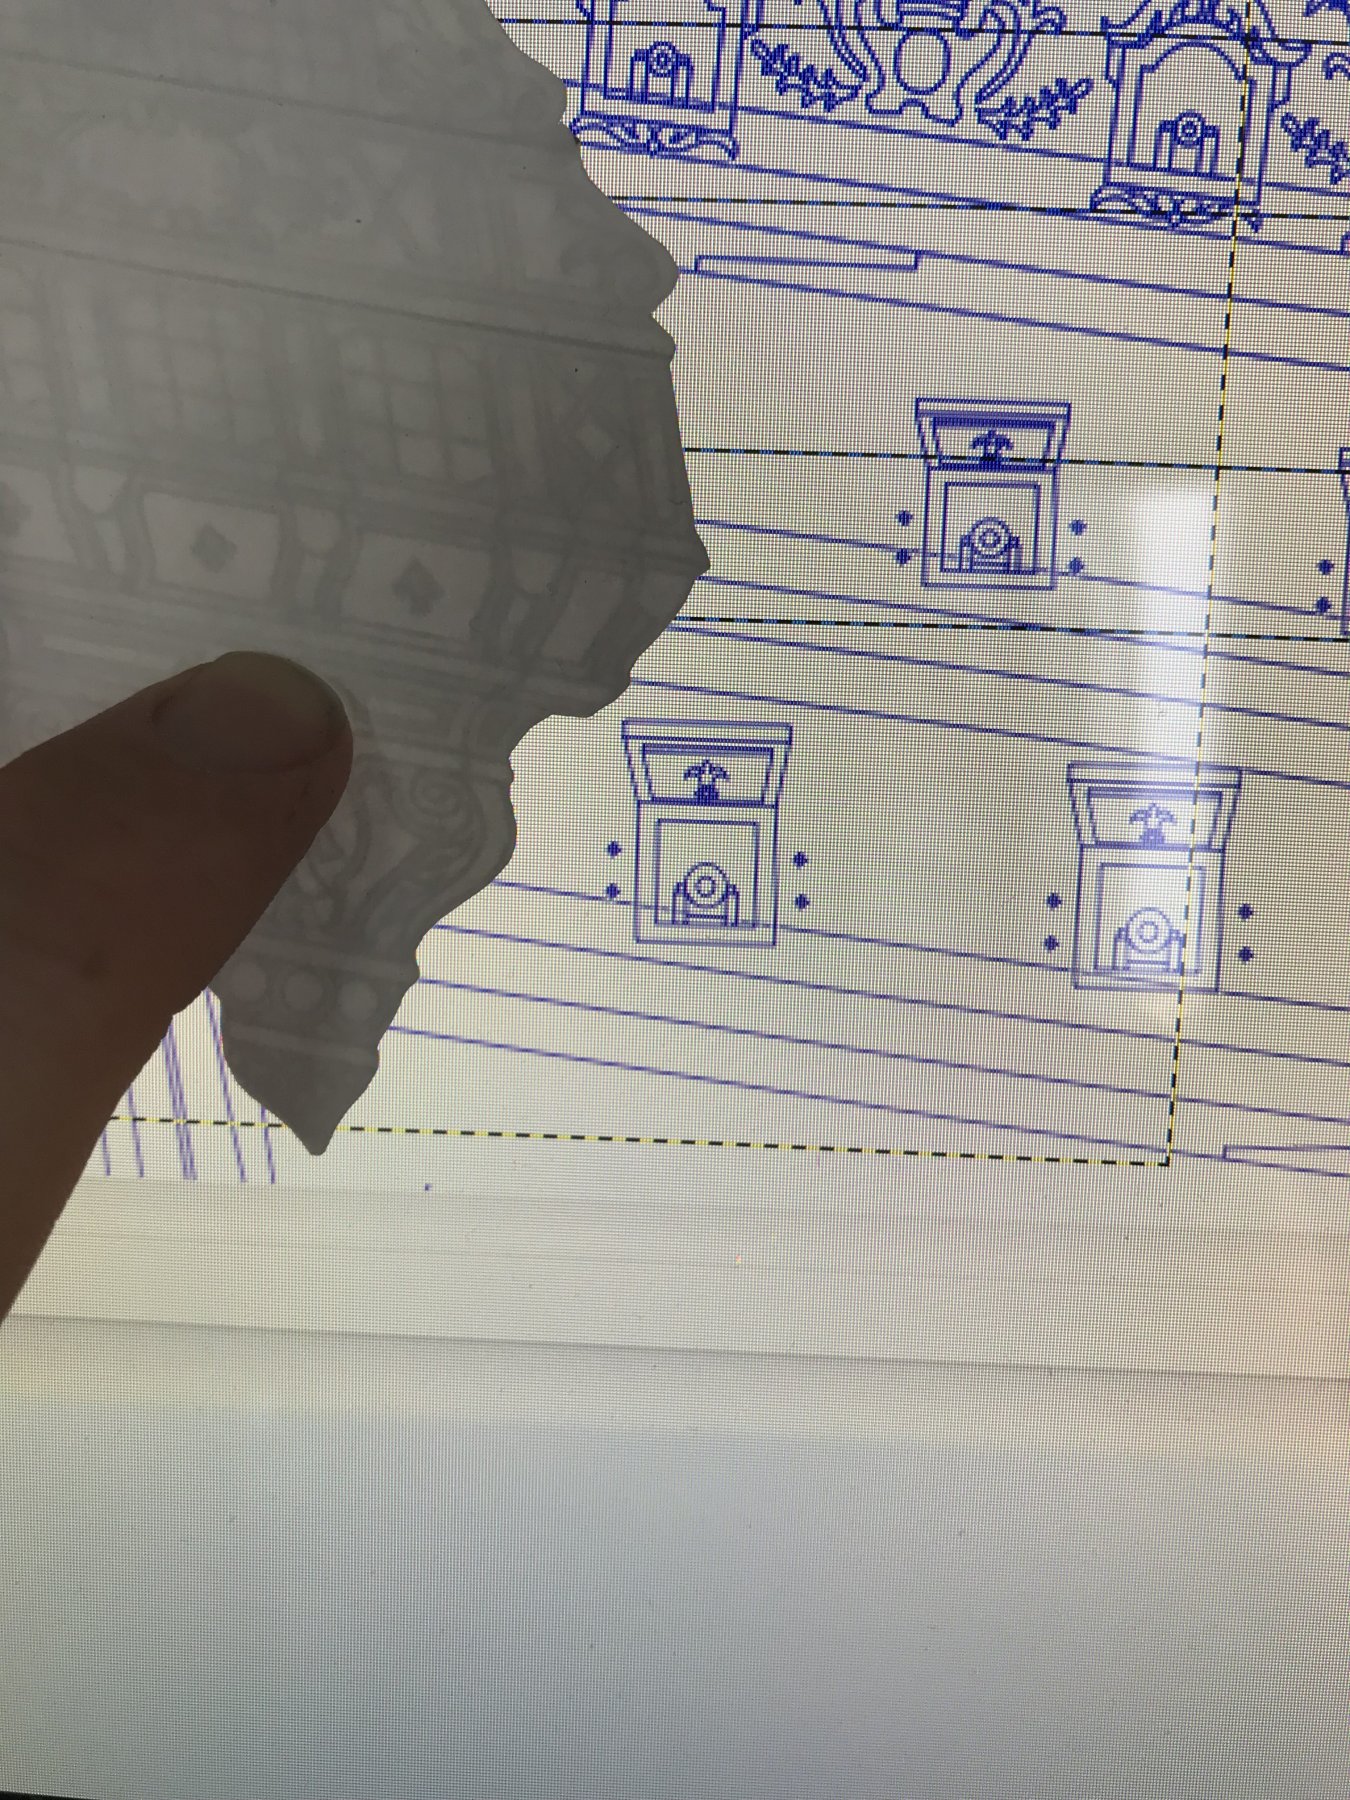
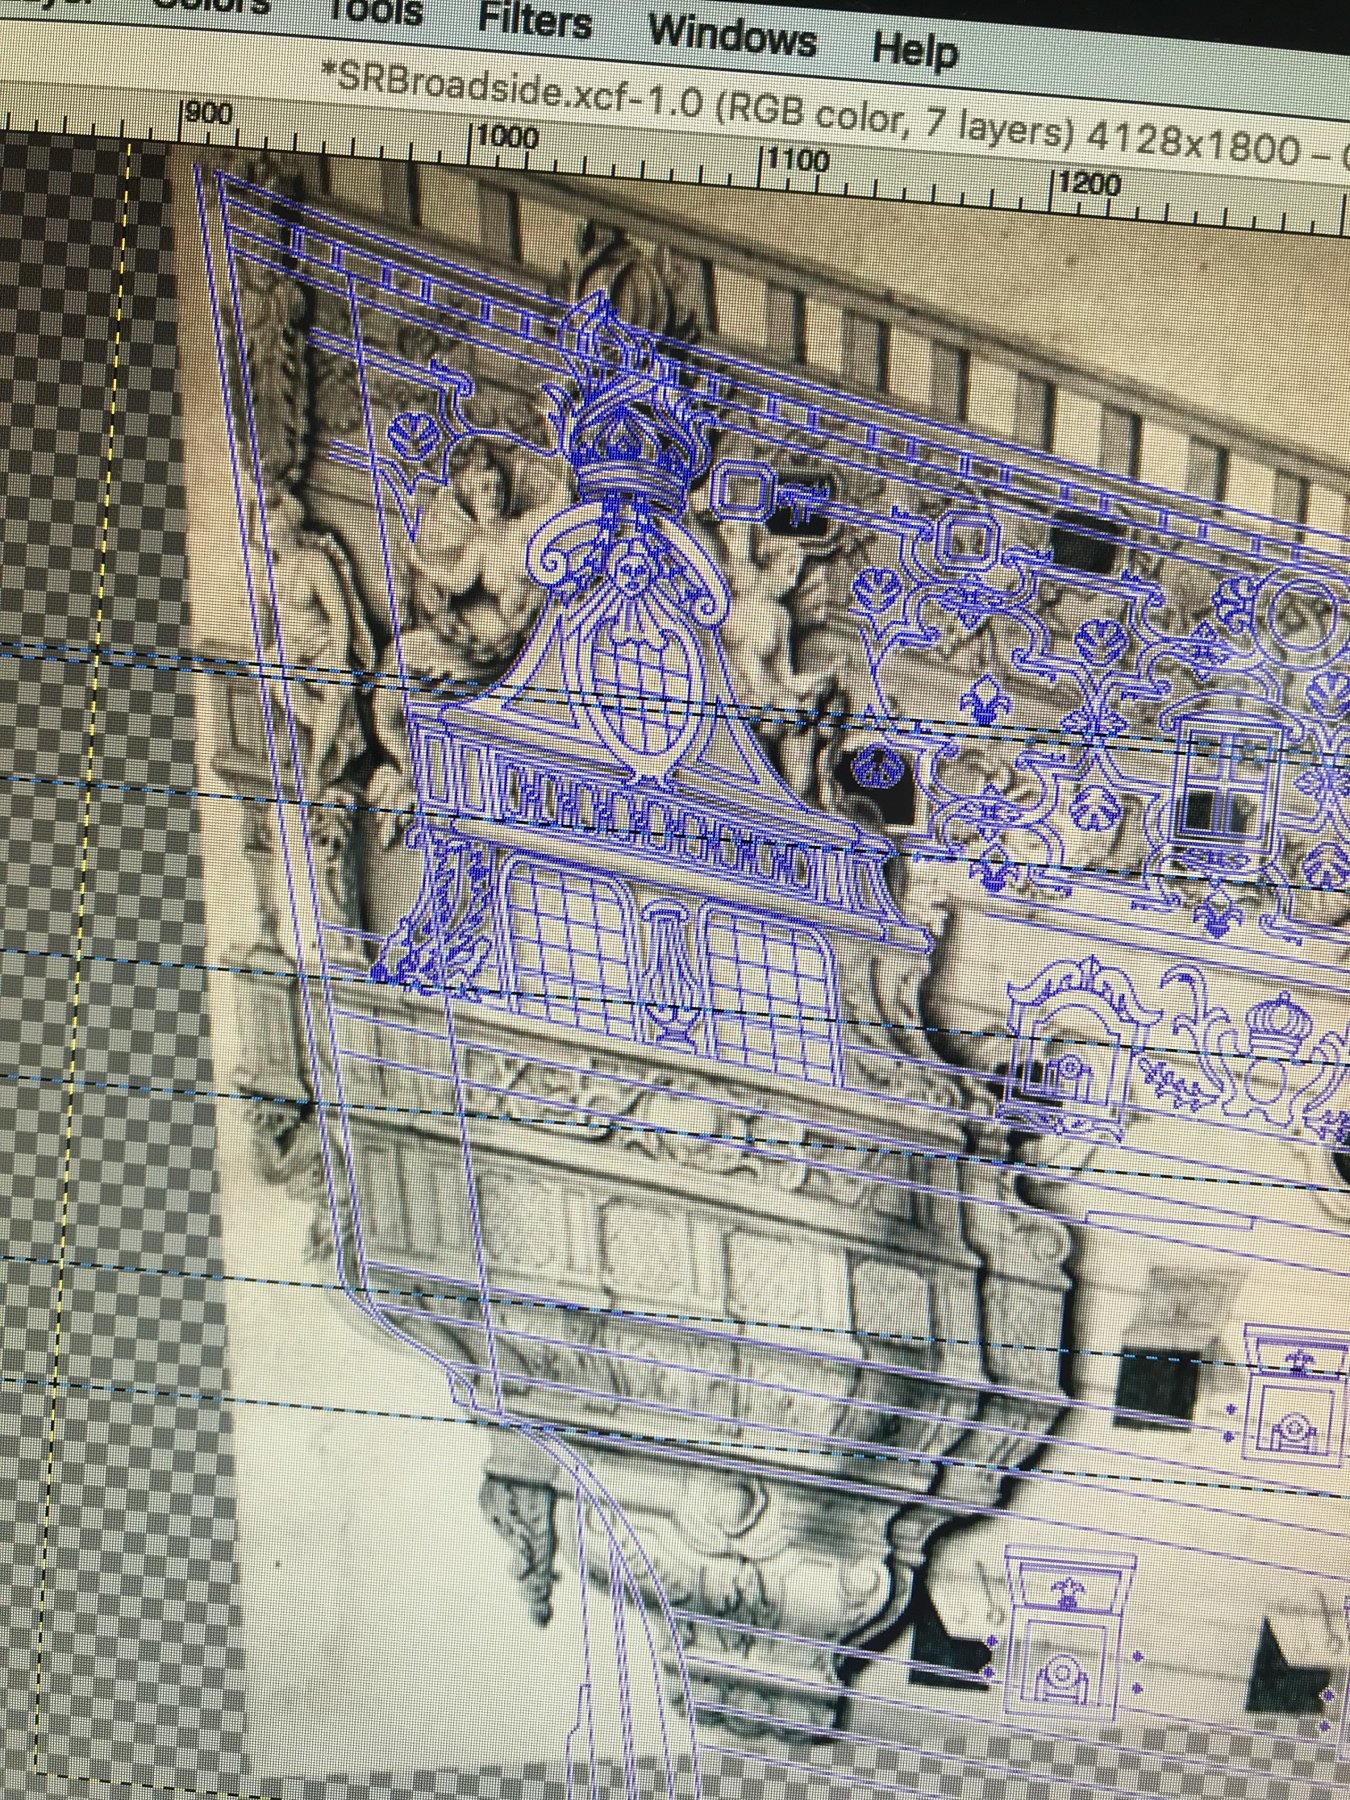
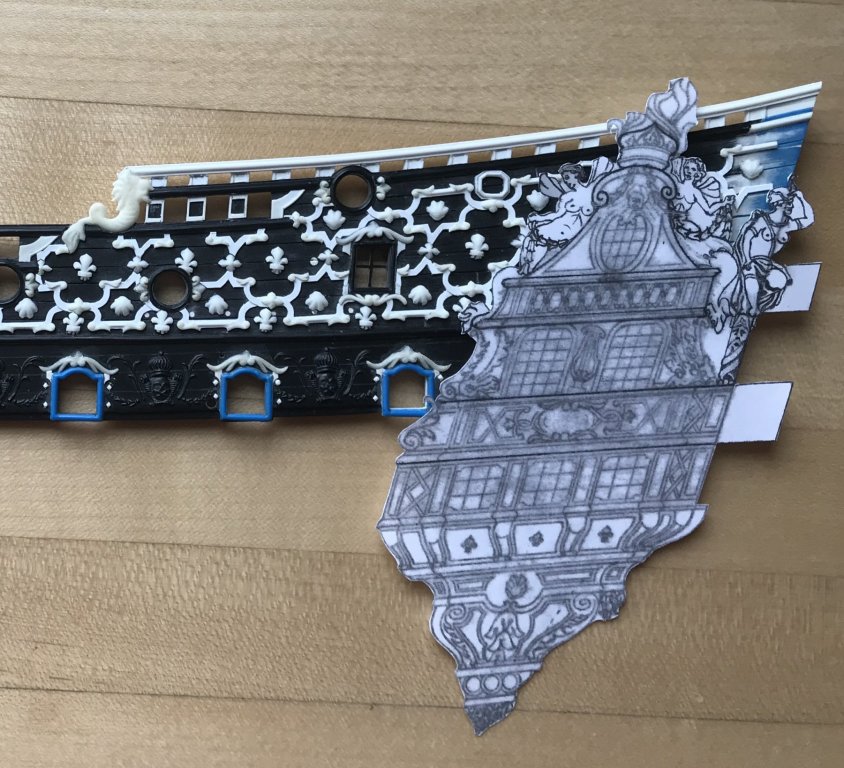
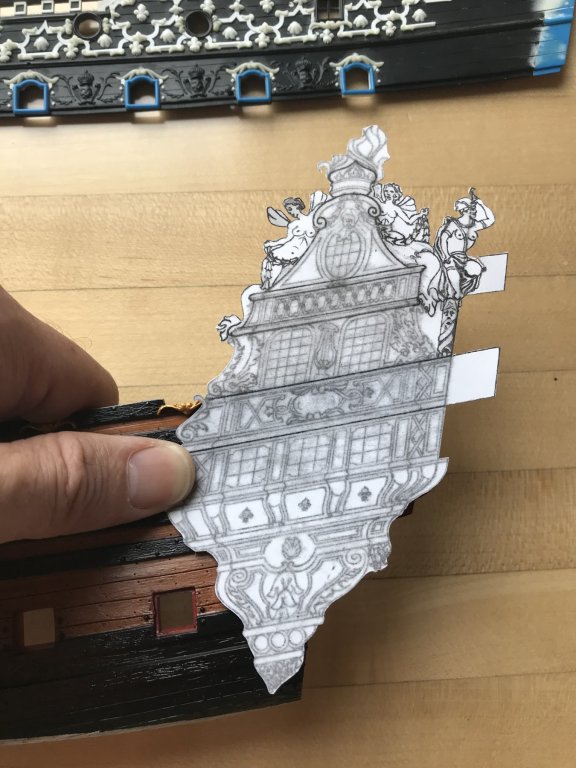
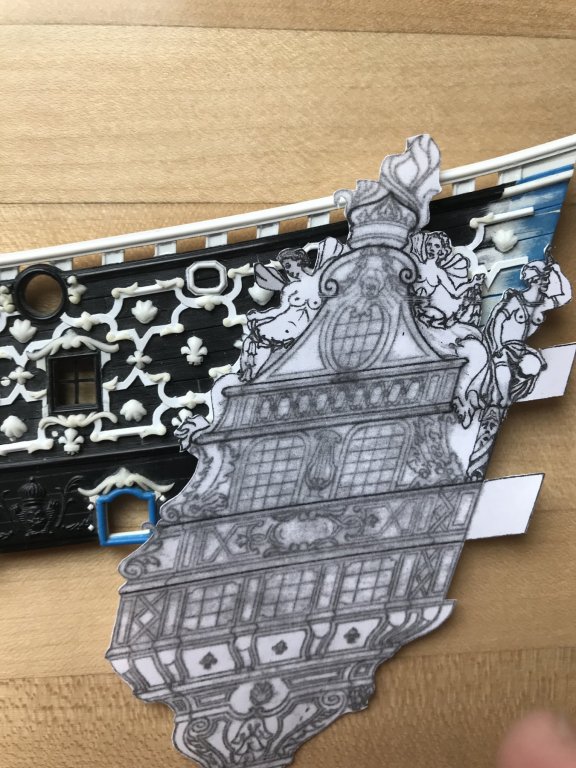
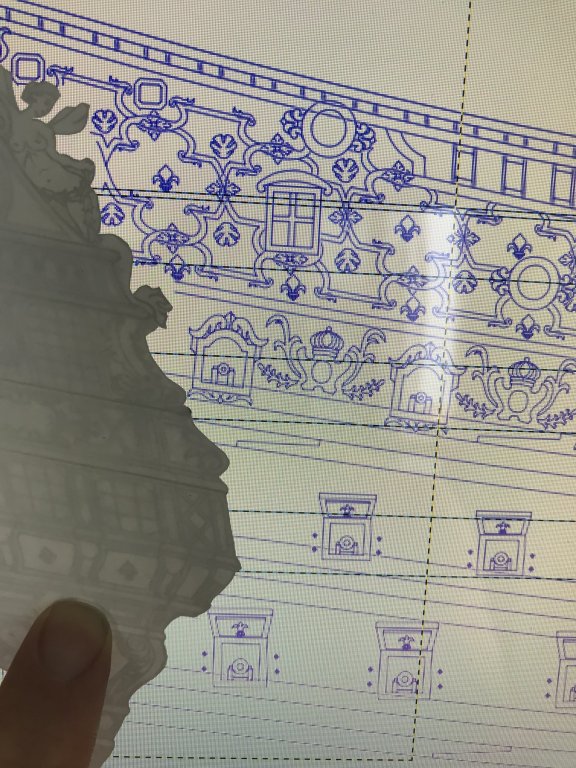
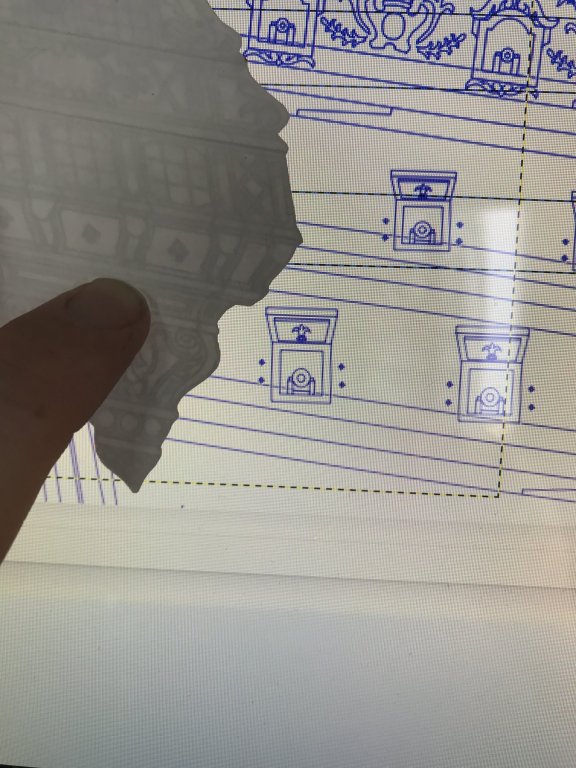
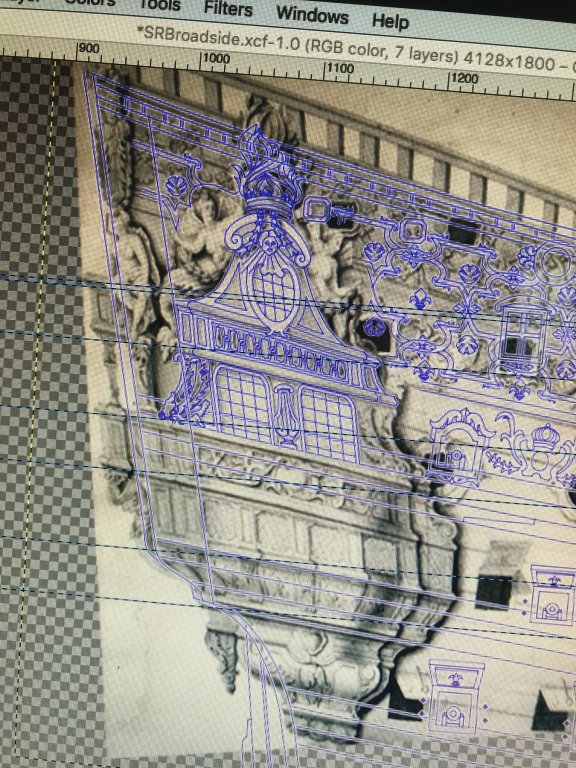
I was so excited to get home and cut out a template of one of the QGs and offer it up to the model to see how close I am. Well, as a now-retired work friend often used to say: “it isn’t broke, but we can fix it!” The lower half, from the main deck down is good. I’ll need to do a little re-shaping of my stern counter/false lower balcony, but everything lines up with where it’s supposed to: There’s some minor interference with the aft-most main deck port, but a little re-shaping of that scroll is all that is required, there. I expected there to be an overlap, there, with the way that I drew that detail. The upper bulwarks are where it gets interesting: First of all, the entire layout seems to rise higher than I intended. It isn’t necessarily a big deal that the crown finial crosses over into the sheer railing. What confused me so much is why the aft octagonal port was almost completely covered by my siren. After all - I measured my drawing again and again! Any lapping over of the frieze elements, BTW, was anticipated. My plan always was to cut the QGs into the frieze. Where the Siren tail mostly covers a fleur-de-lis, for example, I would simply eliminate the fleur, altogether. I expected there to be some distortion of reality, considering the manner in which I began drawing this project; I essentially made a scale outline by literally tracing the outline of the lower hull, and then measuring up from the upper main wale, to map out the upper bulwarks. this drawing was then digitized and detailed in GIMP. But why are elements now being covered, which were not supposed to be? I opened the software and offered my cutout up to the screen: Mmhmm, okay, everything seems to line up. Although, I don’t have a picture of it, when I offer the upper bulwark to the screen, it also matches up very closely, +/- 1/32. Oh, wait a minute! I think I see it: Aha! In my digital drawing, I aligned the lower edge of the main deck QG windows with the bottom edge of the upper main wale. Really, though, those windows should begin above the upper main wale, because the upper main wale coincides with the gallery rail, on this level. But, why did I do that, in the first place? Well, the answer is that I manipulated a scan of the QGs so that it seemed to fit well within the parameters of my available space. I remember thinking, at the time, that it didn’t matter if the windows dropped beneath the upper main wale. But that’s not what I drew on vellum, and that’s why my drawing sits and finishes higher on the model. The height discrepancy is pretty exactly the width of the wale. So, what to do about all of this? Re-drawing is not an option, and besides - the important parameters align nicely. The stern balconies are where they are supposed to be. There’s enough room for my quarter pieces, still. The overall aspect and proportion of the drawing is good, IMO I could simply eliminate the aft-most octagonal port. Really, there are only supposed to be two gunports on the poop deck. Heller provided one round port. I could leave my forward octagonal port as a vestigial reminder of what the Berain/Vary drawing intended. But, dammit, if those octagonal ports didn’t come out well! I’d really like to keep both. Option B would be to clip the wings of my forward Siren, and maybe give her a new hair style that doesn’t interfere with the port framing. Option C would be a combination of measures to reduce the overall height of the QG. First, I could razee one line of glass panes from the main deck windows. I had to re-draw the lyre for patterning, anyway, and it wouldn’t be a big deal to re-fair the lines of my dolphins, after this surgery. That’ll buy me about 3/32”. That, alone, may be enough to save the port. I may be able to recover additional ground by reducing the upper finishing, from the QD window on up, on the photocopier, in increments of -2%. The only thing complicating this approach is that the Sirens inhabit this tier, as well as the tier below. There may not be enough tail width to withstand the un-shrinking border cutting into the Sirens’ tails. Or, maybe 2-4% won’t impact this area that much. Fortunately, these are easy, no-risk/high-reward experiments with paper cutouts that will help me clarify my thinking.

- 2,699 replies
-
- 9
-
-
- heller
- soleil royal
- (and 9 more)
-
This concludes drawing for now. When it actually comes time to model the figures, I’ll do stern perspective drawings of the Americas and Africa, so that I can get the proper shape for these figures in two planes. I may, in fact, be able to re-use the kit figure for the Americas, since the pose is correct, but the scale may not be. I will definitely have to carve Africa from scratch, though. There’s no way to kit-bash the kit figure to arrive at this cross-legged pose. The good news is that I can re-cycle the side-lantern quarter pieces, as well as the Four Winds carvings that adorn the pedestal the the Americas and Africa sit upon.

- 2,699 replies
-
- 5
-
-
- heller
- soleil royal
- (and 9 more)
-
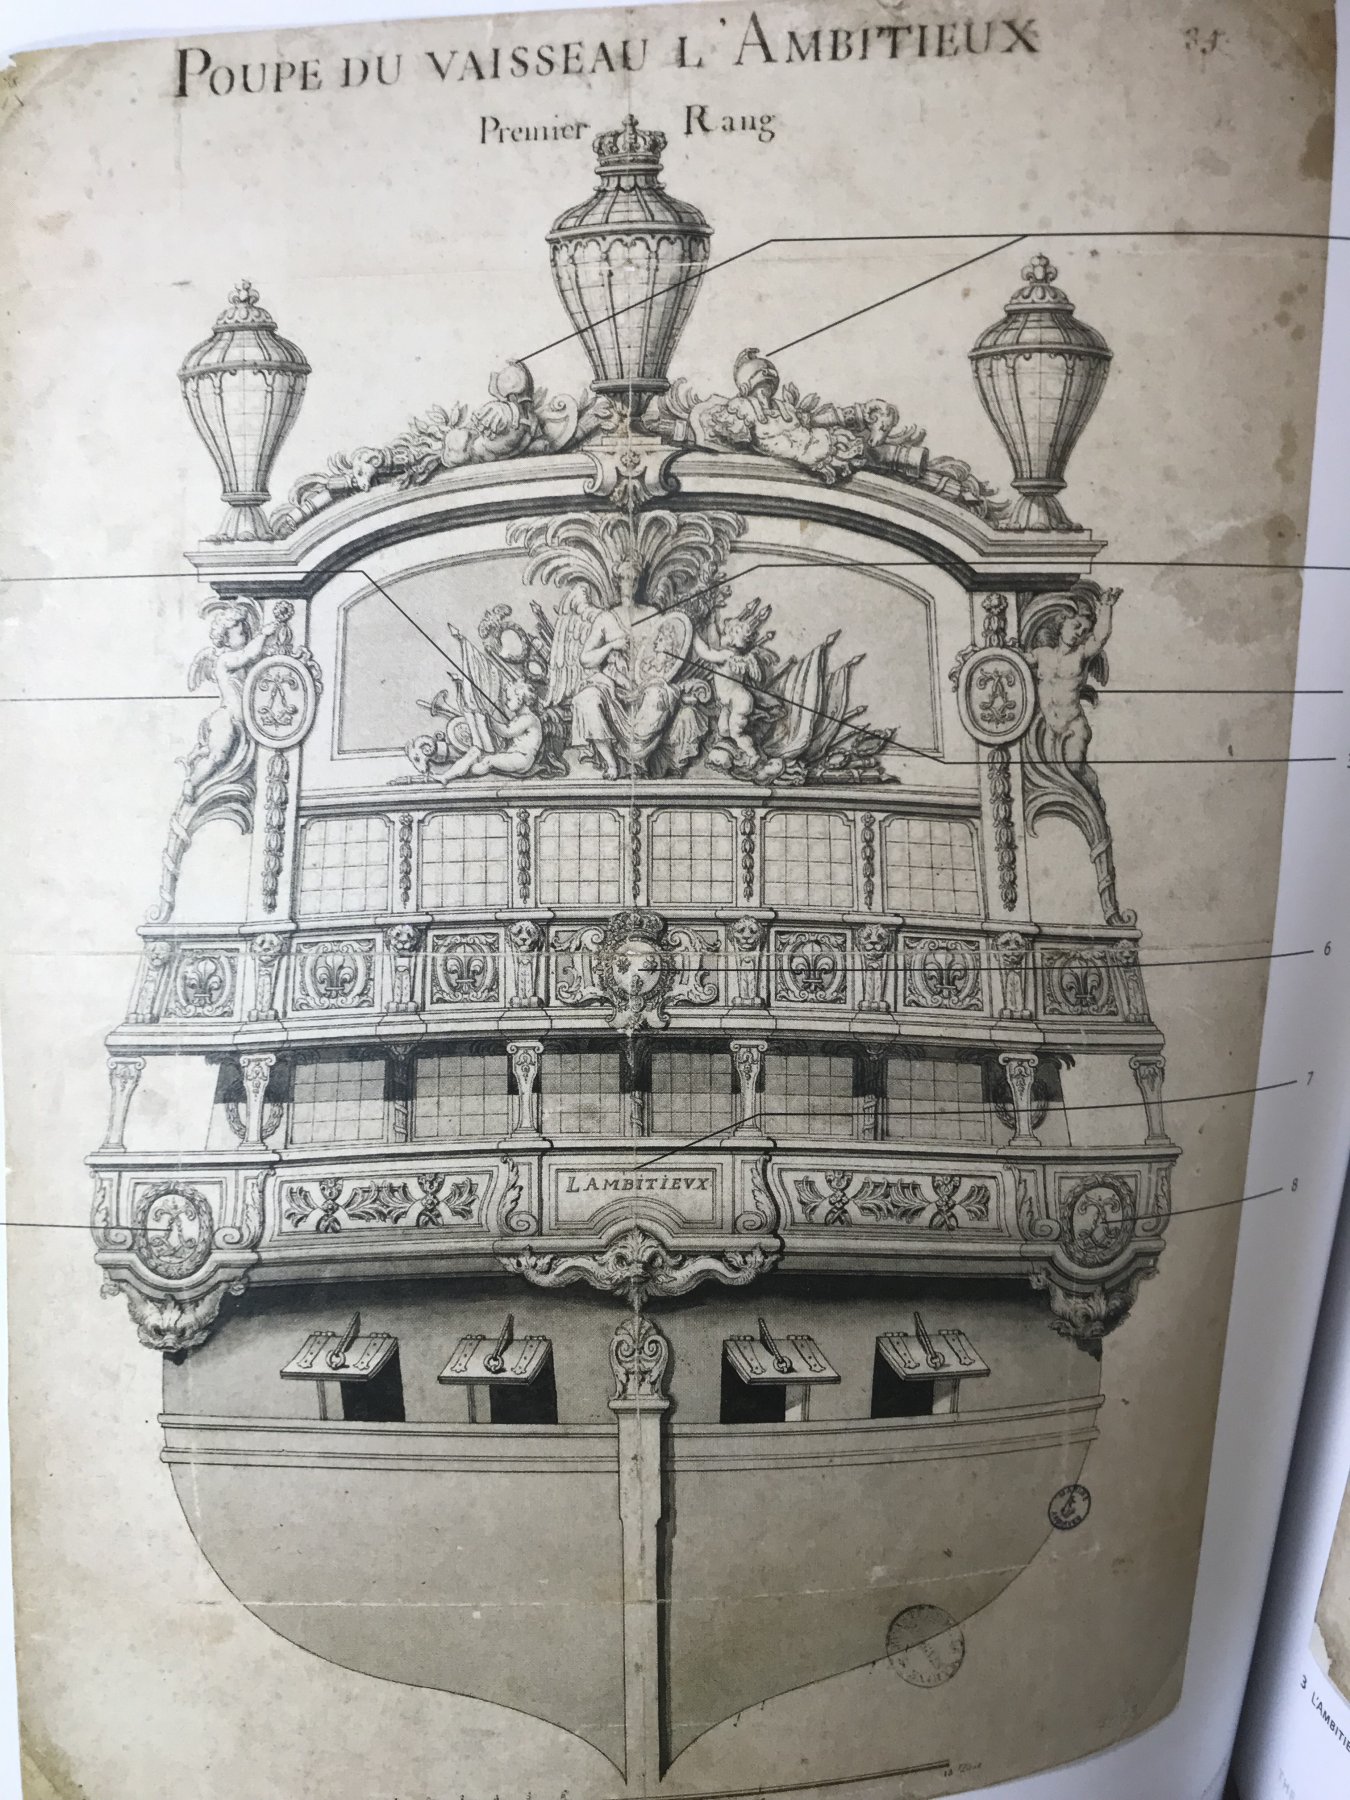
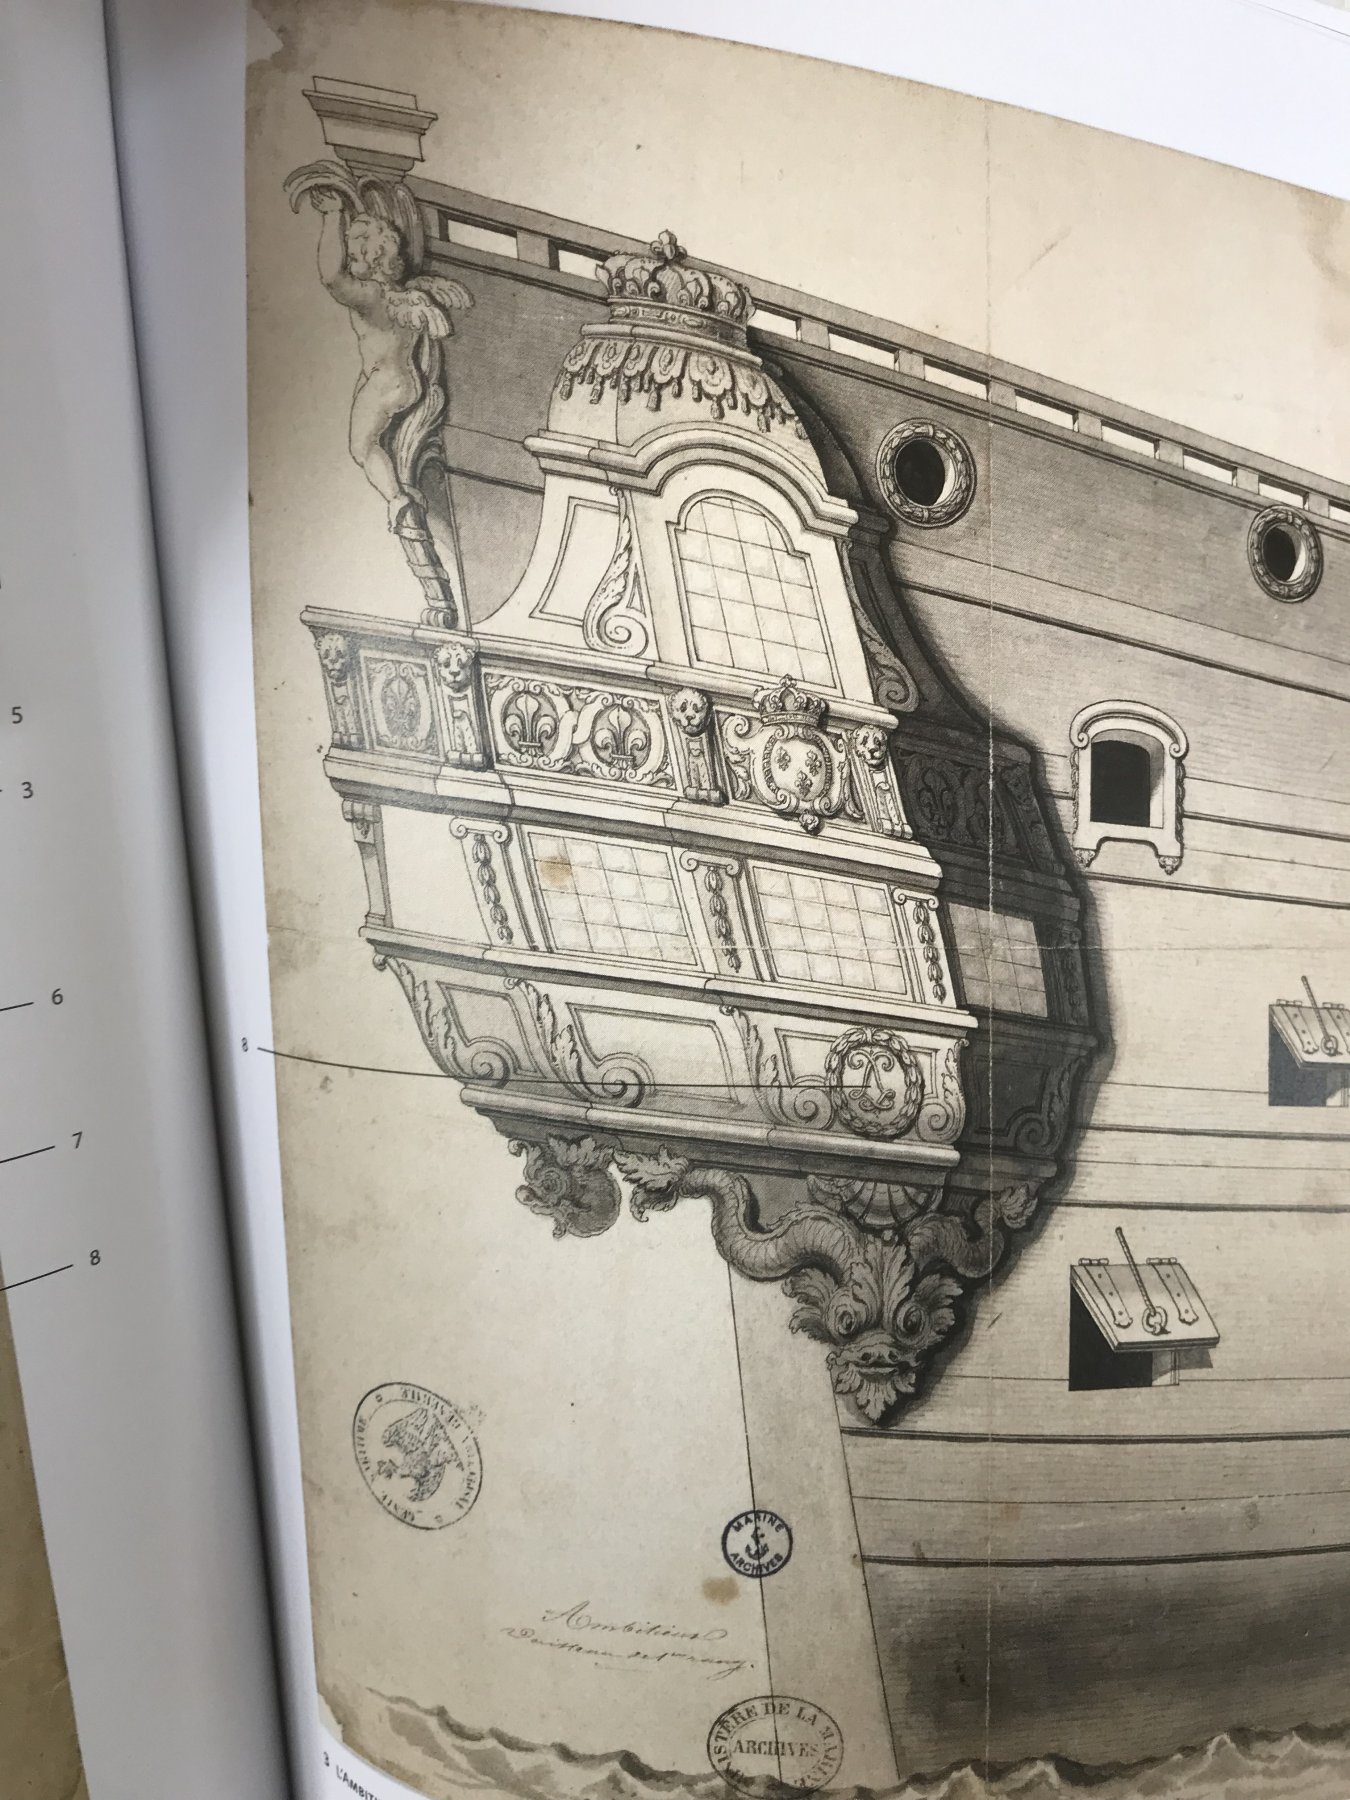
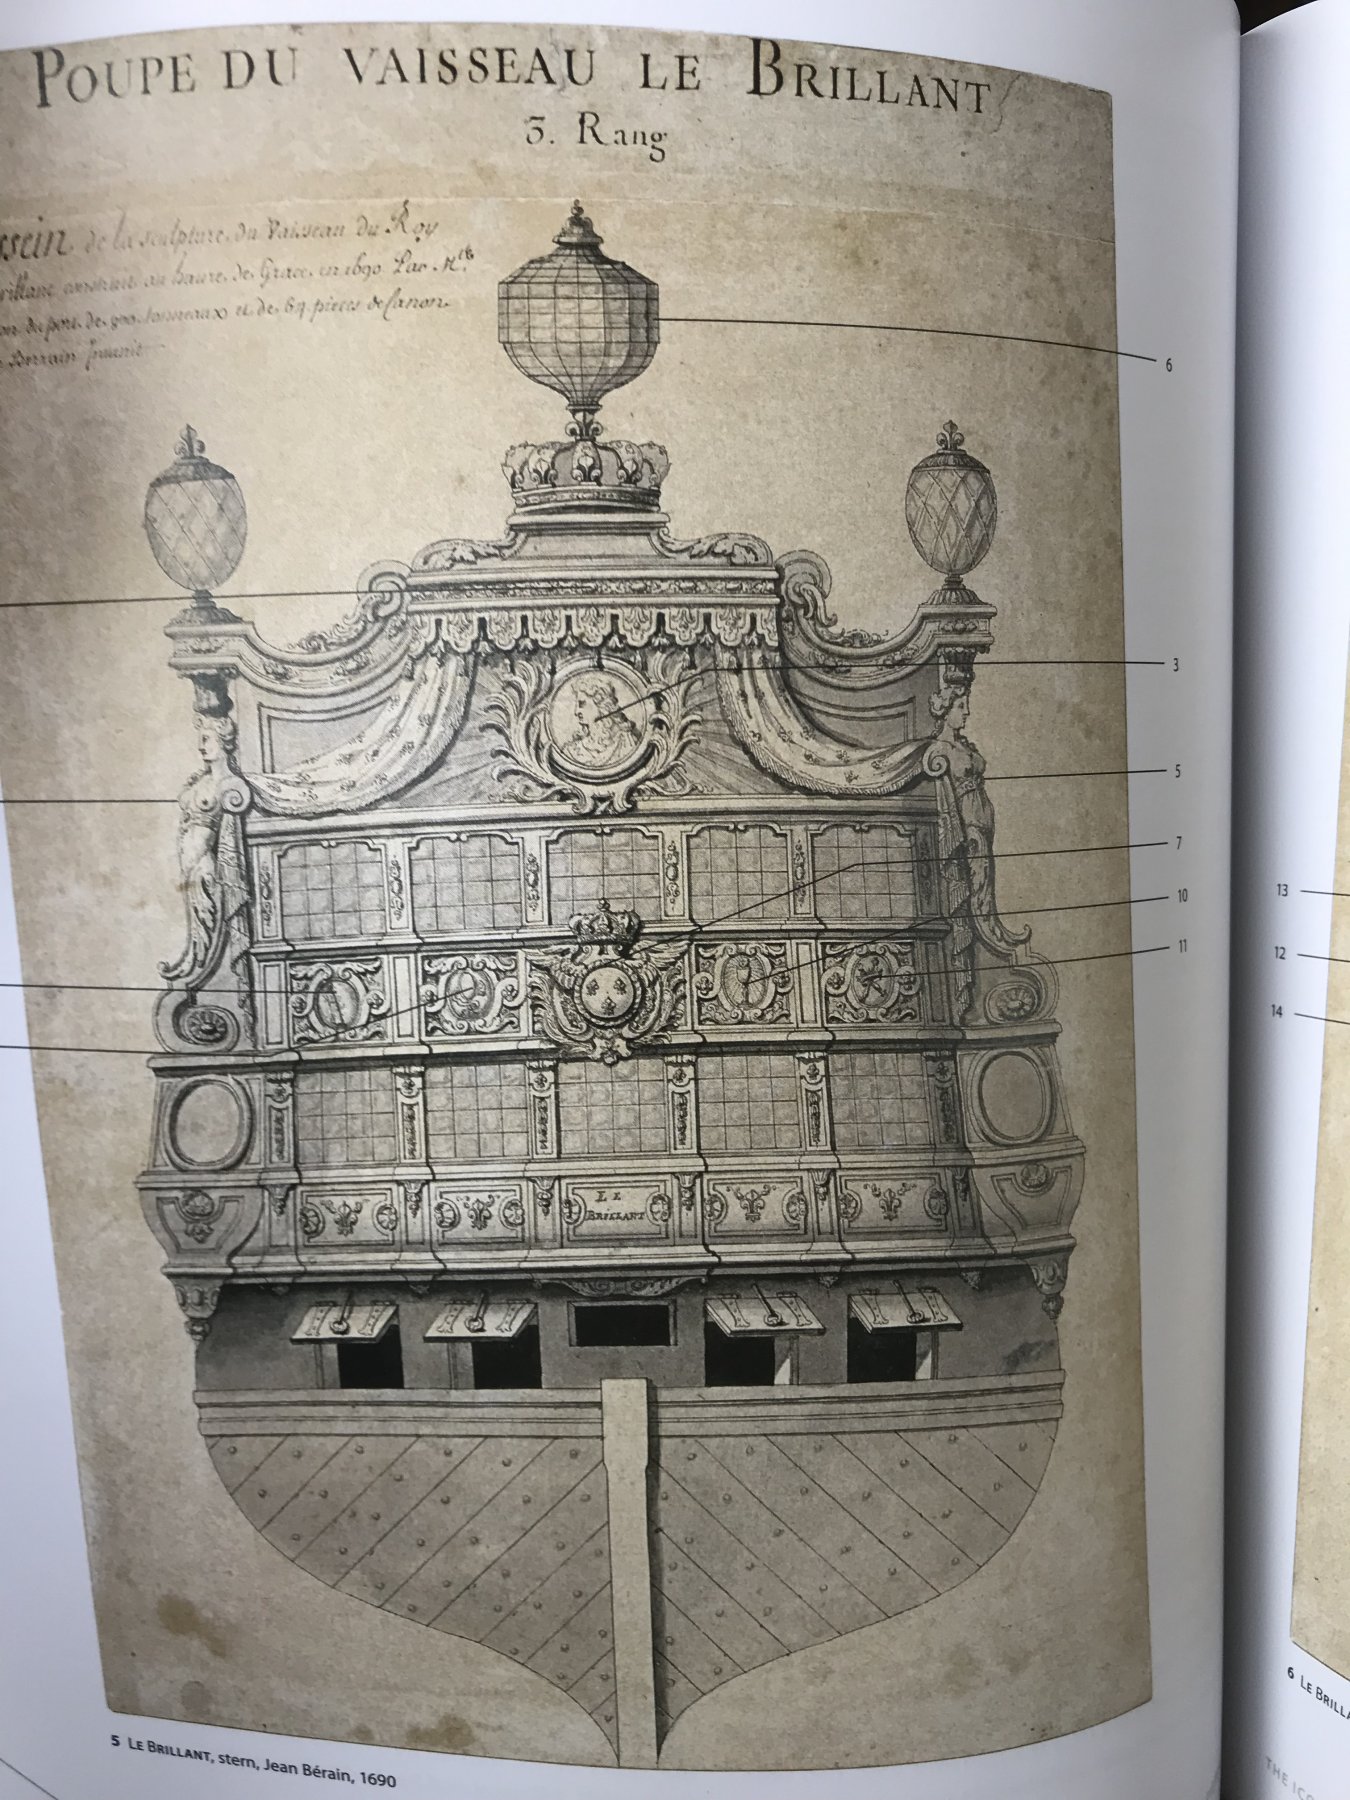
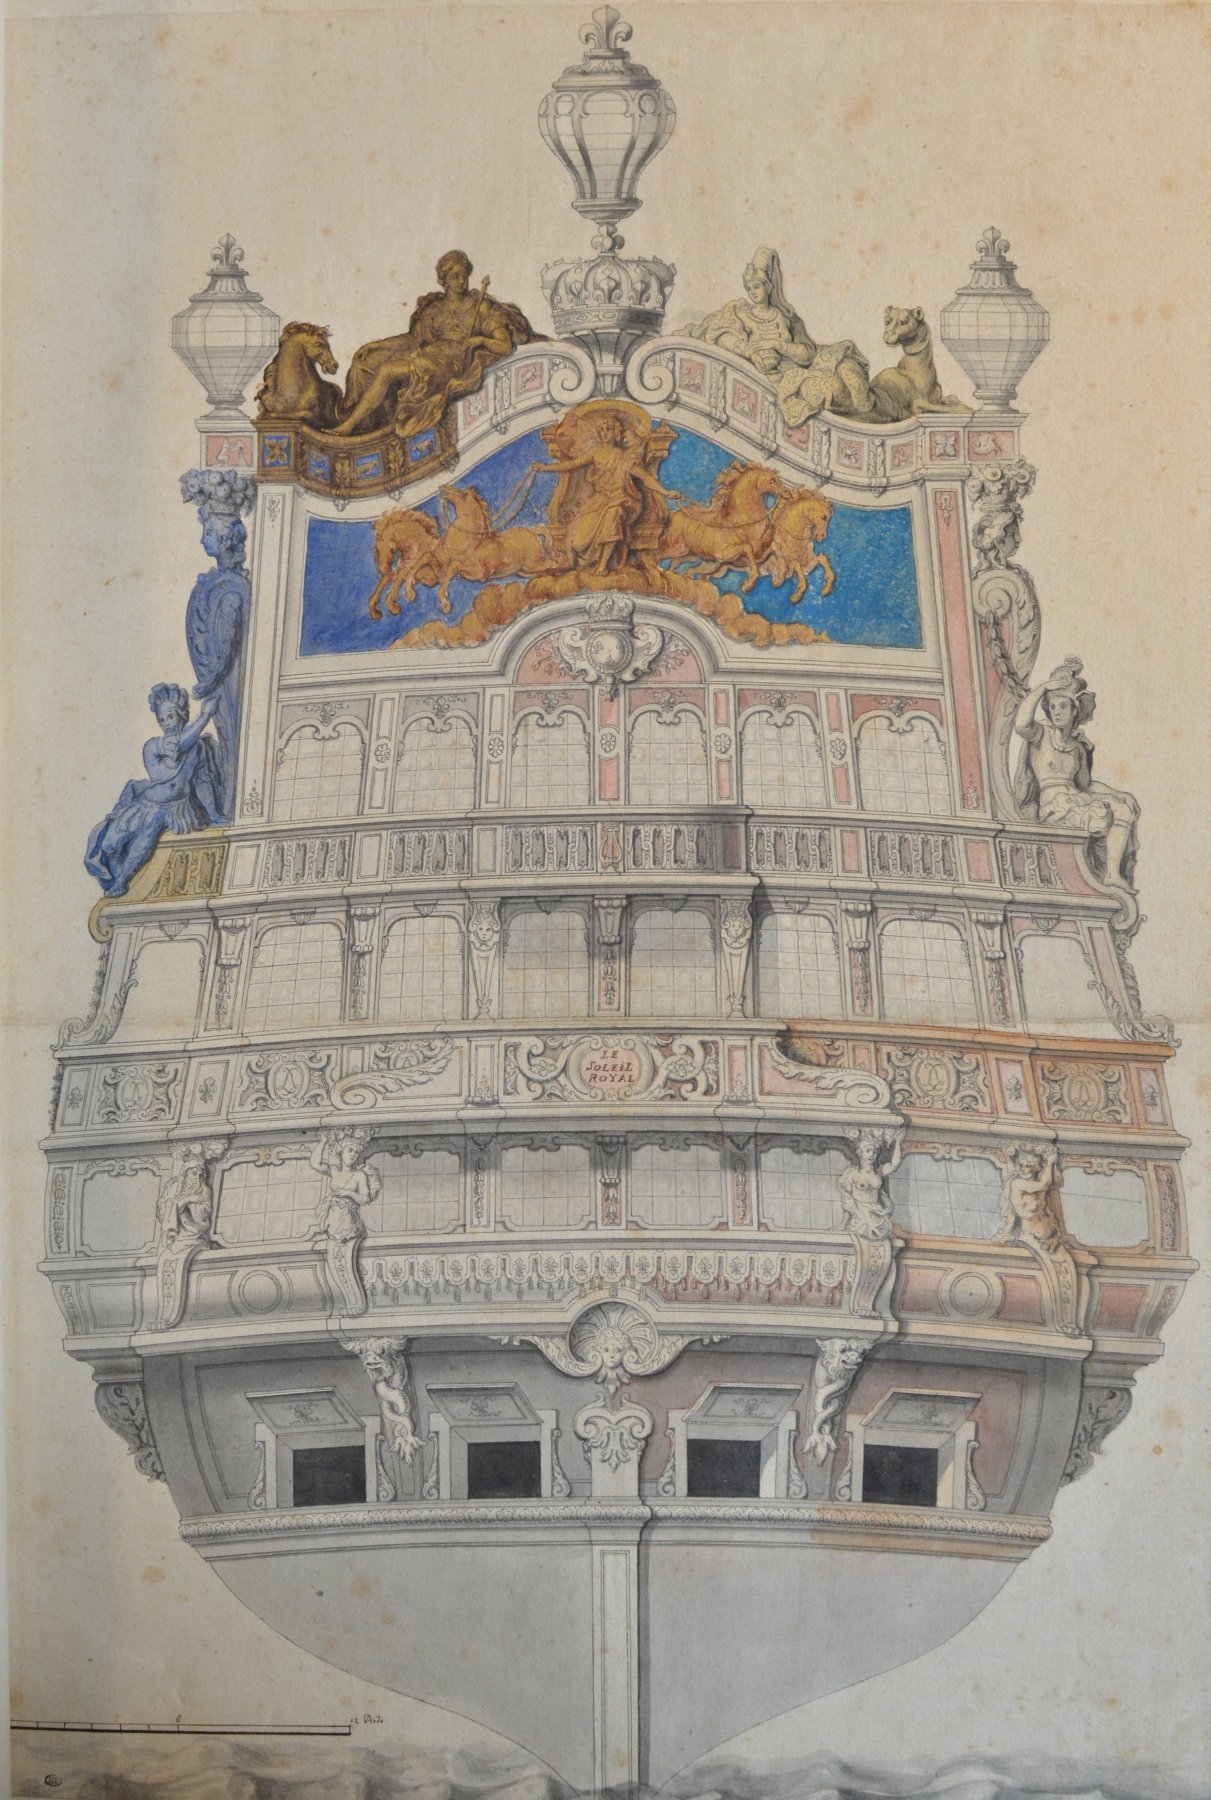
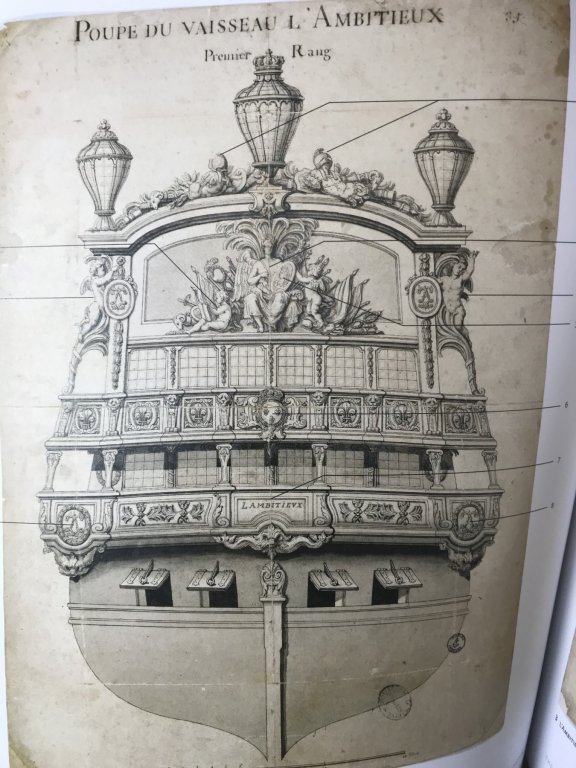
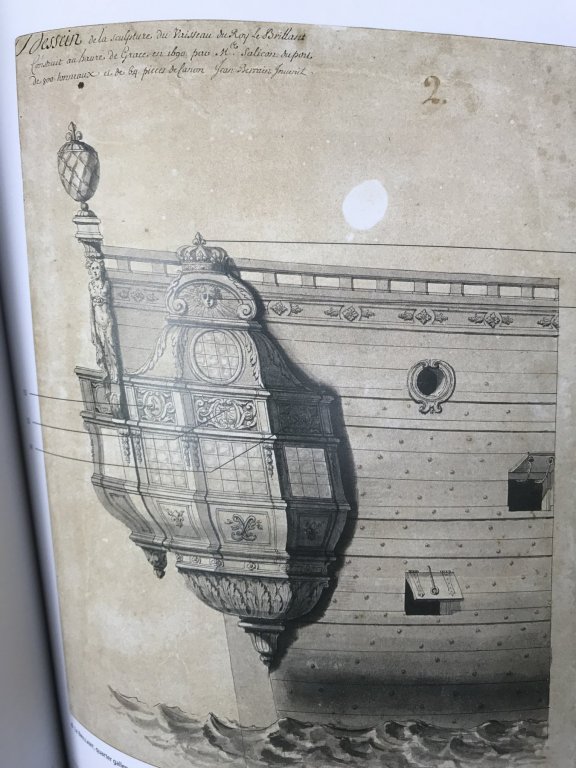
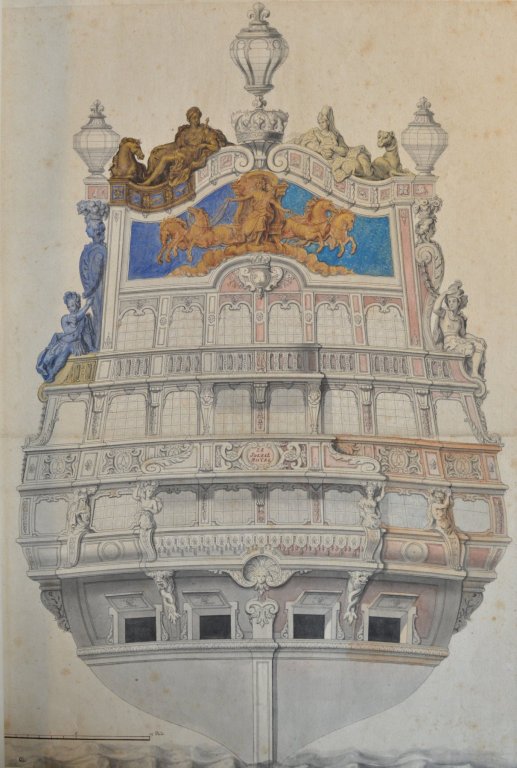
You can see what I mean in the following examples. Even in low-relief, these lower finishings would read as visible projections from the stern view. L’Ambitieux: Le Brillant: This dichotomy between stern and quarter views may explain why the Berain stern drawing makes no visual reference to the mermaid figures, nor the amortisement, which would surely project somewhat from the ship’s side. L’Ambiteaux, which also would have had an amortisement, above the main deck level, is also a good illustration of this omission. It is my opinion that Berain did not include these details in the stern view because they would only serve to clutter the stern drawing, when they could be better understood in the quarter view.


- 2,699 replies
-
- 8
-
-
- heller
- soleil royal
- (and 9 more)
-
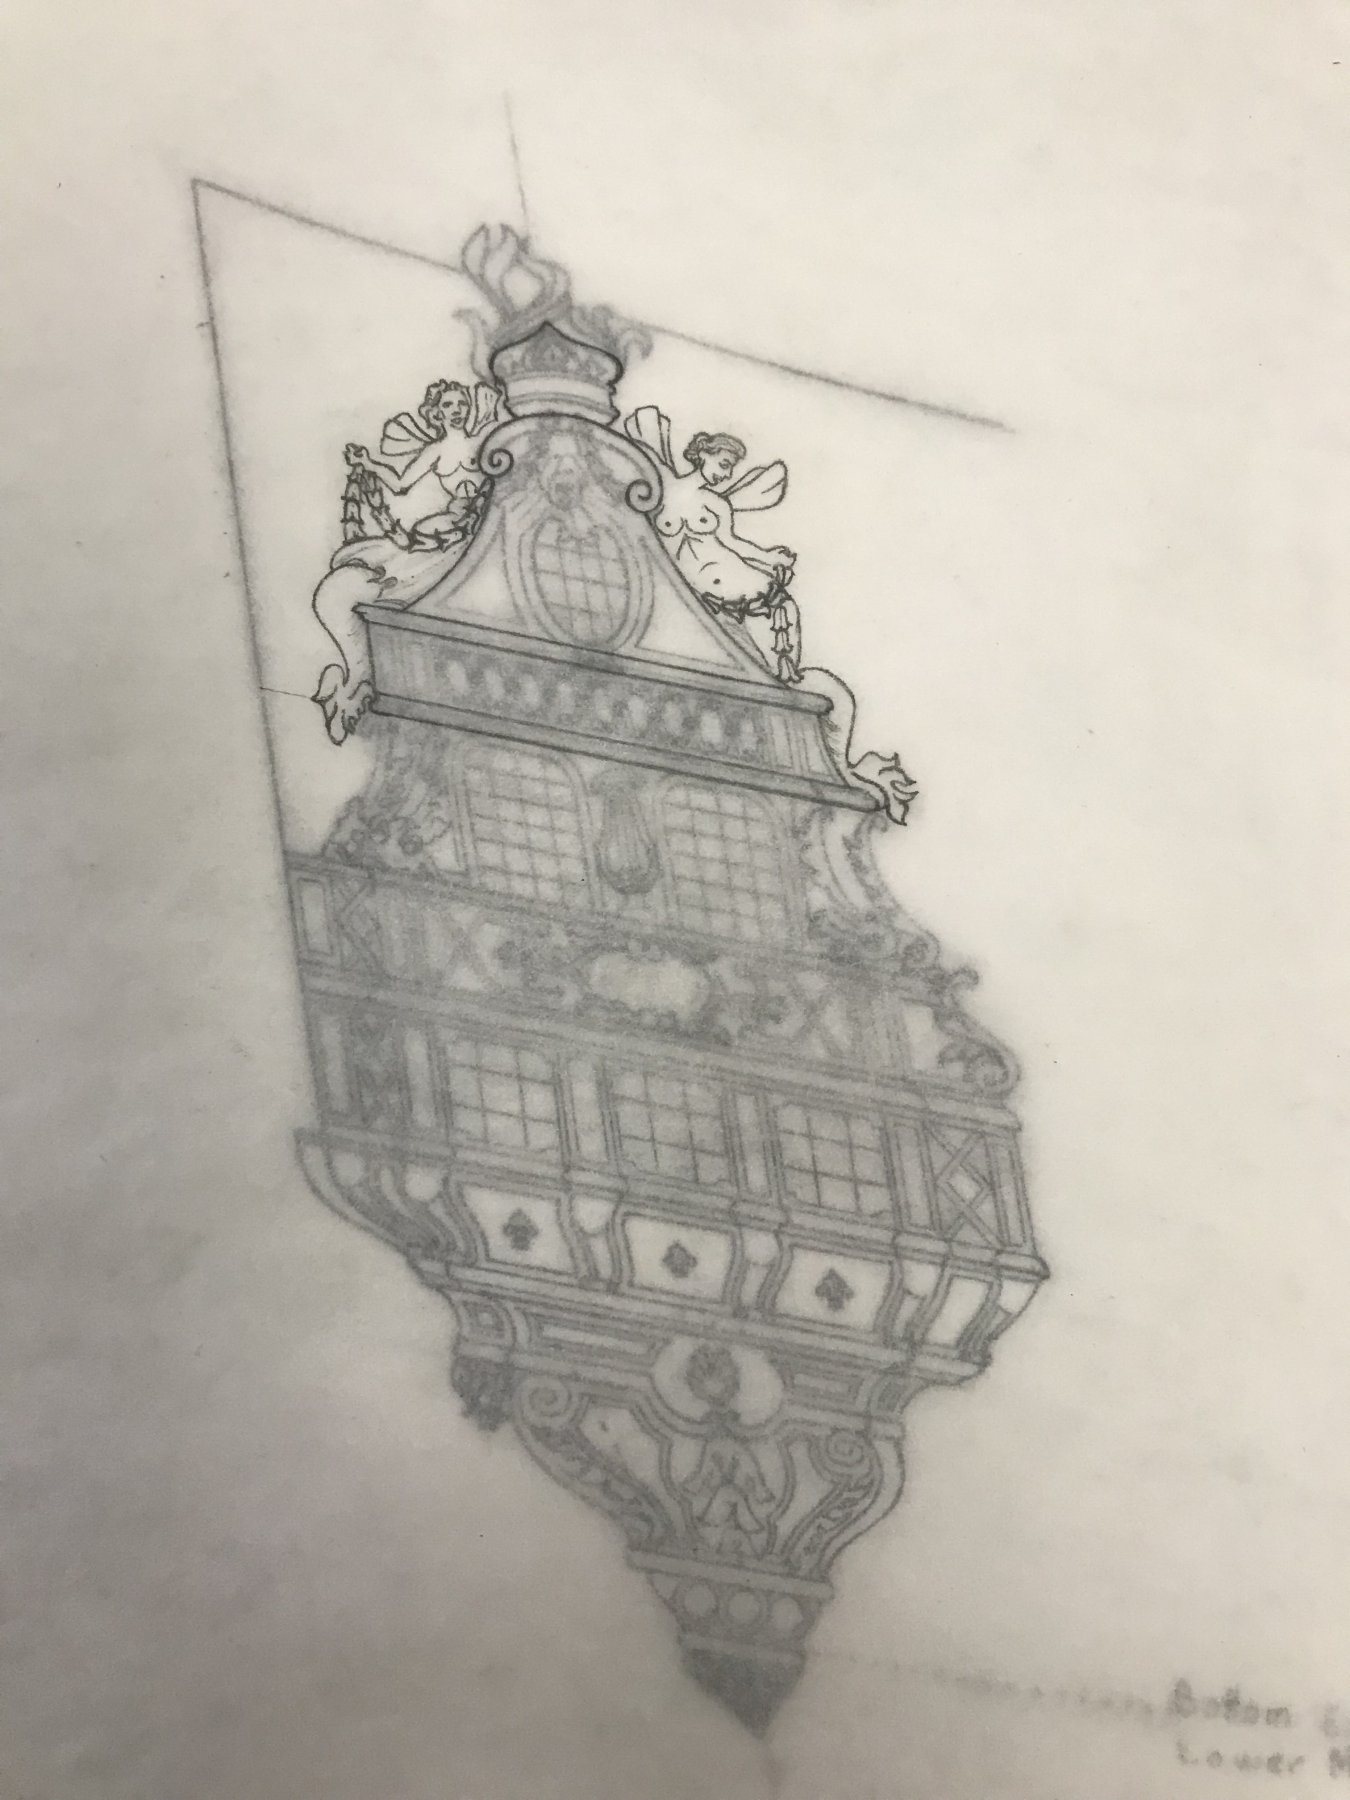
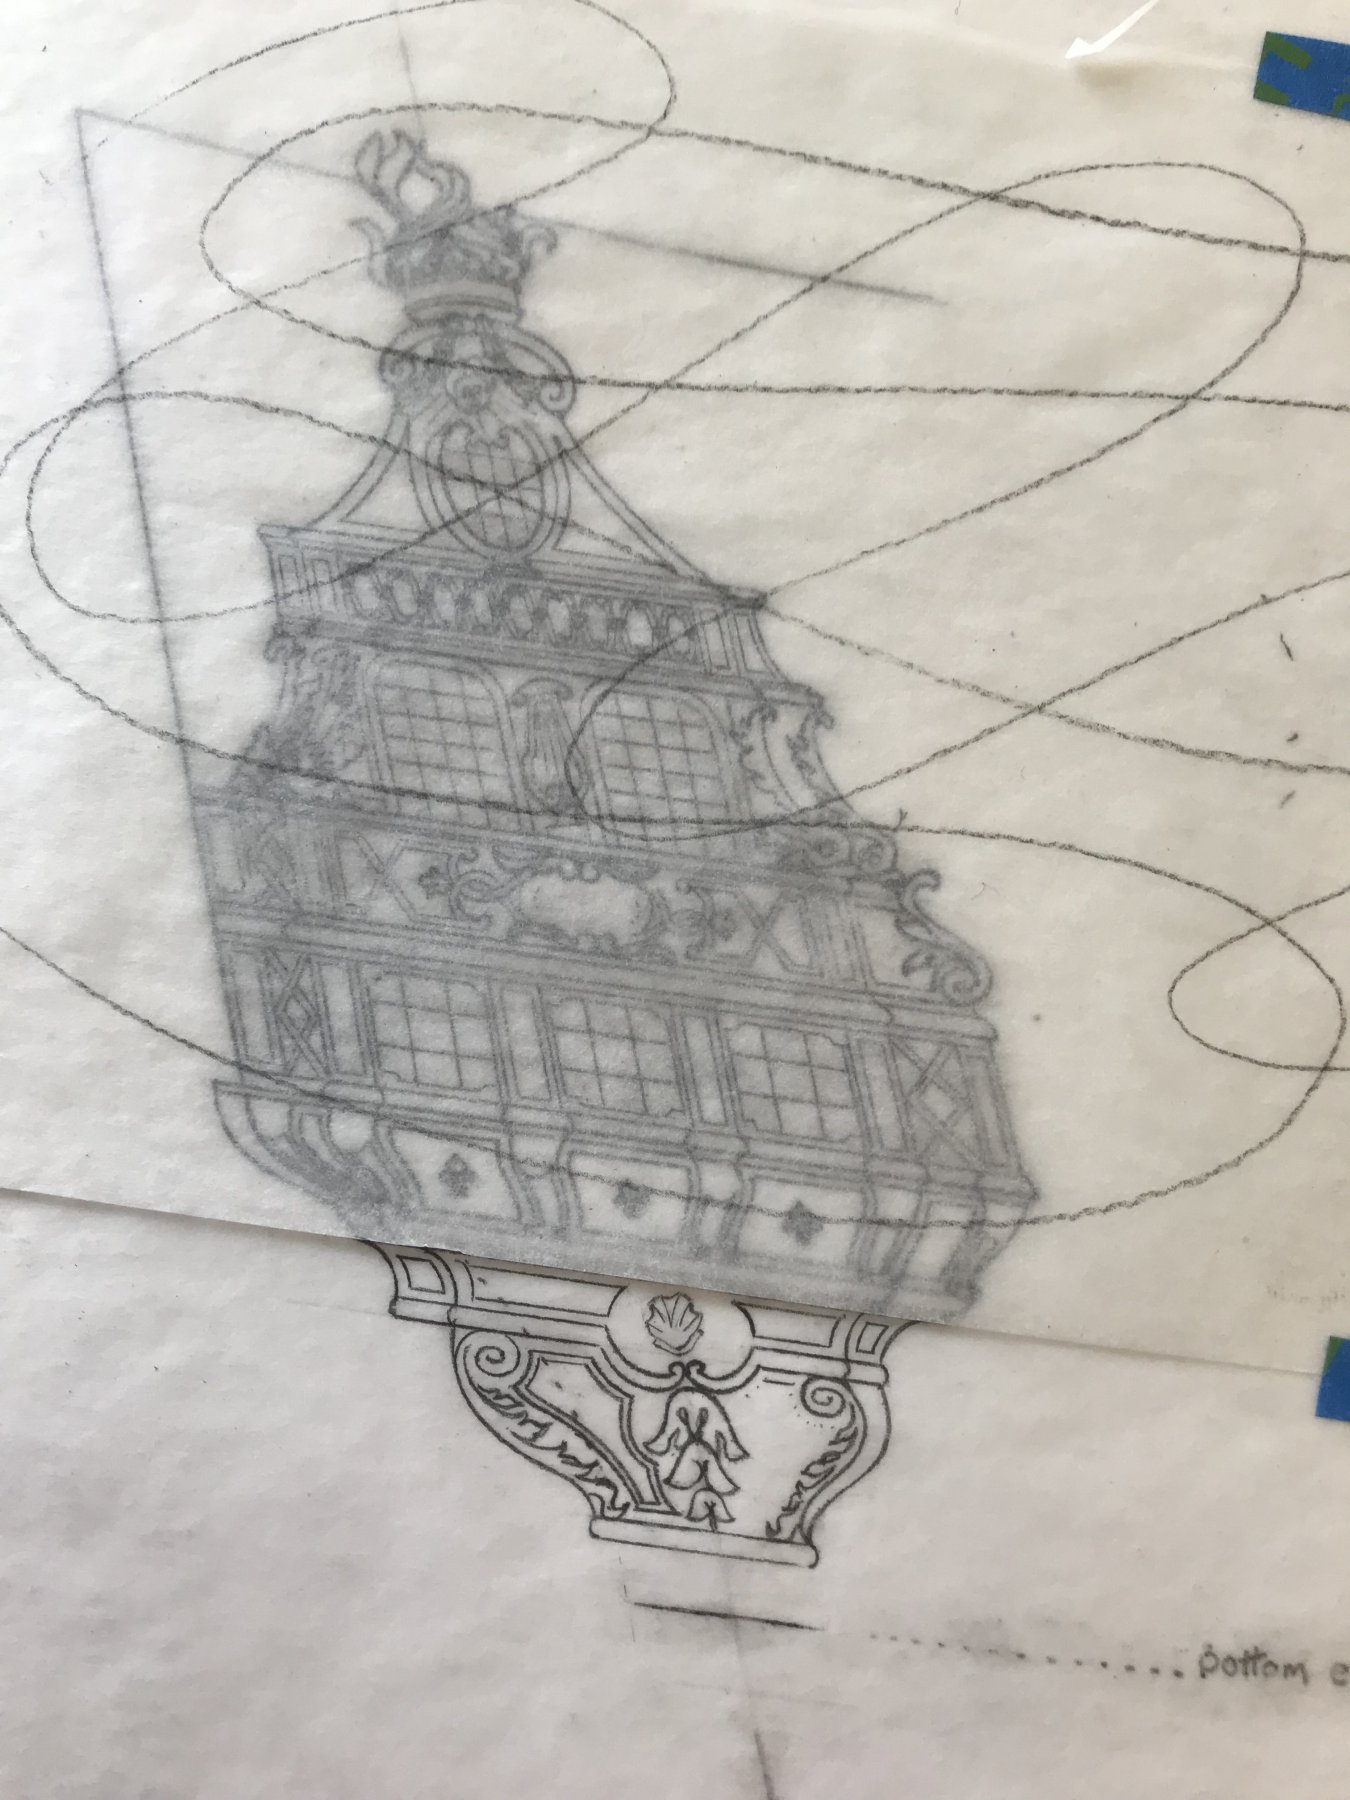
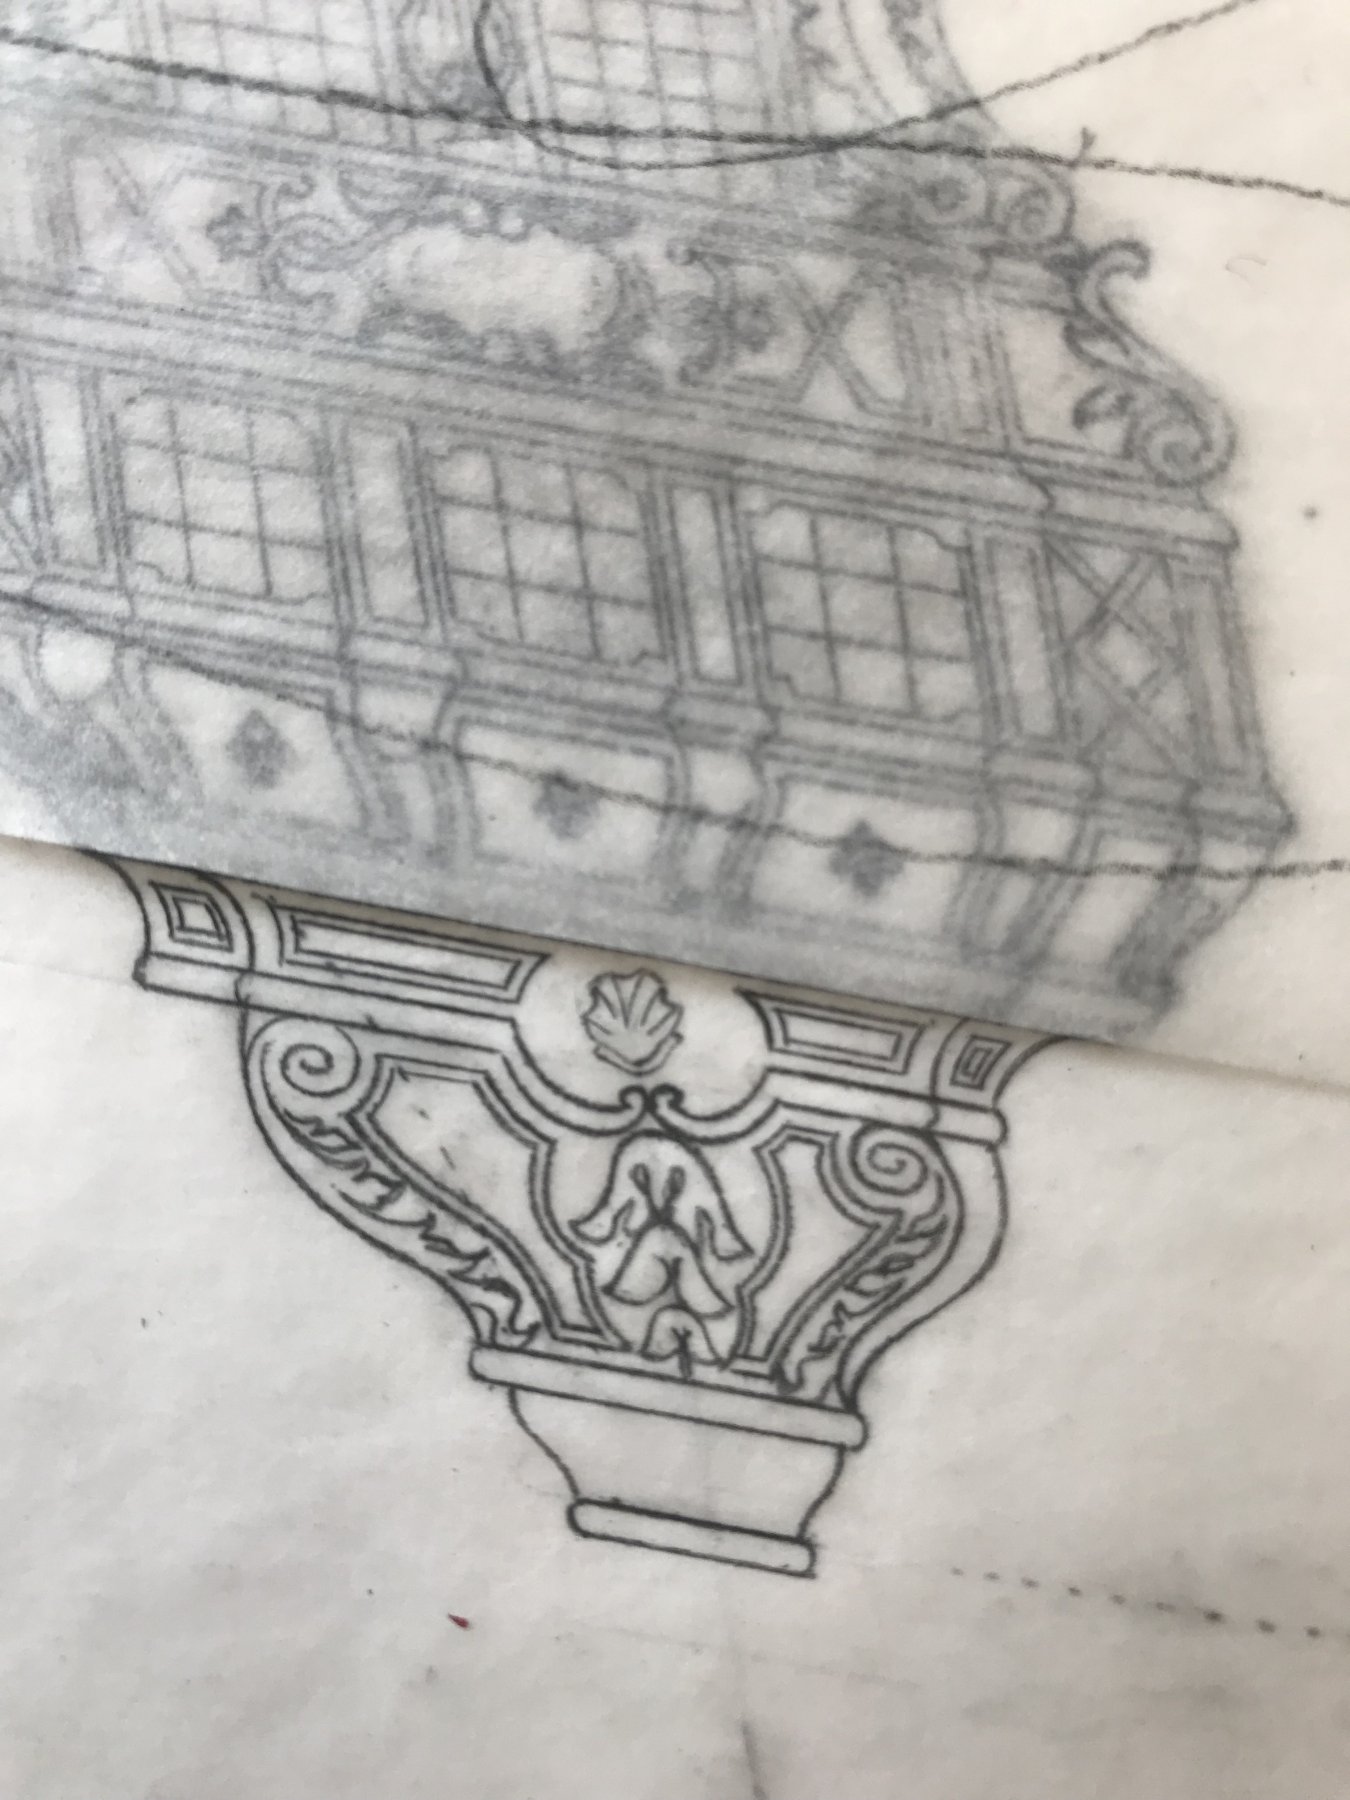
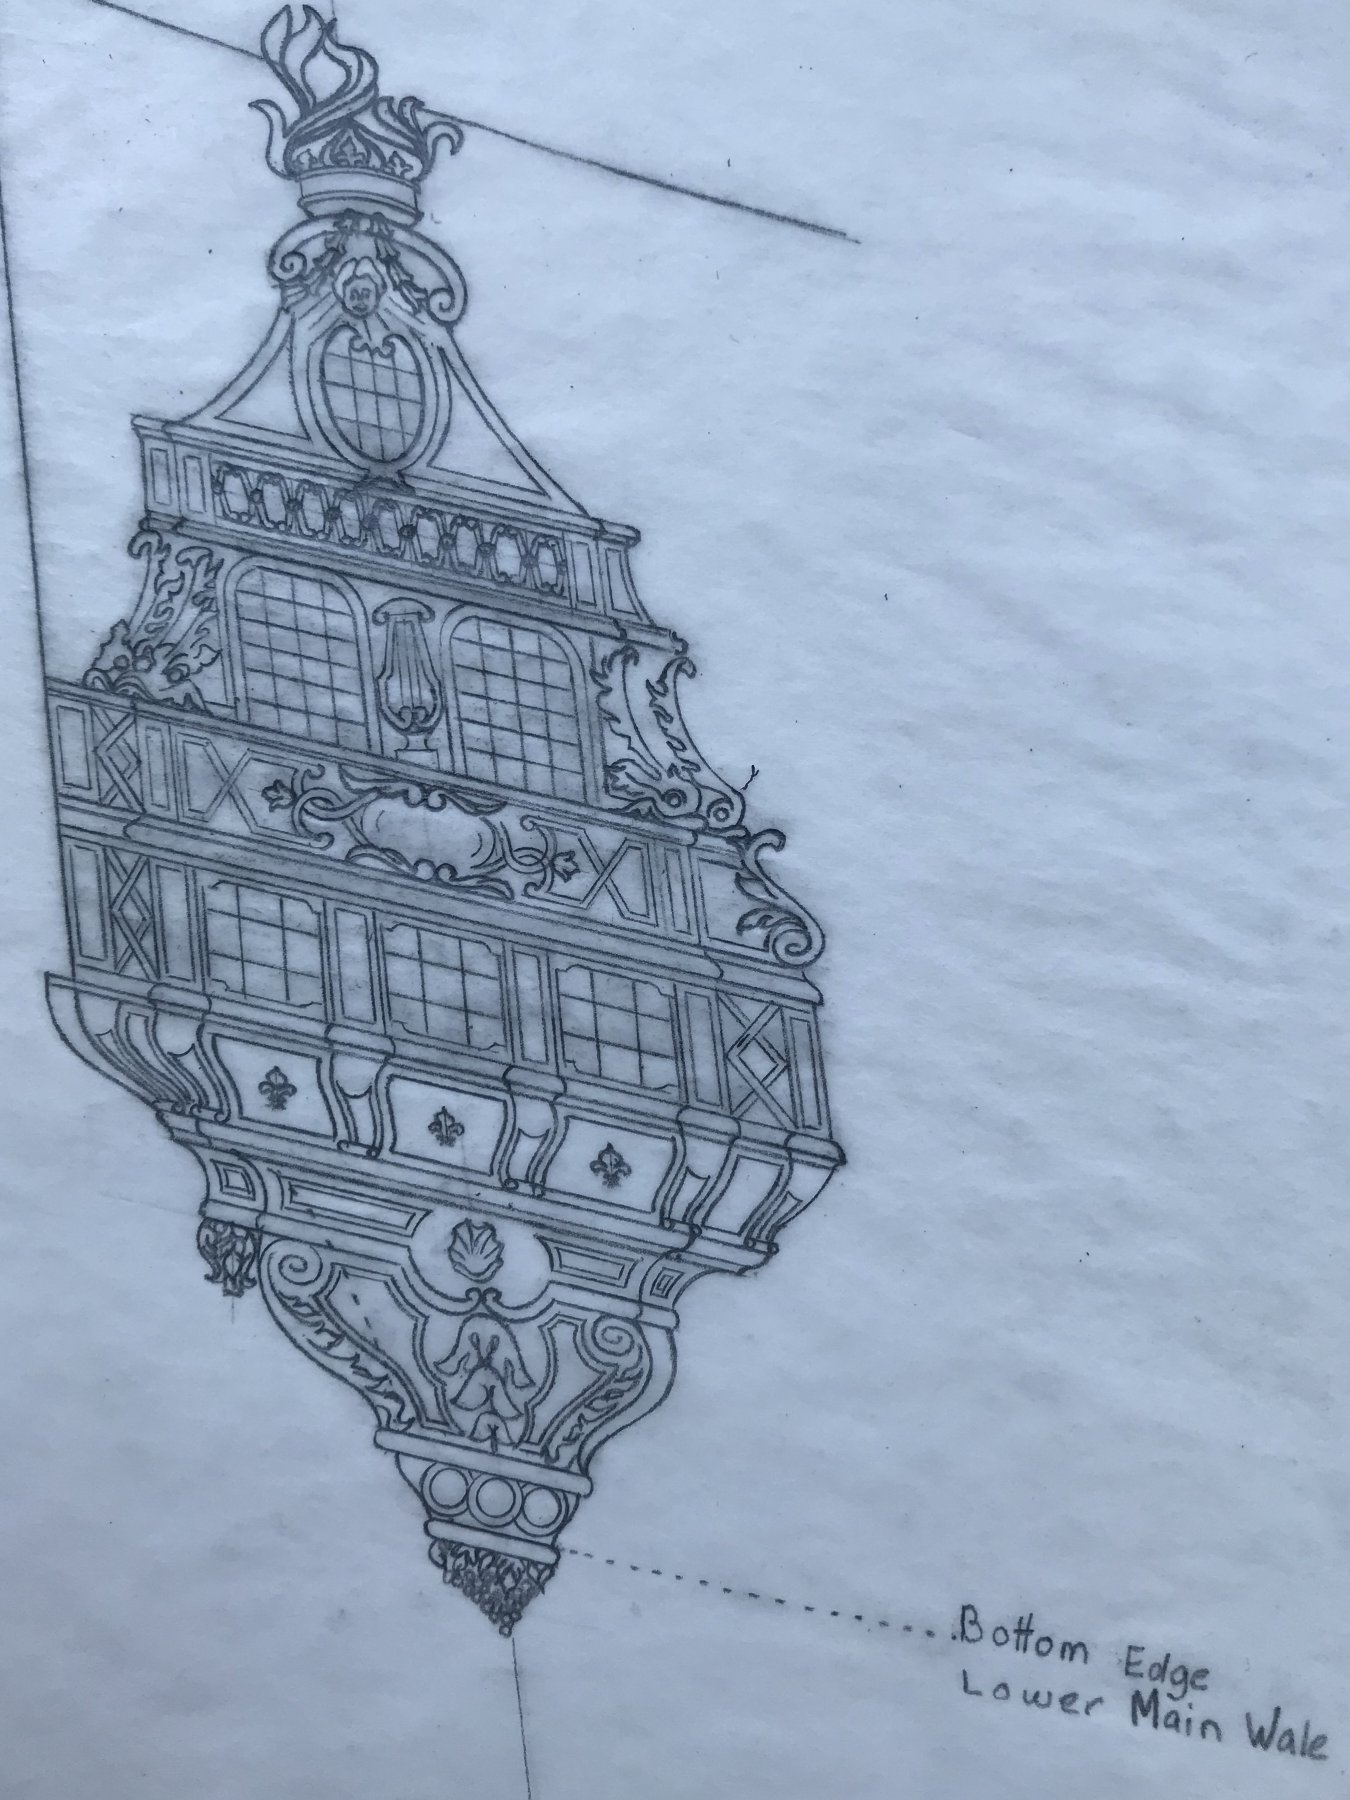
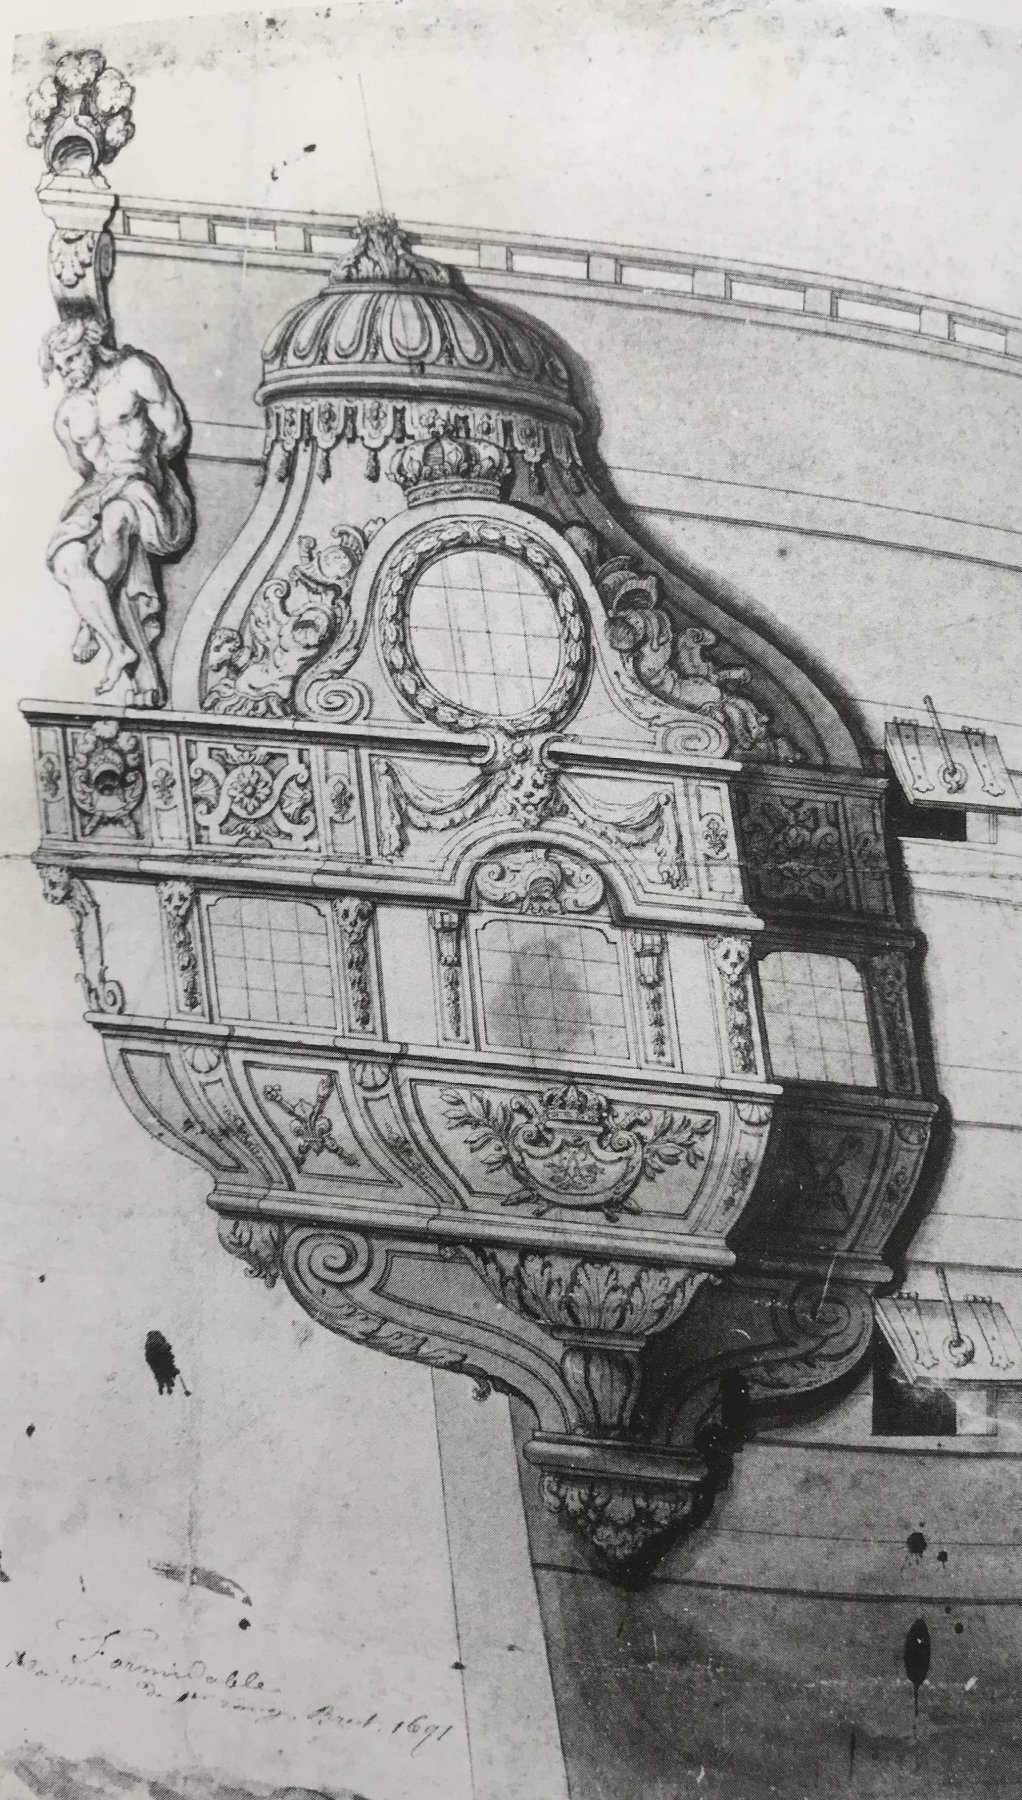
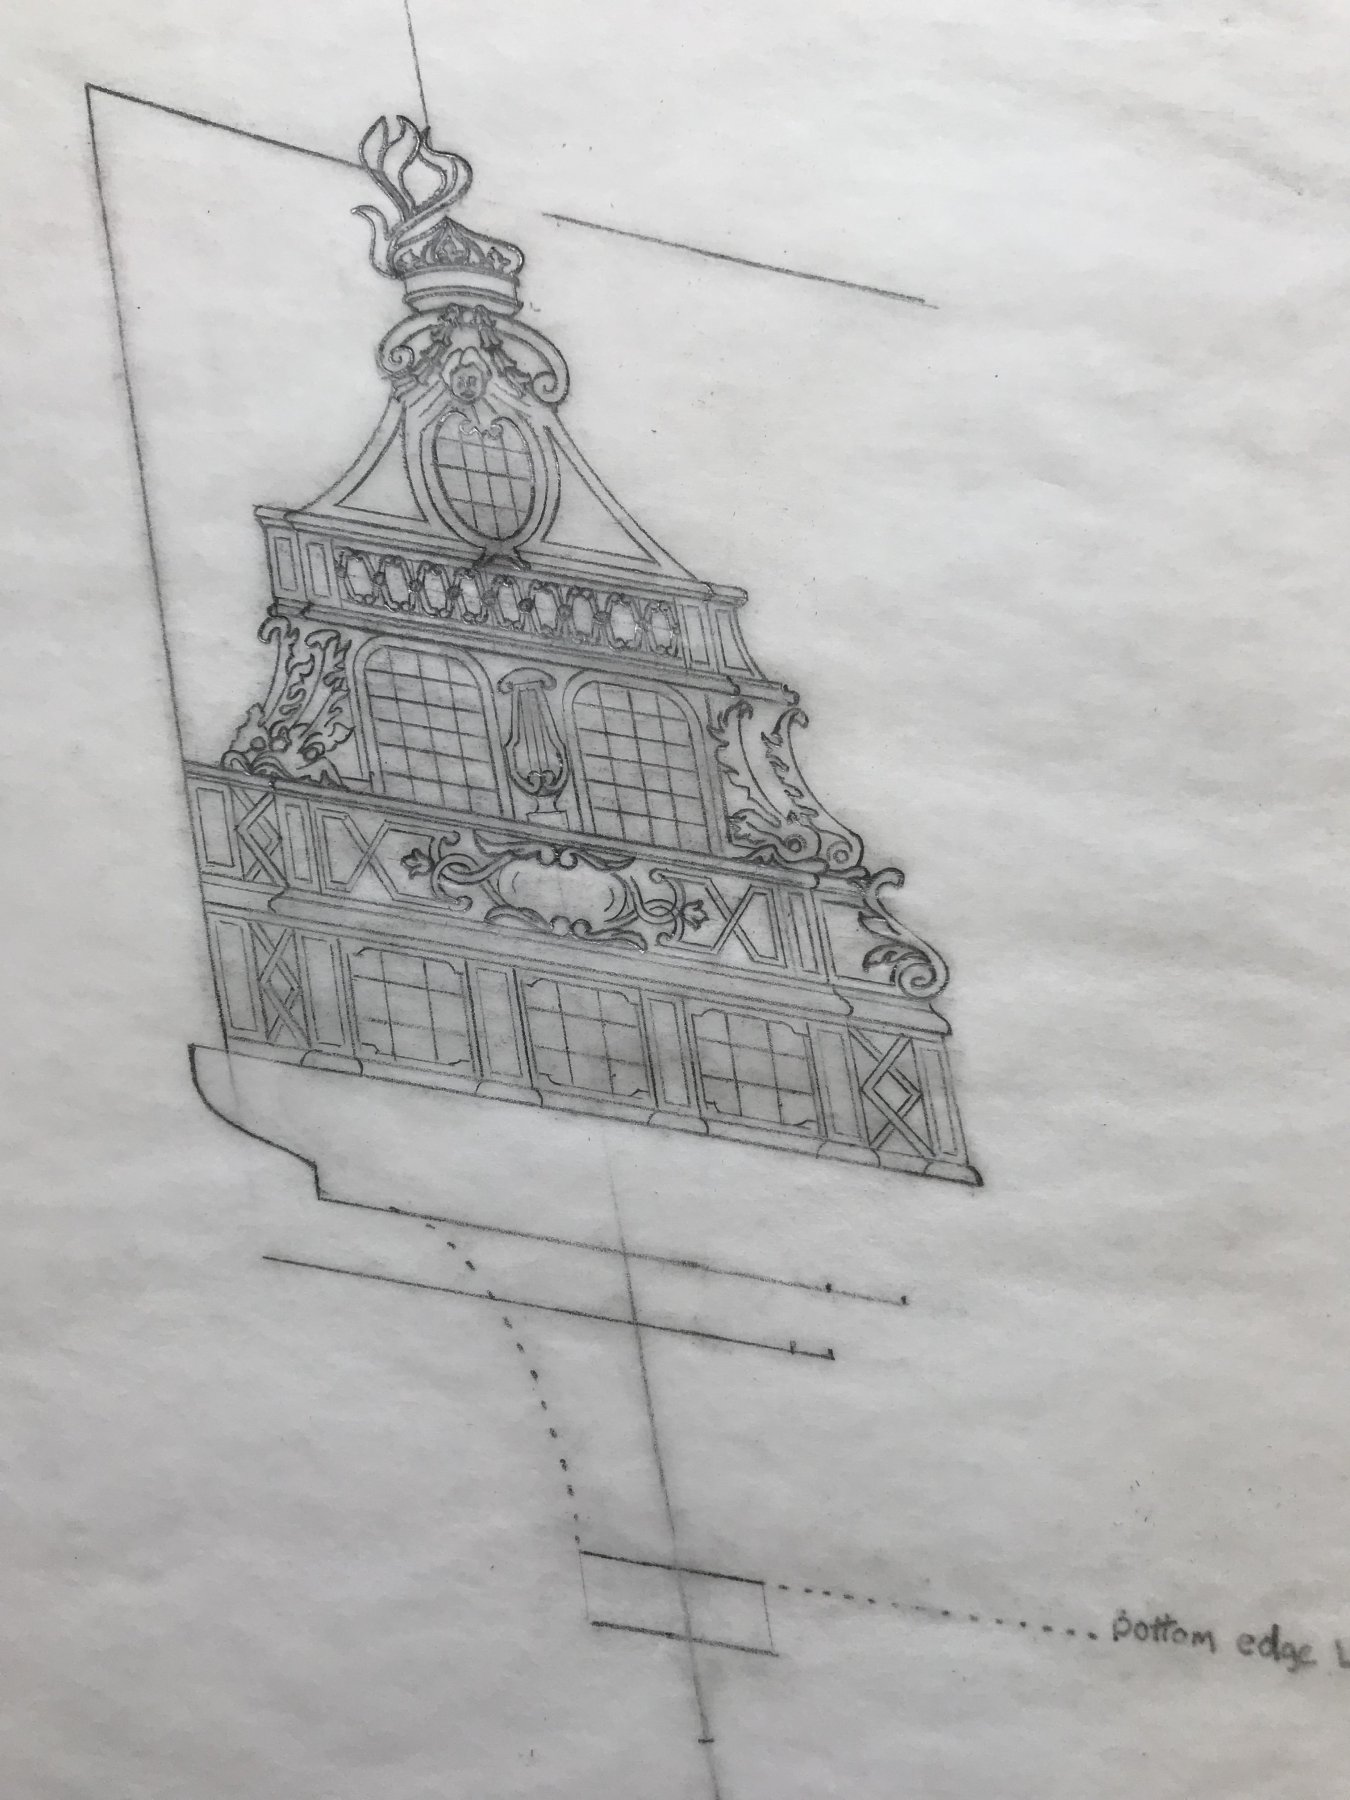
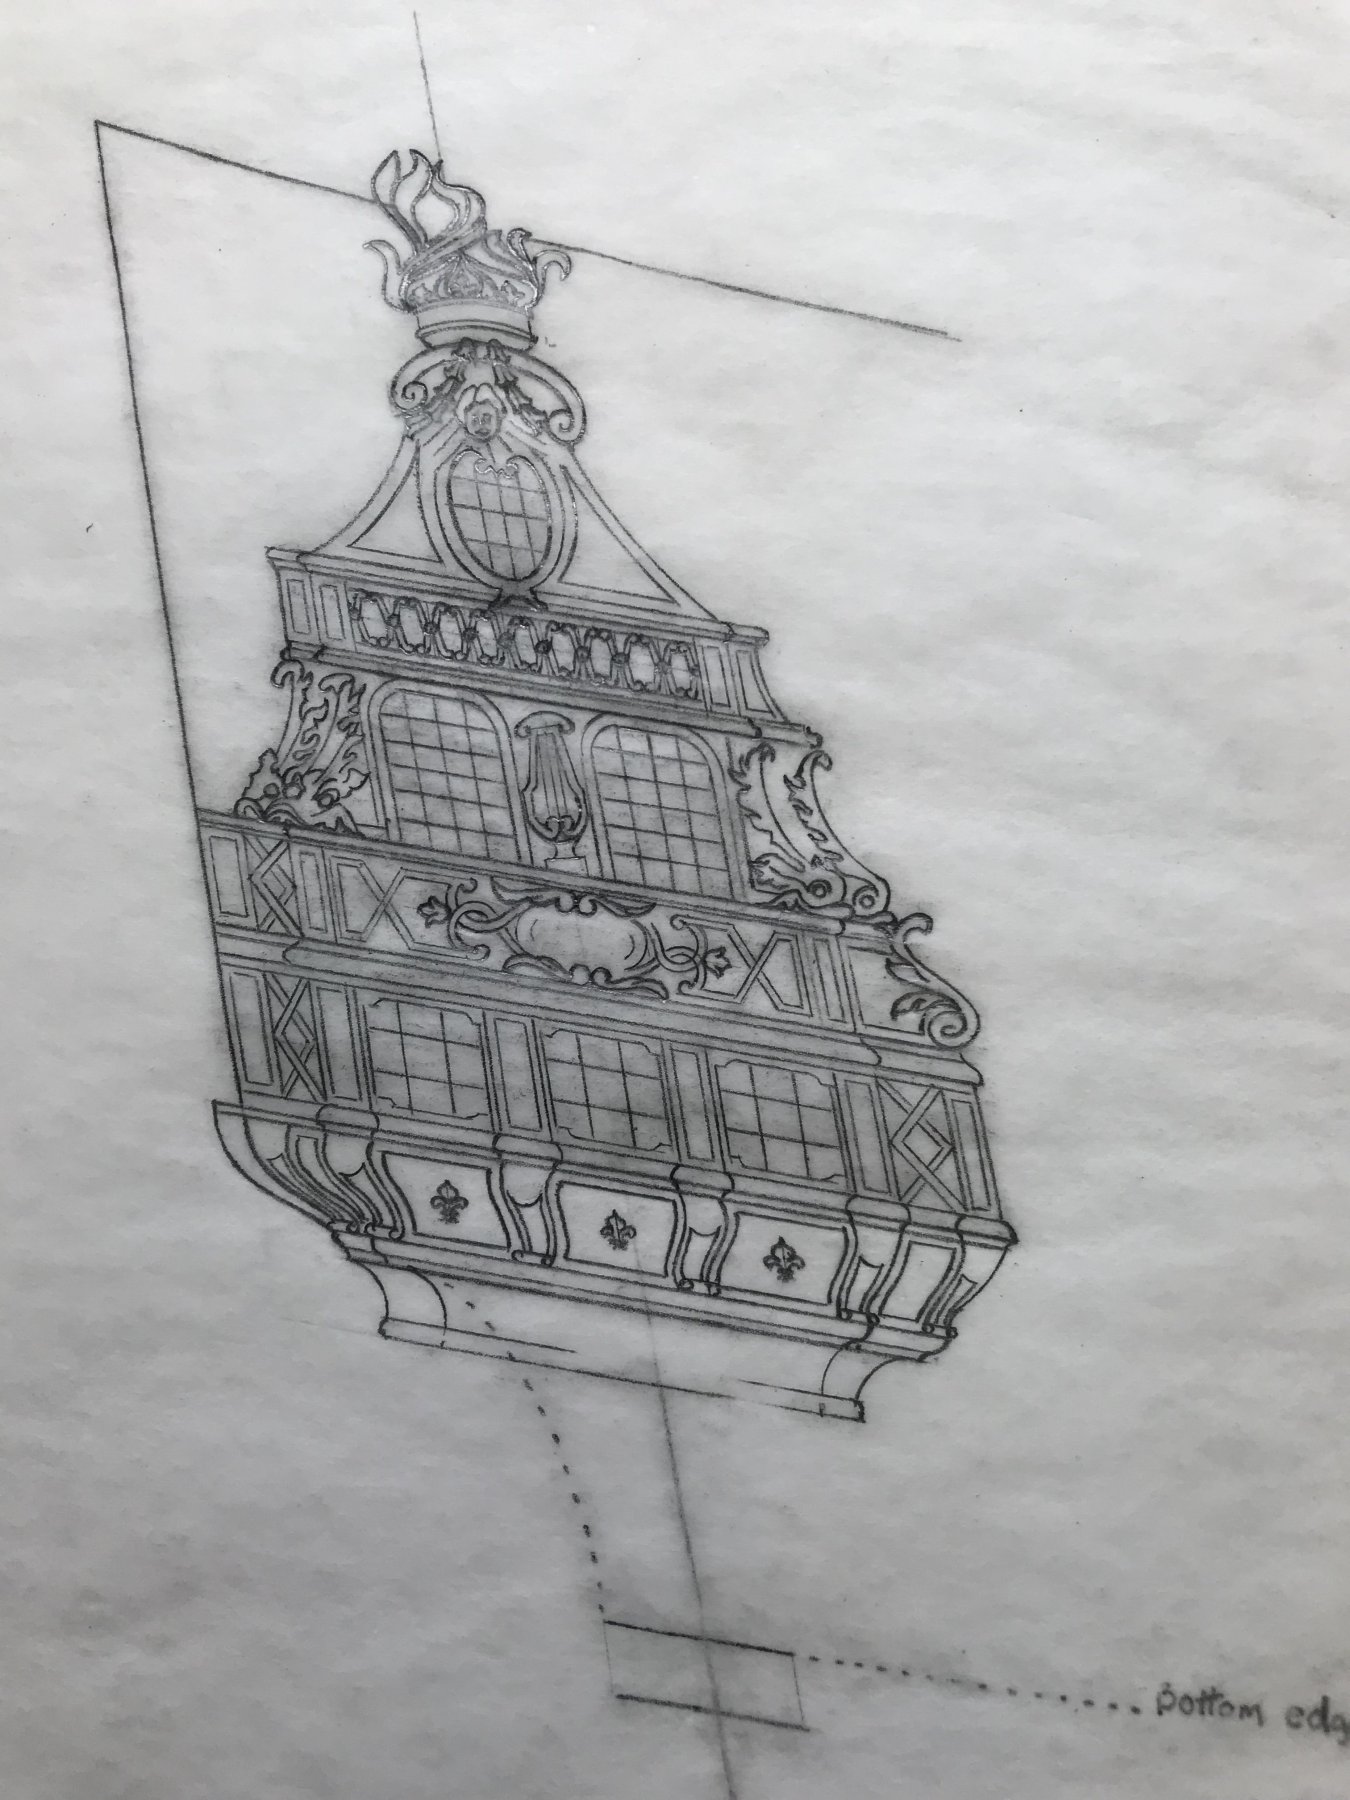
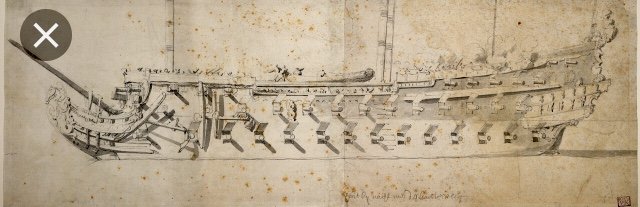
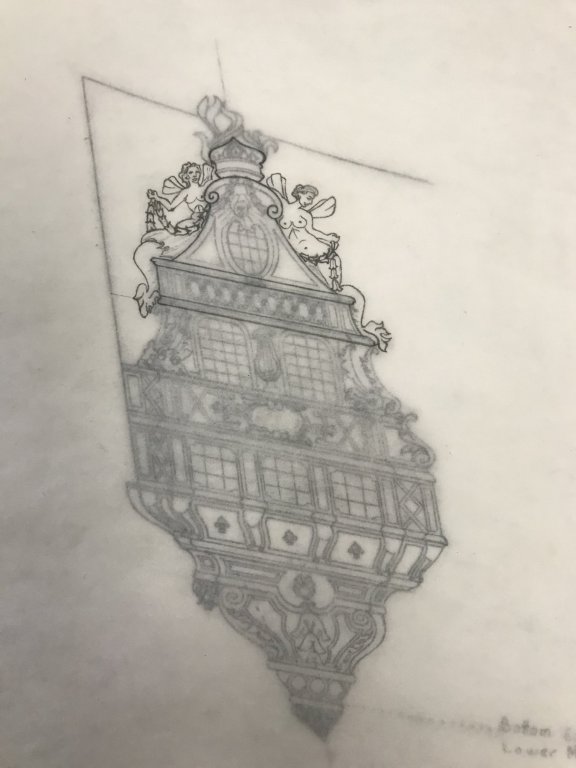
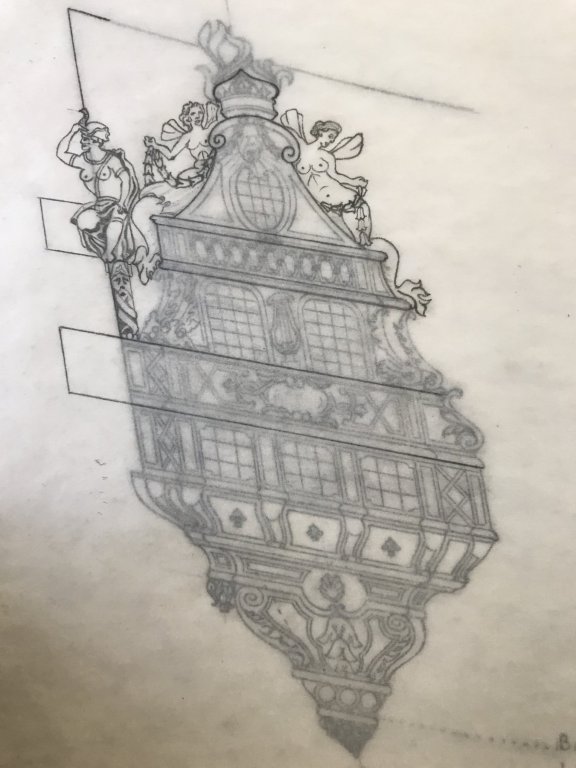
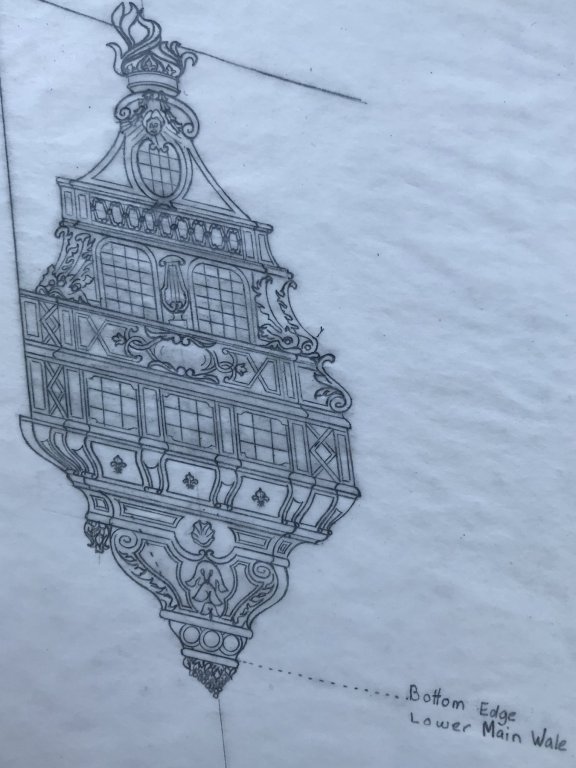
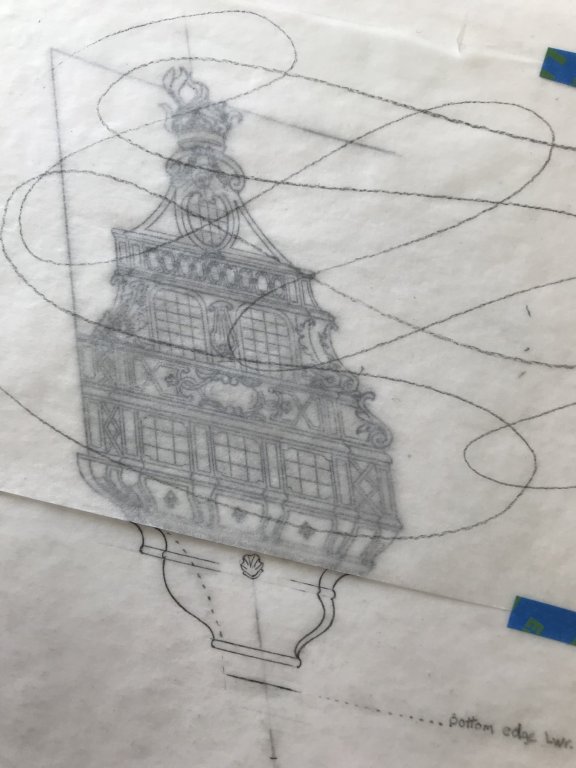
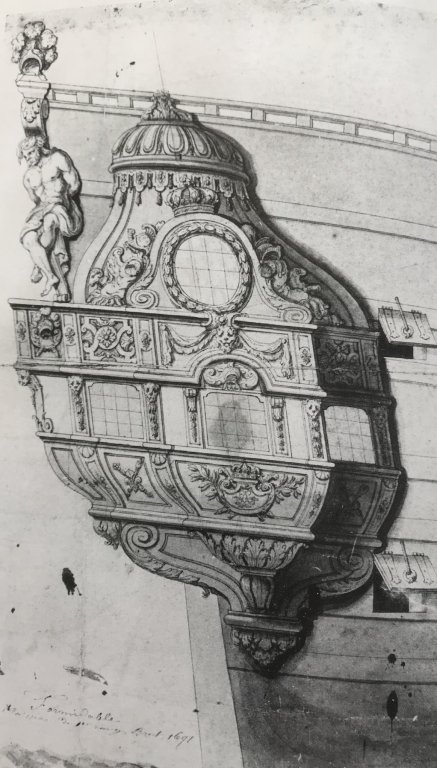
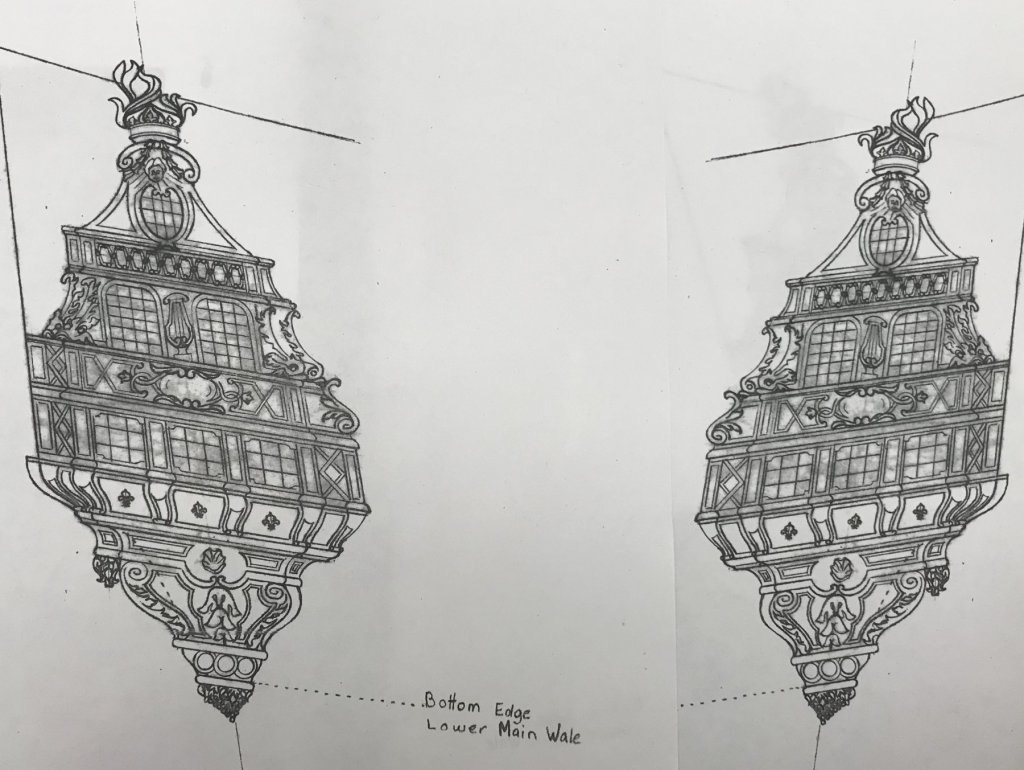
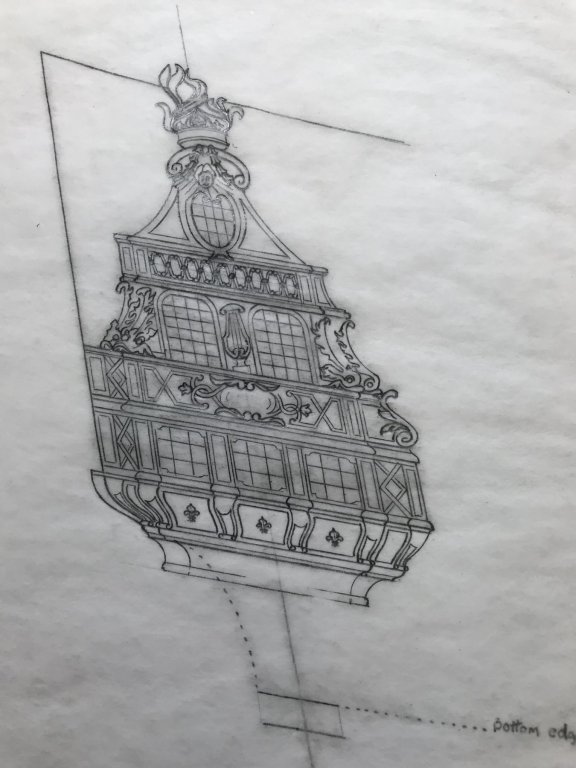
Continuing on, with my development of the quarter gallery plan, I have arrived at the lower finishing. This area is particularly problematic for two reasons. First, to either side of the centerline, the lobes of the lower finishing are similarly shaped, but asymmetrical. This poses the particular difficulty of striking the right balance, while still framing the drawing within certain boundaries of the pre-established kit architecture. My initial reference point for the bottom end of these cyma-curved lobes was to be the bottom edge of the lower main wale. FYI - the scribble sheet, over the main body of the drawing, was my experiment to see whether hairspray would distort the paper. What you see above are the lines I eventually arrived at, with much trial and error. Initially (though I didn’t snap a picture of it) my lines extended down to the short hard line beneath. The problem, there, was two-fold; this longer profile exaggerated the a-symmetry in an unflattering way. Also, I have to consider that the lower finishing overhangs the plane of the lower transom (the dotted line), and there will need to be a corresponding in-board ornament, that wraps the corner and rests against the lower transom. My first lower finishing attempt created much too heavy a space to fill with this corresponding ornament. As a general reference for sussing out the details and proportions, I made good use of this other more clear drawing for Formidable’s [Note: I keep calling this ship L’Invincible, but the portrait is inscribed with the ship’s name. Some things just get stuck in our heads, I suppose] quarter galleries, also by Berain, and dating to 1691: What I find fascinating about the Berain stern drawing is that it only shows the aft face of the acanthus carved waste pipe, and yet it makes absolutely no accounting of the lower finishing, which certainly extends beneath it: Some may argue that the reason for this discrepancy is because my choice of quarter gallery does not correspond with the Berain stern. I, on the other hand, do not agree. Rather, it is my observation, that the lower finishing is often not addressed in the stern drawings of Jean Berain. I am pretty certain that there are a few really clear examples of stern/quarter drawings that illustrate this omission, in Floating Baroque. I will have to check when I get home. Once I had settled on the shape, I had to fill in all of the corresponding ornament: I was not satisfied with the line of moulding just forward of the aft acanthus carving because it needed to more closely follow the aft shape of the lower finishing - as it does on the Invincible drawing, above. After correcting this discrepancy, the rest of the detail fell quickly into place: Ultimately, I want the lower finial to rest just beneath the bottom edge of the lower main wale, so that is what I drew: This represents two weeks of focused effort and much revision, but the effort was worthwhile. These are QGs that I can build, and that will make sense on the model. Port and starboard mirror images ready for patterning: Now that I have this major detail sorted out, I will draw the mermaid figures and stern balconies as overleafs.

- 2,699 replies
-
- 5
-
-
- heller
- soleil royal
- (and 9 more)
-
I agree with the review, but I wish that the enclosed monograph, itself, were also hard-cover bound. That and a few niggling construction details aside (and I am certainly no expert), I find the St. Philippe monograph to be an astounding piece of work, and an invaluable resource to anyone interested in modeling this epoch. Even at 1:144 - the scale pictured in the monograph book - the ship would produce a satisfying model.
- 13 replies
-
- 3
-
-
- plans
- monografie
- (and 1 more)
-
Yes, totally missed it. Since we moved, I rarely look at MSW on my desktop because the computer is so old and slow. I suppose I will have to upgrade that, at some point.
- 2,699 replies
-
- 2
-
-
- heller
- soleil royal
- (and 9 more)
-
Ah, okay! Sorry Druxey - I was viewing your post on my phone; I thought you had merely high-lighted the lyre, as I had drawn it. So, I thought - “that looks pretty okay. I’m close.” When I enlarged your drawing, I could then see your axis lines, as compared with what I had posted before. So, yes, you are right on the Marc, there. Name pun intended! My apologies for not being more attentive. The input is appreciated.
- 2,699 replies
-
- 3
-
-
- heller
- soleil royal
- (and 9 more)
-
Yes, I agree Druxey, but more specifically parallel with the sheer of the quarter galleries, as opposed to the top sheer, which is much more pronounced. The drawing of the lyre is close, but whispers of a hair out of whack. I am confident that I can correct these discrepancies with the tools.
- 2,699 replies
-
- 2
-
-
- heller
- soleil royal
- (and 9 more)
-
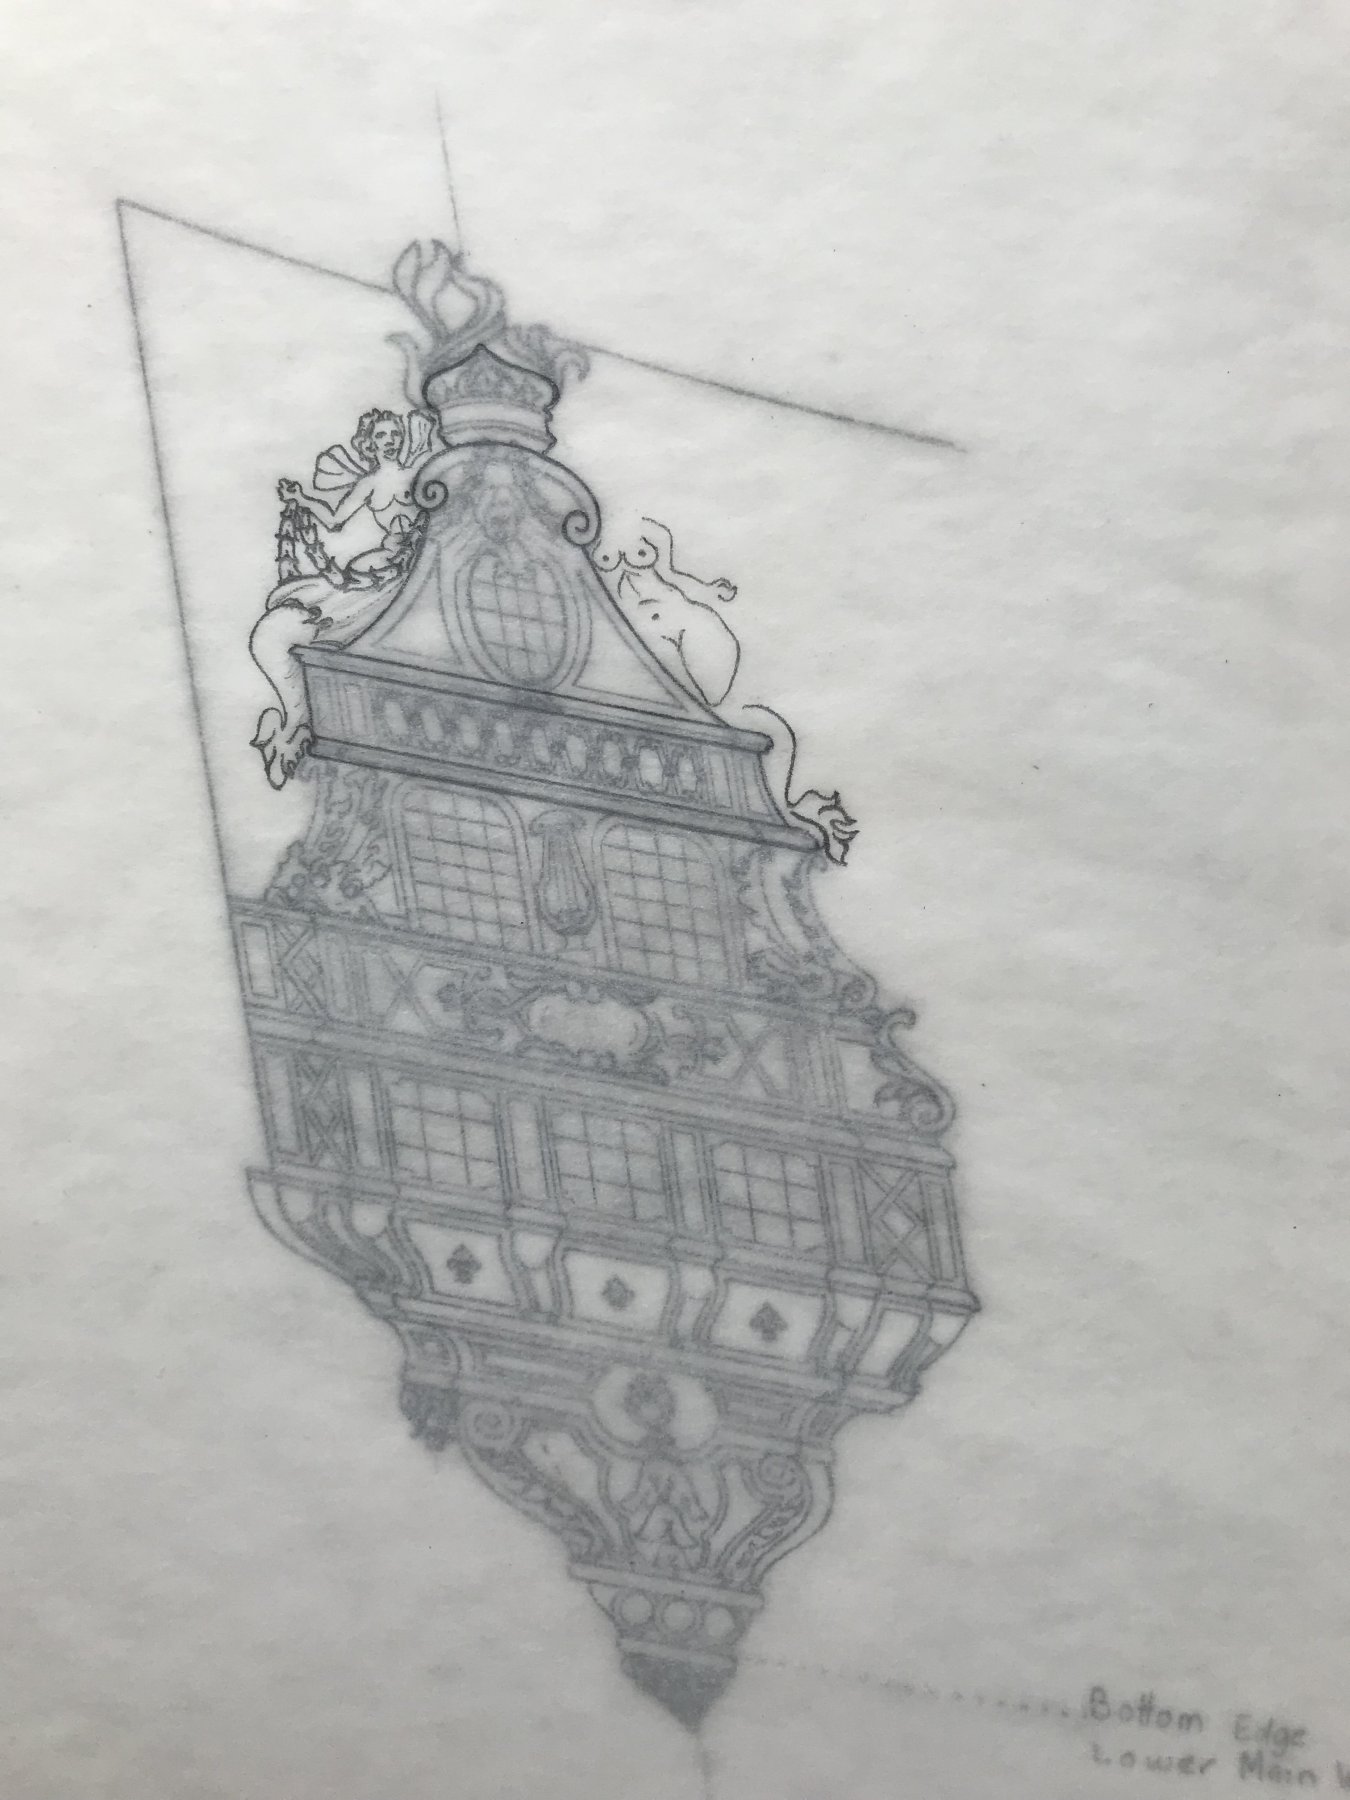
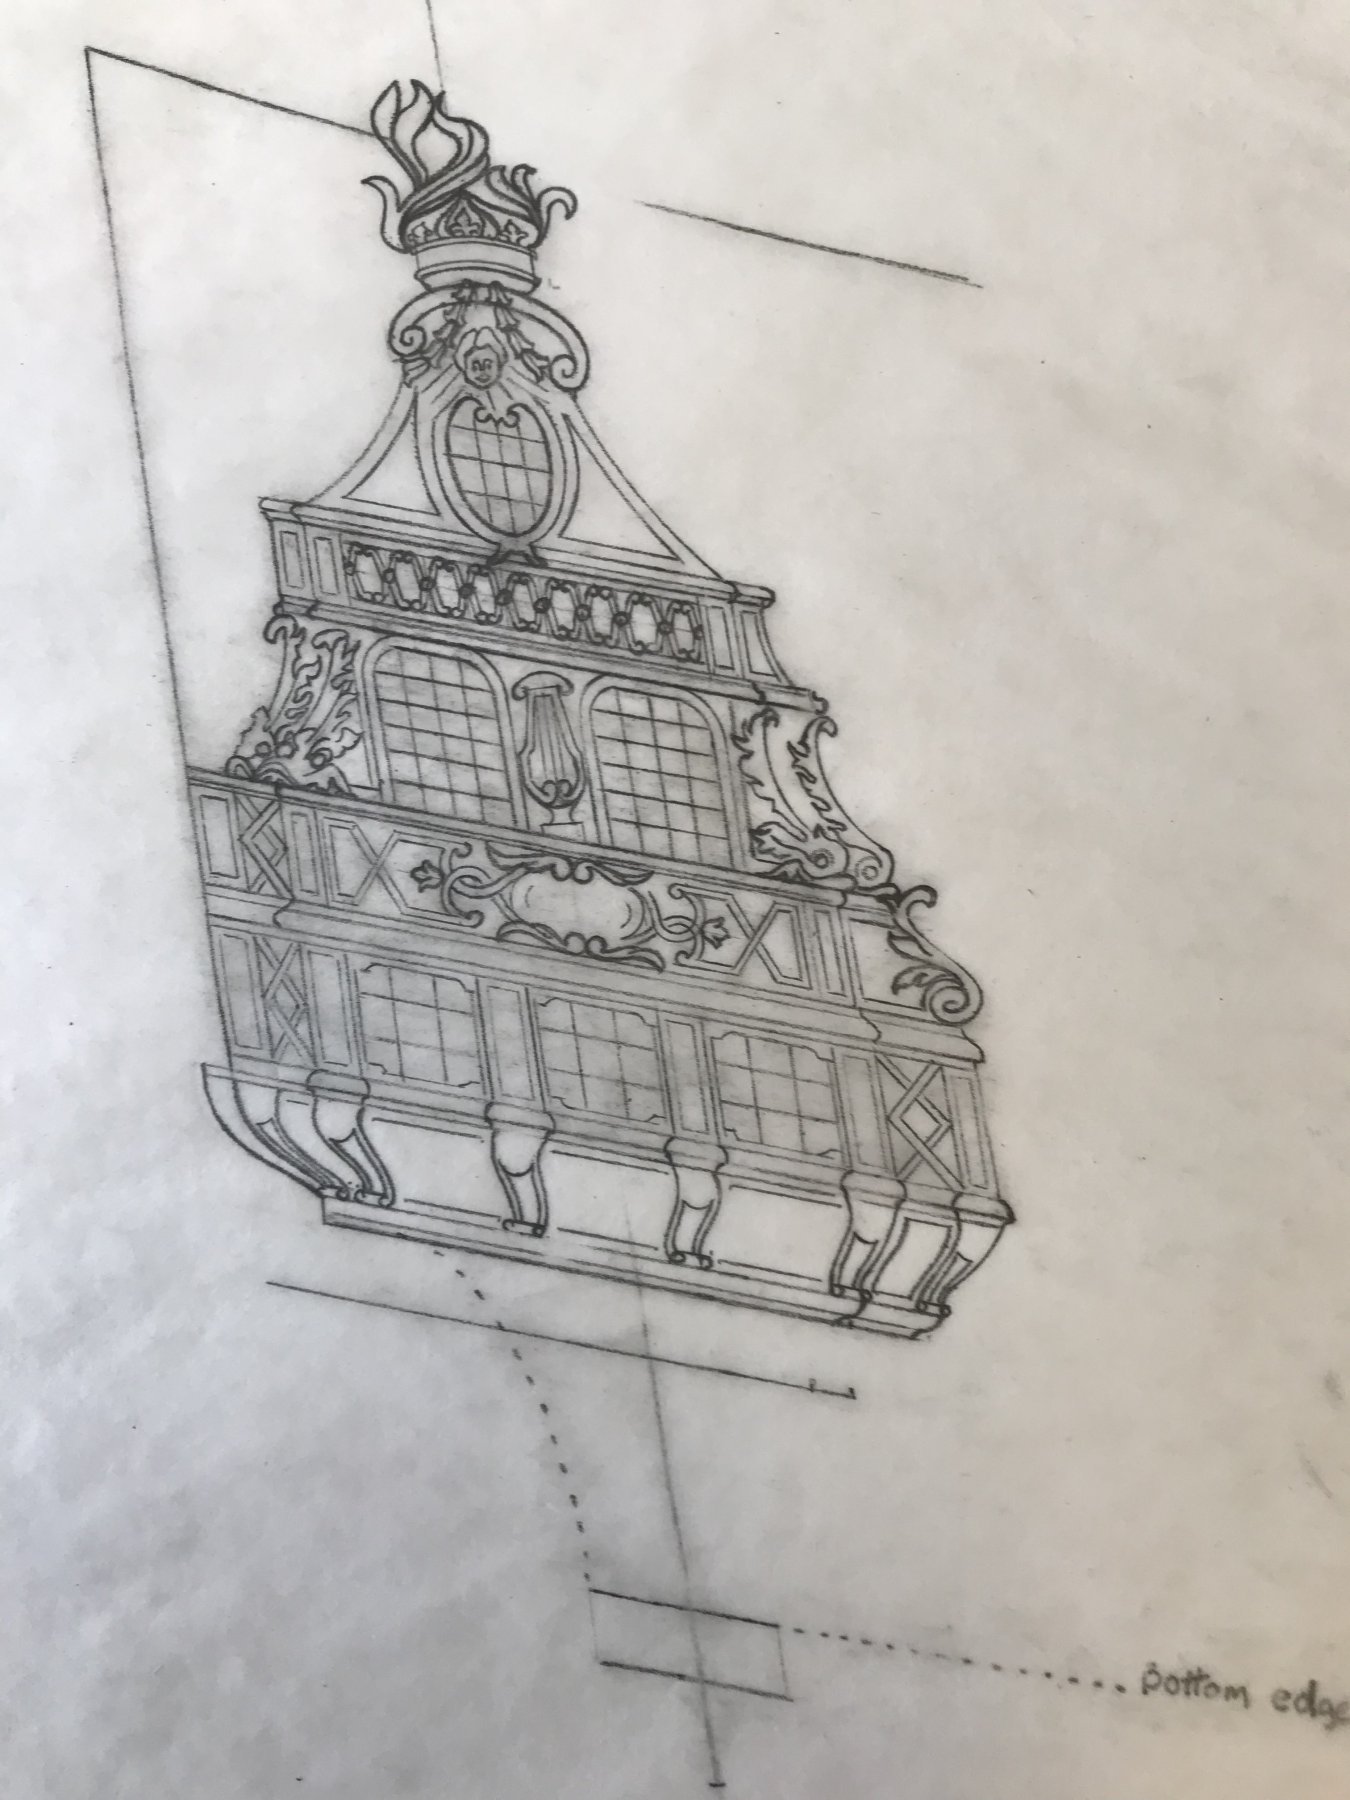
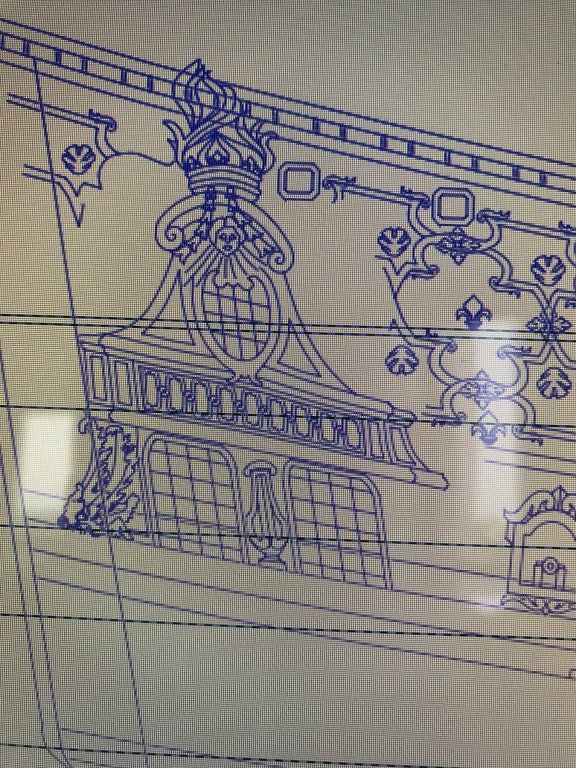
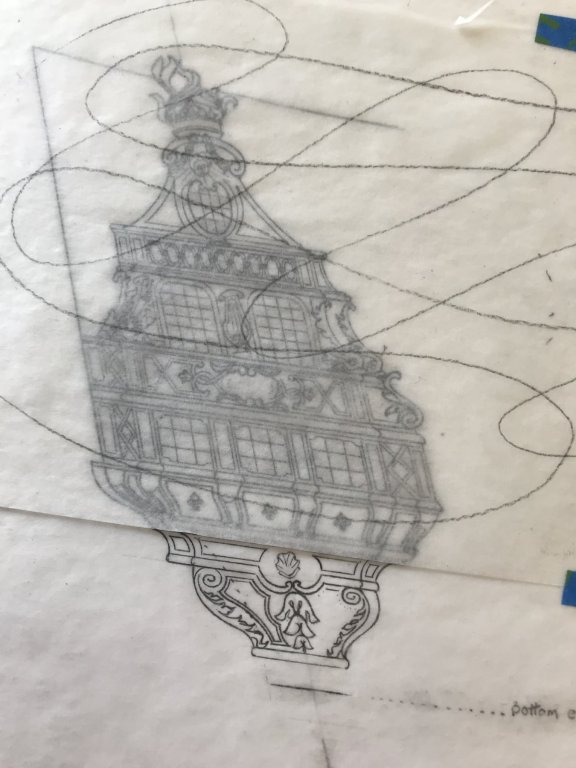
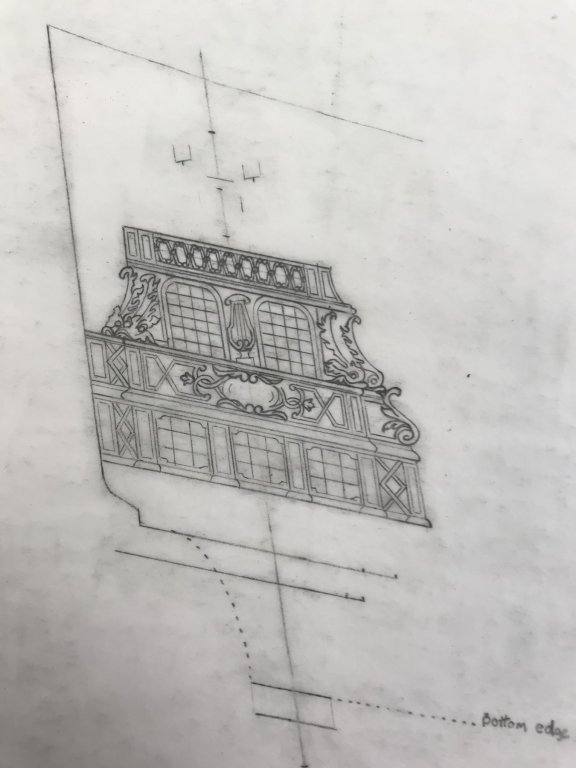
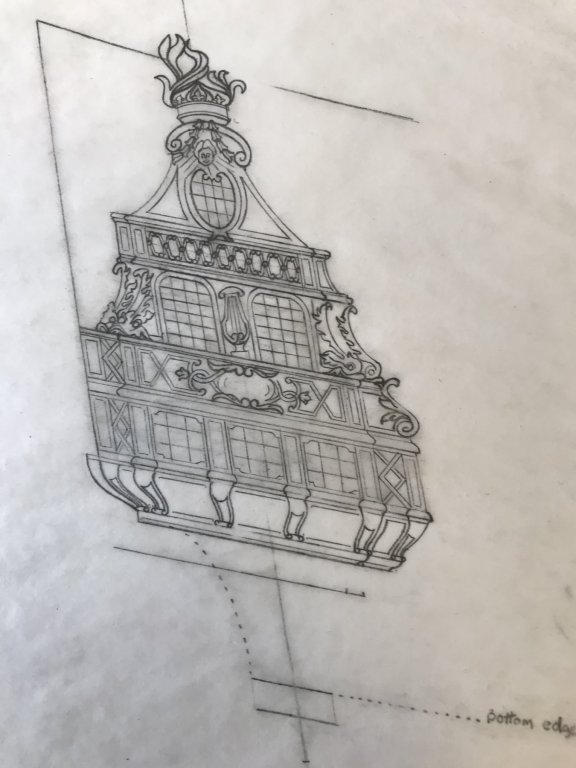
I’ve worked my way up through the crown finial of the upper finishing, and down to the division between the lower gallery and the lower finishing. I’ve realized and corrected a few mistakes, along the way. At this point, though, I think it’s time to spray the drawing so that I can fix in place what I have, before moving on to the lower finishing. I’ve already decided that I won’t include the stern balconies or the mermaids on this vellum; I’ll do those drawings separately, as overlays of photocopies of this drawing: There are supposed to be these tiny faces at the top of these pilasters, between panels of the lower gallery; while I plan to model them, I decided not to muddle the drawing with them. There remains this funky little area, on the lower gallery, as it extends aft into the false gallery that will support the Four Seasons. I’m not sure how all of that will pan out, in three dimensions, but I think it will work.

- 2,699 replies
-
- 5
-
-
- heller
- soleil royal
- (and 9 more)