HOLIDAY DONATION DRIVE - SUPPORT MSW - DO YOUR PART TO KEEP THIS GREAT FORUM GOING! (Only 13 donations so far - C'mon guys!)
×


Hubac's Historian
-
Posts
3,292 -
Joined
-
Last visited
Content Type
Profiles
Forums
Gallery
Events
Everything posted by Hubac's Historian
-
 That’s interesting that they are attributed to Compardel. I will have to look into that further. I can say that this ornamental scheme is sometimes attributed to the Swedish 3-decker (one of the few) Kronan - the wreck of which, in the Baltic, is still an active archeological excavation site; surviving timber (even though the ship blew up) is as fresh and vivid as the Vasa. In my opinion, though, this ornamental scheme has little in common with the ornamental norms of 1665. It looks more consistent with the evolution of French ornamental style, into the 1740’s. I don’t have any clear idea, though, as to what ship this portrait really represents. I’m sorry - I hope this was helpful.
- 2,696 replies
-
- 3
-

-
- heller
- soleil royal
- (and 9 more)
-
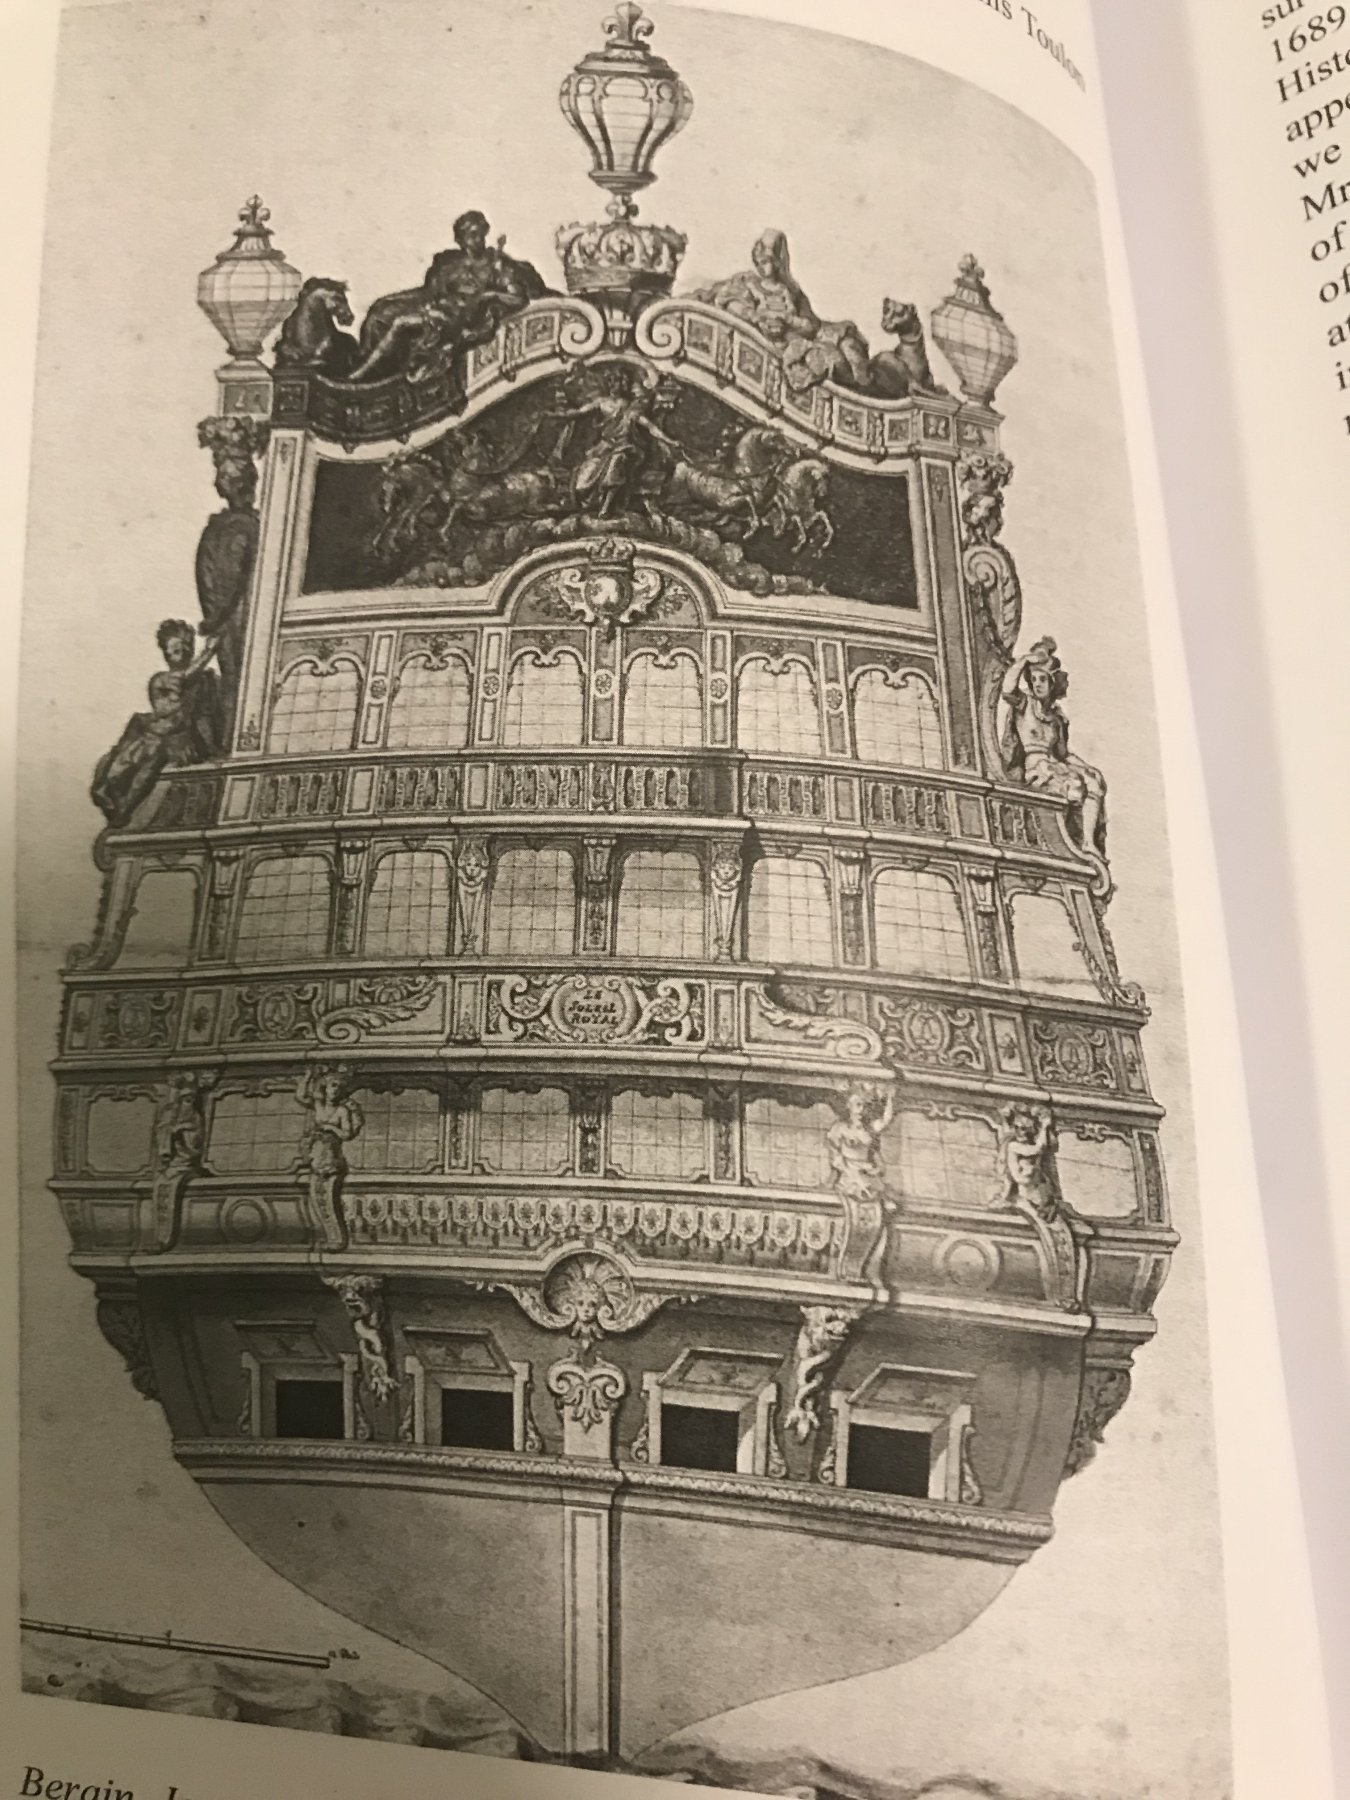
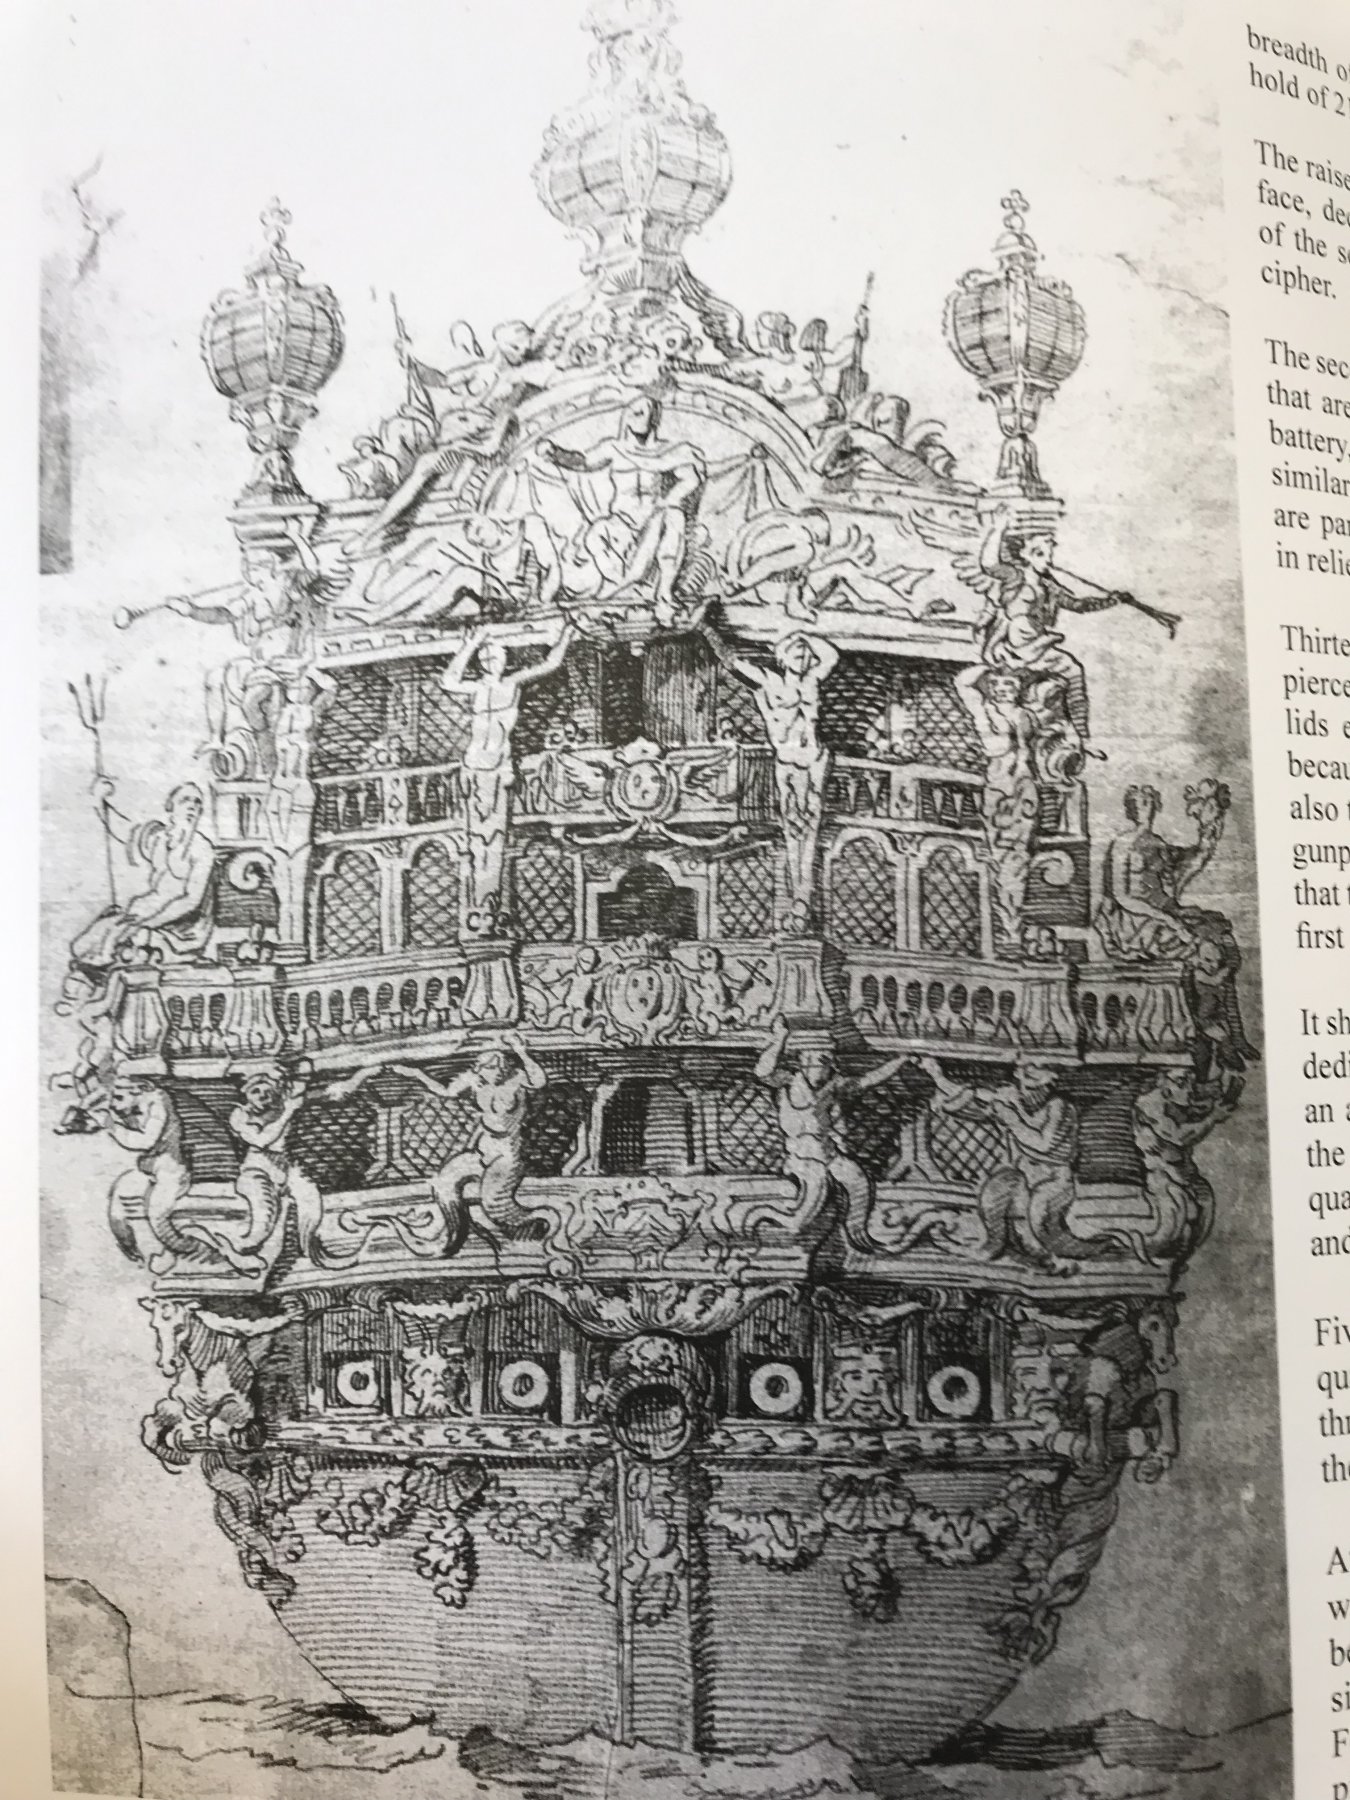
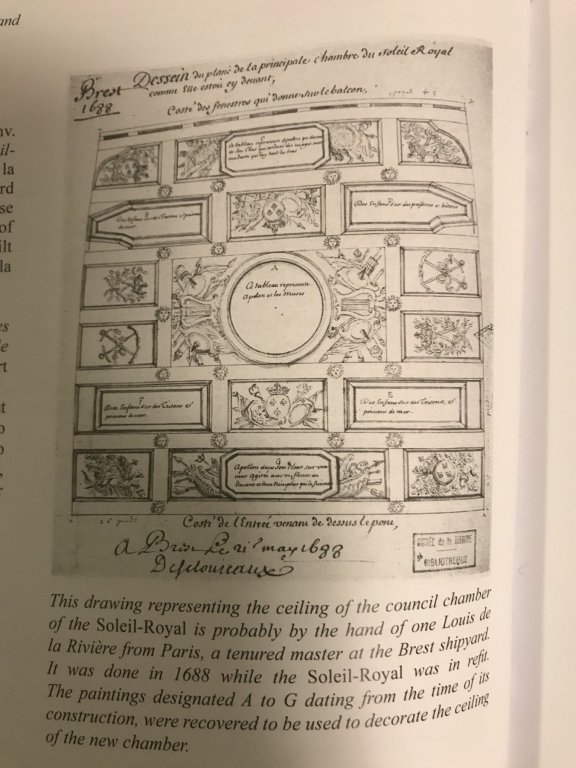
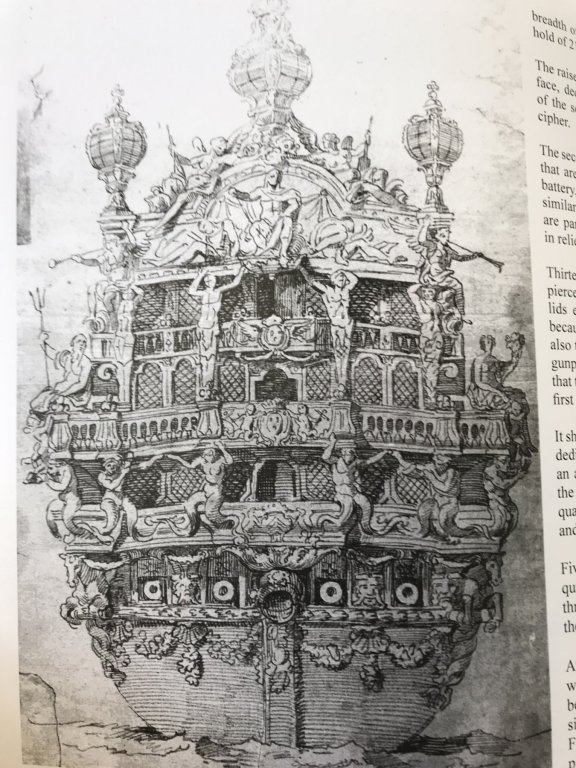
In post 712, I wrote the following: Today, scanning through the Gallica archives, I found the following: Title : Sur la vie et les oeuvres de P. Puget , par D.-M.-J. Henry,... Author : Henry, Dominique-Marie-Joseph (1778-1850). Auteur du texte Publisher : impr. de E. Aurel (Toulon) Publication date : 1853 It needs be noted that the author, in his prologue, is keen on setting the (then) record straight, concerning the artistic career and life of Mssr. Puget - noting the numerous inconsistencies in precious biographies. Inside, I found quite a lot of remarkable information - including what appears to be a fairly complete description of Soleil Royal’s ornamentation before her refit; AS DESIGNED BY PIERRE PUGET, as the author asserts quite strongly. I will try to attach a Google Docs document into which I have excerpted quite a bit of interesting info about Puget’s role on the Monarch, as well as this section on SR. In the meantime, consider what I mentioned about the tafferal figure of Asia and the tiger, in my earlier post, as well as the recycling of ornament. Also, keep in mind that this is a direct copy/paste into Google Translate, without any accompanying edits or interpretation: “” 36 ON LIFE AND WORKS The colossal forces in the rear overloaded this part, had excited the complaints of the naval officers, which led Colbert to engage, as early as the year 1670, the intendant of the port of Toulon to confer with the great artist, so that he was modifying his compositions, and from no decoration could be undertaken that he had not previously received the approval of the Court. Intendant Matharel, charged with getting along with Puget, received from Colbert, on the date of September 19th (1670), a letter in which one reads: "I am glad you have resolved with MM. of Mar "Mar" d'Almeras and Mr. Puget who would not be "Henceforth so great figures to the dolls of the vessels; "We must avoid this embarrassment there and do the least ornament "That it will be possible. The English and the Dutch in their Today's buildings are careful not to put close to them and not to make galleries at all. All these "Great works only serve to make ships more "Burdensome and to give hold to the burns; So it is necessary "To imitate them in this, and for this purpose, that Mr. Puget "To reduce the ornaments of the dolls that remain to be made to "Vessels that are in the water or on the construction sites, so "That they can not embarrass them in navigation. "It will also be necessary for you to send me the designs "To make them see S.M. before he executes them. »(1) At that time, the art of navigation had made great progress. Going out of the ways of the old routine this art was (1) I borrowed this letter from the sculpture article of the nautical glossary of M. A. Jal, naval historiographer. I am P. PUGET. 37 it became a real science subject to calculation, and a sound and thoughtful theory replaced, in practice, the processes which traditional habits had maintained in the course of the Middle Ages, a disadvantage which they offered to navigation. It had been recognized that the exorbitant height of the quarterdeck was only good for drifting the vessel, and the construction of the lower heads was required; but as the improvements, in whatever way, are not improvised, and for those whose need is recognized there are always resistances more or less tenacious to overcome, even susceptibilities of position to spare, it is not was that the rear of the ships was lowered to a reasonable level, and during the reign of Louis XV again we saw the dolls, although lower than under Louis XIII and even under Louis XIV, to rise much to above the limit at which they stopped definitively under Louis XVI. The stern of the Royal Sun, whose decoration is also due to the pencil of Puget, seems to testify to the account held by this artist of the need to restrict the extent of decoration. In the design of this new vessel the upper gallery, that is to say, the one which in the other vessel culminates in the coronation, is suppressed, and the figures are less gigantic. The vault it is a duty and a real pleasure to express to this laborious writer all my gratitude for the obliging competition which he has kindly lent me by searching, in the archives of the Ministry of the Navy, the documents which could not be furnished to me by the archives of the port of Toulon, and sending me textually a copy of the various pieces of Colbert's official correspondence which I use in this work. 38 ON LIFE AND WORKS other ornament than simple moldings and a mascaron to cover the opening of the jaumière. To this seems to be reduced the apparent modification made in the profusion of ornamental riches, the composition of the painting always retaining a great and noble character. It may be, however, that the absence of ornaments in the vault was less akin to the modification demanded by the minister, than to the quality of the vessel, which being of second rank did not admit so much luxury of decoration. The area that bears the name of the vessel, covered with beautiful arabesques, is, at the Sun Royal, supported by four baths indicating the seasons that the star of the day shares in its annual race, because it must be noted, everything is allegorical in the decoration of this building whose name itself alluded to the young monarch. The succession of seasons begins with the left, where winter is represented under the appearance of an old man wrapped in a drapery covering his head and body; the other three seasons are graceful figures of women carrying on their heads a basket full of flowers or fruits that characterize them. The gallery extends from one end of the stern to the other, and its two extremities serve as the seat of two beautiful figures representing warriors of lesser proportions than those of the first vessel. These warriors, whose defensive armor differs as well as attitude, still refer to the two great regions that the sun illuminates. The east, on the starboard side, had its helmet adorned with floating ostrich feathers, while the crest of the port warrior, composed of feathers of other birds, formed a broad plume framing with great taste all the top of the head . With the hands of the two hands, which were near the ship, on the cornice of the gallery, which served as their seat, both of them held up the arm on the opposite side, so that the hand served as support. P. PUGET. 39 next to the top of the board. These sides are formed of an inverted console whose notch accommodated at the reentrant part of the flanks of the building, at the height of the second battery. A bust of a woman carrying on the head a basket of flowers for one, fruit for the other, comes out of the small winding of these consoles. The great bas-relief, left blank in the project of decoration of the first vessel, but drawn in this one which had already received its name, represents the young king under the figure of Phoebus, driving his chariot harnessed of the four mythological horses launched at a gallop, and in the ancient style, that is to say, thrown two on the right and two on the left. The coronation of this beautiful stern, of better taste than that of the other vessel, is formed by two figures of women seated with their legs extended along the very slightly arched border of this coronation, and turned on their hips so to present face all the upper body. Their costume still indicates in them the symbol of the East and the West. Nobly draped one by one, the figure of the west holds in his right hand a long scepter leaning on his shoulder, while in front of her, at her feet, a horse with a bristling, floating mane, with her head held high, her mouth open, and her nostrils wide, looks at her, neighing. To starboard, the symbol of the east carelessly holds in its hands, in front of it, a vase from which rises a plant apparently indicating that of perfumes. At the foot of this figure and symmetrically with that of the opposite side, is lying a tiger that a necklace passed around his neck seems to show as tame and submissive animal. This remarkable composition is, as we see, only an ingenious flattery by which Puget celebrated in his own way the glory of the young monarch, who at the same time dominates the East and the West, the East by the establishment created or 40 ON LIFE AND WORKS encouraged, (1) the West by the power of its weapons, and making its domination accept with love. An immense royal crown placed between the two symbolic figures, in the middle of the arch of the coronation, serves as a support for the only stern lantern. As in the other vessel, the whole surface of the painting is still noticeable by the profusion of details of the accessory ornamentation: L-stamped cartridges, crisscrossed, faces of radiant sun, fleur-de-lis medallions, strips of lambrequins between all the carvings of which is showing a fleur de lys, and this. The design of the Sun-Royal still bears, as we see, several great figures; that was splendor, brilliancy, magnificence, it flattered the vanity of the king, who was as dazzled by sumptuousness as by victory, and Colbert, whatever his conviction, was not a man to be opposed to. his master on this article: the large figures, a little modified as to size, were still tolerated despite the formal disapproval of sailors, despite their incessant claims. However, Puget, in order to remove the inconvenience of too great a weight, had decided to hollow out as much as possible these masses of wood, as we see by those of those figures which still remain. Ten years had elapsed in this sort of struggle since the great minister had engaged the great artist to diminish the proportions of these ornaments, when the Sun-Royal received the decoration which I have just described. As this sculpture work was executed in Brest and that this port lacked or (1) from or (1) East India Company established in 1664; new company of France Equinoxiale created in 1664; protection and encouragement to other Indian companies. P. PUGET, 41 To be able to render Puget's thoughts worthily, the minister had to send some from Paris. On the 21st of December, 1684, the Marquis de Seignelay, to whom Colbert, his father, had delegated the affairs of the navy, wrote to the intendant at the port of Brest, M. de Seuil: "I thought that the sculpture of the Sun-Royal was very advanced. Since you lack skill workers for the great figures, I will send you from here to the most; but "it would be necessary to avoid the defeats which are recounted in the ornaments of the stern of the Royal Louis, where it has been remarked, that these large and heavy figures can only emancipate him much in his navigation. I admit that the ornaments must correspond to the grandeur and magnificence of the king, who appears in these superb bodies of buildings, but we must also beware that they are in convenient. " The correspondence of the minister of the navy with the intendants of the great ports, but especially with that of the port of Toulon, testifies to this continual struggle, from 1662 to 1689, to come to have definitively suppress the cumbersome decorations, and to make prevail, against ingrained habits, the advantage of simplicity “” What is being described, here, is very similar to Berain’s depiction (“Apres Puget”) of Soleil Royal’s allegory, however, there are notable differences - in both style and representation, which seem more consistent with the early First Marine. I will make a more detailed analysis, later, but I have to start making dinner now. And, here, I was just hoping for a few crumbs from the archives while, instead, I was treated to a veritable feast! P.S. there does not appear to be an easy way to link the Google Docs doc, from my phone, however if you are interested - just PM me and I will email it to you. I hope (after all of this reading) that this was as satisfying for you, as it was for me 😀

- 2,696 replies
-
- 5
-
-
- heller
- soleil royal
- (and 9 more)
-
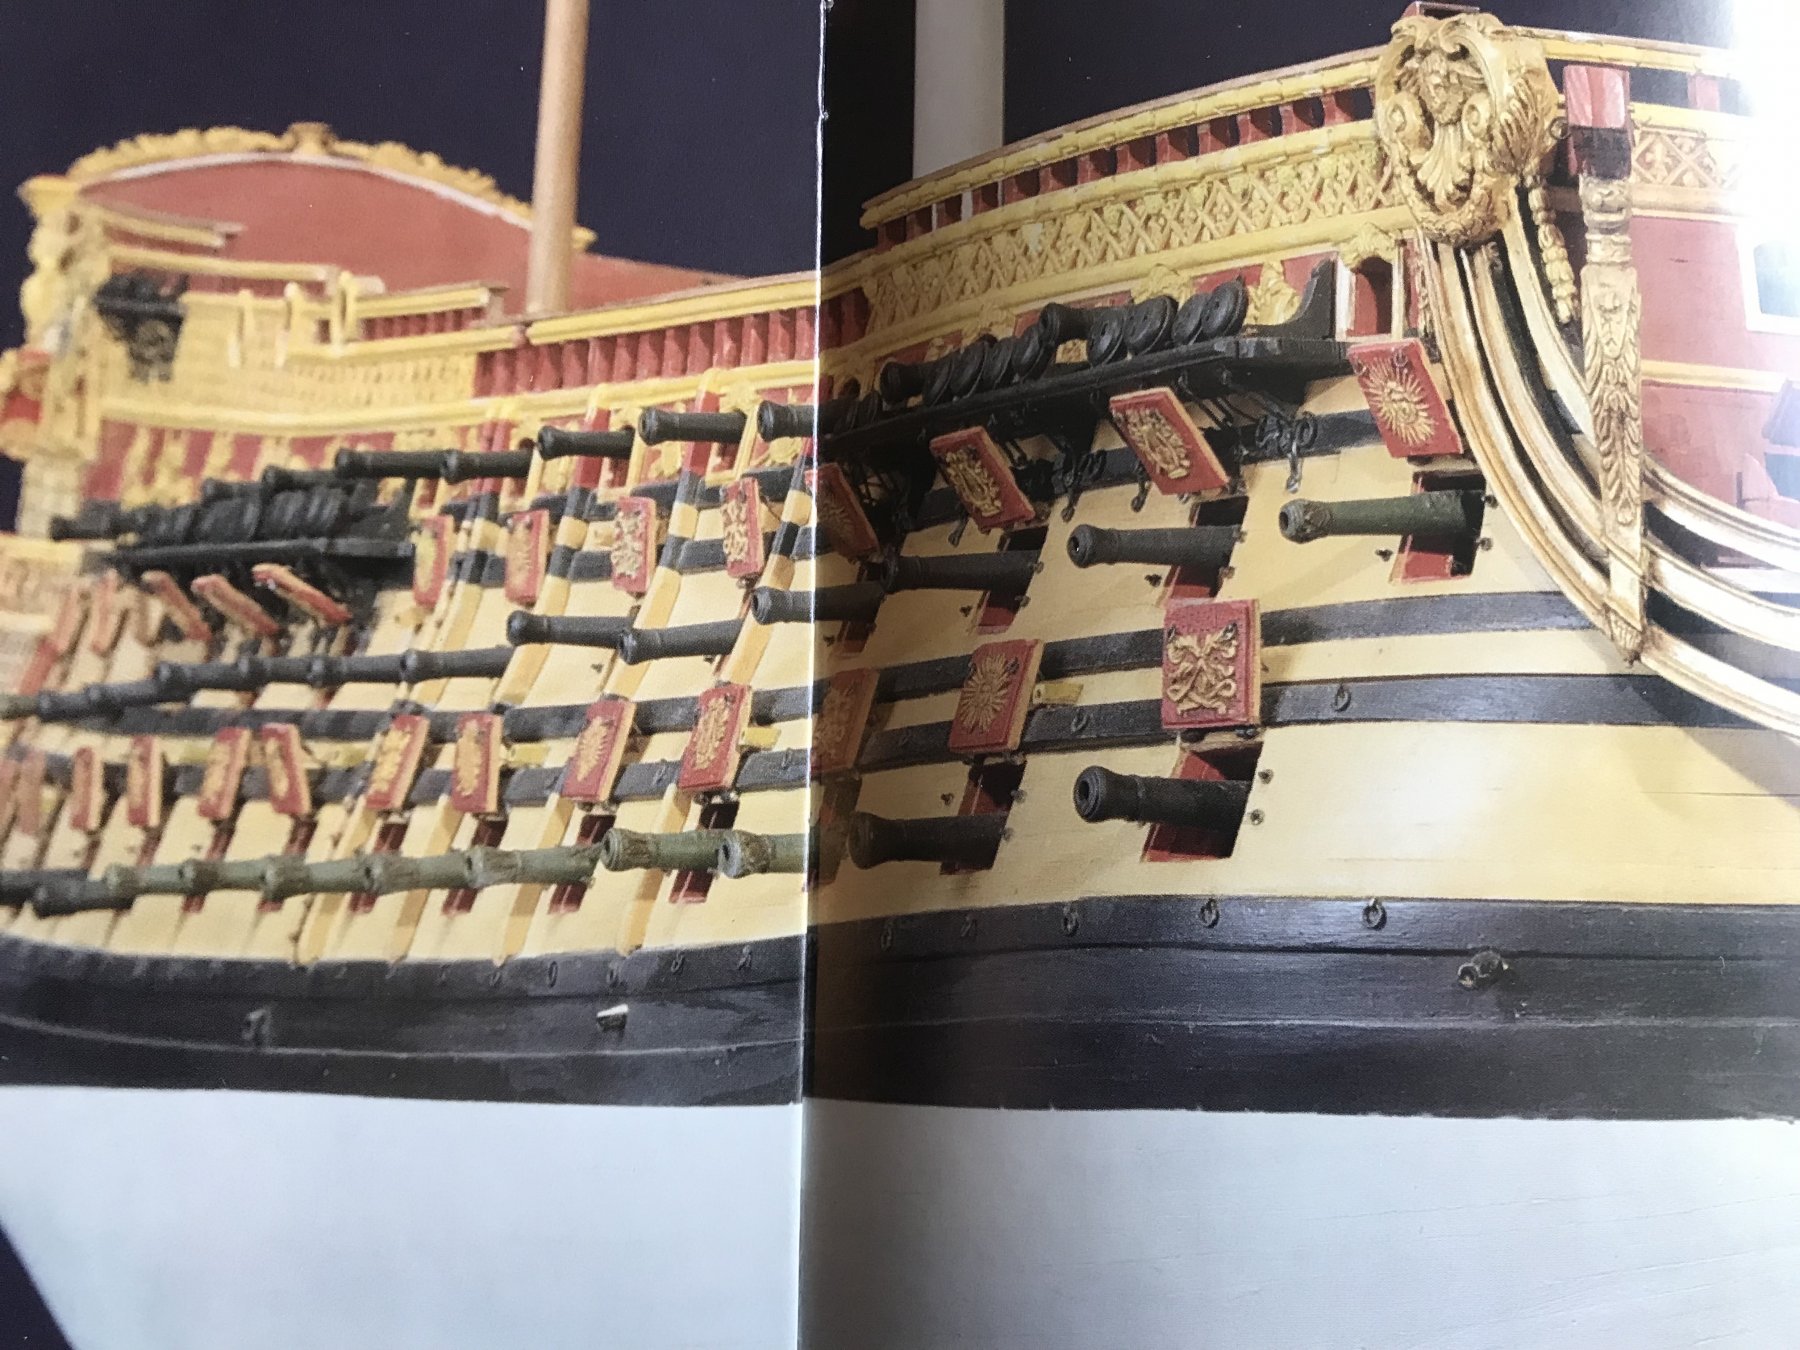
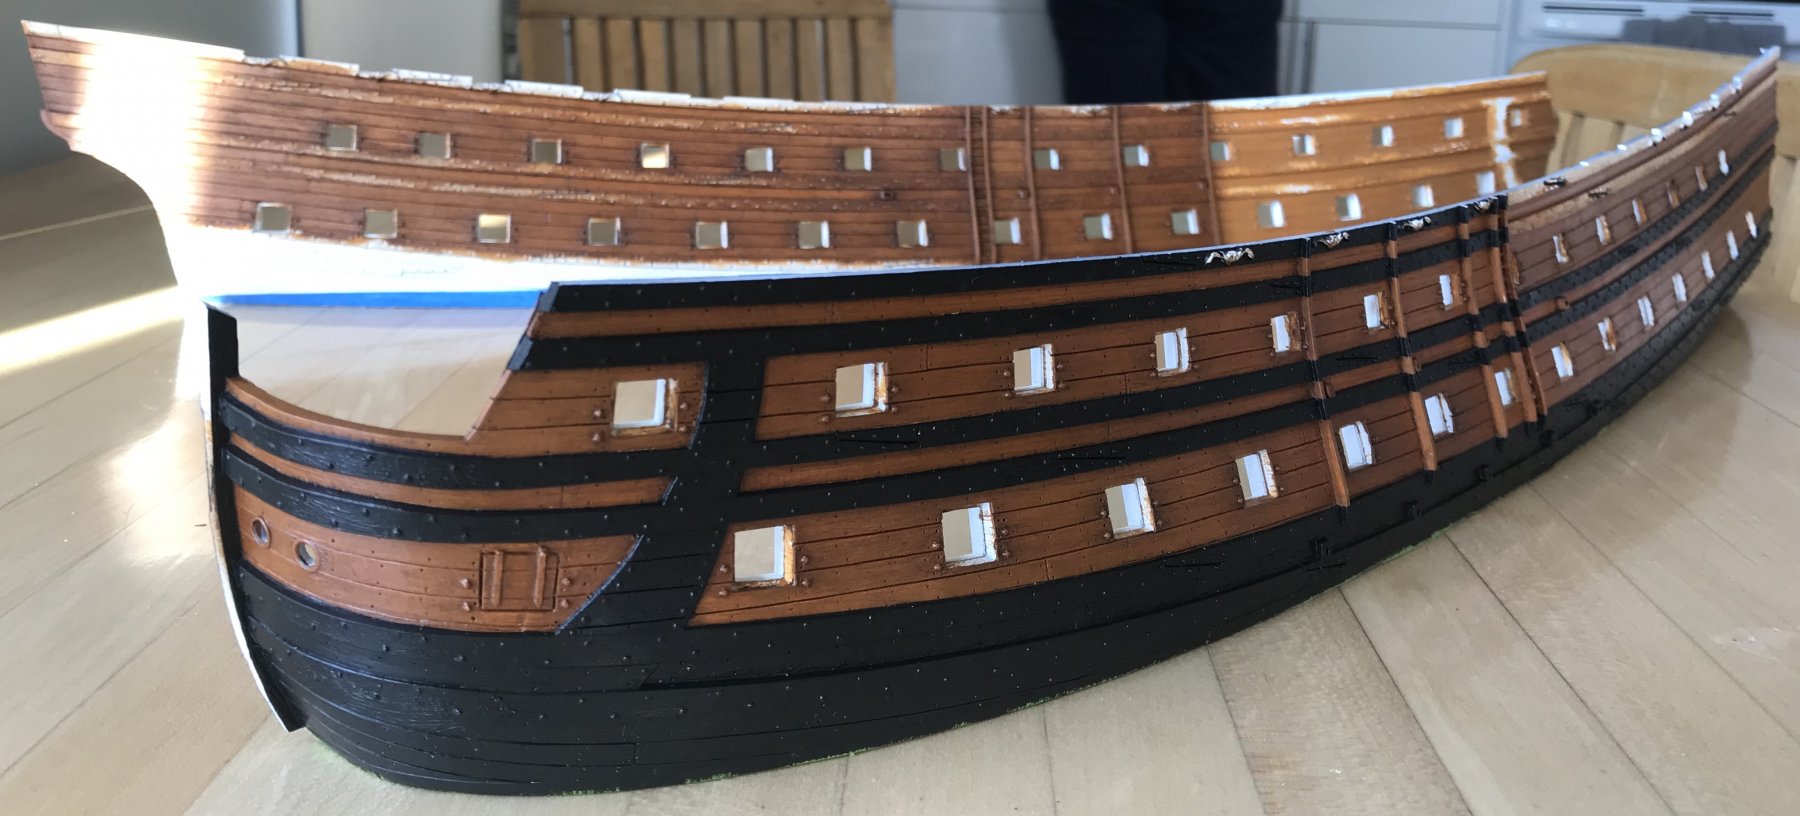
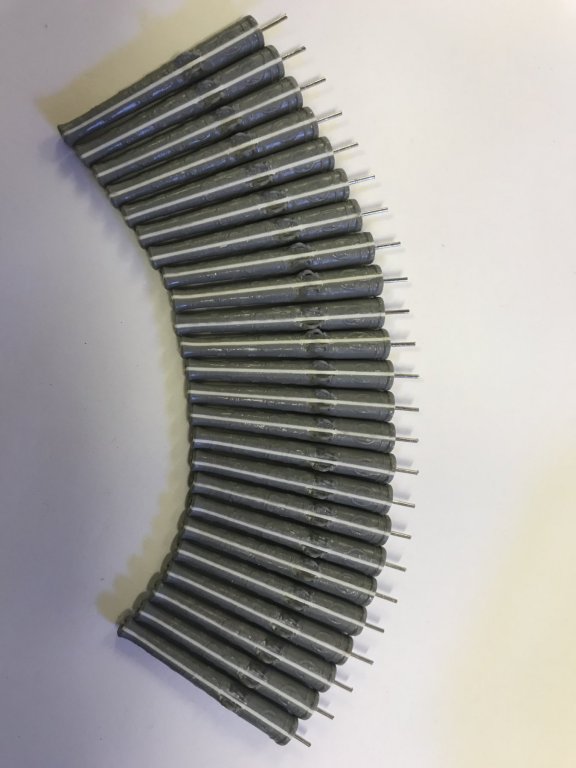
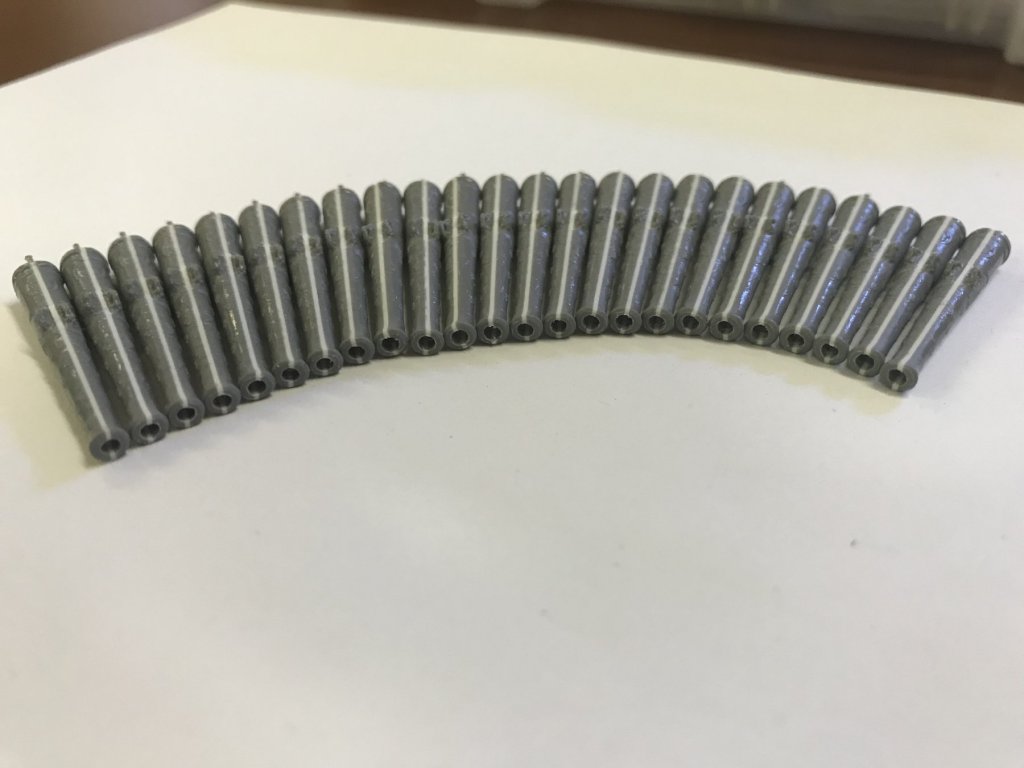
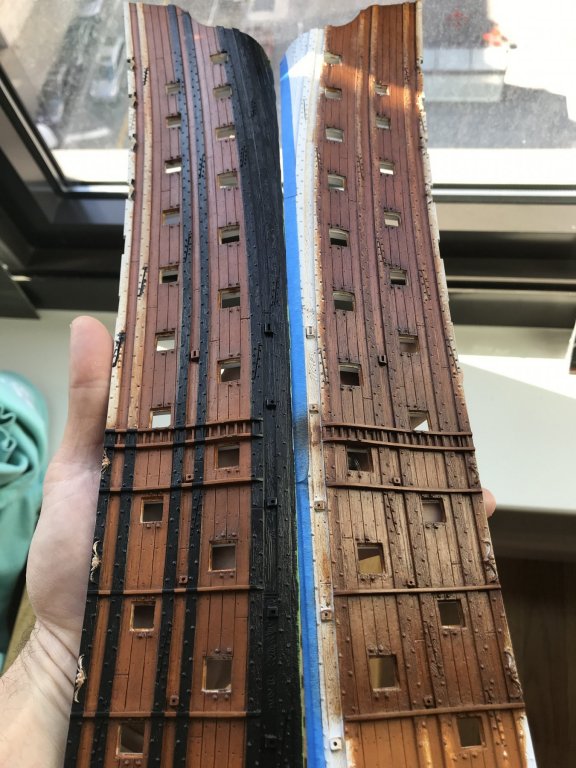
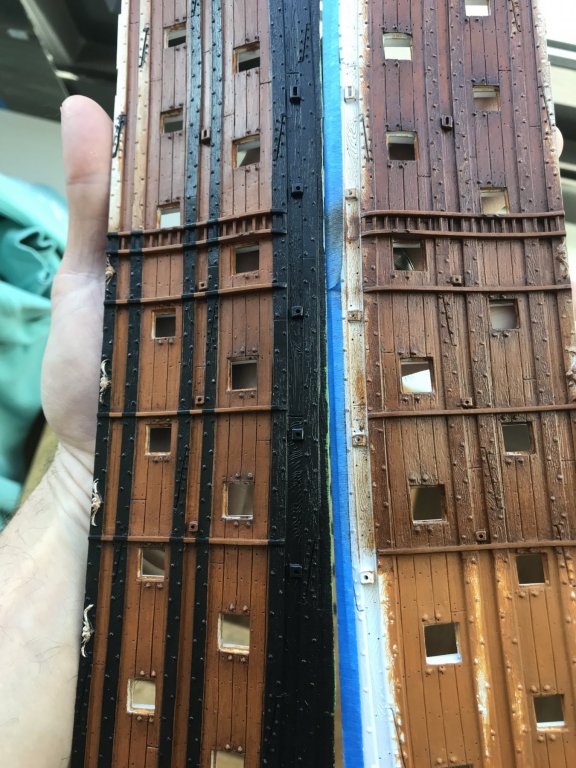
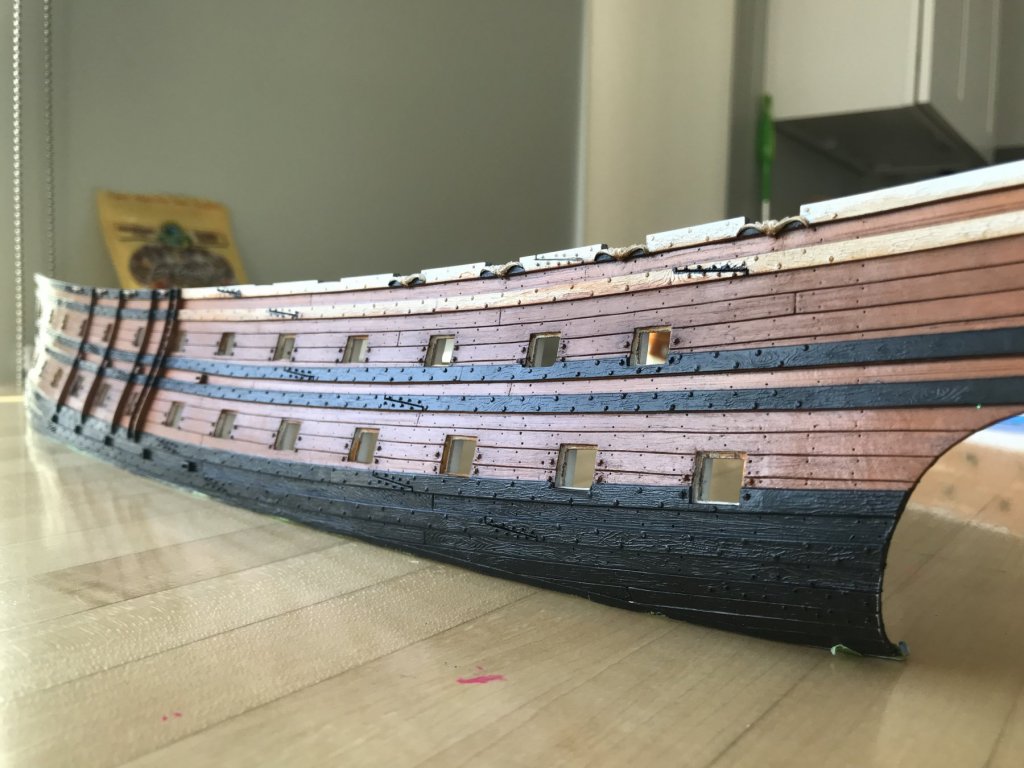
Well, I’ve nearly finished beefing up the lower battery. Here are 24 out of 30 barrels; somehow, I missed one sprue tree, with the remaining six. I’ll have to pick those up, when I go to my Dad’s, in a few weeks. This came out well, I think, and to the desired effect. I am not eager, though, to repeat this process for the middle deck battery. Recently, I had something of an epiphany. I remembered that, for the longest time, I had stashed away the lower battery barrels from my first SR build, as I had chosen, back then, to display her with most of the lower ports closed. It dawned on me that, if I still have those guns, I could assemble them without a spacer and place them on the middle deck; 36lb guns on the middle deck. I could then shift the stock middle battery to the main deck; the main deck to the f’ocsle and quarter decks, and a pair of 12 pounders up to the poop. Doing so, will enable me to beef up every level of the battery without all of the extra work. Hopefully, those extra 36lb guns are still in a baggie inside my un-built Heller Victory (also at my Dad’s). I’ll still need to make up the difference of the few barrels I used on the first SR. Maybe Henry still has his from his un-used kit. If not, I can prolly just make castings of the two halves, easily enough. The painting continues on a near-nightly basis. The port side wales are blacked, the port linings painted and distressed, and the gold ornaments, along the top wale, are gilded. It’s slow-going, but this is the most critical stage to take one’s time. I’m still painting the gun carriage through bolts, and I have to dinge-down the narrow strip of white below the boot-topping. Then, it’s touch-ups and a matte-latex clear coat to lock it all in. Although, I suppose I should wait to see whether I have to adjust the distressing to match the starboard side. I have also been combing the collected correspondence of Colbert to the various ministers of the shipyards at Brest, Toulon and Rochefort, and others. I have set aside particular correspondence to M. De Seuil, of Brest, where there is some mention of SR, during the time of her construction. I don’t think, in my approximate translations so-far, that there’s anything too earth-shattering there, but I will post whatever tidbits that I come up with Here are two such examples: Nouvelles Archives de l’Art Francais Dispatches of Colbert Relative to the Decoration of the Vessels Documents communicated by Mr. Louis Caffarena It was supposed that after the publication of the letters, instructions and memoirs of Colbert by P. Clemen after Pierre Puget Leon Lagrange, it would be difficult to discover anything unpublished on the decoration of ships in the 17th century. Some writers of Provence, and in the first place our collaborator Mr. Ch Ginoux, had besides taken care of the question in a very special way. The abundance of information they had gathered was such as to discourage the researchers that this curious subject could attempt. M. Cafferena, who has been familiar with the archives of this department with his duties at the Department of the Navy, has, however, assured himself that no package has been left unexplored. Our collaborator has not lost his sentence[?]. The depictions that follow are proof that the fund is exhausted. Clement and Lagrange did not know or did not care to publish these letters, textually recorded by Mr. Cafferena on the registers of deputies of Monseigneur preserved to the Navy. I. Moderation to be made in the carved ornaments of which the vessels under construction at Toulon are overloaded. To: Mr. Matharel To: Saint-Germain, September 19, 1670 I am very glad that you have resolved with Messieurs de Martel D'Almeras and Sir Puget, that we should no longer put such great figures in the heads of the vessels. It is necessary to avoid this embarrassment and to make as few ornaments as possible. The English and the Dutch, in their constructions of the past, observe that they do not put any of them at all, and that they are not at all galleries, all these great works serving nothing more than to make the vessels much heavier, and give it to the brulots [fireships?/cannon fire?]. It is therefore necessary to imitate them in this, and for this purpose that Sir Puget reduce the ornaments of the dolls [sterns] that remain to be made to the vessels that are on the water and on the building sites, so that they can not embarrass [in this sense, hinder] them in the navigation. It will also be necessary for you to send me the drawings to show them to his majesty before he executes them. II. From the decoration of vessels under construction in Brest. Drawings provided by LeBrun for The Royal Sun. To: Mr. De Seuil To: Dunkirk, May 22, 1671 Almost always the works of sculpture, painter and gild the rest of the ornamens of the said vessel, so that they are at their best, when the King sees them; if you have not received a decision from Mr. LeBrun, on the change to be made to the first drawing of the flat fund [tafferal] of the Royal Sun, please follow the advice of the painter. He has marked you by his memory to be the more capable of conducting these works, because he makes them complete, and that he loses too much time waiting for new clarifications. —- The first letter to Matharel re-enforces the earlier translation I had posted of Puget and his time at Toulon. The second letter to M. De Seuil is interesting, only in so far as the development of SR’s ornamentation was a process of considerable revision, although nothing is said about the allegory, itself. There are a few other brief passages that I will post in the coming days.
- 2,696 replies
-
- 4
-
-
- heller
- soleil royal
- (and 9 more)
-
Cranes came out very well, Dan. I love the inventiveness of using appropriately scaled U-channel for the clevis mounts; they look exactly like the heavy gauge steel fixtures that they would be. Great work all around!
- 238 replies
-
- 3
-
-
- leviathan
- troop ship
- (and 2 more)
-
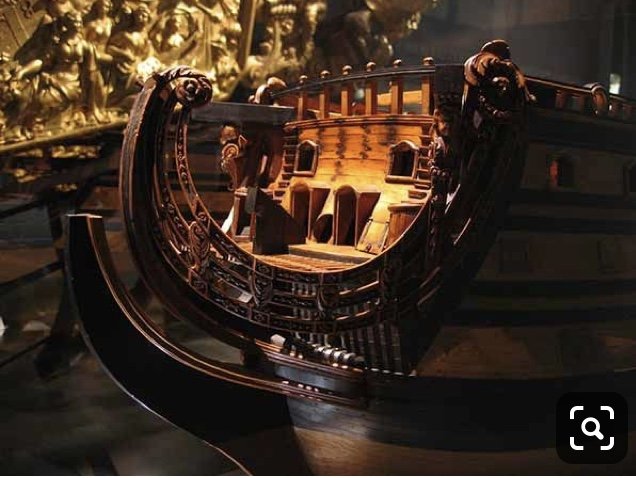
Yeah, I have to also agree with EJ, in that these modification builds are primarily useful as mock-ups, for the real thing. Soleil Royal’s stern and quarters are immensely complex, and there will need to be some reconciliation between the known Berain stern drawing and the Vary/Compardelle quarters, which present some grey areas of interpretation. I’d rather play with all of that on a plastic model - scrap an attempt, if it isn’t working - than to commit to a course, in wood, without a clear idea of how it is all going to work out. I can mostly see it in my mind’s-eye, but.... Once the mock-up is done, which will be a good model in its own right, I would go ahead and draft plans for the full scratch-build.
- 244 replies
-
- 4
-
-
- heller
- soleil royal
- (and 1 more)
-
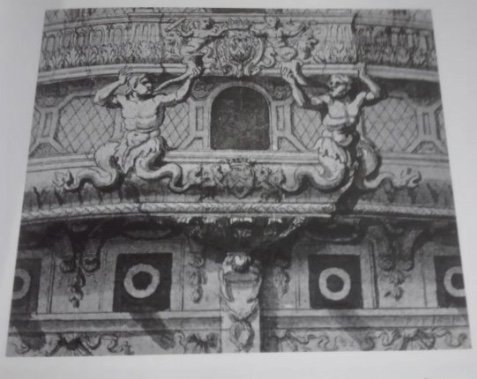
As for the pen and wash drawing, the Tonant, Scepter and Lys were all Toulon built ships. Although their armament roughly corresponds with the likely armament shown, the caption references Rochefort. So, I think it is more probable that the ship represented here could be either the Fier (1694, 94 guns), the Fulminant (1691, 98 guns), or the Magnifique (1693, 88 guns); all Rochefort-built ships. Because the style of ornamentation is clearly Jean Berain, the ship in question would certainly have been built somewhere from 1689, or ahortly there-after. There are probably clues to be had in the iconography of the Tafferal, if anyone out there is well-versed enough in Greco-Roman lore to make any connections, there. I am going to guess that it’s the Magnifique because of the absence of an armed forecastle, and poop, thus making for a lighter armament, overall. Also, the resemblance to SR’s re-designed stern is pretty magnificent, and it would see reasonable that Berain would incorporate the general parameters of this stern, which were so successful on SR, to another ship.
- 244 replies
-
- 5
-
-
- heller
- soleil royal
- (and 1 more)
-
These projects, I think, are comme-ci/comme-ca; a bit like this and a bit like that. To have fun at it, I think you have to accept compromise. Perhaps, not worry so much about the length discrepancies, or height between deck discrepancies. You can make some adjustments to the armament discrepancy, in order to get down closer to 90 guns; right out of the gate, you can lop off the forecastle deck, and remove the two guns from the poop - there’s a savings of 8, right there. Remake the stern transoms and quarter galleries from scratch, in the image of the SP. Create the diamond-hatch frieze of fleur-de-lis. Incorporate the SP color scheme of red vermillion and yellow ocher. Those changes, plus some alterations to the decks and furniture, plus a workable rig will, IMO yield a very reasonable impression of the SP. That will all still be a lot of WORK, but it will produce a model that is greater than the mere sum of Heller SR parts, I think. All of this, of course, is up to you and what you want to do. My thinking was always that just having the kit shells, no matter how flawed they might be, was a tremendous time saver, when compared to making a hull from scratch.
- 244 replies
-
- 5
-
-
- heller
- soleil royal
- (and 1 more)
-
Whatever Tanneron’s sources may have been, in developing the lines for his Soleil Royal, you can see that Heller pretty closely copied Tanneron, even in this regard: As you have mentioned, your false keel does improve the bluffness of the bow, with the added benefit that your widened hull now matches the SP’s beam, and the run of the rest of the hull. Your hull is off to a smashing start, and I think your efforts will pay off handsomely, as the build progresses. Is that engraving the Tonnerant? I would love to know what ship that represents because the stern, in structure and outline is very similar to Berain’s re-design of SR. The primary difference is that the upper stern balcony, at the quarter deck level, wraps to the quarter galleries. Lemineur does not say what ship is represented, there.
- 244 replies
-
- 5
-
-
- heller
- soleil royal
- (and 1 more)
-
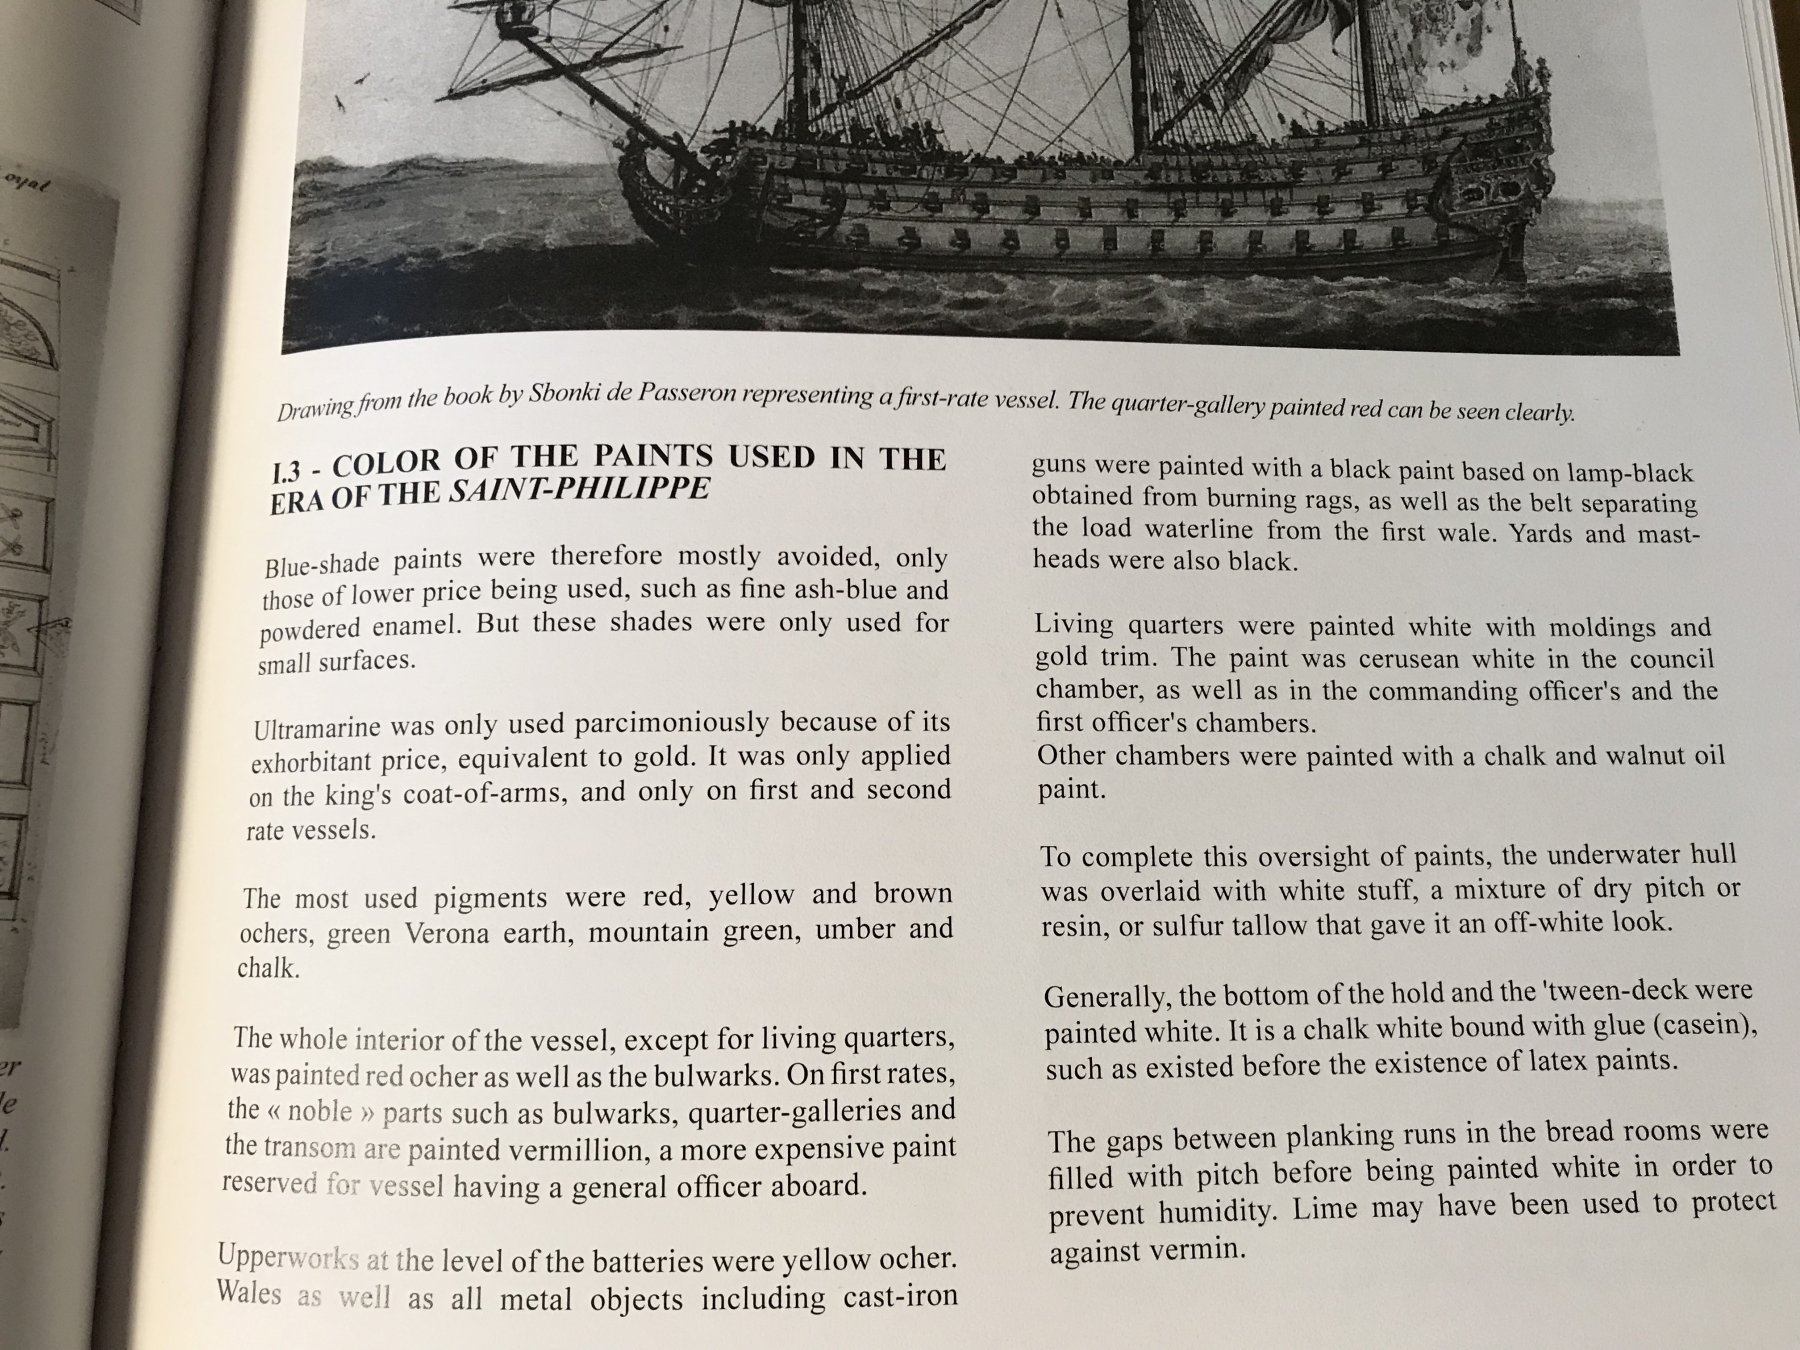
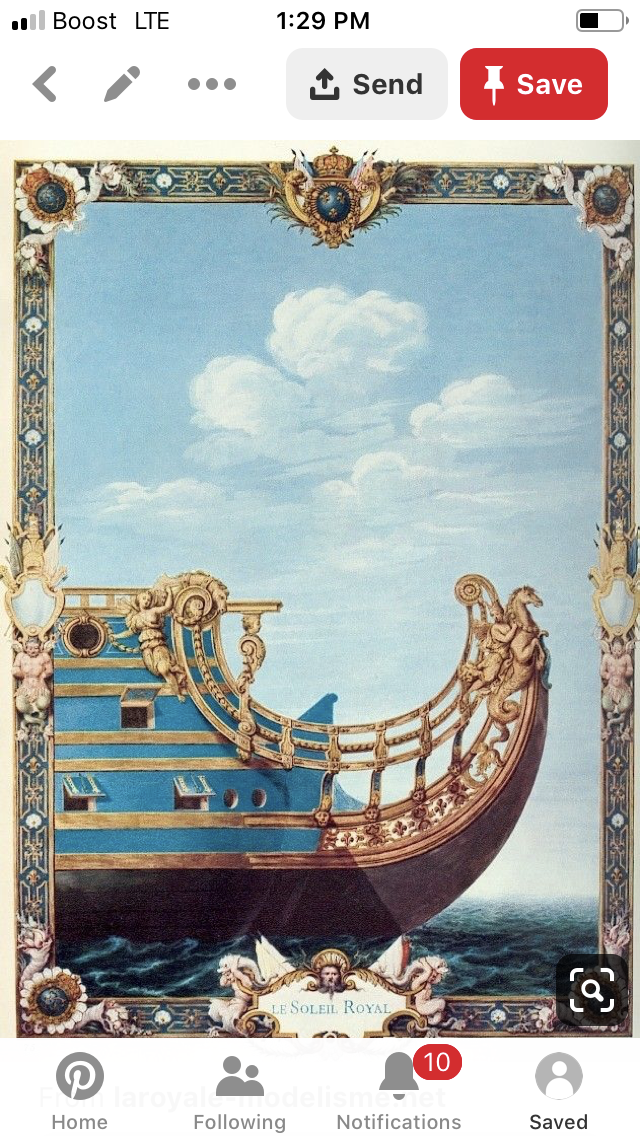
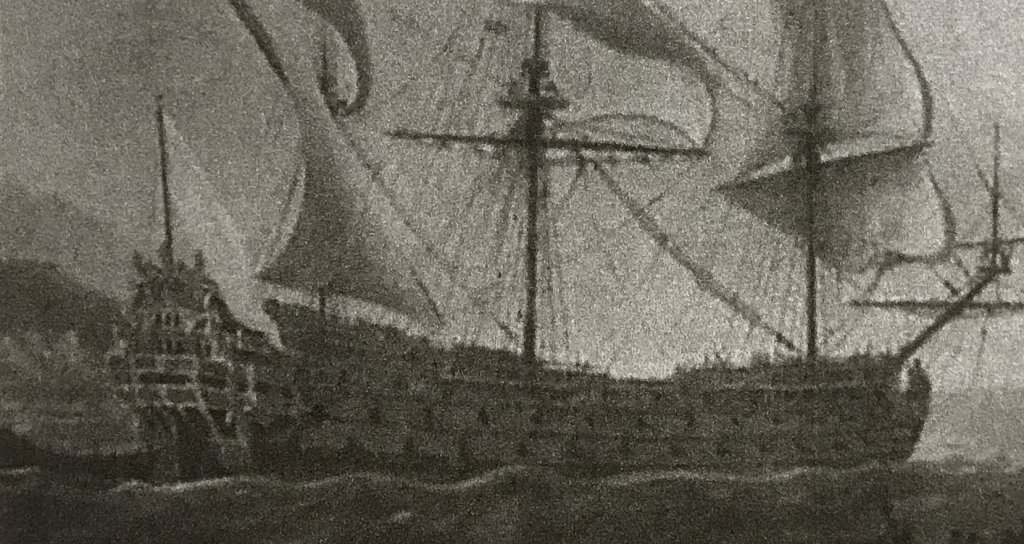
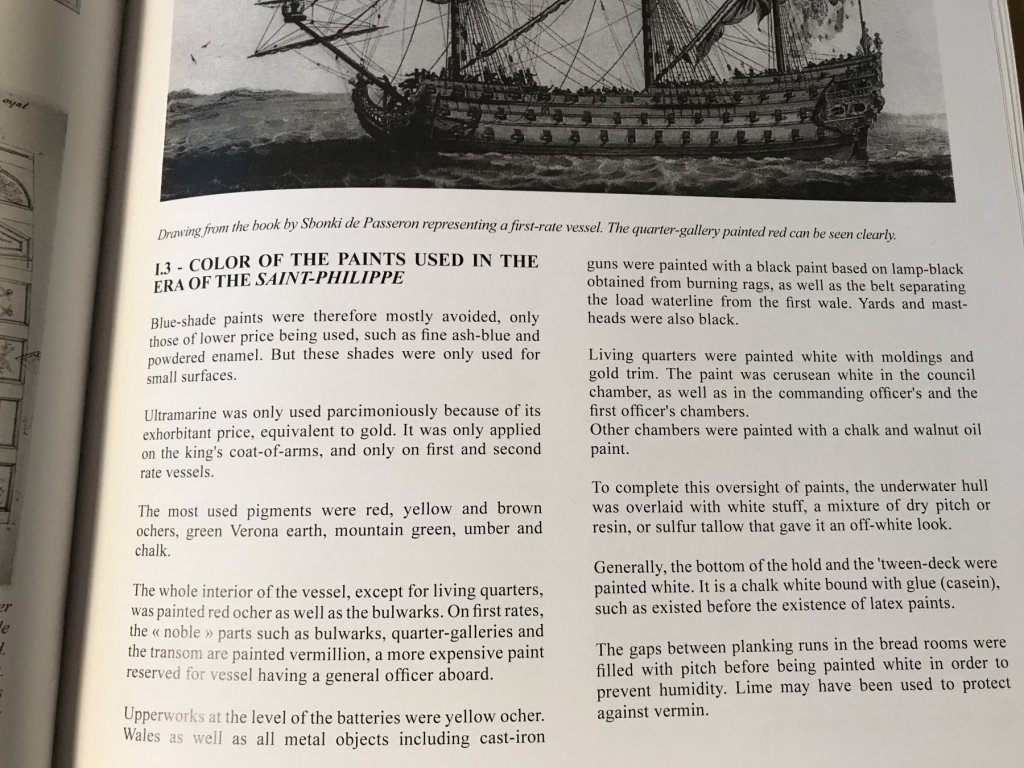
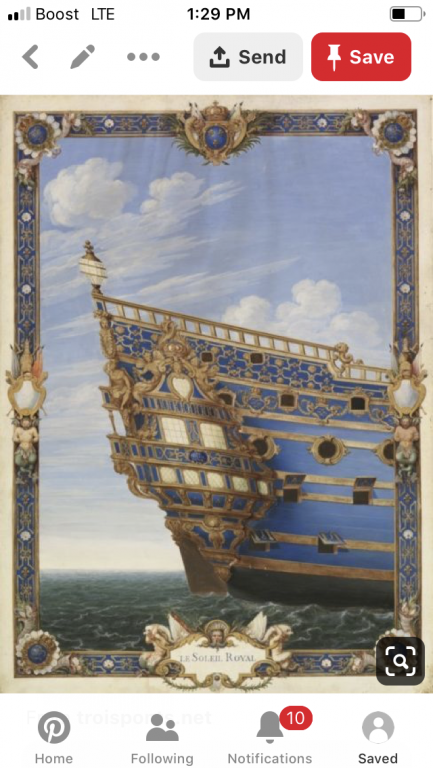
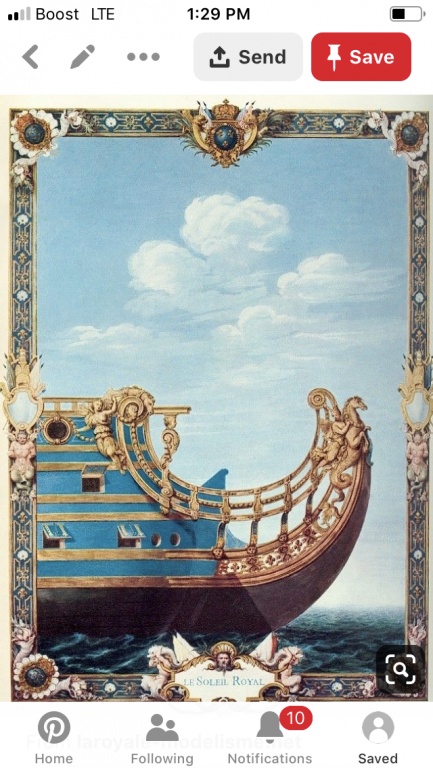
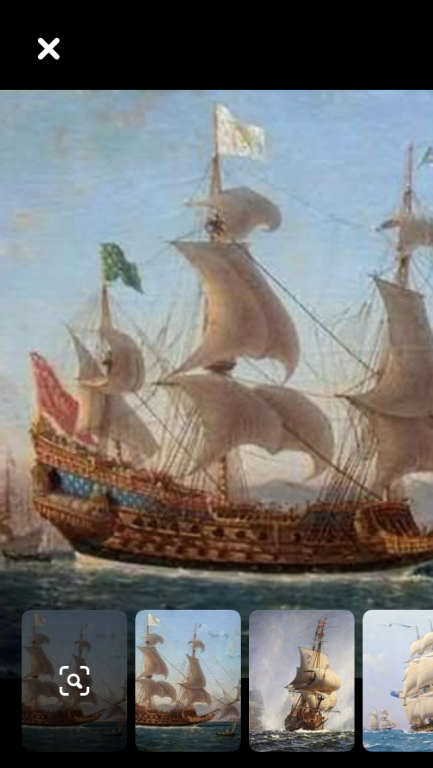
So, in scanning through imagery, I found this color engraving of what is often described as an early portrait of Soleil Royal. That the port lids are painted red -even on the main deck level - would seem to suggest that the inner bulwarks would also be painted red: The portrait seems more folk-art than an accurate portrayal of a particular ship, but the use of color, here, seems deliberate.

- 2,696 replies
-
- 4
-
-
- heller
- soleil royal
- (and 9 more)
-
Go right ahead, and take 2-3 Liqui-Gels right now.
-
Christ, Mark, how’s your back after all of that?! Mine hurts just looking at those pics.
-
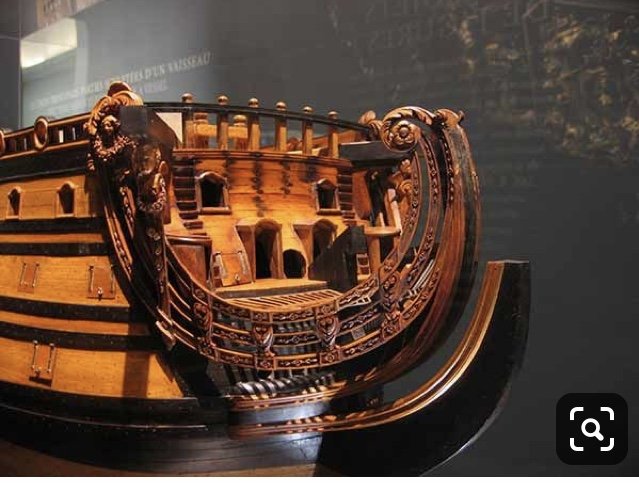
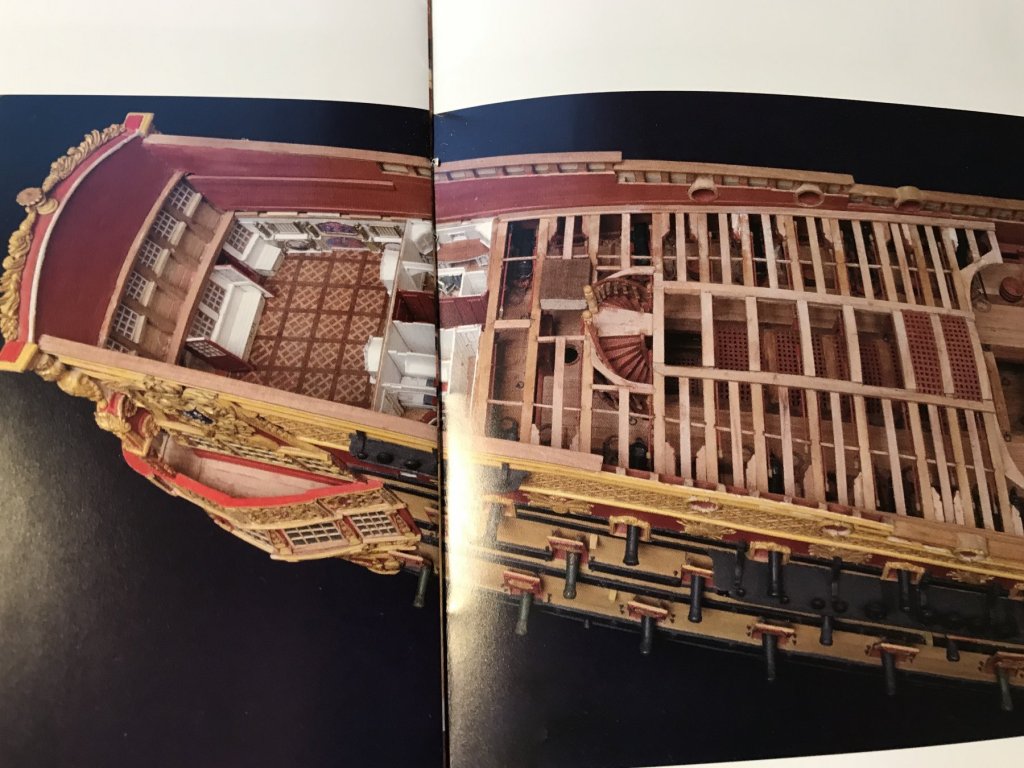
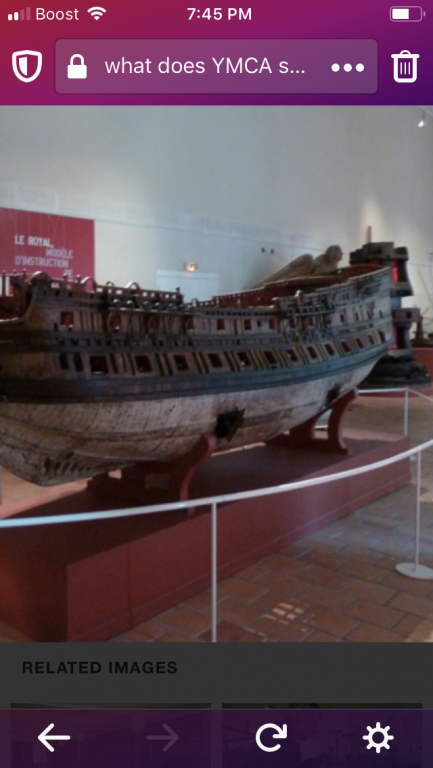
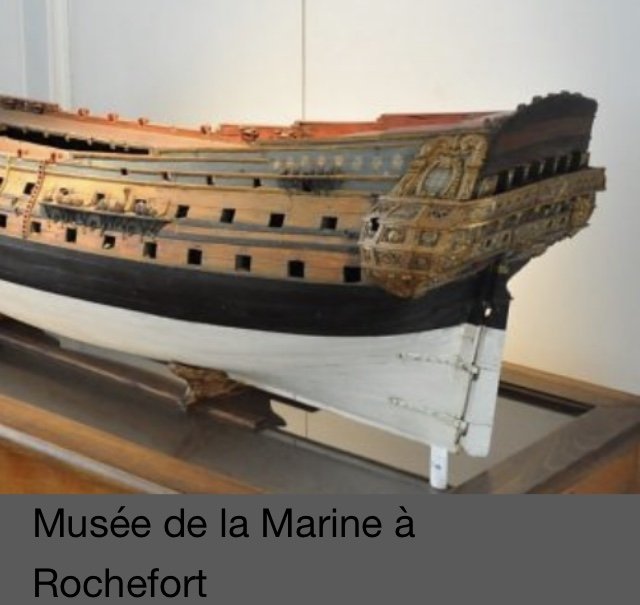
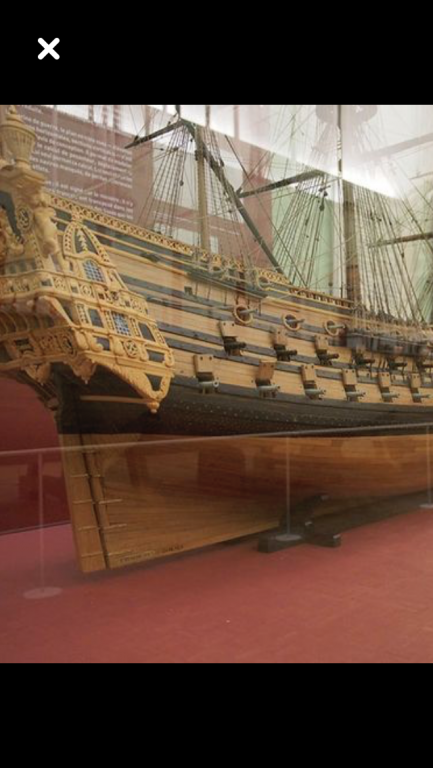
Well, Beare, I would not say that there is a preponderance of evidence that red was used on the inner bulwarks, towards the end of the 17th C. In looking at my resources, I can only find a few contemporary models that are (somewhat) near the turn of the century, which show the use of red here. The best near example is the Royal Louis: Next would be the large instructional model at Rochefort, which dates to somewhere around 1715-1720: Following that, there is what I believe is a model of Tonnerant, from some time shortly after 1720, or thereabouts, if I may be so deliberately vague: With his monograph of the St. Philippe, though, Mr. Lemineur asserts that red inner bulwarks would certainly have been a feature, at the dawn of the Second Marine in 1693. He has this and other interesting things to say about the use of color, in this time period: As he is, IMO, the leading voice of this epoch in French naval architecture, I am inclined to rely upon him, and his St. Philippe, as my guide. In wading through this uncertain period of French naval architecture - so many of these decisions, as Dan Pariser often says, come down to whether you can make a case for “plausible deniability.” I may not be able to absolutely prove that it is right, however, I also can not say that it is definitely wrong. As always, though, I welcome any new insights, and sources of information. One thing I could do, although I’m not feeling up to it at the moment, would be to comb more vigorously through Minister Arnoul’s very lengthy and thorough description of the Royal Louis of 1668. My previous translation focused on the external decoration, but he also describes the interior at great length.


- 2,696 replies
-
- 4
-
-
- heller
- soleil royal
- (and 9 more)
-
Really an excellent paint tutorial, Beare! Thank you for describing it so clearly. Too bad about the pics. I would love to see it. I suppose the same techniques would work on real wood, if you applied a few coats of thinned shellac, or sanding sealer, first. Are you planning to do something like the current museum installation of the Mary Rose; a salvaged wreck that shows the age and erosion of the timbers, as well as the patinated surface from preservation with PEG. I once found a spectacular diorama model of the Vasa in her un-restored state. The modeler so perfectly captured the disarray and damage to her upper works from laying at the bottom of Stockholm harbor for three hundred years. I have not been able to find it, since. Anyway, I hope you will post logs for these models you are building because it sounds as though you are ambitious and that your techniques would be highly instructive. One guy on this site who does really mind-blowing finishes is Kirill4. If you are not already familiar with him, you should check out his galleon - it’s a treat!
- 2,696 replies
-
- 3
-
-
- heller
- soleil royal
- (and 9 more)
-
Like my wife, she’d set you adrift on your 1:48. Maybe a Viking’s funeral, to boot. There’s honor, or something, in that. Pretty sure. Yup.
- 2,696 replies
-
- 4
-
-
- heller
- soleil royal
- (and 9 more)
-
In my opinion, there are four modern, scratch-built models (not including the Tanneron model) of SR that are really fascinating and good. The following is one of them. VISITOR BEWARE: the link comes with a warning that the page is not secure, so keep that in mind. I use Apple products, and am perhaps over-confident in their defenses. http://www.lara.dk/oa_modelskibe/20.html
- 2,696 replies
-
- 2
-
-
- heller
- soleil royal
- (and 9 more)
-
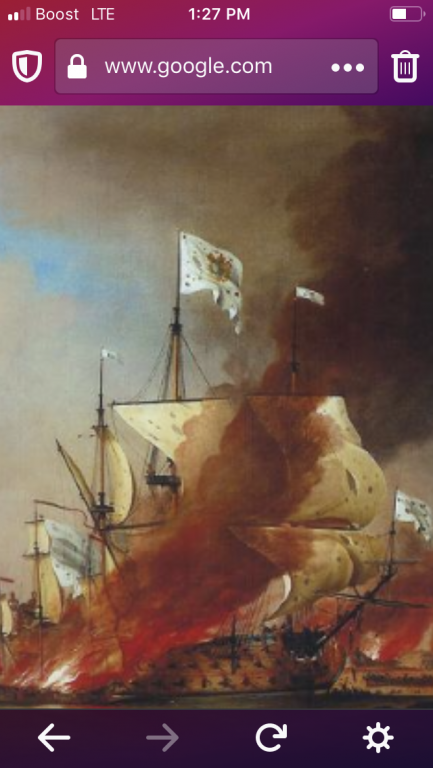
Thank you very much BeareG! The VDVs are the gold standard, IMO, especially in an age of relatively poor documentation of the French fleet. It is both tragic and ironic that the French built some of the most spectacularly beautiful ships, and all we are left with are a collection of fragmentary relics that give some sense of their grandeur. Along those lines, Bakhuizen’s Barfleur paints a dramatic portrait of SR, even if there are massive incongruities between the portrayal of this supreme three-decker and her reality; chief among them, is that Bakhuizen grafted the two-tiered stern of a second-rate onto the hull of a three-decker. Added to that is the fact that the sheer is represented as being much too flat. Nevertheless, it is a fascinating portrait. Incidentally, this painting was also the inspiration for the particular shade of gold that I chose for the model. Bakhuizen’s SR literally glows with a warm golden hue. I found an acrylic that very much gives this same impression of pure gold gilding. I’ve applied a little to the port side, upper main wale, where there are a series of main deck port enhancements. It looks great, but the paint is not easy to work with; you have to keep going over it, un-diluted, to get even coverage. Beare, I am interested in the Texel-type paint technique you were describing earlier. Can you post a few pics of that, here?
- 2,696 replies
-
- 2
-
-
- heller
- soleil royal
- (and 9 more)
-
Yes, Dan, and Herbert Tomesan does a good job of representing the brown stuff on his Texel models.
- 2,696 replies
-
- 2
-
-
- heller
- soleil royal
- (and 9 more)
-
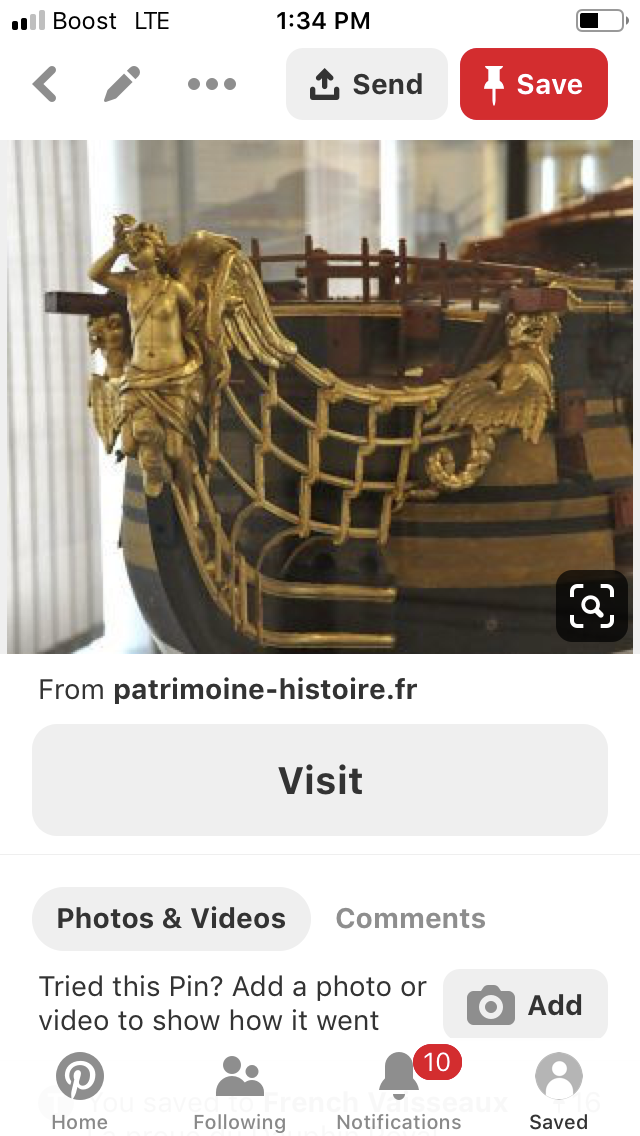
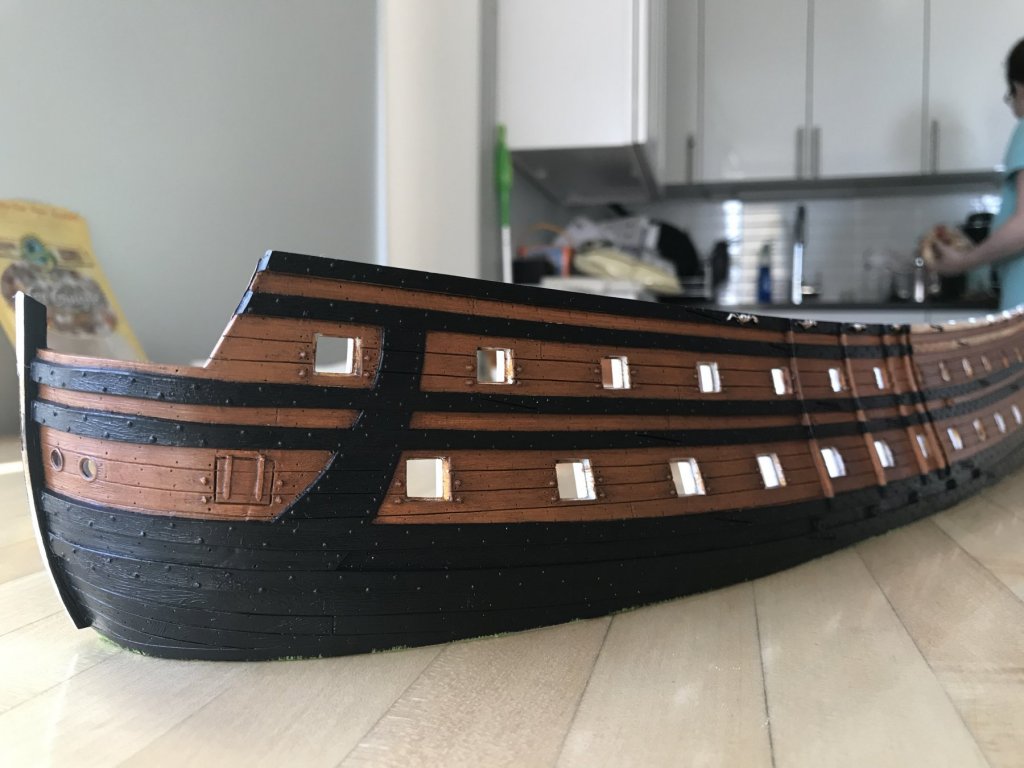
Hi Baere Galleon! Thank you for looking in and for your kind words. Well, I’d be hard-pressed to say that blackened wales were an absolute certainty for French ships, at this time in the late 17th C. Somewhere, I’ve read a brief account (that I may be able to locate, later) of the first SR’s colors; this account, as I recall, does at least mention a blackened boot top, above the white of the lower hull. So, there’s that, if I’m remembering correctly. The color P. Vary/E. Compardel (in my opinion) portrait of SR’s reconstructed bow and quarters also shows the blackened boot topping. Everything else about this portrait, in terms of color, seems off to me. I find it highly unlikely that the ship would have been painted entirely in ultra-marine, nor that the wales would be guilded. These two portraits by Peter Monamy agree with the black boot topping, at least: When, exactly, they were painted is not clear, but sometime within 20 years of the event depicted, seems reasonable. This (I think contemporary) portrait of La Couronne, again, shows the black boot, and maybe blackened wales: Here is another (I believe) contemporary portrait of the LaSalle expedition, featuring the second-rate Le Joli. The image distortion has to do with the angle at which I took this cell picture (of a book’s cover), but otherwise, the painting is a very detailed and accurate accounting of a French warship of this period. Wales and bootcap definitely black. Then, we can explore the realm of near-contemporary models and modern, research-based models. The Louis Quinze model, of which I am having trouble up-loading images of, dates to around the turn of the 17th C., and her wales are blackened. This circa 1740s model of Le Dauphin Royal is from a later time than SR1, but definitely shows blackened wales: The modern Frolich model of L’Ambiteaux shows blackened wales: And the recent work of J.C. Lemineur and Jose Tusset show blackened wales on the St. Philippe of 1693: Not to mention the fact that the Tanneron model of SR, although the sources for this model are clouded in mystery, shows blackened wales. It may not have been an absolute doctrine to paint French ship’s wales black, in the late 1680s, but it seems a reasonable convention of the times. Also, I just happen to like how it looks.


- 2,696 replies
-
- 5
-
-
- heller
- soleil royal
- (and 9 more)
-
Thank you, Dan! As the days tick away, I’m beginning to feel less certain about what I will have to say at the conference about paint compatibility, but your point about lacquer topcoats is well received. Maybe the latex really is the way to go, there. The latex and acrylic paint are both water-based, after all. My spray test on the samples didn’t cause any issues - aside from laying it down too heavily. So, anyway, we will see. I look forward to seeing you and everyone in New London.
- 2,696 replies
-
- 2
-
-
- heller
- soleil royal
- (and 9 more)
-
Hi guys! Thank you for the kind words. Heinrich, I will be using a much lighter color for the decks because they should represent raw wood, whereas the hull would have been painted to protect all of the iron fasteners. I’ll use ModelMaster’s Random Tan with the VDB, or maybe the walnut ink for a distress wash. The ModelMaster produces a durable and level finish. Yes, Mark, I’ve been using Grumbacher’s Academy line for the Raw Sienna and the Black. I liked that I wouldn’t have to do any color mixing to arrive at my ventre-de-biche color. The raw sienna has been durable enough, with all the rubbing away of VDB, but the black rubs away pretty easily even after the paint seems well dried. The samples I made months ago seem durable, but maybe the black just needs an extended dry-time. I think, I will spray the whole hull with matte lacquer, once all of the detailing is done. Accidentally, I bought a matte latex-based clear-coat. That leaves a good surface finish. I just wonder whether lacquer would be better/more durable, and whether blushes will form over the acrylic.
- 2,696 replies
-
- 5
-
-
- heller
- soleil royal
- (and 9 more)
-
Beware - the height between decks of the Heller kit is absurdly out of proportion; even allowing for the thickness of deck planking (4”) and the height of deck beams above (approx. 10-12”), there would still be almost 7’ of clear headroom, between decks, if the Heller kit were full-size. This is a problem that Cedric, of the La Reyne conversion project first pointed out. He was/is attempting to correct this flaw, but it requires closing in all of the existing gunports, re-locating the wales, adjusting the sheer of the decks - and even after all of that, you may wind up running into problems with the new positioning of the guns relative to the gradient of the tumblehome. In the end, it may end up looking more wrong than if you just left the decks and guns where they are. For me these problems - if one felt absolutely compelled to fix them - veer off into the slippery slope of whether you should just go ahead and build the model from scratch, so that everything is as it should be. I suspect that may be the reason that we have not heard from Cedric in such a long time; perhaps the compromises he would have to make with regard to accurate representation, in order to work within certain confines of the kit architecture, sapped his interest in the project. Hopefully, not; I still think he can make a very good model of La Reyne without going to extreme lengths. It is very easy, IMO, with these conversion projects to become so bogged down with certain corrections that the project becomes Herculean and not fun, anymore.
- 244 replies
-
- 4
-
-
- heller
- soleil royal
- (and 1 more)
-
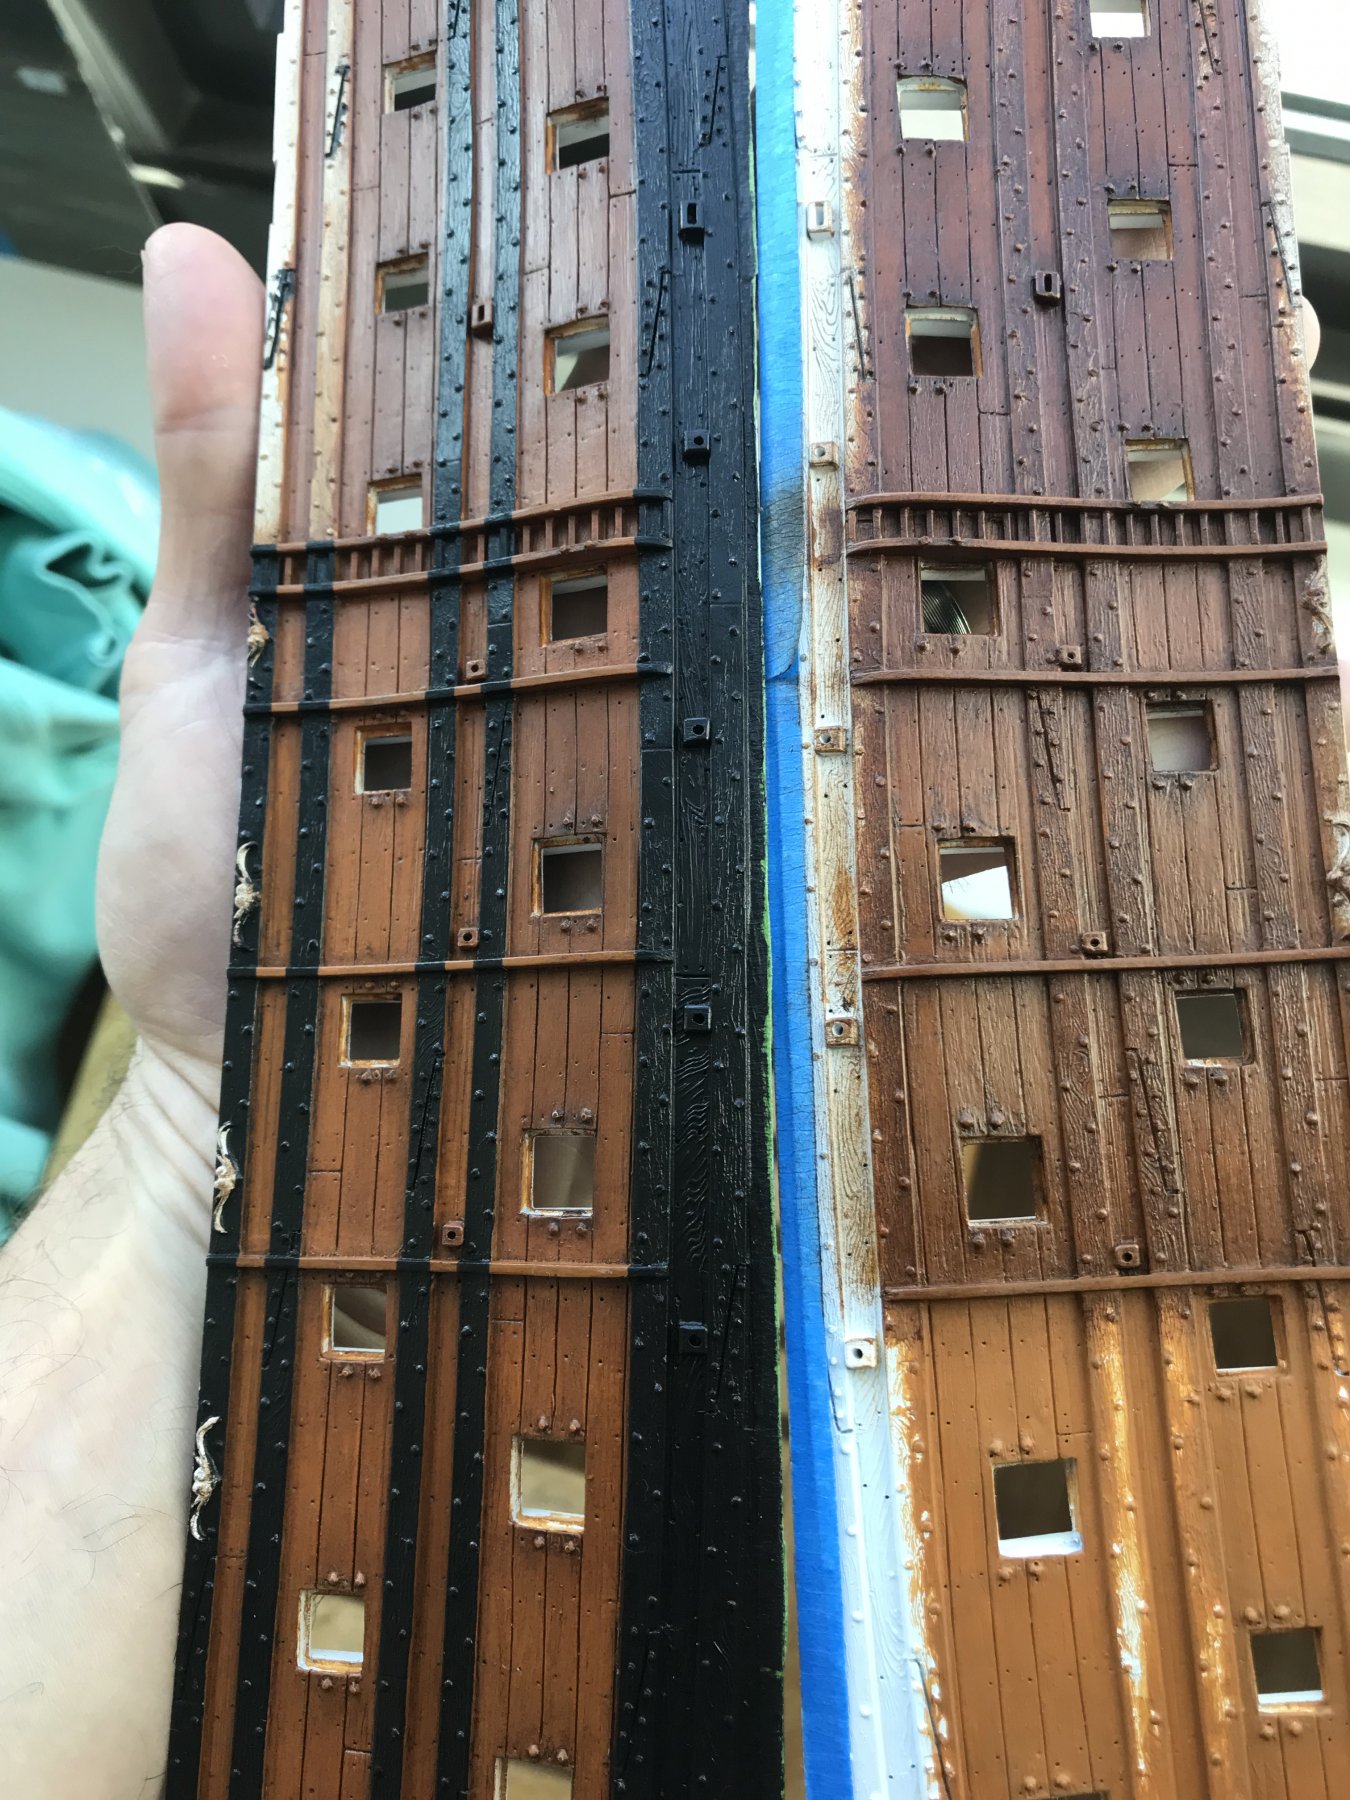
Hello Heinrich, I own an airbrush - new in box, single action - but not a compressor. Using an airbrush would certainly have simplified the application of the raw sienna base color, acrylic. By brush, I had to lay down 5 thin coats to get the color saturation I was after, without muddying up the details. Perhaps I will use that airbrush when it comes time to basecoat the upper bulwarks. Air compressors come in much smaller sizes today, than they used to. The trouble has been these artist acrylics; they must be thinned, but then they require a lot of coats. They also seem kind of fragile, until they’ve had a good long time to fully dry and harden. Purpose-made model acrylics, which I also am using, are not as finicky; 1-2 coats, straight out of the bottle, and you are done. The painting of the wales is coming along nicely. It has had the odd, and unexpected effect of somewhat muting the appearance of the VDB distress coat. Before I began blacking in the port side wales, the distressing from port to starboard seemed a near match. Now the port side seems significantly lighter. I will have to wait until after blacking in the starboard wales to make any adjustments. I will probably tone the blacking down with a dullcoat wash, but that will also wait until painting is near complete.

- 2,696 replies
-
- 8
-
-
- heller
- soleil royal
- (and 9 more)
-
Hello Heinrich, She is looking good!! A curiosity - do you have any pictures of the joint between your central bulkhead and the rise of the stern deadwood? As for the upper bulwarks - you will have to, I think, decide whether to cut down the top-most sheer step, in order to conform more closely with the SP’s 3-step sheer. Yes, my M.O. was to add all the detail to the upper bulwarks first. I will, eventually, return to working on them because I would like to make and attach the quarter gallery amortisement, and the rest of the large figurative sculptures before priming and painting. Only after they are painted will I install them to the hull. By then, I will have completed construction up to, and including, the main deck. One advantage of framing and re-constructing the stern is that It is not necessary to clamp the bulwarks in-board, in order to fit within the parameters of the stock stern plate. When I first built this model, years ago, I had to use fishing line, pierced through both sides of the upper bulwarks and concealed by the QGs, to make a twist-caul that brought the upper bulwarks into position; that meant that the whole construction was under tension, and I am frankly amazed that the whole thing has survived all this time, without bursting apart. When the time comes to install the upper bulwarks, I will make styrene bulkhead stanchions that will be concealed by the forecastle deck (and also hidden by the dummy galley stoves), as well as beneath the quarter deck. These bulkhead stanchions will give me something solid to glue to and will also create support for my dummy deck beams, to which I will glue the styrene upper decking. The exact placement of the stoves is still a little up in the air because I haven’t really focused on it yet. They will have to be placed so that the chimneys that pierce the forecastle deck don’t interfere with the guns, the cathead timbers, or egress to and from the deck.
- 244 replies
-
- 4
-
-
- heller
- soleil royal
- (and 1 more)
-
WOW a your chandlery and rigging skills are just out of this world! And the model is quite a piece of shipcraft, in itself! I am humbled and amazed.