HOLIDAY DONATION DRIVE - SUPPORT MSW - DO YOUR PART TO KEEP THIS GREAT FORUM GOING! (Only 13 donations so far - C'mon guys!)
×


Hubac's Historian
-
Posts
3,292 -
Joined
-
Last visited
Content Type
Profiles
Forums
Gallery
Events
Everything posted by Hubac's Historian
-
 Hi Mark, yes, I think you may be right; I don’t think they are deck beams, but perhaps they are the bench framing for the two ship’s boats, side by side. Chris’s future pics should help clarify that. I was wondering, Chris, when it was that you were giving your presentation. Hopefully, someone will be recording it, and maybe you can share it. Even if you are speaking in German, I’d love to see what you have assembled. Bon chance!, as they say in France.
- 2,696 replies
-
- 2
-

-
- heller
- soleil royal
- (and 9 more)
-
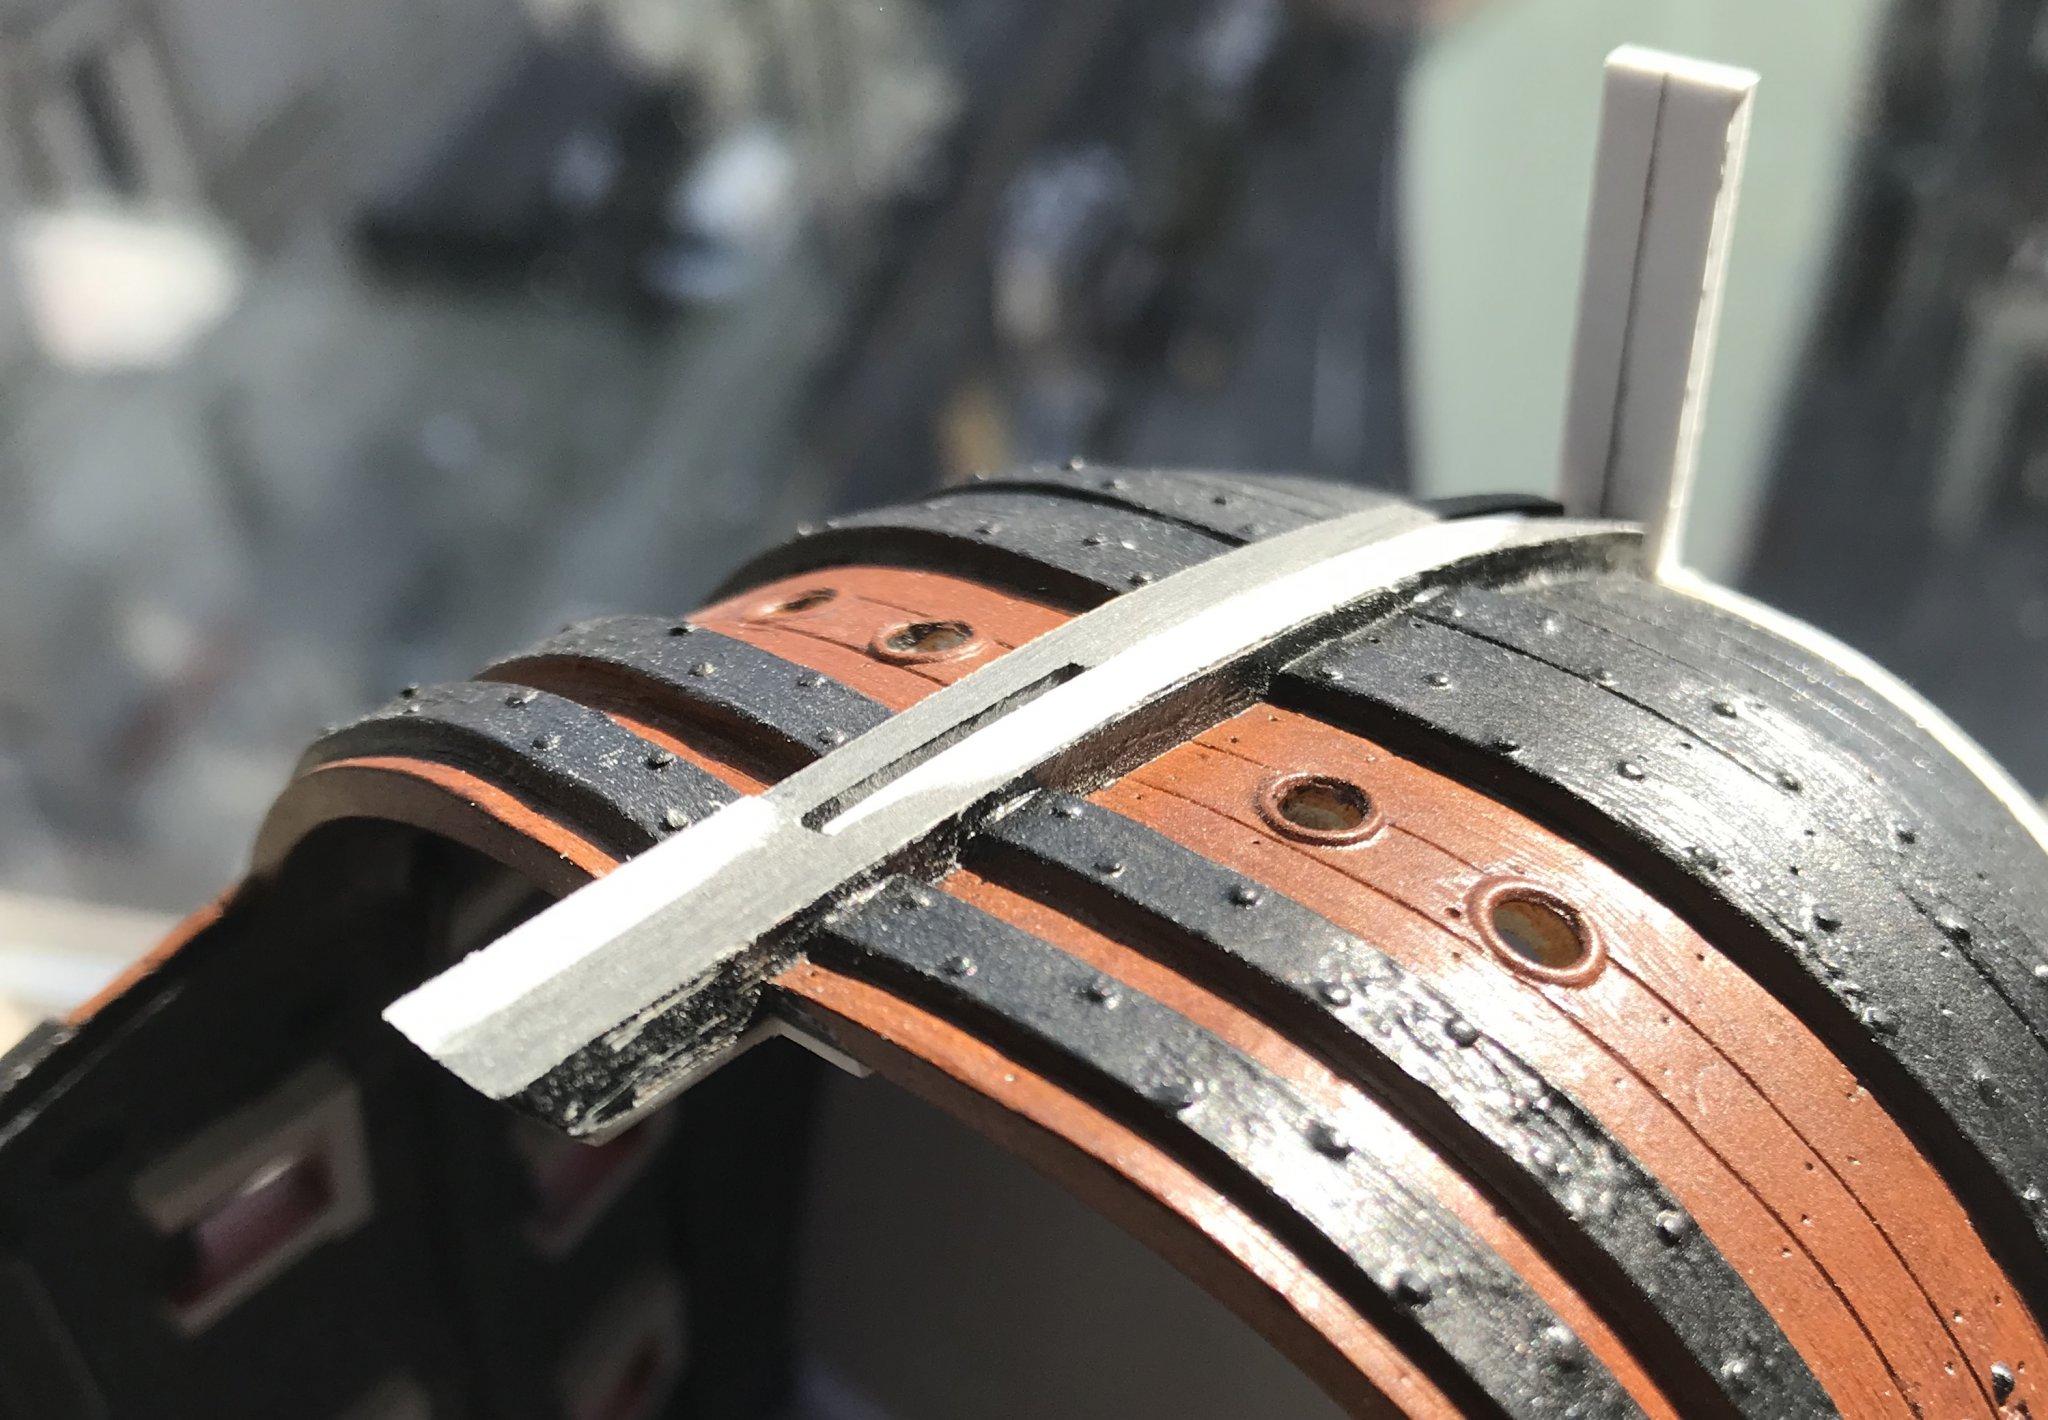
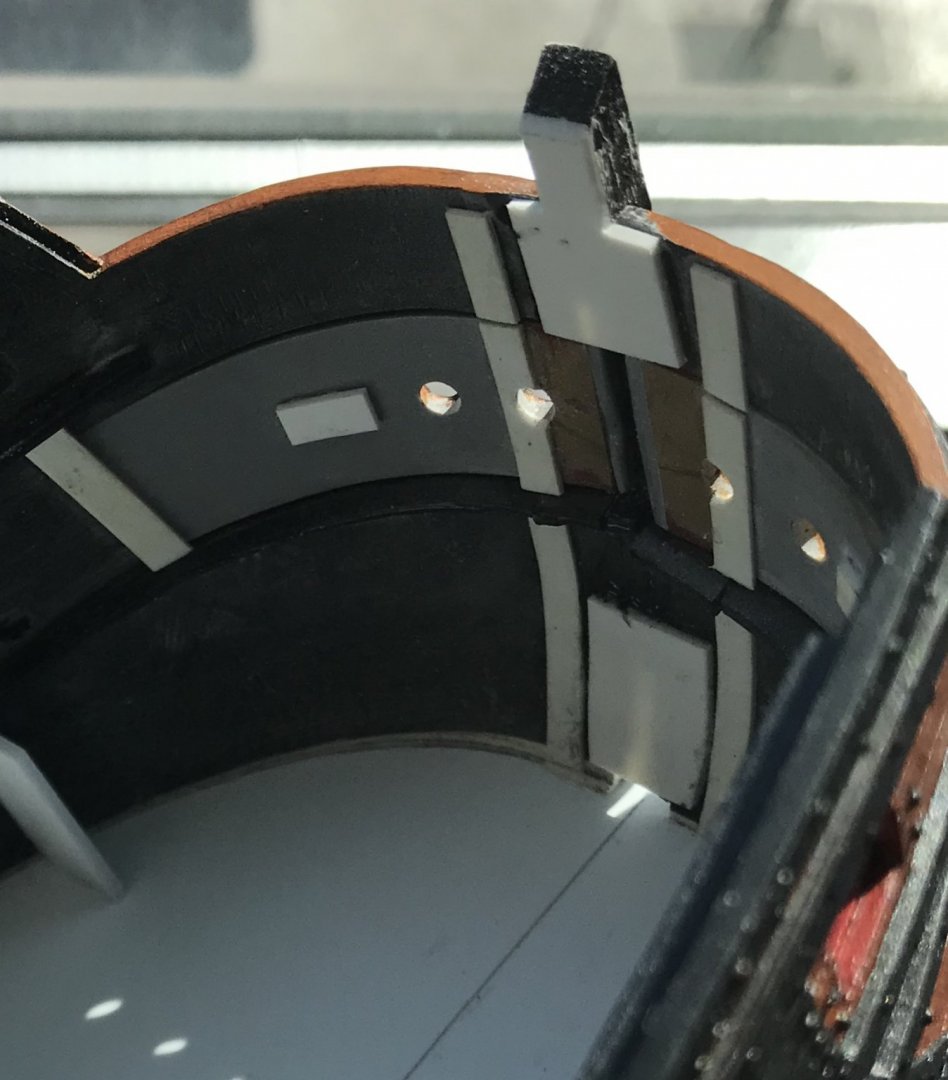
Thank you, Chris, for posting these wonderful pictures from the Floating Baroque exhibition. I had wanted to get a better look at the SR model, which is very nicely painted, but the museum had only released the one photo of the stern. Your pictures, though, allow for a more thorough examination. It appears as though the modeler has chosen to show the waist of the main weather deck as being open; beams are in place, but the opening seems much wider than would be allowed for the hatch gratings. Is that, in fact, the case? As for my SR, it has been a busy week of structural re-inforcement. The weakest area of the model is the bow, where I glued in the extensions. Although I had a good mating, welded bond here, the thought of this area springing open, sometime down the road, is not a welcome one. In an effort to avoid that I have added styrene backing pieces at the top and bottom of the joint, where it was practical to do so: The upper backing piece will be visible above the planking of the short beakhead deck planking. Visually, this adds a little needed heft to what is a pretty anemic stem piece. While it would be preferable to add that stem depth to the front, only the most astute eye may notice that the stem extends a little further aft than it should. I may, yet, add a 1/32” strip to the forward face of the stem, where it is most needed. Before I can do so, though, I needed to true-up the face of this joint. One casualty of the heat-bending for the bow extensions is that the stem pieces no longer matched the same bow curvature. It is worth mentioning that, even if you build this kit straight out of the box, the bow still won’t align neatly, however, my surgery only exacerbated the problem. Rather than sand the proud side down to the lower (and risk further diminishing the outboard stem profile), or using filler (which is not a good glue surface) - I elected to add in styrene strip, and then fair back that surface to one uniform plane: Whether I decide to add another strip, or eventually proceed with the cutwater and knees of the head, I will have a good bonding surface to build from. Next, it was on to gusseting the interior. I noticed, after installing the first pair of gussets, that my bottom plate no longer seemed to lay flat against my dead-flat counter surface. Now, to my dismay, there appeared to be a consistent crown, athwart-ships, that ran the whole length of the bottom plate: After I had been so careful to true the bottom edges of the hull, as well as to ensure that the base sheet of plastic was totally flat, I was really confused as to why I suddenly had developed this crown. I feared that something about the glue-up process of either the hull, or now the gussets, was distorting the base shape. Ultimately, did it matter what was happening beneath the lowest gun deck, I wondered? As long as it wasn’t getting worse, I reasoned, then it did not. However, then I realized that I had to box-in a stepping for the lower main mast, directly onto the mid-ship doubling. This does matter because you can’t have a bouncy main mast. Before shimming, I decided to carry through with the gusseting, in order to see whether there was any change: Fortunately, there was not. About midway, through though, it dawned on me where I had made my mistake. Rather than scribe a center-line down the base plinth, I should merely have penciled in the line. When the razor tip breaks the surface tension of the plastic, the sheet then crowns upward; I had done a particularly deep scribe too, which would explain the degree of deflection. While I didn’t initially put two and two together, I did notice that when I scribed for the doublings, the base plinth also crowned in the other direction. I didn’t think much of it, though, as it benefited the glue-up. So, satisfied with the gusseting and that the problem wasn’t getting worse, I went in and glued 1/4” x 1/16” strip down along the center-line, and then sanded down any high spots, checking with a straight edge. At this point, even without the transom framed in, the hull is fairly rigid and very strong. I took great care to ensure that the gussets were neatly scribed to both the hull and the angle of the base plinth. When I glued them in, I really wet the edge with liquid styrene adhesive and allowed a 10-second count so that the glue had enough time to melt the edge. Then, when I seated the plastic with moderate finger pressure, I was guaranteed that the softened white plastic would fill whatever remaining voids my eyes could not see - even with backlighting, during the fitting process. So, now, I will go back and feed epoxy into all of these seams. I will epoxy-in the 1/4X20 nuts, so that I can secure the model to its plywood construction base. And then, the real fun can begin with the framing and planking of the lower transom.


- 2,696 replies
-
- 9
-
-
- heller
- soleil royal
- (and 9 more)
-
Kirill - nice to see you back at work. The ship looks just spectacular! The potal is a striking contrast to the gold acrylic. Does this product retain its luster, over time, or is it necessary to varnish or lacquer over it? Also, I am intrigued by your new 3-D tafferal medallion. I see what looks like an impression of the medallion in grey modeling clay. It is an interesting idea to contain the clay within a jar lid. So, my questions are these: Is that, in fact, just plain old modeling clay, or is it a rubberized mould medium? Did you sculpt the negative impression of the medallion into the clay, so that you could then make a resin casting? What, exactly, is your process, there?
- 228 replies
-
- 2
-
-
- spanish galleon
- lee
- (and 1 more)
-
No apologies necessary, MD 😃 I’m just happy that you are here.
- 2,696 replies
-
- 3
-
-
- heller
- soleil royal
- (and 9 more)
-
Coming from you, MD, these are high compliments, indeed! I took great inspiration from your Vasa build because you had gone to such great lengths to add to and upgrade the stock kit. Speaking to the lantern, I try to remain constructive in my criticism, and that was one example where not a lot had to be undone, but a better lantern would do so much to compliment what is such a fantastic model. I look forward to seeing this finishing touch. Speaking toward research, much of what I am rambling on about will be particularly helpful for the next, fully scratch-built SR that I will get to, sometime, whenever. While completely conjectural in nature, that model will not be hampered by any constraints in hull form or armament. My objective for the research log has been to provide one-stop shopping that attempts to provide an historic framework for all of this contemporary imagery that is floating around. I am gratified in knowing that you have enjoyed the log, so far 😀
- 2,696 replies
-
- 3
-
-
- heller
- soleil royal
- (and 9 more)
-
Hi Jan! Actually, the styrene plinth will not be visible at all; I will recess the base into whatever material it is that I make the sea from. I’m leaning towards carving the sea into 1” blue board, and then doing a highly realistic gel sea, like some of the best steel navy modelers do. It will take some experimentation to figure all of that out. Initially, I was going to glue the hull halves around the plinth edge, but the compound curves of the hull inner-surface make doing so a very tricky proposition. I did not think that I would get a good connection around most of the hull. As it is, just beveling the vertical gussets to fit snug is something of a challenge because they need to be plumb and square to the centerline, so that I can bridge the span between them with flat deck “beams” on the two lower decks.
- 2,696 replies
-
- 3
-
-
- heller
- soleil royal
- (and 9 more)
-
Thank you, Mark and Backer! Last night, I bedded down the other hull half and began fitting and gluing in the gussets. Even with just the stem glued together, the construction is considerably stiffer than I expected it to be. Nevertheless, I will completely over-build the thing.
- 2,696 replies
-
- 3
-
-
- heller
- soleil royal
- (and 9 more)
-
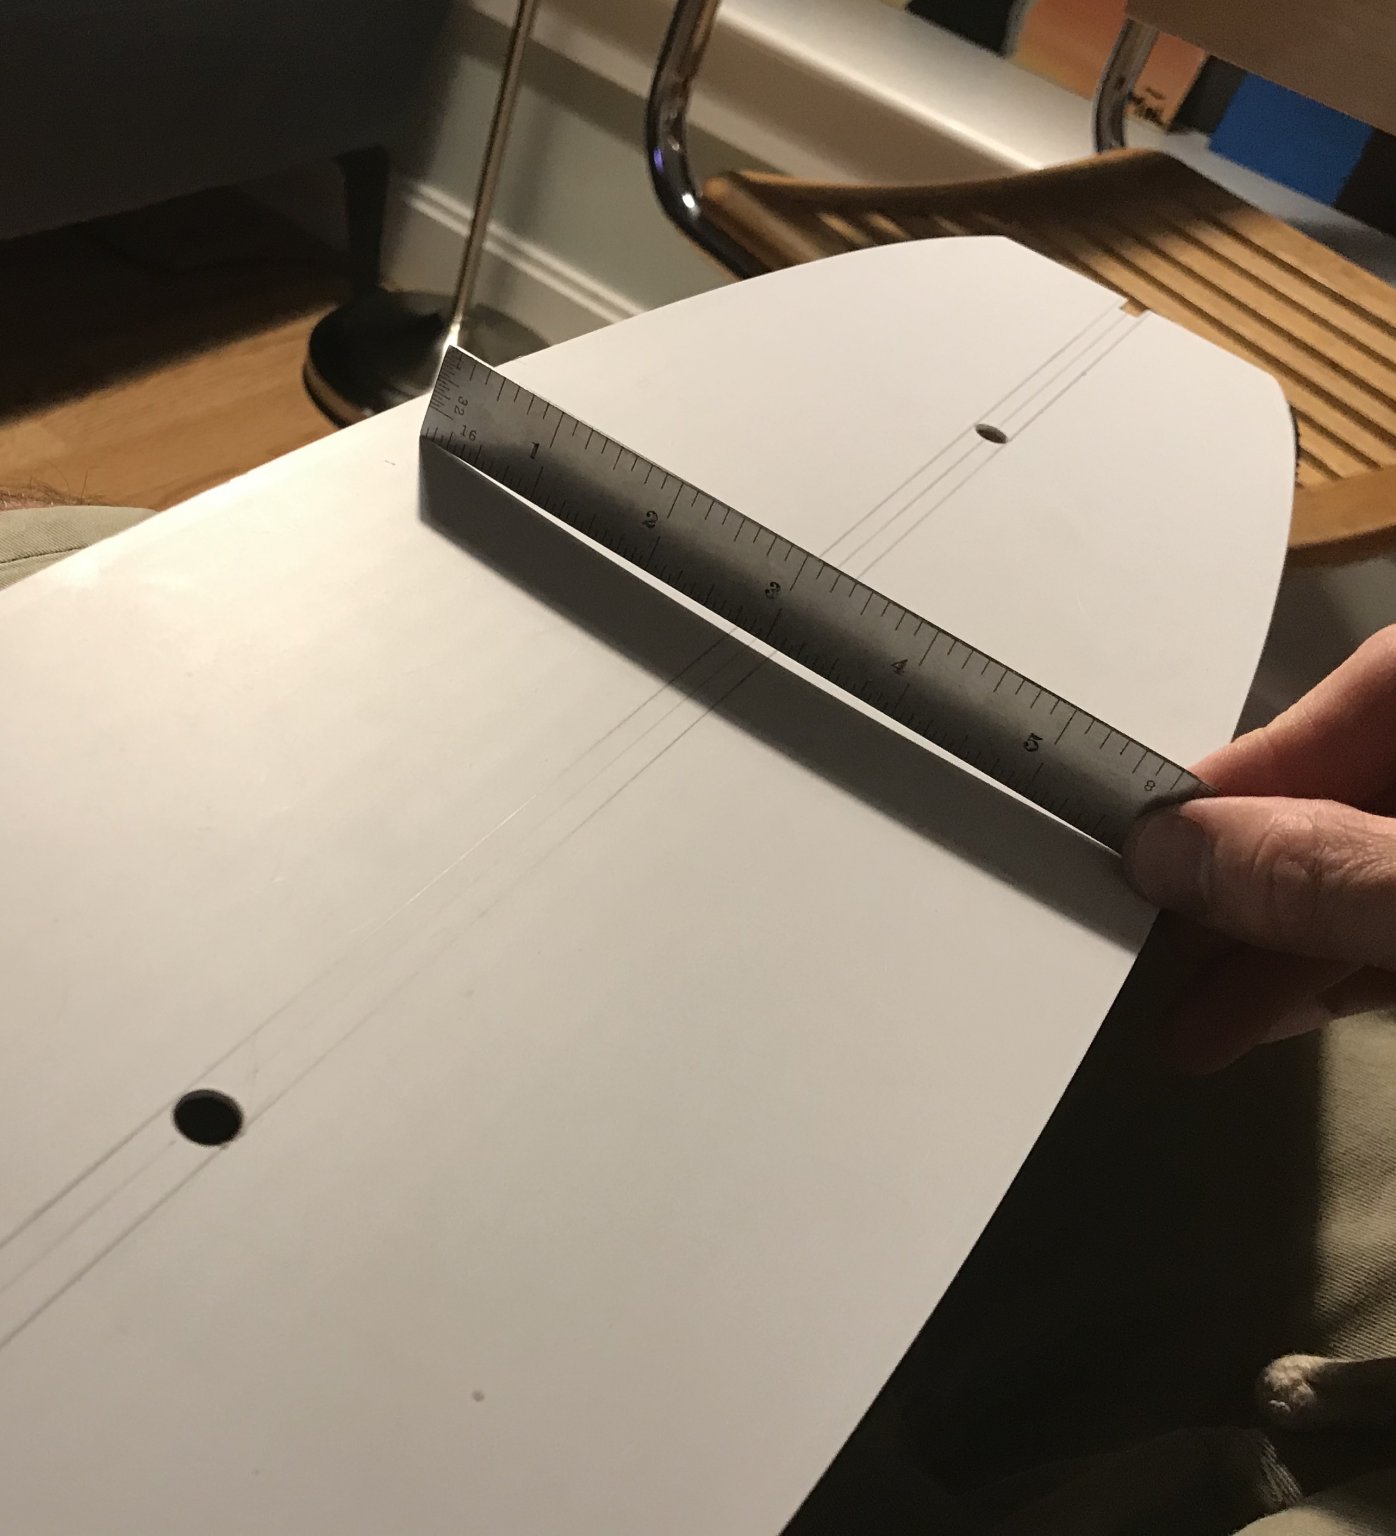
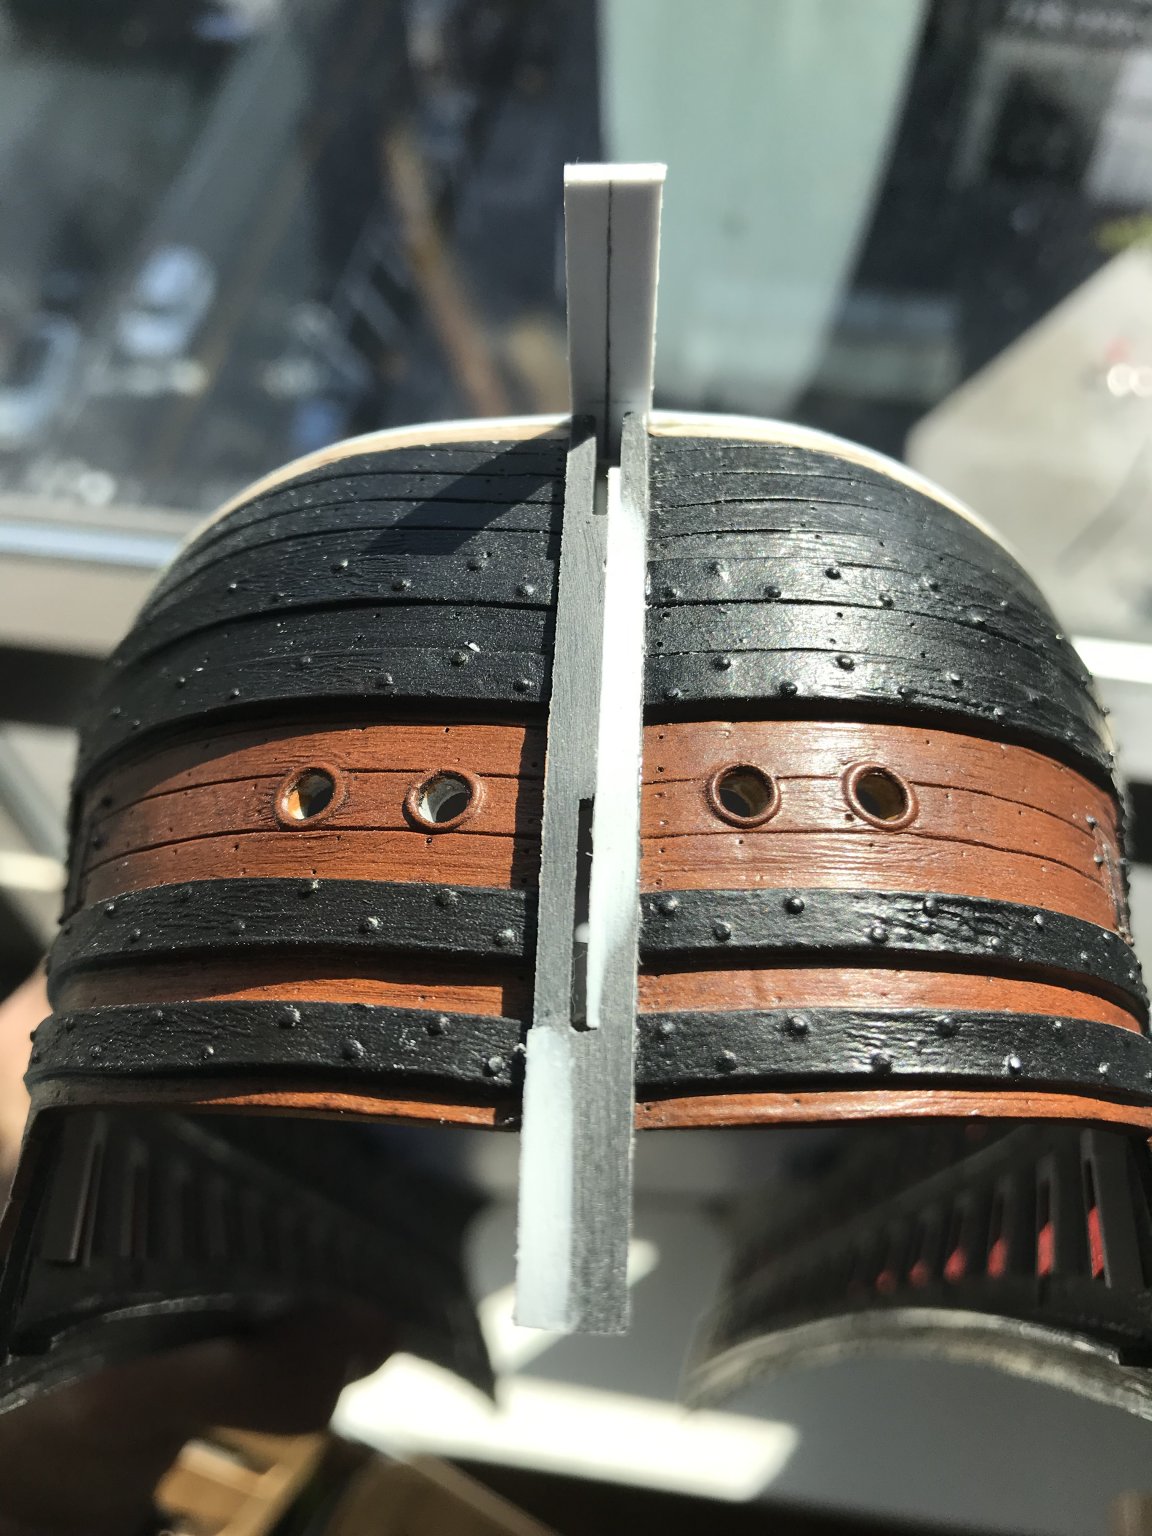
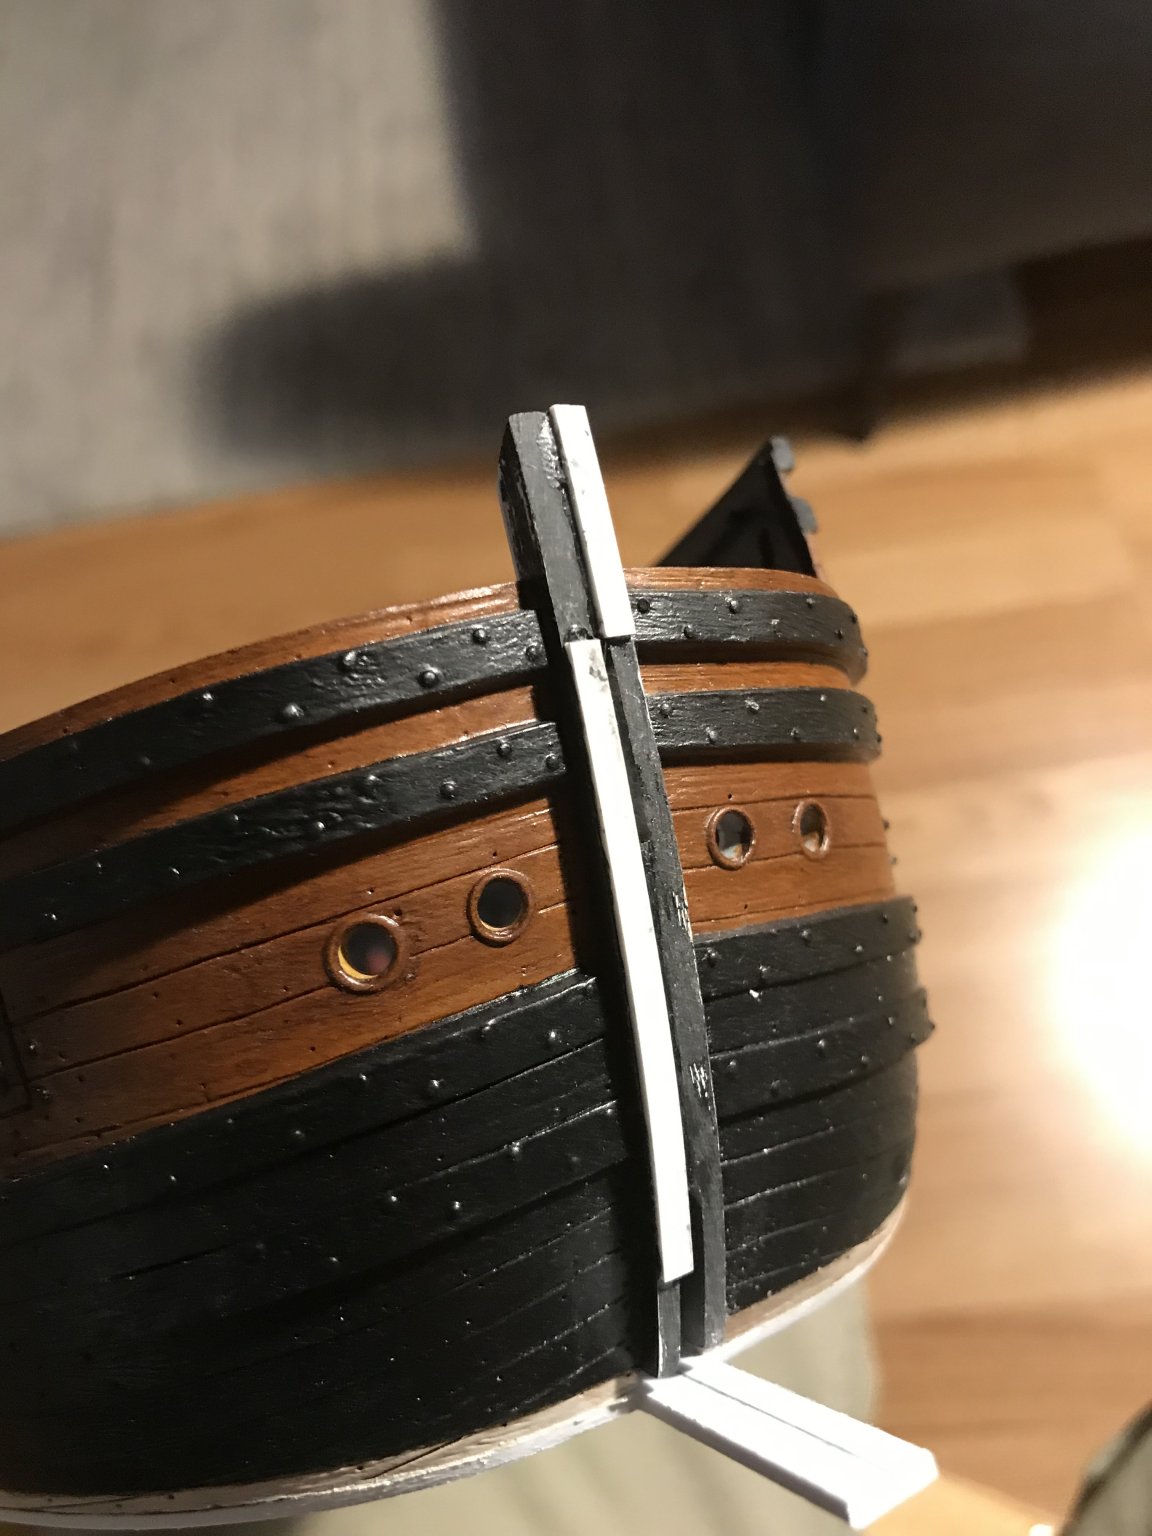
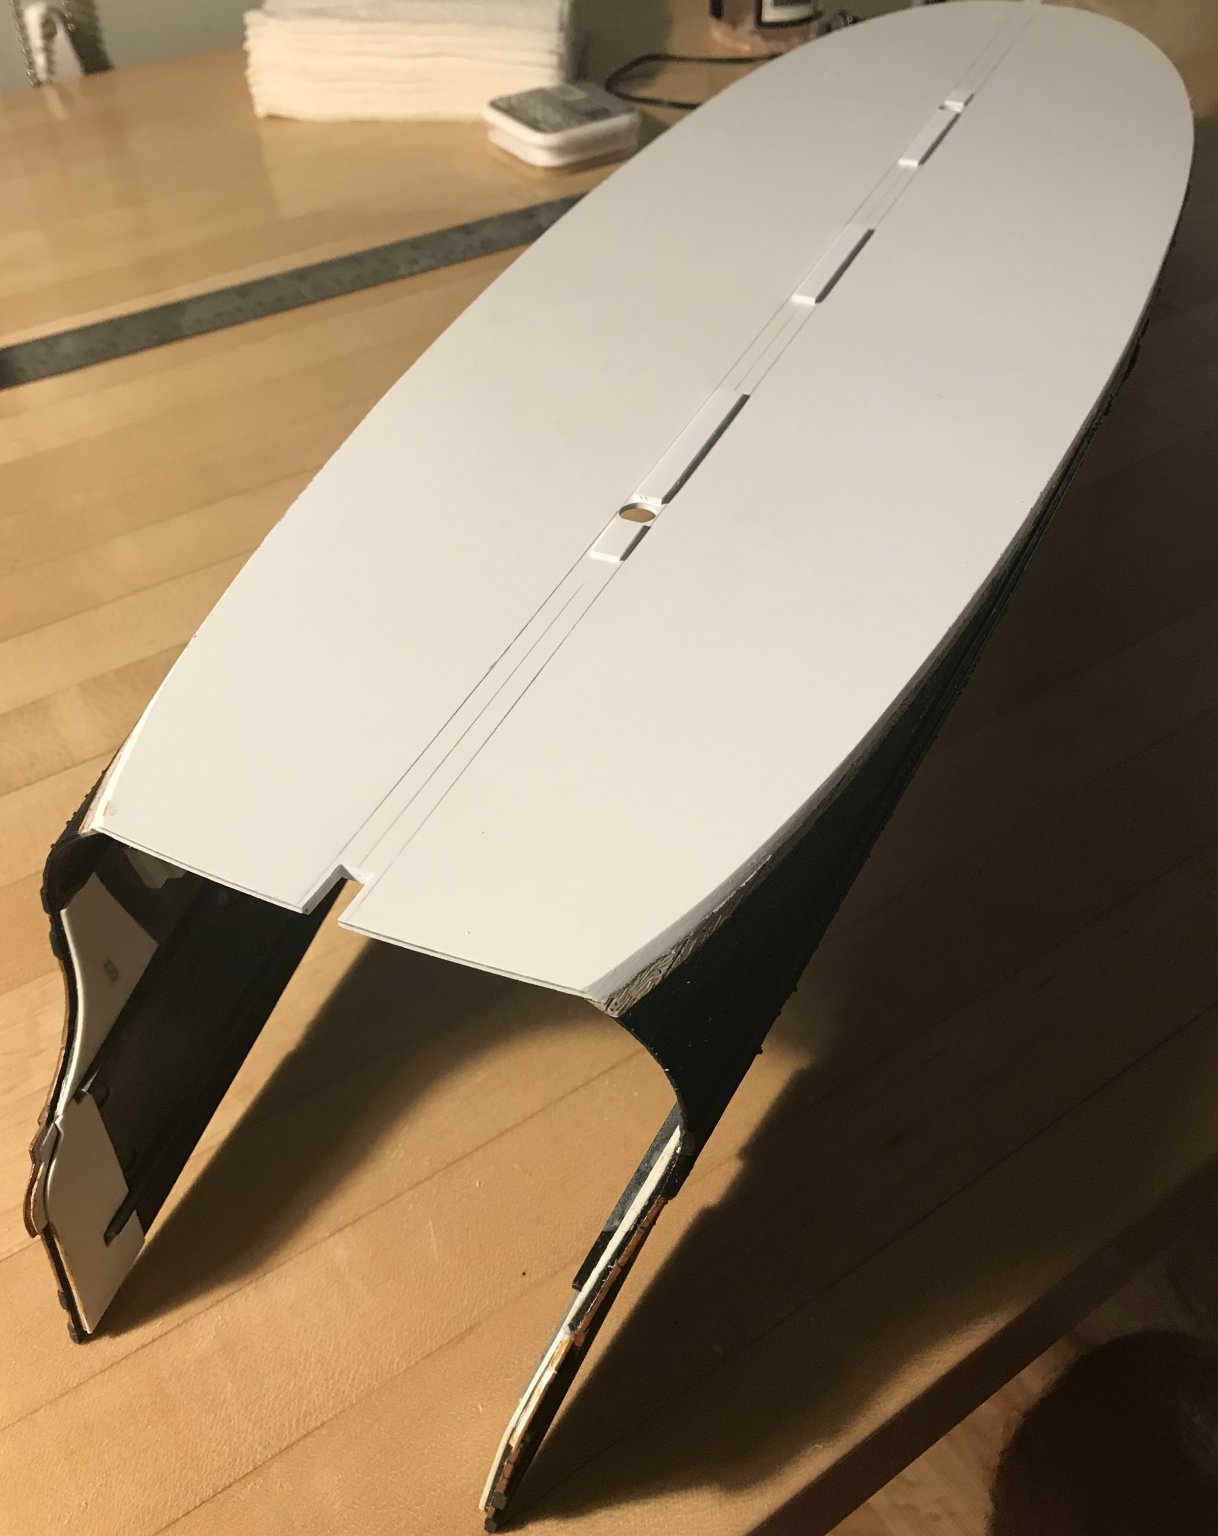
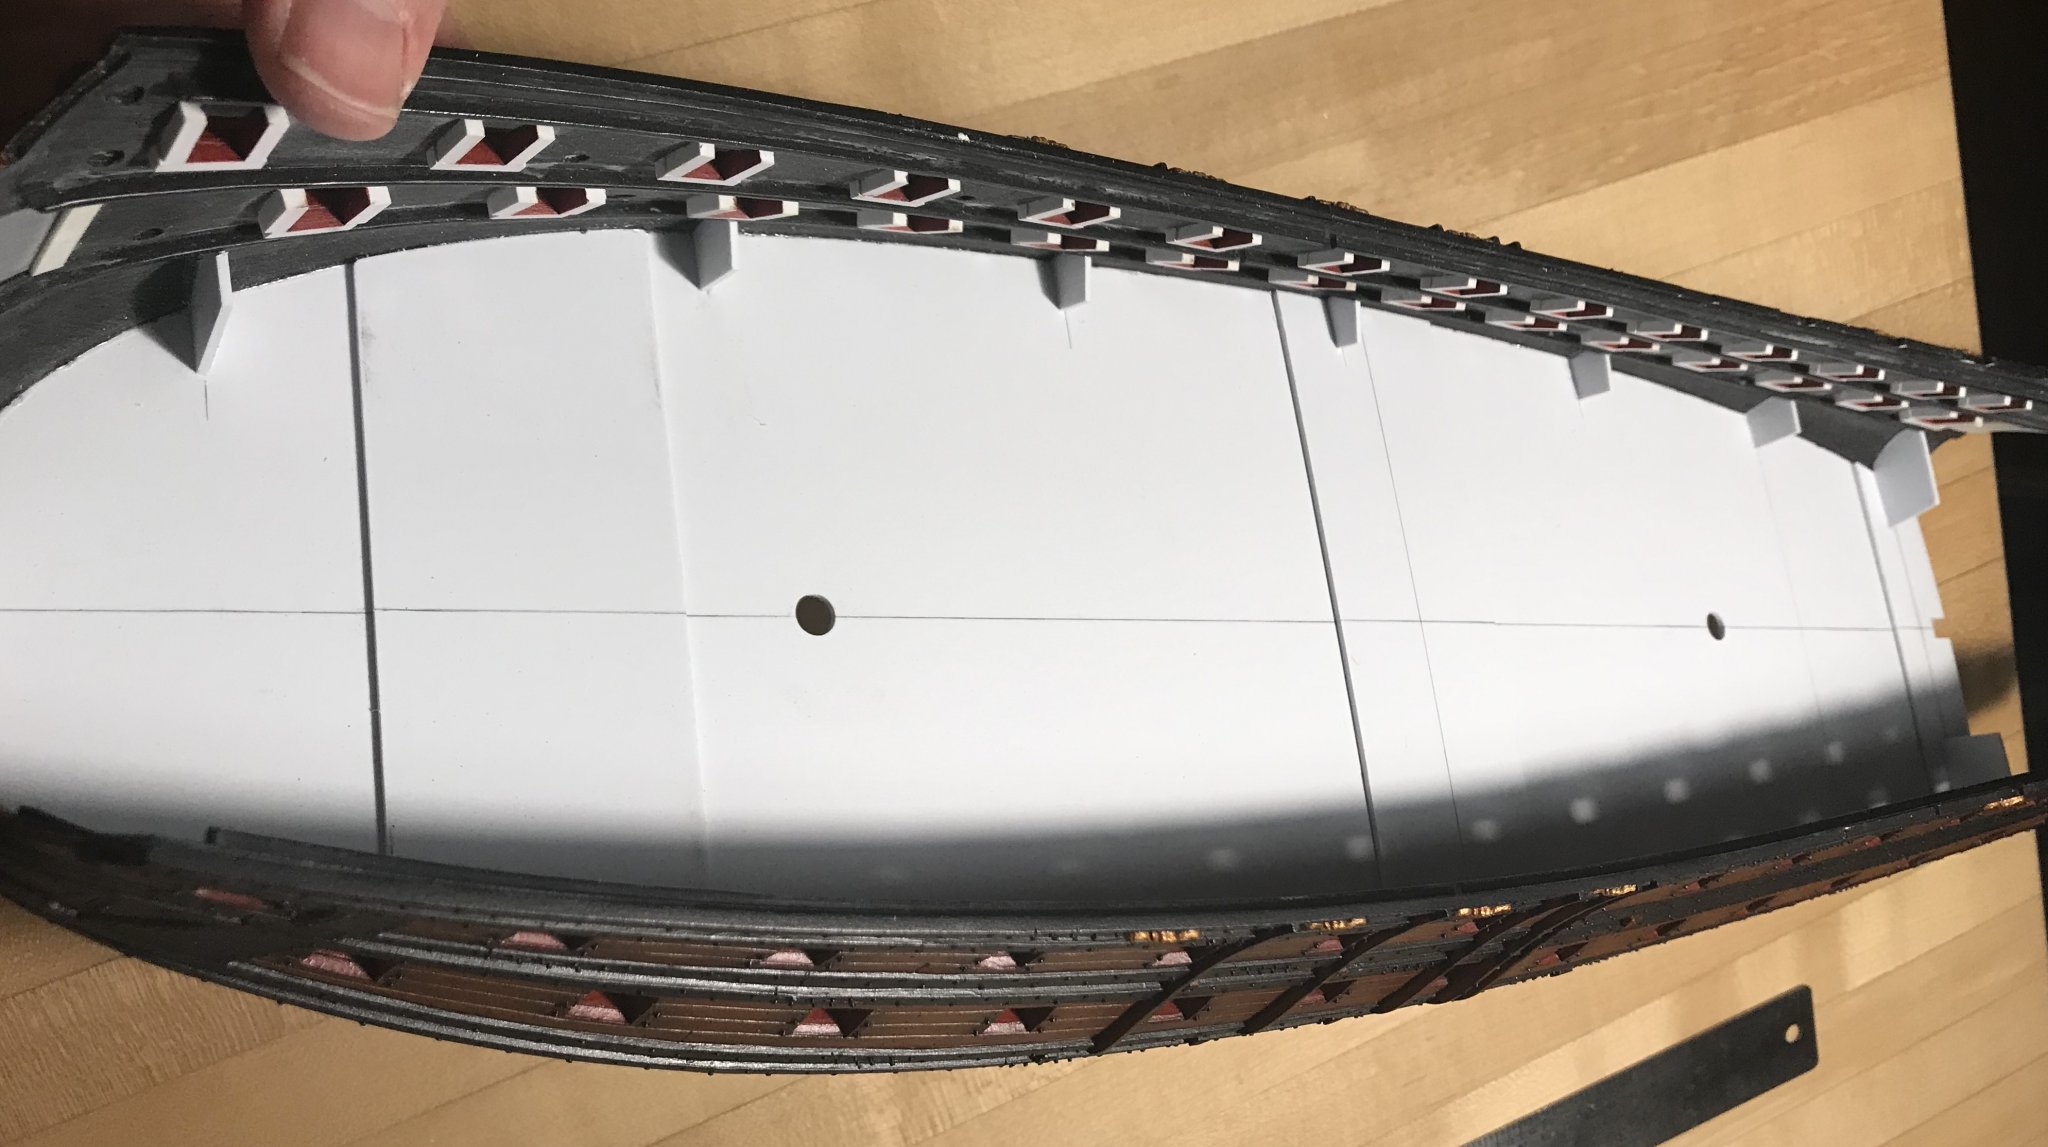
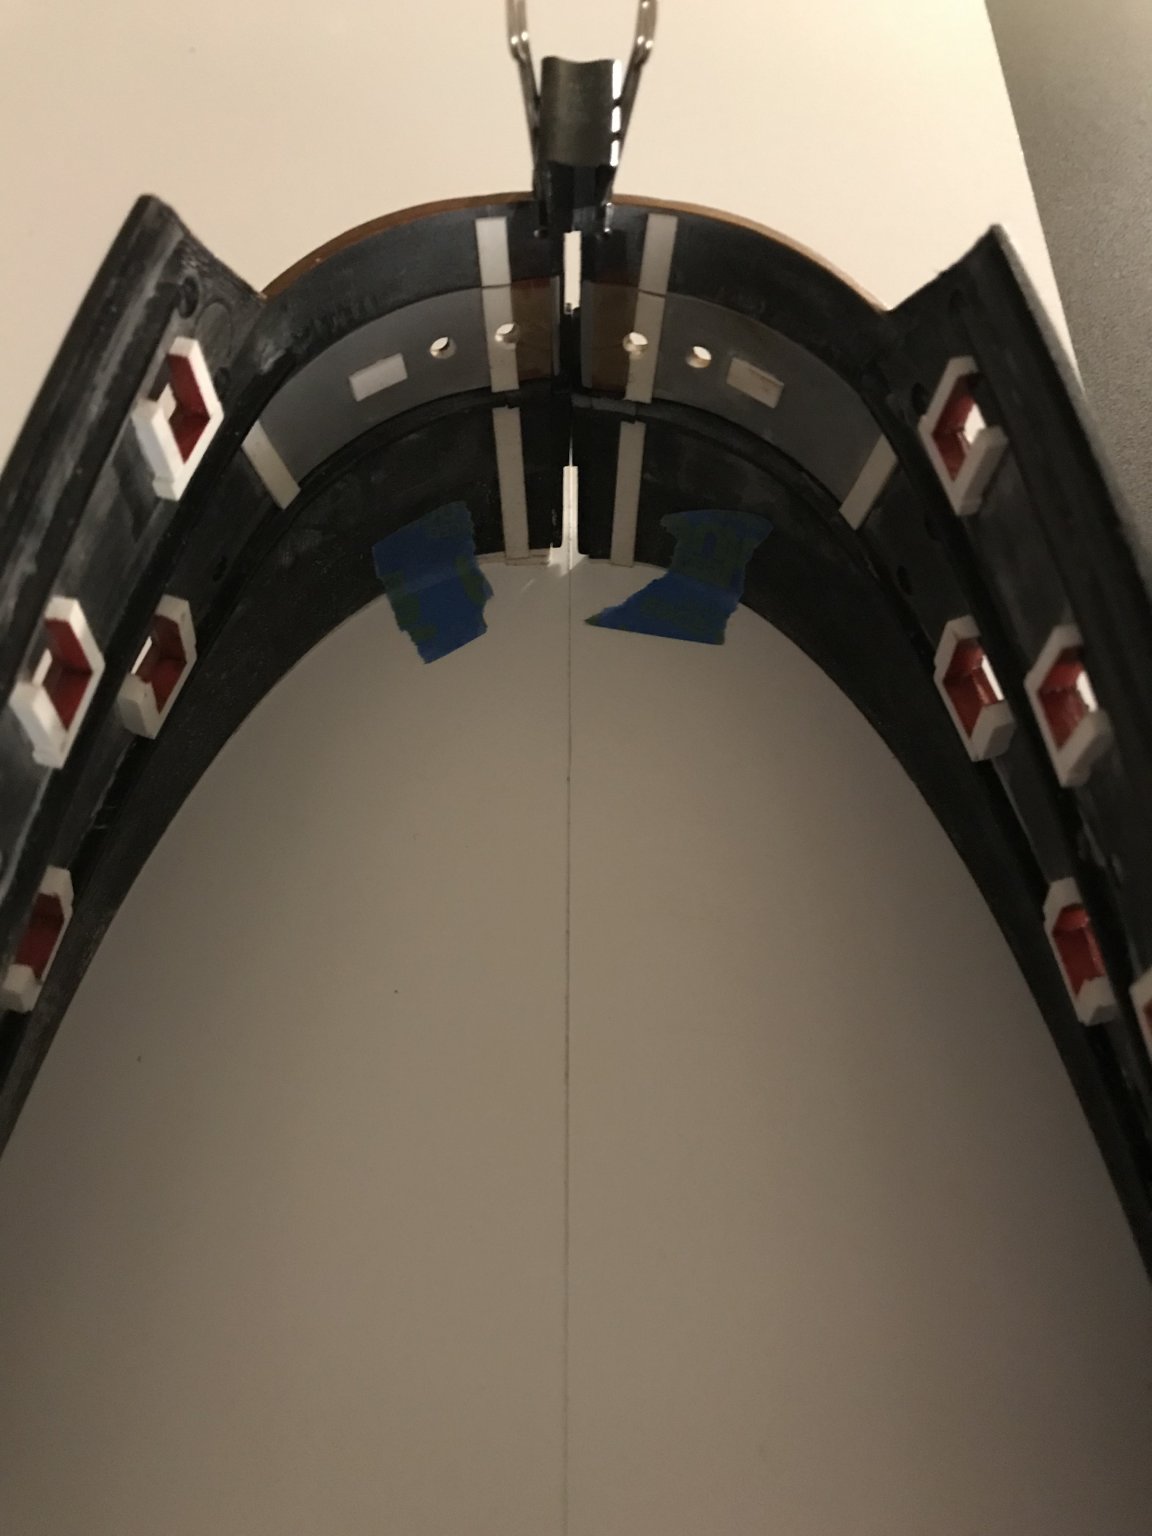
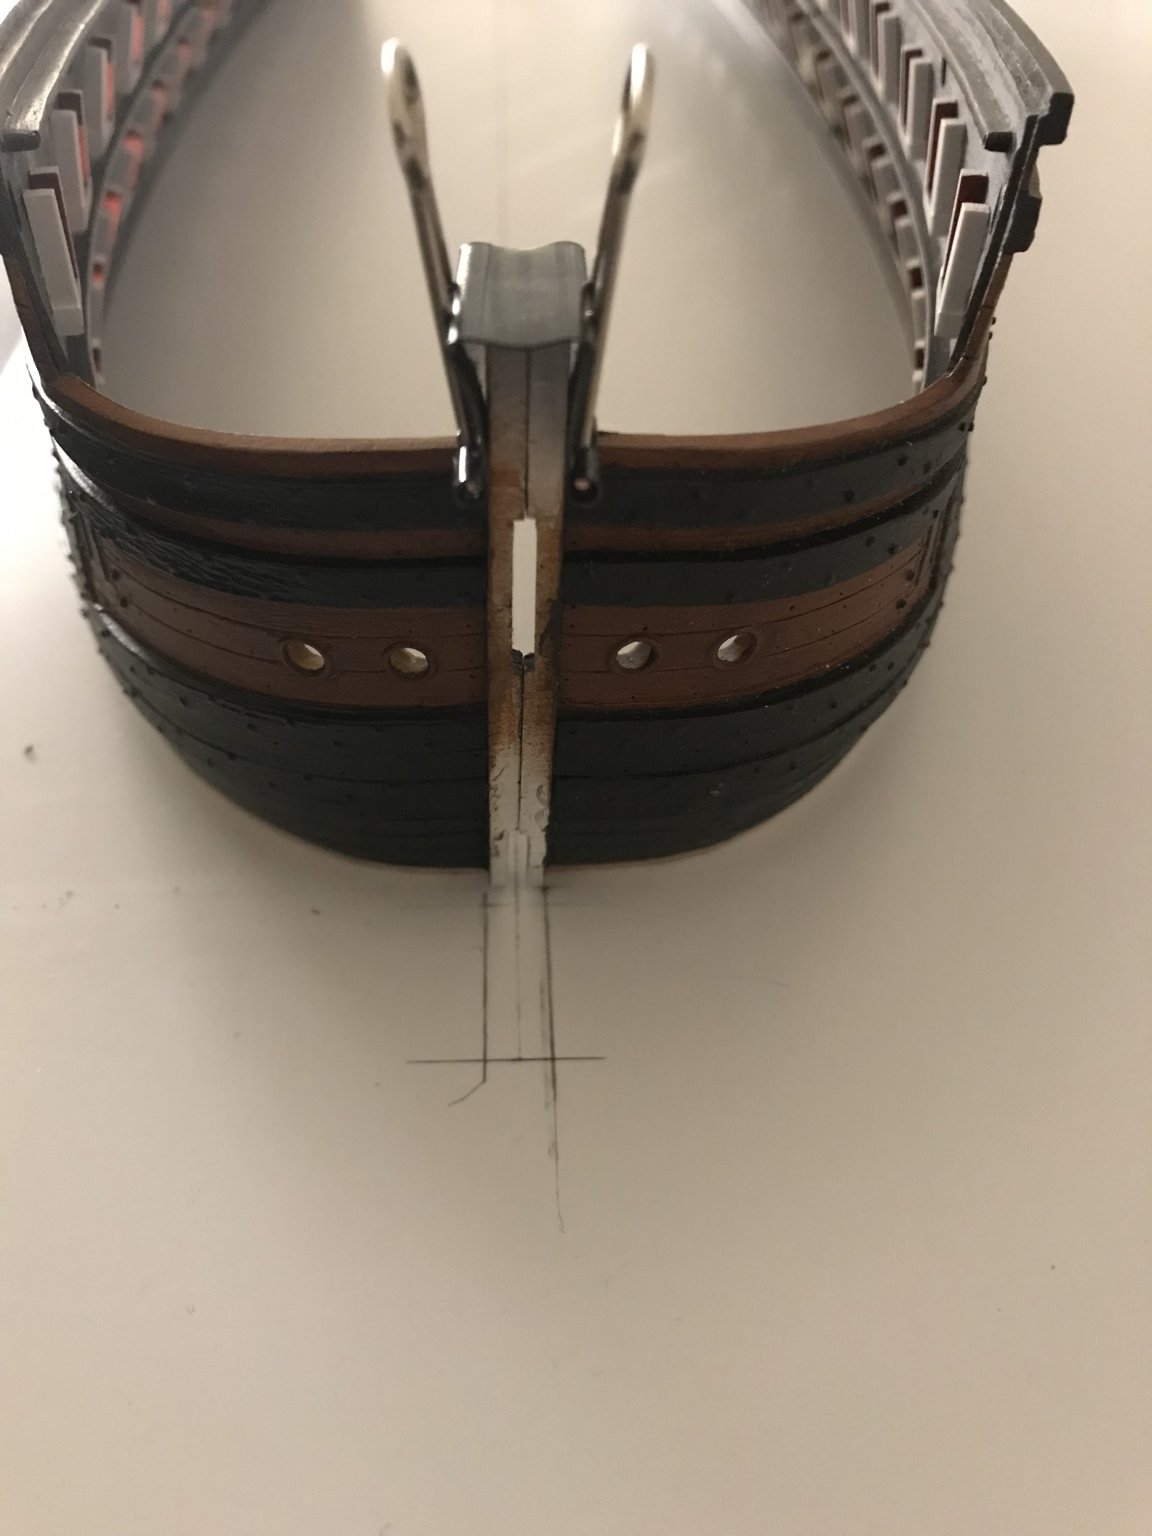
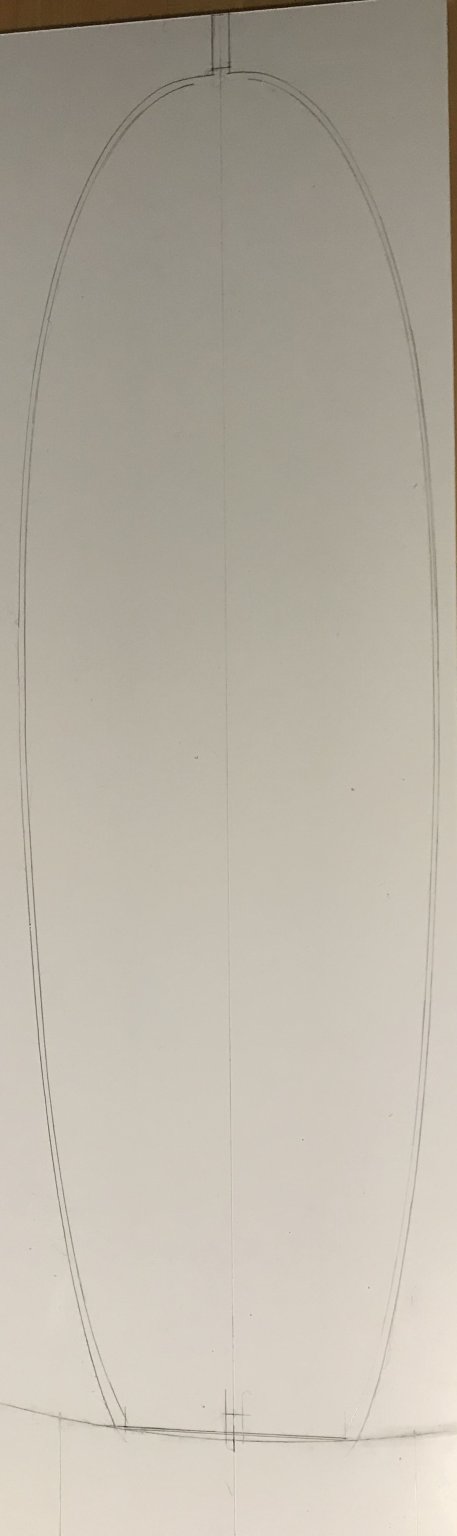
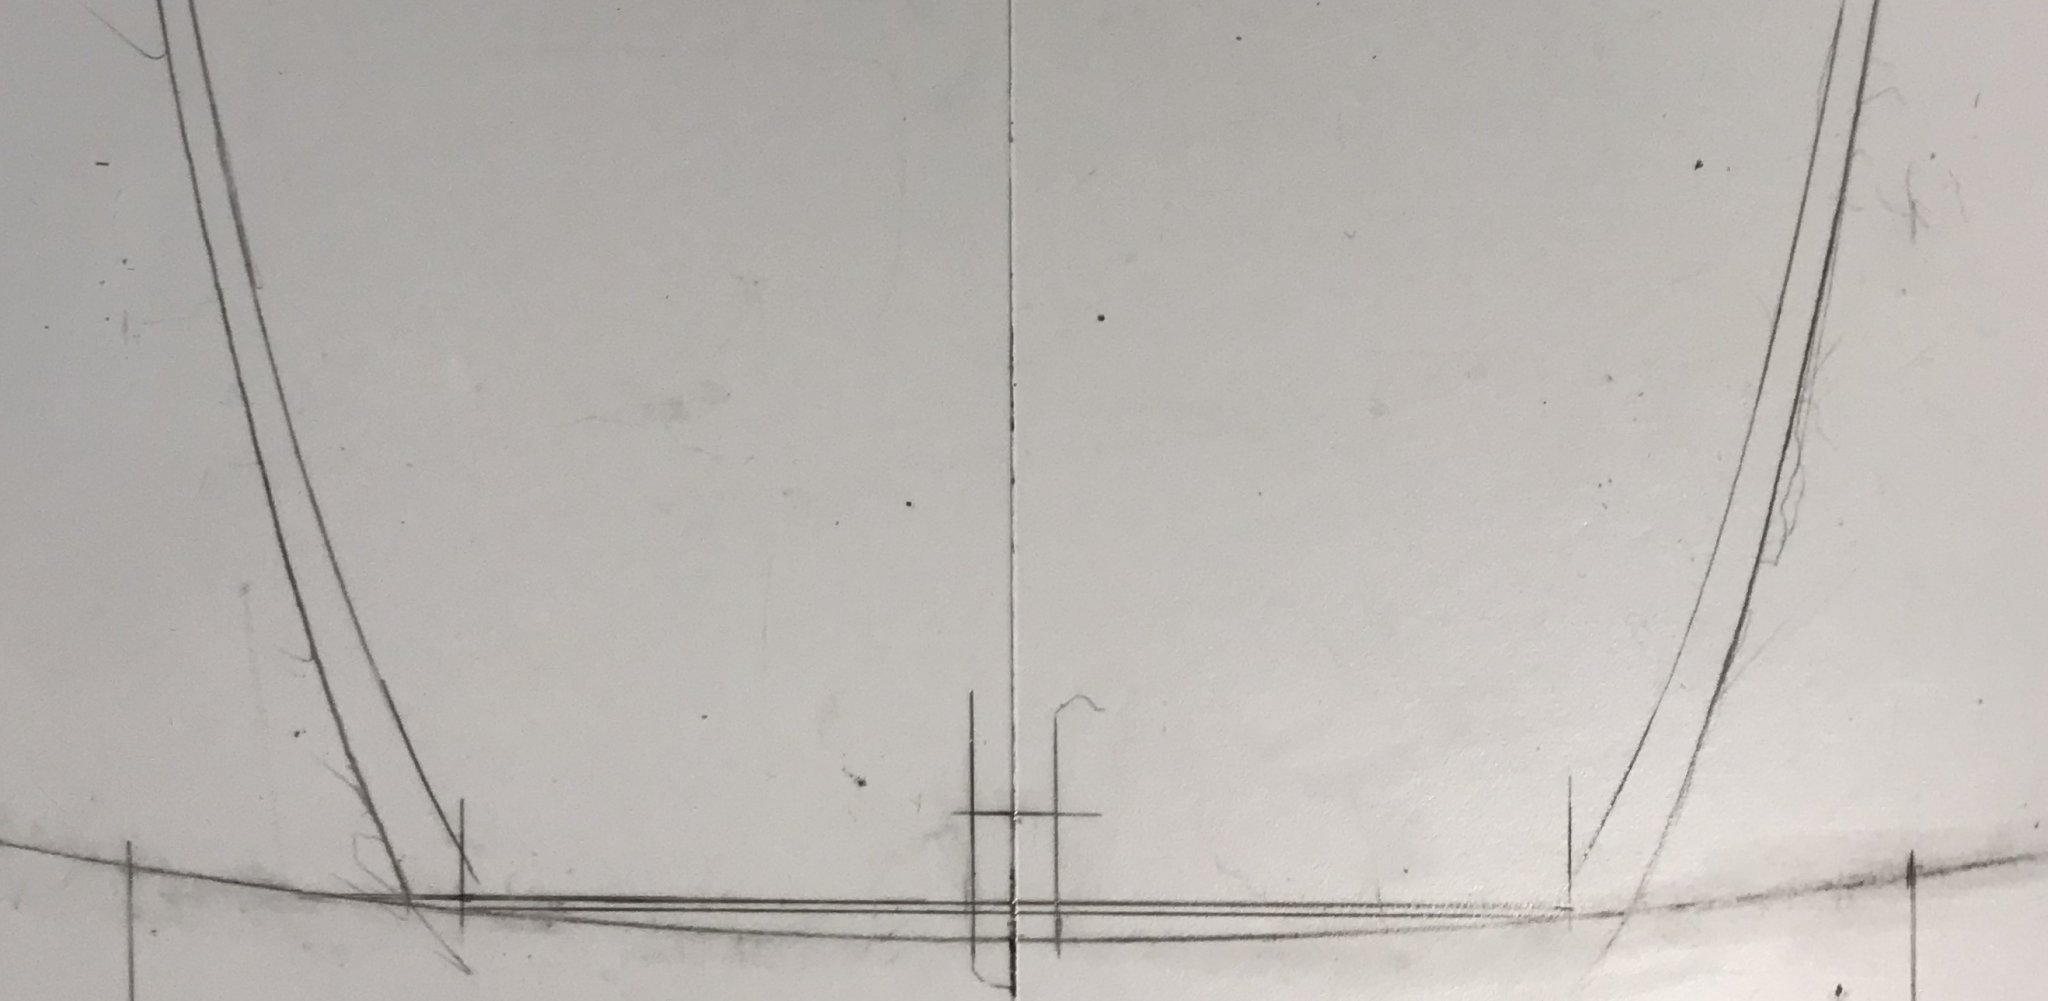
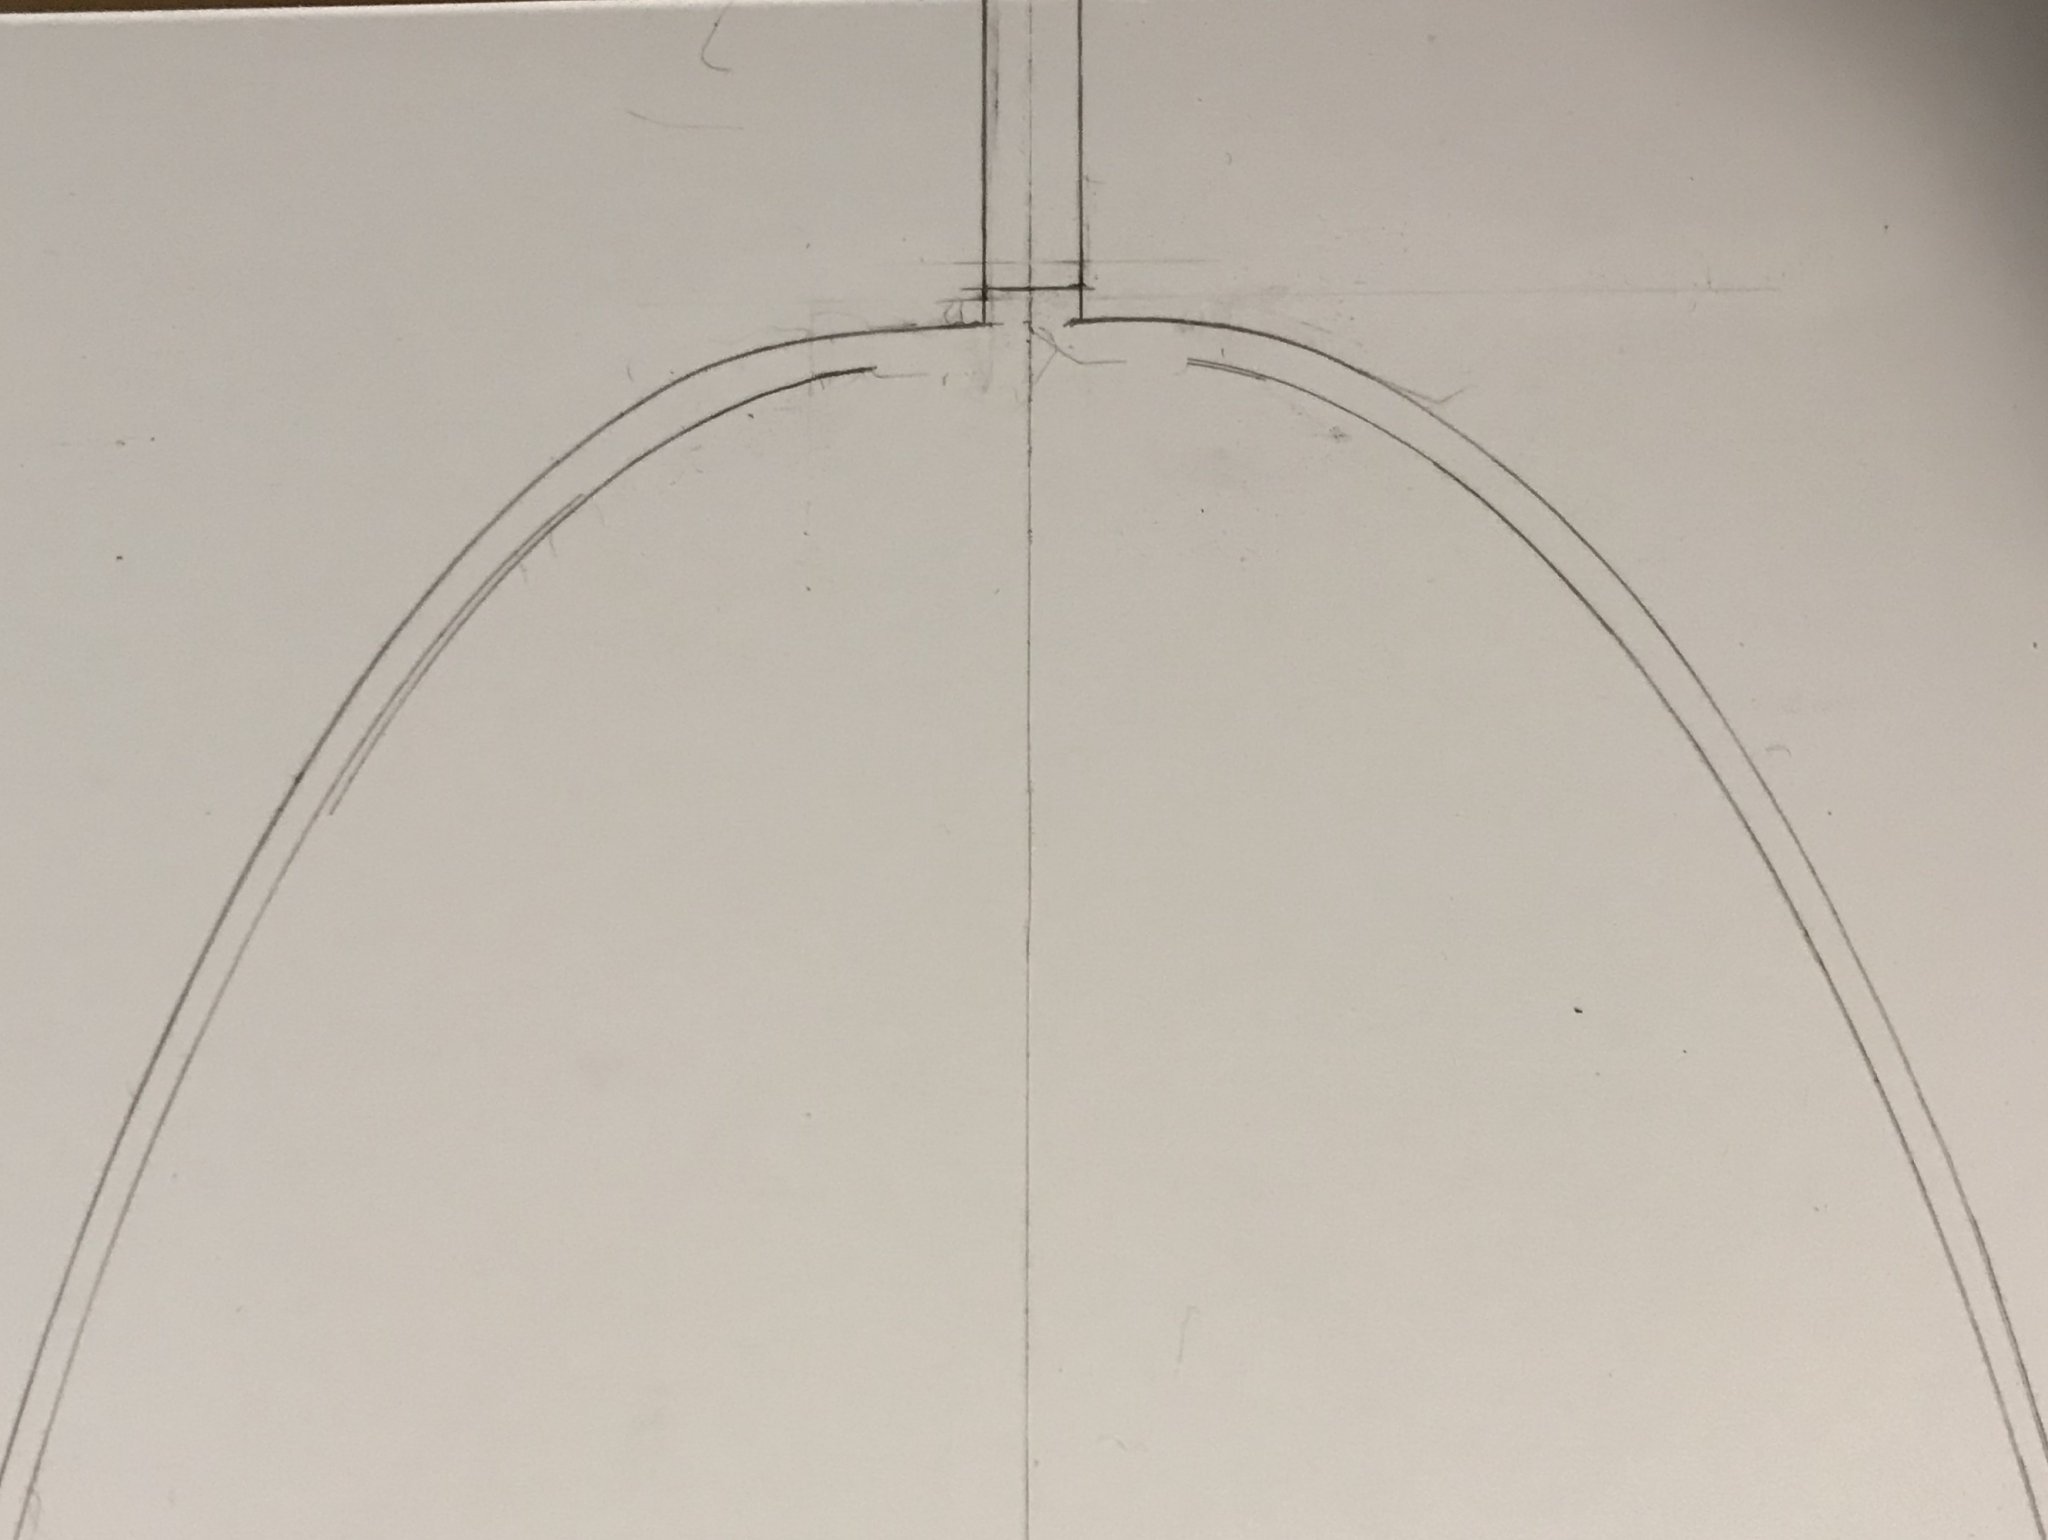
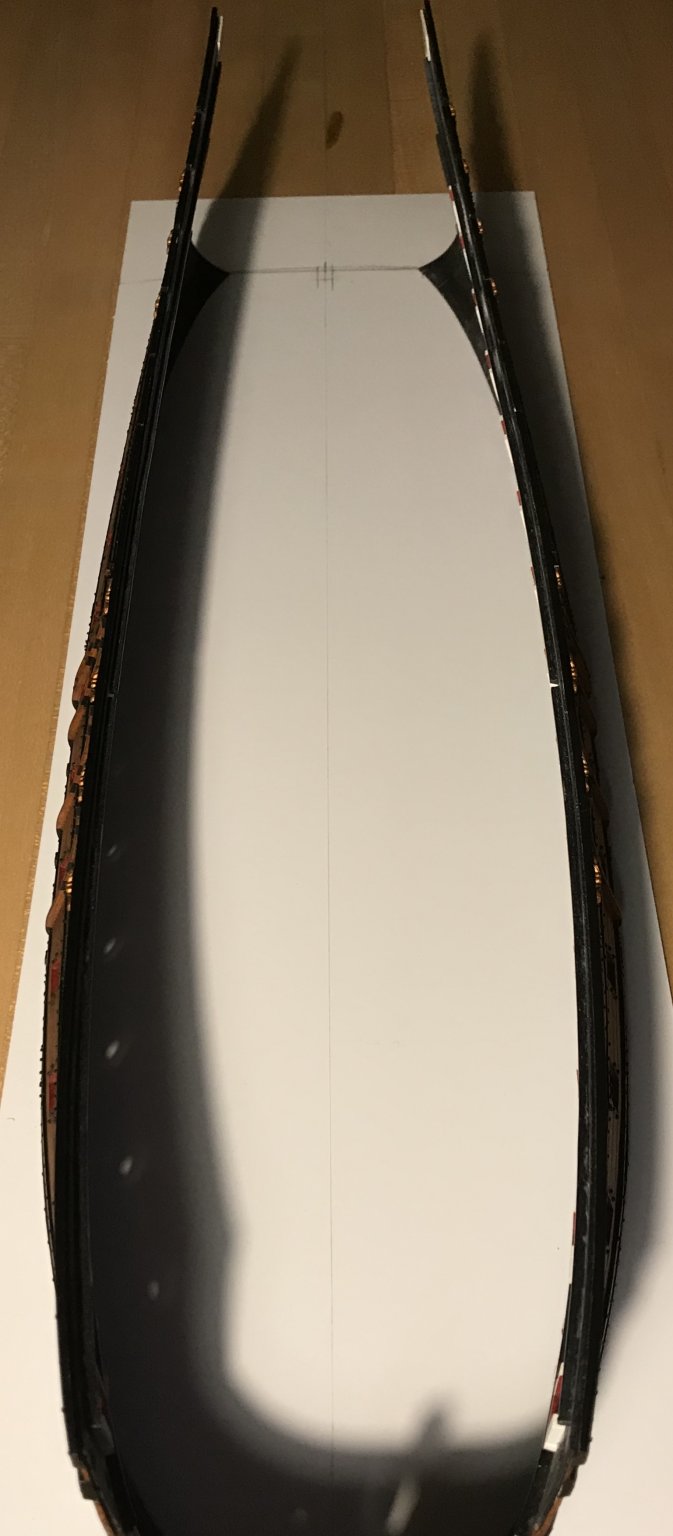
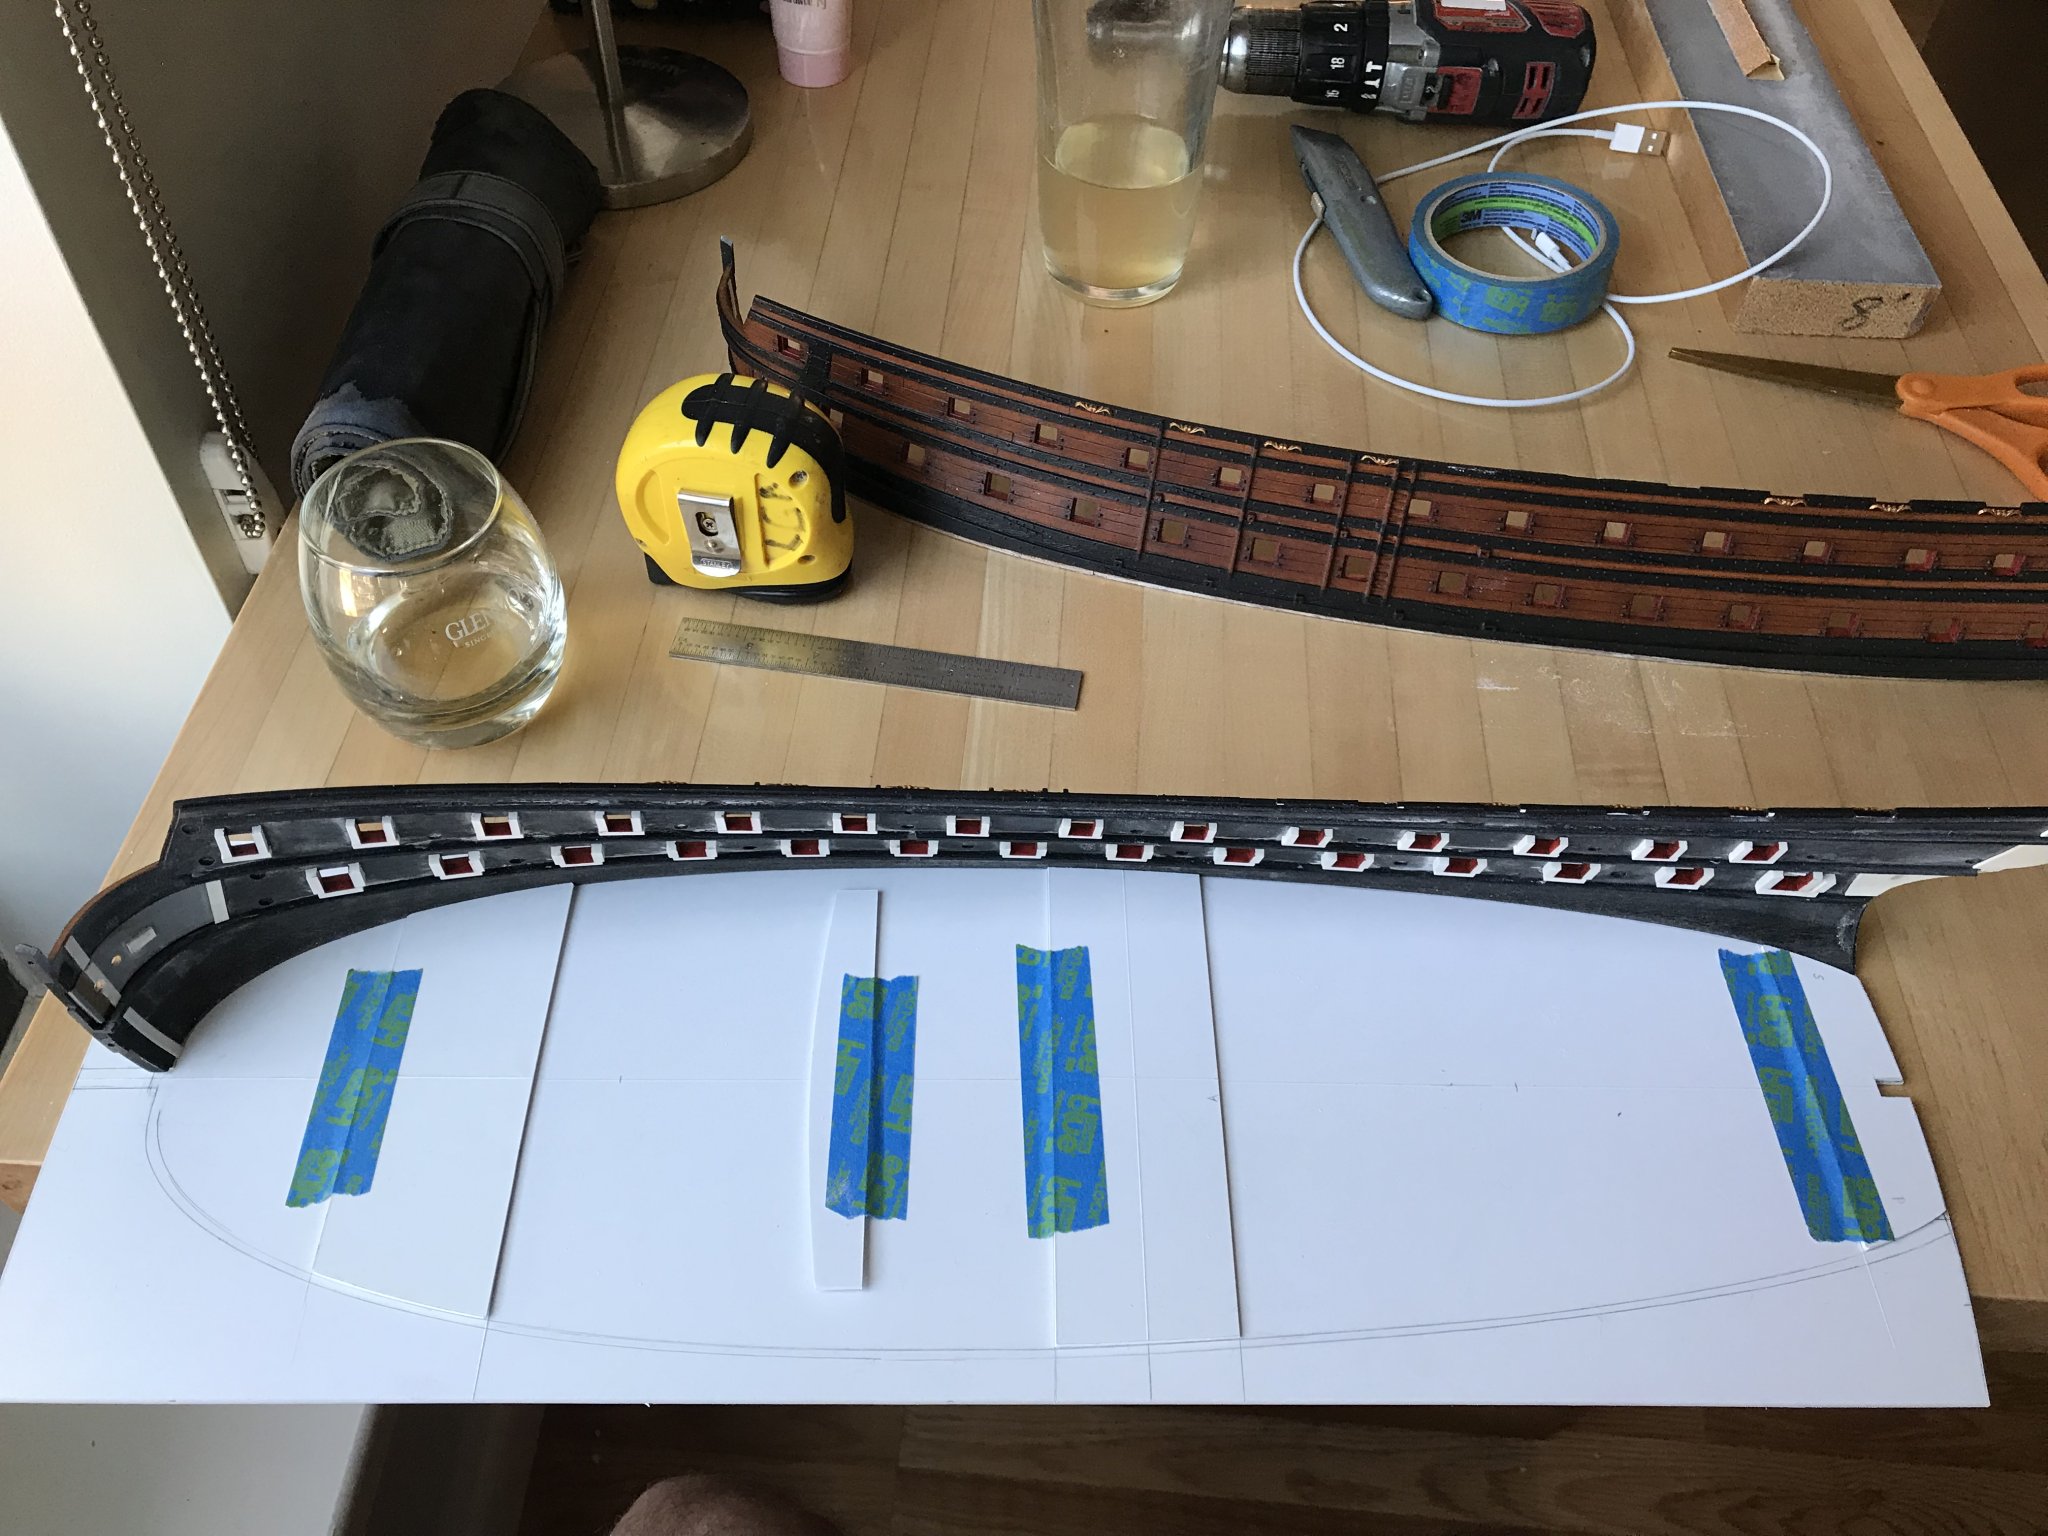
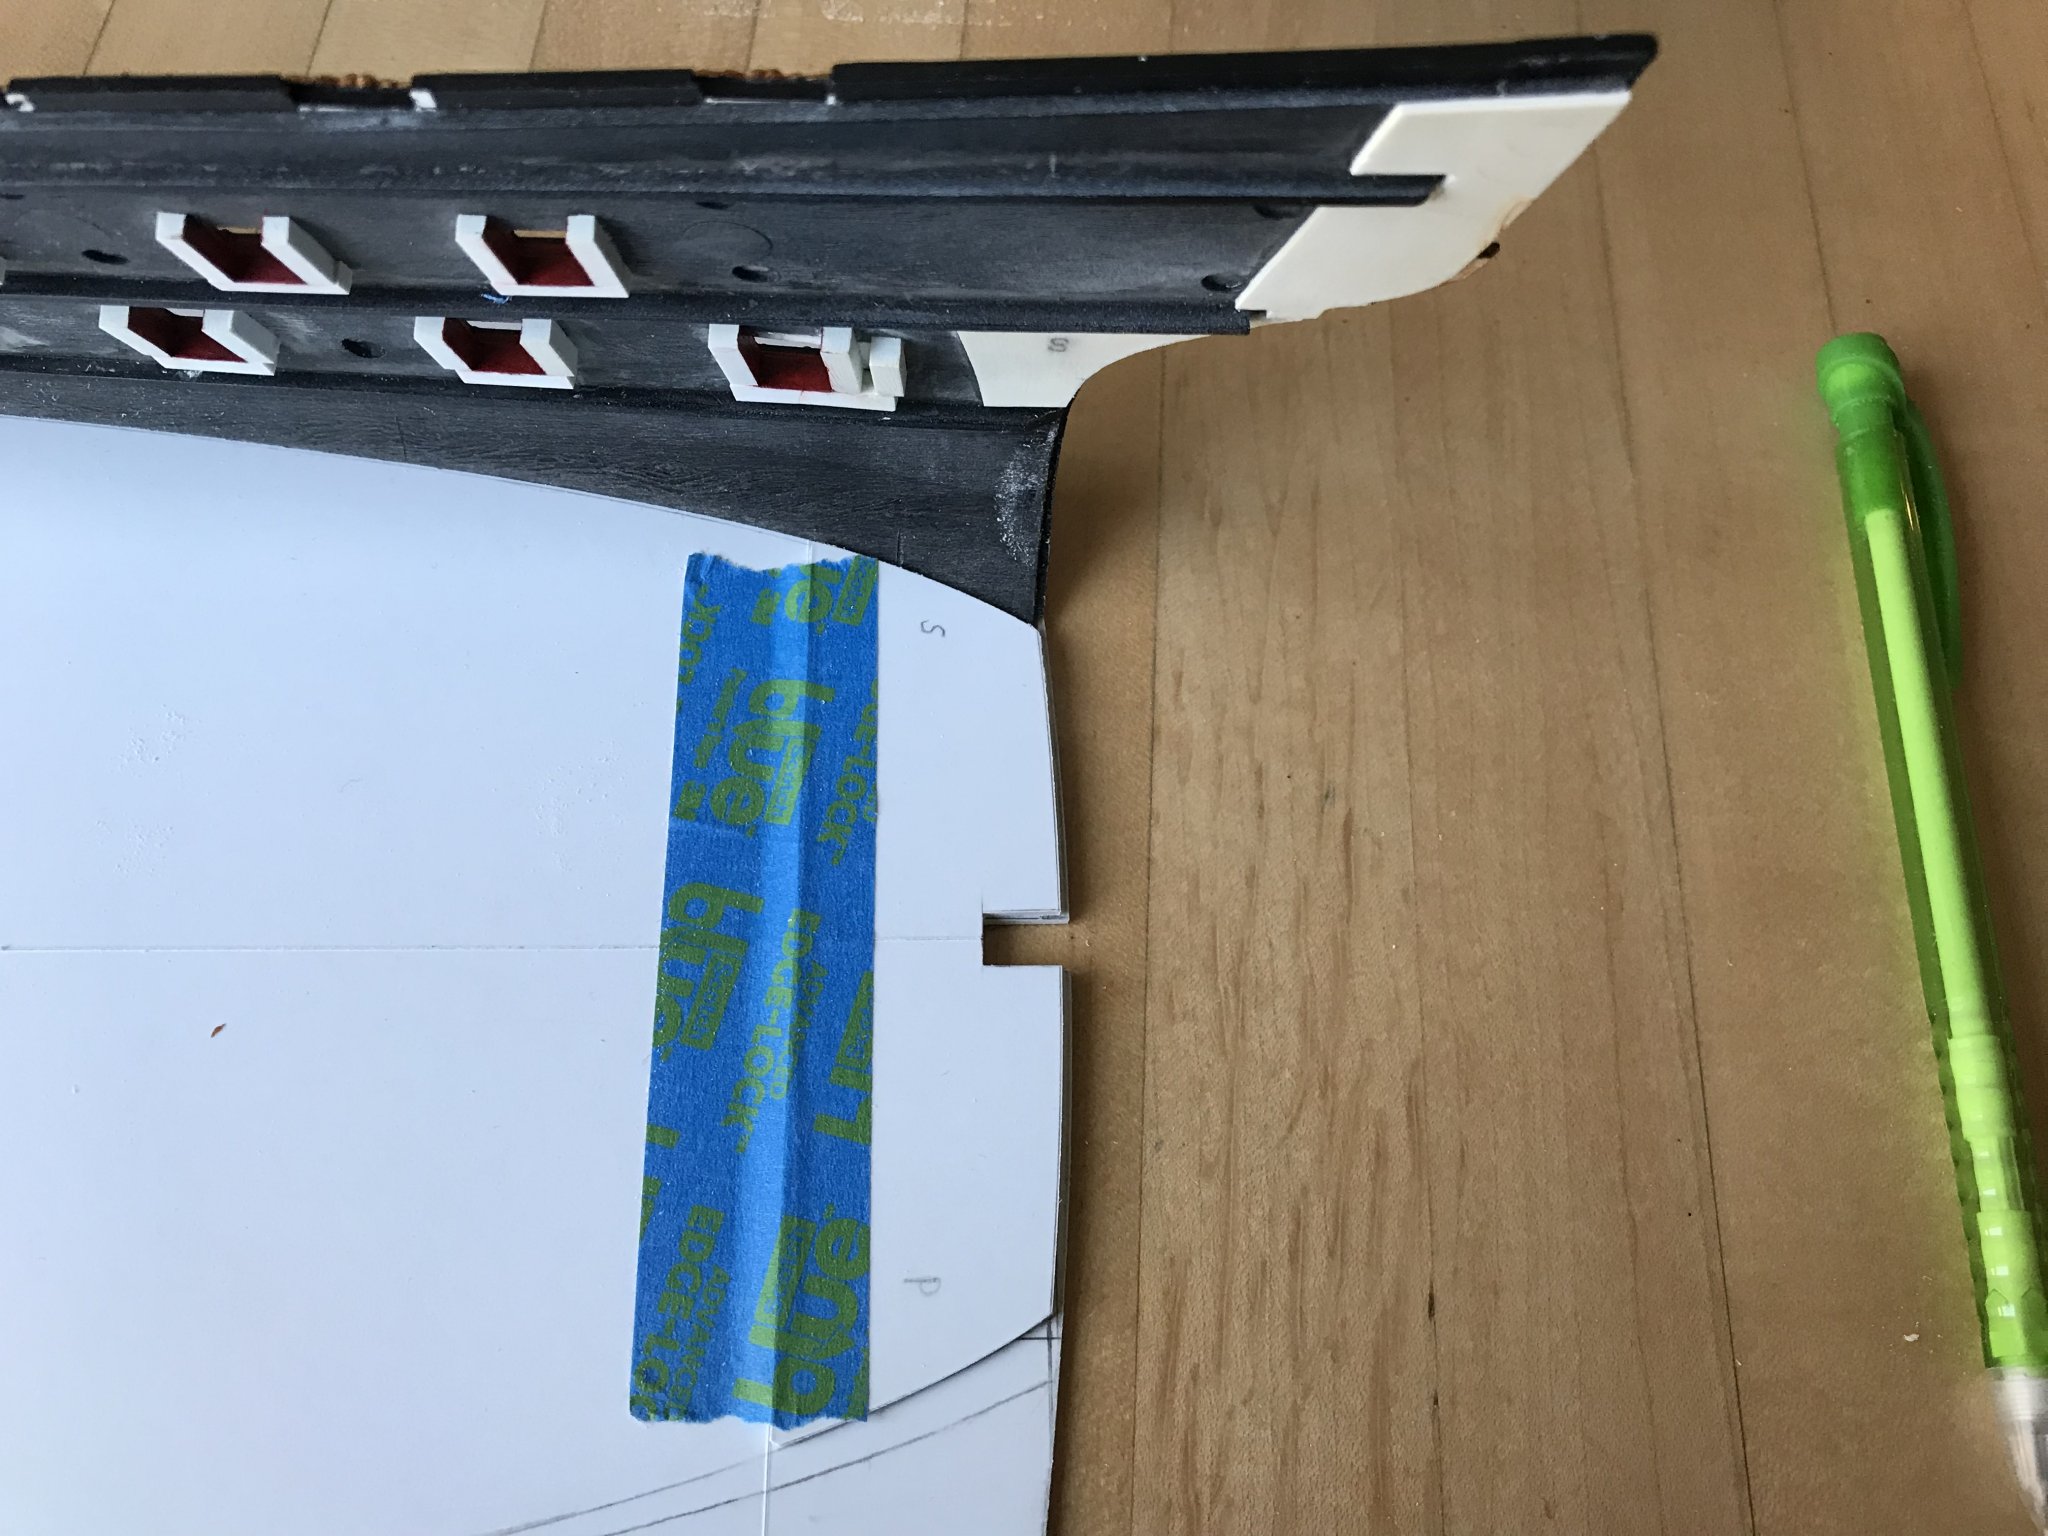
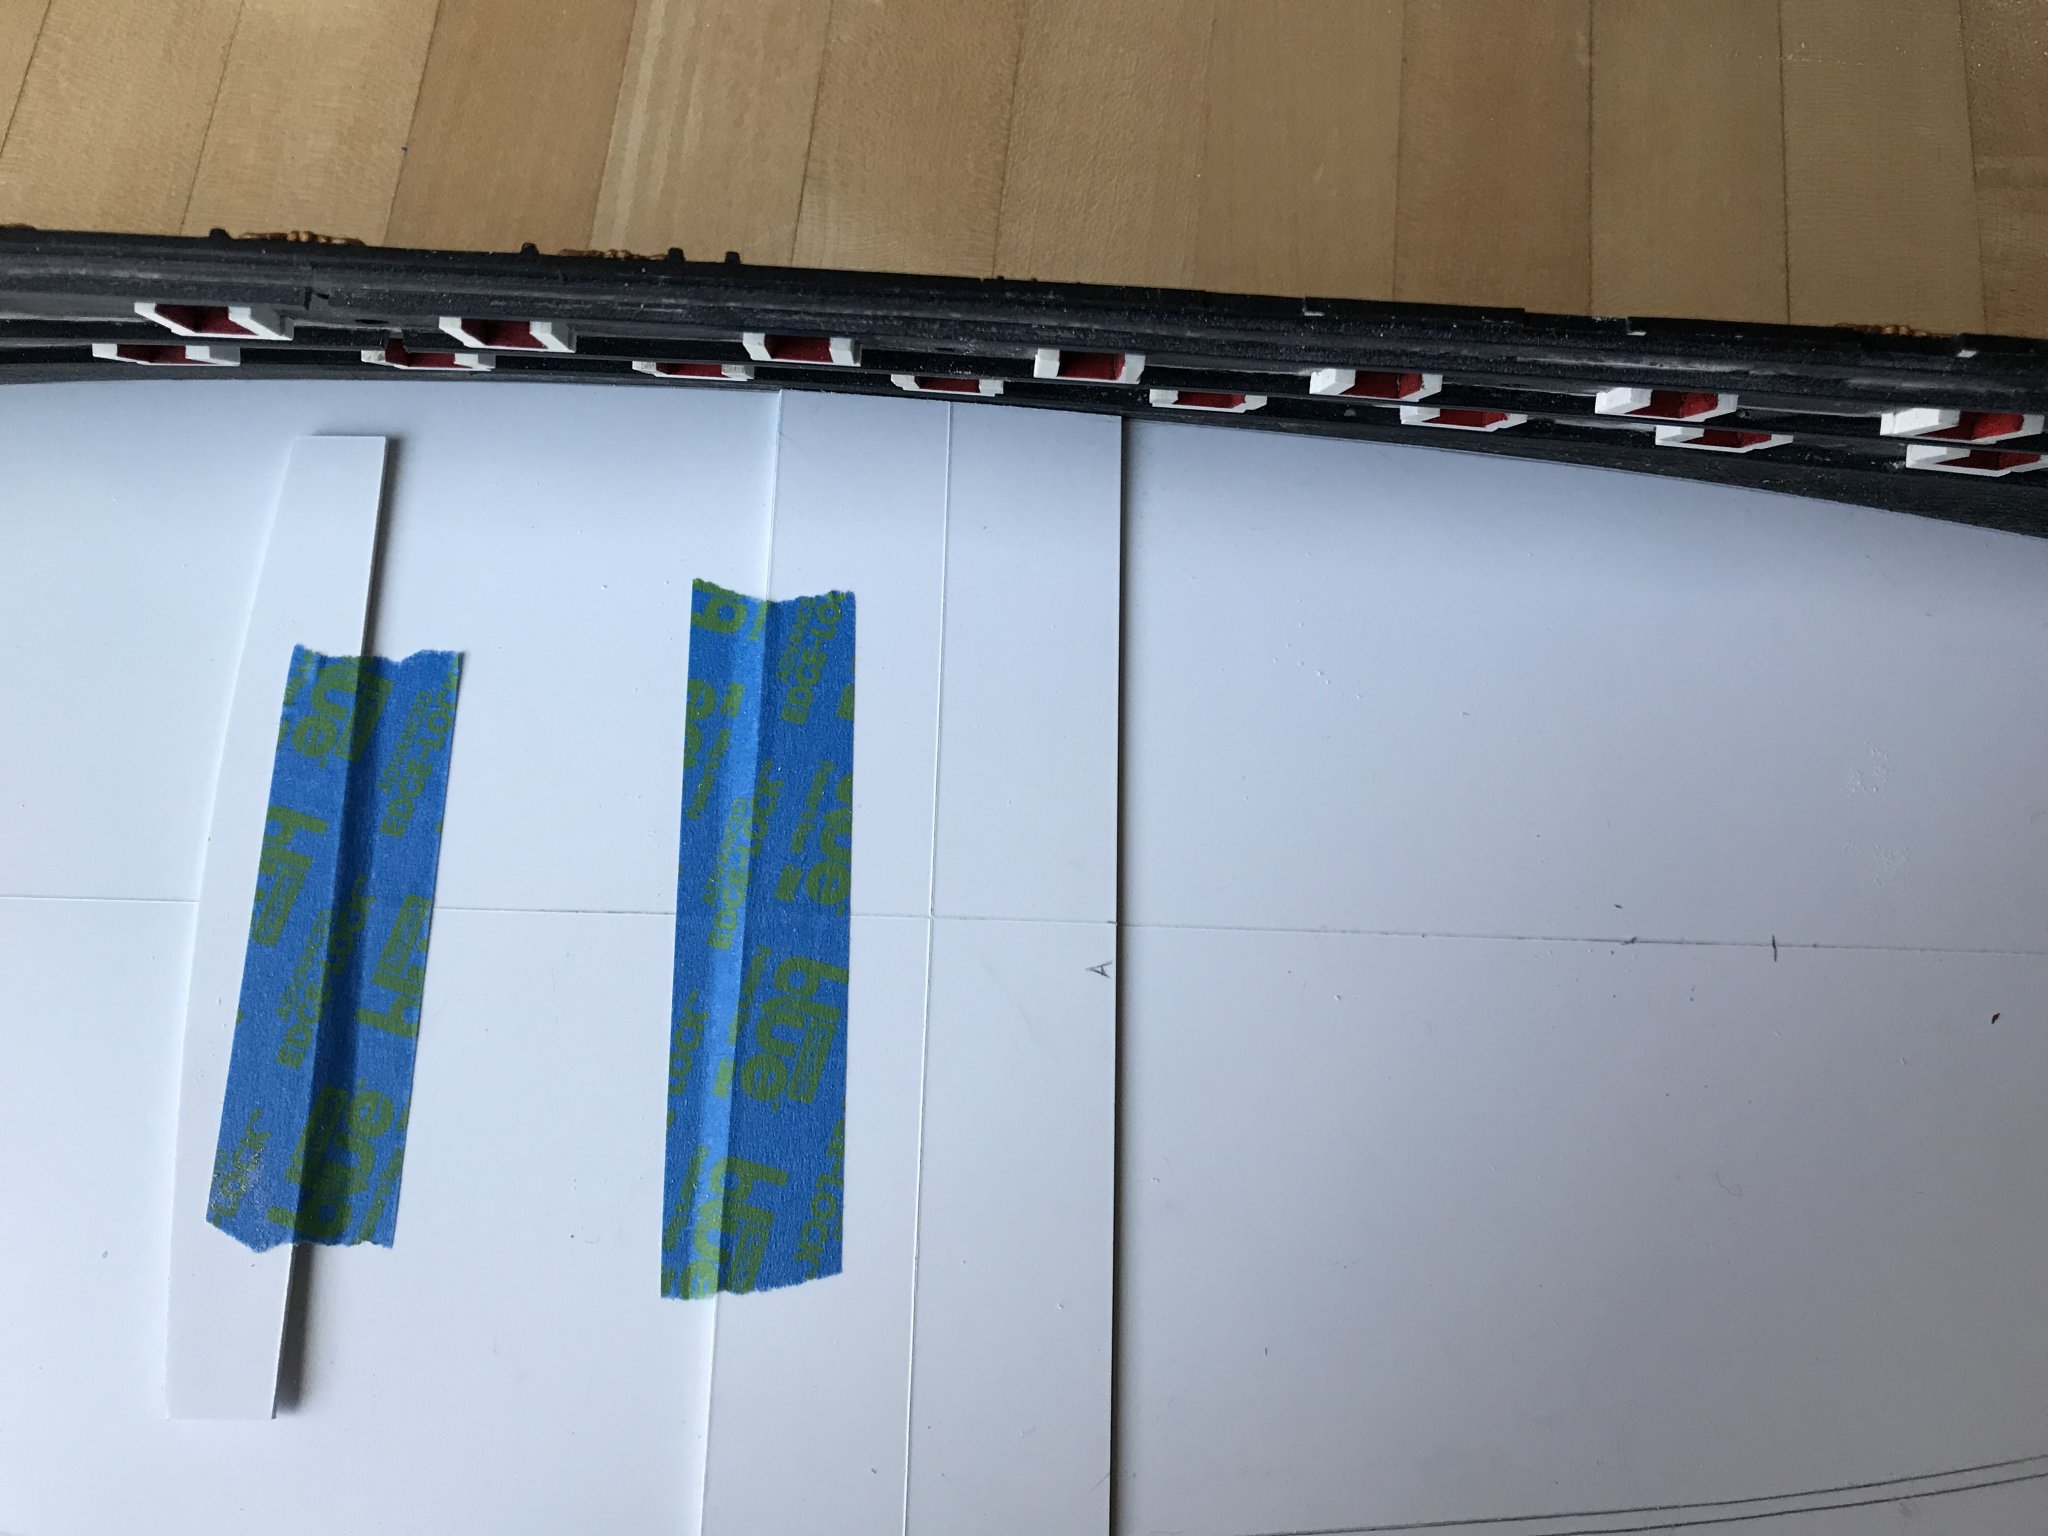
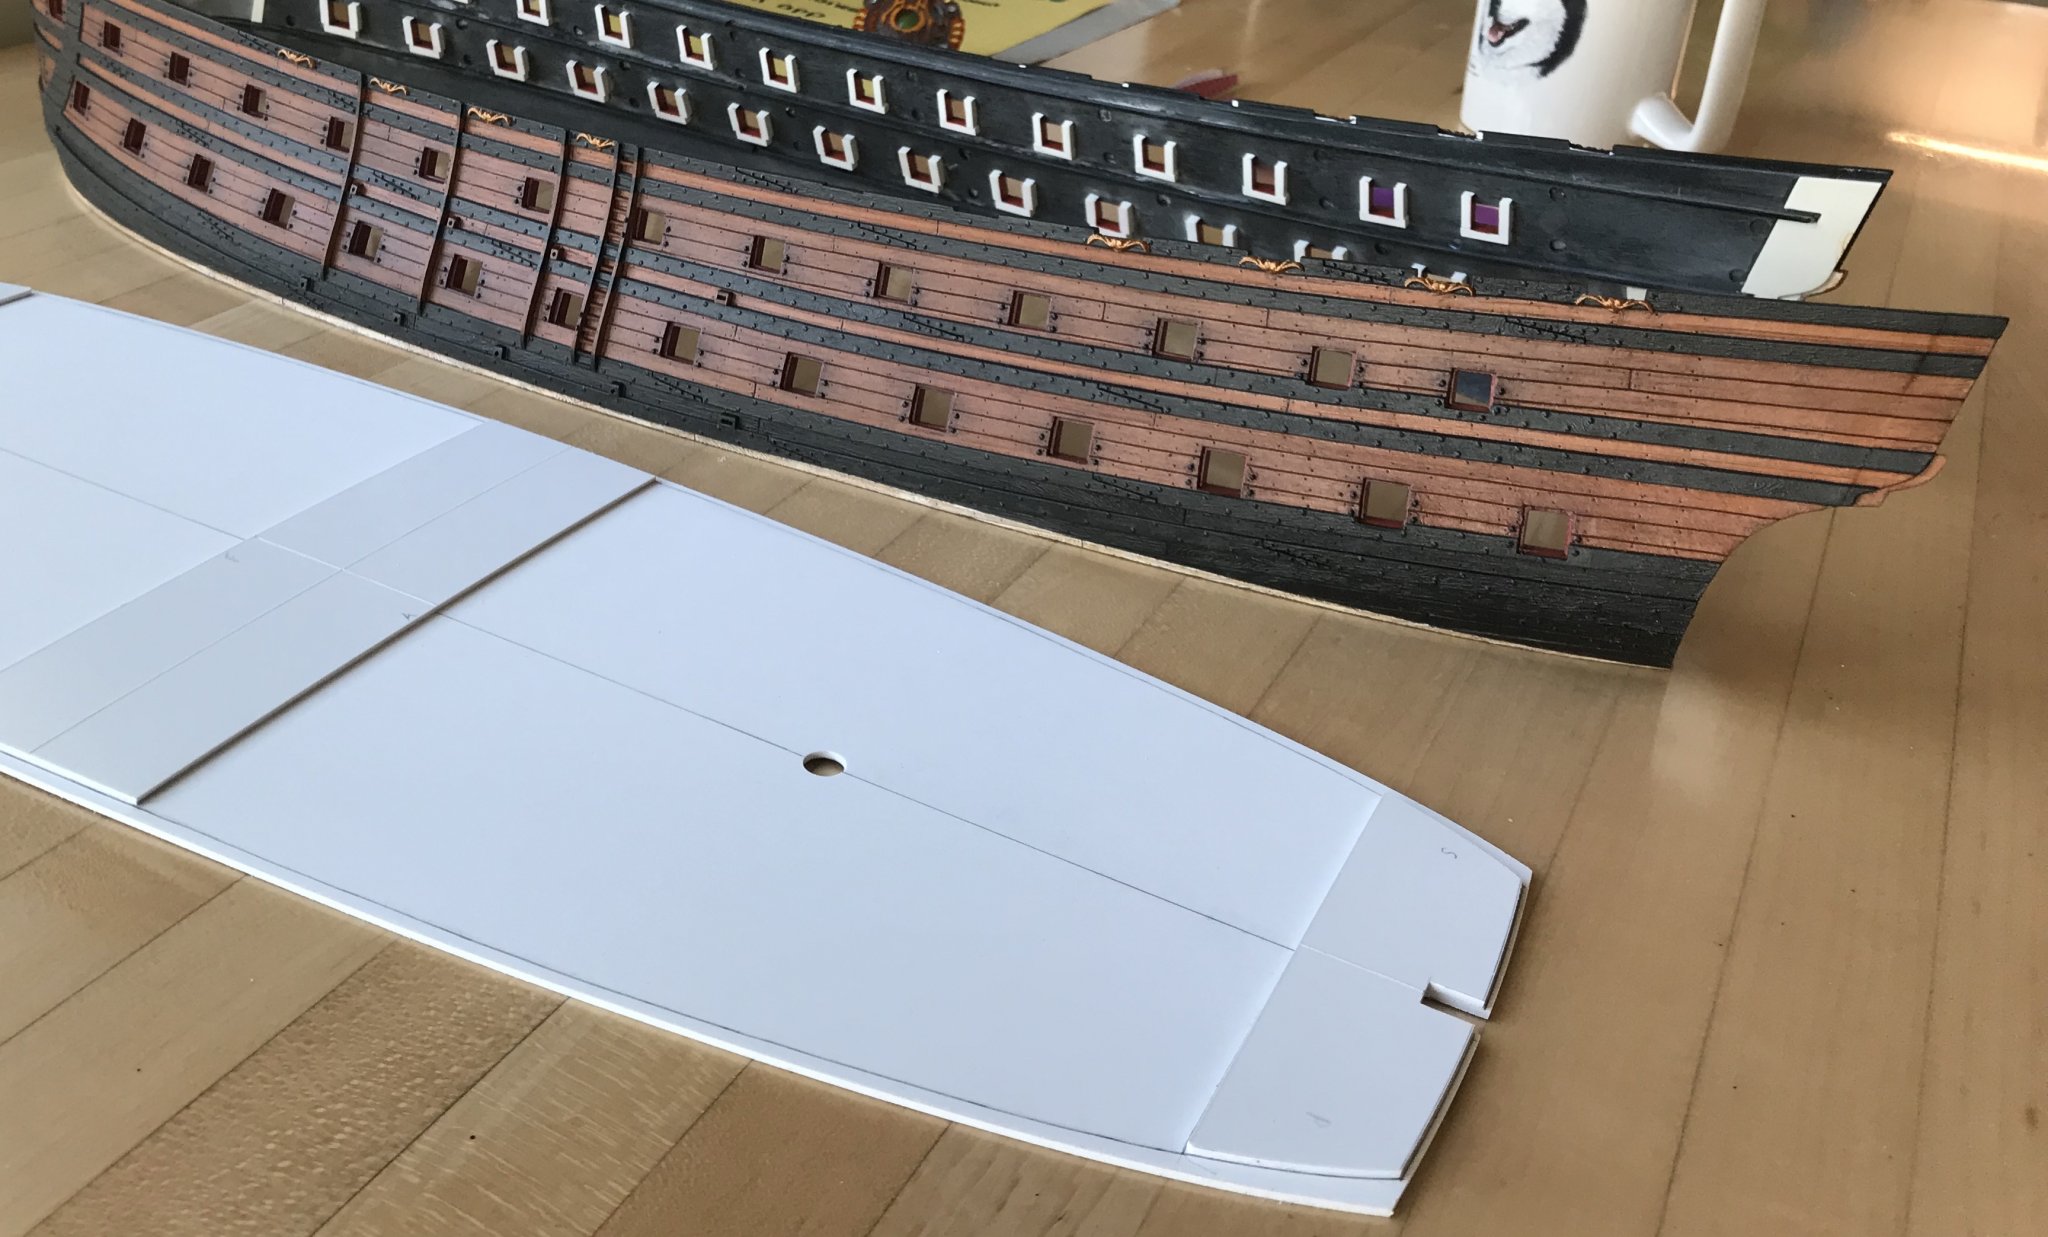
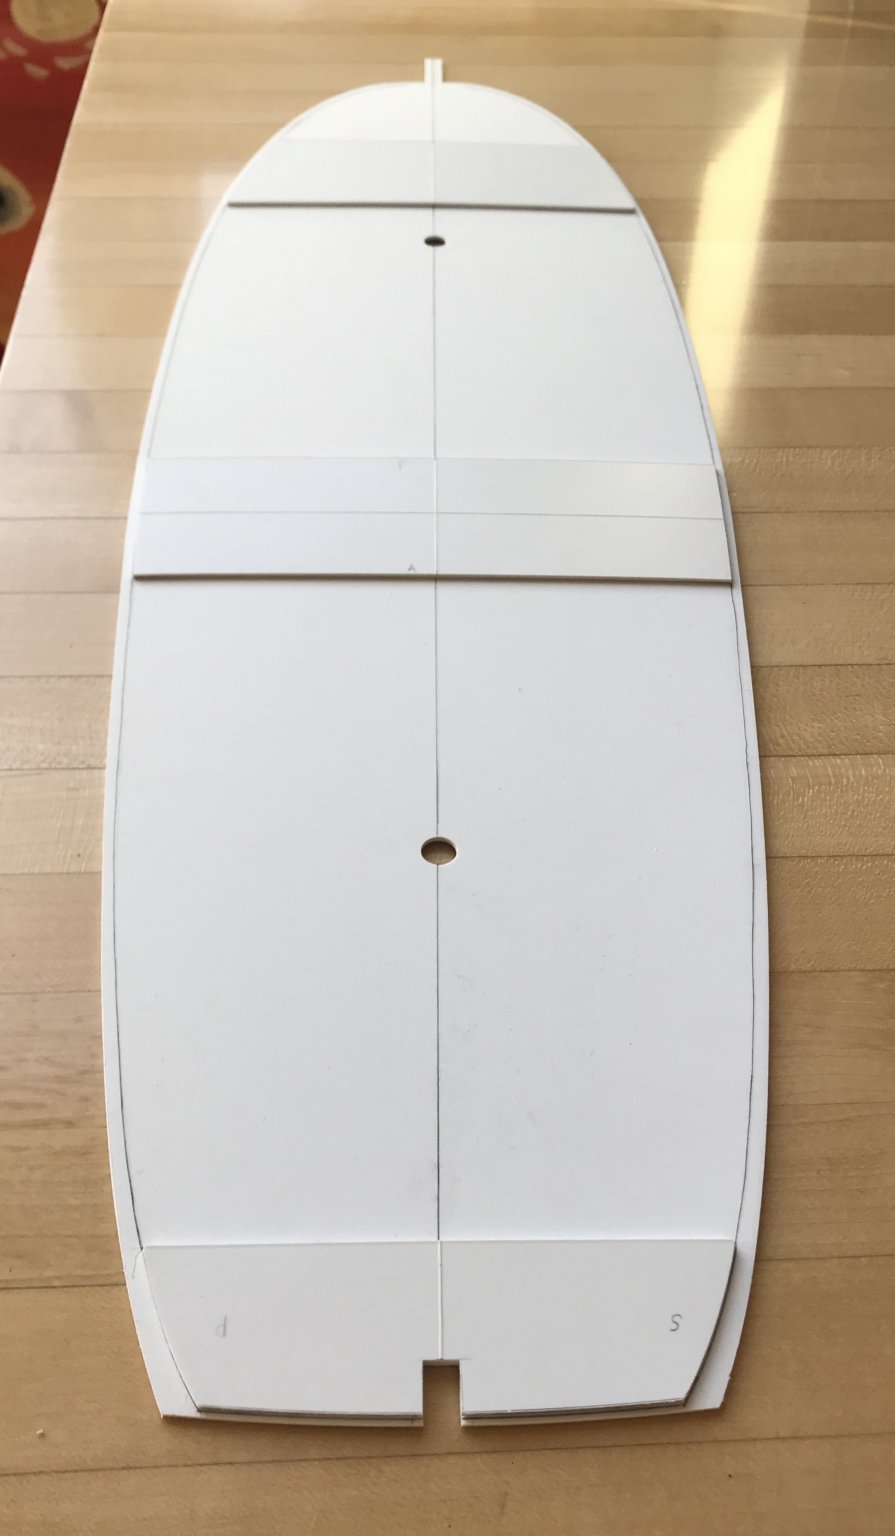
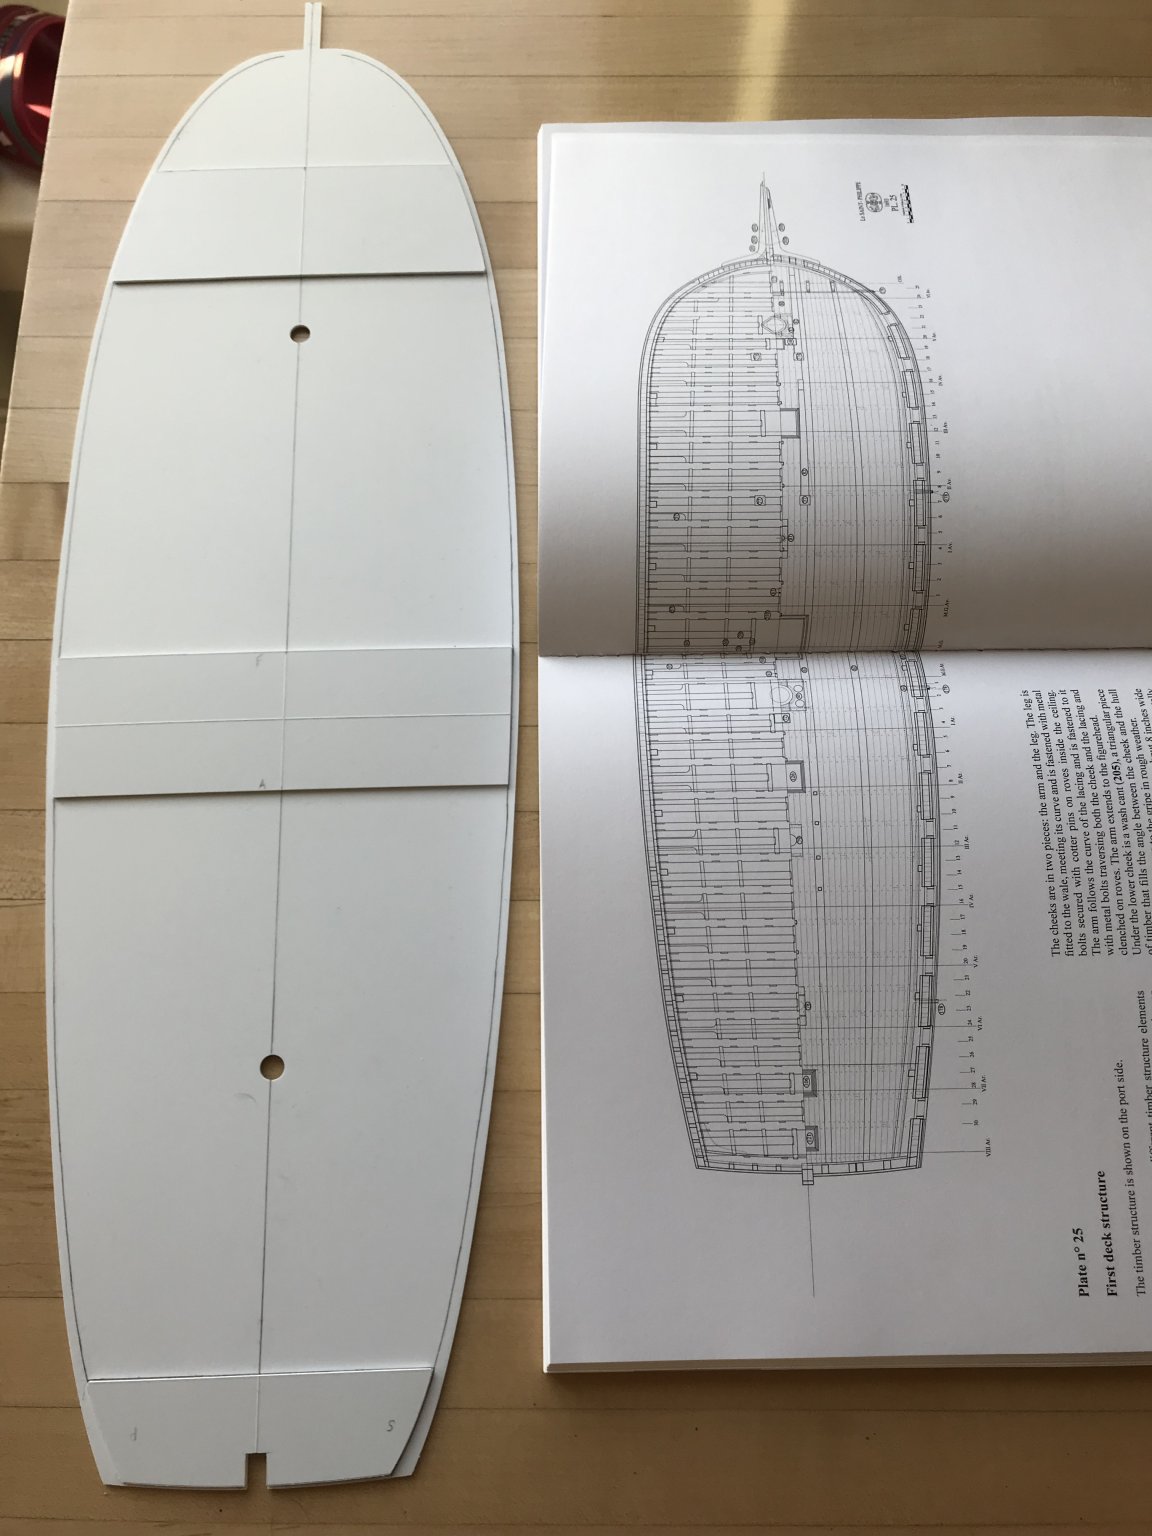
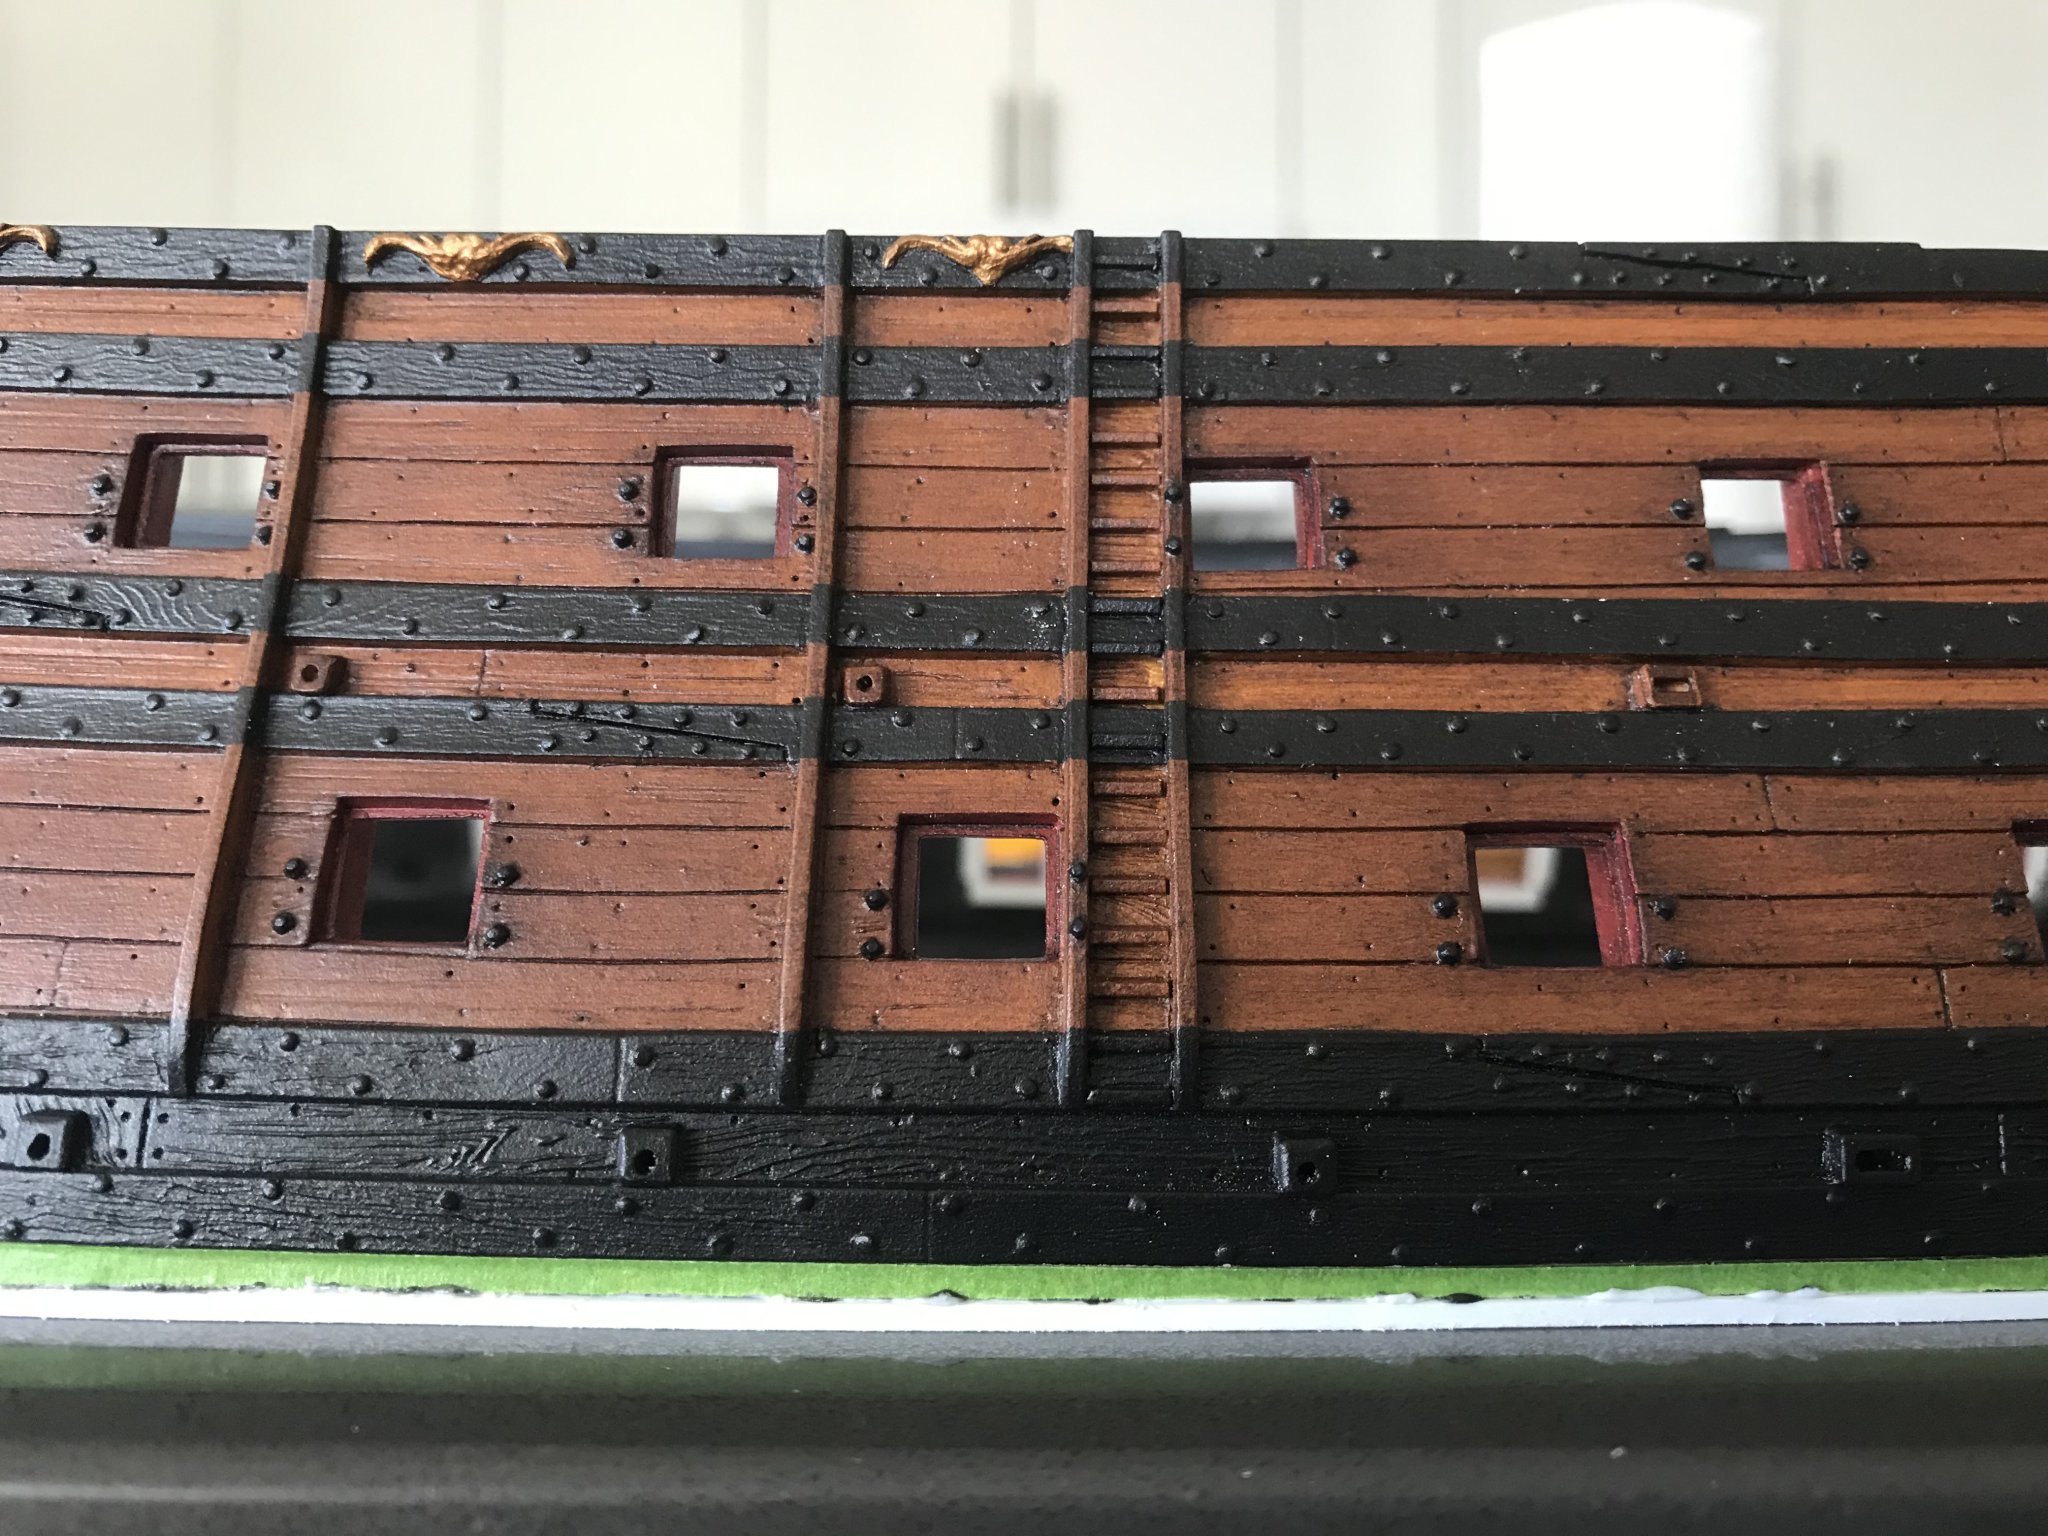
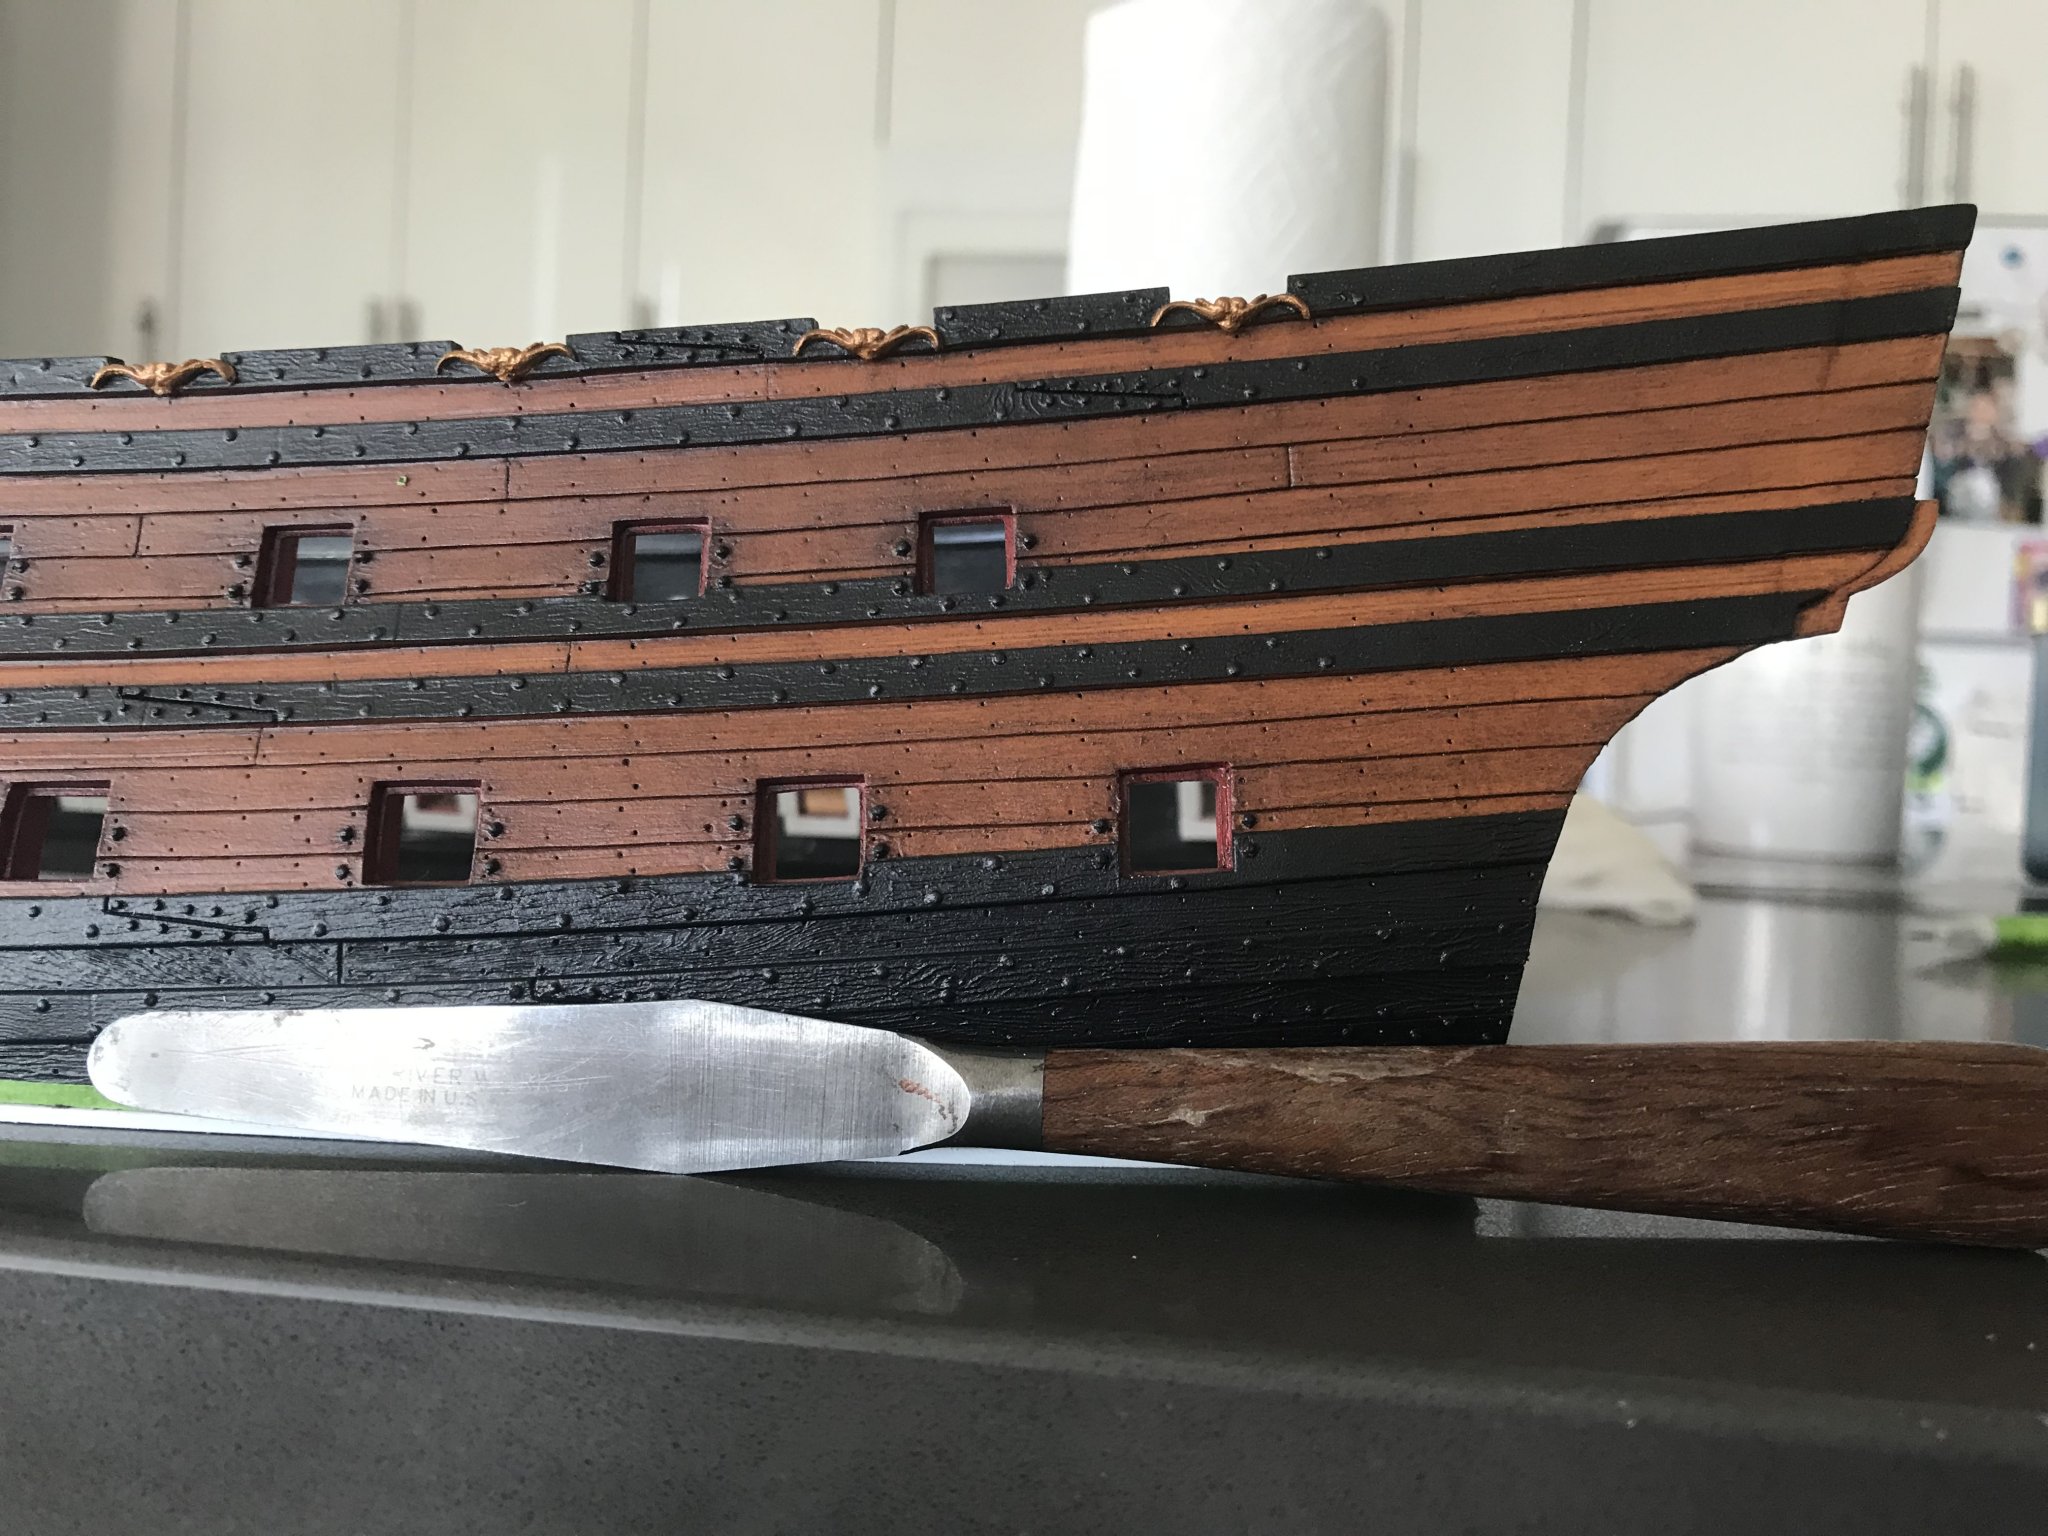
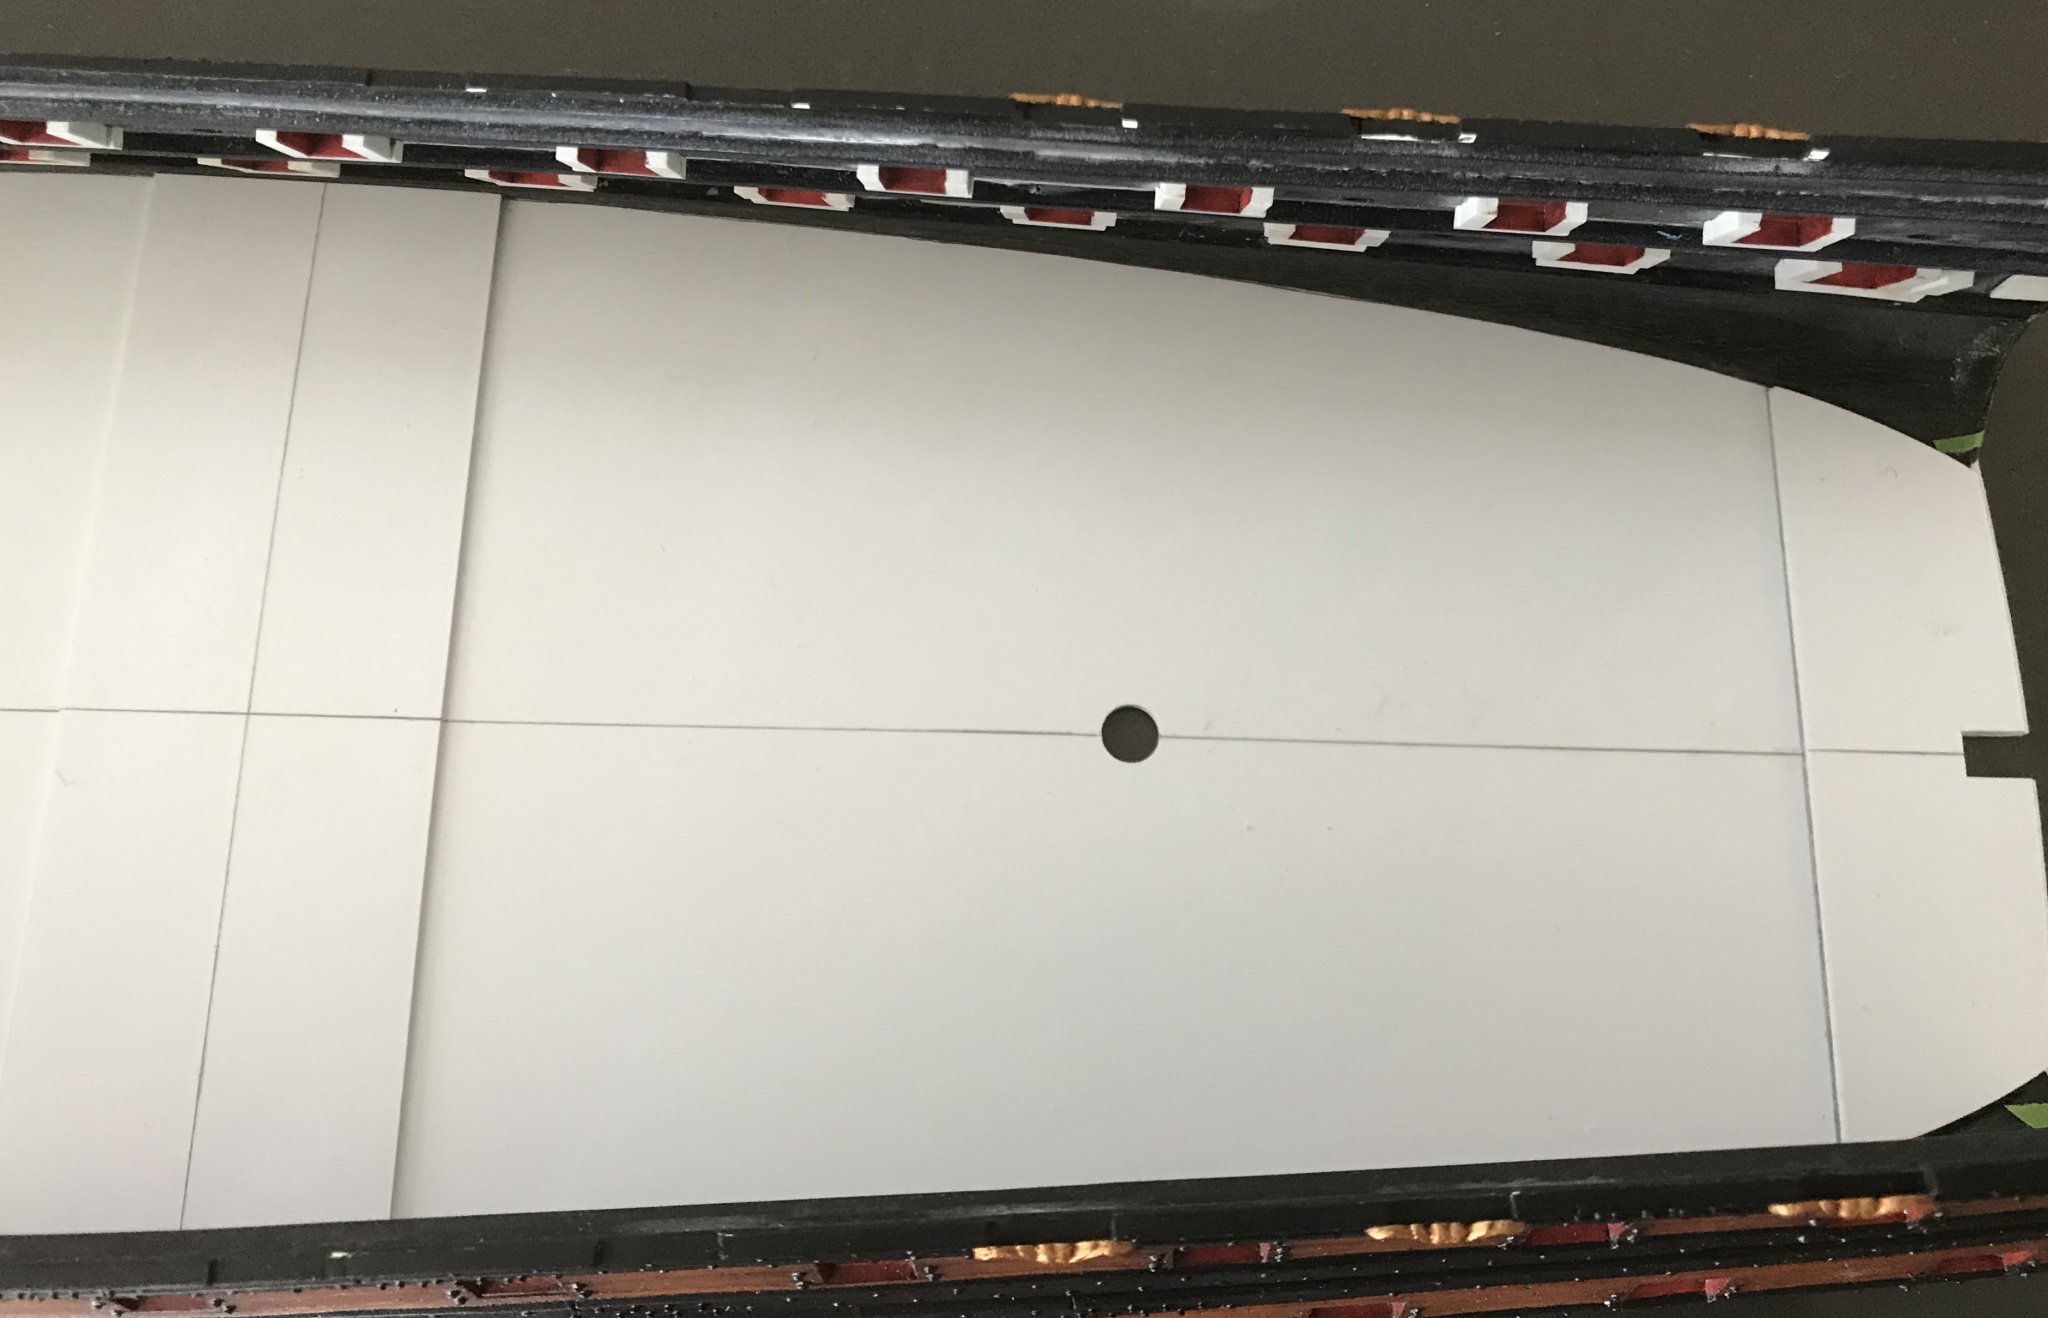
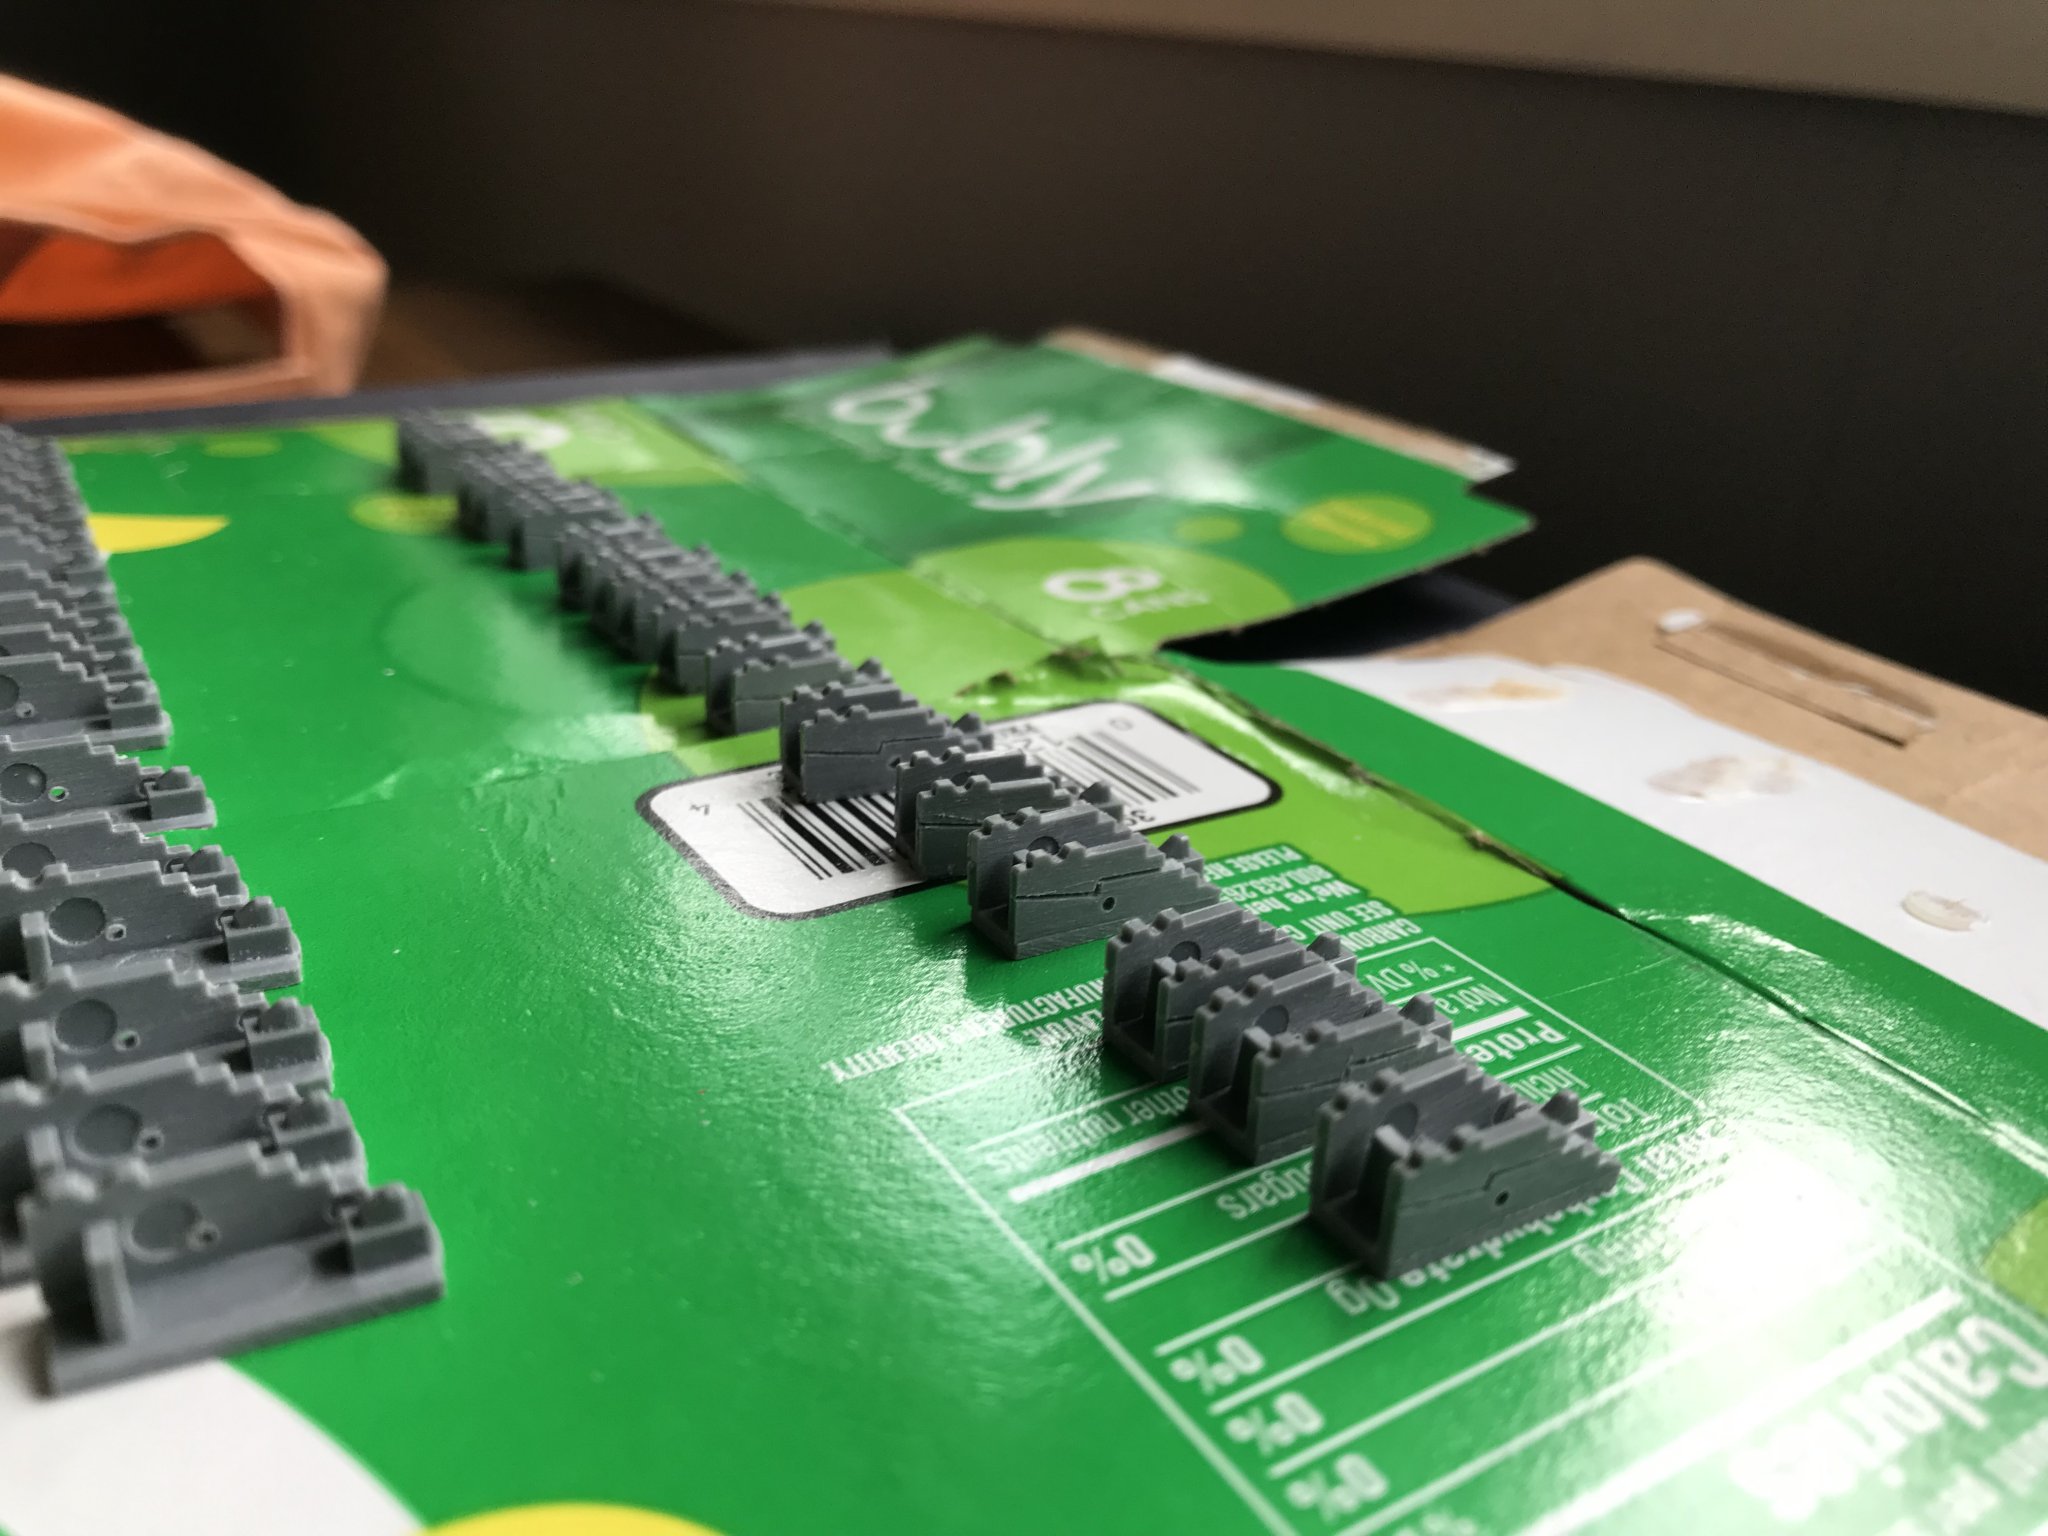
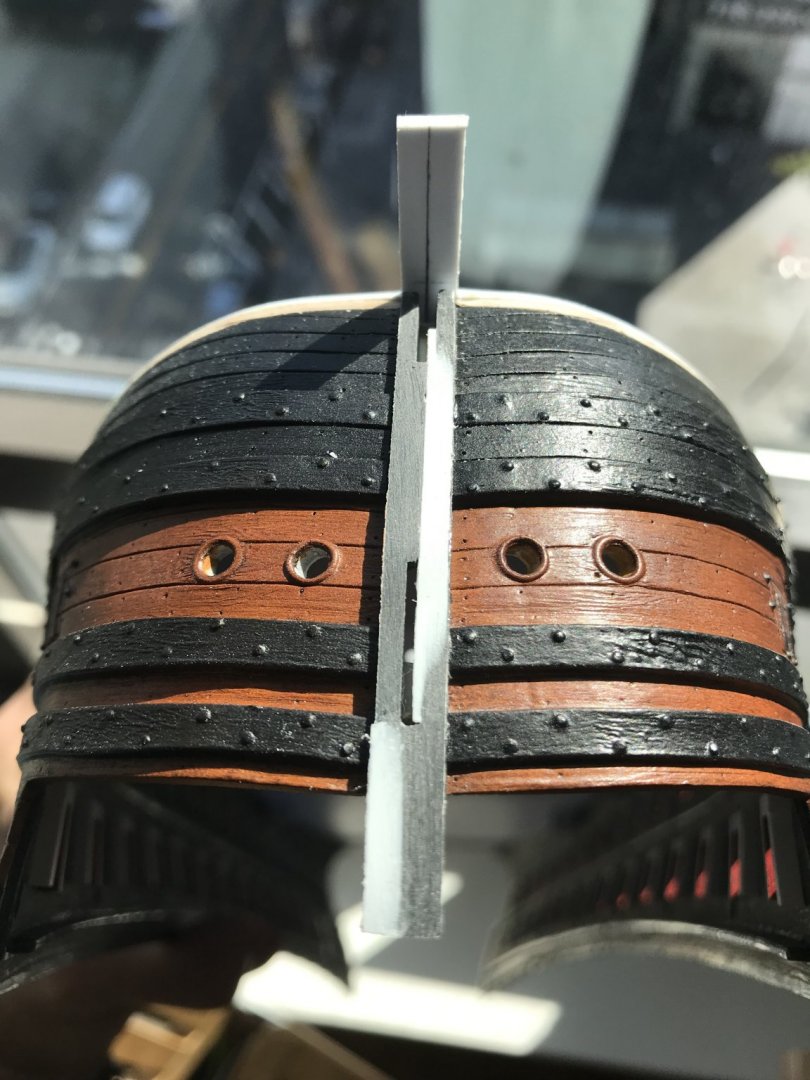
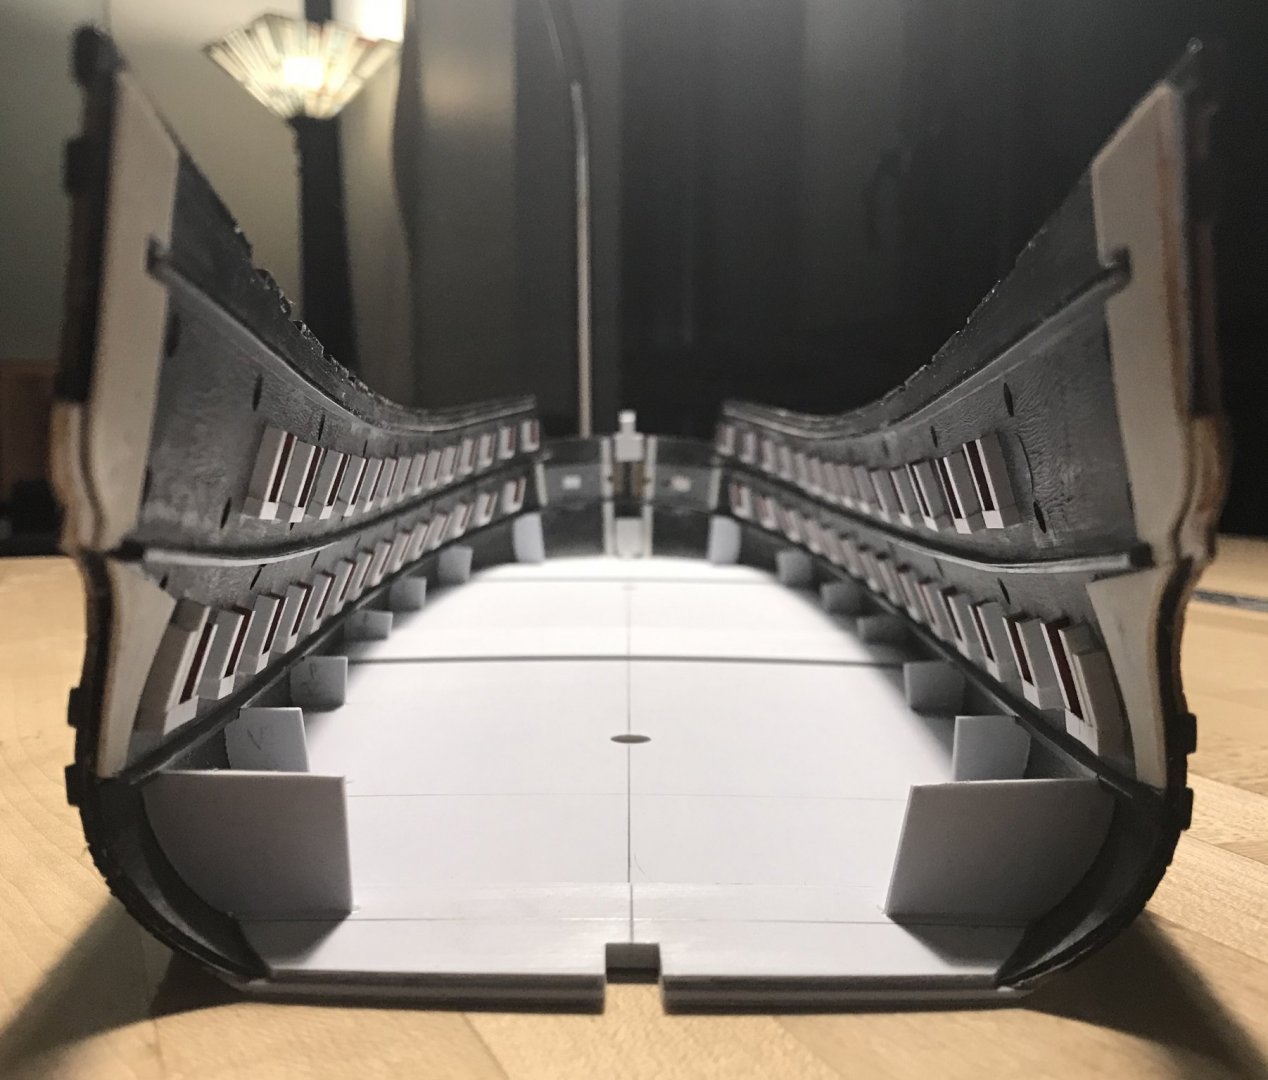
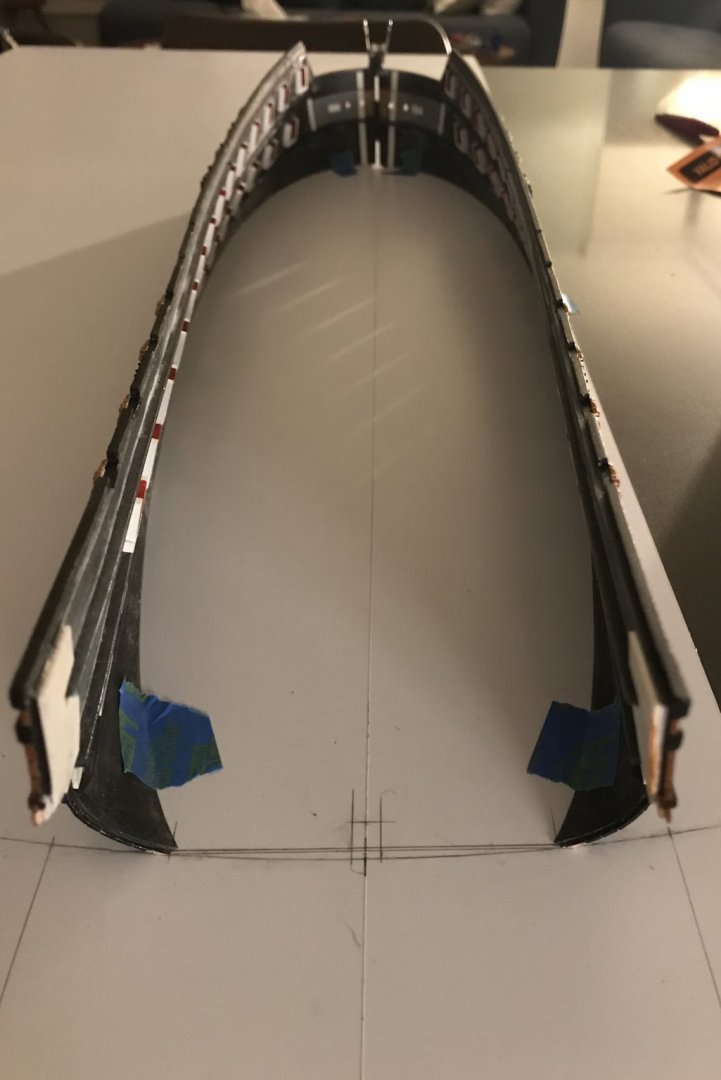
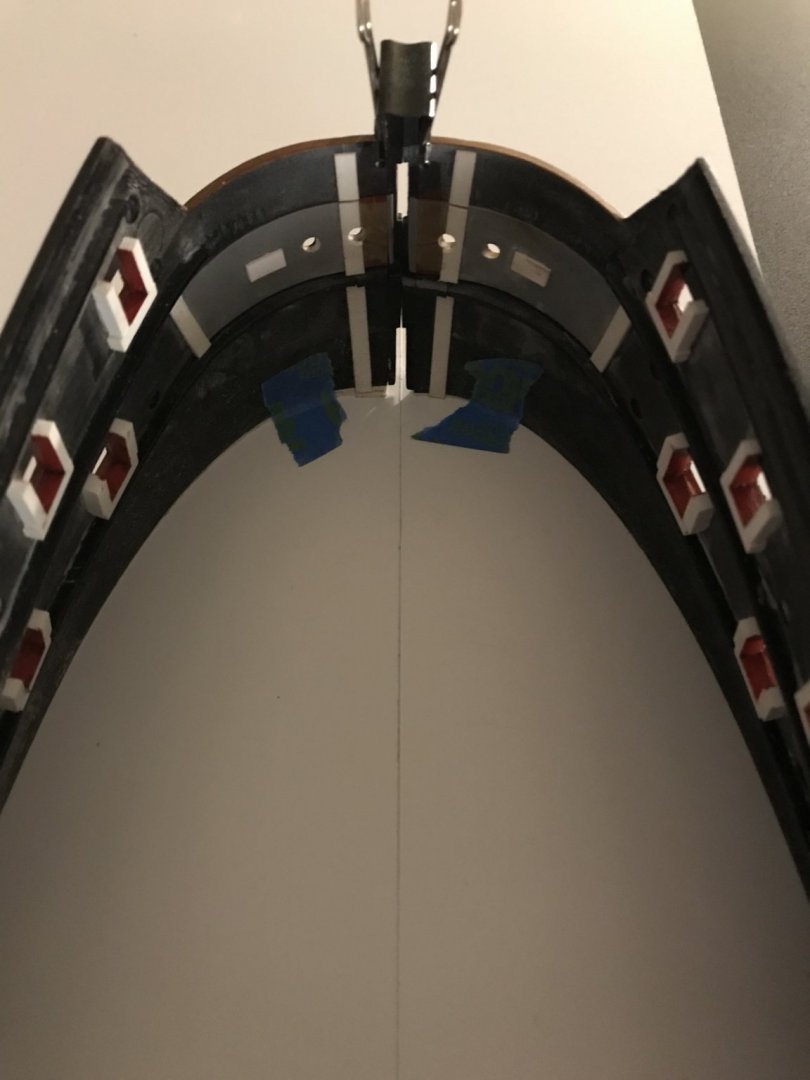
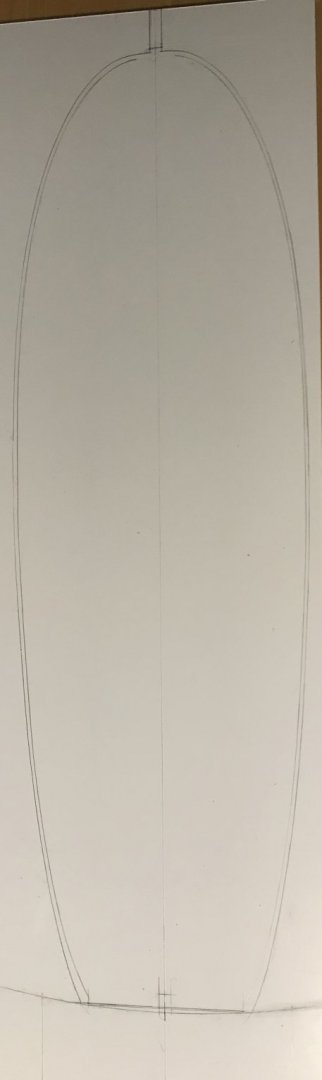
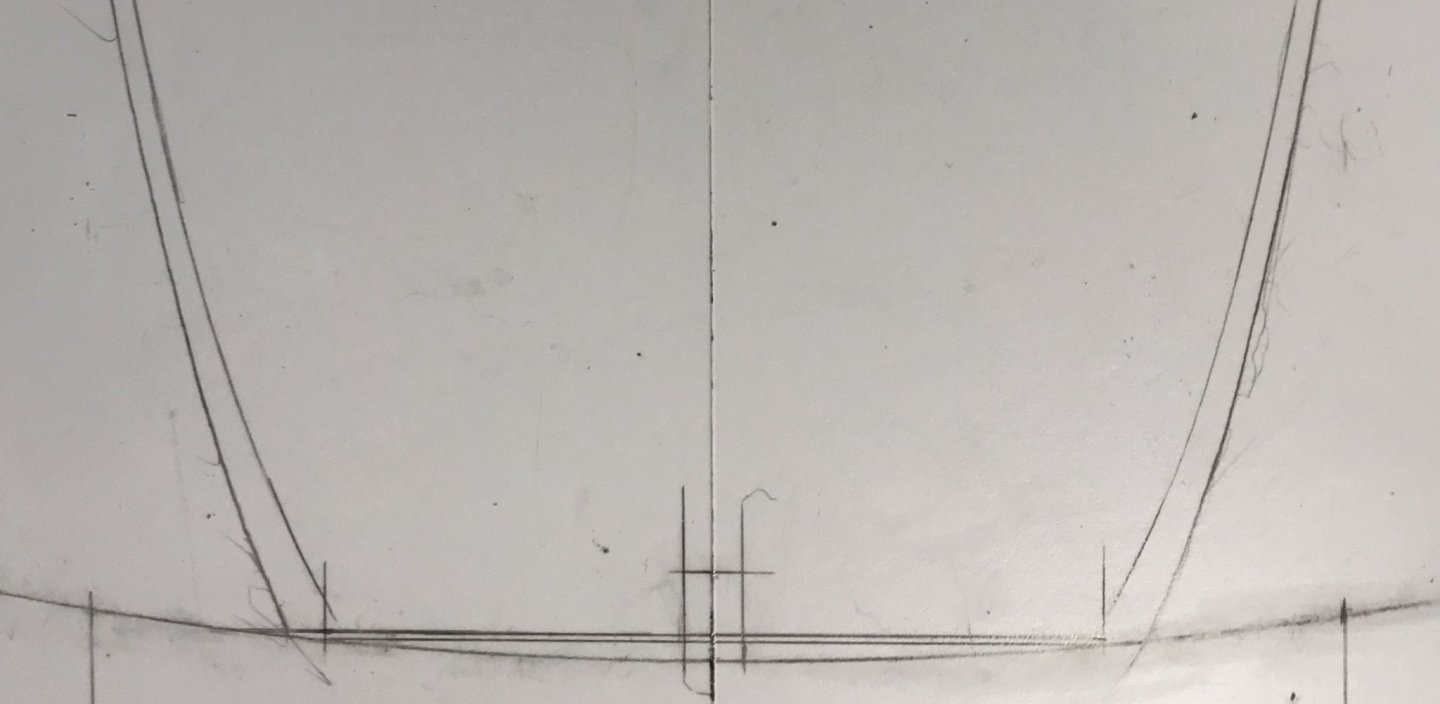
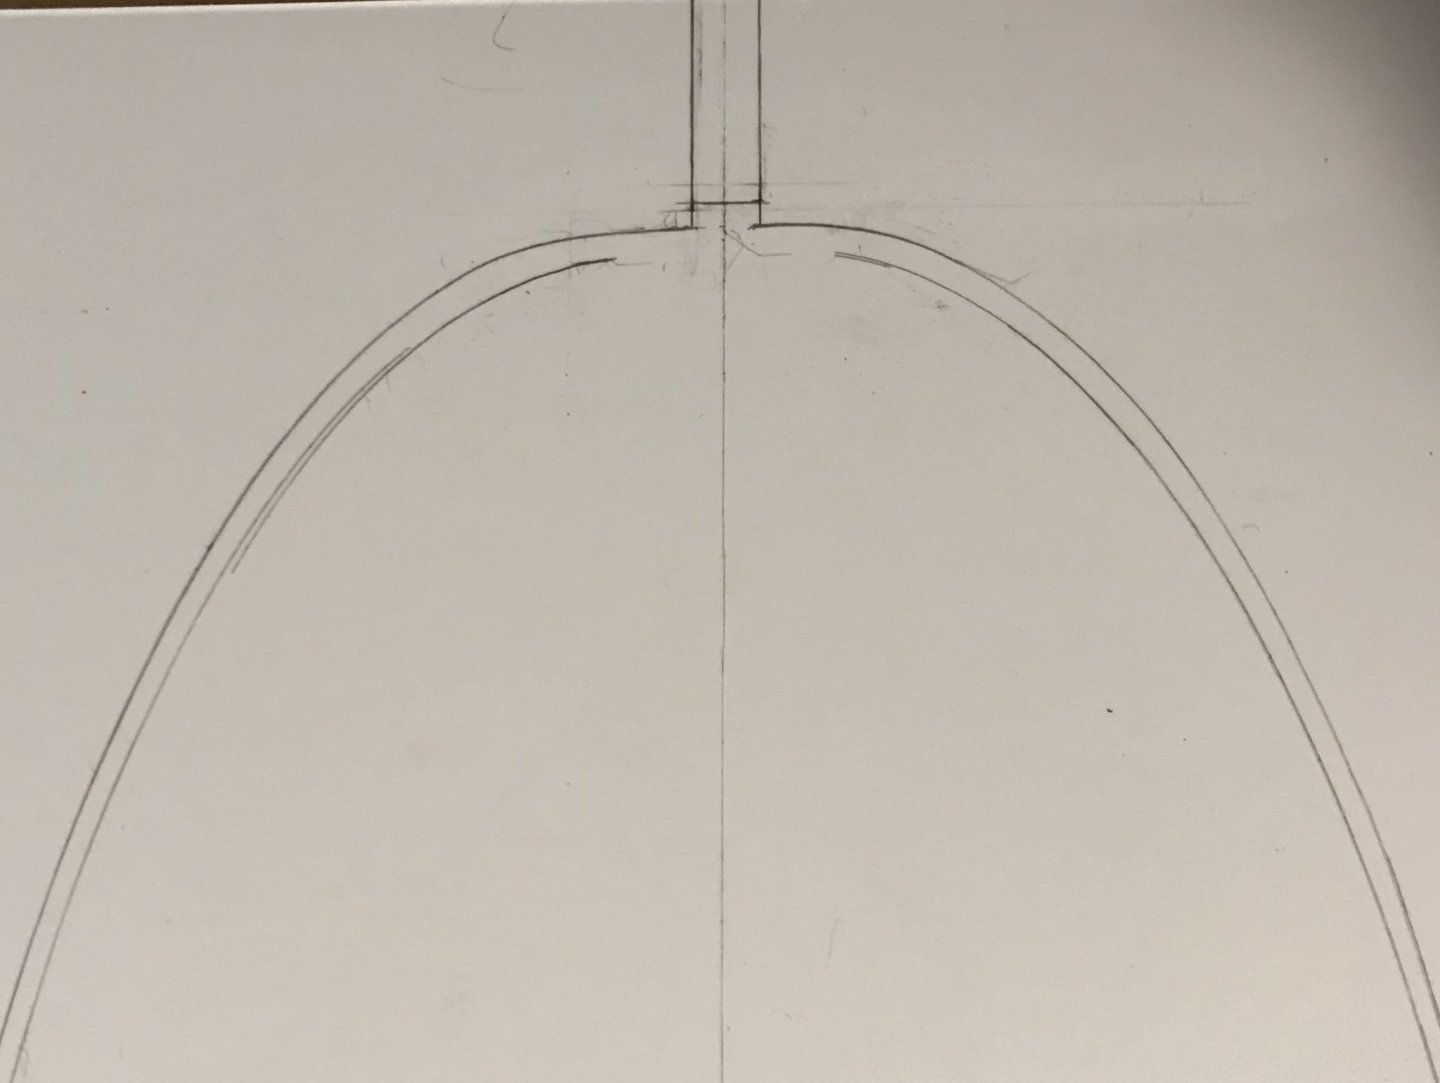
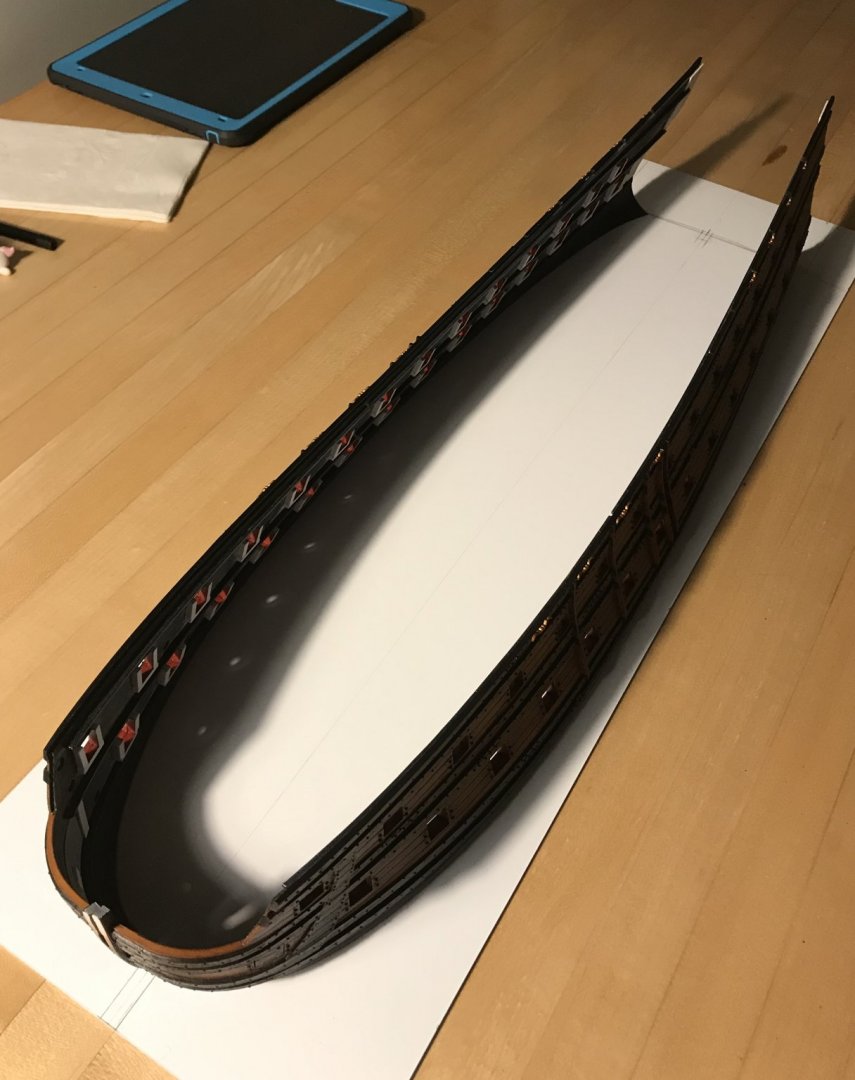
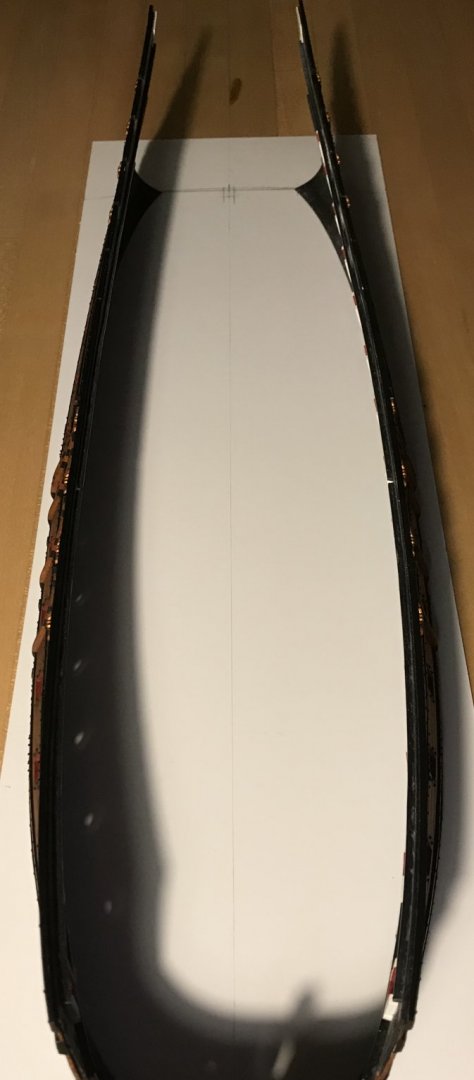
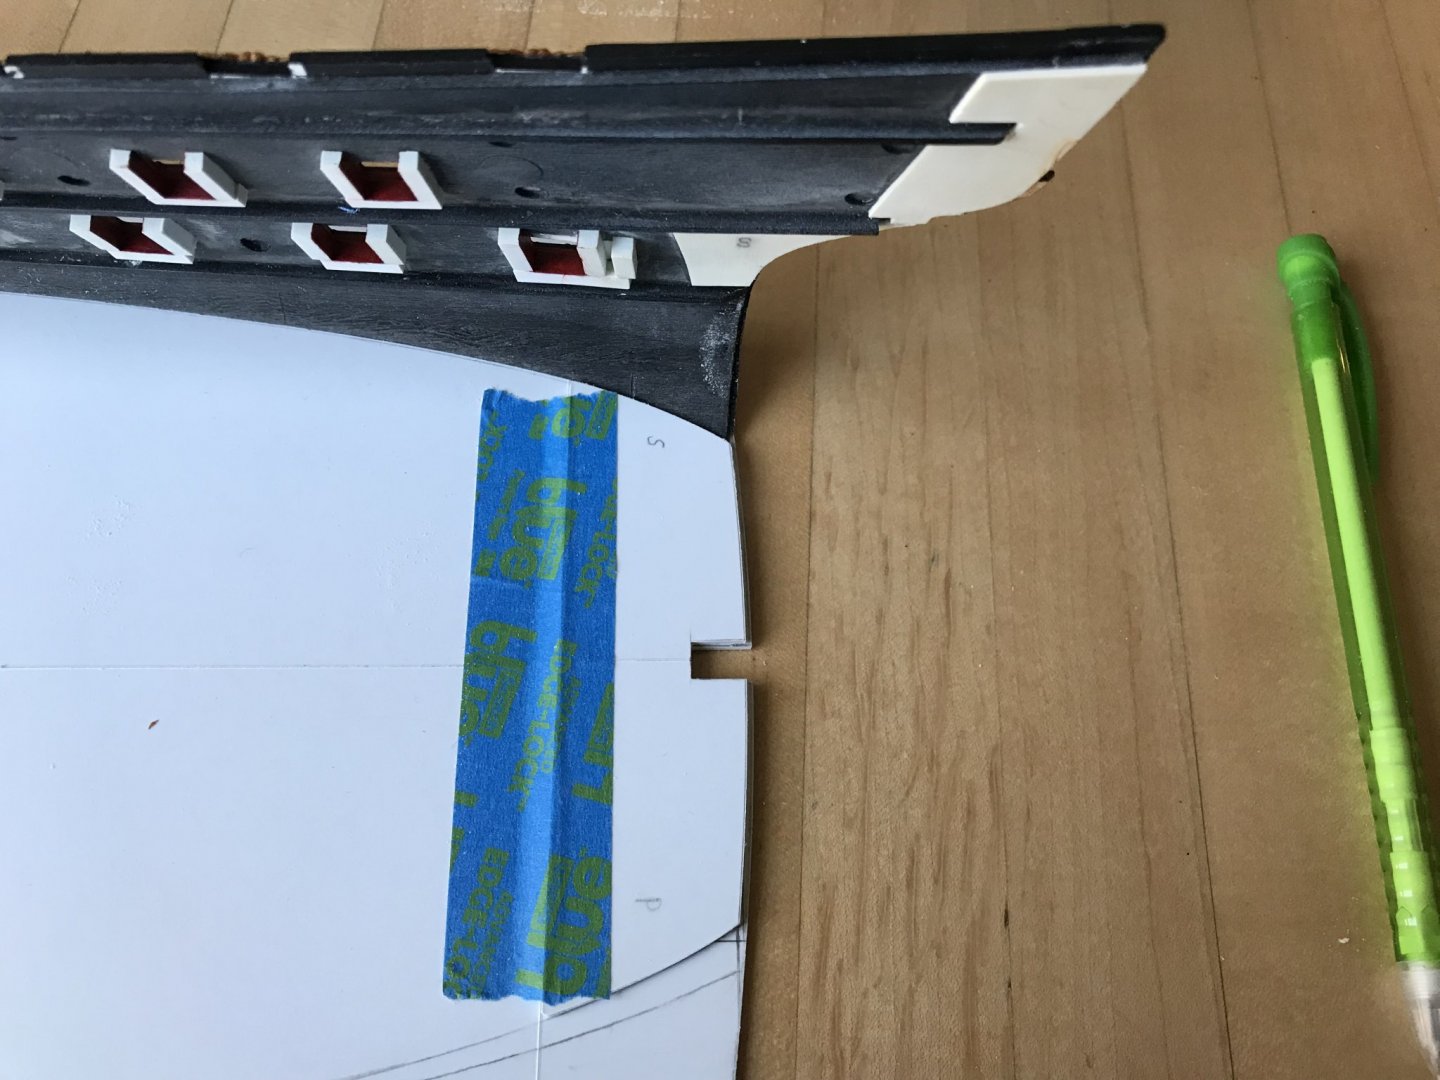
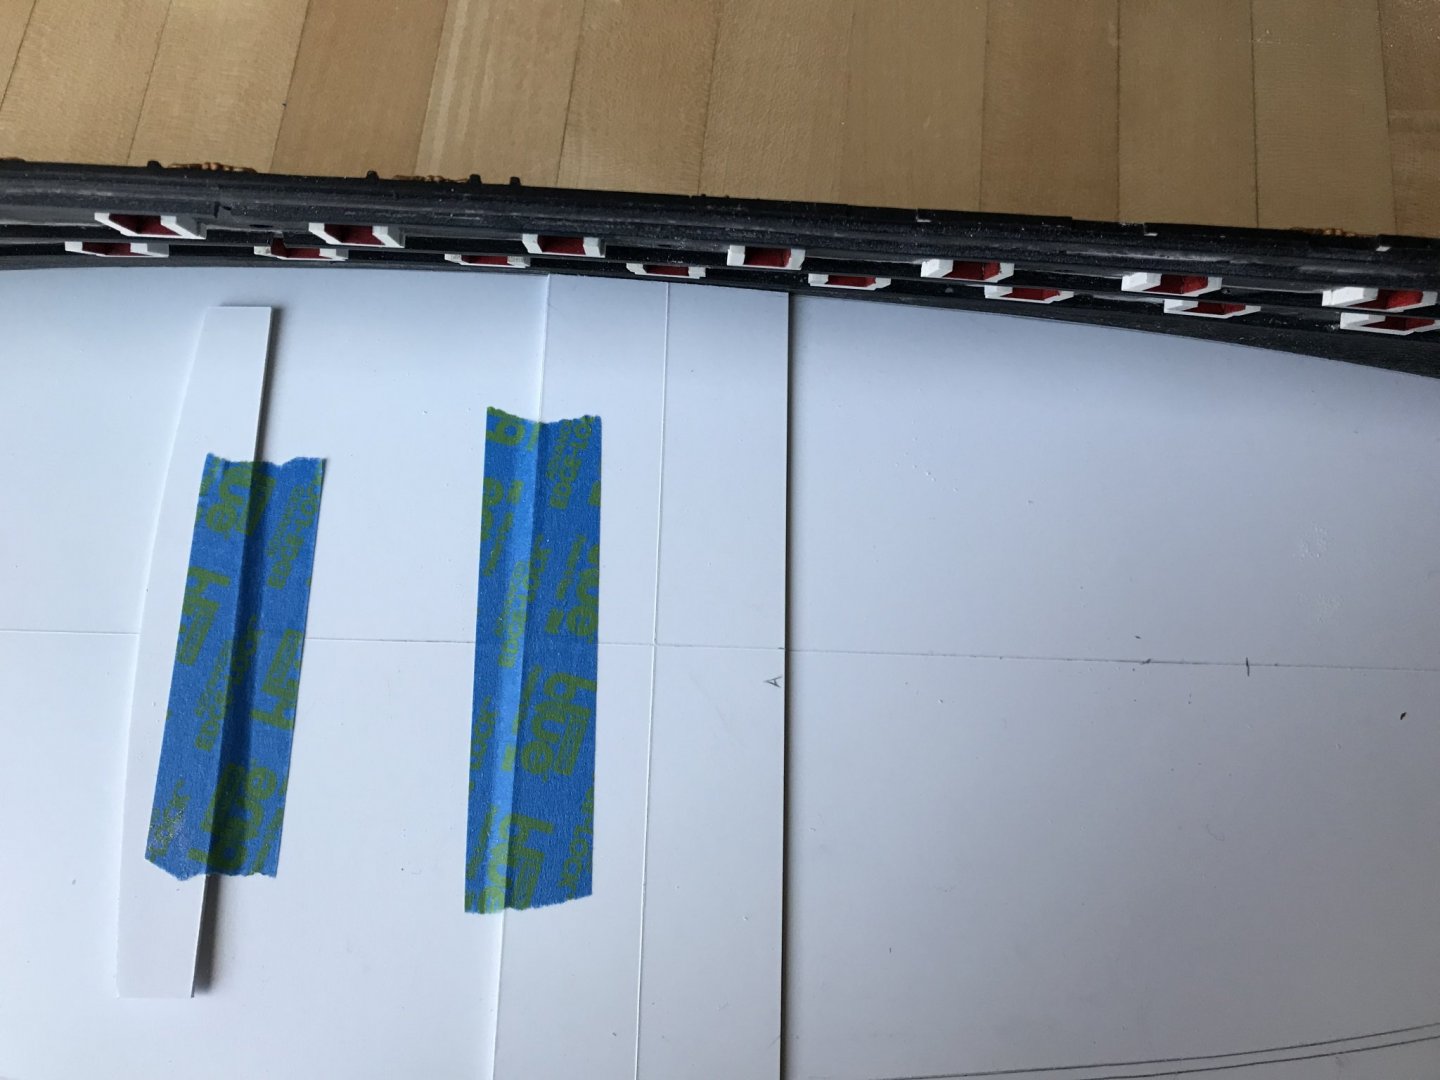
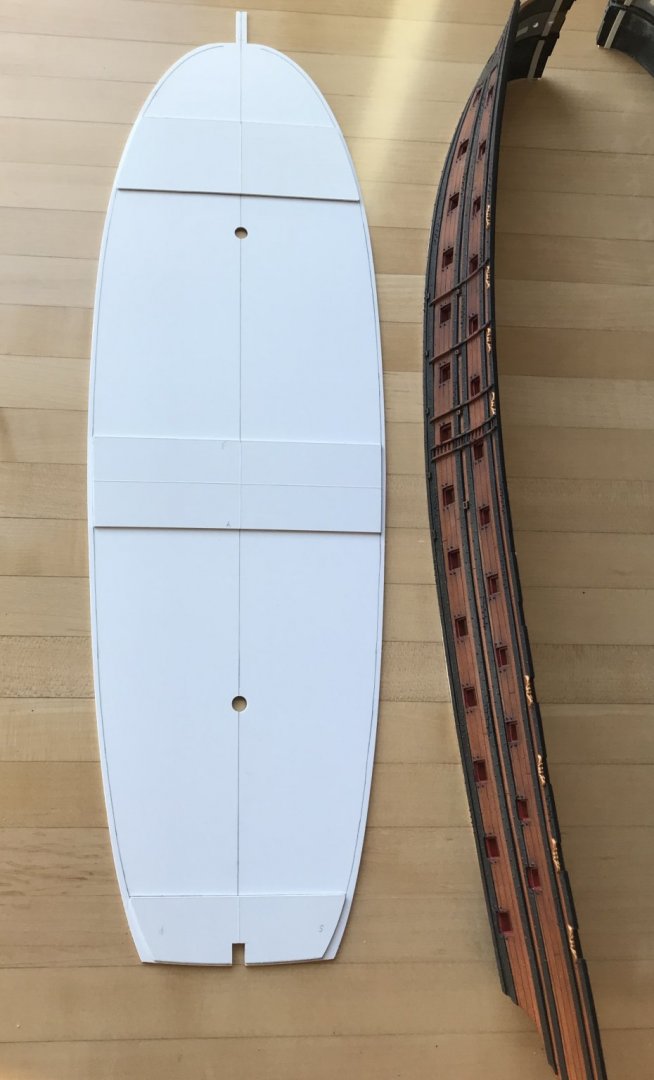
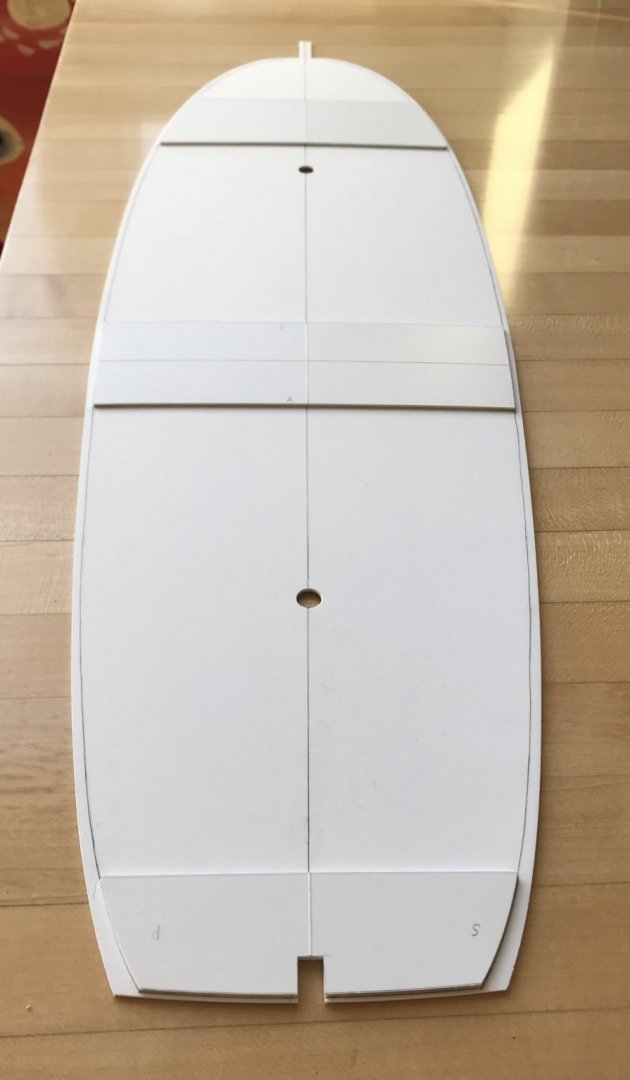
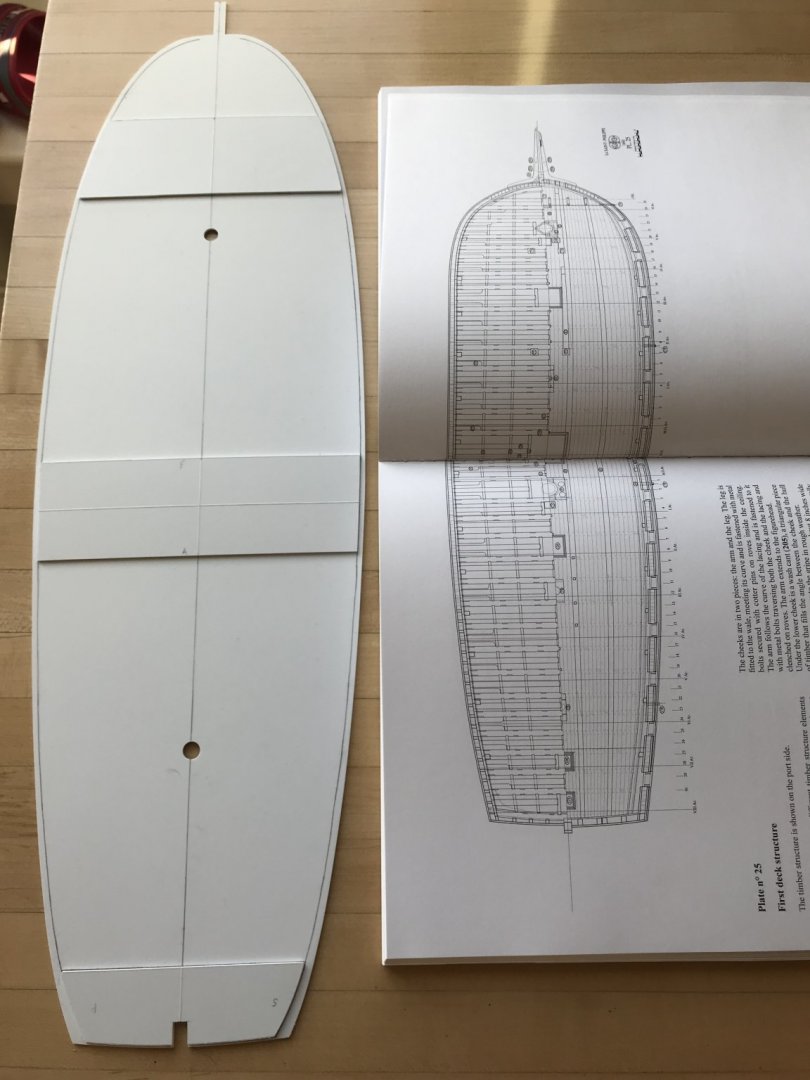
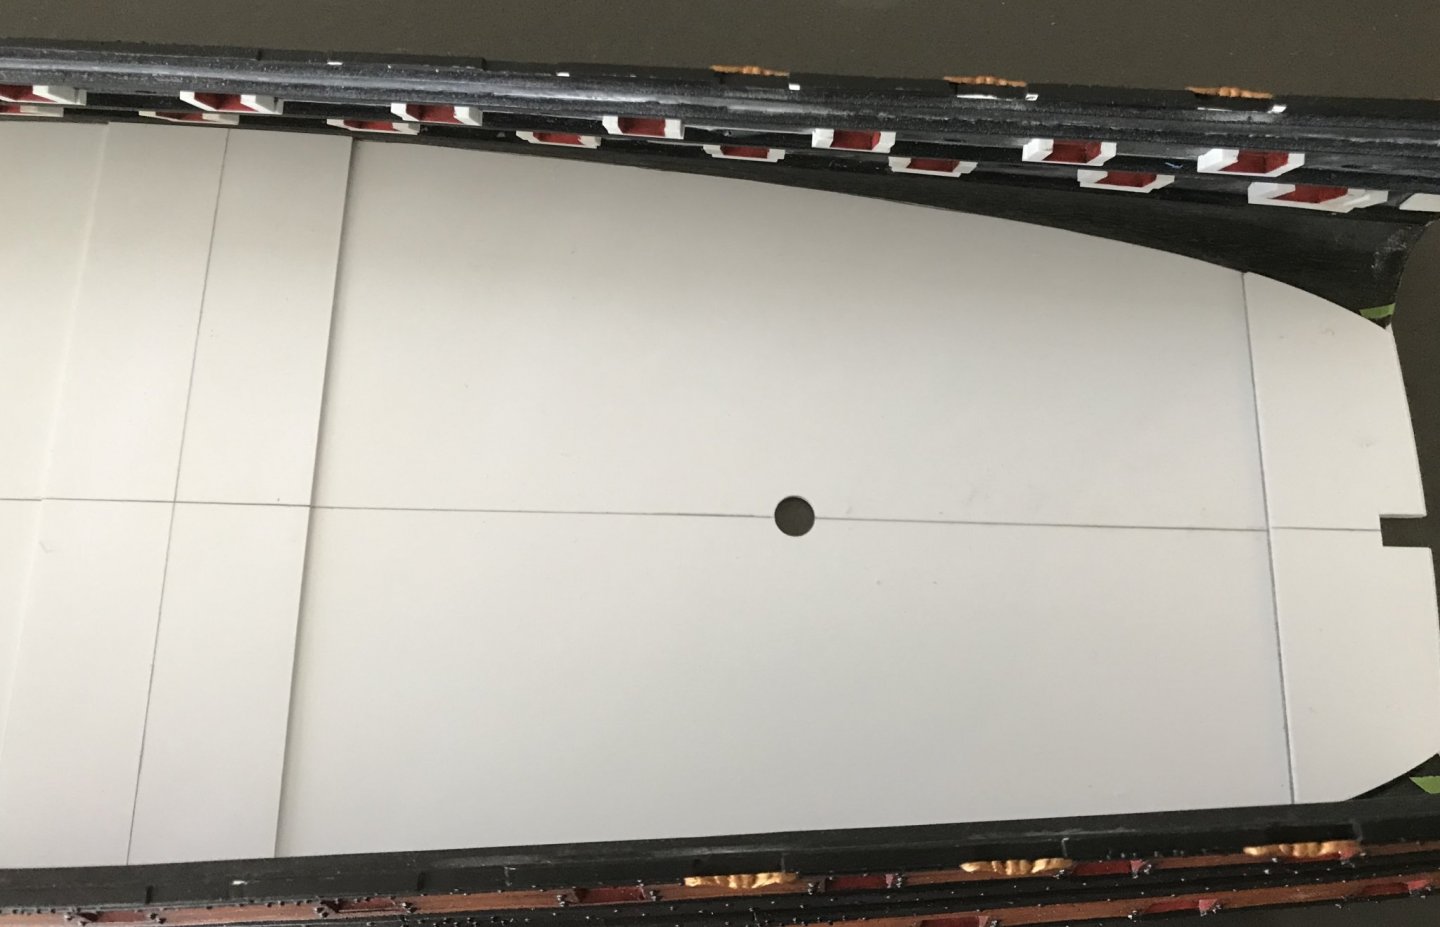
I was going to wait a little longer to post, in order to also show interior re-enforcements, but today was something of a milestone. Today, this project ceased to be merely a collection of super detailed and modified parts; today, my collection of parts became the beginnings of a scale model! The foundation of the model is 5/32” sheet styrene. After scribing a centerline, and clamping the hull halves together, at the stem, I set the transom distance, apart, at 3 7/8” for the lower stern counter. This is the space allowance, within the exterior planking, that I need to incorporate the missing sixth stern light. The arc for the round-up of the transom was a gentle curve, by eye, and in accordance with what Lemineur shows in his monograph for the St. Philippe. After tacking the hull in place, with blue tape, I used a mechanical pencil to mark both the interior and exterior location of each hull half. This was necessary, as my objective, in the glue-up, was to set the hull halves down on the plinth and allow them to set, without top weights. When I tried to use a book or two as a top-weight, during the glue-up procedural trial, the extra weight would inevitably introduce a noticeable degree of hull distortion, while opening gaps at the plinth joint. Once my lines were clearly established, I scribed them all in with a no. 11 knife. Above, the transom appears radically out of square, but this is merely a trick of perspective. I squared the transom layout with a Starrett combo square. After scribing in my lines, I sanded the surface of the plinth base with 150 grit paper. Of all modeling materials, styrene is questionably more ephemeral than most, so I like to ensure both a solid welded bond and a solid mechanical bond, for the later application of epoxy. Sanding assists both ends. A slightly less distorted pic of the squared transom: A few of the pictures, above, create an exaggeratedly spread impression of the transom, but again, this has more to do with my inept photography. These two pictures, above, give a better sense for the reality. Next, I wanted to incorporate a series of doubling strips for the bow, waist and stern. The waist doubling, will also serve as the footing for the main mast, and so, it is scribed with cross-hairs to mark the mast location. The tapered arc pattern to the left, here, is actually a wider pattern that I will need to carry the round-up, up through the stern. It is merely taped, here, for convenience’s sake. After sanding these doublings, I glued them down within their scribe lines. The two holes drilled along the centerline are for the quarter/20 screw and nut that will attach the model to it’s plywood construction base The comparison, above, illustrates the comparable sense of breadth, achieved with the bow extensions, while allowing for the more rounded Heller Hull form. The St. Philippe is notably flatter in the waist and bluffer in the bow, nevertheless, both proposals offer a stable platform for heavy armament, IMO. So, with all of that sorted out, I taped-off from the waterline, up, to avoid glue seepage above the waterline. I applied a generous bead of styrene glue (Testors liquid) to both the hull edge and the plinth edge, in order to ensure a good, welded bond between both surfaces. There was good white/black seepage, along most of the edge, indicating a strong bond. I will use a coarse card file to pare back the heavy 1/32” of excess plinth, outside the hull. It will be clear when the card file frees the masking tape from the glue squeeze-out. While the glue-up was in process, I worked this paint spatula, beneath the plinth, in those areas where there was no squeeze-out - indicating an area where there was not a perfect mating surface. My belief is that doing so made a positive weld across 95% of the joint surface. The subsequent gusseting will only serve to stiffen the construction. At the end of the day, this really doesn’t amount to much, but for me - this is very gratifying. I appreciate every one of you who have stuck it out this long. Thank you all very much for taking an interest in this project.


- 2,696 replies
-
- 13
-
-
- heller
- soleil royal
- (and 9 more)
-
Very well done, Sea Hoss - beautiful, clean work!
-
Well said, Mark! And the model you are making is every bit the part of the original upon which she’s based.
-
It certainly is, in my opinion! There are probably something in the neighborhood of 30 really great and interesting builds going, on MSW. Because of the variety of subjects, it’s a difficult thing to objectively quantify, but Mark’s model is a top-7 build for me!
-
Thank you, Henry! I agree with you on the trunnion notches; correcting this, though, meant adjusting the notches, as well as the under support, at this point, and the quoin elevation. For me - it wasn’t worth all of that. I am debating how to simulate the cap squares, or even whether I will do so. I’ma jump over to your build and see what you did. As always, thanks for weighing in!
- 2,696 replies
-
- 2
-
-
- heller
- soleil royal
- (and 9 more)
-
I, for one, am happy with the results! I love the attention to detail.
- 510 replies
-
- 2
-
-
- reale de france
- corel
- (and 1 more)
-
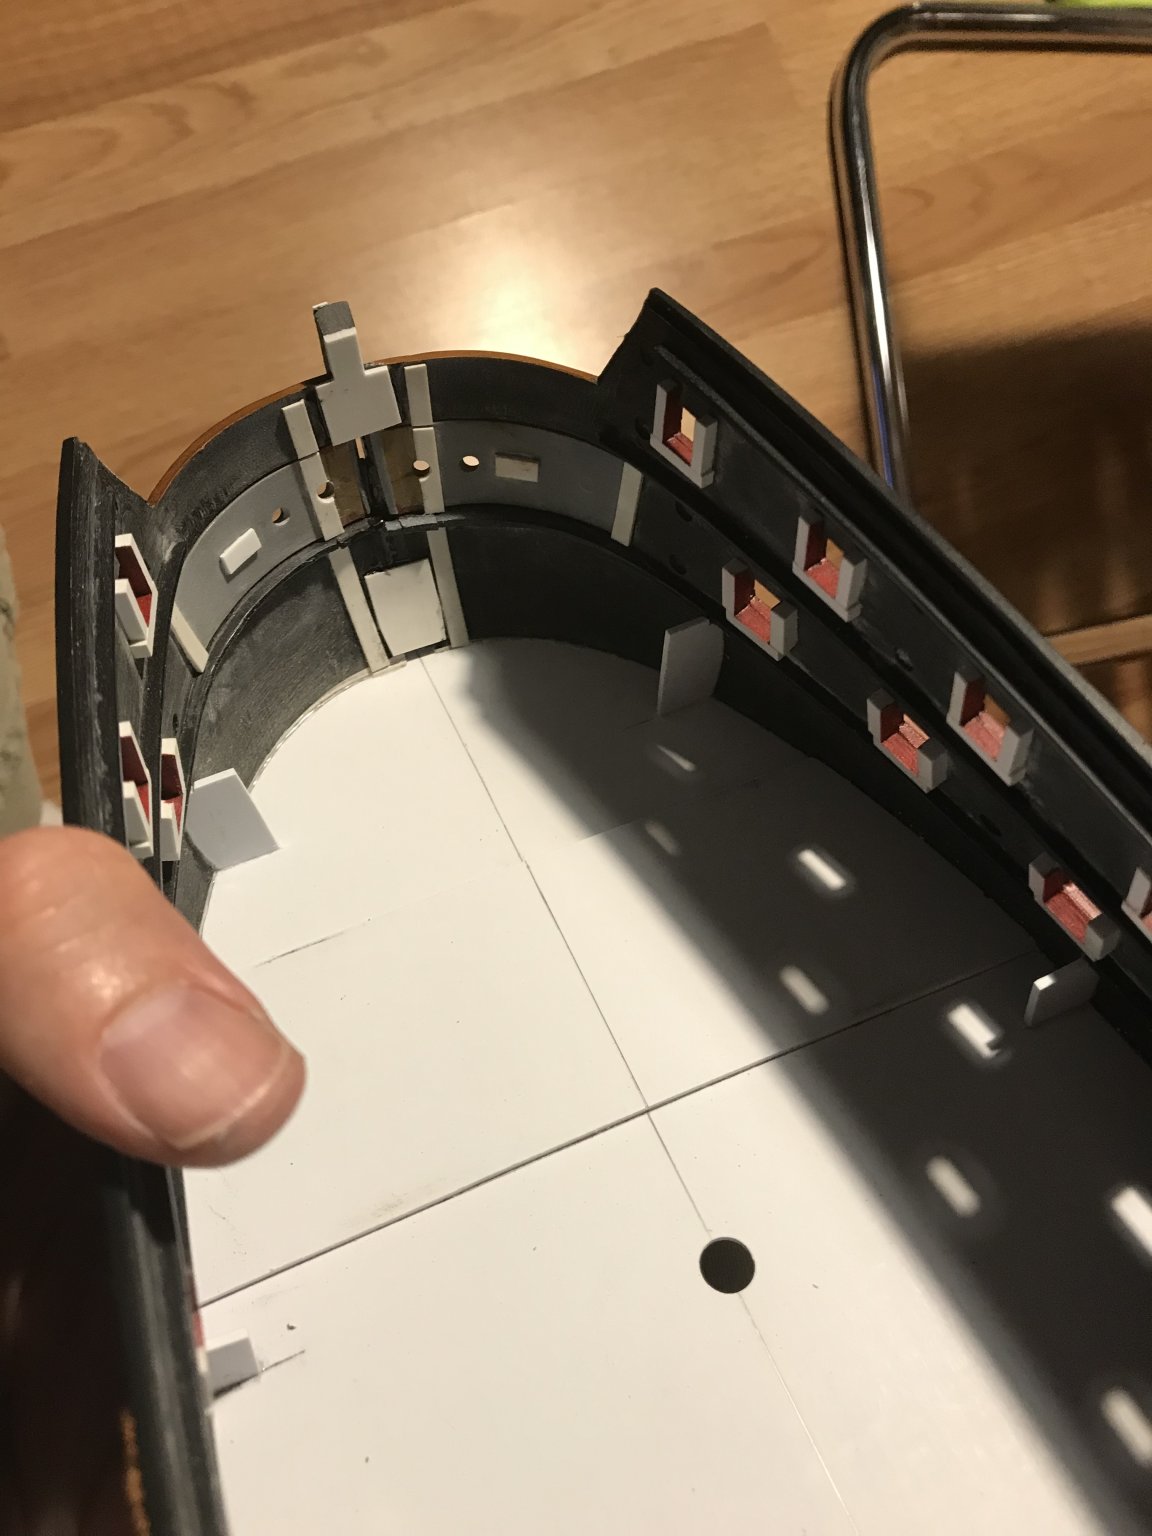
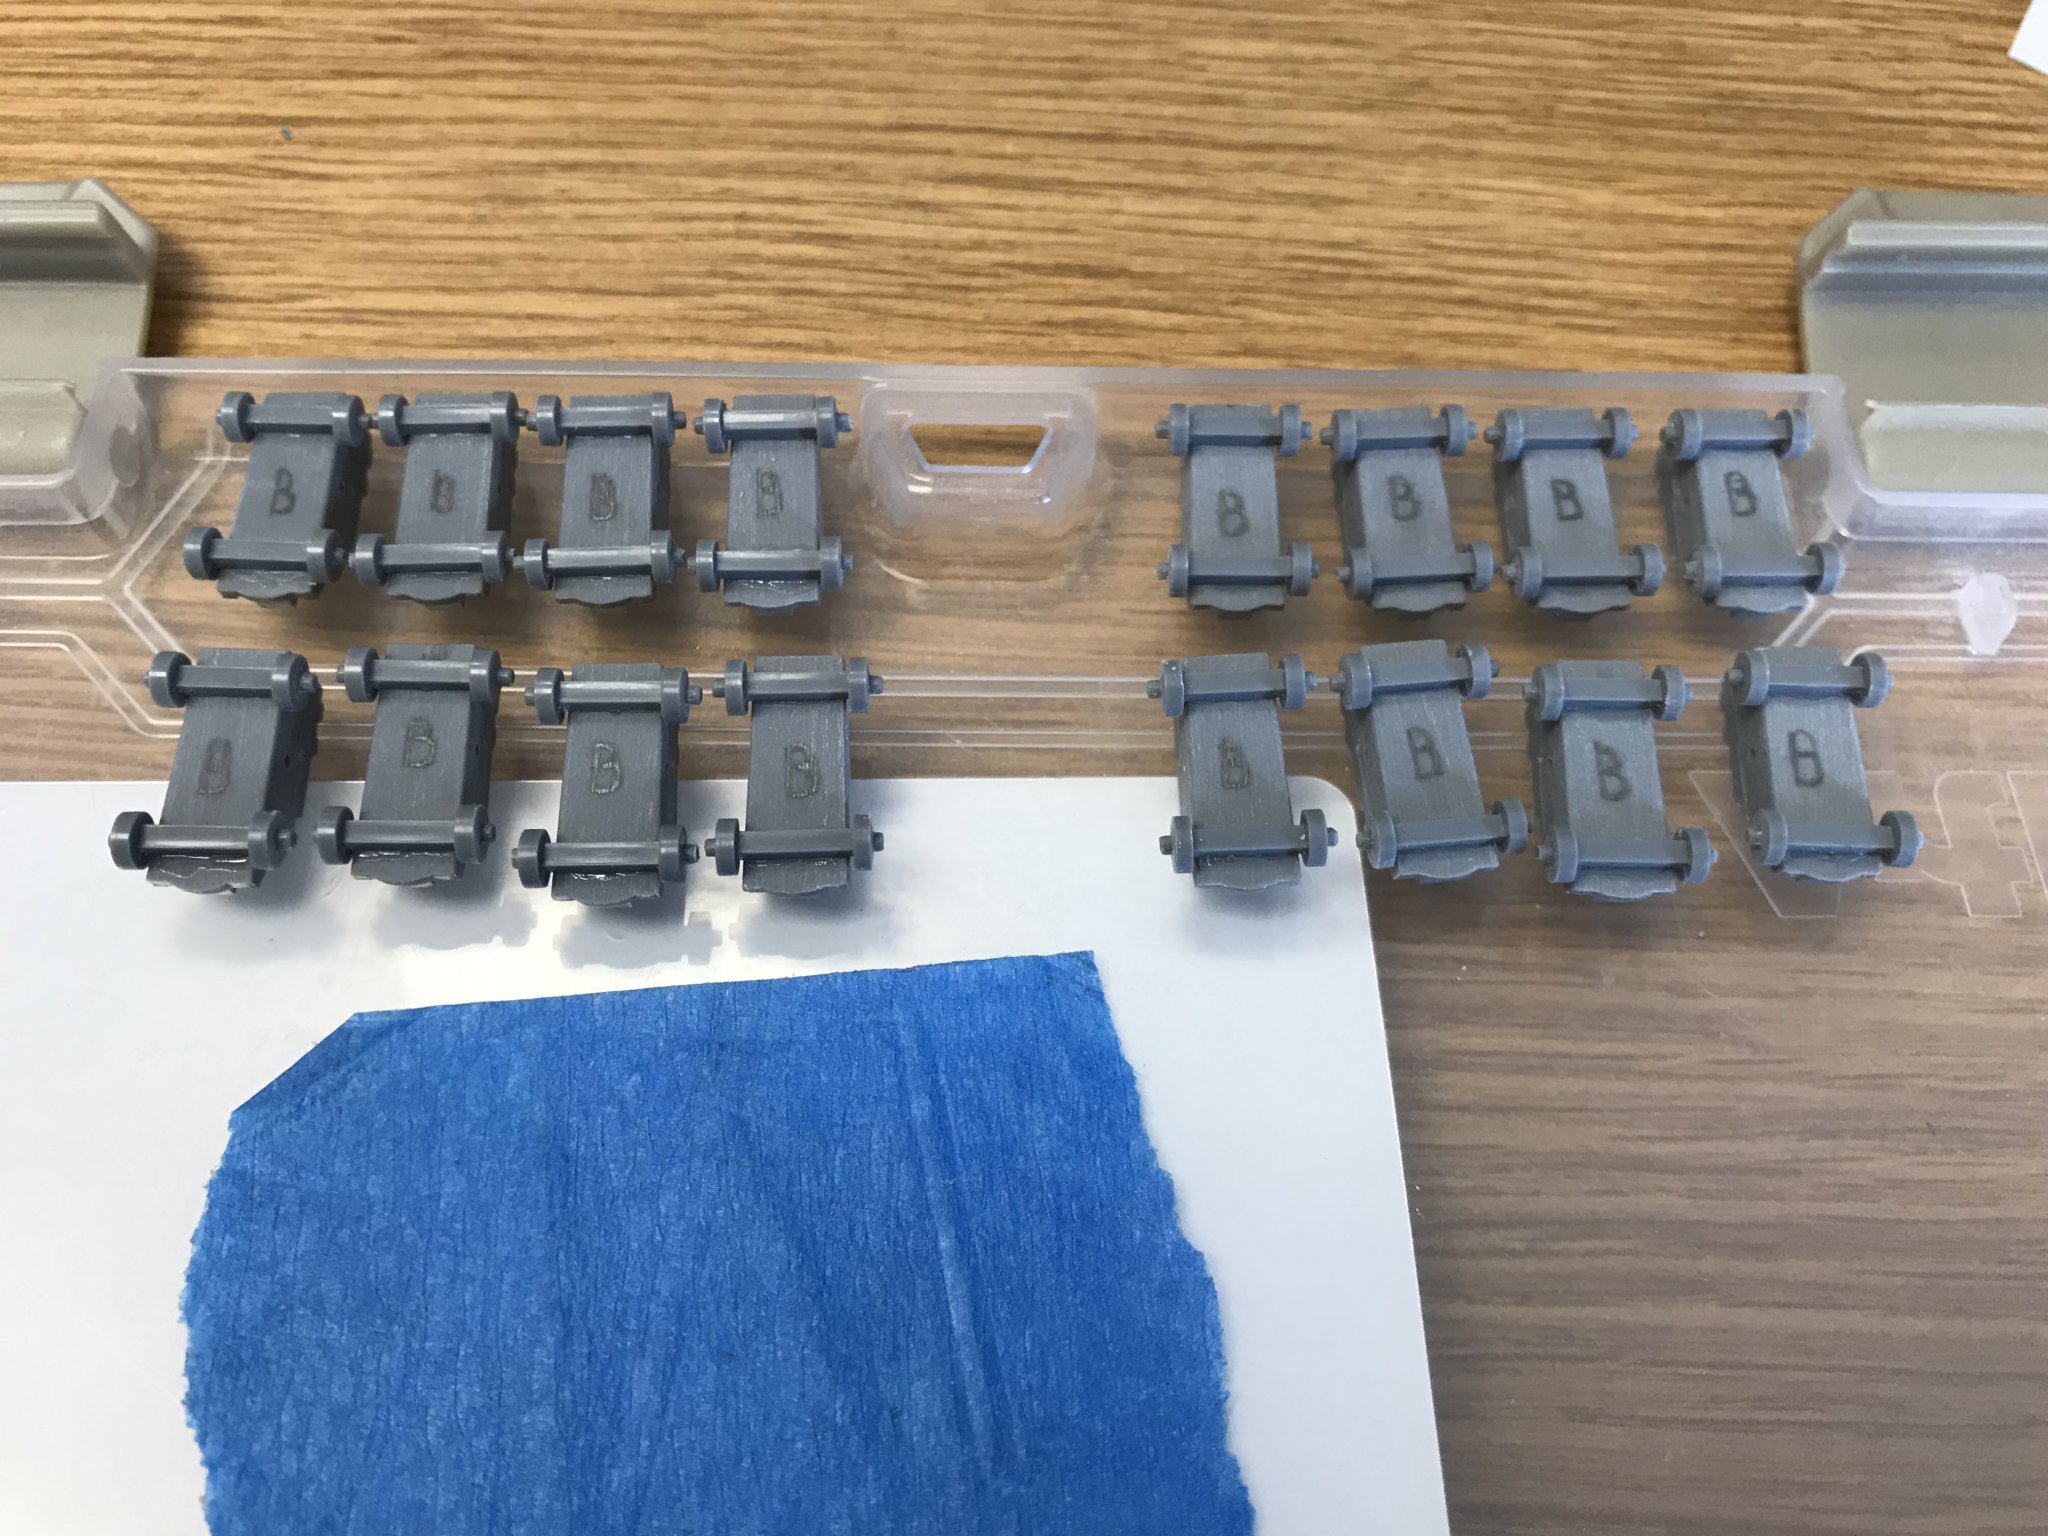
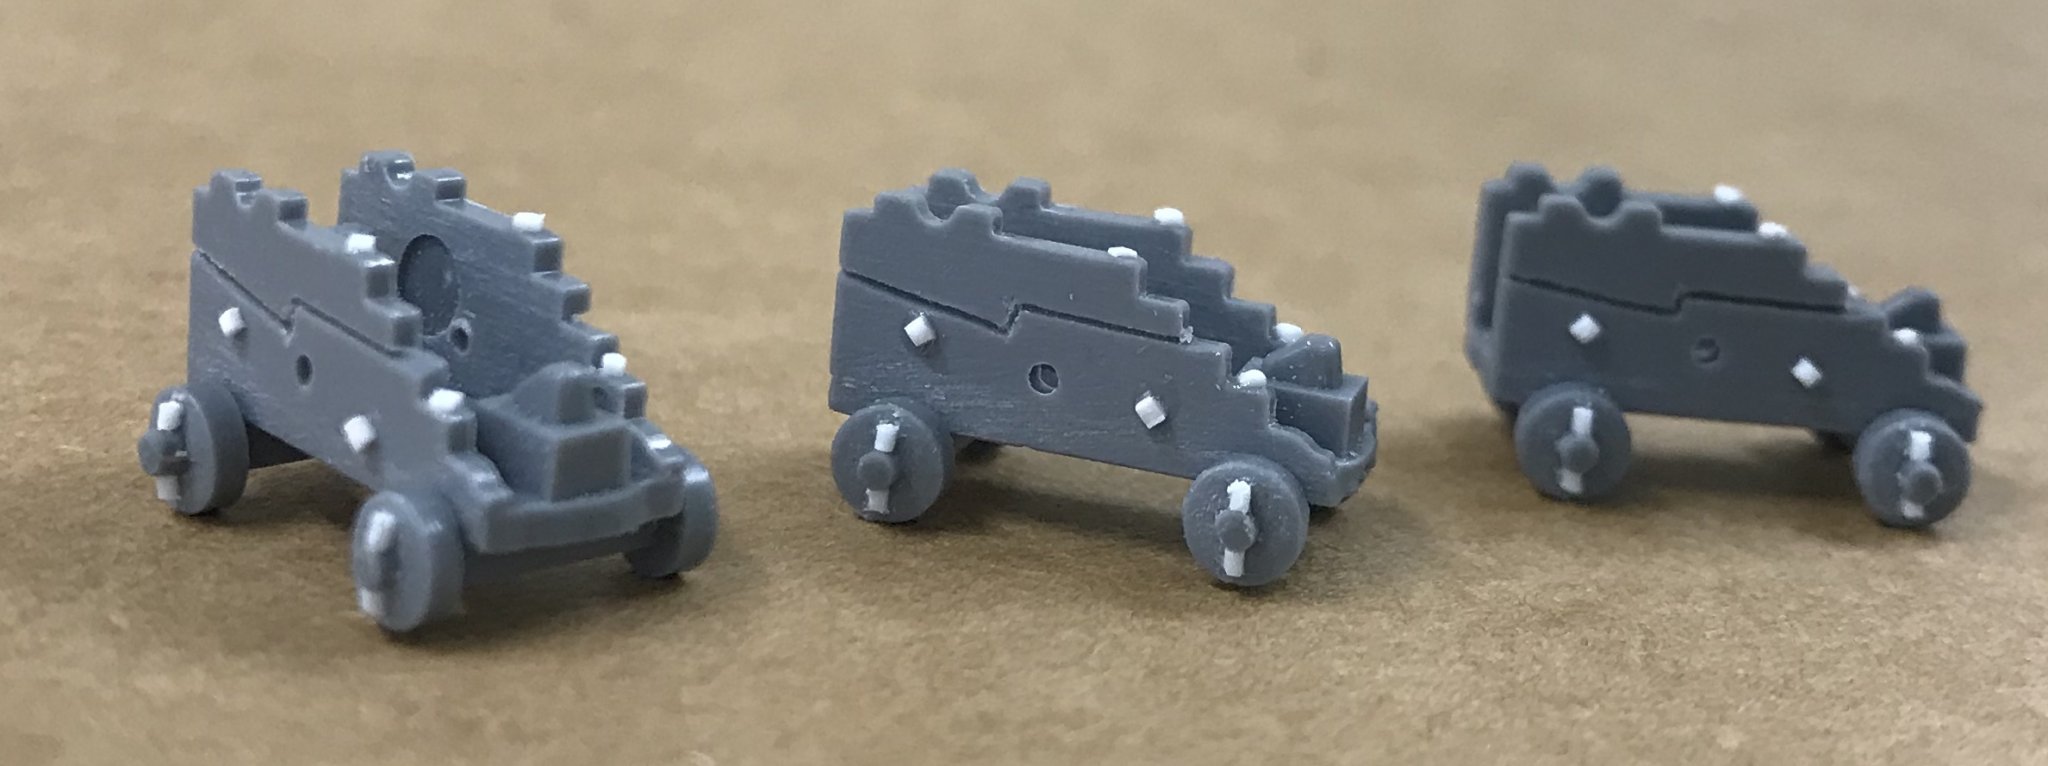
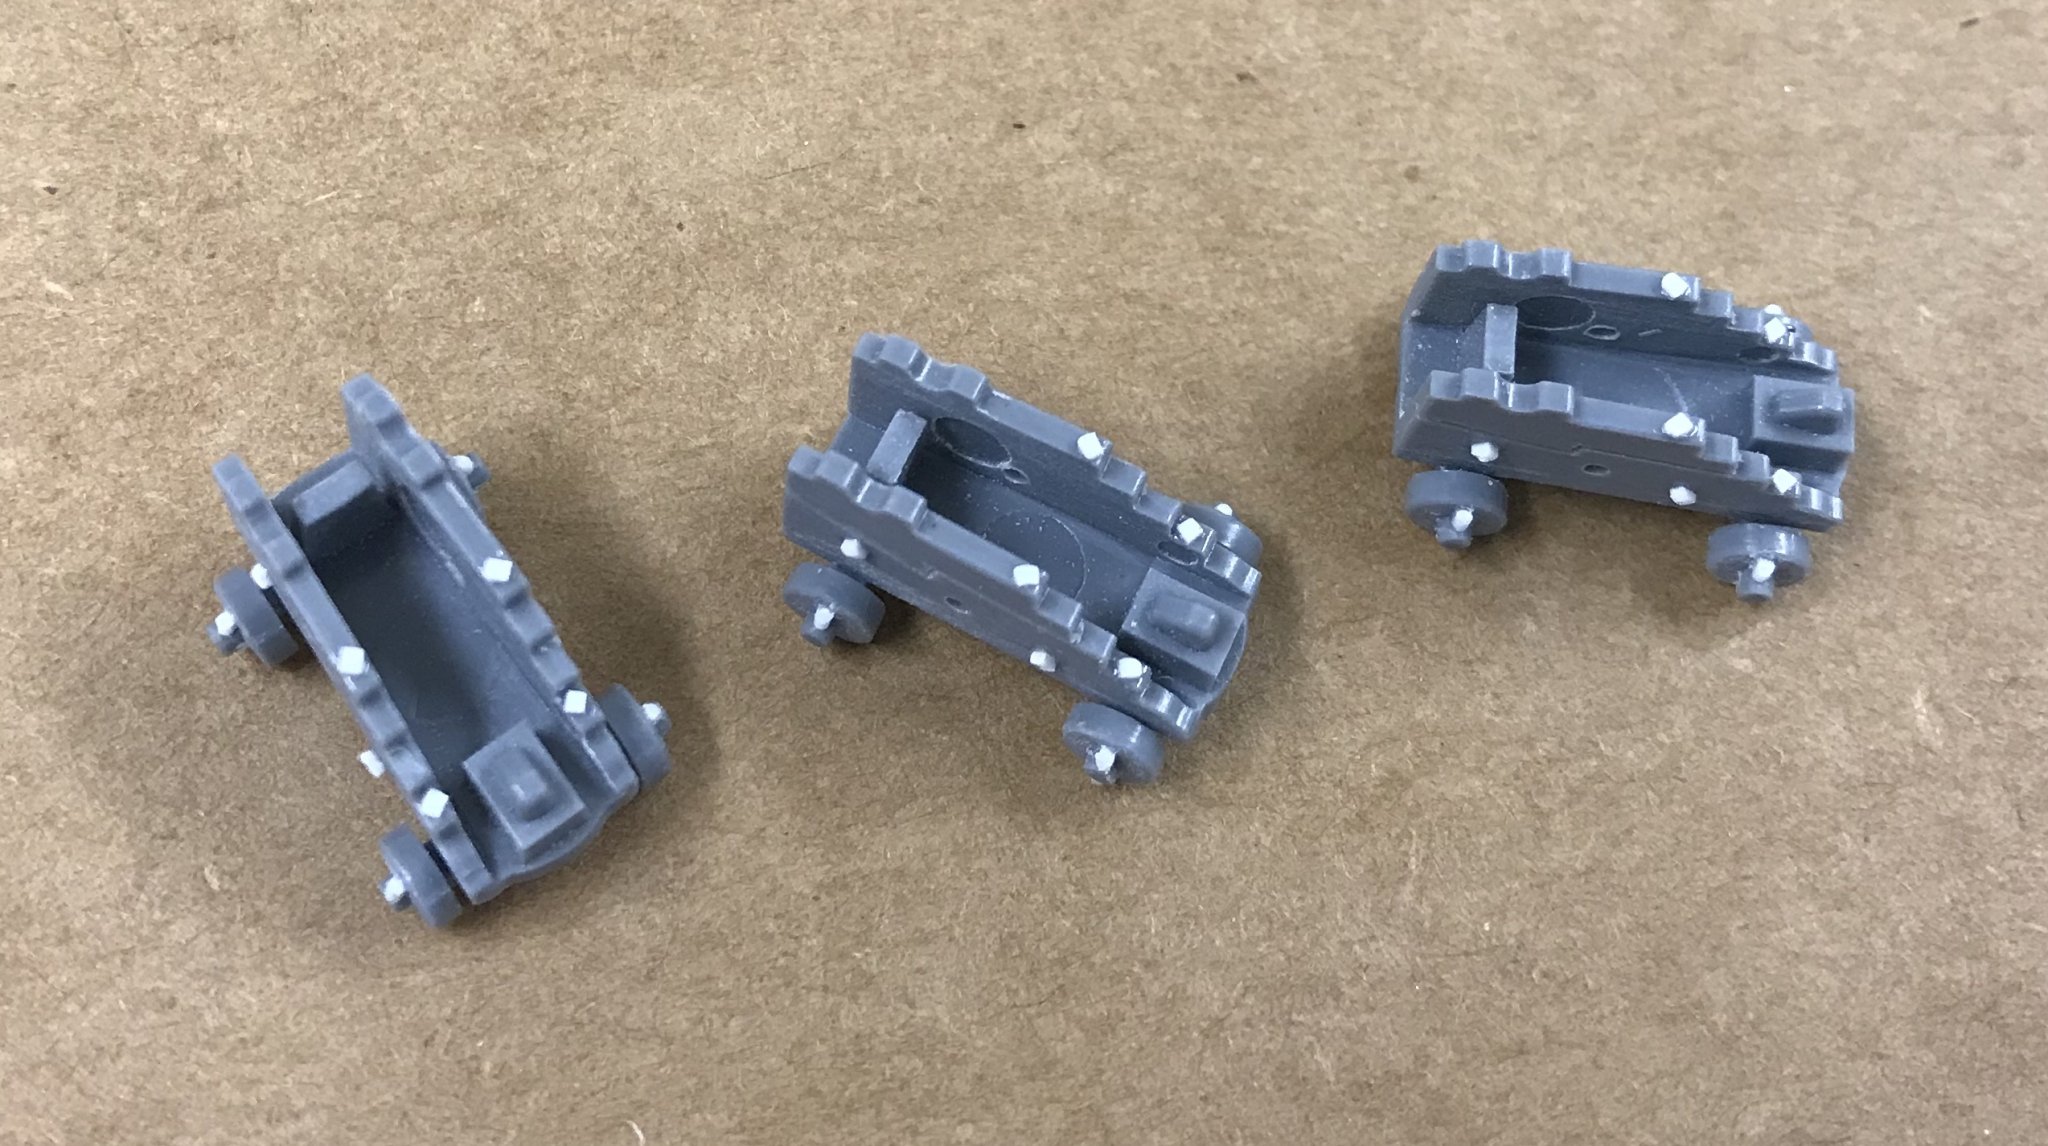
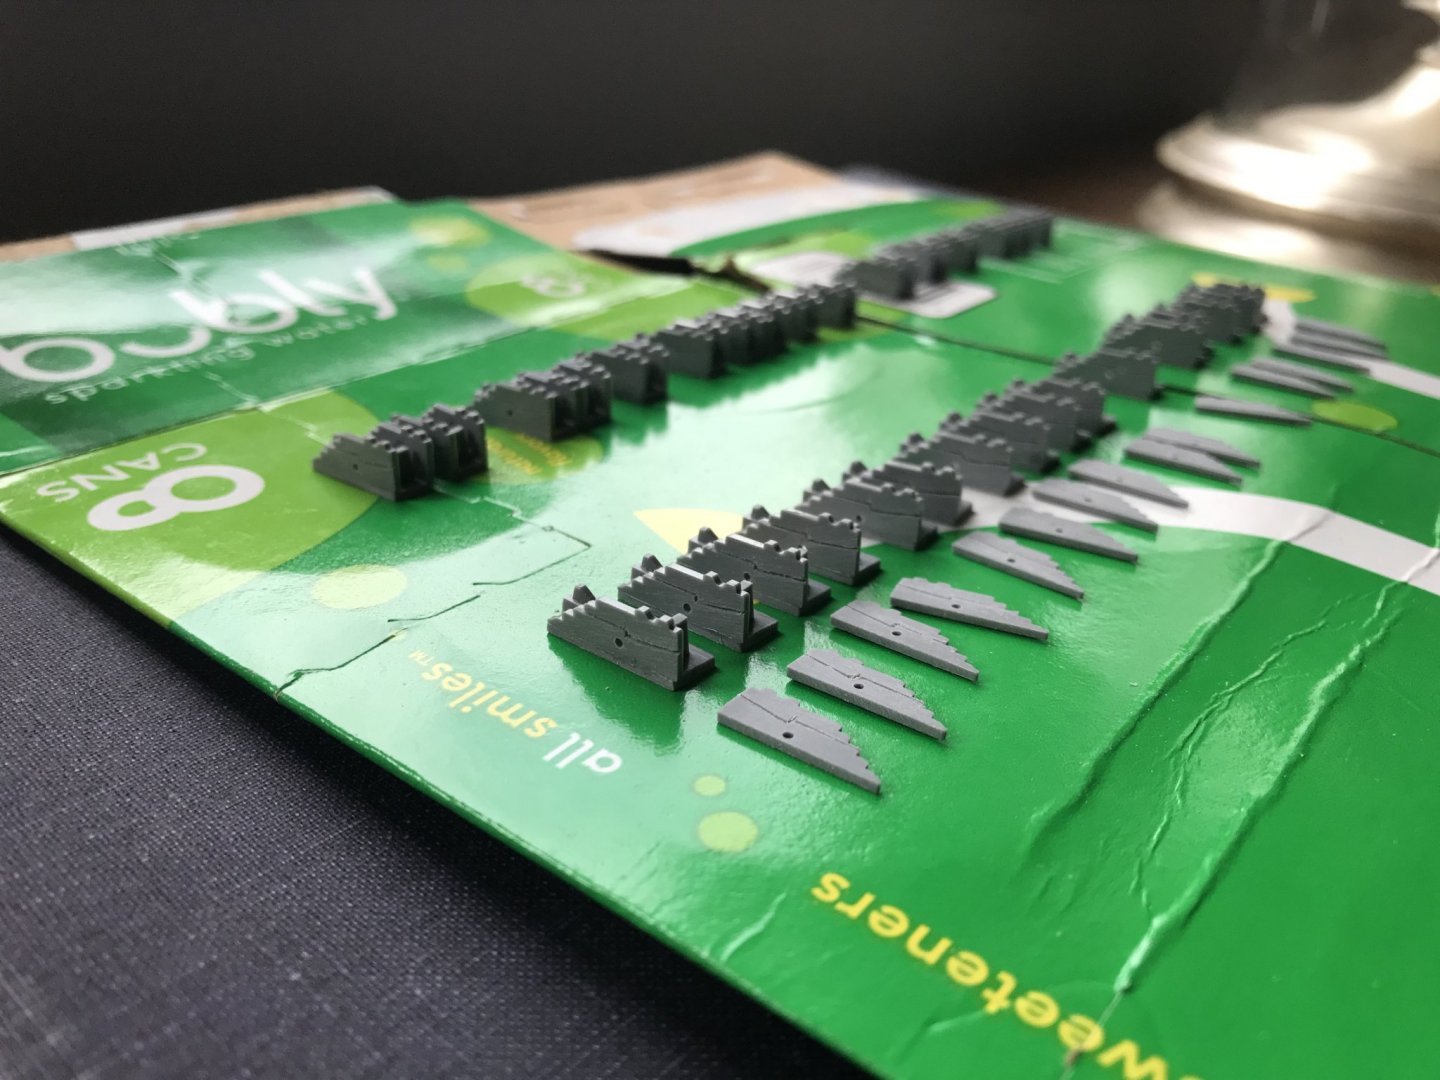
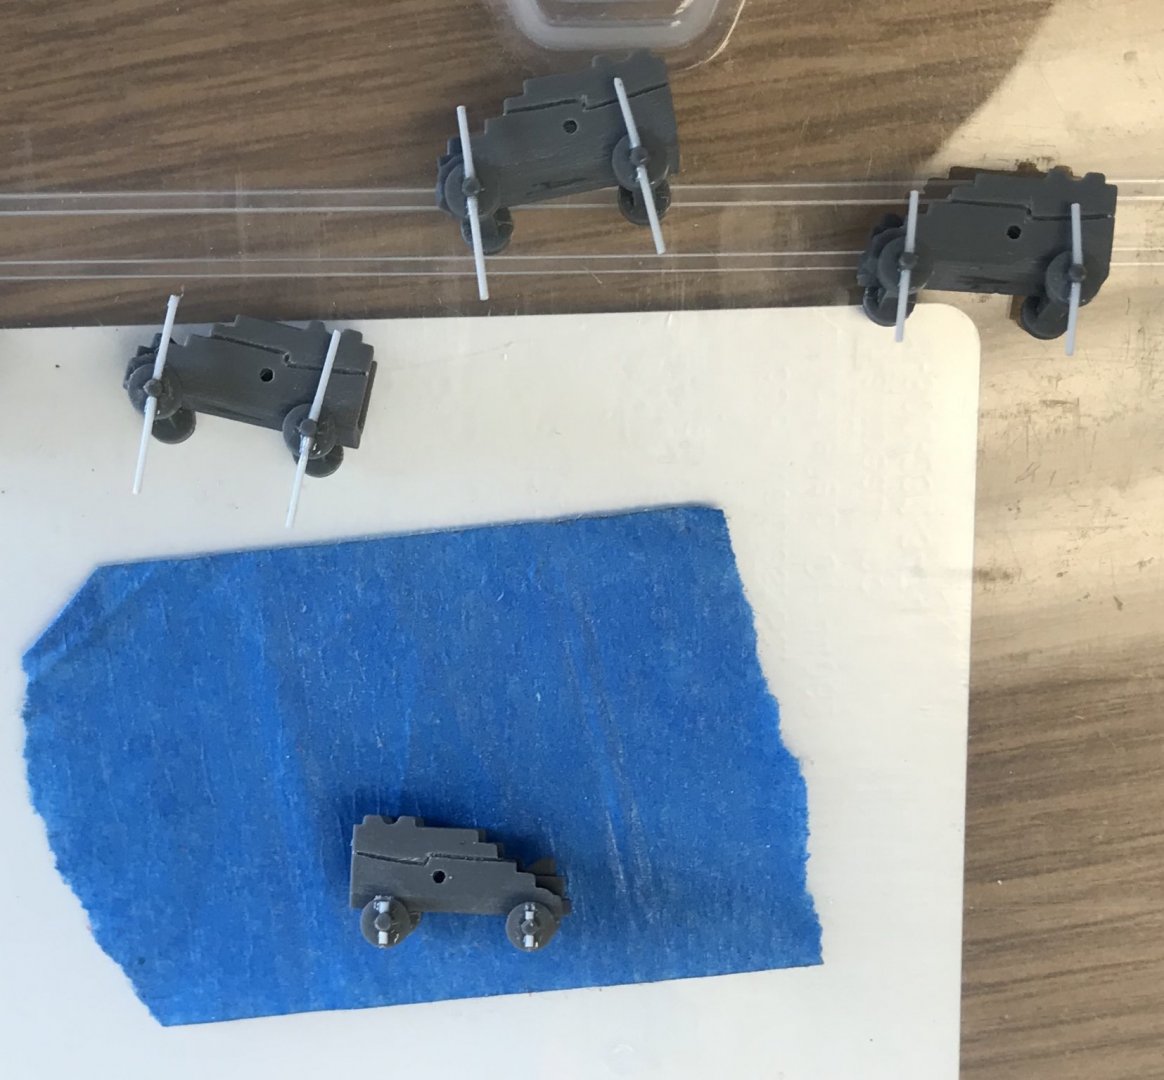
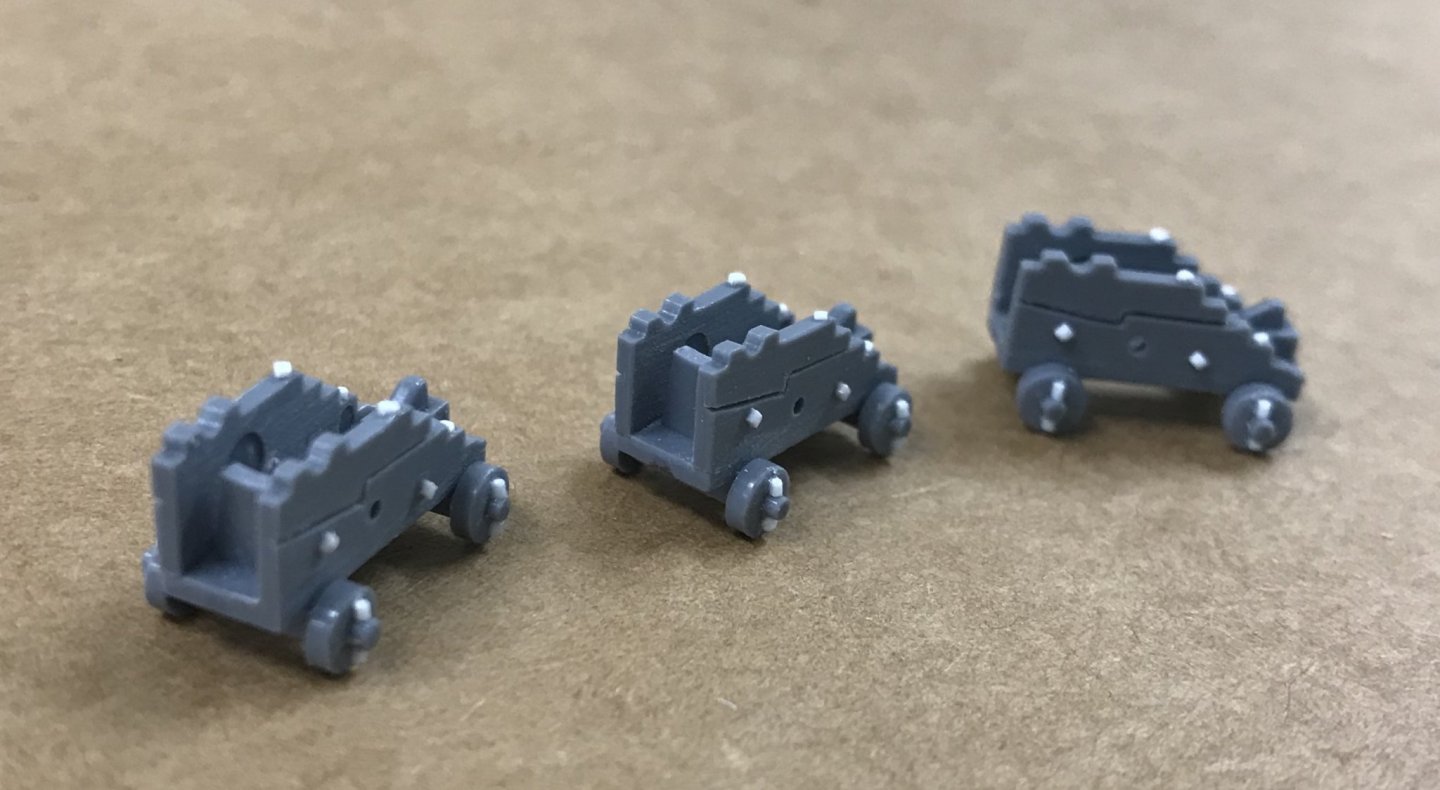
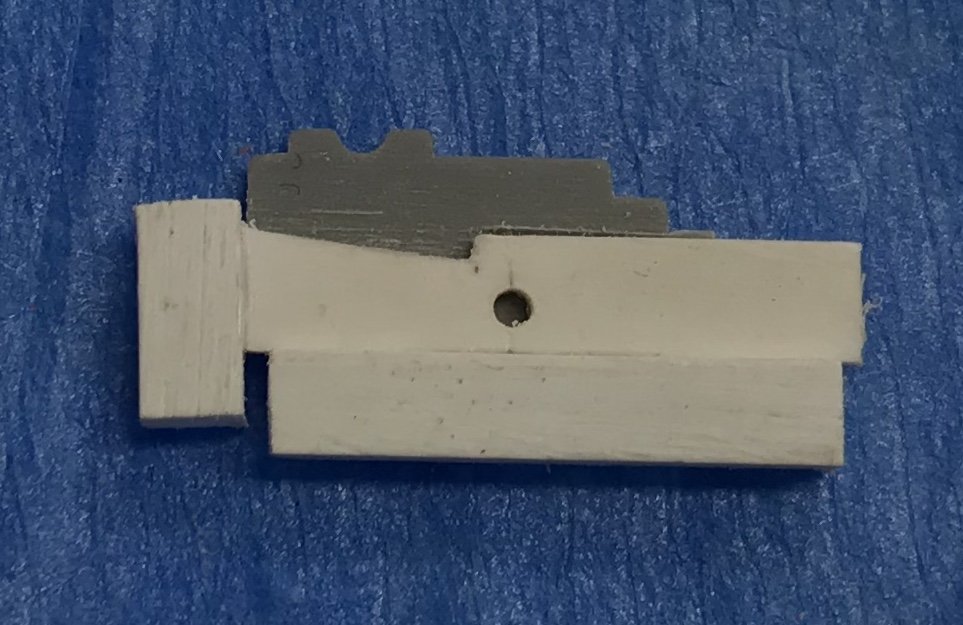
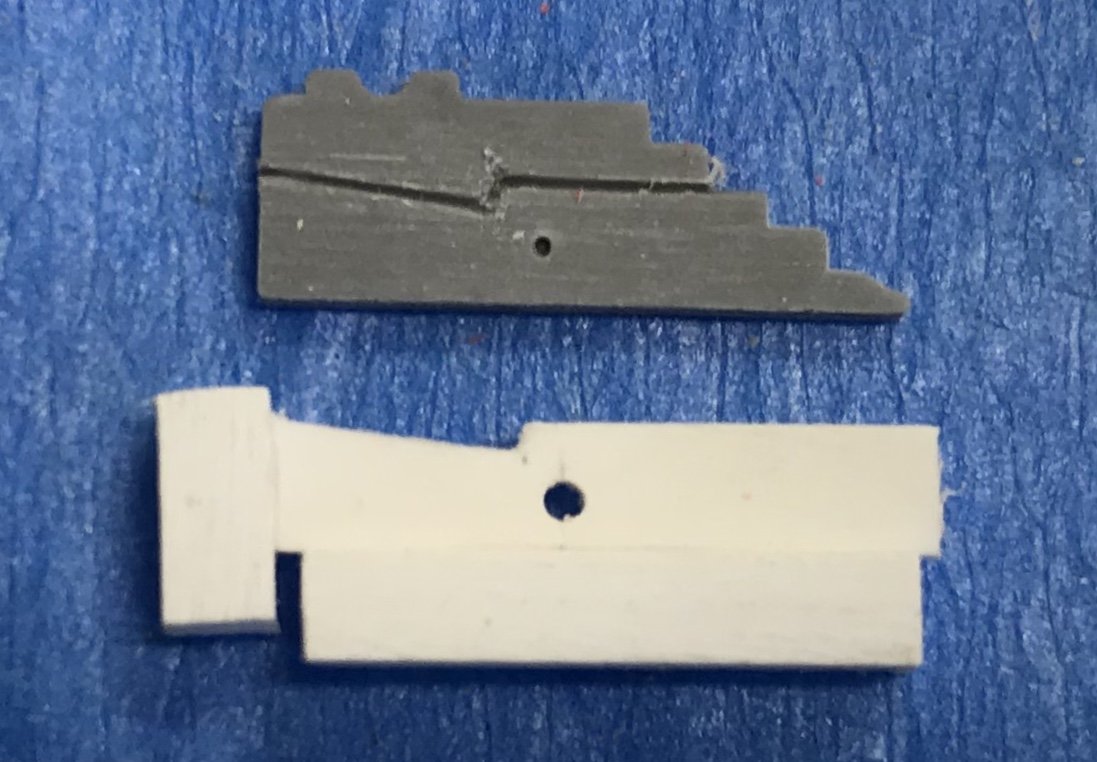
The kit gun carriages are mini models unto themselves, comprised of 5 parts for each carriage. This is why I have opted to use simplified dummy carriages for the lower two decks, where they would be largely unseen, anyway. The main deck is another matter though. Because I have shifted the stock middle deck guns up to the main deck - and will continue that shift in increasing caliber, as I move upwards - I have an opportunity to do a little extra detailing on the 16 carriages that are ever likely to be seen. The added 1/2”+ of width across the decks kind of necessitates a little scaling up of the guns. The kit, for some reason, supplies you with 40 carriages, in this 24lb caliber, but I only need 28. Nevertheless, I made 4 extra to choose from. I will not mount any bow or stern chase guns, as this was not done, in practice, while the ship was in harbor. Much of the tedium involved in this process is cleaning away flash lines and truing up surfaces. A good number of my carriage base parts were notably warped, for some reason, and I had to heat them with a foil-wrapped (do NOT ****-off your wife;() curling iron, in order to flatten them. This sometimes left foil marks in the plastic, but they were on the bottom surface of the carriage base, and most of that was removed while truing on my emory stick. So, the first thing I wanted to do, as a detail enhancement, was to scribe in the stepped joint of the carriage sides. For this purpose, I made a two-sided scribing jig from white styrene, into which I also drilled a locating hole for the breeching rope hole. I didn’t actually drill through my jig, as that would quickly distort my jig. Instead I used an ordinary push-pin, through this marking hole, which the drill tip could easily find, afterwards: Although it wasn’t strictly necessary, because I only need to detail 16 carriages, I went ahead and scribed and drilled all of the carriage sides. The scribing process isn’t always super clean, so this gave me a wider pool from which to select. Ultimately, I divided the gun carriages into first-selects - group A - for the visible guns to be further detailed, and a B-group for those guns hidden behind the bulwarks. For assembly of the carriages, I found it easiest to glue one carriage side to the base, at a time, and allow a full cure time before attempting to glue the other side. This ensured that my carriage sides would remain at a 90 degree angle to the carriage base. As a side note, once the basic 3-part assembly was complete, I came back with my EXACTO, and broke the edges just a bit, with a few back-and-forth scrapes; my goal is always to reduce the plastic appearance of the kit, and super sharp edges read as “un-natural” to what you would see in real practice. Next, I attached the wheel trucks. The stock kit, provides alignment lines for each truck axle, on the underside of each carriage base. Unfortunately, the spacing is too close together and not reflective of actual practice. The forward truck should be positioned beneath the barrel trunnion, as this is the natural balance point of the gun barrel. The rear truck should be placed beneath the elevation quoin. The reality of this kit is that it is not strictly possible to exactly follow this geometry, because the aft wheels would, then, extend beyond the end of the carriage. I got it as close as I possibly could, however, and the visuals are, IMO, a vast improvement. The next steps involved hyper-detailing the truck wheels with pin wedges, made from styrene rod. This was really tedious because, in keeping with my process, I always come back and scrape away any excess glue. I feel that the effort is worth it, though, because any glue slop will telegraph through the paint and spoil all of your painstaking effort Finally, I incorporated the through-bolt iron work that holds the carriages together. I used .030 square styrene rod that I slivered with a razor blade, and then heat-flashed with a wand lighter; the heat-flash gives the slivers a little surface distortion that makes them resemble forged iron, IMO. At some point, in the future when I need another small-work project for the daytime, I will do the same for the quarter and f’ocsle deck guns. Meanwhile, in the evenings, I am very busily engineering the mounting base, upon which the model will be constructed; this involves a lot of structural re-enforcing to restore the rigidity that was compromised when I cut away my lower hull. The next photo montage will illustrate these first assembly stages of the model, as well as the initial framing for the scratch-build of the stern post and lower transom. All the best, and thank you for reading!😀


- 2,696 replies
-
- 10
-
-
- heller
- soleil royal
- (and 9 more)
-
I hear what you’re saying, Vic. It is a matter of preference, as you say. When I applied dullcoat, in my experiments, it seemed to rob the surface of all it’s life. The matte finish I have applied is somewhere between flat and the burnished effect I achieved after blending the VDB oil paint with the chip brush. That burnished surface has great warmth, but it really stretches the bounds of credulity. This, I felt, was a reasonable compromise. I could experiment, on my samples, with just dulling the wales, in order to see what that would look like. It’s only really the Ventre-de-Biche that I wish to preserve.
- 2,696 replies
-
- 3
-
-
- heller
- soleil royal
- (and 9 more)
-
Thank you very much EJ and Vic, and thank you to everyone else looking in and liking the process. I’m excited to get down to business! Tonight, I trued up the bottom edges of the lower hull (which still needed some flattening), while ensuring that my stem joint remained true. I will probably use a gap-filling epoxy to secure the hull to its base, because I don’t think I can reasonably eliminate the last sliver of daylight, in this joint, without compromising symmetry of the two hull halves. This weekend, I will lay-out the 1/16” styrene sheet that I’ve been “seasoning” (flattening) under the living room carpet for the past six months. I’ve also completed the basic assembly of the main deck gun carriages, and can now add all of the through-bolt detailing on the 16 guns that may ever even be partially visible.
- 2,696 replies
-
- 5
-
-
- heller
- soleil royal
- (and 9 more)
-
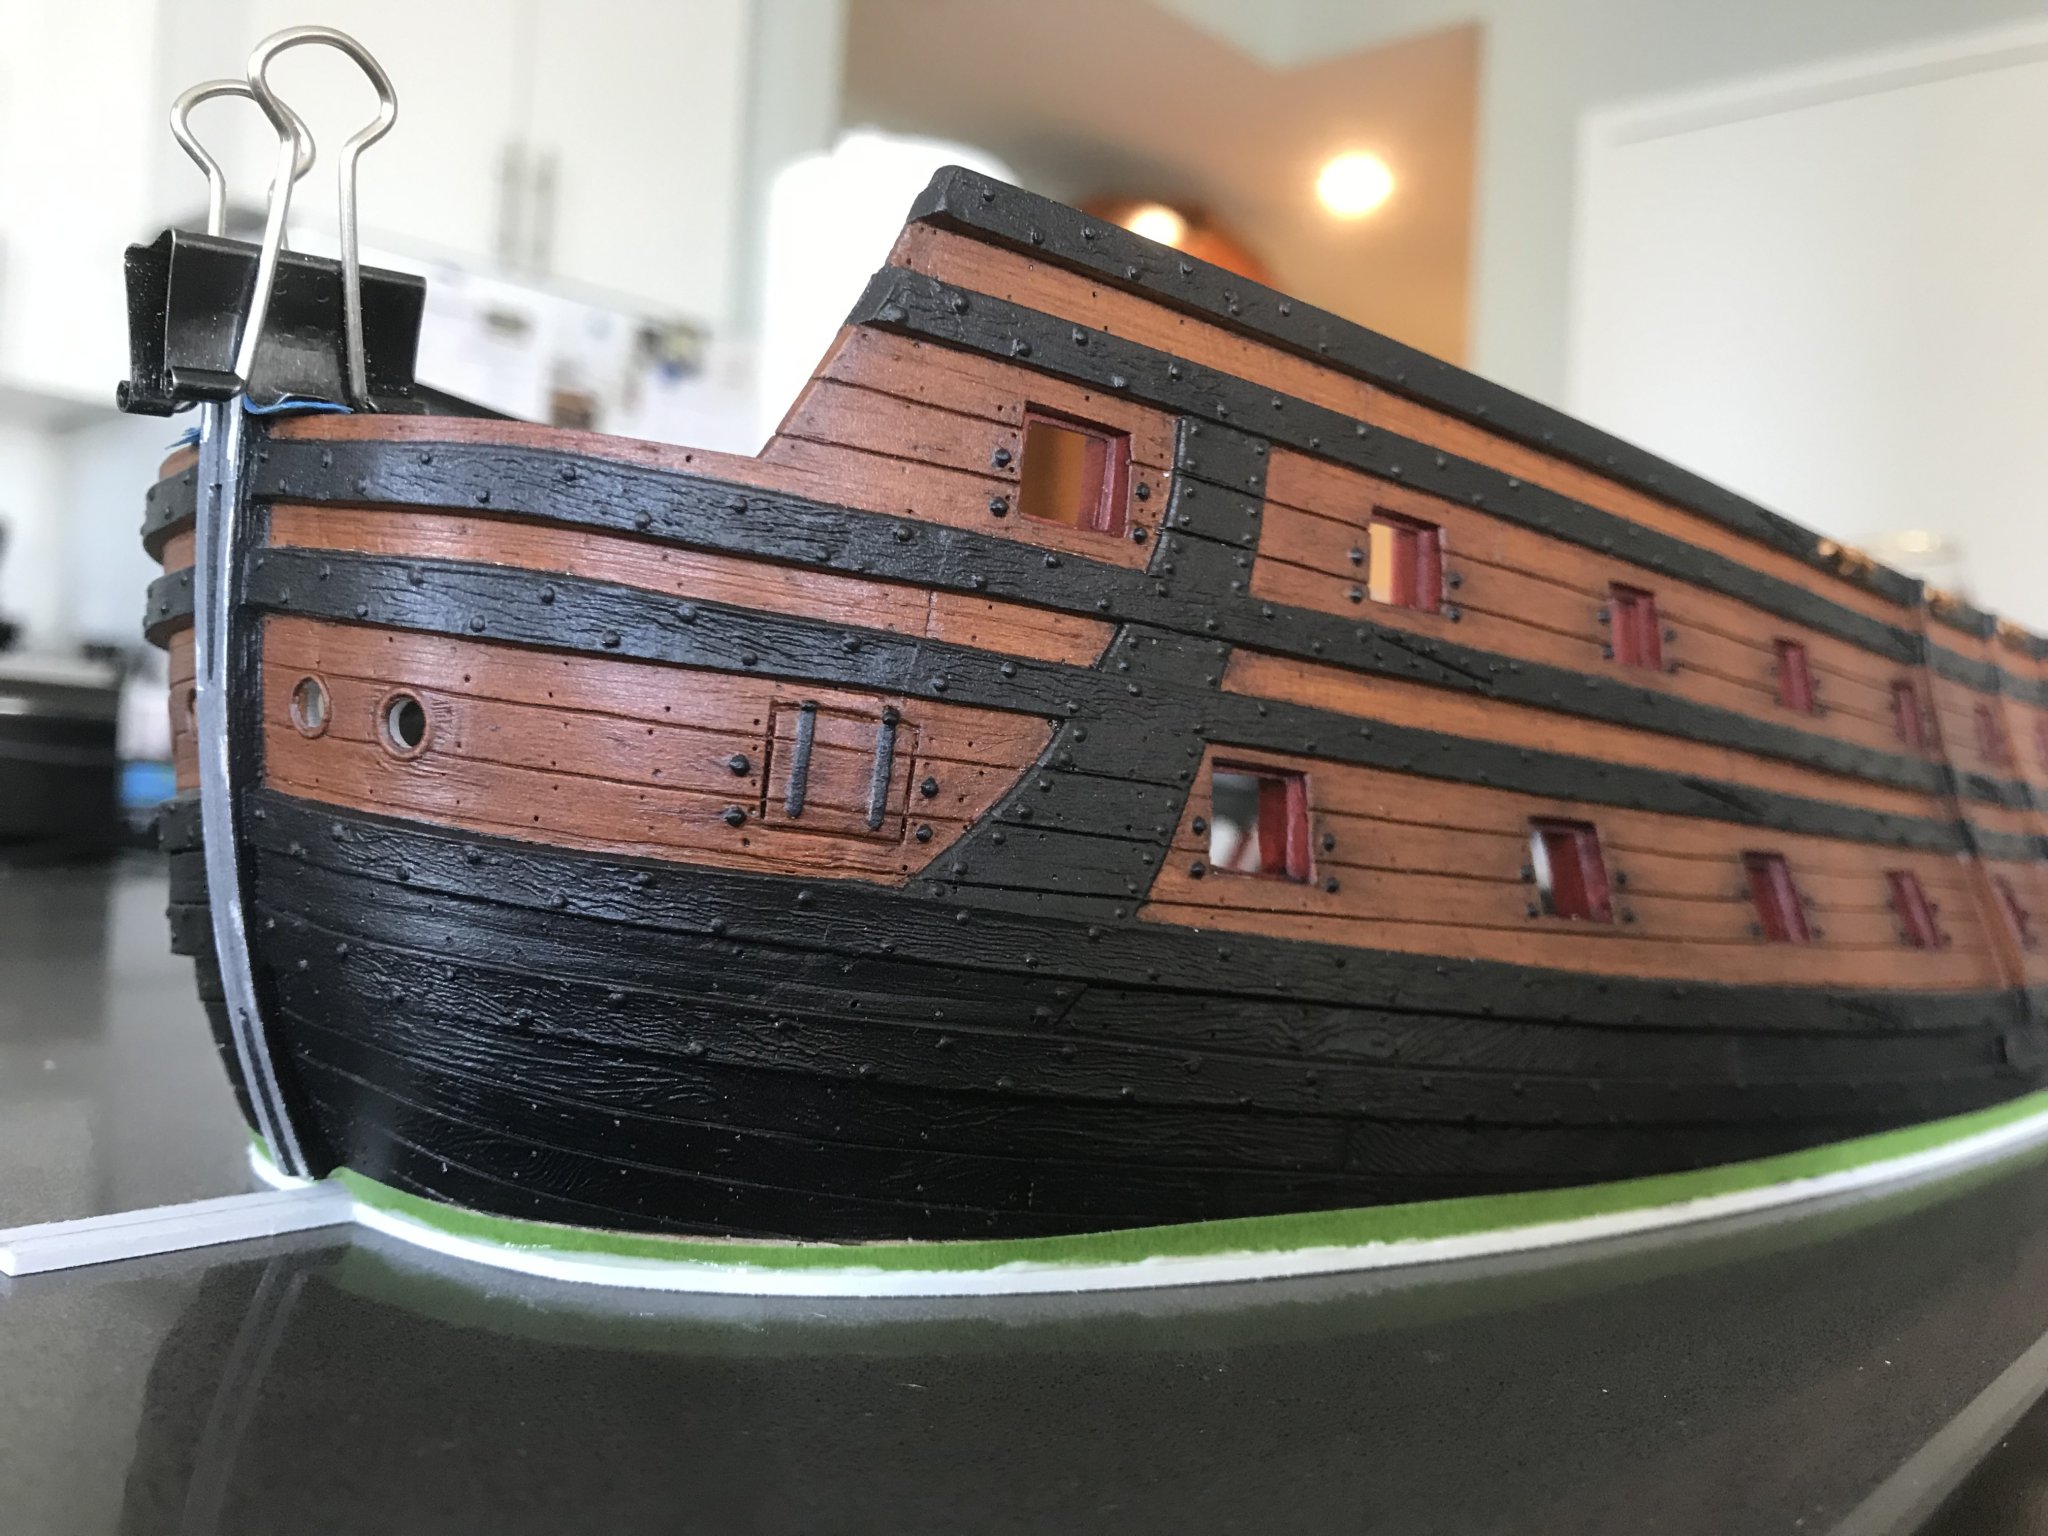
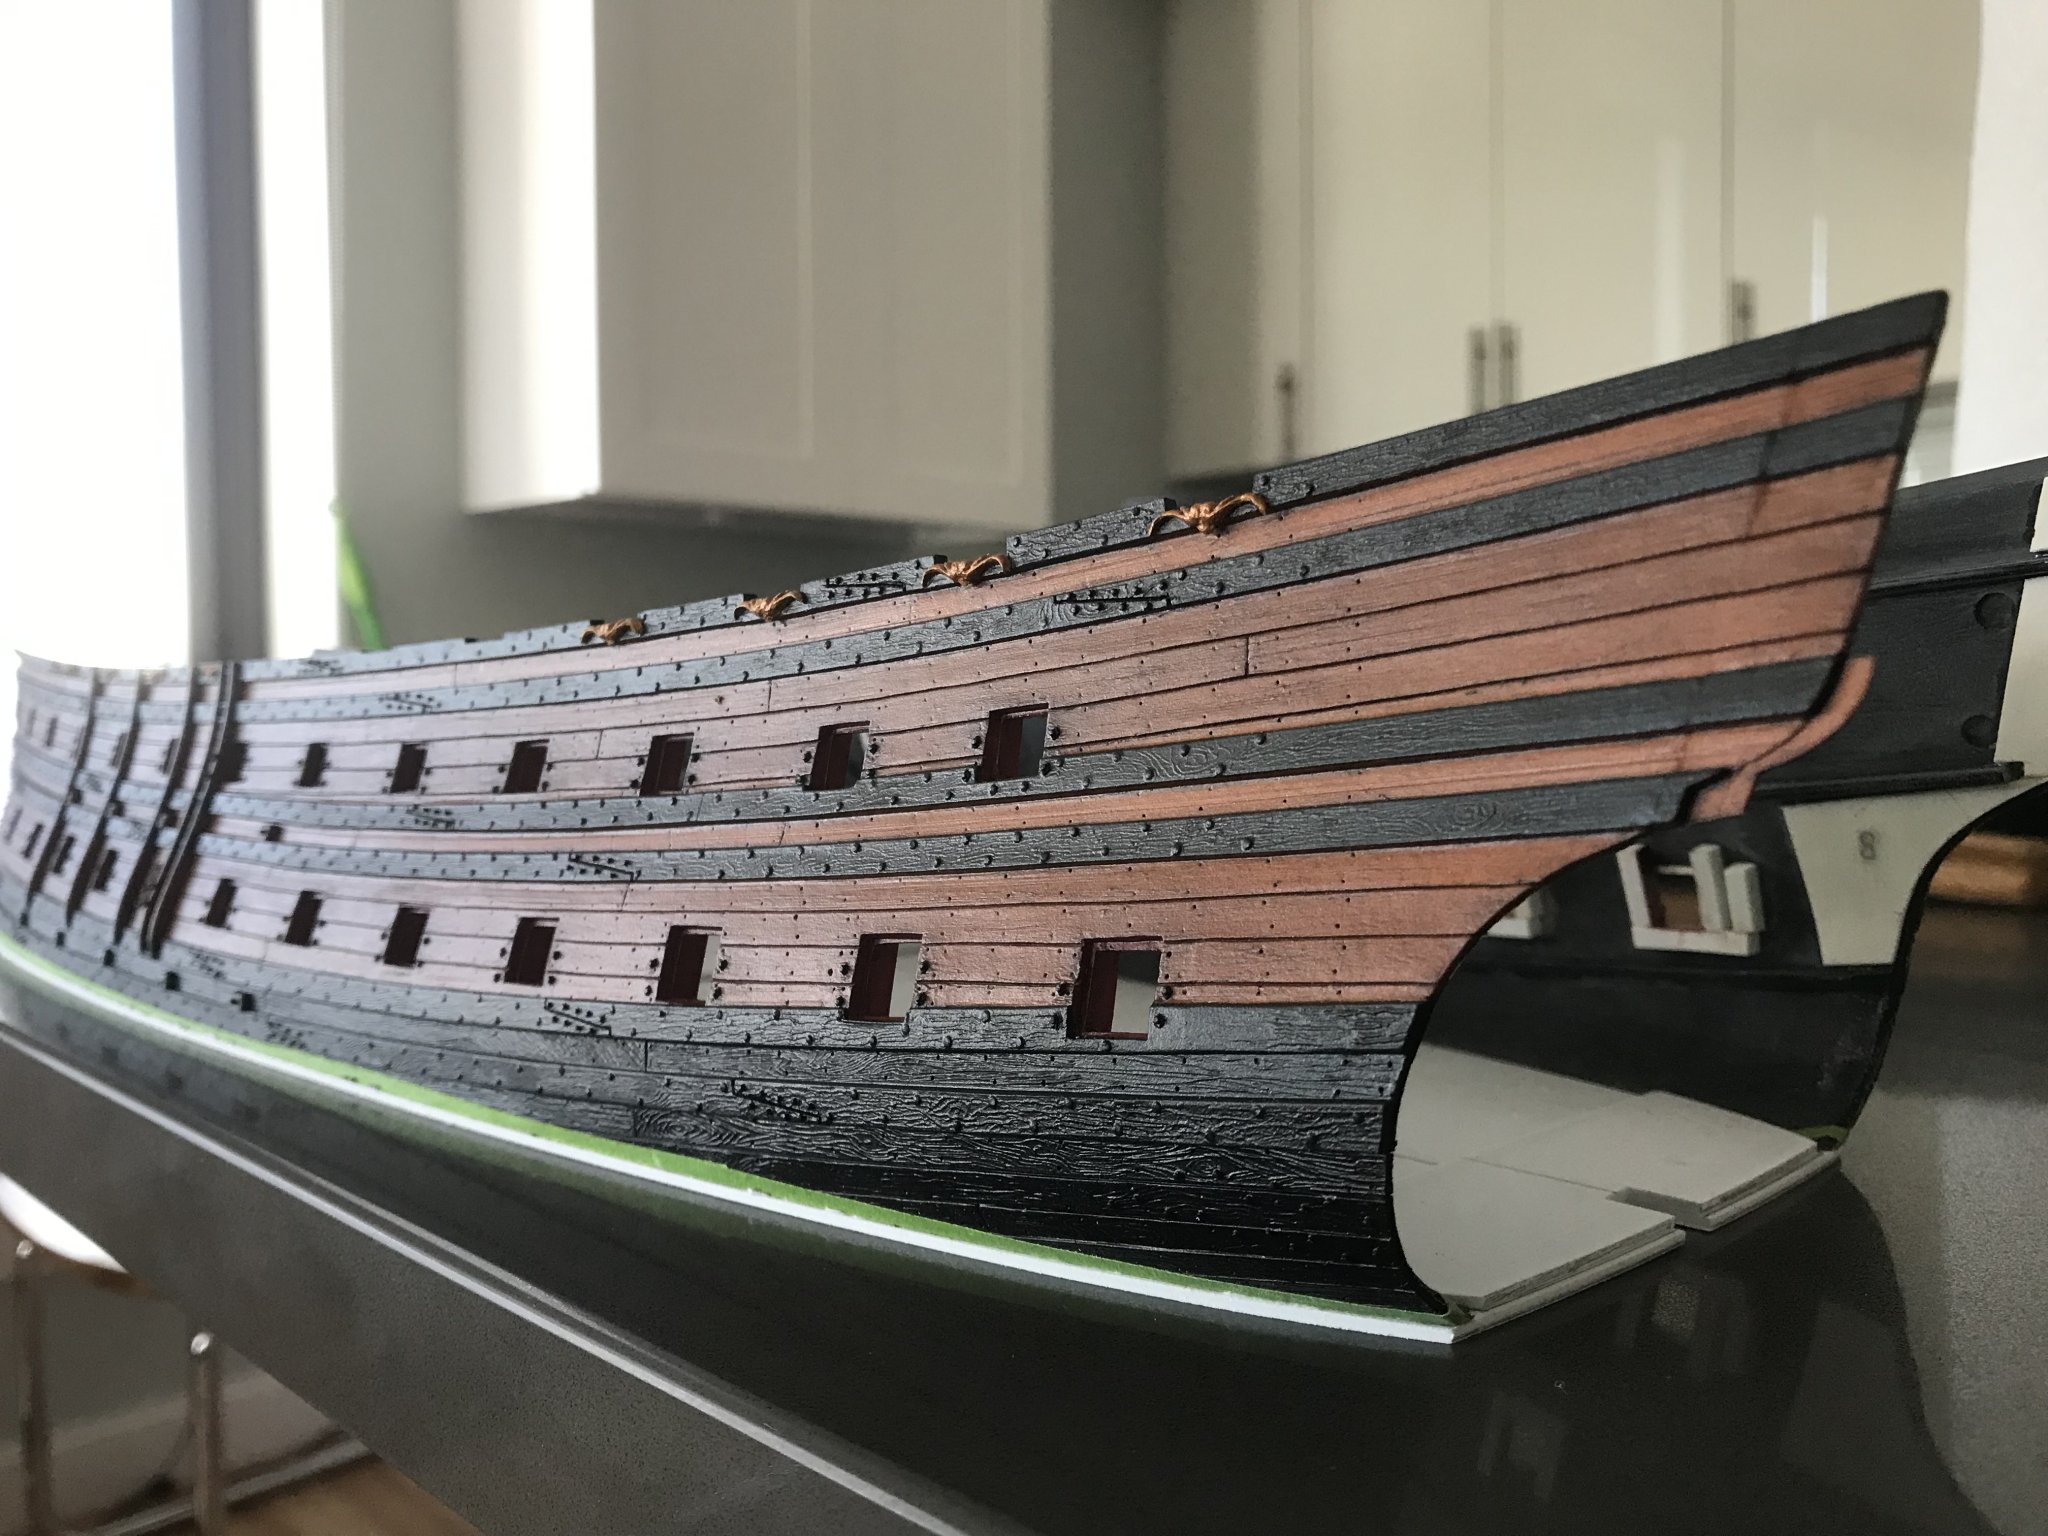
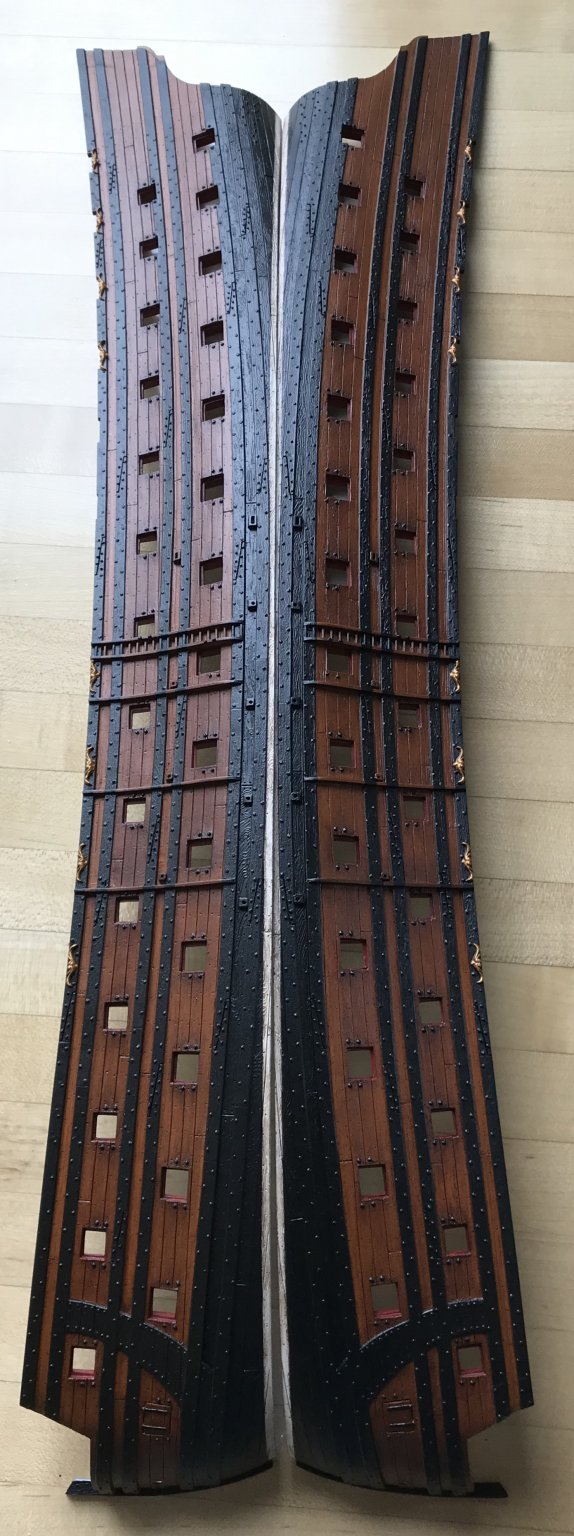
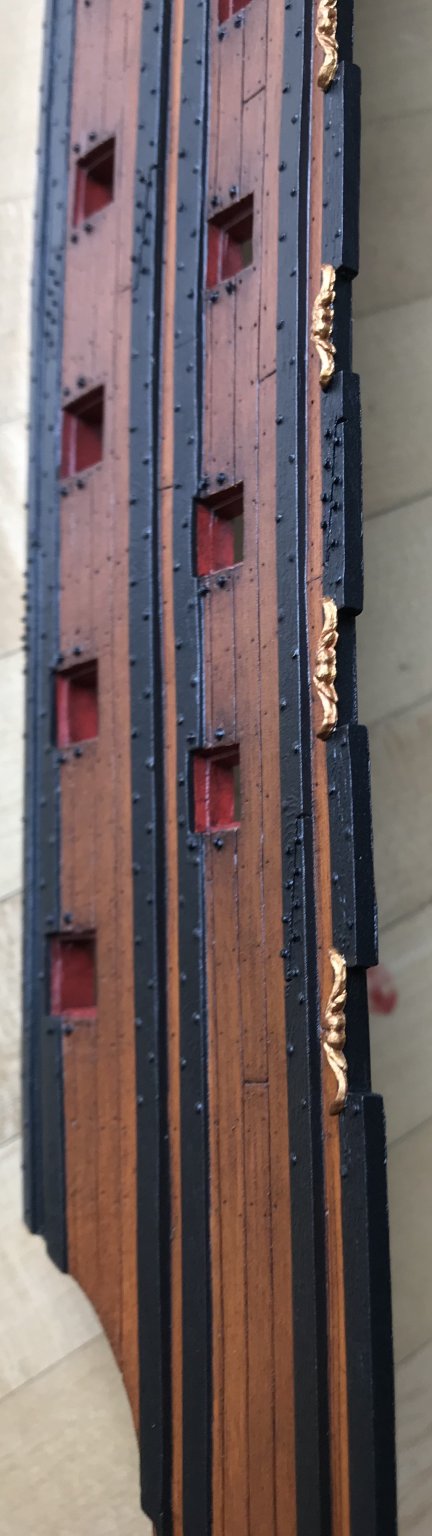
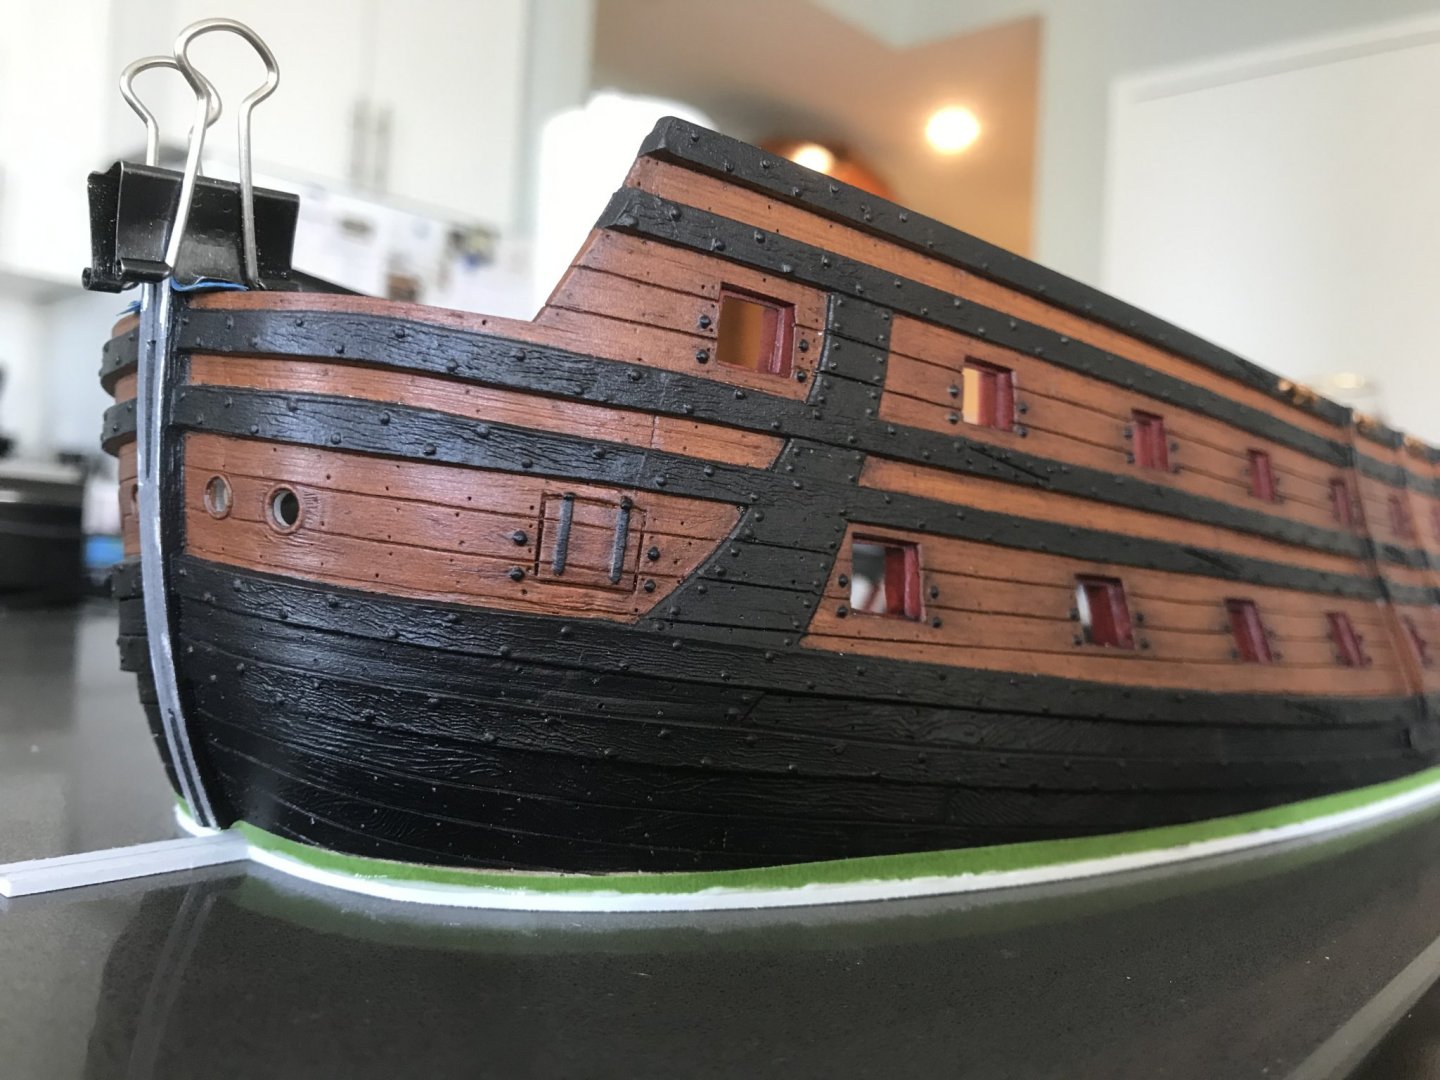
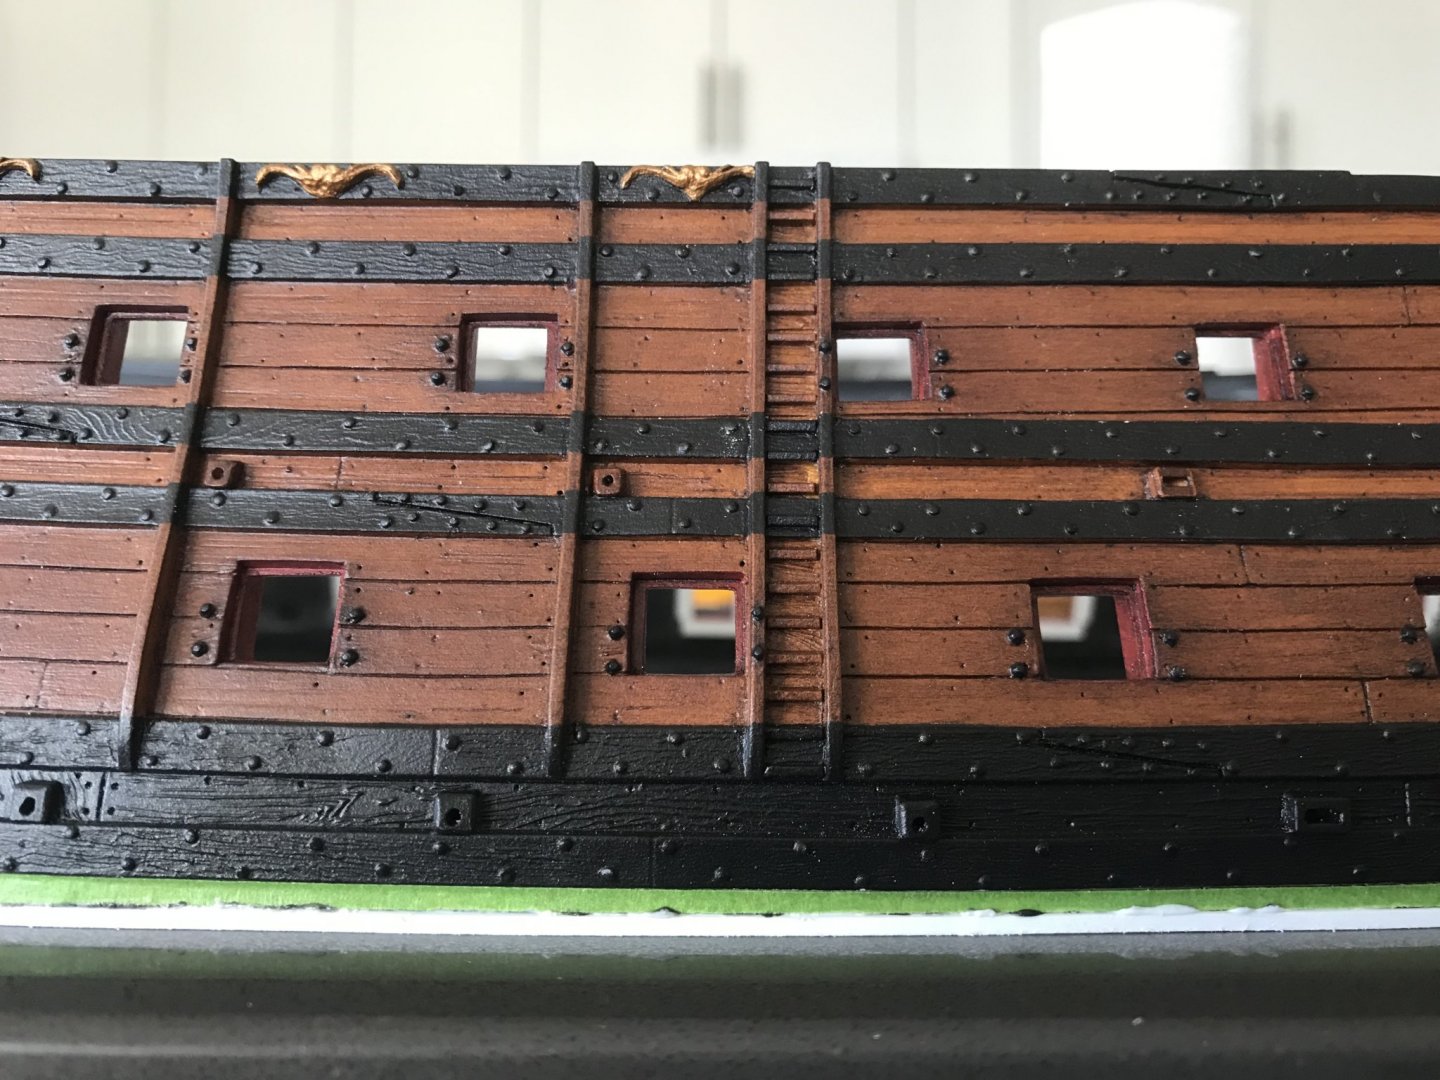
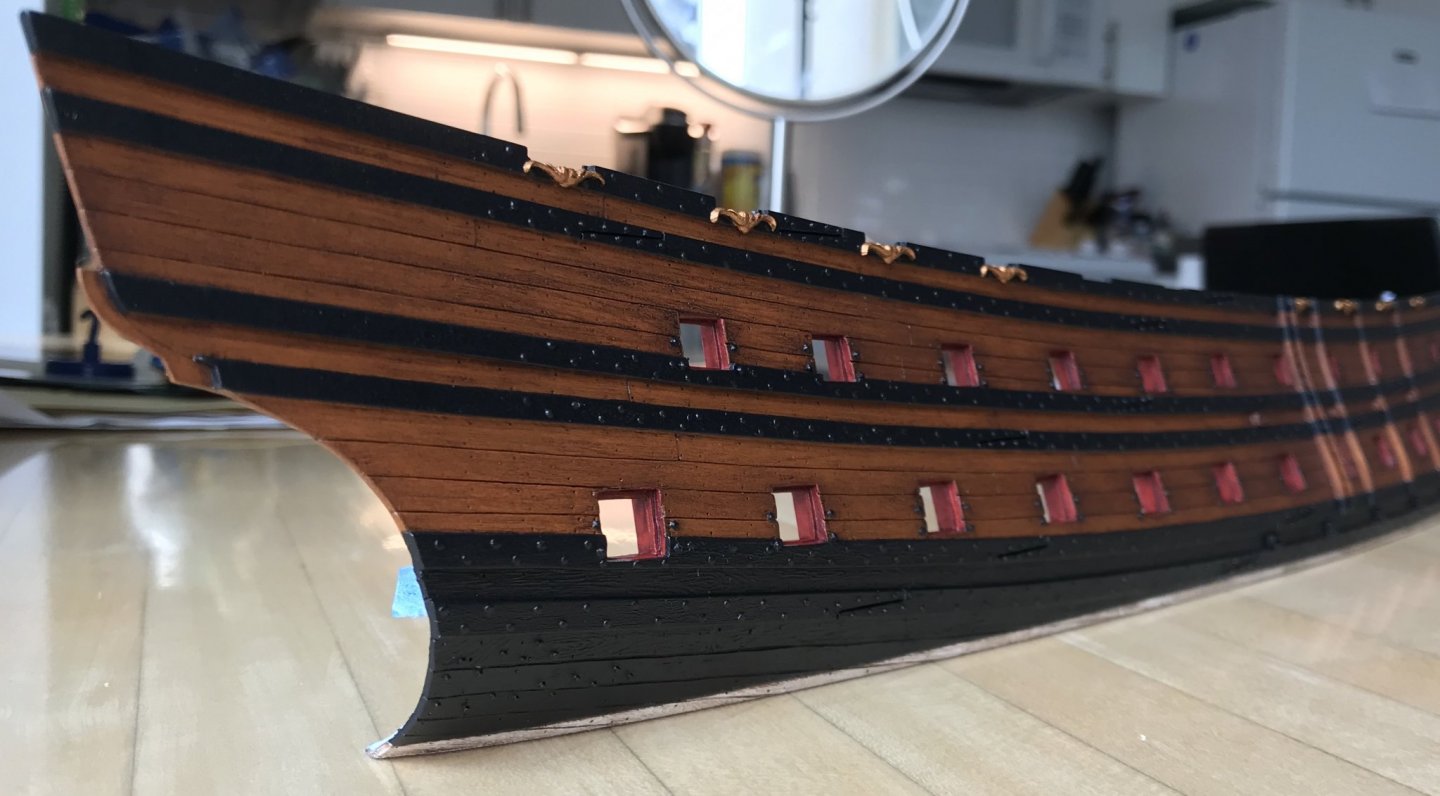
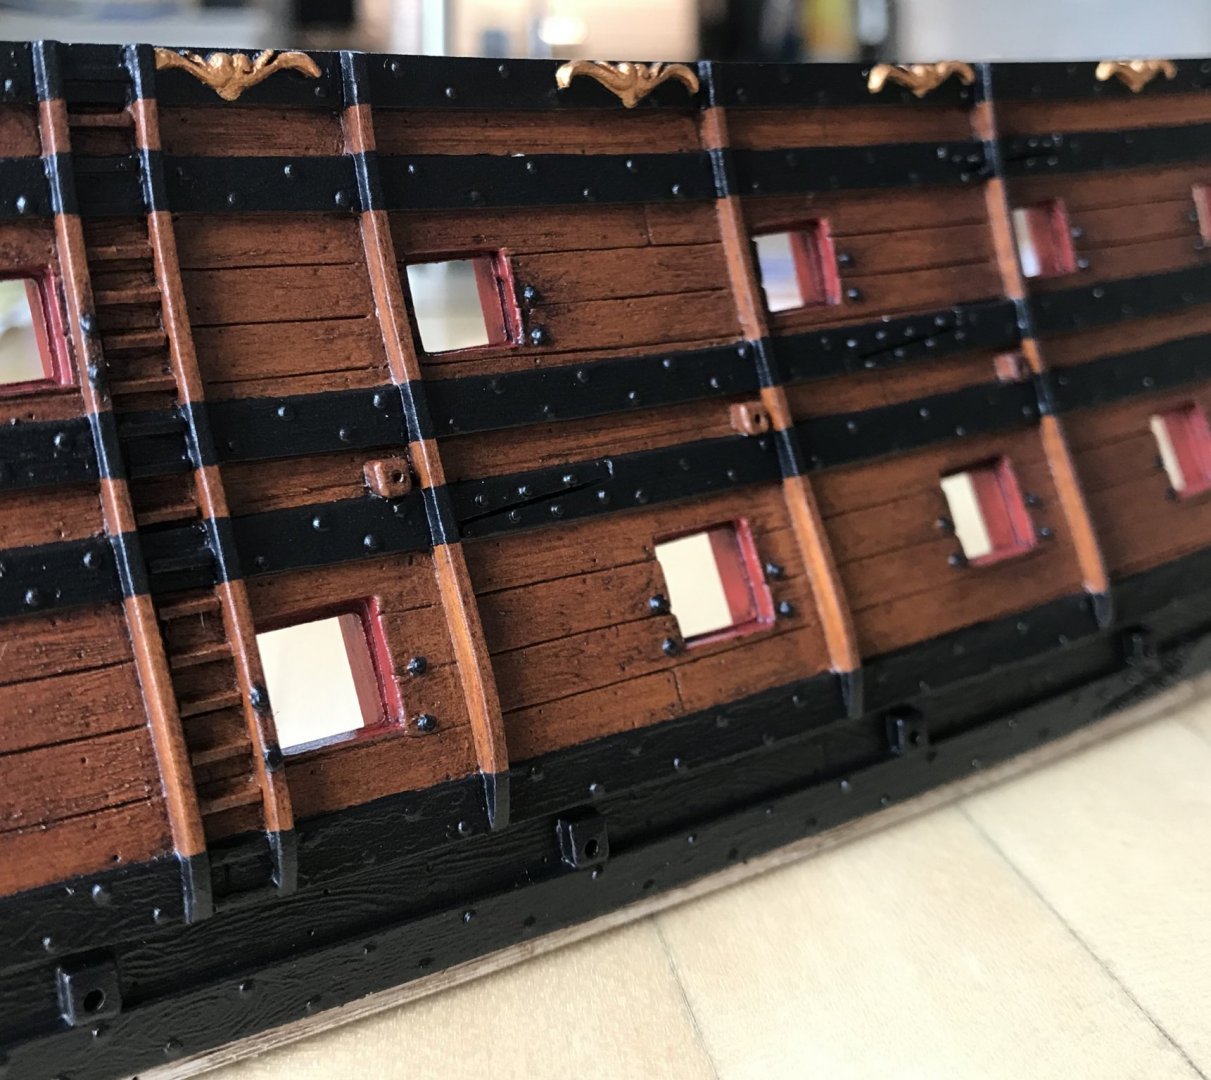
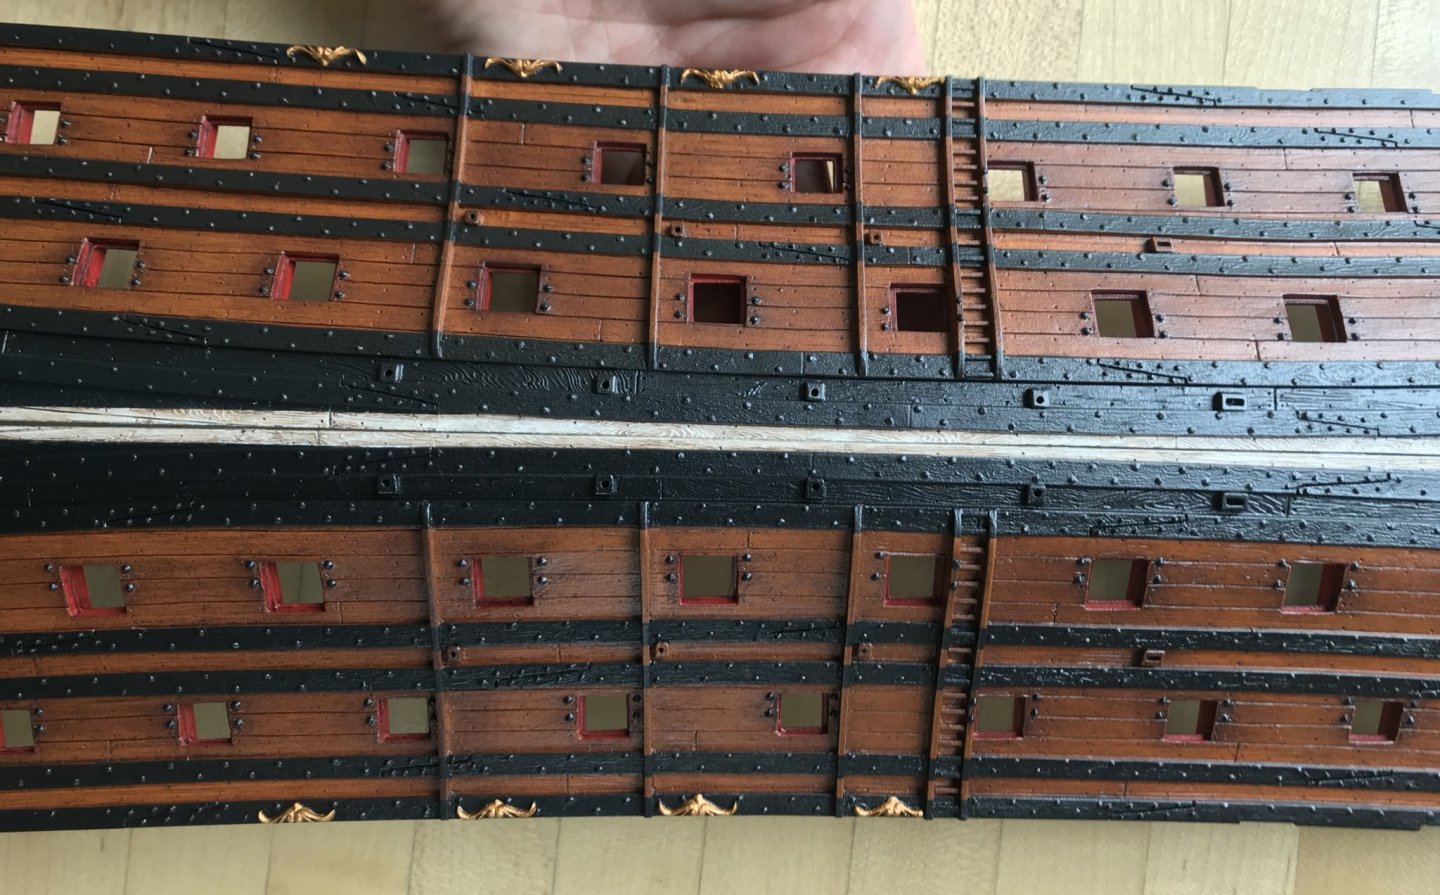
So, some bit of progress. The lower hull is completely painted! The most time-consuming aspect of this was getting good clean lines where the wales join the side planking. One of the peculiarities of the kit is that the wales are moulded with tremendous variation in their projection from the hull planking; around the bow, it’s almost 3/32”, but in other places, it’s a shy 1/32”. The important thing is that the line be clean, and not bleed onto the planking. I have had little success with masking, so the best way was to cut it in by hand. When I did bleed, I would quickly wipe away the mistake with a dampened Q-tip. If I noticed other irregularities, in process, I would very gently scrape away at the still-soft acrylic until the mistake disappeared. What was satisfying is that I found an application for all of the distressing mediums that I had bought to experiment with. The Van Dyke Brown oil paint was, of course, the main distressing agent. I found that the starboard side - which I distressed after doing the port side - was darker in appearance, so I had to then go a little darker on the port side. Rather than a full application of VDB, I applied small dabs with a Q-tip, in a sparse but well-distributed pattern, along the run of guns and between the wales. I then used my “dirty” chip brush to spread and blend the paint, evenly, across the surface. This was an easy solution to the problem, and quickly brought both sides into agreement. The walnut ink was the perfect distress medium, over the ModelMaster Insignia Red of the gunport linings. It was very easy to dial back the effect with a slightly damp brush, if the accumulation was too heavy. Lastly, I was able to muddy the spray-primed ultra-white waterline with two different Testors enamel stain washes; first, I brushed on a light layer of grey wash, and wiped off the excess with a Q-tip wrapped with a t-shirt scrap. I found that two applications of the grey - one after the other, with only a 5-minute set time in-between - gave me a satisfyingly lead-white color. To finish, though, I used a brown enamel wash, and only one coat was sufficient to give me the ring-around-the-ship effect of the vessel anchoring at what was likely a pretty polluted waterway, at Brest. This was one area where leaving the moulded kit grain was beneficial because the grain caught traces of the brown wash. The very last thing was to seal everything under a spray-coat of clear matte medium, which homogenized the two different kinds of black acrylic that I used for the port and starboard sides. So, now, I can begin laying out the mounting base and constructing the model - 🥳!!


- 2,696 replies
-
- 9
-
-
- heller
- soleil royal
- (and 9 more)
-
Although Blue Ensign doesn’t specifically say, my guess is that the yellow ocher paint he mixes with the PVA is an acrylic, as both acrylic and PVA are water based. There is latitude, here, to experiment with color. One could follow Blue Ensign’s protocol with yellow ocher, and then very lightly dry brush streaks of a faint grey acrylic/PVA mix - more along the perimeter of the sail - before drying the ModelSpan tissue. The difficulty, there, is that you will not yet have drawn in the sail cloths with pencil. Perhaps, though, you could suspend a paper pattern beneath your box opening to help guide you in your distressing efforts. Having never attempted this before, I’m not sure what that would actually look like, but it’s worth a little research (into realistic sail weathered appearance) and experimentation, IMO. The question of how many reef points to include is one that probably varies by nation and time period. I am interested in 17th C. French ships, and they appeared to employ a single band of reef points on the main and fore sails, for example, and two bands on the topsails. As a general rule of thumb, probably one reef point per sail cloth is a reasonable guide. Generally, though, I try to reference the best known contemporary examples of my type of ship, in both portraits and models. As for affixing the reef points, a single knot to both sides of the sail will keep them in place, and I am thinking that a mixture of dilute PVA glue will allow you to drape them in a realistic way. The best and easiest thing you might try first, though, is to PM Blue Ensign. I have found virtually everyone here to be exceedingly helpful whenever I have reached out.
-
Hello, Johnathan. Excellent progress on your Alabama! If you would like to save yourself $200, and almost certainly achieve a degree of scale realism that will match or exceed the efforts of any professional sail maker, then I will refer you to the following build by Blue Ensign. This is one of the finest plastic kit-bash projects that I have found on MSW, and he provides a full tutorial of his sailmaking technique, using ModelSpan tissue. The process is not complicated, and I will eventually be using this technique on my build:
-
You are certainly welcome Christopher! And, yes, I’m sure there will be a certain amount of trial and error in making card templates - particularly for the main and quarter deck balcony rails which will have to follow the camber of the stock kit stern windows that I am re-cycling. I may even be able to extend, and thereby salvage the QD stern balcony because I have an extra one and the balusters are a simple, repeating element. I wish I were capable of sweet KISS(es), Chris, but all I do is S entences L ingering O ver B reakfast B usiness (&) E arly R etreat (to bed)
- 2,696 replies
-
- 3
-
-
- heller
- soleil royal
- (and 9 more)
-
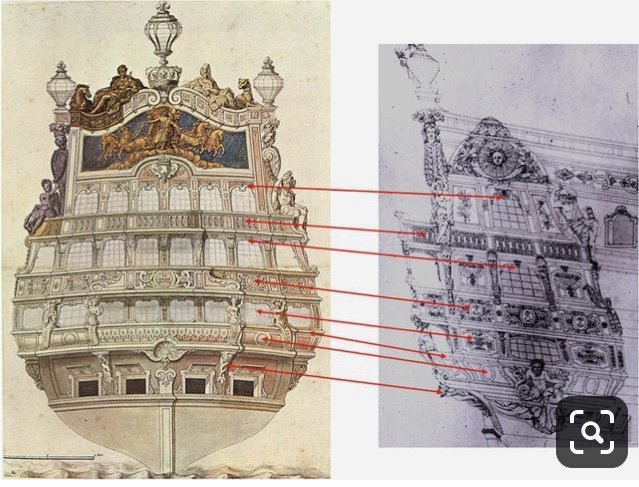
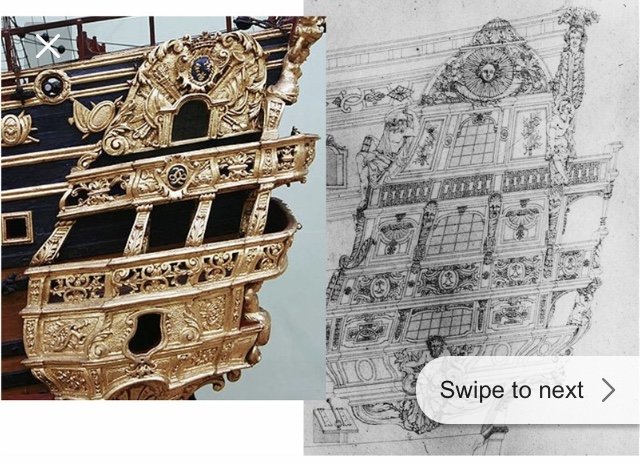
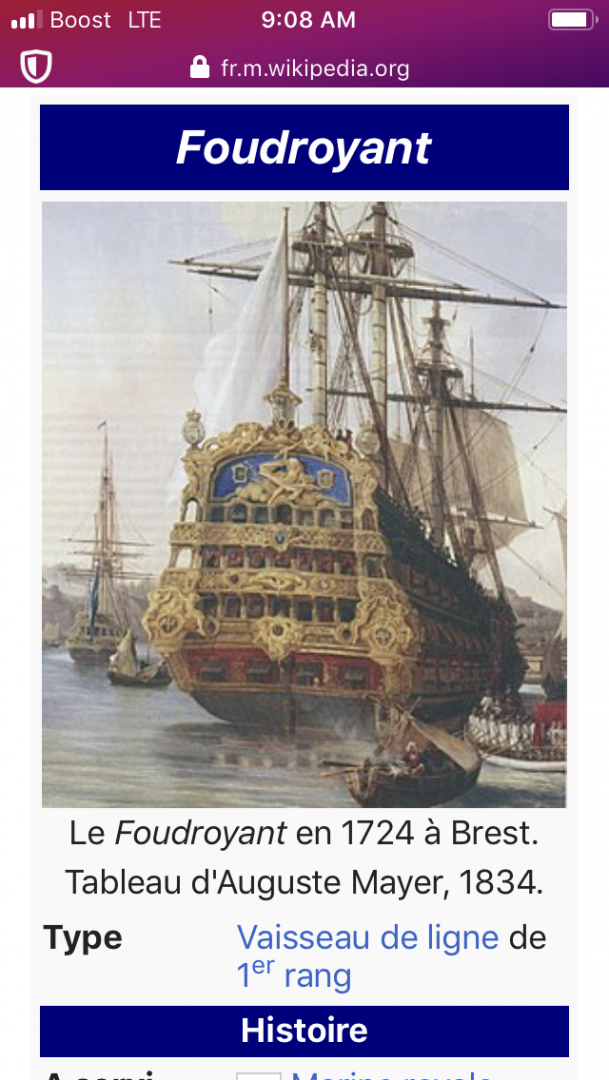
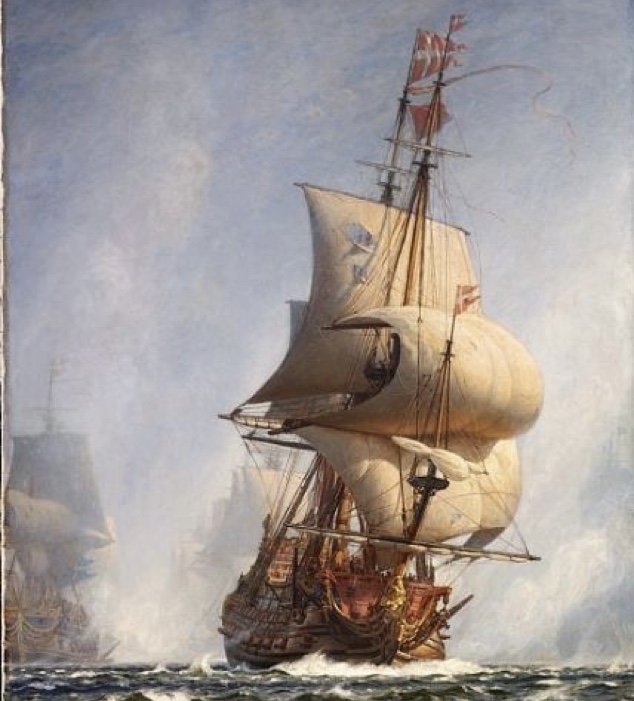
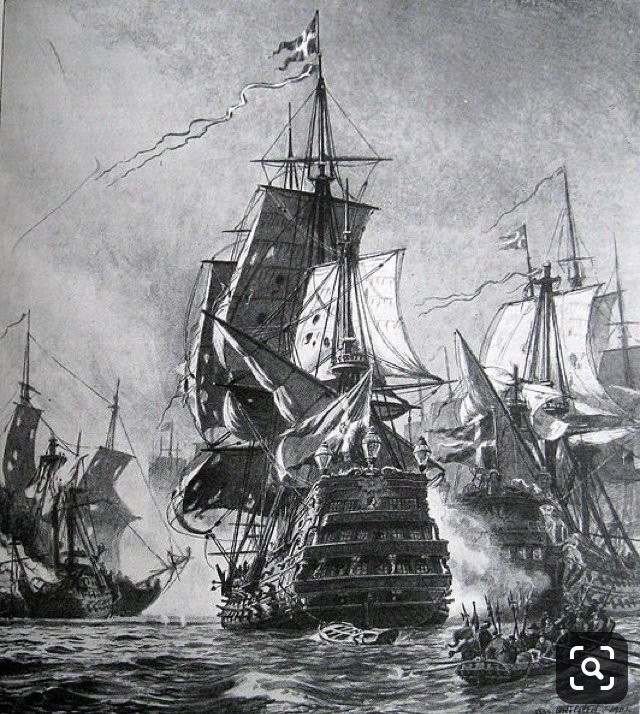
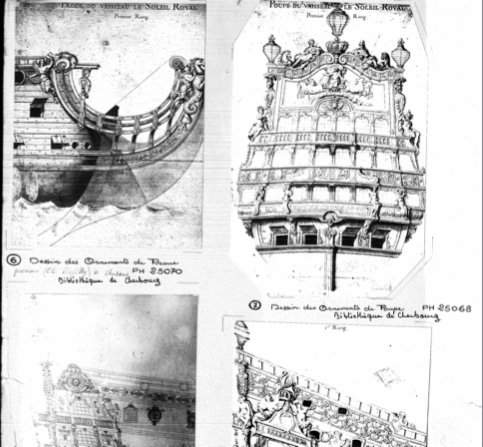
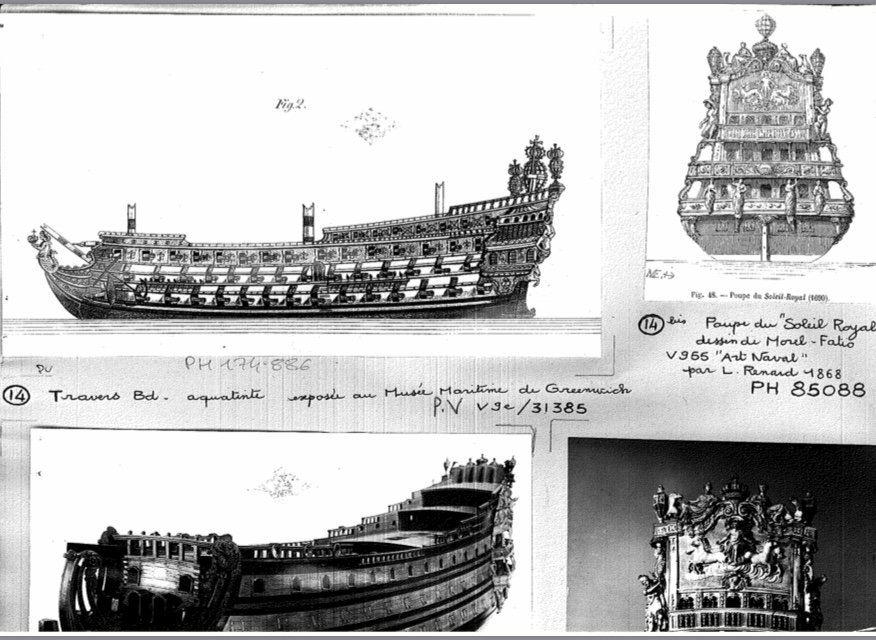
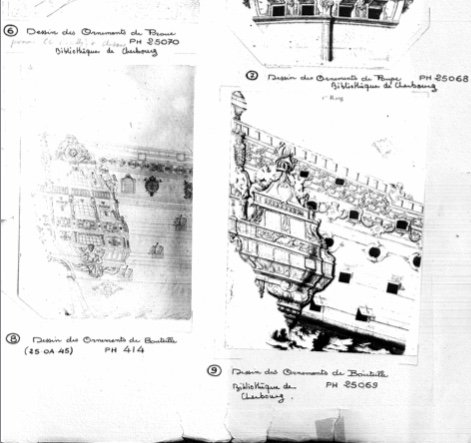
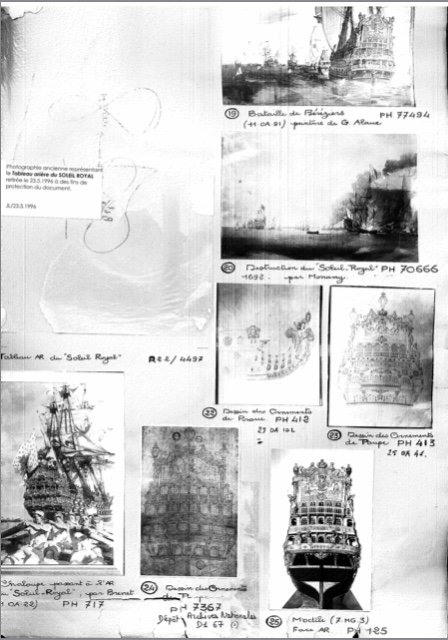
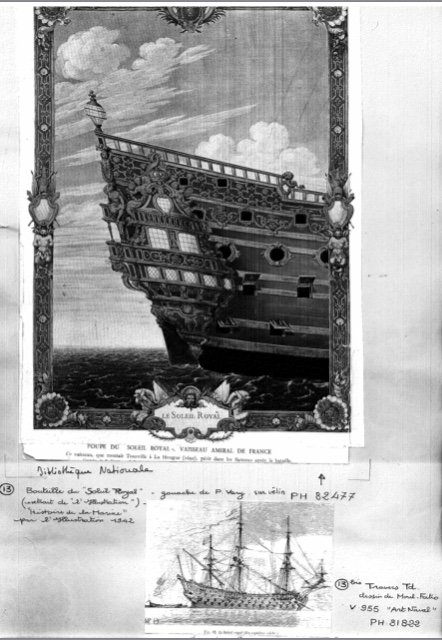
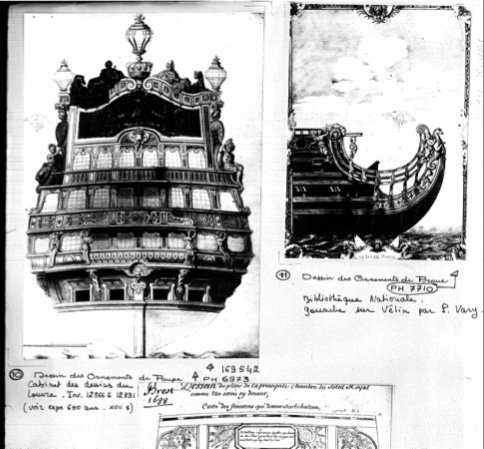
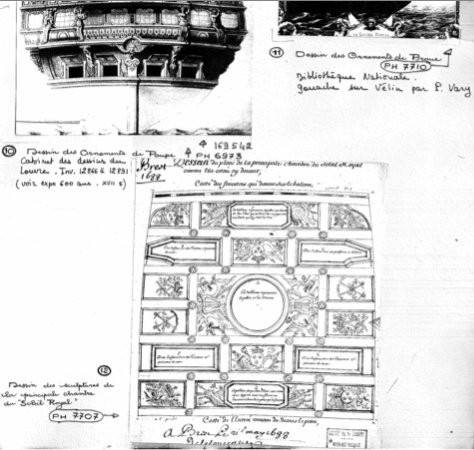
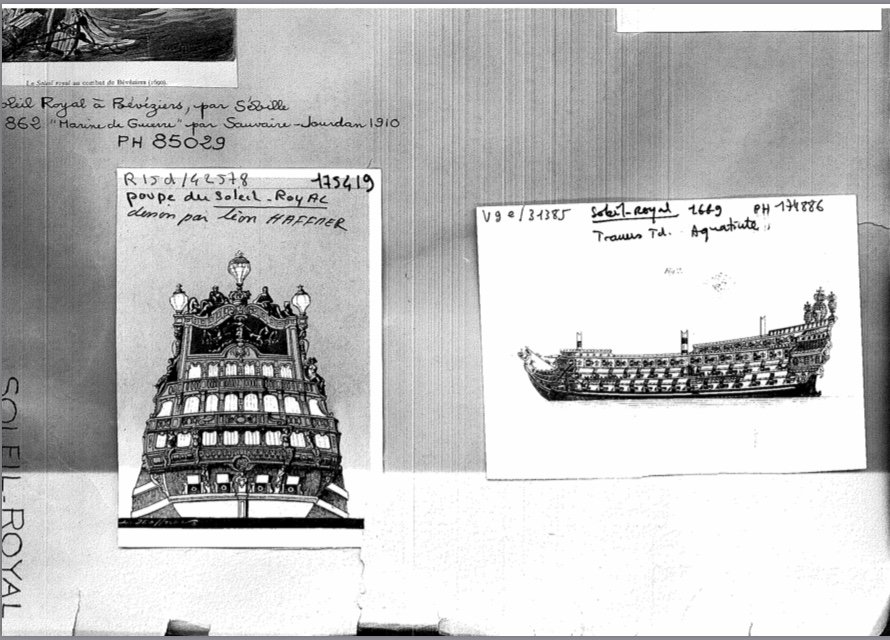
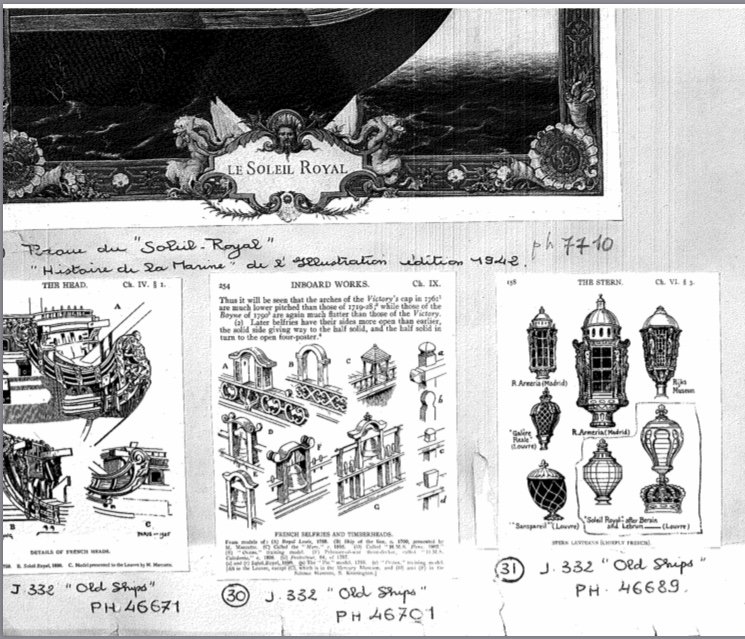
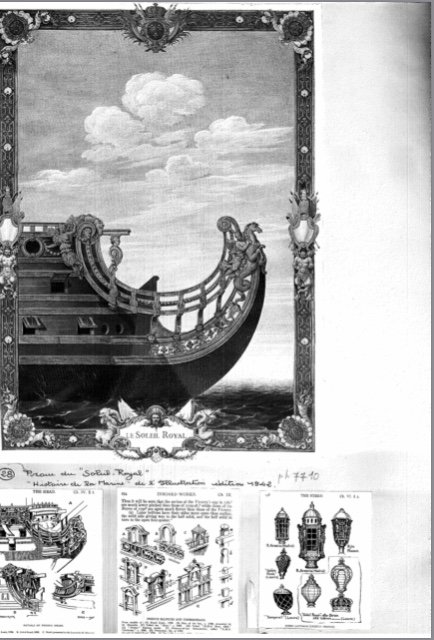
Thank you, everyone for your likes, your comments and for looking in! What’s interesting to me, EJ, is that these sets of drawings were created for approval, first, so there is every likelihood that the actual construction varied, somewhat from the drawings. The models, though, are a different story. Before 1700, there aren’t many (if any?) contemporary models that still exist. It isn’t until the late 1820s into the 1830s that the Musee de la Marine, under the direction of Admiral Paris, makes a serious effort to re-construct the best examples of each rate, from the time of the Second Marine, in the early 1690s, when the practice of French naval architecture finally begins to coalesce into a codified discipline. This is where Paris’s Souvenirs De Marine come from. For his part as the head model maker, at that time, Tanneron was tasked with making models of at least the four primary rates; hence we now have La Capricieux (a fourth rate, of uncertain date to me), L’Agreable and Le Brillant (both dated to 1827), and finally culminating with Soleil Royal (1834). Additionally, for each of these rates, a series of mostly un-planked frame models were made to better illustrate the underlying structure of Soleil Royal, Le Brillant, La Capricieux, among others. It appears likely that Tanneron’s sources would have been concentrated around this time of the birth of the Second Marine, and the choice of subjects appears to reflect that. For Soleil Royal, though, where there are conflicting sets of ornamentation, it appears to me that Tanneron struck a compromise between what was known of the early First Marine (open quarter galleries, for example), and the Louis Quinze model, which was a near contemporary of the re-constructed Soleil Royal (1693): Concurrent with the Musee’s efforts, at this time, other contemporary marine artists of the 1830s and the decades following, helped to broaden the revival and stoke interest in the baroque shipbuilders’ art. August Meyer gave us Le Foudroyant of 1723, in colors: And Christian Molsted would eventually paint several excellent portraits of the Danish ship Christianus Quintus: Above at the Battle of Koge Bay in 1677, and below - perhaps of the same action: I would love to speak with someone at the Musee, in order to obtain a better understanding of Tanneron, and the sources for his work. Unfortunately, the Musee has remained largely un-responsive the last several times I have sent email inquiries. Years ago, they sent me the following collection of imagery, which Victor Yankovic (who had made his own inquiries) was gracious to forward to me, more recently: It came, though, with no explanation or context. It seems as though one must arrange a sit-down meeting at the Musee, in order to get any clear information about the collection. I wish a trip to France were in the offing for me, but that will have to wait until my kids are done with college!
- 2,696 replies
-
- 6
-
-
- heller
- soleil royal
- (and 9 more)