Hubac's Historian
-
Posts
3,308 -
Joined
-
Last visited
Content Type
Profiles
Forums
Gallery
Events
Everything posted by Hubac's Historian
-
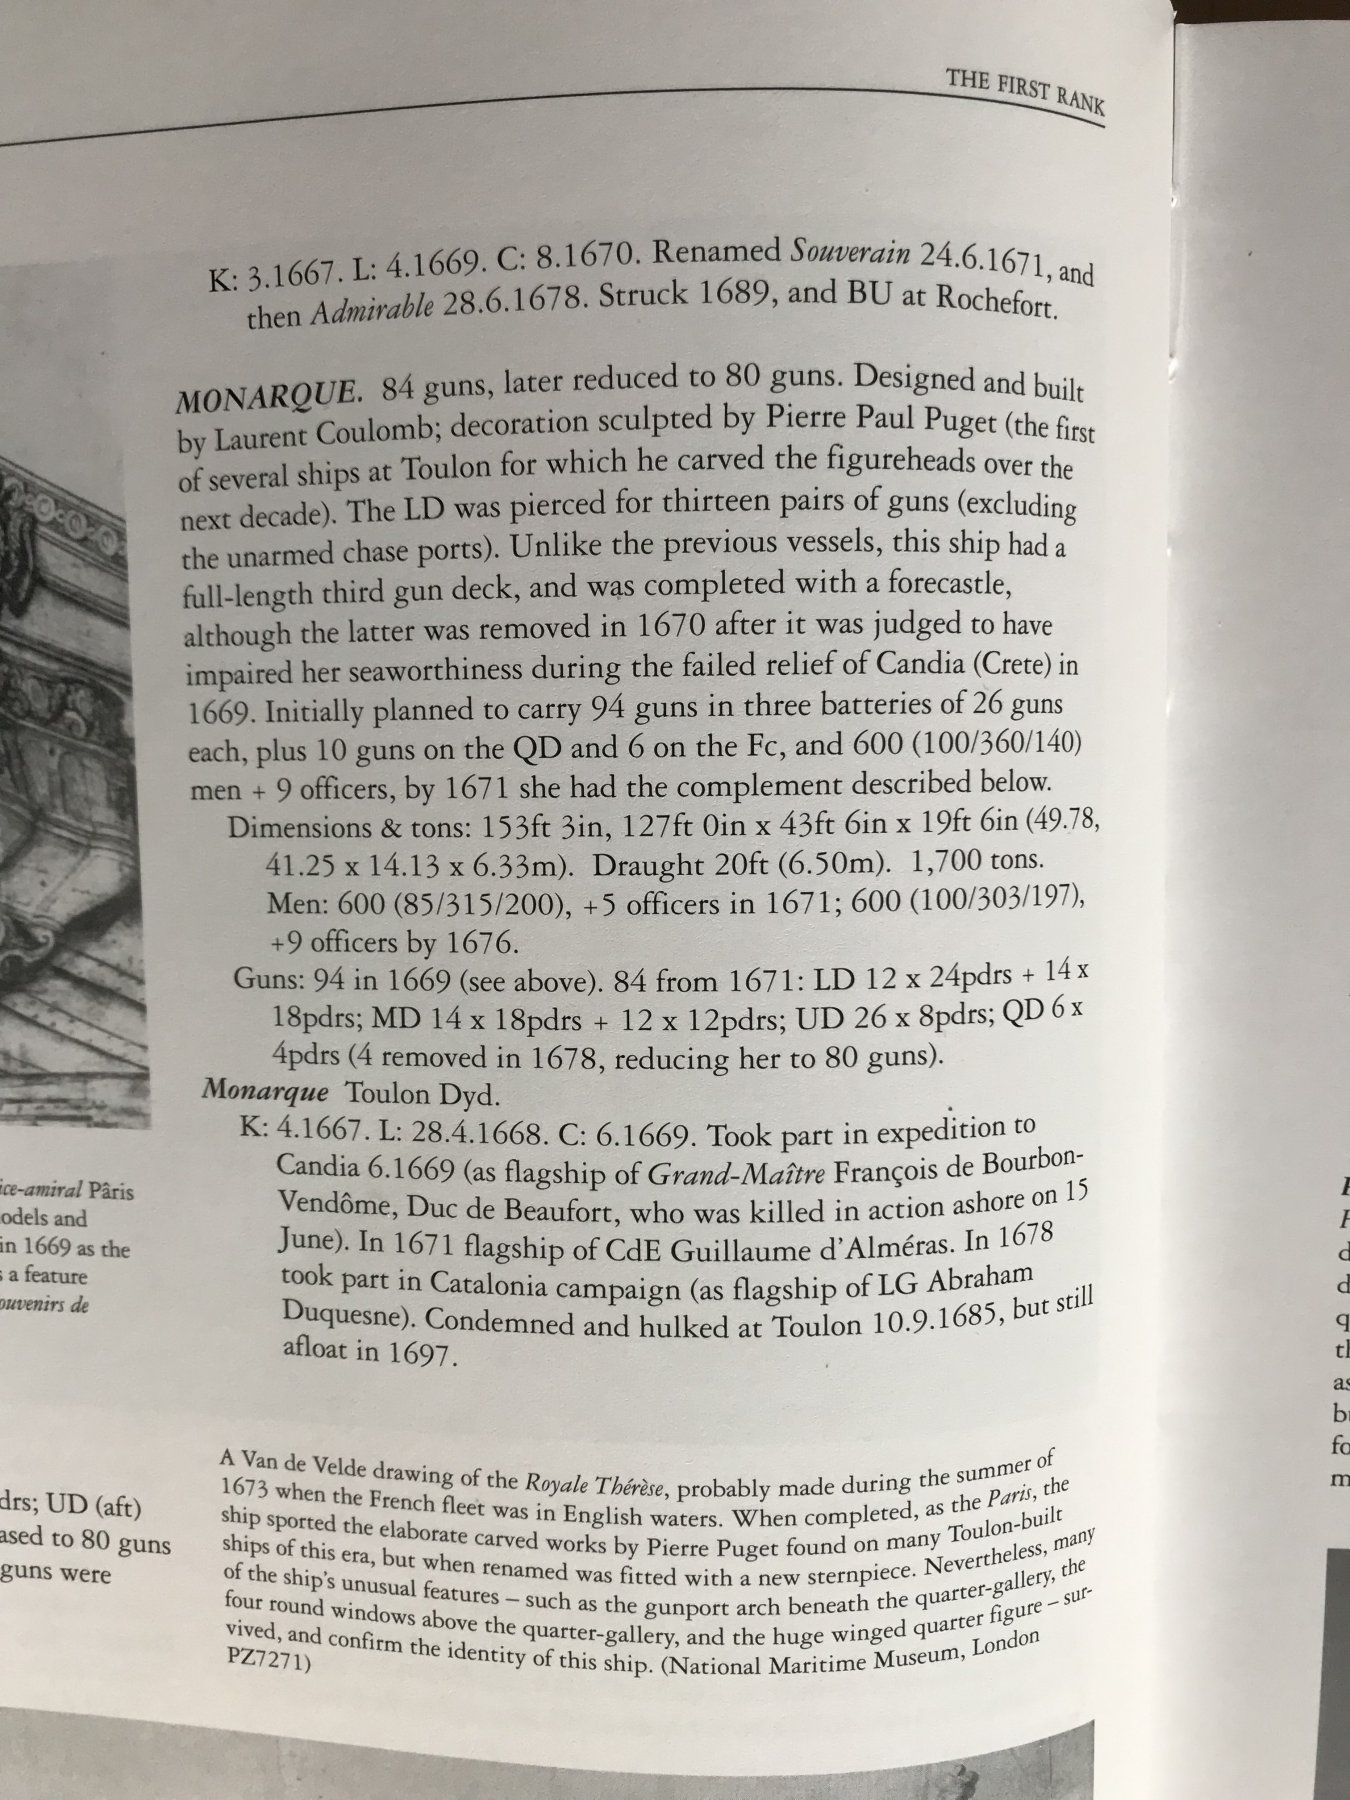
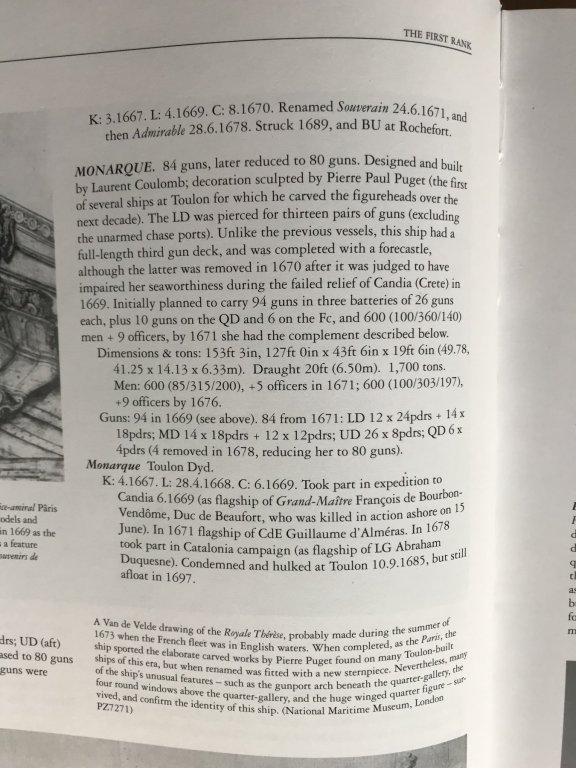
 Hi Mark! You know, it’s really confusing to me. The port broadside drawing of the Monarque has the foresail set, which partially covers the view of the forecastle, but it doesn’t seem outrageously high. Added to that fact is that there isn’t any artillery on that deck, and that’s where real weight would come into play. It isn’t as though she was a carrack, and I have no idea how those things remained upright on their keel. The one thing that can be said of the Monarque is that she had an especially high stern; the tafferal of this ship would have been something like 35 feet above the water! And all of that loaded with massive sculptural statuary - albeit “dug from within” to reduce weight, but it would seem more likely that the navigation problems with the Monarque owed more to her stern. The trouble is that I find the Winfield and Roberts book to be a particularly insightful and reliable source, so I have to assume that they know what they’re talking about, even if I do not understand it.
- 2,699 replies
-
- 4
-

-
- heller
- soleil royal
- (and 9 more)
-
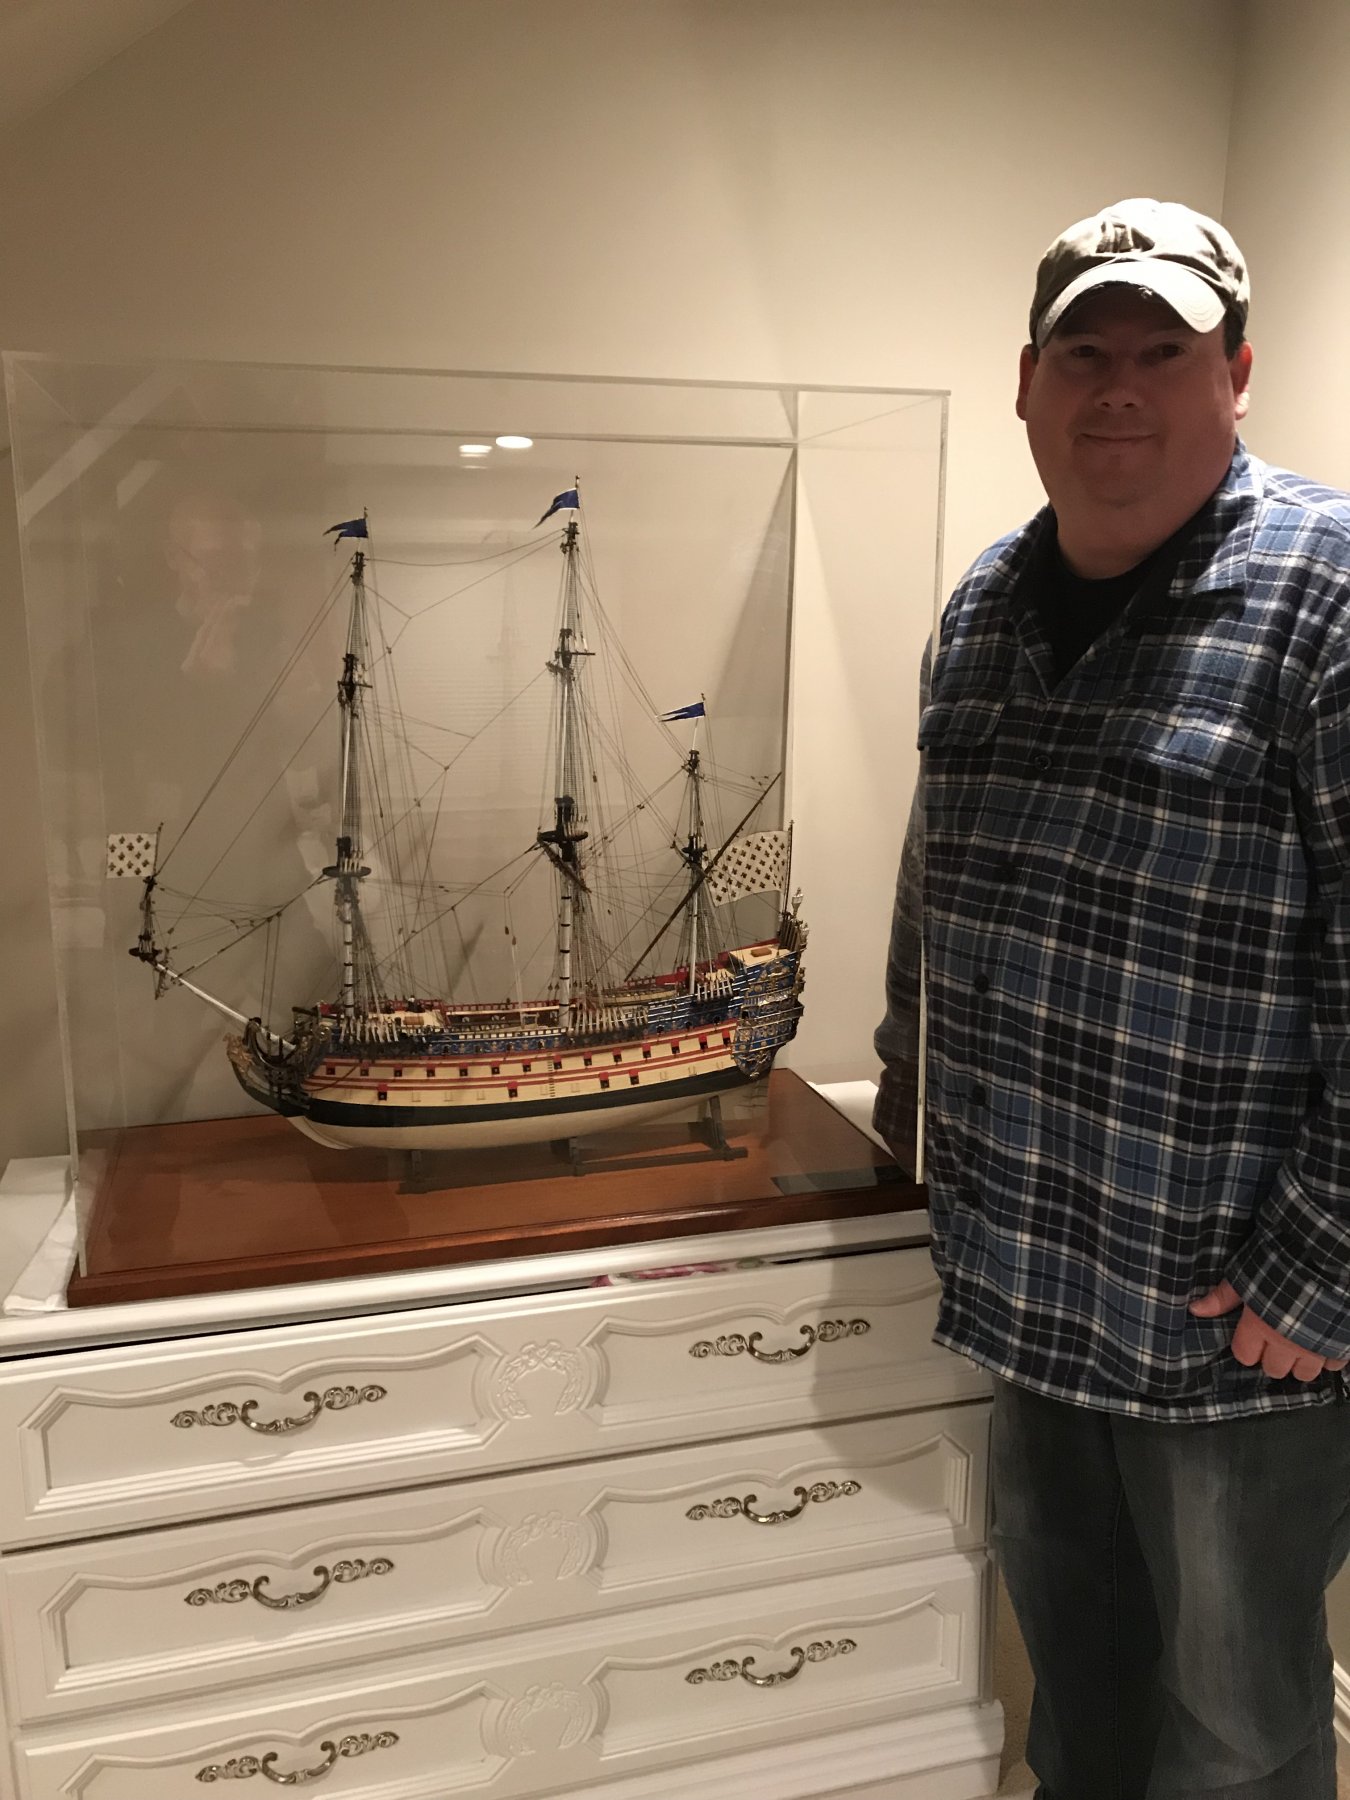
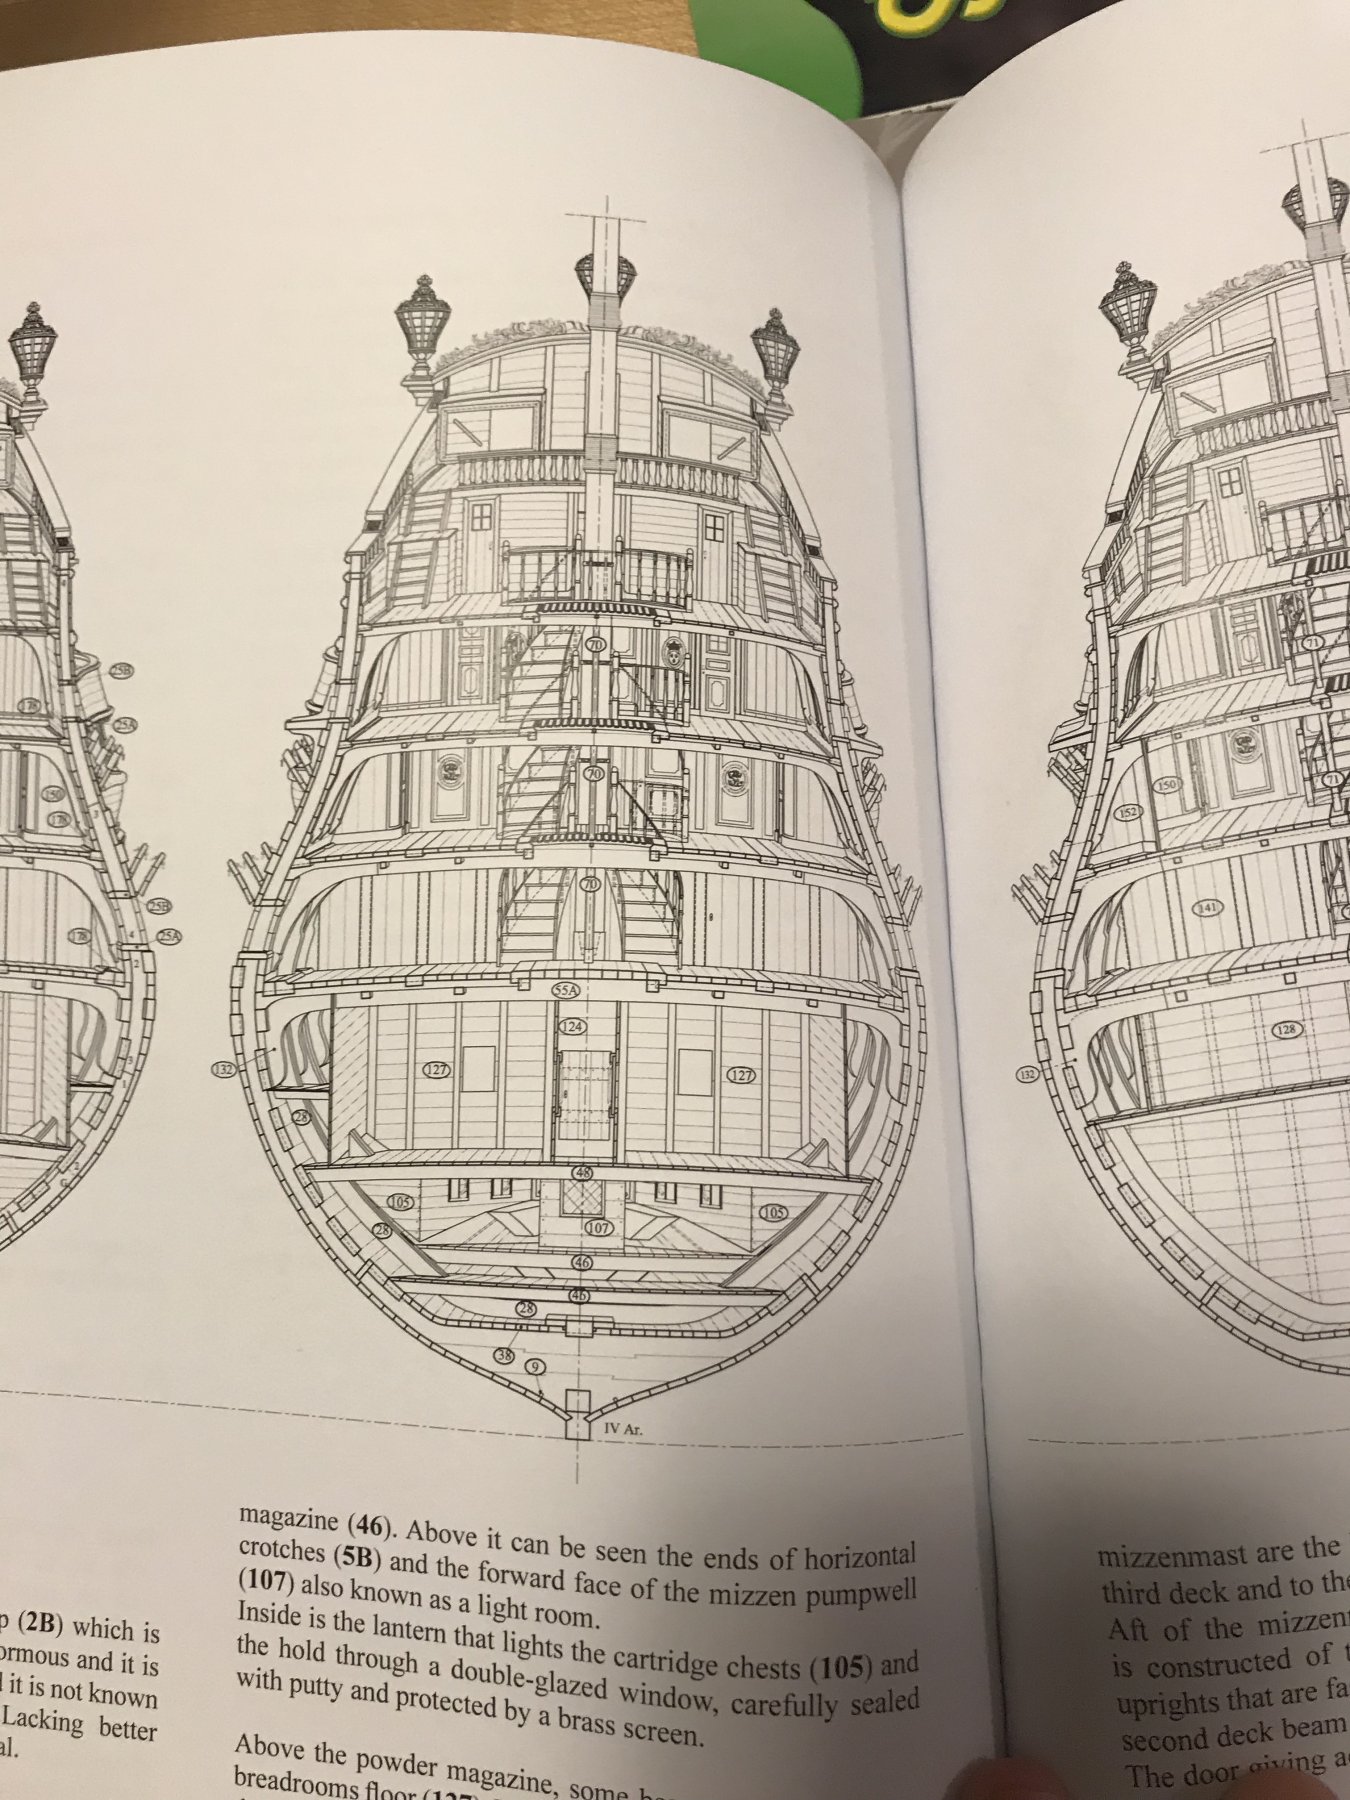
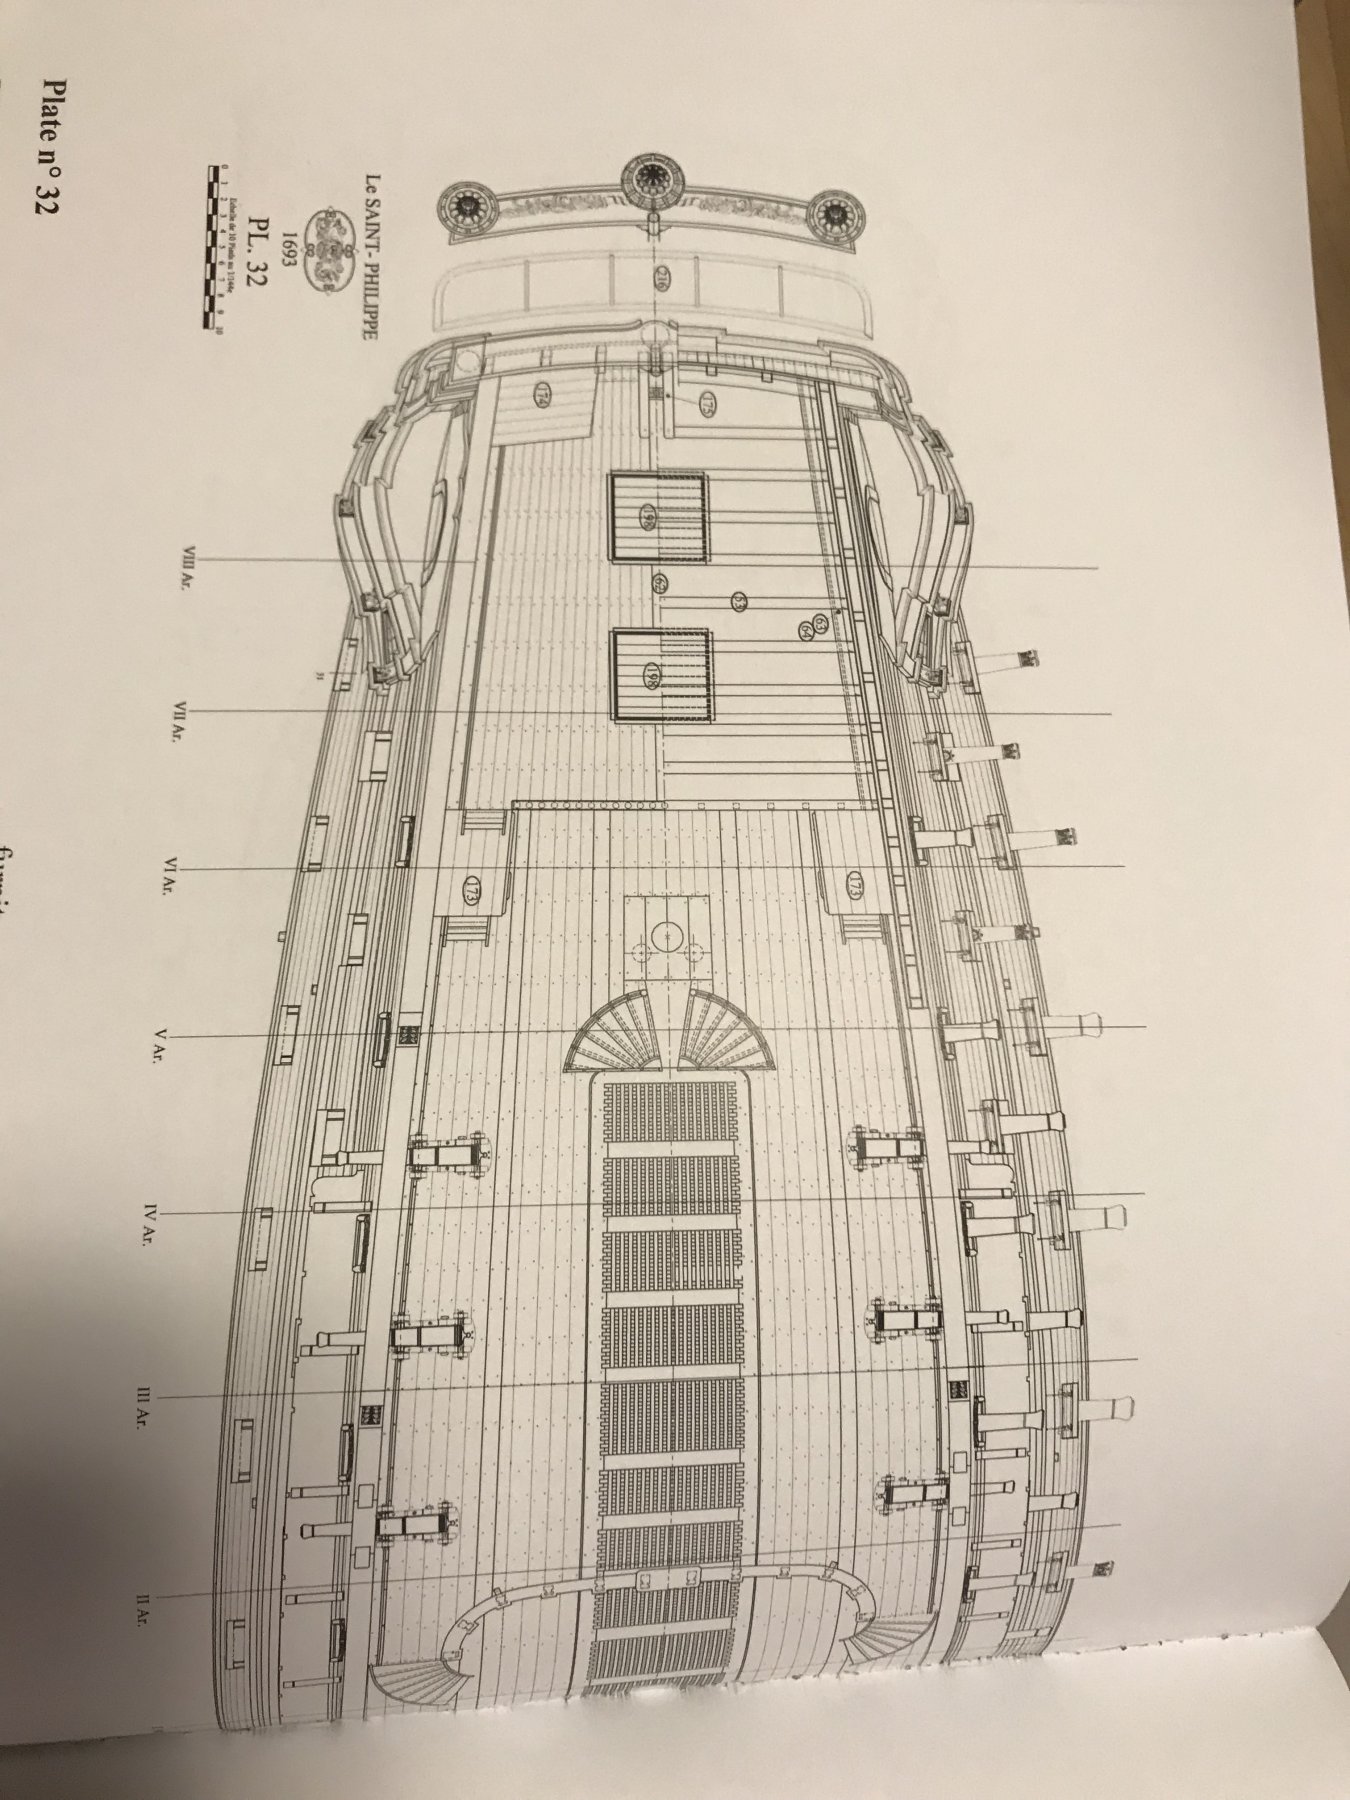
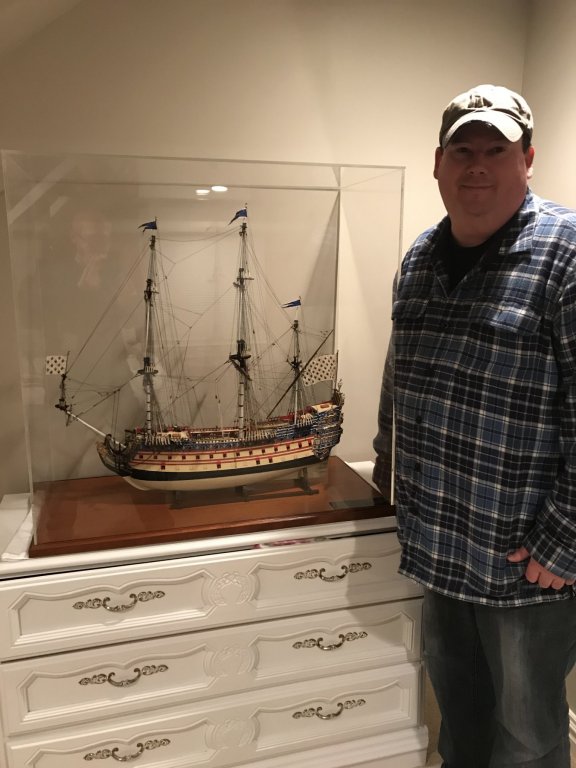
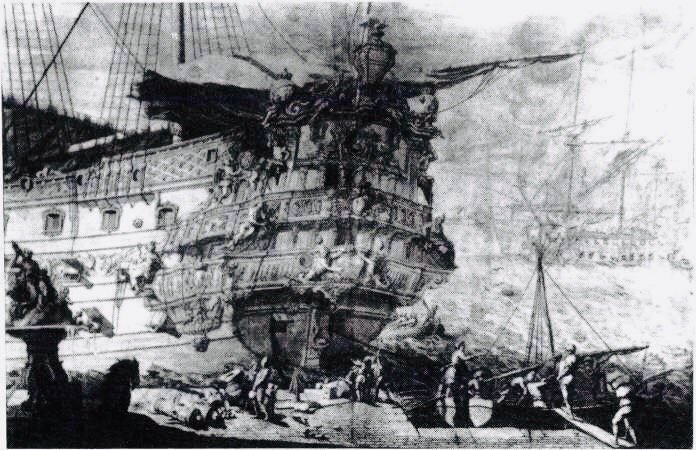
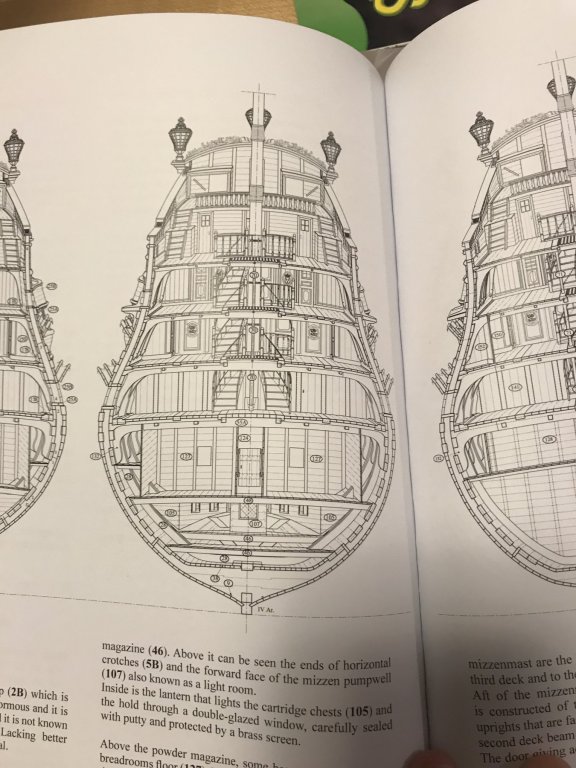
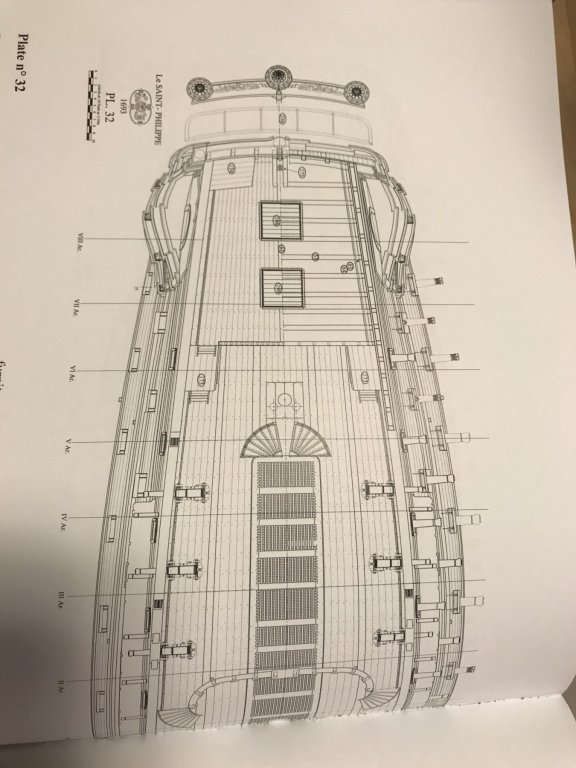
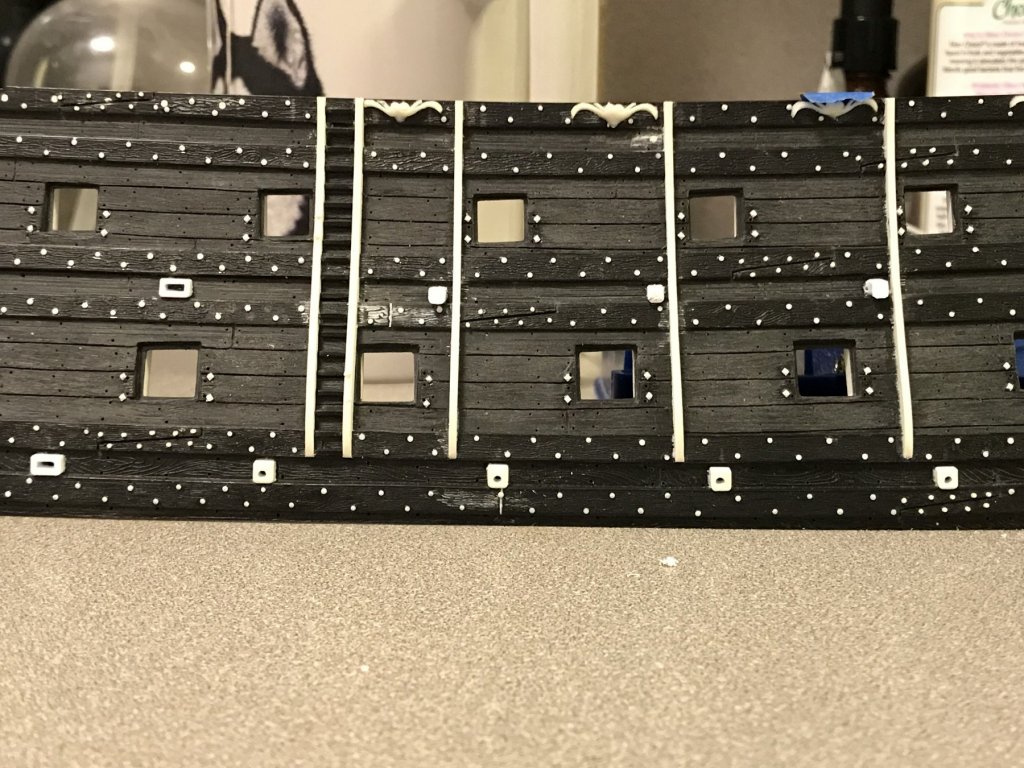
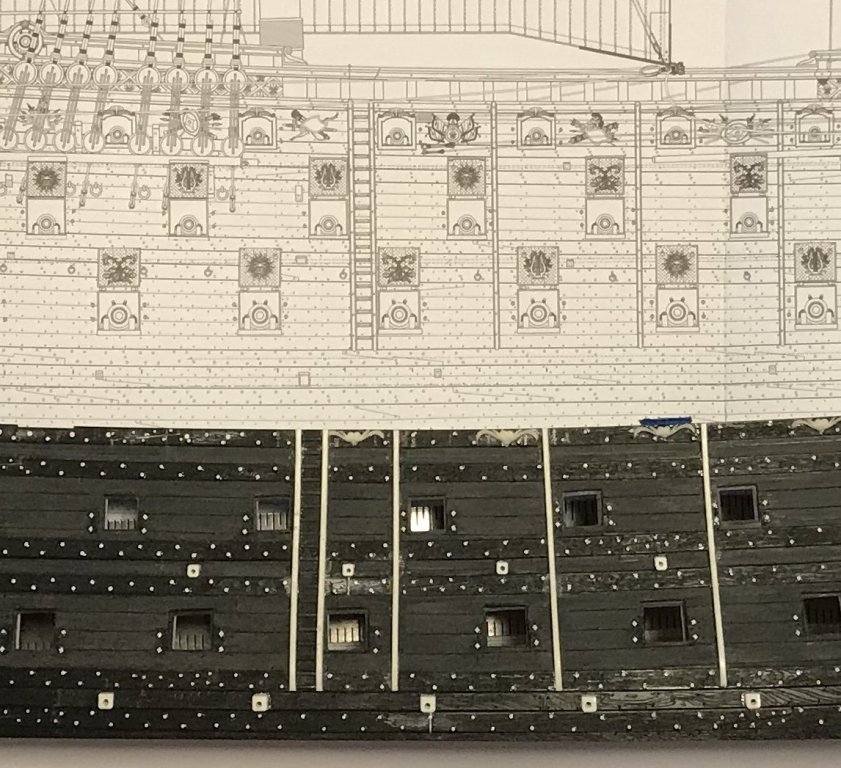
Well, today was a bitter/sweet day. After 37 years together, it was finally time to part ways with SR1. Santa gave me her for Christmas, when I was eight, and I worked on her off and on (mostly off in the teen years) for the next 16 years. And I’ve been moving her around with me from one New York apartment to the next, ever since. However, there can’t be two Soleil Royals at the next (smaller) apartment in Brooklyn, so today SR1 set sail for her new home in Westchester. My childhood buddy, Brian, always liked the model, and always joked that it’d be welcome in his home. So, now it is. Bon voyage, mon ami! Brian will take good care of you. My father reminded me, tonight, that the base and case for this model were made by the man who did all the model case work for the New York Yacht Club (in the roaring 90’s). The case is plexi, but the base is a nice sapele veneered plinth that looks as good today as it did 21 years ago. Although he is long retired, my father had interesting friends in all corners of New York. And now, Heinrich, I would like to say that I have to agree with your assessment that it does seem a “cheese-paring” exercise to essentially re-cycle ornamental allegories in this particular age of excess. And, yet, that does appear to be exactly what the French did with quite a number of the great first rates. Consider that the tafferal tableau for Le Royal Louis 1668, is remarkably similar to the conceptual Louis XIV model of 1693[?]. This is why I think there is plausibility to the theory that some of SR1’s original ornament was preserved and re-incorporated into Etienne Hubac’s re-construction of his father’s great ship. In fact, the French loved Berain’s adaptation of the original LeBrun/Puget allegory so much, that they re-created it almost exactly for SR2, in 1693. The quarter galleries change, and the upper bulwark frieze becomes significantly more restrained, but the ornamental elements have their origin in earlier designs. Moving onto the question of the scuppers. Initially, I had placed my scuppers at the lowest run of the sheer of wales, where structurally, they would intersect with the deck line. I spaced them evenly, on my drawing, without considering the port lids. When the St. Philippe monographie came, this comparison shot brought to my attention the fact that my scuppers were maybe positioned incorrectly, and that there should also be wider scuppers, in line with the pumps: The next picture of the St. Philippe illustrates the scuppers relative projection beyond the wales. Mine project, too, but not quite as much as these. In any case, it seemed counter-productive for there to be any impingement of the lid or impairment to the function of the scuppers As for the Monarque/Royal Louis debate, I’ve read enough source material to feel pretty confident that these were two distinct ships. Consider the synopses of Winfield and Roberts: Peter’s book, Puget et la Marine makes it pretty clear that work was happening on these two ships simultaneously. If anyone is interested, I would be happy to mail the full translation of Part 1. Just P’M me, and I’ll send it along. Chapman, I hope you will find that the Pheonix kit is suitable for your model - that would be an exciting project, indeed! Bon soir, mes amis!


- 2,699 replies
-
- 4
-
-
- heller
- soleil royal
- (and 9 more)
-
Well, today was a bitter/sweet day. After 37 years together, it was finally time to part ways with SR1. Santa gave me her for Christmas, when I was eight, and I worked on her off and on (mostly off in the teen years) for the next 16 years. And I’ve been moving her around with me from one New York apartment to the next, ever since. However, there can’t be two Soleil Royals at the next (smaller) apartment in Brooklyn, so today SR1 set sail for her new home in Westchester. My childhood buddy, Brian, always liked the model, and always joked that it’d be welcome in his home. So, now it is. Bon voyage, mon ami! Brian will take good care of you. My father reminded me, tonight, that the base and case for this model were made by the man who did all the model case work for the New York Yacht Club (in the roaring 90’s). The case is plexi, but the base is a nice sapele veneered plinth that looks as good today as it did 21 years ago. Although he is long retired, my father had interesting friends in all corners of New York. And now, Heinrich, I would like to say that I have to agree with your assessment that it does seem a “cheese-paring” exercise to essentially re-cycle ornamental allegories in this particular age of excess. And, yet, that does appear to be exactly what the French did with quite a number of the great first rates. Consider that the tafferal tableau for Le Royal Louis 1668, is remarkably similar to the conceptual Louis XIV model of 1693[?]. This is why I think there is plausibility to the theory that some of SR1’s original ornament was preserved and re-incorporated into Etienne Hubac’s re-construction of his father’s great ship. In fact, the French loved Berain’s adaptation of the original LeBrun/Puget allegory so much, that they re-created it almost exactly for SR2, in 1693. The quarter galleries change, and the upper bulwark frieze becomes significantly more restrained, but the ornamental elements have their origin in earlier designs. Moving onto the question of the scuppers. Initially, I had placed my scuppers at the lowest run of the sheer of wales, where structurally, they would intersect with the deck line. I spaced them evenly, on my drawing, without considering the port lids. When the St. Philippe monographie came, this comparison shot brought to my attention the fact that my scuppers were maybe positioned incorrectly, and that there should also be wider scuppers, in line with the pumps: The next picture of the St. Philippe illustrates the scuppers relative projection beyond the wales. Mine project, too, but not quite this far. Anyway, it seemed clearer to me that any projection would still be an impingement to the lid and/or the function of the scuppers: Lastly, with regard to the Monarque/Royal Louis debate - I have read through enough source material to feel confident that these were two distinct ships, each with their own service history. Consider Winfield and Robert’s synopses of the two ships: I would be happy to mail you, or anyone else that is interested, the full translation of Peter’s Puget et la Marine. It is clear, there, that work on both ships is happening simultaneously. Just P’M me and I’ll send it along. Chapman, I’m excited for your model of La Reine, and I hope that you will find the Pheonix kit suitable. Bon soir, mes amis.


- 2,699 replies
-
- 5
-
-
- heller
- soleil royal
- (and 9 more)
-
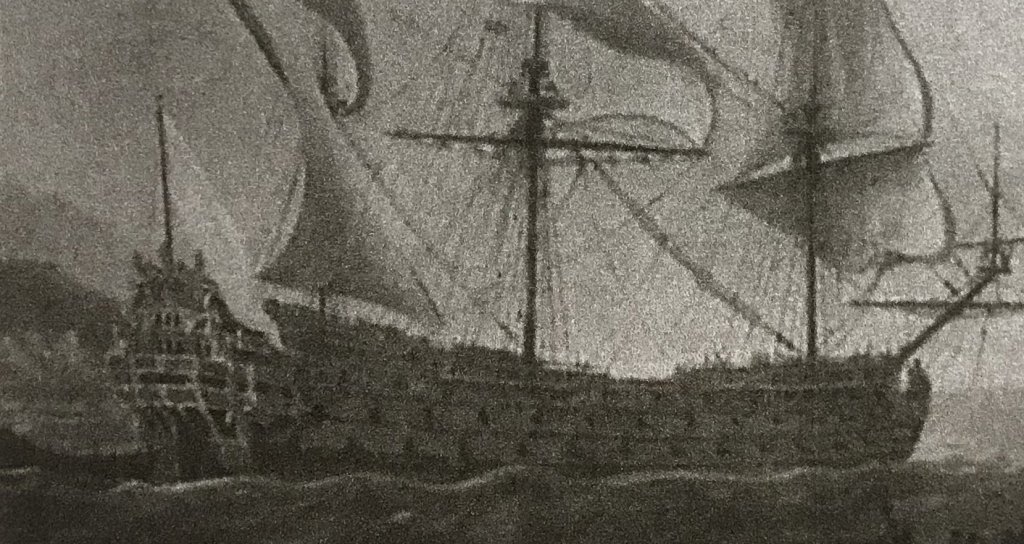
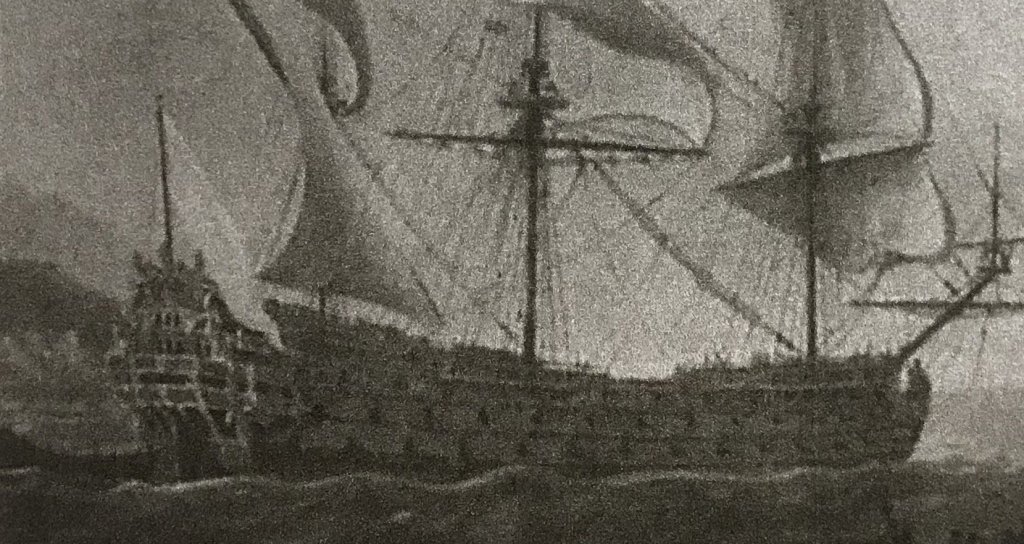
Last post for the day. So far, I have had zero success tracking down the two portraits that would help me the most, if I could just get a better image of them. Yesterday, it dawned on me that there may he an APP that could improve digital pixelation, and turns out - THERE IS!! It’s free, and it’s called DPI. Apparently, the maximum resolution you can achieve is 3,000 DPI. So, I decided to plug these two portraits into the app and see what happens. Before at 72 DPI: And after at 3,000: On my phone, these do not look really very different at all. However, I think my phone’s maximum display value is 1080 DPI. My 11-year old MAC, at home, is probably significantly less. Here is SR after 1689 [also a very low res snap]: Here she is at 3000/1080: Maybe just a little better. I wonder what these images would look like on a truly high resolution monitor. If anyone out there has one - please feel free to re-post their screen shots. Enjoy the weekend!


- 2,699 replies
-
- 1
-
-
- heller
- soleil royal
- (and 9 more)
-
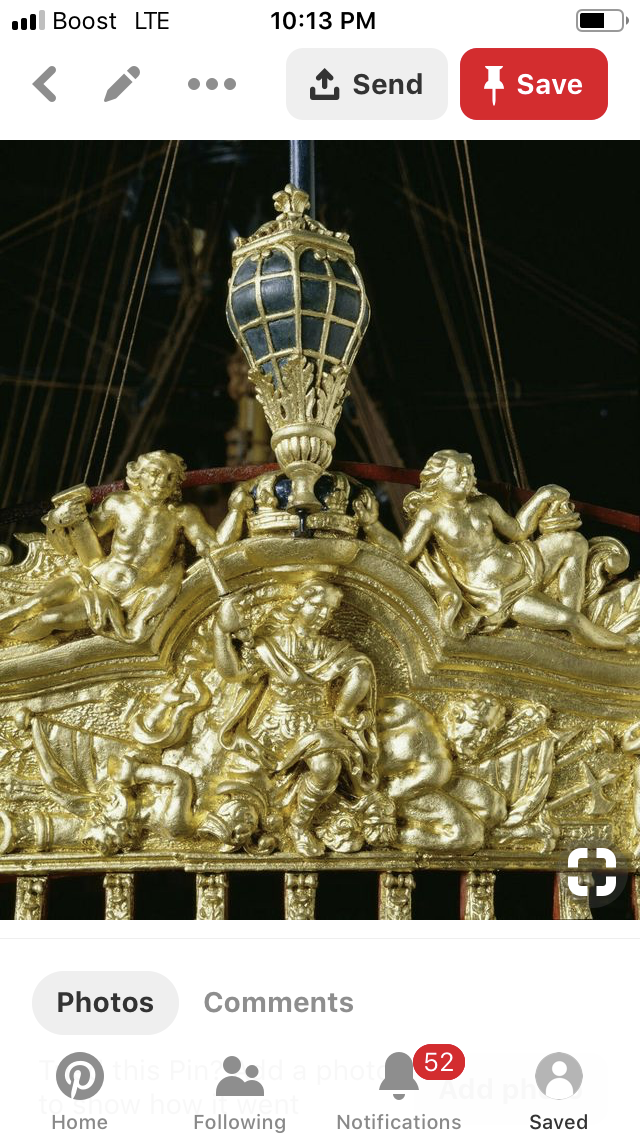
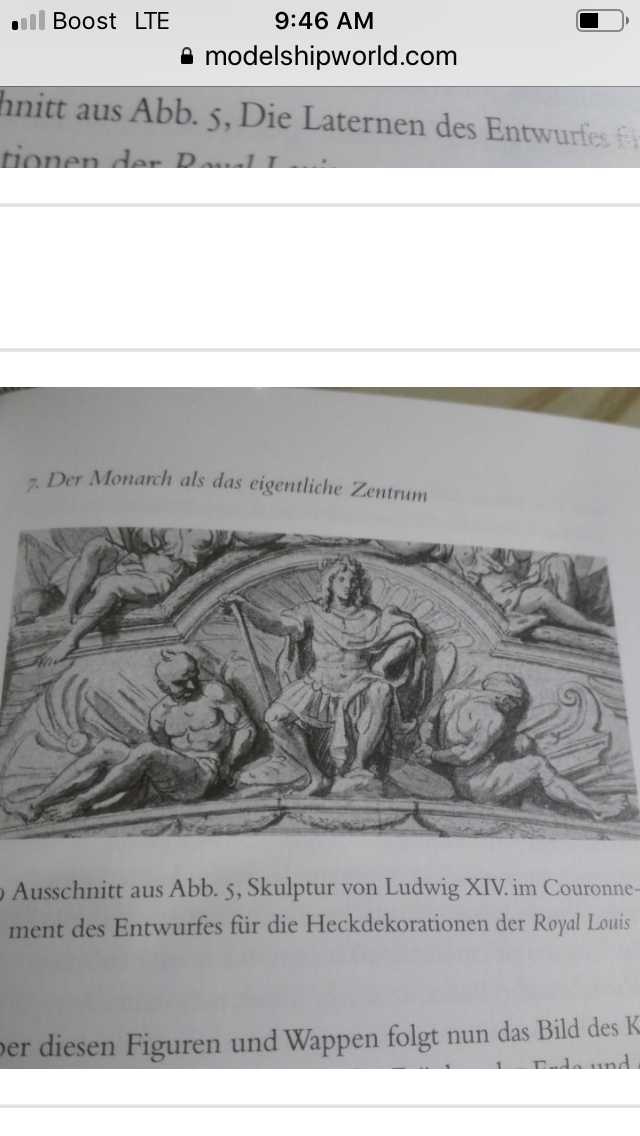
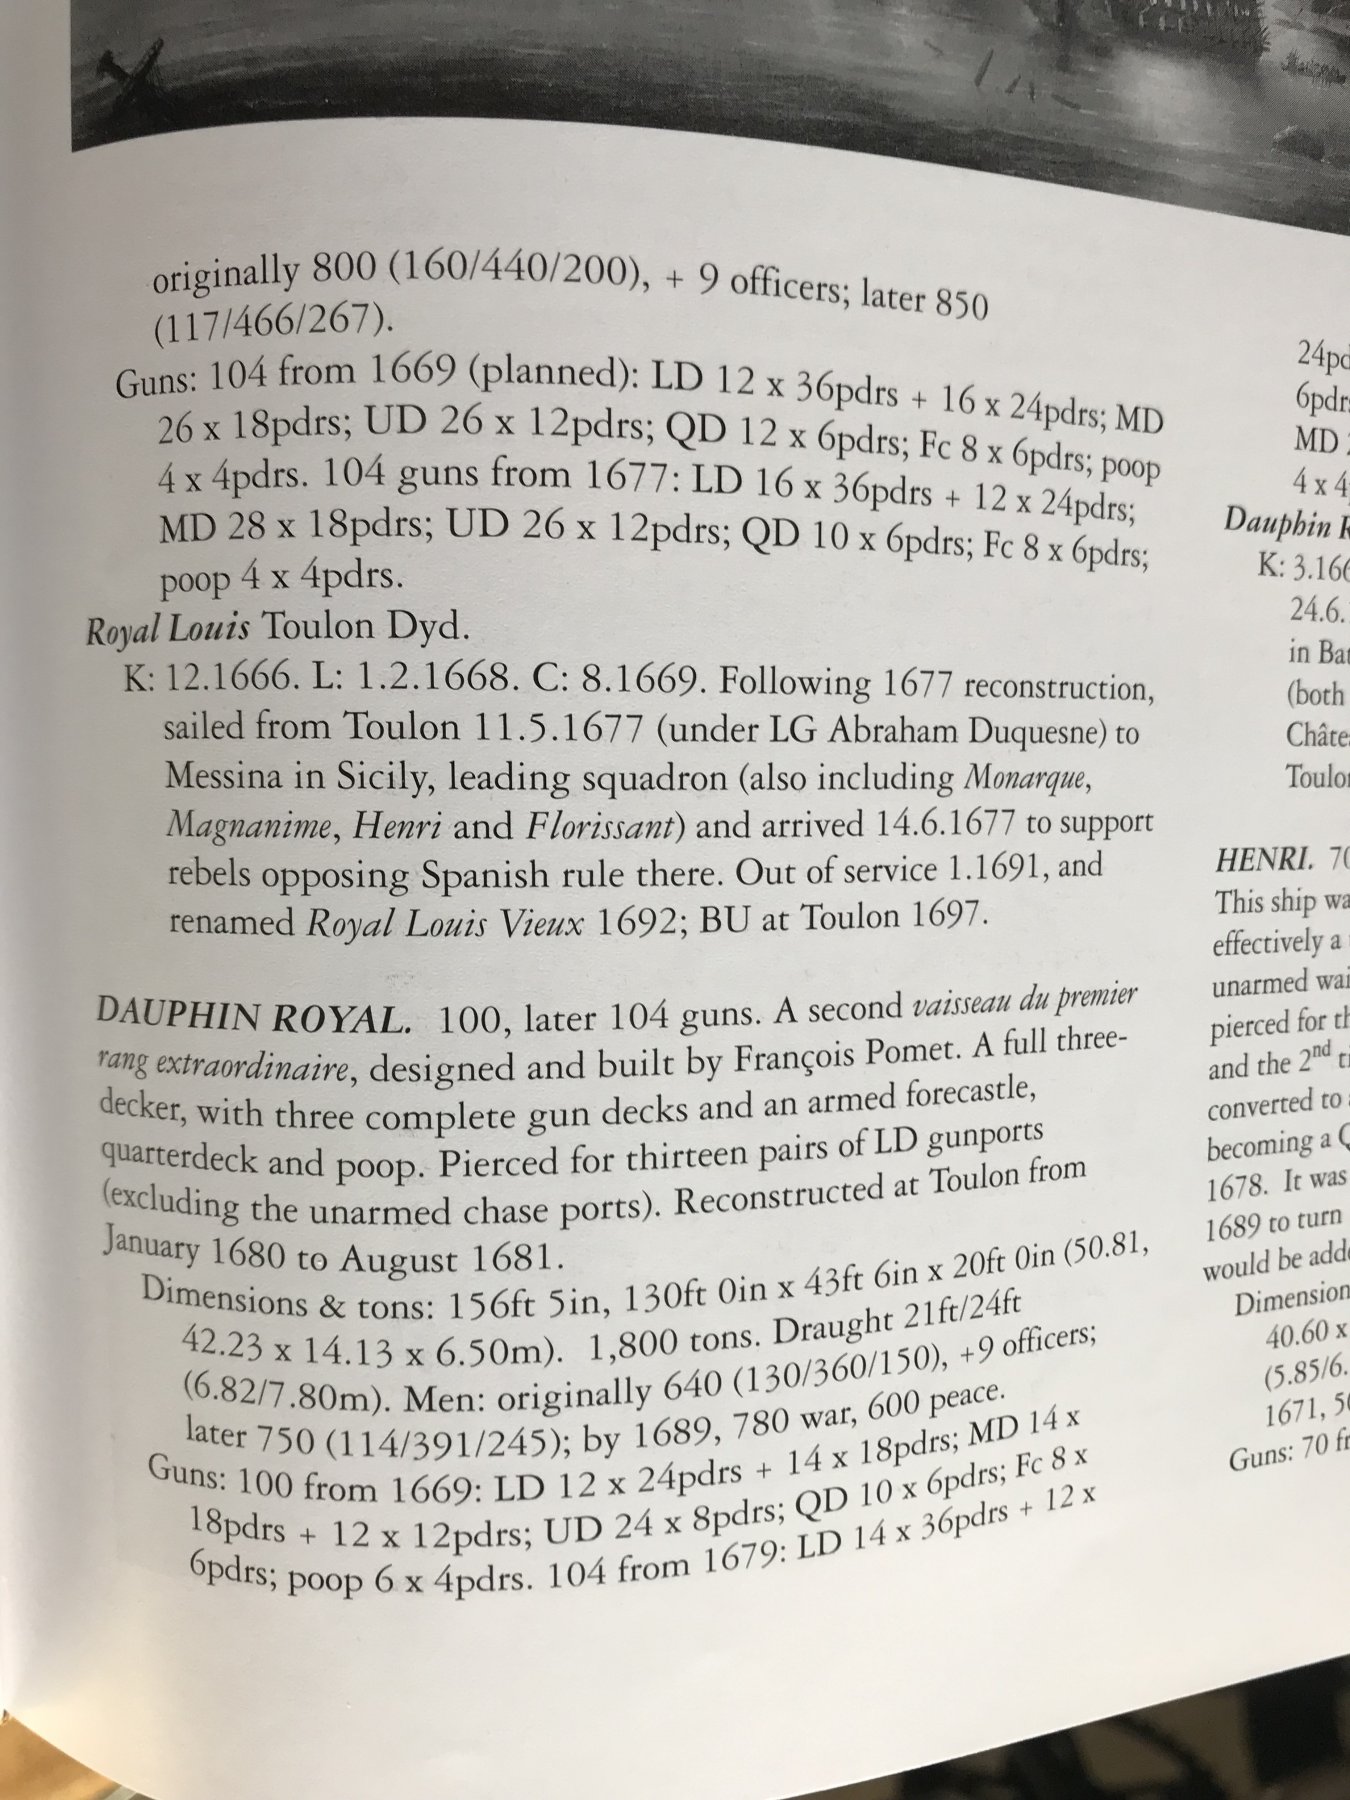
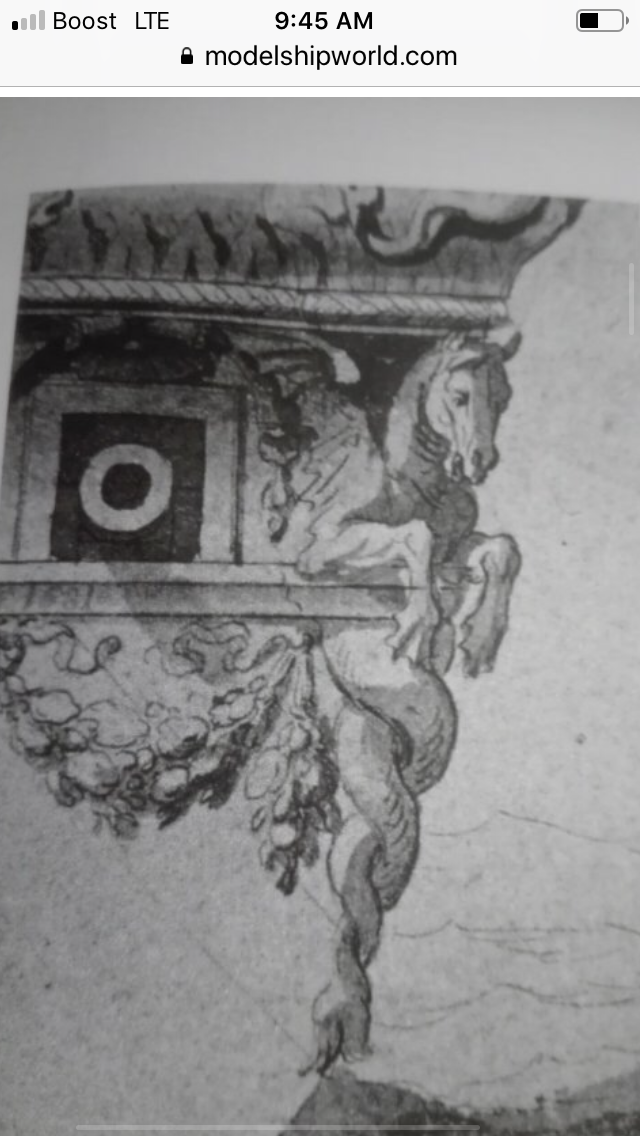
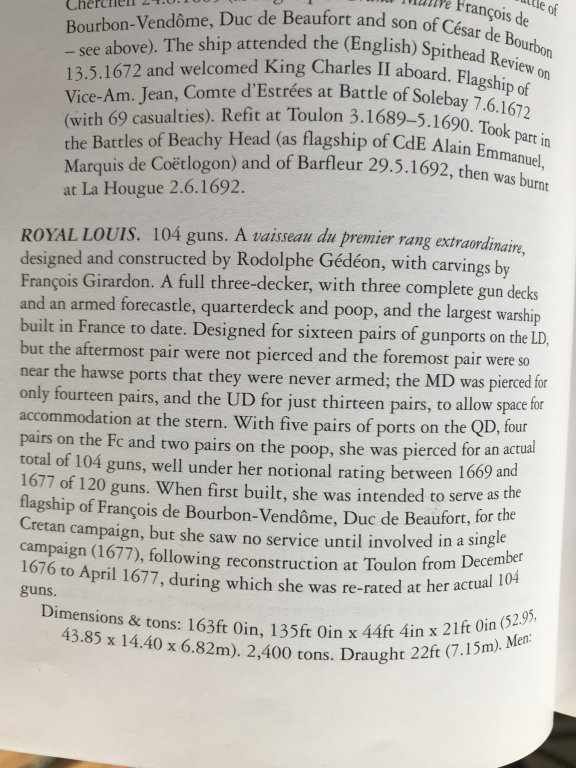
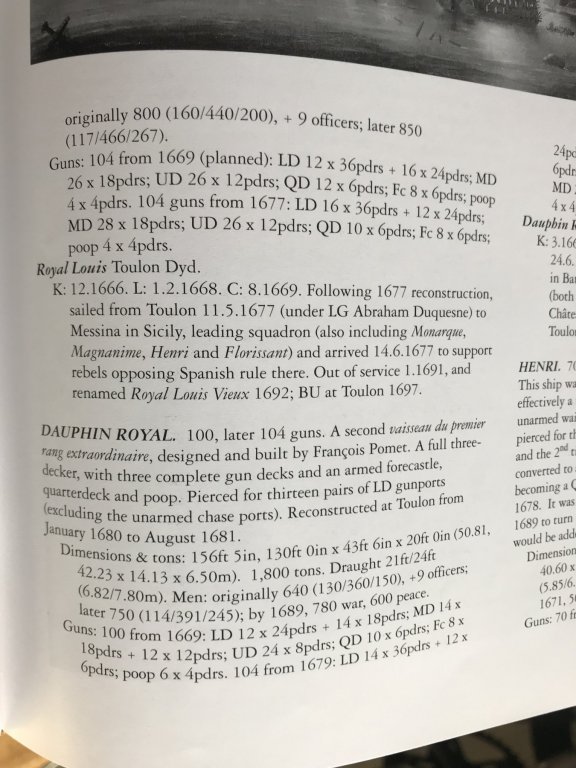
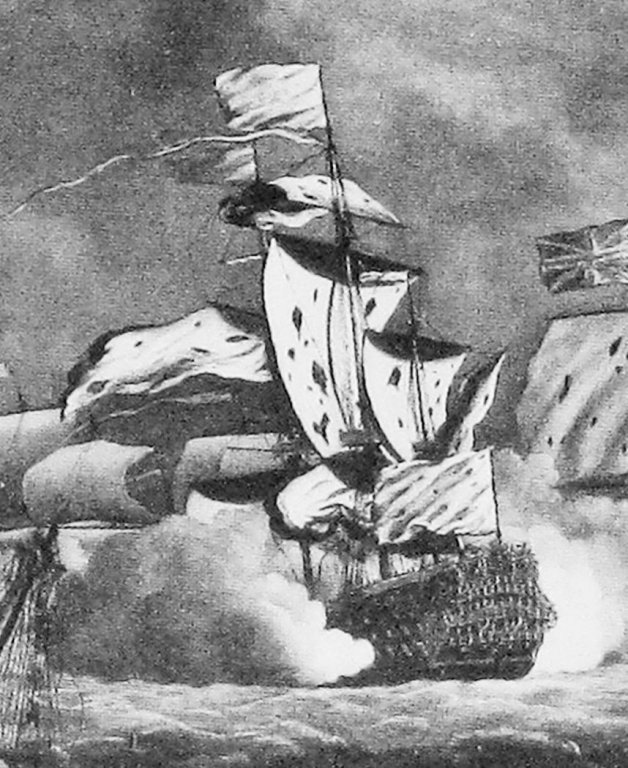
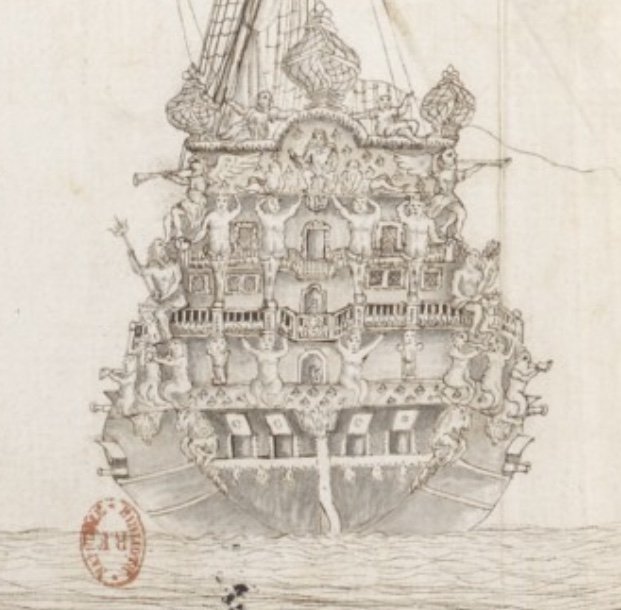
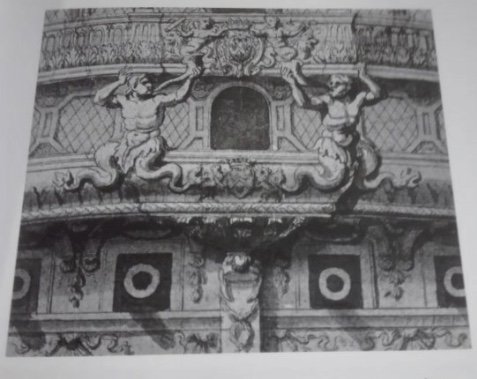
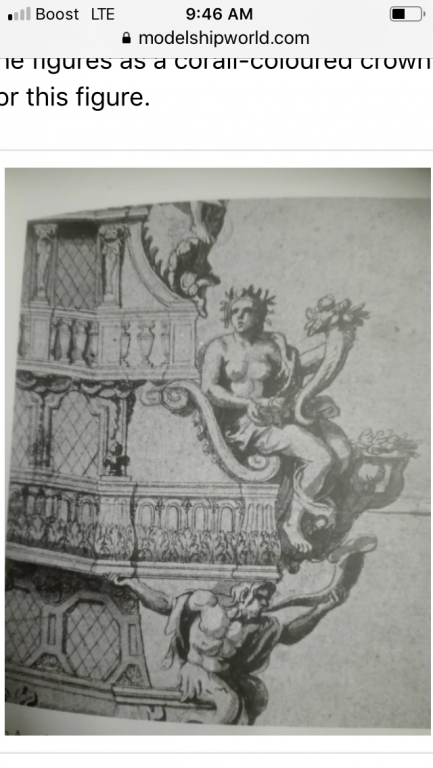
Now, with Victor Brun’s description of the Monarque in mind, let’s consider Pierre Arnoul’s [Intendant General of the Marine Levant] exacting description of the Royal Louis. This description is part of a much more expansive cataloging of the Royal louis, that includes measurements of almost everything, detailed descriptions of the interior, as well as the exterior. This original text exists in the GALLICA archives and is titled “Description du Vaisseau Le Royal Louis.” The title page is inscribed with the date MDCLXXVII: 1677. This text is also the origin of this primitive drawing, which is essentially what Arnoul is describing: Here is the title page: And here is the point at which Arnoul describes the exterior of the ship: Following is my translation. I have made [notes], where applicable in order to clarify differences in ship nomenclature: “The smooth dourdy [lower transom] is enriched outside laurel leaves with shells seashell on it, all of ore has perfection. Over there is a marine horse at each coast [side] and four large consoles that support the first baterie [lower stern balcony], above which there is a very beautiful cul de feu lamp [concealing the rudder head and stern post]. The first gallery, at the height of support is all dotted with fleurs-de-lys d'oreen [in gold], on which are affixed four sirens that serve as a support for the second gallery, and costez [along the side galleries] three tritons and two consoles with a frieze that runs all around, where are the arms of Monseigneur le Duc de Beaufort, supported also by two tritons holding an anchor with one hand; on the starboard side Neptune and Thetys [Tethys] on the left, with a babe at their feet, present[ing] in the divinity of the riches of the earth and the sea, which they then present to the figure of the king, who is in his throne of justice above the third gallery in relief and gold. as well as the whole stern, with a slave of each side and a cornice of gold which reigns all along the ship [sheer rail all in gold?], with trophies joining the said divinities. On each corner, from above, there is a renomee [fame] each holding a trumpet. On the second cornice at the coronation, which has the same effect as the other, are two affixed figures holding in their hands a crown of laurel on the head of the King, of one side, and on the other an olive branch. On the third floor [quarter deck level] there is a balcony, two feet high, where the king's arms are in a medal, on which there are four capitals, or four half-bodied figures, all of them representing the four parts of the world. All portals of ports [gunport lids] are adorned with fleurs-de-lis, figures of the King, lyres, and suns. All between the wales [from the quarter deck level to the sheer railing] there is a frieze in gold which reigns all along the ship, of fleurs-de-lis, also of gold. Between the ports of the second baterie there are trophies of the navy, all of them between lasses of peles [?indescipherable?] and anchors of the same. Those [ports] of the third gundeck are adorned with a frame of foliage with griffins on the sides, all of gold in perfection. At the highest wale [beneath the sheer rail at the poop deck level] there are consoles of space in space, with festoons between two, all in gold. The sides of the vessel with smooth are enriched with fleurs-de-lys golden with molures[?]. The whole mirror, in other words, the guardianship of the vessel is blue in color with golden fleur-de-lis [the stern/tafferal, I suppose]. THE BOW At the bow of the vessel there are two great escolats[?] two half-wives, whose bottom ends in foliage running along the precients. All precients [wales] of the bow are the same, with consoles from below the bows and florets gild space to space. The figurehead is a renowne [fame] holding the king's arms, with a little triton underneath, which has it to wear them, all of which is excellent. The crane carriers [cathead supports] are two big tritons of gold. At the face of the castle of Prou [beakhead bulkhead] there are two children in low relief of gold who carry one a laurel and the other a palm, are an escort or are the arms of the King. The whole bow is adorned, even the herpes [head rails] of fleur-de-lis and the figures of the King of the Golden Crown in perfection.” Here are what I believe to be the stern drawings for the Royal Louis, from Uber Den Wellen... The tableau presented on the tafferal, so far as I can tell, appears identical to the Monarque Here is where it gets interesting. Brun references Cybele, opposite Neptune for the Monarque. However, Arnoul speaks of Tethys, opposite Neptune. In Greek Mythology, Cybele is an earth mother/nature goddess, while Tethys is the sea goddess; daughter of Uranus and Gaea, who was married to her brother Oceanus. Here, on the lower stern balcony, can be found the greatest number of differences. First, the armes of Beaufort are clearly present on the lower stern balcony of the RL, but notably absent on the Monarque. The supporting corbels, beneath this gallery are also notably quite different; on the RL, they are notably less robust, and appear to have shell ornaments on the ceiling of the counter, between them. The other notable difference is the absense of the swagged garland below the stern chase ports, on the Monarque; yet, this detail is clearly observed by arnoul on the Royal Louis. The presence of these sea horses appears to be a common thread among the Monarque, the RL and early SR. Here’s the better of the two Monarque portraits for comparison: So, in summary, I believe that the ornamental scheme for both the Monarque and Royal Louis were so similar as to be nearly identical. This would not be surprising, if the RL’s first ornament were placed upon the Monarque to, perhaps, satisfy Beaufort. The other striking thing, to me though, is how much the exterior description of the RL mirrors the portrait of the Monarque. Nevertheless, his band of heraldic ornaments is something that can be found very clearly on a drawing of Le Dauphin Royal [which, if not the original ornamental scheme, may be a revised proposal for reduced ornament]: The other notable thing is just how much of the RL’s ornament appears to have actually been gilded; perhaps with these earliest flagships of the First Marine, truly no expense was spared! I’m not sure whether that would still be the case in, 1689, but as I have outlined before - I will make more sparing use of gold to highlight the ornaments, themselves, while using yellow ochre for the mouldings. This is all highly debatable, of course, but these are my theories.


- 2,699 replies
-
- 4
-
-
- heller
- soleil royal
- (and 9 more)
-
It is not clear to me from when this account by Victor Brun dates, but I suppose that it must be from before 1675, when the Monarque’s ornament was reduced. Victor Brun describes the Monarque: ”The King in Roman costume, having slaves at his feet, is on his throne between two Renomees [fames], holding the tunes [carrying trumpets] of his glory, they were the upper terms of the painting; other terms, even richer, represented Neptune and Cybele, paying tribute to Louis XIV: three magnificent galleries, supported by caryatids and tritons kissed the rear, and this beautiful tableau was framed by geniuses [winged angels to either side of the great lantern] which rose up to coronation, on the king’s head, and sea horses that seemed to swim in the sea. The front [bow, presumably] was an allegory representing Vigilance taming the Lion of Spain and Holland.” Mr. Peter notes: ”Masterpiece of naval decoration, the Monarque also represented the almost general model of which we will find simpler, less sumptuous variations, in several other drawings of the artist, among others the I’lle de France, the Scepter, the Royal Therese, the Fool, the Deceiver. Each of these ships shows a surprising wealth of invention, a variety in the choice of the arrangement of ornaments that give Puget’s fecundity the best proof. All of this was accompanied by statues full of fantasy, satyrs, dolphins, characters in time costumes, symbolic animals, trees, mythological figures, monkeys, masks, garlands” (Marcel Brion). Personally, it seems to me that the Monarque was, perhaps, Puget’s masterpiece, and like the suggestion of six ornamental models that represent the totallity of possibilities - the Monarque was maybe the single ship that embodied the largest sampling of his ouvre. That might explain why he was so proud of the ship that he created no fewer than two [and maybe three] highly detailed portraits of her.
- 2,699 replies
-
- 3
-
-
- heller
- soleil royal
- (and 9 more)
-
Hello, Chapman! That is awesome news about La Reine. Are you doing a complete scratch-build, and will there be a build-log for the project? So, to continue the timeline: July 18, 1669 - Colbert issues instructions to D’Infreville to limit Puget’s influence to a supervisory role in the workshops. September 1669 - Louis Matharel succeeds D’Infreville, and firmly adopts Colbert’s edict that the ornamentation shall be secondary to the ship’s sailing qualities End of May 1670 - Royal Louis ornamentation and painting complete. The implication, here, is that this concludes the second attempt at finishing the Royal Louis, and that the ornamental scheme very closely follows the illustration within the book, Uber Den Wellen Bin Ich Einzigarten - the German language exploration of the Royal Louis’s ornamental scheme. Although, I still think the cover art is Puget’s drawing of the Monarque, enlarged, the stern drawing, within [that is the actual subject of analysis] is amazingly detailed and displays all of the hallmarks of design that are noted in Arnoul’s eye-witness description; Arnoul and pics to follow. And so, for Chapman’s sake, I’d like to offer an apology for seeming too sure about something before I had really looked at it. Heinrich has sent me pictures from the book, and he will, at some point, forward a copy, which I will then read in detail, and “data-mine” as Heinrich puts it. The pictures, alone, though, seem confirmation enough of Arnoul’s description. But, I’m getting ahead of myself... July 10, 1670 - D’Infreville writes to Colbert to inform him of Puget’s proposal to create 5-6 models of sterns, which could then be broadly applied to the new ships being built at Toulon - mixing and matching figures, as dictated by the architecture and idea of the ship. This proposal by Puget signals his increasing dis-interest in the ornamental design of the King’s ships. They have hemmed him in so much, that he no longer aspires to complete creative control. What’s interesting to me, though, is that among the Monarch, the Royal Louis, and the portrait that I believe to be Soleil Royal, there is a certain commonality in the structure and arrangement of the stern balconies and quarters. In all three, there are these marine horse figures supporting the lower stern balcony. And it appears that SR, like the Monarque and RL, also appears to have the split-tailed triton figures supporting the main deck quarter gallery and stern balcony. Maybe I just want it to be so, but it seems plausible, even if the photo is too grainy to reliably read for detail. Throughout Peter’s research, there is not one mention made about Puget’s collaboration or involvement with LeBrun for the design of Soleil Royal. This does not mean, of course, that he wasn’t. If he were, though, it is not discussed, and it seems that he was not really present at Brest, during this timeframe. Perhaps, though, these Puget models actually were created, and they helped inform LeBrun’s ornamental scheme for Soleil Royal. I have no answers, here, only questions. What can be factually ascertained is that the famous Berain drawing of Soleil Royal’s refit stern design is inscribed, across its top, with the following: “Apres Pierre Puget”. I will have to check again, though, to be sure that it doesn’t say “Par Pierre Puget,” which would mean something else. “Apres” would suggest “after,” or “in the style of” Pierre Puget. So, I personally believe Puget influenced LeBrun’s design; however directly, I can not say - yet there do appear to be certain Puget hallmarks that Berain retains into the new design; principal among them, the large full-figure sculptures of The Americas, Europe, the Orient and Africa. Now, to conclude Peter’s timeline: January 16, 1672 - Colbert reminds Matharel that Puget’s drawings must always be submitted, first, to the construction council, before work can proceed. Sept 13, 1672 - Puget completely disengages and the King decrees that sterns will no longer carry figures in full relief. Between 1672 and his dismissal from Toulon in January of 1679, Puget undertakes several large commissions for marble staruary, for the gardens at Versailles. Chief among these works are his figures of Milo, Perseus and Andromede. In the next post, I will give Victor Brun’s eyewitness account of the Monarque. To be continued...
- 2,699 replies
-
- 2
-
-
- heller
- soleil royal
- (and 9 more)
-
To begin with, let’s go through a timeline of events, per Jean Peter’s research: 1660-1667 - Puget is primarily in Genoa, where he carved the statues of the Blessed Alessandro Sauli, as well as Saint Sebastian for the basilica of Cargnan. July 18, 1667 - Puget issues his 11-demand list of requirements for employment at Toulon, via D’Infreville. January 30, 1668 - Puget (aged 45 years), meets with LeBrun and Girardon in Paris. Subsequently, Colbert agrees to bring Puget to Toulon. According to Mr. Peter - even before Puget’s arrival at Toulon, there was much in-fighting among the 34, or so, sculpters and artists employed by the arsenal. The hope of Colbert and D’Infreville was that Puget’s artistic credibility would lend oversight and organisation to the proceedings at Toulon. June 19, 1668 - Assignment for design of the ornament for Le Dauphin Royal and Le Monarque awaits Puget, upon his recovery from illness in Genoa. July 8, 1668 - Puget arrives in Toulon where he sees the carved work that is underway for the Royal Louis, as designed by LeBrun and Girardon. End of July, 1668 - Puget at work designing ornamental sketches for the I’le de France and Le Paris December 11, 1668 - Girardon completes decoration of the Royal Louis, and is busily making a wax model for the Dauphin Royal. It is not explicitly stated, but implied by Mr. Peter, that this wax model is derived from Puget’s design for the DR. If so, this would be quite remarkable, if Puget were to arrive in Toulon on July 8th, and complete the DR’s ornamental scheme in less than a month, before moving on to the I’le De France and Paris. Perhaps it is more likely, as Tony Devroude notes in his two-part NRG article on the design of the DR, that Girardon was solely, or primarily, responsible for the DR’s ornamentation. Personally, I have not dug deeply enough to have an opinion on that, one way or the other. January 1669 - Workshop painters and guilders complete the finish work to the Royal Louis’s ornament. End of February 1669 - all sculpters are busily carving ornament for the Monarque. Again, it is implied that Puget designed the Monarque’s ornamentation, in addition to both the I’le de France and one of his best known ships, Le Paris - later to be re-named and re-decorated as Le Royal Therese; this is simply an astounding pace of work! End of May 1669 - the Monarque nears completion, and the Duke of Beaufort makes the following observation: “The Monarque has almost all his sculpture in his place and already much gilding, he will not be ashamed of the king, if he had had the leisure, Puget would have done wonders. His entitlement [translation of “entetement” unclear], he deserves to be in Paris like Girardon.” End of June 1669 - Puget returns to Toulon, from Genoa, to discover that Tureau and Rombaud had taken [unclear whether it was some or all] the ornament from the previously completed Royal Louis, and placed it on the Monarque, which had subsequently served as the flagship of the Duke de Beaufort. This caused quite a great deal of conflict between Puget and Tureau/Rombaud. It is this switching out of the Monarque’s ornament, in my opinion, that creates the confusion between the RL and the Monarque. Because of the number and arrangement of the guns in the portraits I have noted to be the Monarque, I believe those portraits really do represent the Monarque, at this earliest stage of her career, under command of Beaufort, and before her forecastle is cut down. Why the presence of her forecastle “hinders navigation,” as noted by others - and must be removed - I can not say. Frankly, that part of the narrative makes no sense to me. Likewise, I will later illustrate that what I truly believe is actually the ornamental sketch for the stern of the Royal Louis, specifically includes the family armes for the Duke de Beaufort. Yet, why those arms do not appear to have also been transferred to the Monarque for service under Beaufort’s command - I can not say. It is clear, though, that they are missing from the lower stern balcony in both Monarque drawings attributed to Puget. Those drawings are sufficiently clear to see both the armes of Louis XIV, and the armes of France, in the two stern balconies above. Perhaps the omission of the Duke de Beaufort’s armes is Puget’s revenge for swapping out his ornamental scheme. Or, perhaps, those drawings of the Monarque were done before the swap, and instead reflect the tremendous similarity between the two ships. I think it is more likely the latter and will show why in my next post. For today, though, I have run out of time. To be continued...
- 2,699 replies
-
- 3
-
-
- heller
- soleil royal
- (and 9 more)
-
First up is Puget et la Marine, Utopie ou Modele? By Jean Peter This book examines the career of Pierre Puget as an artist and designer; first, as a sculpter of marble reliefs and statuary, in Genoa, where he earned his renown, and then, his subsequent career as a designer and overseer of the arsenal carving workshops at Toulon. The second half of the book focuses on his architectural involvement with the designing of the arsenals, themselves, but I did not include that in my research. The character study of Puget that Mr. Peter establishes fairly early-on is one of a man that is absolutely self-assured of his artistic creative genius, as well as Puget’s desire to spread his influence as far and wide as possible - all with a nearly intractible will to do as he sees fit, despite the objections, whether they be reasonable or motivated by jealousy, of others. Colbert was persuaded to recruit Puget to the workshops at Toulon, on the strength of his marble work in Genoa. Work in marble being his medium of passion, Puget made it clear that it would take quite a lot to draw him into the service of the King. Via the intendant at Toulon, D’Infreville, Puget issued a list of requirements for his employment that, essentially, consituted 11 demands. The demand that best underscores what will inform the essential conflict between Puget and the Arsenal of Toulon, as well as Colbert, is the following: 8. “That the officers will have nothing to say, if I make work in my workshop in marble and bronze.” You see, in his heart and mind Puget was, first and foremost a sculpter of fantastic and large-scale marble statuary. In the picture that Mr. Peter paints of Puget, one gets a strong sense that decorating the King’s ships was kind of an inconvenient side-gig that was taking him away from Genoa, to where he would often return, for stretches, during his employment at Toulon. Therefore, if Puget was going to decorate the King’s ships, he was determined to do it in as grand-scale and sculptural a fashion, as only Puget could. It was only a short while, though, before D’Infreville, and later Louis Matharel, were complaining to Colbert about the overburdening ornament of Puget’s designs - beautiful though they were - that were spoiling the navigation of these great machines of war. The intendants at Toulon were, thus, constantly engaged in a slow (and, eventually successful) struggle to reign-in the intransigent Puget. The great value, to me, in Mr. Peter’s book is that it provides what I find to be a reliable timeline of correspondance between Toulon and Colbert, which illustrates Puget’s involvement in designing the Monarque, as well as the relative completion dates of the two vessels. After translating this book, it has become much clearer to me, why there is so much confusion between the two. Later, when I post Intendant General (de Levant) Arnoul’s highly detailed description of the Royal Louis, the reasons for that confusion will become even more clear. ... more to follow
- 2,699 replies
-
- 1
-
-
- heller
- soleil royal
- (and 9 more)
-
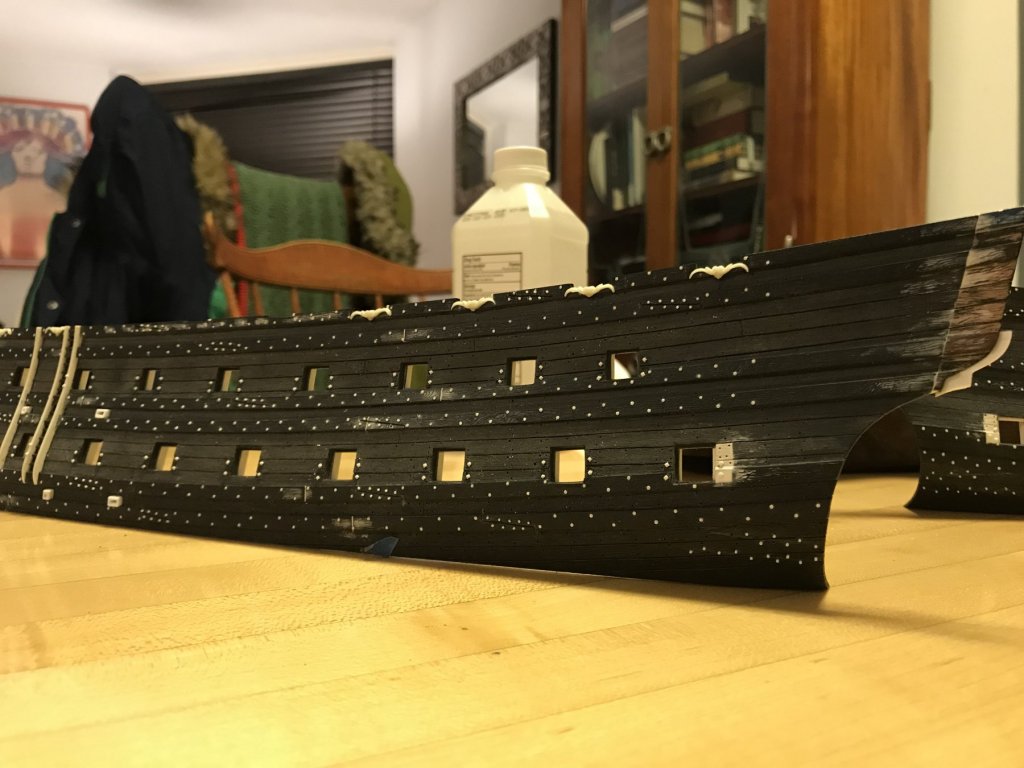
Well, all scuppers are now properly positioned, and I’ve created gusset patterns for re-enforcing the hull below the lower gun deck. I’ve repaired any damage, cleaned the shells, and begun my paint protocol. Unfortunately there isn’t much to show for that, at the moment. I have, however, been quite busily researching the ornamental differences between the Monarque and the Royal Louis of 1668. I have come to a few conclusions about that. Now, some of you may be wondering: if he’s building a representation of SR from 1689, then why is he so obsessed with these two other ships from 20 years prior? This is a reasonable question, and the answer is two-fold: First, understanding the defining characteristics of the early First Marine - being able to put that into a decade to decade context - helps me to make sense of the ways in which ship architecture would have evolved over that 20-year span. This, in turn, also enables me to make better educated guesses as to which details to include (for 1689), and how to represent them. The other benefit of this research is that I can return to it, in the future, when I attempt to do a truly forensic re-construction of what SR may have looked like in her original incarnation. By the day, my conviction that the Monarque and Royal Louis are essentially blueprints for that endeavor, grows stronger. And so, towards that end, I have undertaken two rather lengthy transcriptions (both of which required manual data entry into Google Translate) of two French language texts on the subject; one is a modern academic study, while the other is a first-hand, eye-witness account of the subject. Even by my standards, this is going to be a lengthy discussion, so I will break it up into a series of posts. This is all just information that you are free to ignore or use to your own advantage 😉. I hope that you will find it interesting
- 2,699 replies
-
- 2
-
-
- heller
- soleil royal
- (and 9 more)
-
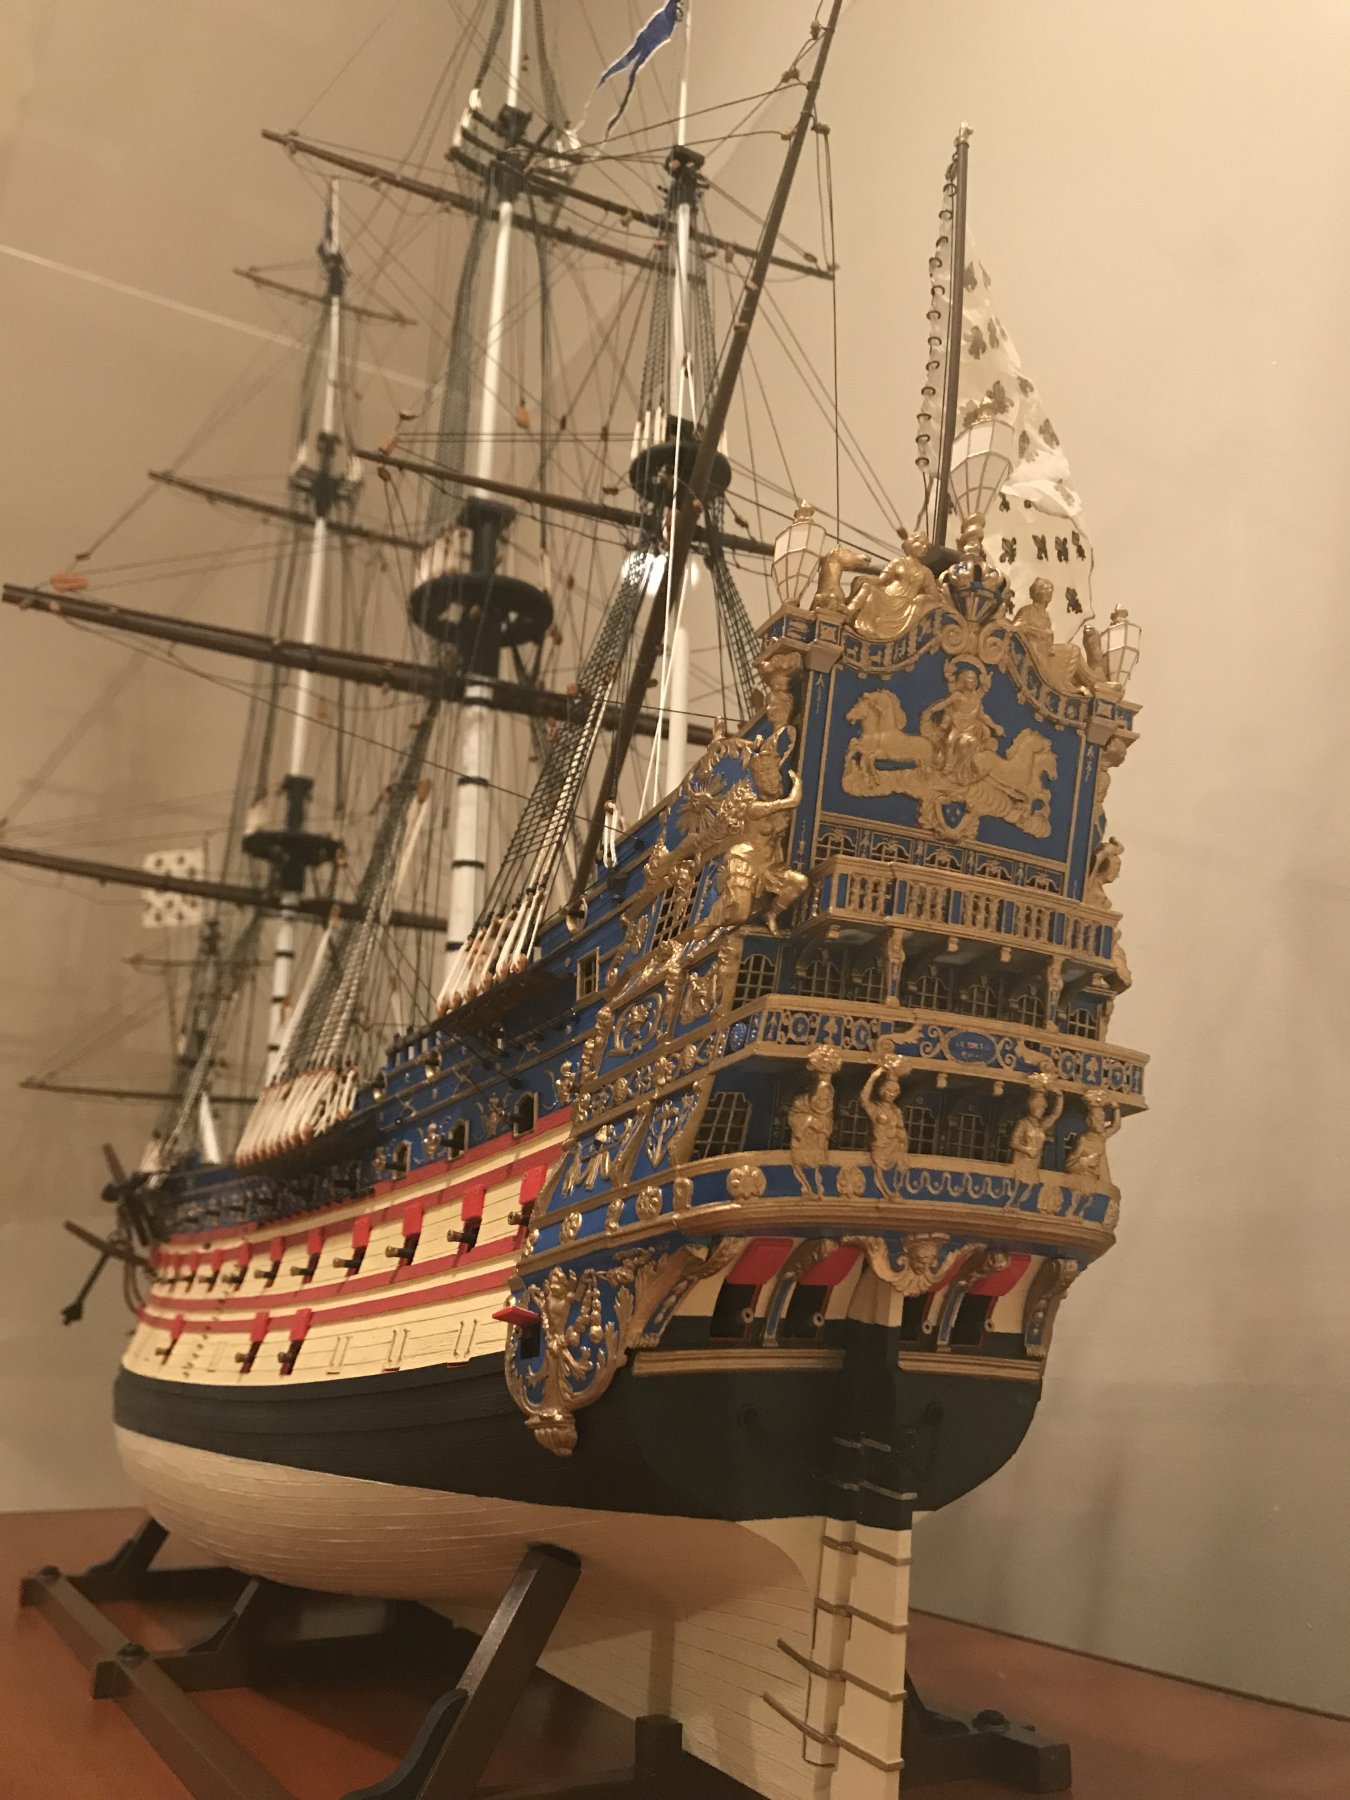
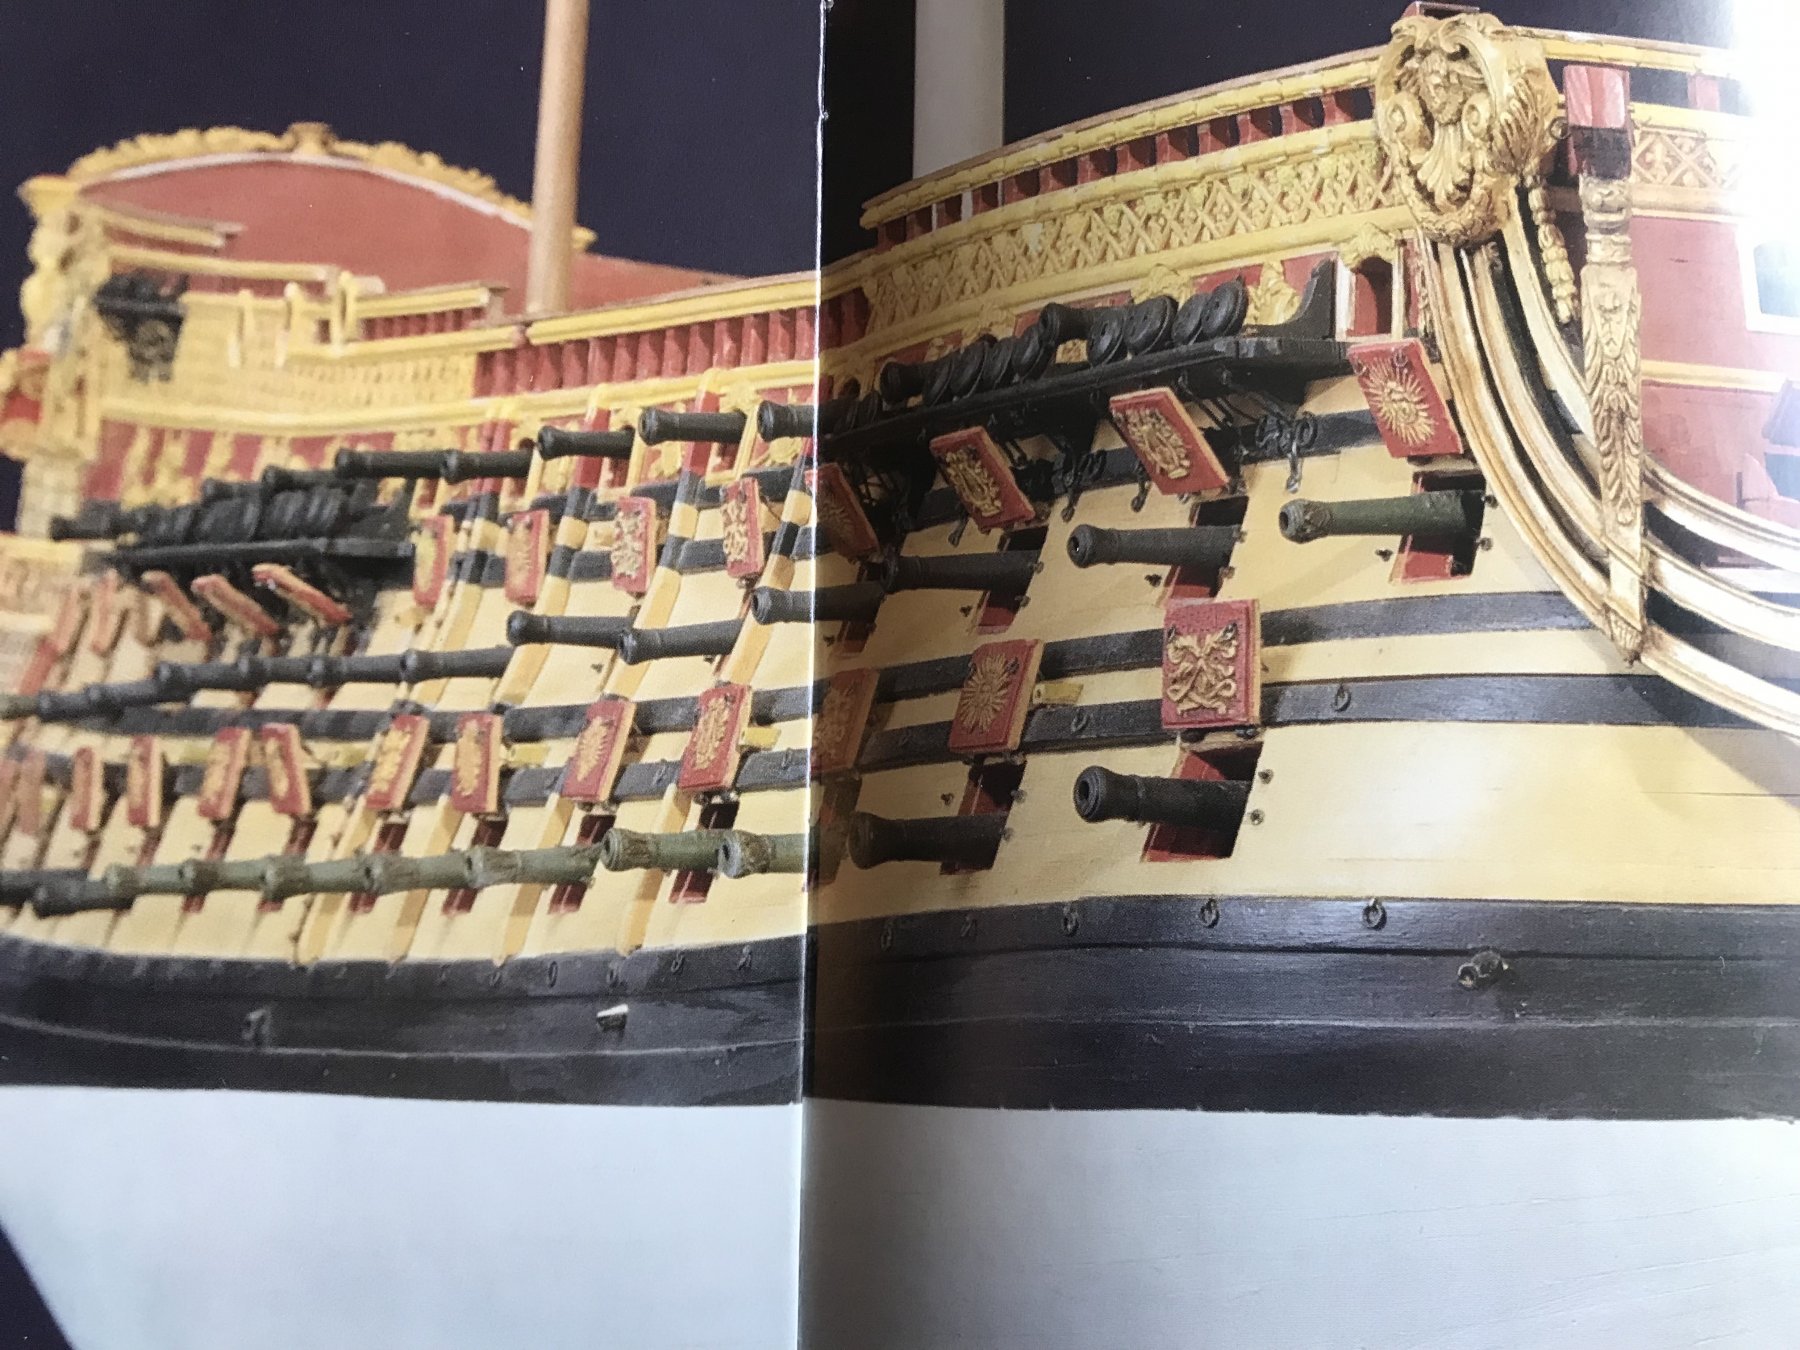
What I really love is the scale of the guns in their ports; they really convey the mass and heft of the artillery, as often seen in Van De Velde portraits. Beautiful, though these ships are, the guns are what make them terrible and terrifying. It’s hard to imagine what the men who fought in these ships were feeling, as they anticipated the first broadside.
- 1,035 replies
-
- 8
-
-
- royal katherine
- ship of the line
- (and 1 more)
-
No kidding!! I really can’t even wrap my head around that last bit - the proof marks. Next, she’ll make a 1:1 card scale model of an atom.
- 1,035 replies
-
- 14
-
-
- royal katherine
- ship of the line
- (and 1 more)
-
If you take a look at Michel Saunier’s build log for SR, you will see that the poop royal houses, if I remember, 5 sleeping berths.
-
Hello EJ, It is an annoying void in kits of SR that there is no representation of reasonable access to the poop and poop-royal decks. Here is what is presented for the St Philippe monographie: I will, myself, create this sort of bridge platform (although, here, the so-called bridge is really the roof-deck over an officers sleeping berth) over my aft-most quarter deck gun, in order to create access to my poop deck. I may, though, create a different Dutch-style (reverse curve) bulkhead for the poop-royal deck with treads attached directly to the bulkhead. What’s left of my poop-royal deck will be significantly lower and somewhat shorter than what the stock kit allows for.
-
Okay, so it seems as though the degree of tangential shrinkage of your lime wood substrate is the culprit here. The cracking appears most prominent, along the centerline of the ship, where the lime is pulling away from the central keel former and causing the plywood, there, to split along its laminations. Your planking strakes show irregular gapping and cracking because they are alternately fixed to the shrinking lime and the stable plywood bulkheads. So, that’s a description of the problem. It’s a bit surprising that you are seeing this degree of shrinkage, given how dry the lime was when you first glued it in. You mention that, at one point in your early build, there was some flooding in the basement that damaged the work surface, but not the model. Did the model get even a little wet? Anyway, as for fixing the problem - I agree with the advice of Vossie and others that you are going to need to regulate the humidity, to the degree that the cracks close up again. Personally, I would remove the cracked planks that will never be sufficiently “repaired,” so that I could get a better read on the substrate to know when the cracks had truly closed. Once you have done so, and stabilized the hull, I would think about injecting some thin cyano (or perhaps there’s a better adhesive for the application?) into the crack faults - particularly along the central bulkhead former. You might also consider marking the path of the cracks with pencil, in the event that they close so completely, that you can’t reliably find them for your injections. Once you are satisfied that you have stabilized movement, I think it would be safe to go ahead and make repairs. I feel for you, Drazen. This is one of my favorite models on MSW. I think it is fixable, just a bit of a bear to set things to right, again.
-
And, also, what is the relative humidity now?
-
A few questions for clarification: The bulkhead formers and keel plate are plywood? Lime is your filling wood, which initially had a moisture content below 20% - what has the average humidity in your cellar been since this problem first surfaced?
-
Hello Drazen, I’m sorry that you are having this problem. I’m going to go back and have a look back at the early stages of the build. I will come back, after I’ve had a chance to process a few things.
-
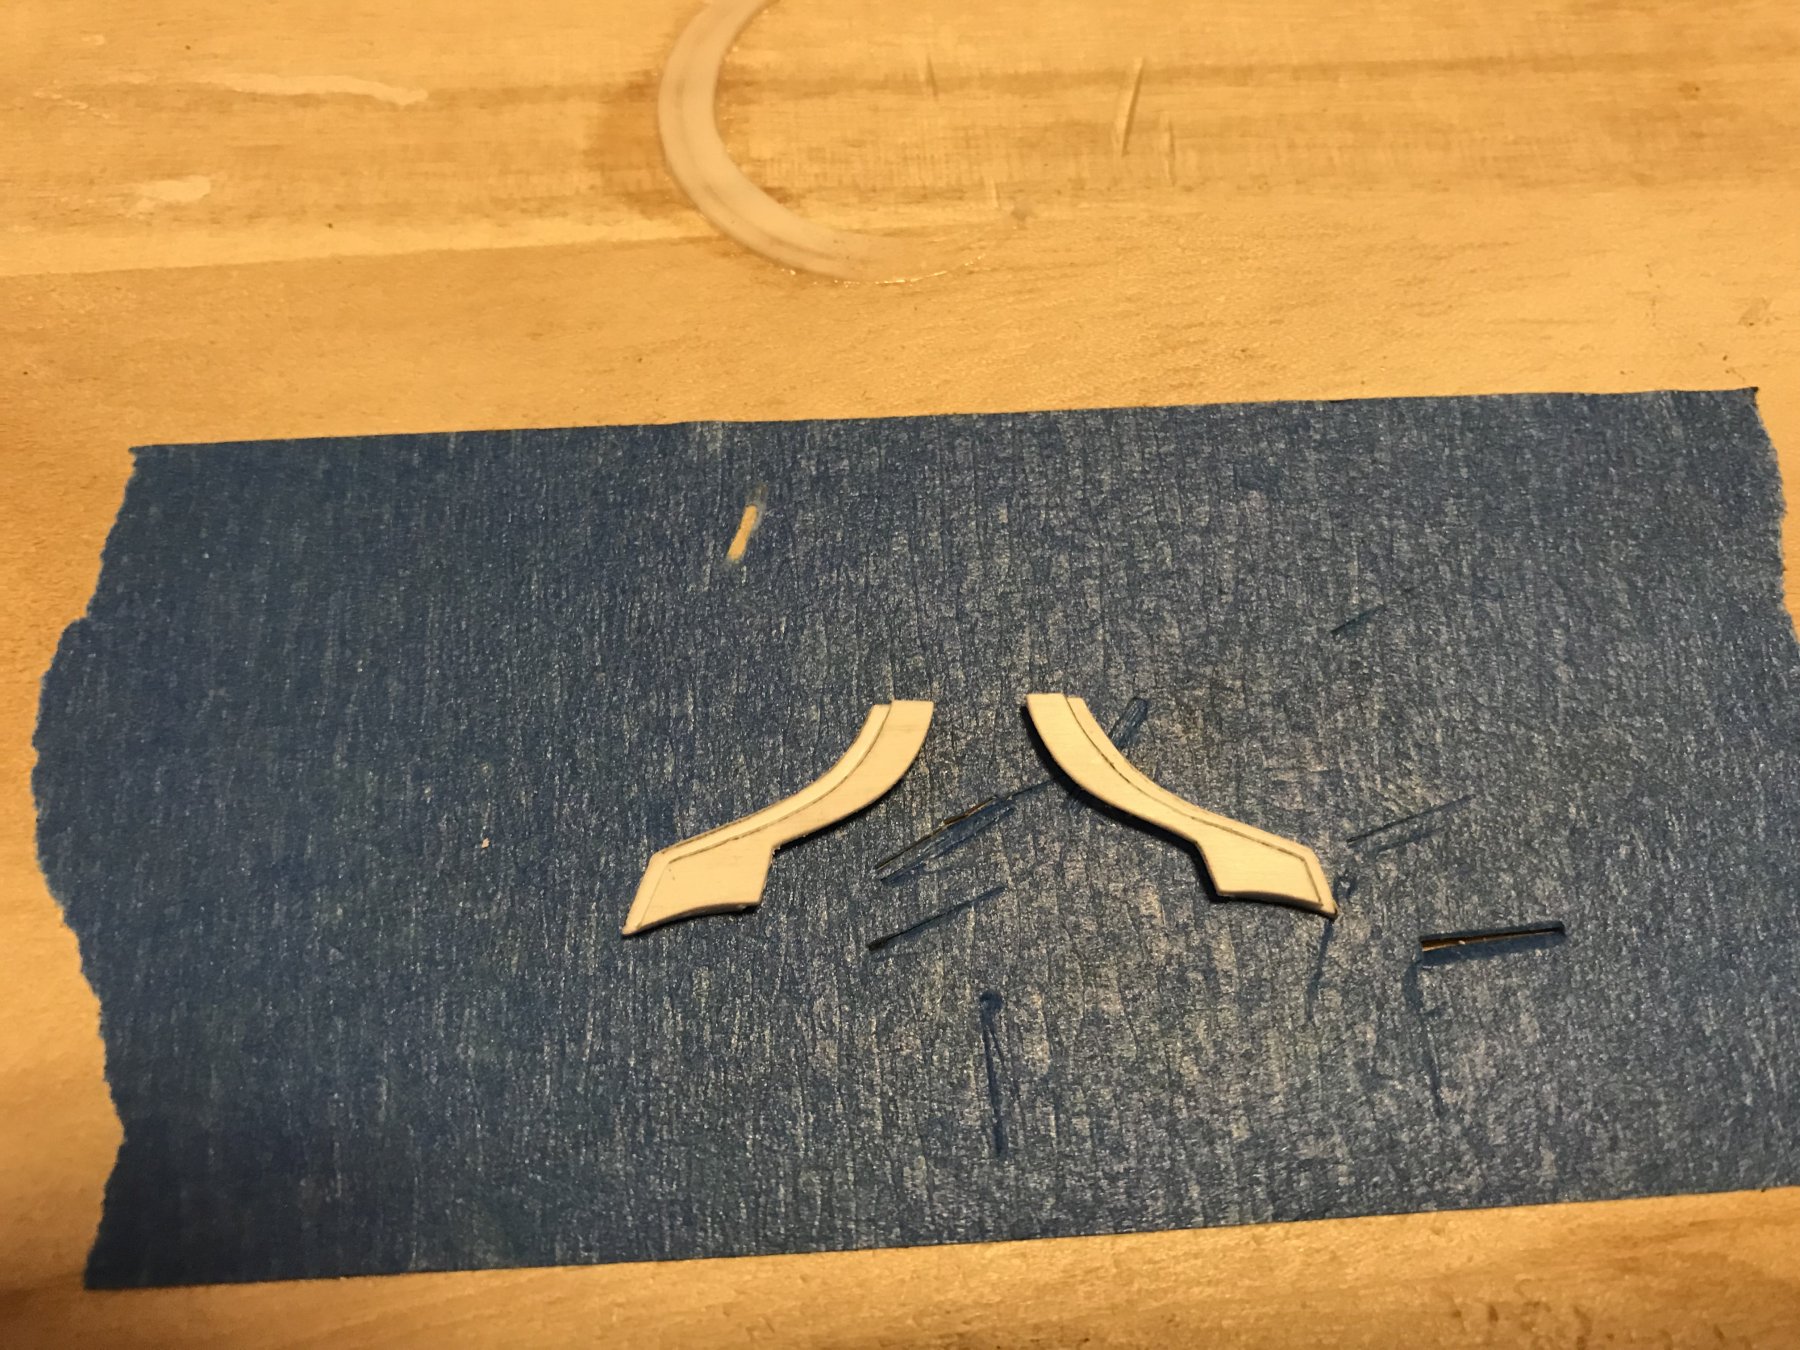
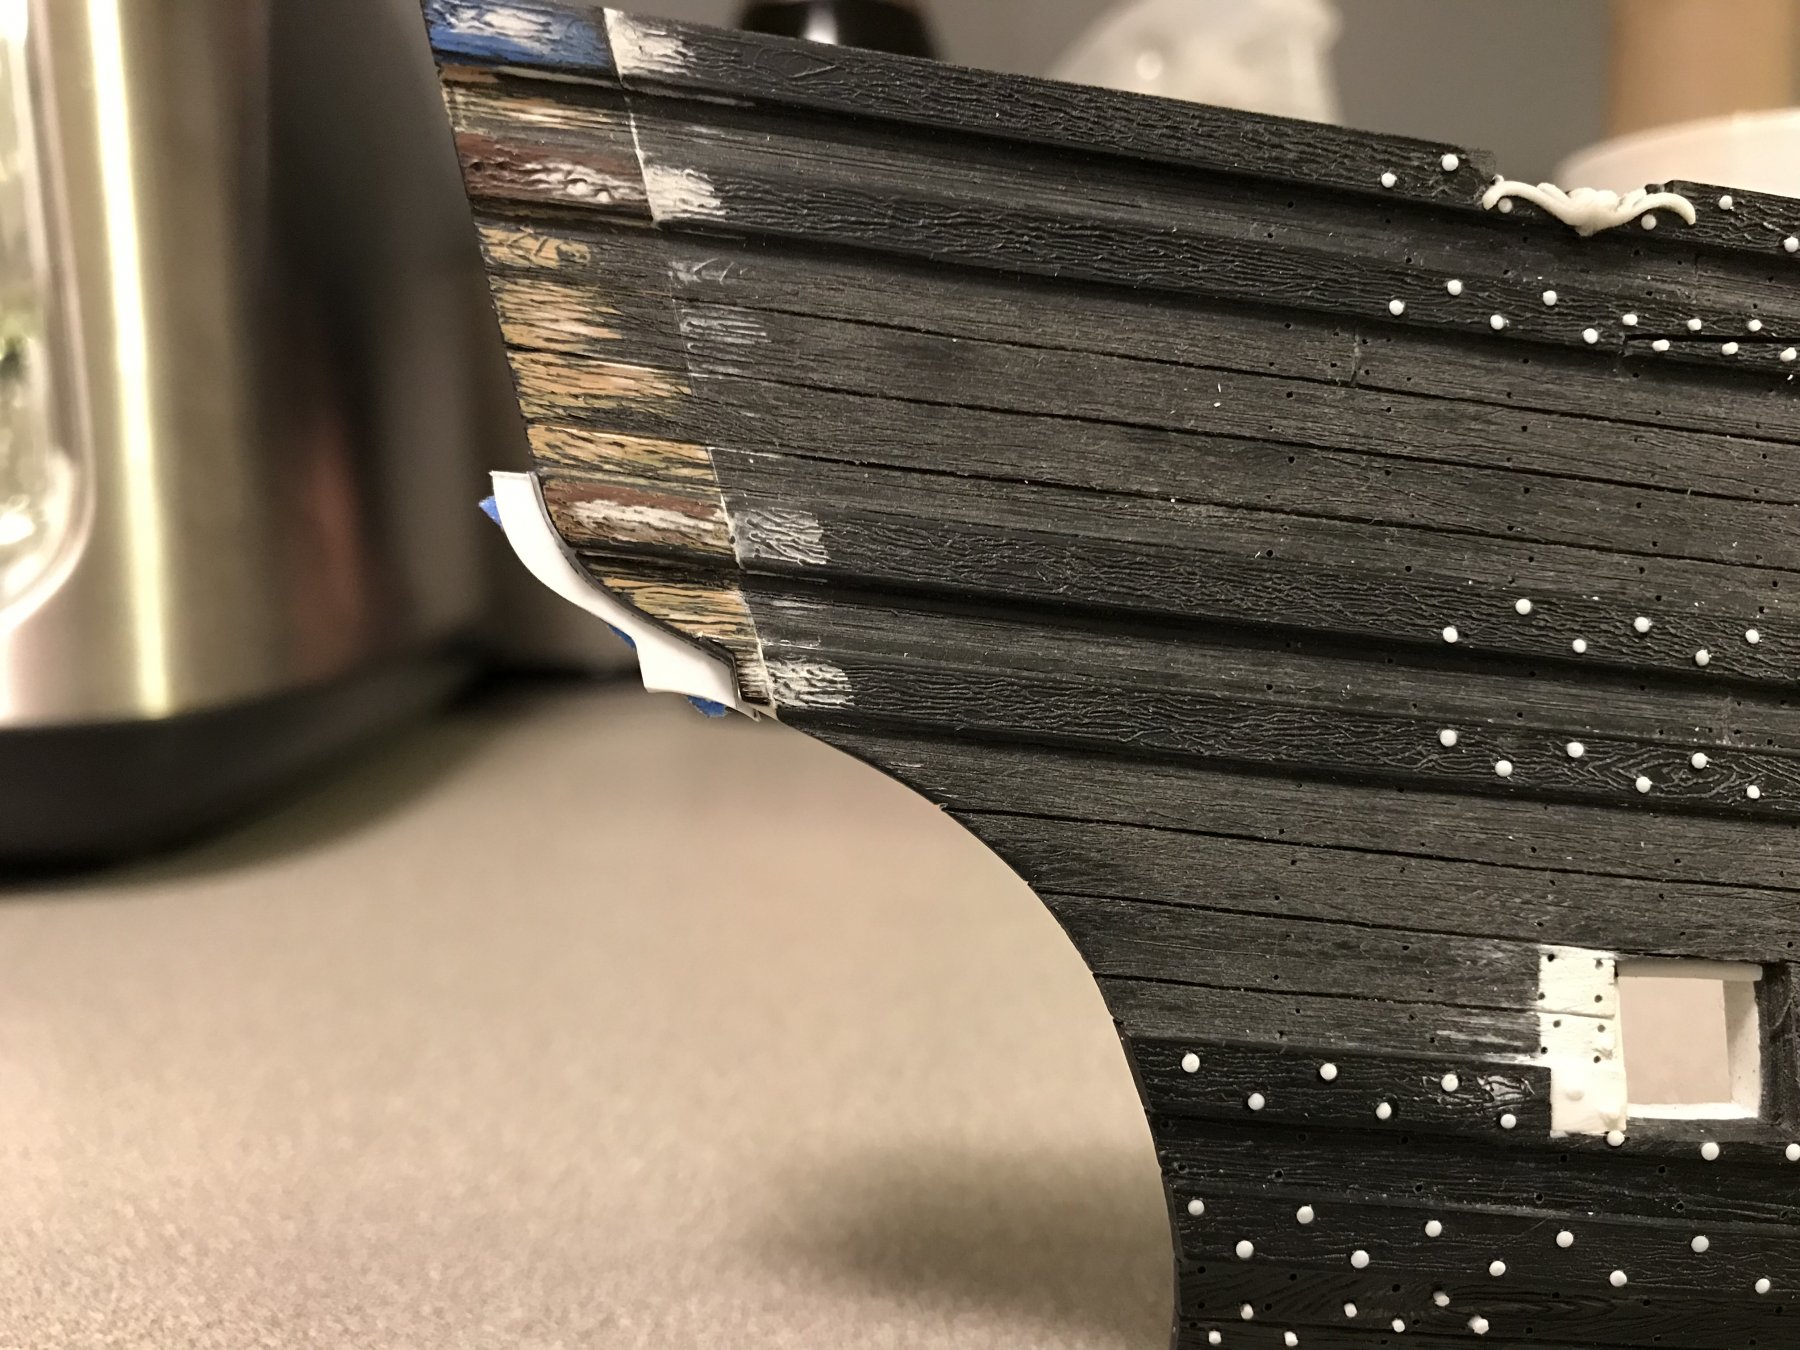
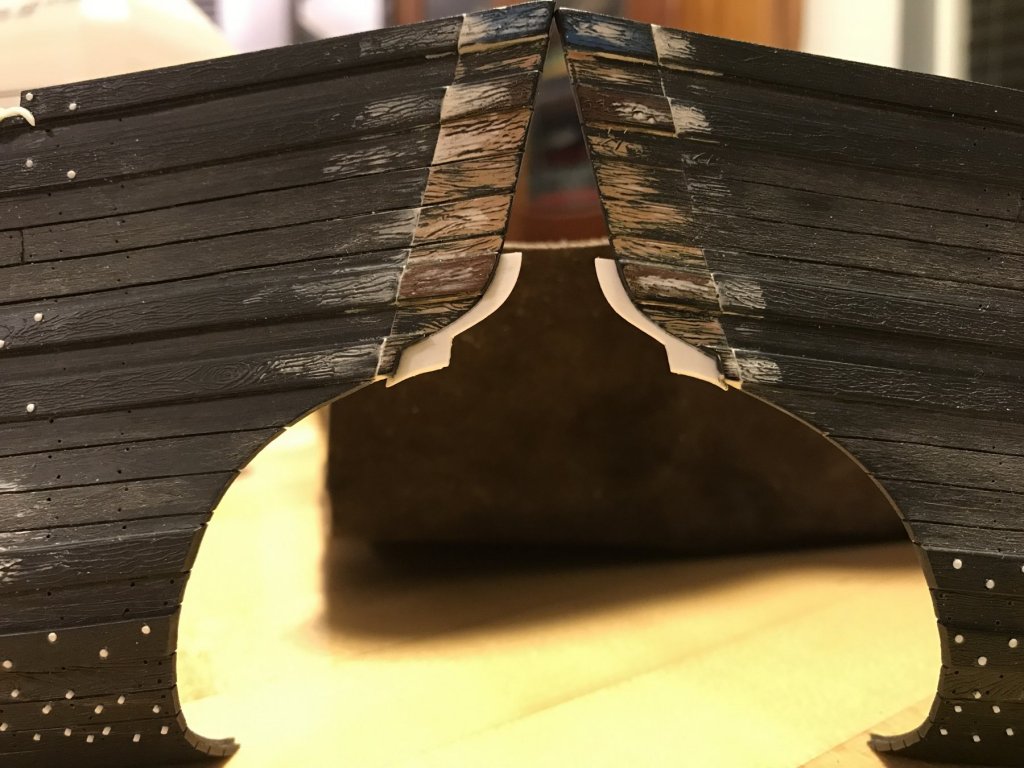
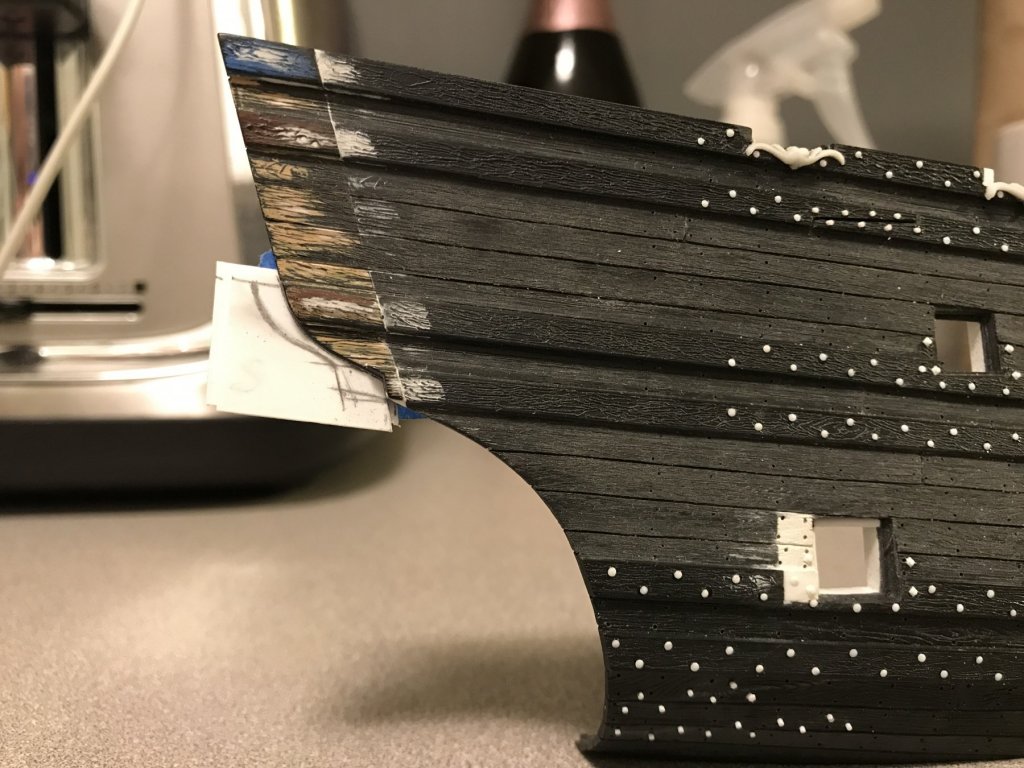
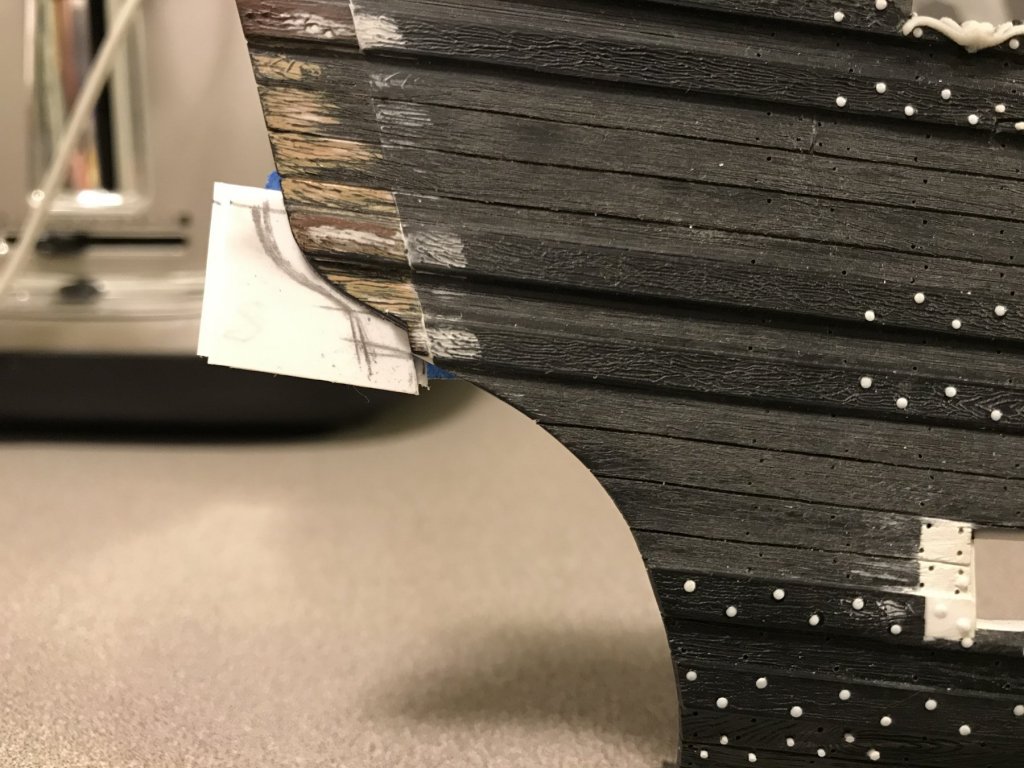
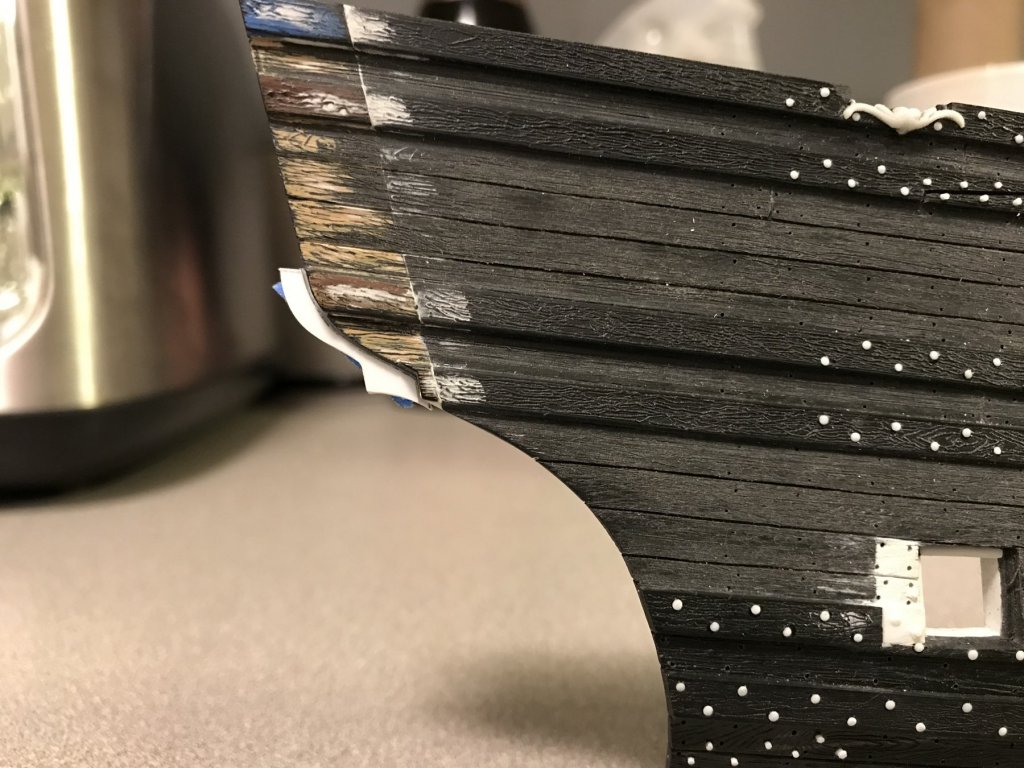
It took some back and forth to arrive at good symetry, but I was finally satisfied with my “false gallery” extensions. The most time-consuming aspect was cutting-in the planking rebate into the aft-most edge. Although as I mentioned before - the overhang of the fashion pieces, above the wing transom is pretty exaggerated - the outline of the false gallery, which will define the shaping of the QG, just below the middle deck windows, is now more close to correct. After the glue dries, I’ll fair the bottom edge into the fashion pieces, but I am now happy with this. Next, I’ll scrape off those wide middle deck pump scuppers one more time and position them so that they could function properly AND be seen with the port lids open. What would be the point of including the detail, if it were hidden? Then, clean the shells; replace anything missing or damaged bits; prime and then paint. I hope to at least have the shells primed and the ventre-de-biche base coat down before I move my family to Brooklyn, next month.

- 2,699 replies
-
- 6
-
-
- heller
- soleil royal
- (and 9 more)
-
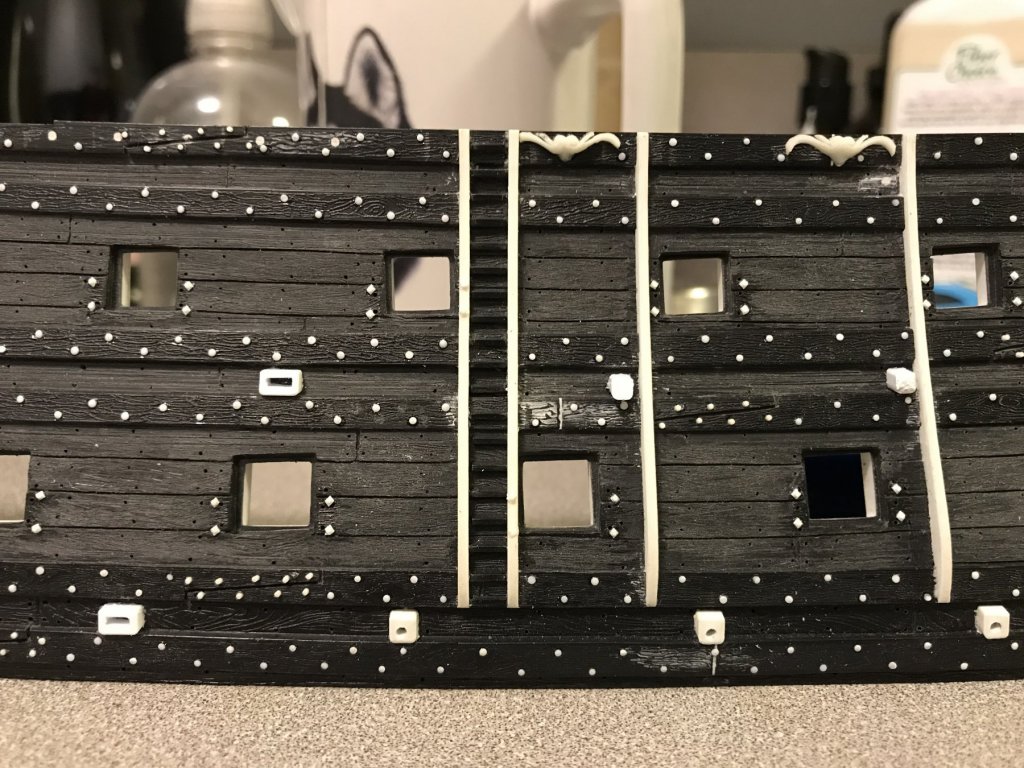
Thank you, Mike! I am likewise enjoying your Renomee build very much. Of course, the annoying thing was that I came to this realization that my middle deck scuppers were in the wrong position, the very day after I had glued in the new wide scuppers at mid-ships. Consequently, while a wide scupper may be more appropriate, and an upgrade of the detail, my new scupper is still centered on a port, at the middle deck level. My thinking was that the scuppers should line up directly with the locations of the pumps, which they do, just forward and aft of the main mast. At this point, I’m kind of inclined to leave it, as is, but I may re-visit this one after I am satisfied with the stern counter. Making up the wider scupper stock was a bit of a process, and I am just feeling a little lazy about re-doing it, at the moment.
- 2,699 replies
-
- 4
-
-
- heller
- soleil royal
- (and 9 more)
-
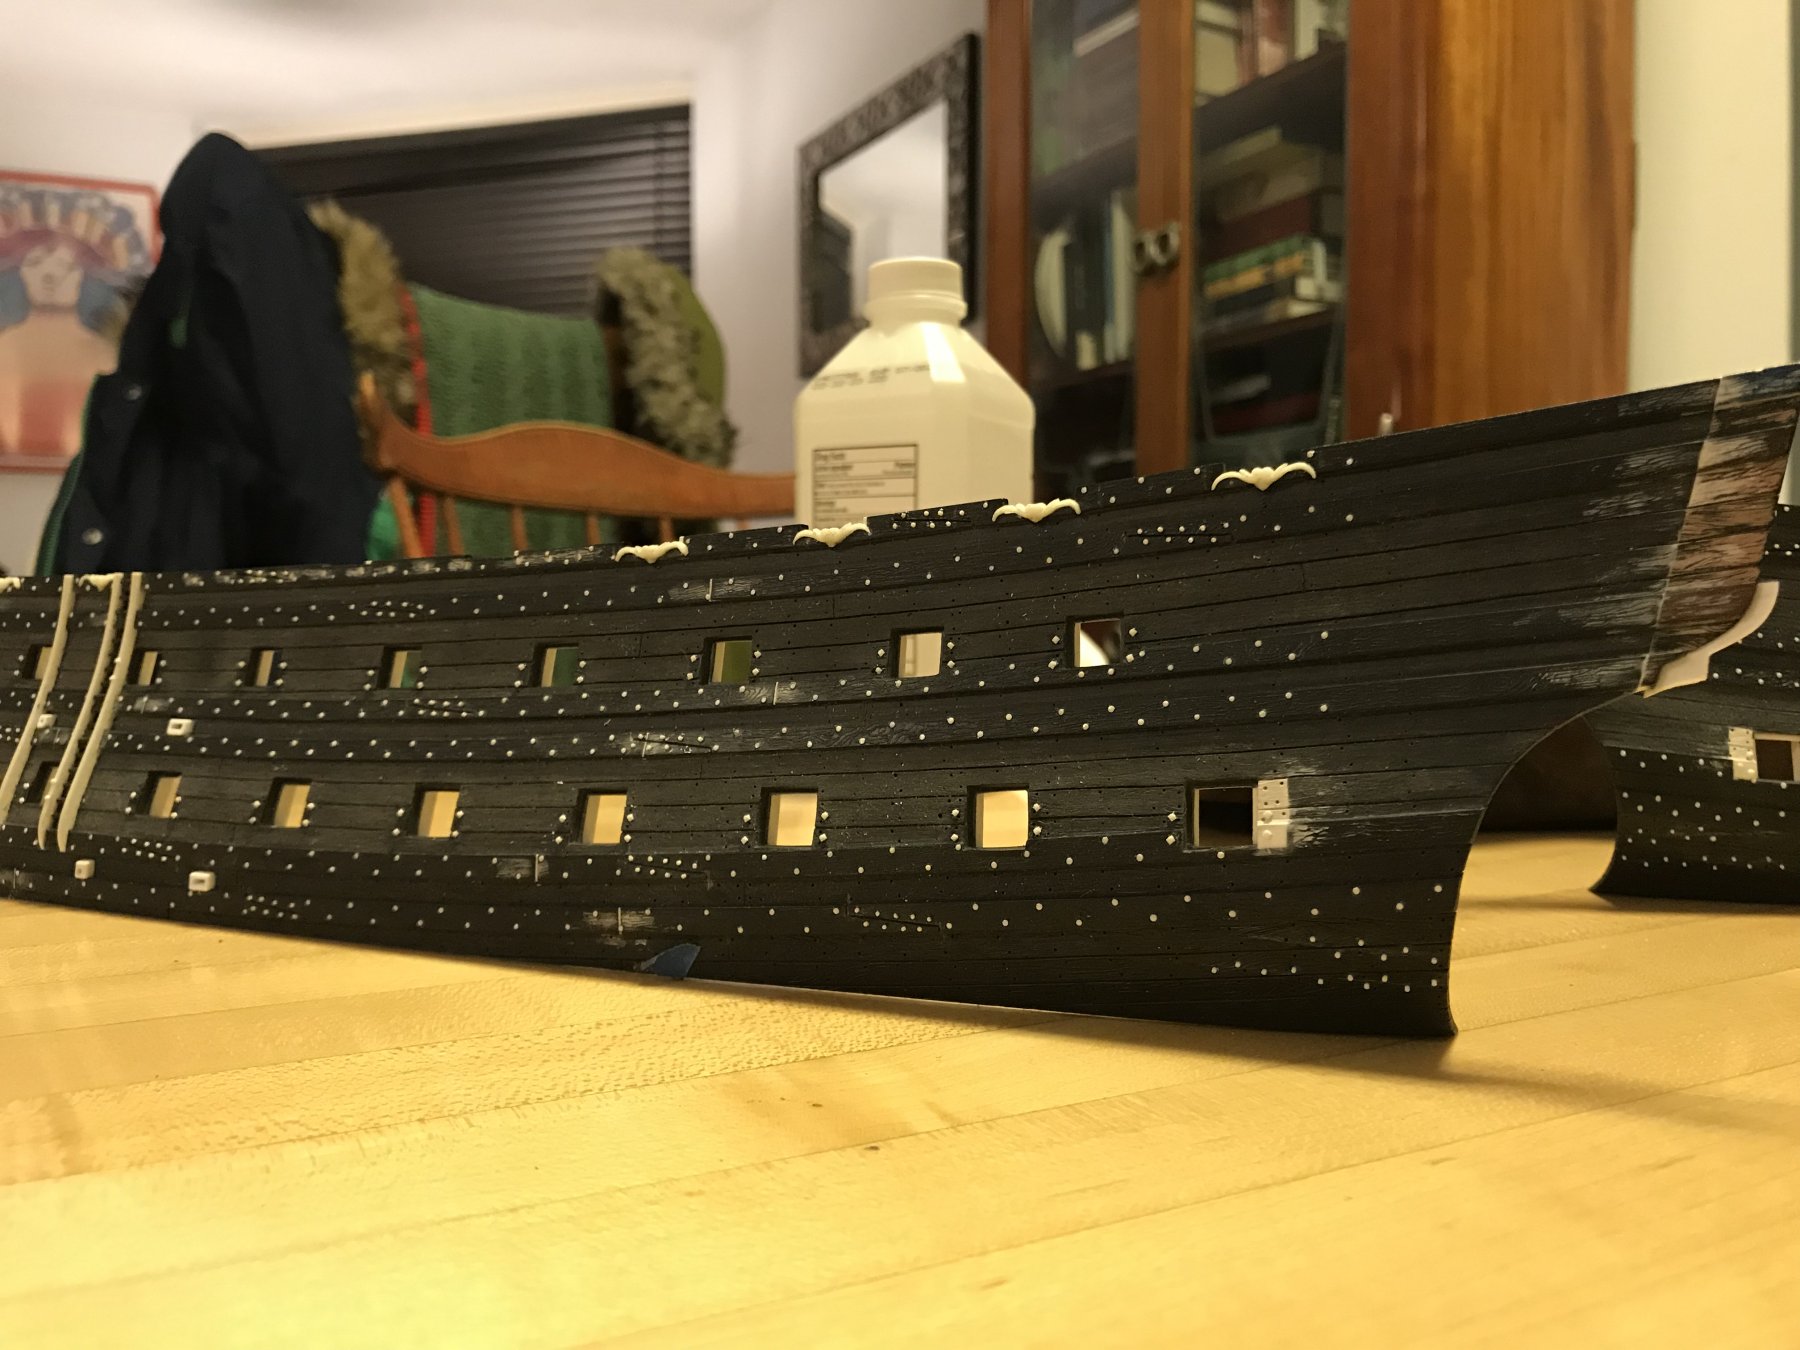
After a very nice holiday season, I got back to work on SR. It was tedious to scrape away the faux raised grain along the lower and middle deck run of ports, and to add 60-grit texture, but the effort will be worth it; the paint work will come out as I want it to. I only broke off a few pieces of my “iron” work, so that shouldn’t be too much extra work to replace, after cleaning the hull shells for painting. One of the more immediate moments of truth, as a result of reading Lemineur’s work on the St. Philippe, was realizing that I had incorrectly placed my middle deck scuppers directly over my lower deck gunports. For all practical purposes, they really should be placed either, just forward or aft of the port beneath. There are two reasons for this. For one, the scupper tubes project beyond the surface of the wales, and would be an impingement to the full opening of the port lids. More importantly, though, whether the lid is open or closed, there should be no obstruction of the scuppers. Added to these practical considerations, I realized that what turned out to be a nice detail would only be covered by my open, lower deck port lids. So, I bit the bullet, scraped em’ off and am in the process of re-doing them. As yet, I still need to fair them into the ship’s sides and re-drill the hole. The other interesting detail that I picked up from the monographie is that the scupper ports just forward of the main mast (middle deck) and aft of the main mast (lower deck) should have a wider mouth. This only makes sense, when you consider that the point of the pumps is to drain water quickly. So, I re-made these scuppers, as well. I had some hesitation in introducing such a large hole into the hull, so close to the waterline. In practice, though, the lower scuppers would have been fitted with a kind of anti-backflow sleave. I have some ideas about how to represent this, but I will worry about that much later on in the project. The other revision I have had to consider is the fact that my stern counter, as I originally fashioned it is exaggerated both in it’s projection, and it does not make any allowance for what should be a “false” lower stern balcony that, essentially, provides a ledge of support to the four seasons figures. The solution, I think, is the sort of compromise that has defined this kit-bash. I am fashioning an extension that will create this shelf, while somewhat correcting the projection issue by bringing the stern counter more into the vertical plane. The compromise is that the fashion pieces must, then, extend even further (about another 1/8”) aft, of what was already an exaggerated posture above the wing transom. Going way back in my modifications - remember if you will - that I shaved back the stern profile by about 1/16”, from the break of the stern counter down to the waterline, in order to create the appearance of a “round-up” to the square-tuck stern. This gave the fashion pieces a more (and, IMO, not unpleasing) rakish appearance. So, first I faired in an extension piece, then I sketched in the new profile to an 1/8” projection from the face of the stern. I thought this was a bit much, so I reduced the projection by 1/32”. This is my final profile. I may or may not fill in the short wale segments. I’m not sure it really matters because the QGs will cover that, anyway. What makes me feel better about all of this is that the lower finishing of the quarter gallery sweeps down, overlays and obscures this exaggeration of the fashion pieces. A little bit of fudgery. Comme ci, comme ca.
- 2,699 replies
-
- 9
-
-
- heller
- soleil royal
- (and 9 more)
-
That’s the spirit! I’ve been thinking about paper, lately, and the many ways in which it can be used to detail our models. I figure it’s a low-risk/high-reward proposition. Personally, I want to experiment with using silkspan tissue to create a painted scrolling banner, with tendrilly ends, that I will paint to appear three dimensional. The theory being that anything ornamental, below the stern chase guns, would be painted on, in order to circumvent an actual carving bring washed away by a following sea.
-
P.S. it’s Friday, and I have a few whiskeys in me... but, what about paper? Print ‘em, cut ‘em, glue ‘em, mold-master ‘em, cast ‘em. If it doesn’t work, scrape ‘em off your masters. I’m assuming - because I’ve lost track of the log conversation - that you might still be looking to cast resin guns.
-
Really lovely use of color, amazing detail and perspective, and every painting is full of movement and vitality.