leginseel
-
Posts
177 -
Joined
-
Last visited
Content Type
Profiles
Forums
Gallery
Events
Everything posted by leginseel
-
 Hi Robert, the deck planking and the 'tree nails' look great. I agree that to add mid plank nails, whilst totally authentic, would detract from the clean deck planking. Lovely job and I follow with interest.
- 527 replies
-
- 3
-

-
- caldercraft
- victory
- (and 1 more)
-
Fabulous work and it's been a real joy to see it develop. Looking forward to your next build.
- 653 replies
-
- 4
-
-
- trabakul
- marisstella
- (and 1 more)
-
Thank you Zappto, yes, I've glued the cannon to the decks and I'm now in the process of sorting the rope coils out and then I'll start on the port side.
- 121 replies
-
- 1
-
-
- bounty
- constructo
- (and 1 more)
-
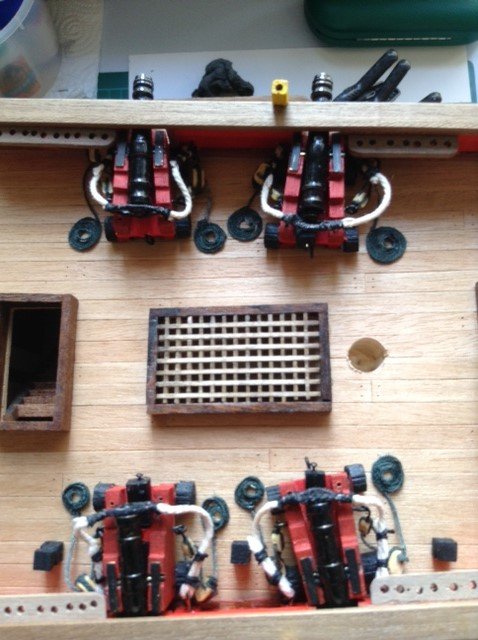
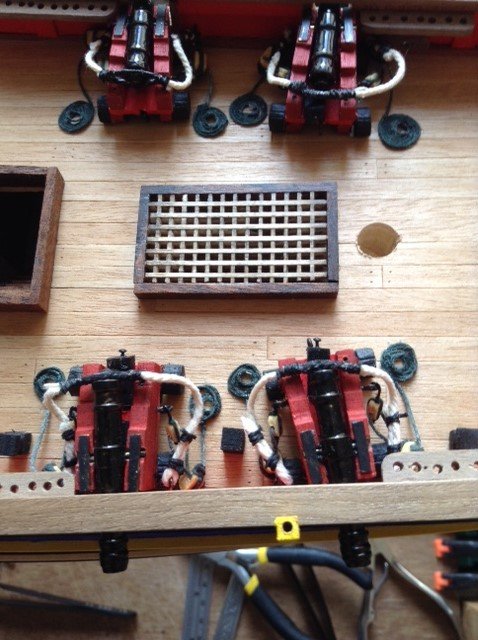
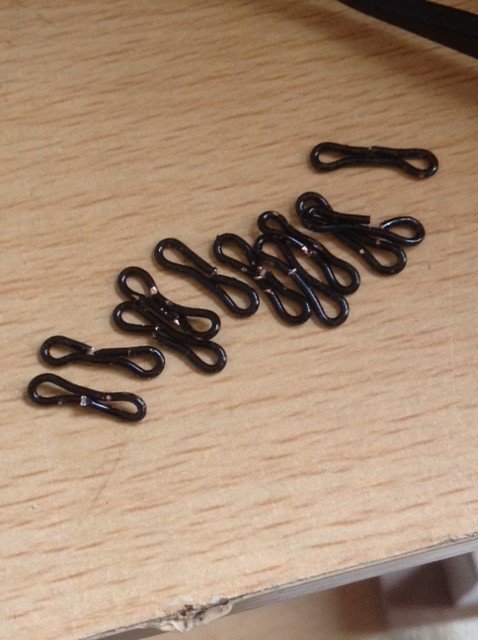
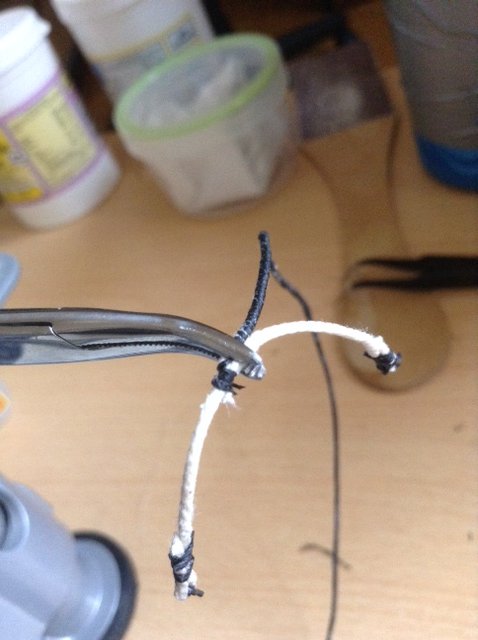
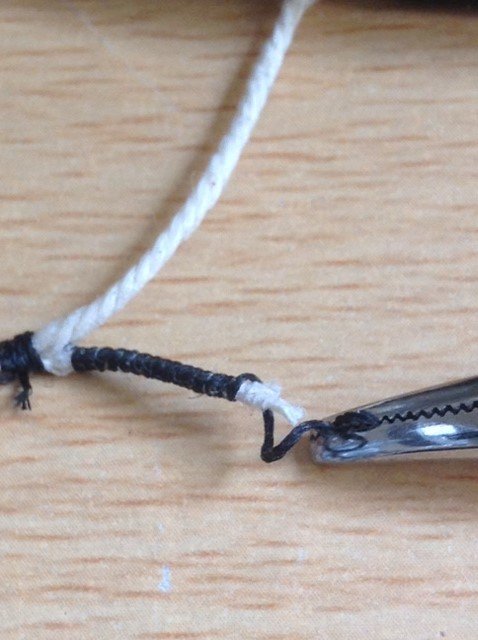
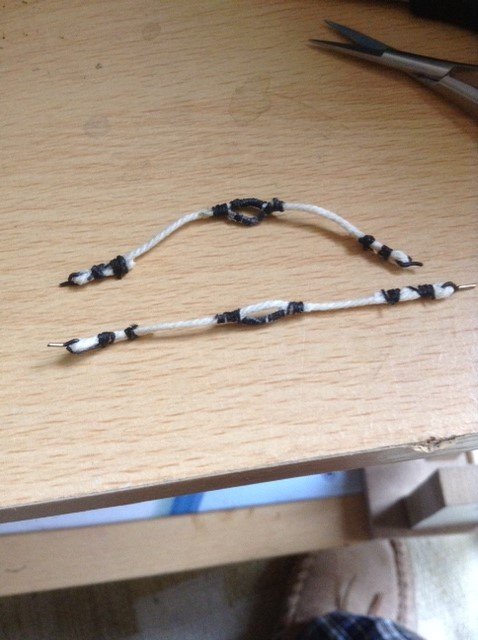
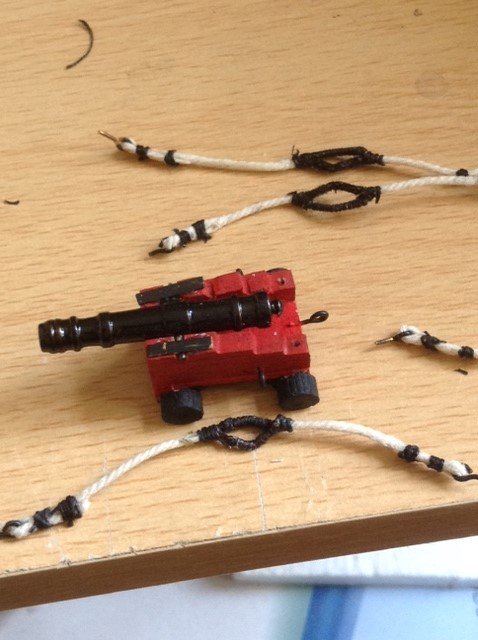
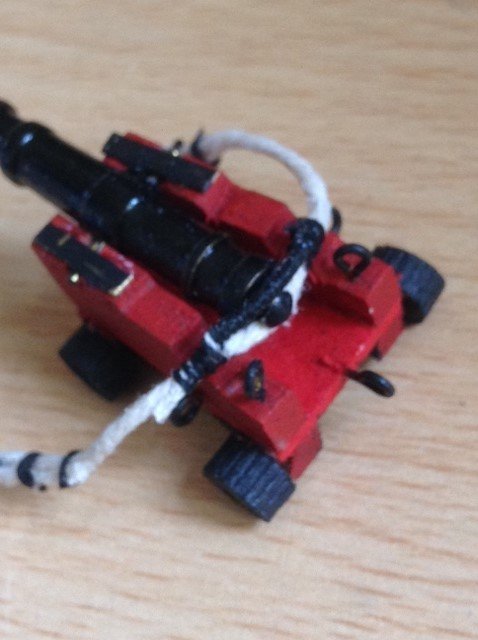
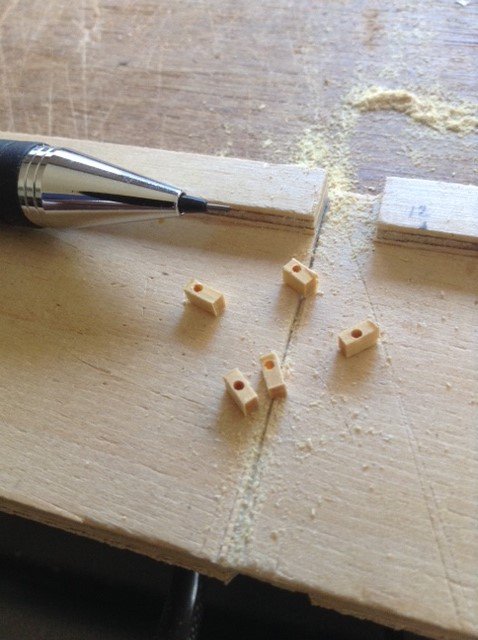
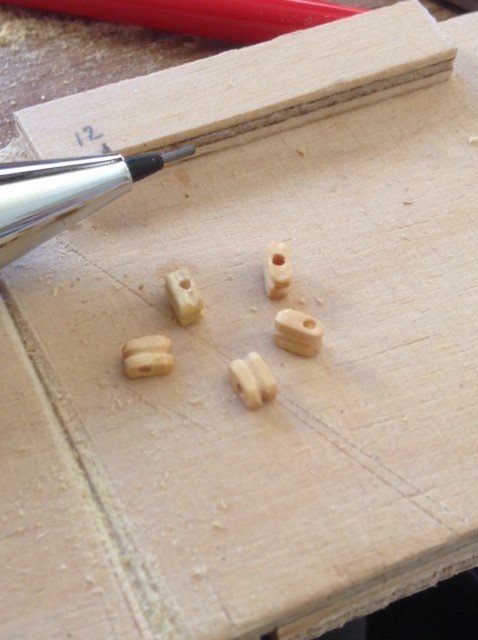
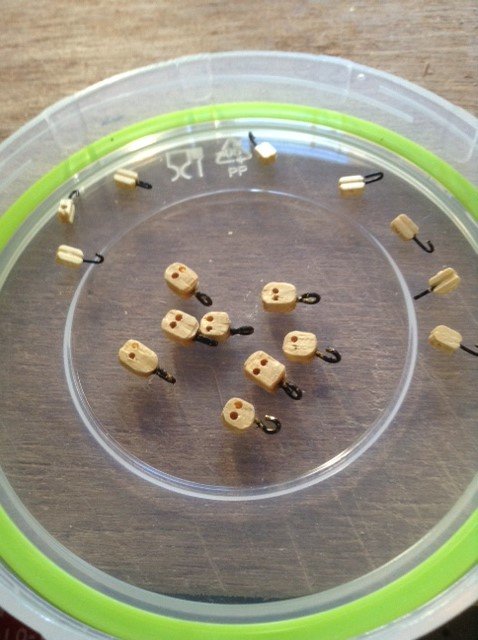
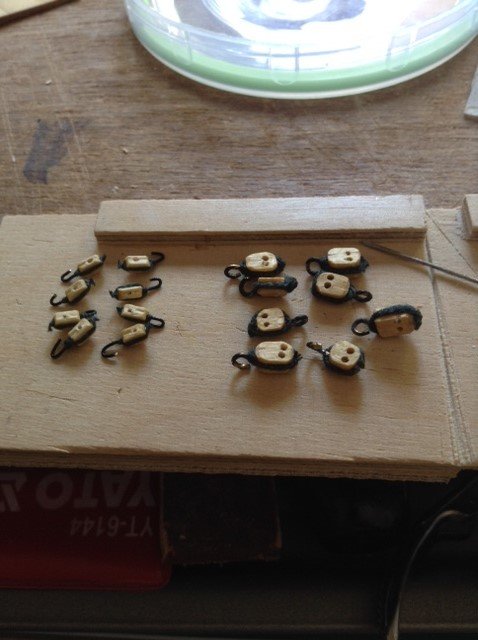
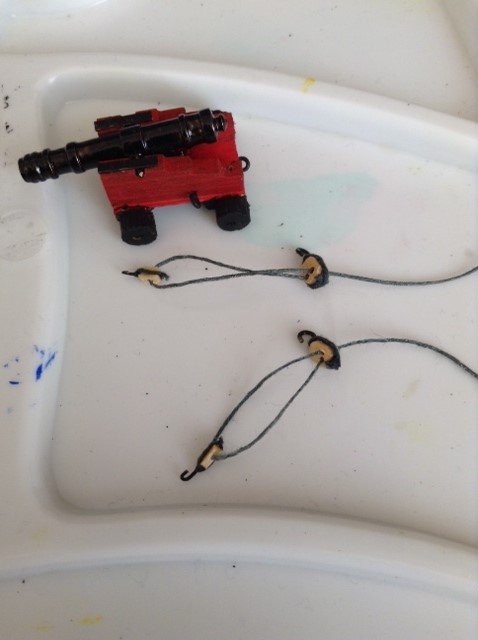
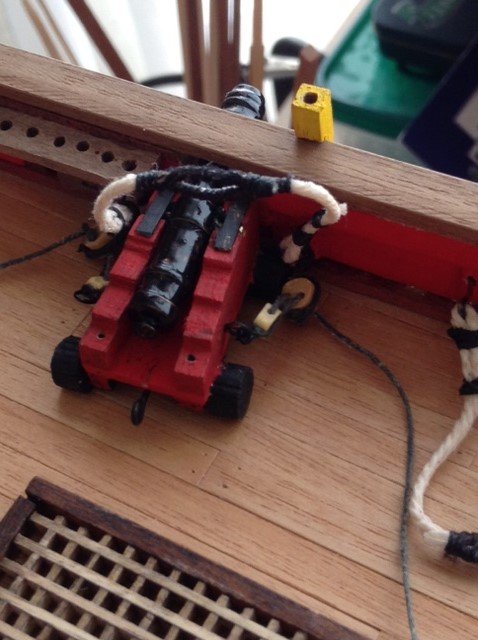
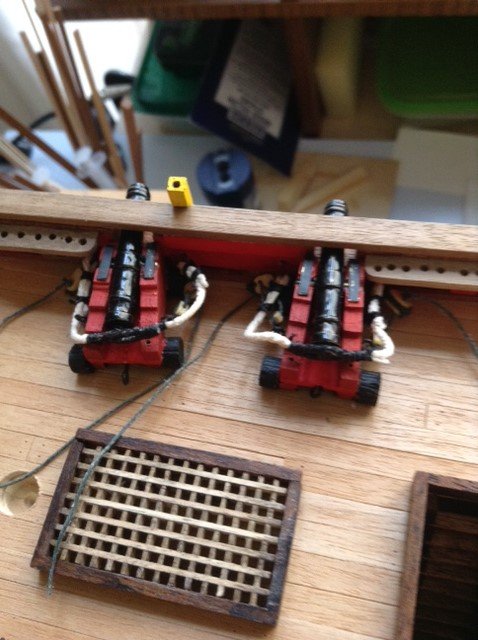
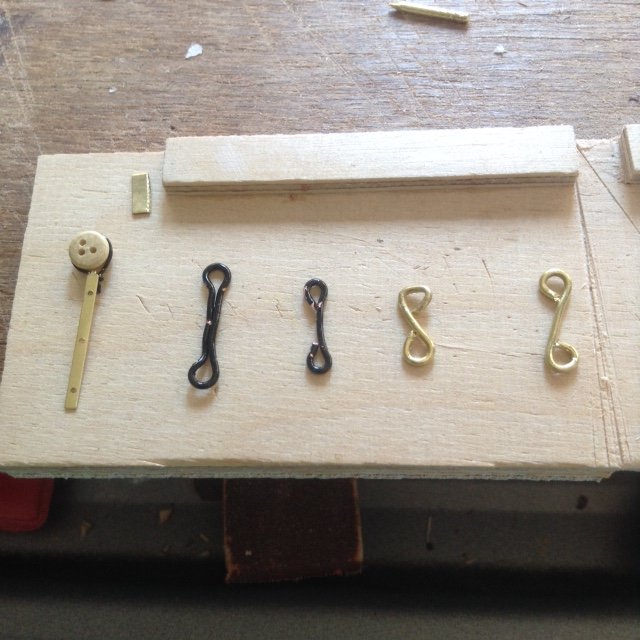
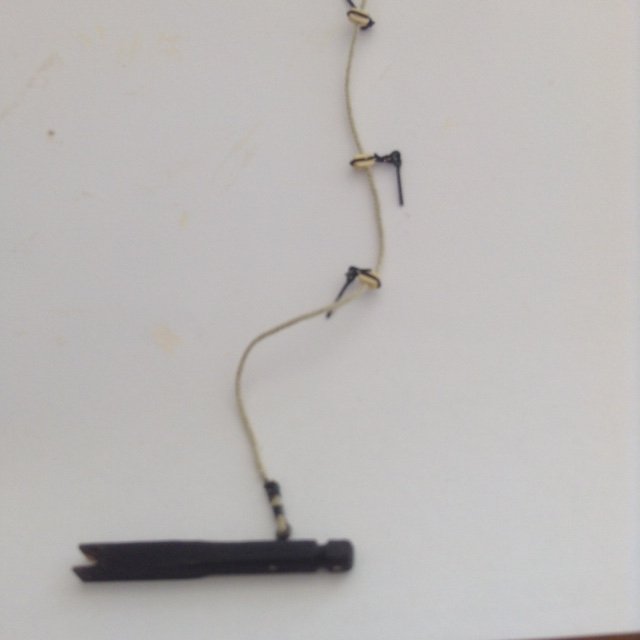
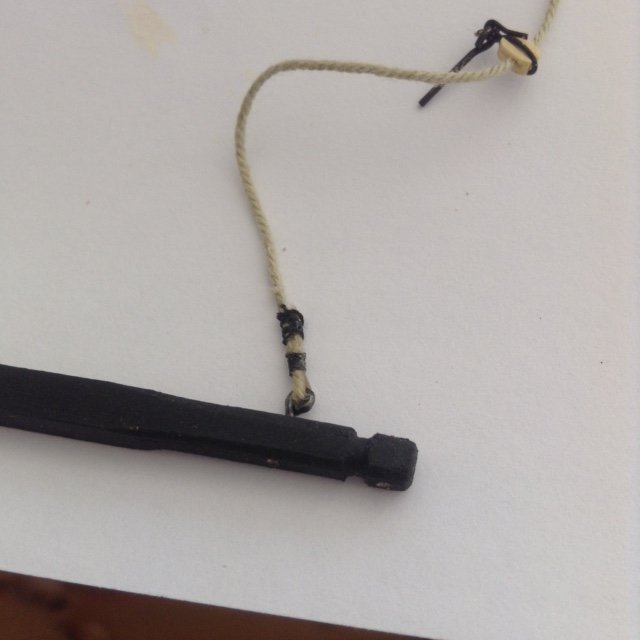
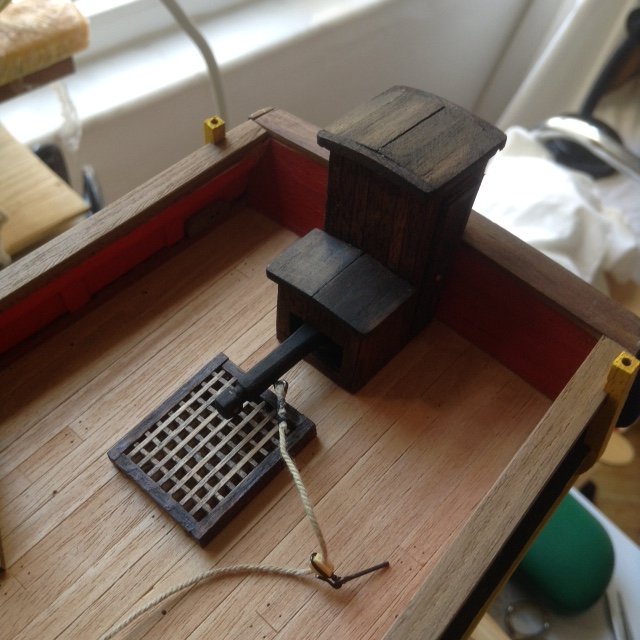
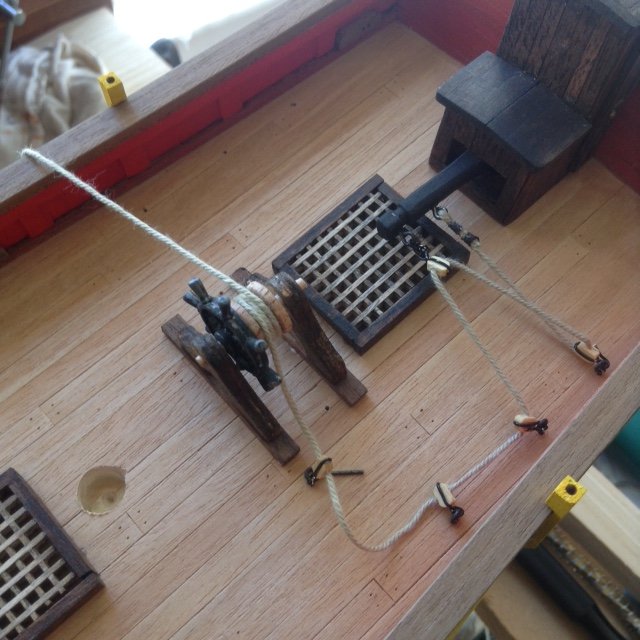
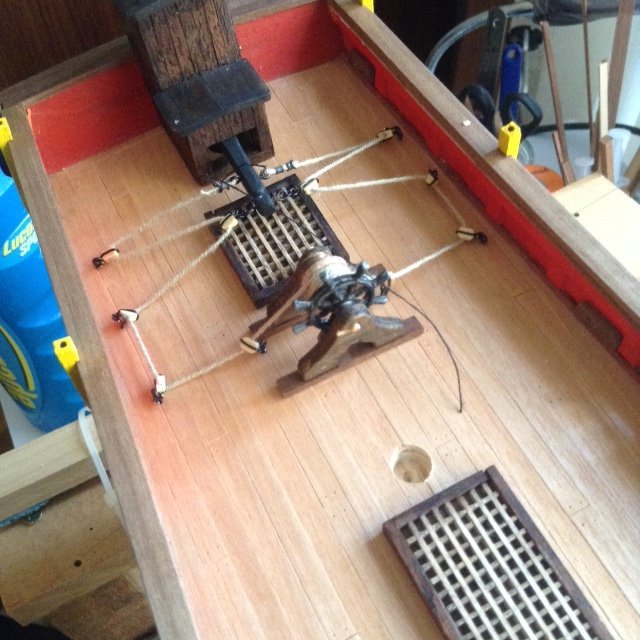
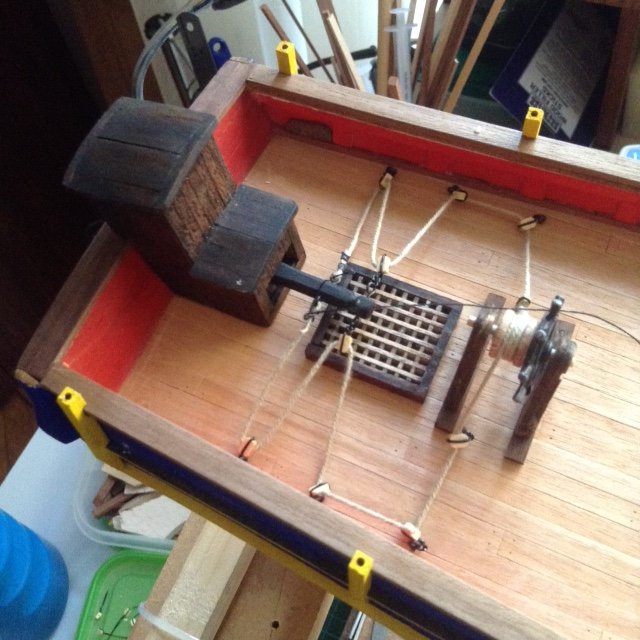
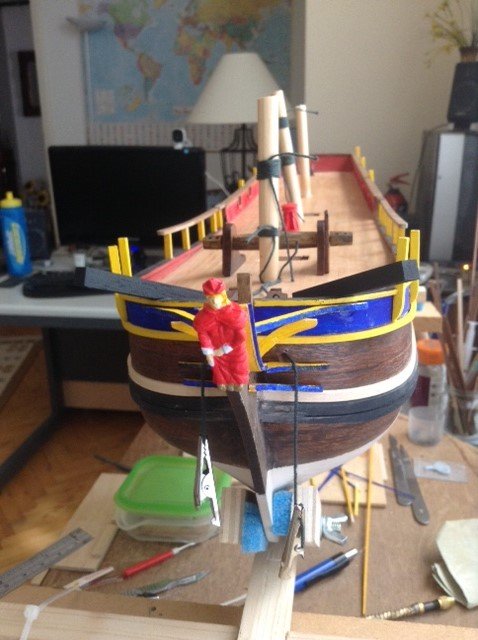
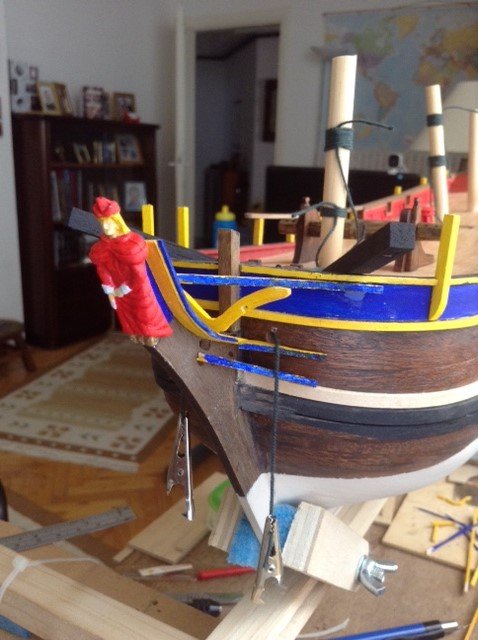
It seems like ages since I last posted but I've been otherwise employed as my wife has had a back operation so whilst I've been working on the Bounty it's been some small jobs. As I've said in a previous post I wasn't impressed by the chain links in the kit so I've fashioned some myself They need tidying up but they look a little more realistic than the kit supplied brass strips. The next job was the cannons. The kit shows just a simple rope draped over the pomiglion which looked awful, so I decided to a little research. As there is no pomiglion ring I found some pictures with a rope fashioned to fit around the button as follows. I started by seizing a small rope and then splicing it onto the main rope. The third photo shows the top one with both sides of the 'ring' seized. This produced a fitting which was much too stiff so I only seized one side of the others and coloured the non seized rope black. Then I looked at the tackle which is not mentioned at all in the kit. Looking at the posts of others I needed double and single blocks to create the 8 sets for the four cannon. I realized that I would have to make these as there was insufficient in the kit. So I ventured into the world of block making. After some sore fingers, lost parts and much swearing I managed it. I have to take my hat off to all the scratch builders out there as making 100's of these must be a nightmare!! I then rigged the blocks and the cannon. On reflection it would have been better to not have waxed the pomiglion ropes as they don't sag in this forward position, but that's another lesson I've learnt for future builds. My wife is now getting over her operation and mobile so I hope to have a little more time in the shipyard. Thank you all for your comments and likes on my previous postings, it's much appreciated.

- 121 replies
-
- 4
-
-
- bounty
- constructo
- (and 1 more)
-
Nice work on the anchor as it looks perfect. I haven't made mine yet but I'd like to try and emulate your work, if that's ok with you?
-
First class build, it's been a joy to follow your log and I'll be looking out for your next one.
-
Hi Robert, I personally thought that the comments re joggling were a bit harsh. Model building is a hobby for enjoyment and such suggestions could be said a little more sympathetically as we are not all perfect.
- 527 replies
-
- 4
-
-
- caldercraft
- victory
- (and 1 more)
-
Hi Jeff, as a first time builder the best tool I've invested in is a Dremel with various bits and pieces together with a drill stand so I can drill accurate vertical holes.
-
Good to hear from you Steve and I hope all is well with you. You'll be pleased to know that your Bounty build is still my go to reference point for my build. All the best with the RC Plane and yes I would love to see some photos as well.
- 291 replies
-
- 3
-
-
- bounty
- billing boats
- (and 1 more)
-
Hi Jeff, What I did with mine is use a needle to make small pin pricks to the ends of the planks which showed up beautifully when I varnished the deck without them being too much.
-
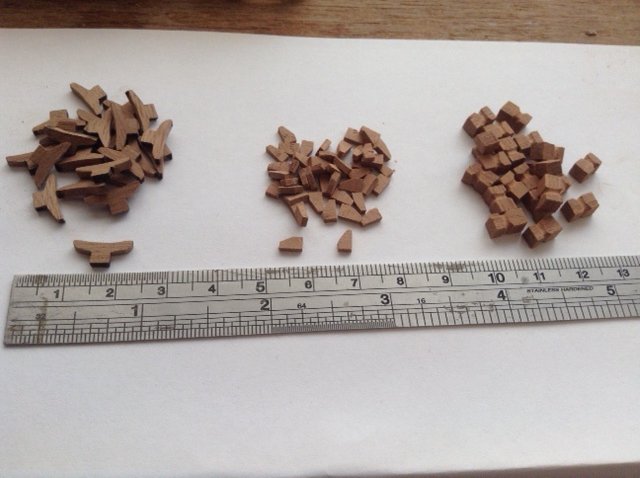
Could I please get some advice from those builders more experienced than me? I'm planning ahead a little but I'm looking at the design of Chain Plates provided with the kit (left in the photo). Firstly, I think they are what I would call straps not chains and I don't think that they look right. As you can see I've made up some others and I intend to attach this by one link to the Deadeyes and I would blacken them before fitting. My dilemma is am I right or am I overthinking it and which of mine look the best alternative? Any comments or suggestions would be much appreciated
- 121 replies
-
- 1
-
-
- bounty
- constructo
- (and 1 more)
-
Morning all, been working pretty well this week and I have completed the nightmare called the Cutwater. I'm sure that all the lessons I've learned constructing this will save me in good stead for future builds. After this I turned my attention to the steering gear and for the first time tried my hand at seizing ropes. You guys make it look so easy!! It was fairly easy to seize the rope on the Tiller while it wasn't fixed but when I'd fitted all the blocks I used a little CA to hold the ropes together but when it came to seizing my big fingers kept getting in the way. I can only hope that this process gets easier with practice. Here are the photos.
- 121 replies
-
- 4
-
-
- bounty
- constructo
- (and 1 more)
-
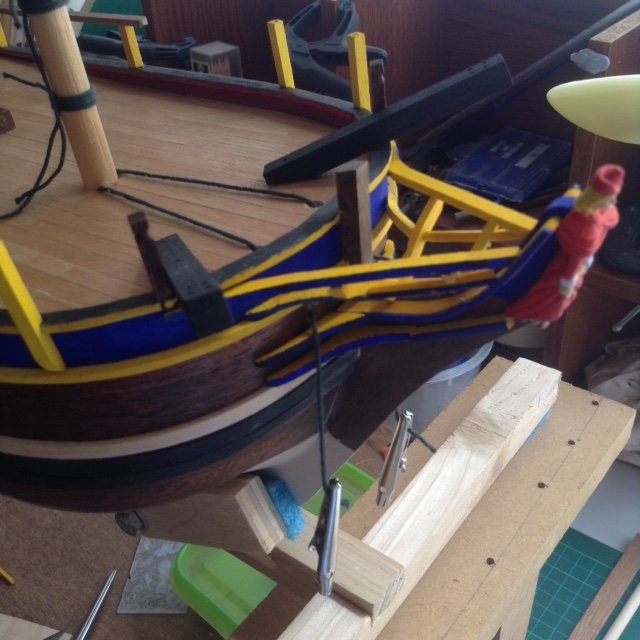
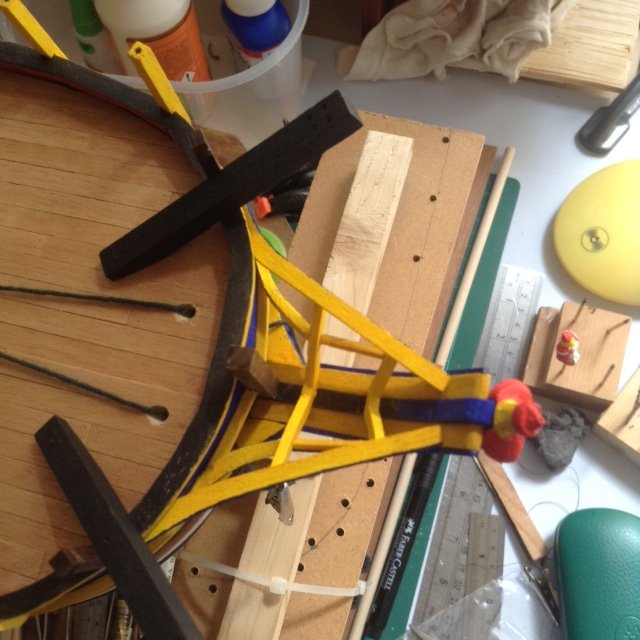
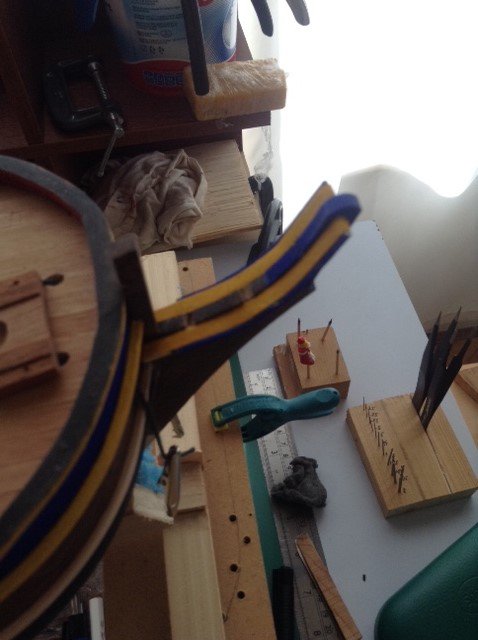
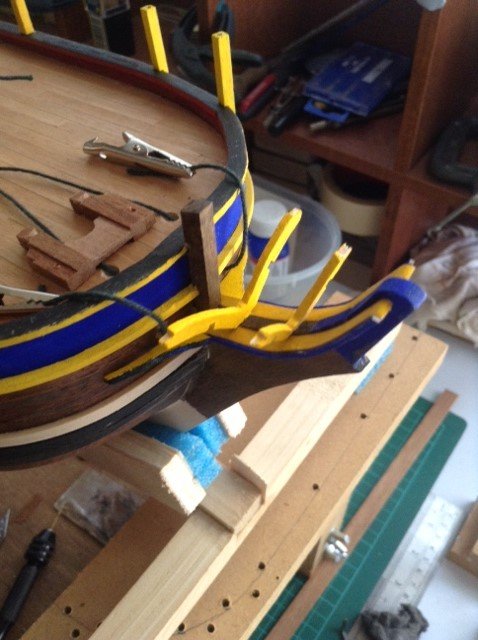
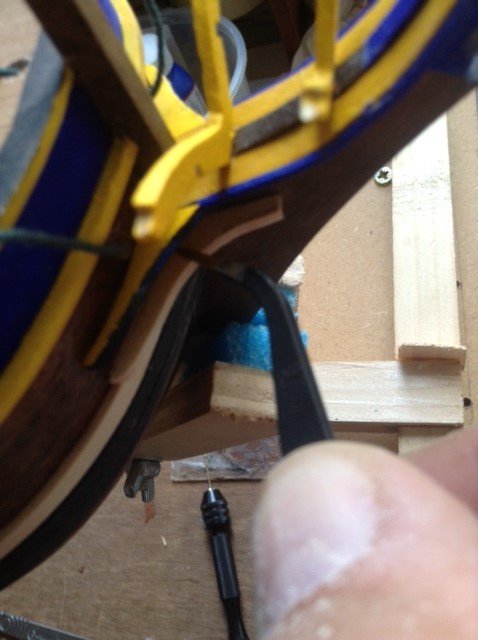
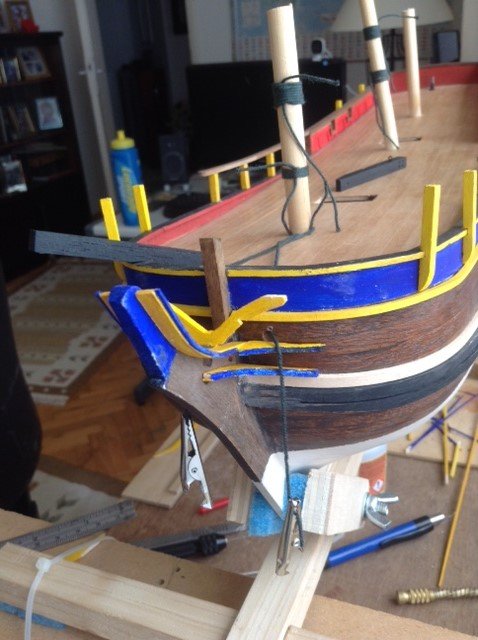
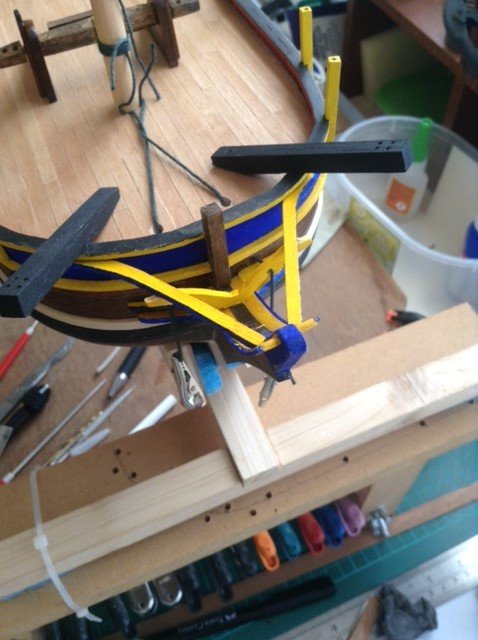
I've been having a torrid time trying to create the Cutwater Braces etc for the bow as the plans and instructions are severely lacking (not for the first time!) However, between McKays book and other builders on this site, notably Steve1234, I've managed to bring something together but it's still very much work in progress. Also they say the camera never lies and seeing the photos I've got quite a bit of paint to touch up.

- 121 replies
-
- 4
-
-
- bounty
- constructo
- (and 1 more)
-
Dave, the detail on your model is amazing and your log is a great example of how it should be done.
-
Hi Guys current progress is slow I'm afraid. I've set up and got to grips with my Airbrush and I was going to try it on a cheap Bluenose kit I have but then I thought better of it and decided to make all the small fiddly cleats and belays which has been fun. I made some holders by soldering croc clips to brass wire. I bought a large plastic box to house a turntable I've also made. The Box contains the spray, which I have to say is much less than I expected and doubles up as storage for all the paint and paraphernalia. I'm really pleased with it as the finish on the cleats etc is great.
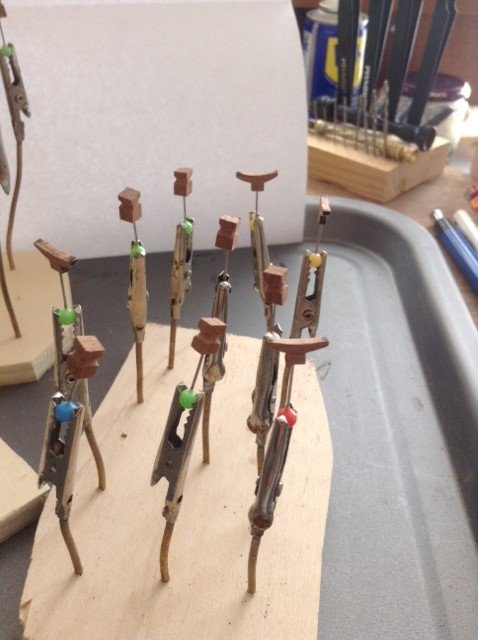
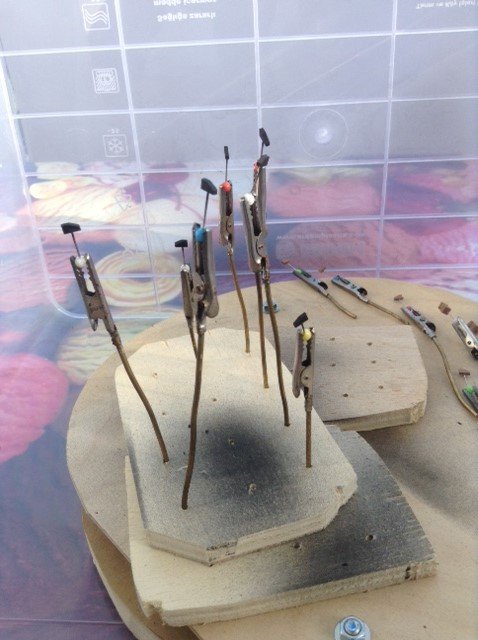
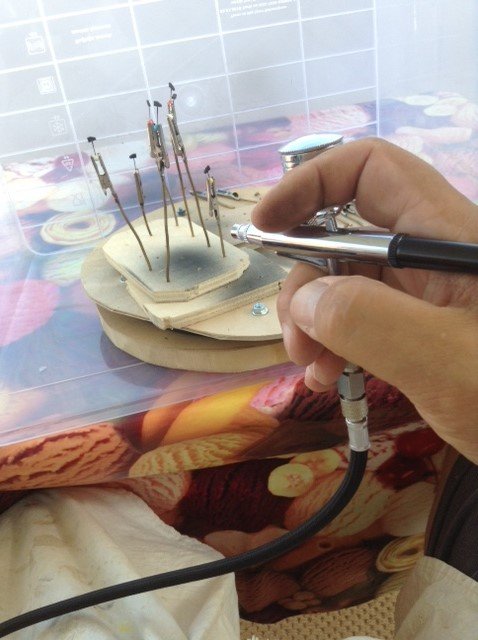
- 121 replies
-
- 4
-
-
- bounty
- constructo
- (and 1 more)
-
Big apology guys you'll see that I've added two of the same photo DOH!
-
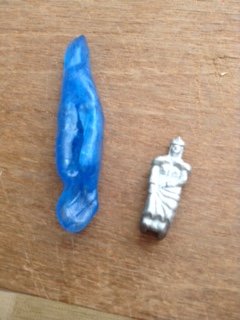
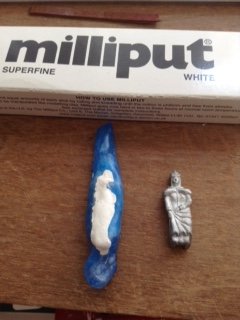
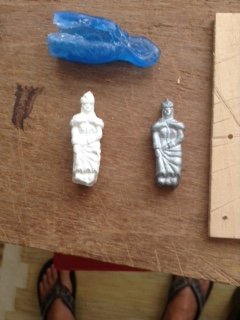
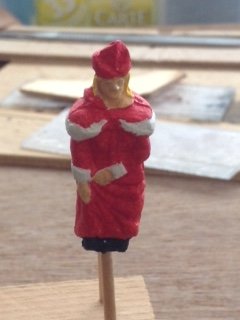
When I was over in the UK I bought some 'Blue Stuff'. If you've never heard of it or used it check it out on YouTube. Basically I bought it to replicate items such as the figurehead so I could practice on it as I've never done any close miniature painting before. Anyway here are some photos showing what I did with it - melt the blue Thermo Plastic in boiling water; wrap it around the metal figurehead and let it set (about 10mins); take the figurehead out of the mould; mix some Milliput and push it into the mould; leave to set and remove the replica. The beauty is that the Blue Stuff can be used over and over again - just melt it in boiling water - magic! She's not the prettiest girl in the world but she's mine! This stuff has many uses and I hope it gives you some ideas.
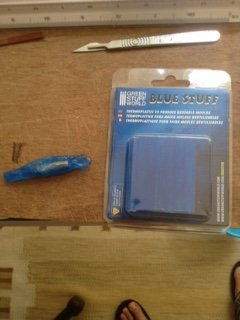
- 121 replies
-
- 3
-
-
- bounty
- constructo
- (and 1 more)
-
Beautiful work!! Looking at the lower decks I wish mine were the same but I suppose that's the chance I took as a first time builder. Good luck (I don't think you'll need it) and I look forward to following your great log.
-
Hi Jeff, you're really getting there well done for perseverance. Don't beat yourself up over having to check everything on the kit as I'm having to do the same on my Constructo kit. The cannon were really poor compared to the book so I re made the carriages from scratch, unfortunately it seems to be a fact of life with these kits. As for re making or re fashioning any part one thing I have done is buy a mixed box of balsa wood which is dead cheap any easy to work with and I've made patterns with it to prove my ideas work rather than wasting time money and effort on the best wood. Regarding the holes I drilled mine at each end of the slot and joined them by filing. Keep up the good work mate.
-
Thank you Mustafa, it's nice to be warm again but unfortunately when I try to get on with modeling the sweat from my brow is causing me a few problems!! Maybe I'll have to go slowly till we get below 30 degrees C.
- 121 replies
-
- 1
-
-
- bounty
- constructo
- (and 1 more)
-
Wow Jeff you are really up against it mate. I presume that the frames etc are to scale as per the original kit? I've not progressed to the Victory yet (as you know) so I'm probably not the right person to give advice, but looking at it objectively and if as you say you are not looking for 100% authenticity, then I would start by veneering any exposed plywood. I presume that if the gun port is obstructed by the frame and you cannot mount a cannon properly then make it so that it looks aesthetically correct from the outside. In other words frigg it. This may not be the answer you're looking for but I'm with you and feel your pain mate. Keep positive and I'm sure more experienced guys will come up with a better solution.
-
Hi Guys, back from my annual trip to good old England and I had a great time with the family and Grandchildren but now I'm ready to get back in the shipyard. Had a 20kg case in the hold of the plane full of modeling goodies and not a single item of clothing! Check out my newest purchase - Really looking forward to trying this out. I've bought a very cheap solid hull Bluenose kit so I can practice on that before I use it for painting the Bounty. I hope all my followers have had a great summer and I hope to be posting some 'proper' work soon.

- 121 replies
-
- 1
-
-
- bounty
- constructo
- (and 1 more)