


jfhealey
-
Posts
359 -
Joined
-
Last visited
Content Type
Profiles
Forums
Gallery
Events
Posts posted by jfhealey
-
-
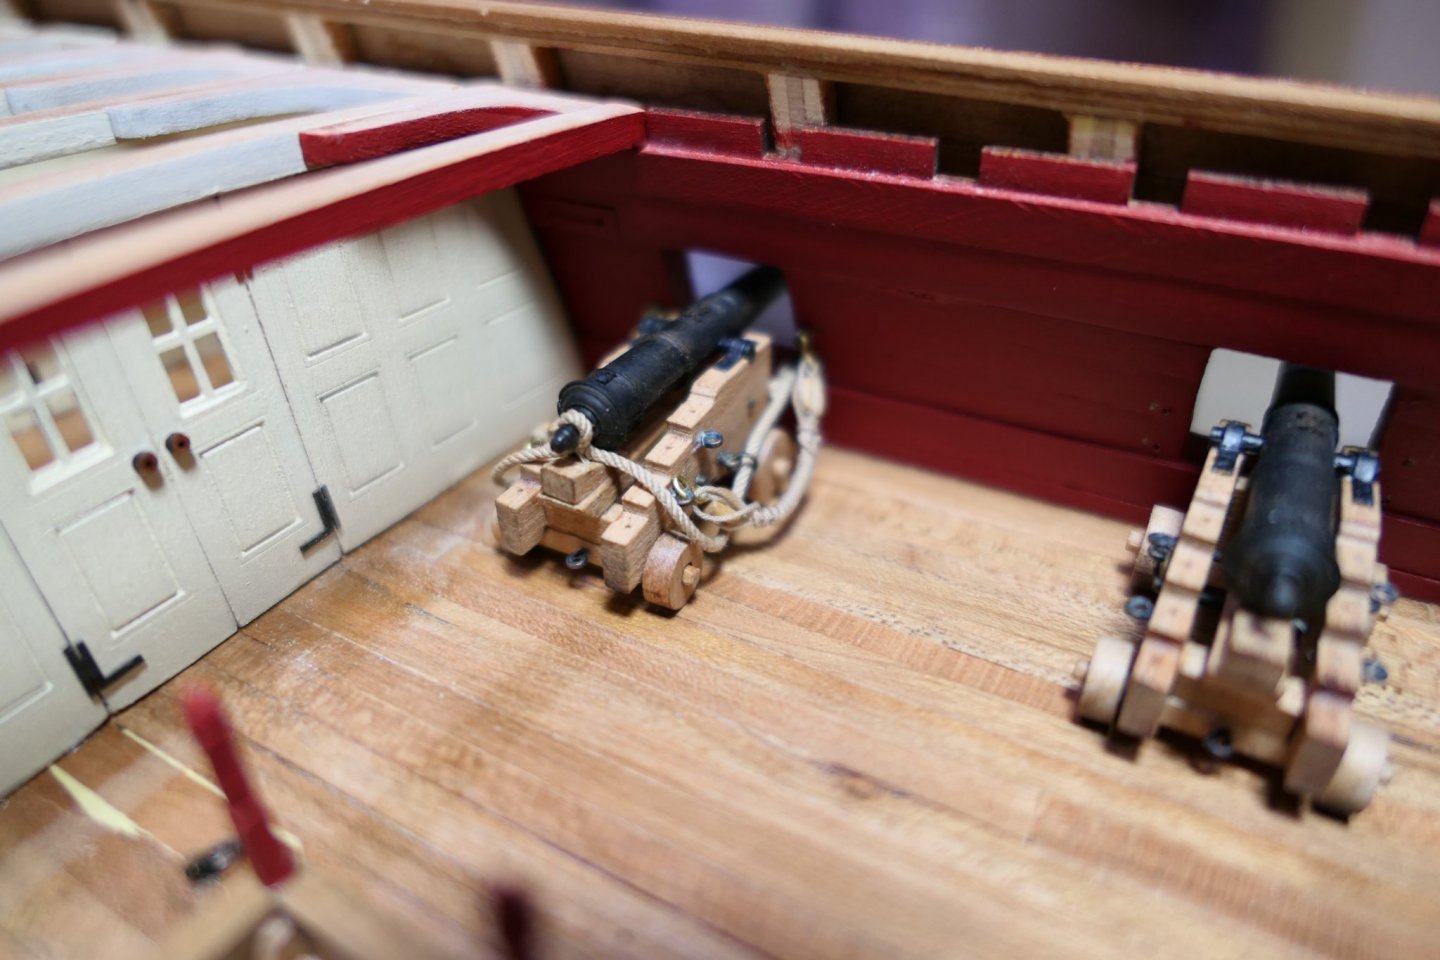
Six guns rigged. The first one took me ages. The sixth about an hour so the remainder are do-able - slow and patient are the watchwords here.
.thumb.jpg.e363d64212cbfb3ad035866c2f4bc5eb.jpg)
I reckoned the boxwood filed rhodings were a bit above my skill level so I used microtubing soldered to brass strip. They are probably a little overscale but they are robust , functional and easy to make.
.jpg.fe71ec3e07831f966add48c9f6dba944.jpg)


The posts at either end are not yet glued down. I'm not at all sure about the wooden posts at the forward end. Should they be steel I wonder? I think I should certainly follow Chuck's simpler design. Every departure I've made from Chuck's instructions so far has come unstuck.
.thumb.jpg.288562c6fa3c9a5227acc1bf2a4bcad5.jpg)
All the best everyone.
Fred

-
Looking wonderful, Matthias. You must be thrilled with the result.
All the best
Fred
-
Chuck - you ask: "Should I design a 10 .... or settle for a quick 4 in results?"
My answer is in two parts. First I completely concur with the responses from my fellow Winnie builders set out above. Secondly I cannot help but feel you had your tongue firmly in your cheek when you posed your question. I suspect shooting for a 4 out of 10 outcome simply isn't in your DNA. You can leave the "that's close enough" approach to the likes of me. I'm constantly taking a deep breath and saying "slow down - take your time" . It's just........well, at least I'm getting better at model building but a way to go yet. Still I'm having fun and really looking forward to the 10 out of 10 tricky bits down the line.
All the best
Fred
- Ryland Craze, Gregory and FrankWouts
-
 3
3
-
That looks wonderful. But I can't help feeling: if that took you a day what hope is there for the likes of me. Hopefully you will turn your marvellous laser cutting skills to the task in hand and we will all produce something passable (and enjoyable to make).
Thank you for this terrific project.
Fred Healey
-
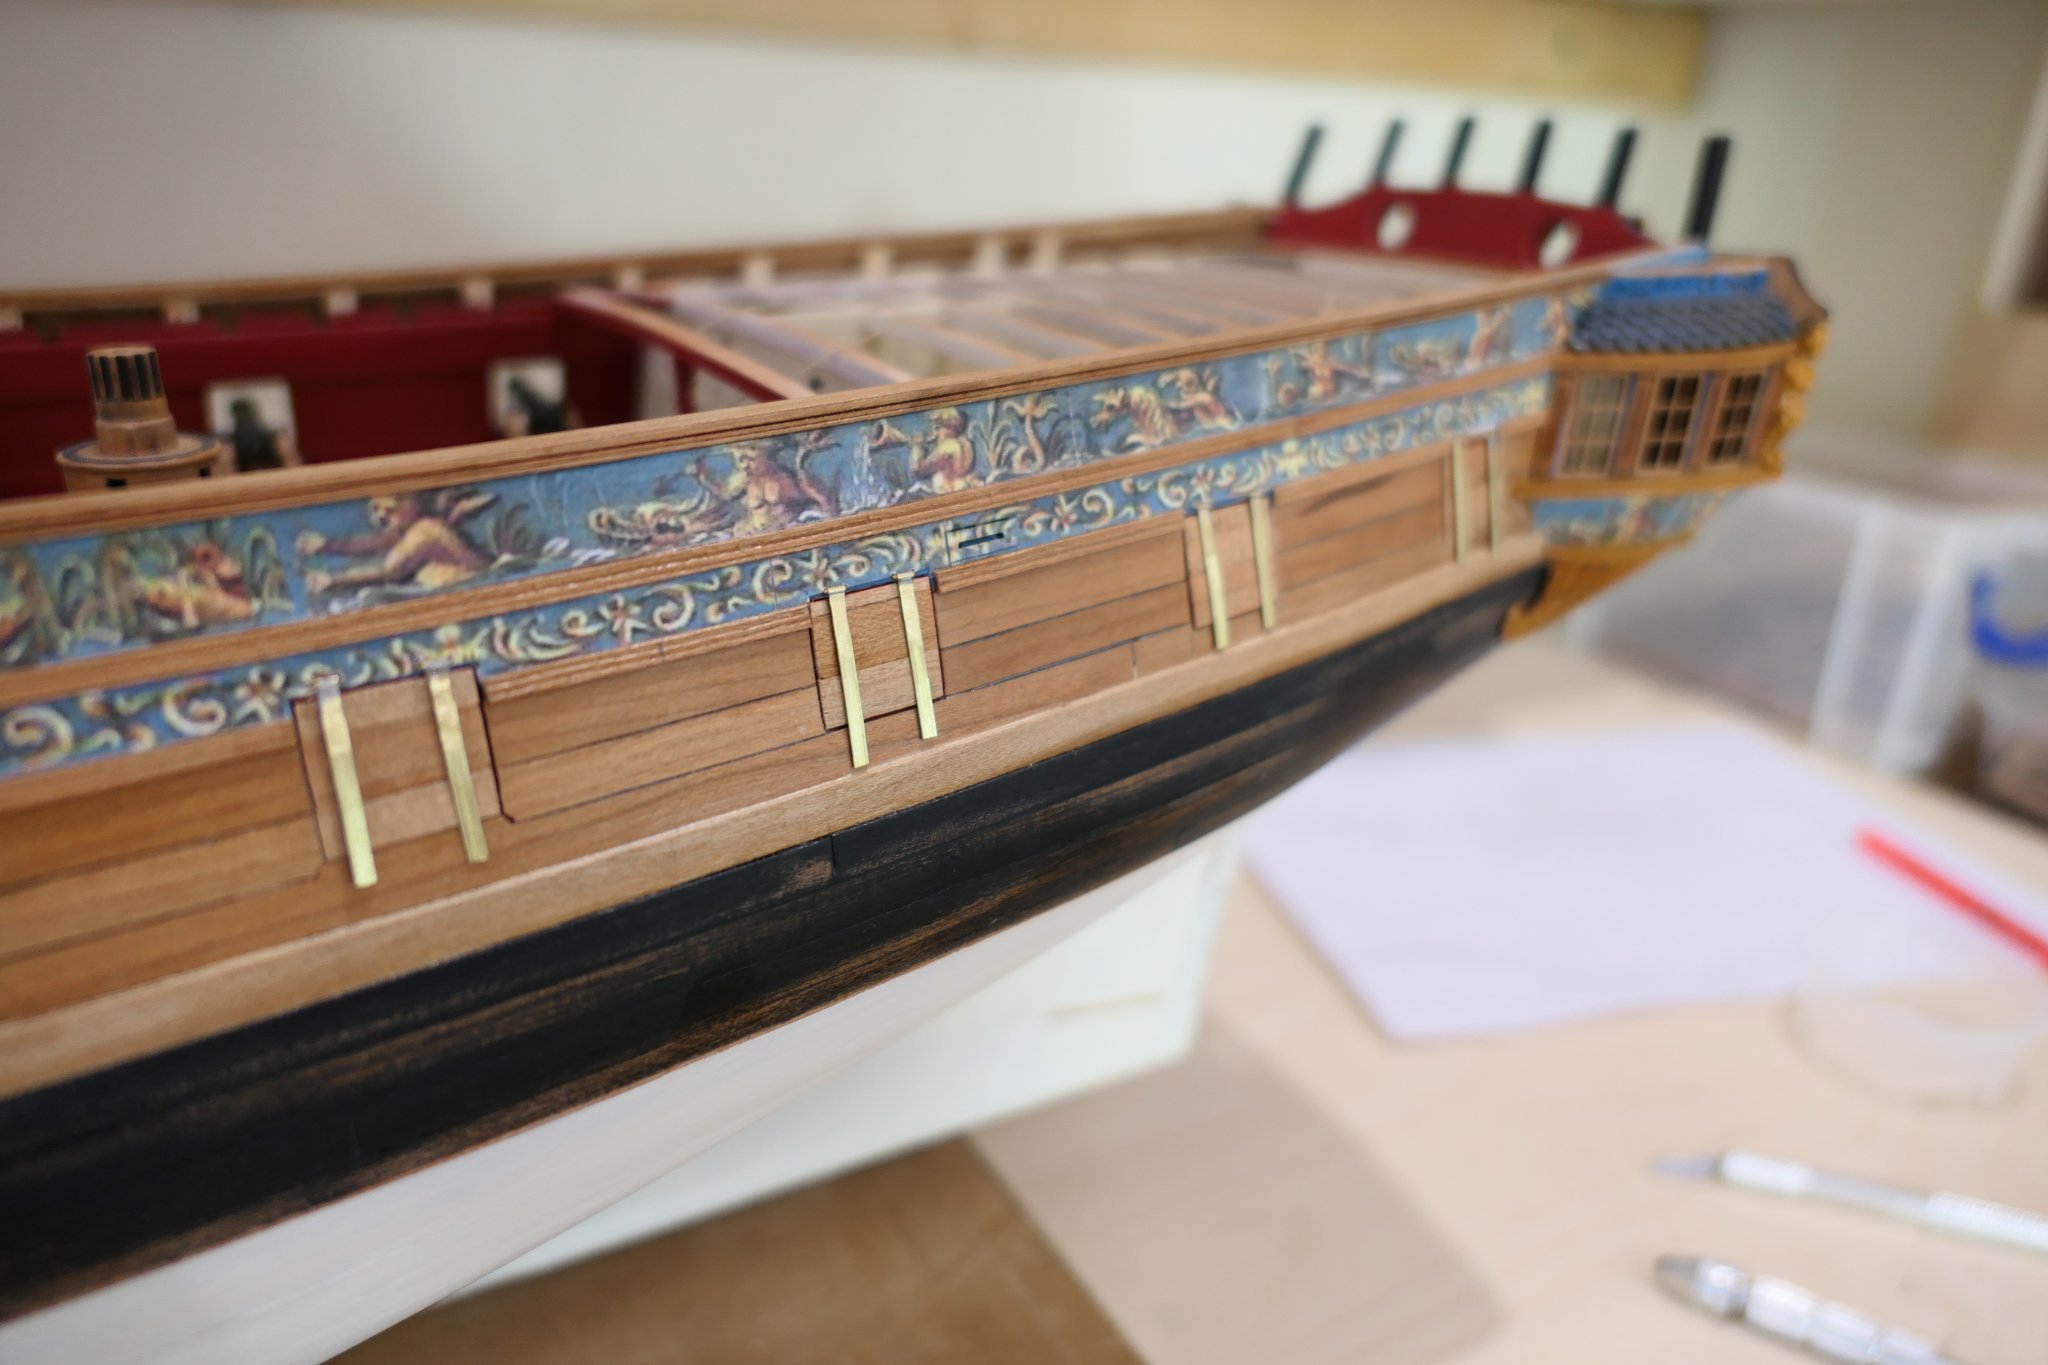
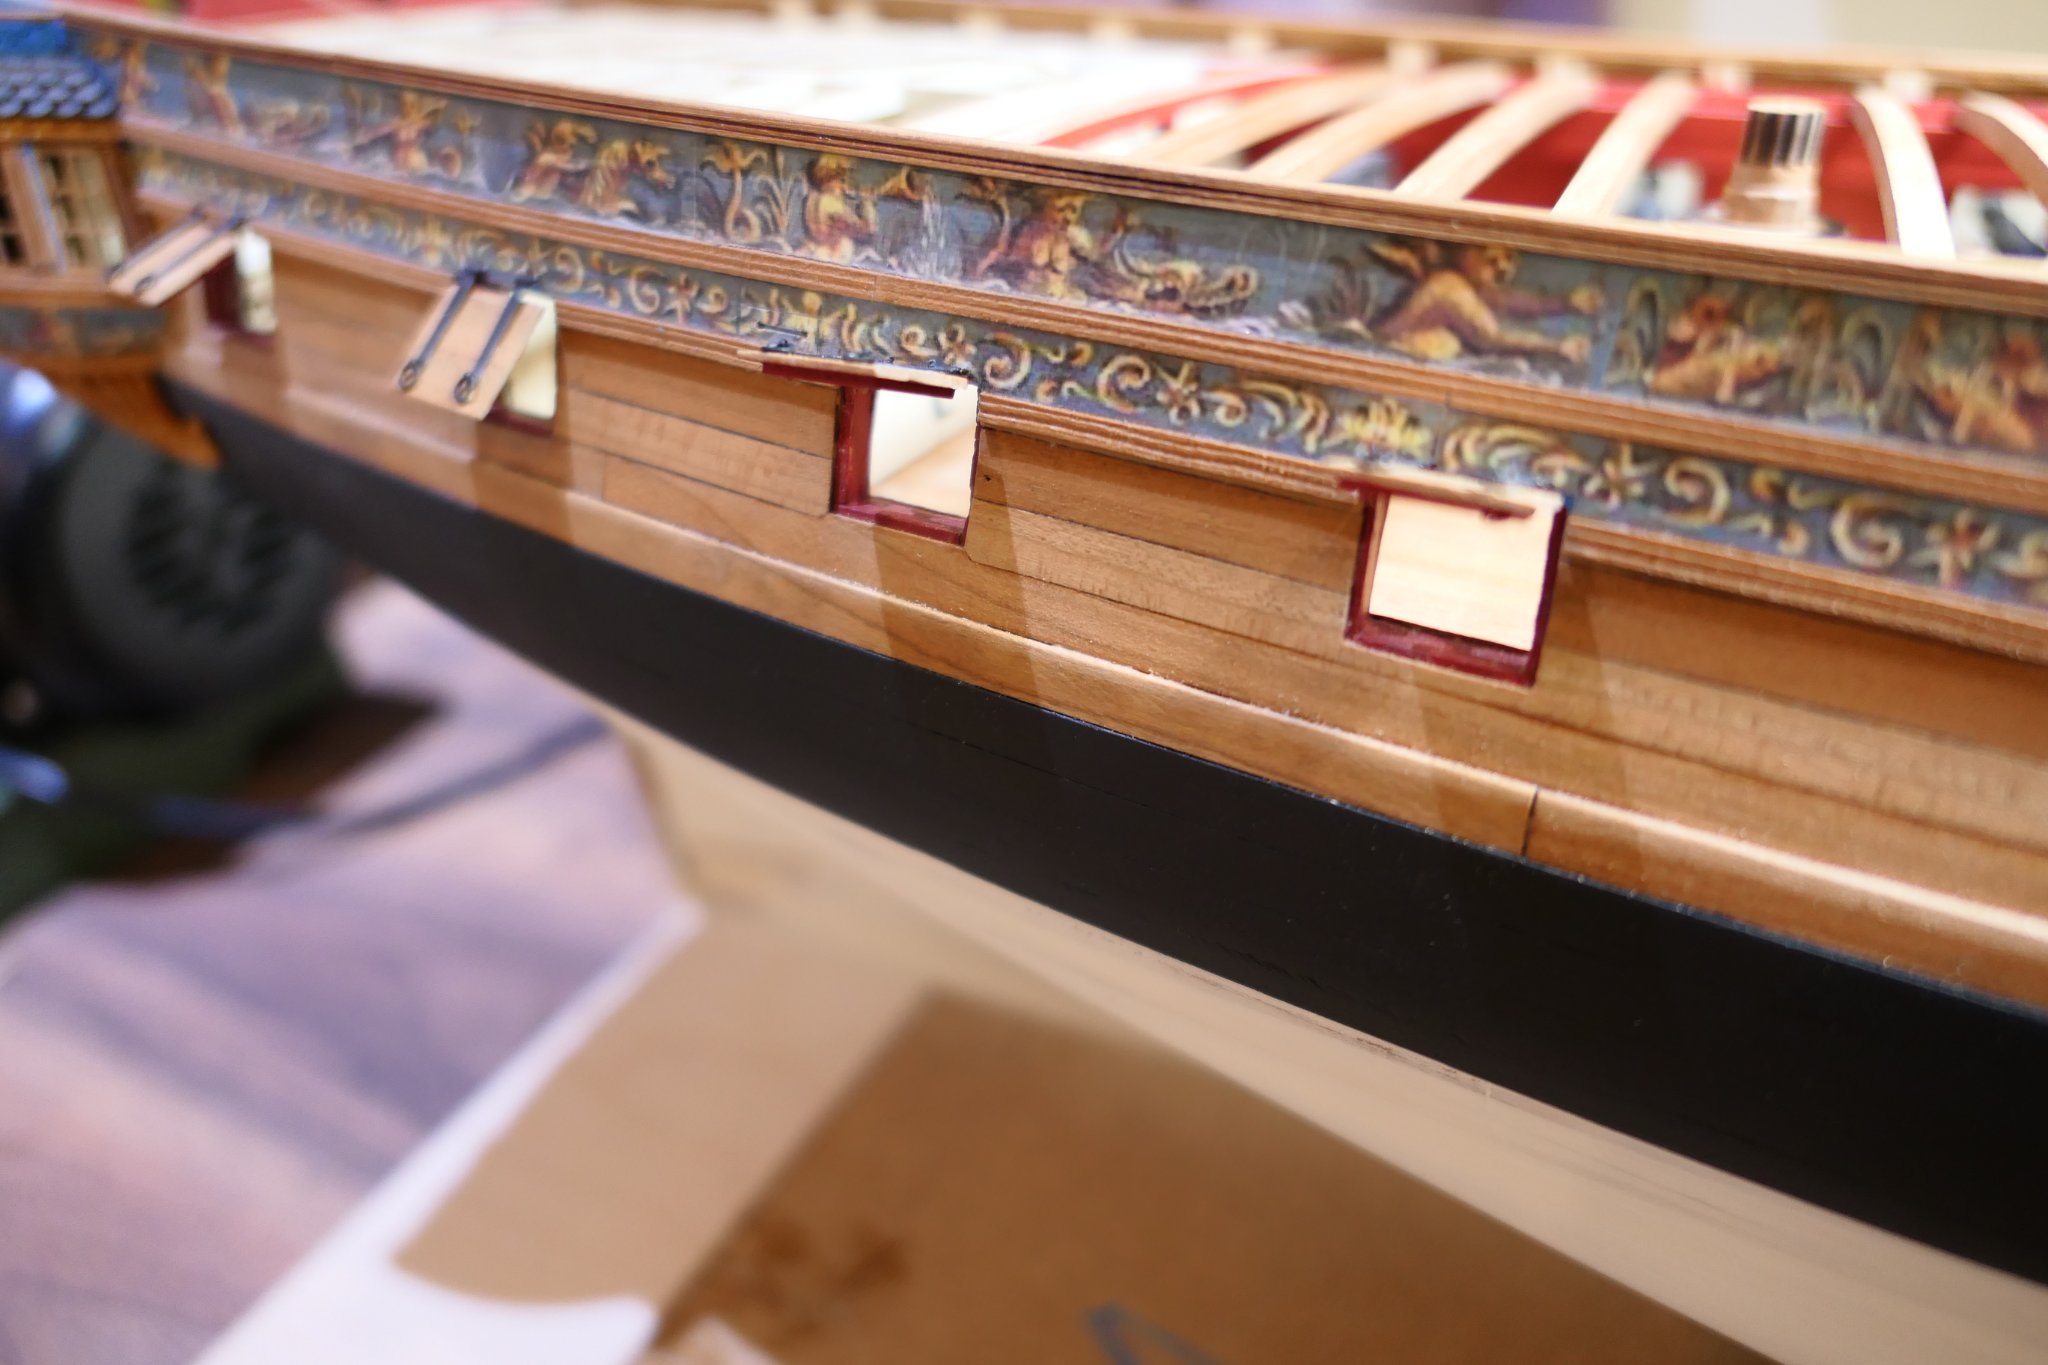
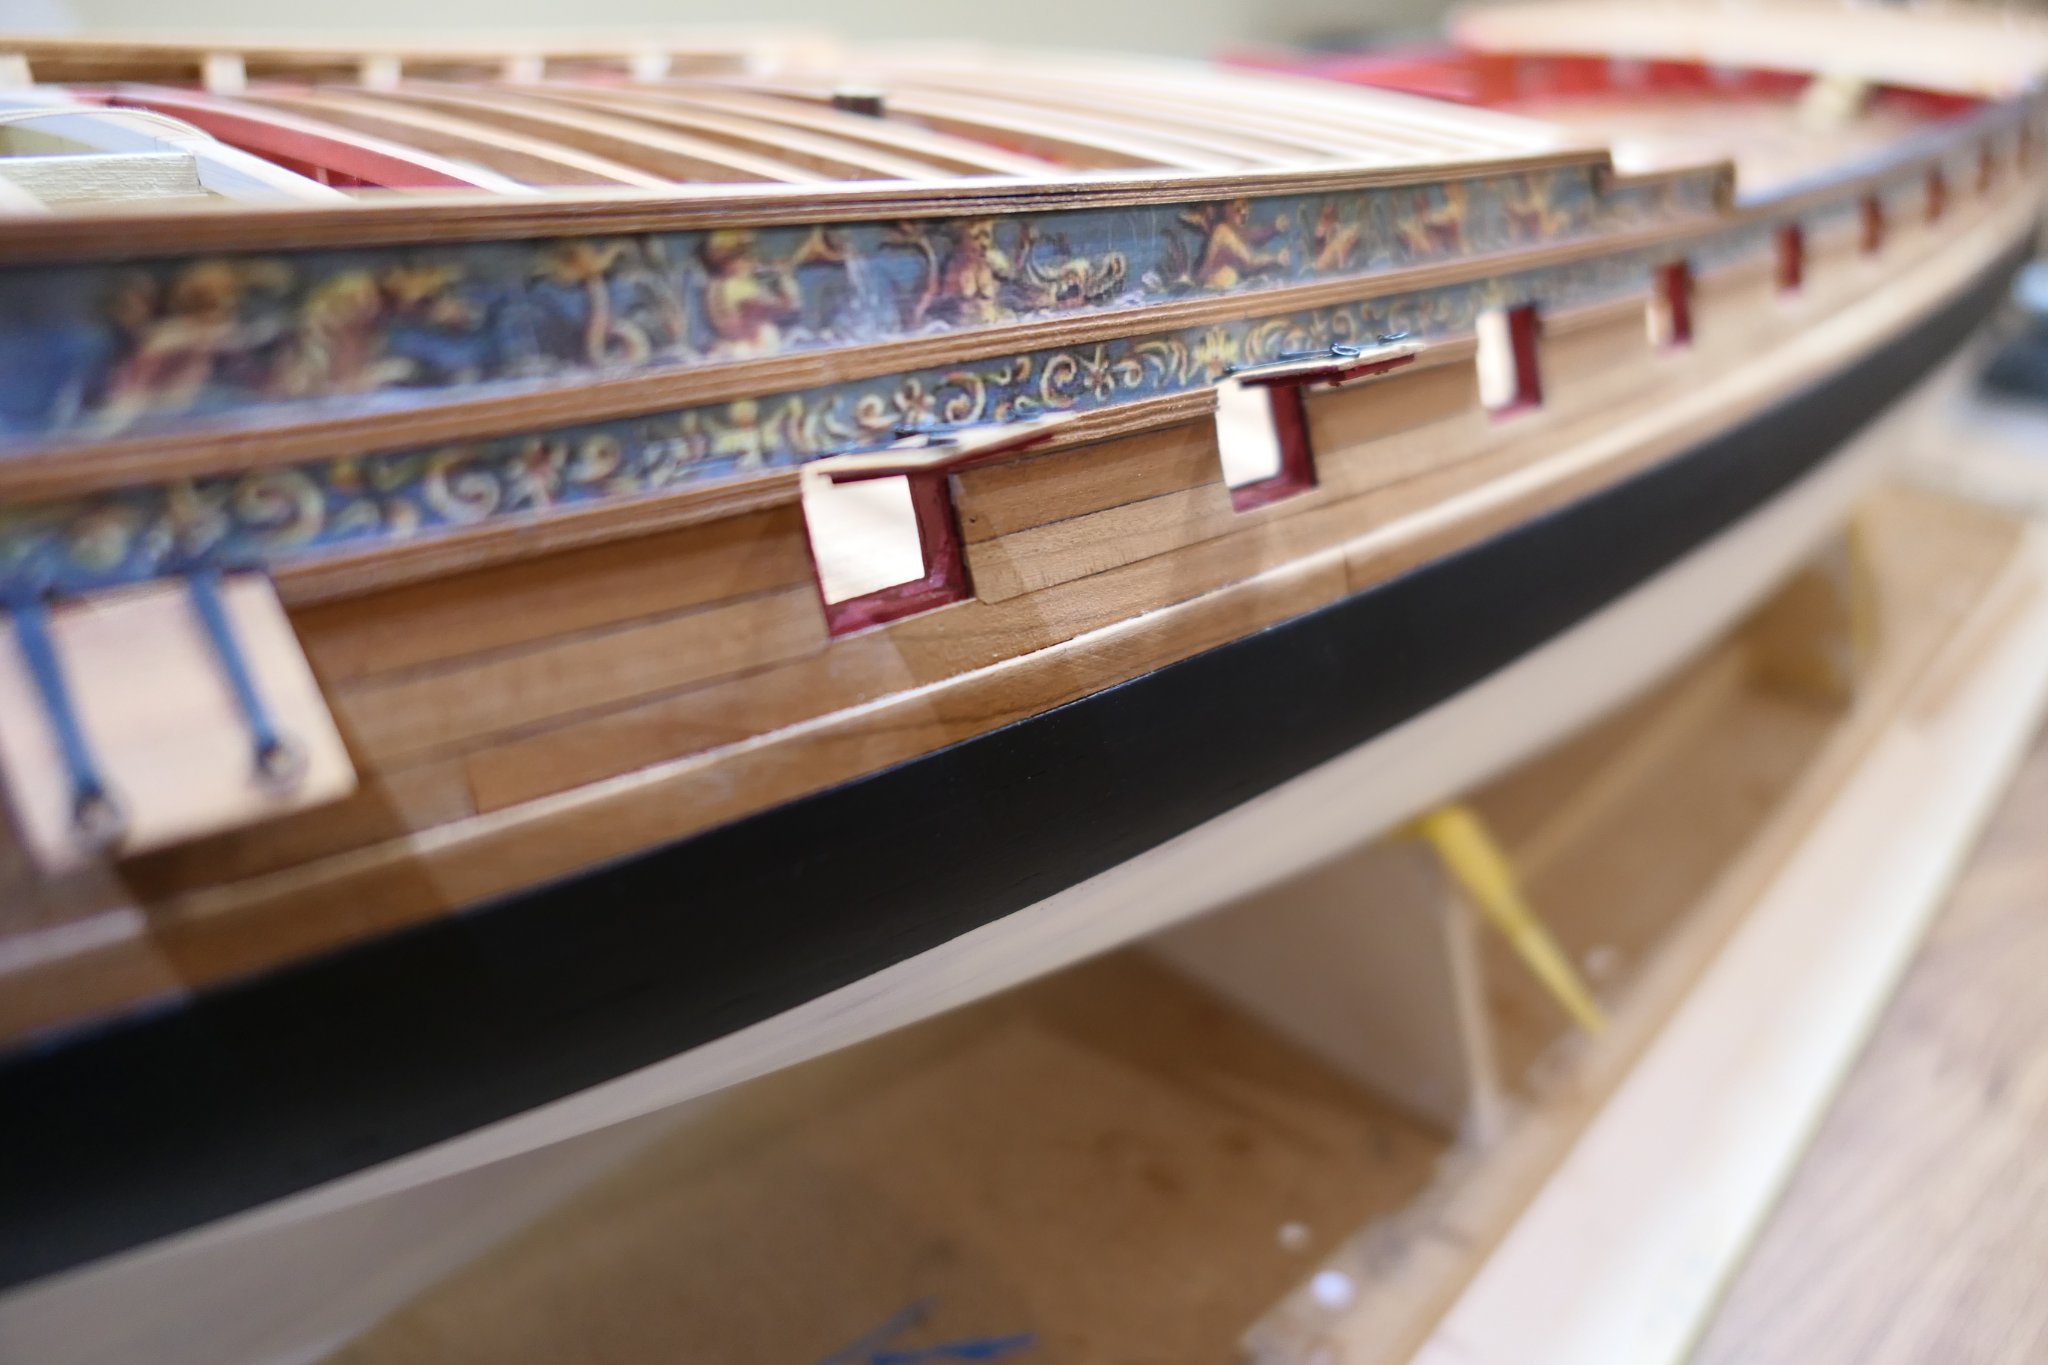
I could not get the hang of forming the gun port hinges with pliers so I soldered some micro tubing on to the hinge strap
.thumb.JPG.faaa7ccc7acdab6f48f3d98d21700de2.JPG)
.thumb.JPG.4dc27e731d302a6b569aa4864090aafc.JPG)

They work well enough as hinges but - there is always a but with my work -the opened gun ports don't line up very attractively.
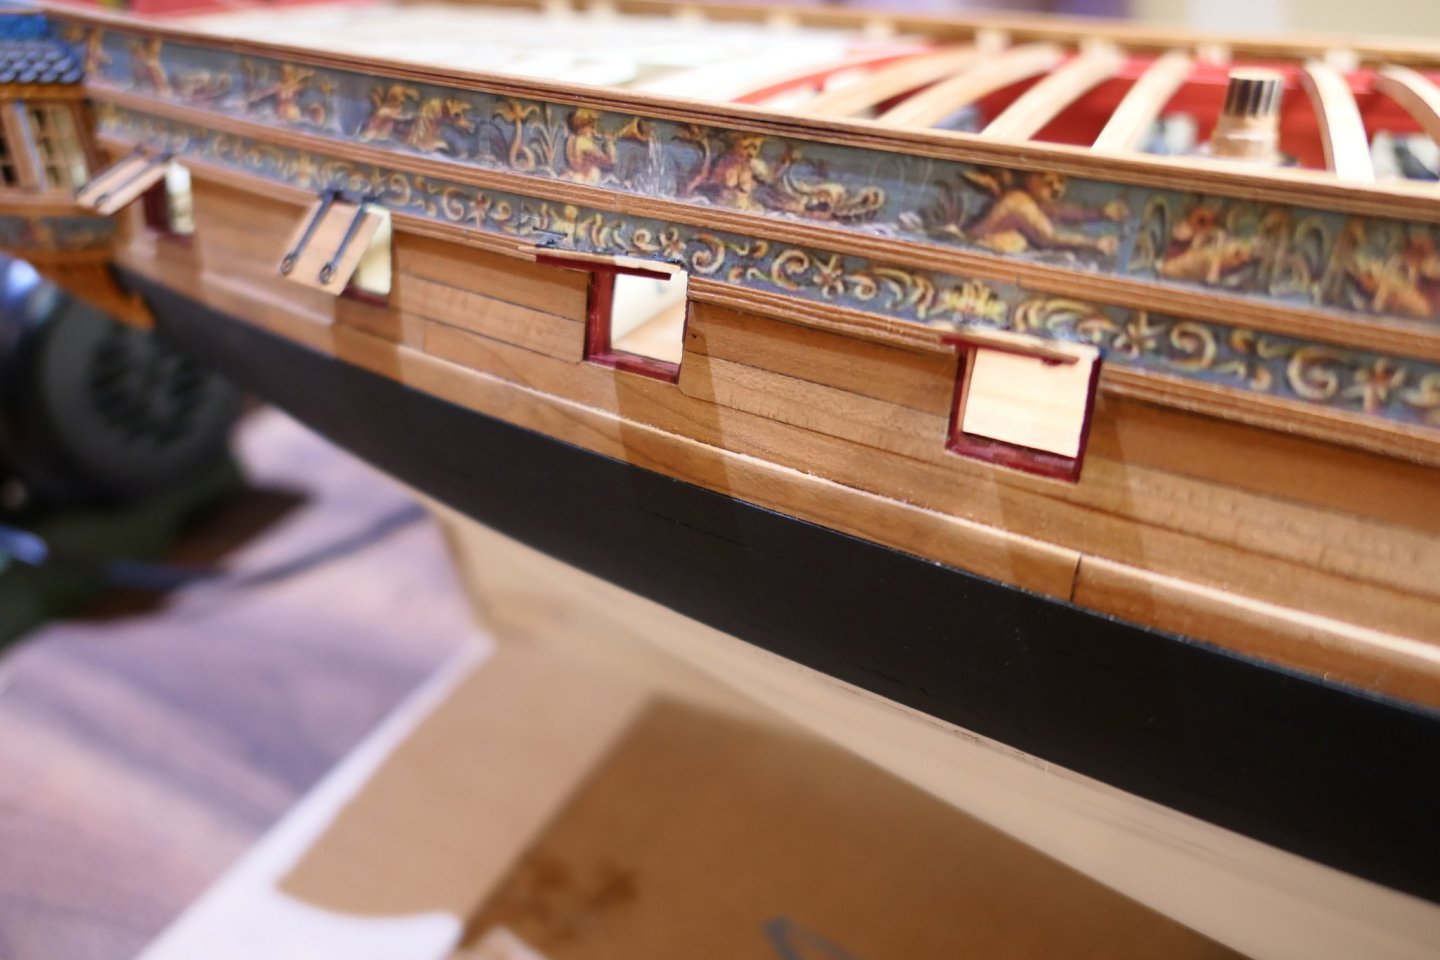
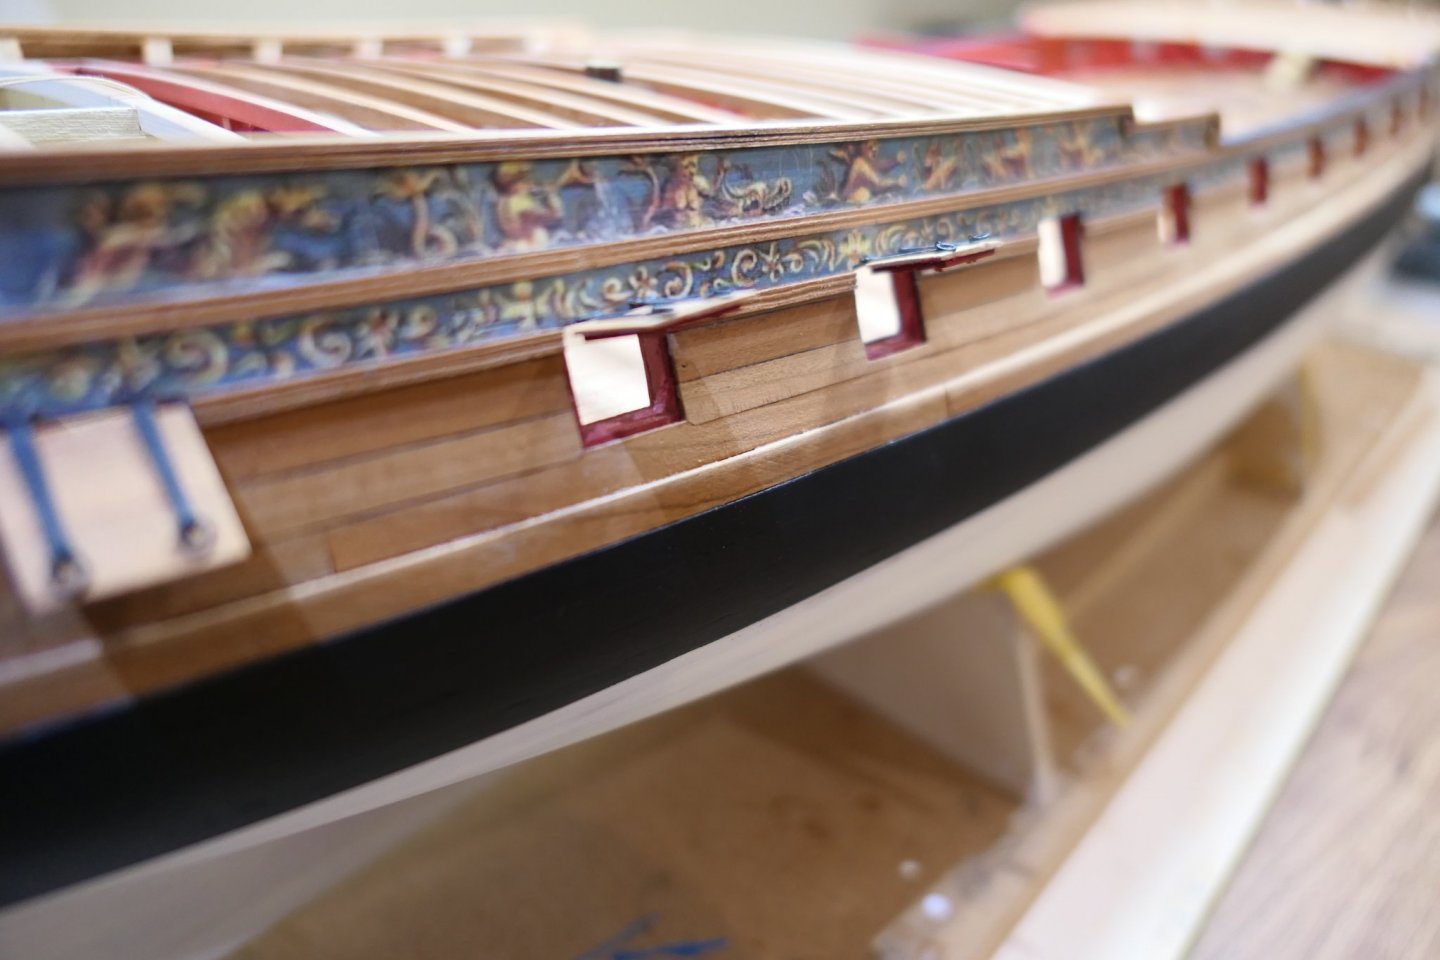
I don't know whether that is the result of complex geometry (opening a rhomboid shape) or poor execution. A bit of both perhaps. But I can live with it.
.thumb.JPG.3c829e6d77cab12bfef41c8dec2d3065.JPG)
.thumb.JPG.81d0be06a9de67c799ad16daffed8552.JPG)
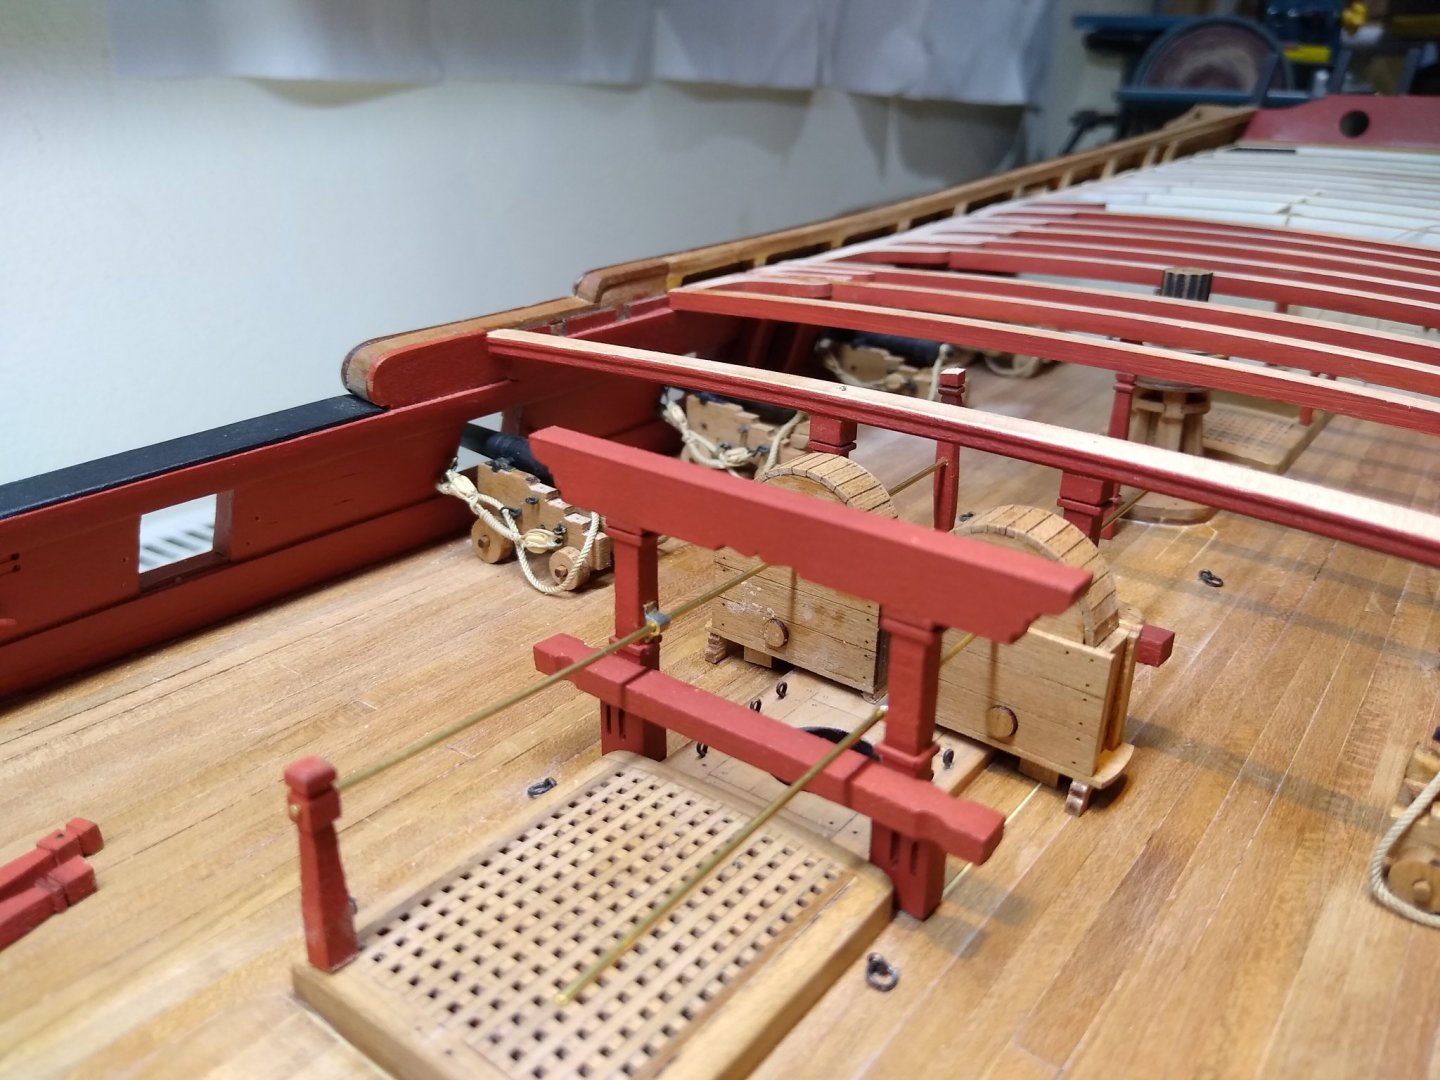
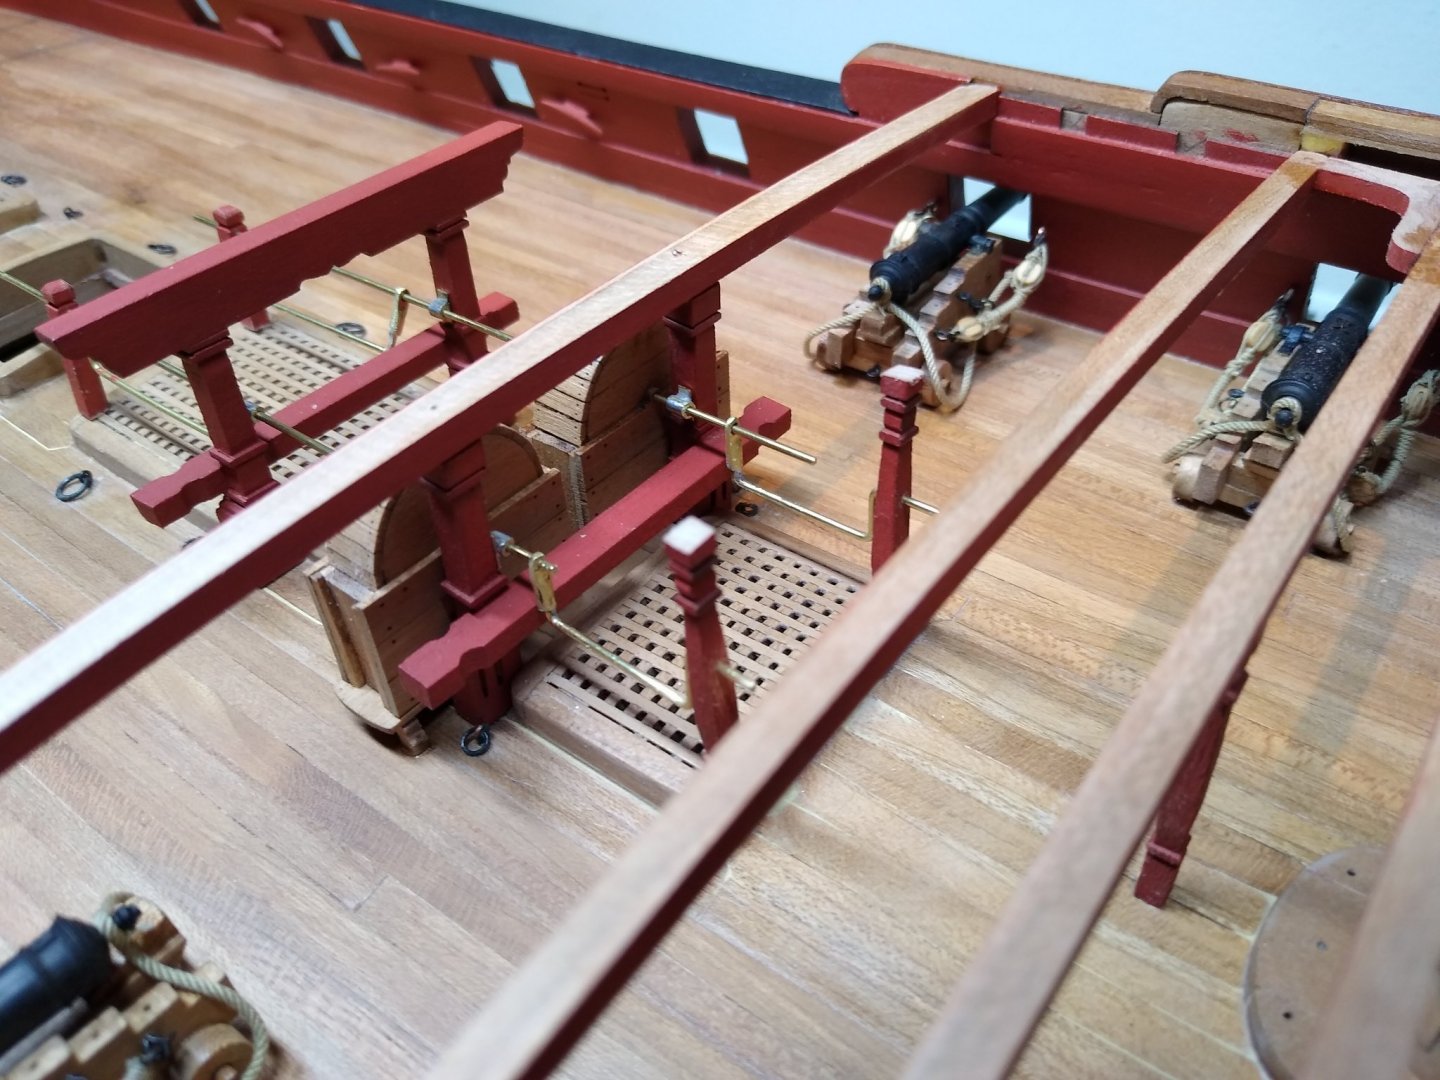
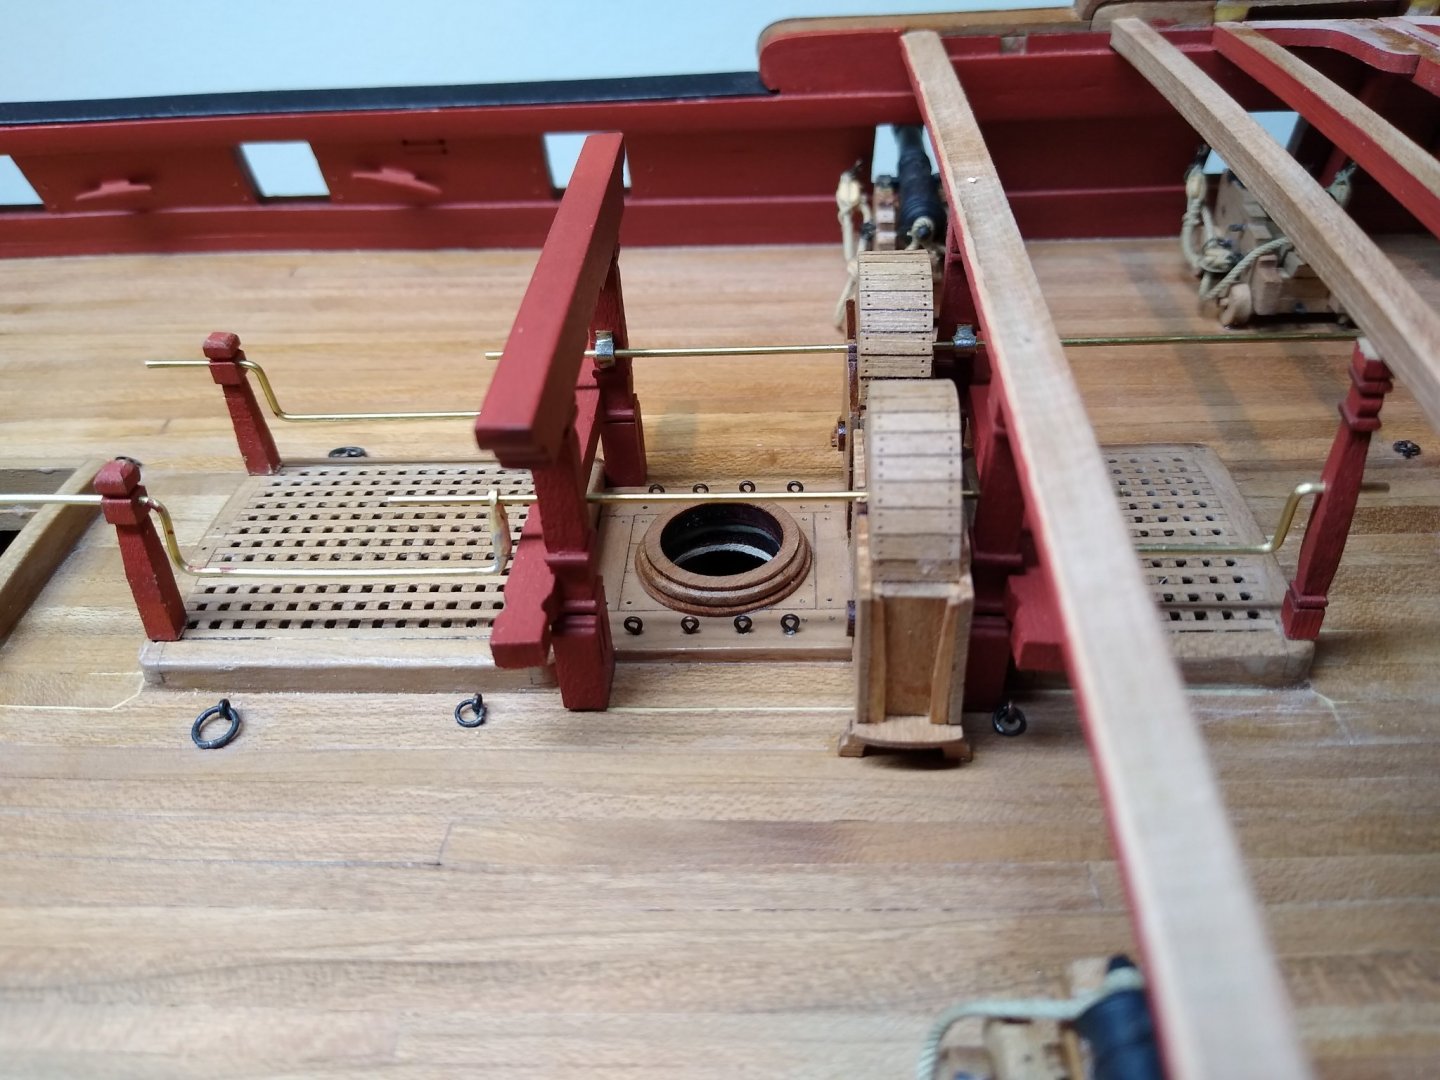
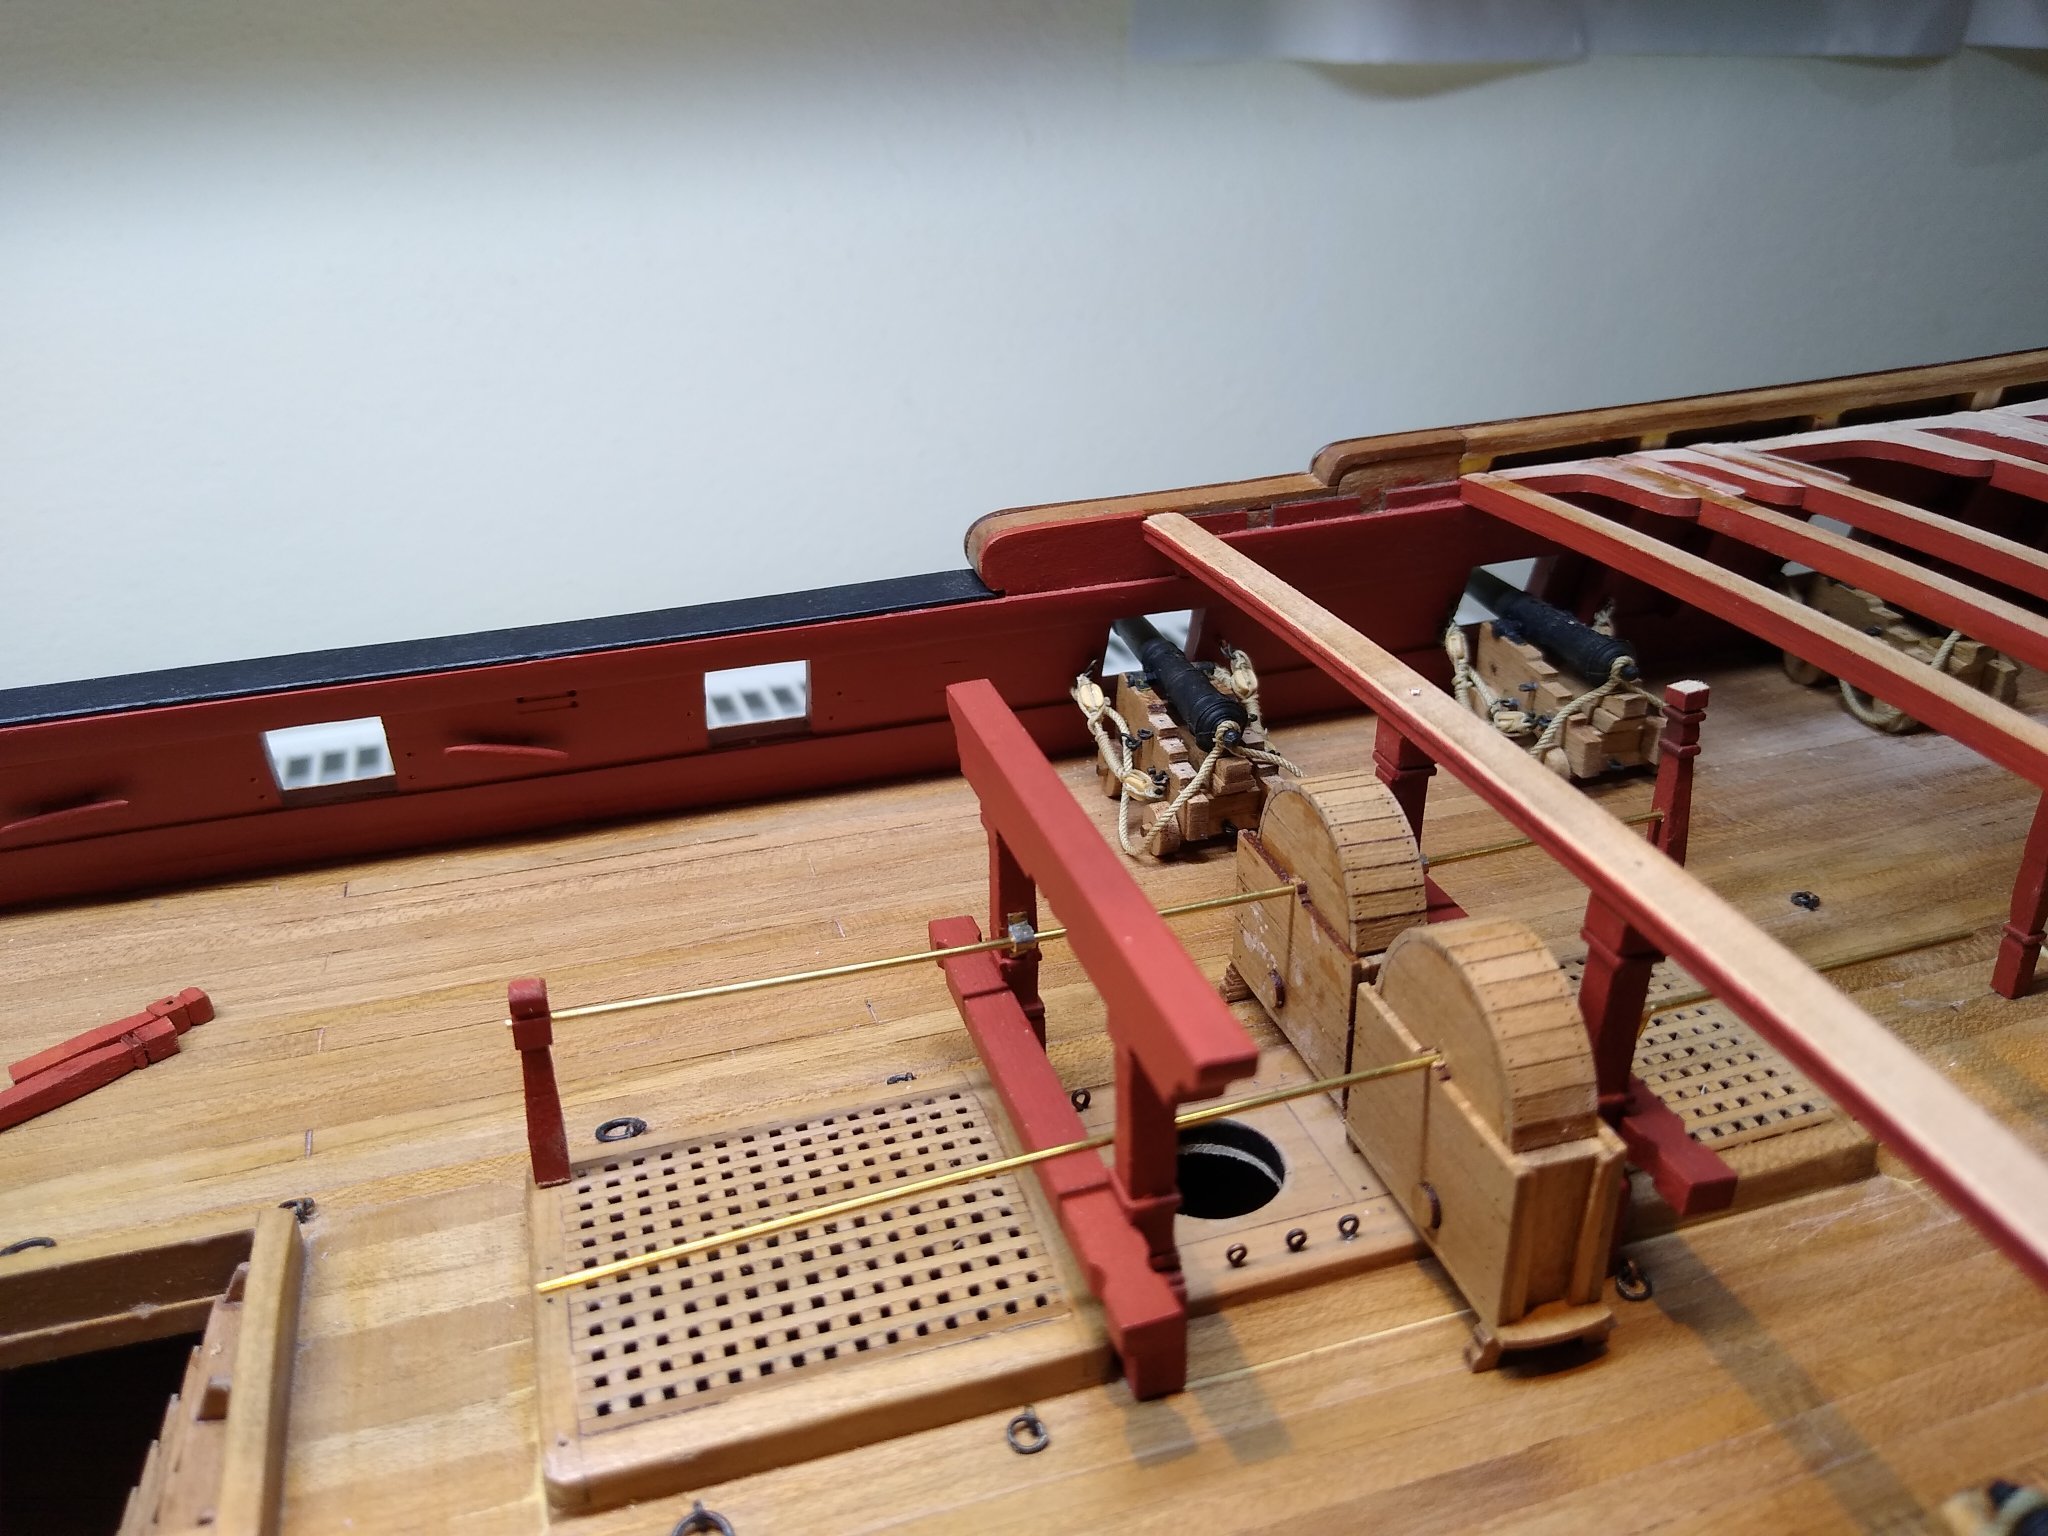
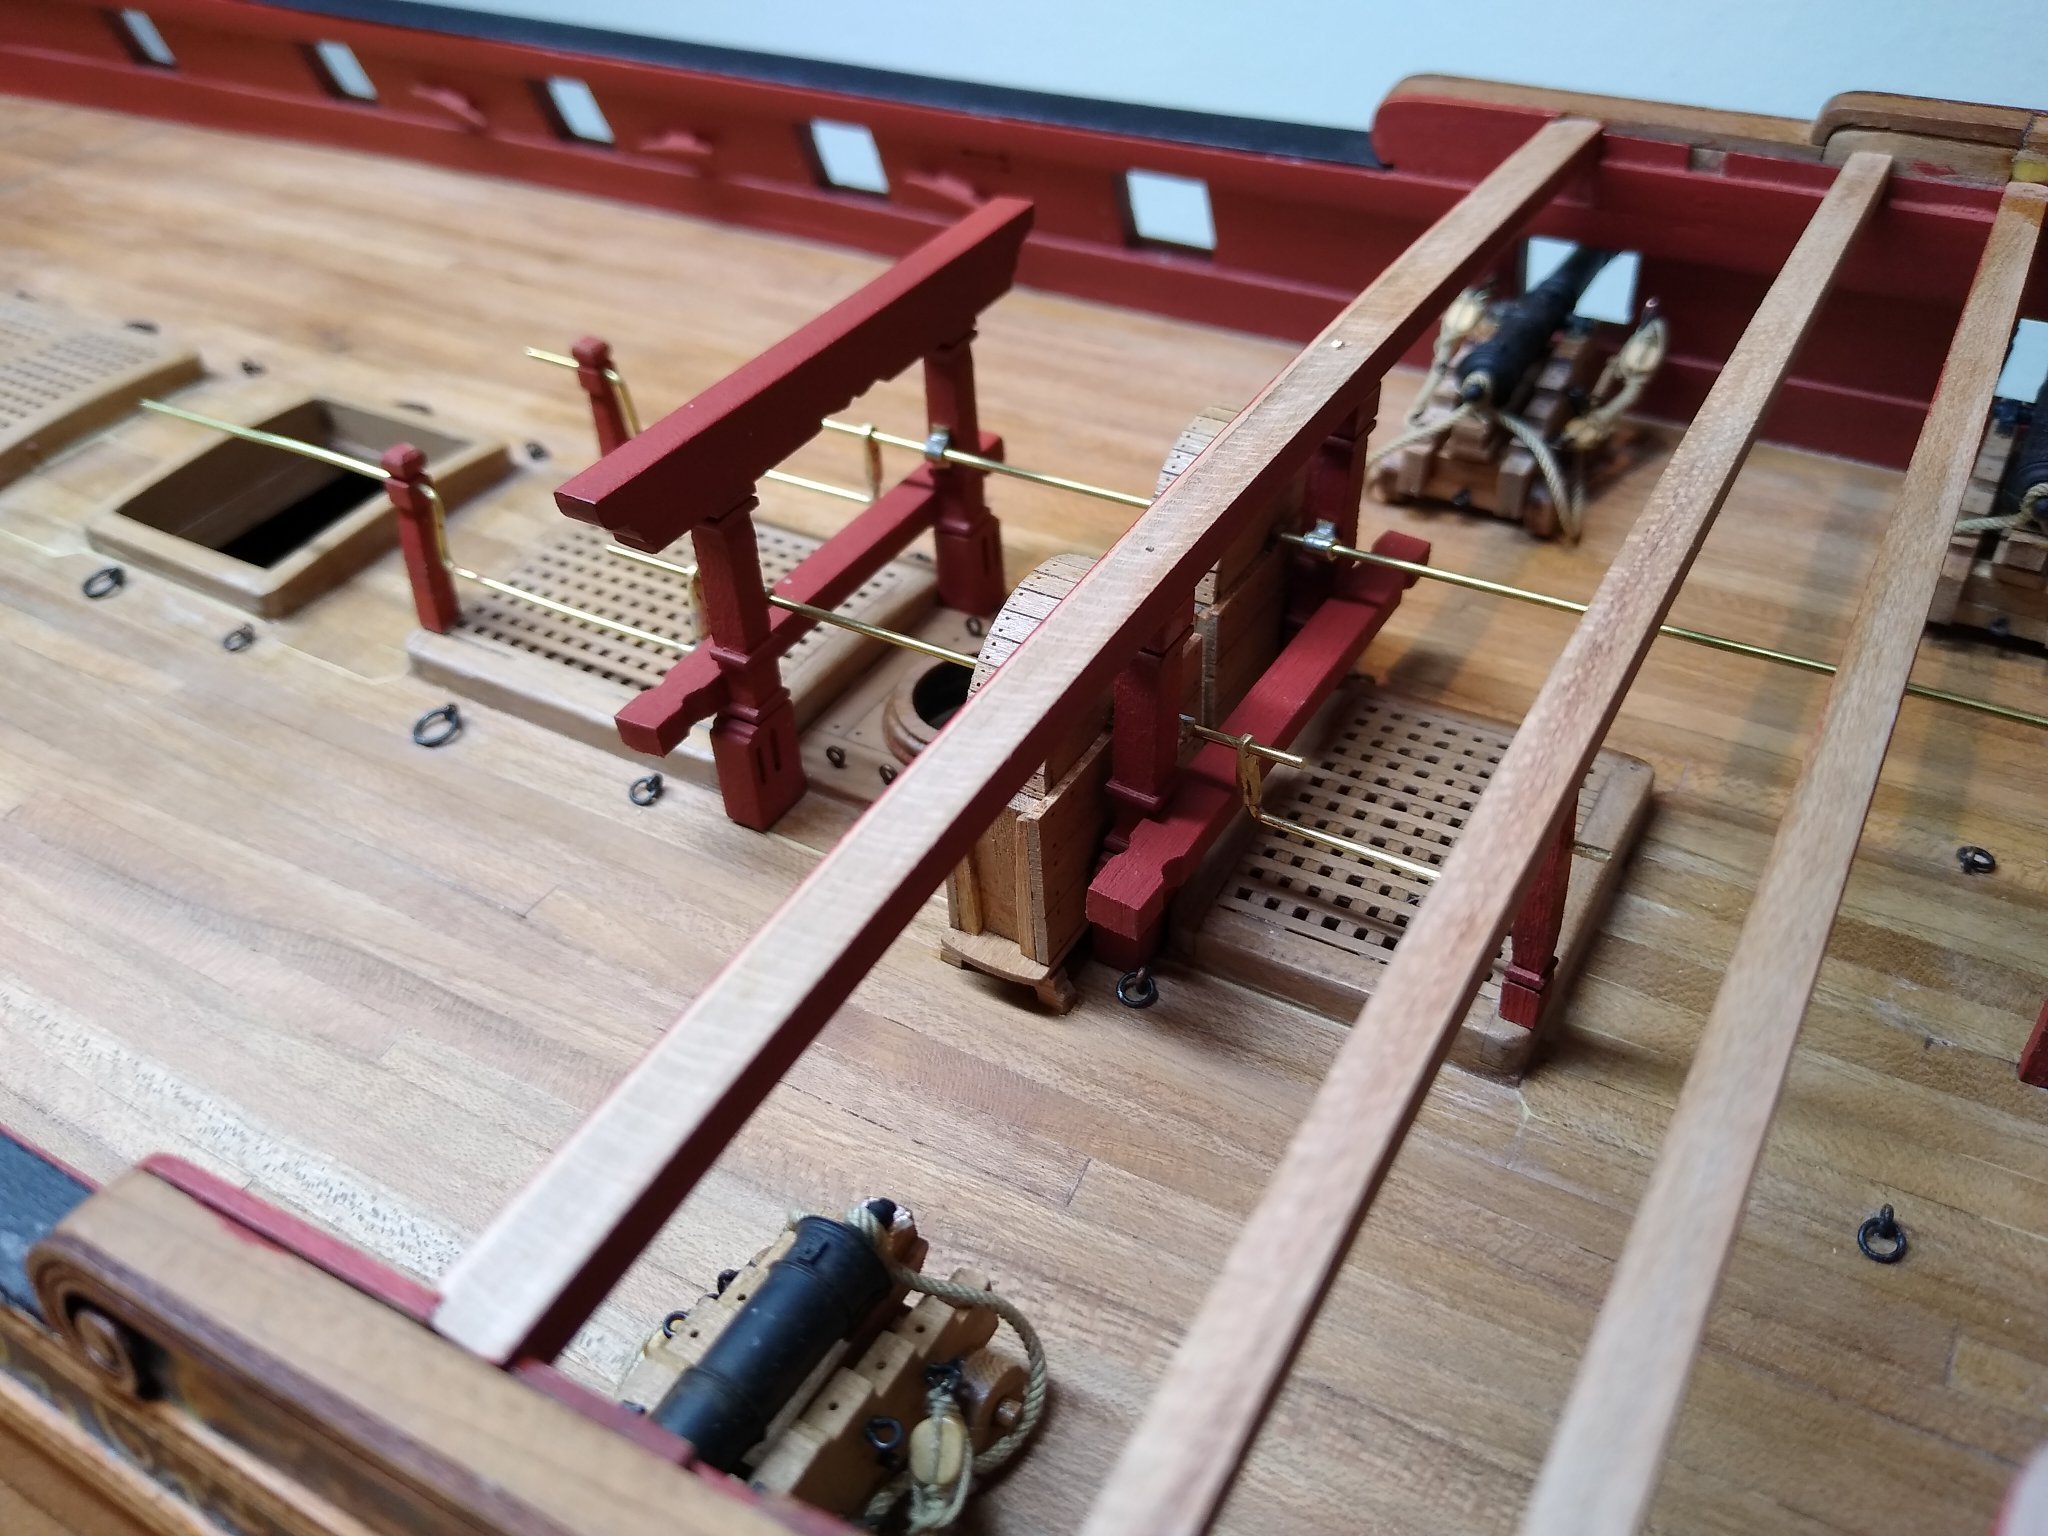
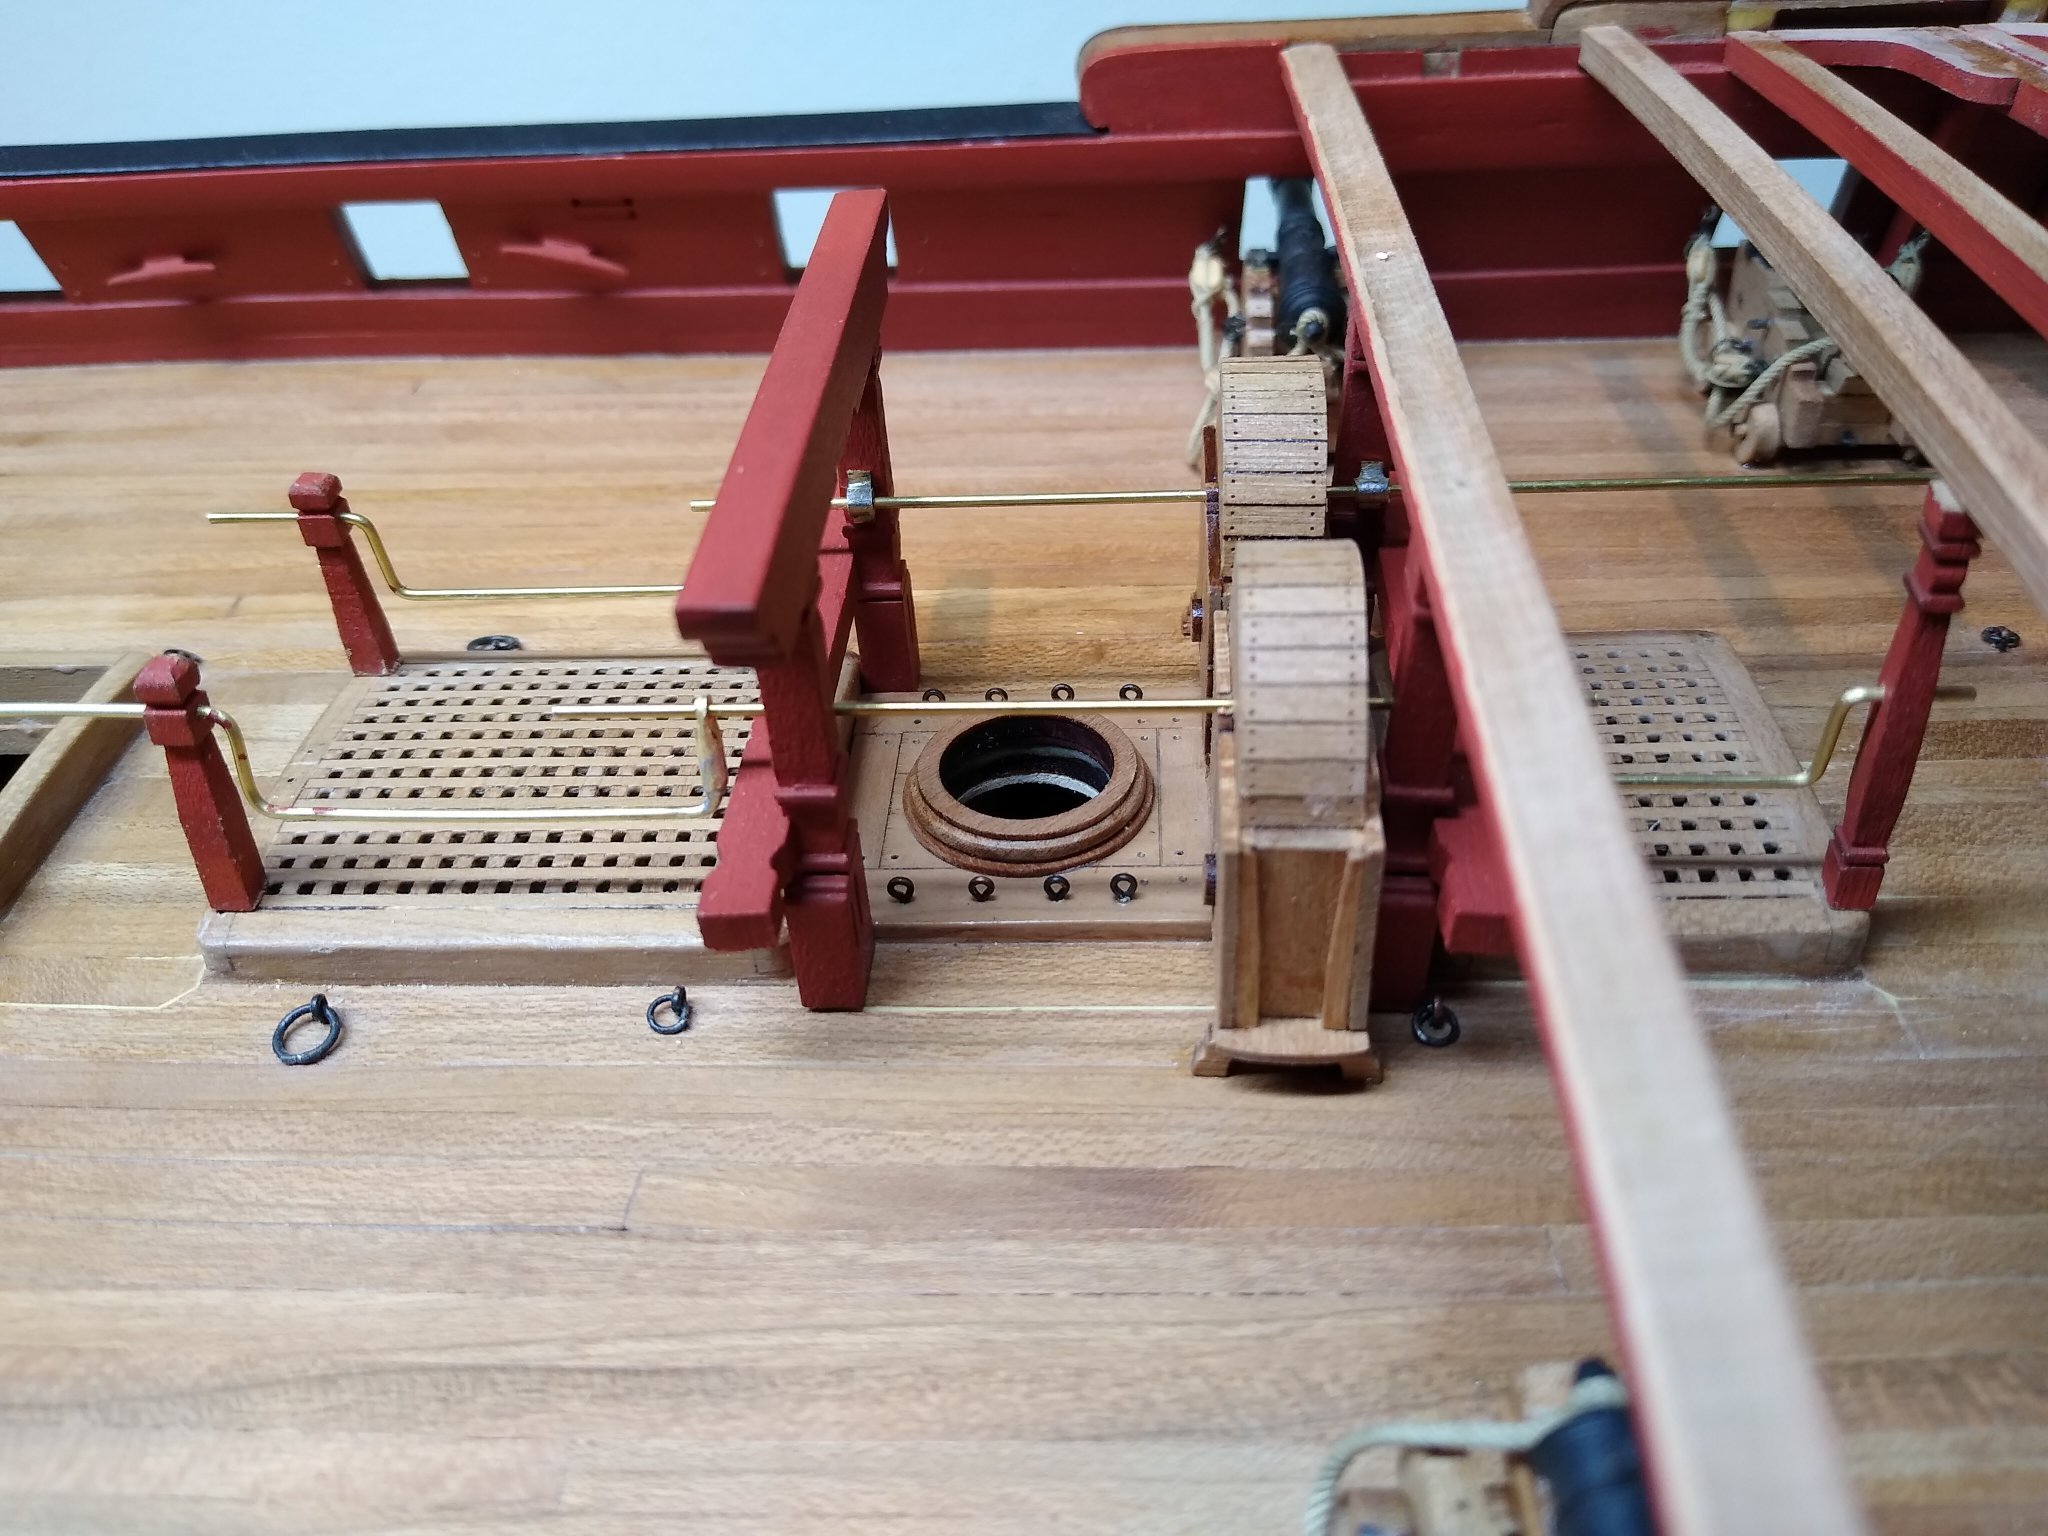
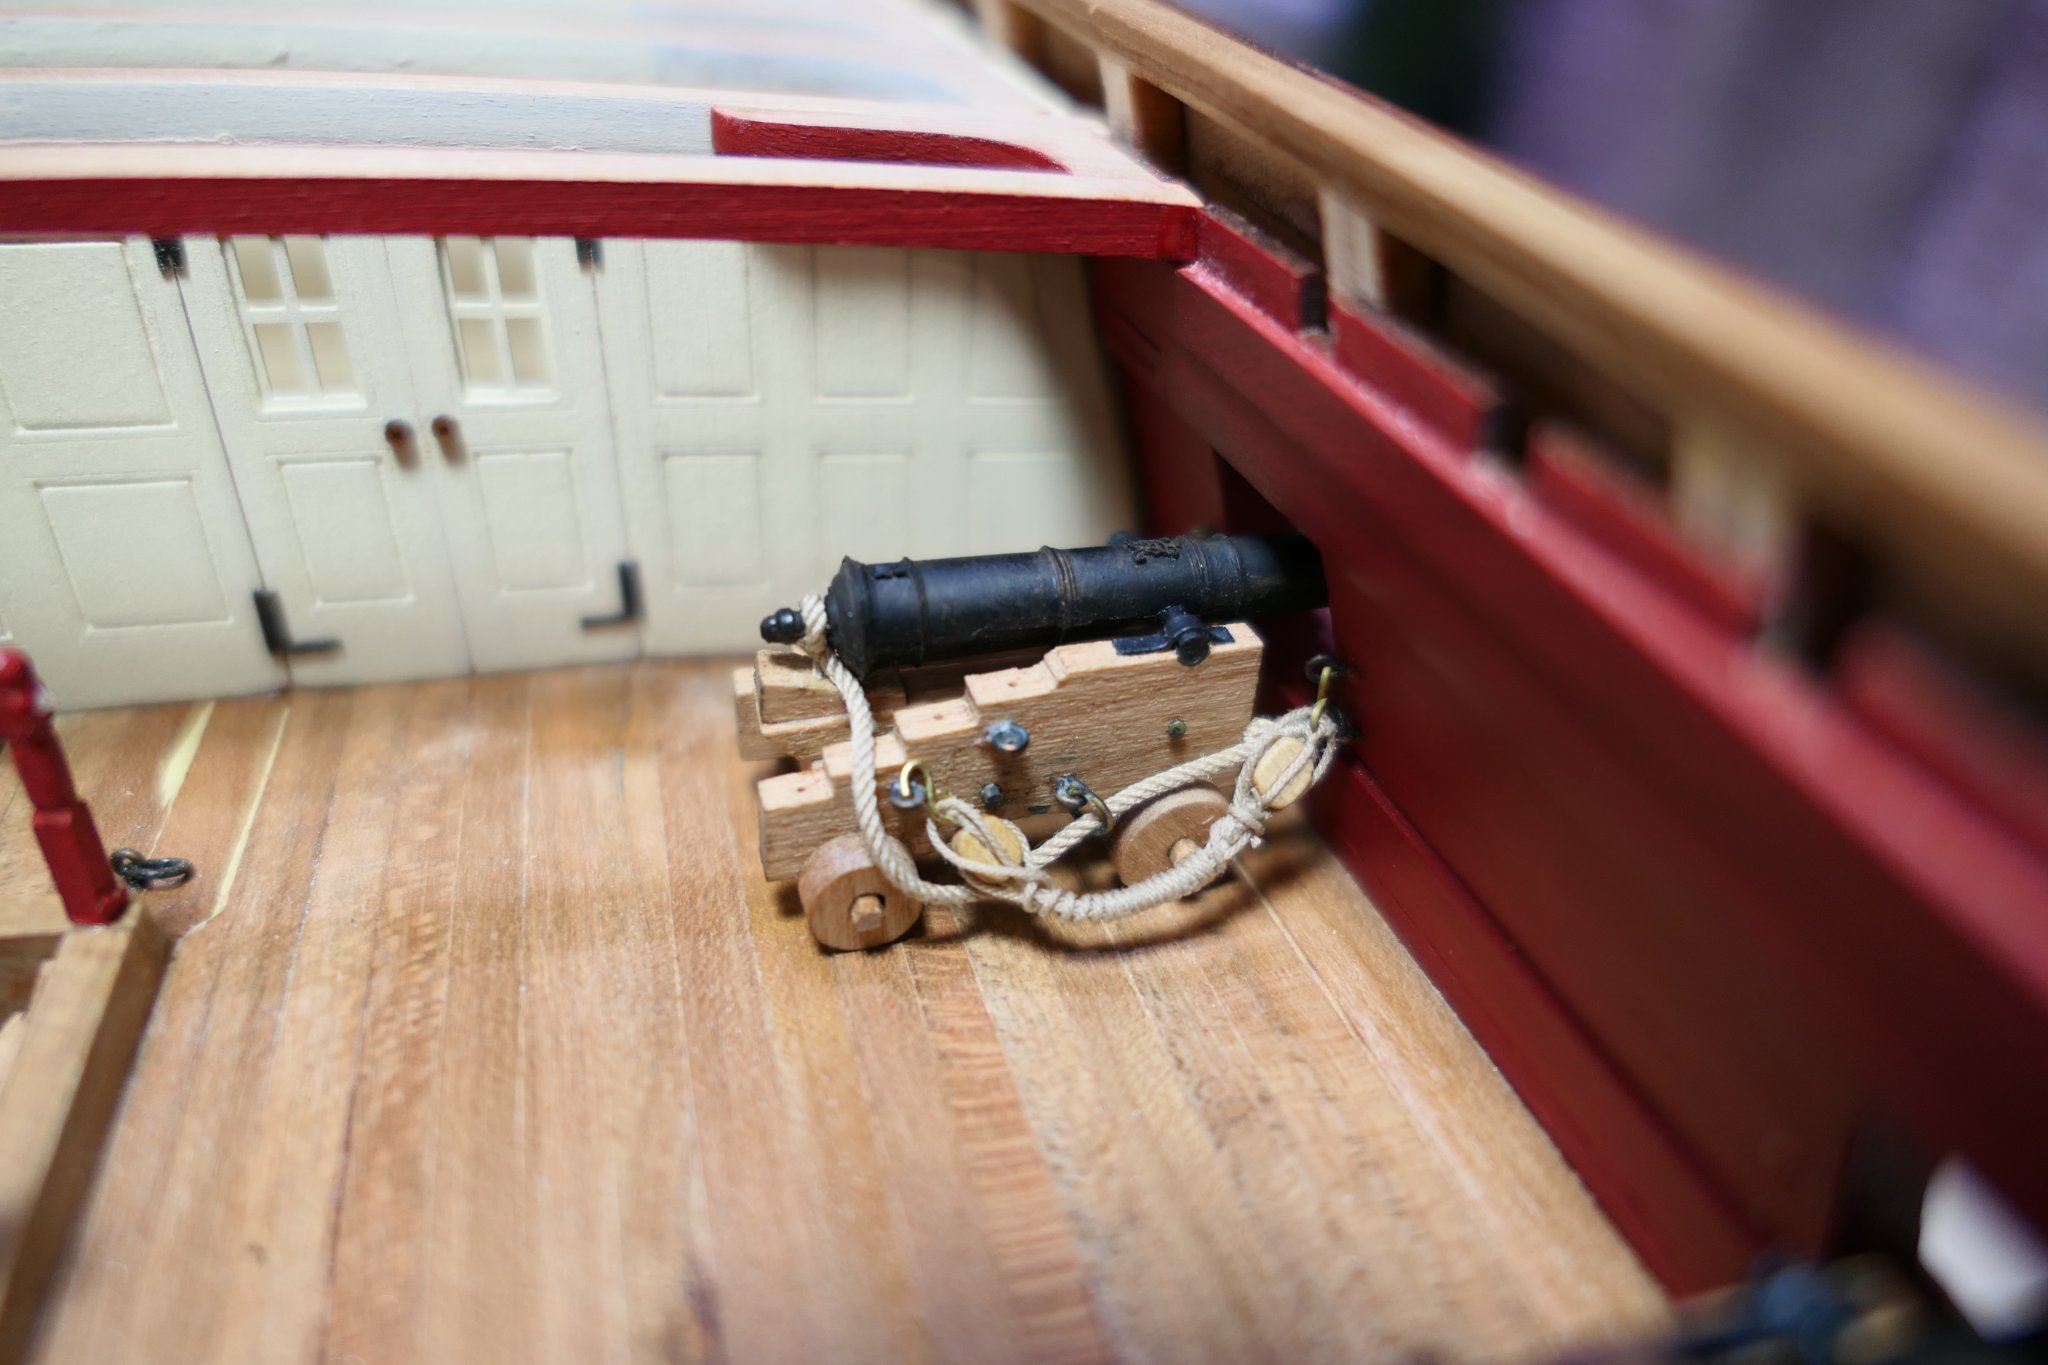
I trial rigged a canon with Syren ultra rope and blocks.
.thumb.JPG.0f956f4d75394f3d674276d3eb48169e.JPG)
.thumb.JPG.068f389f902a2ca0d7d33fbe5d58def0.JPG)
I believe the boss does not particularly like frapping but I think it looks neat and tidy and for a first attempt I'm really pleased.
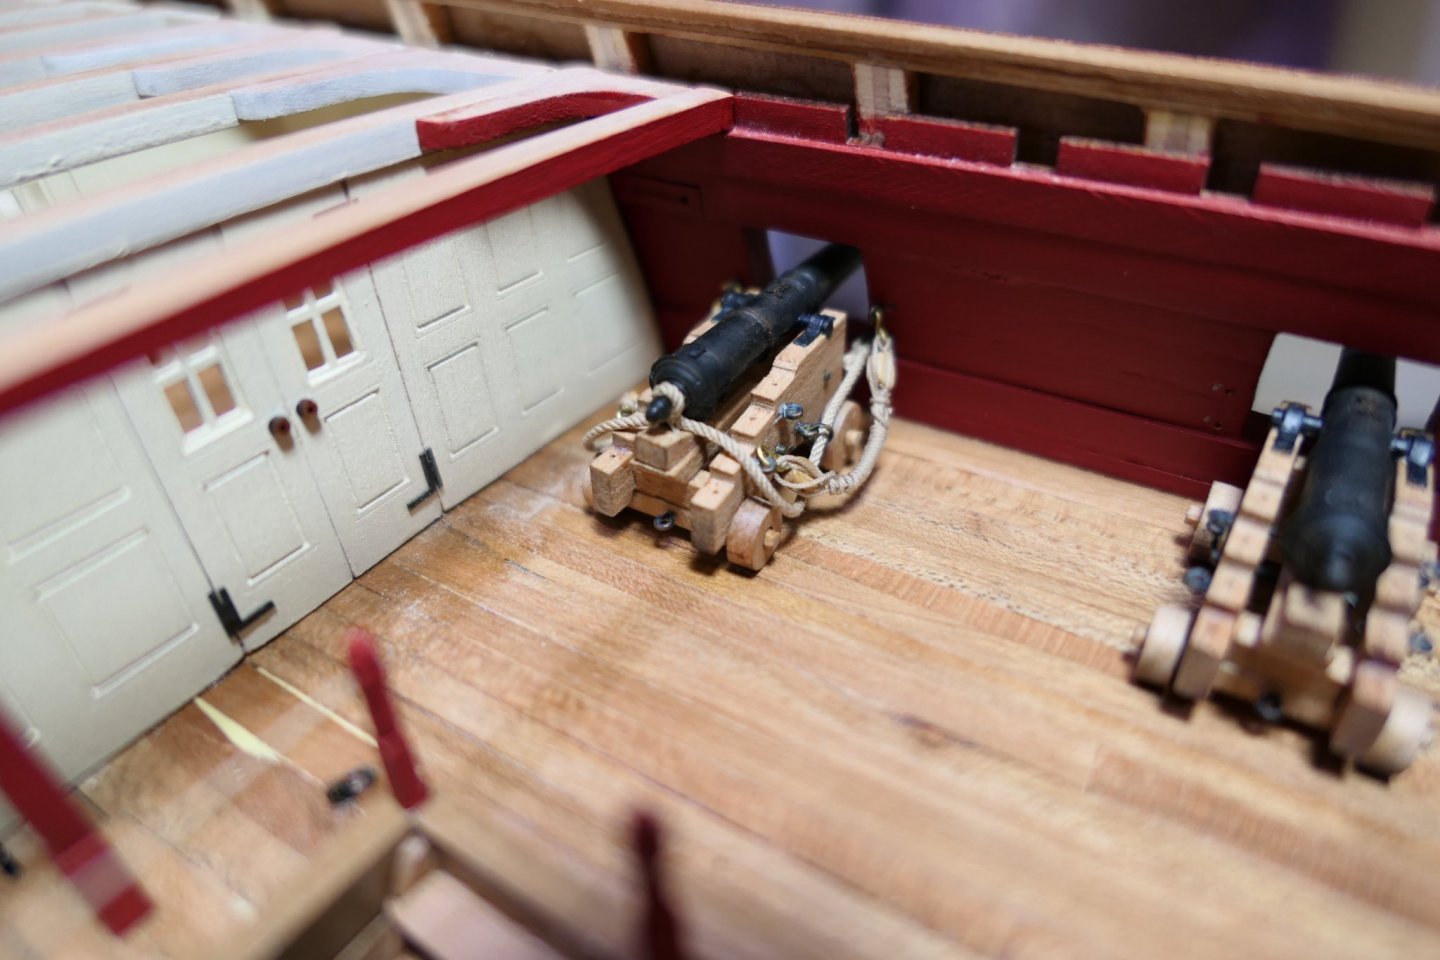

Only another twenty something to go. That one took me ages but I think its all quite repeatable so Chapter 8 sometime around 2022 I reckon.
Keep going everyone
Fred
.thumb.JPG.6494cd99dc35bc5ac47e169c905bb0ec.JPG)
- Matt D, Rustyj, Nunnehi (Don) and 9 others
-
12
-
Pleased to see you are back under way. All that careful lining off will pay dividends later on (as others have observed on other logs). I wish I'd done it properly rather than semi-winging it.
Please put up a few more pictures as you go.
All the best
Fred
-
I've got a real problem, Mike, with every post you make and every photo you show. I sit here thinking "If only I were half as good..."! Never mind. I'm really enjoying my build....just as long as I don't look too closely at yours or Chuck's.
Really superb work
Fred
-
Lovely work rigging the guns. I've ordered rigging rope from Syren today so I hope to make a start soon. I prefer the way you've hung the tackles ropes from hooks on the bulwarks rather than coiling it on the deck (that looks a bit Sunday best to my eyes - not that I know anything about it).
-
That's looking great JJ - but those bolt heads on the mast partners haven't got any smaller yet!
Fred
- scrubbyj427, FrankWouts and bdgiantman2
-
1
-
 2
2
-
Thank you everyone for your kind remarks and likes.
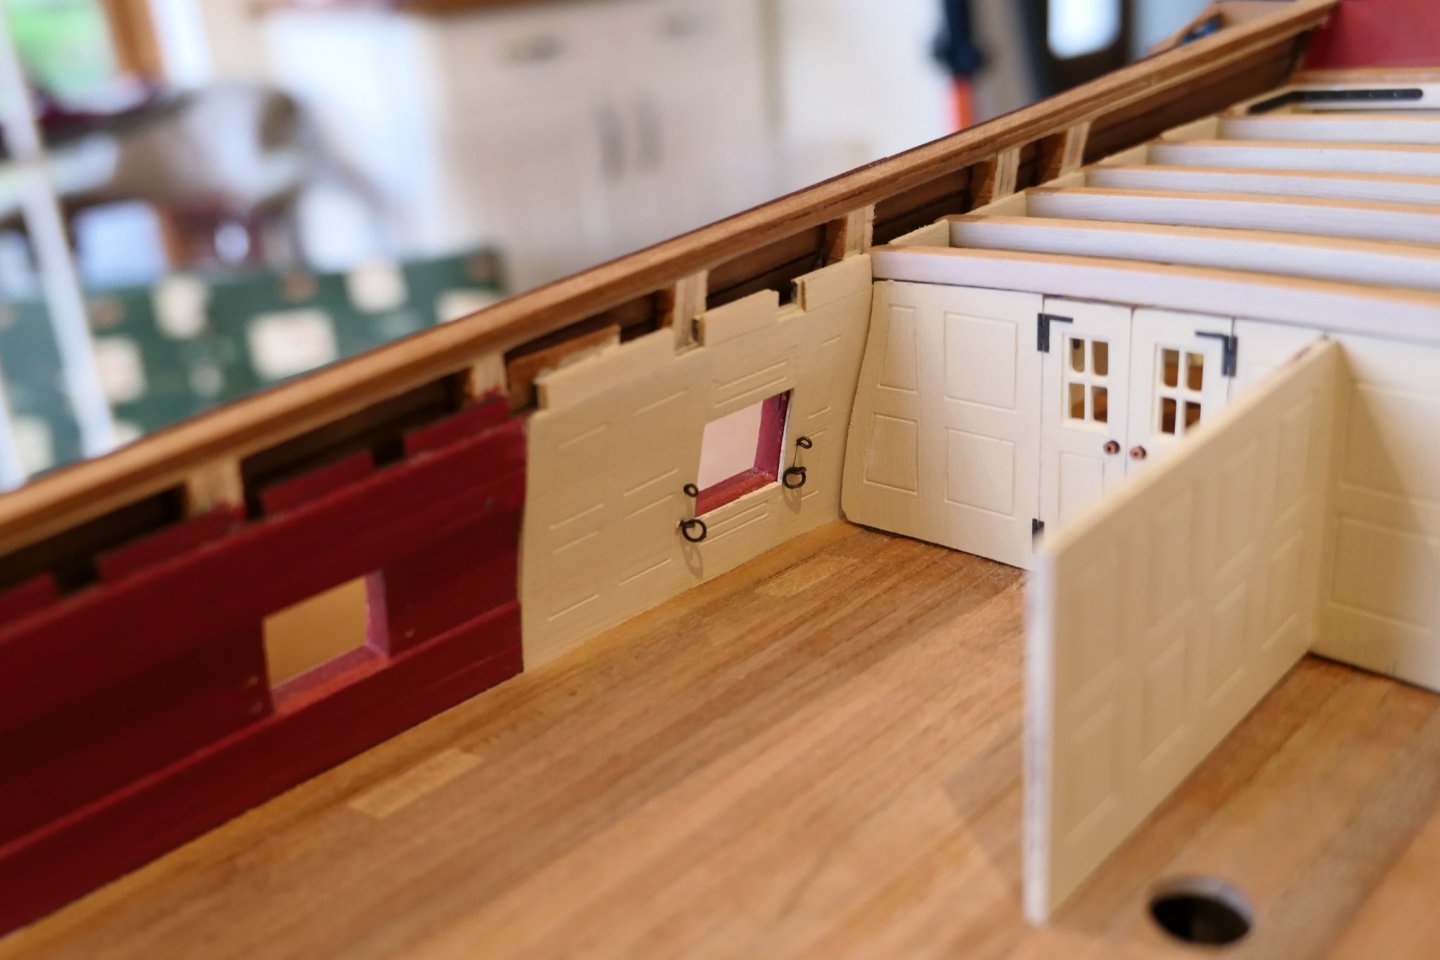
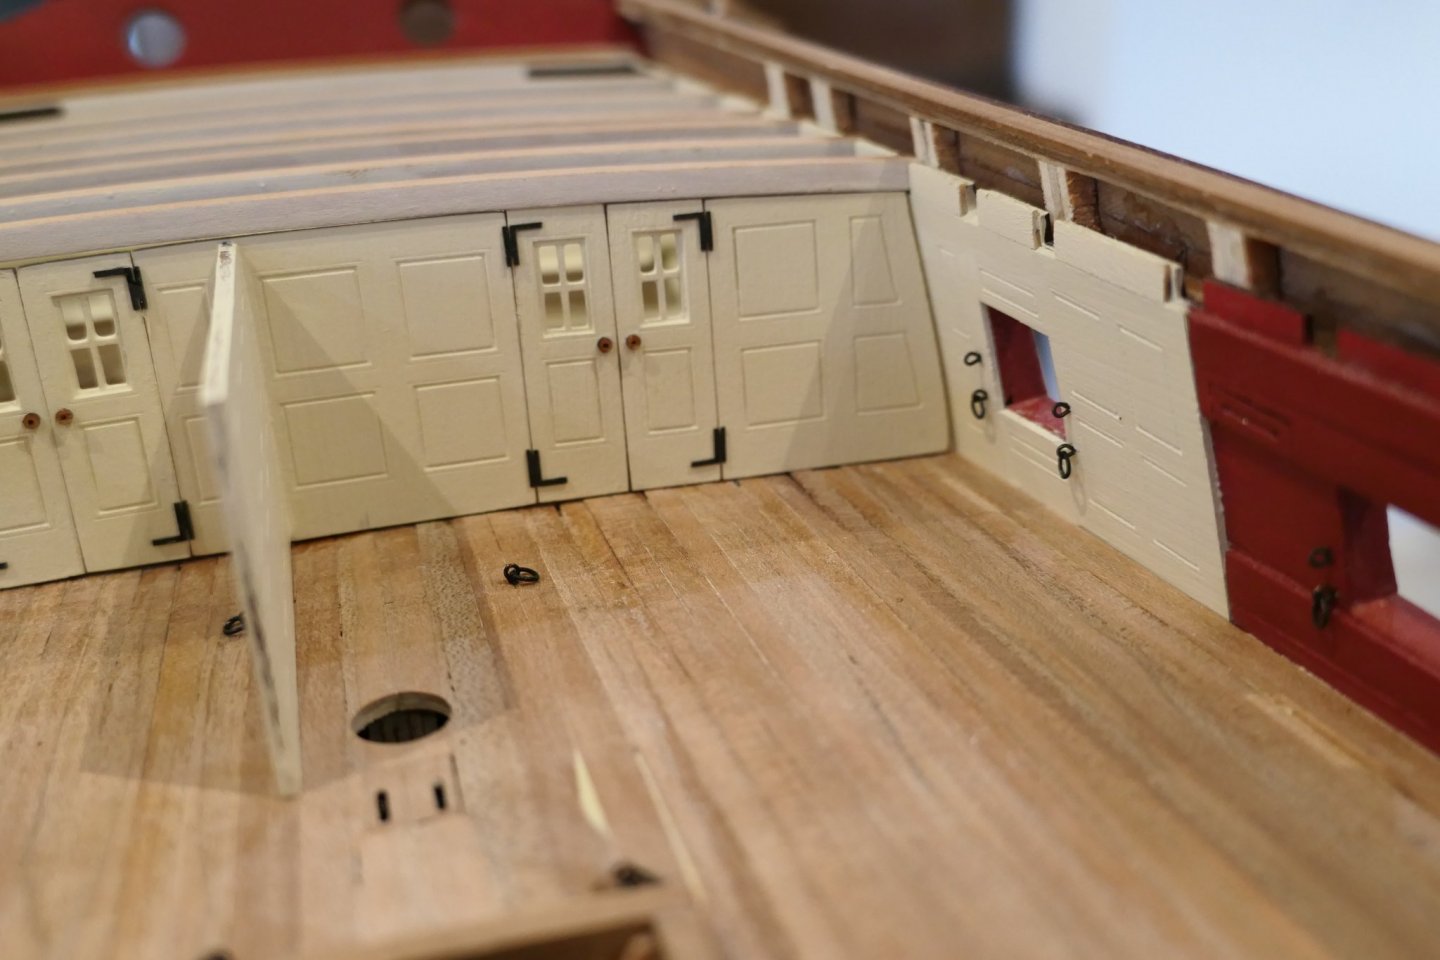
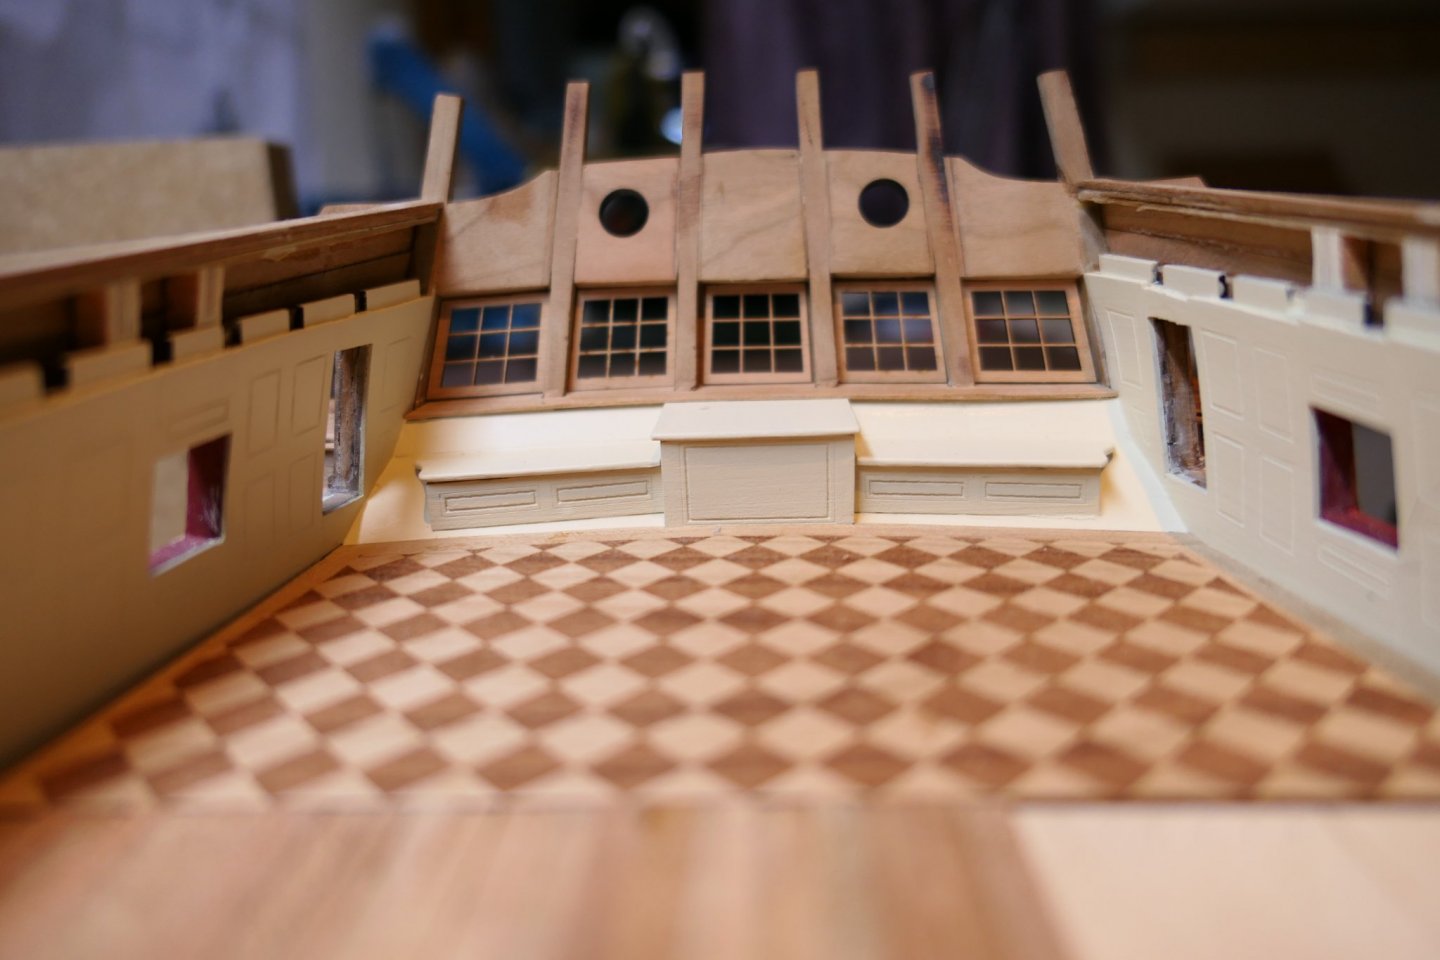
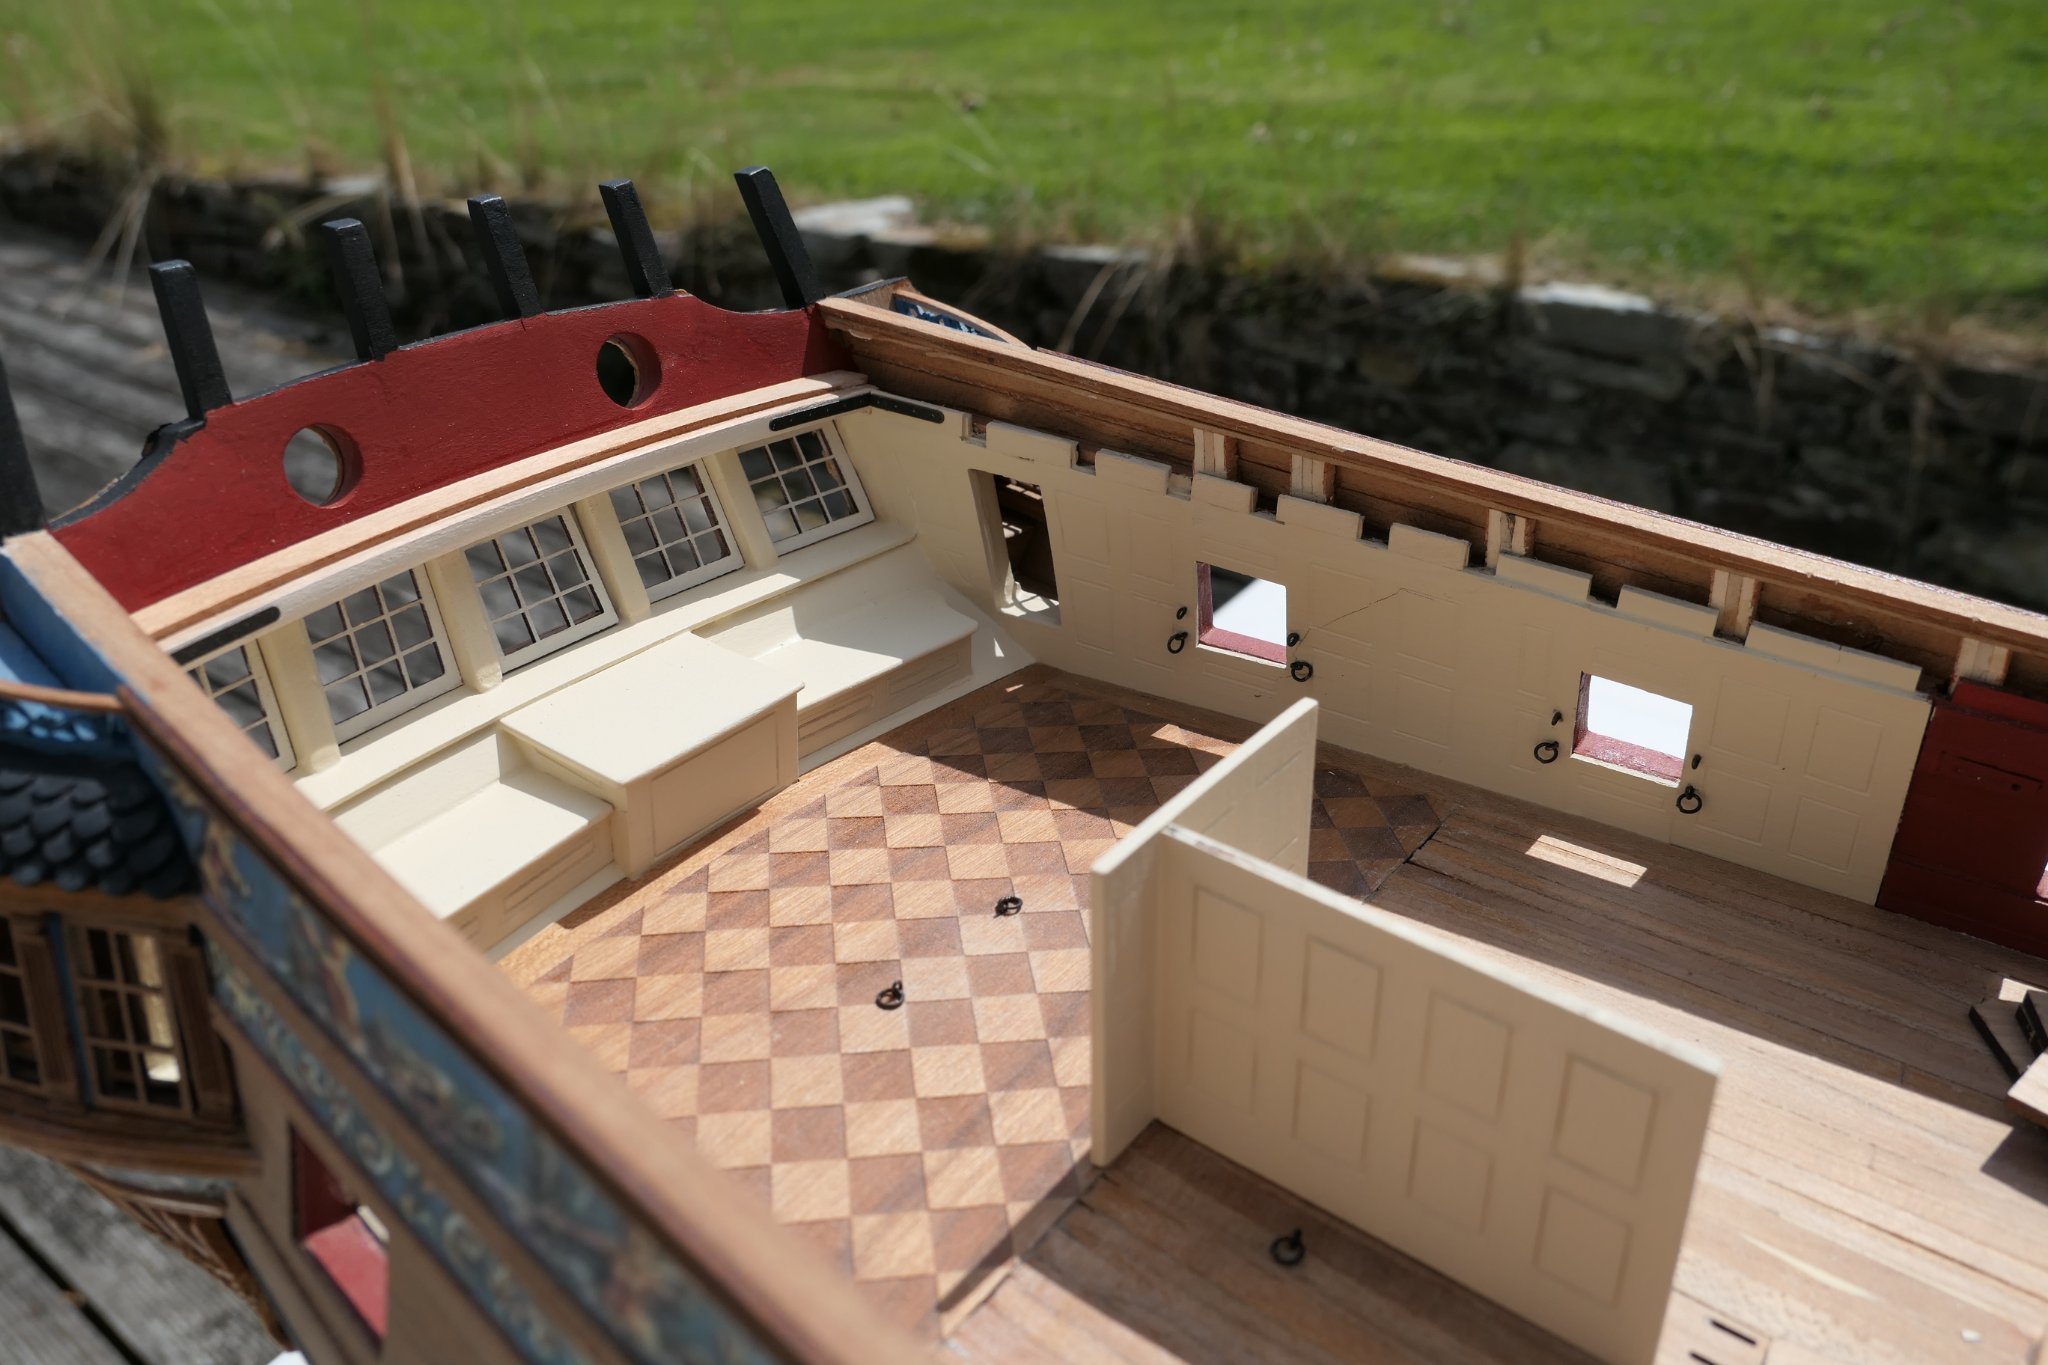
I finished the aft bulkhead over the weekend. Nothing is glued in yet.
Looking at the pictures reminds me that I never put in the waterways.
Canons next - I intend to rig the canons. I'm mindful of NZ Reg's reckoning of 2 hours per canon for rigging. That should keep me quiet for a while but semi-retirement beckons from the end of September so all being well I'll have a bit of time on my hands.


- CaptMorgan, Ryland Craze, Rustyj and 12 others
-
15
-
Good afternoon everyone from a lovely sunny Cornwall.
Thank you everyone for your comments and likes!
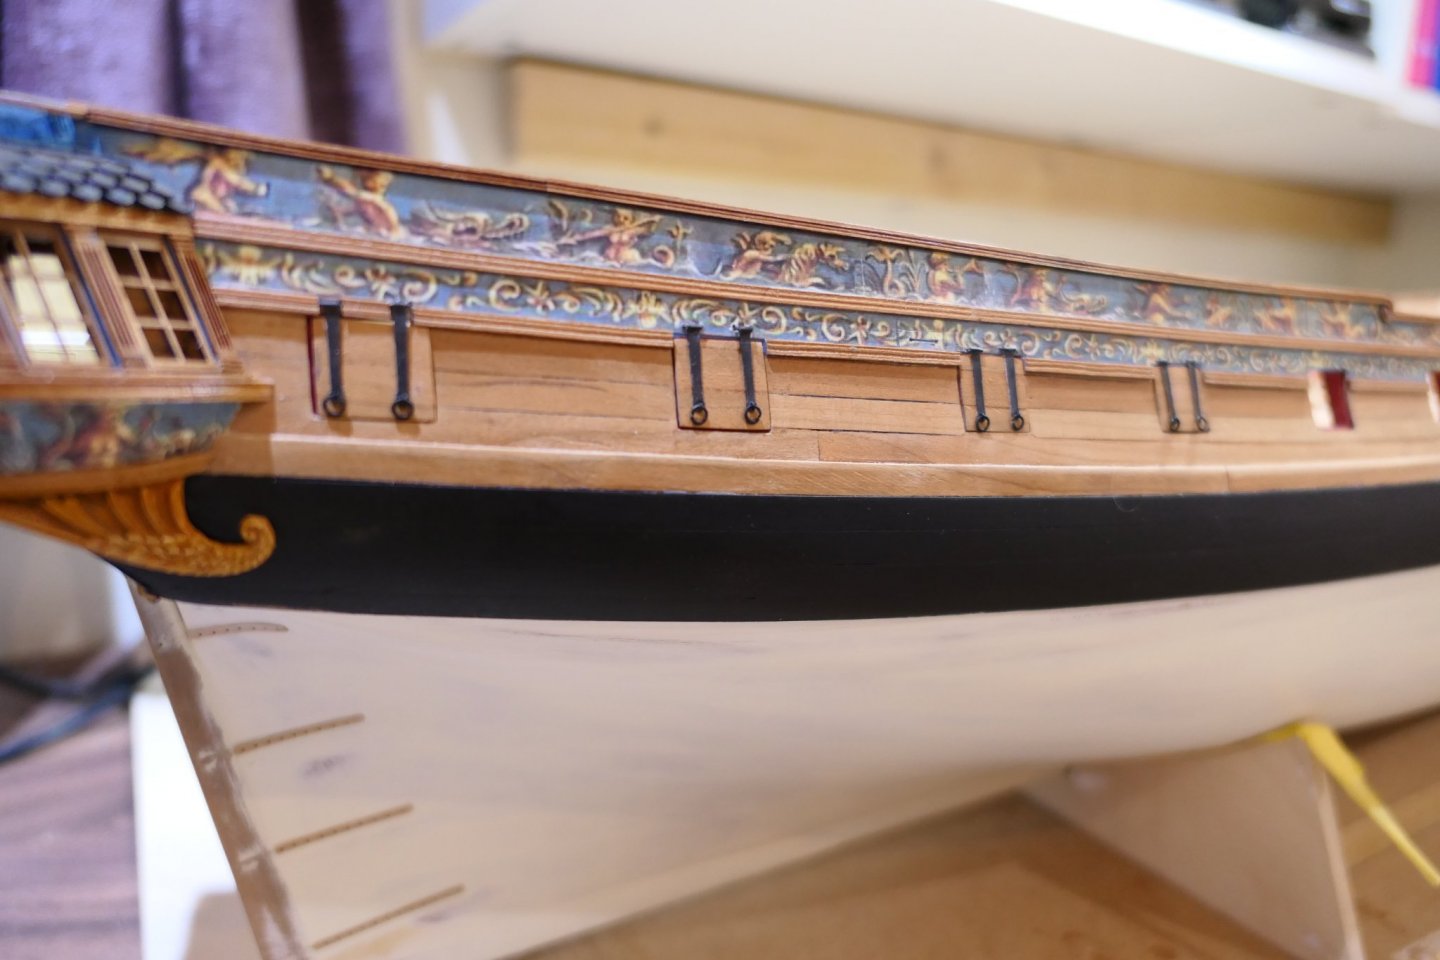
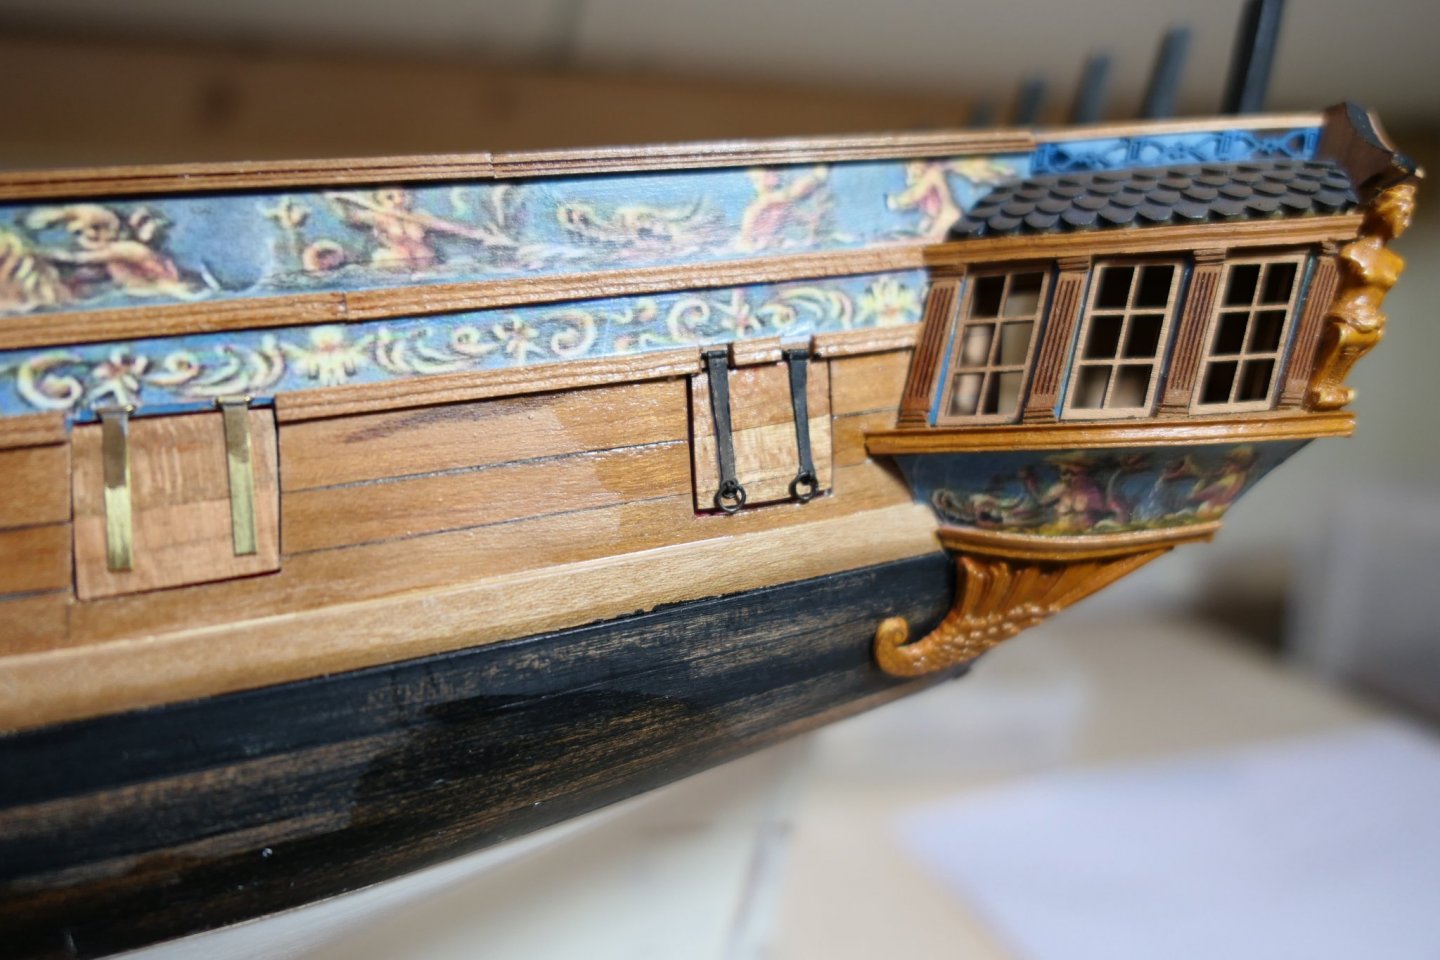
Greg - the blue colour is Tamiya flat blue with a squirt of Vallejo Andrea blue. I just mixed away until it looked about right. I think the colour differences are pretty forgiving. One of the advantages of blue paint is that you can underpaint the areas covered by the friezes so no bare wood shows and also colour the cut edges of the paper so you don't get a white border.
I didn't use a pencil to simulate the tarred edges to the deck planking as Chuck observed above. That was an idiotic oversight I very much regret but there is nothing I can do about it now. Never mind.
Things are moving on on wet days. One mishap was breaking off the rudder. I suspect I won't be the last. Chuck very kindly supplied some replacement hinges so those will go on soon. I intend the rudder should be removable for the time being. I think I may have read that on Mike's log.
.thumb.JPG.8d0bbc38278416b106a782de4bd8064e.JPG)
.thumb.JPG.dbe8df6d7ad345227276ed27002e7caf.JPG)
I clearly didn't sand my roof tiles thin enough and I can't get the hang of scraping profiles but the windows fit nicely.
.thumb.JPG.c76aa6ff2d39851729bdf778945b5e01.JPG)
I can't get hold of fruitwood gel here in the Uk. I drybrushed the resin figures with raw sienna oil paint and wiped it off with a kitchen towel between coats. Not everyone's taste I suspect but I like it.
.thumb.JPG.2829e44276796f4736d5faf7553f5eee.JPG)
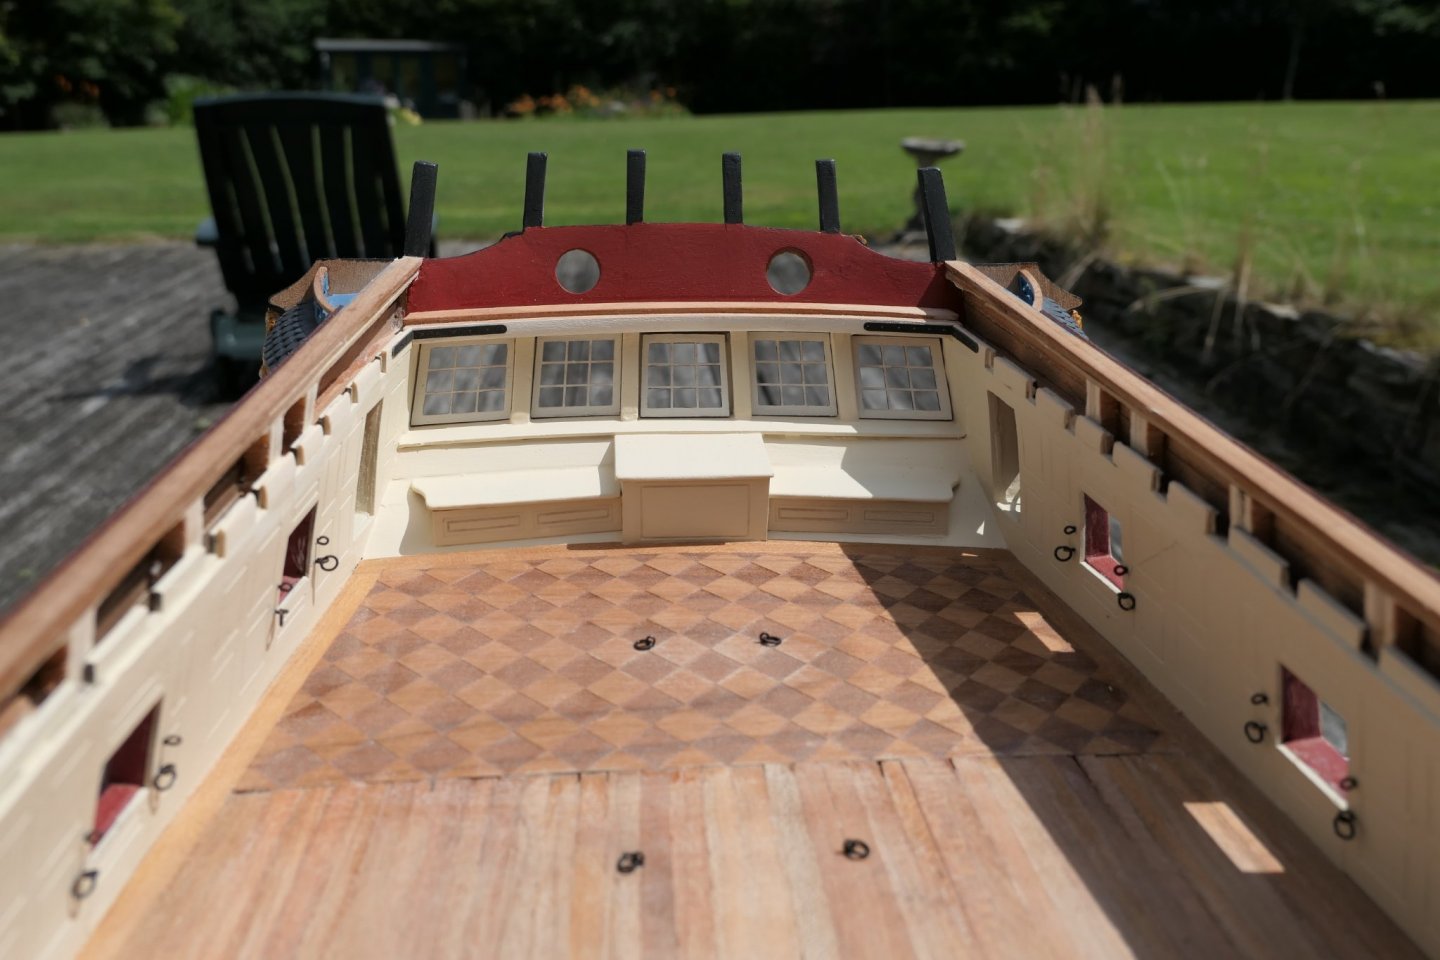
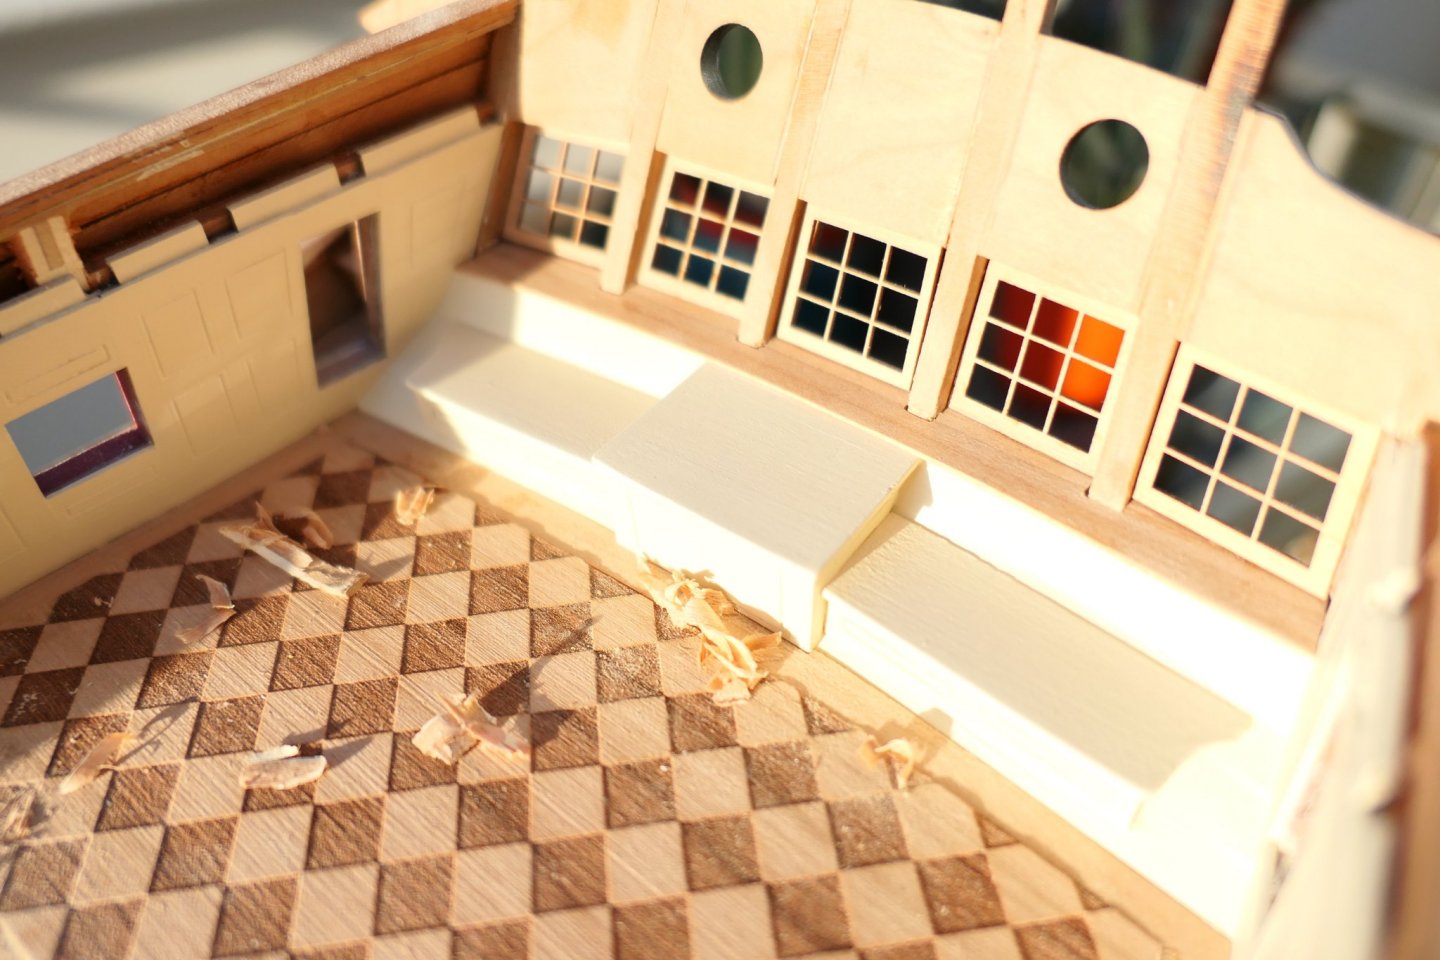
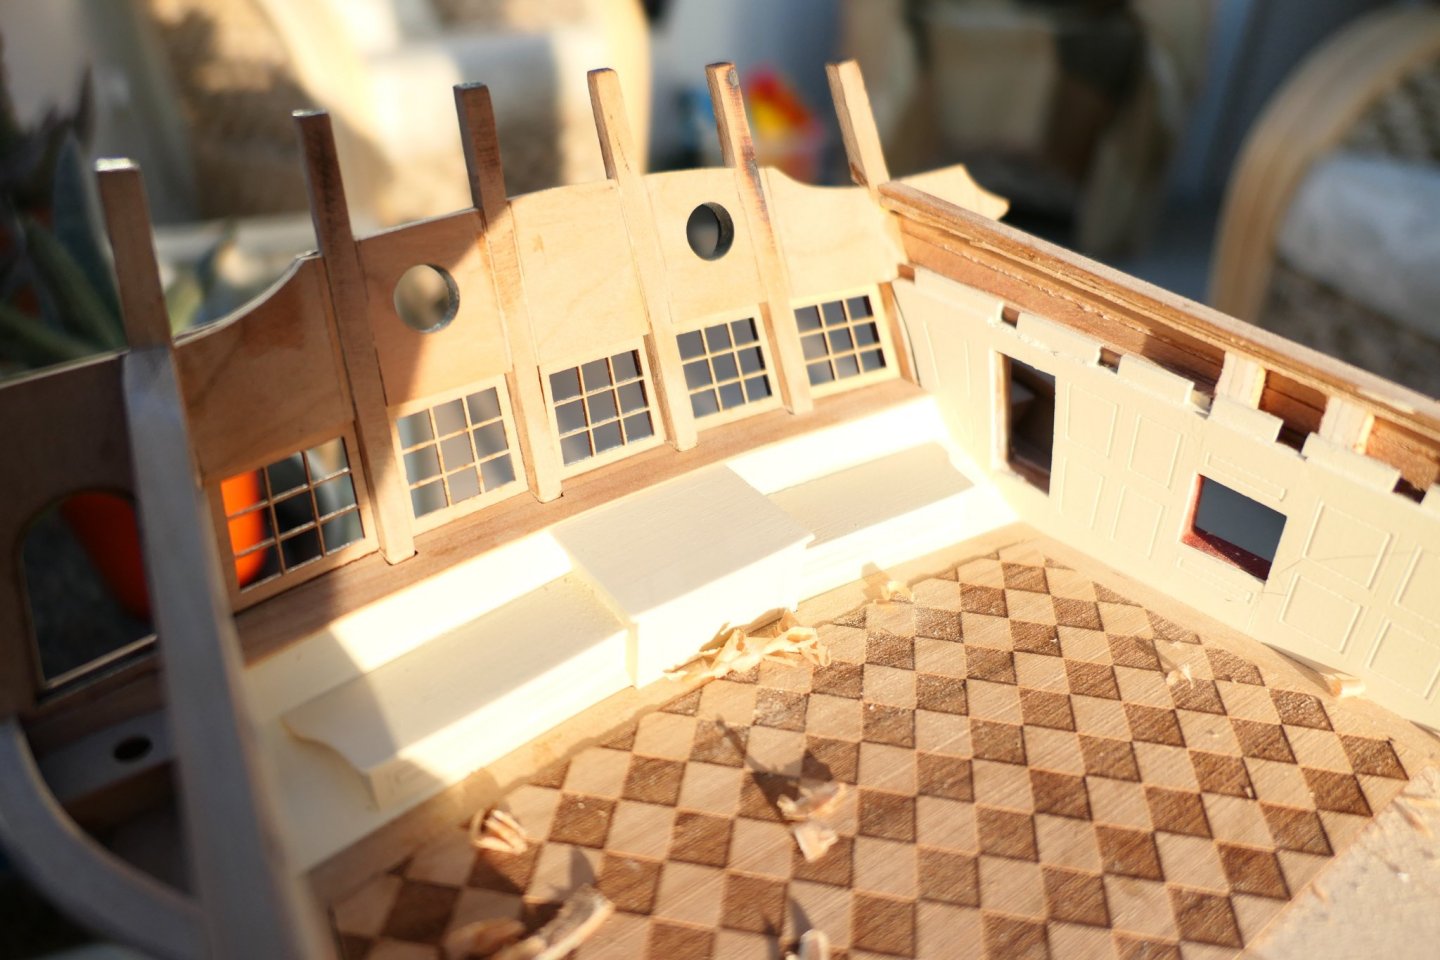
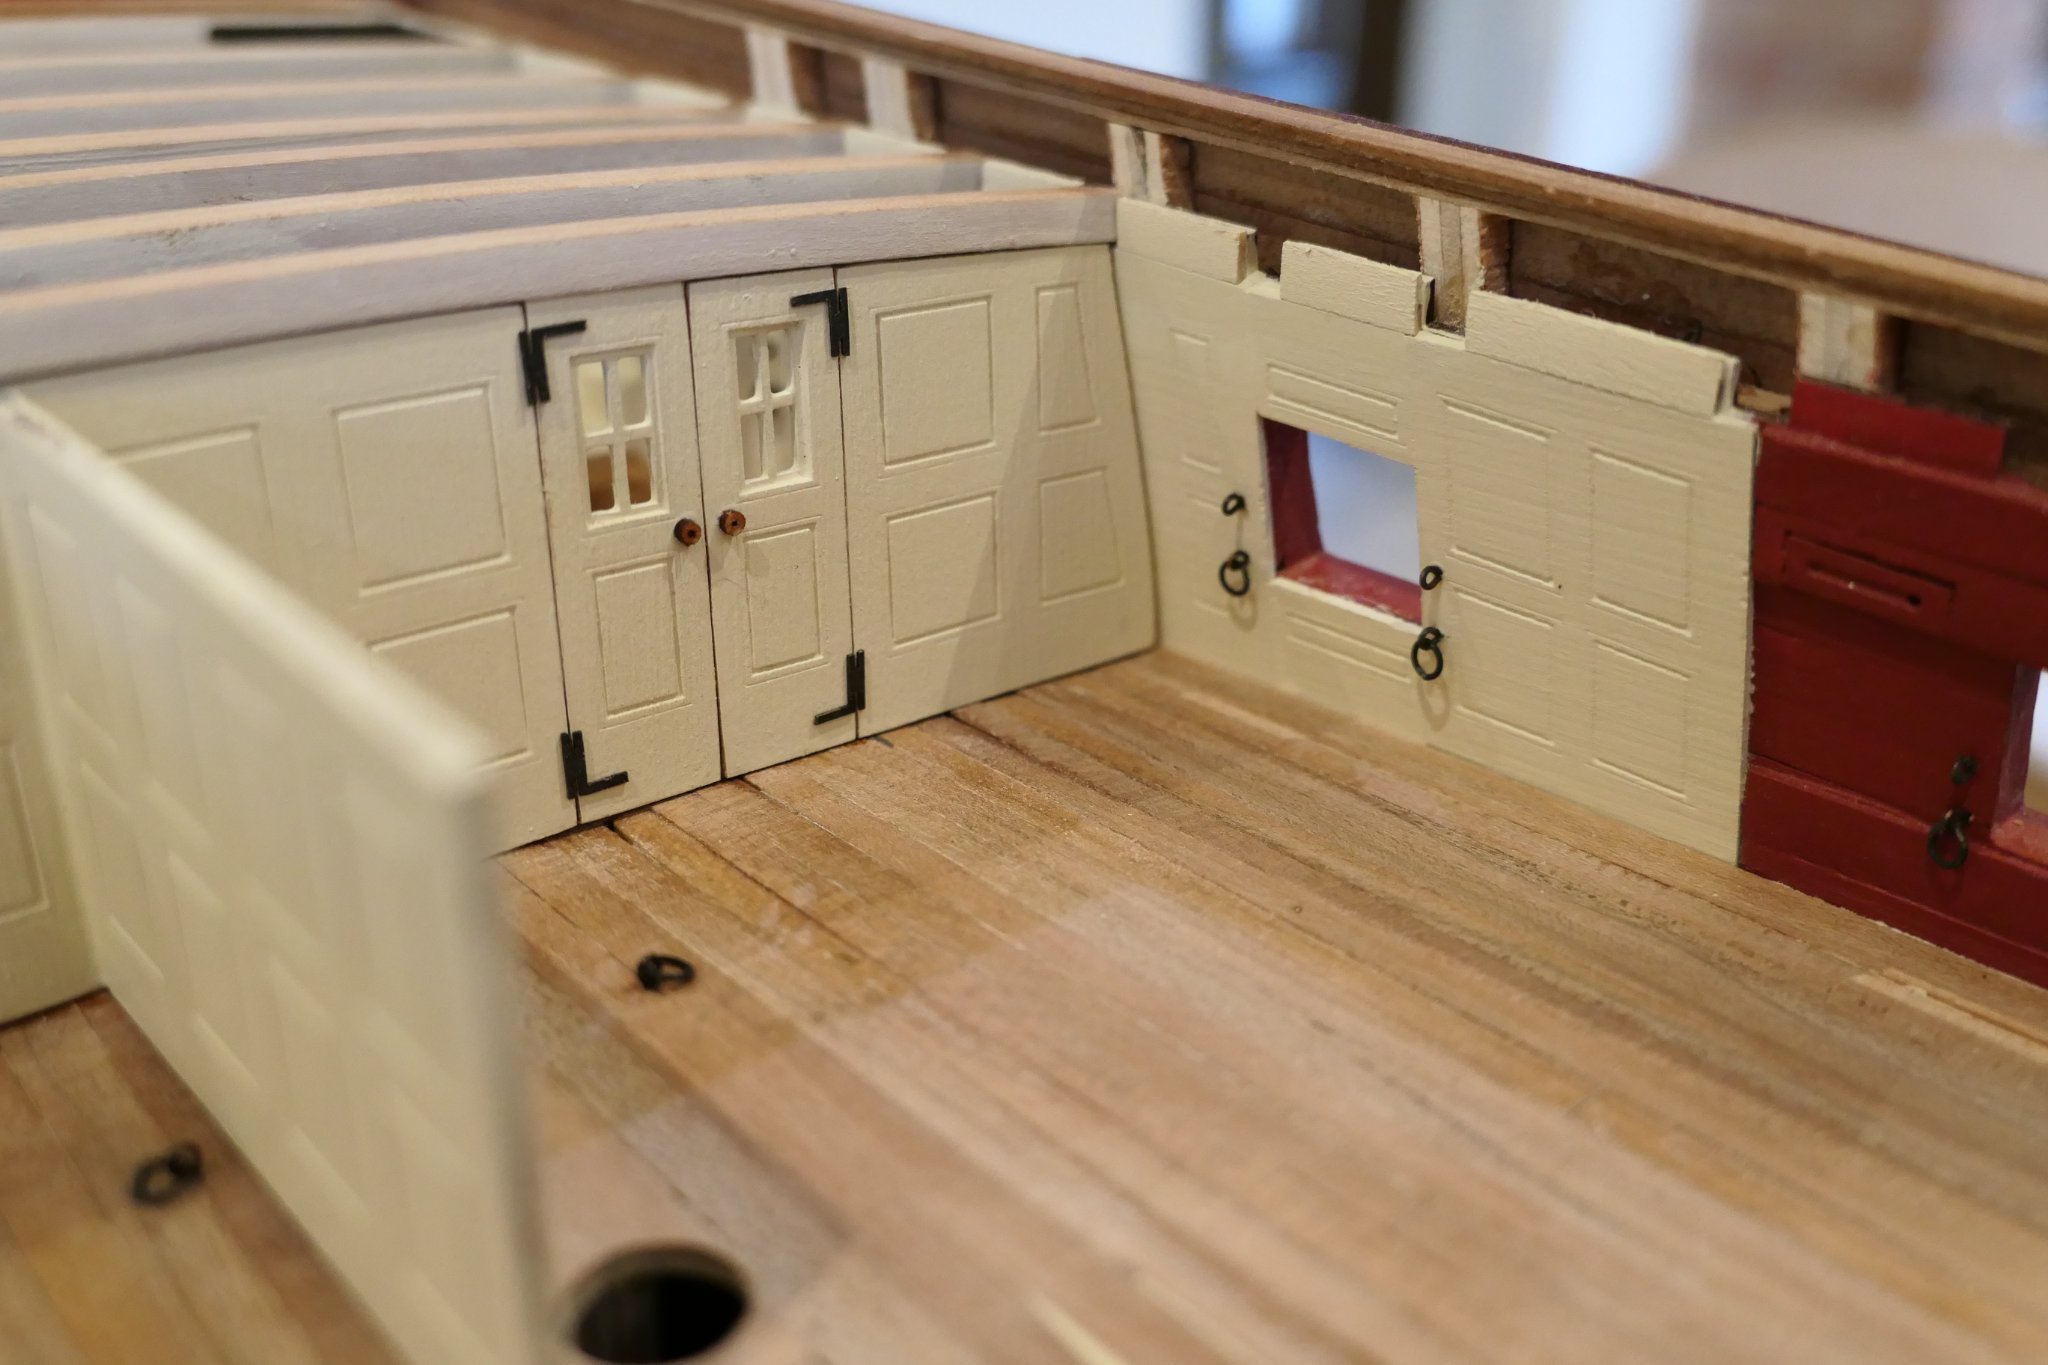
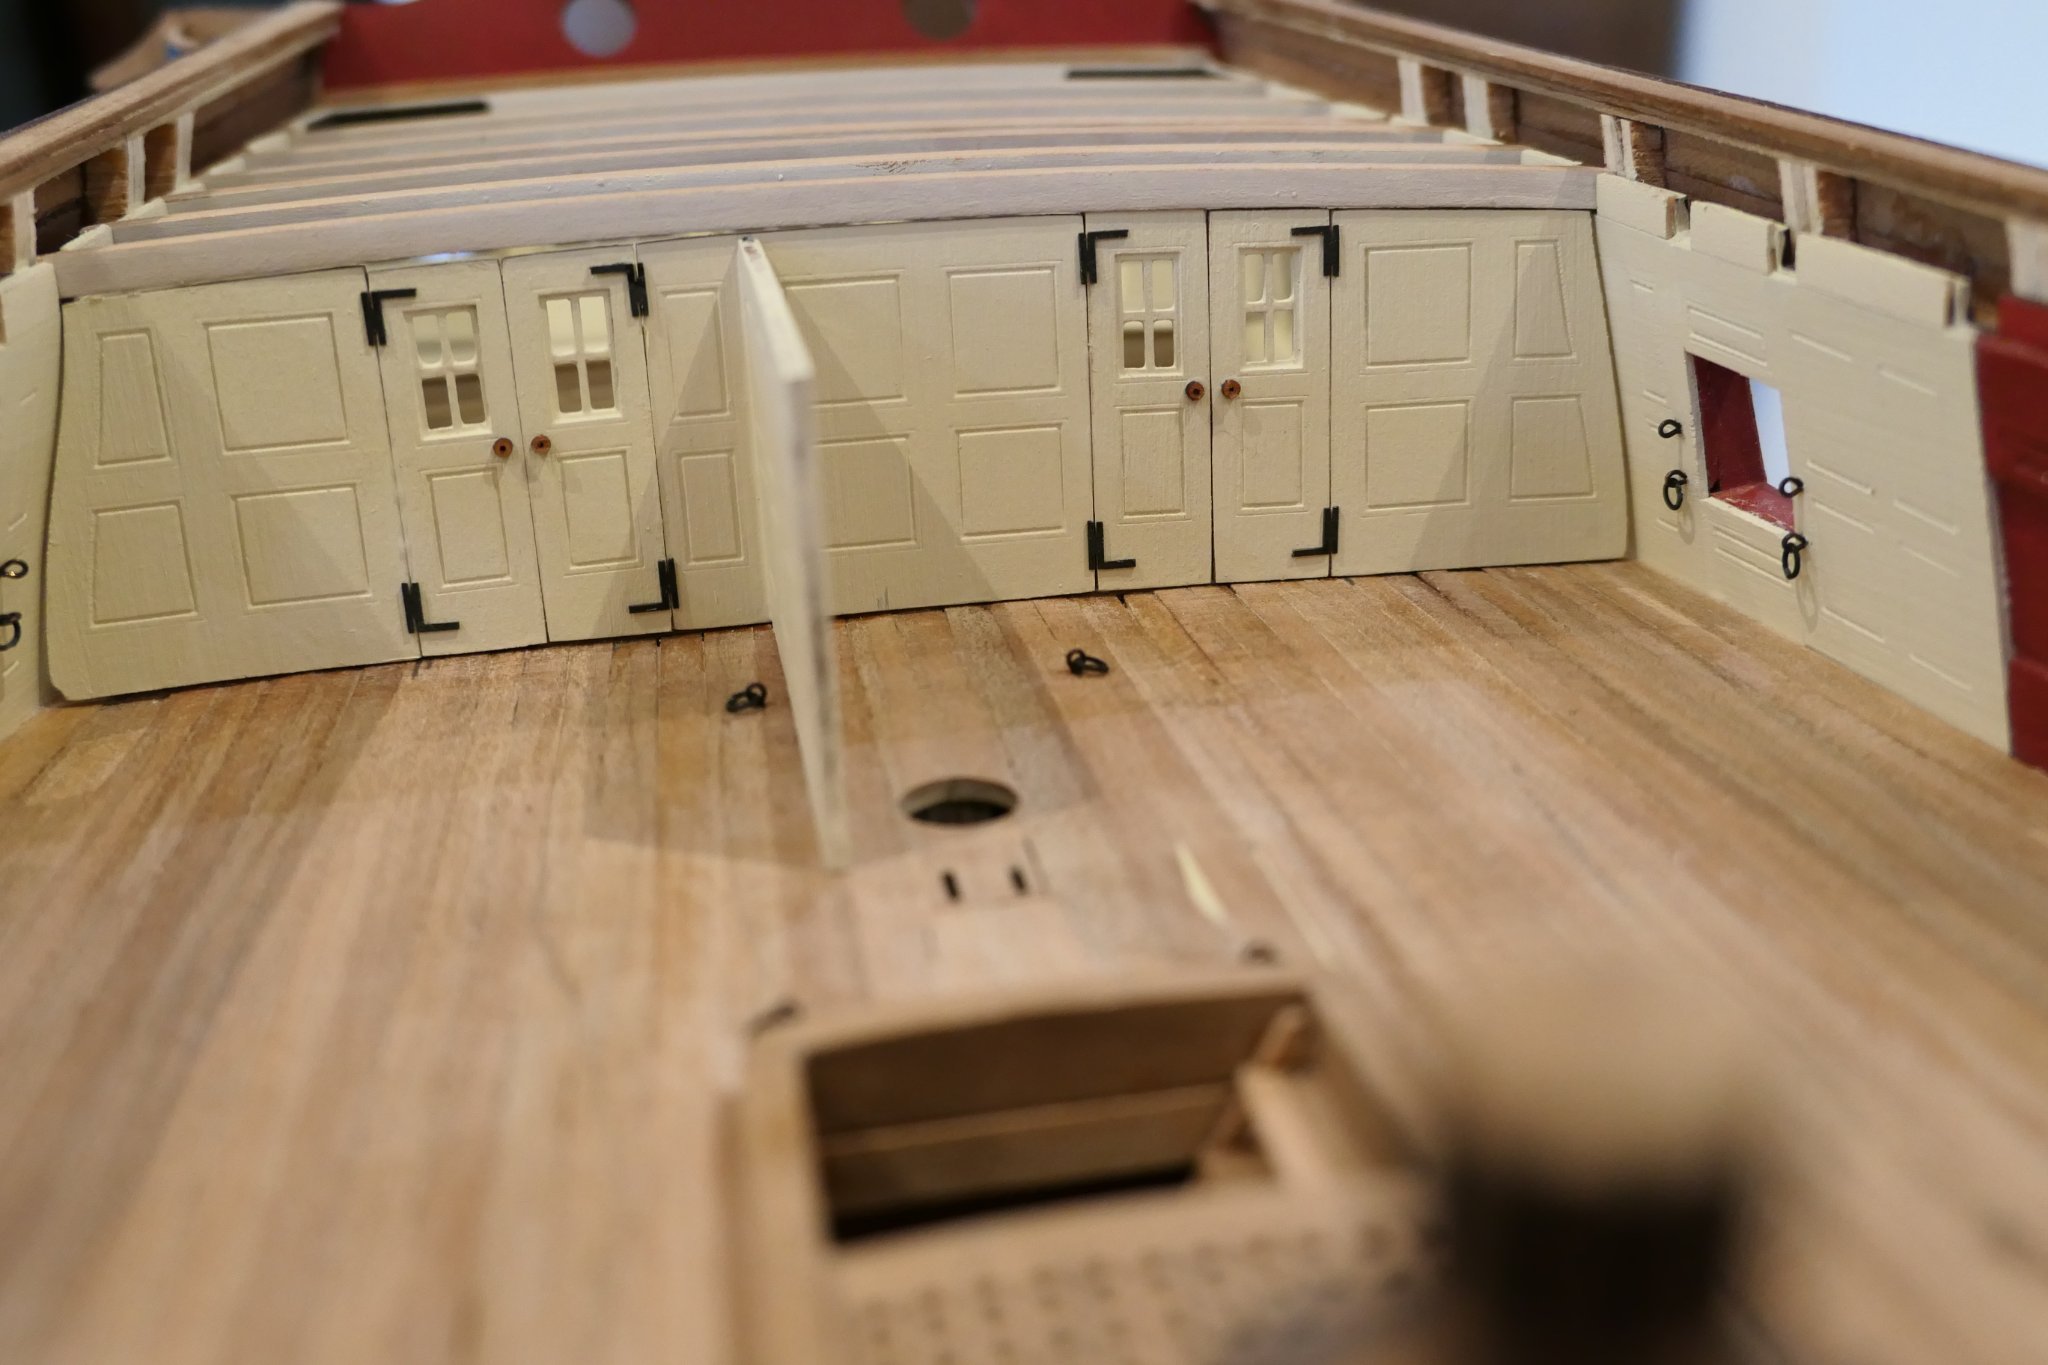
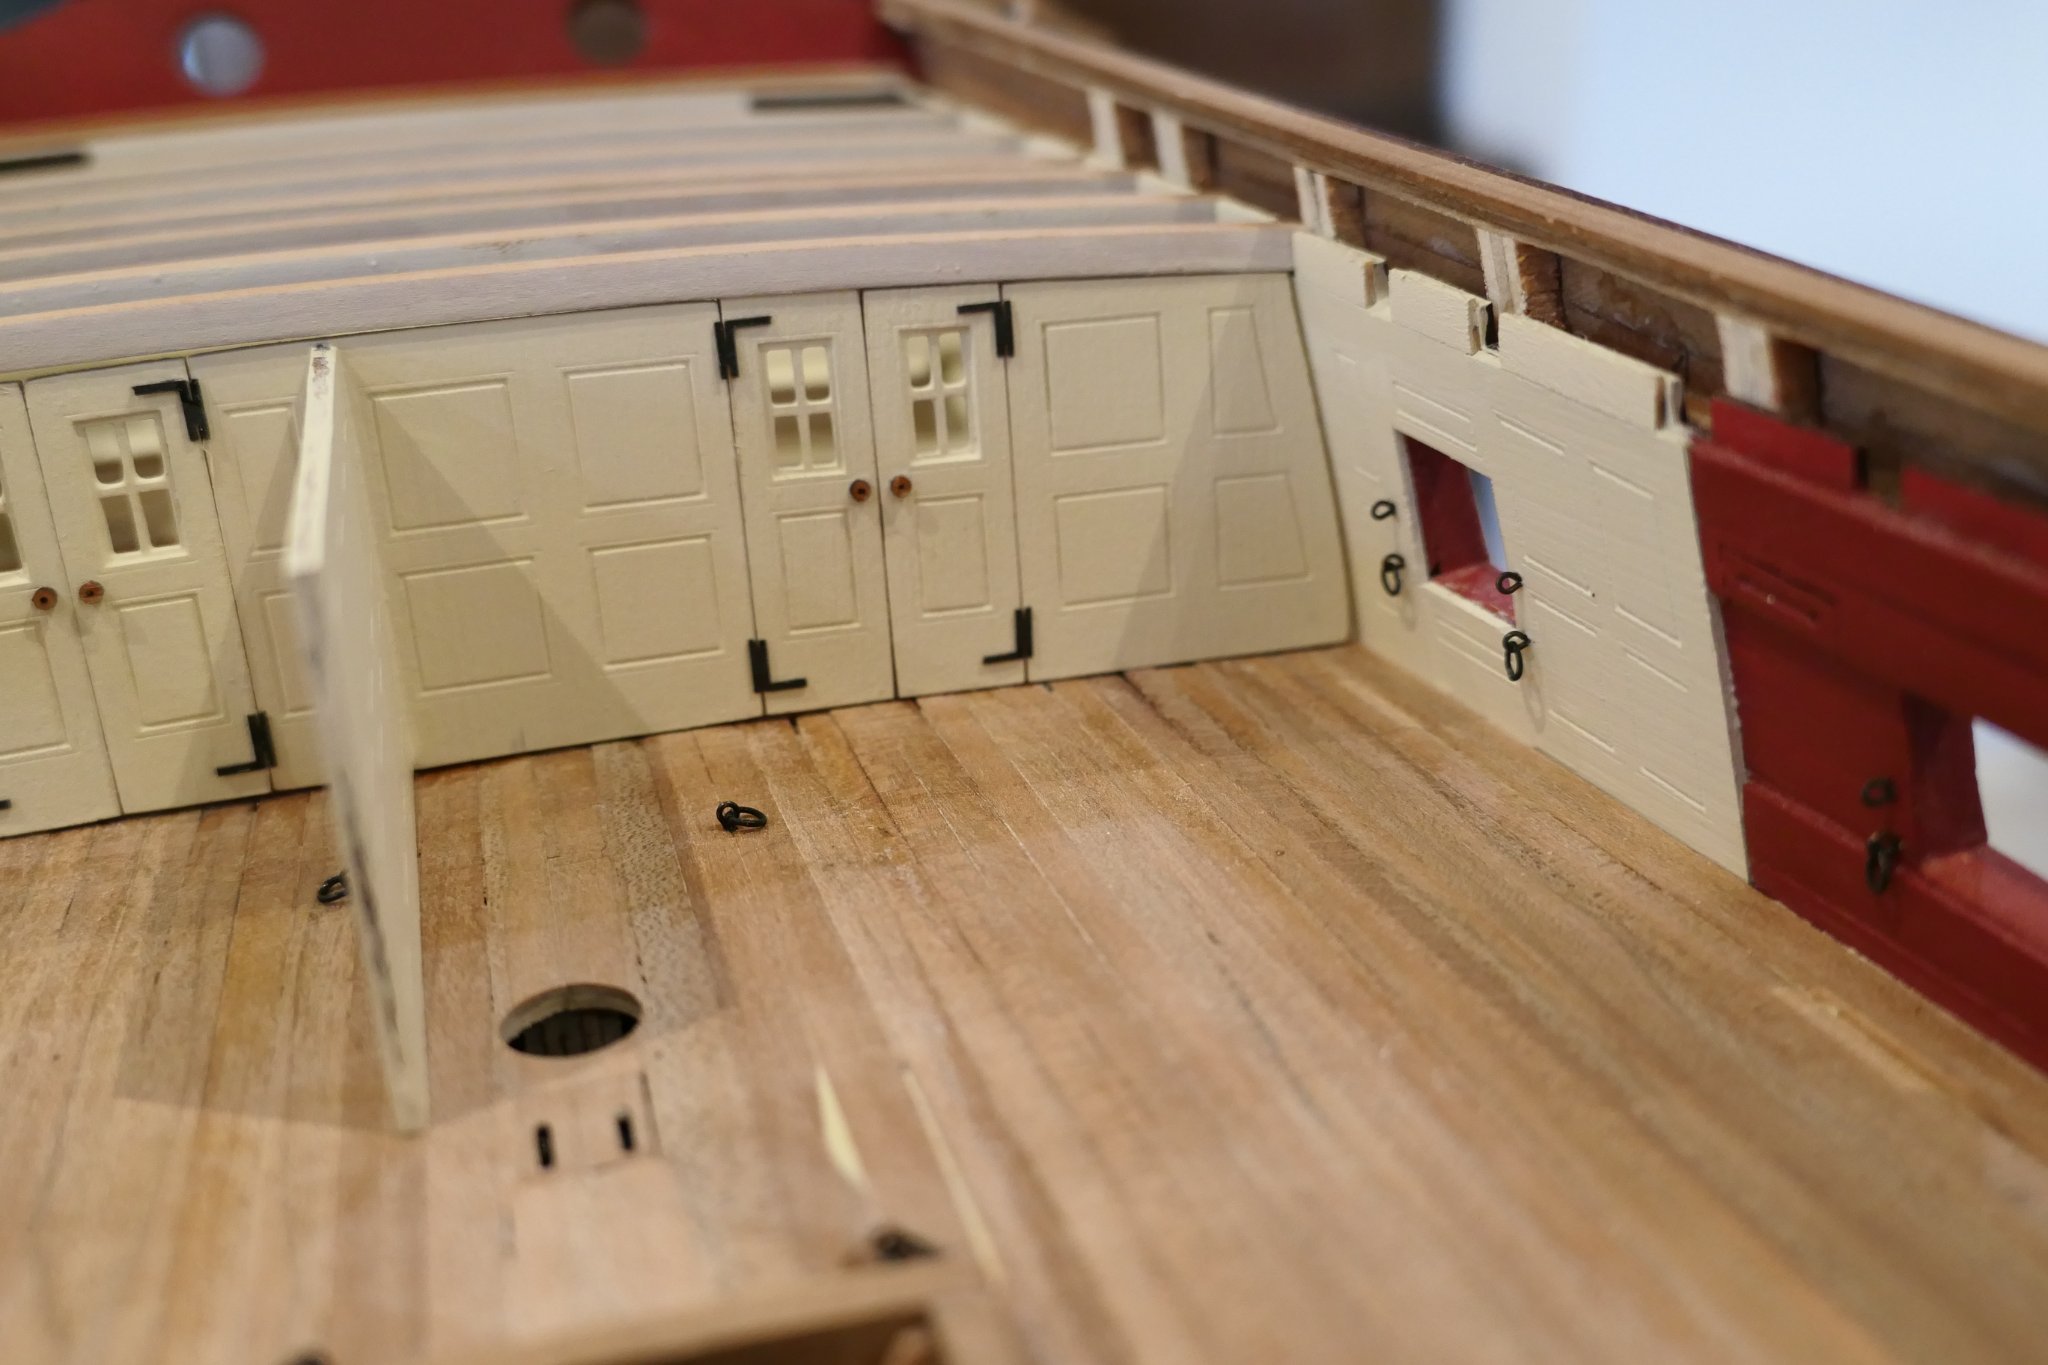
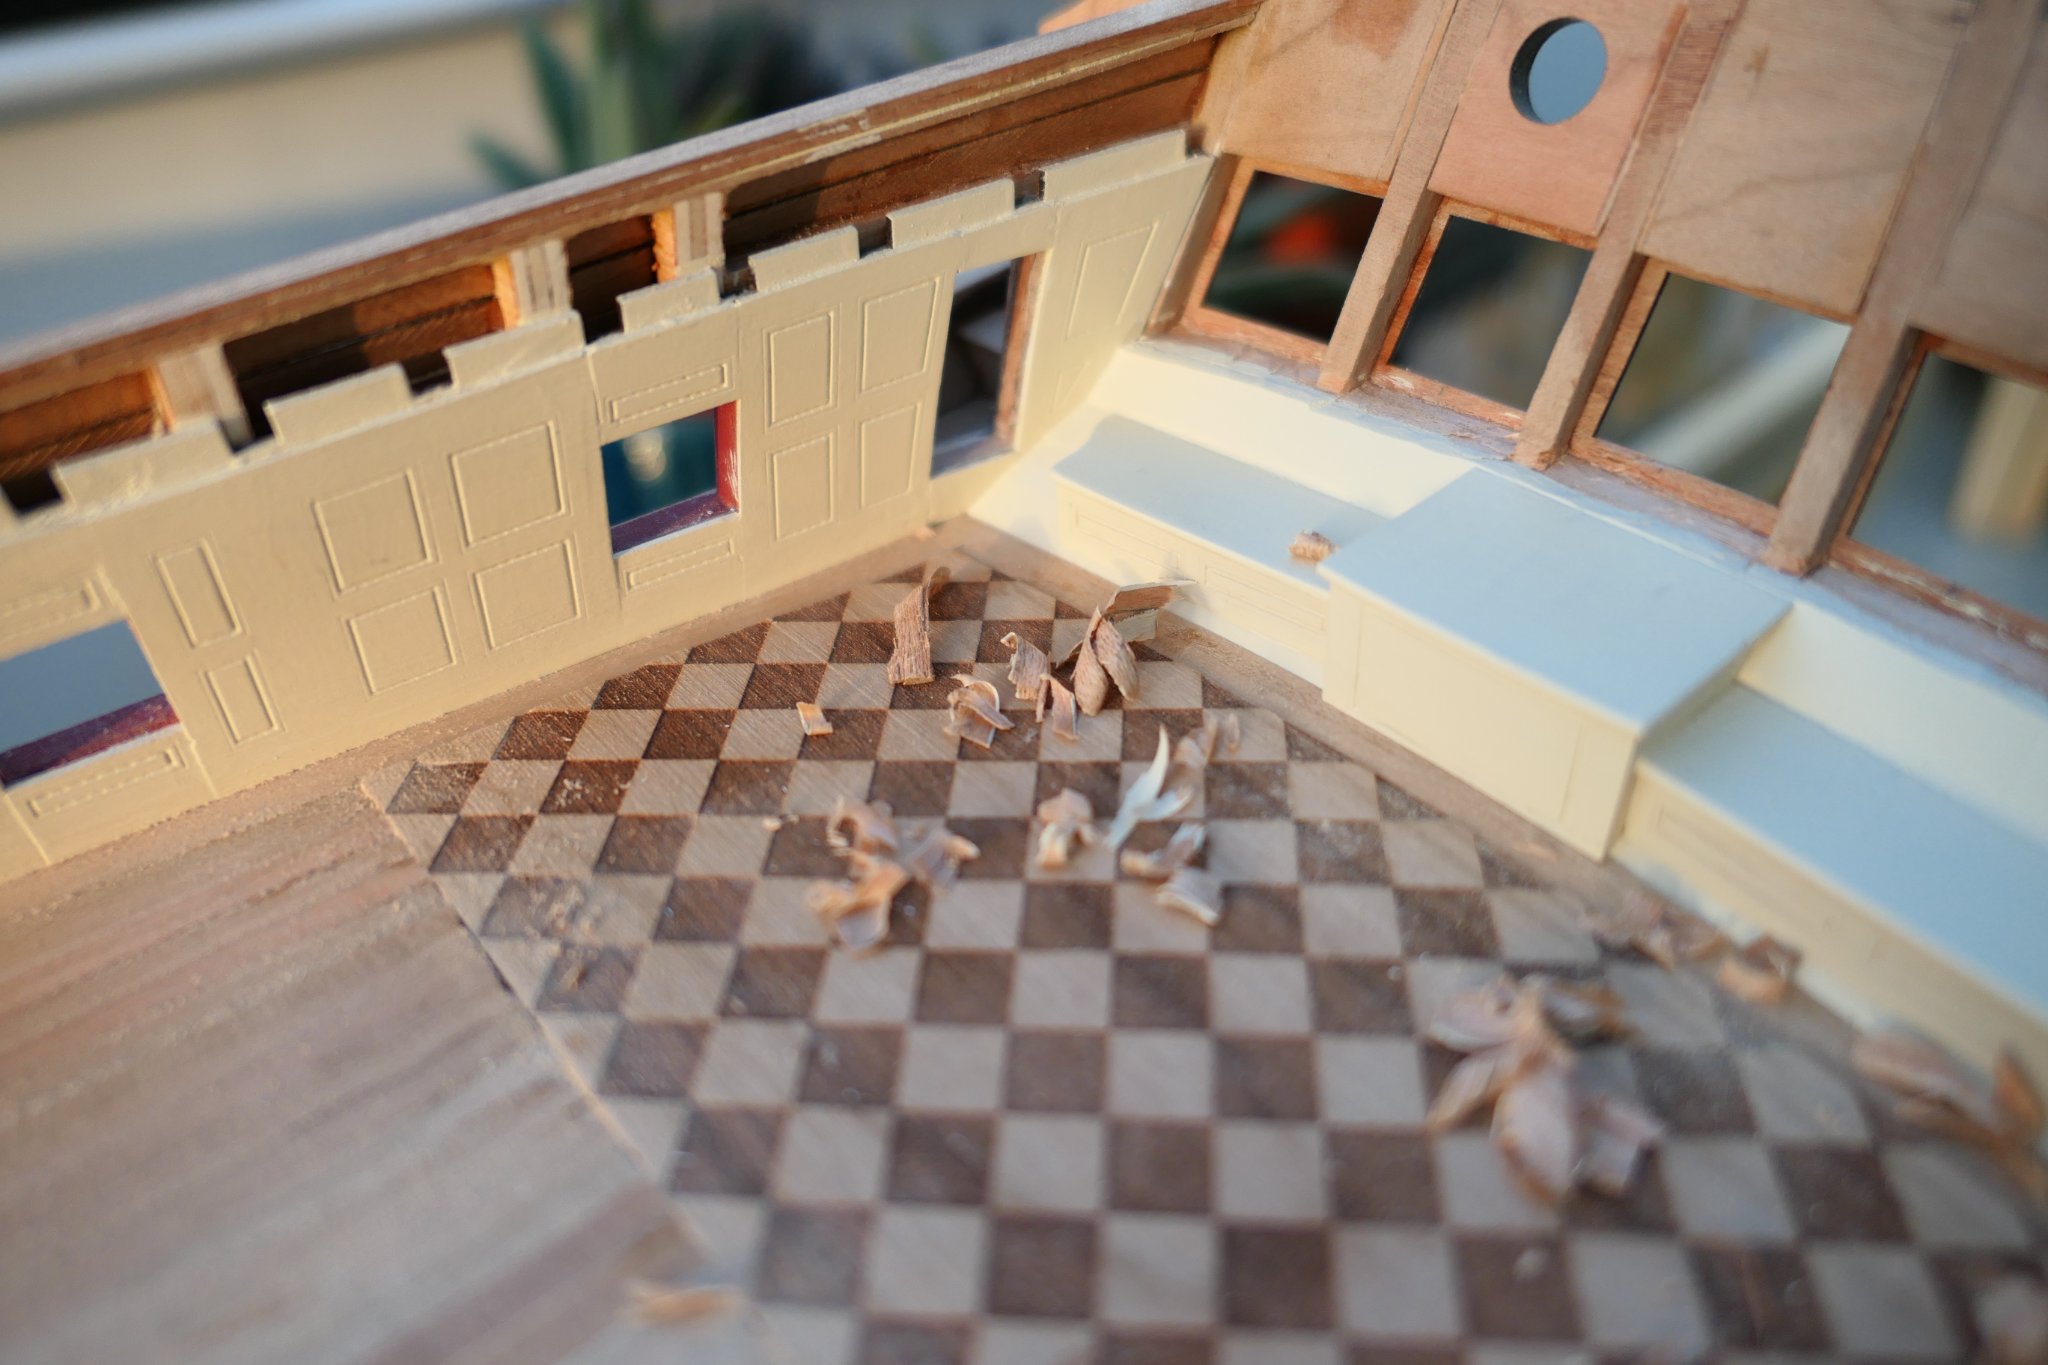
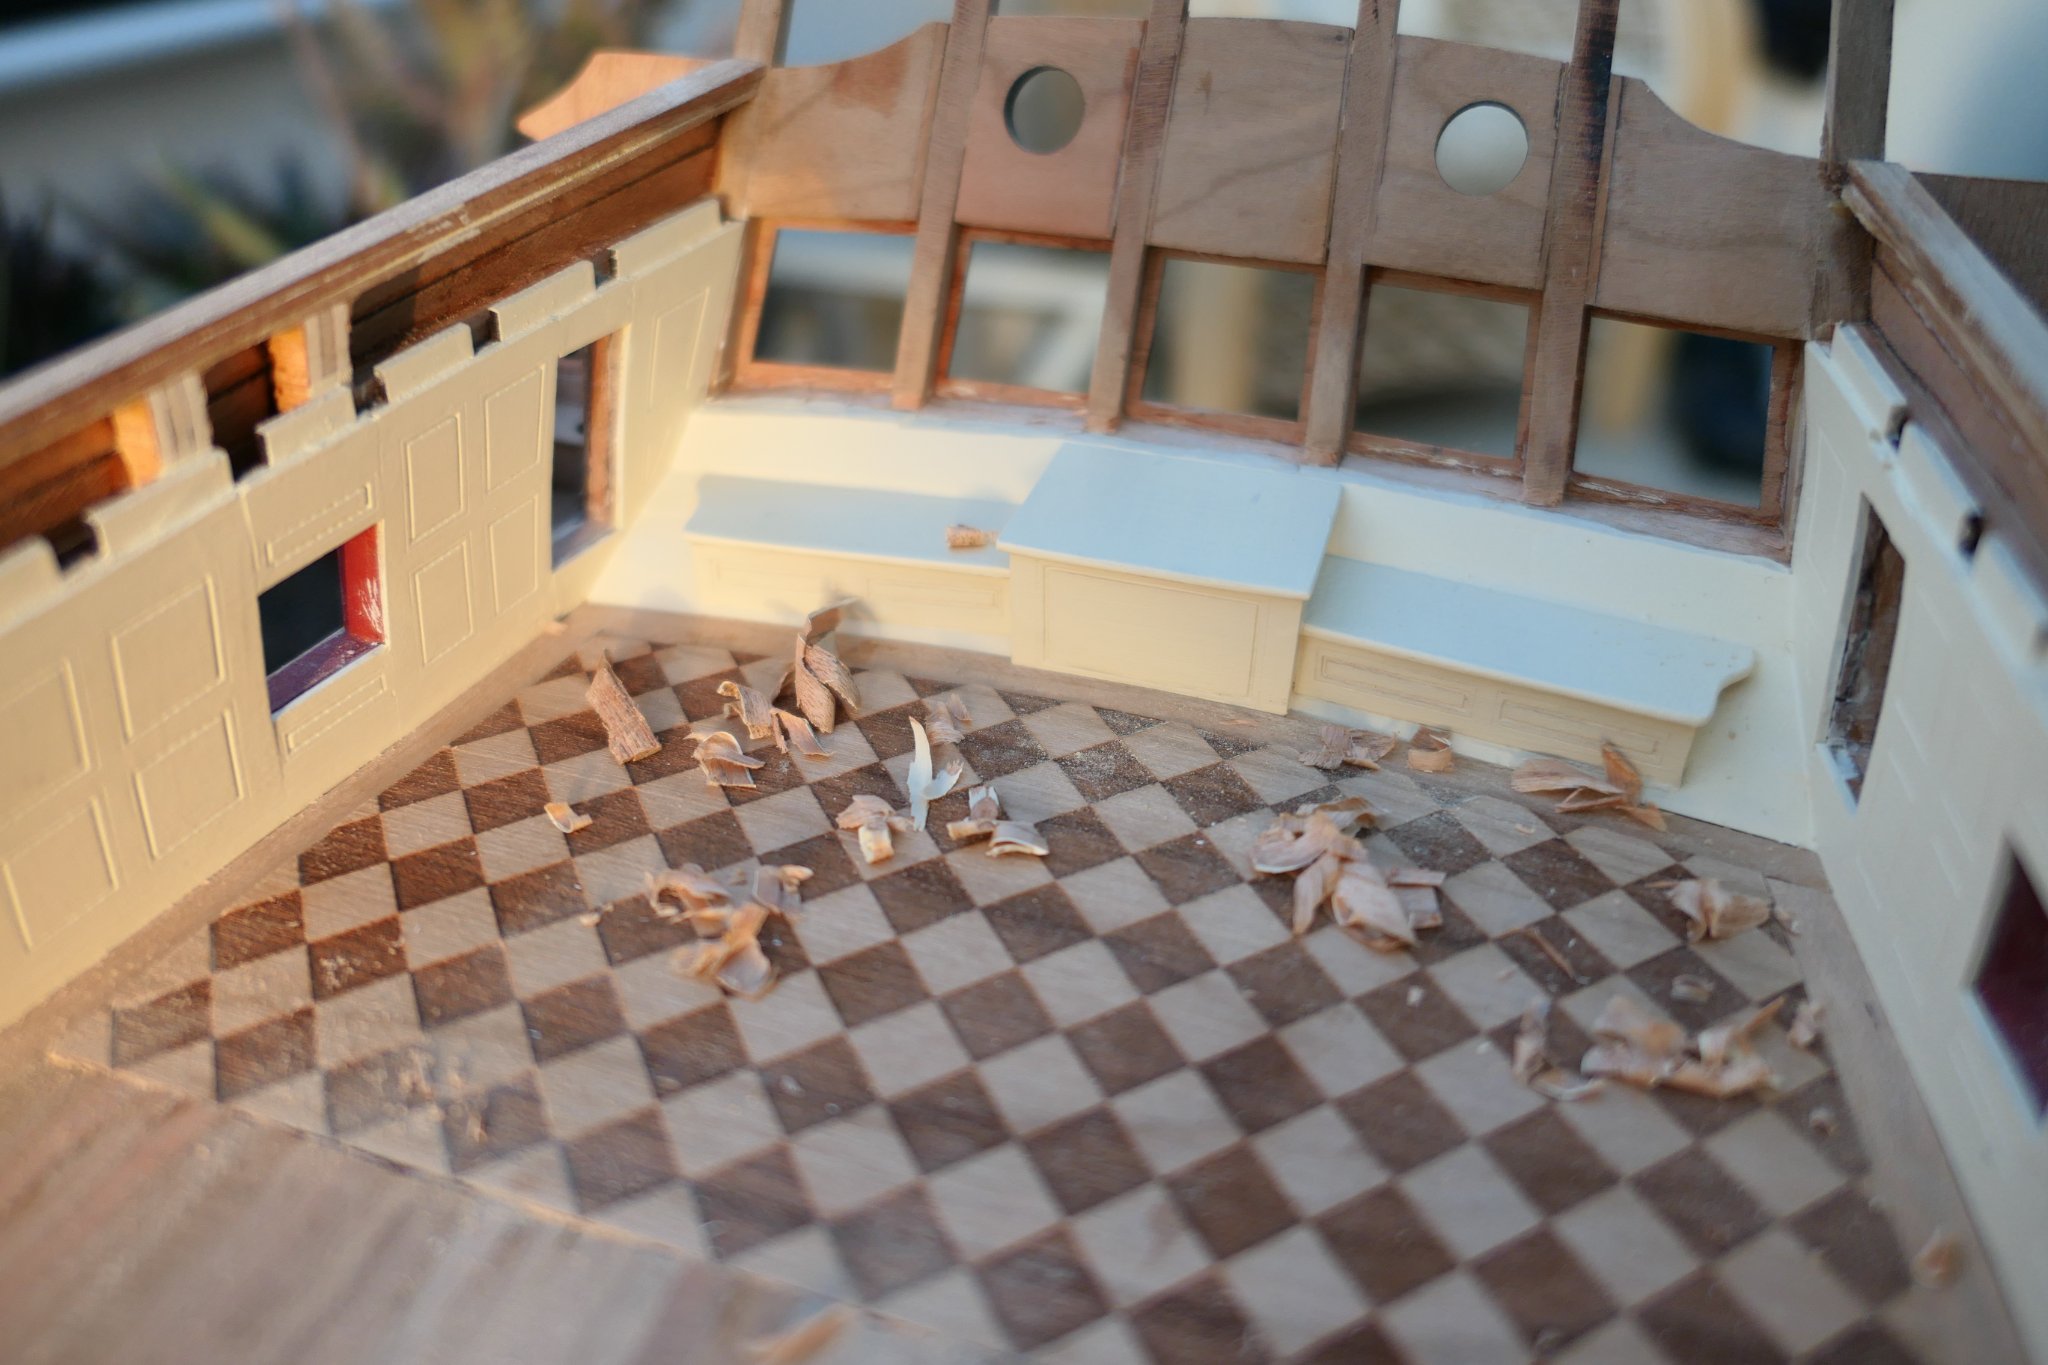
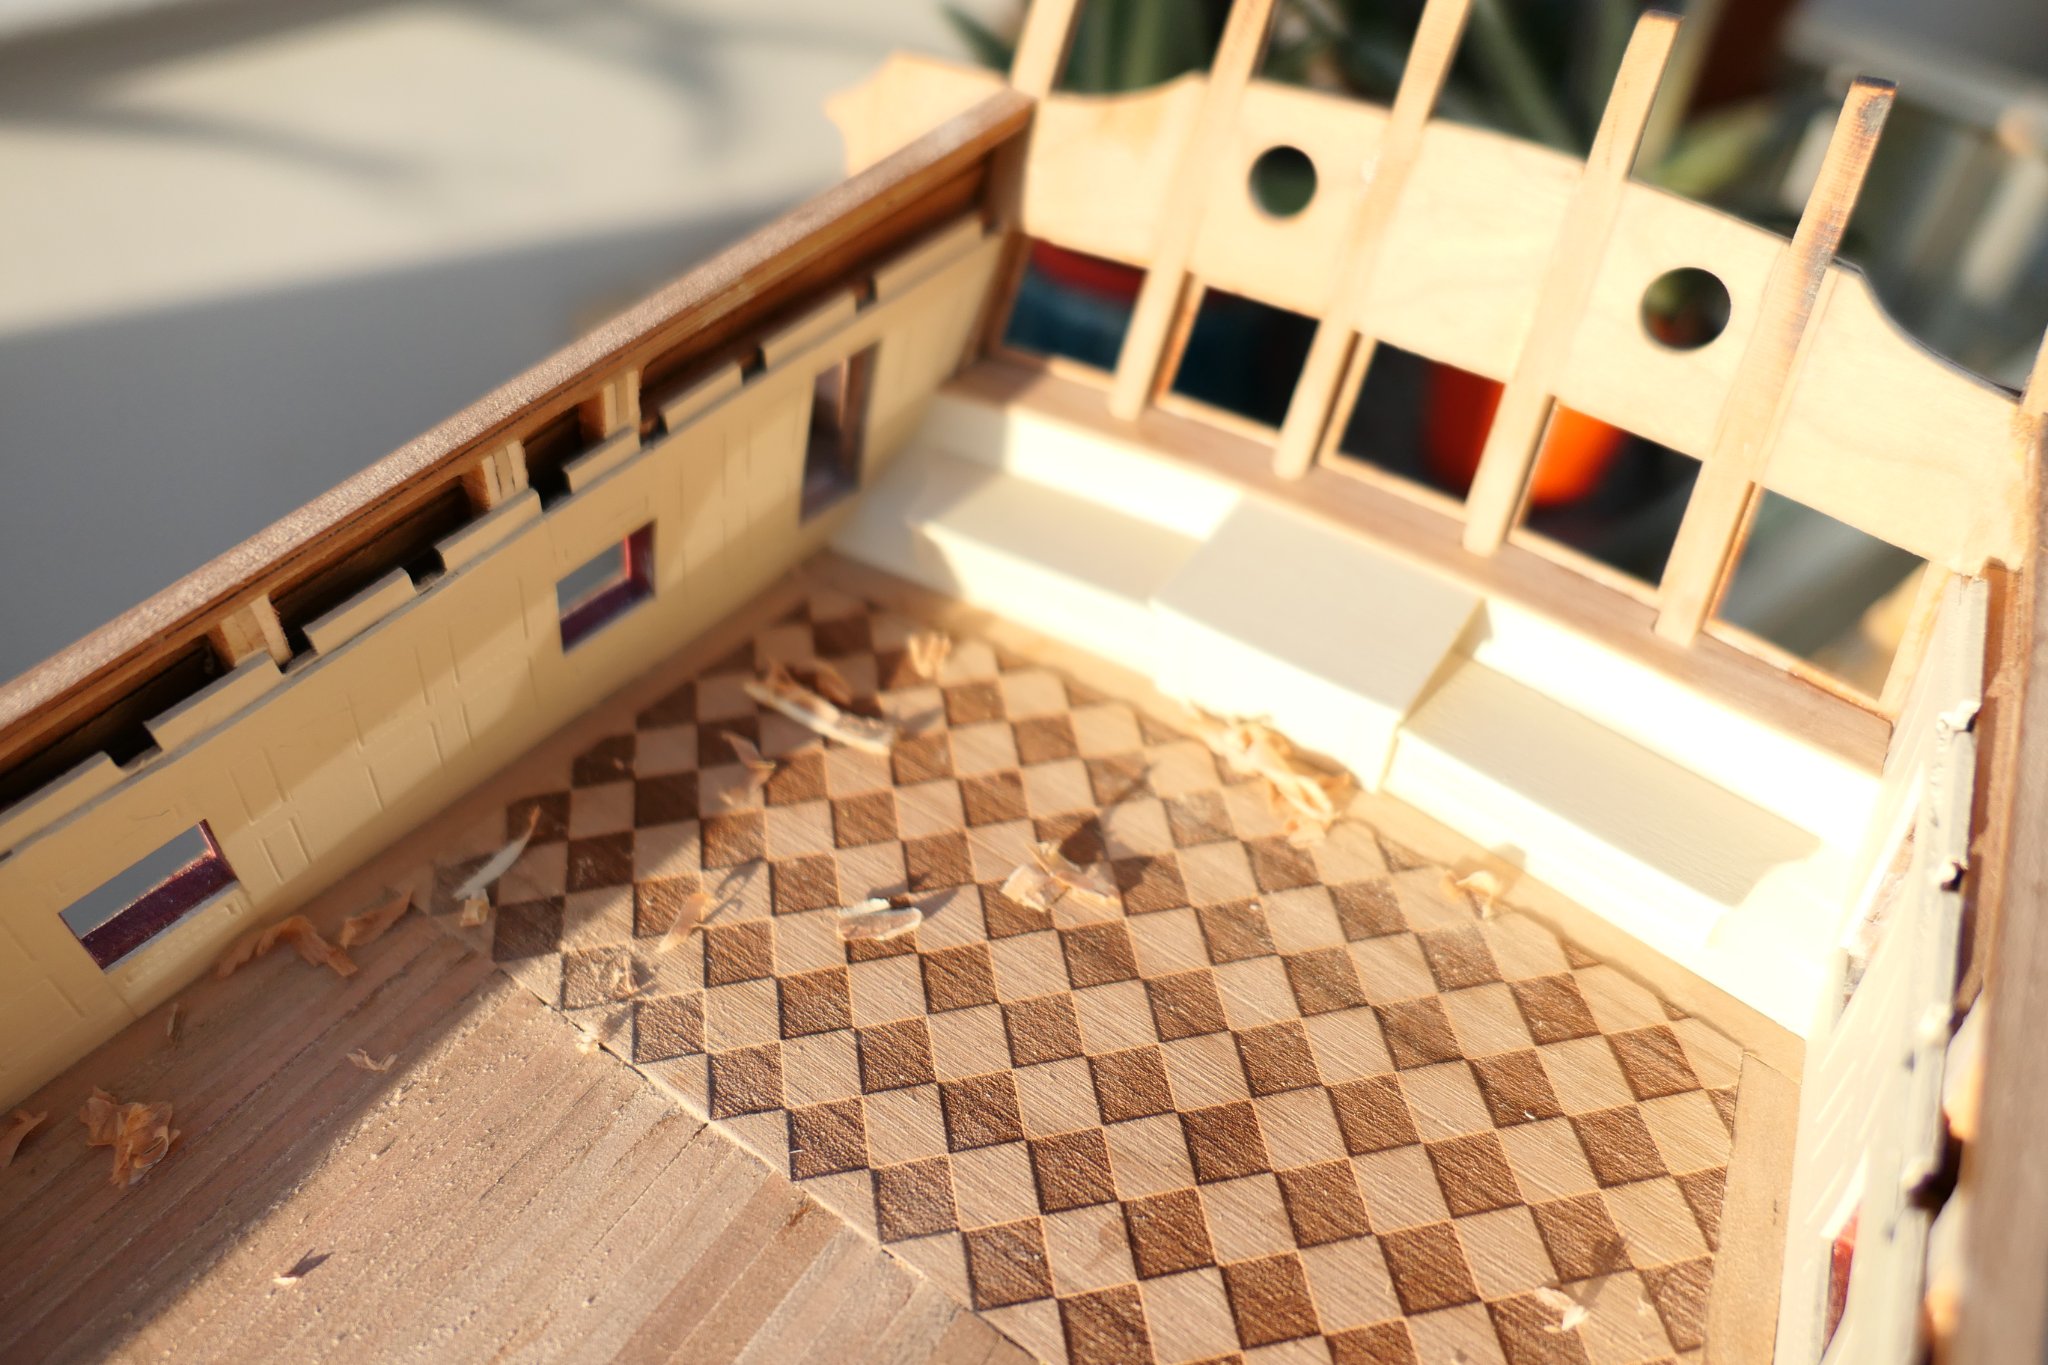
The interior is underway. I painted the windows white on the inside. The panelling is ivory.
.thumb.JPG.a37443171c98e278bce8d8ee14783da0.JPG)
I found it easier to glue together the centre part of the aft bulkhead and the cabin divider.

.thumb.JPG.b10dcbbbc6159bae3a0a268849a891b7.JPG)
- Edwardkenway, scrubbyj427, Bonte_Koe and 13 others
-
15
-
 1
1
-
Hi Steve. Removing the rudder is a really good idea. I didn't - and in a careless moment, pulling the boat towards me, I heard a crunch and ended up with the rudder in my hands. Fortunately Chuck is sending me replacement hinges along with my chapter 7 parts but I wish I'd been more careful.
All the best
Fred
- CaptMorgan and FrankWouts
-
2
-
This is looking superb Bob.
Surely after going to all that trouble rigging the canons (I plan to do the same) you will rig the ship's wheel? As to the bit below the quaterdeck you may not see it but you'll know its there. You could regret it if you leave it out Bob!
All the best
Fred
- Wacom and FrankWouts
-
2
-
Nicely done indeed! That looks like the product of hours and hours of very patient work. You must be delighted with how your Winnie is coming along.
All the best
Fred -
Keep it up Rusty. This is going to be a fantastic model - one to be really proud of - when you are done.
Fred
- Rustyj and FrankWouts
-
2
-
Brilliant work JJ - though those bolts an the mast partners definitely had too many shredded wheats for breakfast!
Fred
- scrubbyj427, bdgiantman2 and FrankWouts
-
2
-
1
-
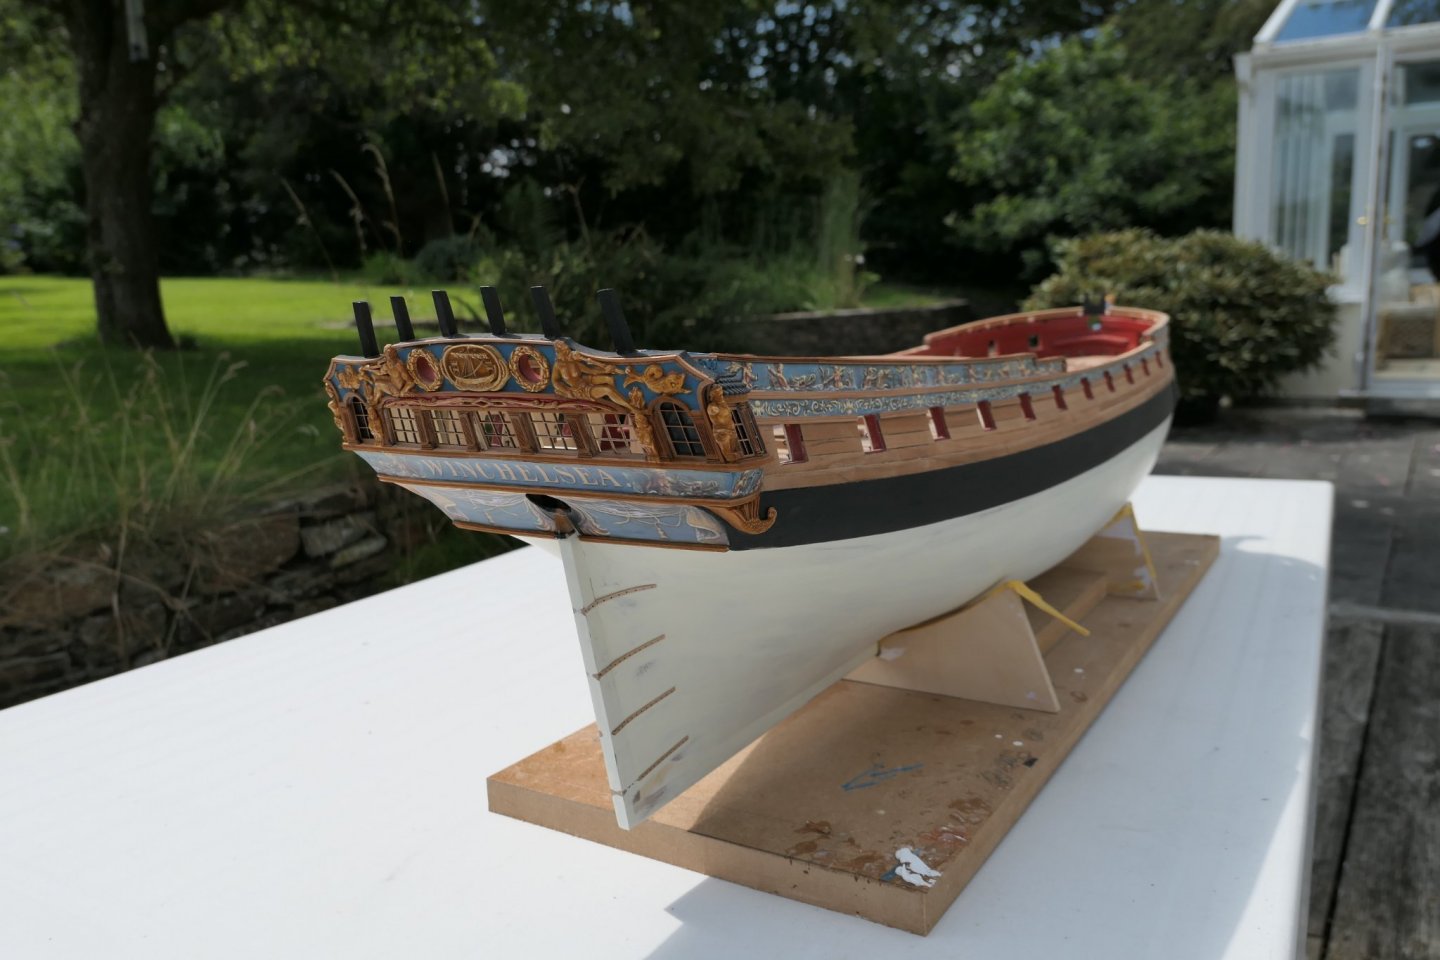
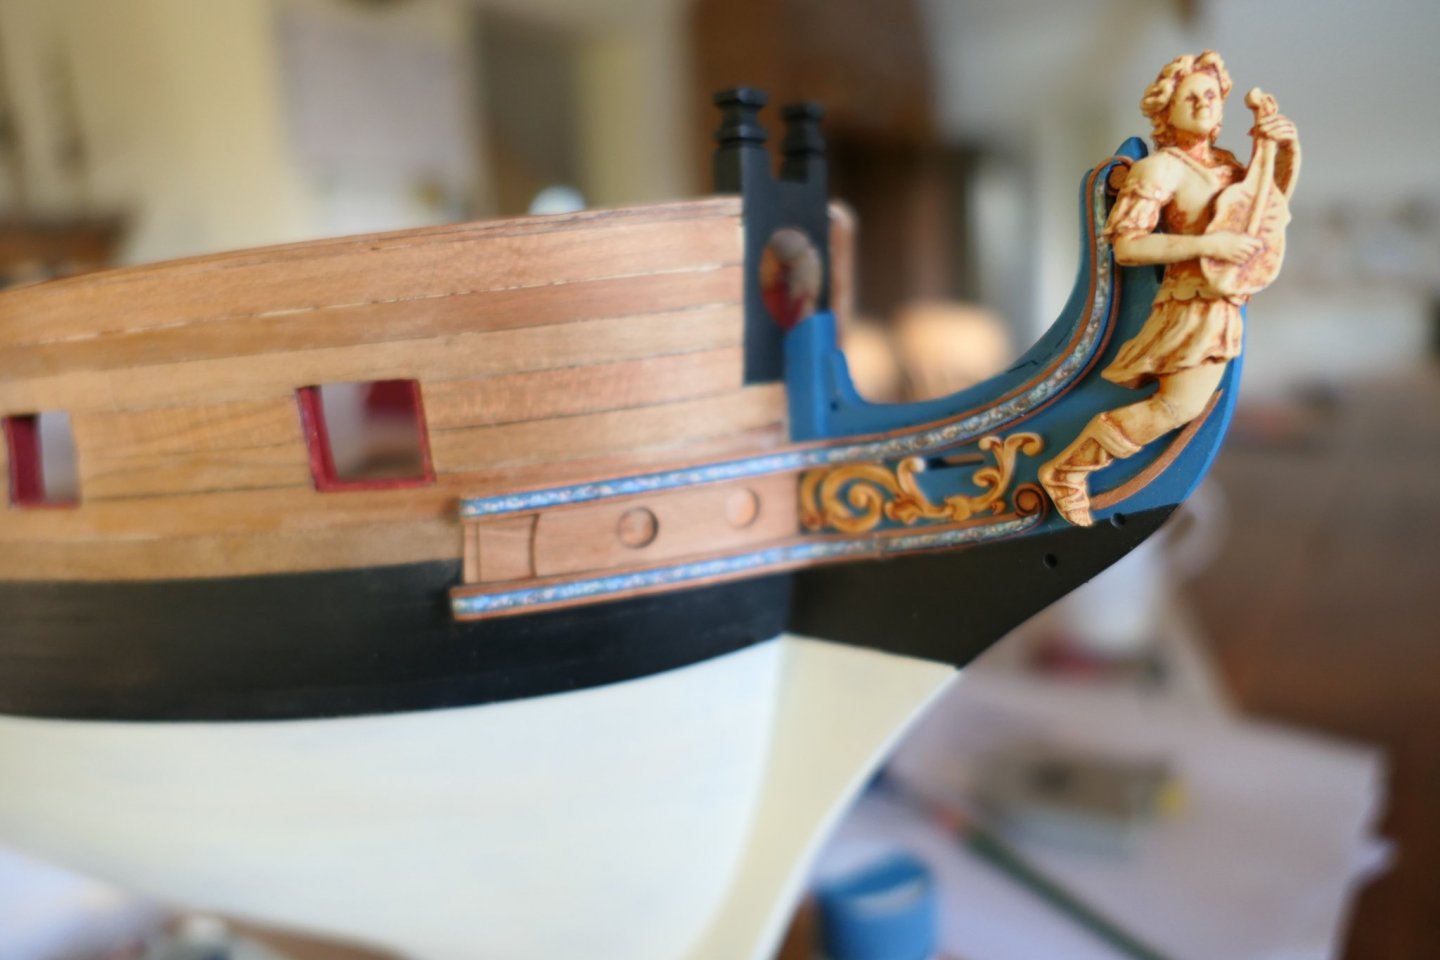
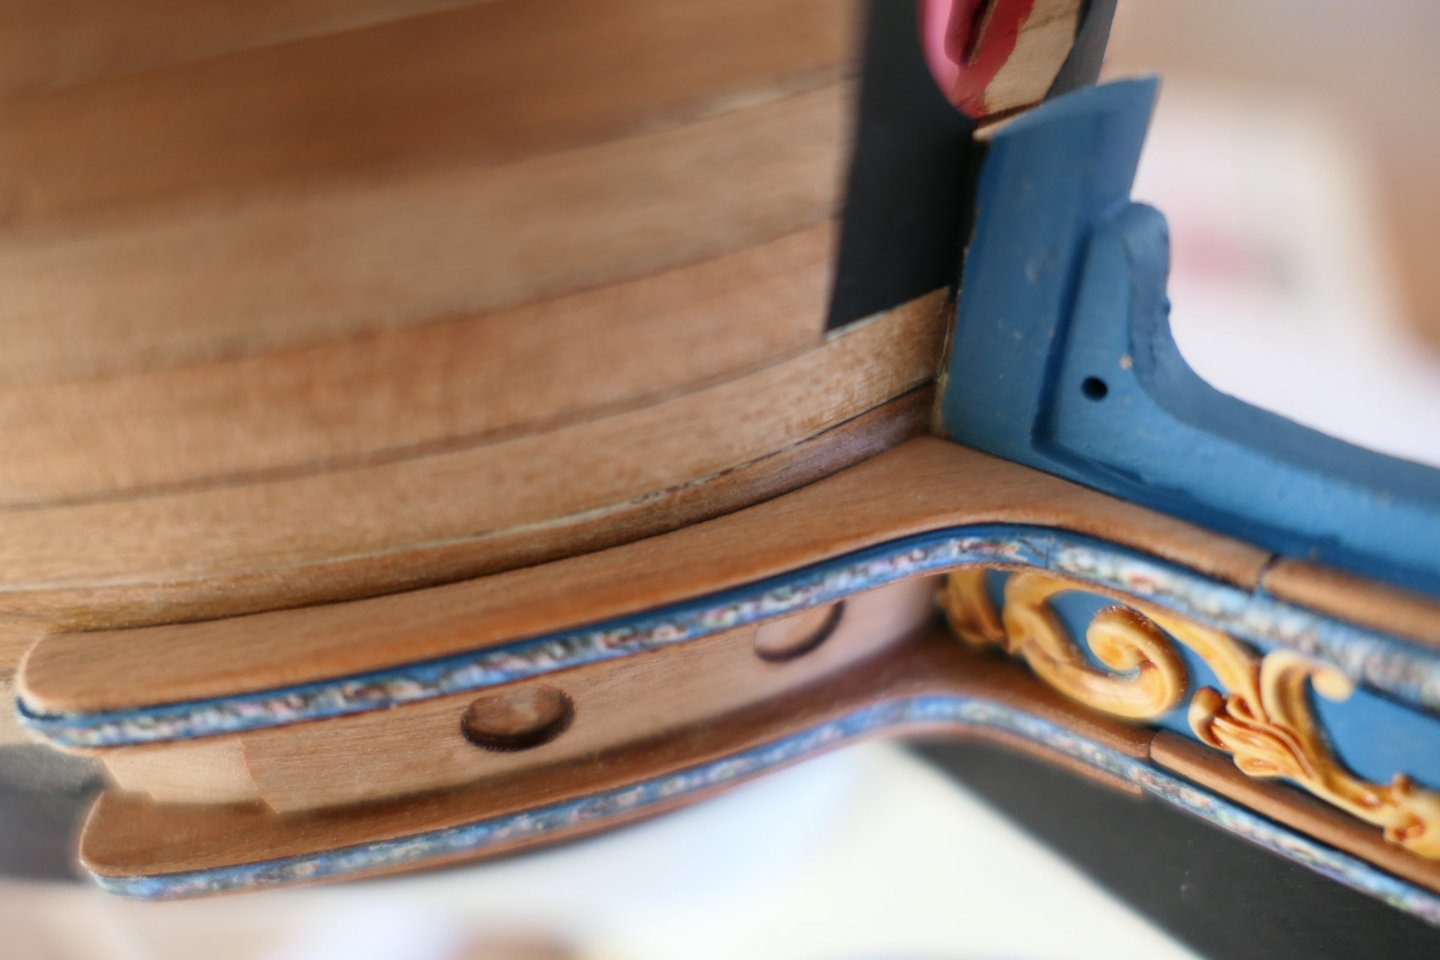
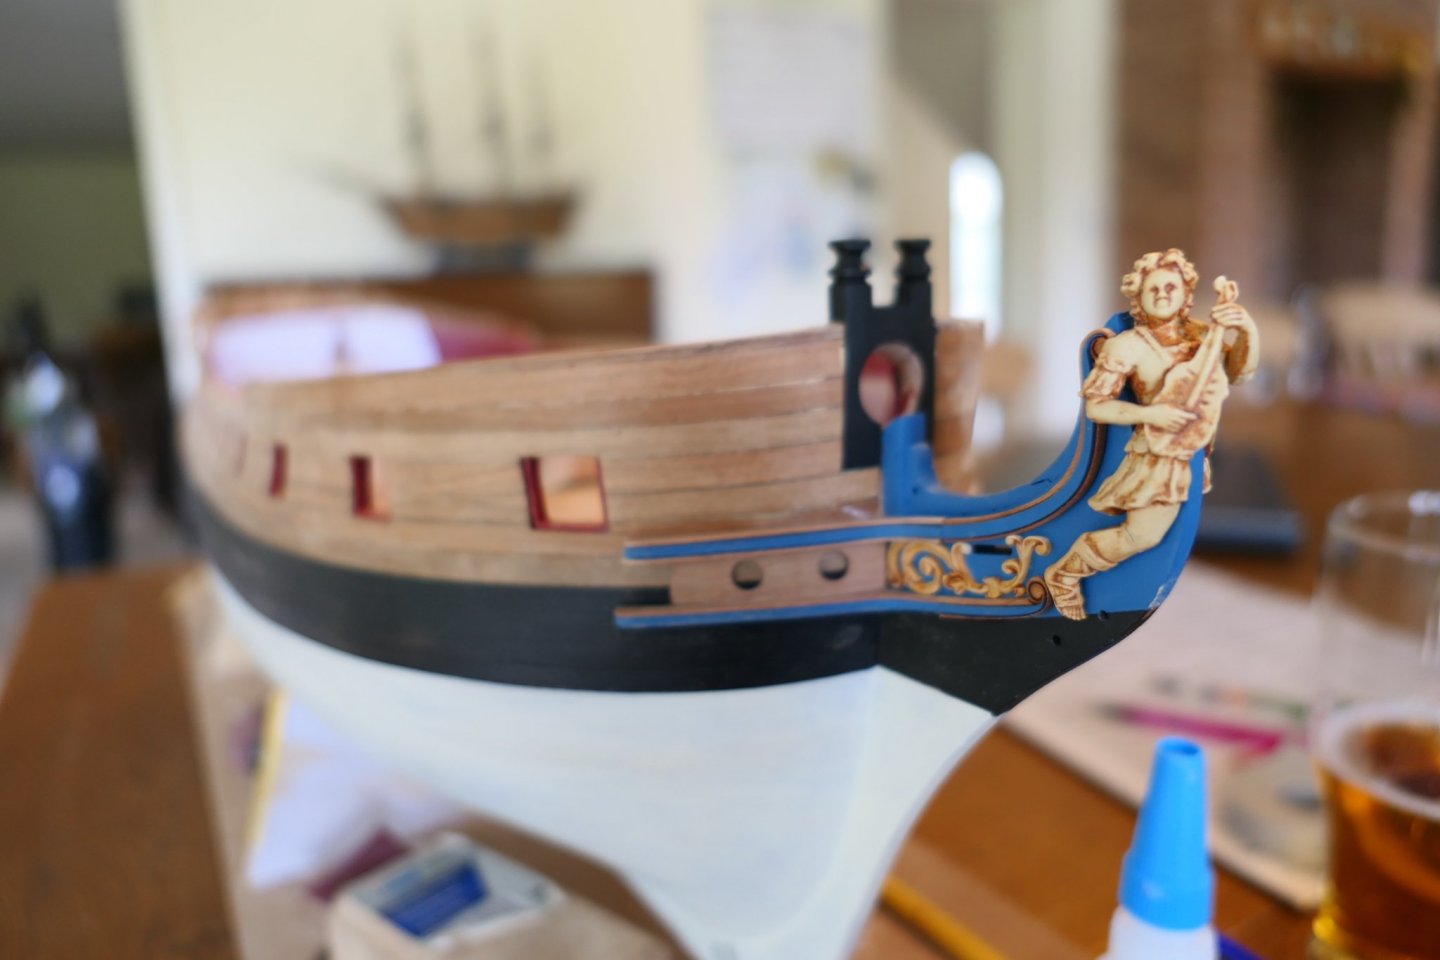
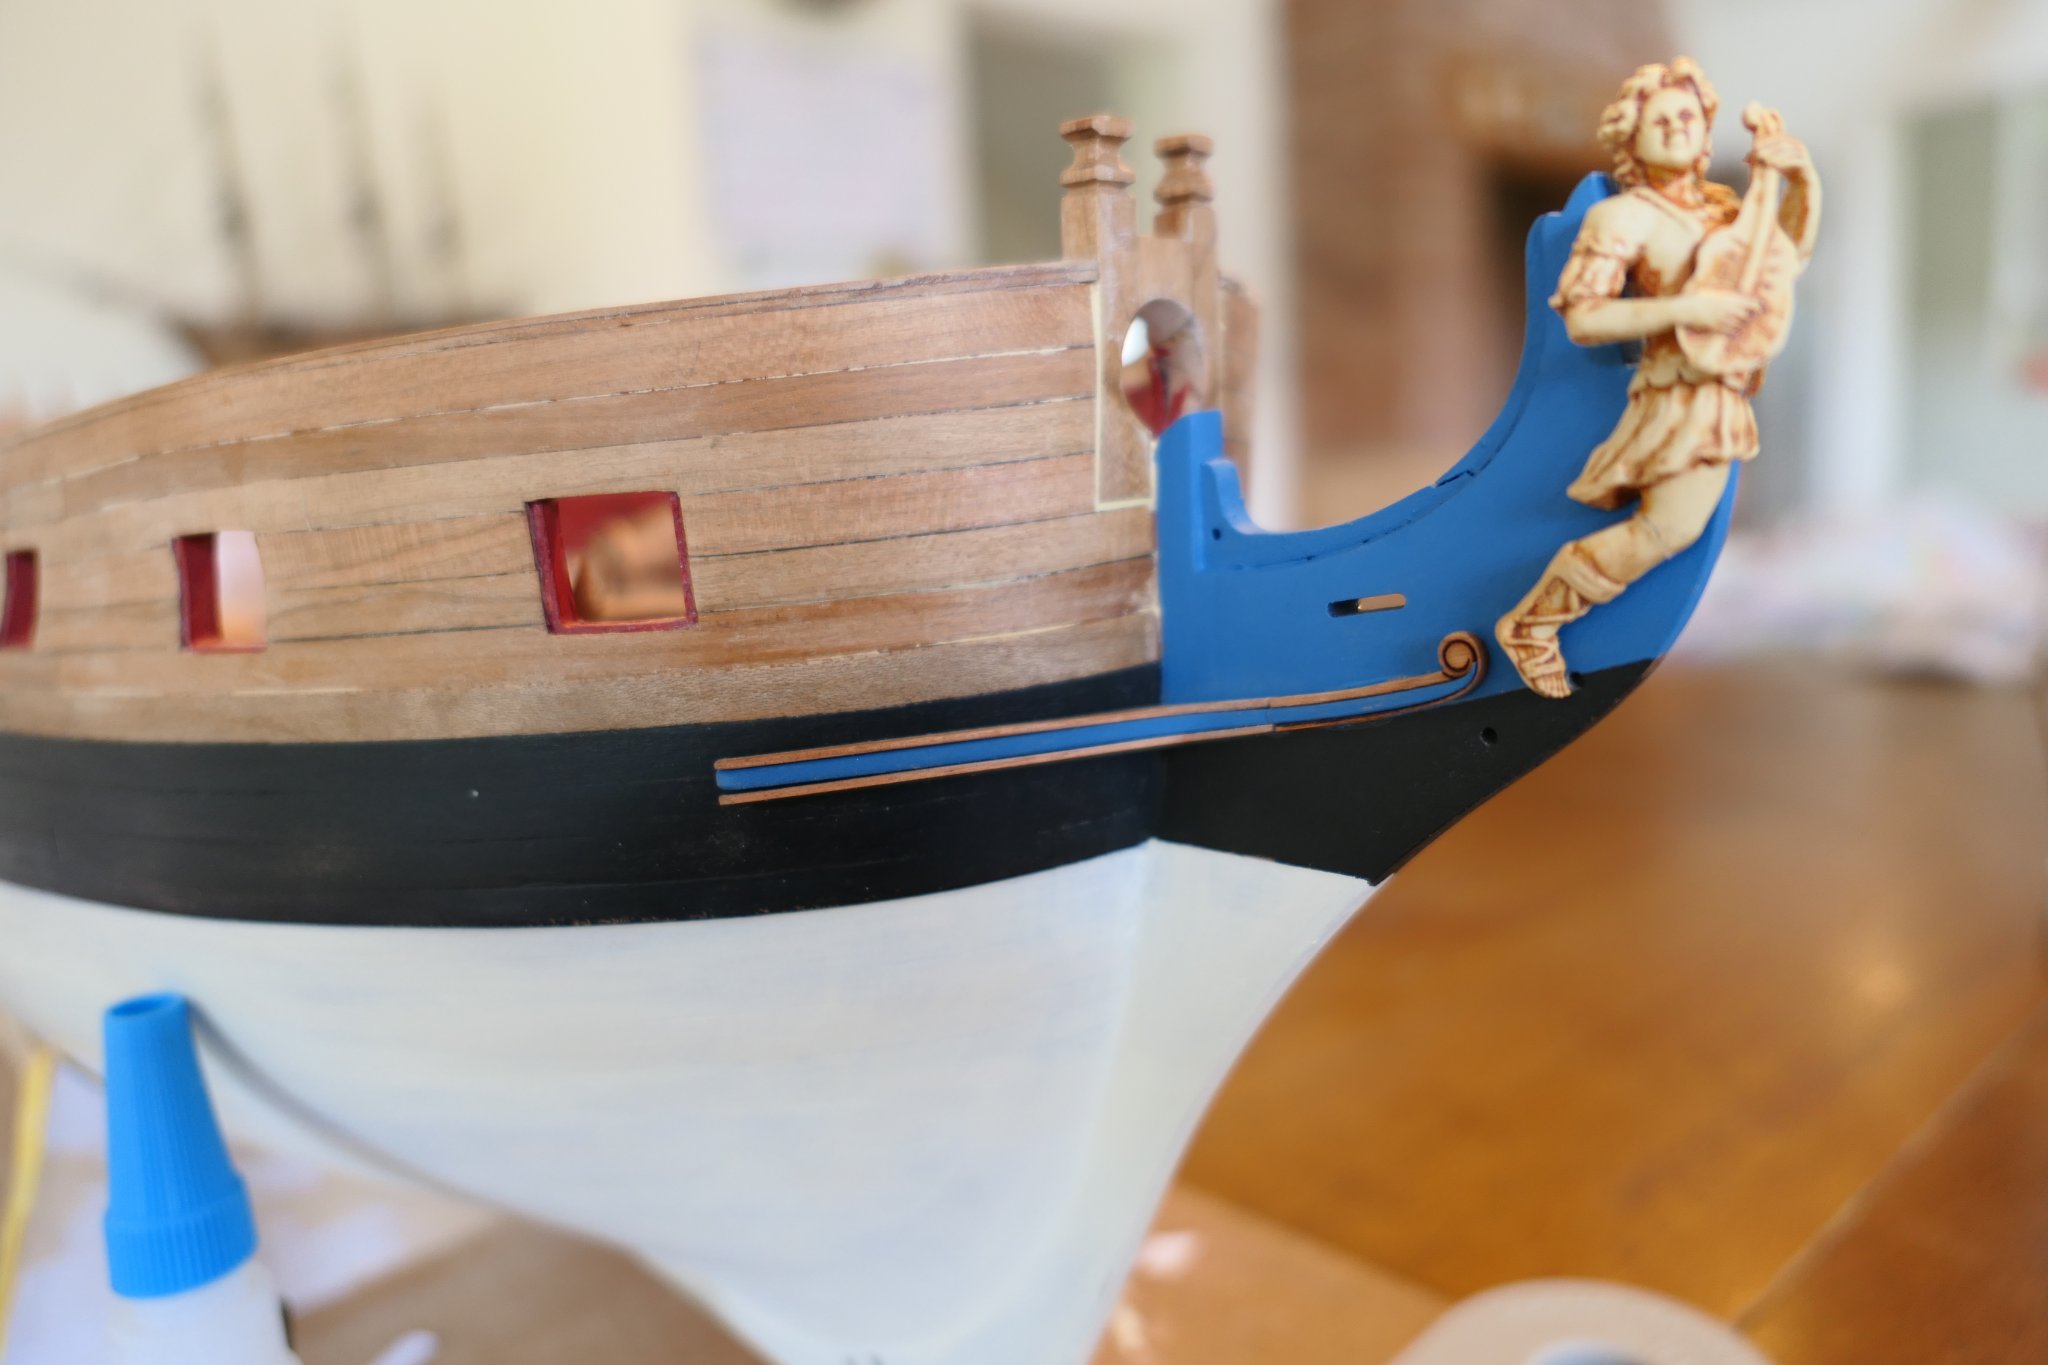
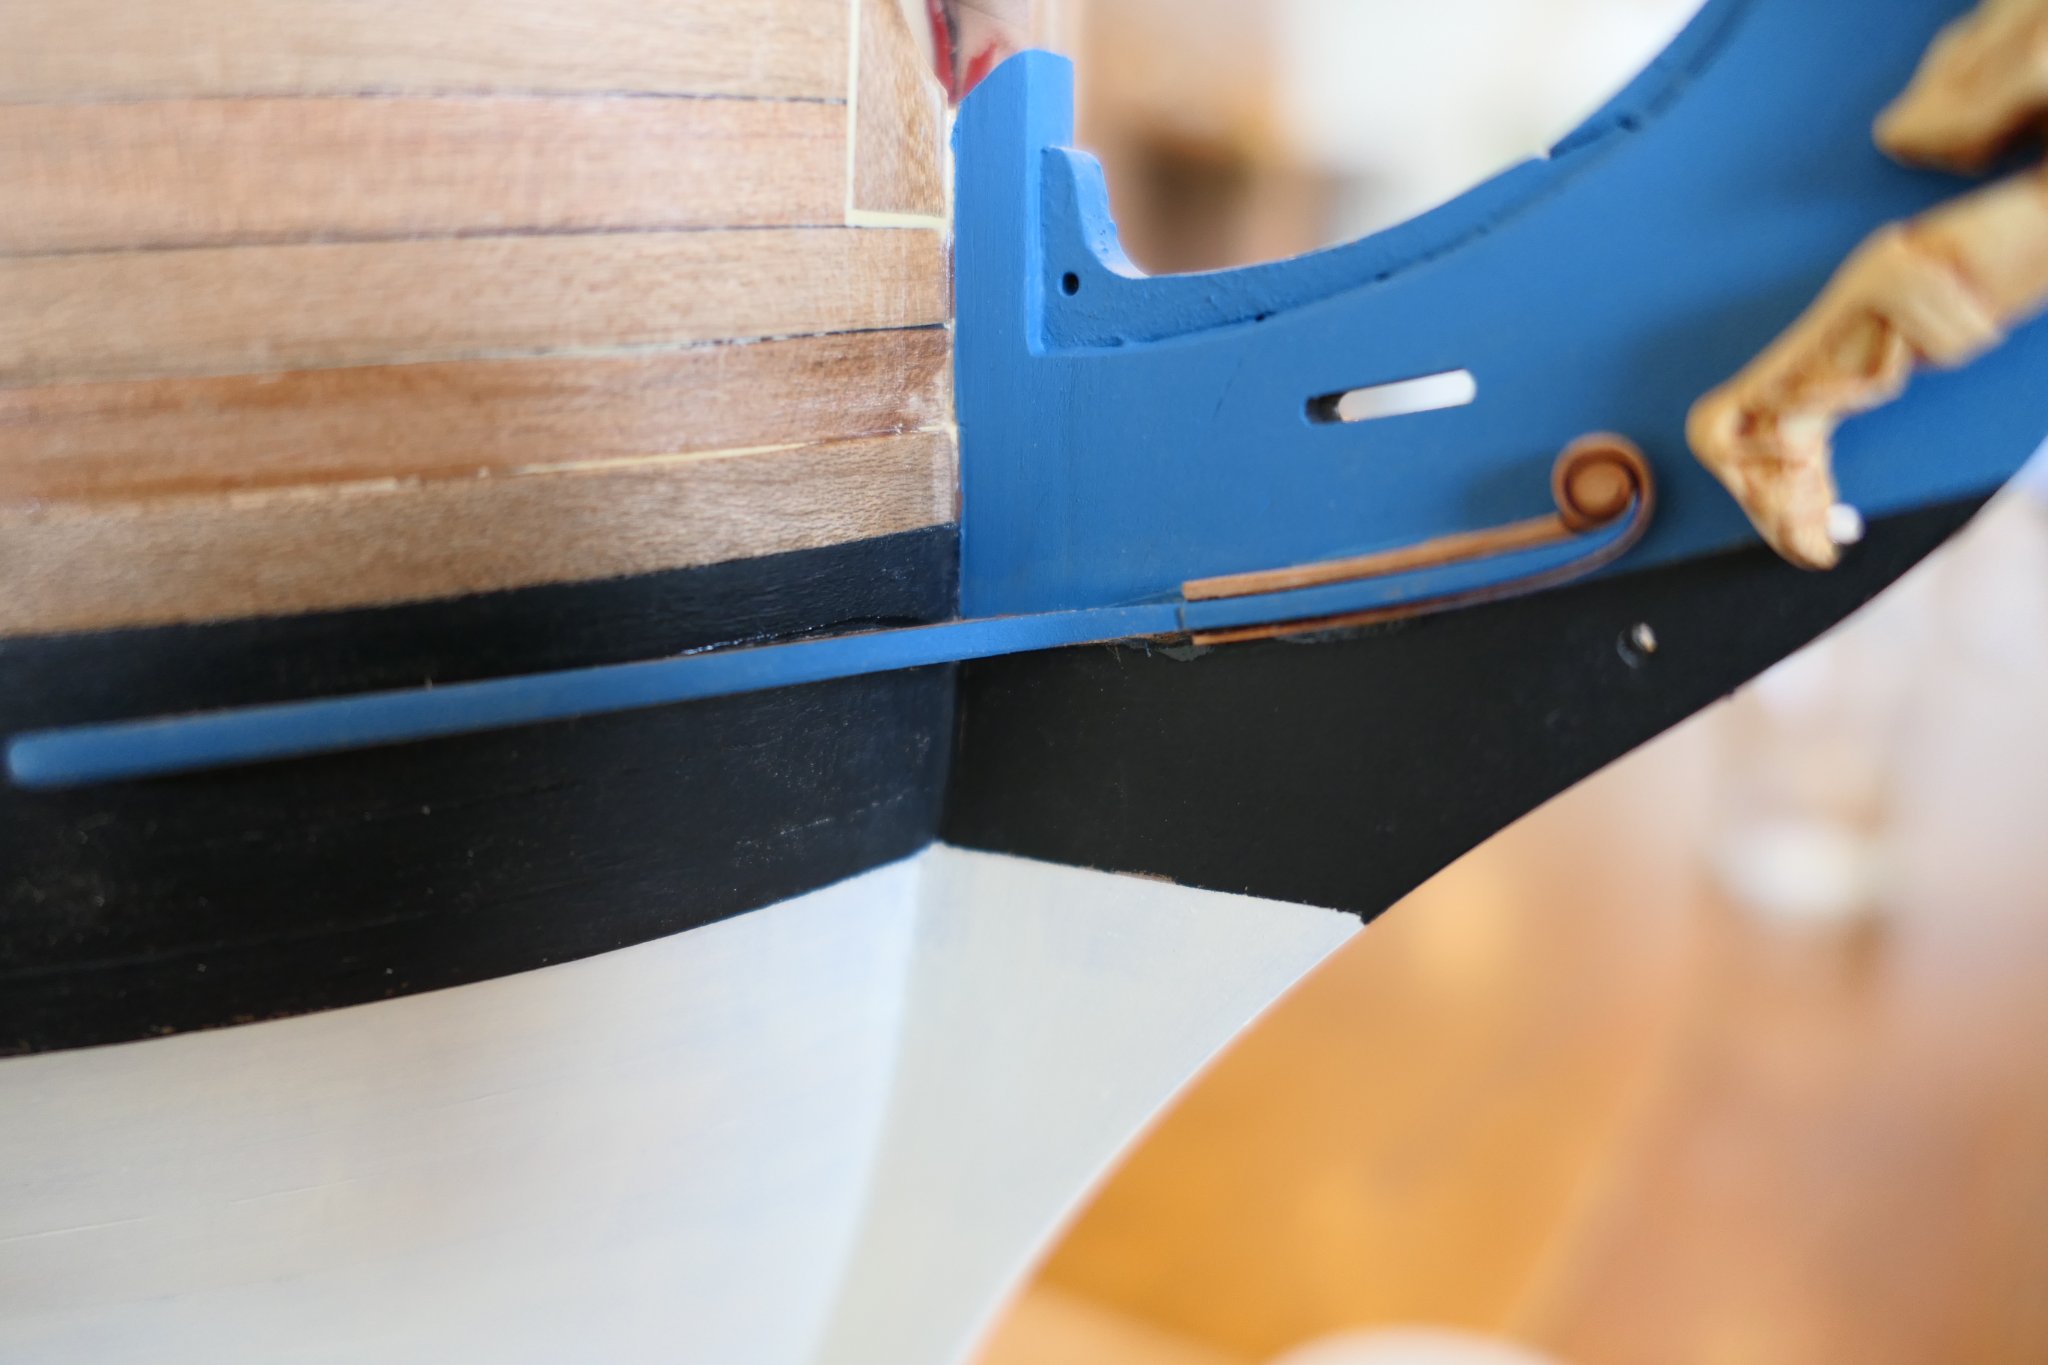
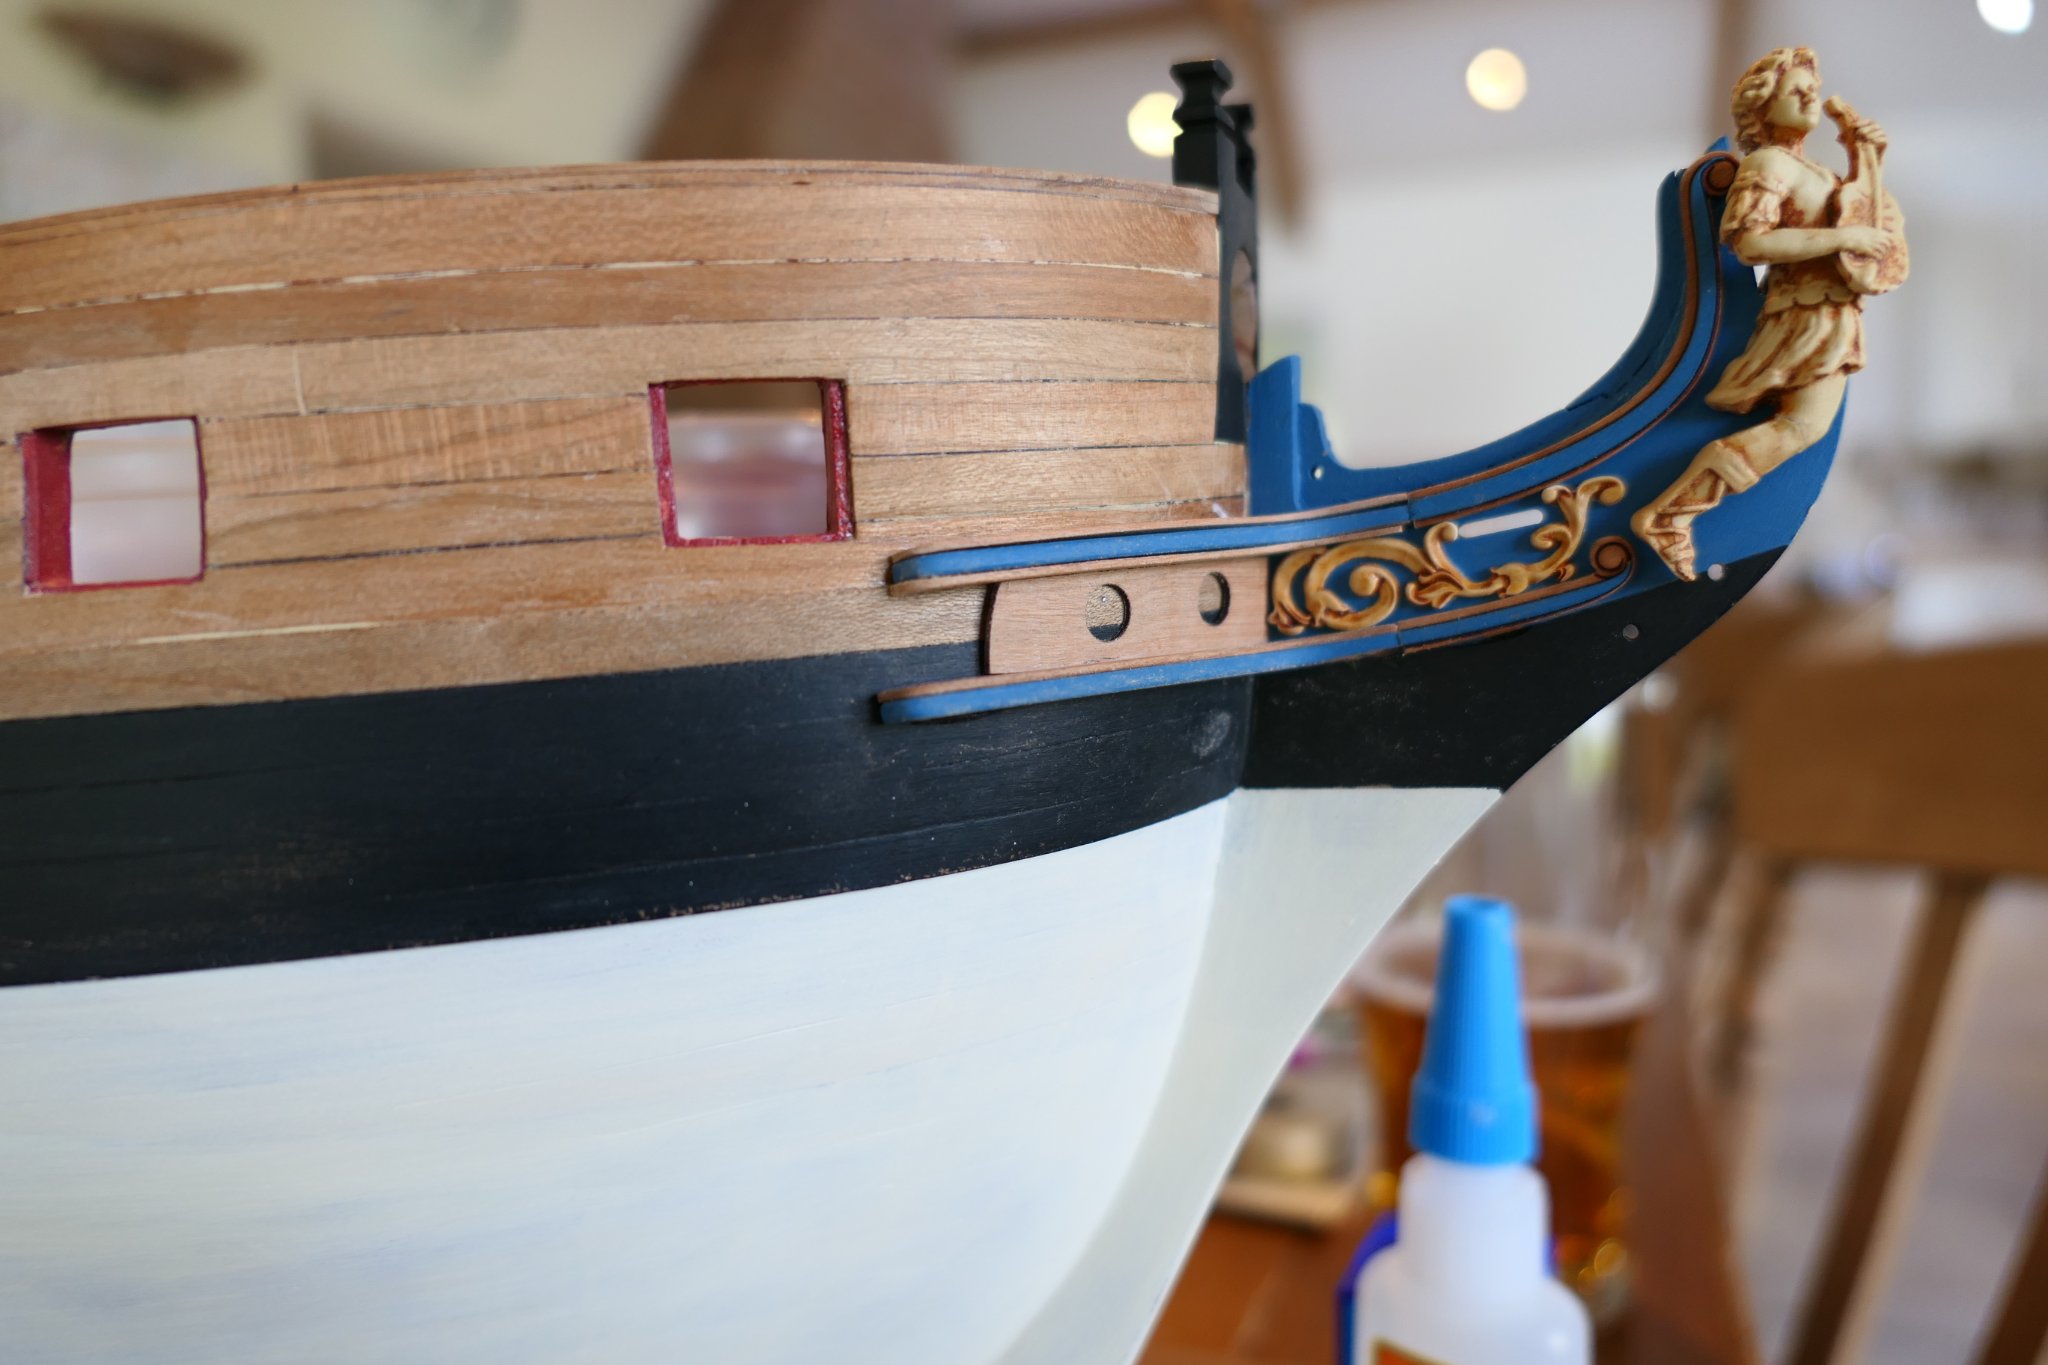
I had a go at the cheeks and hair brackets and I'm very pleased with the outcome.

Rather than make up the cheeks off the ship I started with the middle section and fixed it in position with the hair bracket. The top and bottom sections of the cheek are not yet glued in.
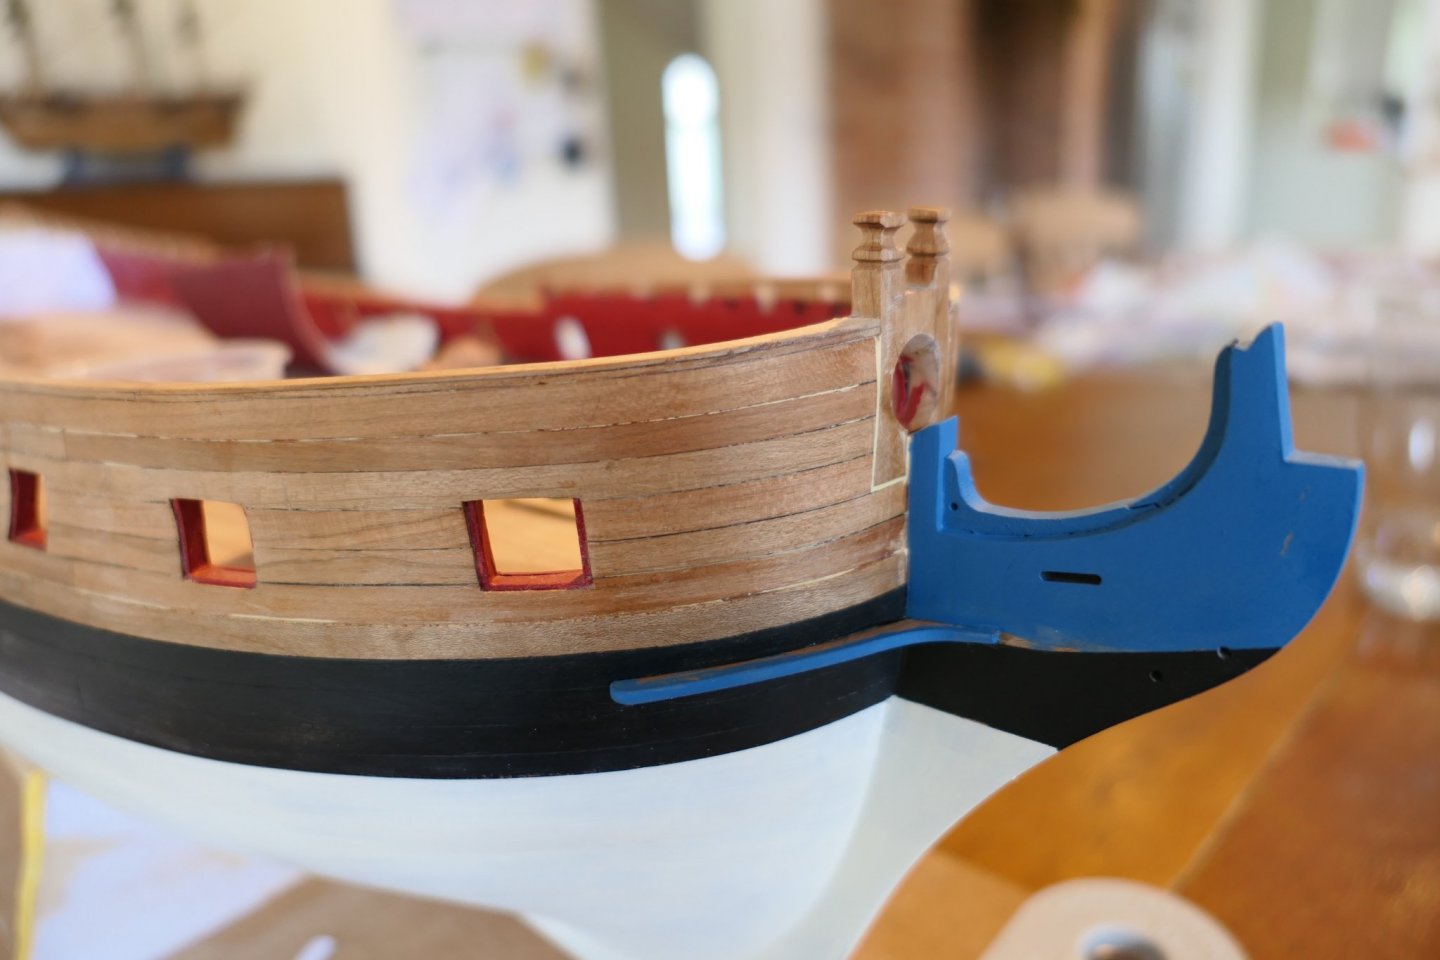


Then the top cheek and hair bracket. I wish I'd started with the top bracket as that must (I think) line up with the top of the stem. I put my bottom cheek a couple of millimetres too high and got very cramped for space to fit the resin moulding - but I got it in with a bit of filing. I' wasn't sure if the resin piece above the gammoning hole was a casting sprue or meant to be there. I cut it out as I needed the space but I suspect that's incorrect.
Here the hawse hole piece is not glued in.

Then I glued on the friezes. The advantage (as I see it) of not fixing the top and bottom sections of the cheeks is that the friezes can easily be manipulated into position and pressed to follow the bevelled edges of the middle section very easily between thumb and forefinger. Painting the section first also disguises any mismatch between the wood and the paper. I "painted" or coloured the cut white edges of the friezes before glueing so I'd have no white paper showing.
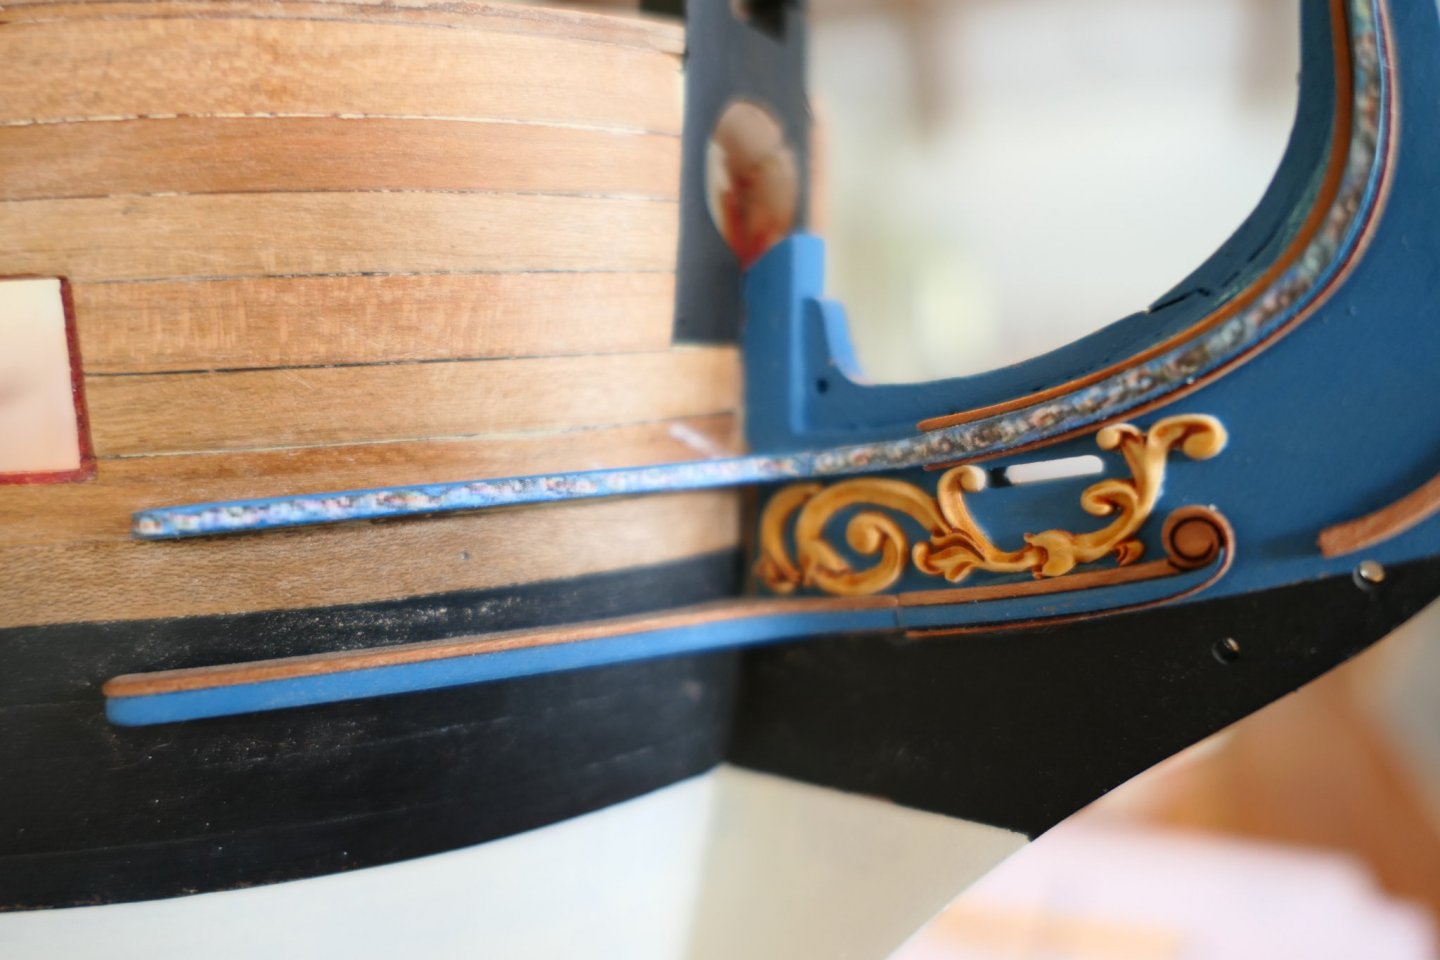
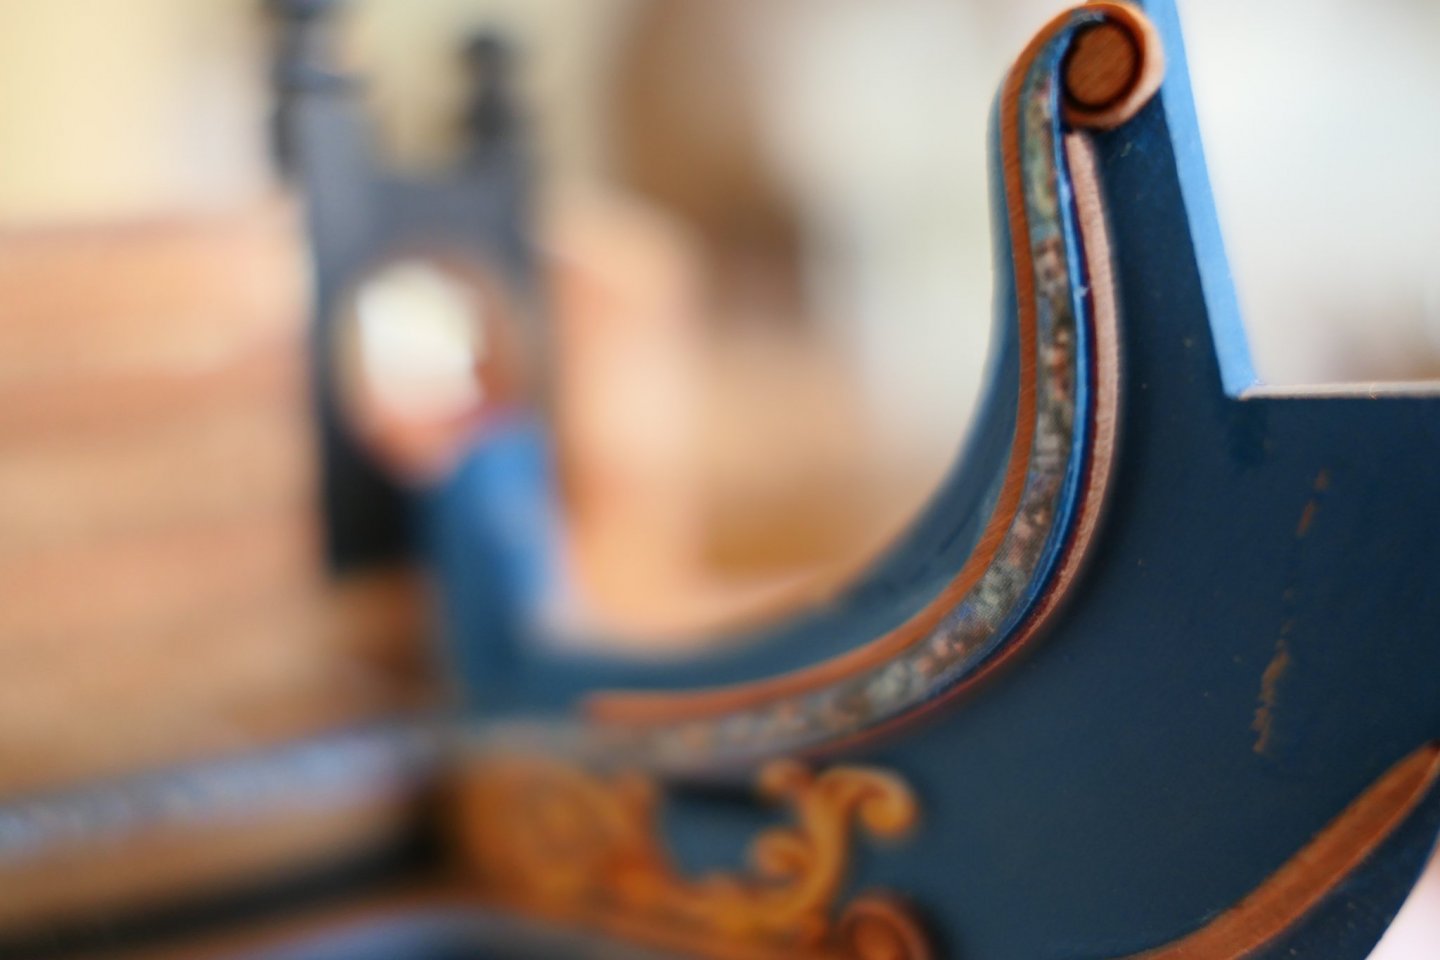
And here is the result. Far from perfect but I'm very happy. The joints between the cheeks and the brackets could have been tighter but I guess much of this will be disguised by the gallery (is that the correct terminology?).
Now for the other side.
The precision of the laser cutting, incidentally, is a marvel.

- Rustyj, Greg M, scrubbyj427 and 9 others
-
12
-
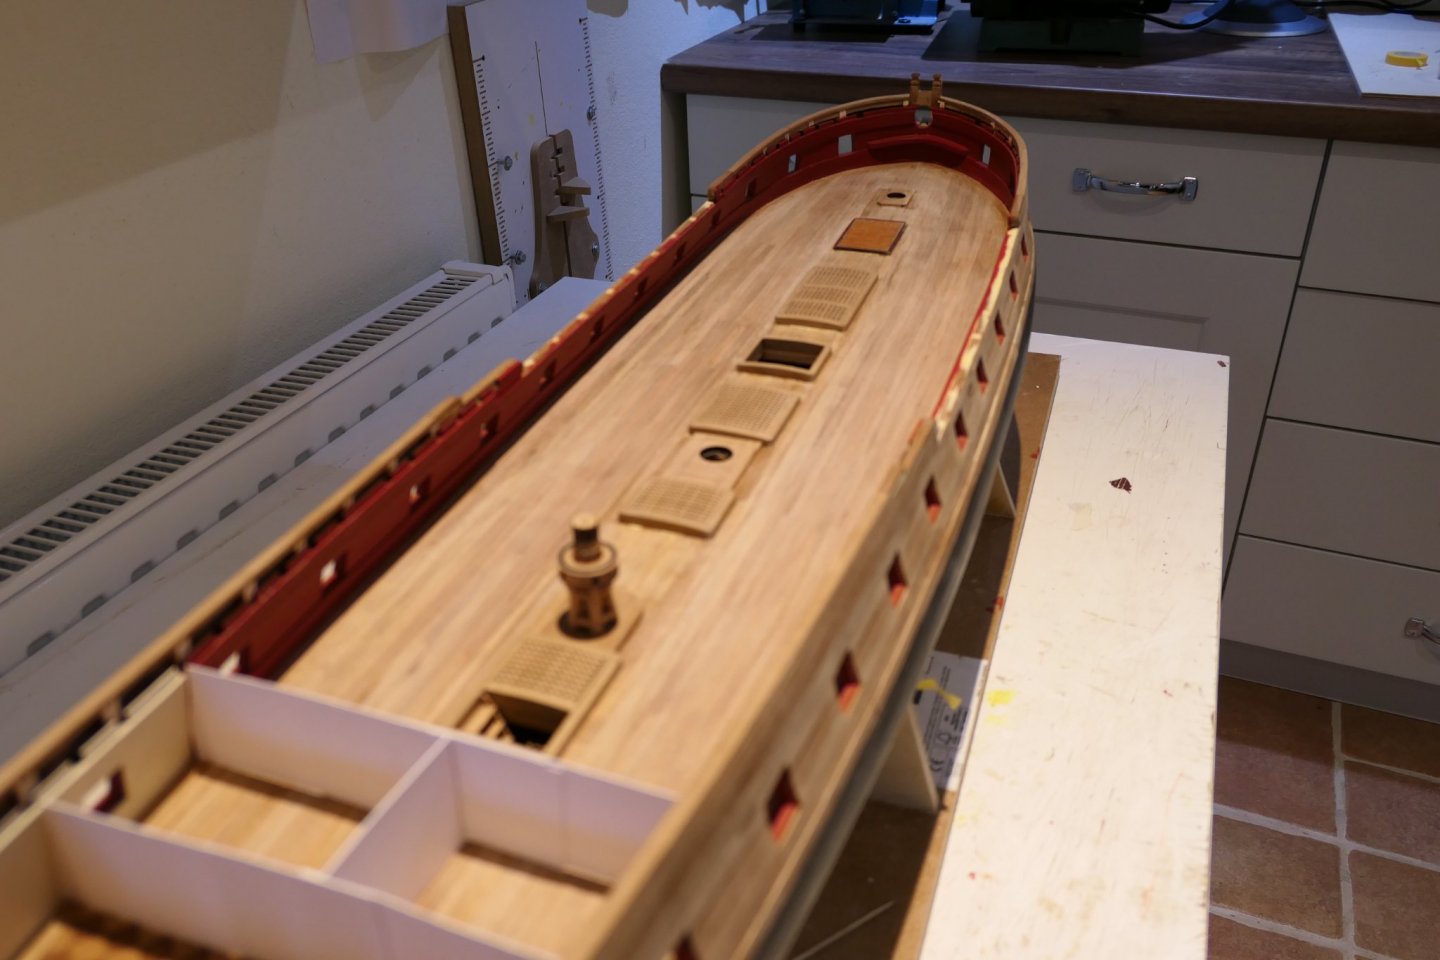
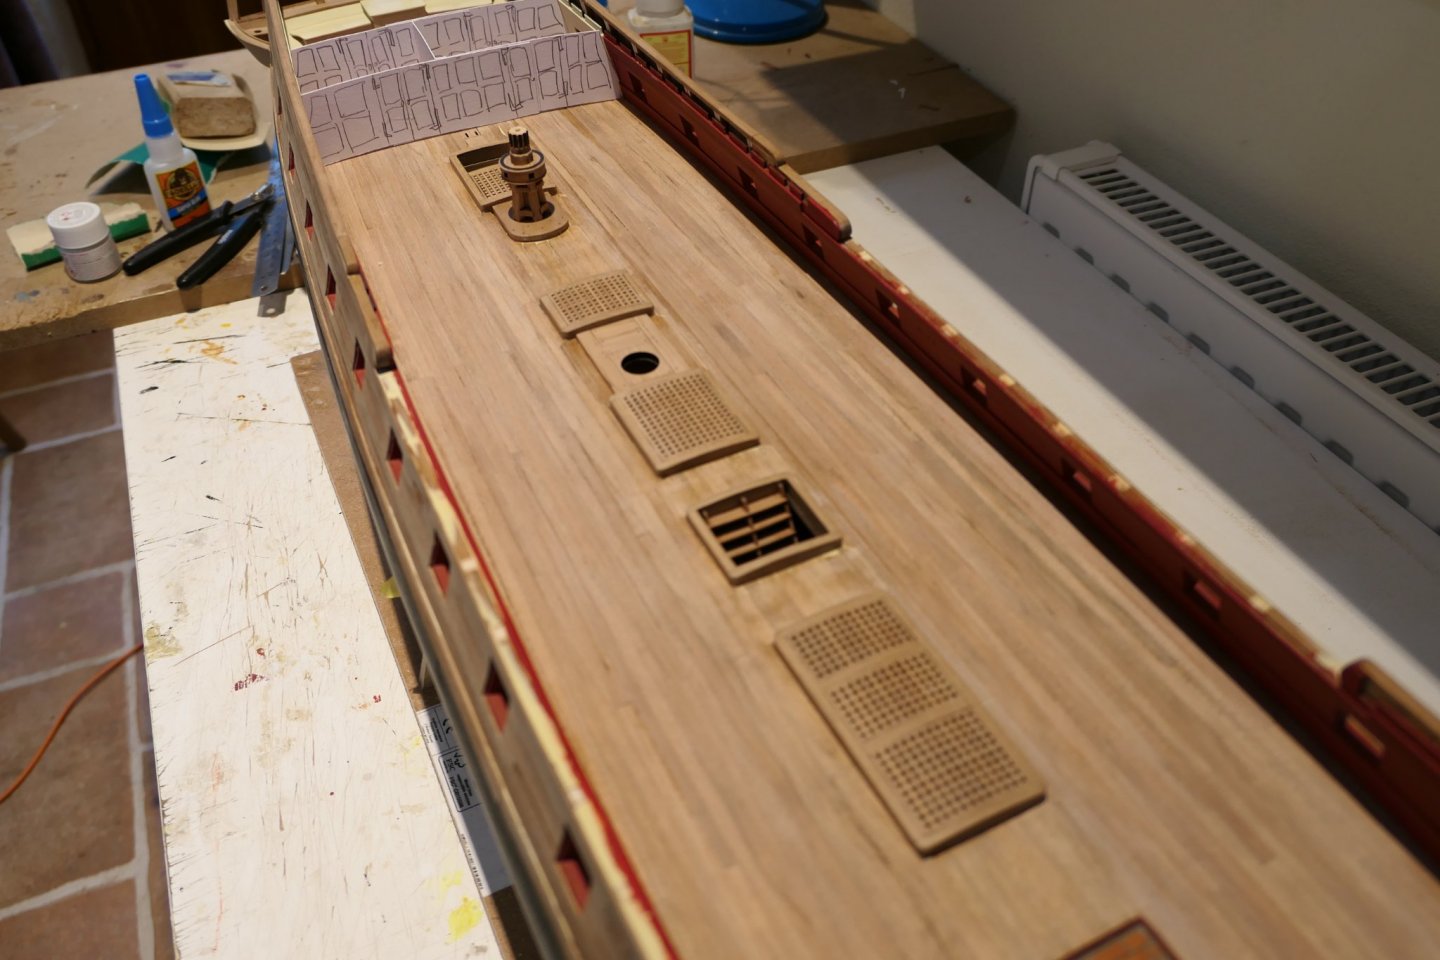
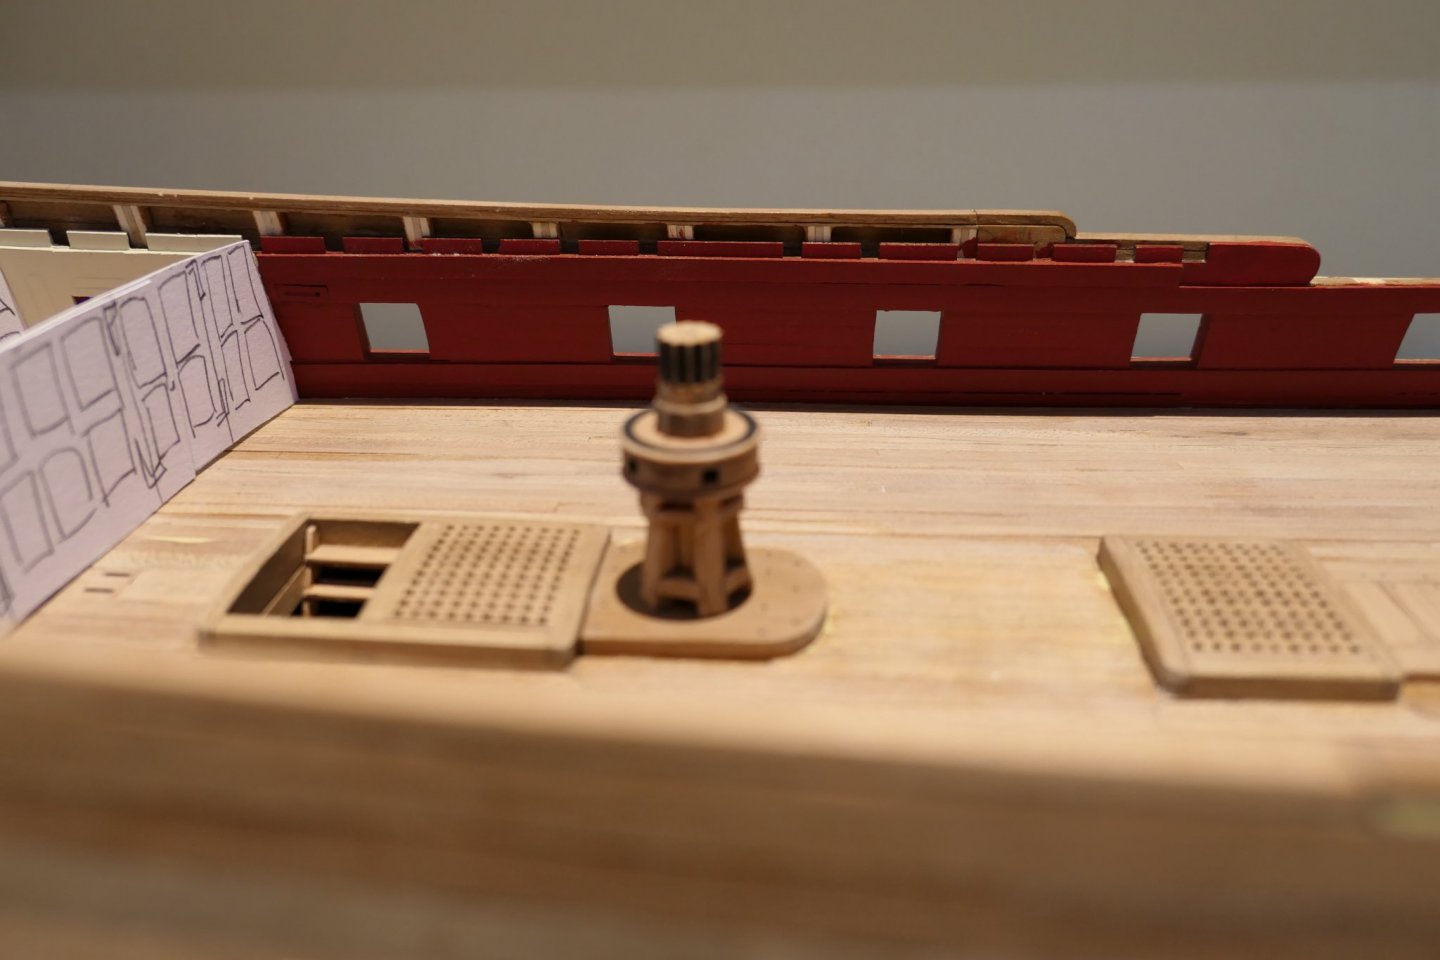
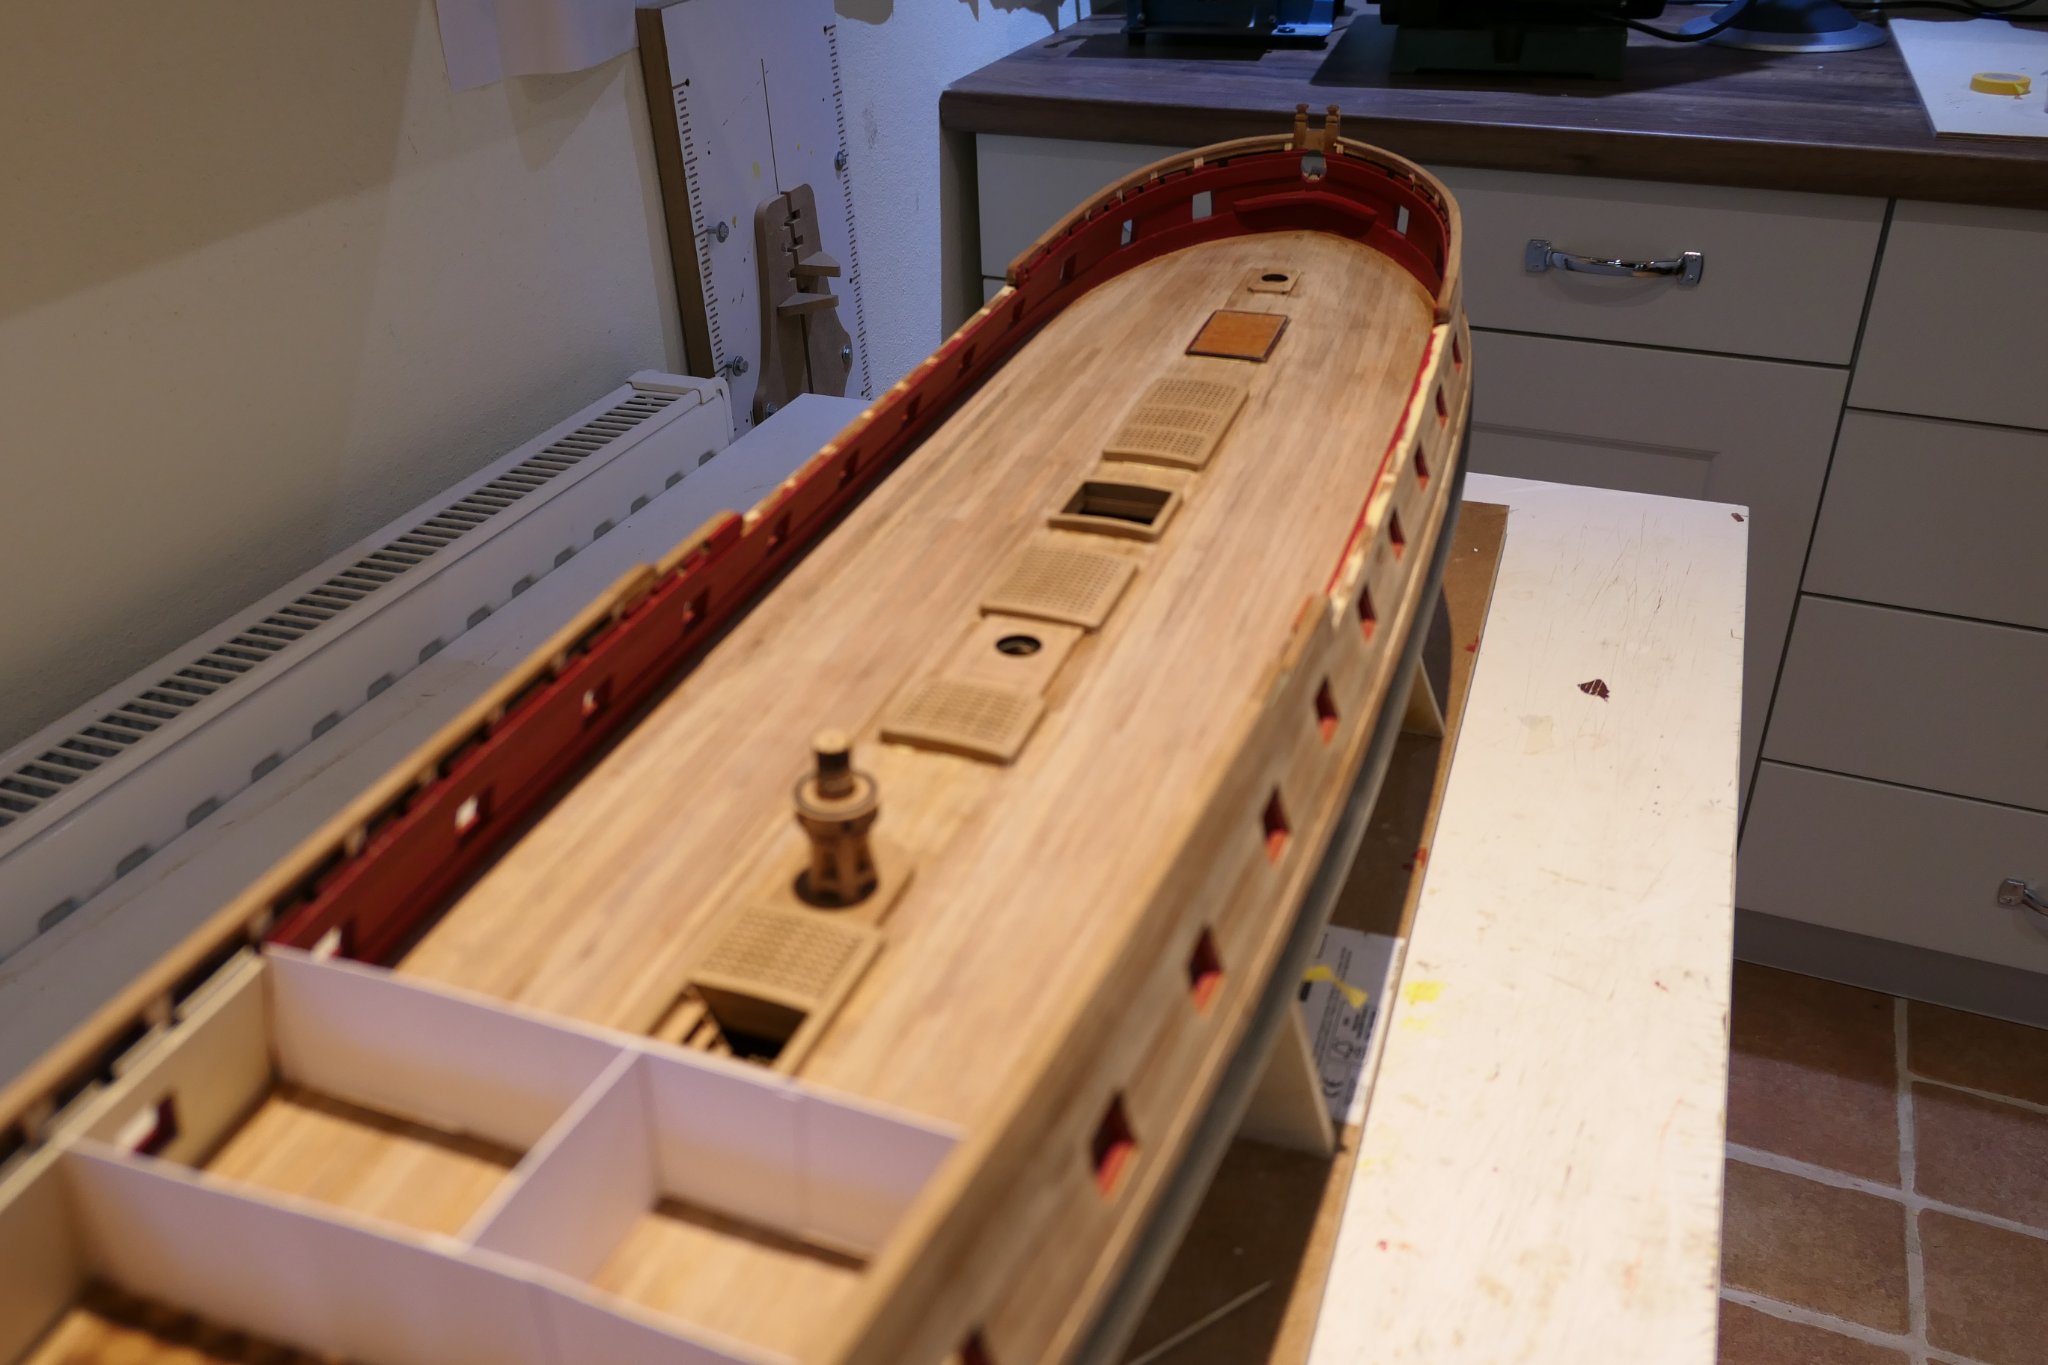
The deck is finally complete. That seems like the last major constructional step.
It turned out reasonably well. Here is my first attempt at a scarf joint: not perfect but I'm happy enough.
.thumb.JPG.a9836afb184e4ba0f11c460e712848c4.JPG)
Here is the capstan. I can't believe so many are taking Chuck's lead and sloshing red paint it! I guess what to me is a little masterpiece ( Chuck's contribution not mine) is the everyday to the master.
Unfortunately I dropped it at the moment of completion and broke off the central stick which may make positioning the upper section a tiny bit more tricky – but nothing serious.
.thumb.JPG.92824739992ed748d2e80a6e9af1f106.JPG)
.thumb.JPG.1e32d7fec2794cc00789d806552f8c2c.JPG)
.thumb.JPG.b6d602d40b19a76353d9acf1352780ea.JPG)
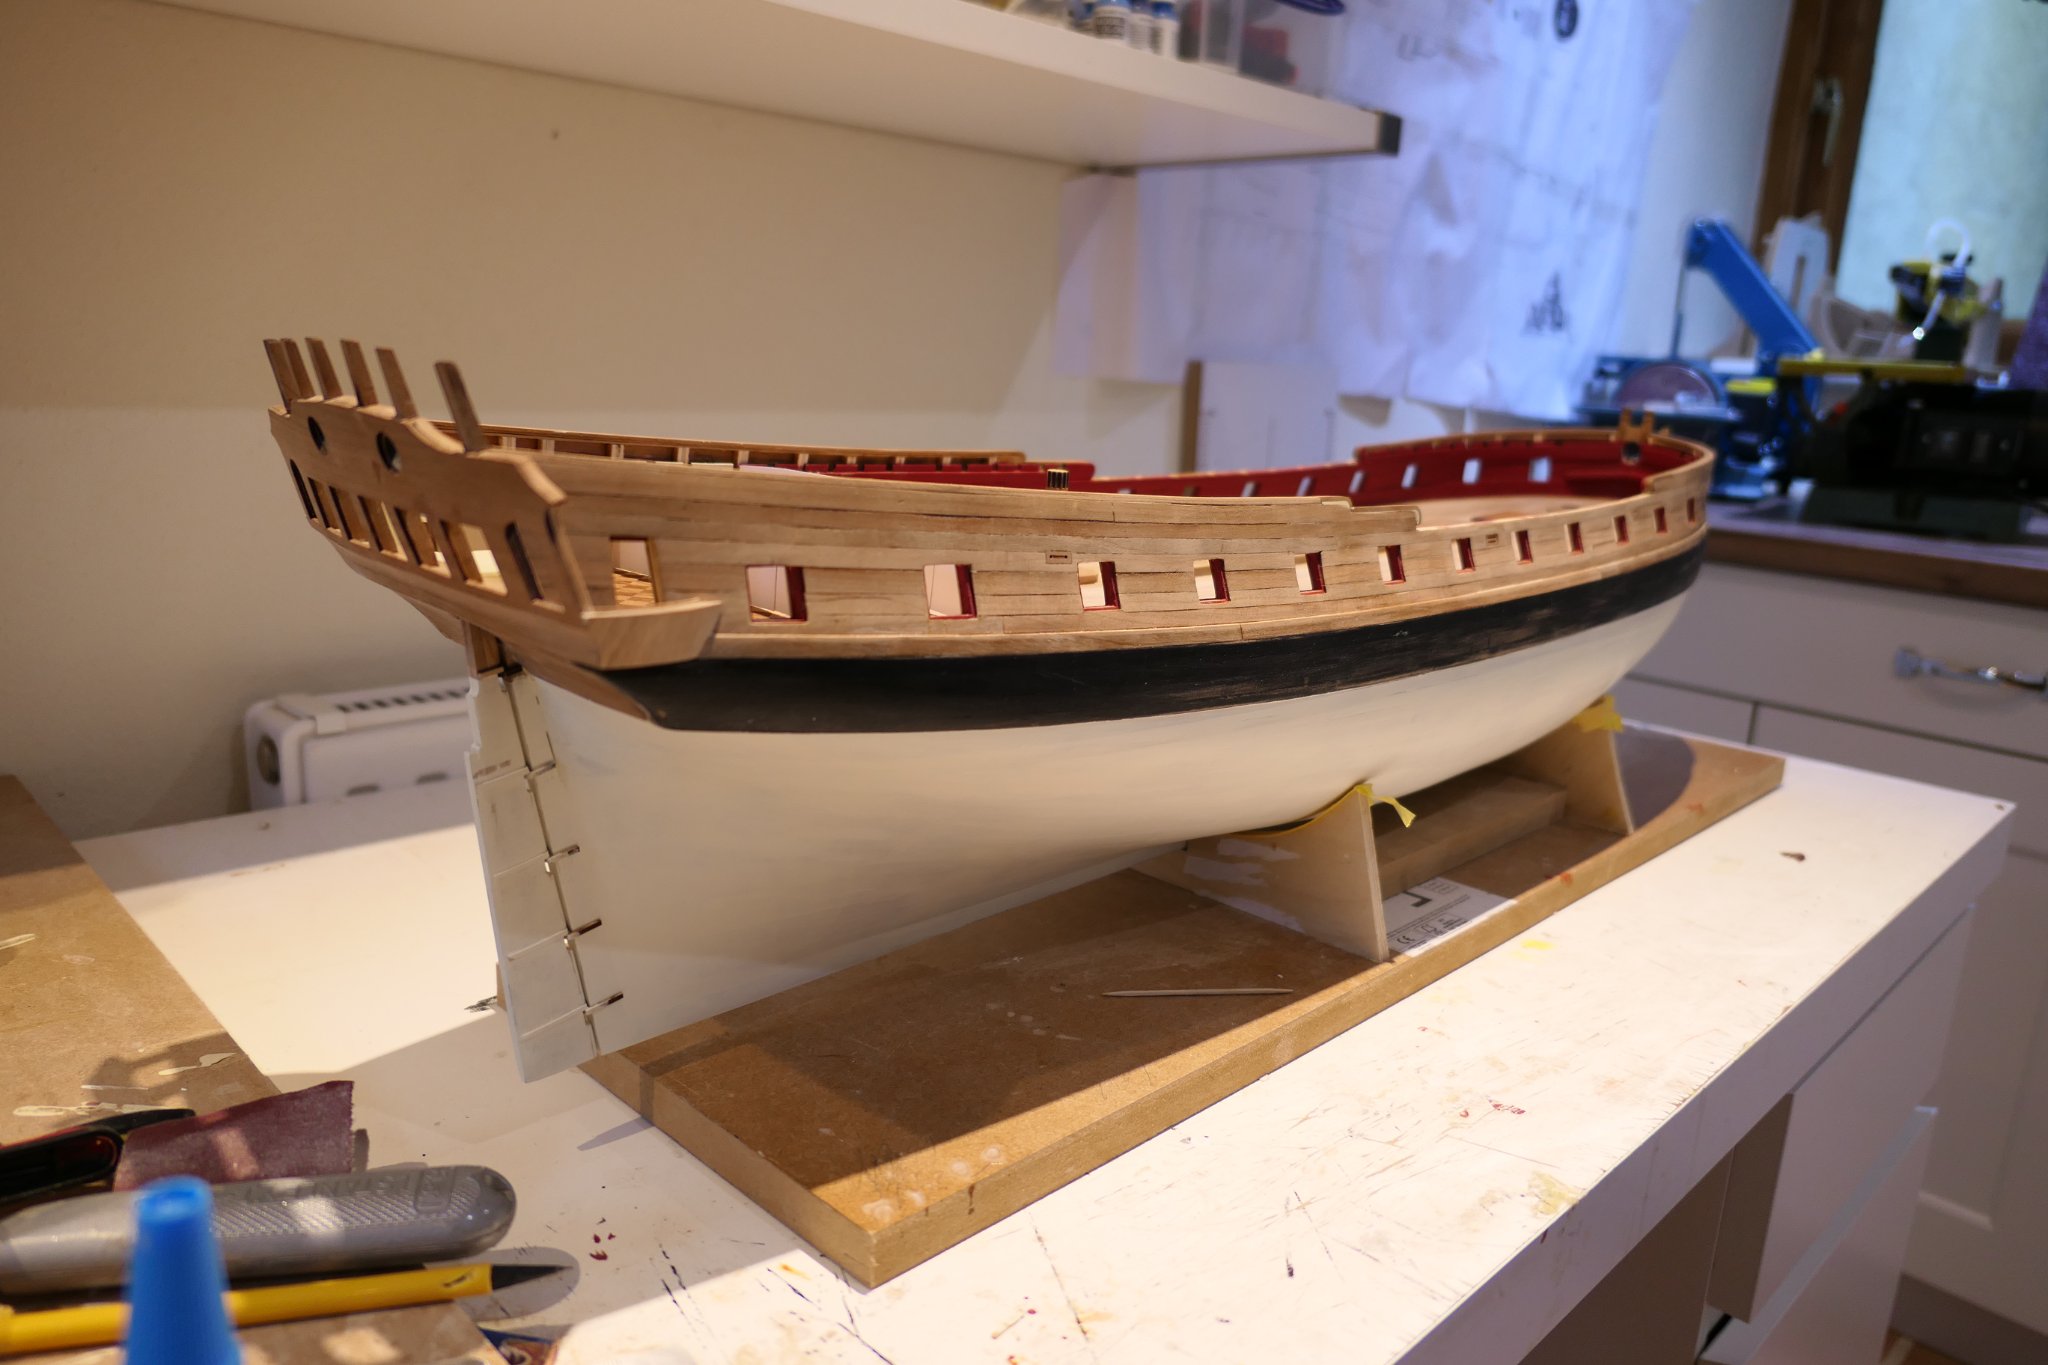
I took Chuck's advice regarding painting the hull right up to the wales rather than the waterline. I think it looks much better. And I've made a start on the rudder. Shame that's got to be painted but no choice really.
.thumb.JPG.43ad3be675cc34151ca80c2de784376a.JPG)
.thumb.JPG.140649a52289f0bdcfd5a153648401d6.JPG)

-
You must be delighted with how your Winnie is coming along, Bob. It is looking fantastic.
All the best
Fred
-
On my first Winnie I made an awful job of the planking below the wales where it twists up to meet the underside of the transom. I found it a lot easier second time round after studying other logs. Yours has come out really well. You are well on your way to a fine ship.
All the best
Fred
-
That's looking very good, Frank. I noticed, though, that you have all the marks for positioning the wales facing aft. I thought the marks faced aft on the bulkheads from midships back and forward on the bulkheads from mid ships forward. It might be worth checking the instructions unless, of course, you were only positioning the bulkheads to get your first look at how big this model is!
All the best
Fred
-
This is looking fantastic, Matt. Like you I couldn't resist doing the coamings and gratings out of turn. They are superb little kits which look great on their own and even better in situ with planking around.
All the best
Fred
- Matt D, FrankWouts, Saburo and 1 other
-
4
-
Good morning all.
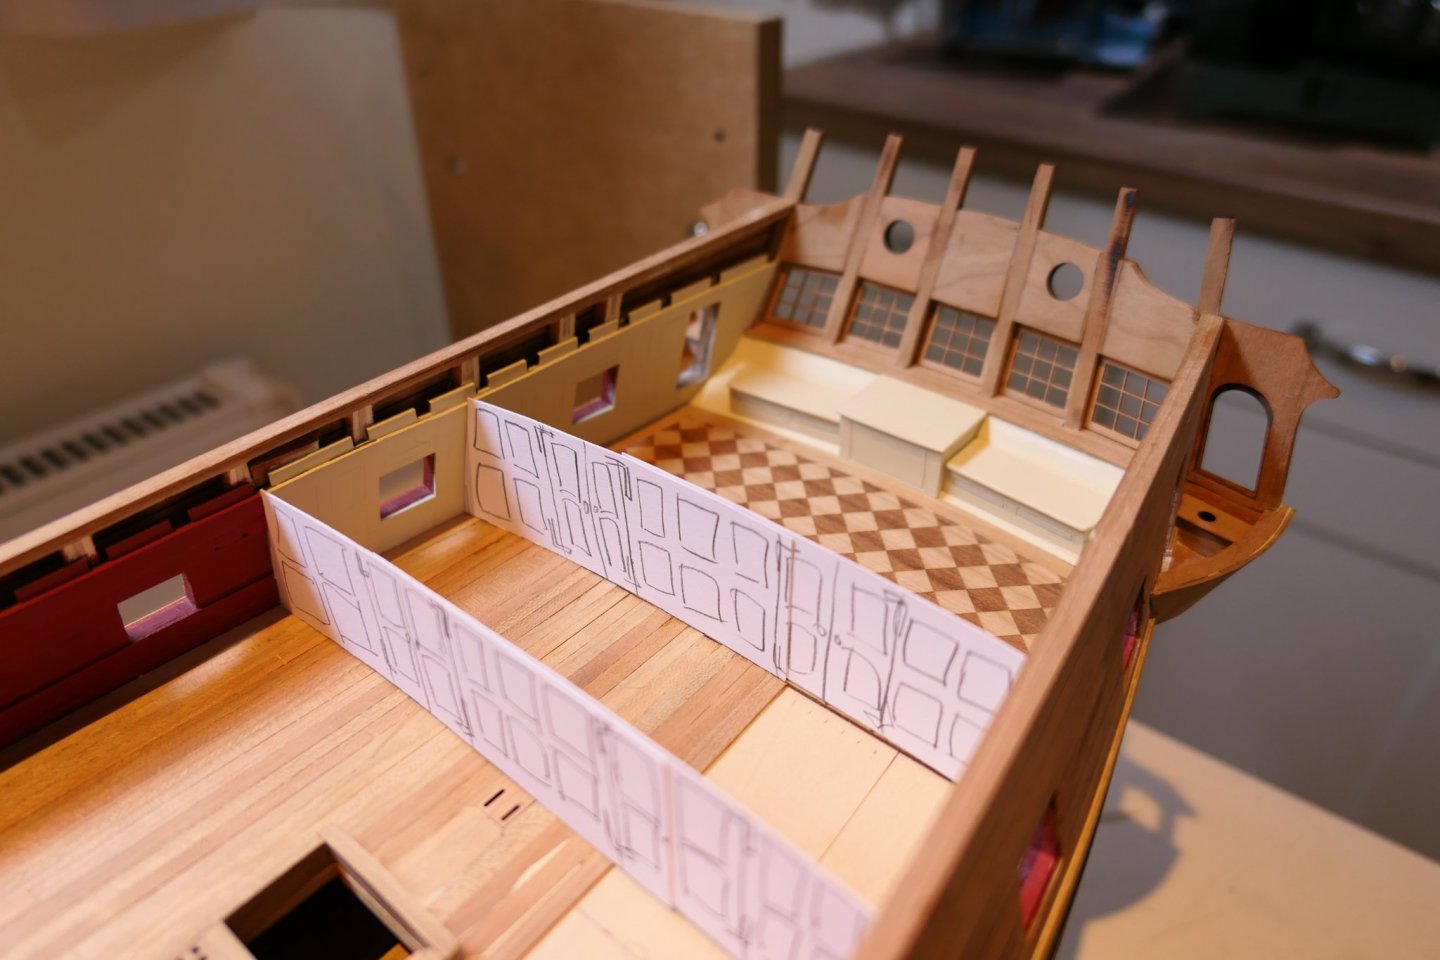
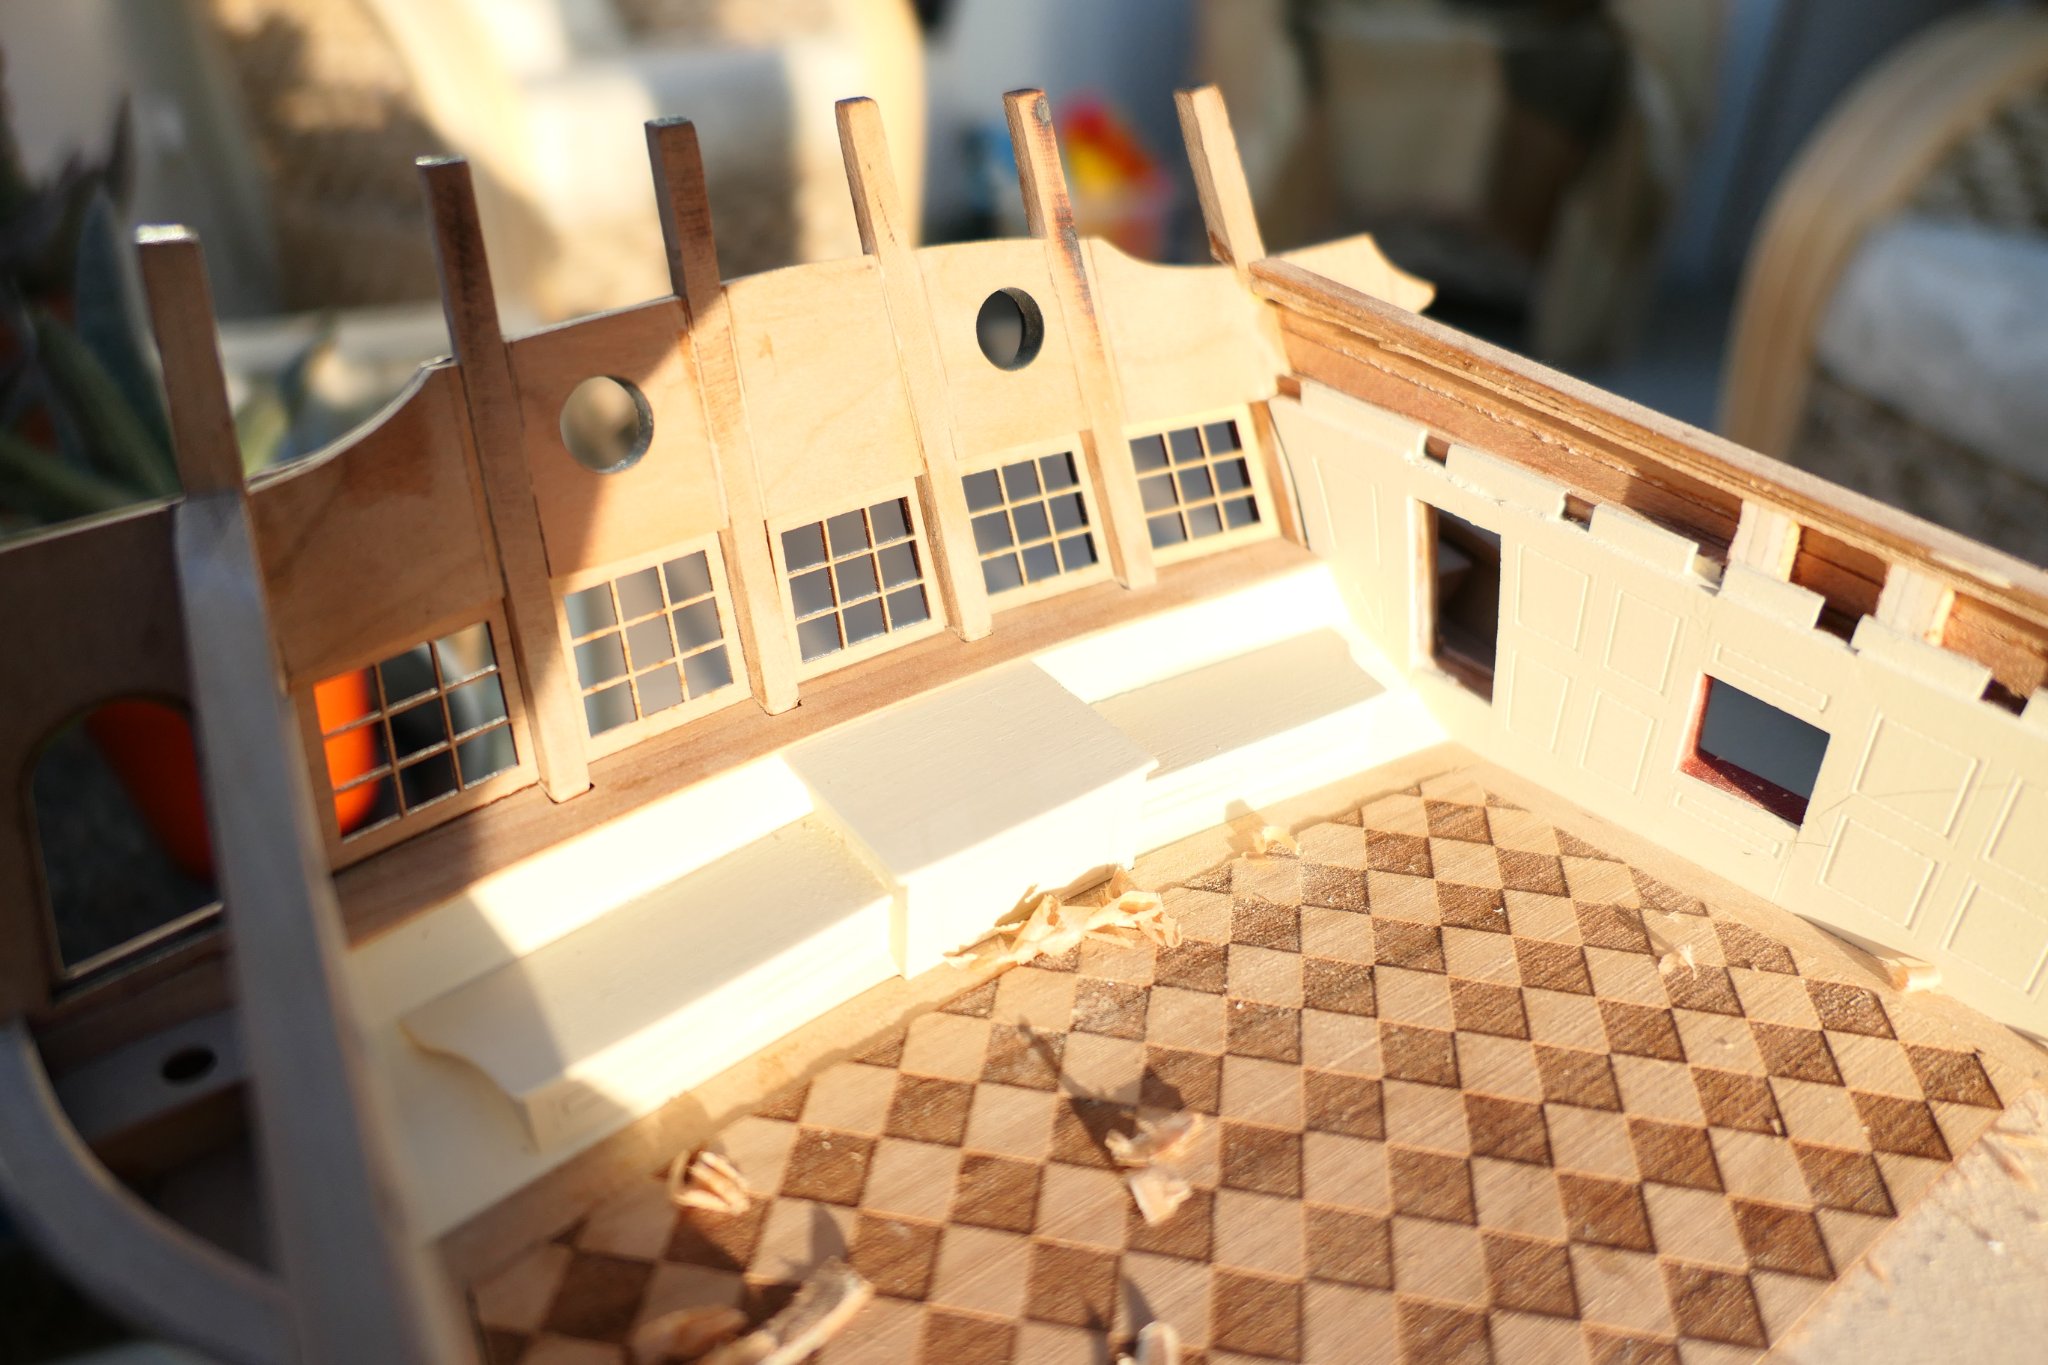
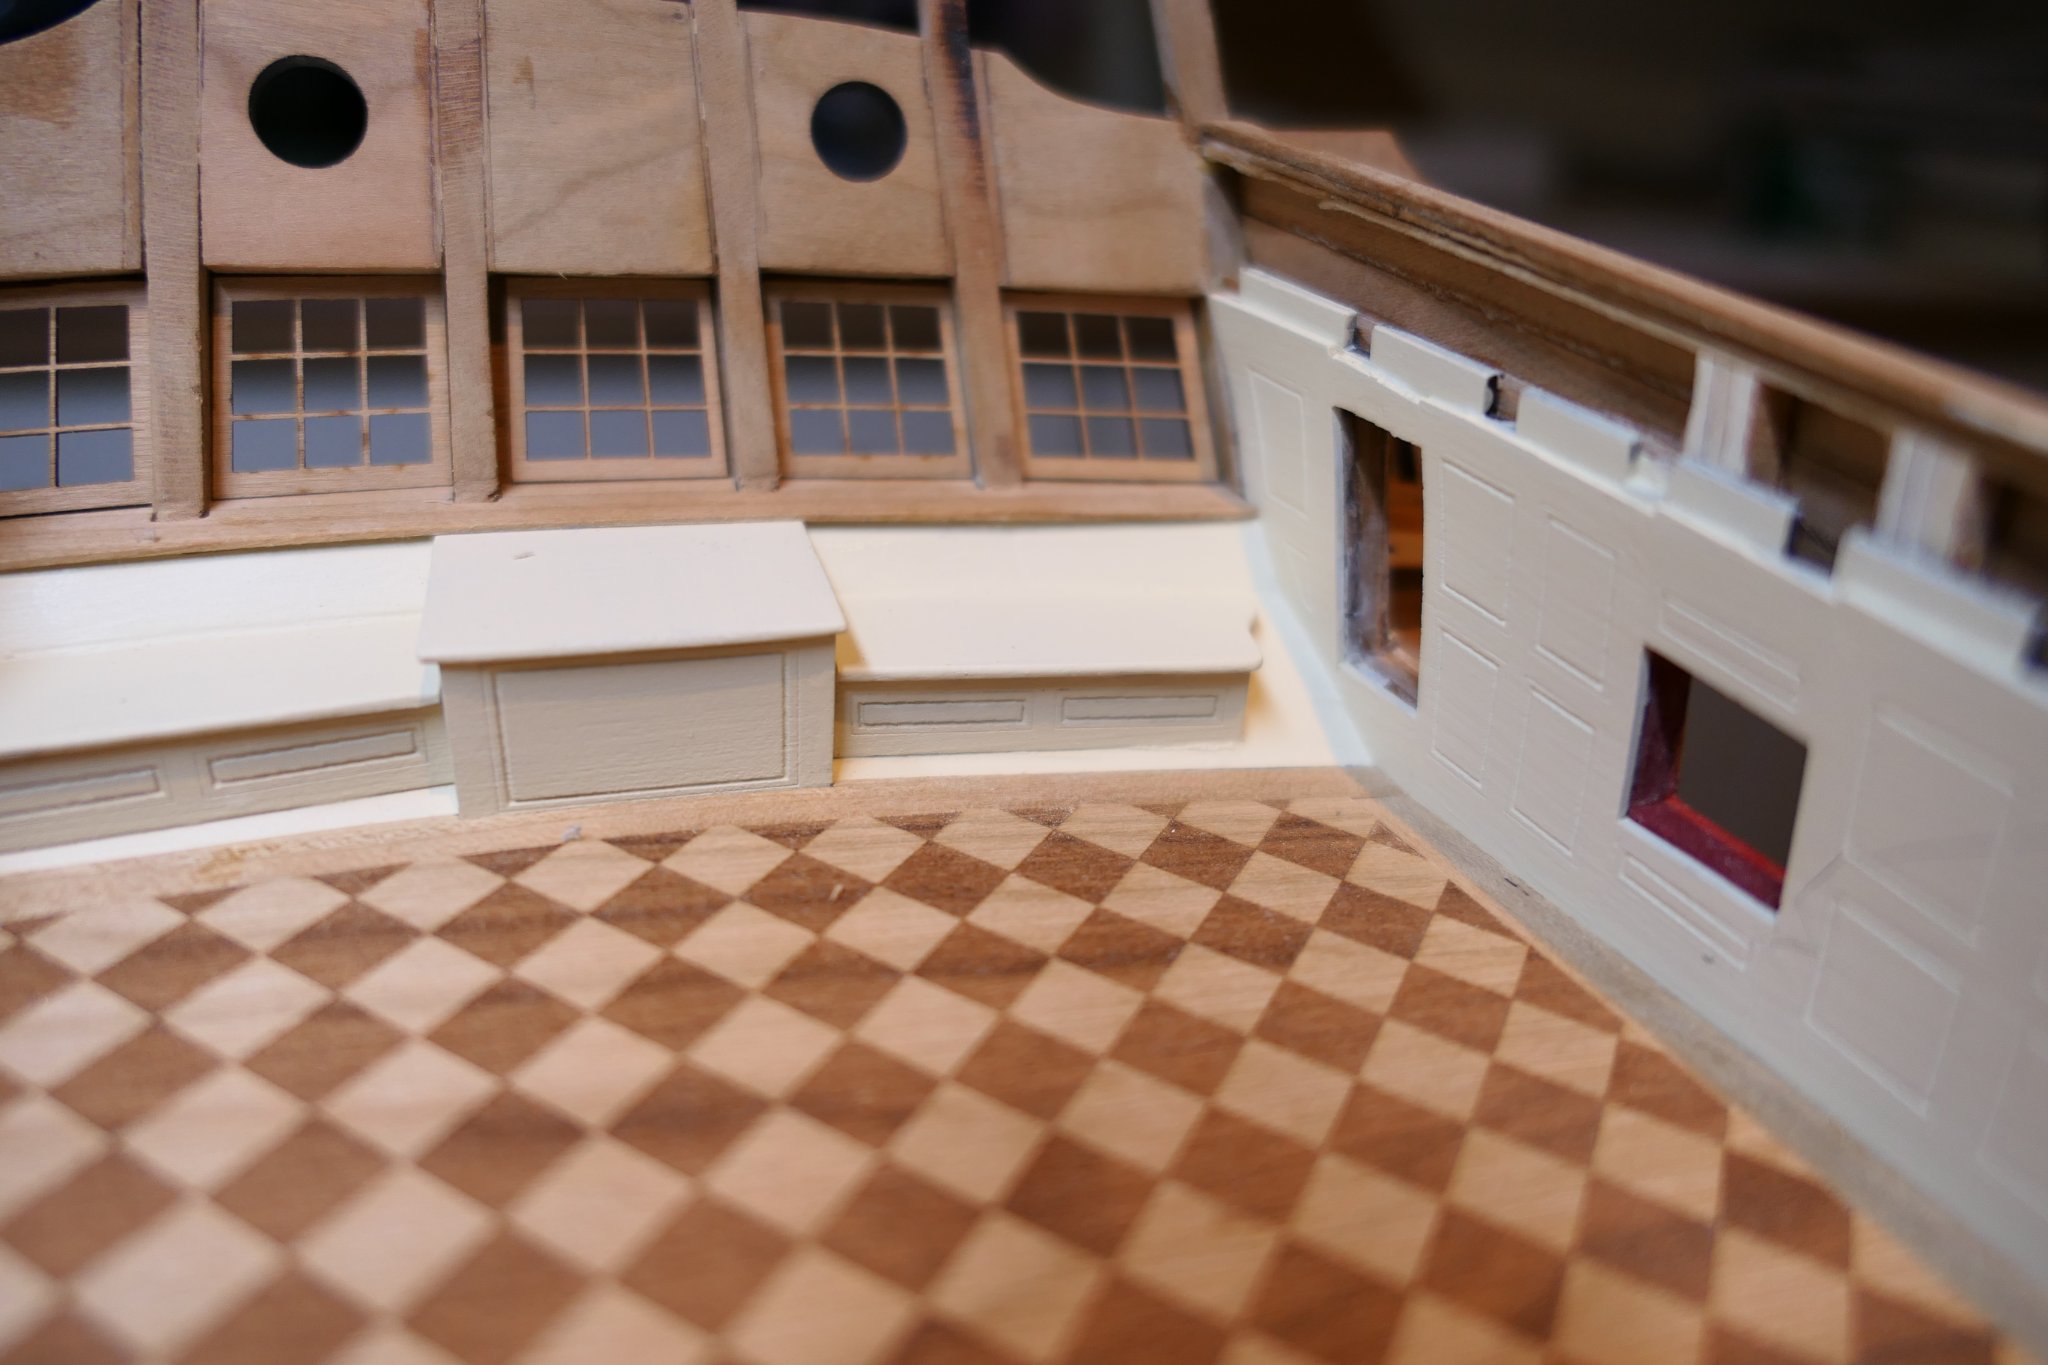
I have been working on the inside face of the transom. I cut away quite a lot of wood from beneath the window apertures so that I could fit in the cill leaving enough room to move the window frames in and out without having to cut down the frames.


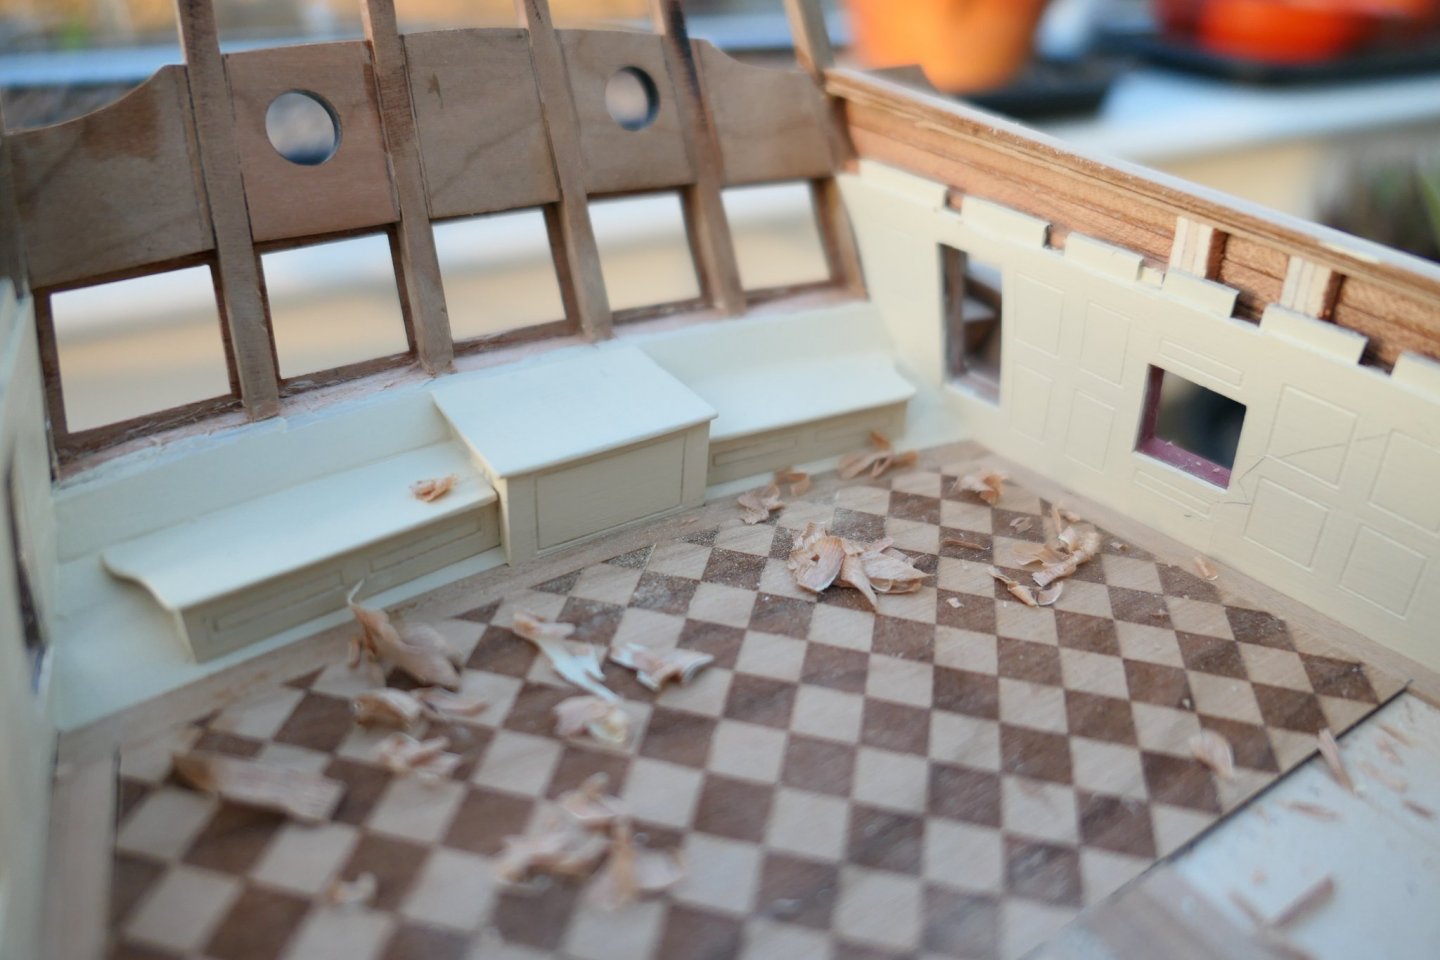
Then I cut and fitted the cill

Incidentally, I recently purchased a new camera. I have not got the foggiest idea how it works yet: hence the out of focus images.

I can't decide whether to paint the windows and the cill. I think probably I shall – leaving the outside of the windows natural.
In an idle moment I spent two minutes cutting the bulkheads in card just to see what the spaces look like only to find this morning that Chuck has now posted the real thing. Don't they look fantastic - Chuck's that is , not mine!
I have completed about half the deck. Completing that is the next job.
Best wishes to all
Fred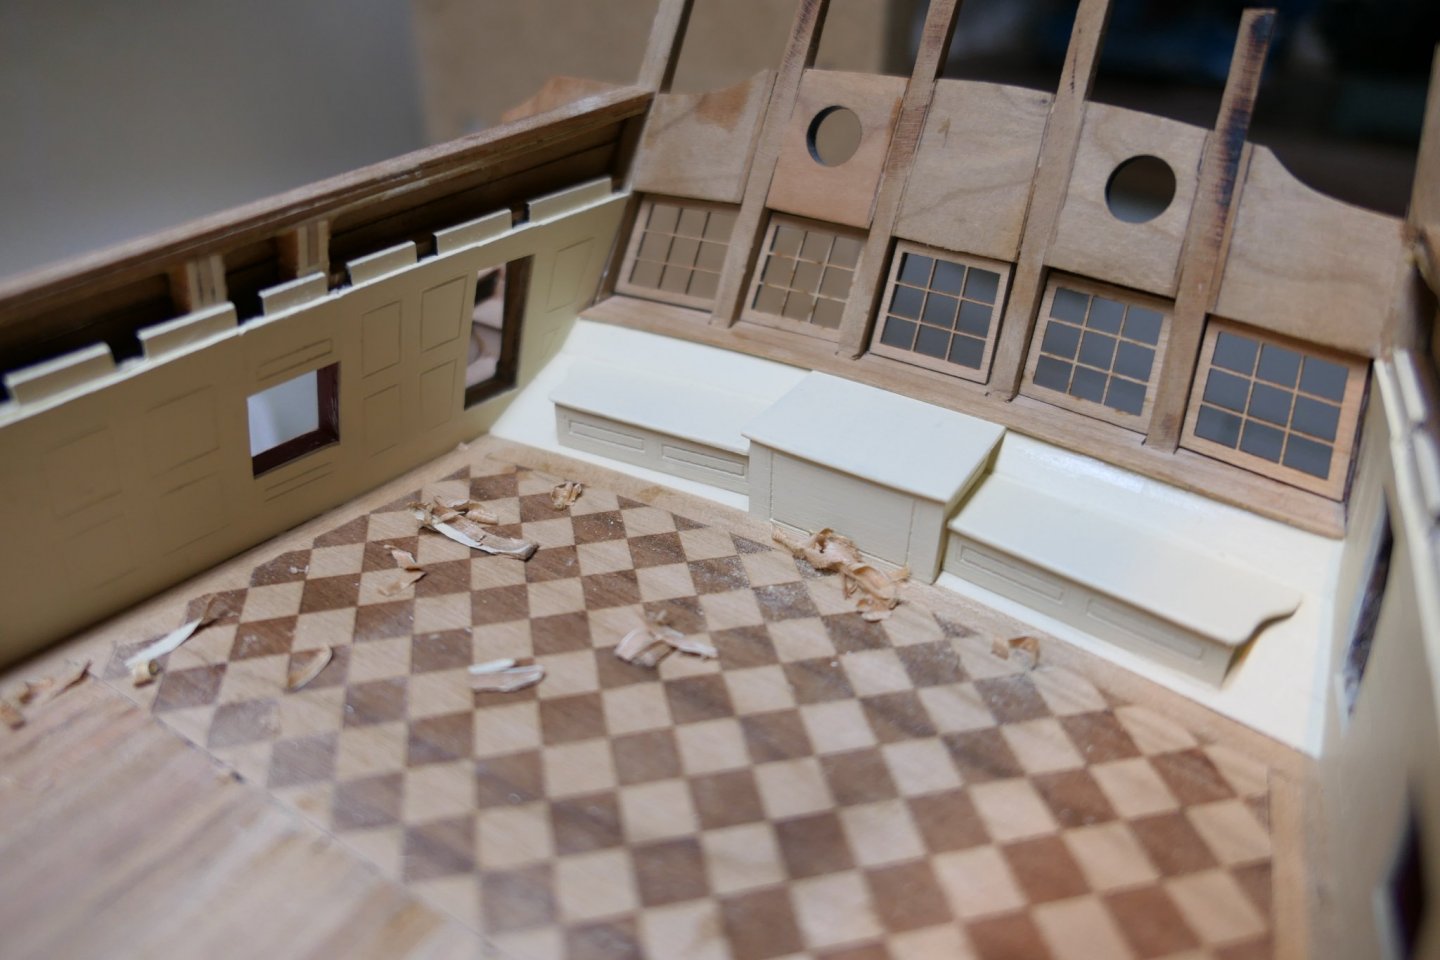
- Edwardkenway, Rustyj, Greg M and 7 others
-
10
-
Ah-ha. Just a little encouragement. That's what I wanted to hear. Thanks JJ. I'll keep the bricks.
On a quite unrelated topic: the chapter 5 instructions suggest a single plank down the centre line of the deck. The plans show two planks one either side of the centre line. I guess either is correct. I went for one either side.
- scrubbyj427, FrankWouts and Matt D
-
3
.jpg.5bae66700e1bae285fe59161d70c176c.jpg)


.jpg.6a63d7edb7d86c6c9229f5d3112b686d.jpg)


.JPG.5f5f5ff4b1c6e898f3aeafd4f9f4433c.JPG)
.JPG.44acc64ce0d0775ce67da5dc64c88eb2.JPG)

.JPG.58c68ba72e6b1cab8c4e6a2e51e5dfd0.JPG)
.JPG.1b50665acc512e4caf46182bd7a3170f.JPG)
.JPG.38736e92f2f09201e9ecb59ef8e2623e.JPG)
.JPG.035310f5eeb1314dcc6f617617e1324a.JPG)


.JPG.4bd33362ca925442cb72643fff19da8d.JPG)


.JPG.76da451a806570b9daf987d37bb4afe9.JPG)


.JPG.2a3aabe2f04b44f9eb351fb8bc606e68.JPG)
.JPG.c5988ab6a0ef24080f34c24d1b36e7ab.JPG)
.JPG.50dcc432349807cd95ce21a3018951cc.JPG)

.JPG.ac4490bed396e320826e7e079fe9ce37.JPG)
.JPG.e40c4089f71167b2ec63f99046d42c06.JPG)


.JPG.652c68a61858874ee9ee125b0dfb9d9d.JPG)
.JPG.a8c58c8ee51213c8e6618fd633d76362.JPG)
.JPG.e96e96c4937d73642c22b789ed4822c8.JPG)
.JPG.25682cb4c7bb4e78b70c535e8be7b807.JPG)

.JPG.2431654886006e0e9b40ca4015c3ed4b.JPG)
.JPG.5bf5f3d37a7c4fecca2ae0950b66a008.JPG)


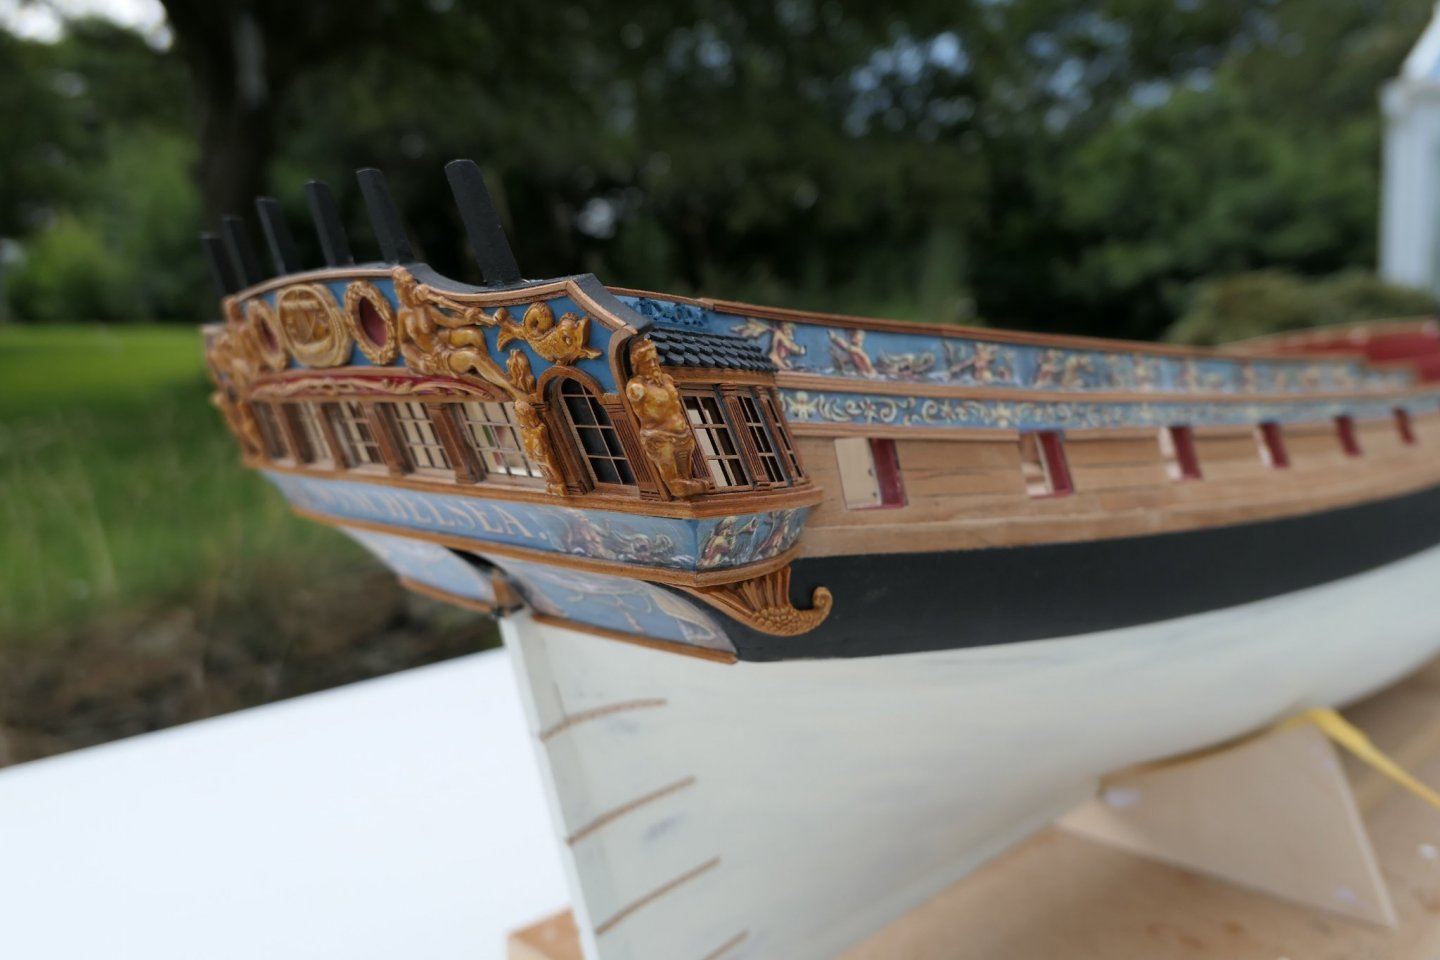
HMS Winchelsea - FINISHED - 1764 - by Chuck (1/4" scale)
in Member Build logs for the HMS Winchelsea
Posted
I'll second everyone else's thoughts on a fully framed Speedwell - or whatever else you decide. It sounds fantastic. I appreciate you have the Winchelsea project to finish first but do you have any thoughts on timescale? Whenever - put my name down for one.
The quarterdeck and fo'csle details on your Winchelsea look superb.
I shall be ordering chapter 8 soon - but where can I find the planking/carling plans for the q'deck and fo'csle? They don't appear to be in the Winnie downloads section unless I'm being very shortsighted.
Alll the best
Fred