


Kitzilla
-
Posts
50 -
Joined
-
Last visited
Content Type
Profiles
Forums
Gallery
Events
Posts posted by Kitzilla
-
-
Just wanted to say I love the models you put out, Chris. I've been eyeing the Vanguard for a while now, but I may have to start a bit smaller and go with the Sphinx. Either way, they both looks like loads of fun to build.
- PaddyO, Canute, VonHoldinghausen and 4 others
-
 7
7
-
Does anyone know what the minimum size of hull this cradle can take? I know HobbyZone makes a smaller cradle, but if this one can handle small as well as large hulls, then I wouldn't need both versions. I ask, because it looks like the length is only adjustable a certain amount, and while it says it can go up to 100cm, the site doesn't mention what it can go down to.
-
One thing I'm going to try when I put lighting in my kit is these 3mm LED Lenses. They look like they could present the appearance of a nice scale heavy-duty bulb housing. I might try fabricating a wire cage around each one as well.

-
Yeah, I understand that about a lot of Chinese companies. Trumpeter is quite a giant in the industry though, so any actual "pirating" wouldn't go unnoticed, or punished, for long. I've done a quite a few Trumpeter kits as well, and they're always a pleasure to work on.
Modelling seems to be more of a "respected" industry in China and Japan as well, so you get less shenanigans going on there than in other sectors. With big-daddy Tamiya watching over everyones shoulders around the Pacific Rim, no one company wants to step out of line and get banished from the modeling community.
-
5 hours ago, ErnieL said:
But Trumpeter’s two best 1/32 aircraft models, the Douglas SBD and the Grumman TBM are both blatant pantograph enlargements of 1/48 scale Accurate Miniatures kits.
Unlikely. That sort of old-fashioned copying is not really done anymore. 99% of models are created first in CAD, which means companies can license their CAD files to whomever they wish. Especially in a case like this where Trumpeter wanted to do a larger scale model, so the two products between Revell and Trumpter don't clash because they occupy different segments of the market. Even older models are being scanned to create digital CAD masters, for ease of reproduction and licensing in the future. Heck, I'm working on a Revell Star Destroyer right now that was originally a Zvezda model. Revell licensed it, reboxed it, and that was about it. The sprues even still say "Zvezda" on them. For better or worse, when licensing a product on the model world, there's little incentive to go back and correct any errors present from the original model. The Revell kits were already extremely popular as is, so Trumpeter saw no need to go back in and spend more money correcting what they saw as errors most modelers were willing to overlook or correct on their own.
This sub model is the Revell model, but licensed and upscaled. Just like the interior modules are the CMK interior kits for the Revell sub, licensed and upscaled to fit this Trumpeter kit. Nothing nefarious such as copying or pirating going on, just cold, hard business and money changing hands. 🤑
-
Wow! An amazing build so far.
I just received this kit myself, and am eagerly awaiting to dive into it myself. It may take some waiting though, as I want to get the RCSubs PE detail sets as well, but they've temporarily moved their business operations into creating PPE during this Covid pandemic. Cheers to them for helping out the medical community, jeers to me for being impatient. I've also bought the light and sound kit from Magic Scale Modeling, as I don't know anything about electrical, and their kit is largely plug and play.
I'm definitely going to take some cues from your build, Yves. You've really elevated this kit into a real museum piece. Can't wait to see the finished model!
-
The right upper tool-head is for pushing lines. So if you have a stubborn string that keeps popping out of a space you need it to go into, you can use that to push it into small spaces your fingers might be too big for.
- Ray, Beef Wellington and drtrap
-
3
-
I would suggest that you go to the hardware store and purchase dowels slightly larger than you need and start experimenting with the various methods until you find the one that works best for you. This will also give you spare material should you break one.
I'm using this practice method myself right now to get down a technique. Home Depot has dowels in the mouldings section that are the exact right sizes for masts and spars, and are perfect practice material.
For those that do want to go with block planes or spokeshaves, Lee Valley has a particularly fine collection of mini wood-shaping tools perfect for working with small dowels and wood shapes.
http://www.leevalley.com/US/Wood/page.aspx?p=70138&cat=1,41182
- Jack12477 and thibaultron
-
2
-
Dremel also makes a small scroll-saw as well, called the Moto-Saw. I haven't used it myself, and Dremels quality as of late has been hit or miss, but it seems like a decent unit considering it's so cheap. It also has the unique function where you can remove the table assembly and hand-hold the entire unit to act like a powered fret-saw.
http://www.dremel.com/en-us/Tools/Pages/ToolDetail.aspx?pid=MS20
-
I'd love to see some sharpening info!
I generally don't need to worry about this, as I can get an unlimited supply of medical-grade scalpel blades from work, but it'd be cool to add another skill to my "toolset".
-
I also see the cans with compressed air, are they powerful enough to remove the sawdust?
These are actually really powerful. So much so that an inattentive blast could rip a spar or some rigging off. Plus they're pricy and don't last forever.
-
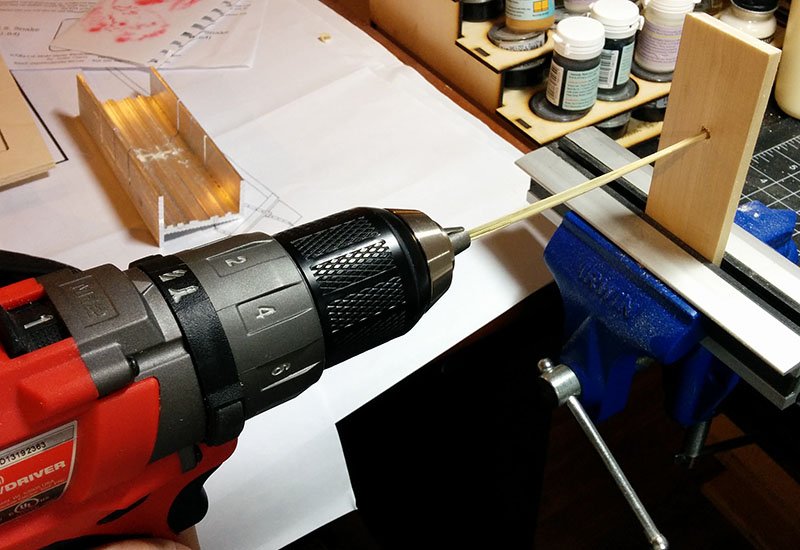
Here's a quick one I just took. Fairly basic but it gets the job done. And since I'm just using scrap wood for the receiving hole, I can just drill new holes to accommodate larger or smaller spars.
-
I was actually just messing with this myself tonight.
My solution was quick and dirty. I just drilled a hole slightly larger than the diameter of the dowel in a piece of scrap wood, and then clamped that. With the drill clamped in one jig, and the tip of the dowel resting in the hole of the clamped piece of scrap wood, it kept everything secure. You just need to make sure you account for the length of the tip of the dowel resting in the scrap-wood hole so your overall spar length is accurate.
Once you get your spar down to the near finished proportions, you just have to cut off the bit from the tip and the end that was chucked in the drill and hand fiinish those sections.
-
-
I'm sorting of resurrecting this thread, but just to let you guys know my experiences with Jotika/Caldercraft.
I finally got around to inventorying the parts in my kit, and found it was missing some parrel ribs, and it had an extra set of 7mm double-blocks instead of 5mm double-blocks. I emailed them on 01/04/15, and the parts were sent right off, free of charge, and I received them on 01/14/15. Couldn't be happier with the service I received from Jotika/Caldercraft, and they definitely seem to be on top of their emails now.
-
Hi Kevin
Instructions and plans are so poor in understanding all the steps.
I cut and shaped those lines just to become more familiar with those procedures but I think that even with the coppered layer, bearding and rabbet lines were needed to demonstrate the right shape and curvarure of the hull and keel respectively.
Thanks
Thanks for the info. I'd done some more research in the meantime, and this was the conclusion that I came to as well.
I think I'll head out to the hardware store this weekend and pick up a little butt chisel to help with shaving the bearding line.
-
Quick question this kit. I noticed neither the instructions nor the plans mention anything about bearding or rabbet lines with this kit. Did you bother to cut and shape these lines, or was it not needed because this kit is coppered and will hide any imperfections where the strakes meet the keel?
Edit: And to tack on another question, I was inventorying parts and was curious about the parrel ribs. It says they are cast parts, but it looks like the ones I received were brass photo-etch? Is that correct, the same sort of thing that came with your kit? It also says I should've got 30, but there's just a single fret with 12.
-
Thanks for the tip, Bob!
I'm really starting to get a better handle on the rigging and sails now. The mists of confusion are slowly fading away, and what was once a warren of random ropes is become thoughtfully laid out assemblage of stays, ratlines, preventers, and all manner of other line. Still plugging away on the rest of research as well, so hopefully my build will start in the next few months.
Although the frequent dips into the tales of Aubrey and Maturin slow me down at times!
-
-
I've actually got that one already, but thanks for the tip!
-
I happened to have contacted Jax as well recently, about their different blackeners and darkeners. I had specifically had asked if there was any difference to the finished tone and texture between the Pewter Blackener, and their Brass Black Darkener. Just thought this a bit more interesting info to add to the pot. This was the response:
The Jax Pewter Black will definitely work on both the brass and the pewter (and it will make them both the same color).
The Jax Black Darkener will definitely work on the brass and MAY work on the pewter.
The Jax Black Darkener will make the brass “blacker” than the Jax Pewter.
There is no substitute for actually trying the chemicals on the specific metals you are trying to blacken.
I hope this little tidbit will help.
- Mahuna, Erebus and Terror and mtaylor
-
3
-
I was doing some research on rigging books, and I think I've narrowed it down to two selections. I'd like to pick up copies of Rigging Period Ship Models by Petersson, and the fourth book in the Swan series The Fully Framed Model: Rigging a Sixth Rate Sloop of War 1767-1780.
Ideally I'll be getting both books at some point, but for those familiar with the two books, can you recommend one over the other for a first purchase? Or perhaps another book that would serve me even better? These will be used when I go to rig the HMS Snake 1797 kit.
-
I'll definitely be starting a build log at some point. Going to do some research first, and maybe get an accompanying book or two, before I dive in.
-
That seems to be the story with Caldercraft. Every story I've heard about them seems to be they excellent service over the phone, but terrible service through email.
Oh well, I'll get to work on making sure all parts were included. That in itself will require some research, as even though they include a parts list, there's no accompanying drawing of each part. So being new to the hobby, I'm all "Okay, the kit is supposed to have 20 of X part.... what the heck does X part look like though?"
Professional Building Slip - Hobbyzone
in REVIEWS: Model Shipwrighting Tools, Parts and fittings
Posted · Edited by Kitzilla
I just purchased and built up the Professional Build Slip, and overall it is a very nice product. Constructing it was very easy, and almost all of went together like a dream. Everything is square and solidly built, and should work very nicely for my upcoming build. The kit has been updated a bit since the original build log in this thread, with most changes being for the better.
Wingnuts are now included for the clamps, so a wrench is no longer needed to tighten those. The bolts that hold the various components to the base still require this though, and a nice change to the kit would be to provide thumb-screws for these sections, so no external tools are required to adjust anything on the slip. Anyone can buy some M5 (20mm and 30mm needed) thumb screws online to upgrade the kit, but it would be nice to have them out of the box.
As mentioned previously by other users, the base itself is still constructed out of 3 layers of wood, but each layer is now split into two pieces. Clearly this change was made to reduce package size and thus reducing shipping costs. It does make construction slightly trickier, but the way the joints are staggered so they don't overlap means the overall sturdiness of the base is not compromised at all. Once I had mine properly glued and flattened and all 3 layers combined, you'd never know it wasn't a single solid piece of wood.
Now I come to the one downside I have with the kit. The way the clamps are constructed, with two main pieces sandwiching a standoff piece of wood between them, makes an EXTREMELY weak bit of construction. I saw this for myself after two of my clamps snapped with only every light handling. It wasn't the glue that failed, but the standoff piece of wood in the middle. MDF has decent compression characteristics, but abysmal strength during expansion, which is what the two halves of the clamp will be exerting to the inner standoff when pressure is applied to them. The kit does provide some nails that can be used to strengthen the clamp ends, but honestly this solution doesn't really work, as smooth-sided nails have almost no grip in MDF. Now I will say that the way that the piece that surrounds and holds the clamps is designed to prevent this from happening, keeping the clamp in compression, it's not a bulletproof design. My recommendation is once you have the clamps assembled, both the keel clamps and bulkhead clamps, drill a hole through all three pieces of the clamp where they are sandwiched together, and glue in a 1/4" dowel as seen below in my mockup image. After it dries, any protruding bit of dowel or glue can be cut away and sanded to make the sides of the clamp smooth again. This will significantly increase the strength of this joint, and should prevent any issues with the MDF delaminating from itself under compression. This would be a nice upgrade out of the box, if the hole for a dowel was precut, and 4 wooden dowels provided.
Overall though a very nice kit, and I can't wait to put it into action. Nice work, HobbyZone!