


Jorge Hedges
-
Posts
119 -
Joined
-
Last visited
Content Type
Profiles
Forums
Gallery
Events
Posts posted by Jorge Hedges
-
-
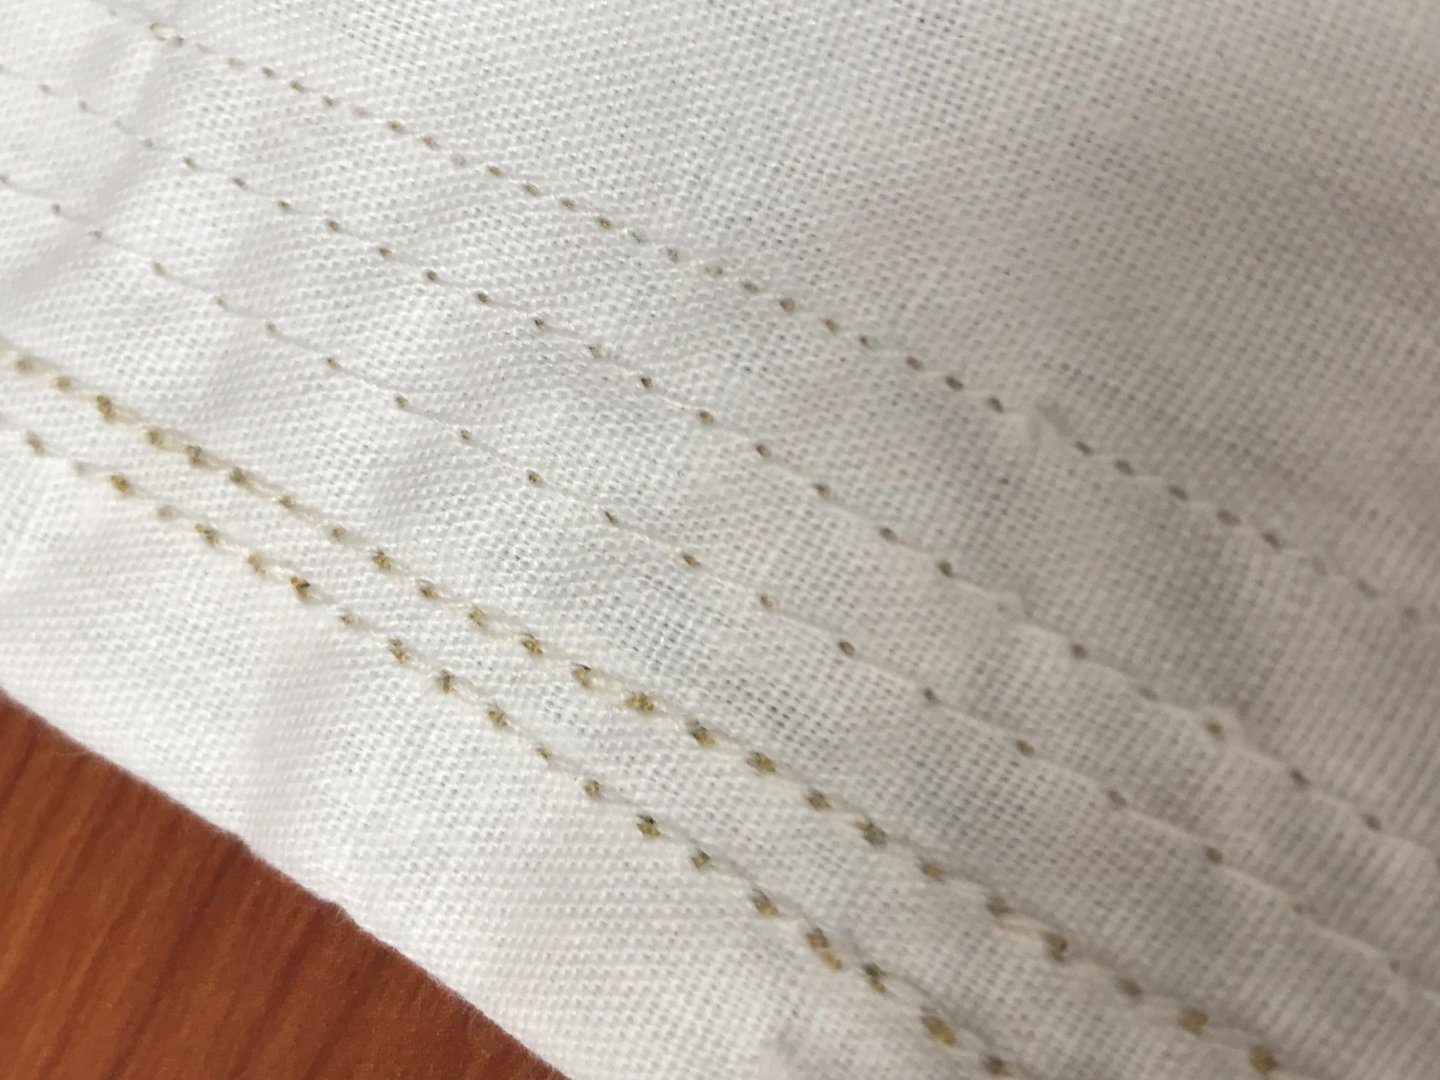
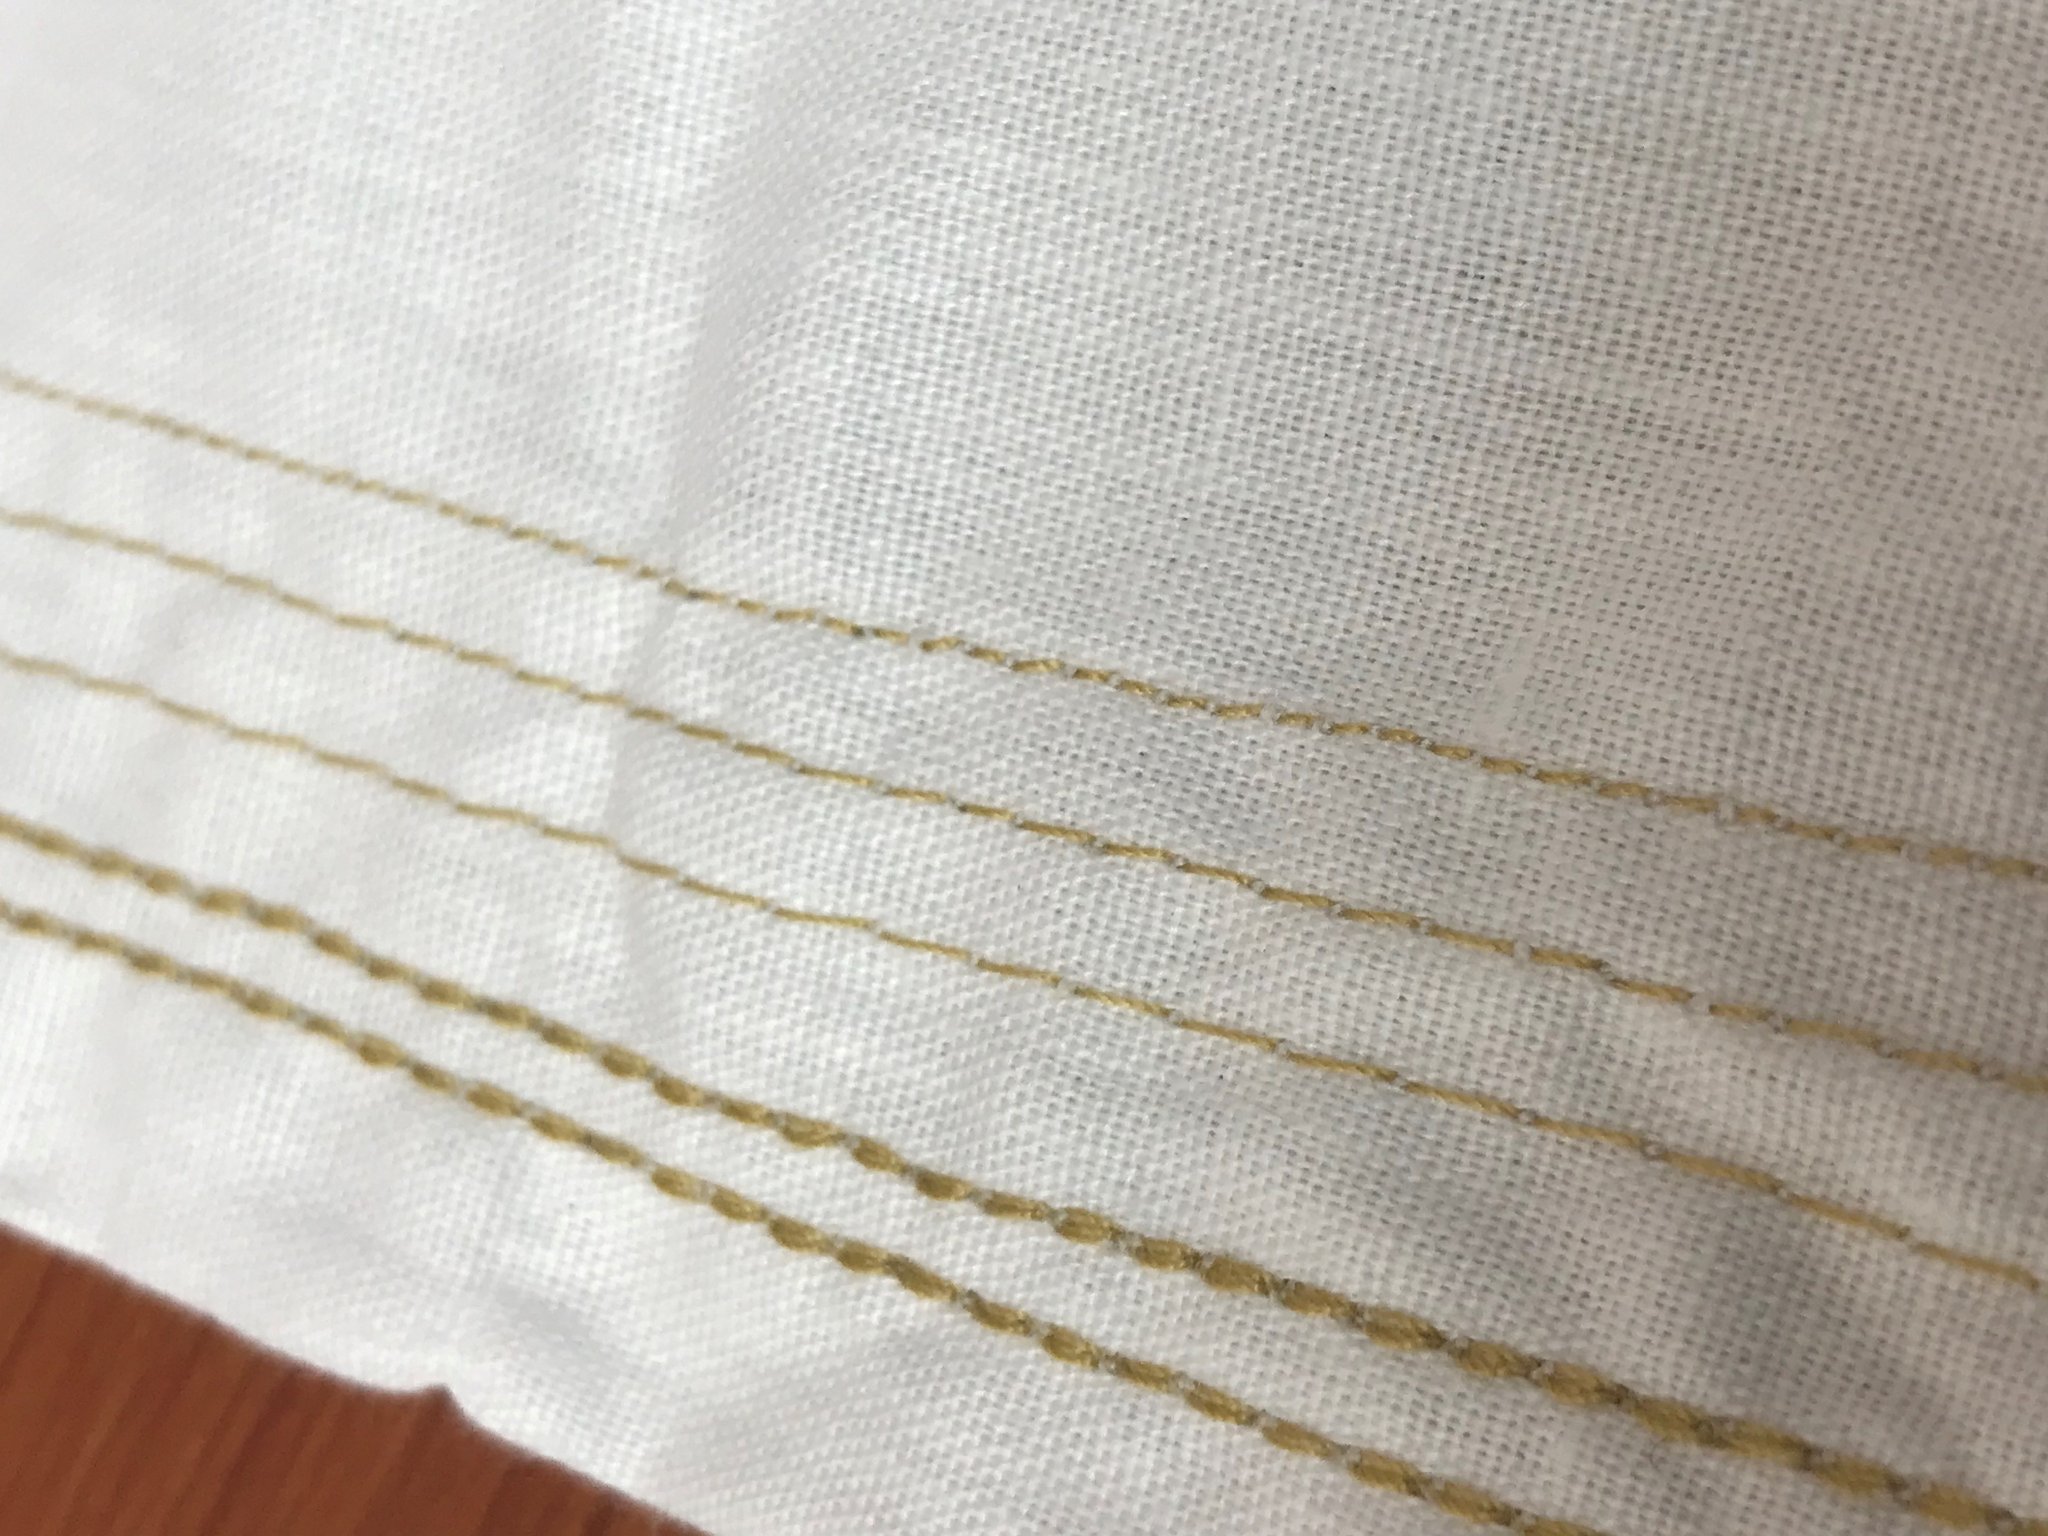
Well, first formal sail test run performed.
Used a Singer "Simple" Sew 3327 in the smallest stitch setting, and a cotton cloth, sort of creamish colored (definitely not white) in order to simulate the aging better when "tinted" with coffee or tea.
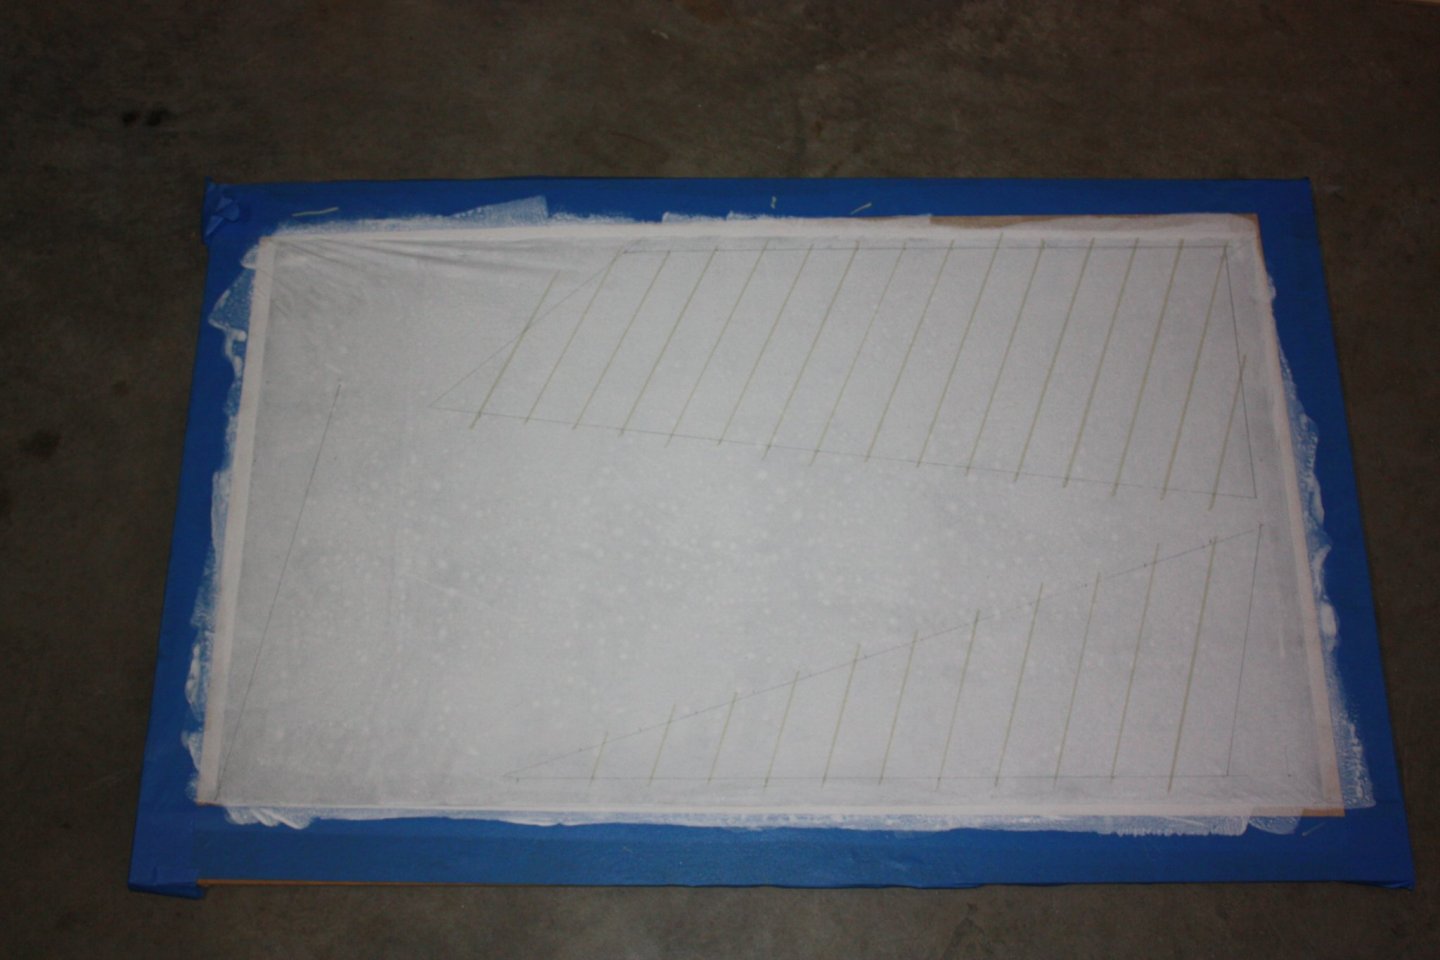
Used a tear-away fabric with pva (white) glue, placed the sail cloth, and "squeegeed" (sic?) the glue... set aside for drying, and had a nice, flat surface semisolid but flexible material, and great backing for the machine.
Gave it the required pases, and the machine performed flawlessly... I was the cuplprit, in the event you see a couple of misalignements.
After the sewing, I cut the corner reinforcements and glued them; when dry, will sew once again.
Before cutting, I will apply a anti-fraying solution in the sail borders, and remove the tear away, and after that, cut the fabric right next to the stitch... and see what other detailing I can apply, other than the red cross in the main sail.
Pics follows... critiques/suggestions welcome. These were early am flash pics... will take better ones. I know it is not the most correct form of build, but happy with the looks, and "learned" a new trade... and hope to improve with practice.
Thanks for all of your support!


-
Beautiful build so far; I have this kit in turn for assembly as soon as I finish what I am working on.
Regards,
Jorge
-
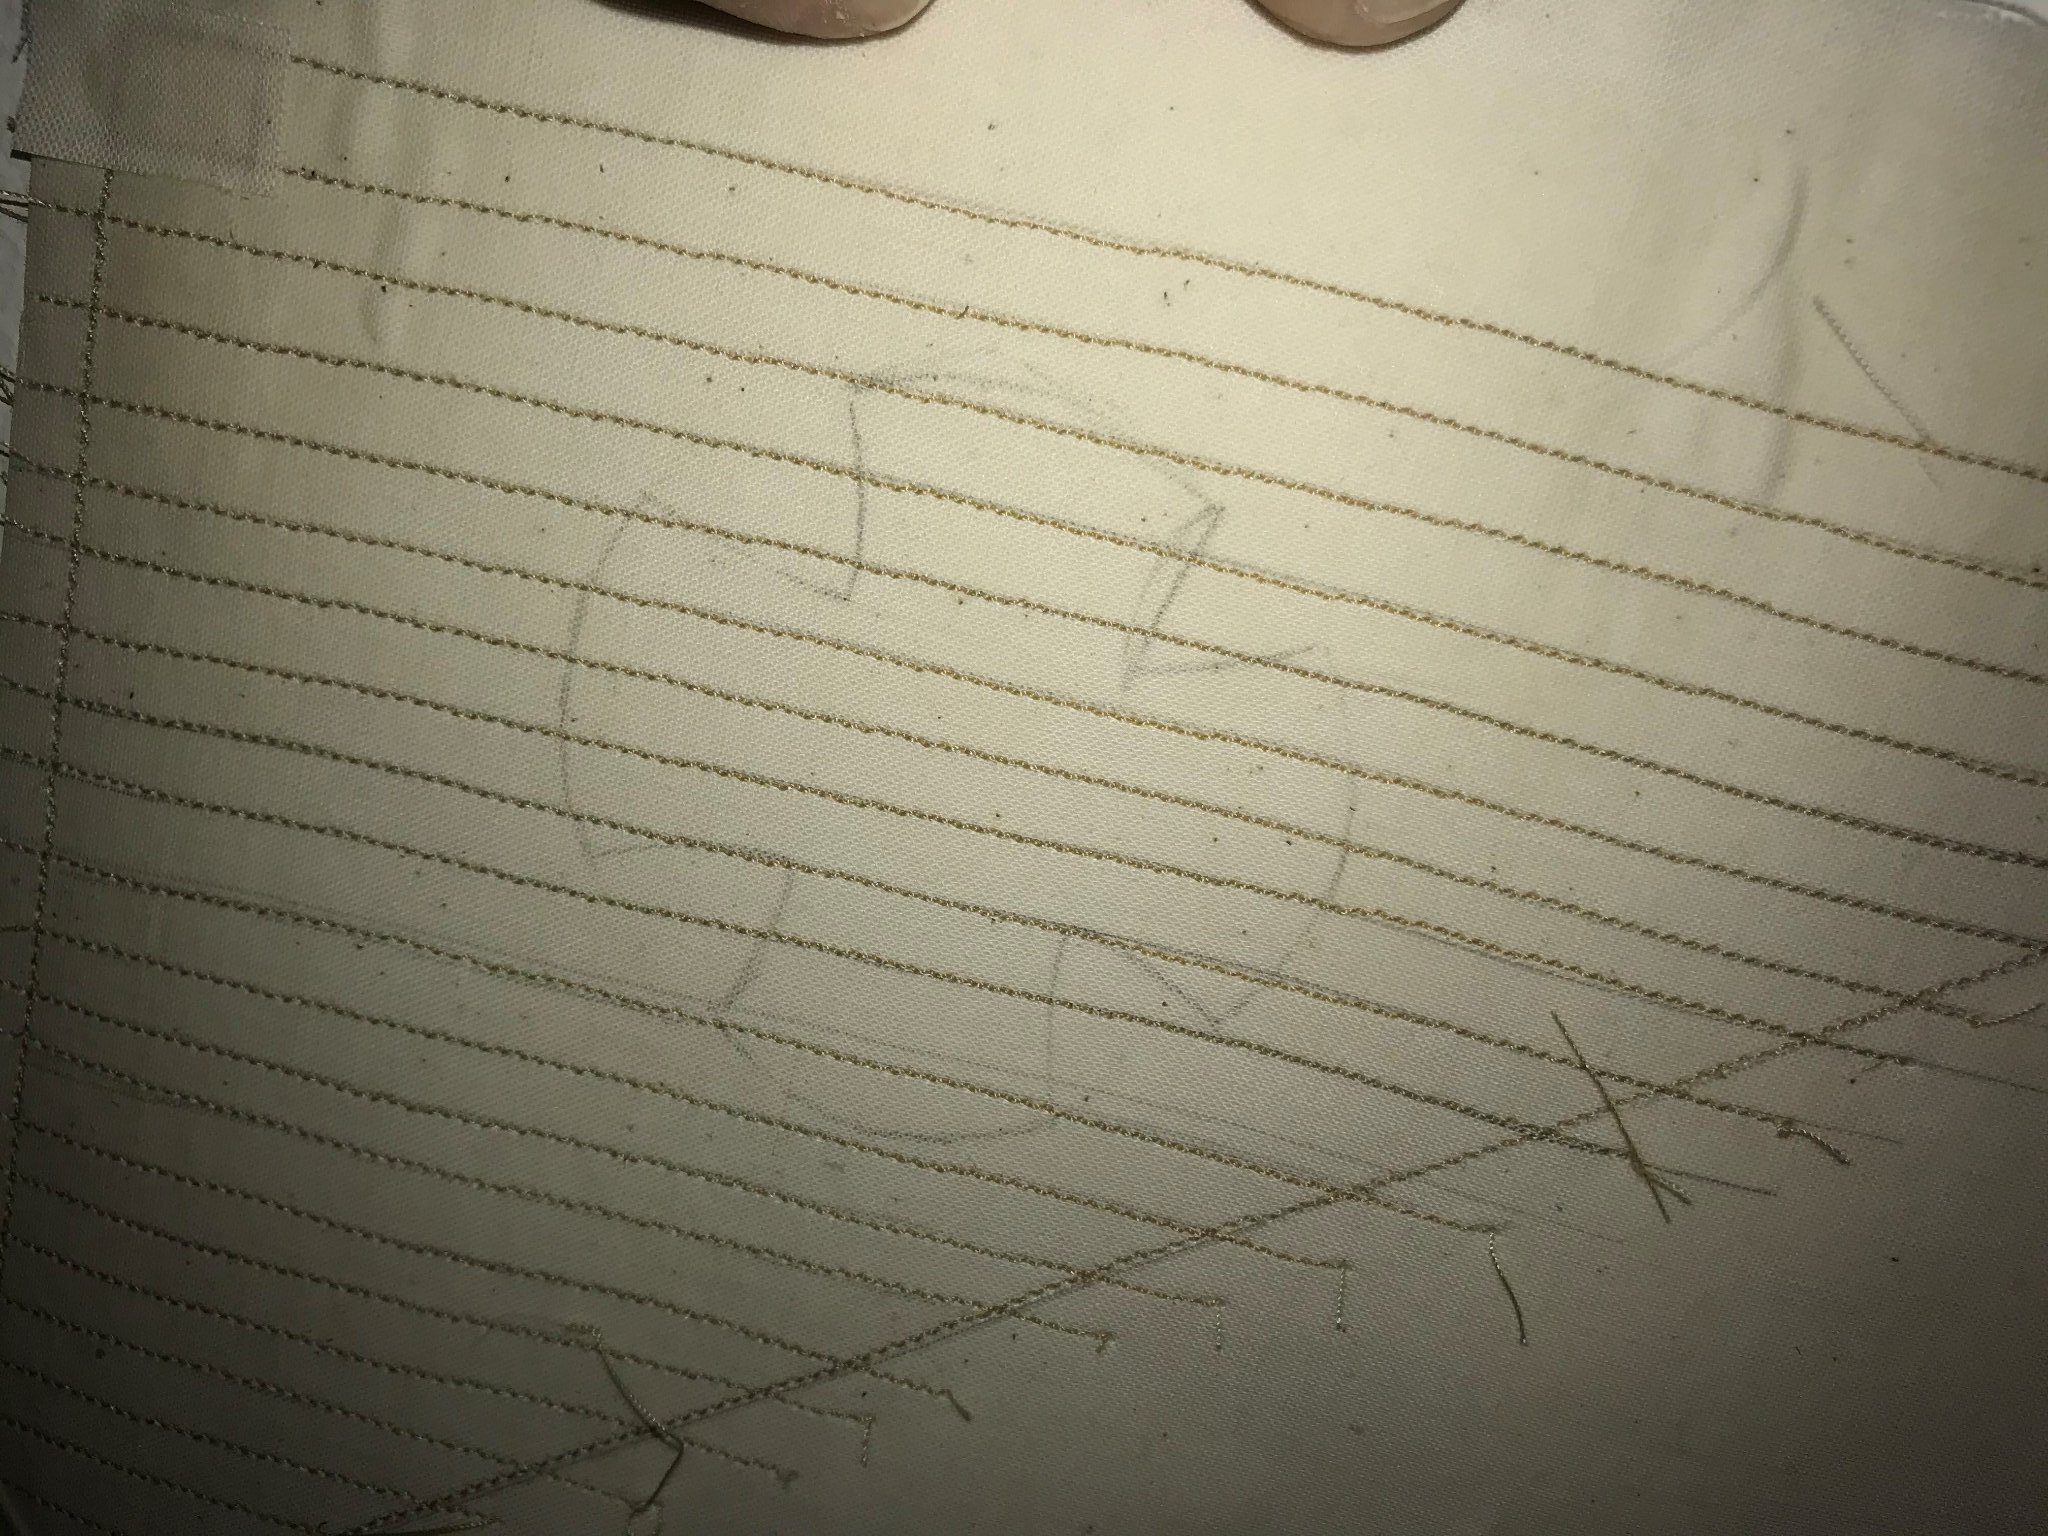
Success! Played around with top thread tension, and fianlly got the expected results. A little adjustment, and we should be done.
Top thread is the beige colored, bottom is the white on the bobbin. I will use the smallest stitch for this particular build, and the thread color will be the camel color.
Left the sail cloth material drying on a tear-away fabric with white pva glue so I have a better material feed through the machine.
Thanks for all you replies!
Regards,
Jorge

-
17 hours ago, RdK said:
Hi!
Thanks Nils for the nice tutorial!
While I also agree that stitches are always way out of scale, sometimes it adds to the charm of the model. I wanted stitched sails on my Mayflower, scale 1:100, which seems ridiculous, but I am very pleased with the result.
However, the catch is that I stitched it all by hand... 😅
-Radek
It can be always looked as a showcase of techniques....!
-
On 12/9/2020 at 9:12 AM, allanyed said:
Jorge,
Yes there is a frame and a matching plug that fits inside the frame. First I took the dry silkspan and cut it to fit just inside the outer edge of the frame. While it is laying on the frame and plug I wetted the silkspan with a water (brush or spray bottle works fine) Then I pulled the short edge on one side so there were no big wrinkles and taped it to the frame. Then I did an adjacent side, again pulling the wet material a little bit to get out big wrinkles and taping it to the frame. Then did the same with the remaining two sides. After it is taped I picked the frame with the material up to get it off the plug. I set it on blocks to dry as the sail material sags a bit. Once it is dry, it shrinks and is very tight. There is no need to try to pull it too tight while wet as it will tighten up on its own. Once it was dry I painted it. It will sag again at this point. This can be done carefully without the frame going back on the plug or with the plug in. If with the plug in, be sure to carefully remove the frame and painted material as soon as the paint is on so it does not dry to the plug. The plug will have paint on it if inserted during the painting, but I found this was not a problem once removed and left to dry while the frame with painted material were drying. Once the paint is dry, the material will be tight again. I then reinserted the frame on to the plug for the next steps of drawing the sails, doing the seams, etc. You can find a lot more details in David Antscherl's booklet on sail making which is available at SeaWatch books for $7. Hope this helps.
Allan
Thanks, Allan!
-
17 hours ago, allanyed said:
Jorege,
Be careful with white glue as it is water soluble. If this was only a test, I suggest you try using matte medium. It will not dissolve if wet with water and dries clear, plus is less viscous than white glue so there is no worry of bumps and spots that may stand out.
Sewing will be totally out of scale and not look realistic. At our scale you would be hard pressed to see a sewn line if it were to scale, which is not possible. Remember that there are seams for each panel and the edge of the sail prior to putting on the boltrope, not just a sewing line. The first photo below is one of several posted in the Boothbay 65 build log last week with additional explanations on sail making. In place of sewing, consider using a marker pen such as Liquitex which comes in many shades. I used a 2mm pen but if your lines need to be narrower, the tip can be cut smaller with a scalpel blade before charging the pen the first time. I also happened to give a thinned coat of titanium white artist acrylic after the seams were drawn to make them more subtle. Examples of before and after panel or edge lines are in the second photo below. David Antscherl recommends making seams, which should be about 2" wide (real world), with thinned paint to match closely to the sail cloth using a bow pen.
Allan

Hello Allan!
Is that a frame you prepared to maintain the cloth taut while the acrylic medium dries?
Thanks for your feedback!
Jorge
-
-
Hello All!
Hope you are all doing well.
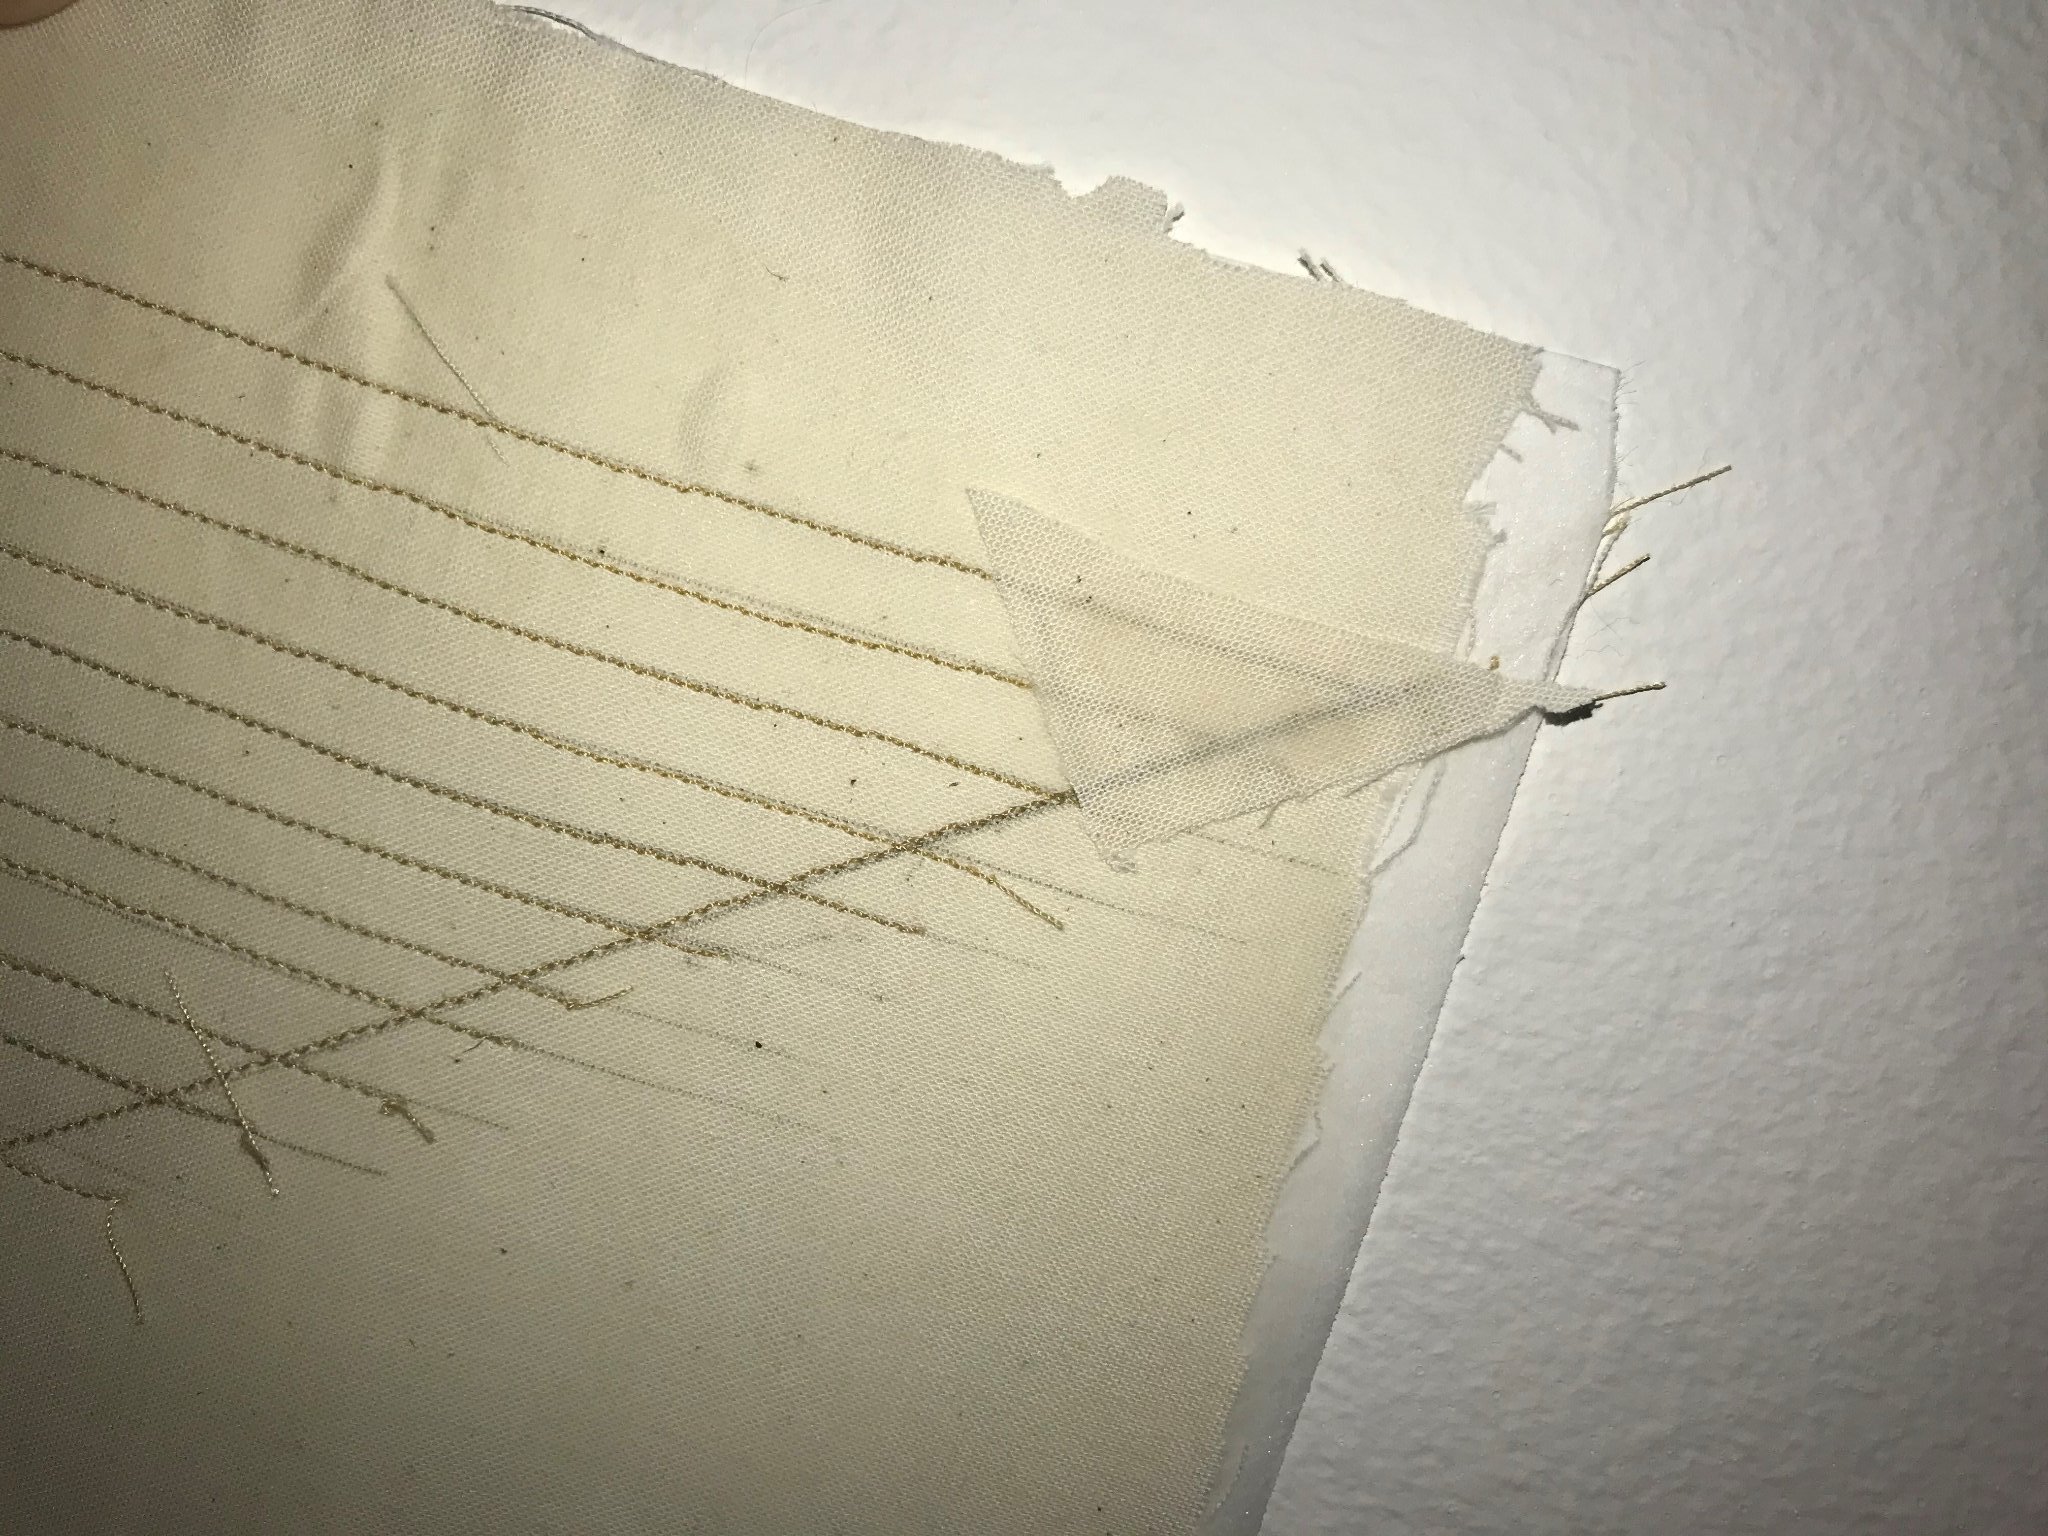
Quick question... please see image below. Pretty sure I will get the hang of stitching straight lines soon, but for the life of me, I can't get one thing right.
I am unable to get a line going on the sali borders, like a hem-type stitch.
My question is, should I set/pin the sail on a tear-away fabric of a bigger size, so I can properly run the sail and stitch (pass) thru the machine? NOt sure if I am explaining myself... I am pretty sure that the issue is that the cut sail is too small, and I cannot hol properly for the initital stich pass.
Any good links/tutorials out there? BTW, the sewing machine is a Singer 3337 "Simple" stitch... yeah, right... simple...
Have a great weekend!
-
On 8/5/2020 at 7:51 PM, ErnieL said:
You should see my 1/32 aircraft kit stash. It truly defies description.
I'll post a pic of my 1/35 military miniatures collection as well so we can compare...! When I got my first wooden model ship kit, my wife was like..." another hobby?!?" LOL!!!
-
Hello!
Quick question... do you assemble masts/sails/rigging off the hull, or install on the hull and then the rest of the work? Pros/Cons of each appreciated.
Also, any good rigging tool kit available? Or what tools do your recommend for a very nice rigging tool kit?
Thanks!
Jorge
-
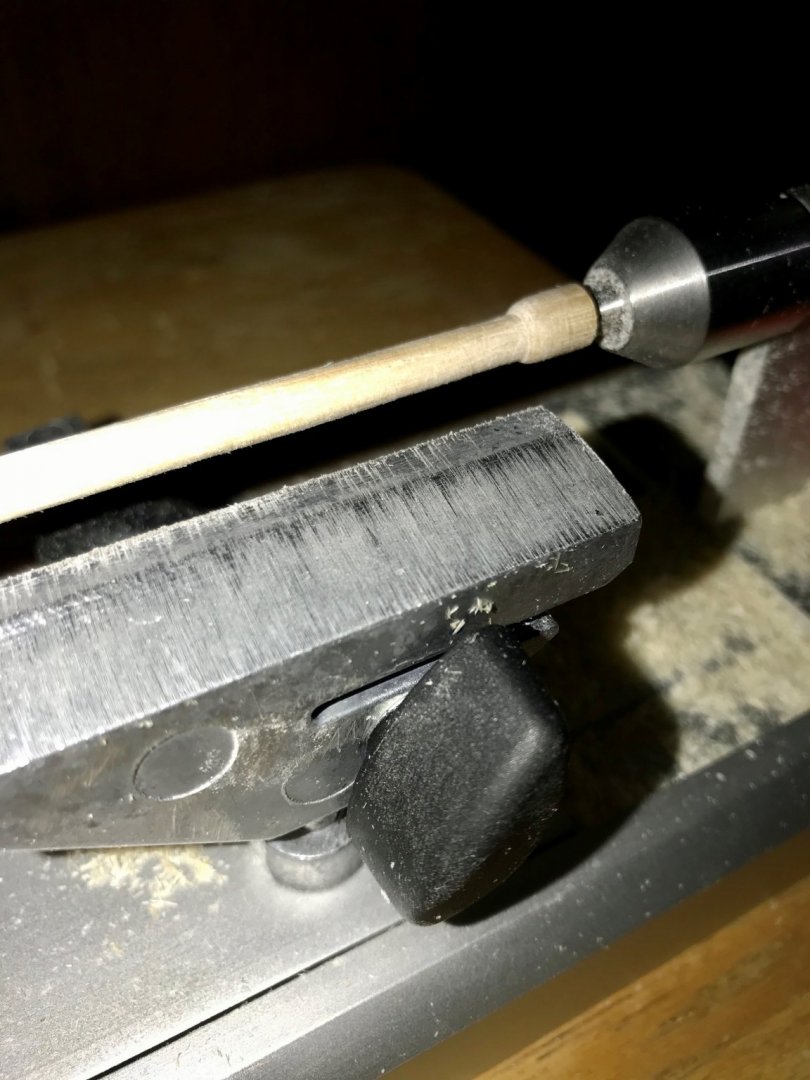
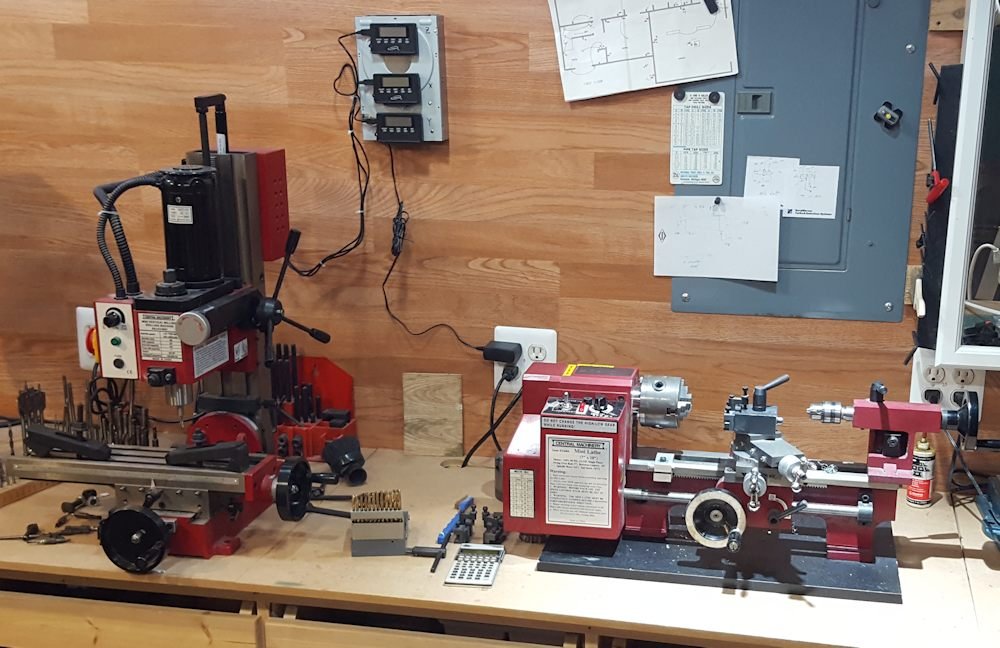
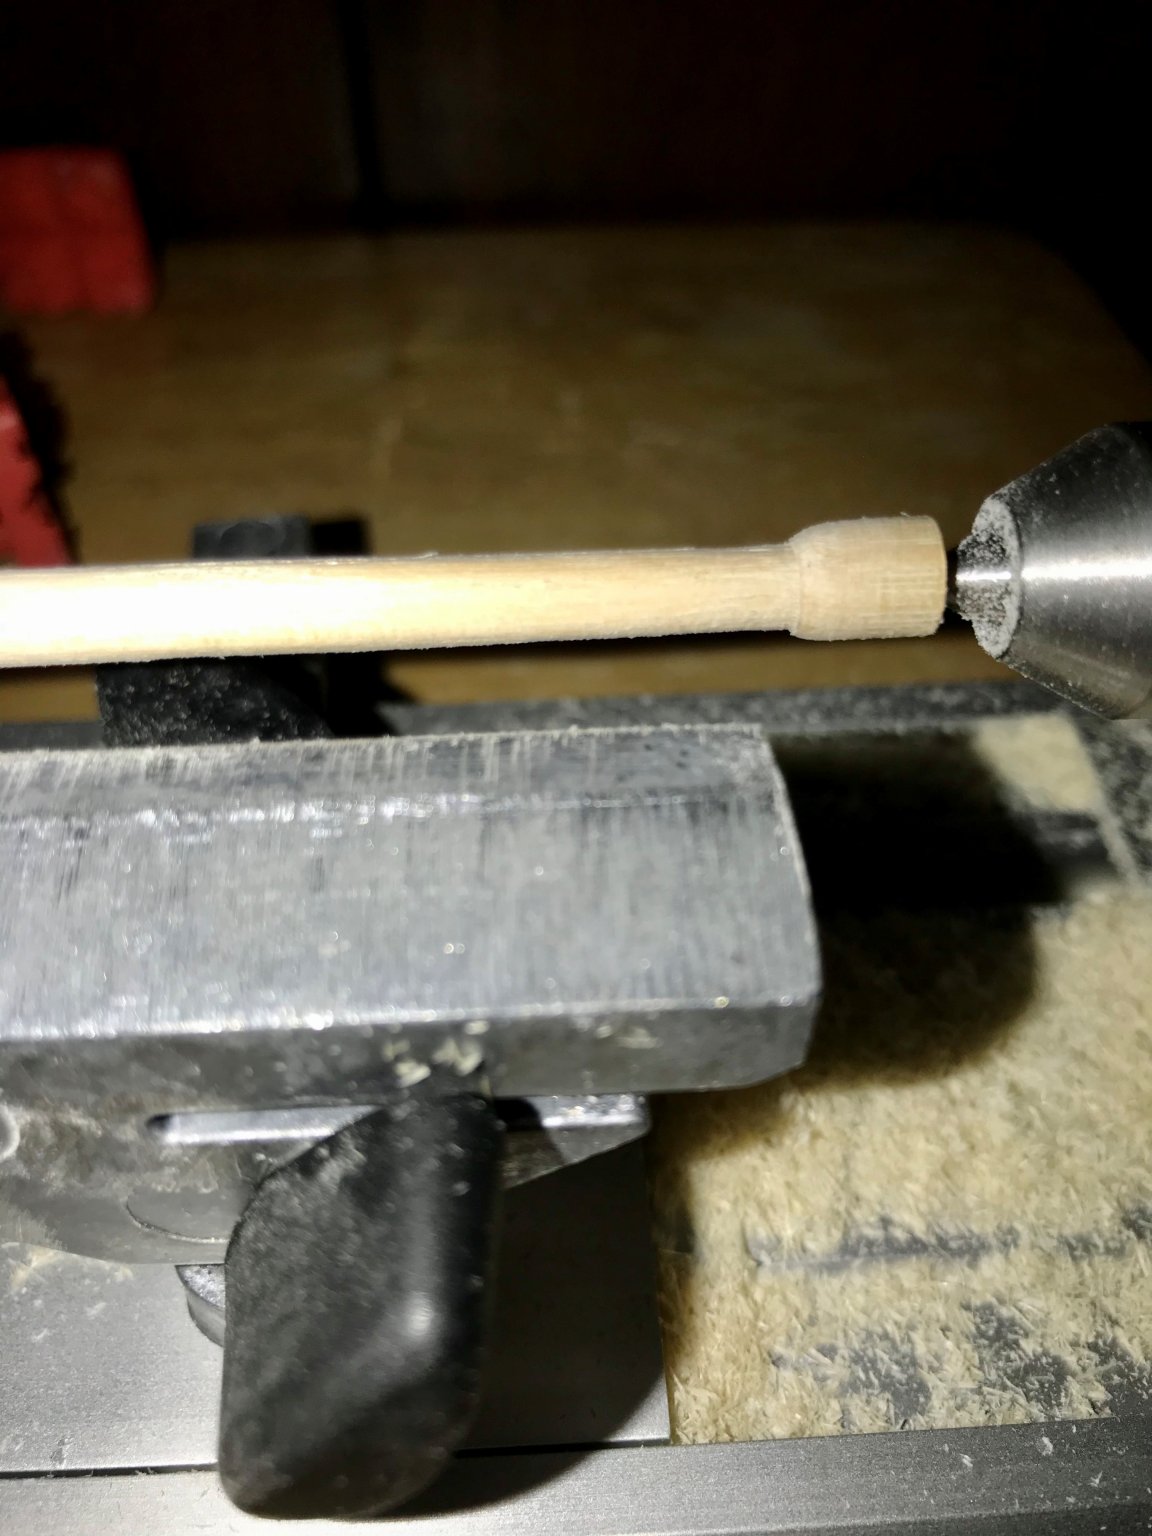
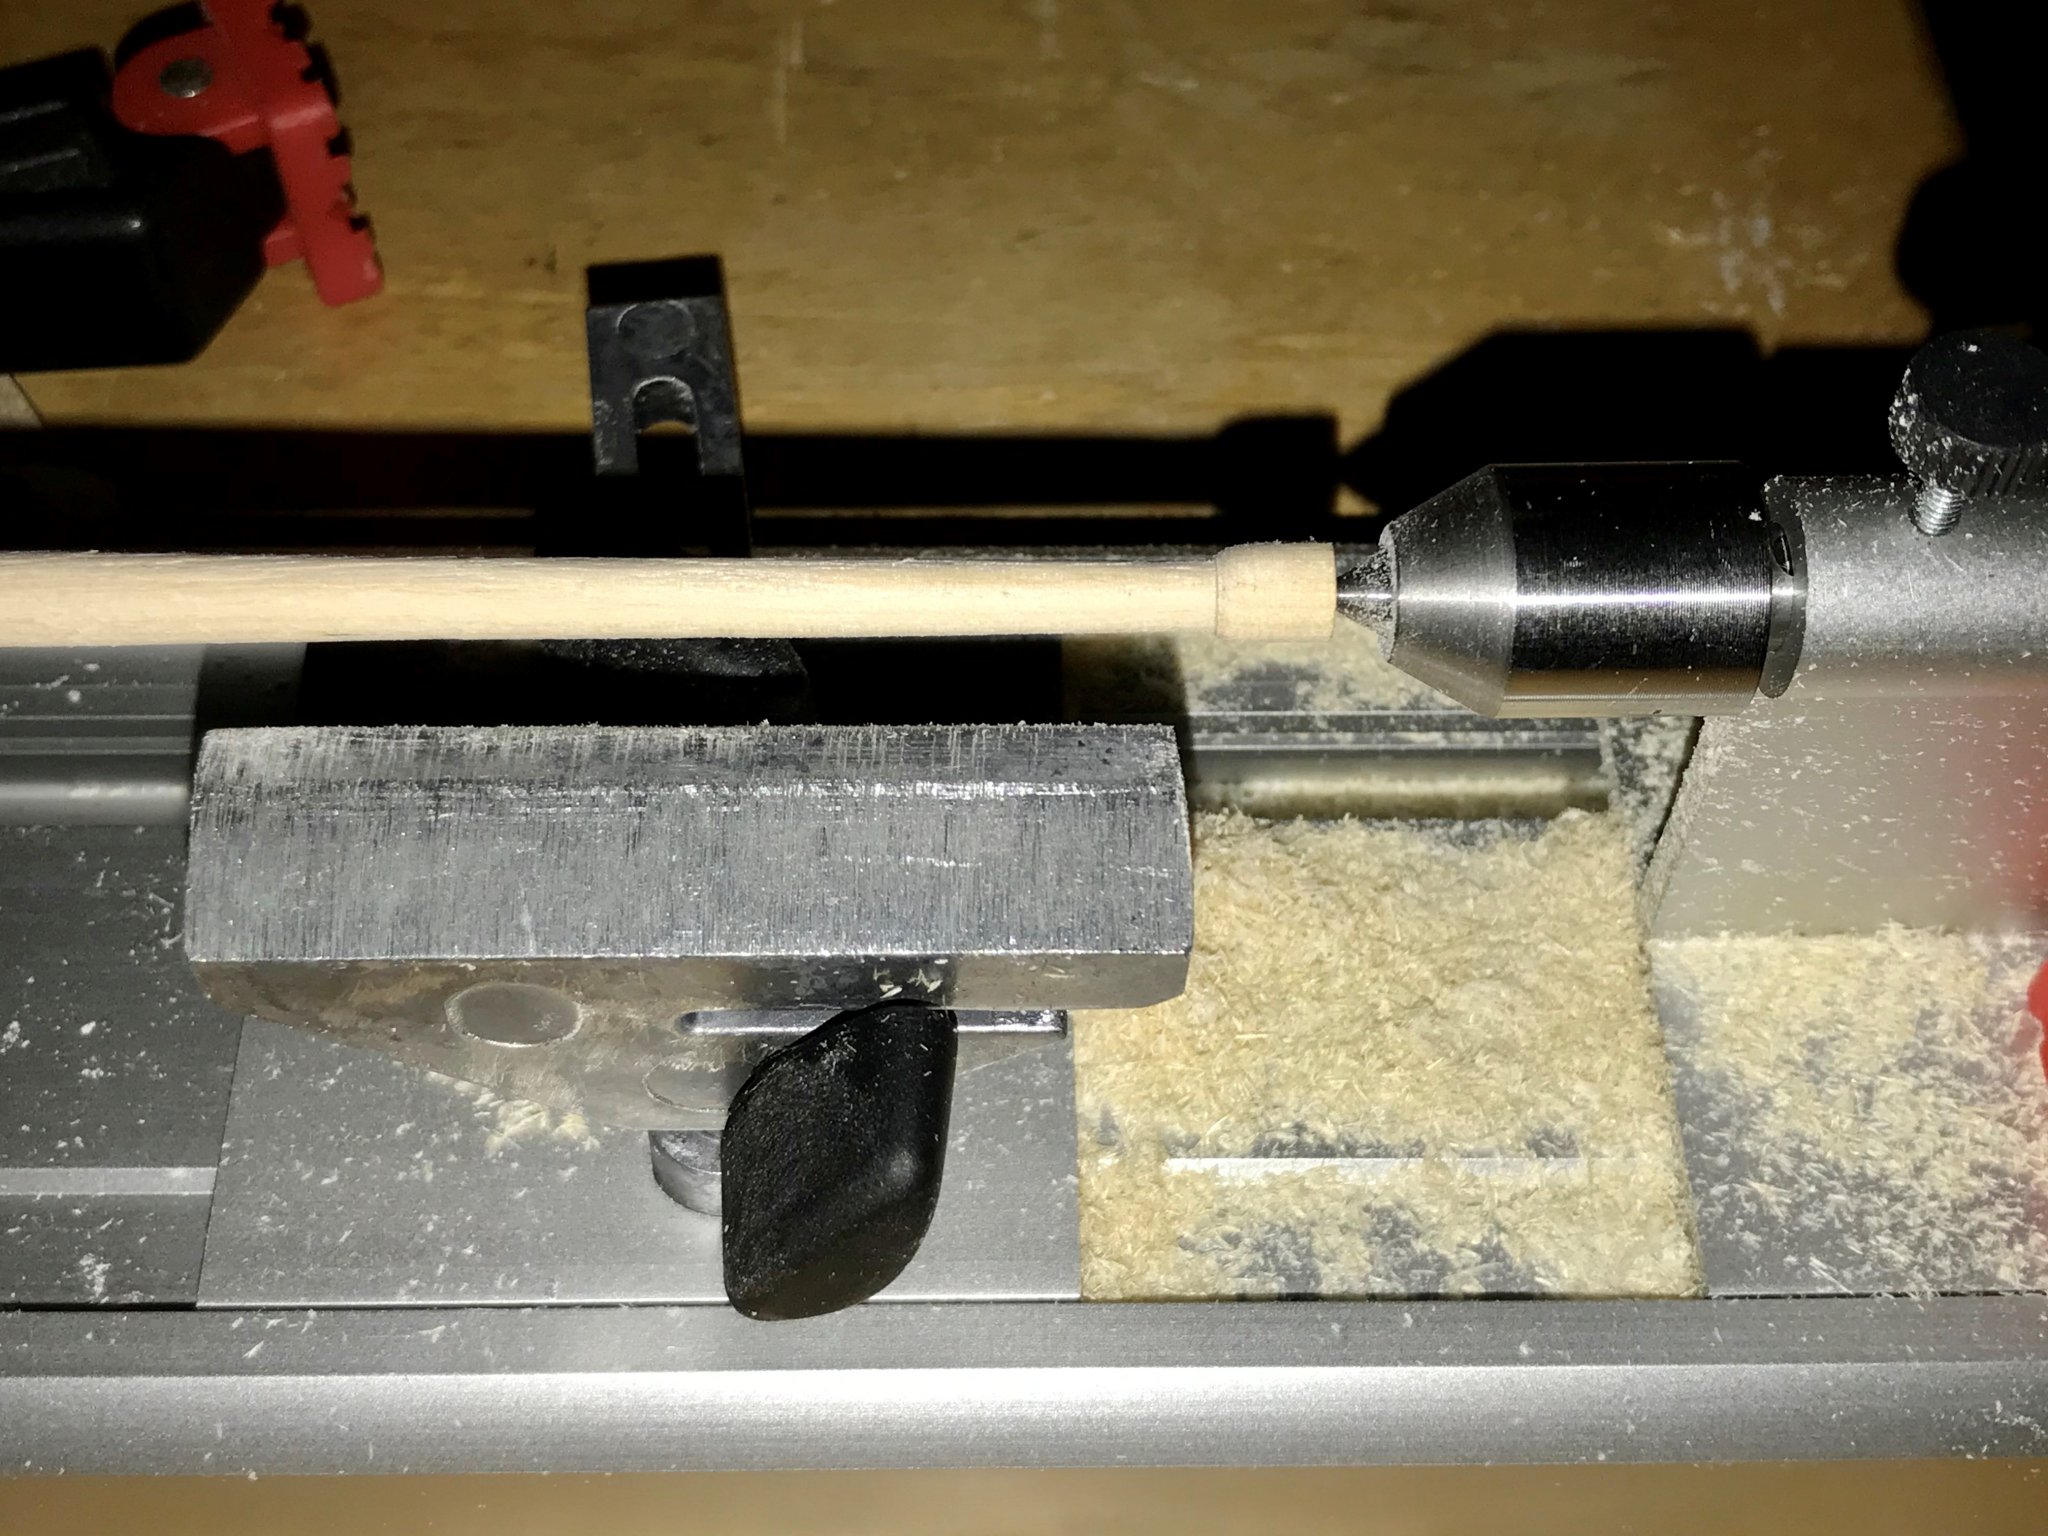
So, the Proxxon mini lathe has arrived... here's my 5am test first impression:
Unit is compact, but the feedthrough will definitely help with masts and larger spars
Tested it with a 6mm diameter dowel, which will be a small mast; will be reduced to 5mm at bottom of mast and at the top turned down to to 2.5mm diameter. Use the 3-Jax chuck, with the live tailstock (which spins very nicely).
Cutting performed with the Proxxon turning tool set, whih performed nicely. My only REAL gripe, however, is the tool rest surface... short, and badly finished, as the tools tend to snag/catch. Will remove from the bed, and polish the same as best as possible. Maybe have a machineshop prepare me a stainless steel unit, wider? That way larger tool passes can be performed.
Sanding was a breeze as well with this unit. Alignment as very nice between chick centyer and tailstock.
All in all, very satified with the purchase, while the savings go for the Sherline later down the road!
A couple of pics follows, so any questions you might have, please feel free to ask!


- JpR62, bruce d, Landlubber Mike and 4 others
-
 7
7
-
3 hours ago, rtropp said:
If I were already saving for a replacement, I wouldn't look to improve or upgrade. I would put my time into learning to use the tools so I was ready when the Sherline came along.
R
Small improvements always help as well. For what I purchased tHe unit, I can do a couple Fixes/improvements, and still be under the new price.
Got it from a widow that can’t stand to see her husband’s hobby stuff in the house. New, in the box, for $100. Seems he never got to use it, as all the manuals are there, and the chuck in the original package as well. Got a kit as well during the visit.
-
On 6/30/2020 at 3:56 PM, Morgan said:
I brought a second bed direct from Proxxon (Code 27020-31) and mounted it and the lath end-on-end on some MDF. The bed cost €14.30 (+ postage) a couple of months ago, try your Proxxon dealer to see if they supply spares. Obviously not as good as a single piece extended bed, but it does the same job.
Gary
Found it and ordered, so will be waiting for the same later in July/August (out of stock, and ordered from Germany).
Thanks!
jorge
-
20 minutes ago, bartley said:
The 250 mm center distance can be limiting. For example the bowspit on my Cheerful is 310. So I have the extension table which allows me to turn longer pieces such as masts.
John
I did notice that there is an extension available, but I have only seen it in Australia; I have searched multiple time/ways, but I havent been able to find it anywhere in US...
Thanks!
Jorge
-
Hello Gents!
Got a sweet deal on a Proxxon DB250 wood lathe, so I pulled the trigger on this unit with the 3 jaw chuck while I save up for a Sherline (which you guys really sold me!).
Are there any tips/tricks/mods that can be performed to improve function/added value? Would love to see what you guys can come up with... already saw a stainless steel mod for the tool rest, so this one seems a no brainer to perform... bugger, more stable tool rest.
Please, let me know what can be done to improve the unit.
Thanks!
Jorge
-
On 6/26/2020 at 8:29 PM, smotyka said:
Hello,
When requesting a built up deck as opposed to the laser cut deck, are other parts such as deck planking provided?
Thanks much in Advance.
Steve
I understand that if you order the pre-built deck, it substitutes the deck planking - see below from the Vanguard Models' page:
"Please Note – We have developed a laser etched deck for the Alert, which is laser cut and laser etched in 1mm limewood. The etched deck includes the correct planking arrangement and all treenails are included. If you would like this deck instead of the standard planking, please let us know when ordering, and we will swap the planks for the ready cut and etched deck."
Hope this helps!
Jorge
- mtaylor and Ryland Craze
-
2
-
6 minutes ago, jimbyr said:
Gene
Ok, so if you're ripping planks 1/8 x say 1/16 first surface your stock on a thickness sander or buy sheets that are 1/8. With our thickness sander you can easily surface your stock to 1/8 or .125 + or - .001 which should be close enough. Don't surface your stock to 1/16 and rip the planks on the edge. Your going to sand the hull when you're done so always do it this way. Look down the side of the stock and start on the side that is the straightest. If both sides are bowed take a small plane and square up one side the best you can. Now set up the saw with a 3" .03 kerf slitting blade and the mic stop if you have one. Move the fence so it's 1/16 from the blade, eyeball it or use a scale and then set the mic stop to 0 and move it to the fence. Take your stock on the straight side, lay it up against the fence(fence extension removed) and run it through the saw. Measure it with a caliper and adjust the fence with the mic stop. Now start cutting your planks. Keep light pressure on the stock toward the fence with your left hand just south of the blade and push it through with the right. When your stock gets close to the blade use a push stick. I use a piece of scrap stock and push it all the way through till it falls off the back of the saw. You should be able to rip your planks + or - .001 this way
Jim
I was jut about to ask if I can saw 1mm or 2mm planks with the saw... any good ripping plank tutorials using your saw out there that you know of?
Thanks again!
Jorge
-
On 4/19/2019 at 8:24 AM, jimbyr said:
Joe
This is the first one
Jim

DAMN, that looks NICE! Where was I when this showed up???
I am the technical type... why do I have to send the table top? I would've assumed that the top, if bolt off/bolt on, that I could do at home.
How much is the extended top?
Thanks, Jim!
Jorge
-
-
-
Got the Alert book from Abe Books... used but EXCELLENT conditions; only detail is a sunbleached jacket spine.
Other than that, book is basically new; seems to be one of the originals, as the jacket does not have the plans inside... cant beat it for $57 delivered, when compared to new prices.
Thanks for the search tips!
Regards,
Jorge
- mtaylor, Ryland Craze, VTHokiEE and 1 other
-
4
-
Well, an early surprise for Father's Day has arrived at home... I just received the Vanguard Models HMS Alert 1777 kit, Version 2.
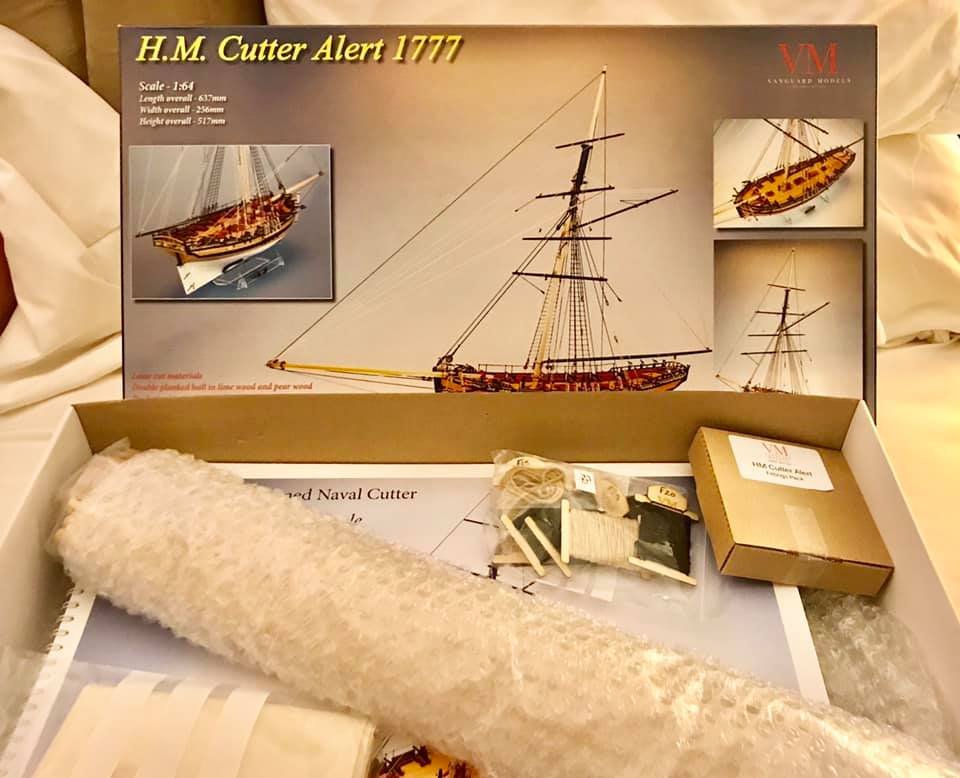
Mr. Watton was nice enough to guide me to his US rep (Ages of Sail), so placed the order and got the kit; I asked for the deck that need to be built up (not the etched complete deck), as I find that the built up one looks way better... the etched deck is convenient, but I think the individually laid planks looks way better.
Very nice to have all parts bagged and marked... and the instructions... damn priceless!
Finishing up a kit at home, so as soon as that one is completed, will put the Alert on the workbench, and see if I create my first build log here
Best regards,
Jorge
- ccoyle, DelF, Ryland Craze and 7 others
-
10
-
I was looking at this package... any opinions? Sherline 4410:
https://www.sherline.com/product/4400a-dro4410a-dro-package/
And this tool rest for manual work:
https://www.sherline.com/product/extended-wood-tool-rest-set/
Now, is there any lever action quick release cutting tool holder? I have seen these on YouTube videos, but can't find it in the Sherline page; maybe a competitor's compatible accessory? Is it a nice to have item, or would it really help?
.jpg.a7b0f6ede67c07fd9e659c32e93f758b.jpg)
Thank you all!
Jorge
-
13 hours ago, Pat Matthews said:
Another option, which I *hardly* regret making- the once very inexpensive and now not so much anymore, Chinese mini mill and lathe. As offered by Micromark, Little Machine Shop, Harbor Freight and others. I'm happier with the MASS of these cast iron machines, as sometime I need to machine something a bit bigger. And yes I've added many tools over the years... some 20 years I've had these things.
.
Hello Pat!
Are those units Central Machine (or Machinery)? I believe I have seen these in Habor Freight or Northern Tool...


Stitching sails with sewing machine
in Masting, rigging and sails
Posted
Hello All!
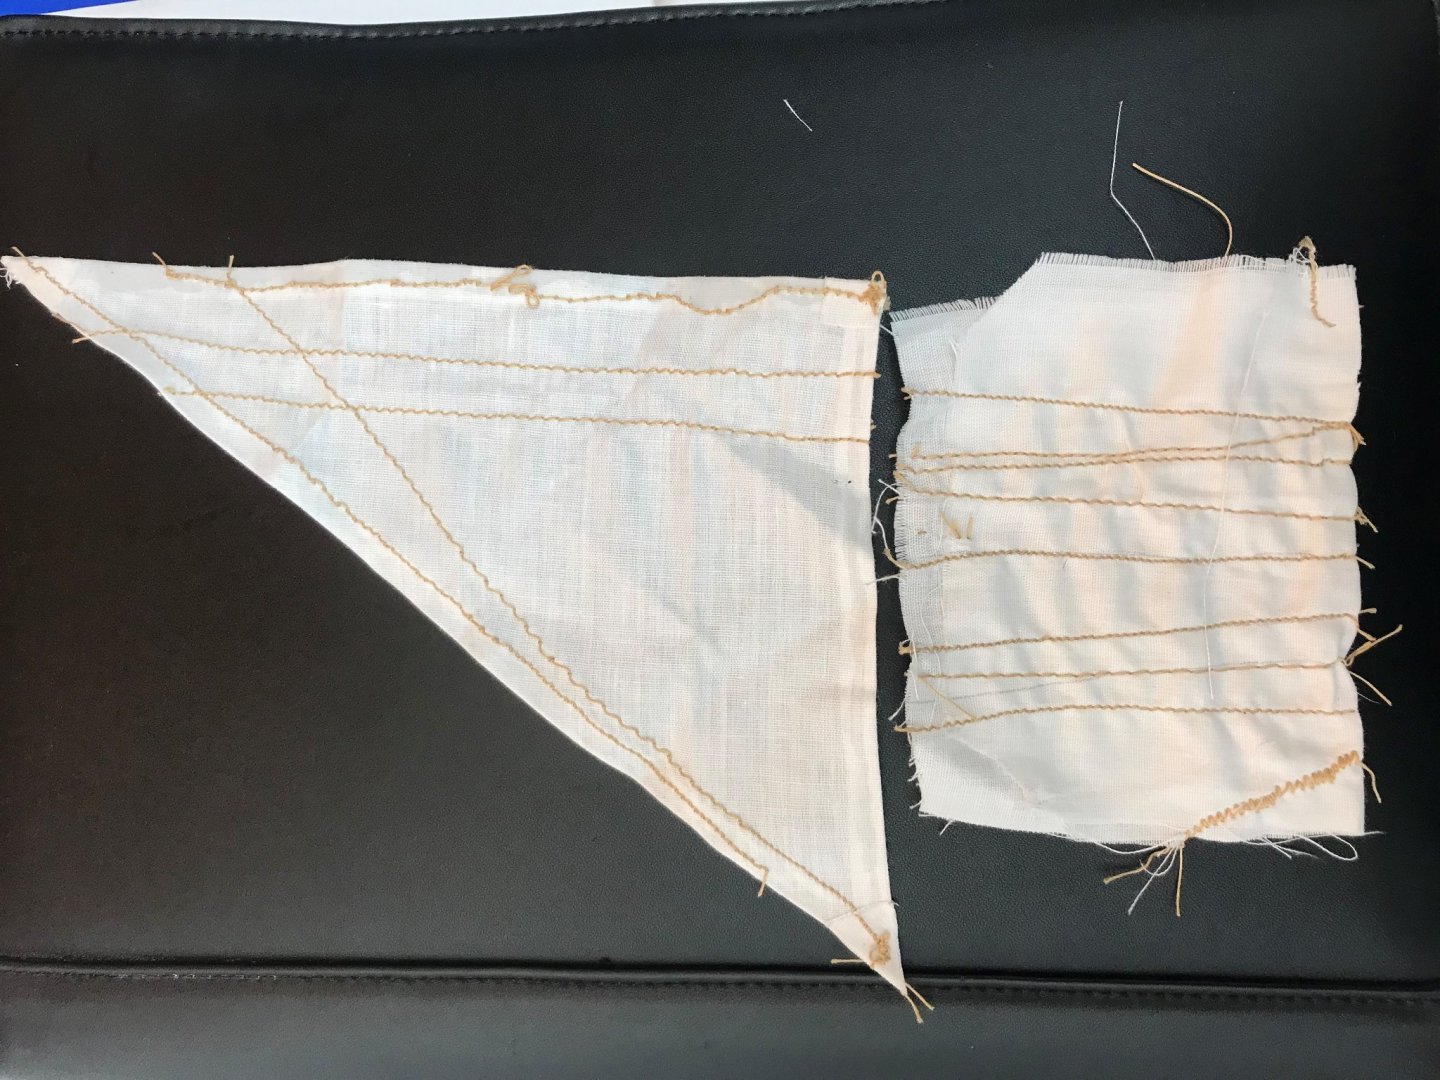
After much trial and error, first sail build completed!
See pics below... feel free to critique.
Already removed the ter-away fabric, and looks nice enough... can’t complain much for this first one.
now, as soon as it dries, will apply the no-fray liquid, and basically Don, and ready for sewing to the spar.
question, though... what type of paint do you use to paint crosses on the sails?
again, thank you all for your support and comments!