HOLIDAY DONATION DRIVE - SUPPORT MSW - DO YOUR PART TO KEEP THIS GREAT FORUM GOING! (89 donations so far out of 49,000 members - C'mon guys!)
×


niwotwill
-
Posts
596 -
Joined
-
Last visited
Content Type
Profiles
Forums
Gallery
Events
Everything posted by niwotwill
-
 Making great progress Andrew. A great point about the gap between the cutwater and bowsprit. Studying the plans I see now how the gap would be developed. Great catch for us following. Glad your fix worked for you. I love the view of the deck framing. Great Work Stay Well and Stay Safe Will
 -
Great post and very informative. She's looking really nice and I think you're correct on the brass will look better when painted. Stay Well and Stay Safe Will
-
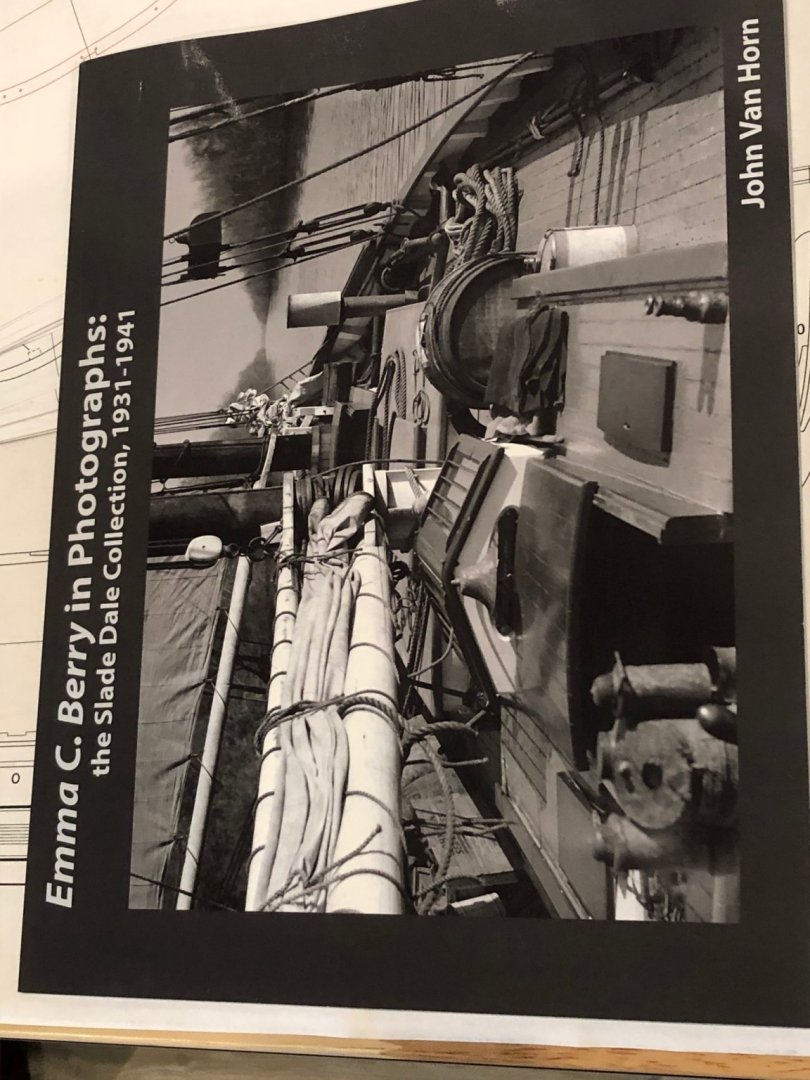
Maury I found this book while researching the ECB I know you mentioned you had a library of ECB but thought I'd show it to you in case you haven't got a copy. Excellent photographs of the Emma C Berry Stay Well and Stay Safe Will
-
Maury That's what I was concerned about glad to see you'd thought about it. I was concerned about asking but decided I had to ask. Thanks for clearing this up. Stay Well and Stay Safe Will
-
Good work you're really flying on the build. I'll be watching you progress with you jigs and frame installations. Really nice work. Just a question though. if the top of the frames end at the sheer won't the line on the gantry have to be reset as the sheer curves? Just a thought. Stay Well and Stay Safe Will
-
Rope looks fantastic. Yes it is fun to make rope. The hardest thing for me is keep the receipt and record for future use. I haven't used poly rope yet but yours looks really nice so maybe I'll give it a try. Stay Well and Stay Safe Will
- 950 replies
-
- 1
-

-
- syren
- model shipways
- (and 1 more)
-
Transom looks very clean and nice. I especially like the inside planking to the deck. I was would like to see a photo of the transom from the stern. I'm using your build to learn from and follow my build which I hope to start soon. Lovely work. Stay Well and Stay Safe Will
-
Maury Your making good progress. Hard to wait to see the next installment. UPS finally dropped my Emma kit on Saturday studied the plans and am ready to start but must wait to get more work done on existing projects. Stay Well and Stay Safe Will
-
Maury I'm entering the HAER Lettie G. Howard into my CAD system to develop the patterns to make her parts. Also ordered the ECB and the kit is in the hands of USP somewhere. (should see her next week) Your log will be very useful to me with ECB since I've been collecting books and photos as you. I'd like to pull up a front row chair if there is still room. Waiting is the hardest part Stay Well and Stay Safe Will
-
Deconstruction complete without damaging the keel assembly. Now start build frames using the Tosti method. Start again tomorrow Stay Well and Stay Safe Will

-
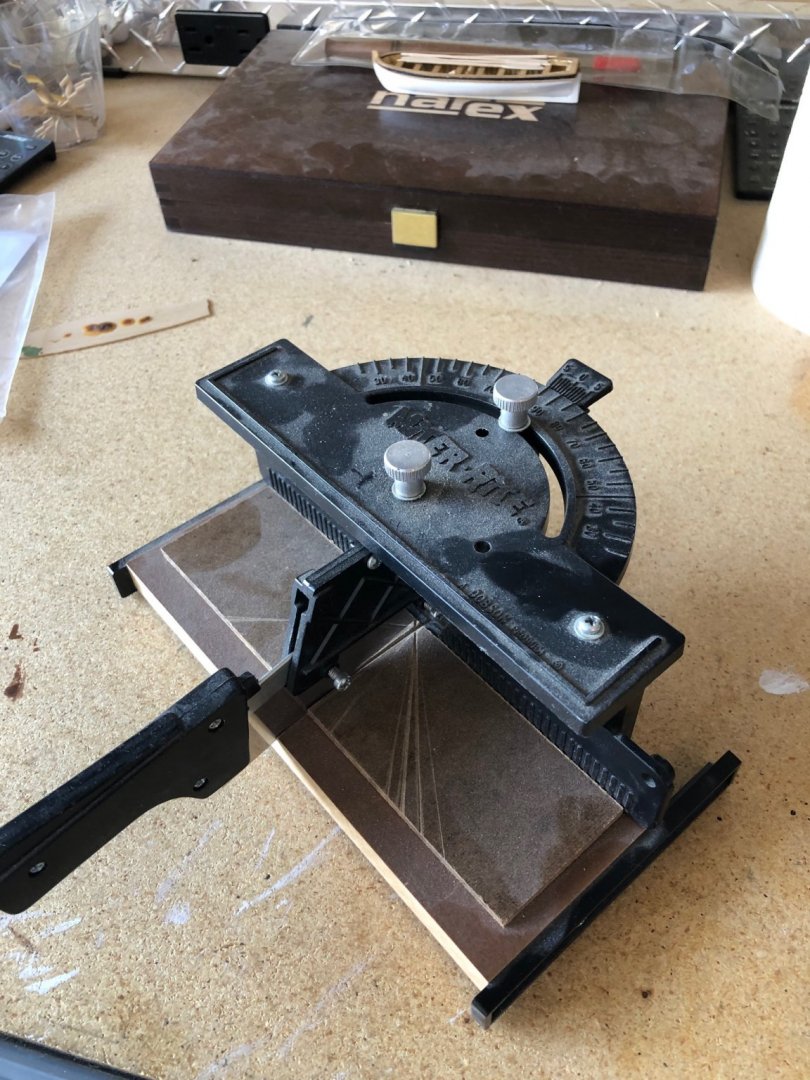
Good Morning Andrew I've been following your build while I wait for my ECB to arrive. One good thing about this covid is UPS is delivering on saturdays here and around 5 my kit arrived. You know with the size of the lodging knees I'm not sure using a table saw would be of much use. I went out to my shop and found a modelers mitre saw like a carpenters finish mitre saw. Probably too lake but here's a picture. I use this if my cuts are one off and not worth making a jig or setup. Stay Well and Stay Safe Will
- 161 replies
-
- 1
-
-
- Model Shipways
- Emma C Berry
- (and 1 more)
-
Patrick its been a long time since I checked in on your log and you've made great progress. The work you've done since my last time is looking very nice. Overworkeds comment on the front port doors reminded me of something I'd seen on another model. At 1:64 the front doors were curved to sit evenly with the siding and what the modeler had done was to lightly sand them to shape. It wasn't much but looking closely you could see the fit. Stay Well and Stay Safe Will
-
Fantastic shrouds and ratlines. Every time I check in on your work I amazed at such a high level of detail perfection of your work. You work much faster than me and each time it amazes the amount of work that been done. Great job start to now keep it up I can't wait to the see the finished Syren. I have a question about the ratlines, what size is the rope?, Did you wax the rope or some other prep? (they hang perfectly), What glue did you use on the ends? Stay Well and Stay Safe Will
- 950 replies
-
- 1
-
-
- syren
- model shipways
- (and 1 more)
-
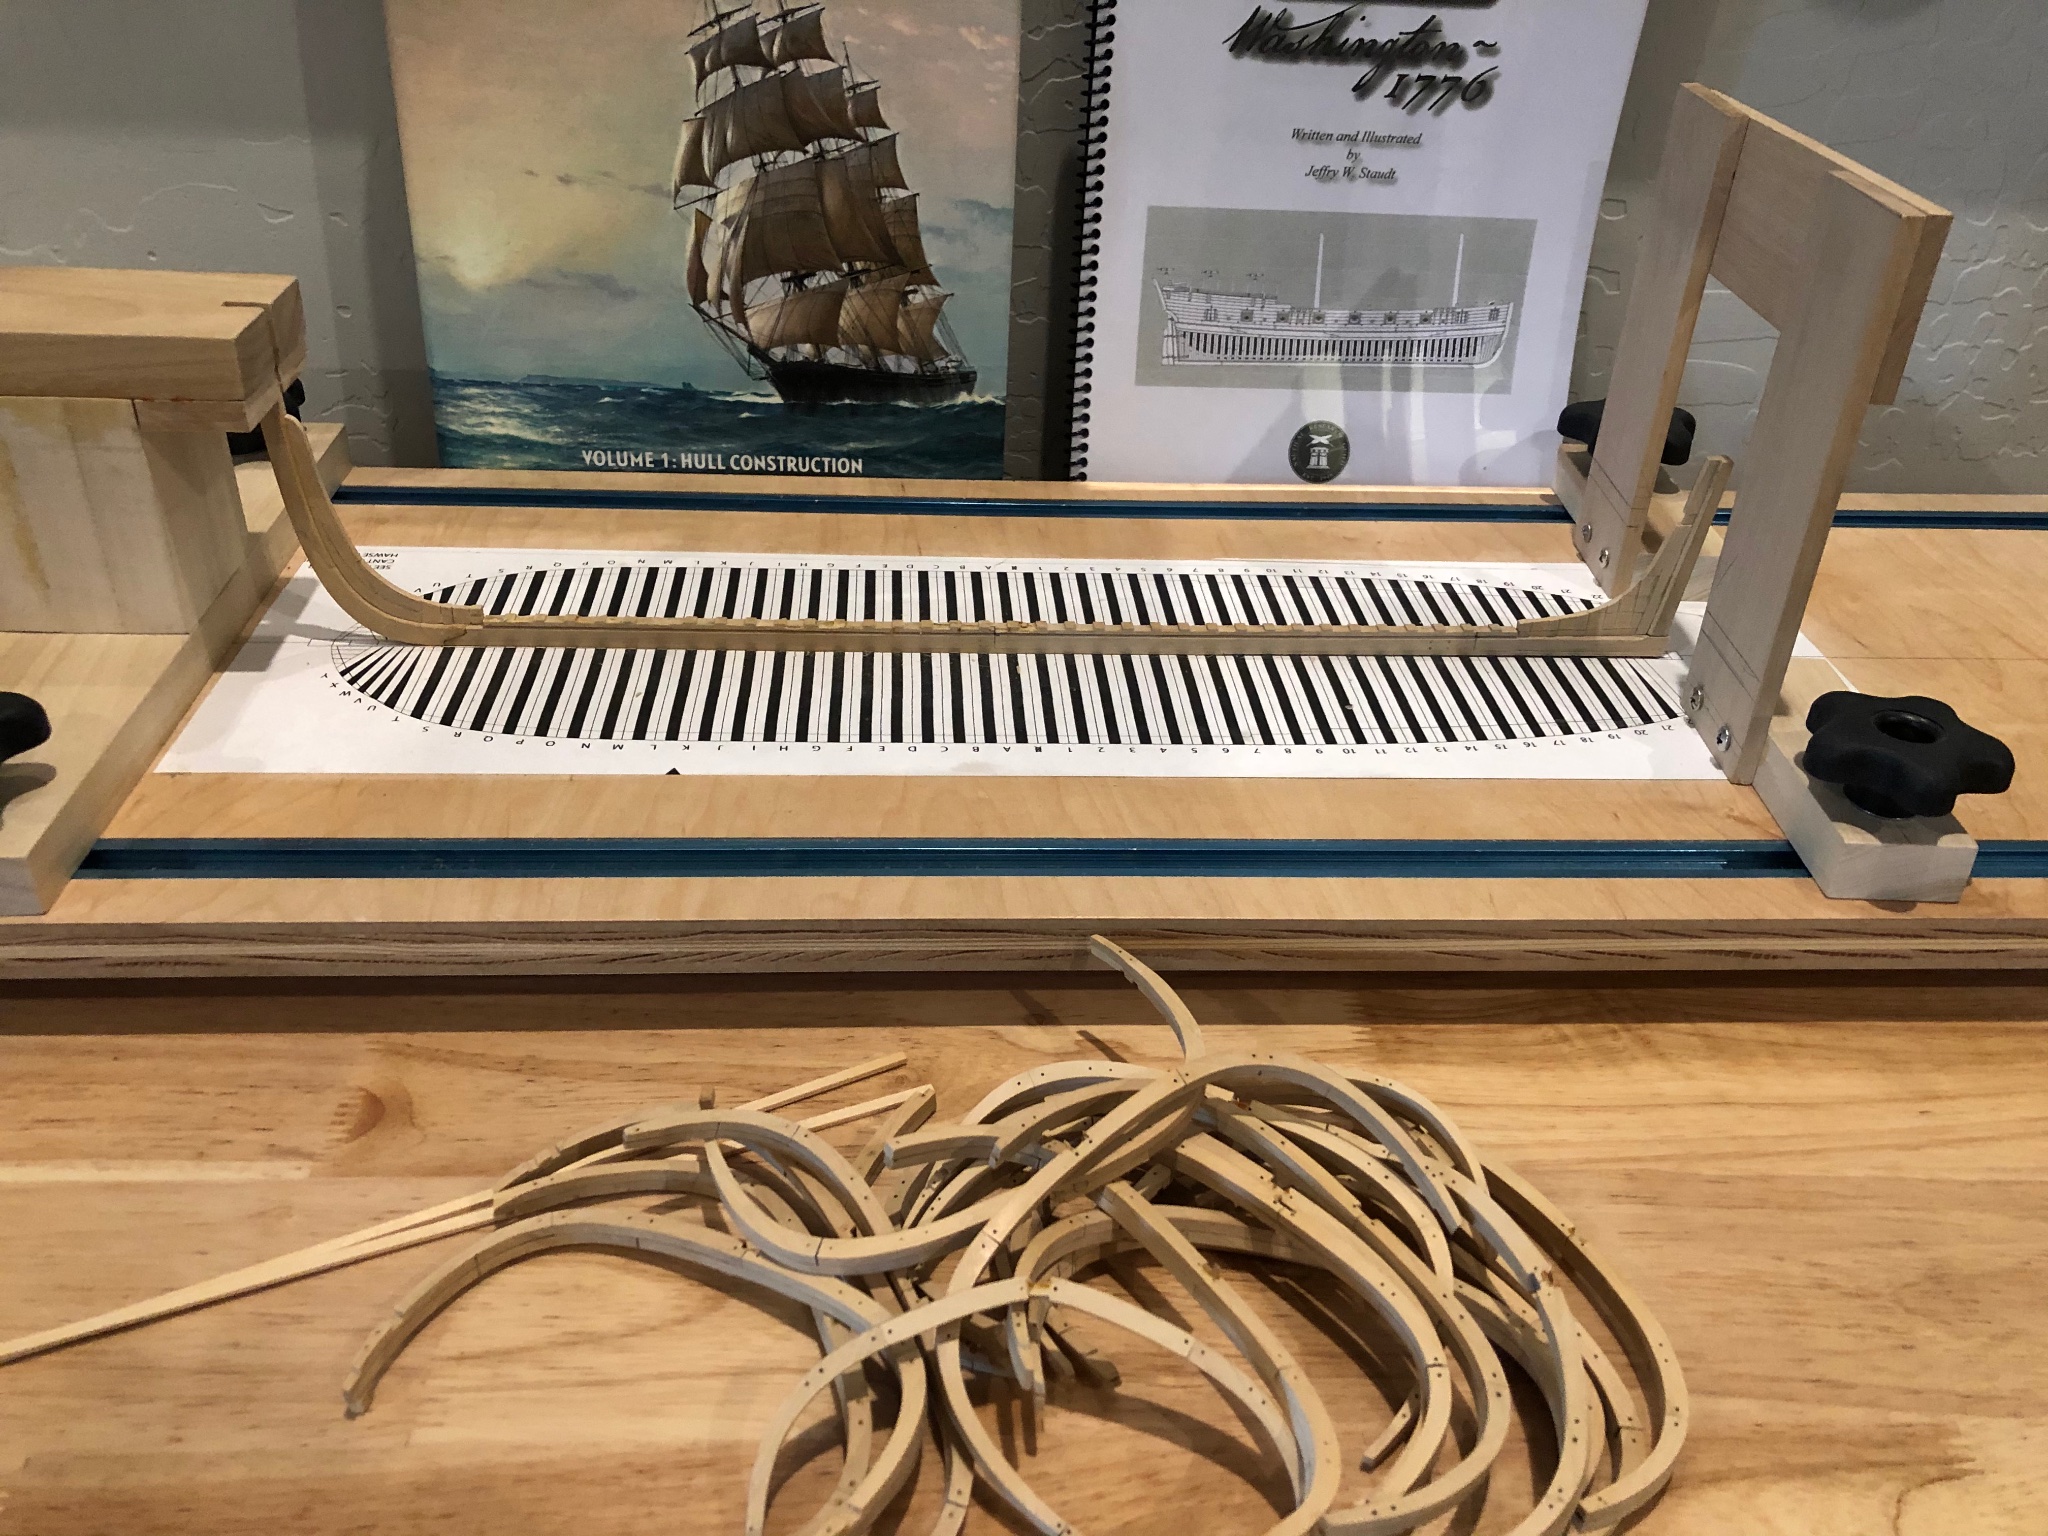
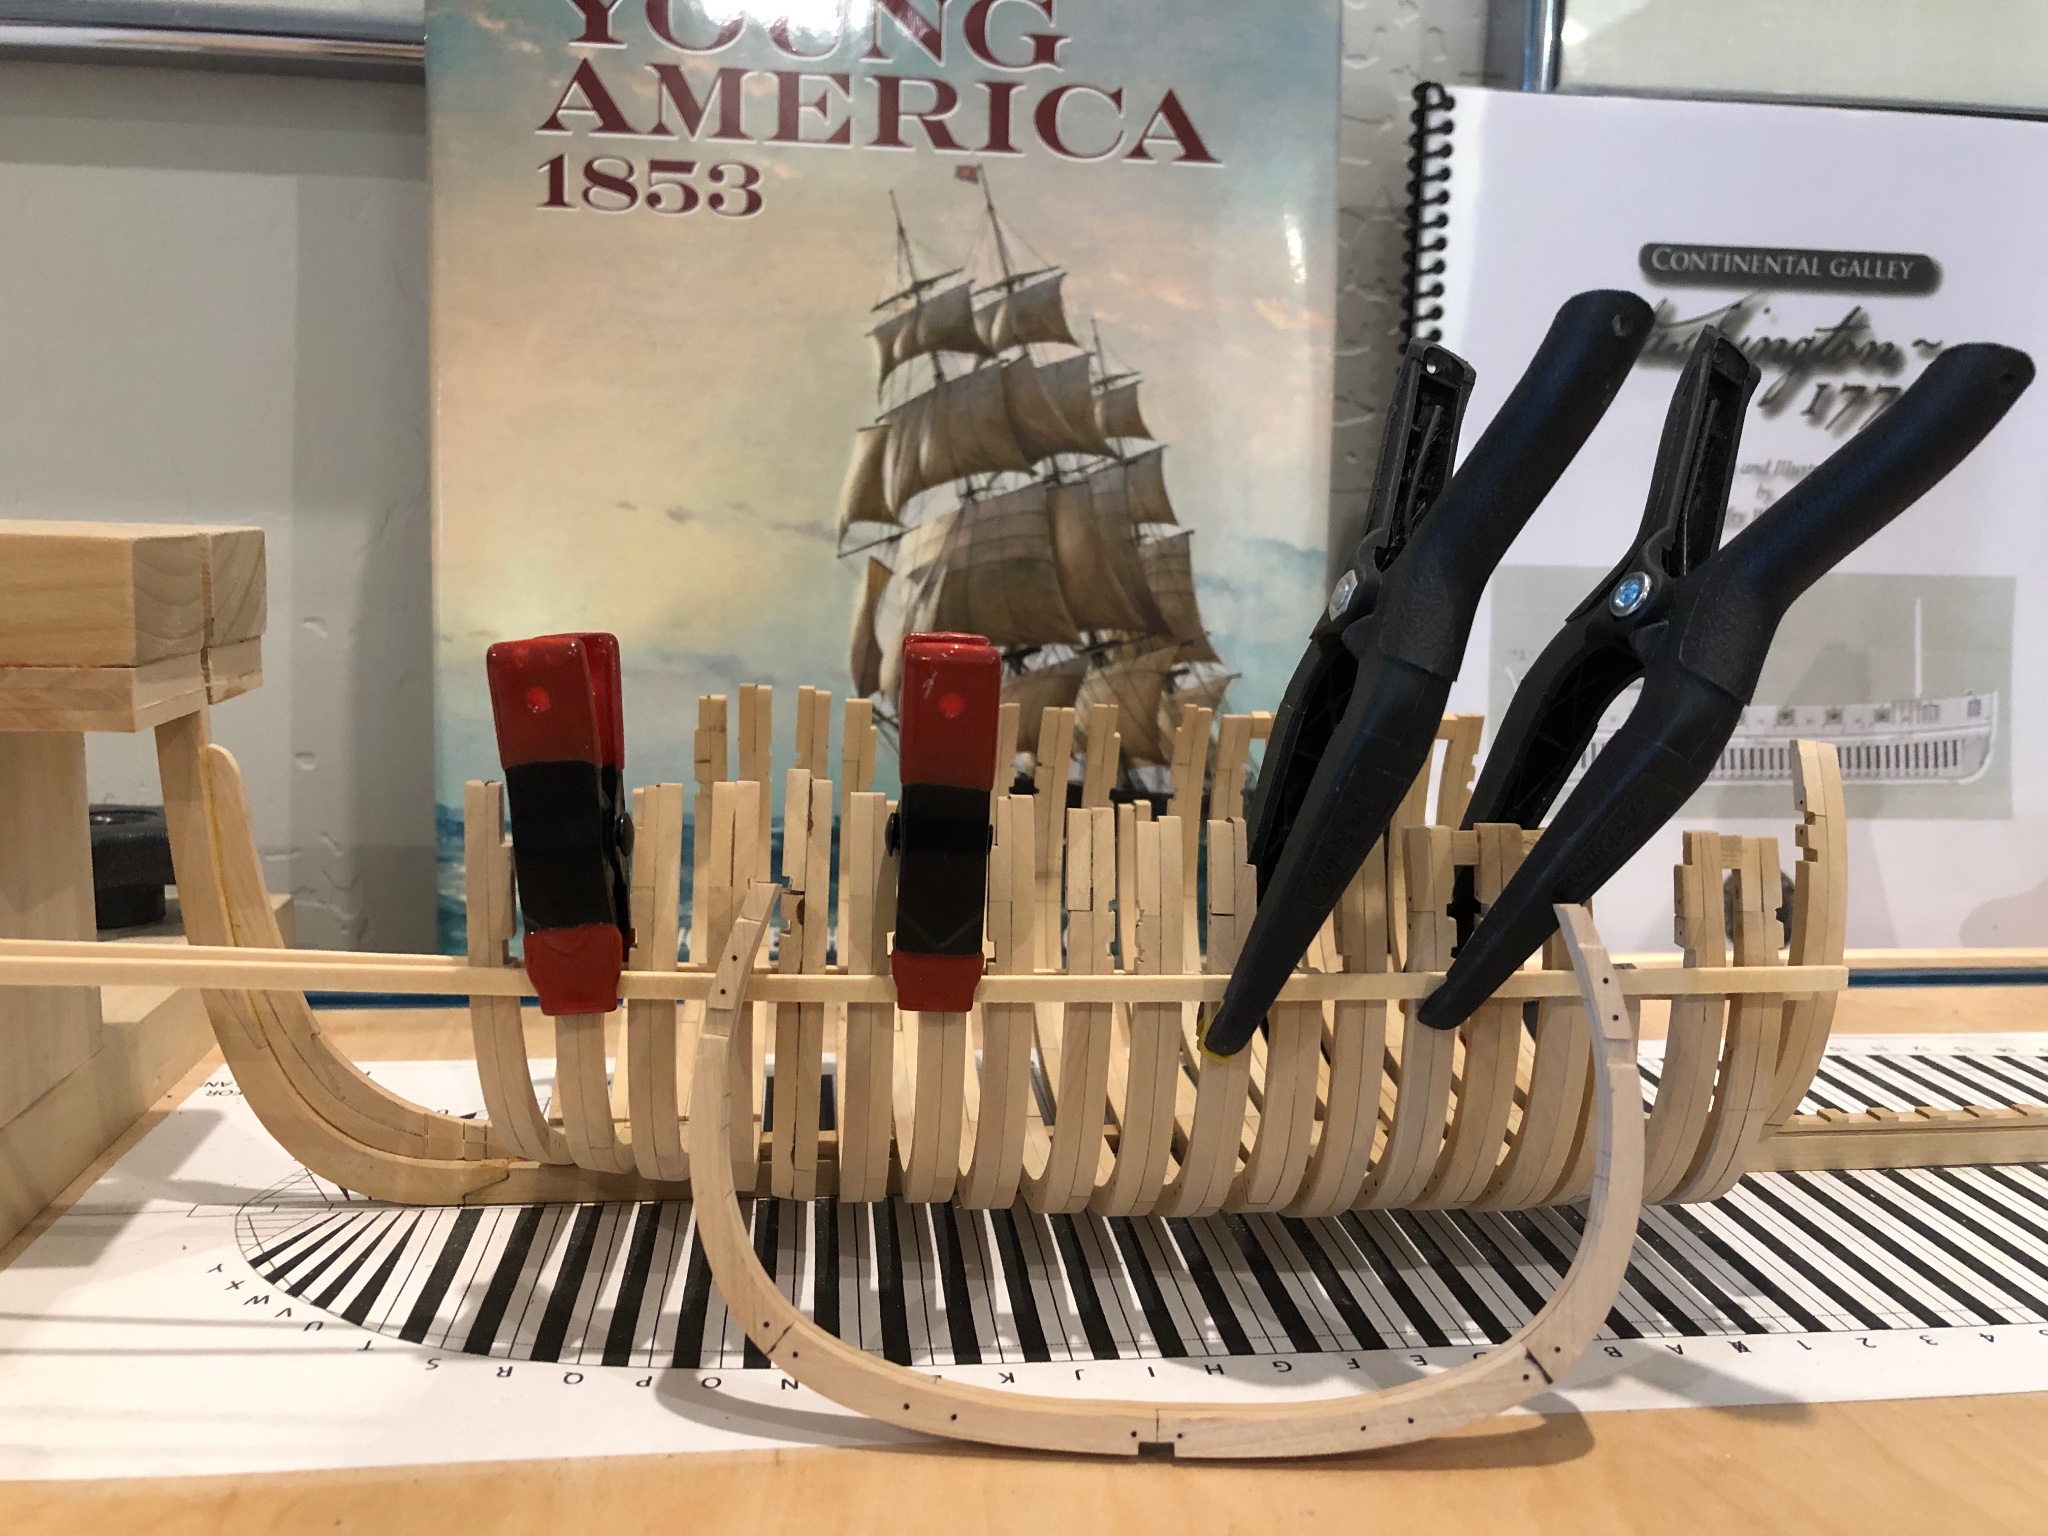
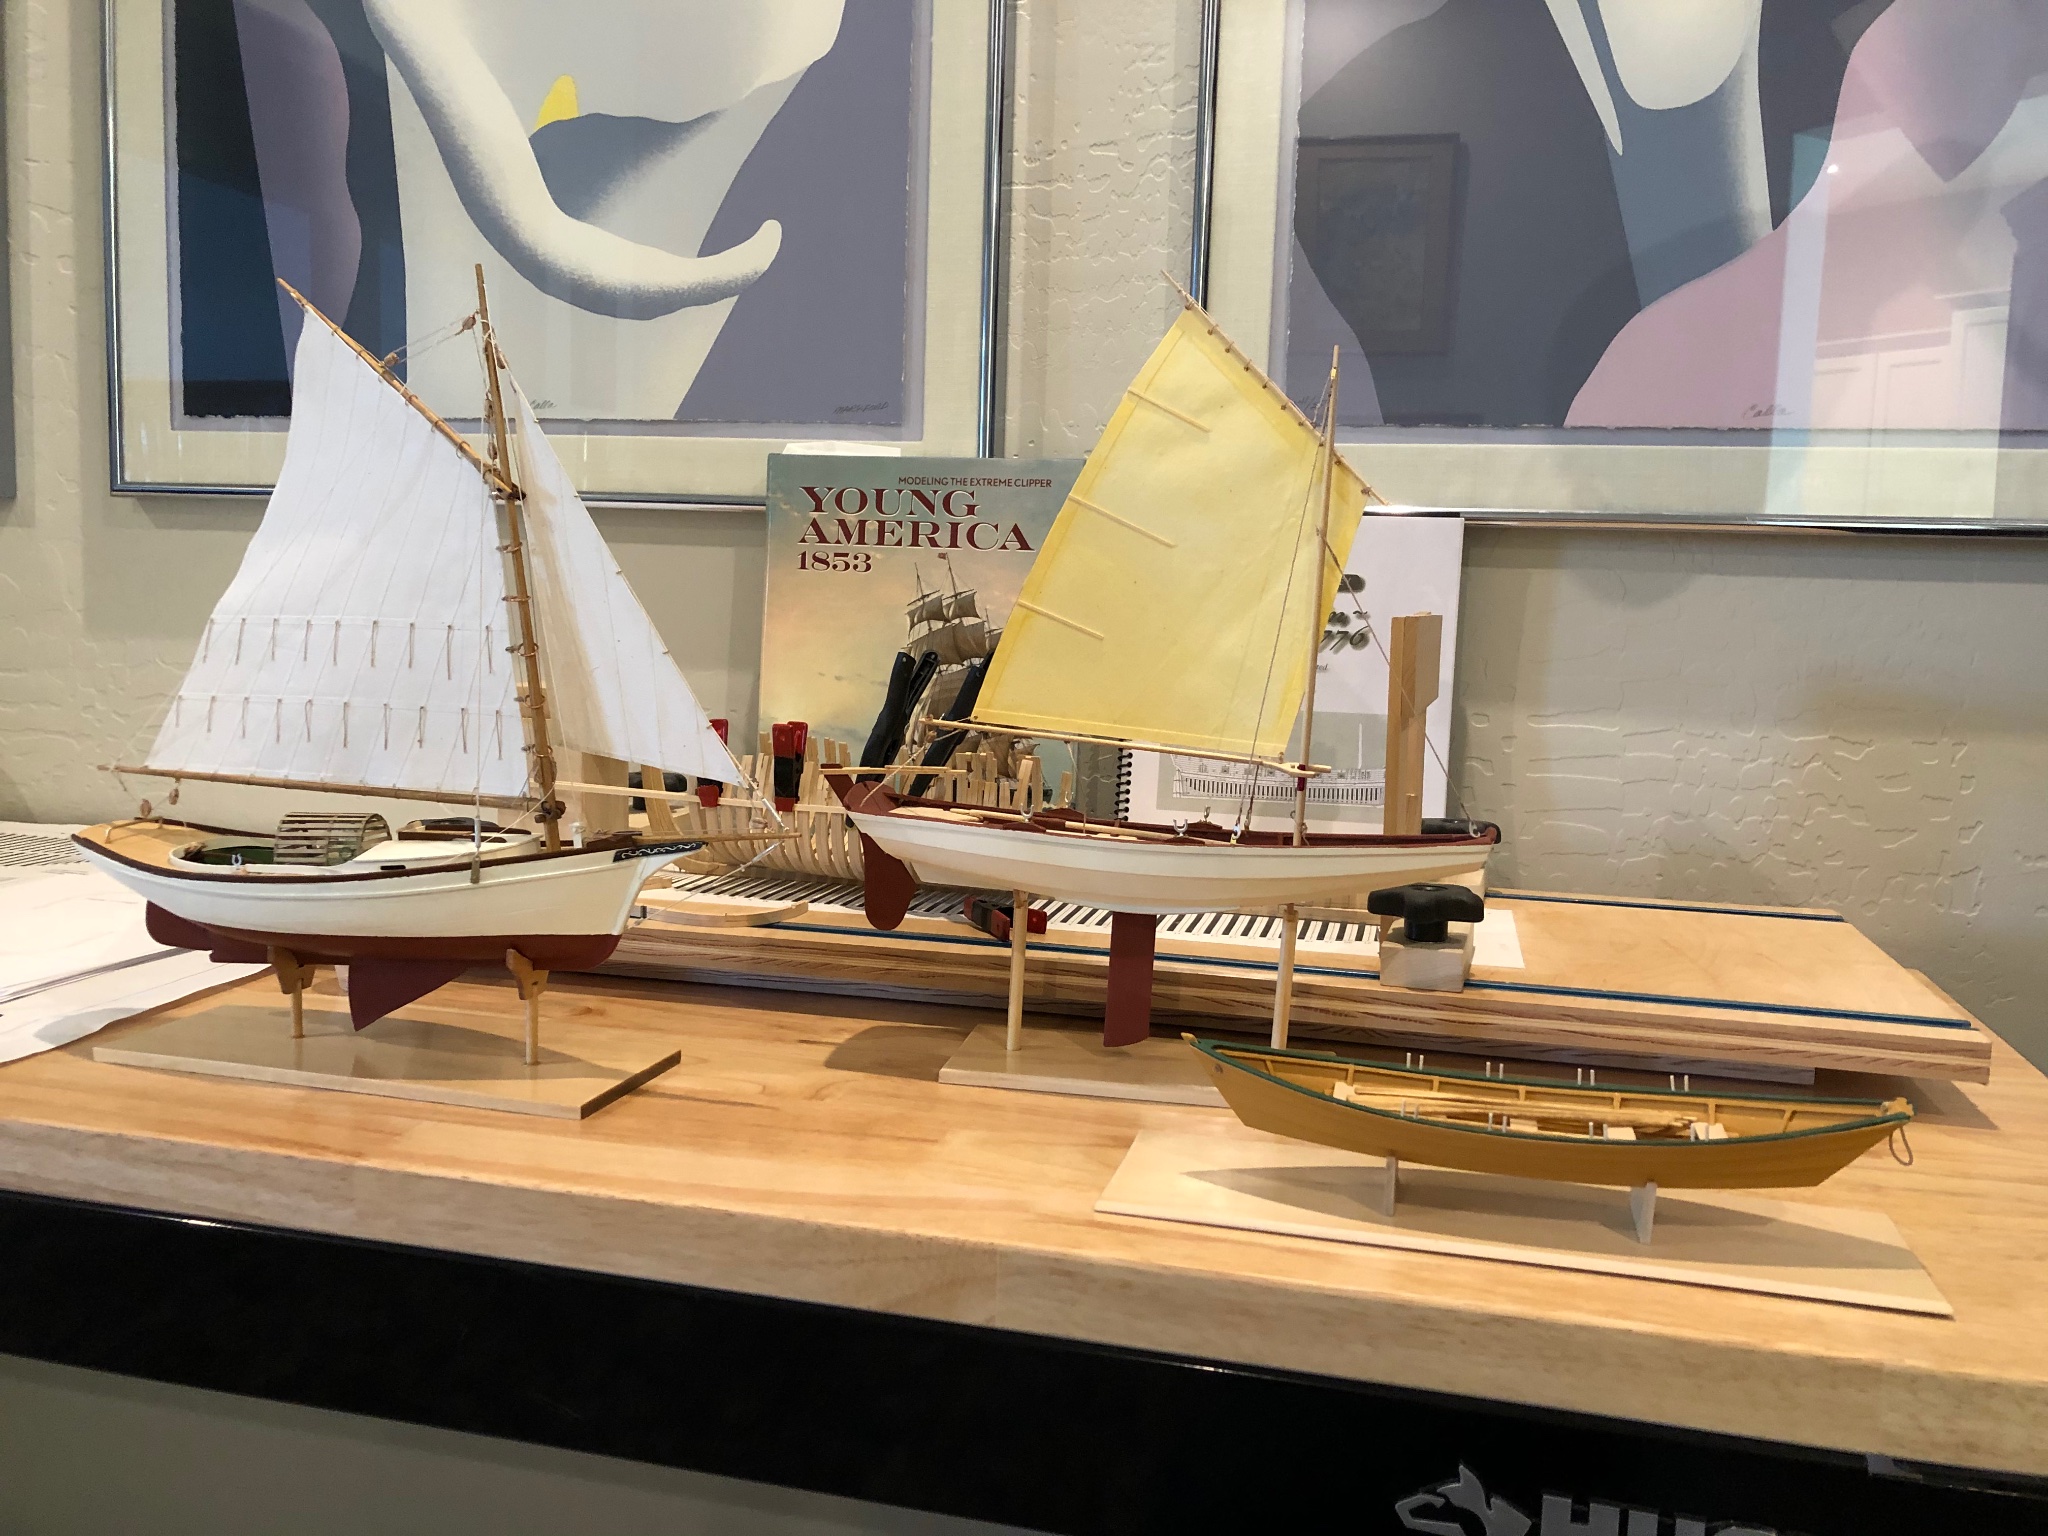
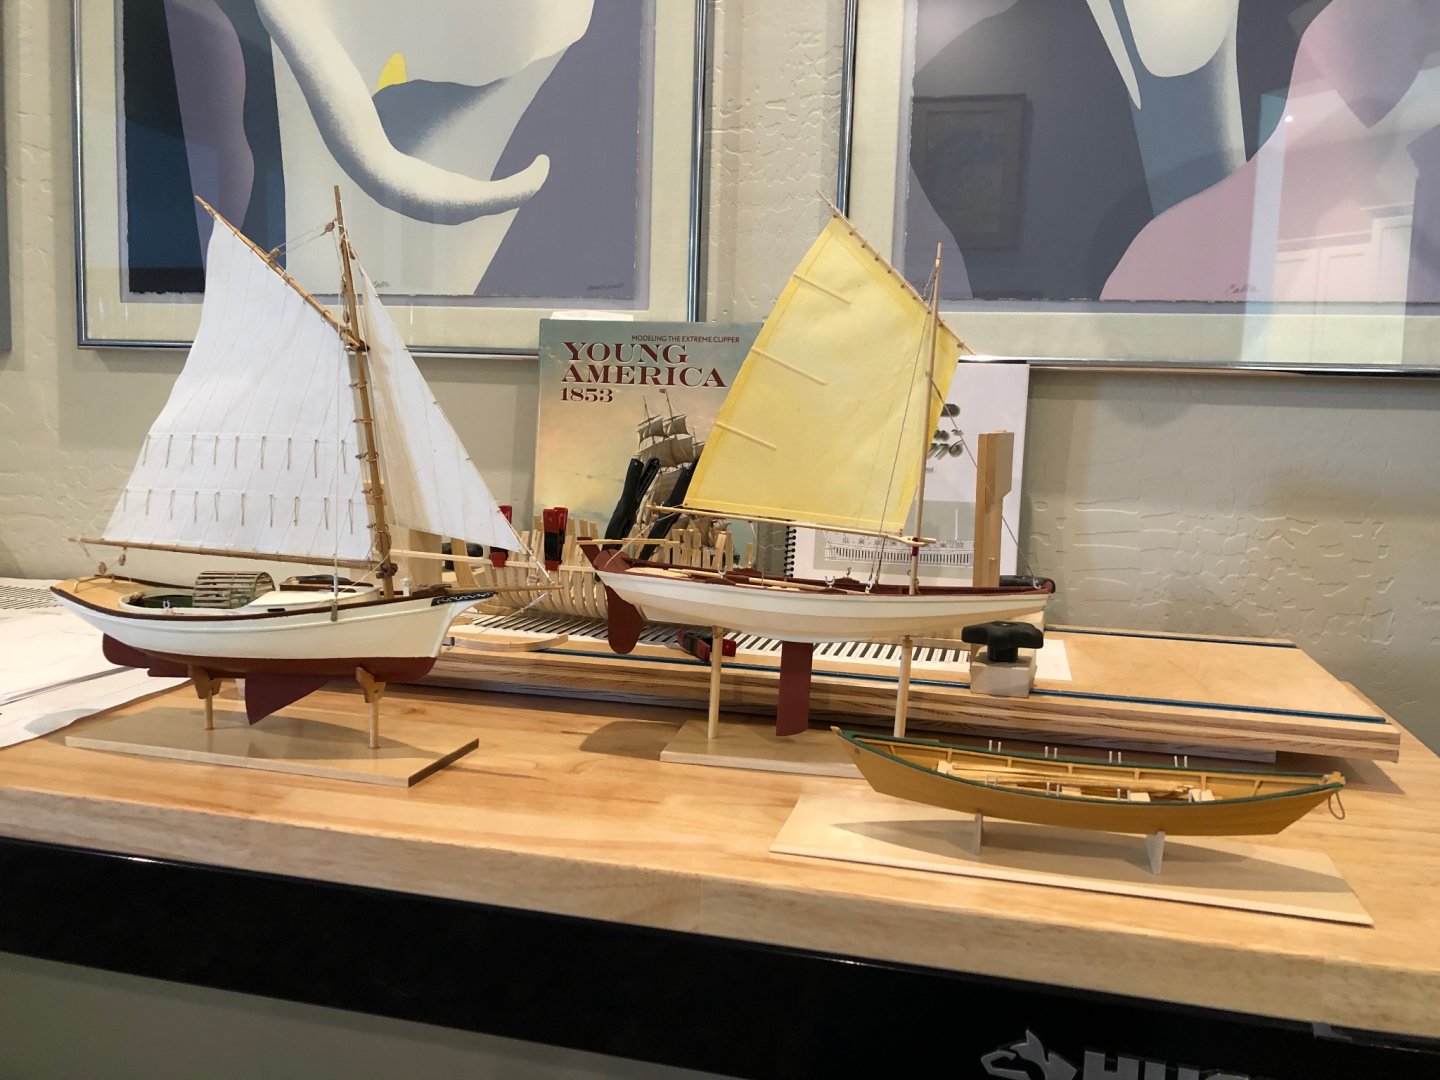
4 MONTHS LATER Major problems have risen their ugly head!! This is the reason for the long delay between posts I have not given up. I got all the lettered frames made using the modified Ed Tosti method and I started putting the stiffening blocks and port sills between the frames to give rigidity to the assembly when the problems were discovered. I'll try to explain the issues hopefully making it clear to all and to most of all to me. First a picture of the Washingtons current state The problems 1: I failed to use the Tosti method exactly as he describes. My thinking was to simplify the process by not assembling the frame on top of the patterns. 2: Thinking that I didn't have to worry about the top of the frames as I could bring them to the correct height after standing. 3: Not being accurate when cutting the gun and sweep port reliefs. 4: Not realizing the the waterline marking must be exact both on the frame and the gantry How to fix: I realized that my woodworking skills were not up to the level to make a scratch model so I found the series of David Antscherl models by Model Shipways and built them to improve my skills. Lowell Grand Banks Dory, Norwegian Sailing Pram, and Muscongus Bay Lobster Smack were built and I must say I learned many valuable skills, tips and hints from them. All three in front of the Washingtons present state. What did I learn from all of this: 1: The old rule of measure twice cut once is now look at the plans twice and assemble once. 2: If not good enough make another 3. Verify the part is like the print by visually aligning them. 4. Stand the frame to meet the marked water lines. 5. Finish each frame before starting another i.e. install blocks and gun and sweep port sills so verification of correctness can be done. 6. Take my time it is not a race. Now I need to take the Washington out to the yard and remove all the frames trying to save the keel assembly and then start over. Stay Well and Stay Safe Will

-
Maury I'm entering the HAER Lettie G. Howard into my CAD system to develop the patterns to make her parts. Also ordered the ECB and the kit is in the hands of USP somewhere. (should see her next week) Your log will be very useful to me with ECB since I've been collecting books and photos as you. I'd like to pull up a front row chair if there is still room. Waiting is the hardest part Stay Well and Stay Safe Will
-
She's looking fantastic I'm pulling up a chair to follow along if there is room for one more. Just a tip I learned from master modeler David Antschsrl. Using binder clamps or any clamp on the soft texture of basswood can leave dents in the surface, if you moisten the dent and let it dry it usually swells and fills the dent. Again she's look great I can't wait to start mine is in the clutches of UPS. Should see next week. Stay Well and Stay Safe Will
-
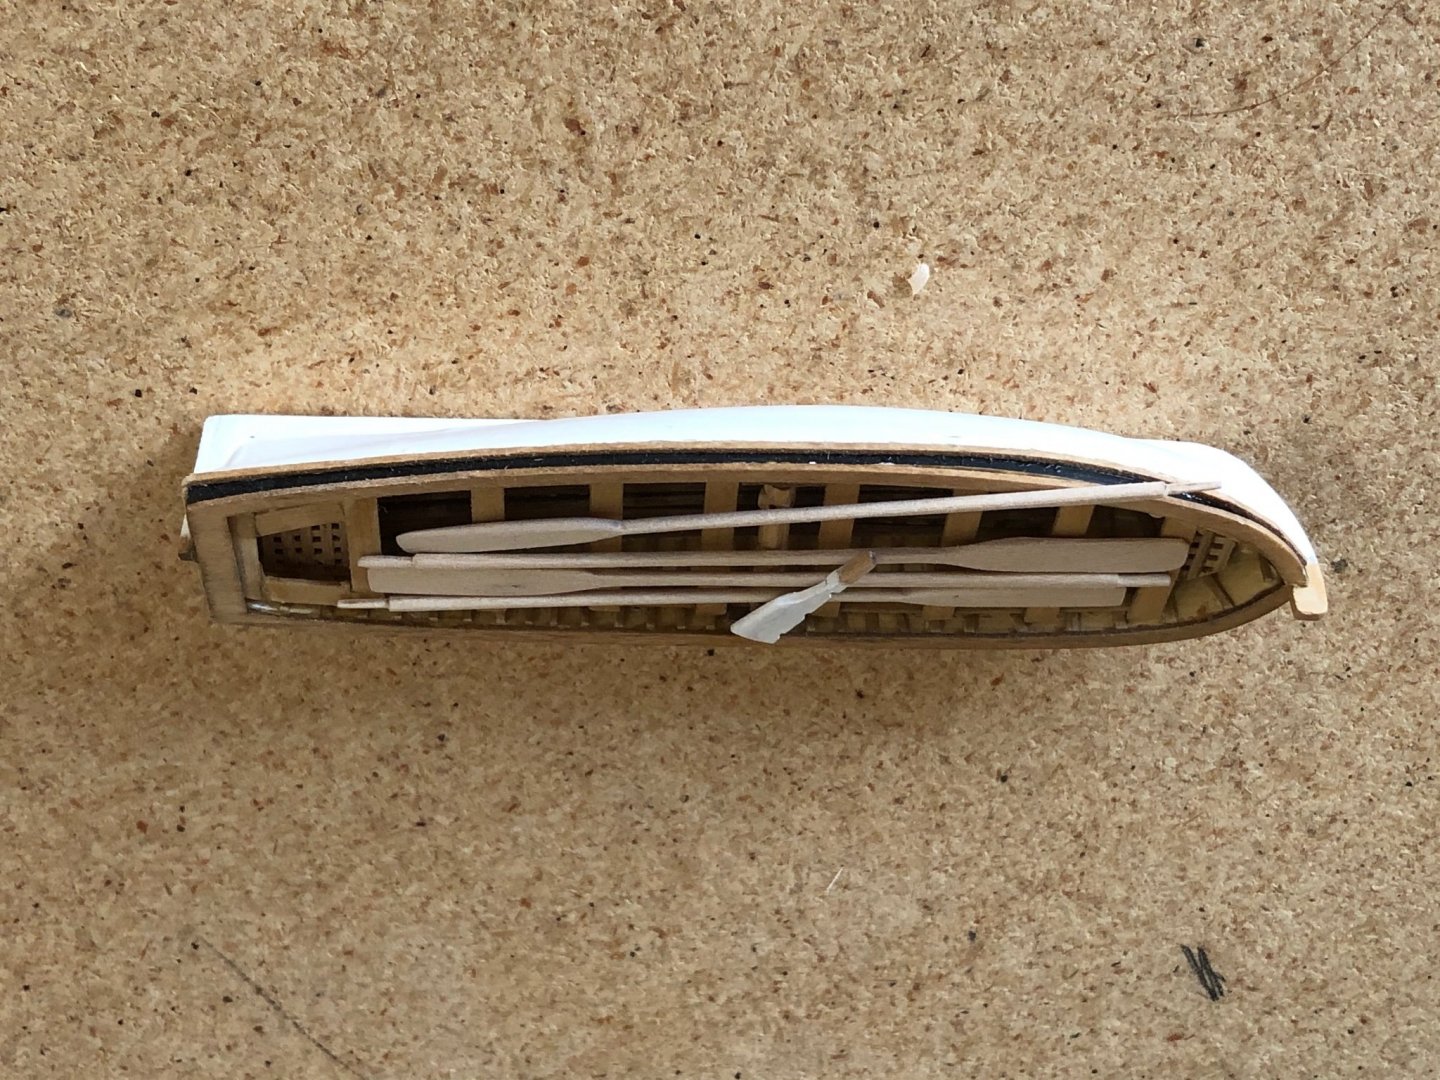
Back working on the Syren again after a brief interruption. Finished the oars and rudder for the longboat. Made more rope for the carronade rigging. The strands of Aurifil Mako 50wt make a .008 dia rope for rigging so I made 60 feet and hope that will be enough. One carronade rigged only fifteen to go. Yippee. Many thanks to Thomas Gahm for his help will the tooling and his method of coiling. Day off modeling tomorrow looking forward to family day touring Tovar Castle in Phoenix and then out to dinner with our girls. They grow up so fast but they are still our girls even though they are on their own. Stay Well and Stay Safe Will

-
Many Thanks Thomas one done 15 to go Will Stay Well and Stay Safe Will
-
Thomas you da man. I'm off to the bench to make up the tool and give it a try. Thanks again Stay Well and Stay Safe Will
-
Good Afternoon Thomas I've started rigging my carronades and would like to use your method for coiling the lines but I need some information on the tooling you made. Looking at the tool it appears to be sitting on a felt pad, then a wood disc, next I'm unsure of, then a clear plastic disc all held loosely by the pin. My questions are what is on top of the wood disc and how is pressure applied keeping the line between the ? surface and clear plastic? It appears the line is held in the center through a hole, is that correct? By using the plank width i guessed the wood disc is about 1/2" dia and the clear plastic is about 1/16" thick. Based on these assumptions I'm going to make a tool and give it a try. Many thanks for all you help and the beautiful photos of you Syren. Can't say enough of much help it is to follow your build. Stay Well and Stay Safe Will
-
Fantastic progress 🙌 Really enjoyed the pictures. Now that I'm back I'll go back through the log and take a closer look. Loved the hammocks. Stay well and stay safe Will
- 950 replies
-
- 1
-
-
- syren
- model shipways
- (and 1 more)
-
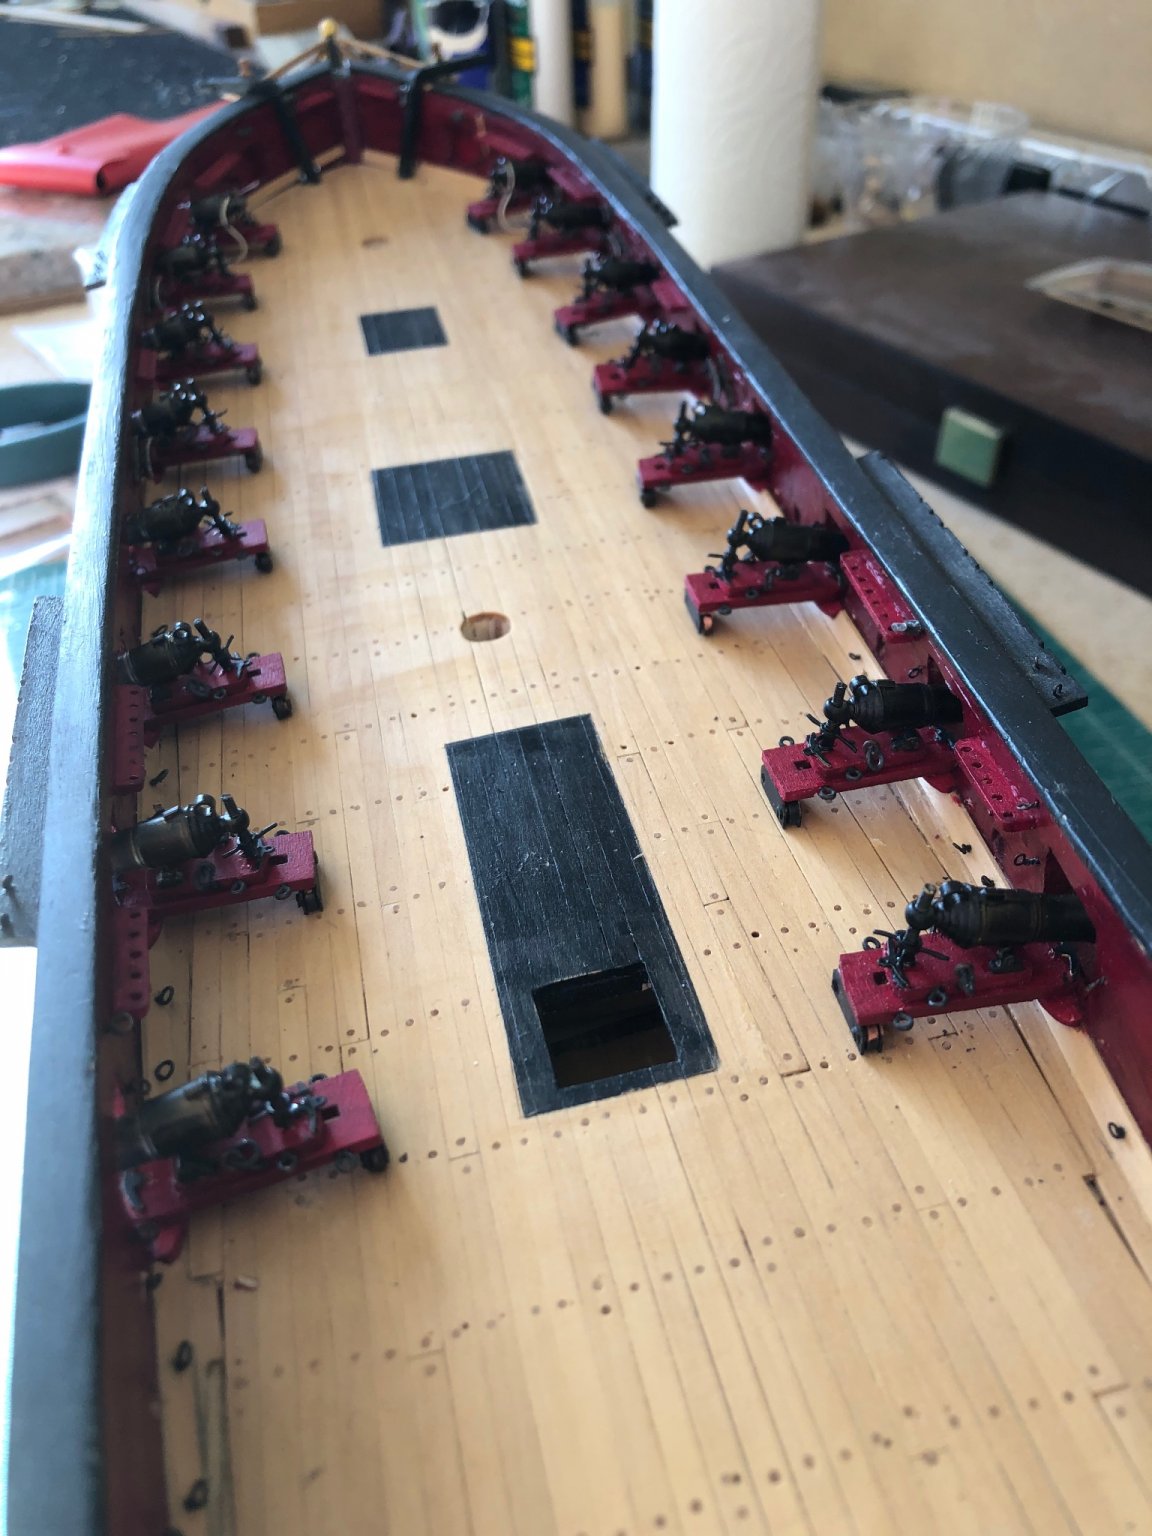
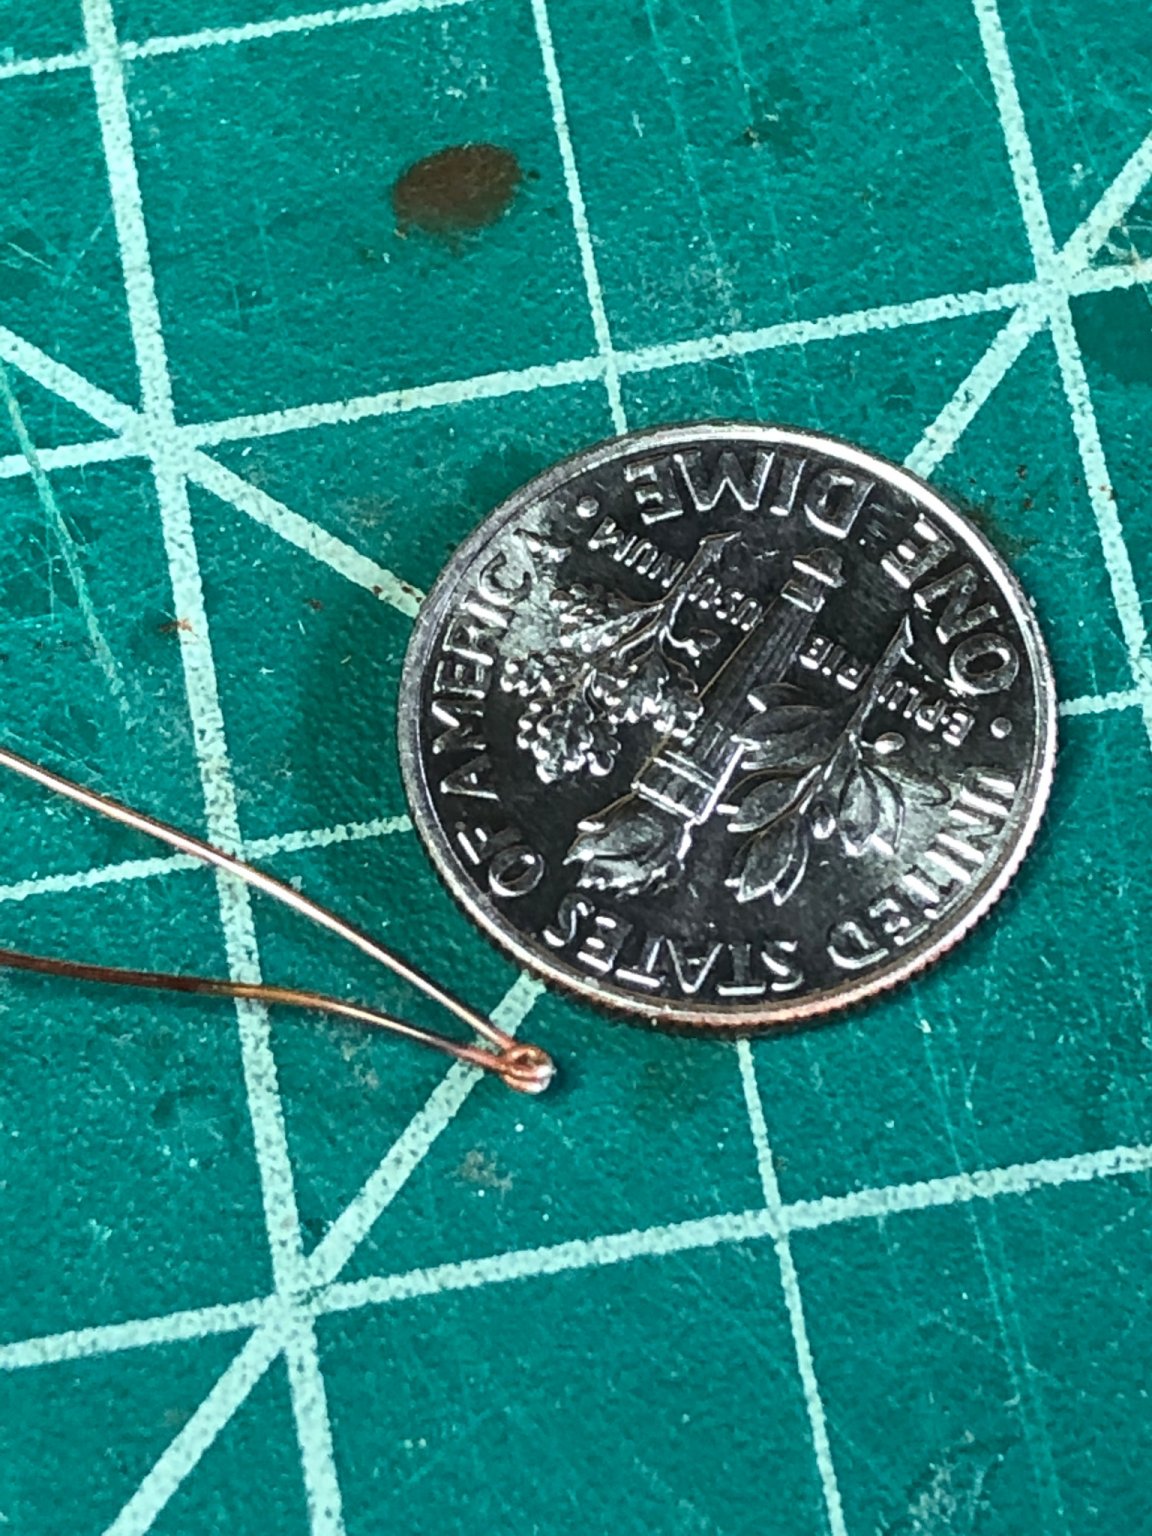
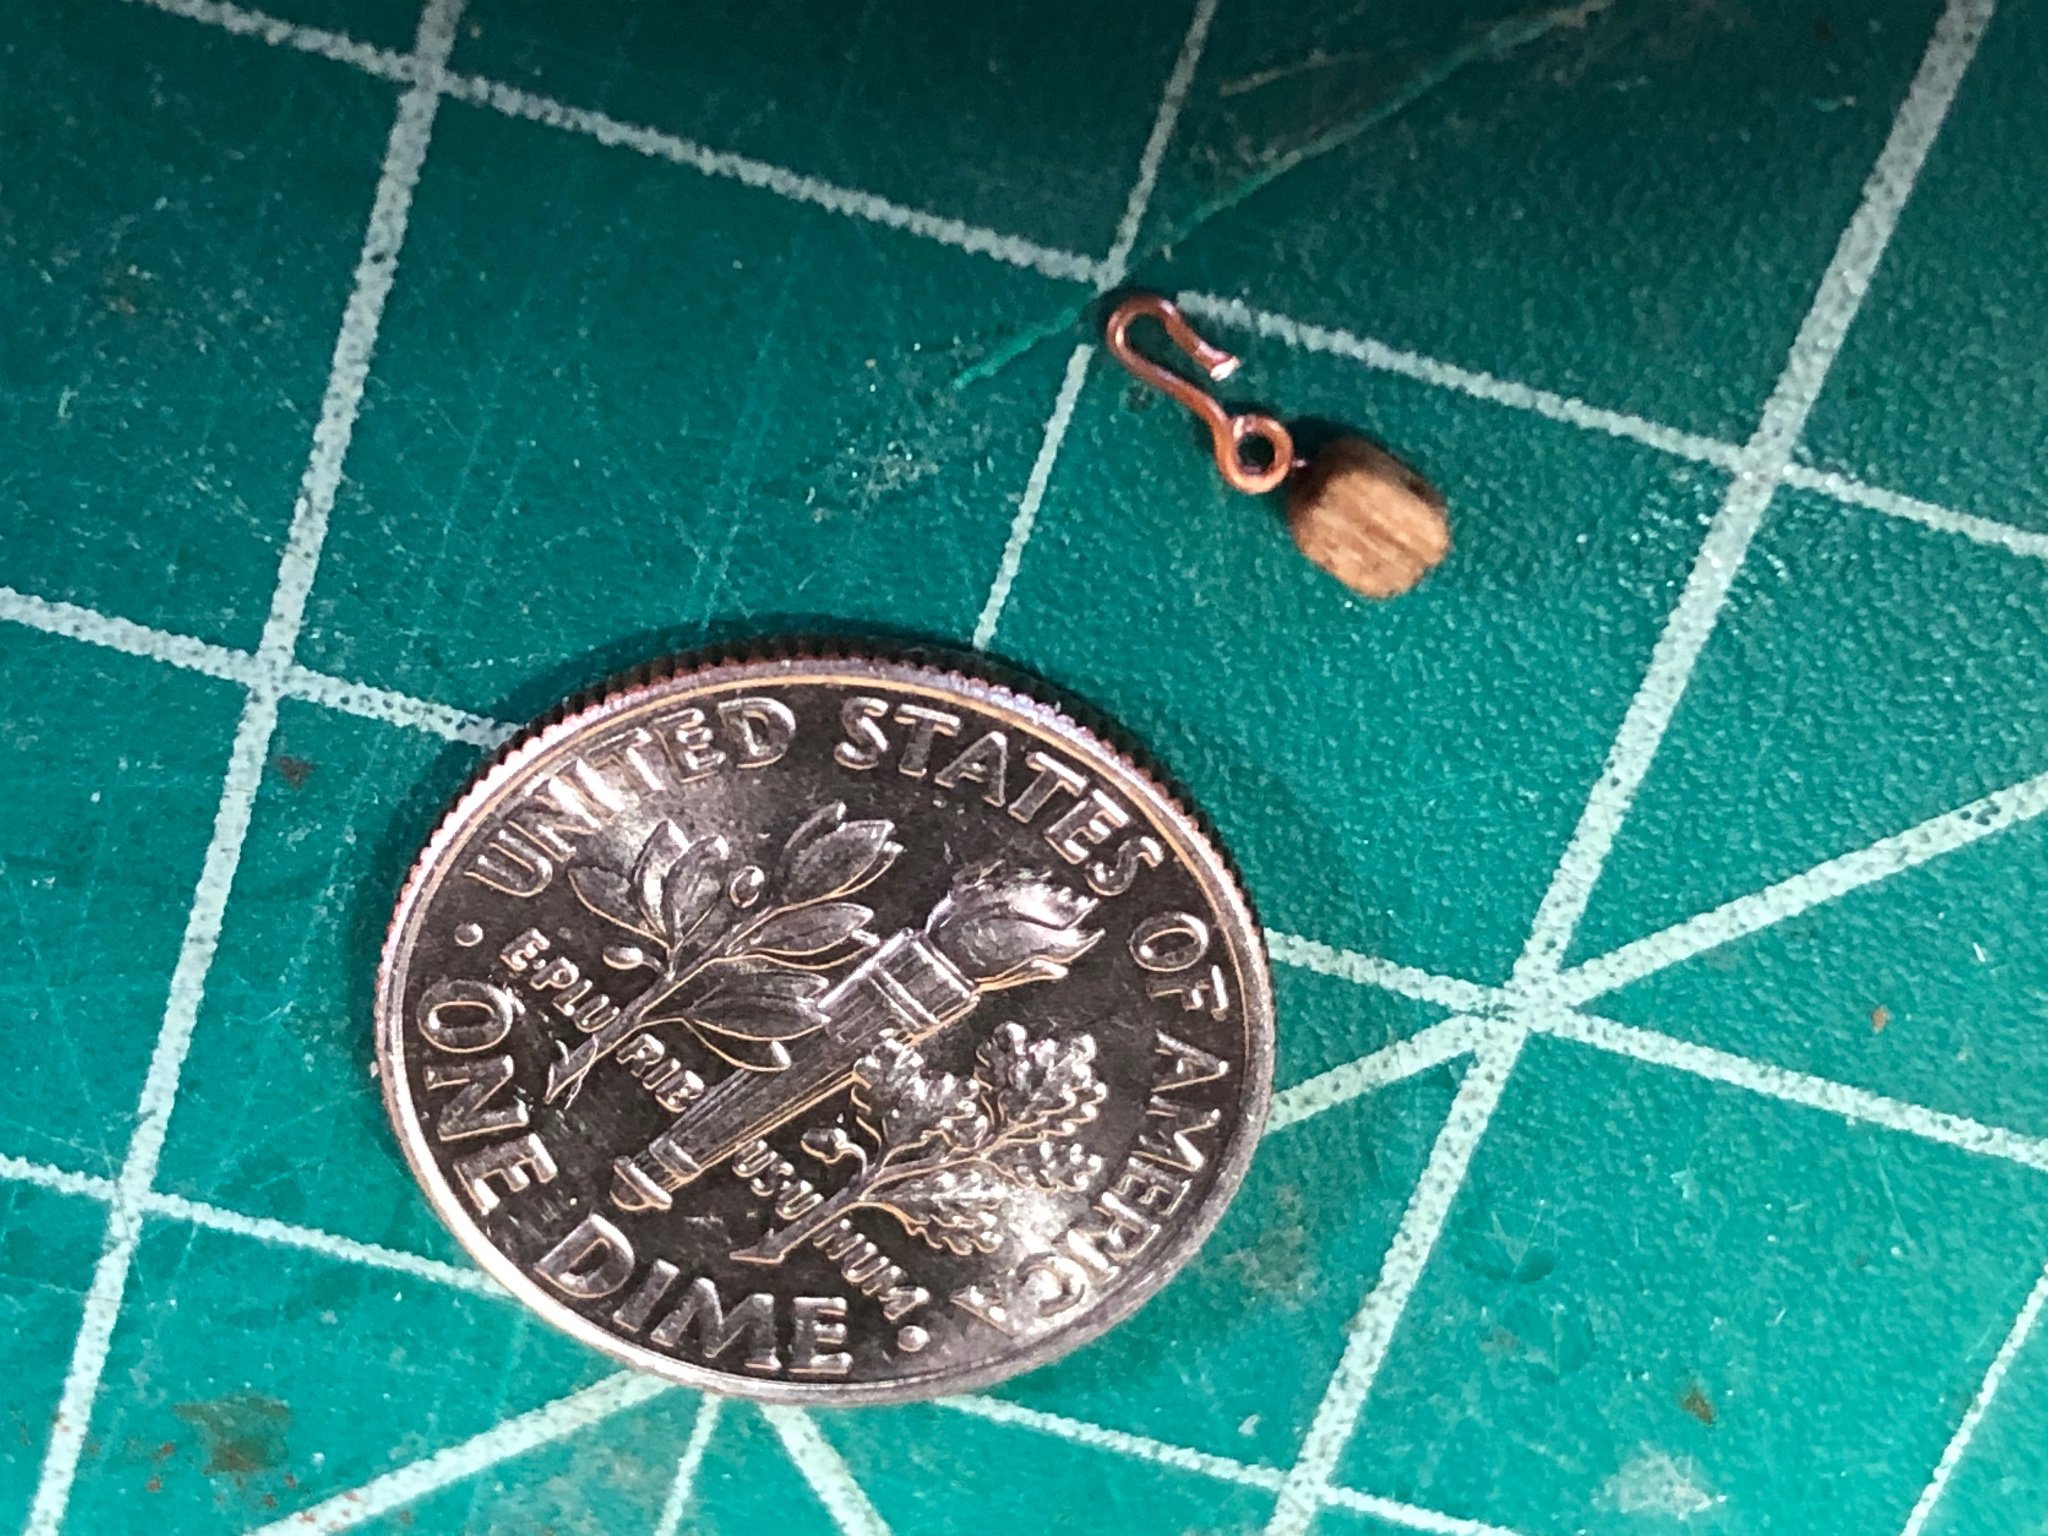
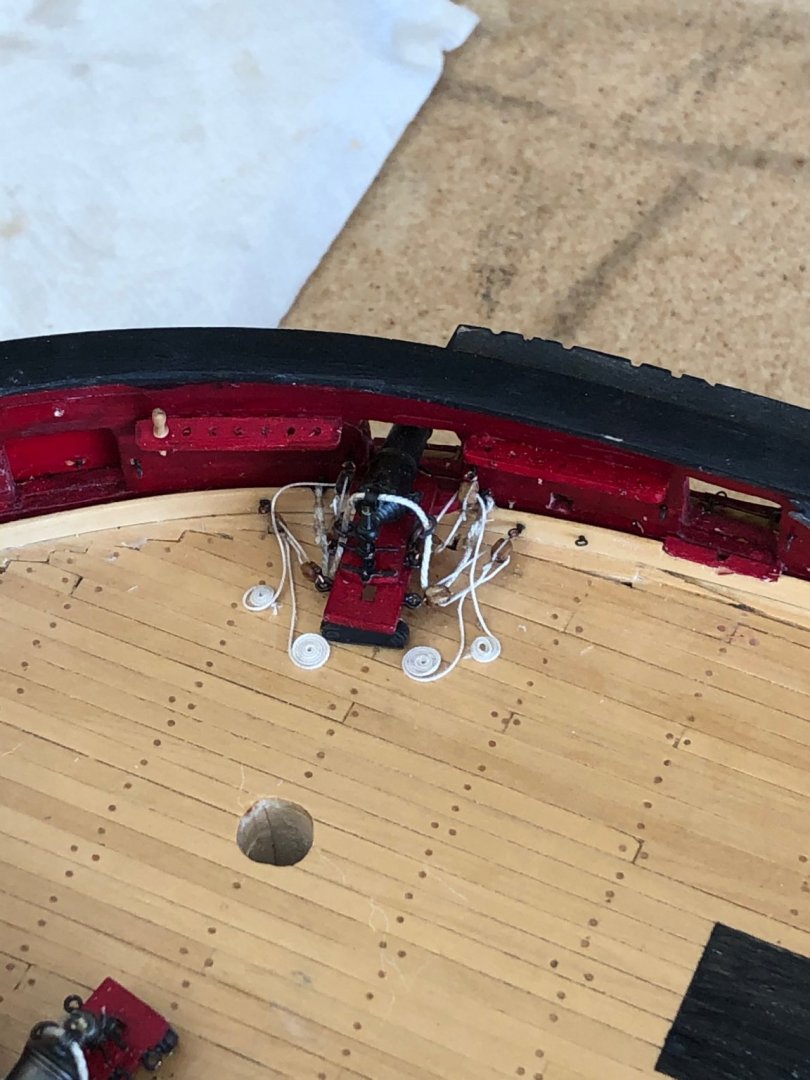
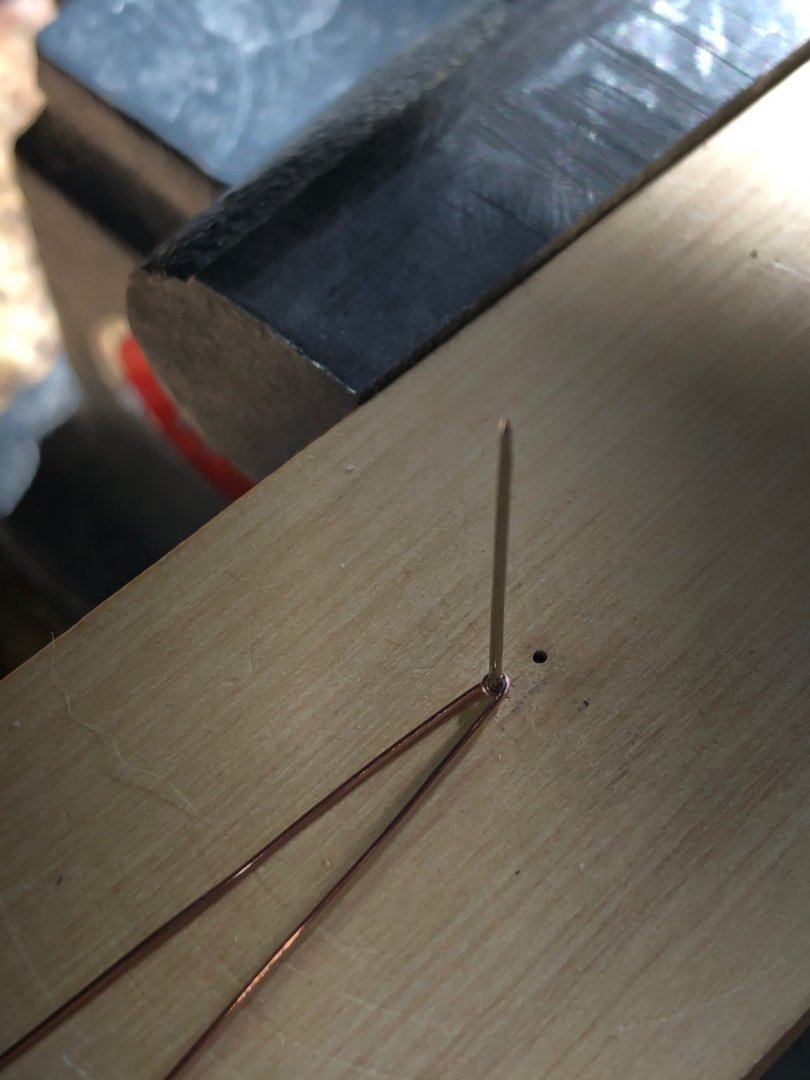
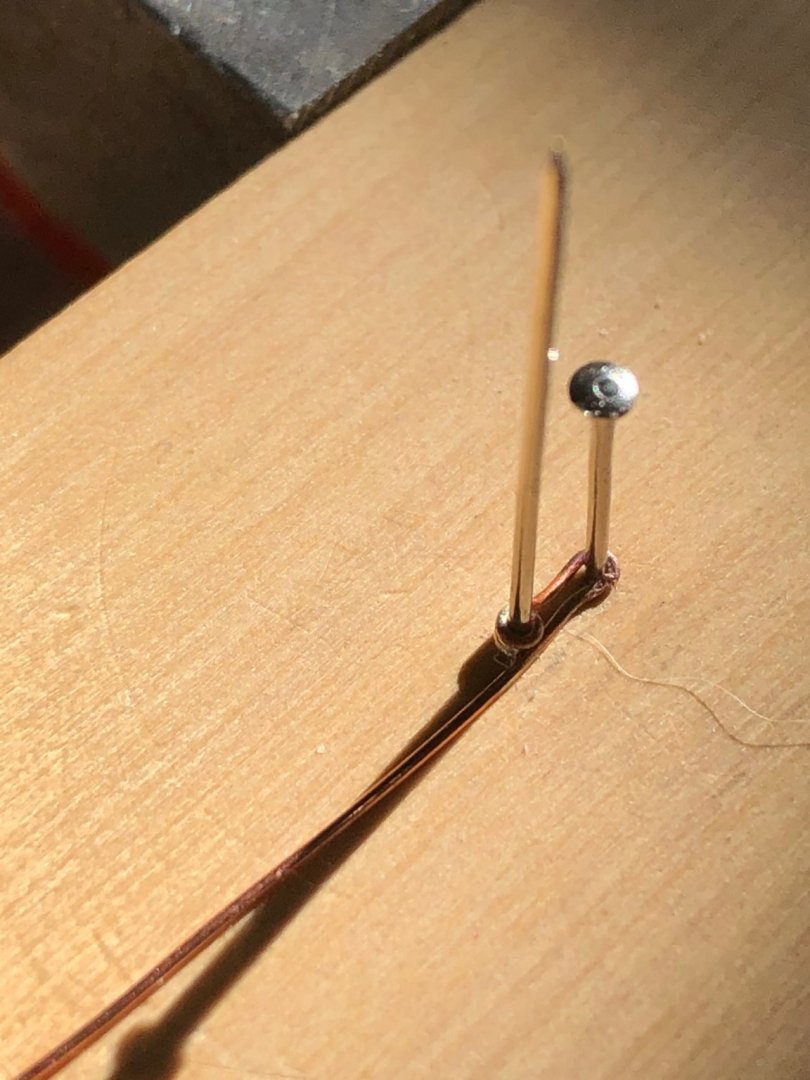
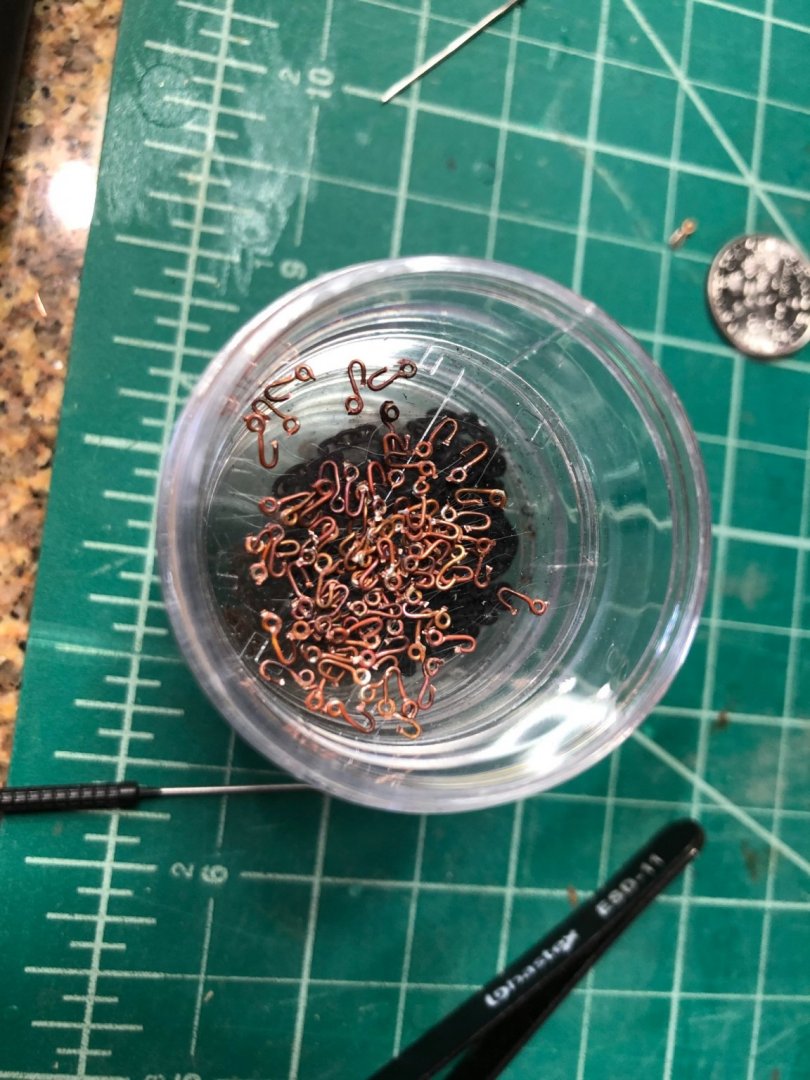
2 Months later: Many thanks Patrick, Robin, Steven and all the others with likes and kind comments. I've been busy working on small projects taking a break from Syren. I found the three step kits from Model Expo designed by David Antscherl to be very helpful and a great learning experience. Now back to Syren Since my last post I painted the carronade sleds made the rings for rigging painted the guns assembled all 16. The hardest part was adjusting the leveling screw to get the barrels equally leveled and symmetrical in the gun ports. I had to label each gun to each port but even the best laid plans can go awry. I put a piece of blue masking tape under each sled and after a couple of days most of them pealed the bottom and i had to start over. This time I used a magic marker to number them. you can see the second gun is lever but not centered in the port so this is why it took so long to get a symmetrical appearance. After too much fiddling I got them to be somewhat satisfactory. I cleaned the deck and started rigging port one (starboard and port) breech lines. Having a look at how crowded the deck will be with the guns mounted I decided to rig each as I place them. With lines rigged to blocks having an eye and hook I decided to rig the 4 lines and mount them to the eye bolts with the hooks. I'm going to make a fixture to hold the blocks while I string the rigging lines. TBD Until then I need to make 128 eye hooks. (going to have some fun now_ First I took the kit blocks and put them in the block tumbler to smooth off the corners and make a more round shape. Next I broached the holes with a drill to ensure the rigging line will pass through them without problems. To stain the blocks I dipped them in pre-stain and then in light oak stain. Not happy with the results some blocks are almost black others are a white oak color. What gives? I'll live with it as I don't want to spend anymore money on this kit. To make the eye hooks that would be correct to scale (imo) I made a simple fixture consisting of a piece of wood with two holes for pins. I used #9 silk pins of .028 diameter. Using 26AWG bare copper wire for the hook and eye. I wrapped the wire around the pin and the resulting i.d. was .03 (2" diameter ring) Silver soldered the ring to give it the strength to retain shape during rigging Cut off one leg and placed the ring on the pin wrapping the lasting leg around the second pin The resulting ring/hook


-
Ron thanks for taking the time too present your methods it gives me another alternative to get large files scanned. As a follow on to Marks post I have found that at a local engineering copy center they can scan drawings up 34" by 44" (E size) and adjust scale to meet your needs. The output can be most formats including tiff. Thanks for sharing your method Stay well and stay safe Will
-
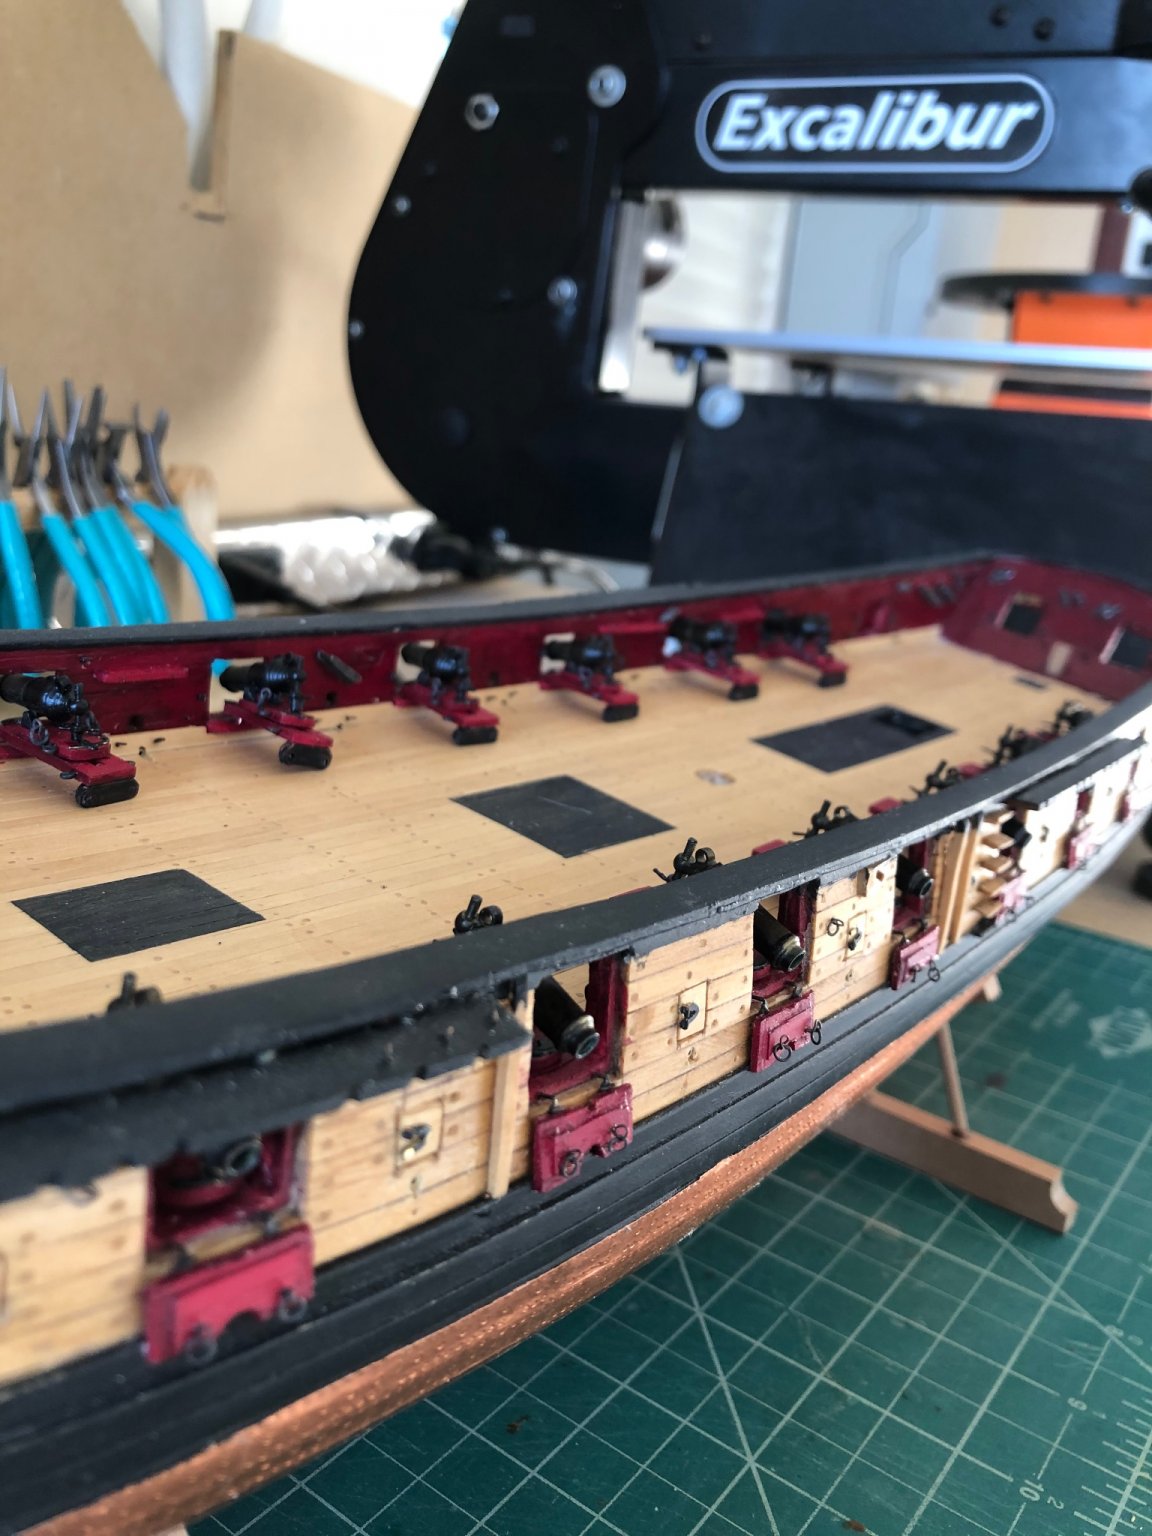
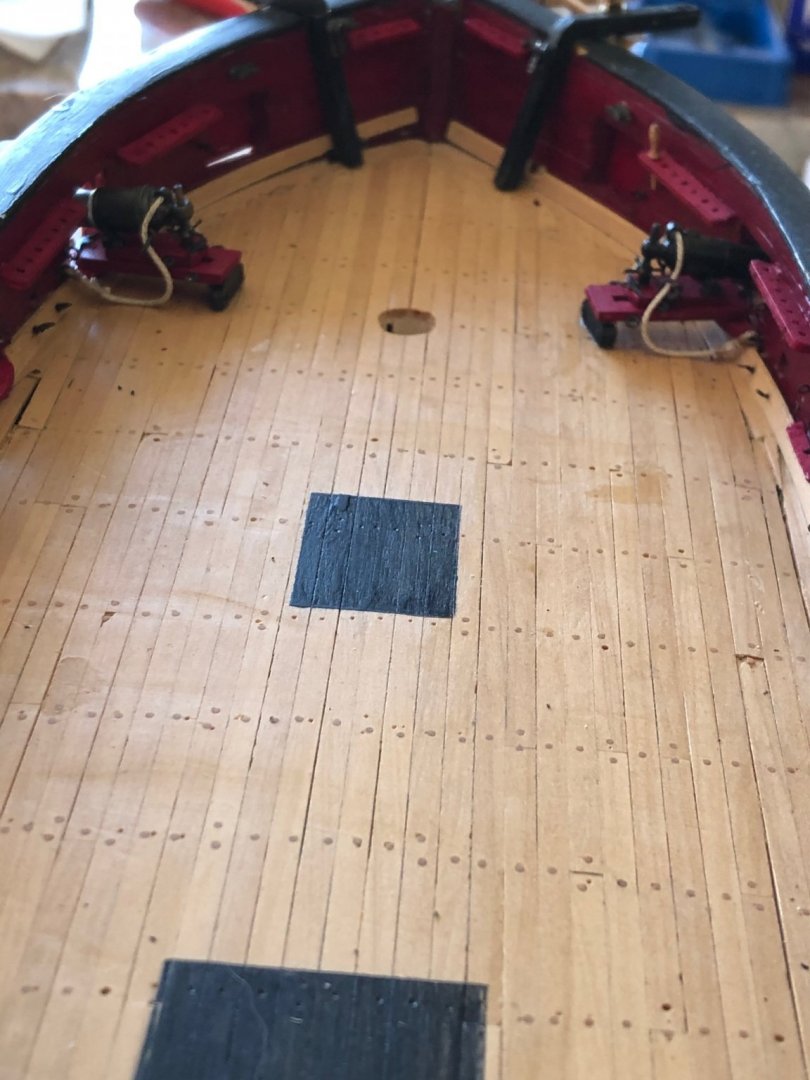
If you were playing poker you'd have a full house A's high. My what a beautiful deck you've made again I say I can't wait to see you next feats. Happy New Year Stay well and stay safe Will
- 950 replies
-
- 2
-
-
- syren
- model shipways
- (and 1 more)
-
Patrick I'm wondering how hard Sculpey gets when baked. Does it carve well or should you carve prior to baking? Thinking of using it to carve the stern ornamental carving but would Sculpey be too fragile. Thoughts? Wife said I could use oven but don't make it a mess. Merry Christmas and Happy New Year Stay well and stay safe Will