-
Posts
1,193 -
Joined
-
Last visited
Content Type
Profiles
Forums
Gallery
Events
Everything posted by CPDDET
-
Welcome aboard! You will find this is a great group.
-

Hello All - From Santa Barbara, CA
CPDDET replied to Blu330ciracer's topic in New member Introductions
Welcome to the community! Sorry I can't help with your research. -

Byrnes Table Saw Configeration
CPDDET replied to Guyuti's topic in Modeling tools and Workshop Equipment
Well, this may not help. I use the zero clearance plate all the time and use the micro meter stop often enough. It took a bit of getting used to but is nice. I also have the extended fence. 90 tooth / .03 slitting blade is about all I use. -

Navy guy excited to be here 🏴☠️
CPDDET replied to GRATEFUL LITTLE PHISH's topic in New member Introductions
Welcome aboard, sailor! -
Welcome aboard!
-
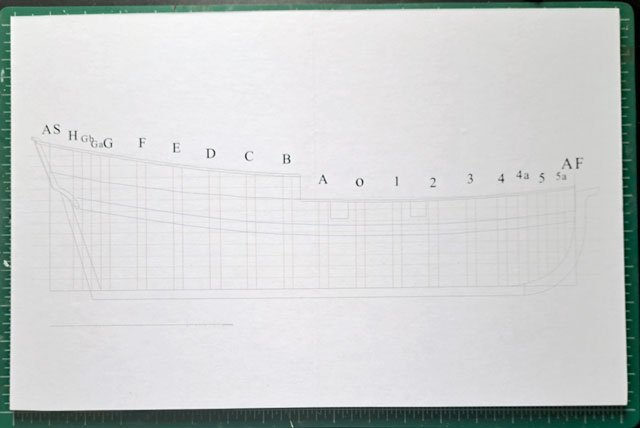
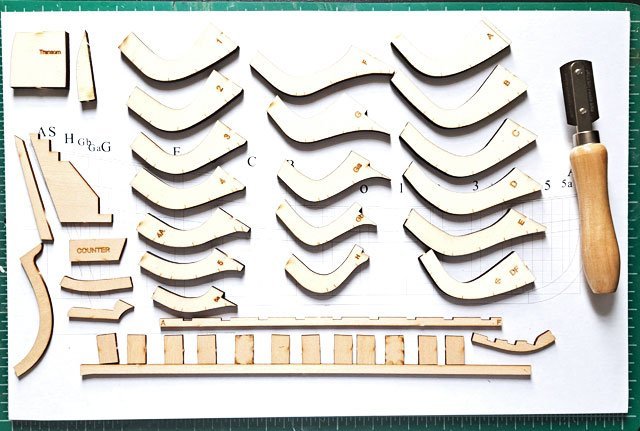
Got a bit of a start today. Used Elmer's spray adhesive to attach the plan to a piece of foam board and then trimmed the board to the edges of the plan with a utility knife and metal straight edge. The proceeded to remove all the laser cut pieces from the billets. Using a razor blade saw made a quick job of this. Please excuse the poor exposure on these pics, they were taken will my cell phone. I usually use my SLR and will do so in the future. Tomorrow I will get a start on squaring up the pieces (lasers don't cut a perfect 90) and removing the char as well. Not sure how far I will get but no hurry, of course. Dave
- 47 replies
-
Thanks Ed, just have to clean up the shipyard and wait for the boxwood I ordered before my next project.
- 389 replies
-
- bluenose
- model shipways
-
(and 1 more)
Tagged with:
-
Thanks, Knocklouder! Your kind words are much appreciated.
- 389 replies
-
- bluenose
- model shipways
-
(and 1 more)
Tagged with:
-
Thanks! Will be following Toni Levines build log, among others, for the NRG Half Hull model. I've seen Toni's finished piece as she attends our model shipwrights club meetings and was very impressed. Hope mine comes out as well.
- 389 replies
-
- bluenose
- model shipways
-
(and 1 more)
Tagged with:
-
After taking my Bluenose as far as I wanted I decided it was time to learn proper hull planking. I ordered the kit ( https://thenrgstore.org/products/half-hull-planking-project) from NRG some time ago and will spend the next week or so gathering what I need for this build. I will also be reviewing the various build logs of other other shipwrights to gain further insights. Since I now have some experience I've decided to upgrade my material to Boxwood rather than using the Basswood that comes with the kit. Hopefully I would ruin too much of it. 😆 Any advice or suggestions from those who have built this kit is always appreciated! Dave
- 47 replies
-
So this will be my final post on this build as this is as far as I'm taking this model. If I had to start this hobby again I wouldn't have chosen this particular kit. This build was far more complex than I anticipated. Because of its complexity, it was truly a baptism by fire. I always viewed this one as a "learning build" so many of the finishes aren't uniform. Some bright brass and some blackened, some painted parts and some stained with different finishes, and some left natural. But I did learn a lot about many different facets of this hobby; woodworking, metal working, painting, staining and so on. It also forced me to invest in the various "tools of the trade". All and all I'm fairly satisfied considering this is my first build. I expect to improve on my skills and believe that what I learned during this adventure will only make future builds that much more enjoyable. My next endeavor will be to complete the NRG Half Hull Planking kit. Ill leave this current build with some picture............
- 389 replies
-
- bluenose
- model shipways
-
(and 1 more)
Tagged with:
-
Building the main boom. Started off by using the cordless drill and sandpaper method to taper the main boom. First step in making the yoke was to cut out the printed plan and glue it to a piece of 1/8th inch stock. I used white glue for this. Then drilled out the slot that will fit around the mast. After cutting the piece in half with a fine cut pull saw, I used the disk sander to remove the excess material. Then used files and sand paper to finish off the pieces, gave them 2 coats of amber shellac and, using white glue again, stuck the bolt pattern onto the 2 pieces Used the mill to drill the bolt holes on each piece. These didn’t come out as well as I wanted as they aren’t in an exact line, but they are acceptable. I shouldn’t have trusted the pattern on the plans. Cut some small brass nails down to the proper length and inserted them into the drilled holes. Had to use the pin vice and a slightly larger bit to make the holes larger to accept the rope. But the smaller holes acted as a guide to keep things straight. Used CA on the tip of the rope and white glue on the rest to stiffen it and threaded it into holes. Tied off one side. Made the clapper and glued it to the end of the boom. Then glued the 2 yoke halves onto the boom. I used Titebond Quick and Thick for this so it was necessary to sand a flat onto each side of the boom and to prep the side of the yoke halves that would come into contact with the boom. Since the clapper was already in place it was easy to flatten the sides of the boom 180 degrees apart, using the clapper as a guide. Will do some clean up and touch up the amber shellac when the glue completely dries. While I have cut the masts short and won’t be doing the rigging, I will add 5 metal bands to the main boom per the plans. But these will be for decorative purpose only. Now to move on to the bowsprit rigging, which is a far as I will be taking this model.
- 389 replies
-
- bluenose
- model shipways
-
(and 1 more)
Tagged with:
-
Welcome!
-
Welcome! Yes, this group has been an immeasurable asset to me as well.
-

Tinting shellac?
CPDDET replied to CPDDET's topic in Painting, finishing and weathering products and techniques
Thanks Bob, good information there. Dave -

Tinting shellac?
CPDDET replied to CPDDET's topic in Painting, finishing and weathering products and techniques
Thanks! Will be starting a new build soon and contemplating using dyed shellac rather than different types (colors) of wood or paint. My thoughts are to use the same type of wood throughout and doing tinted shellac test colors with that wood before I begin. Going to have to learn alot about shellac, universal tints and how to mix them. Dave -

Tinting shellac?
CPDDET posted a topic in Painting, finishing and weathering products and techniques
Has anyone played around with tinting shellac? I would appreciate hearing about your experience, procedure or any advice you could pass along. Dave -
Welcome! Very impressive work your doing.
-

New from Minnesota-MS Constitution
CPDDET replied to Minnesota.Tom's topic in New member Introductions
Welcome back to the fold! -
Welcome! All the help you will ever need can be found here.
-
https://mainemaritime.edu/waterfront/schooner-bowdoin/ Perhaps some help can be found at the email addresses posted here.
-

Decorative trim/rail
CPDDET replied to DaveBaxt's topic in Building, Framing, Planking and plating a ships hull and deck
I believe I got a set of 3 plates from Micro Mark for about $17. https://www.micromark.com/Artesania-Latina-27300-Micro-Shapers-Set-A-3-Plates?gclid=CjwKCAjw04yjBhApEiwAJcvNoR63cw32-NOTLCL_VQ2n-SnBrivpcjabL7pR4VKYouNLh6bxcoJ0XxoCHccQAvD_BwE -

Decorative trim/rail
CPDDET replied to DaveBaxt's topic in Building, Framing, Planking and plating a ships hull and deck
In my opinion, I would sacrifice a bit on exact dimensions in order to produce better detail on the workpiece. But that's just me. I don't know of scrappers that come in decimal or fraction, only in mm. I've used these with good success after experimenting using at different angles to the workpiece. I've also learned to work pieces longer than what's needed. At one end you need material to hang on to and at the finished end I've always had to trim off a bit to get a consistent shape in the finished piece. -
This is great advice! If I were to begin again it's what I would do. I would also recommend the half hull planking project offered by Nautical Research Guild. Planking a hull correctly can be a tricky business and it's a skill that will serve you well in future builds. That said, welcome aboard! Dave
About us
Modelshipworld - Advancing Ship Modeling through Research
SSL Secured
Your security is important for us so this Website is SSL-Secured
NRG Mailing Address
Nautical Research Guild
237 South Lincoln Street
Westmont IL, 60559-1917
Model Ship World ® and the MSW logo are Registered Trademarks, and belong to the Nautical Research Guild (United States Patent and Trademark Office: No. 6,929,264 & No. 6,929,274, registered Dec. 20, 2022)
Helpful Links
About the NRG
If you enjoy building ship models that are historically accurate as well as beautiful, then The Nautical Research Guild (NRG) is just right for you.
The Guild is a non-profit educational organization whose mission is to “Advance Ship Modeling Through Research”. We provide support to our members in their efforts to raise the quality of their model ships.
The Nautical Research Guild has published our world-renowned quarterly magazine, The Nautical Research Journal, since 1955. The pages of the Journal are full of articles by accomplished ship modelers who show you how they create those exquisite details on their models, and by maritime historians who show you the correct details to build. The Journal is available in both print and digital editions. Go to the NRG web site (www.thenrg.org) to download a complimentary digital copy of the Journal. The NRG also publishes plan sets, books and compilations of back issues of the Journal and the former Ships in Scale and Model Ship Builder magazines.


