


CPDDET
-
Posts
1,194 -
Joined
-
Last visited
Content Type
Profiles
Forums
Gallery
Events
Everything posted by CPDDET
-
 As always, methodical, well thought out tests and plans. Nice work, Patrick.
 -
Patrick, thanks so much for posting this. My current model won't have hull plating but I'm sure it will happen in a future build. And now I have a great tutorial resource.
-
Thanks Patrick, will definitely look into this tool. I have a micro Dremel and wonder how it compares to your tool. Here are the Dremel specs DIMENSIONS Speed: 5,000-28,000 Charge Time: 3 Hours, 45 Minutes Warranty: Limited 2 Years Length: 8 " Battery Chemistry: Lithium Ion Battery: Lithium-Ion Battery Height: 1.5 " Material: High Density Plastic Battery Voltage (V): 8 Model Number: 8050-N/18 Width: 1.5 "
-
Looking really nice Patrick. I'll have to get over my dear of the Dremel took. Always afraid I will take off too much wood.
-
"Embossing Stylus Tool Set by Craft Smart®" Got mine at Michaels craft store. 3 piece set with 5 different size ball shaped ends. Very reasonable price wise.
- 389 replies
-
- 1
-

-
- bluenose
- model shipways
- (and 1 more)
-
Very crisp, clean work Pat. Keep up the great job!
-
Thanks Patrick. Almost finished rebuilding the skylight window frames. Went a different route and they came out much nicer. Will post an update later this week. Dave
-
Beautiful work. I'll remember that tip about the lines when I get to my rigging.
- 38 replies
-
- 1
-
-
- bluenose
- model shipways
- (and 1 more)
-
I'm pretty happy with the look and your right about the friction fit holding the pins without the need for any gluing. I also like your idea of sanding the frames after they are assembled. It's tedious work that can't be rushed. Pulling out the camper for a few days so the build will be on the back burner for a bit
- 389 replies
-
- 1
-
-
- bluenose
- model shipways
- (and 1 more)
-
My concern in using wire is twofold. One is will the CA hold metal to wood. The second is if I glue the wire to the back of the window frames will I get a tight fit between the window and the housing. The tight fit issue might also apply if I use rigging line. The best remedy seems to be going through the top and bottom window frames. This would allow a tight fit to the housing. Dave
-
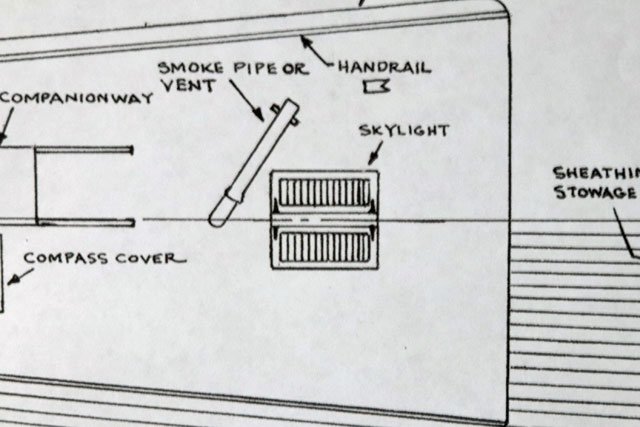
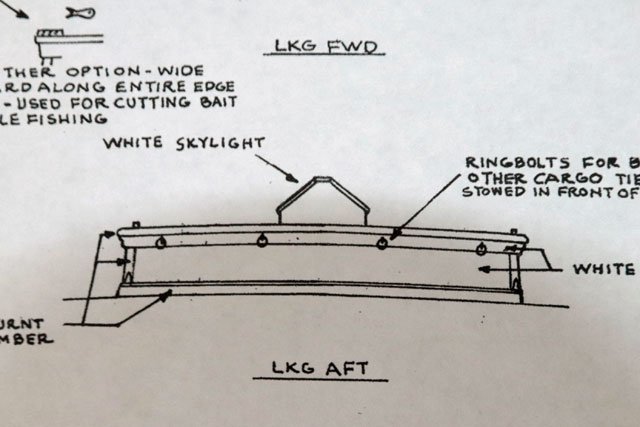
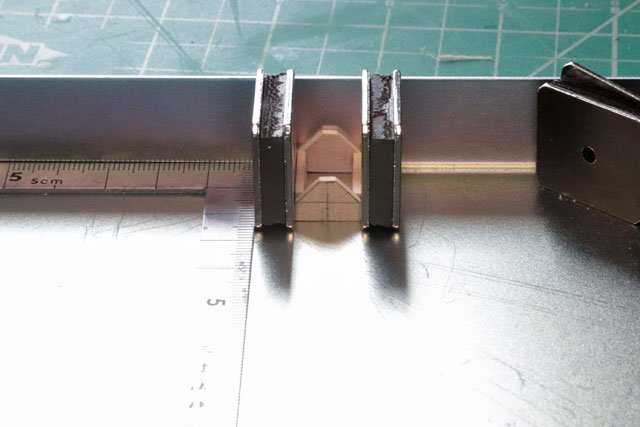
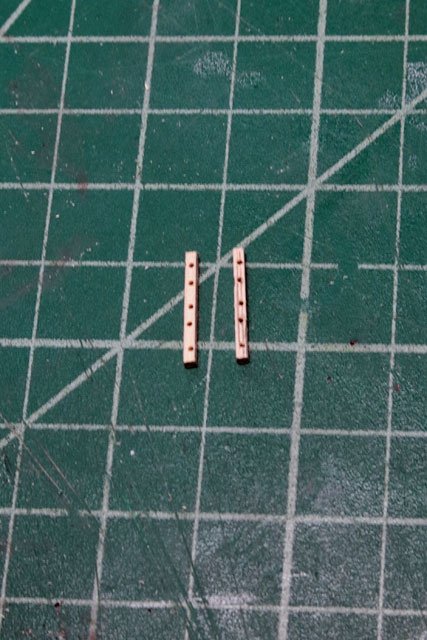
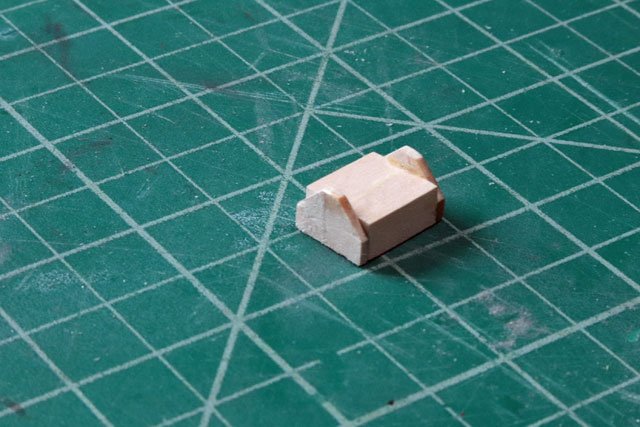
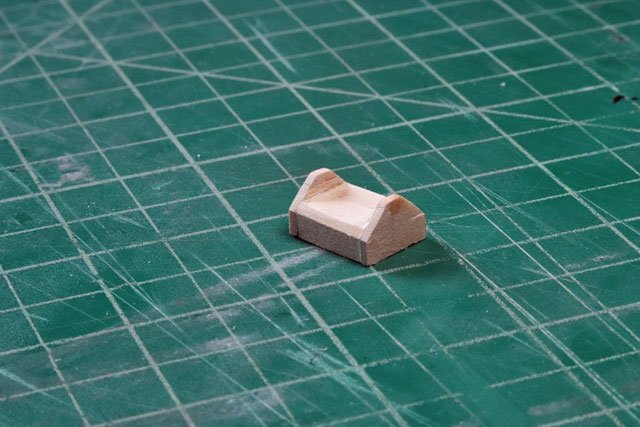
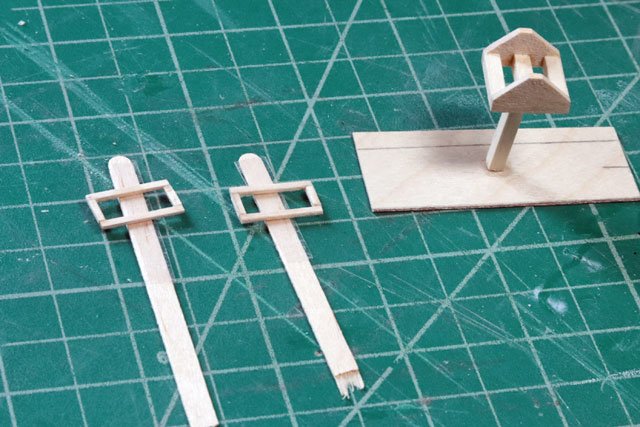
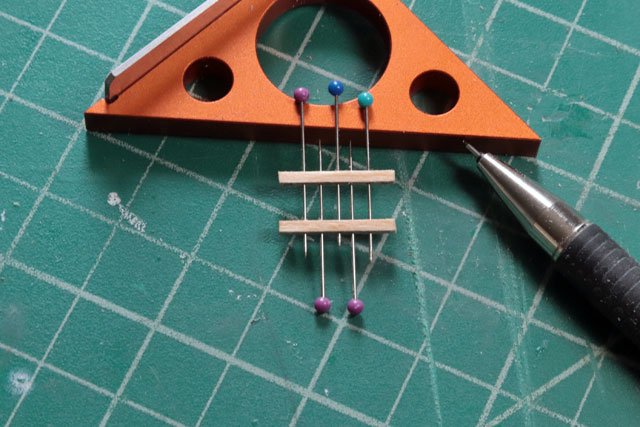
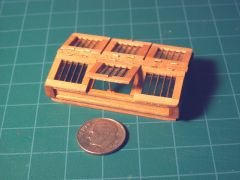
Working on the skylight. Here is the top and end views from the build plans. I began by building the base, making it as square as possible I then hand drilled holes in the frame and inserted copper wire There are a few issues with this method. The “bars” look oversized, the bars are crooked, the frames need to extend slightly beyond the fore and aft end pieces and slightly past the bottom edge of the long side. Another problem was that the dimensions of the fore and aft end pieces was wrong. I had cut it too narrow. Obviously this isn’t going to work. My next attempt was to use a solid block between the fore and aft end pieces. This was another fail as the bottom edge was too wide after being trimmed. Here is my 3rd attempt. The base is the correct size and the frames fit nicely (not shown) the pieces have been mounted on temporary stands for painting. The problem with this attempt is the frames are so thin, 1/32 inch, there isn’t enough surface at the butt joints for a good gluing and when I attempted to lightly sand these they came apart. I’m also not happy with the frames as the edges and joints look sloppy. But I am satisfied with the base so it’s now trying to do my best effort for the windows. I decide to go a bit thicker on the frames at 1/16th inch thick. This would scale out at about 4 inches. I pulled out the Dremel drill press and drilled 1/64th holes. Then inserted 5 pins. I’m pretty happy with this. The bars do a good job of resembling the bars on Bluenose II and since I’m build somewhat of a hybrid of the 2 ships that’s fine with me. The pins are straight, about at the right scale and evenly spaced. The plans show about 12 bars, but at this scale I doubt I could accomplish that. I may try stretching rigging line and see how that looks but 12 strands across that small width might be a bit to “busy”. Have a ways to go. Still have to build another set of these, the side pieces and decide if I want to attempt cutting lap joints for a stronger bond. Also try using rigging line if I can get a strong enough joint to take a bit of pressure. The work continues.


- 389 replies
-
- 8
-
-
- bluenose
- model shipways
- (and 1 more)
-
Looks like we have wandered far from the "Gluing wood and metal" and into the actual building of skylights. So I'm going to move this over to my log. Will post images of my disaster and a possible solution tomorrow before noon. https://modelshipworld.com/topic/19195-bluenose-by-cpddet-model-shipways-scale-164-first-ship-build/page/7/
-
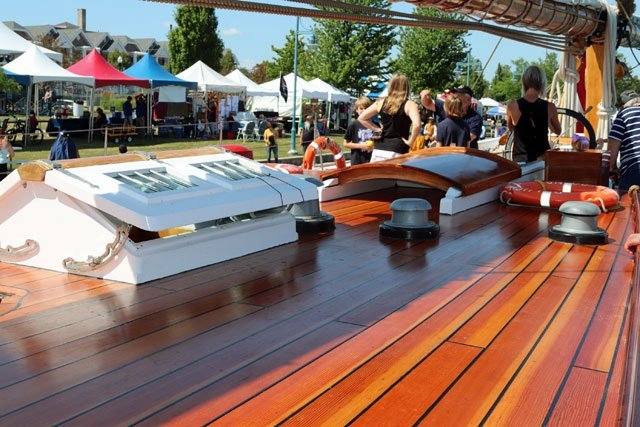
Here is a photo of the skylight on Bluenose II. Different materials but very similar. I have to confess I'm mixing the build details of the two to my liking. Thanks for passing along the images. Here is a pic from another build log of, I think, America. Not sure of the scale but the workmanship is esqusit. Notice the lap joint on the frames.
-
I agree Dave. It's the scale that makes this a difficult task. My model is 1/64. With a frame thickness of 1/32 inch it would be impossible, in my opinion, to have both bars and windows. But vellum may work at a larger scale. Sure, I could have used larger dimension wood and drilled holes for the bars but it would have ended up far to bulky. In any case, I'll try to post some pictures of my issue. The skylight is a very prominent fixture and I want it to be my best effort. Dave
-
No dumb ideas here, Dave. It's always good to consider as many options as possible. Thanks for your contribution
-
I've just finished the skylight window frames and now need to add metal bars across them. The frames are quite fragile (1/32 thick by 1/16 wide) and took several attempts to build. My plan is to cut straight pins to the proper length and glue them to the underside of the frames. The pins are 1/64 diamiter which is fairly close to scale. I only have one shot at this as I don't want to rebuild the frames again. So I'm looking for advice as to which type of glue to use. Dave
-
Nice work Patrick, and well worth the time and effort. Carry on!
-
BTW Patrick, I loved your X-wing cockpit background at our last Zoom meeting.
-
Beautiful work Patrick, I wish mine was as clean and precise.
-
Beyond any words I can think of.
-
Thanks for the votes of confidence!
-
I agree that using solid blocks is the most expeditious way to build these housings. And with the right trim they look great. My instructions even show solid block options. The only reason I decided to build mine was to teach myself methods for a future scratch build, if I ever finish this one. 😄
-
No such thing as a stupid question. While my solution isn't the best, I placed a sheet of sandpaper on the deck and worked the housing fore and aft on it until it conformed to the shape of the deck Perhaps not the best solution as it caused the base of the housing to be a bit thinner at the center point. But at this scale I found it to be acceptable. Much easier than trying to shape the base of the cabin to the very slight arch of the deck. If you noticed, I didn't arch the roof of the cabin either. Just to slight of a shape to bother with in my opinion. But if you're looking for absolute perfection. Then the base should be cut to fit the curviture of the deck. And the roof of the cabin arched as well. Hope this answers your question.
- 389 replies
-
- 1
-
-
- bluenose
- model shipways
- (and 1 more)
-
That's quite the compliment, considering I'm new at this and this is my first build. Thanks for your kind words. The skylight is going to be a real challenge for me. Trying to keep everything is scale at 1/64th to an inch isnt easy. Especially since I'm only using hand tools.
- 389 replies
-
- 1
-
-
- bluenose
- model shipways
- (and 1 more)
-
Looks great Nirvana. Thanks for sharing your progress. Lots I can learn from.