


Dr PR
-
Posts
2,464 -
Joined
-
Last visited
Content Type
Profiles
Forums
Gallery
Events
Everything posted by Dr PR
-
 A disc sander is really useful for creating chamfered edges like the tops of bitts and knight heads, catheads and such. After the angle is set you can make the same cuts on multiple pieces. And it is useful for cutting the same angles on many pieces. You can do this my hand with files or sanding blocks but getting the exact same angles is difficult. A belt sander is very useful for shaping pieces, trimming to a mark, etc. I recently bought a cheap belt and disc sander at Harbor Freight. Here is a review. https://modelshipworld.com/topic/37369-harbor-freight-combination-belt-and-5-disc-sander/?do=findComment&comment=1070074
 -
Some of you have expressed interest in my "sea tales" while aboard the Cape. Remember - you asked for it! By now you should have some idea what it was like to serve in McHale's Navy. But I may have given the wrong impression. I said the ship was "bolted to the pier." But we did get underway about once each month. Sometimes it was just to go fishing, and other times were on minesweeping exercises. But on one occasion we went to San Diego to visit the shipyards for planned maintenance. The Navy had a Planned Maintenance System (PMS) that scheduled maintenance based upon statistical evaluations of system failures. The idea was to make repairs before they were actually needed. So one day we headed out from Long Beach to go to the shipyards in San Diego for planned maintenance. Why San Diego? I have no idea. The largest shipyard on the west coast was in Long Beach, a few hundred yards from where we were berthed. But we set out for the San Diego shipyard, approximately 120 nautical miles by sea. We plodded along at about 8 knots, for about 15 hours. We left Long Beach about 4 PM (1600 Navy time), making most of the voyage at night. The plan was to arrive at the channel entrance before 8 AM (0800) and proceed in to the shipyard in daylight. The entrance to the channel is marked by a series of buoys. You "pick up" the outer marker first, and take it down the port side. Then you follow the buoys into the channel, taking each down the port side. Out bound vessels do the same - the buoy on the port side - so you pass ships going the opposite direction on opposite sides of the channel. It sounds simple, but this time we were in a dense "pea soup" fog bank, with no visibility beyond the jack staff on the bow. Finding the first buoy was a challenge. It had a light, but that wasn't visible for very far in the fog. It had a fog horn so we could hear it when we got within a few miles, but it gave only the general direction. The buoy had a radar corner reflector on top, and that showed up on our surface search radar. If the sea is calm a reflector is easy to track. But if there are many swells each wave top appears as a "blip" on the radar, and the reflector is lost in the clutter. But if you pay close attention you can see the blip that remains fairly constant. Marking it on the radar PPI (Plan Position Indicator) screen with grease pencil lets you follow its relative course until you close on it. So we proceeded slowly into the channel. As we came close inshore the fog bank lifted and we had clear visibility into the channel between Point Loma and North Island. But the channel was anything but clear! There were hundreds of sailboats all across the channel, headed our way! According to the rules of the road, sailboats have the right-of-way over all motorized vessels, except ferries. They were swarming all around us, with some passing so close beneath our bow that we could only see the tops of the masts! As I have explained before, we had almost no maneuverability at slow channel speeds. But it would have done no good to try to avoid one of these boats, because if we turned we would just run into another! What was going on? Well it happens that morning Sharon Adams was coming home to San Diego, having sailed from Yokohama, Japan. She was the first woman to sail solo across the Pacific, and just about every boat in San Diego was headed out to greet her! It was July 25, 1969. We didn't have a clue to what was happening, but we did make it through the swarm of small boats. It was like walking through a swarm of gnats. No real problem, but annoying. The next challenge was the ferries connecting the city of San Diego to North Island across the bay. Two ferries crossed the harbor simultaneously, starting the same time from each side and crossing at the center of the channel. They had the right-of-way over us. But because of our lame engineering plant, there was no chance of us stopping if one crossed in front of us. And it would have looked very bad if a US Navy ship ran down a ferry! As we approached the crossing we throttled back and waited until the ferries started out from their landings. When they neared the center of the channel we "gunned it" and raced at the best speed we could make toward the point where they passed each other. They were approaching their berths when we crossed their route, and we proceeded to the shipyard without further incident. We spent several days in the shipyard while the yard people overhauled our engines and did other maintenance. The crew had liberty except for the duty crew on board. For several days I explored San Diego, taking in the sights, including Balboa Park. The zoo there is one of the best in the world. The San Diego Museum of Art is amazing! And since San Diego was one of the first hubs of aviation, the Aeronautical Museum is one of the best, with an original Ryan M-2 like the one Lindberg flew across the Atlantic (the Spirit of Saint Louis was built in San Diego). Then with our engines overhauled we started back to Long Beach. The trip out of the harbor was uneventful until we rounded Point Loma and headed north. We were chugging along when suddenly there arose a clatter from the engine room that was audible topside, even on the bridge. Our senior engineman happened to be topside taking in the air when he heard the noise. He pulled the emergency shutoff levers near the funnel that cut off air to the engines. While we drifted close to shore, with the currents carrying us south into the shipping channel, the engine crew started trying to find the problem. It turned out to be one of the four GMC 6-71 main propulsion engines. The people performing the maintenance in the shipyards had failed to tighten the locking nuts on the rocker arms on one engine. The vibration from running caused the adjustments to change, and eventually the intake and exhaust valves moved deep enough in the cylinders to hit the tops of the pistons. When that happened the heads of some of the valves broke off, and the loose valve heads started carving chunks out of our very expensive non-magnetic cylinder heads and pistons. In two of the cylinders they punched through the tops of the pistons, allowing the burning fuel-air mixture to blow into the crank case and burn the lubricating oil. So much for planned maintenance! We proceeded on under three engines and eventually got back to home port in Long Beach. It was anything but an uneventful and routine voyage! We repaired the engine ourselves in Long Beach with the help of a few cans of coffee and a canned ham or two. Oh - I finished gluing the center frame/keel pieces together and trimmed the piece so it is ready for fitting the bulkheads. I also cut out the O1 and O2 decks so I think all of the pieces are ready to start assembly. But first I think I will finish the sails for the Albatros and try to complete the rigging.


- 484 replies
-
- 9
-

-
- minesweeper
- Cape
- (and 1 more)
-
I looked at several places on line and found the typical posts by people who are clueless. The recommendations are to use acetone, rubbing alcohol, some brand detergent (cleans everything, cures cancer and removes unwanted hair!), cooking oil, mineral spirits, denatured ethanol and soapy water. Since it is for use by children I suspect it will wash off with water. It seems to wash off my hands easily with water. The Elmer's web site isn't much better that the other sites, but it does say to try scraping it off after it dries. The problem with trying to wash it off is that I don't want to delaminate the plywood or to have the glue soak in deeper. These surfaces will be painted (1960s ocean gray) so I suspect I will end up sanding the surfaces to remove glue. Maybe I will just cut two new pieces.
- 484 replies
-
- 3
-
-
- minesweeper
- Cape
- (and 1 more)
-
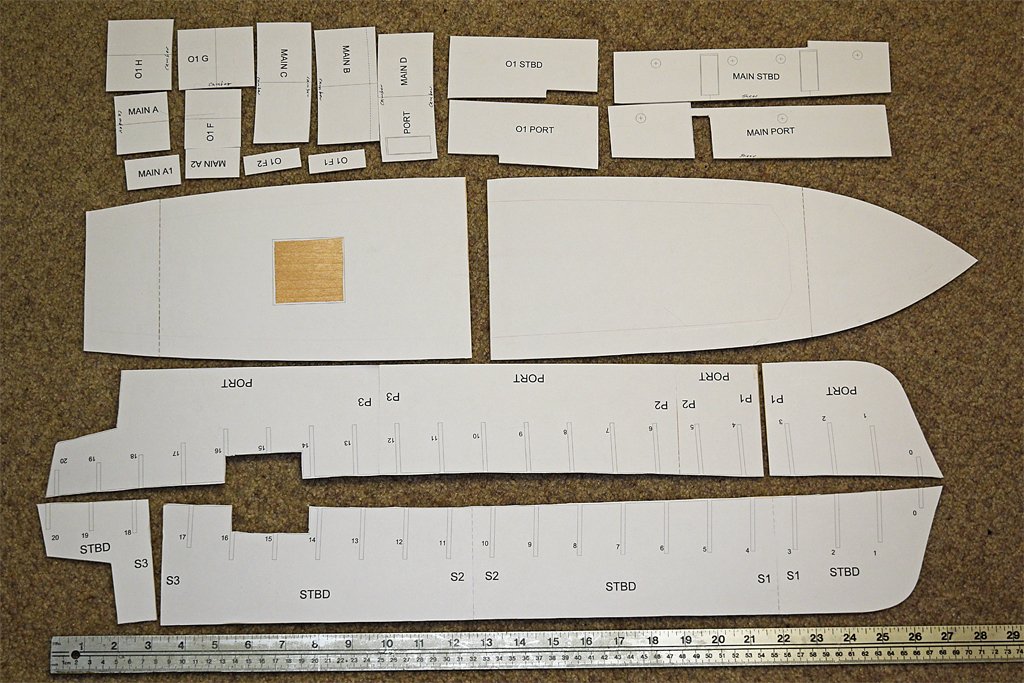
I cut the sub deck and deckhouse parts from two sheets of SIG three ply 1/16 inch (1.6 mm) plywood. The sheets were 24 x 12 inches (610 x 305 mm), but the hull is 27 inches (686 mm) long, so I had to cut the sub deck in two pieces. I cut the hull center frame/keel in four pieces, two each starboard and port. I want the center frame to be 1/8 inch (3.2 mm) thick, and I couldn't find a sheet of 1/8 inch plywood that long. So I decided to cut it from 1/6 inch plywood and glue the pieces together with SIG Bond cement. The joins on the port and starboard sides are at two different places so there is 1/16 inch ply on one side at each join. After it is all glued together I will glue 1/2 inch (12.7 mm) strips along the joins to make 1/8 inch and 6 ply at each join. In the photo the port bow piece is already glued in place, but the starboard stern piece has not been attached - it will be the last. The pieces are all rough cut except along the keel and where the parts come together. I will finish shaping the parts to the lines after the glue has set. Then I will open the slots for the bulkheads. That will take a lot of individual fitting because the glued sheets will not be quite as thin as the 1/8 inch plywood. As the glue is setting up I checked to ensure than the keel piece is straight. It appears to be, but if there is any curvature it will be slight and easily corrected when the planking is started. Also, I will need to remove the glued-on paper from the main deck deckhouse sides. I should have printed the paper templates backwards so they would be on the insides of the parts, but I didn't think of it until after I had already glued them onto the plywood. All the other parts can be used with the paper on the inside where it won't be visible. Anyone have any suggestions for removing Elmer's Glue Stick from wood?
- 484 replies
-
- 5
-
-
- minesweeper
- Cape
- (and 1 more)
-
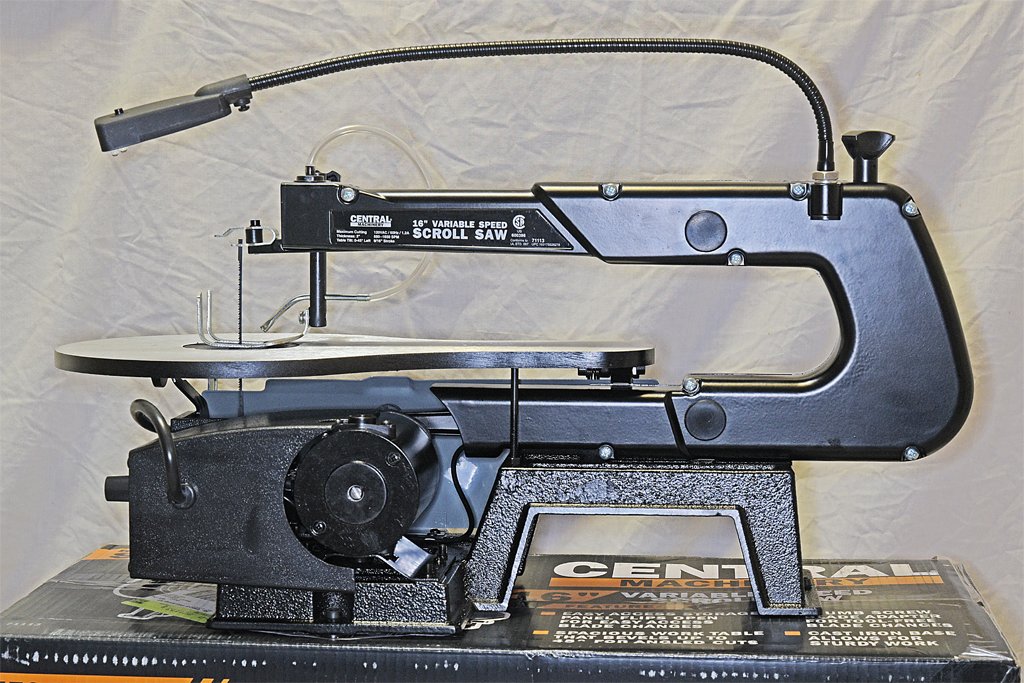
Harbor Freight 16" variable speed scroll saw
Dr PR replied to Dr PR's topic in Modeling tools and Workshop Equipment
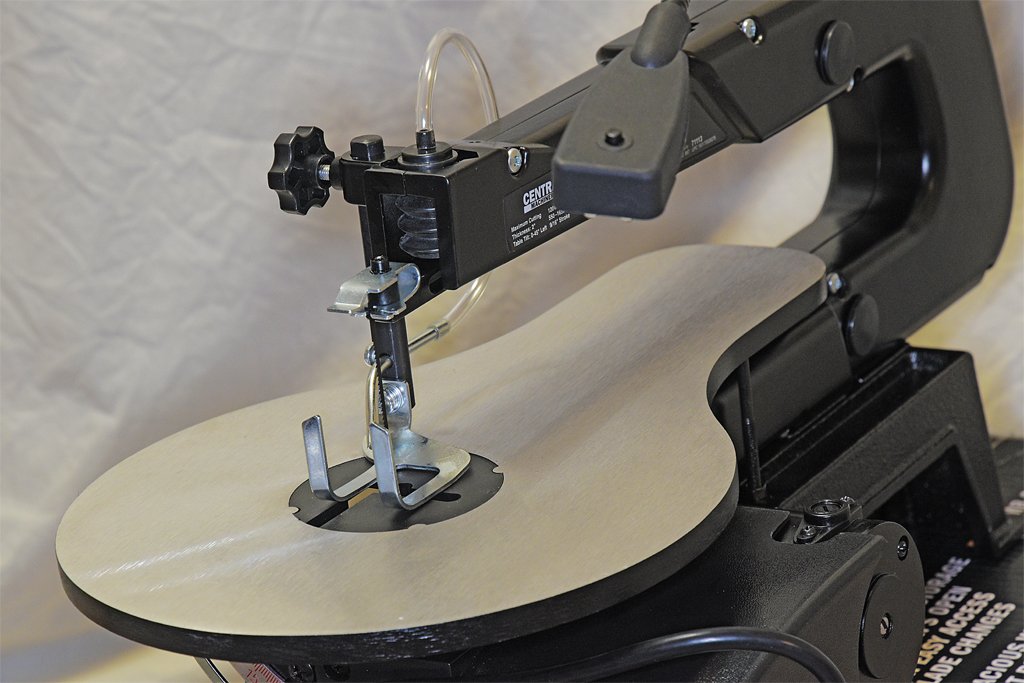
I used the saw yesterday to cut some 1/16 inch (1.6 mm) 3 ply plywood. I succeeded in making the cuts I wanted, but not without problems. I expected cutting thinner material might have some problems - all the ads for these scroll saws say they will cut 1/8 inch (3.2 mm) to 1 1/2 inch (38 mm) or more wood. Why not thinner materials? The thinner material flexes more and tends to raise more with the motion of the saw blade. This made it necessary to hold it down more firmly that was necessary with the thicker plywood. And when the blade did raise the plywood the "foot" on the saw that is supposed to hold the material down and prevent if from rising with the blade turned out to be nearly worthless. It is attached to the rod that sets the height of the foot with a single screw, and it doesn't fasten tight enough. When the blade pulled the plywood up the foot just rotated around the screw. I tightened it as much as I could without stripping the screw head, but the foot still rotated. I just raised the foot out of the way and held the work piece down with my fingers. The whole arrangement is poorly designed! Another problem came up. The plastic insert into the table (see arrow) is a bit too thin, and sits a bit recessed into the table. I measure the top of the plastic to be about 0.011 inch (0.27 mm) below the top of the table. Time and again as I tried to feed the wood into the blade an edge of the work piece caught on the edge of the metal and stopped the cut. I had to raise the wood off the table to continue to feed it into the blade! THIS IS A MAJOR DESIGN FLAW! I guess this is an example of why Harbor Freight has the reputation it has. I can fix this, but a more respected brand scroll saw likely won't have this problem. I used the 15 tooth per inch blade to cut the thinner material. At first I set the speed to the slowest setting (550 strokes per minute) and that caused the thin plywood to bounce and grab the blade. Then I set the speed at the highest setting (1650 strokes per minute) and it cut much better. There was not as much bounce or hanging on the blade. It looks like the recommendation to use the highest speed for wood was good advice. We are supposed to use the lowest speed for metals, but thin soft metals will probably flex more than the thin plywood!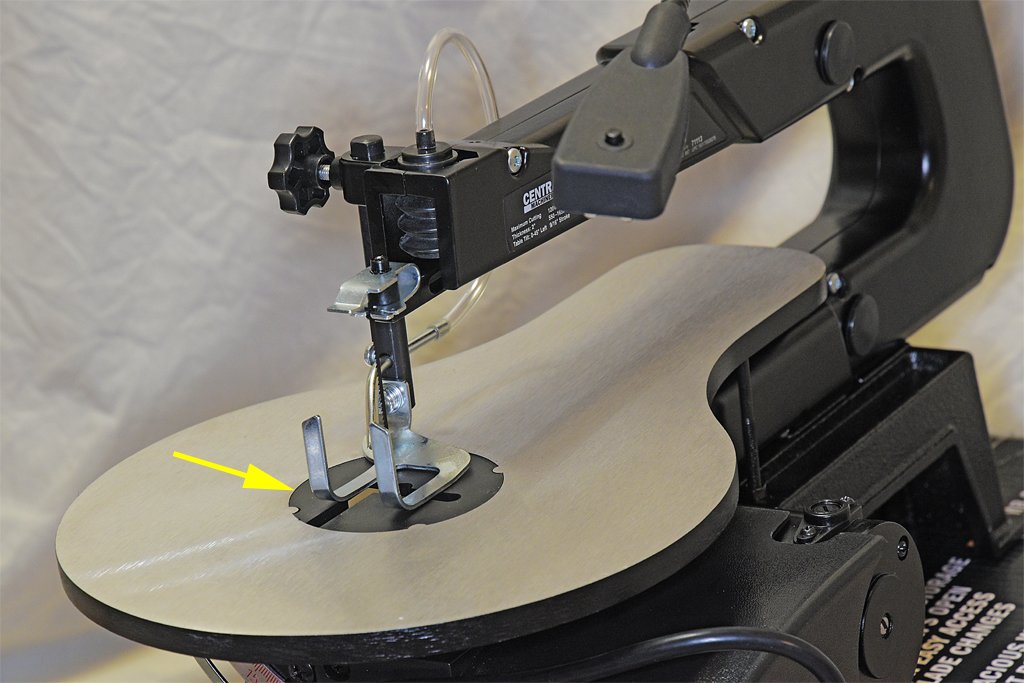
-
Harbor Freight 16" variable speed scroll saw
Dr PR replied to Dr PR's topic in Modeling tools and Workshop Equipment
I should also add that I bought the Harbor Freight foot switch - rated for 15 AMPs. It works, but the base is molded plastic and not metal. The foot switch is definitely worth the money. It allows you to turn off the power immediately if the blade jams, or if you just want to reposition the work piece without the blade moving. I wouldn't want to work with the saw without it. -
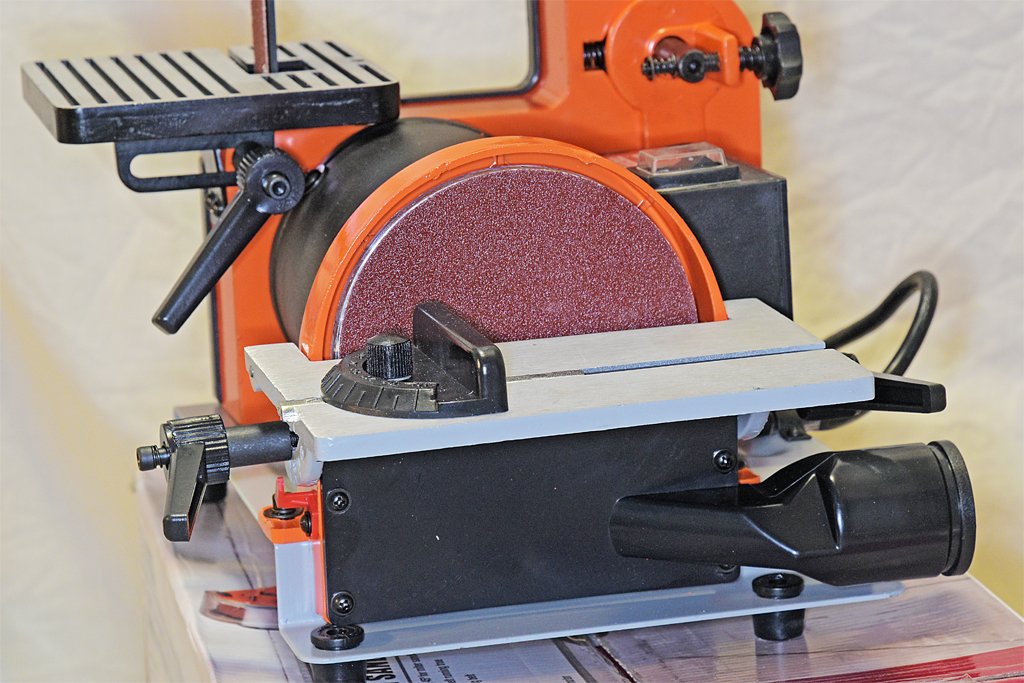
Harbor Freight Combination belt and 5" disc sander.
Dr PR replied to Dr PR's topic in Modeling tools and Workshop Equipment
Keith, Here across the pond Home Depot carries a pretty wide selection of 5 inch sanding discs. Maybe they have some other sanders that use this size disc - hand held rotary sander, disc to fit into an electric drill, or oscillating sander??- 8 replies
-
- 3
-
-
- belt sander
- disc sander
- (and 1 more)
-
Harbor Freight Combination belt and 5" disc sander.
Dr PR replied to Dr PR's topic in Modeling tools and Workshop Equipment
Keith, I was wondering how to remove the stick-on discs. I tried flexing the tables and they are both pretty sturdy on the unit I have. But I wonder if extended vibration might loosen the handles that hold them at the desired angle - to be seen. And the miter gauge does leave a lot to be desired! I used the sander today to trim 21 bulkheads for a plank-on-bulkhead model I am starting. I used the belt and it worked well. The 80 grit belt is pretty aggressive and can remove wood fast. Captain Vader is right about the vacuum ports. They are 1.5 inches (38 mm) inside diameter - too large for the hose on my portable vacuum cleaner. They are probably intended for the larger hose on some shop vacuums.- 8 replies
-
- 3
-
-
- belt sander
- disc sander
- (and 1 more)
-
Harbor Freight 16" variable speed scroll saw
Dr PR replied to Dr PR's topic in Modeling tools and Workshop Equipment
Mark, Thanks. I was wondering what kind of wax to use. I do hold the pieces down when cutting. I think the foot is just a safety measure in case the blade jams in the work piece -
USS Constitution by mtbediz - 1:76
Dr PR replied to mtbediz's topic in - Build logs for subjects built 1751 - 1800
You are building a beautiful model! -
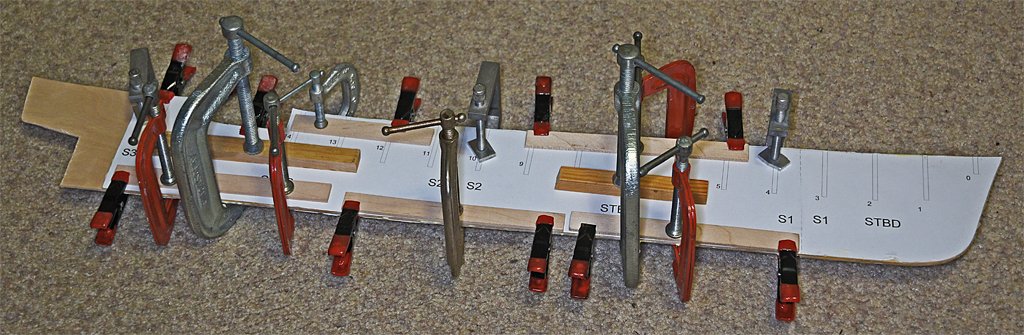
Thanks, everyone. The saw cuts were a bit outside the line. Today I sanded the parts to the line. I plan to mount the forward bulkheads with the paper pattern on the aft side, and the after bulkheads with the pattern on the front side. Then when I fair the edges to the curvature of the hull I will try to leave the pattern lines. That is the way I designed it, with the bulkhead dimensions to the inside of the planking. Now the real challenge begins. The center frame/keel will be 28 inches (711 mm) long. Cutting it out of plywood sheets 24 inches (609 mm) long will be a challenge on a scroll saw with only 16 inches (406 mm) clearance! There are lots of curves and slots for 21 bulkheads.
- 484 replies
-
- 5
-
-
- minesweeper
- Cape
- (and 1 more)
-
My newest Challenge
Dr PR replied to James Flynn's topic in Building, Framing, Planking and plating a ships hull and deck
James, I think I understand why you want a big project that will take some time to build. A plank on frame model is a very big project with thousands of parts you must design and build, especially if you build to an uncommon scale where there are few, if any, pre-made parts available. Maybe some here were suggesting you try something easier because in your first post you said you were "kind of new to ship building." Many modelers "bite off more than they can chew" on their first attempt and become discouraged and quit. So they advise newbies to start with something simple so they don't become frustrated and give up. But in your latest posts you show that you aren't a beginner, and have a few builds under your belt. And you say you have the tools for scratch building. There is great satisfaction from working on a single large project for many years instead of a series of small builds, trying to build the one model to perfection. I spent 14 years making my CAD model of the USS Oklahoma City CLG-5, modeling everything down to rivets and screws as small as 3/16 inch (5 mm). Most of the time was spent obtaining data sheets and manuals for the equipment and missiles, and blueprints for the hull and superstructure. It gave me great satisfaction to build a model that had far greater detail and accuracy than most other models. I encourage you to take on your great project, and take pride in every piece that you build. And I hope you post your progress here. There is great knowledge in the members of the Forum and we are all willing to help solve problems as they come up. It is a learning experience for all of us. -
Carpet and button threads come in several sizes. I have some J & P Coates Dual Duty cotton covered polyester thread that is 0.007 inch (0.18 mm) diameter. It is very smooth without loose fiber "fuzzies." You should be able to find something like this at a sewing or fabric store.
-
Intakes usually have grilles to prevent fish and other large objects from being sucked in. They also prevent critters from crawling in and setting up house while the vessel is in port. Outlets often do not have grills, especially if they are constantly discharging even while the vessel is in port (engine cooling water, etc.).
-
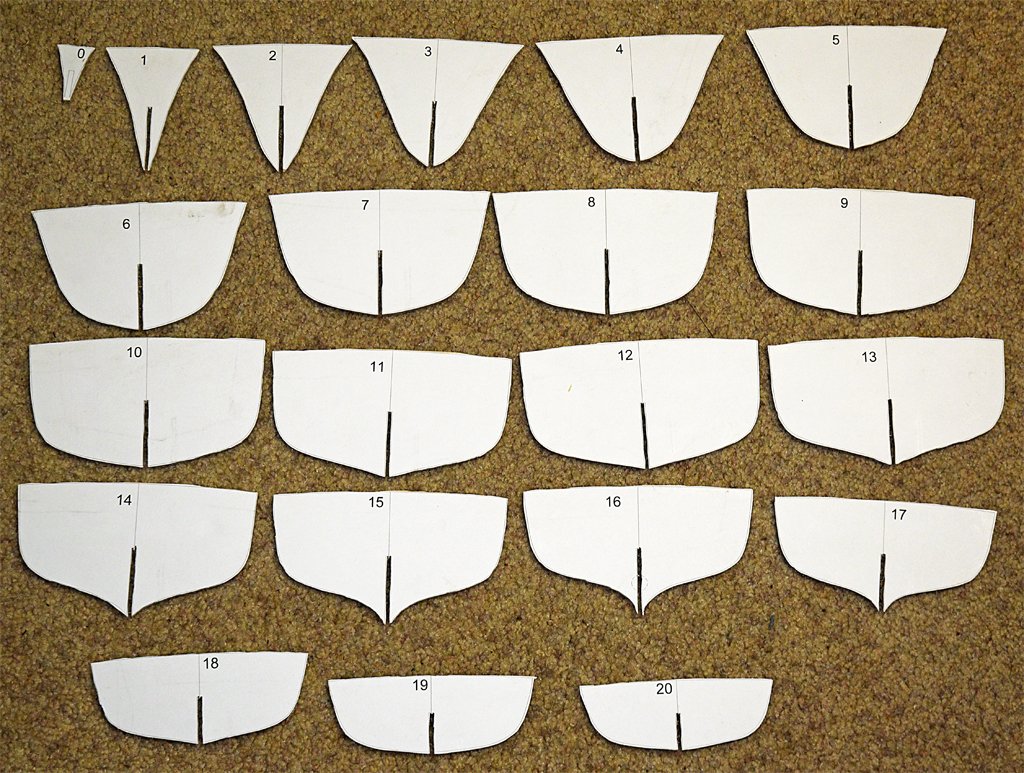
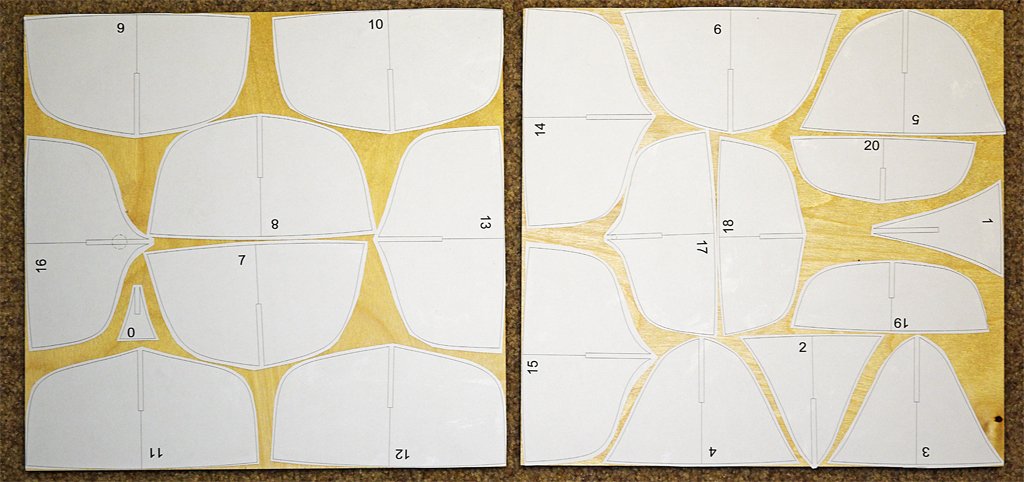
I have bulkheads! I used a scroll saw to cut the 21 bulkheads from 1/8 inch (3.2 mm) six ply basswood plywood from SIG Manufacturing. I printed the patterns on paper and then cut out each piece. These were glued to two 12 x 12 inch (305 x 305 mm) plywood sheets using an Elmer's "All Purpose Glue Stick." This was recommended in another thread on the Forum and it worked well. The pieces can be repositioned for a few minutes after applying the glue, and after half an hour the paper was stuck to the wood tightly. The paper did not lift from the wood while sawing. I used a 10 tooth per inch saw blade and ran the saw at 1650 strokes per minute. It took less than two hours to cut the pieces, feeding the wood into the blade slowly so the blade didn't bend or twist. This is just a rough cut close to the lines. I will trim the pieces to the final size with a sander, sandpaper and files. The slots for the pieces to fit over the center frame will be widened to 1/8 inch (3.2 mm) with a file to create a slip fit over the 1/8 inch thick center frame.
- 484 replies
-
- 8
-
-
- minesweeper
- Cape
- (and 1 more)
-
Harbor Freight 16" variable speed scroll saw
Dr PR replied to Dr PR's topic in Modeling tools and Workshop Equipment
I gave the Harbor Freight scroll saw its first test today. I cut 21 bulkheads out of two 12 x 12 inch (305 x 305 mm) sheets of 6 ply basswood plywood (SIG Manufacturing). The largest of the pieces in the photo was about 6 inches (152 mm) wide. I used the 10 tooth per inch blade and the highest motor speed. It took a little under two hours, advancing the part into the blade at a slow pace that didn't bend or twist the blade. I had no problems cutting the plywood - no broken blades and the blade did not tend to wander in this thin material. I found two two minor problems with the saw. The first is the workpiece foot - the part that lowers to hold down the part being cut. As delivered it doesn't contact the work piece evenly. Consequently it presses harder in some places than others allowing the piece to "chatter" up and down more in the loosest fit areas. I lowered it to allow a loose fit while still holding the part down to the table. It needs some bending to adjust it to fit parallel to the table and contact the work piece evenly. The other problem was pretty high friction between the plywood and the table surface. The table has a fairly coarsely brushed surface and that created noticeable friction against the plywood. I had to push the wood with significant force to move it over the table and rotate it. However, this drag may add a bit better control for moving the work piece. This must be a common problem because the instructions say to apply a light coat of paste wax to the table and buff it to allow the material to move smoothly. I didn't have the vacuum connected most of the time but just used it occasionally. There was some dust accumulation inside the machine. Not so much on the table surface. The fitting is on the front of the machine and the hose protruded out far enough to get in the way. This is a design defect in my opinion. Maybe I can add an elbow ("L" shaped) piece of PVC pipe so the hose runs off to the side.
-
I have a need for a small disc and belt sander. Now that the Burns machines are no longer available I looked around and found the Harbor Freight #69033 sander. The two advantages of this machine are the cost ($70) and it uses common 5" sanding discs and a 30" x 1" sanding belt. There was quite a variety of replacement sanding discs and belts in stock at Harbor Freight and Home Depot. It is pretty quiet when running without sanding anything, and there is little vibration. It has a belt tensioner for the sanding belt. The tables to support the work piece tilt down for both the belt and disc sanders to allow angled work. It has two ports to attach vacuum holes to. It came out of the box partially disassembled in eight pieces, and there were no assembly instructions. This is not for someone who has trouble screwing the top back on a milk bottle! The instructions do tell how to replace the disc and belt, but there are a few pieces that need to be assembled in a specific order to put the thing together, and it isn't always obvious what to do first. And the clearances to get tools to some of the screws are pretty tight. But through trial and error I got it together in less than an hour. You need a set of metric Allen wrenches, a Phillips screwdriver, and about a 12 mm open end wrench. But there was one serious problem. The table for the disk sander is a separate piece, as are the two locking handles and the miter guide bar. To install the table you have to slip two pins (one on each end of the table) into slots in the metal disc guard. Then you screw the locking handles into the disc guard. However one pin (shown) would not fit into the slot in the guard. My calipers showed that the pin was about 0.020 inch (0.5 mm) wider than the slot. This was a casting issue, and there were several obvious blemishes in the cast metal guard. I used a square file to clear out the flash from the slot and then the pin did fit the slot. But, the table still wouldn't slide into place. Inspection showed that the pin had been pressed too far into the table, and the gap between the two pins was narrower than the distance between the slots! I used a jeweler's hammer to tap the pin back out a bit and the table finally slid into place. The sanding discs are the stick-on type. The single disc supplied with the sander is 80 grit, a bit coarser than I would like. The belt supplied with the unit was also 80 grit. The miter guide for the disc sander is a cast plastic piece with coarse angle indications, so you should use an accurate angle measuring tool and make test pieces to ensure that the angles are correct for your work. I really haven't used this machine much yet, but it will soon get a workout on my MSI build. I will report back later and tell how well it worked and describe any problems I might see.


- 8 replies
-
- 8
-
-
- belt sander
- disc sander
- (and 1 more)
-
For my MSI project I need to cut out 21 bulkheads and the central keel piece from 1/8 inch (3.18 mm) and 1/16 inch (1.59 mm) plywood. I could do this with my hand held coping saw, but it would mean many hours of work and sore arms afterward. I looked around for powered coping saws or scroll saws and decided to buy the Harbor Freight model 71113. I have no delusions about the "quality" of this machine - it is from Harbor Freight and is cheap Chinese junk. However, I only need it to work for a relatively few hours. It is definitely not good enough for someone who uses a scroll saw frequently! The main advantage for this product is the cost - $109.00. That isn't a huge expense for a modelling project. I am using $120 worth of scale rope and blocks on my Albatros project! The cast metal work table is 10" diameter with a 16" clearance (almost all the parts of the machine are metal). The table can be tilted up to 45 degrees for angled cuts. It has a LED work light that can be positioned near the cutting area, and an air blower bellows to clear dust from the work area. There is a place to connect a vacuum hose to remove saw dust. Changing blades is pretty simple - one side opens and hinges down out of the way to allow easy access to the lower blade holder. It has a blade tensioner. It is surprisingly low noise when running without cutting anything, and there is little vibration. It has a speed control to vary from 550 strokes per minute (metals and plastics) to 1650 strokes per minute for wood. It came out of the box completely assembled - you just have to position the table and tighten the locking knob to complete the "setup." A big advantage of this saw is that it uses standard 5" scroll saw blades made by many manufacturers. I looked at the Dremel scroll saw and the major disadvantage is that you can't find replacement 3" blades anywhere except the Dremel web site, you have to buy an assortment of blades and not just the one you want to use, and shipping costs are greater than blade costs (also, the Dremel saw is mostly plastic and just looks flimsy)! Harbor Freight has 5" blade packages in stock locally, although they are assortments of five different types, and they don't offer packages of just the type you need. Home Depot does offer quite a selection of 5" blade types and packages of several blades of a single type. Most of the reviews on line are good. As usual there are people complaining that they break blades and it won't cut really thick pieces (>2 inch (5 cm) thick) without the blade wandering, etc. Basically these people don't know how to use the tool and are trying to use it beyond its capabilities. It is a cheap tool for use on light jobs. Many reviews say it cuts 1/2 inch (12 mm) wood, 1/4 inch (5 mm) plastic and thin soft metals (no steel). I haven't used it for anything serious yet, but soon will give it a workout on my MSI project. I am posting this now to describe the tool, and I will follow up later with a report of how well it works and any difficulties I encounter. Note: Home depot offers several varieties of this same scroll saw - same castings, same specs, etc., but with slightly different "accessories." For example, they have this same model but without the work light for about $10 less than the Harbor Freight model, and another model with the work light for about $10 more than the Harbor Freight version.
-
Problems with blackening brass
Dr PR replied to Desertanimal's topic in Metal Work, Soldering and Metal Fittings
In another thread someone described using Sparex to prepare brass for blackening. I bought some but haven't used it yet. Most of the blackened parts I have made so far are very small. But for larger parts with large surfaces it seems better reparation is needed to get good even coats. One of the recommendations was to find a small crock pot to heat the Sparex. So I visited out local Good Will store today to see if I could find one. There were about half a dozen, ranging from US$6 to US$9. I got one that holds about a cup to 1 1/2 cups (240 to 360 ml) and it works, heating water to 170F (77C) in about 45 minutes (45 min). I think I will need the Sparex for the more complex machinery on my minesweeper build. -
Free at last, free at last! Taxes are done (I hope). Now I can get back to important things. Next I need to add the reef points to the larger sails. But how long should they be, and what size rope? As for the length, Steel (The Art of Rigging, 1796) says: "POINTS, short pieces of braided cordage, plaited together as gaskets are; beginning at the middle with nine foxes, and tapering to five at the ends, and from one fathom and a half to one fathom in length." A fathom is 6.0 feet (1.828804 meters) , so the points would be 6-9 feet (1.8 to 2.74 meters) long. At 1:48 that comes out to 1.5 to 2.25 inches (38 to 57 mm). Falconer (Universal Dictionary of the Marine, 1769) says: "... the top-sails are always, and the courses generally, reefed with points, which are flat braided pieces of cordage, whose lengths are nearly double the circumference of the yard. These being inserted in the eyelet-holes, are fixed in the sail by means of two knots in the middle, one of which is before, and the other behind the reef-band." The circumference of the course yard on my model is 0.6 inches (15 mm) and the main boom is 0.66 inches (16.8 mm). That would make the course points 1.2 inches (30 mm) and the boom points 1.32 inches (33.6 mm). Falconer's point length is a bit shorter than Steel's, but close enough for speculation. Half the length of the point lines will be hanging down each side of the sail, and at 1:48 that will be somewhere between 0.6 and 0.75 inches (15 to 19 mm) on each side of the sail, minimum. They could be half again as long using Steel's rule, or 0.9 to 1.125 inches (23 to 28 mm). On my model the reef bands on the main (gaff) sail are spaced 1.5 inches (38 mm) apart. Looking at historical drawings and paintings I see the reef points from an upper band may extend from half to two-thirds the distance between reef bands. So I can use reef points from 0.75 to 1.0 inches (15 to 25 mm) on each side of the sail. I think I will use 1 inch (25 mm) on each side, so the reef point lines will be 2 inches (50 mm) long, with a bit of allowance (to be determined) for the overhand knots on each side of the sail. Note: On square sails with multiple reef bands near the top the reef points are successively longer by a bit on reef bands from top to bottom. This allows for more sail material being gathered together by the lower reef points. This leaves the question of what the reef points should be made of. I am not going to try to make 1:48 flat braided and pointed pieces. And I didn't include reef points in my calculations for the amount of rope I would need for the model. I have a spool with 75 yards of tan cotton covered polyester thread (J & P Coates Dual Duty Plus) that is smaller than the smallest rope I am using (0.008 inch, 0.2 mm) and larger than the small stuff I use for seizing (about 0.003 inches or 0.07 mm). It is supposed to be for buttons and carpets, but now it will be used for reefing sails!
-
Mark, Thanks. Dremel makes a small hand-held version that gets pretty good reviews. I'll check Micro-Mark. But that is dangerous - I might find other things I am tempted to buy! I just checked. Micro-Mark has several options - all out of stock!
-
Problems with blackening brass
Dr PR replied to Desertanimal's topic in Metal Work, Soldering and Metal Fittings
I have had problems similar to what Chris and others reported - some blotches and the blackening rubs off. I noticed that the parts blacken almost immediately in Birchwood Casey Brass Black diluted 1:1 with water. I have tried leaving them in the bath for 5, 10 and 15 minutes with about the same results. Then I rinse with water 5-10 times and dry the parts. Maybe I should use a minute or less. I normally wash the parts in acetone for a minute or two to remove solder flux, then use rubbing alcohol to remove the acetone, and a final wash with water to remove the alcohol or any remaining water soluble materials. After drying I use the blackening solution. I have also tried etching with mild acetic acid (vinegar) and then rinsing with water. Then the acid/alcohol/water washes. It doesn't seem to make any difference. -
Some people say shellac is the only thing to use ... It is sorta like a ship's rigging - there are as many versions as there are people.
-
Can anyone recommend a small, hand held reciprocating (back and forth) narrow kerf saw? I need to cut some pieces from 1/8 inch (3 mm) plywood and don't relish doing this with a coping saw or jeweler's saw. I do not have a band saw (or a place to put one) nor do I have a laser cutter.

