
jpalmer1970
-
Posts
376 -
Joined
-
Last visited
Content Type
Profiles
Forums
Gallery
Events
Posts posted by jpalmer1970
-
-
The shrouds look great, though I think larboard and port are different terms for the same side of the boat?
I really enjoyed this part of the build. It is tempting to secure everything too tightly though, at least it was for me, so do watch out for that when you do eventually get everything fixed in place.
- Glen McGuire and Thukydides
-
 2
2
-
I remember now why about 40 years ago I gave up making plastic model kits – I just don’t really enjoy painting that much! I’m not sure whether I don’t like painting because I’m not very good at it, or whether I’m not very good at painting because I don’t like it. Either way, I was reminded of this during all of the time I have spent painting the Pen Duick for the last week or so… 🫤
I used a spray can to give the whole hull a covering of white, even though only a very small section of this will eventually be on show. I tried using very light coats but of course at some point I was just too heavy handed and had a section that had a run in it. So I had to sand that back and there were also various parts that I thought needed smoothing out a little more, so between coats I occasionally added a little filler in small places. More and more light coats (I learned my lesson!) were added until I was happy with the coverage and the finish. All of this took a week or more to achieve given that the somewhat unseasonal early heat we have been having here in Australia limited the times of day in which I could paint.
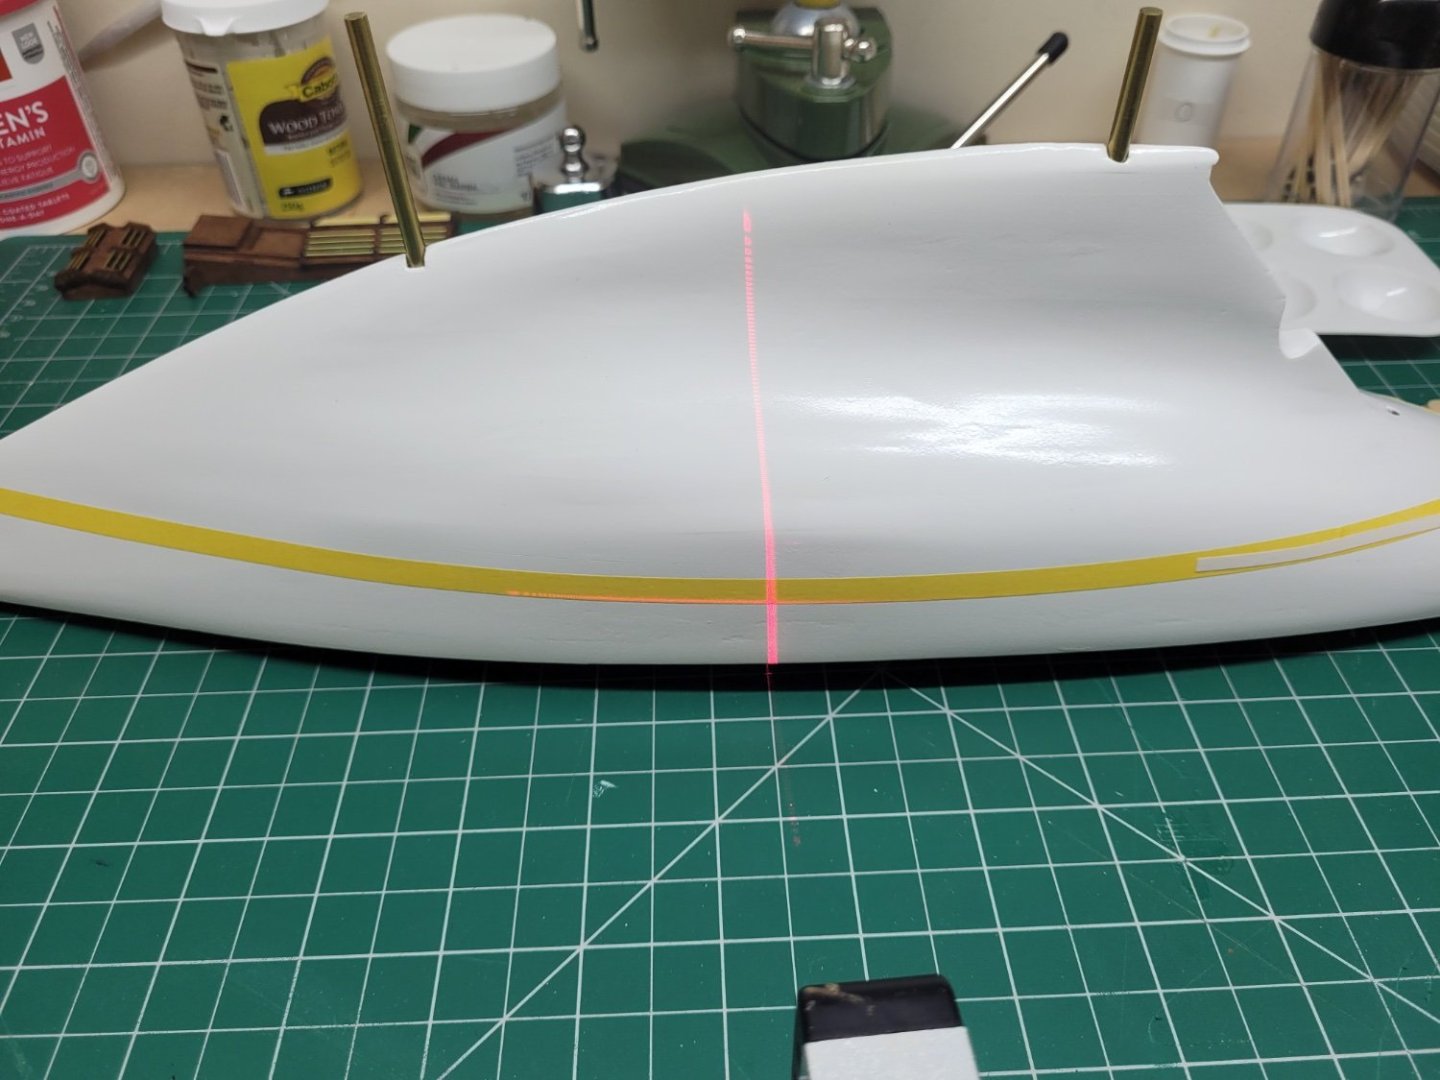
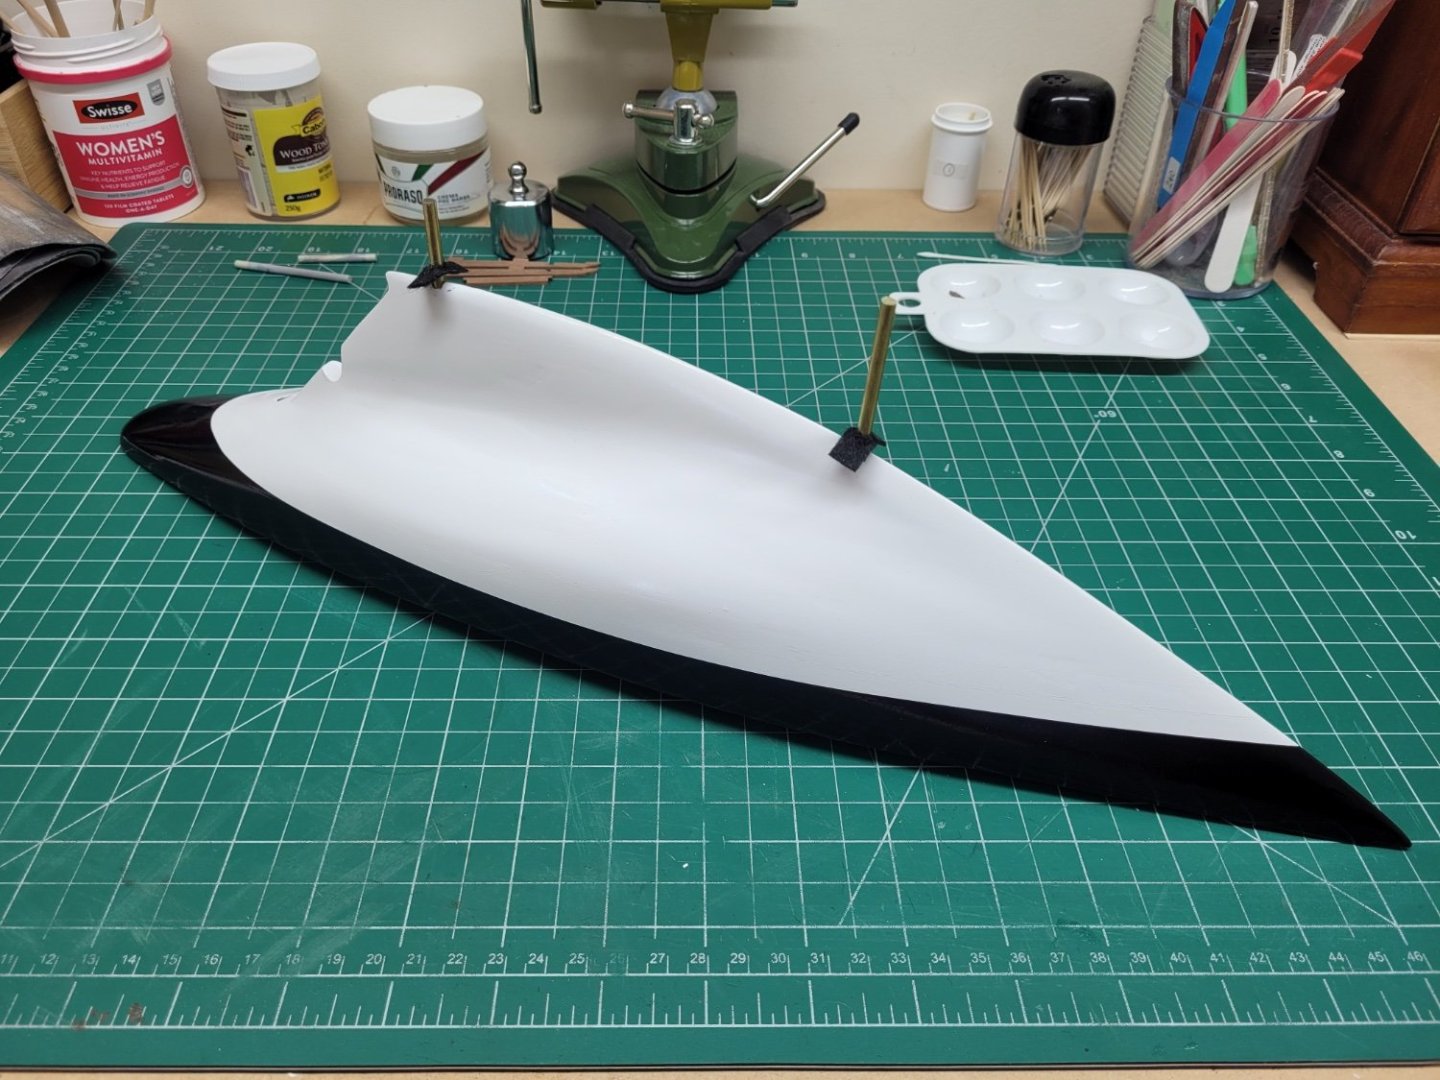
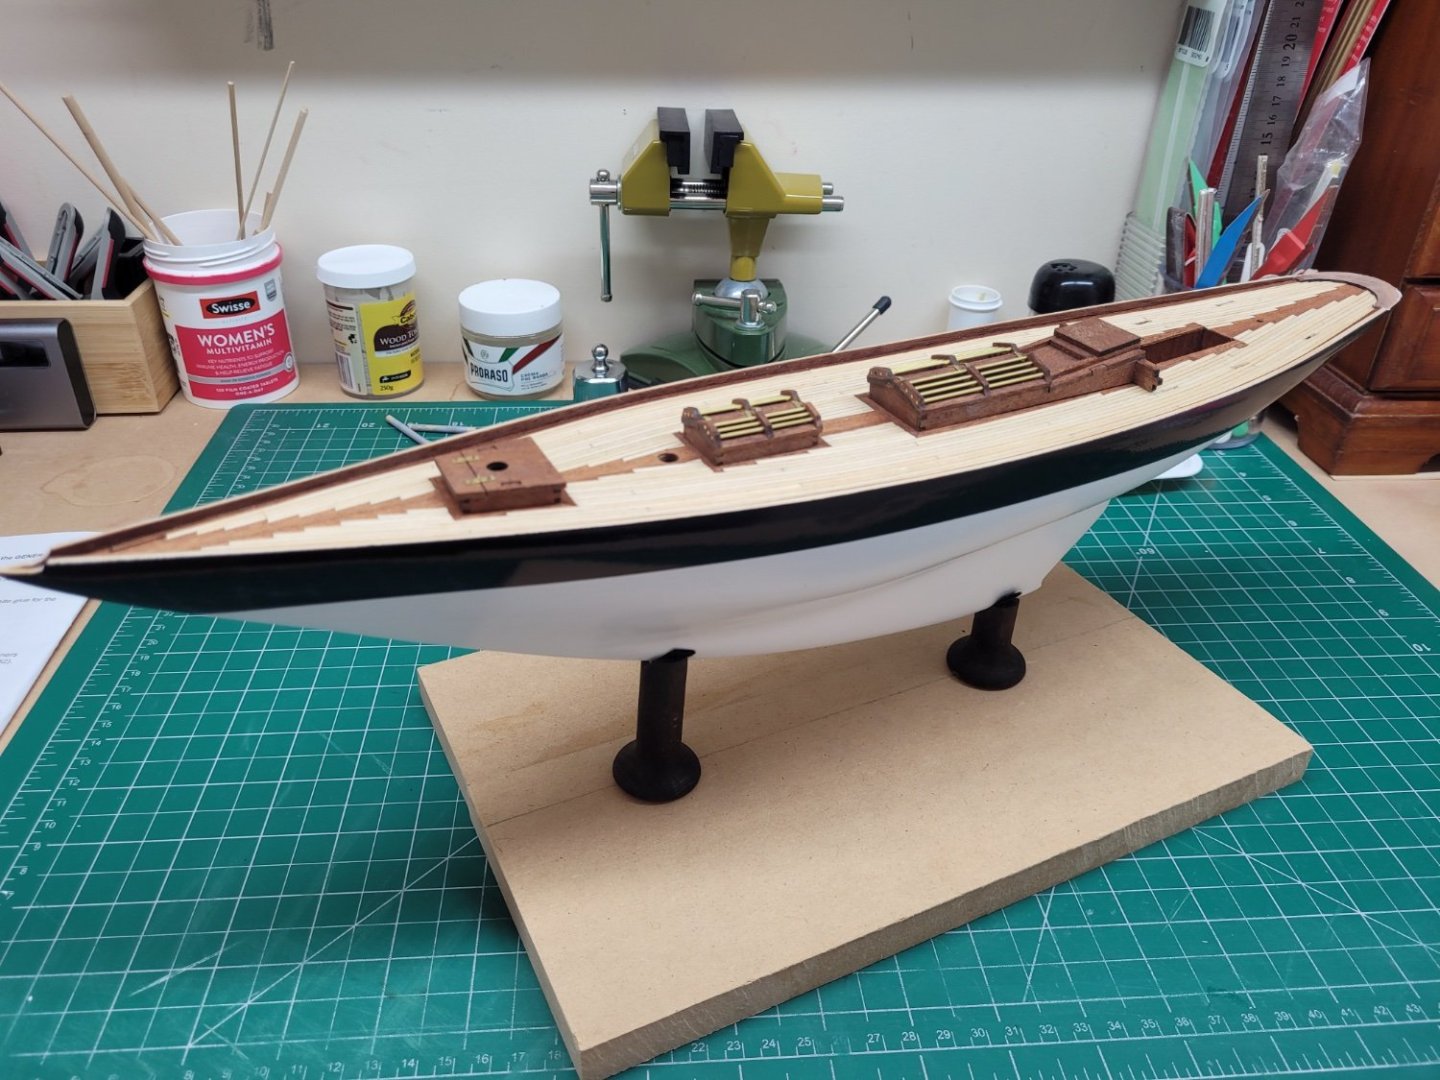
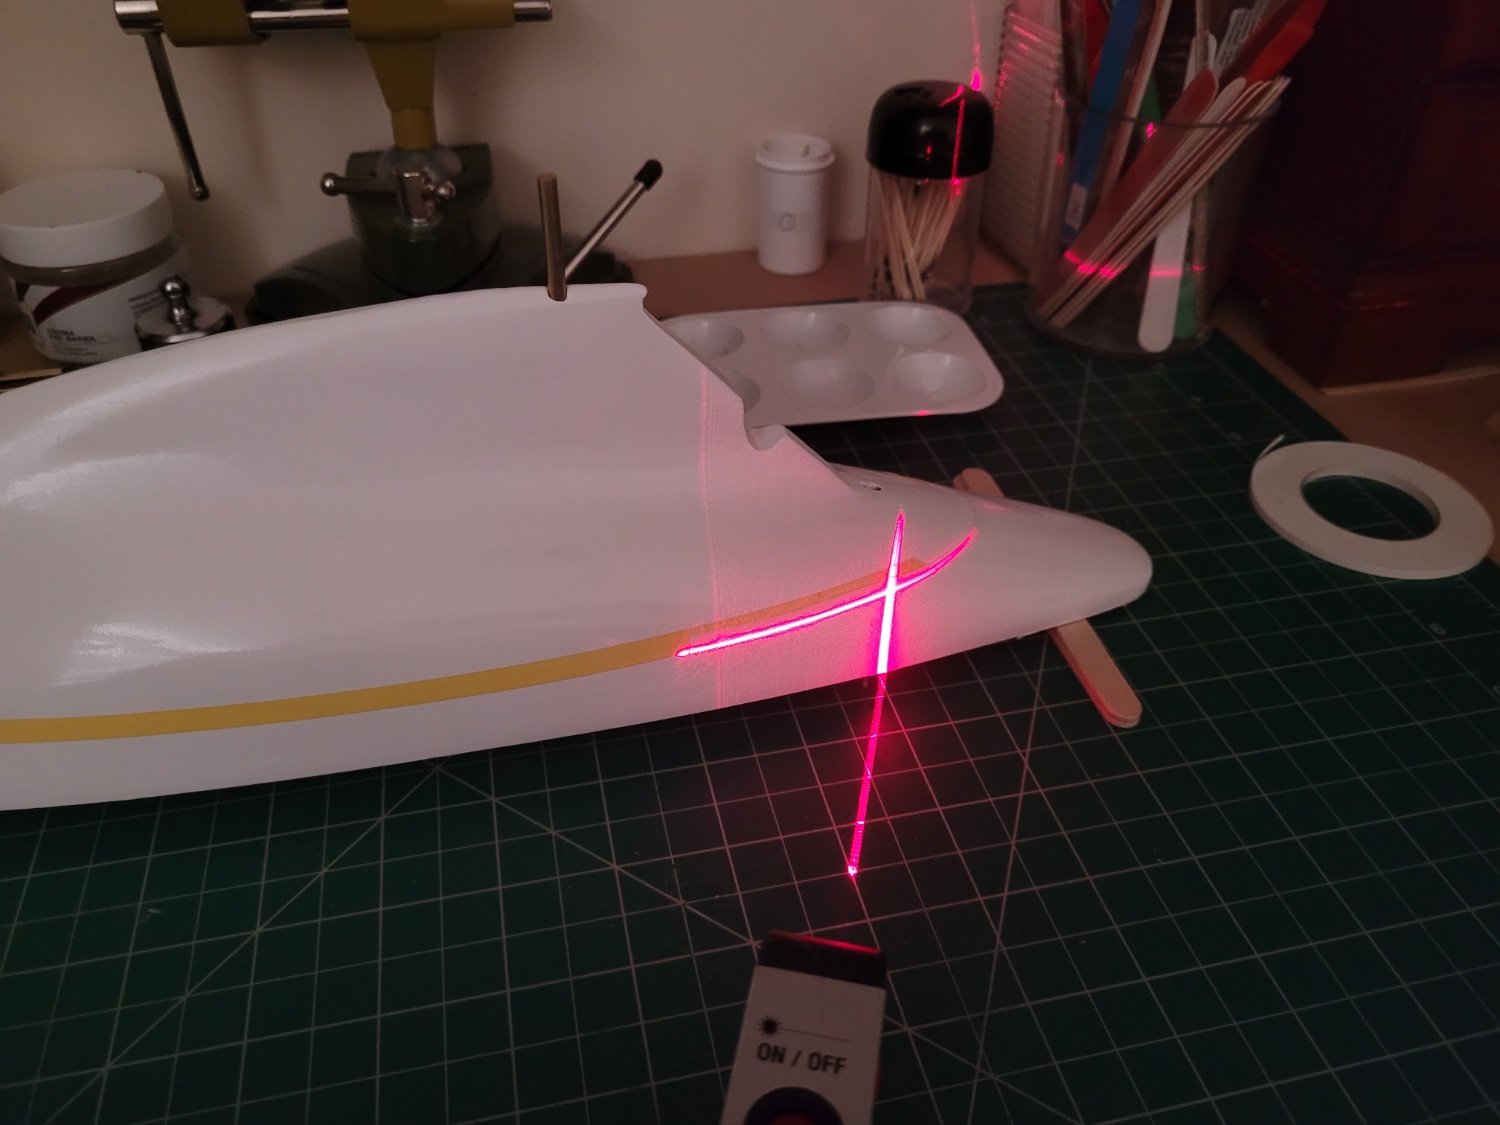
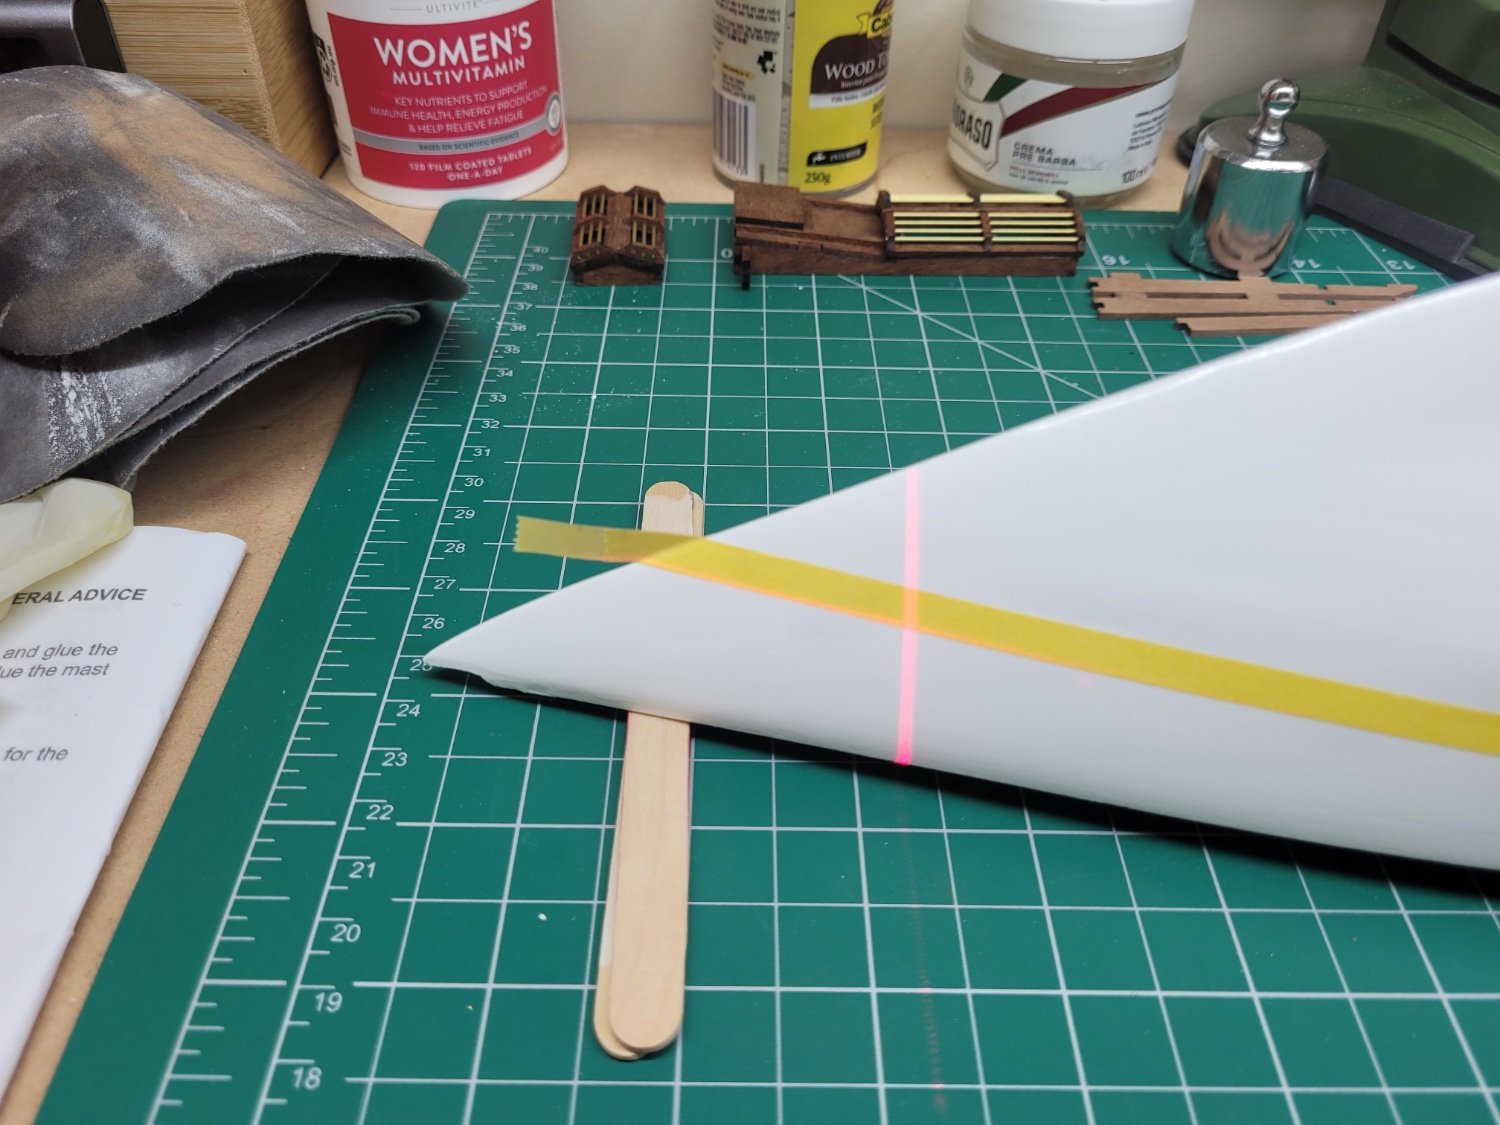
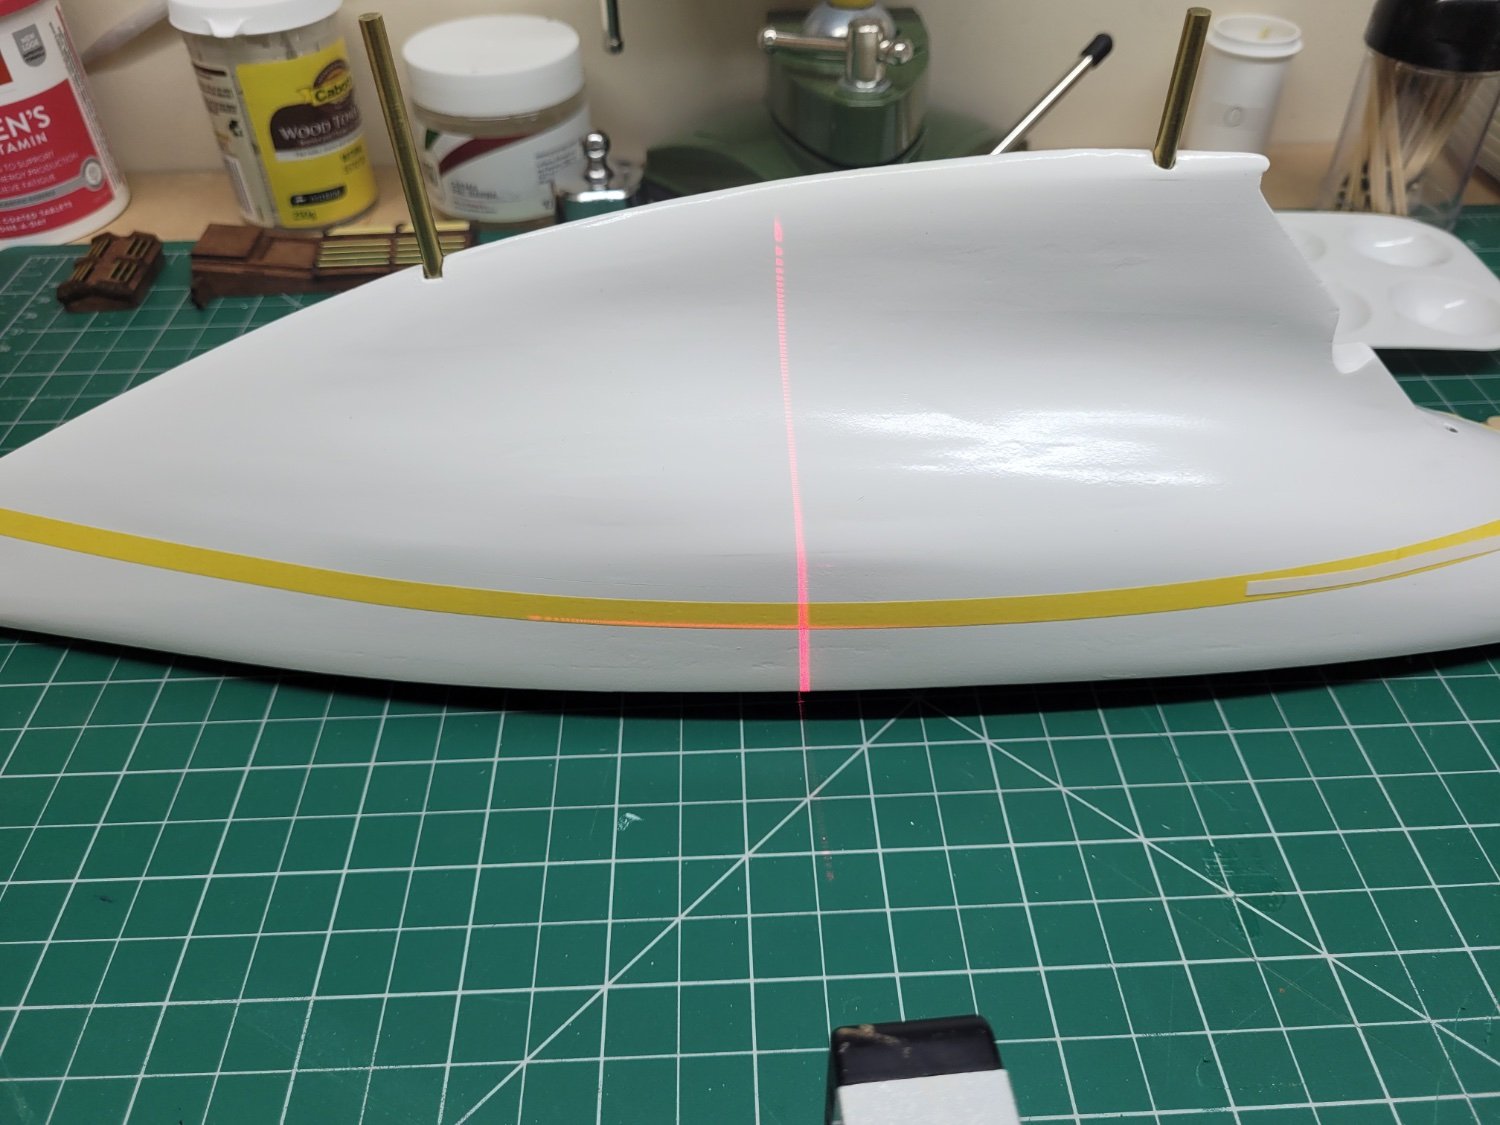
Eventually I was able to turn to marking off the hull to apply the black section of paint at the top of the hull. The kit instructions or plans don’t really give too much information on the positioning of the demarcation lines between the black, white and green sections of the hull but they do seem to suggest that the central white band spans the area where the top of the rudder meets the hull. I looked a few images online of the Pen Duick undergoing restoration and found a different answer there. In those images the white band is positioned above the rudder / hull meeting point. I decided to go with this second option and set out to mark the top of the white band using a pencil waterline marker. However, it soon became apparent that this wasn’t going to work in this case because of the almost horizontal plane of the underside of the hull at the stern of the model. My pencil holder had no ability to angle the pencil downwards and could therefore only draw a horizontal line on a basically vertical surface – fine for the waterline of an 18th century frigate but no good at all for a 19thcentury racing yacht. I decided to go high tech and used a laser level to project the line onto the hull and then marked it out using Tamiya tape and a special 'tape for curves' at the stern.


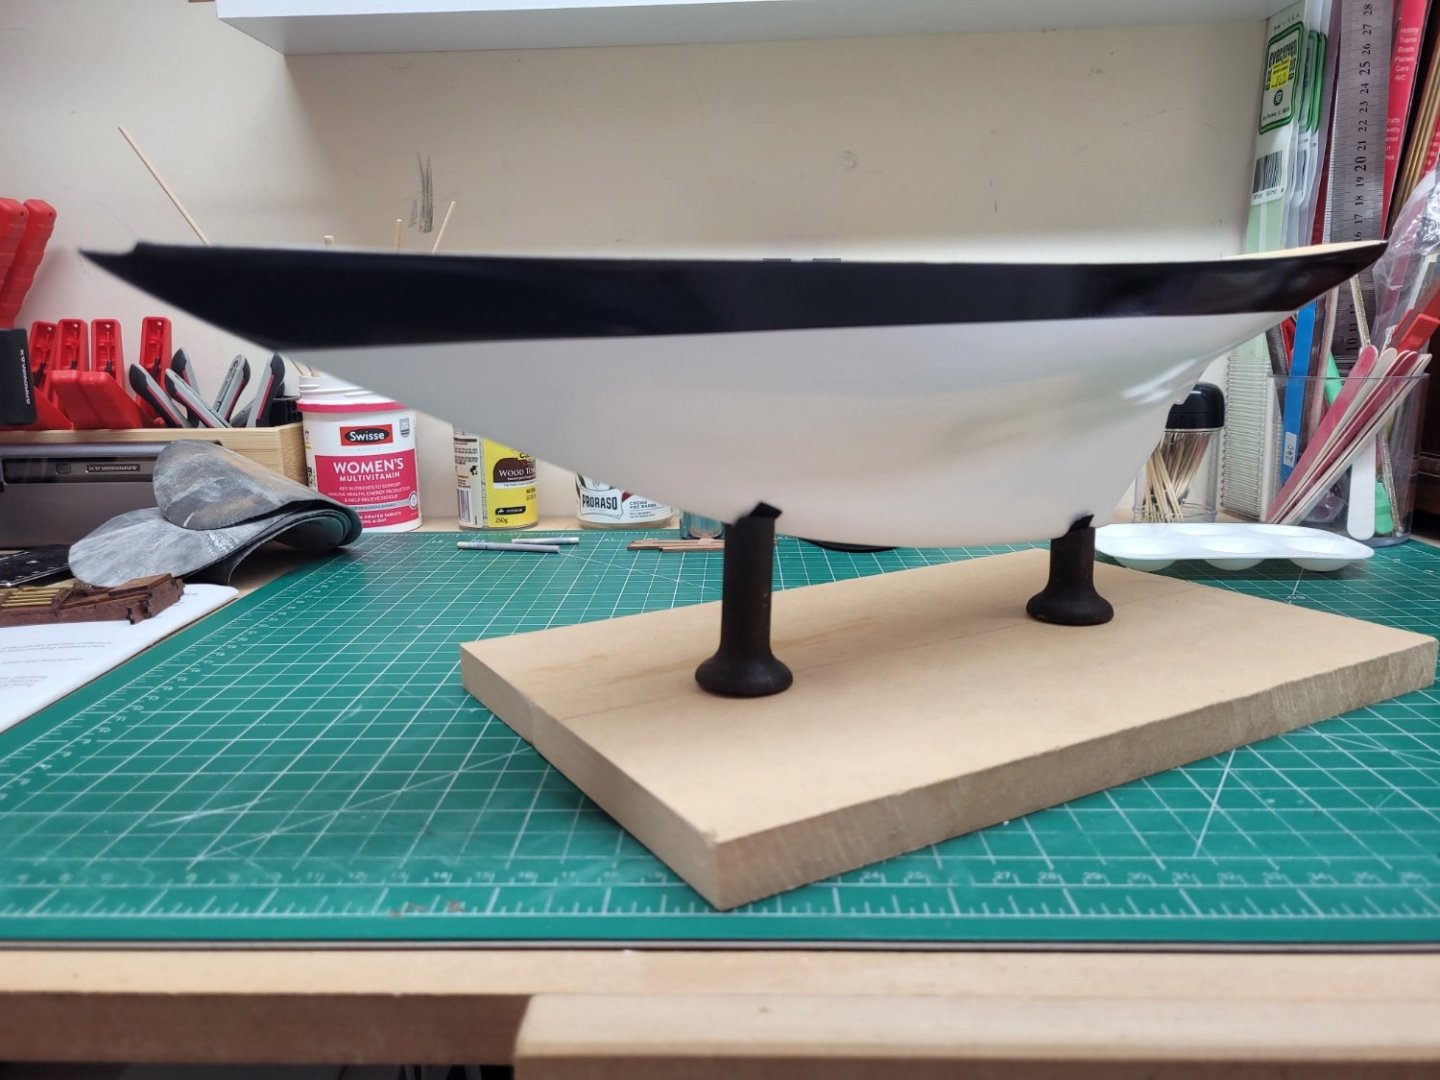
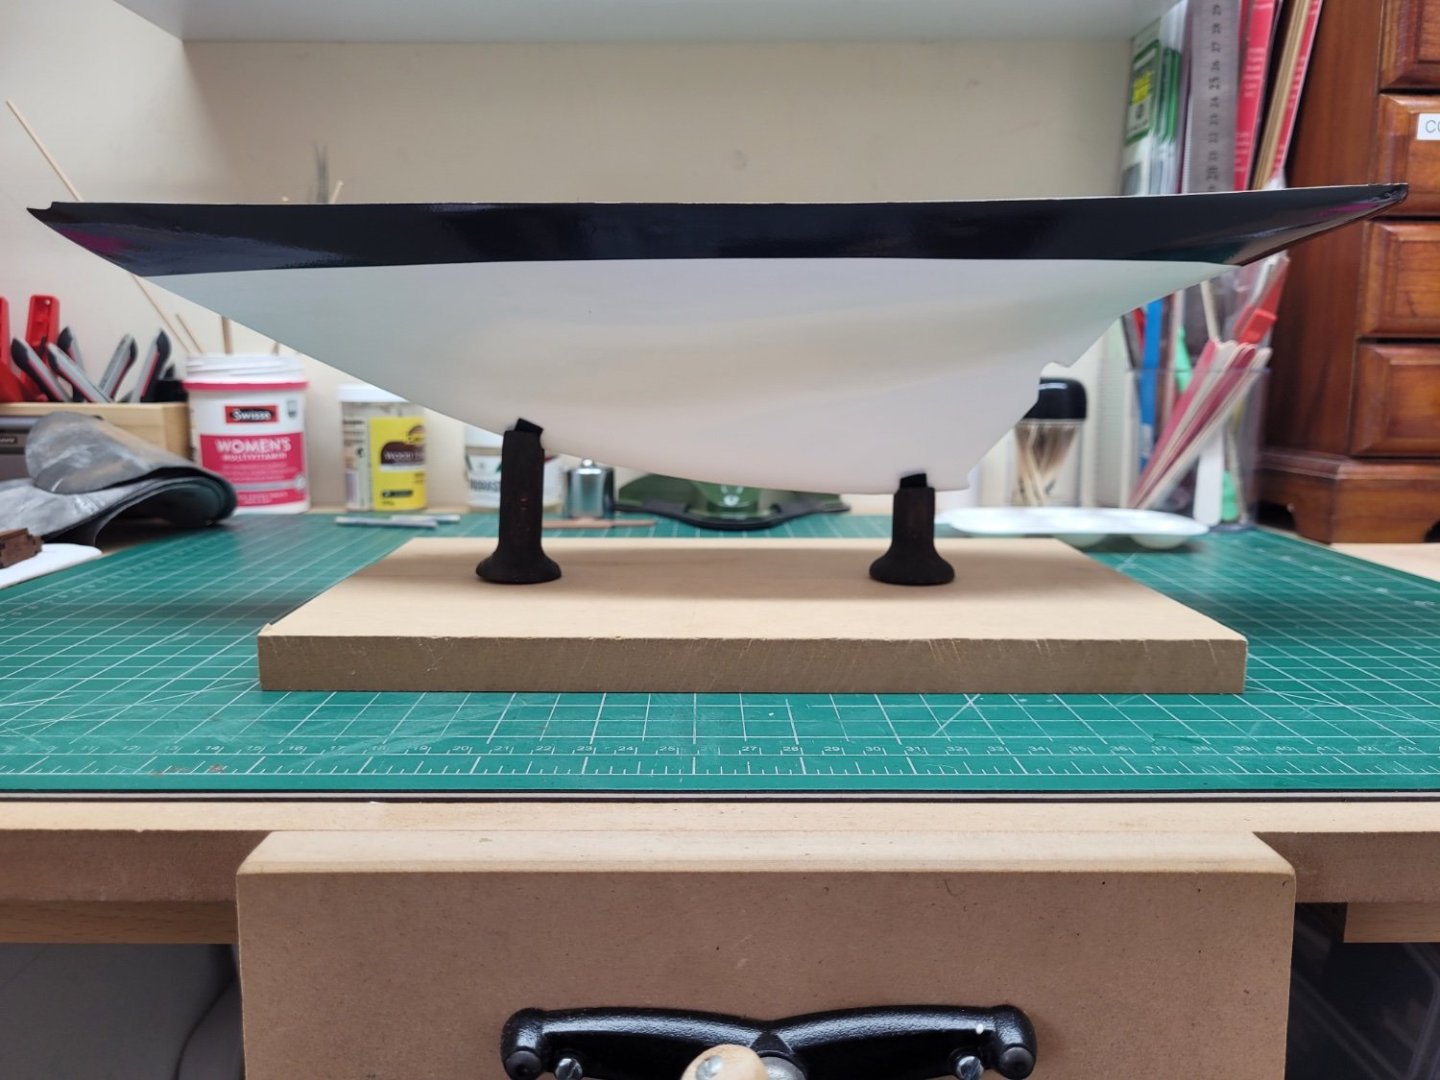
After masking off the rest of the hull with more tape and some plastic sheeting I then added the black paint to the area at the top of the hull. You will also see from these images that I had by now also cut and fitted the 4mm brass bar to fit into the pedestals on which the model will stand. I am never quite sure when is best to remove masking tape when painting models? Leave it until the paint has dried or take it off as soon as there is enough paint is on the model? I hedged my bets and took the tape off about 10 minutes after applying the final coat of black – again I had applied several light coats. I was pleasantly surprised to see that I managed to achieve a pretty good clean line between the black and white paint.
Setting the model on the pedestals on a temporary base board I then started taking off the masking on the deck. I had my fingers crossed that no paint, spray filler or wood filler had managed to get onto the deck. For most of the length of the hull the bulwarks do provide a very effective barrier against this but at the rear of the deck there is no bulwark at all. Removing the masking went well and whilst there are a couple of small places at the stern, especially on the port side, that needs a bit of attention, I was pleased to see that the deck was still nice and clean. I did lose a very small dot of black paint on the starboard side where the cut out for the bowsprit lies but this should be an easy touch up later on hopefully.
In between all of the painting and waiting to do painting I had had time to progress with working on the deck fittings. I made up the section comprising the main hatch and companion way and then added mini hinges to both of the butterfly hatches.
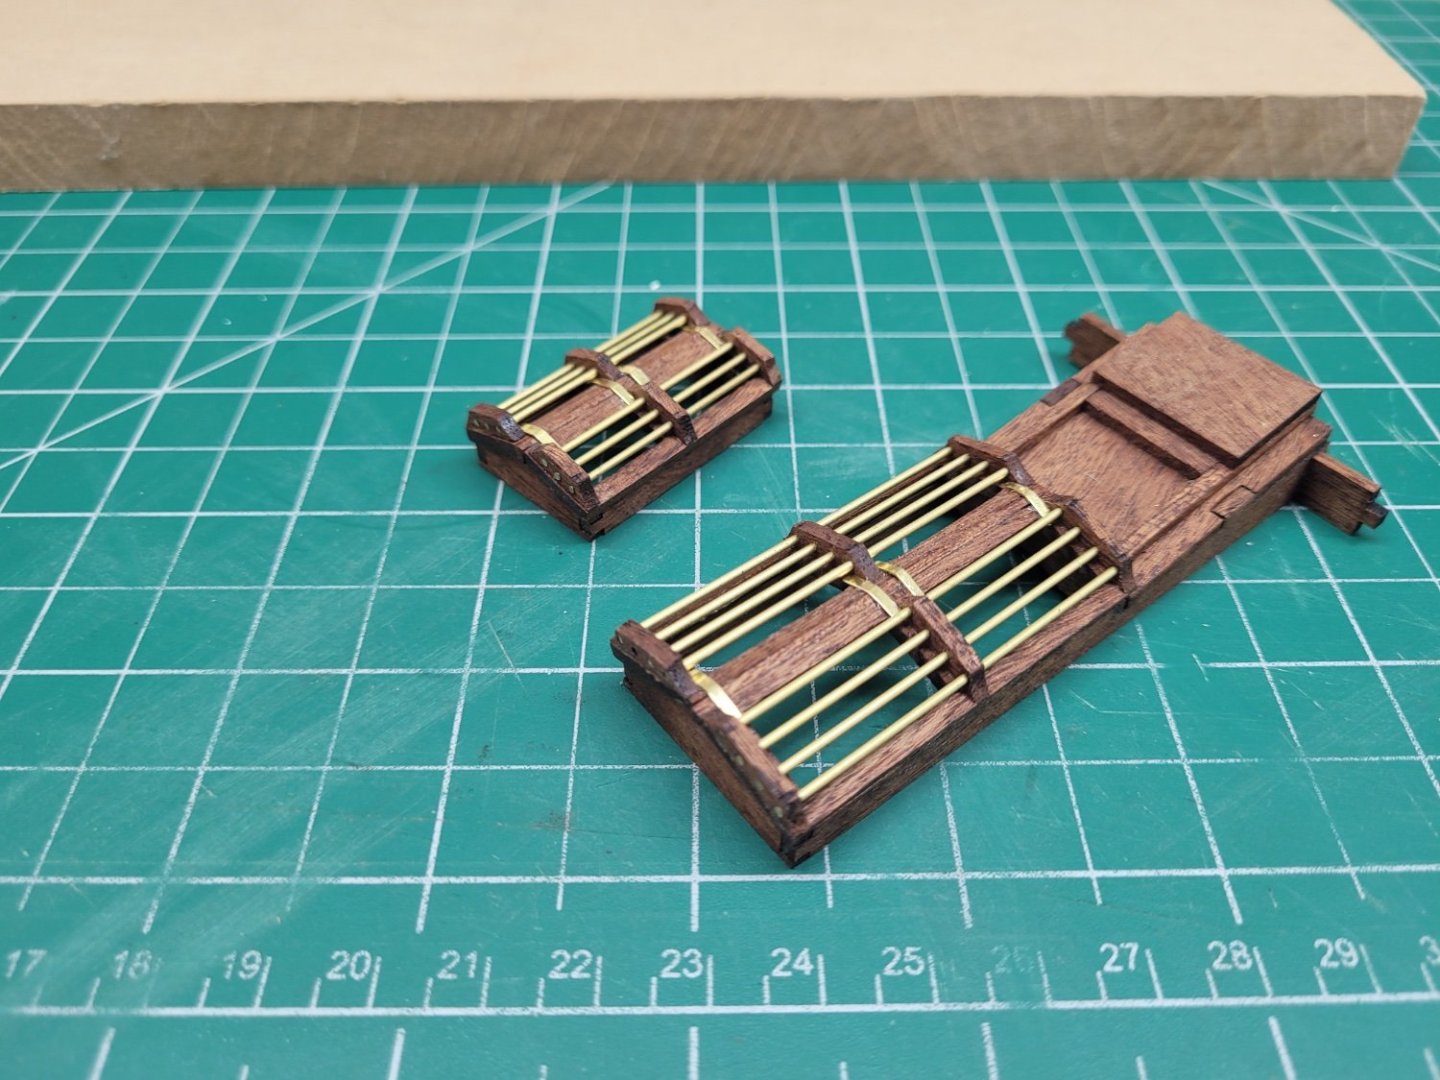
The image below shows some of the deck fittings simply placed on the deck – nothing will be permanently attached for some while yet until the rest of the hull painting has been finished.
- Thukydides, Knocklouder, BobG and 6 others
-
7
-
 2
2
-
I believe the poles are stanchions and I guess the rope may have a specific name but rope seems to work 🙂 Do be careful of them though, they are likely very easy to catch on things when you are busy rigging. I left them to the very end of the build to avoid damaging them.
It is a fantastic build and I'm sure your masting and rigging will be of an equally high standard.
- Glen McGuire and Thukydides
-
2
-
Thanks HOF. I am still unsure whether I will add the sails or not. If I do, I will attempt to make them from scratch as the kit supplied ones are undersized. I am also missing one sail from the kit so to have a full set I would need to make one at least. The chances of me finding material that matches the kit cloth is slim so I'd probably end up making a whole set.
-
-
Thanks Bob. Yes, the instructions are pretty woeful regarding the rigging. I am hoping the collection of diagrams in the plans gets me through it. I have one or two other guides to help but not being a sailor does mean that sometimes these don't make a lot of sense when you aren't sure exactly what things are for in practice.
")
-
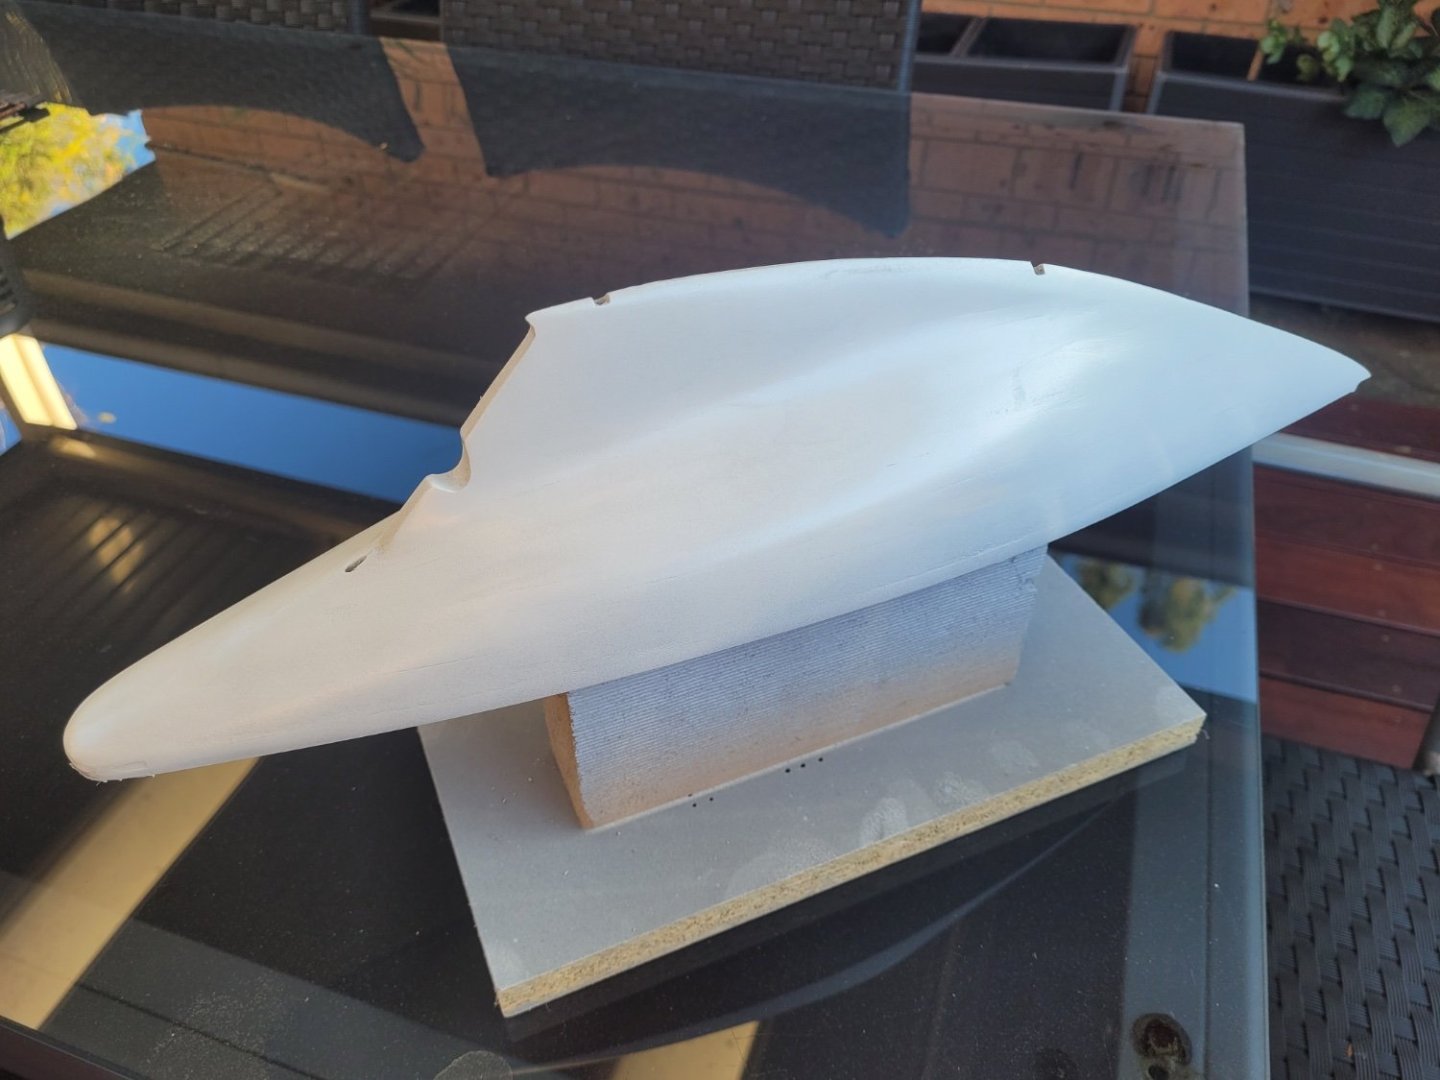
I have been continuing to work on the hull, adding more filler in specific places, sanding and repriming to check progress. There have been a couple of rounds of this since the last update and I am getting closer to being pleased with the finish.

After the last sanding session I sprayed the hull with the white paint I will use as a top coat to see how this went on. I added a couple of light coats and it seemed pretty good but there were still a couple of places that I thought could be improved. I have since sanded back these areas a little and will respray with more coats of the white paint over the coming weekend.
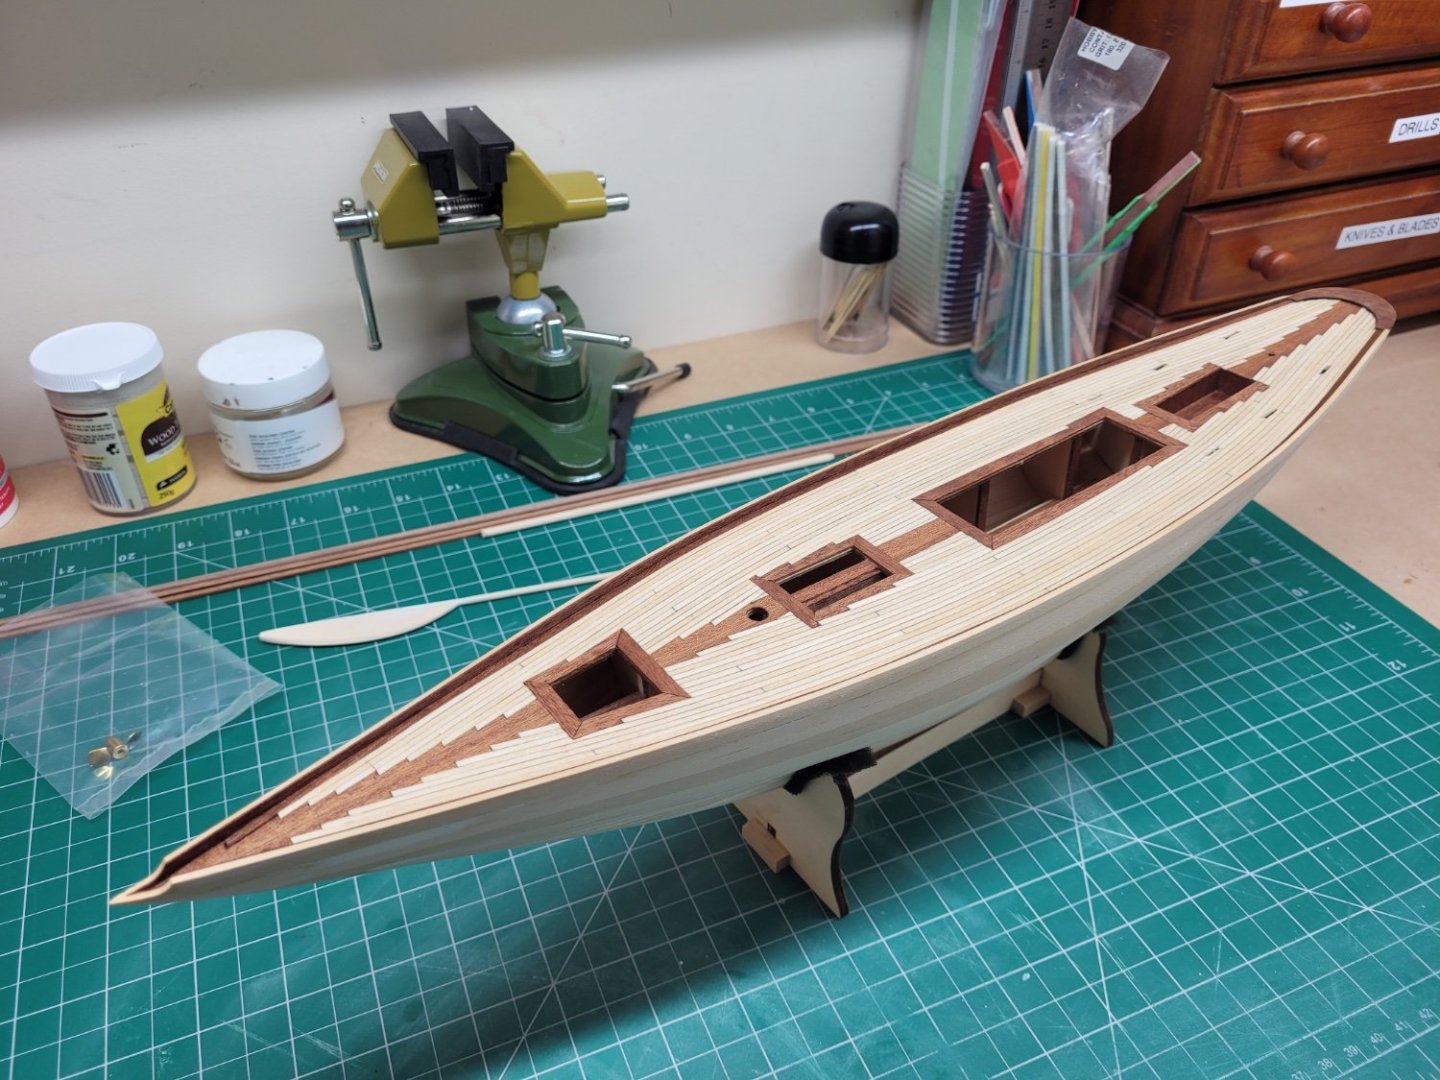
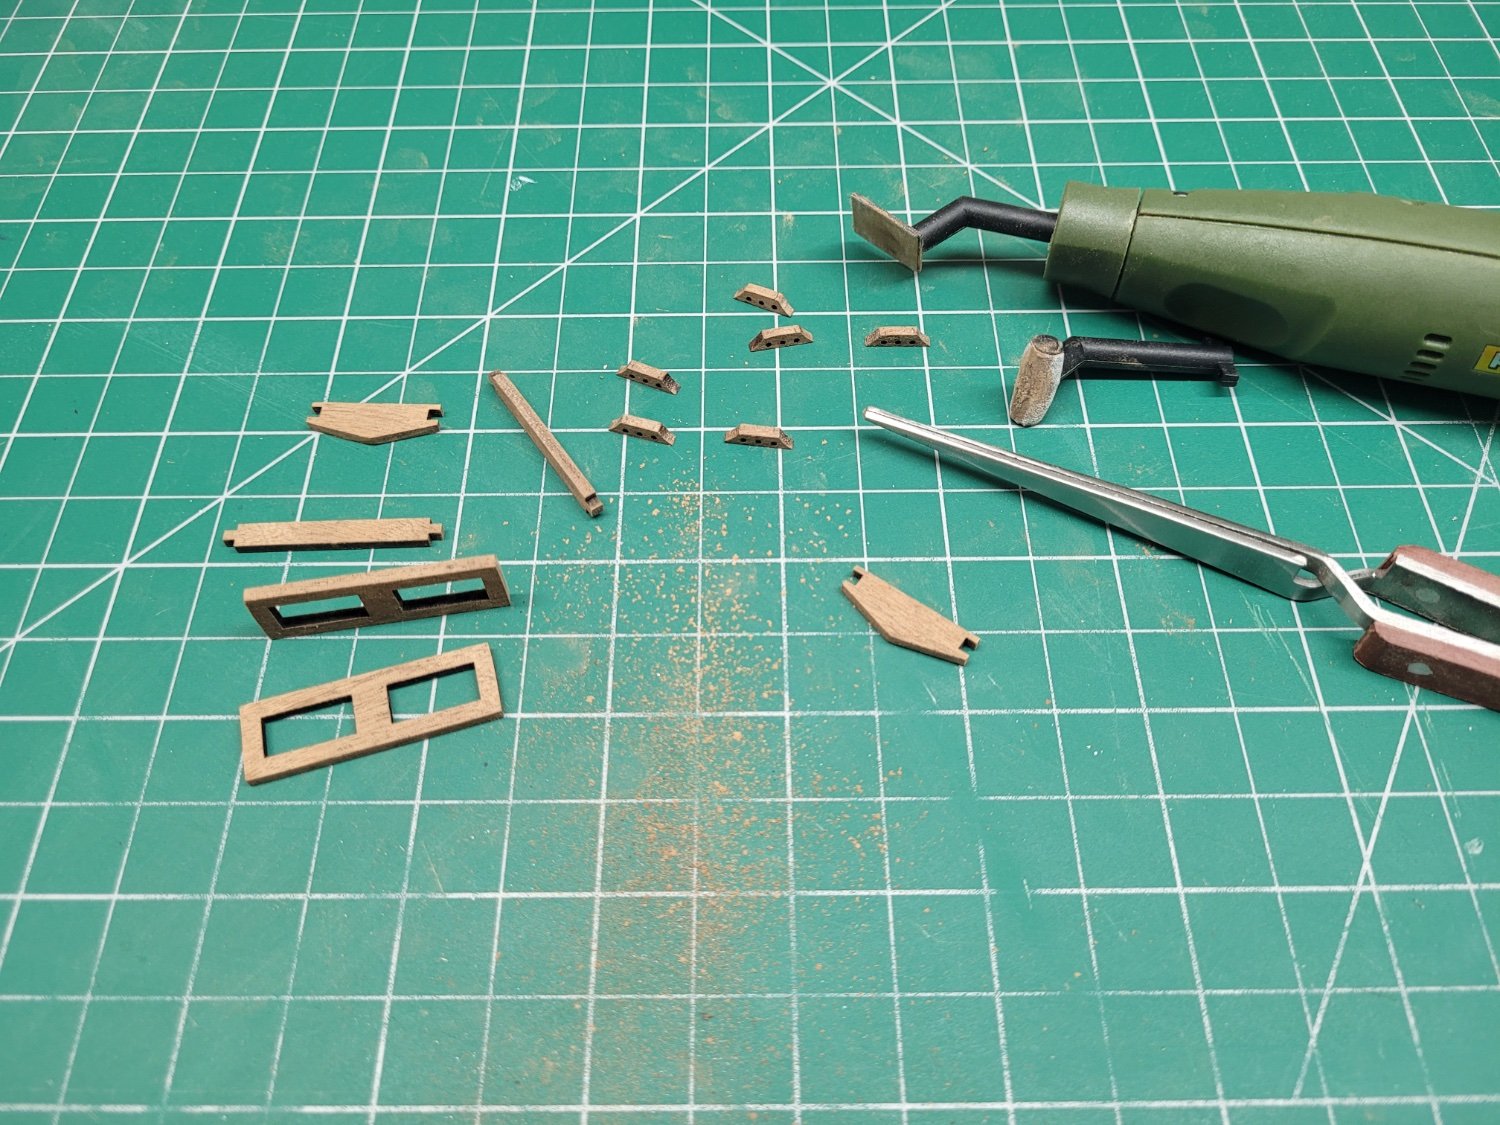
As a change of scene I have also now started work on some of the deck fittings. The Artesania Latina written instructions basically give up at this point and simply indicate that you should follow the pictures to see how everything goes together 😃 Luckily it is all fairly straightforward and the images are clear enough to follow along. The deck fittings are precut in a couple of sheets of sapelli and the first task is to remove all of the char. I found the Proxxon pen sander to be very good at this - I have some of the Proton sanding pads but you can easily use normal sanding paper in an appropriate grit by using double sided tape to hold it on the sanding head.

I constructed the forward hatch and gave it a coat of wipe on ploy which brought out a lovely deep colour in the wood. The manual images suggest just gluing two thin pieces of brass strip to the hatch to simulate the hinge but I decided to try to make this a little more appealing by gluing a thin brass wire across the centre of the hinge and drilling a hole at each end of the hinge into which brass pins were inserted. Hopefully it looks a little more like a working hinge - if you glance at it quickly!

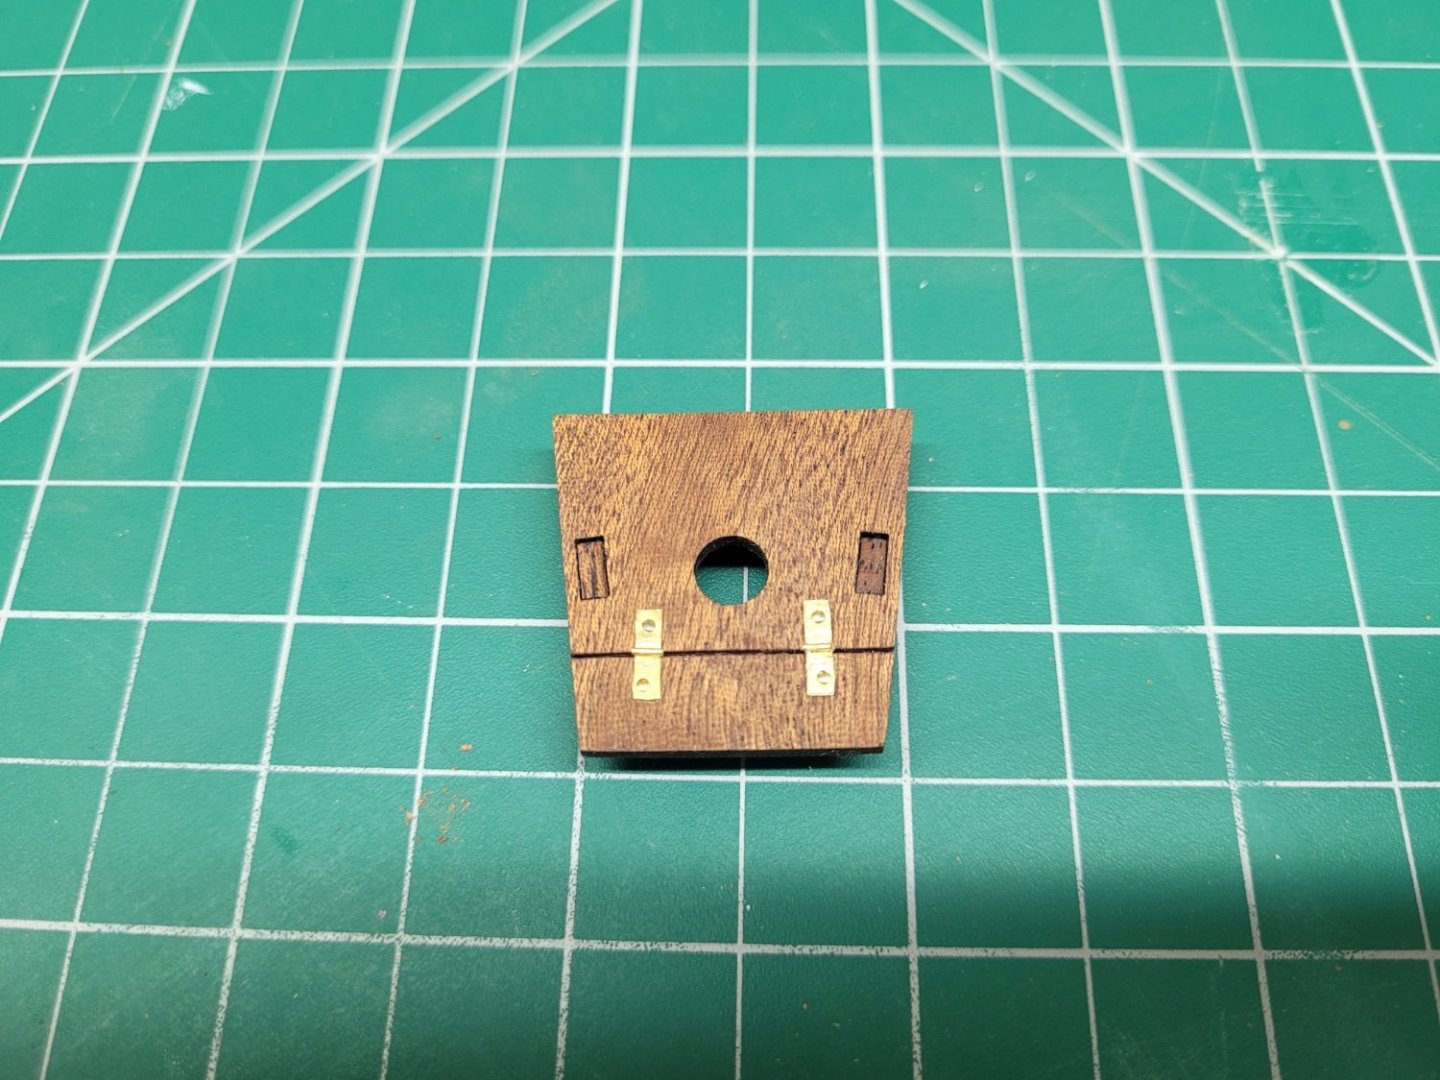
There is a round skylight fixture that needs inserting into the central hole in the hatch but the kit supplied version is a grey metal piece. I will need to paint it a brass colour to match the rest of the metalwork on the deck fittings so I will have to source some Vallejo paint to do that.
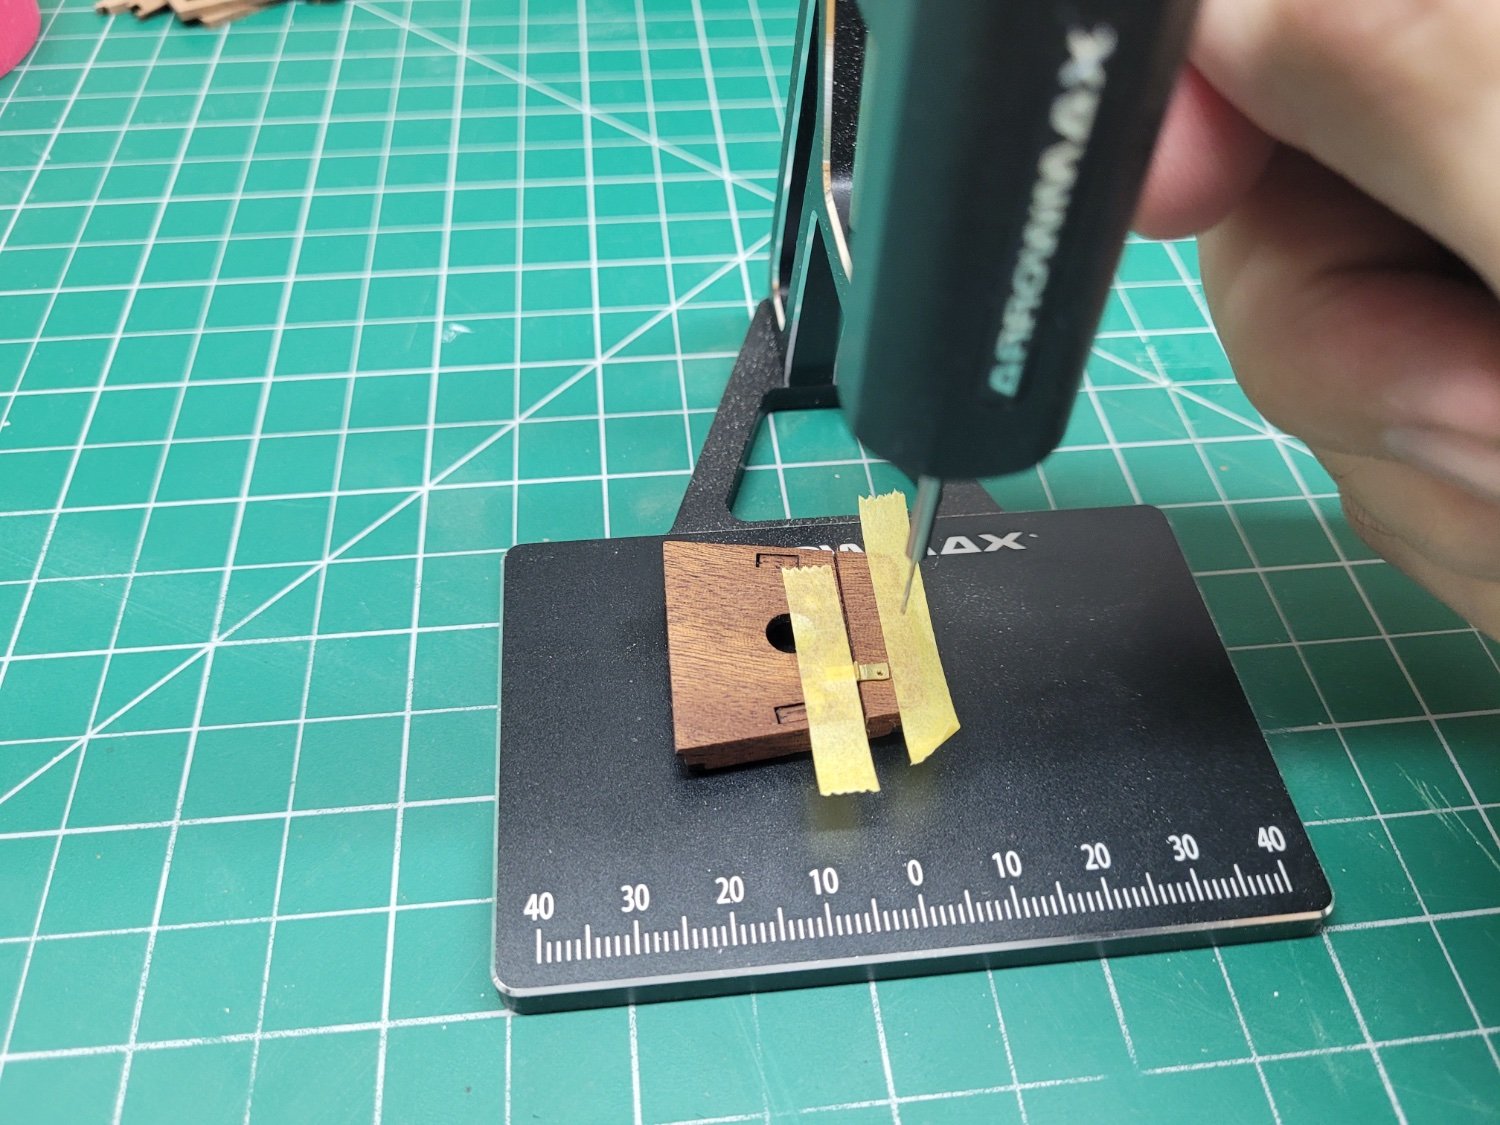
I then moved onto the butterfly hatch and also decided to enhance this a little too. The AL instructions simply indicate that you should add the two rectangular skylight frames to the top of the hatch framework. However, because the hatch framework is angled you are left with a little v shaped gap down the middle of the hatch where the skylight frames meet at an angle. Looking at images of the real Pen Duick it was clear that the actual yacht has a central bar running the length of the hatch into which the two skylight frames are fixed by three hinges - it is a butterfly hatch after all! I therefore added this central struct to my frame and beveled the edges of the two skylight frames so that they butted up snugly to the central strut. I will add hinges in the same way I did for the forward hatch but I can't do it in exactly the same way as the real yacht simply due to space constraints caused by the fact that on the model the wooden pieces holding the brass bars are greatly over scale. I will add 4 hinges to my model hatch rather than the 3 on the actual yacht - 1 inside each of the end bar holders and 1 either side of the central bar holder.
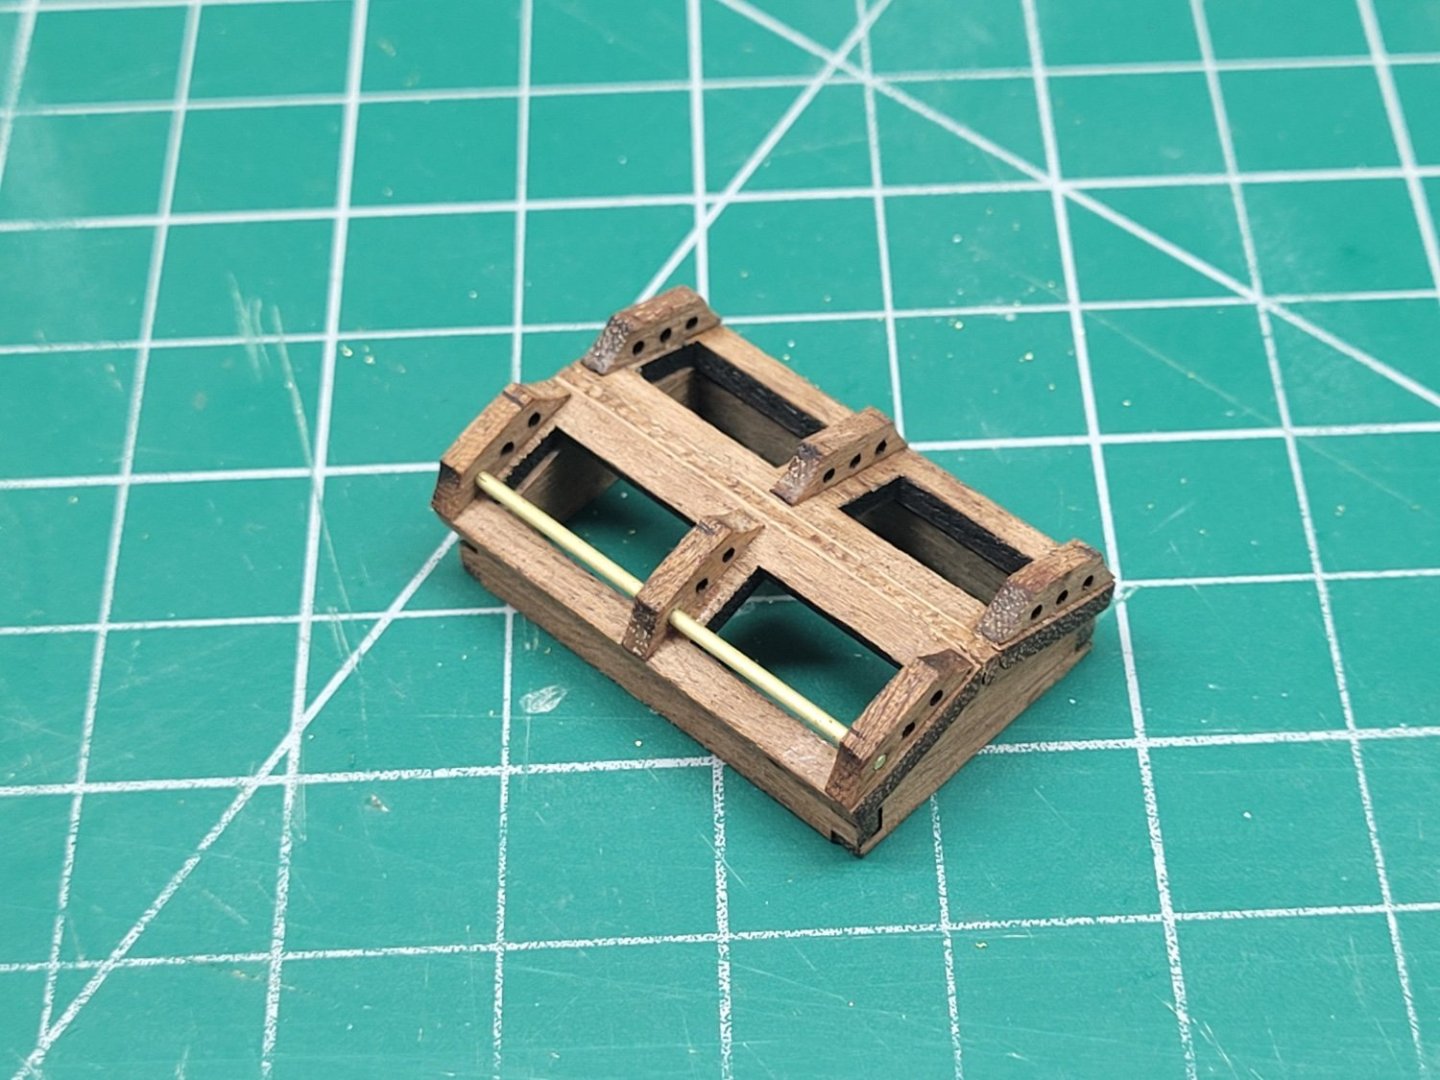
The 1mm brass bar supplied with the kit comes in a coil (?) but luckily I had some straight lengths in my stash of materials. It was easy to cut the brass bar to length using the bar cutter and a razor saw - and that method also ensure the lengths are consistent and avoids the problem of the ends getting squashed when side cutters or other similar tools are used.
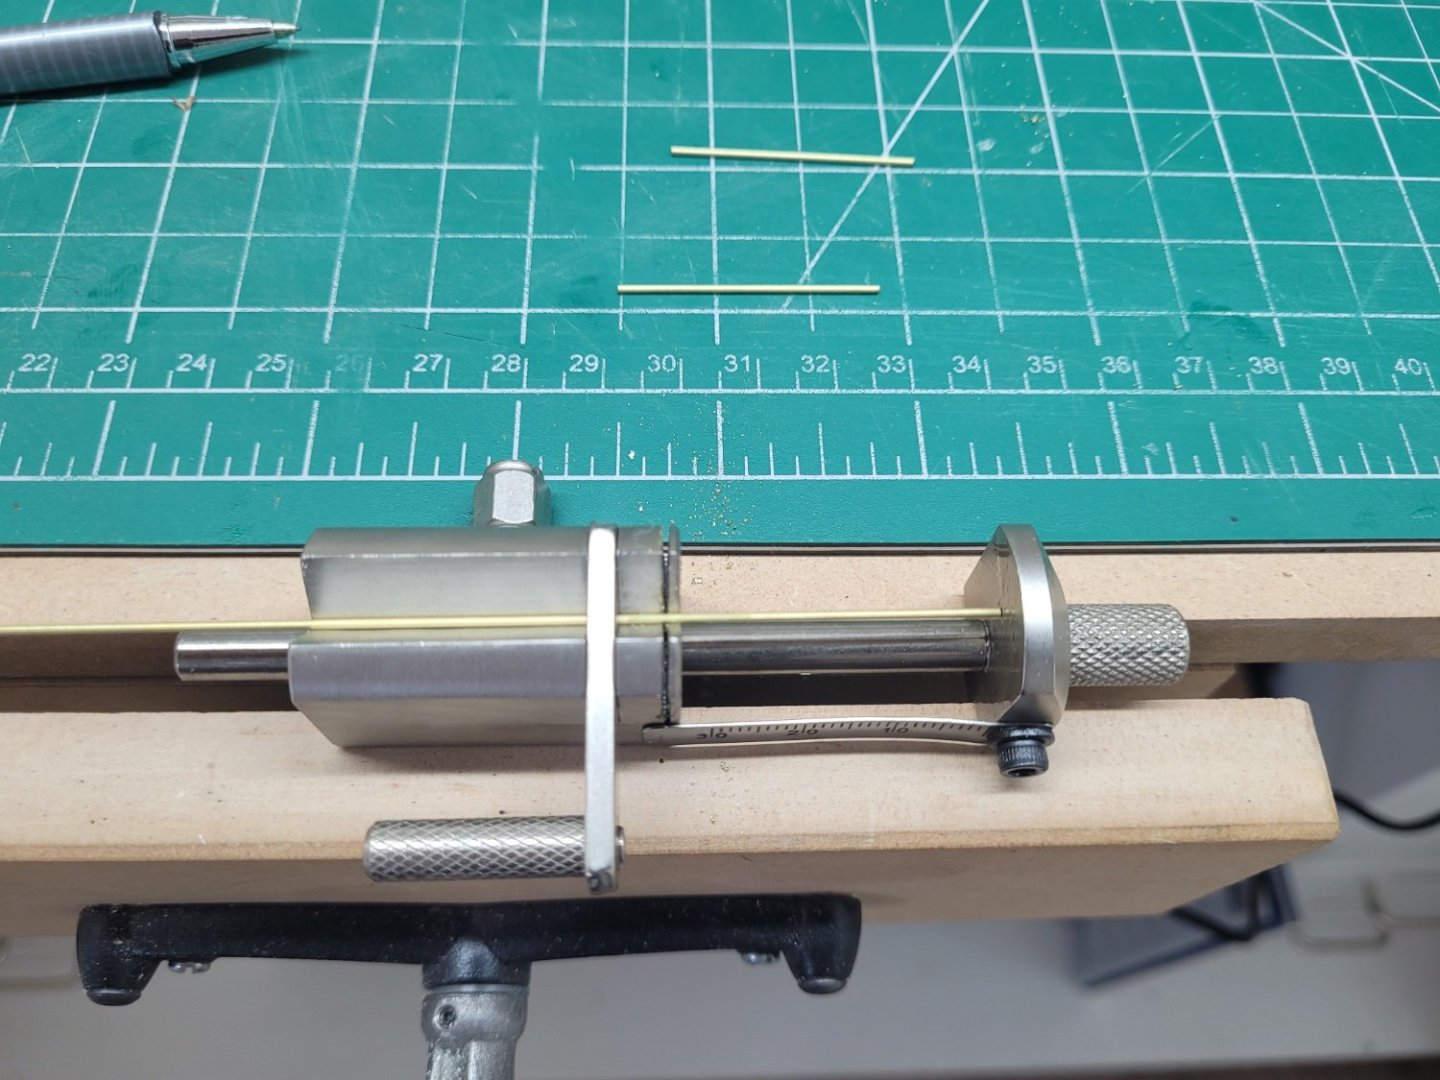
I imagine it would be possible to straighten the coiled bar supplied with the kit but it was certainly easier to just use straight pieces to begin with! The butterfly hatch needs a coat of wipe on poly and then I will insert and secure the brass bars.
- yvesvidal, Knocklouder, Thukydides and 4 others
-
7
-
Great work - using jigs like that really helps make everything look consistent which adds a great deal of professionalism to the build.
- Glen McGuire, Quimp Slattery, AJohnson and 2 others
-
4
-
 1
1
-
Welcome !!
- Keith Black and mtaylor
-
2
-
I find flytying thread to be very useful for this sort of task. There is lots of choice of colour and thickness and it is pretty easily available from online fishing stores. Size 8/0 or thinner seems pretty good for this scale. Guterman Mara thread is also useful too.
-
Thanks HOF,
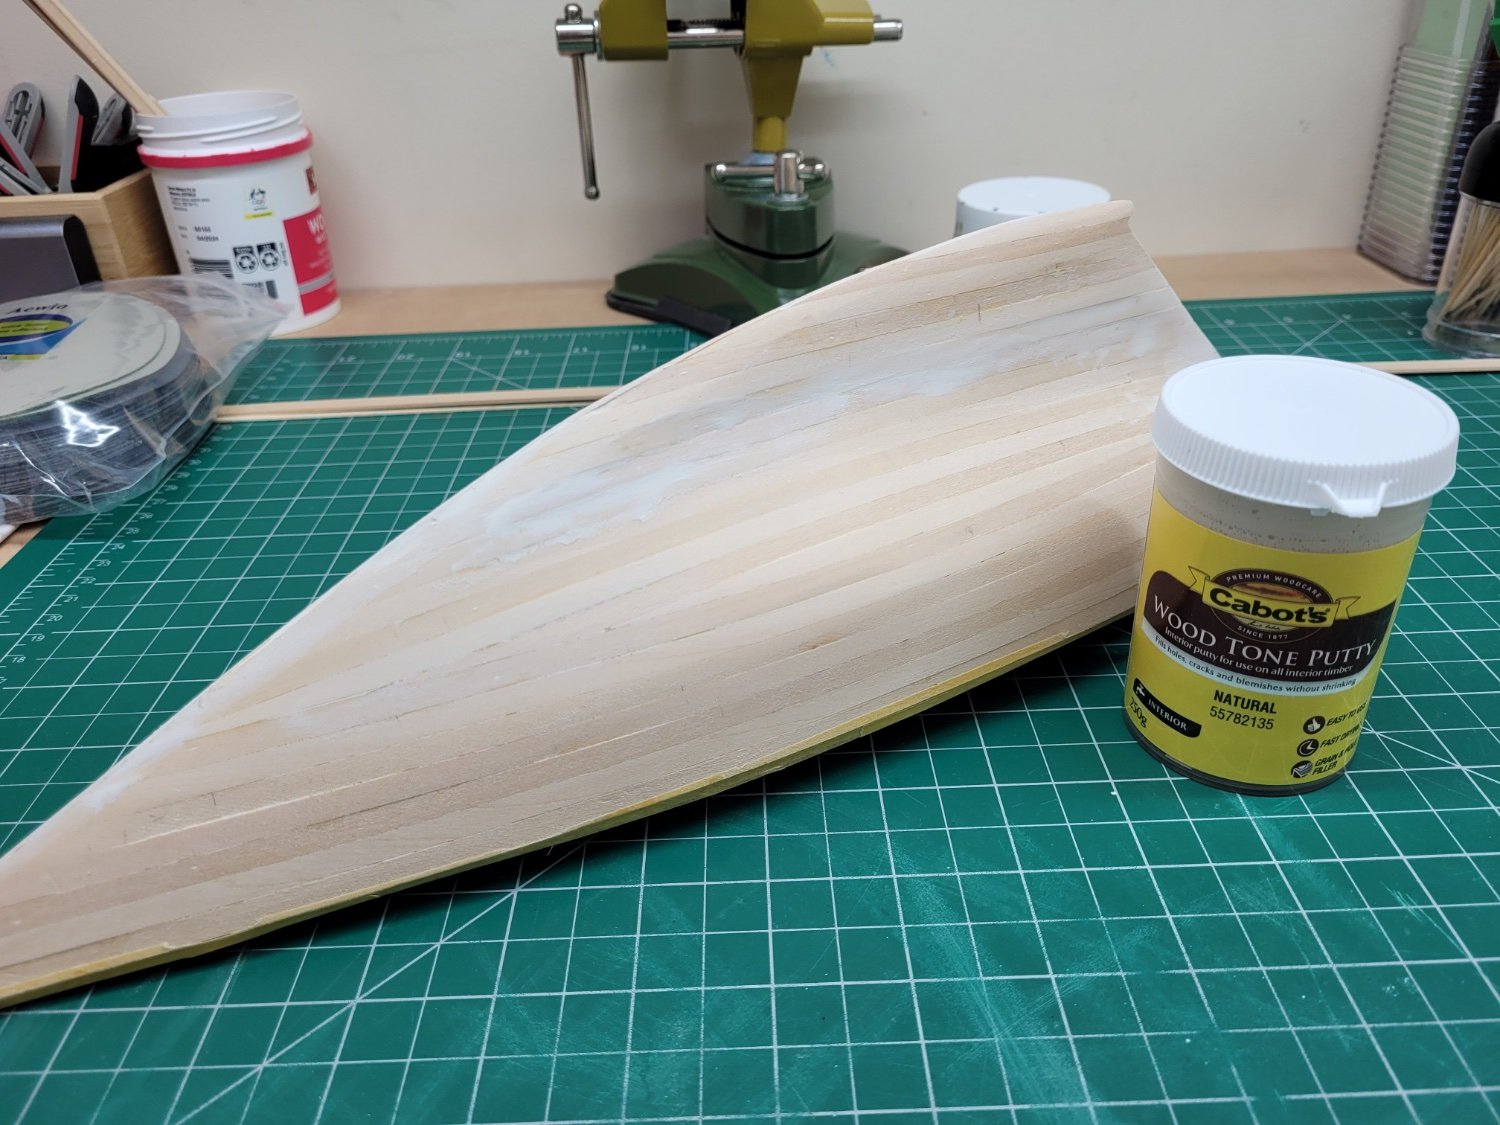
Yes, the spray putty really makes a huge difference and hopefully it will allow me to get a really good surface in preparation for the painting.
The painting of the hull is a bit daunting as I know it is so easy to muck it up at any stage, but on the other hand it is easy to sand it all back and start again, even if that is a bit depressing! I just hope that it doesn't take me too many goes to get it right. I plan to use a spray can to put a couple of white coats over the whole hull which I will then mask off to allow me to add the black and green sections. These will probably be applied with my airbrush - but I do need to brush up on my skills with that (pun intended 😄). Then I'll put some varnish over the whole hull - not quite sure yet on the choice of gloss or satin.
Getting the hull into shape and applying a good paint job will be the biggest challenge in this build. Once that is done adding the deck fittings, mast and yards etc should be much more straightforward. I'll take my time now over this part and hopefully be pleased with the end result.
-
I have continued working on the hull to try to get as smooth a shape as possible. I added a little more filler to some of the low spots, sanded and gave the hull another coat of primer to see how things were going. There were still fear few undulations in the hull lines which I didn't like so I decided to buy some of the spray putty that @hof00 had mentioned he had used on his build. However, before continuing with further work on the hull lines I thought that it would be a good idea to turn my attention to the problem of mounting the boat and the options that are available.
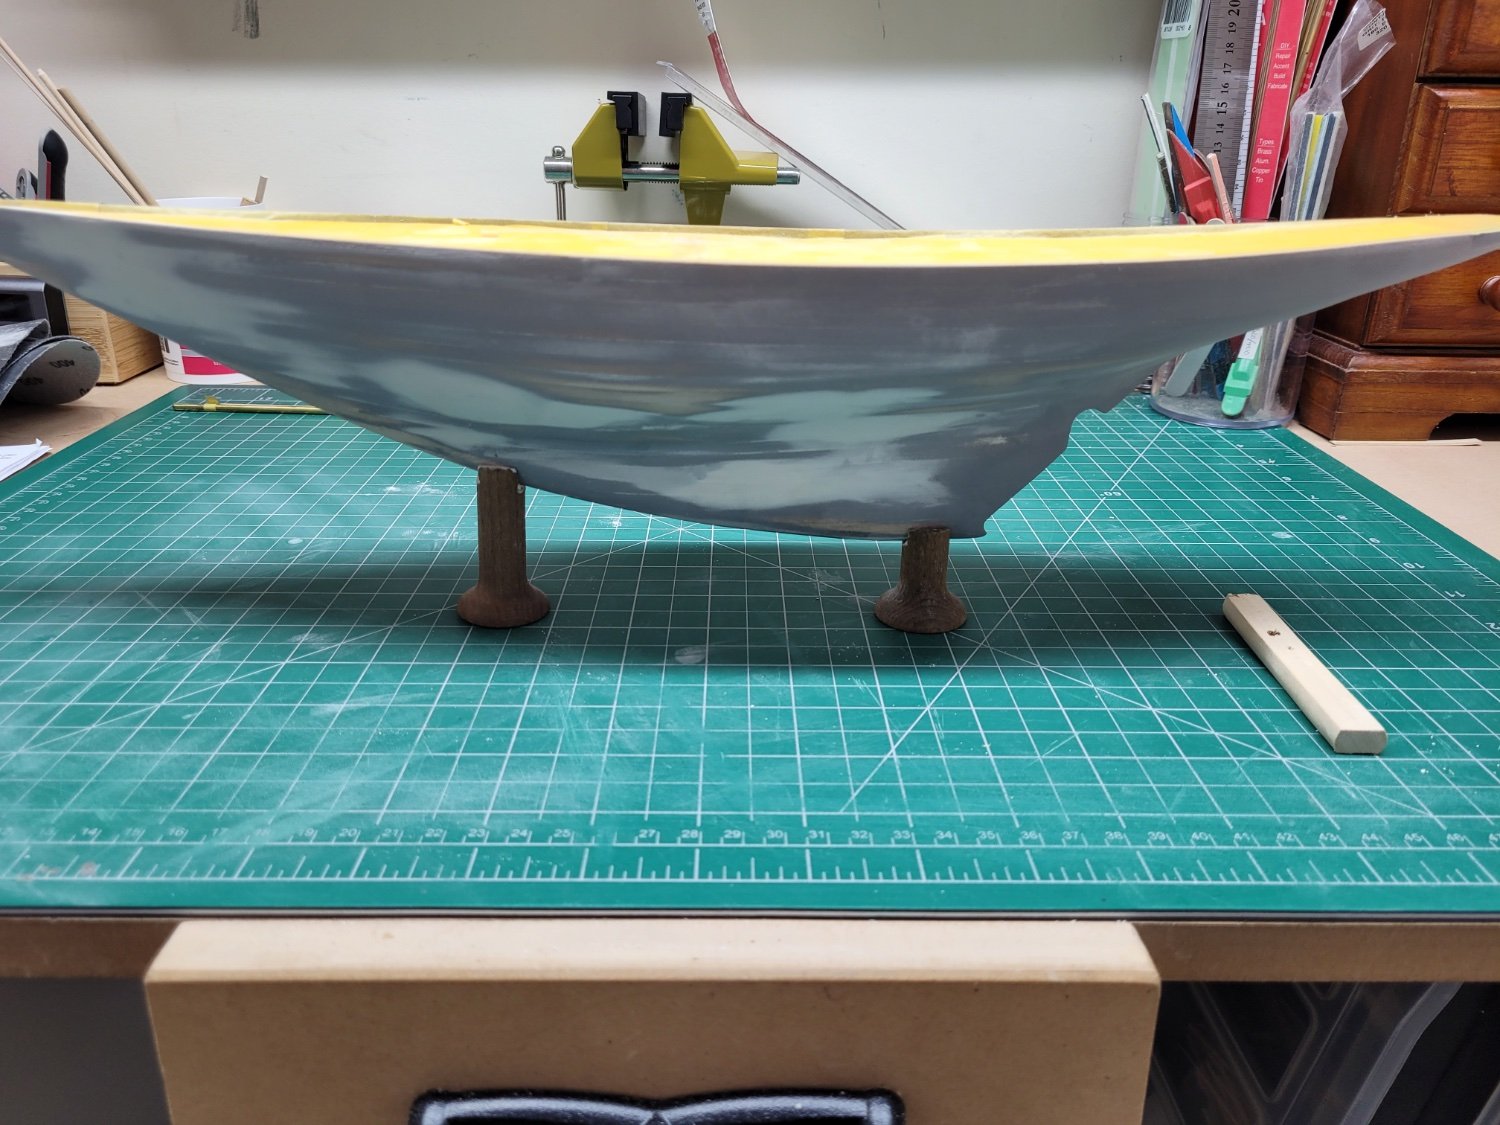
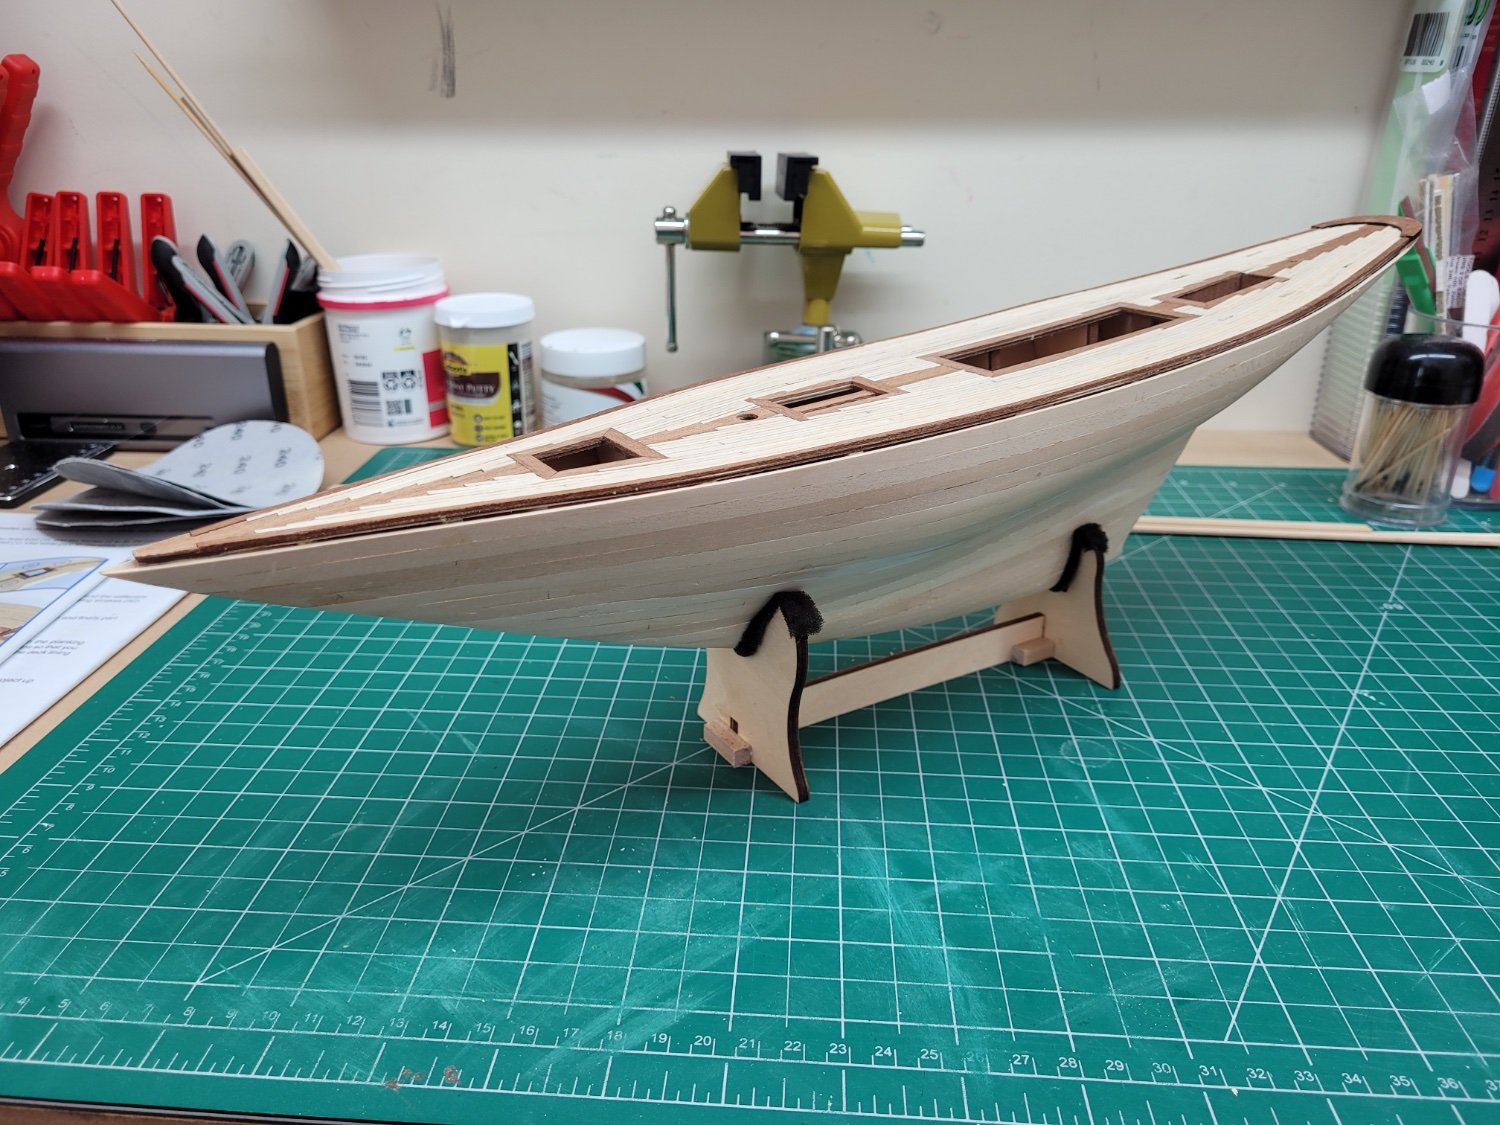
The kit comes with a simple plywood stand which I found didn't really fit my hull shape too well - perhaps my initial fairing was off. However, the stand is made of three pieces and didn't actually fit together too well itself, with the joints being very loose. I have added in some supports to make it square and more sturdy and you may have noticed from earlier images that I have been using it as a support during the build, but it certainly wouldn't be suitable for when the boat is finished and on display. I do have a few types and sizes of wooden pedestals available to me but all of these have a cutout at the top ready to fit a nice square keel and so I wondered whether I could adapt these to fit the nice v shaped keel line of the Pen Duick.
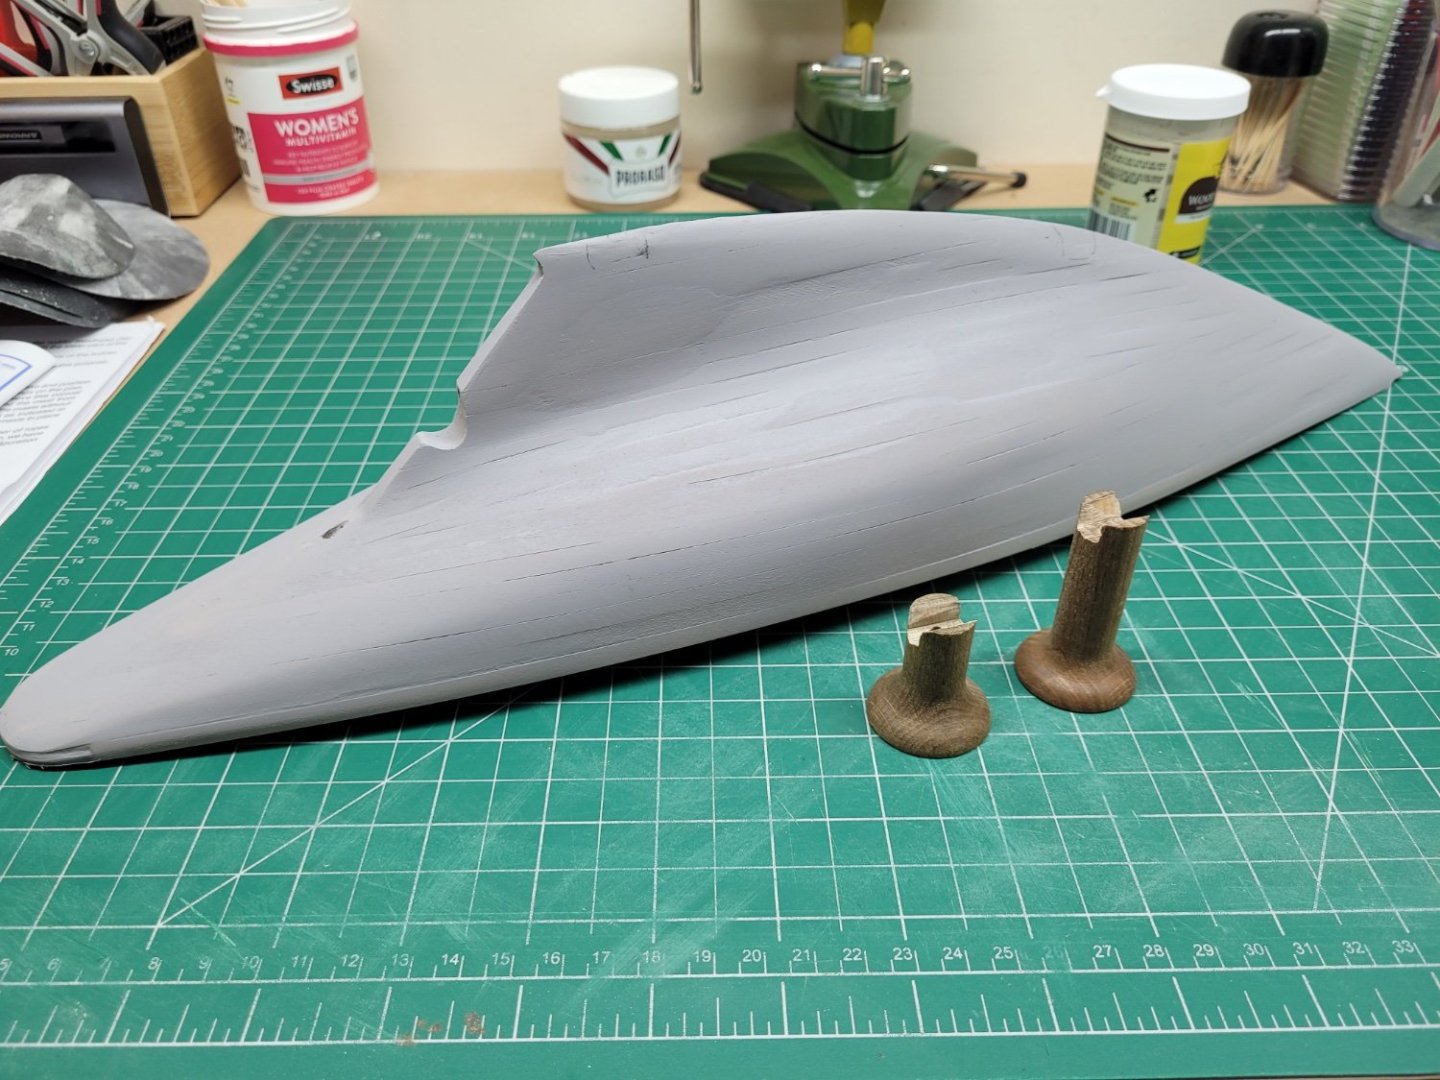
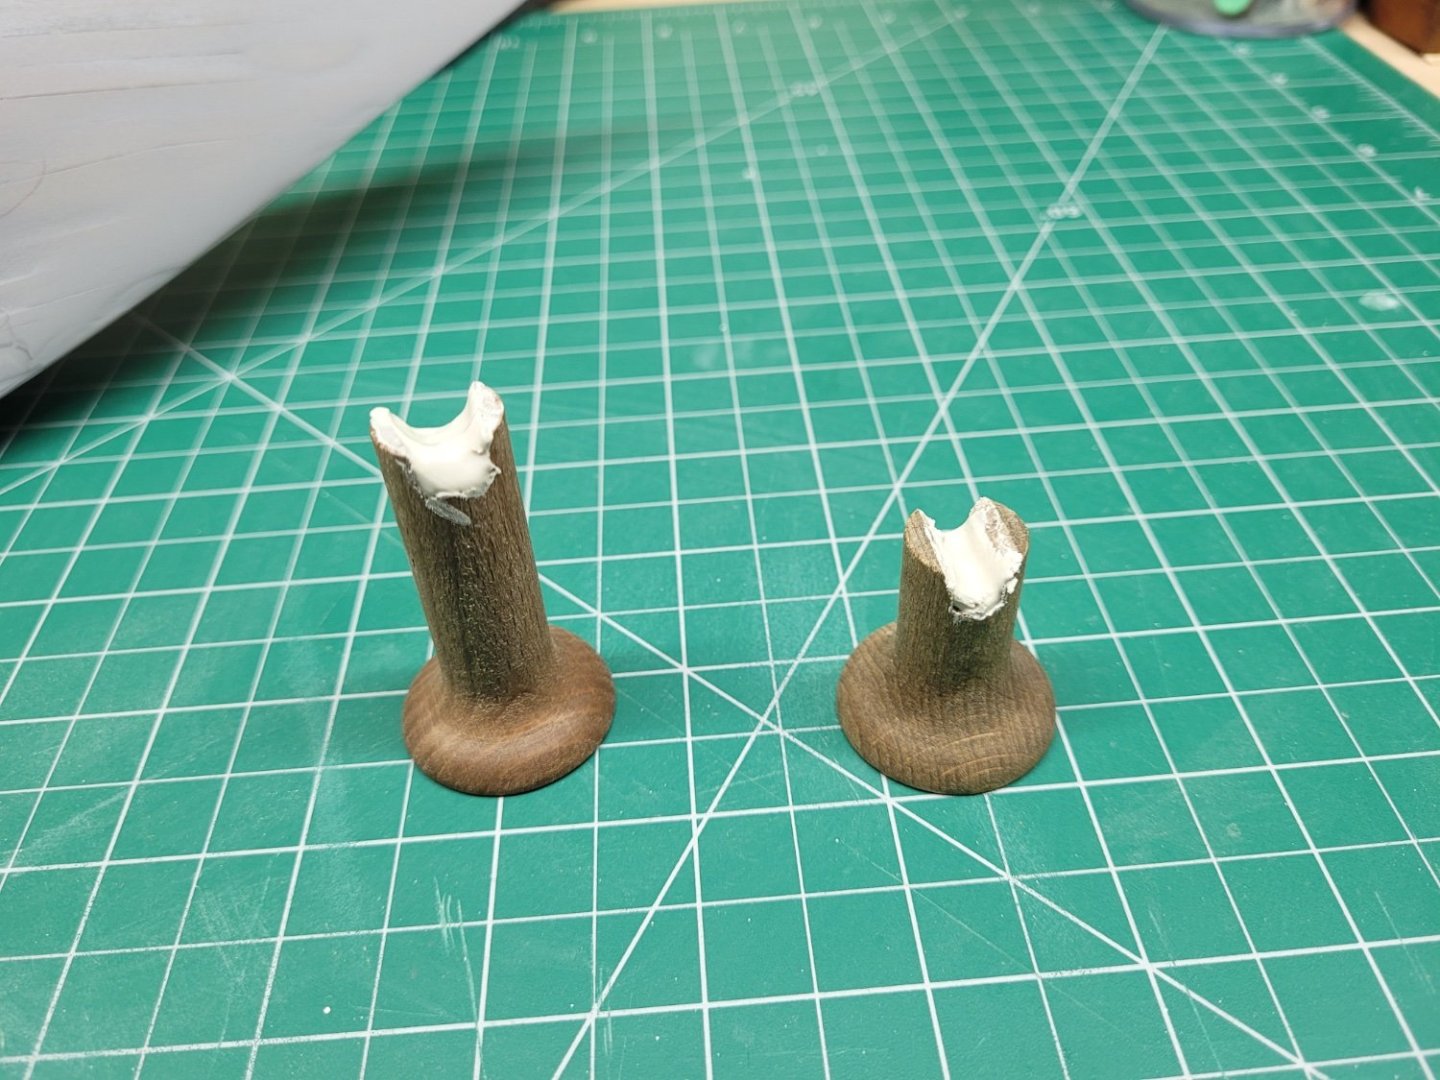
Because of the fact the the underside of the keel curves upwards towards the bow the two pedestals will also need to be of different heights and I was able to find a likely pair of wooden pedestals that might be suitable. The taller of the two will be the forward pedestal and it needed to have its nice square cutout altered so that it was angled up to match the angle of the keel and also to be filled and sanded into a v shape. The smaller of the two pedestals will go at the rear of the keel and really only needed the profile of the cutout changing to a v shape as the keel is fairly horizontal at this point. Again, I used filler to block in some of the cutout and sanded it to a v shape once more. The current profiles of the cutouts at the top of the pedestals are only pretty rough at the moment as I won't quite know the exact shape they need to be until I finalise the work on the fairing of the hull lines.
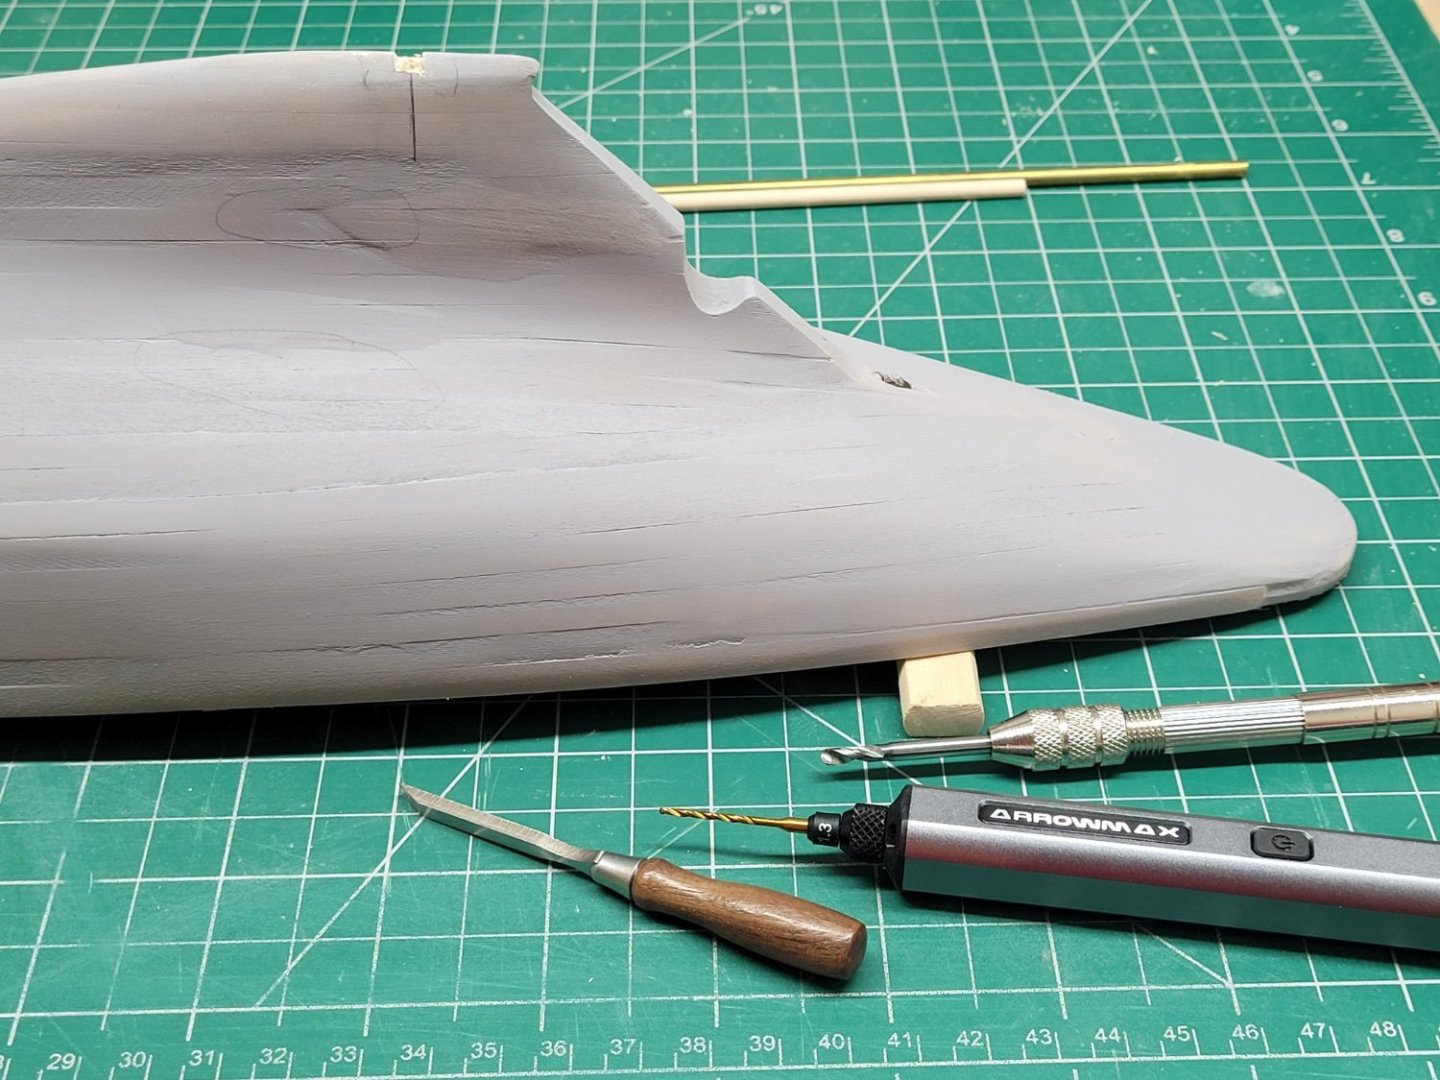
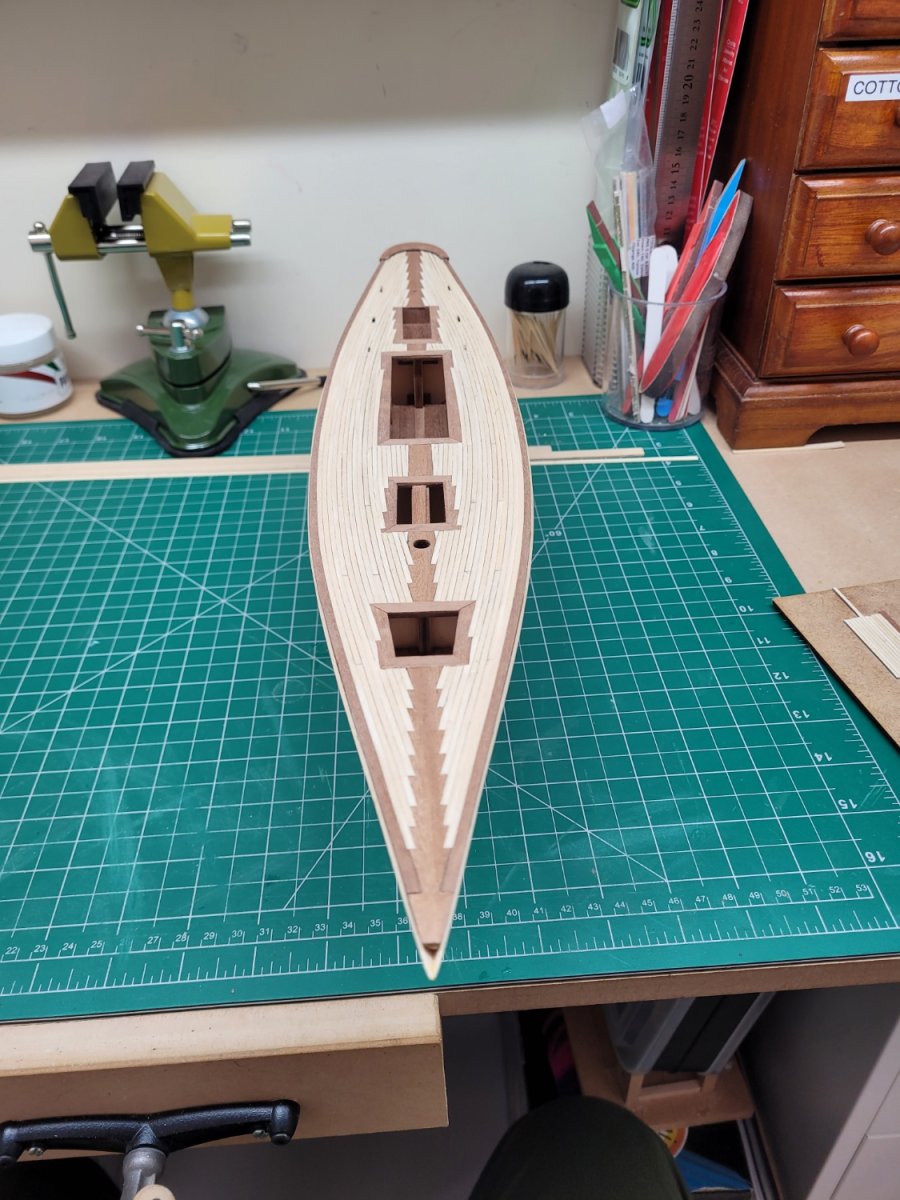
In order to have the model sit securely on the pedestals I needed to drill holes into the keel so that a brass rod can run through the pedestal and into the model. The pedestals have a 4mm hole through them and I have some 4mm brass rod which will do the job nicely. A bit of trial and error worked out the best places for the model to sit on the pedestals and I marked the centre where the hole needed to be drilled. I began by cutting out a 4mm wide 'chunk' off the hull so that I had a square and level piece of the keel to drill through. The depth of the cutout in the hull was determined by how far I needed to go until the flat inner piece of the hull was just over 4mm wide. I then began drilling holes down into the keel frame, starting with very small drill bits and working up until I reached 4mm and had suitable sized holes into which the brass rods will fit.
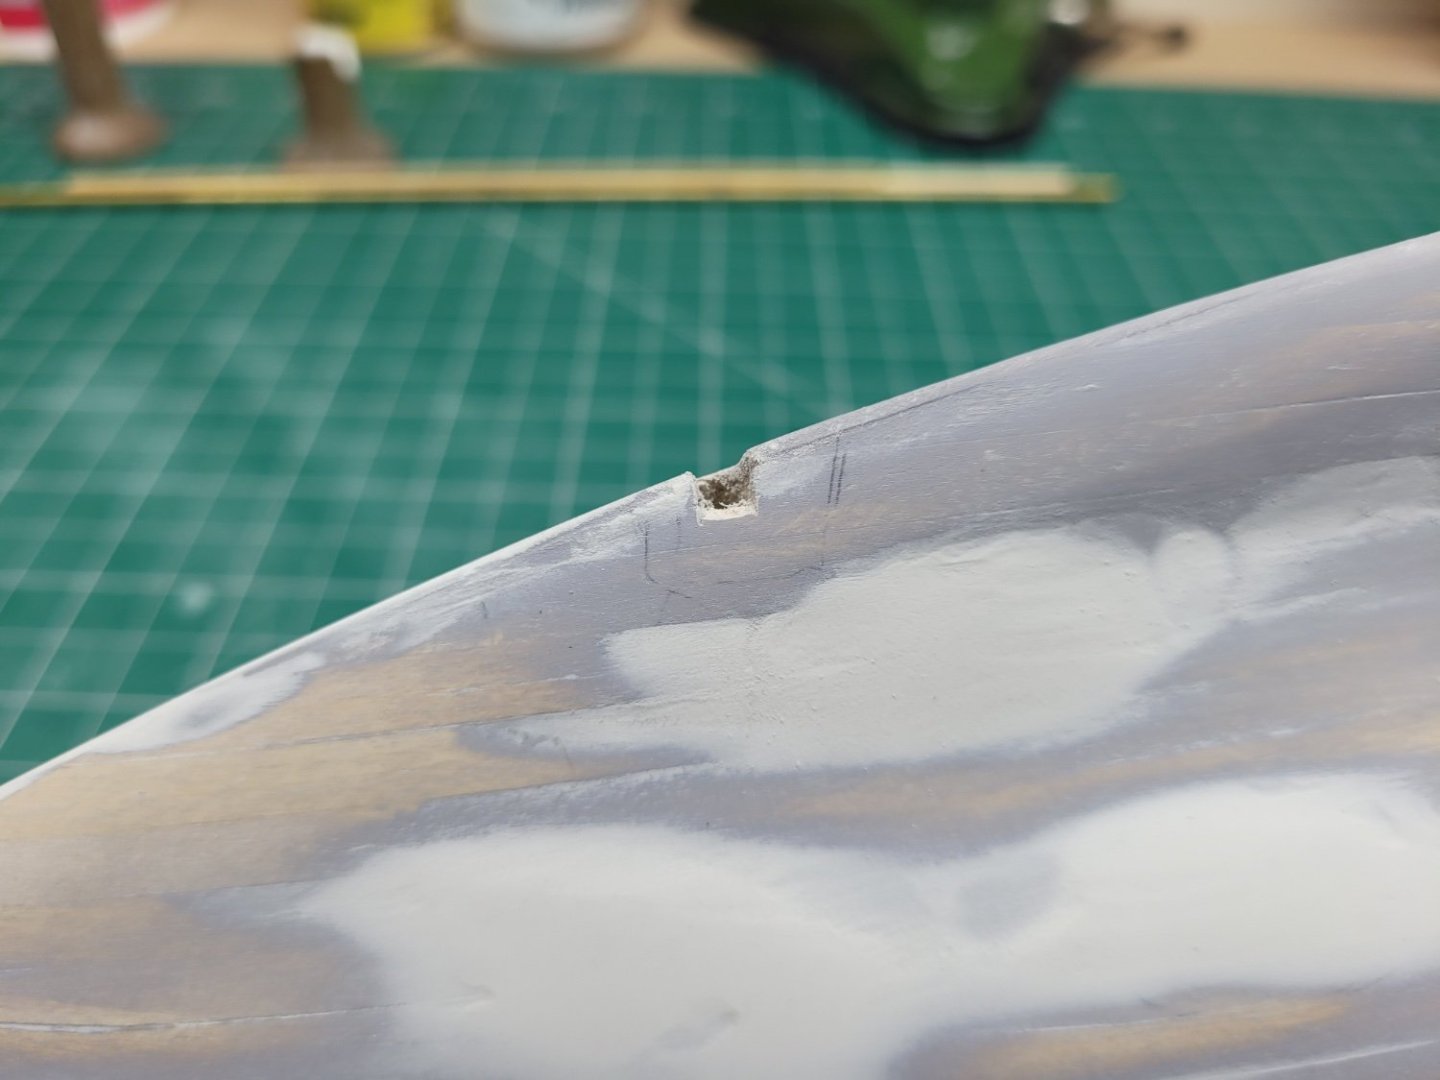
The holes are drilled to a depth of about 20mm into the keel. The various keel thickener pieces which were added to the keel much earlier in the build mean that the bottom of the model is pretty much solid wood for quite a distance from the keel and so there is plenty of wood there to support the rods once they are inserted into the model.
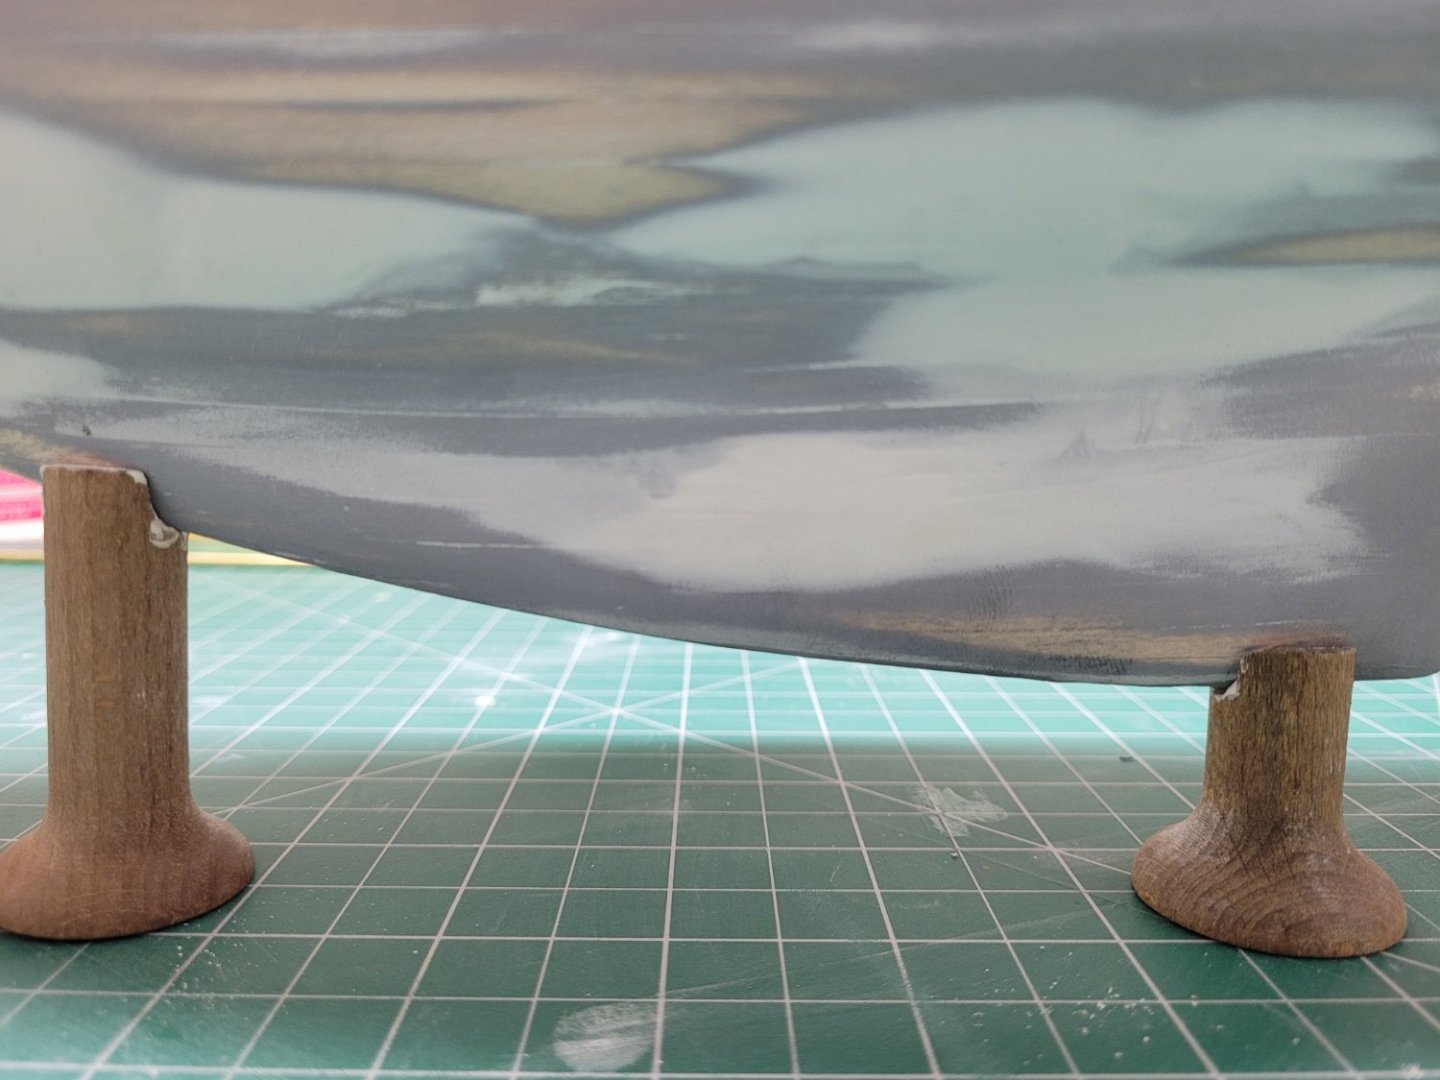
A trial fit of the model on the pedestals using some 4mm dowel was undertaken just to make sure everything worked ok.
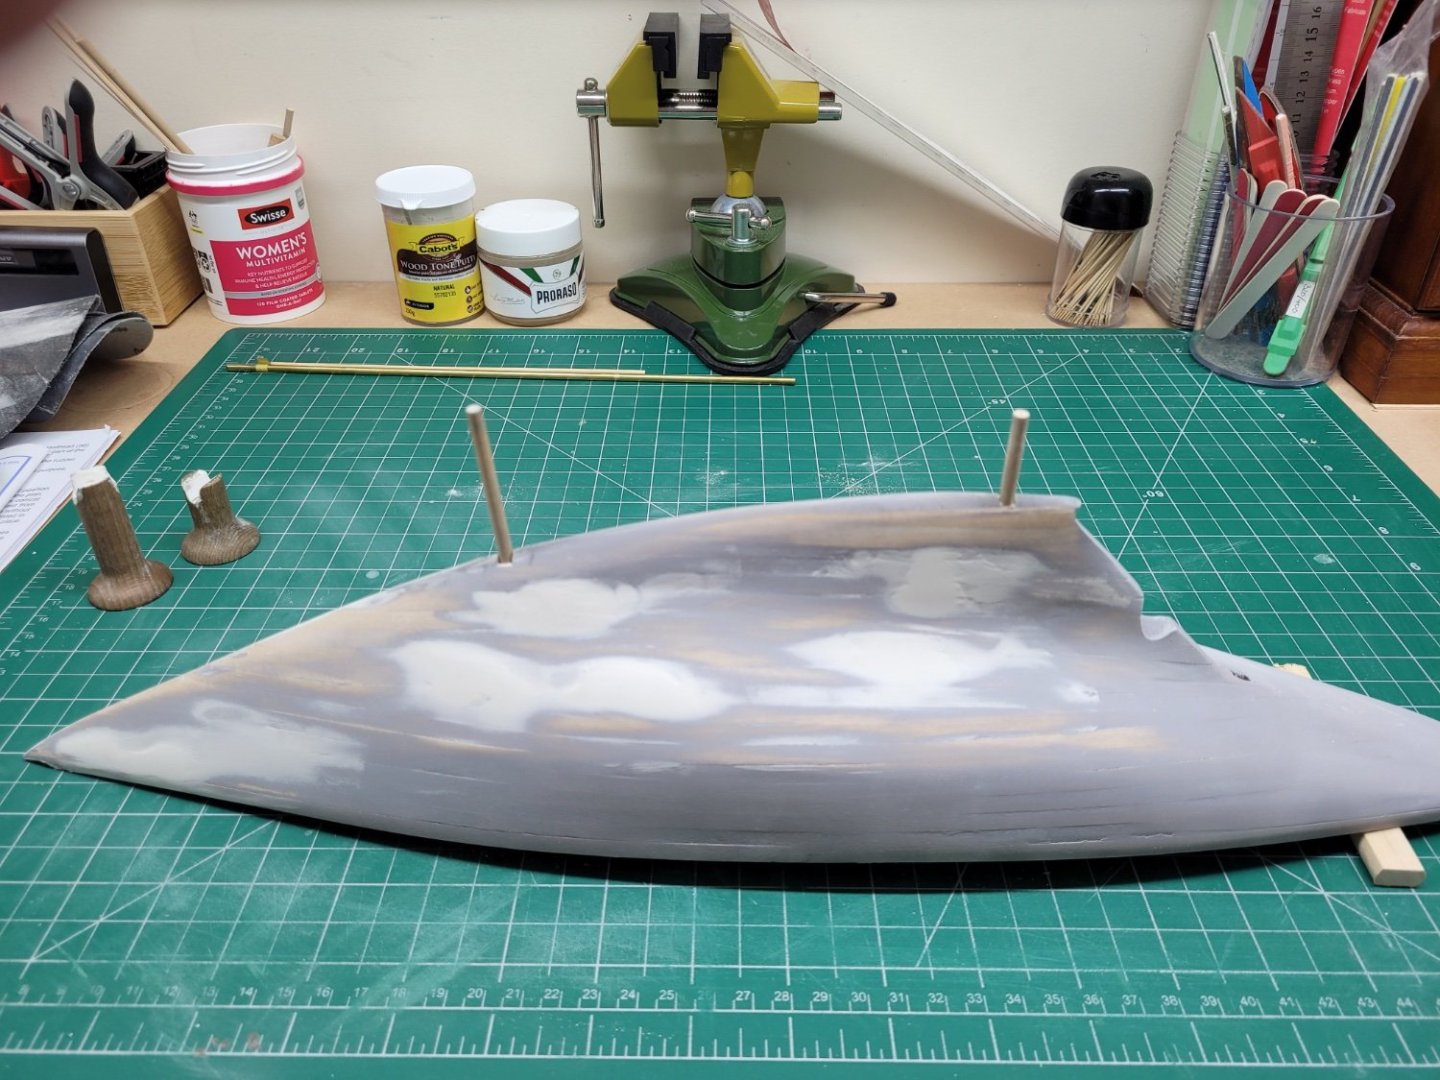
I think the forward hole is very slightly off from perpendicular to the hull (it looks even more off in the photos) but the model seems to sit well when positioned on the pedestals - I can always tweak this as and when the final fitting is undertaken.

I plan to glue the rods into the hull but leave them free in the pedestals, and the pedestals themselves will be screwed to the baseboard of the display case - that then allows me to remove the model easily from the case if that is ever required. I will either stain or paint the pedestals at some point too.
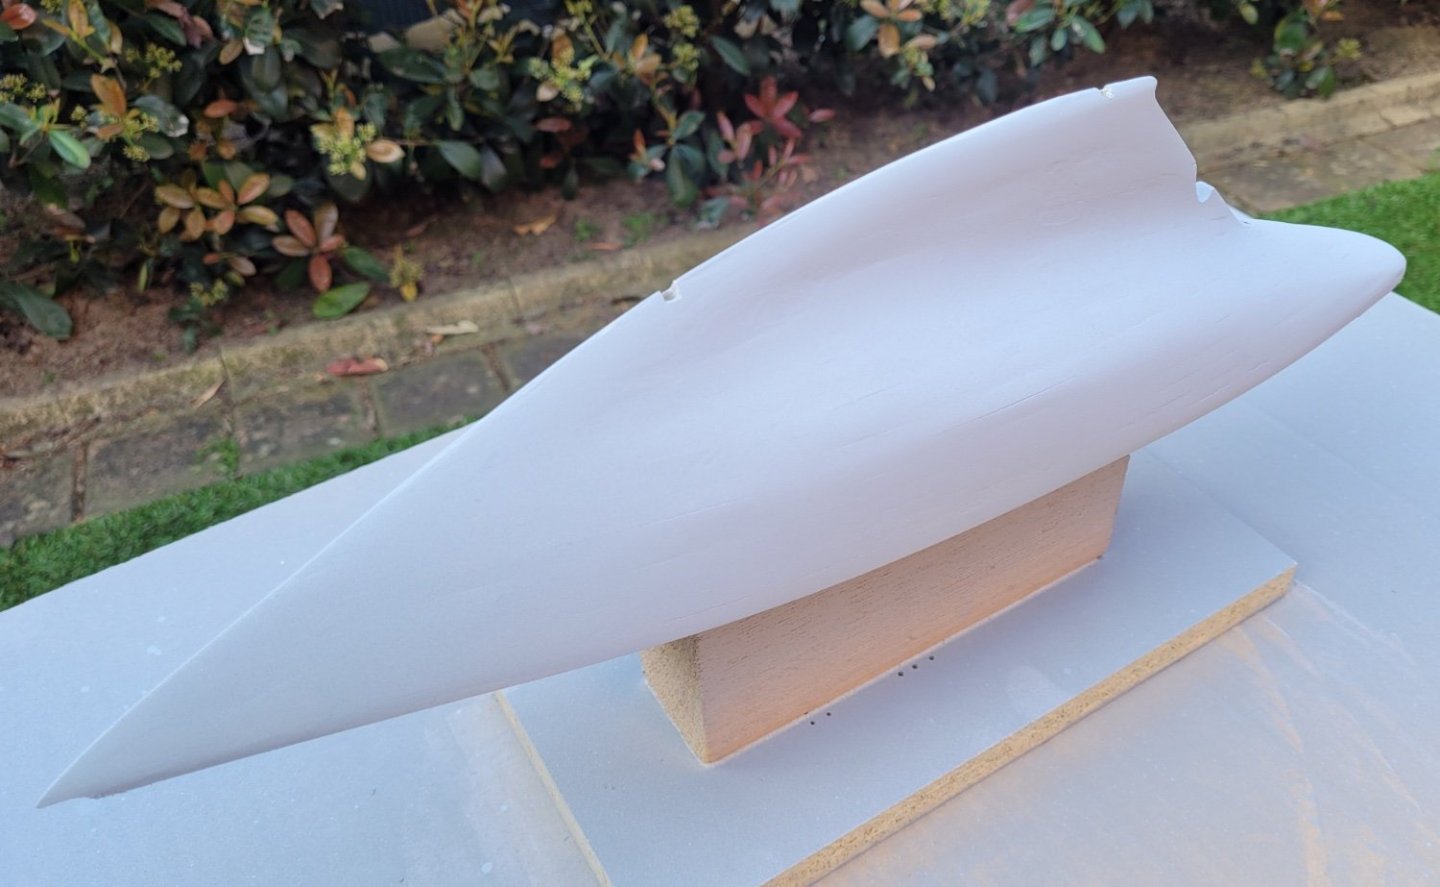
With the dowels still pushed into the holes I then gave the entire hull a couple of light coats of the spray putty. This went on very well and again helped me highlight where a little further work was required on the hull. After sanding the hull once more I have identified a few small areas that need a little more filler. This process of filling, sanding, priming, sanding, filling etc etc will probably continue for a little while longer but each time the hull is becoming more and more one cohesive shape and I think it is well worth taking the time to get this right now before I begin with the tricky work of painting.

- DB789, Thukydides, gsdpic and 4 others
-
7
-
-
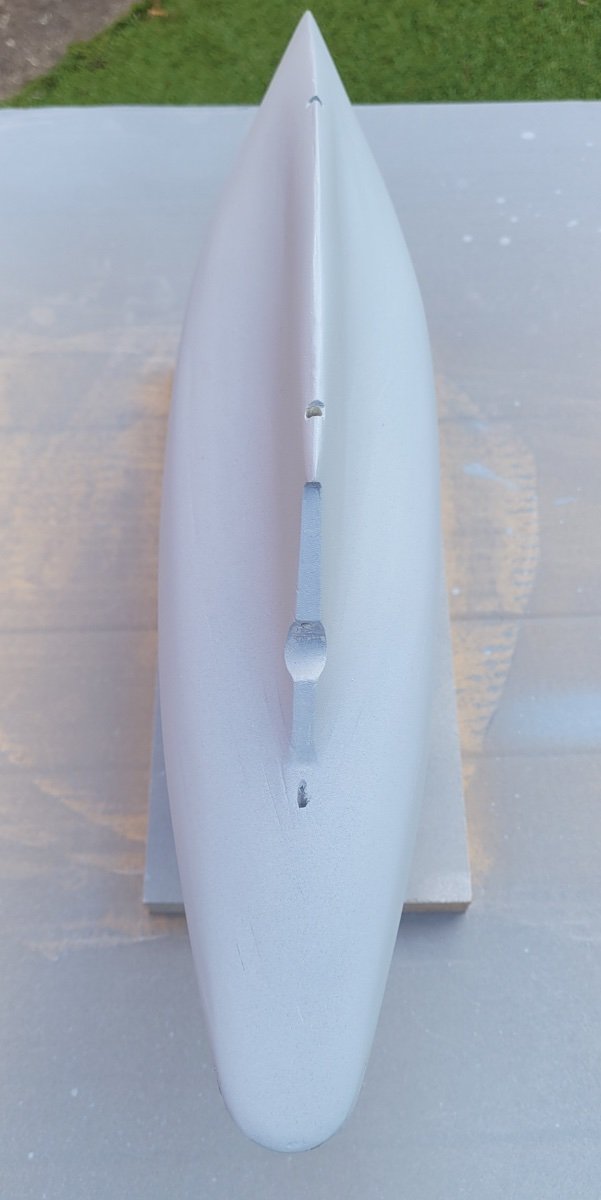
So this week's work centred around fixing the rudder, sorting out the setting of the propeller, and more work on sanding and filling on the hull.
As mentioned above I had decided not to drill through the entire hull to fit the rudder stem but even drilling the 4mm hole just to fix the stub of the stem into the hull was quite a tricky exercise. I began with a 1mm drill bit but none of the pin vises or other drills to which I had access really allowed me to easily hold the drill in the position required against the keel line so that the hole for the rudder stem could be at the right place and set at the right angle. After a bit of struggling I managed to drill the 1mm hole by just holding the drill bit in some small pliers and once I had the hole started I was then able to start sizing up through the drill bits to work my way up to 4mm. I only drilled to a depth of about 8mm but that will be more than enough to hold the top of the rudder. It would certainly be easier to drill from above the deck through the hull but I'm not quite sure how you would guarantee the drill exited in exactly the right position against the keel. Kudos to those of you that did it that way though! I think I probably should have had the hole slightly nearer the keel so that the gap between the keel and the rudder was slightly smaller but that was the best I could do. I can always beef up the edge of the rudder a little at a later stage if I decide the gap is too large and annoying. I also drilled a 0.5mm hole in the very base of the keel and rudder in which a brass pin is inserted to hold the bottom of the rudder in position.
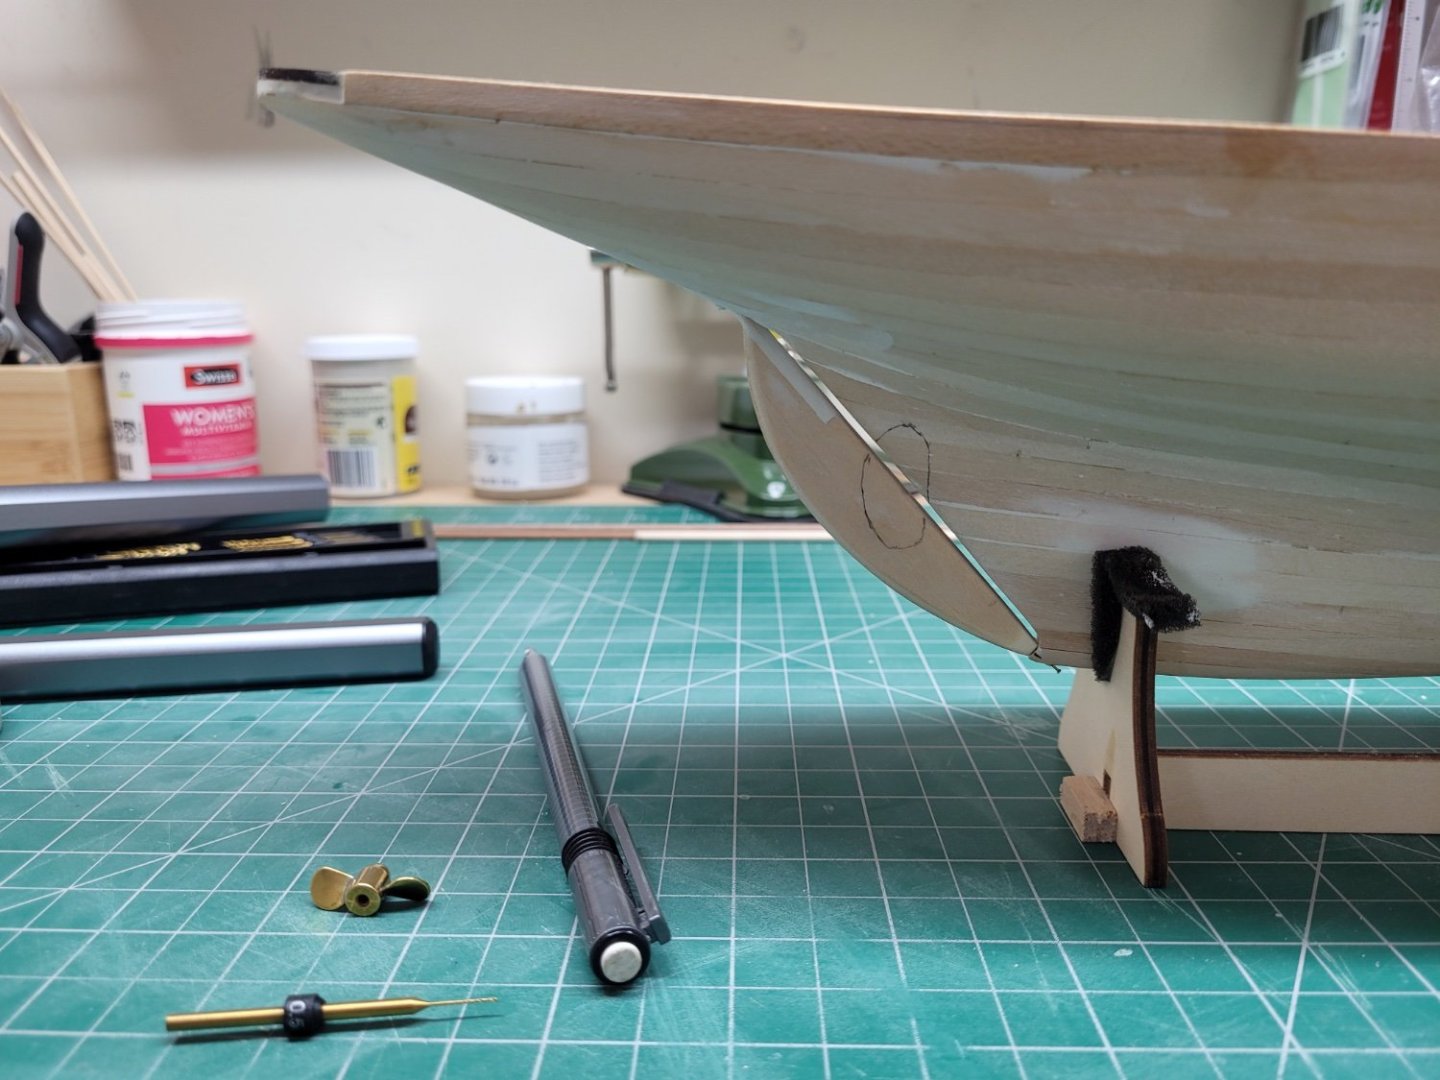
Now that I had the rudder in place (only dry fitted though) I could consider where I needed to cut into the rudder and the keel in order to fit the propeller. I spent some time online researching images of the Pen Duick during one of its restorations so that I could see how far up the keel the propeller was situated in the real ship. I eventually found one image (albeit fairly low res) which allowed me to gauge how far up from the keel the propellor was fixed and how much of a 'bite' needed to be taken out of the hull and also the rudder. It wasn't fun having to take a razor saw to my nicely planked hull to start cutting out the chunk of wood I needed to remove to make the space in which the propeller would sit. It was fairly easy though to remove the required wood with the saw, some files and sanding sticks.
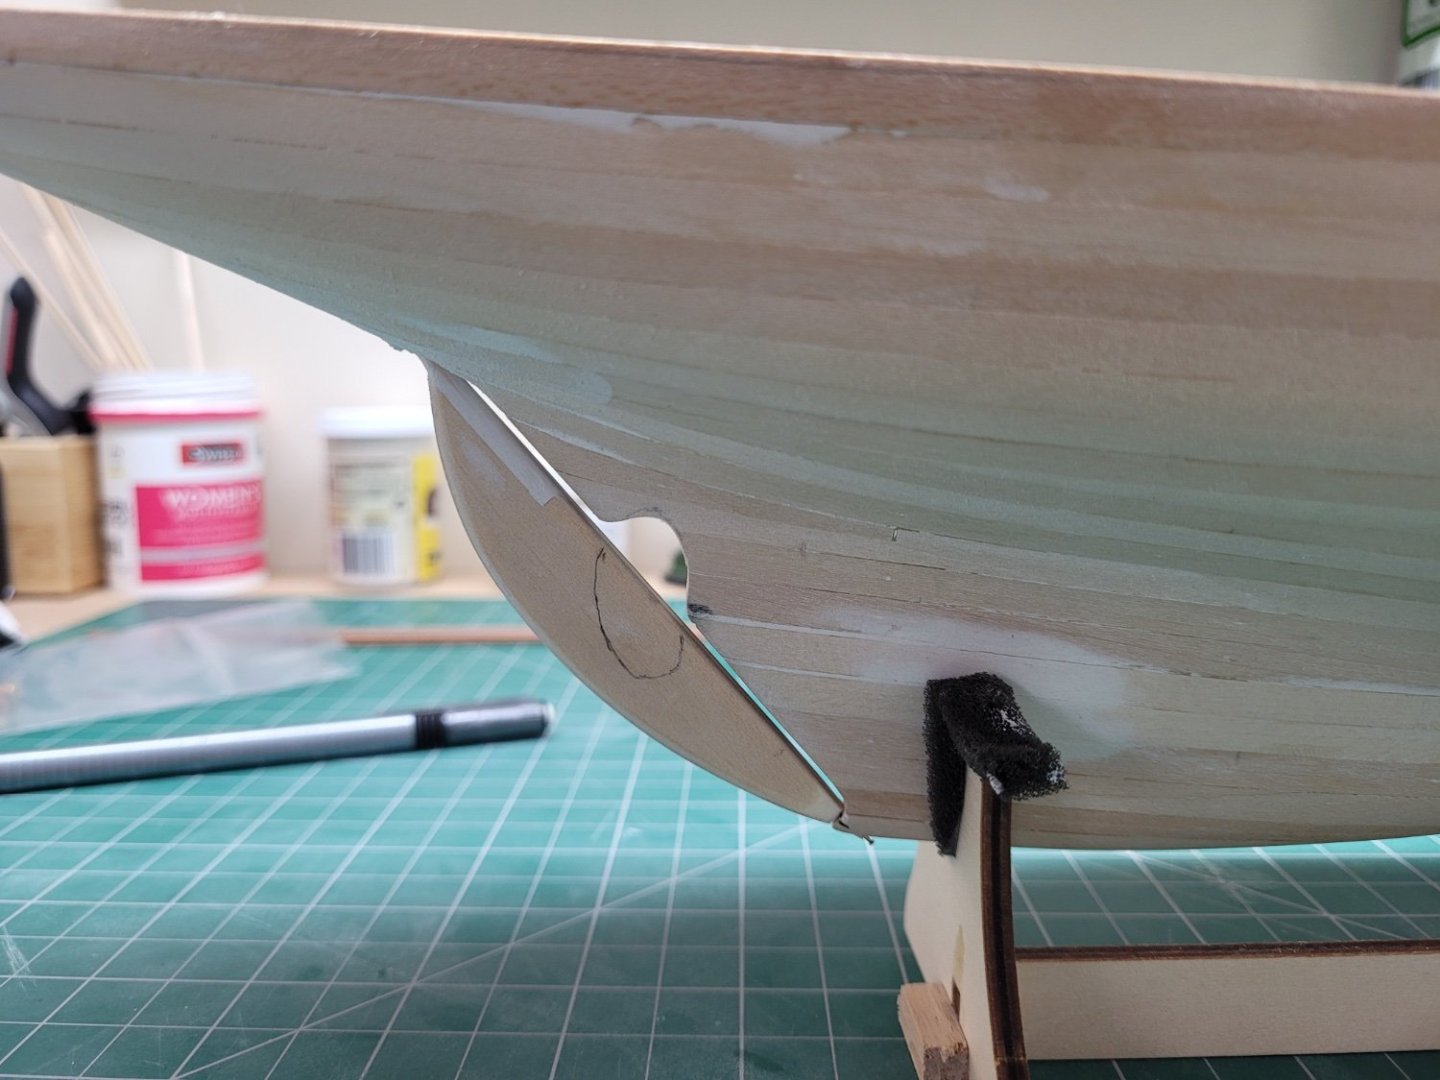
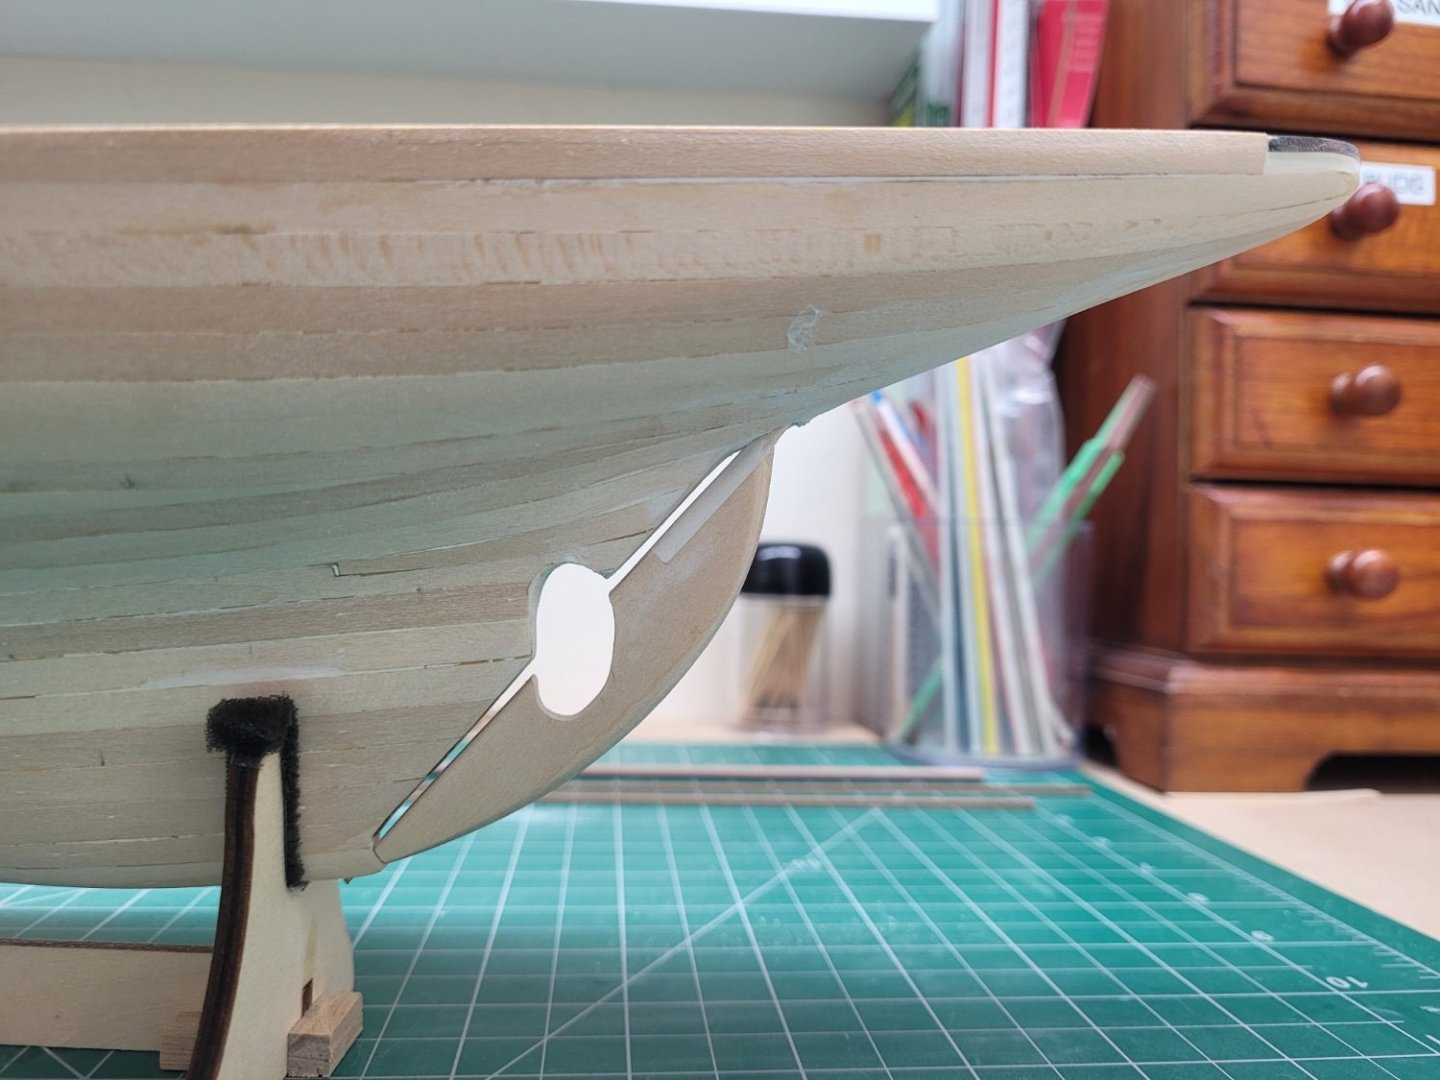
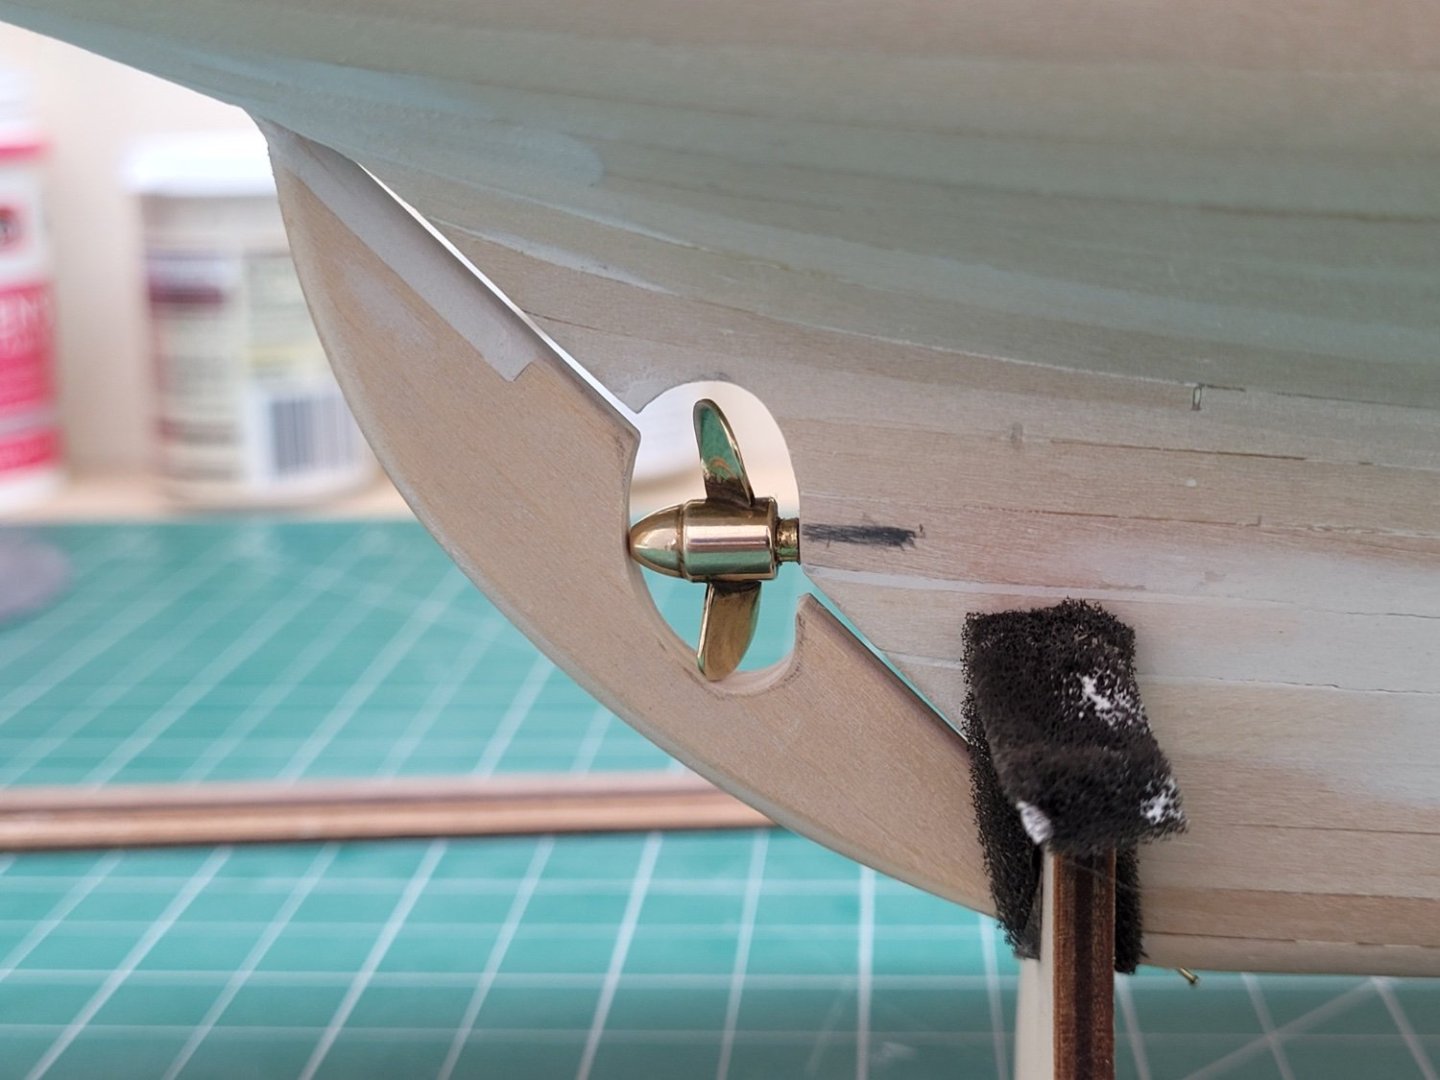
The propeller I had purchased apparently takes a 2mm propeller shaft and I toyed with the idea of using a brass rod to make a propeller shaft. However, there is an internal thread in the propeller and I had no way of cutting a thread onto my 2mm brass rod. I therefore decided to use a wooden dowel as a propeller shaft and disguise this within a thin collar made from a 3mm brass tube. I drilled a 2mm hole into the hull into which the dowel would sit with the brass collar sandwiched nicely between the propeller and the hull. I also had to cut a section out of the rudder so that this would allow enough space for the propeller to protrude from the hull. I took this slowly and steadily as I wanted to make sure I didn't remove too much of the rudder. The image below shows the hull, propeller and rudder all in place with the rudder just clearing the end of the propeller. There is much more of a gap at the bottom of the propeller blade that that photo suggests - it is just the angle of the photo that makes it look like the blade is sitting right on the rudder there. I have subsequently taken just a little bit more off the rudder to give a slightly larger gap in front of the propeller hub.
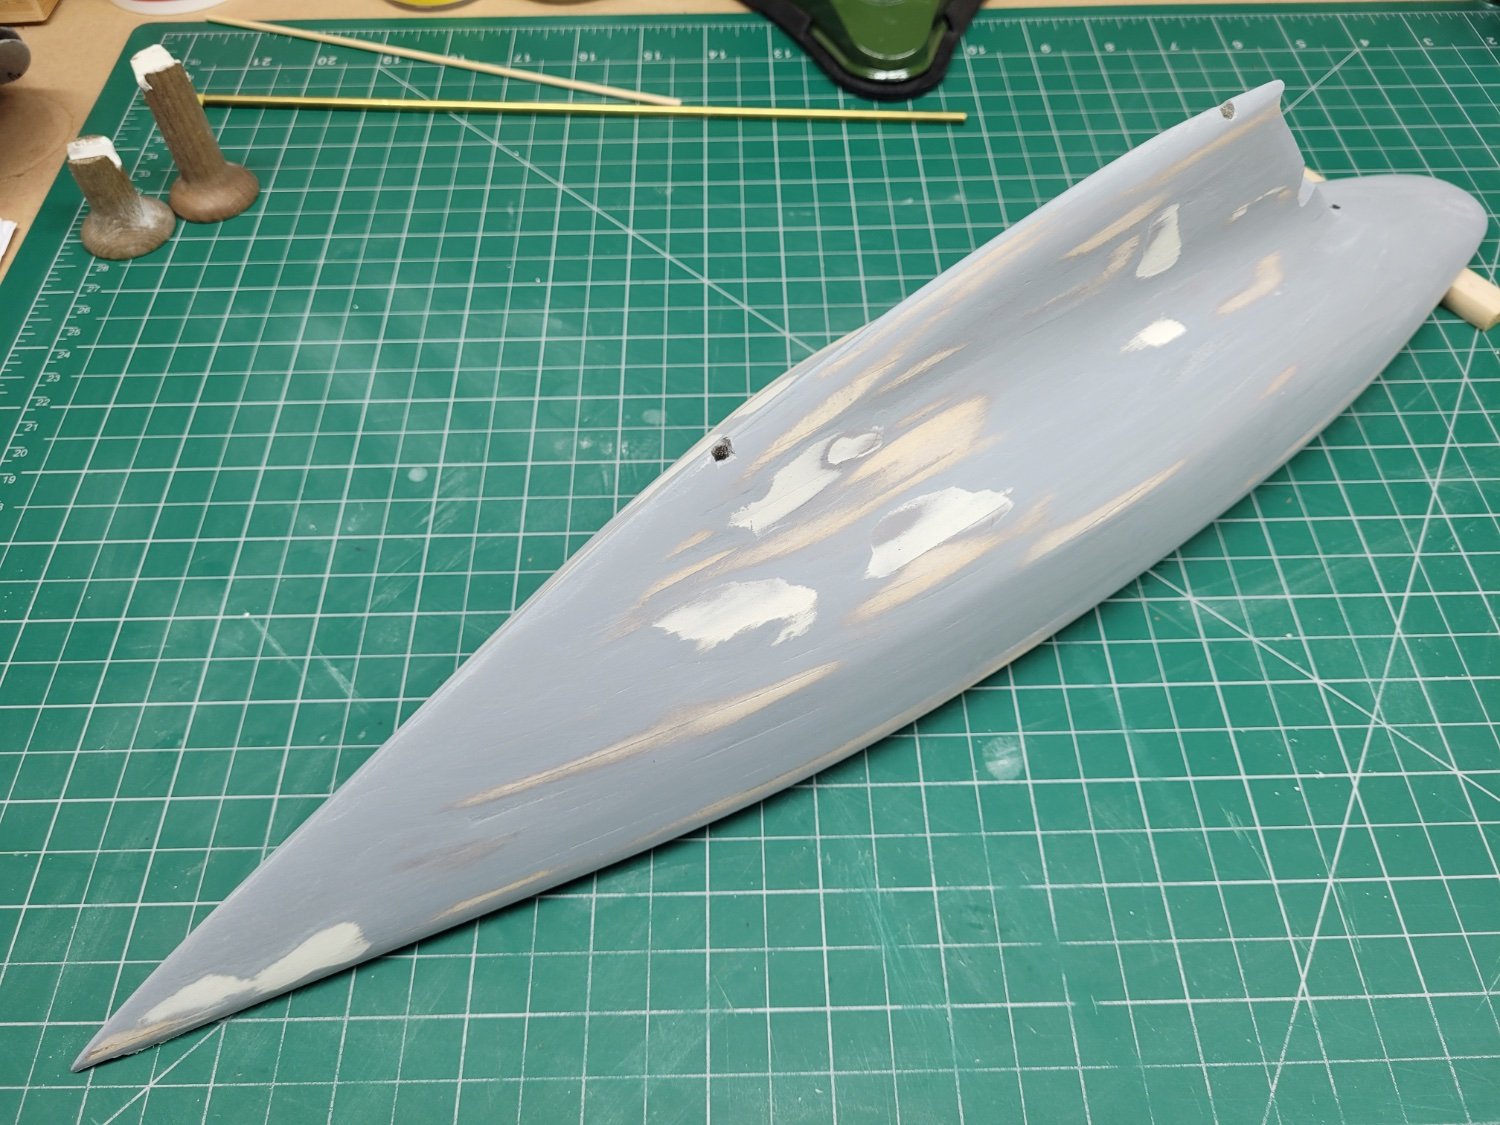
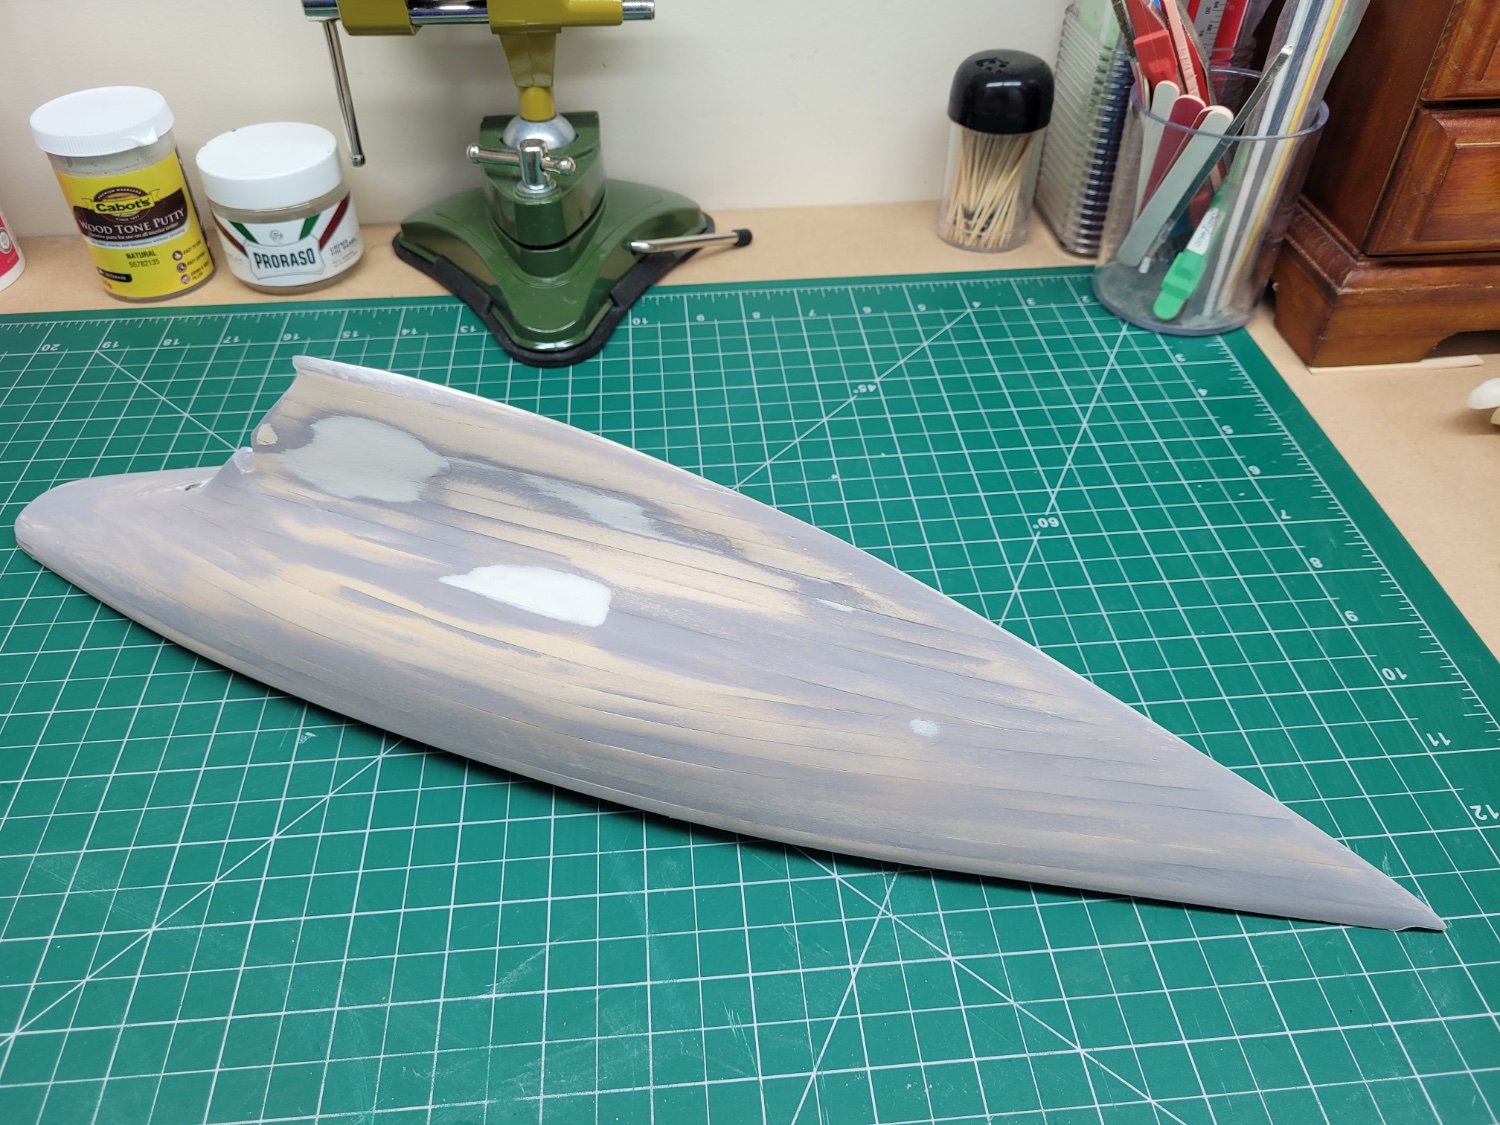
Having finalised the position of the propeller I was then able to give the entire hull a thin coat of grey primer as this would help with identifying those areas of the hull where a little more sanding / filling work was required. The rudder was also given a coat of the primer separately. I gave the hull another sand and added some wood putty to the depressions that were much more obvious against the grey paint. The putty was then sanded smooth as shown below.
The hull now needs another coat of primer so that I can judge how well I did with the filler and whether more work is required. @hof00 did mention above about using a spray putty and that is something I may consider after this next coat of primer and sanding if I am still not getting the smooth finish I am after.


- hof00, gsdpic, Bryan Woods and 2 others
-
5
-
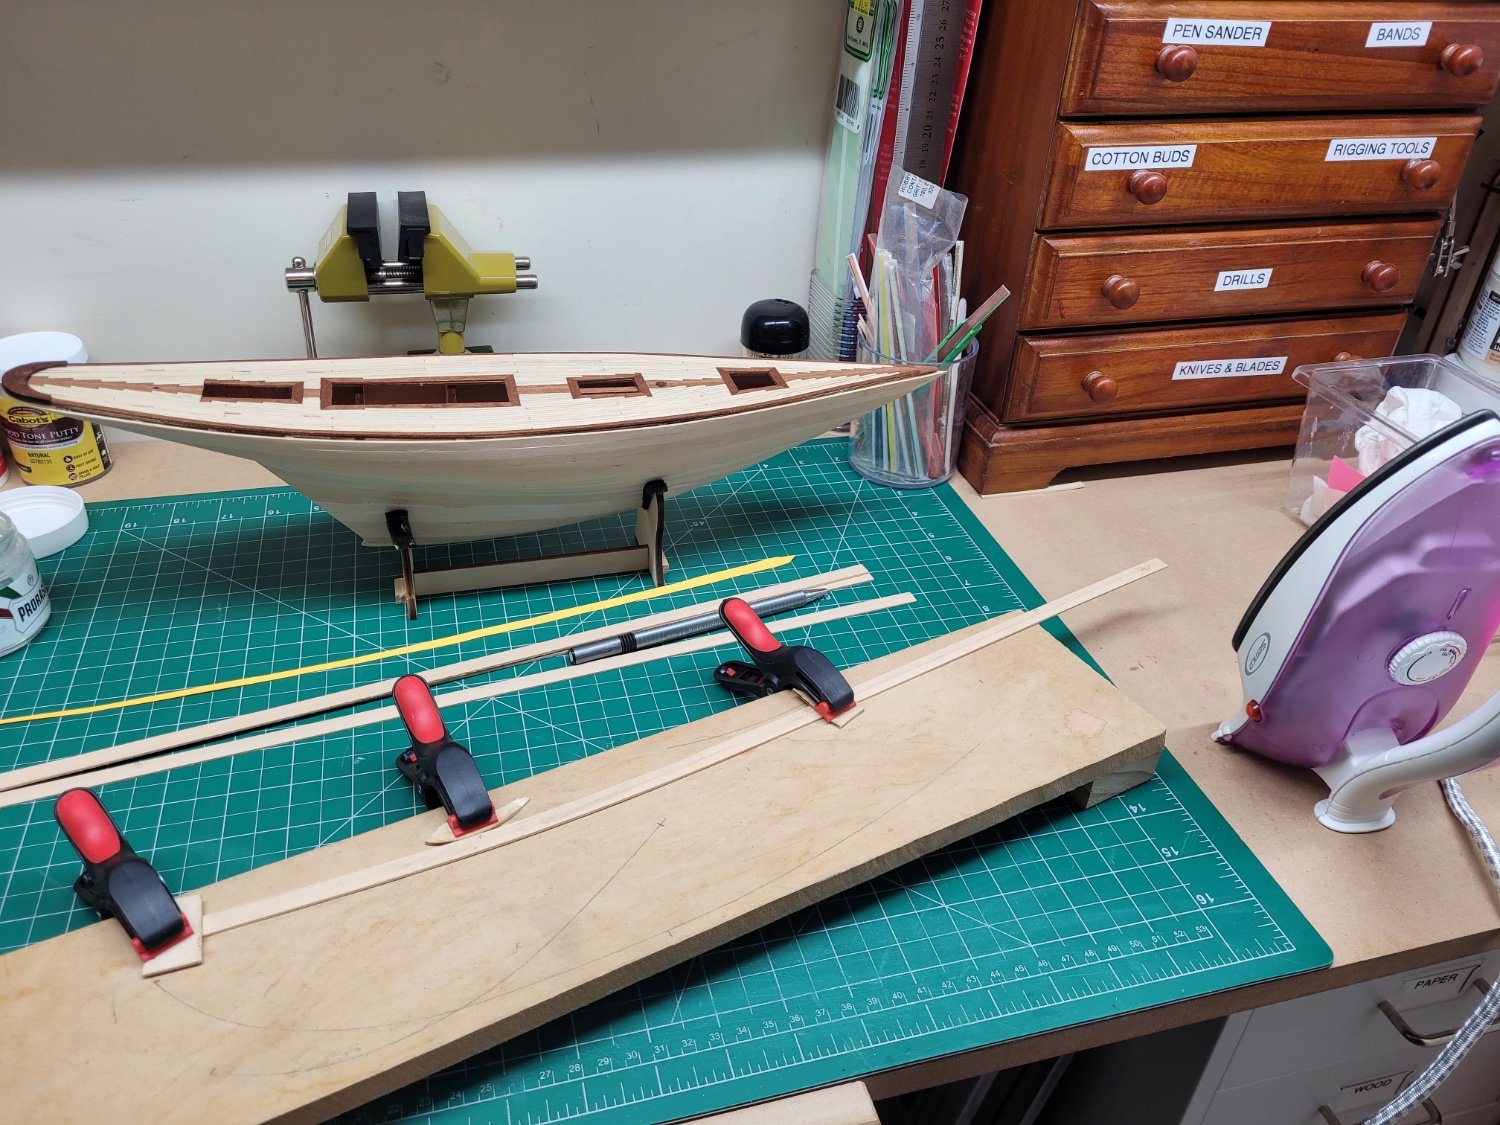
I was able to work on the bulwarks this week. As mentioned above I have some 1.5mm x 8mm pinewood planks that I am using for the bulwarks rather than the kit supplied planks. The first task was to get a slight bend at the rear of the plank so that it sat nicely on the curve of the deck and wasn't being forced into place. I was able to achieve this with a few seconds of heating with my travel iron.
 Having shaped the plank I was then faced with the problem of gluing it to the edge of the deck and the top face of the first hull plank. There was plenty of area to glue it to but I struggled to come up with a good way of clamping it into place. As the hull is quite 'pointy' I wasn't able to use a clamp fitted across the decks as the deck profile wasn't square enough for it to grip securely. I could have pinned some plank offcuts into the hull to hold the bulwark but I don't want to damage my nice hull planking! In the end I decided to use superglue to hold the rearmost inch or two in place and once that I grabbed I stuck the rest of the plank using PVA and just held in it place with my fingers. It didn't take too long for it to set in place thankfully. I don't really like using superglue but it does come in handy from time to time.
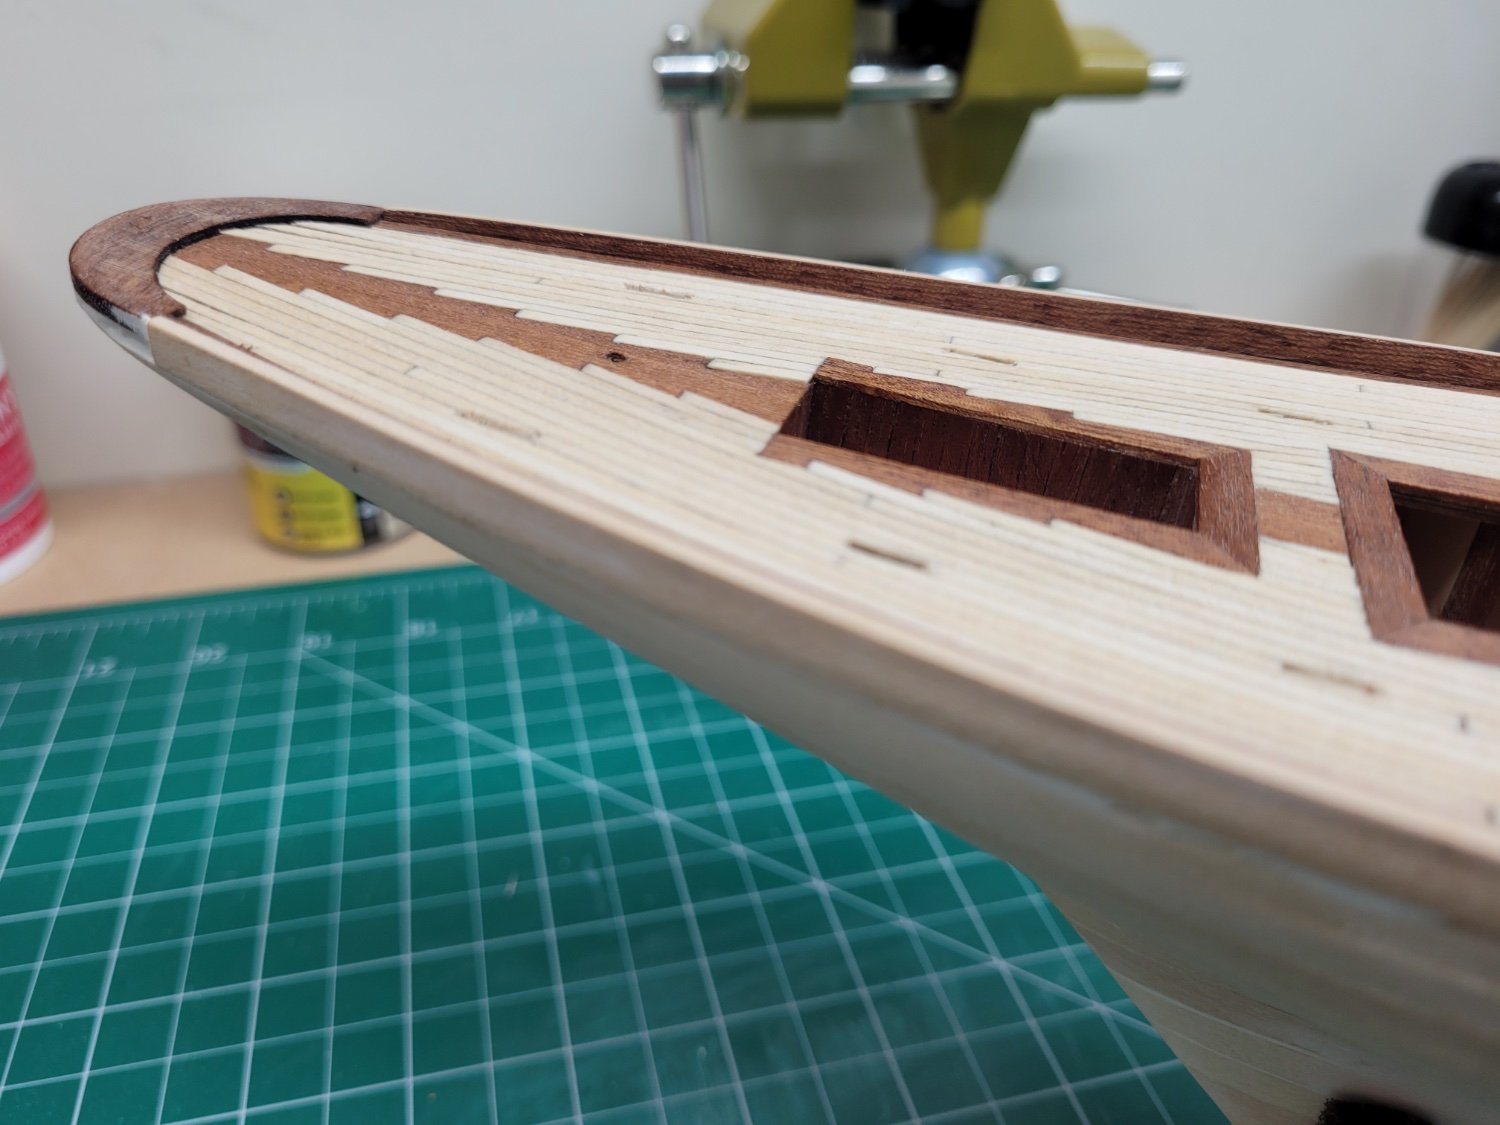
 Once both bulwark planks were in place I then added a thin mahogany plank of 0.5mm x 5mm to the inner facing of the bulwark as a decorative lining so that they blended nicely with the mahogany margin planks.

The bulwarks then needed to be sanded to shape of the profile required in the plans - the aft part of the bulwark is flush with the stern piece and the bulwark then rise up in a curve going forwards until they are 5mm high at the prow. As there was a fair amount of material to remove at the rear of the bulwarks I did contemplate using either a cut off wheel on my dremel or the sanding drum on the dremel to remove the material quickly but I chickened out and decided that simply sanding them with some #120 paper on a sanding block was the safest way to proceed. This method also let me sand both bulwarks simultaneously in an effort to keep the profiles matching by having the sanding block cover the span across the deck. Even so I still found I have to tinker with the sanding of each side individually to make sure they were as equal as possible.

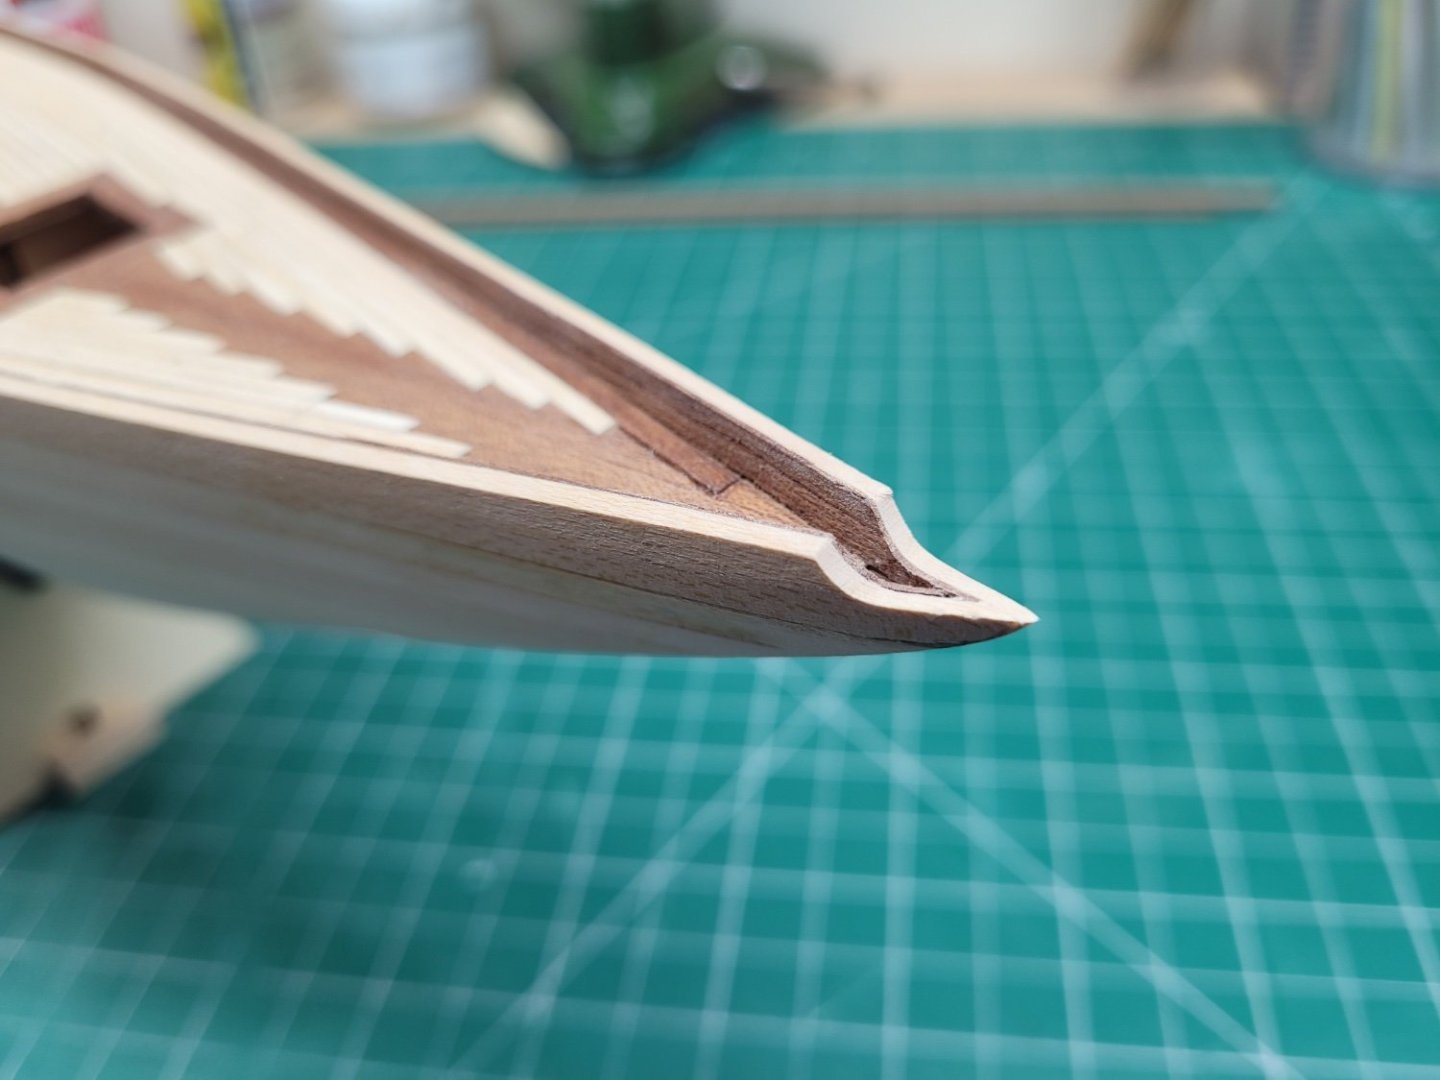
When I had fitted the bulwarks I made them join at a point at the prow but the next task was to cut away the very front sections of the bulwarks as a gap is needed at the very front as the bowsprit lies along the deck and in between the bulwarks. It is supported by the tip pf the deck planking and so a sort of beak shape needs to be made in the bulwarks. Again I approached this slowly as I didn't want to mess anything up at this stage and using a round file, a sharp blade and a small sanding block I was able to shape the front sections of the bulwarks so that the 4mm bowsprit fitted nicely.
I also took an opportunity at this point to do a little more filling and sanding of the hull. Hopefully I'll be satisfied with it before I run out of thickness in the planking!
Having cleaned sawdust from the model with a wet cloth and a hairdryer (the best substitute I have for an air hose gun) I was then able to give the mahogany linings of the bulwarks a couple of coats of wipe on poly. This was then followed by another coat of wop on the whole deck.
My next task was starting work on the rudder. The instructions call for you to fit a long dowel to the rudder and drill a hole through the model to the deck so that the dowel can be used as a rudder stem but I'm not sure how practical that is for someone with my skills. I have already made the exit hole for the rudder stem in the deck and I plan just to attach the tiller to a false piece of rudder stem and fix it to the deck - so I won't have an actual working rudder. Similarly, in the hull I'm just going to have a stub of the rudder stem fixed into the hull and pretend that it goes all the way through to the deck. I sanded a tapered profile into the fore and aft edges of the rudder and fixed a dowel to it that I can cut to size as my dummy rudder stem.
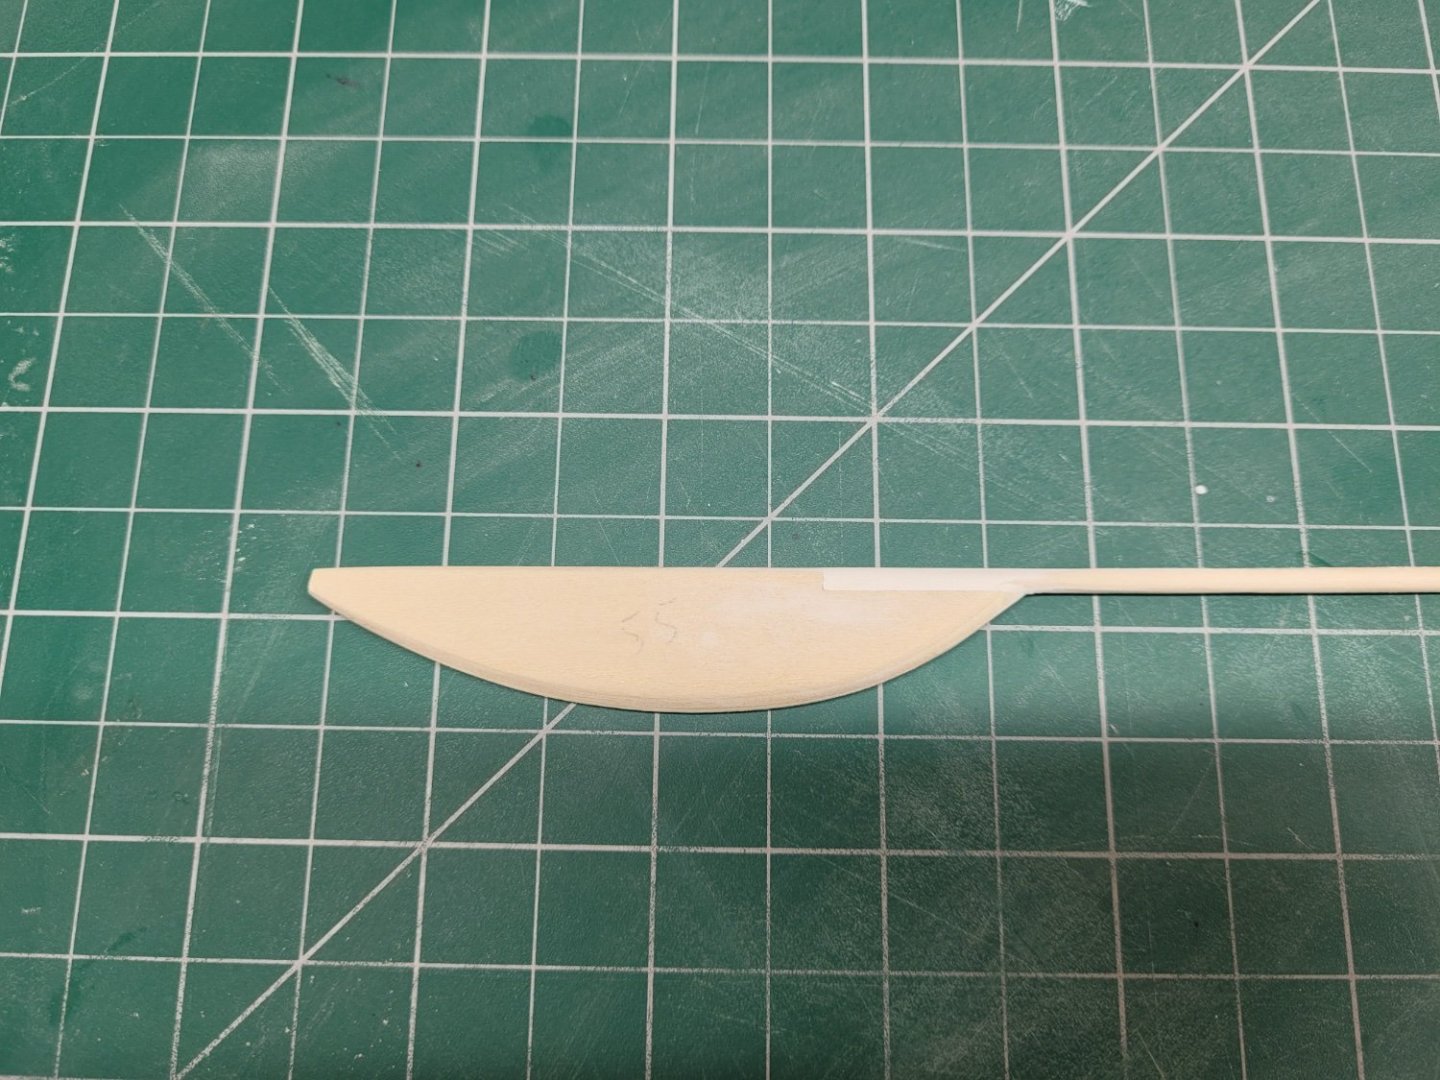
I recently ordered a two bladed propeller from Cornwall Model Boats and was pleased to find that this arrived in Australia a couple of days ago. I am really not sure of the exact size of the Pen Duick's propeller as I haven't been able to find any plans that show one but hopefully it is of an appropriate size - it doesn't look out of place to me. I have to work out how and where this needs to be fixed to the sternpost(?) so I will spend sometime online to see what I can find. I did come across one video of the Pen Duick being relaunched after some repairs and restoration so that may give me a rough idea of how far down the rudder it needs to be placed and the shape I need to cut out of the rudder and the sternpost (?) so that it sits correctly.
.thumb.jpg.f15dd9eed8e726e2e631c6f9526edadd.jpg)
- Bryan Woods, Knocklouder, hof00 and 6 others
-
9
-
You are speeding through this. It will be launched and in action before you know it 😁
- mtaylor, Dave_E, Glen McGuire and 2 others
-
5
-
I was able to undertake some working on the hull at the weekend. I added some wood putty filler to various parts of the hull where there were either small gaps between the planks or small dips or depressions needed building up. I'm pleased to say there wasn't a great deal of filler that was required so hopefully I am getting better with the techniques of hull planking as each new model comes along - certainly the hull of the Pen Duick looks a lot lot better than my first attempt with the Endeavour Longboat a few years ago!

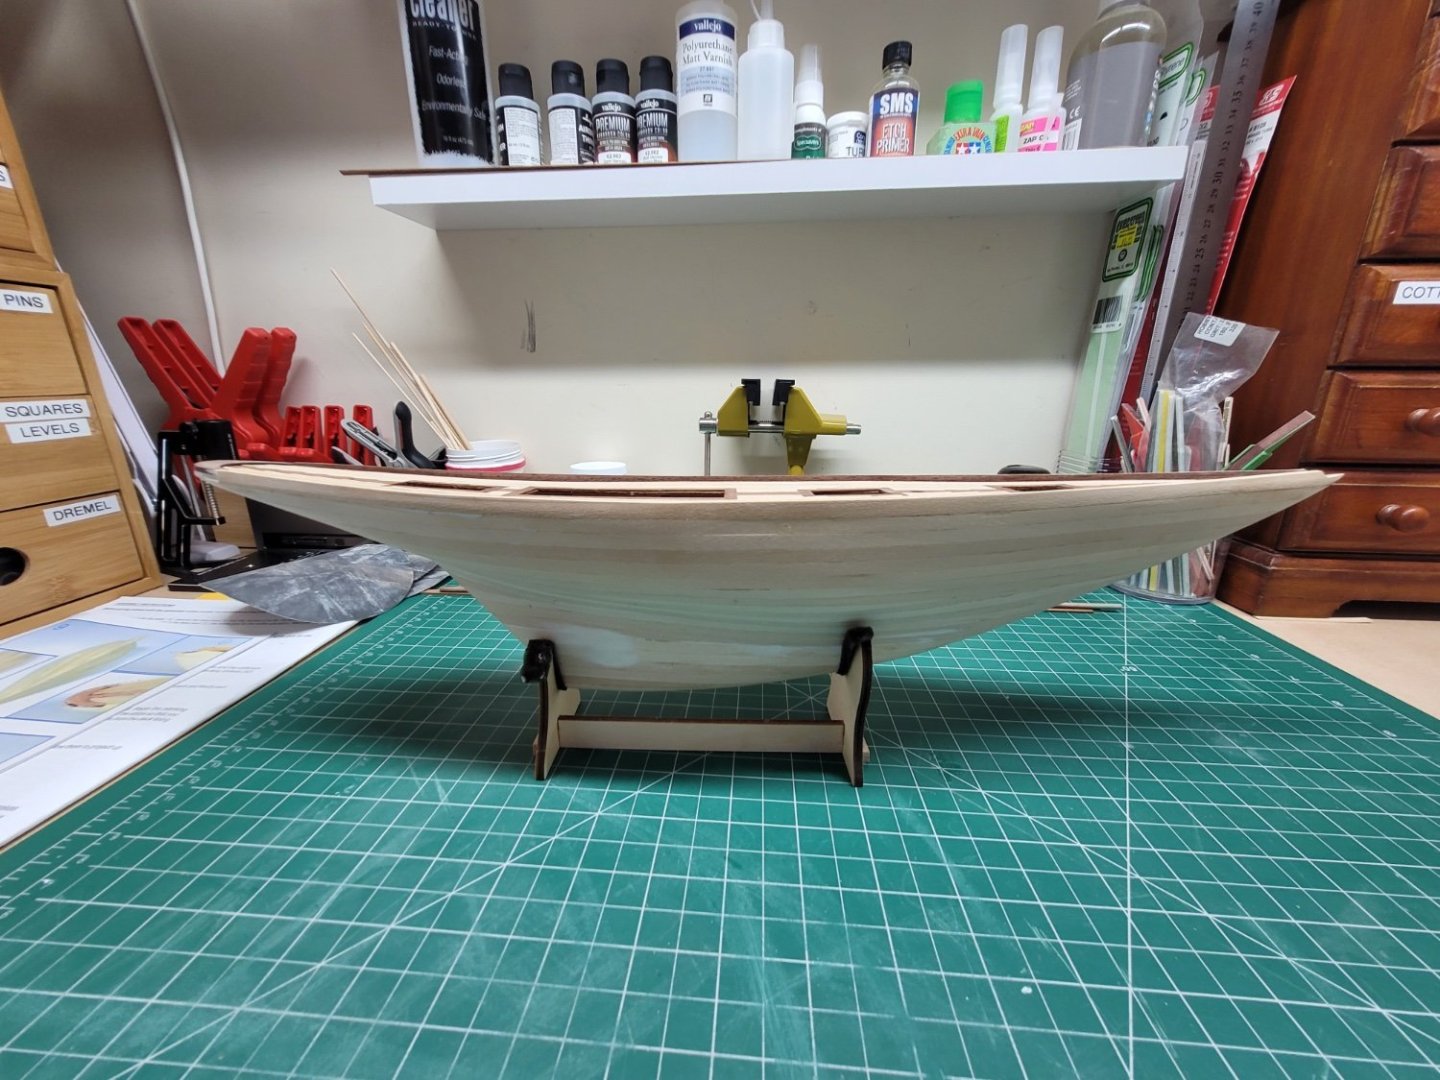
After letting the filler set for a day or so I went over the hull with #400 and #600 grit sandpaper and spent quite some time working a smooth finish to the hull. There are still some areas that need a bit of attention and there will be further sanding needed later on when I have to blend the bulwarks into the existing hull planking but I am happy that 90% of the sanding and hull shaping is now out of the way. Here are some images of progress so far.


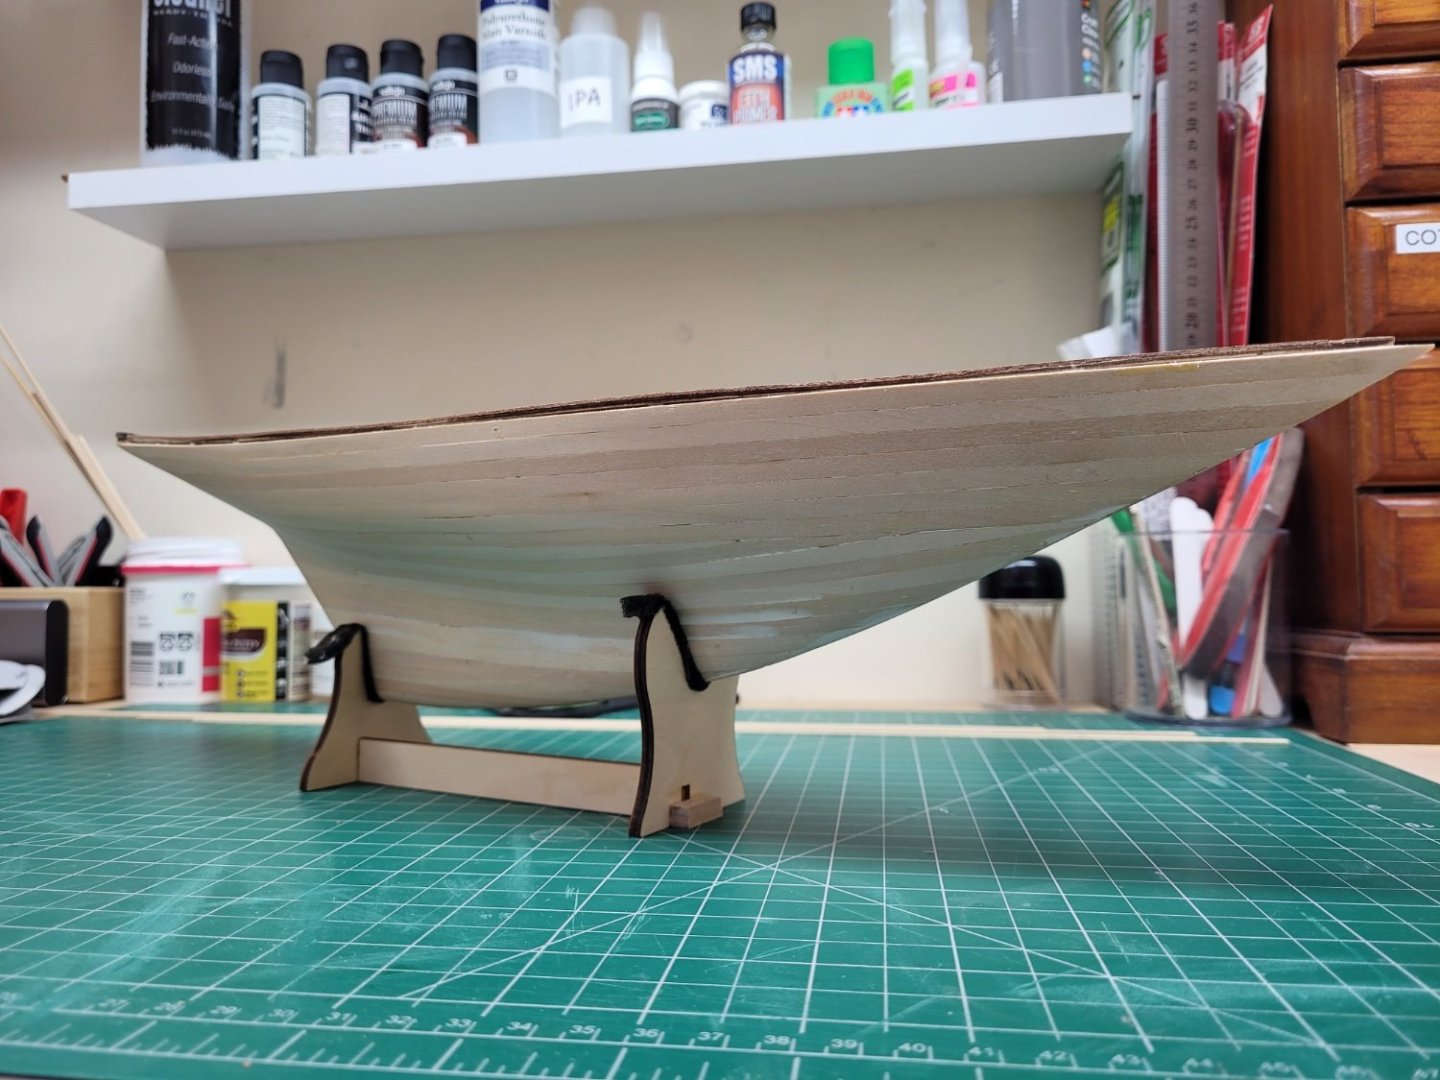
After completing the work on the hull sanding I turned my attention back to the deck and gave this a good scrape with a razor blade to even out the finish there. I don't like sanding the deck planking as I fear that the pencil marks used for the caulking could easily be smeared over the deck planks, especially with these very pale limewood deck planks, and so hopefully scraping with a blade avoids this somewhat. I then gave the whole deck and hull a good clean with a blower and a tack rag to remove as much dust as possible before I moved on to adding a finish to the deck. I like to use wipe on poly as this gives a very subtle colour to the wood and helps with protection I think. I apply the wop with a brush rather than a rag and make sure to wipe off any excess right away to prevent pooling etc. Hopefully you can see the effects of two coats of top on the deck in the before and after images below.


The wop has added a little colour to the lime wood planks but it has certainly had a bigger effect on the mahogany.
The next step is to add the bulwark planks - the instructions call for the use of 1.5mm x 8mm ramin planks for the bulwarks and I'm not quite sure why these are thinner than the 2mm ramin planks the instructions wanted you to use to plank the hull? As you may recall I used 1mm planks for the hull planking and so I had been looking for some 1mm x 8mm limewood planks to use for the bulwarks but I was unable to find any online. I was able to buy some 1.5mm x 8mm limewood planks from the same shop that had the 1mm hull planks and so I bought a couple of these at the same time, though as the entire hull is to be painted it probably doesn't make any difference whether I use these or the ramin ones that came with the kit. I have thinned down one edge of the 1.5mm planks a little so that it sits flush with the outer edge of the hull planking - but as I mentioned before there will still be some sanding of that part of the hull required to allow the bulwarks to blend in nicely.
- DB789, Bryan Woods, G.L. and 6 others
-
9
-
-
-
Look forward to following along on this👍
- Dave_E, Glen McGuire, Keith Black and 4 others
-
7
-
-
Looking very good. I find a rotary fly tying vice is very handy for this sort of work. It is probably not worth buying one if you don't already have one but luckily for me fly tying is another hobby
- Thukydides, AJohnson, rvchima and 2 others
-
5
-
Thanks for the comments. It is interesting what you say about the propeller @Jean-Pierre as there is no reference to this in the kit. I have looked through the sources I have been able to collect about the Pen Duick in various books or magazines and none of the plans featured there show a propeller either. I have found some pictures of one model which does include a propeller and this seems to be a two bladed one as you indicate. It would certainly be nice to include one on this model so that is something I will look into. I'm not sure I would be able to fabricate a metal one myself so I may have to find a pre-made one from a shop, or failing that perhaps try to carve a wooden version....
-
Hello,
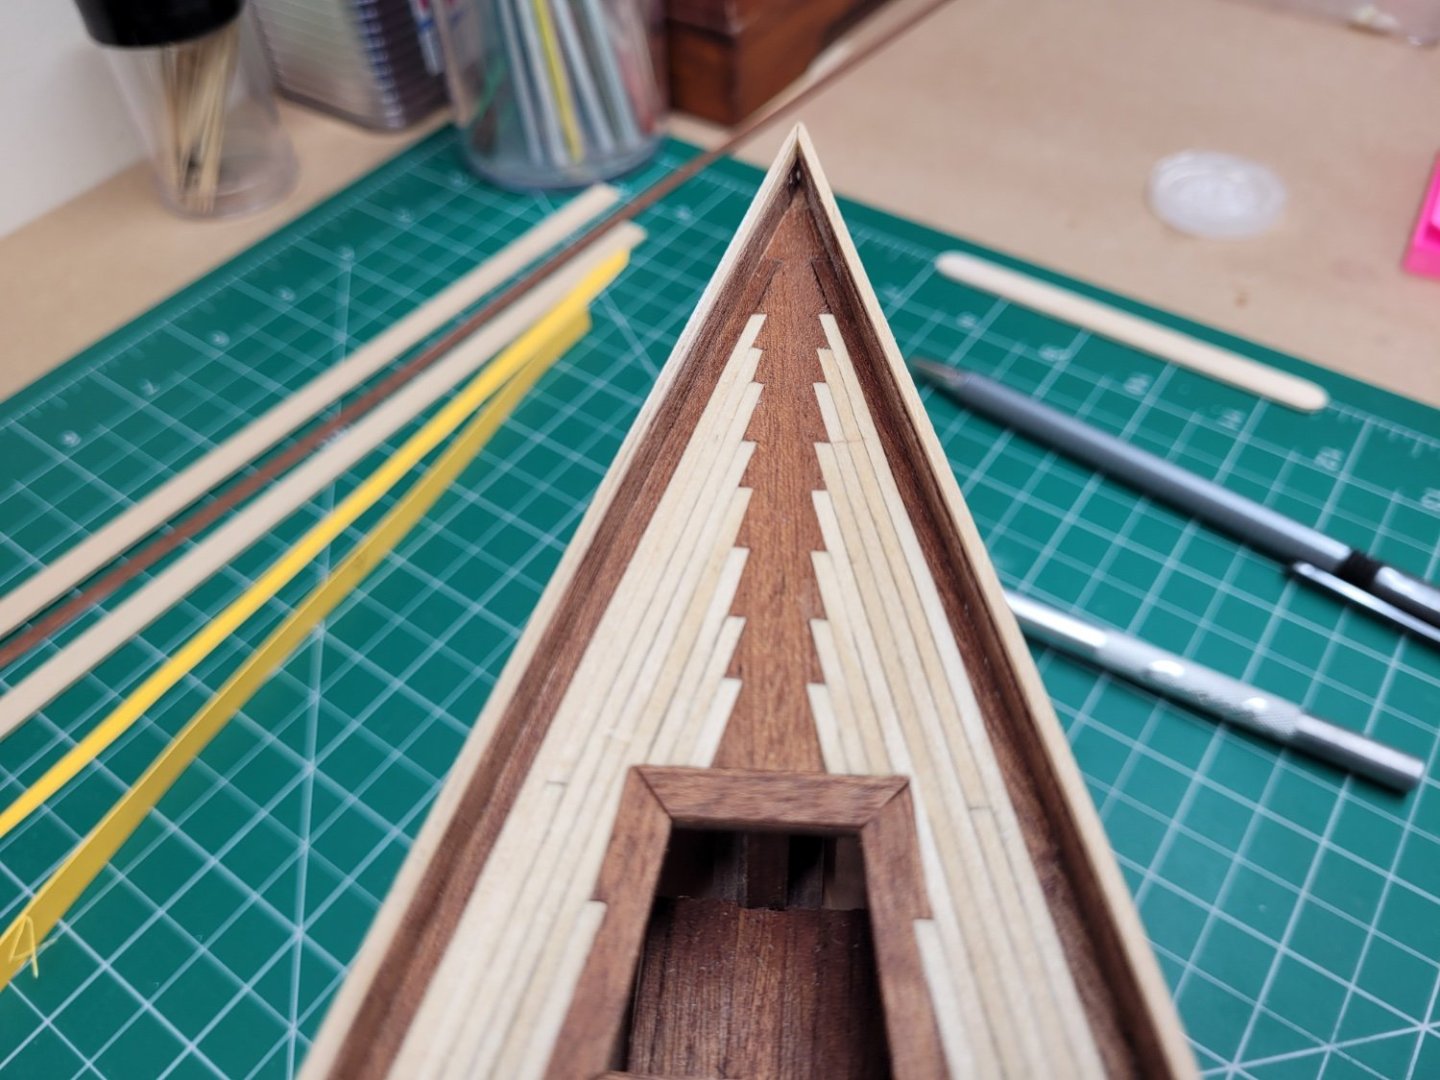
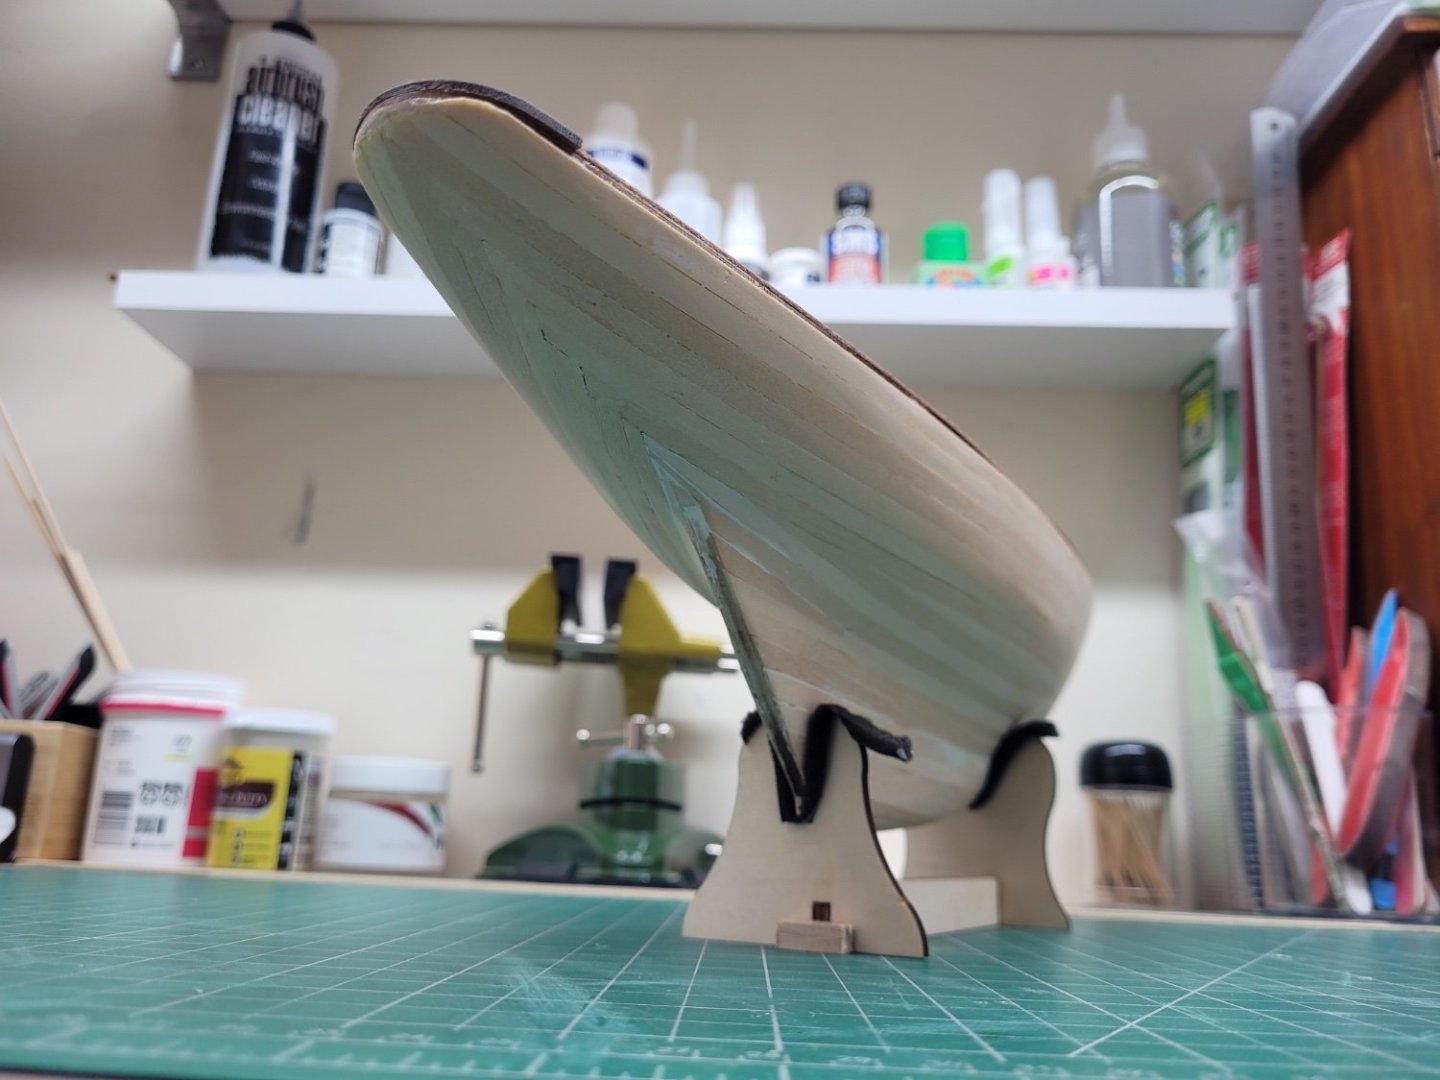
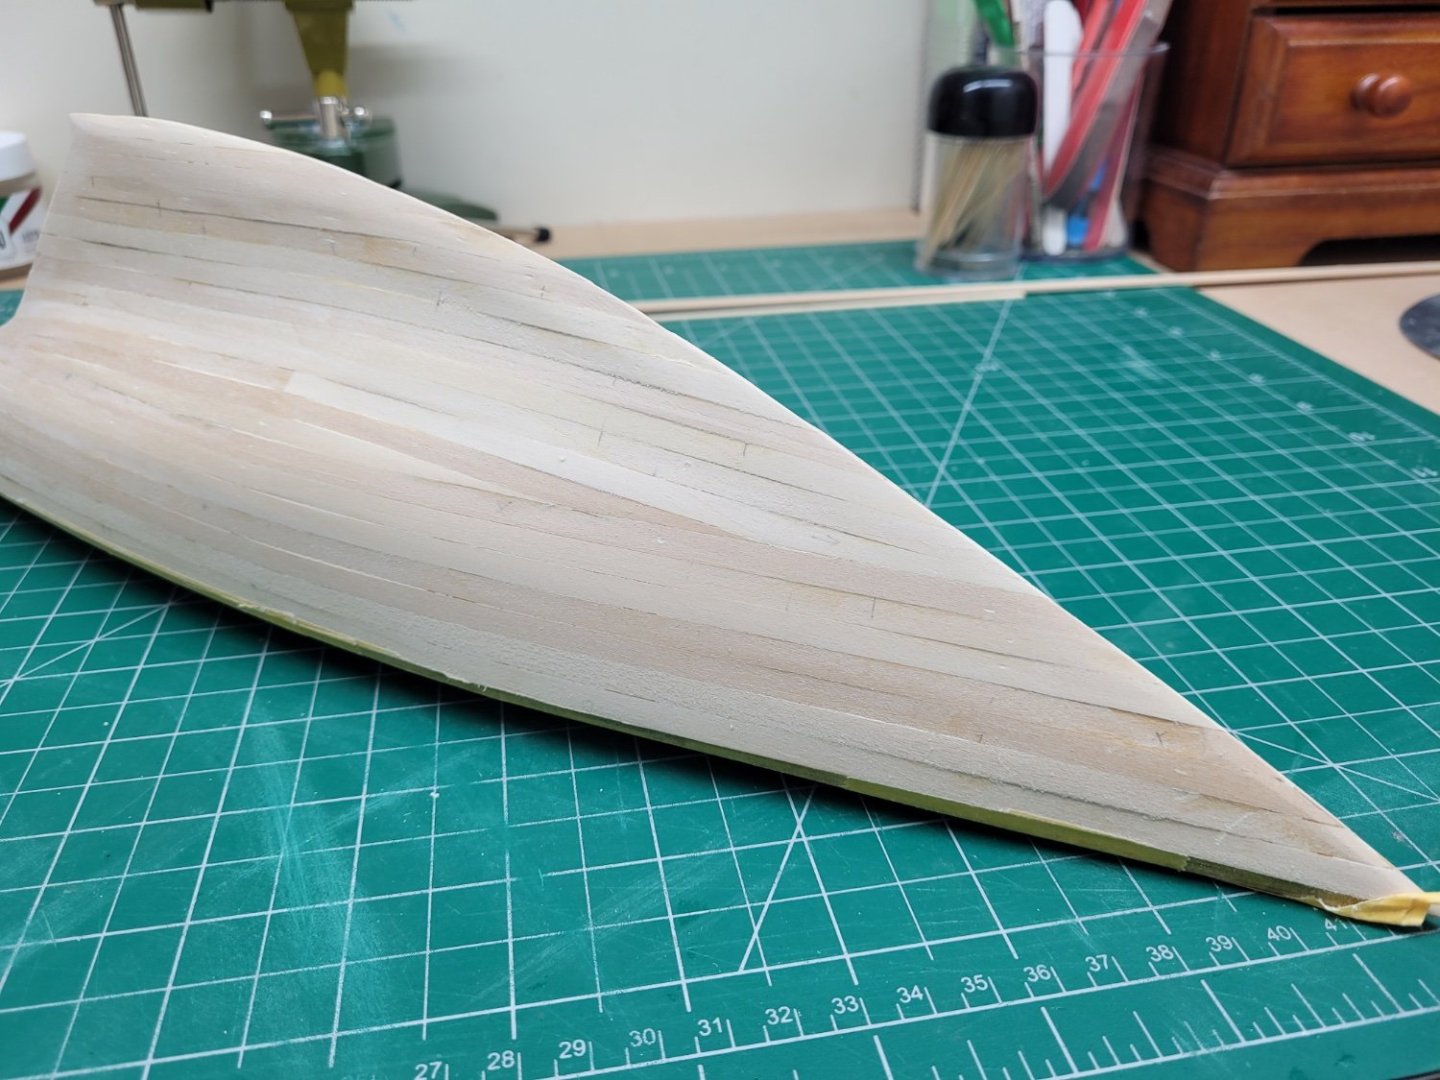
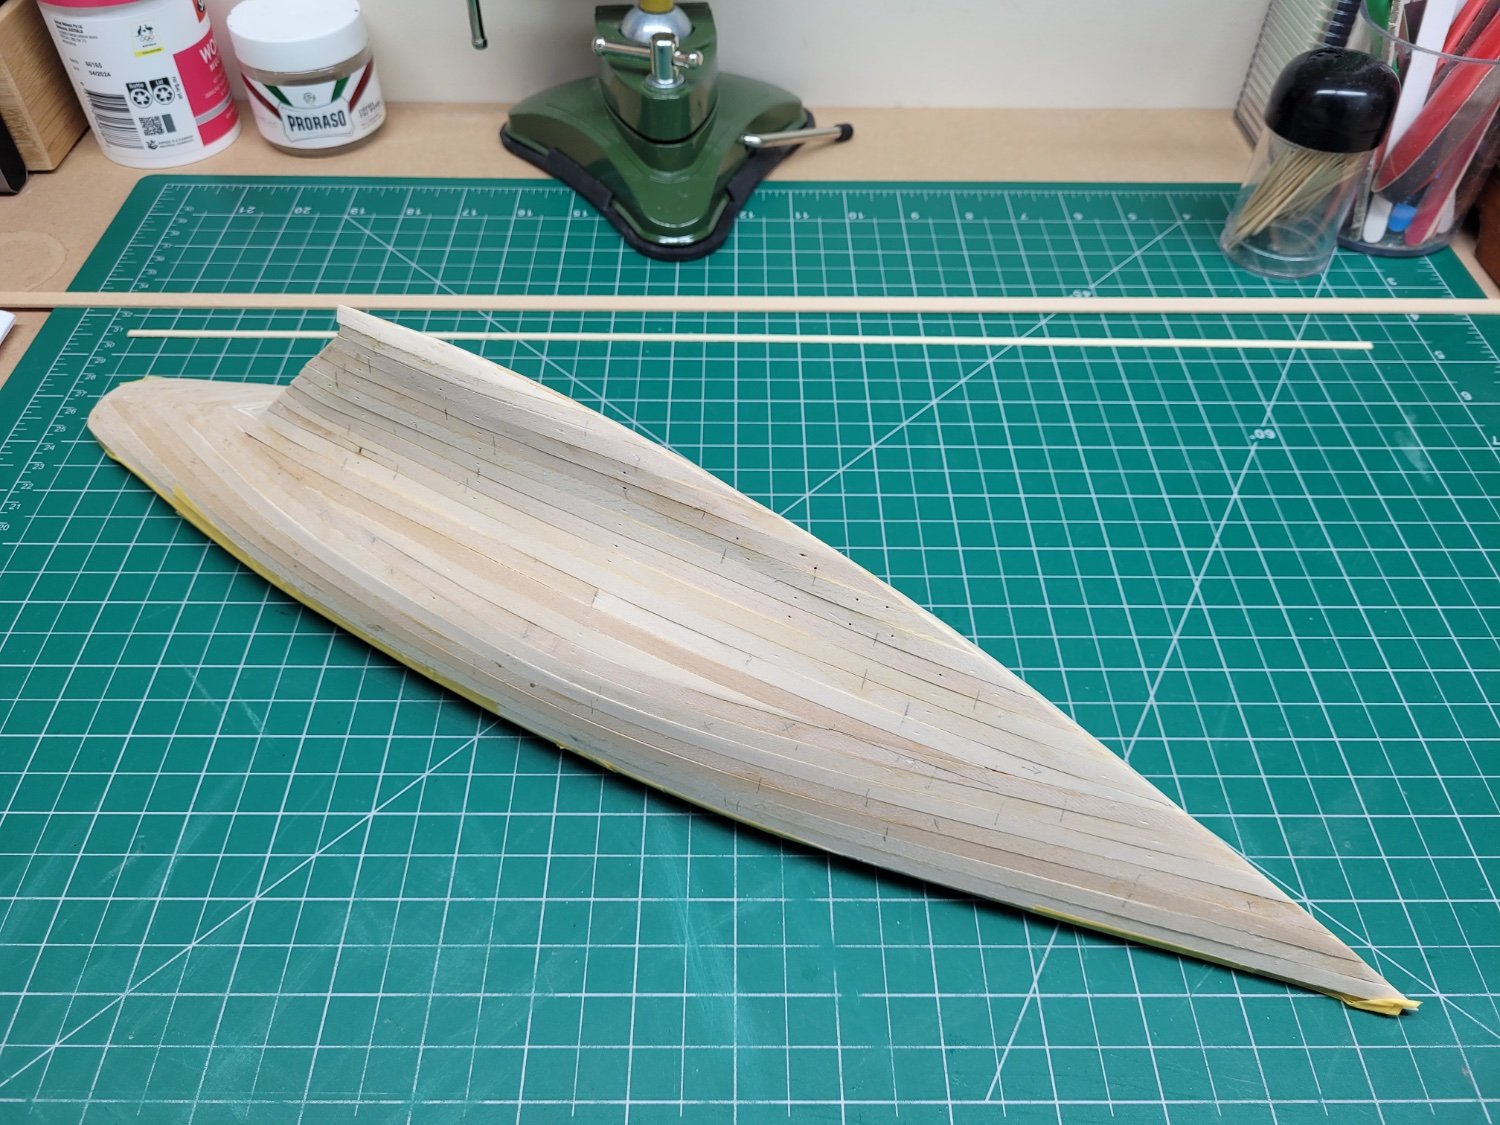
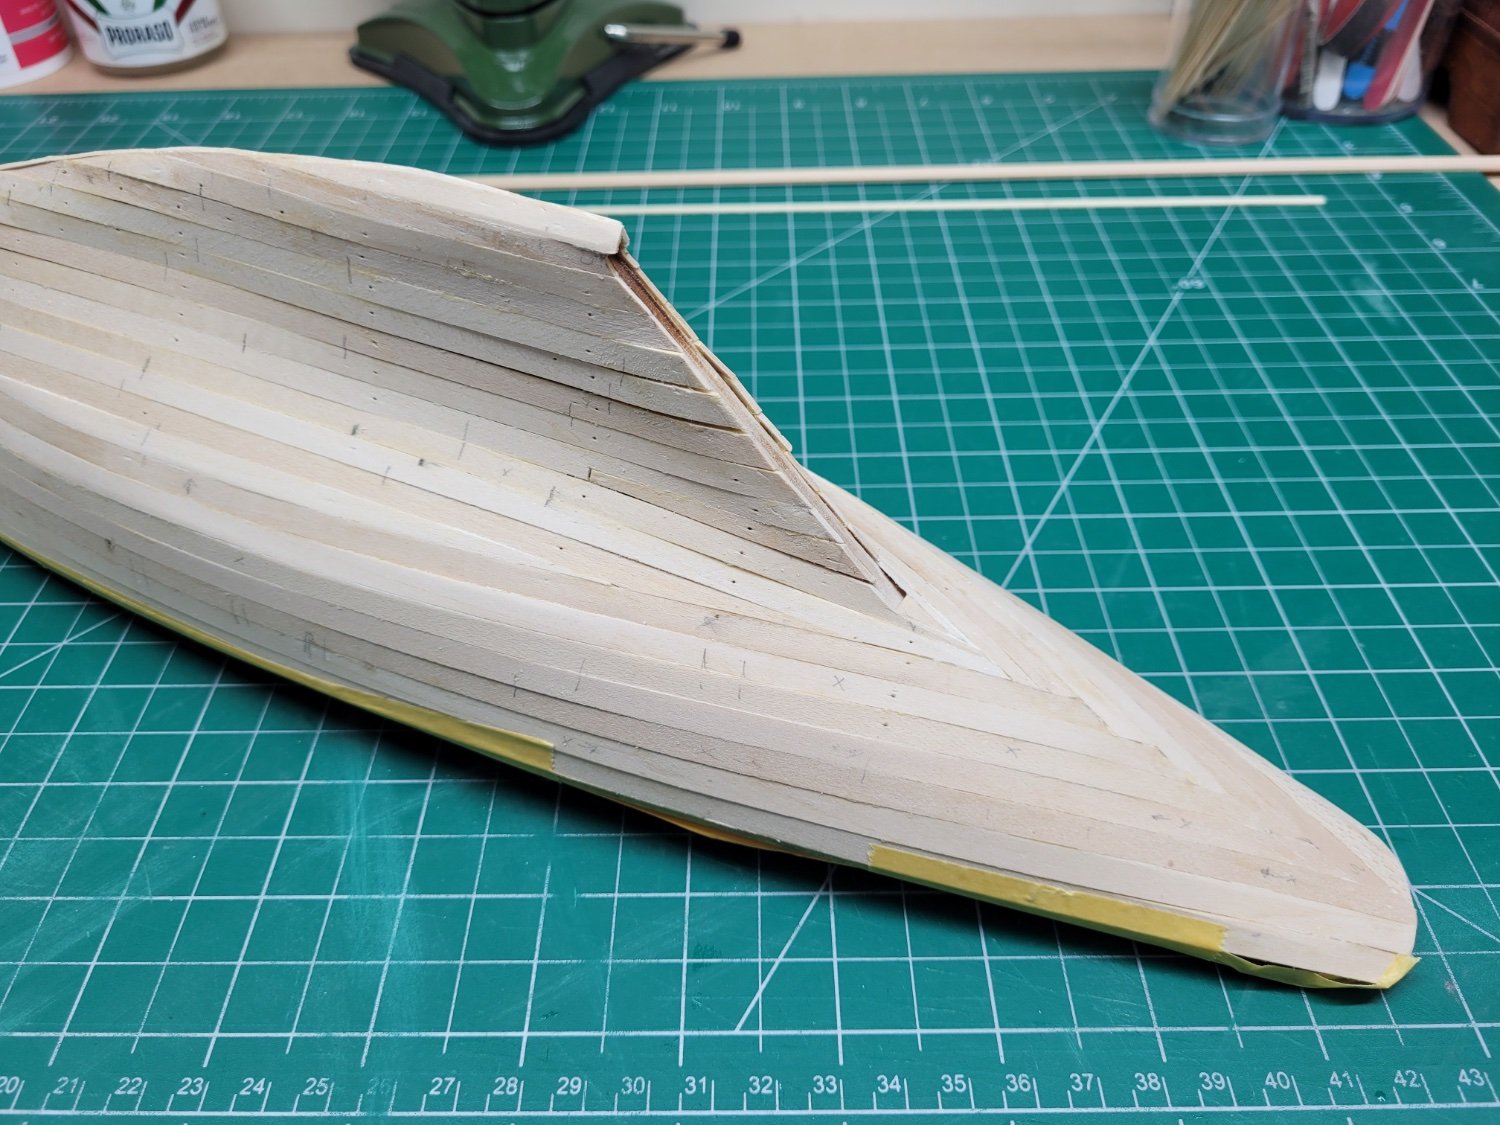
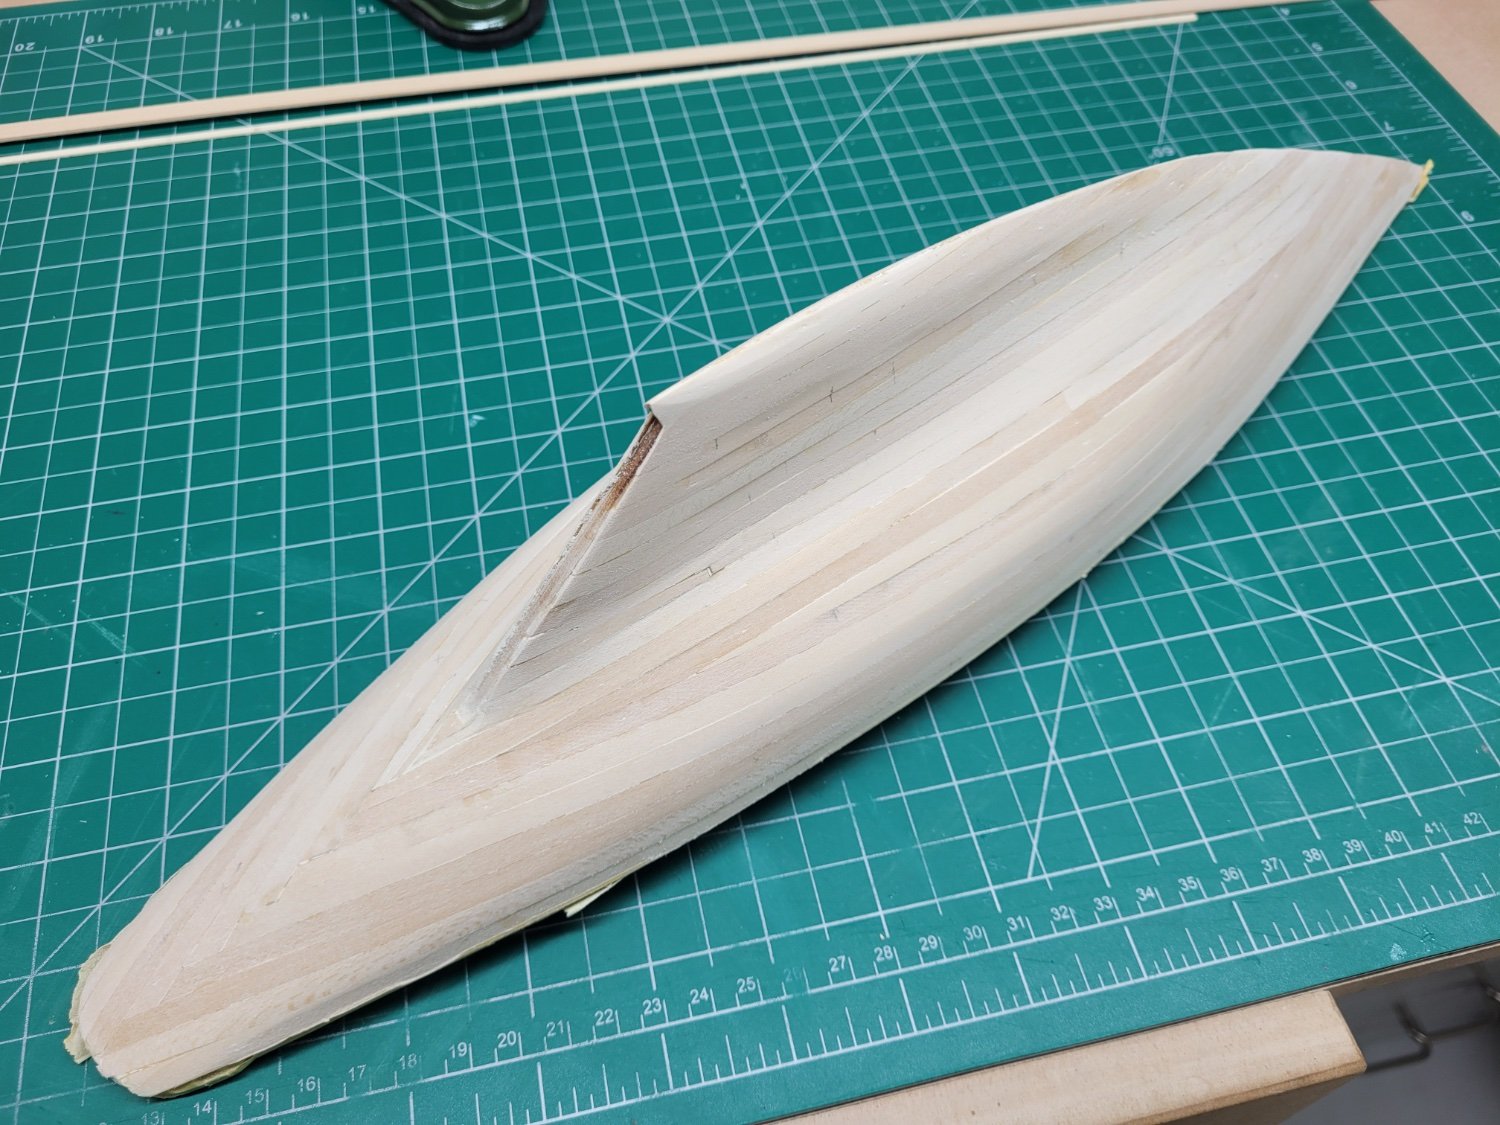
A quick progress update - the hull planking has now been finished. The last few rows of planking were pretty easy to do as they were just fairly straight runs of planks with very little bending or curving required. The trickiest part was allowing for the change in curve of the keel line but that wasn't too difficult to do by firstly working out the correct angle to cut using plank offcut templates.

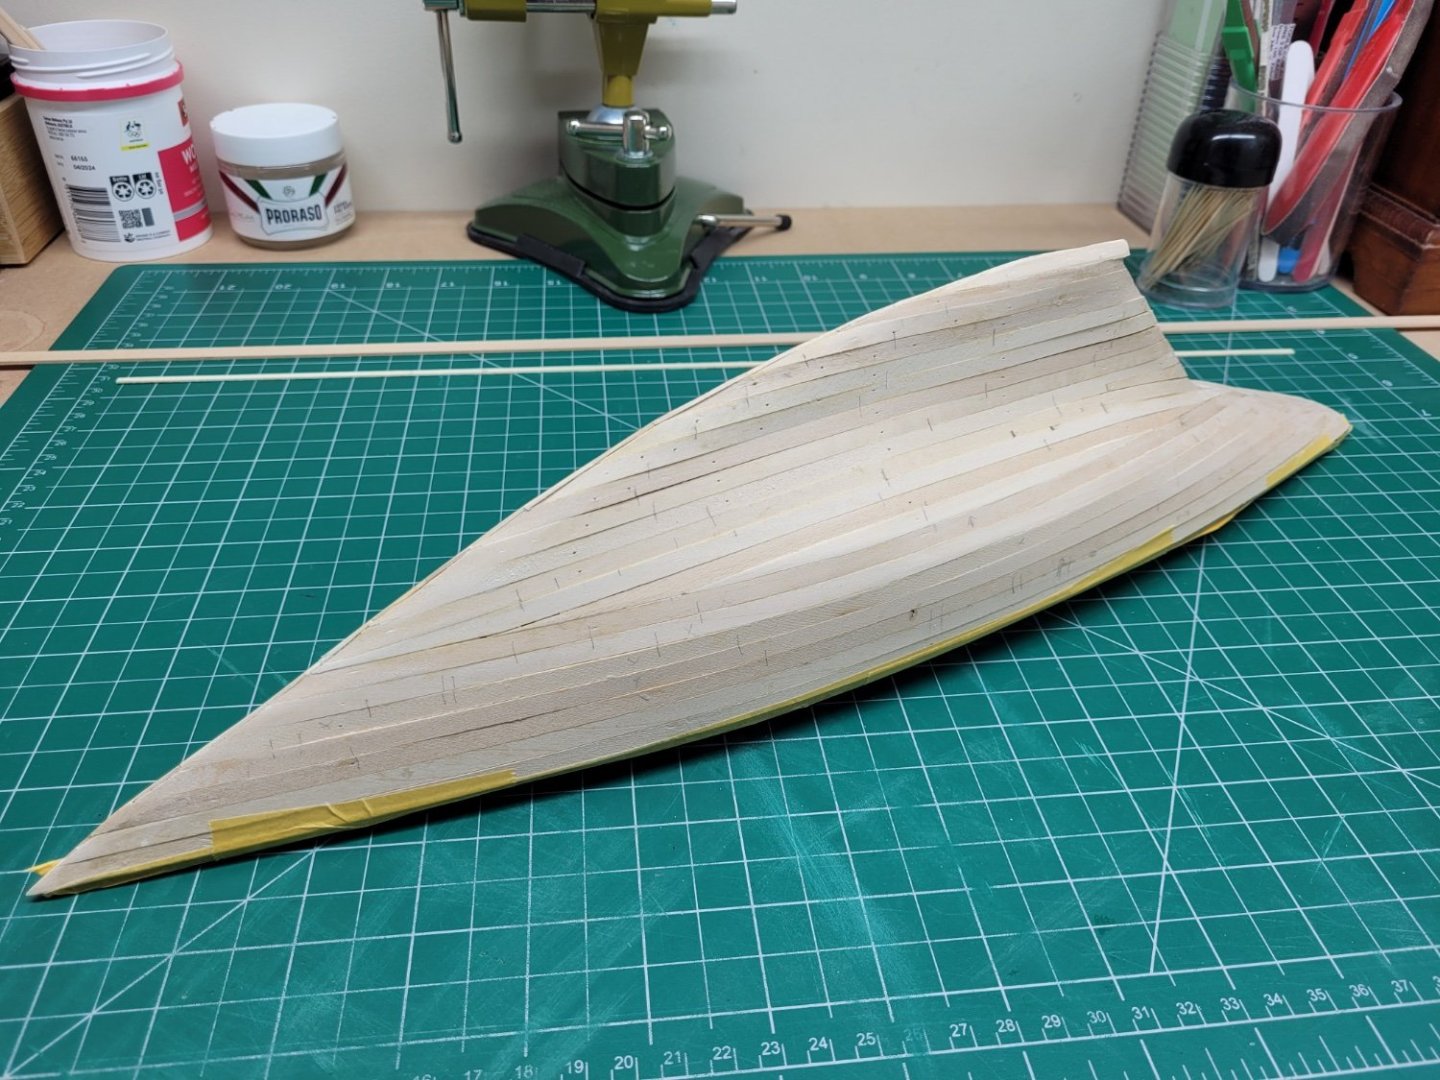
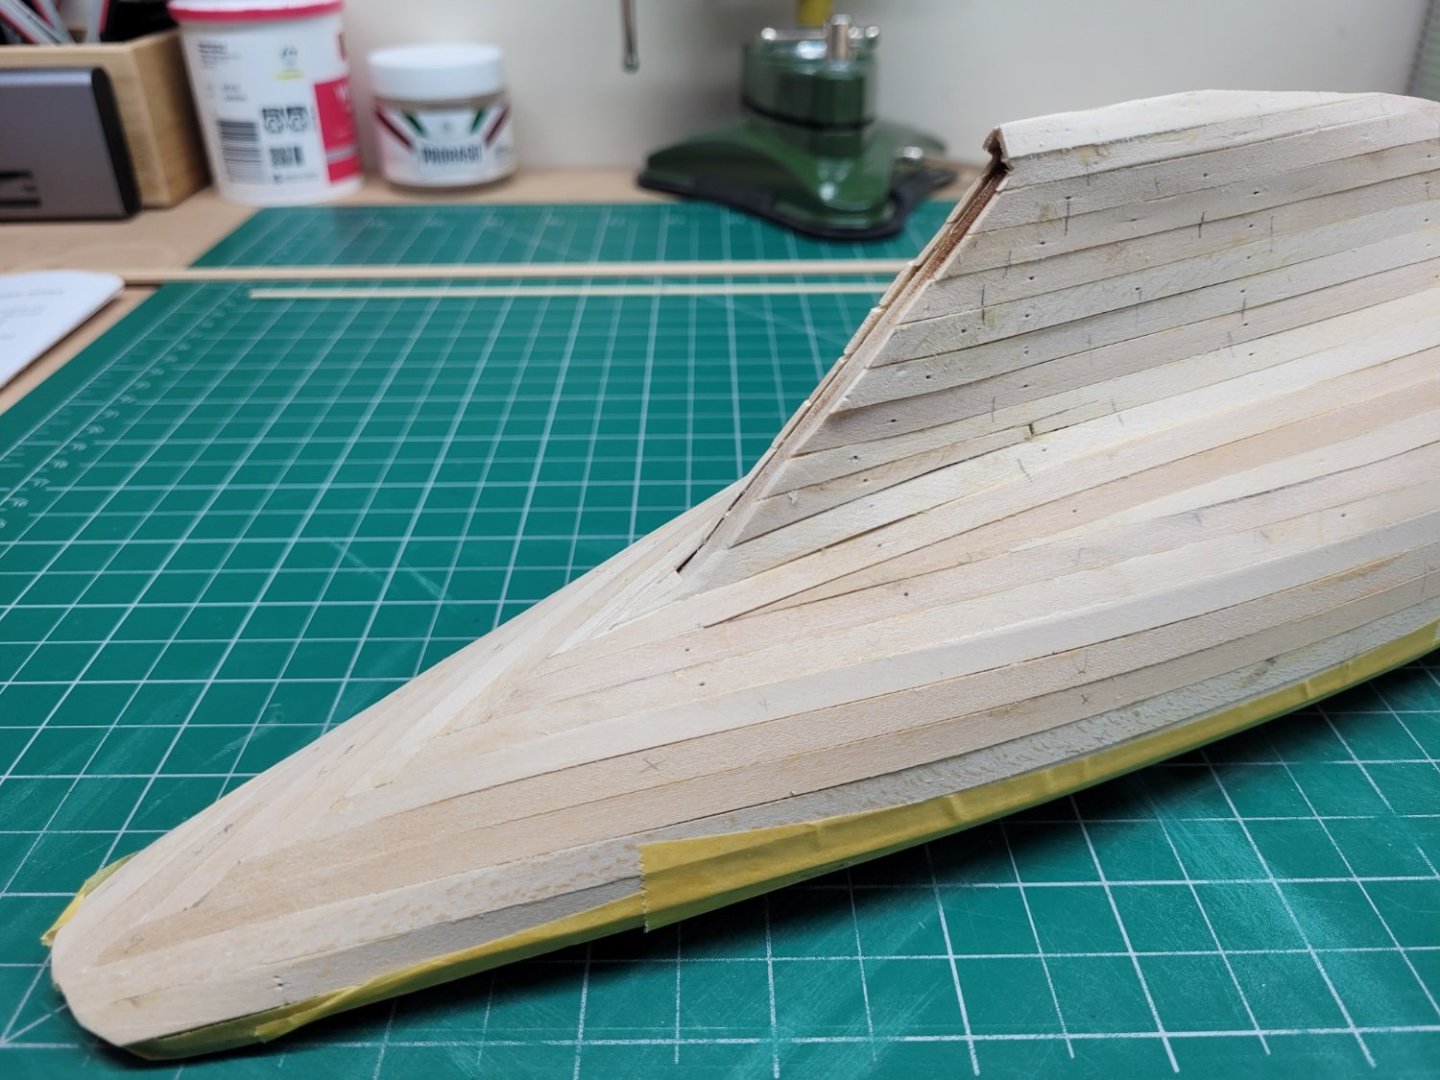

I noticed that there is a bit of gap in the planking on the starboard side of the hull about five rows up from the keel. I'm not sure how I missed that at the time but I guess my clamps didn't hold the plank exactly where I was hoping them to! Never mind, but it isn't something to worry about as there will be some filling required in various places so that should hopefully sort that out.
There are, of course, a few bumps and lumps in placed where my initial fairing may have been a little off, or perhaps there was some variation in plank thicknesses etc, but again that is something that can easily be sorted with a bit of sanding (and filler).
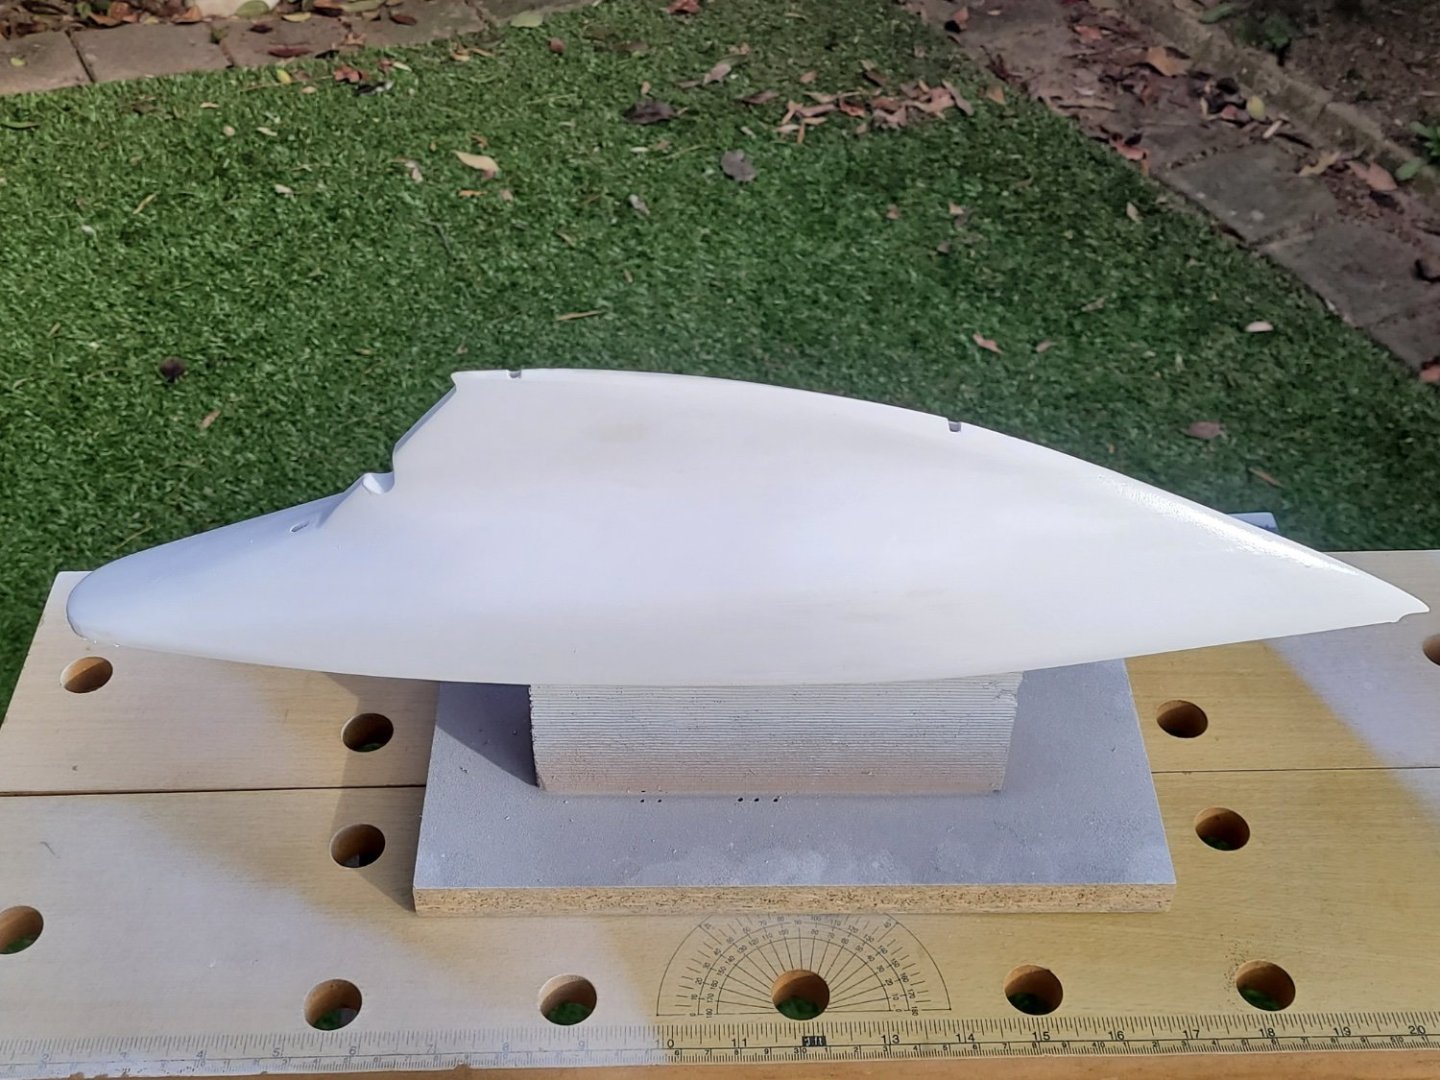
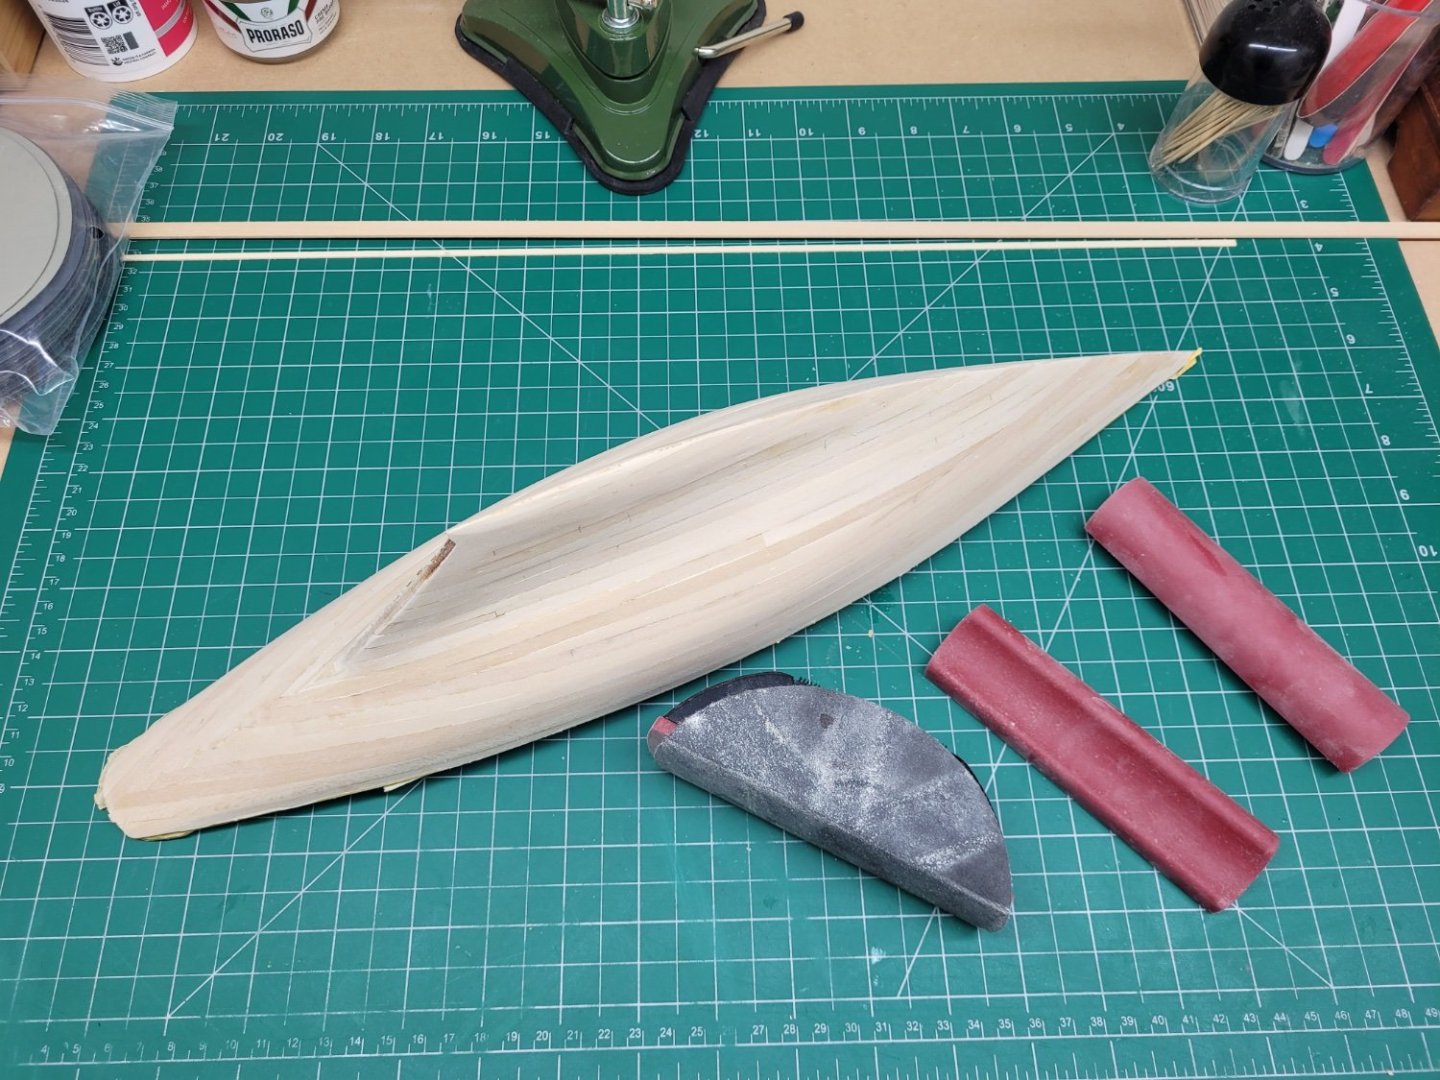
For the initial sanding I used my new hand sander that I recently purchased from Amazon. It has a selection of interchangeable bottom sections which allow you to alter the profile of the sander. It takes 125mm round velcro backed sanding discs and I was able to find a set of 40 discs also on Amazon which ranged from #120 grit to #3000 grit. I used the straight edge, concave and convex profiles with #120 grit paper for a very quick initial sand and then moved up to #240 just to smooth things out a little more. The purpose here was to get the hull roughly to the required shape so that I could then work out which areas needed any filler and whether any high spots needed further sanding down or not.

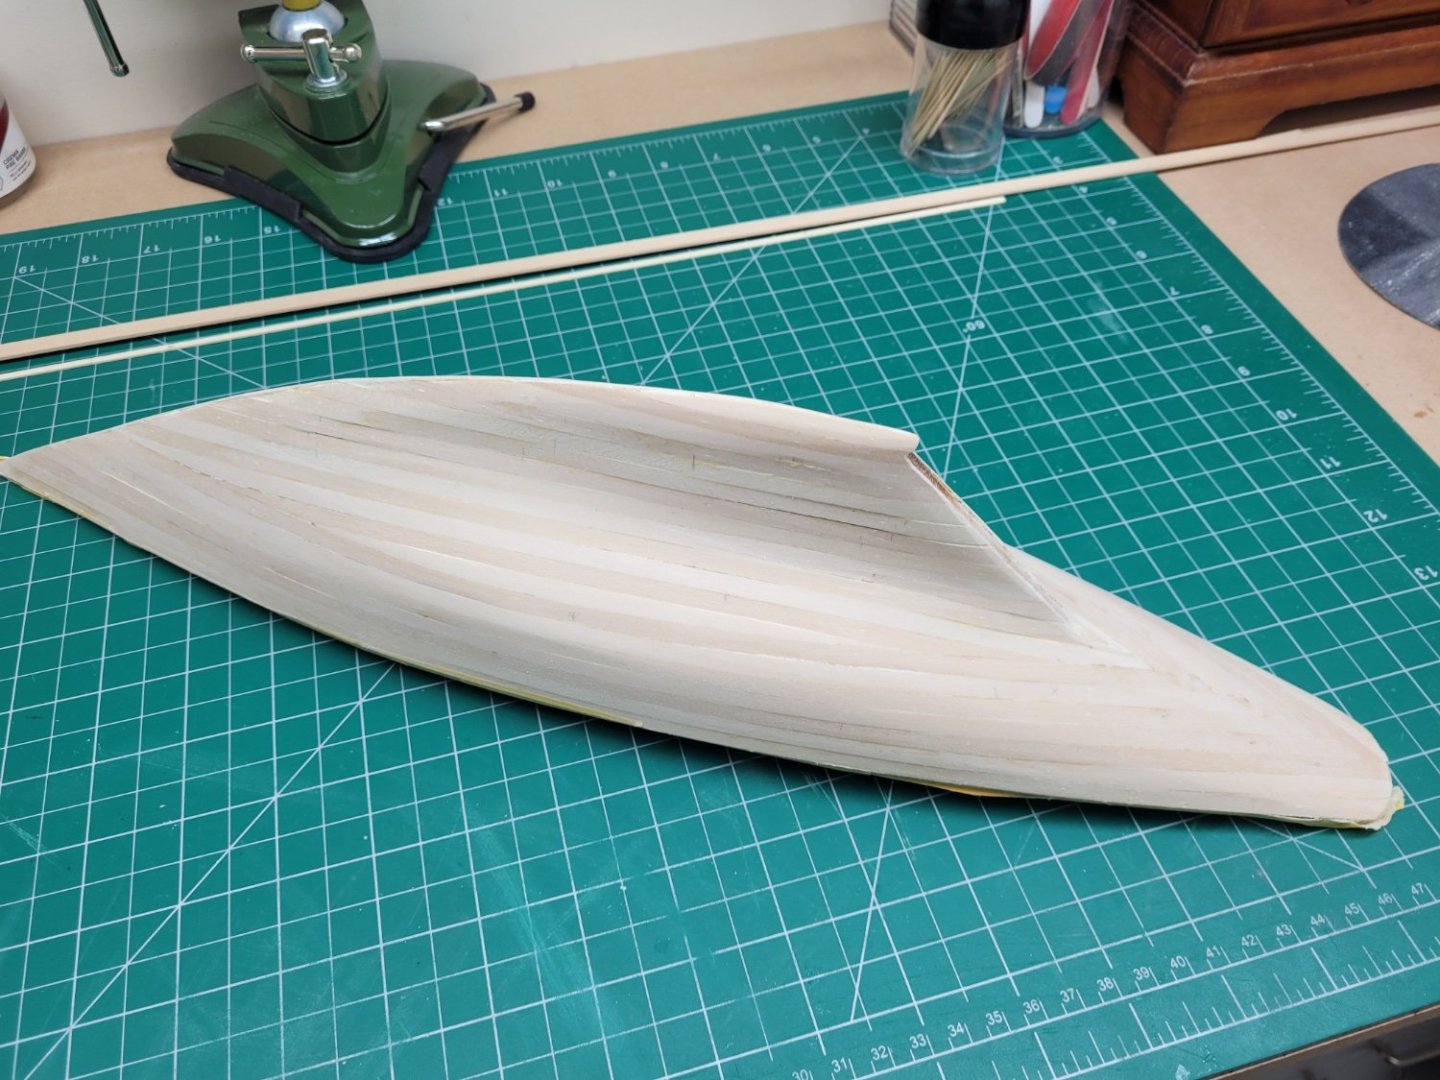

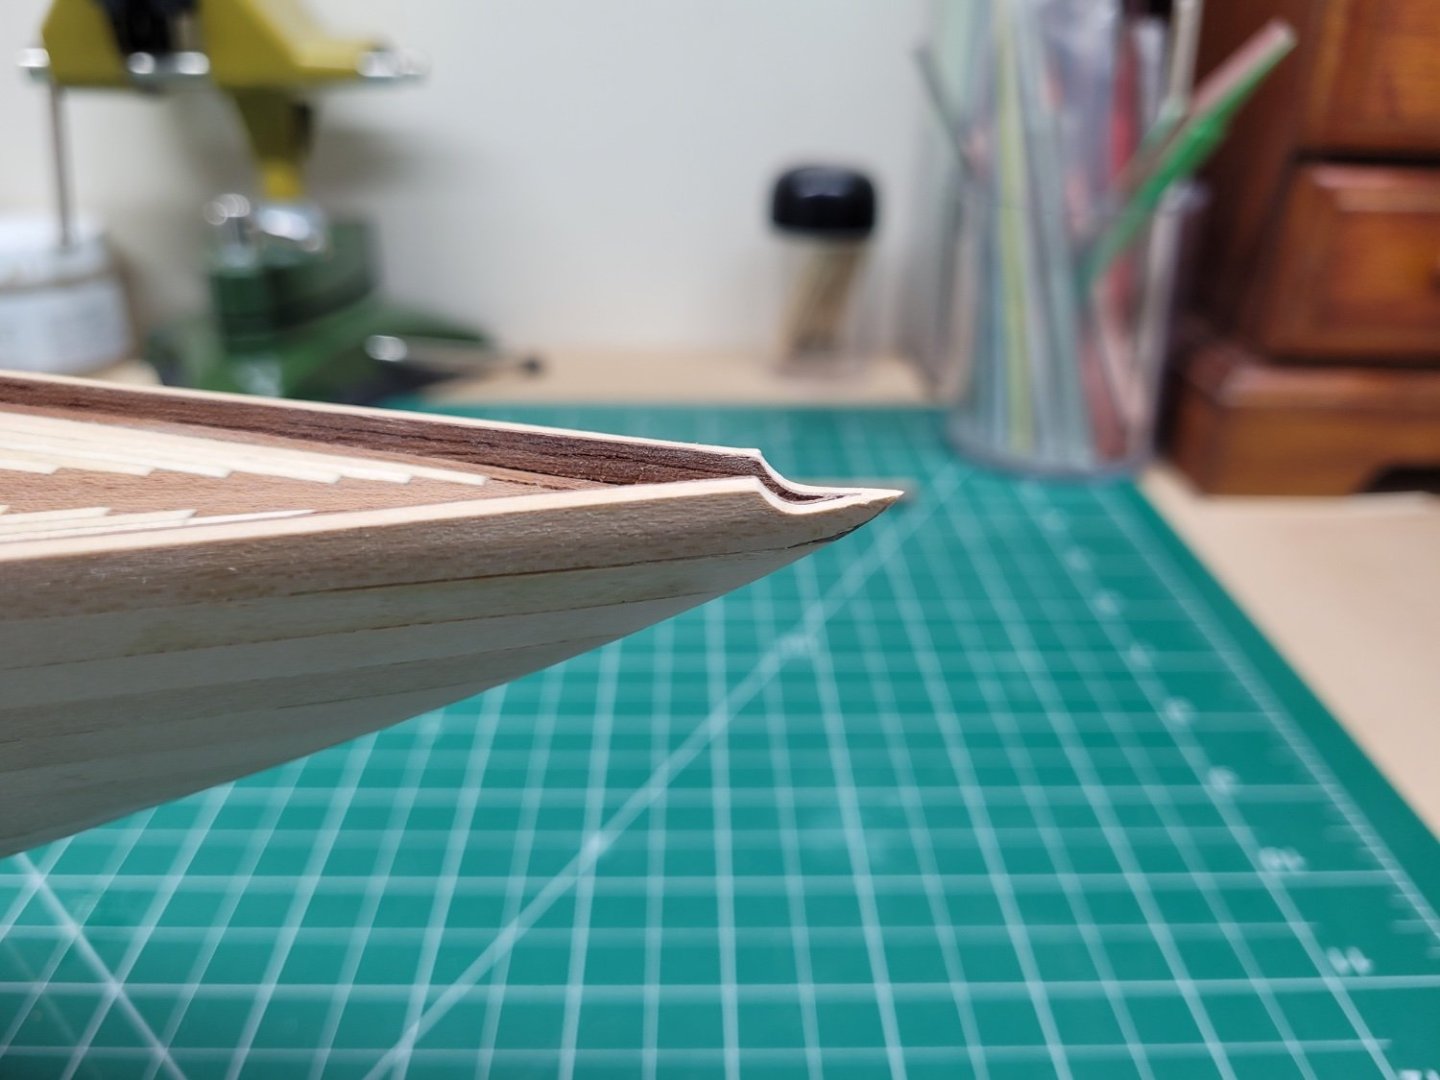
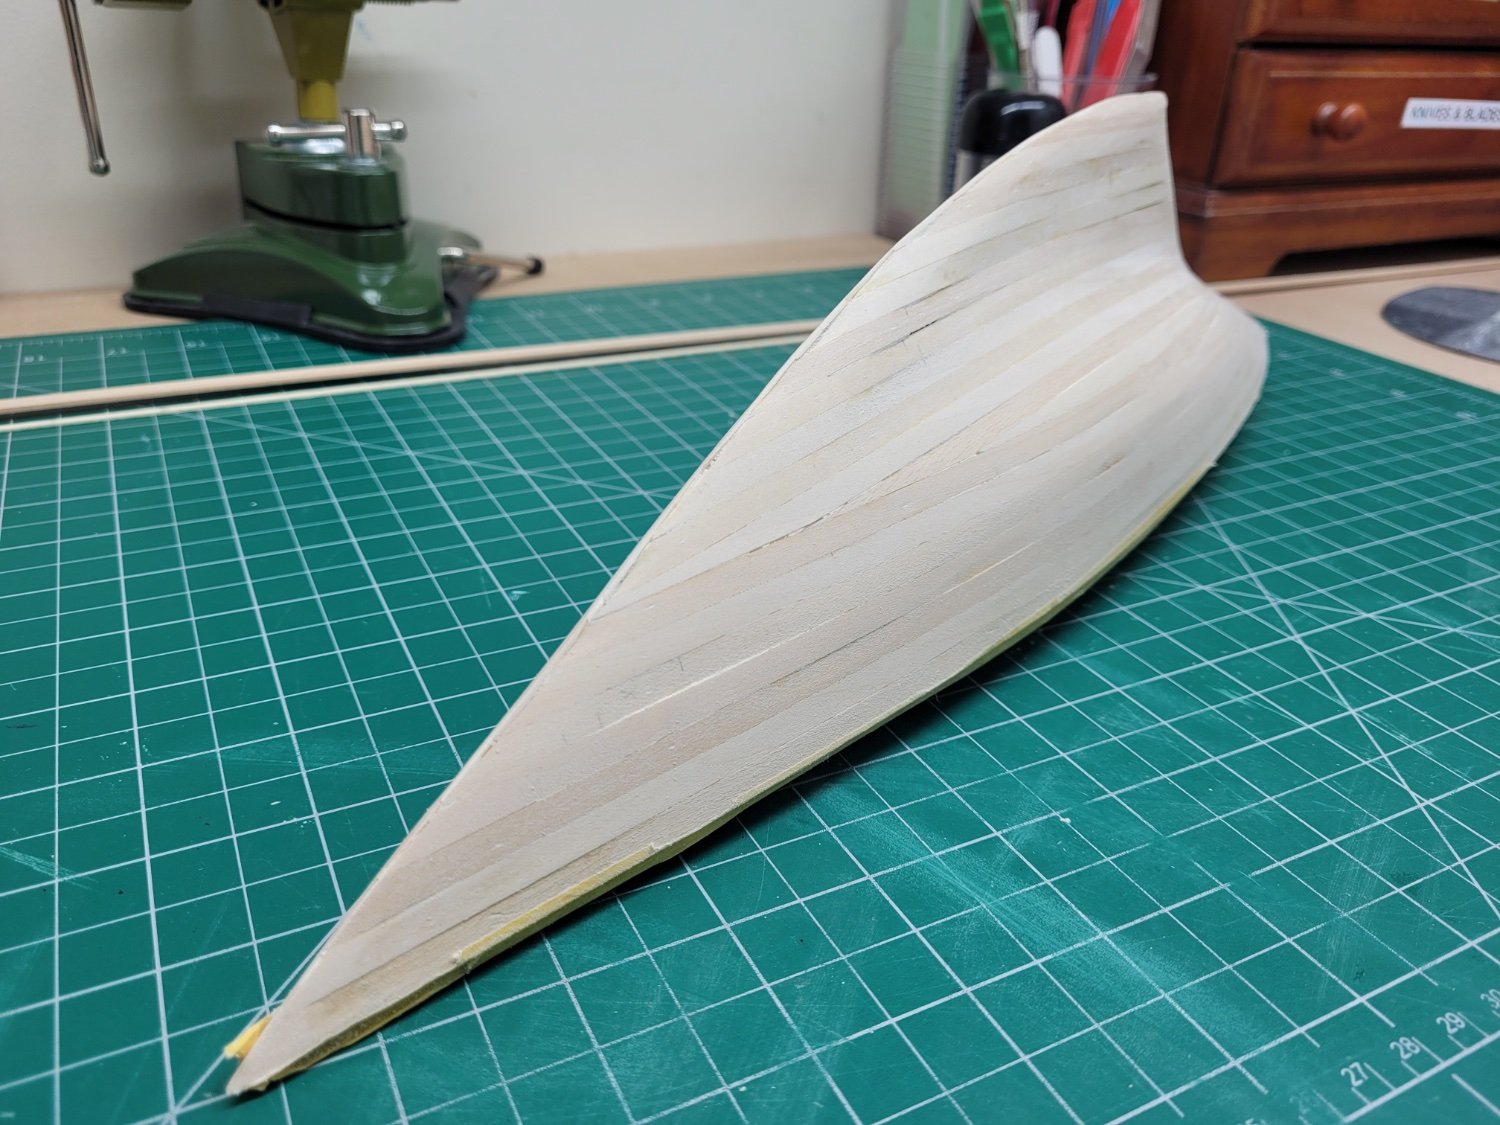
The next job is to add some wood filler where required and then go over the hull once more with a much wider variety of grits and shapes to refine the hull contours as much as possible. The stern planking also needs some work as I have left this a little long at this stage so I will need to thin this out and blend it into the rearmost bulkhead to get a graceful curve. I also haven't yet added the bulwark planks and these will need to be fitted before the final hull sanding can be undertaken, but before I can even do that I also need to scrape the deck planking and get that nicely finished. Unfortunately, as it is winter here and I really only get to work on model in the evenings and weekends I'm probably not going to be able to get outside and do any further sanding now until next weekend.
- Paul Le Wol, yvesvidal, BobG and 7 others
-
10


.jpg.3fba024996542de4e3c4c1e473597b8c.jpg)


HM Cutter Alert by Thukydides - FINISHED - Vanguard Models - 1:64 - first build
in - Kit build logs for subjects built from 1751 - 1800
Posted
Yes the final tension when you secure the shrouds to the hull. And also with any of the rigging and stays and lines generally. It is easy to pull the masts or spars out of alignment with even a tiny bit too much tension. Even after I tied off the rigging I left extra length on all the lines and only finally cut them to size once all the rigging was set up to account for any late changes I may have needed to make.