HOLIDAY DONATION DRIVE - SUPPORT MSW - DO YOUR PART TO KEEP THIS GREAT FORUM GOING! (Only 68 donations so far out of 49,000 members - Can we at least get 100? C'mon guys!)
×


Long9Ron
-
Posts
222 -
Joined
-
Last visited
Content Type
Profiles
Forums
Gallery
Events
Everything posted by Long9Ron
-
Nice idea on bending the beams and I like your treenails testing. Can't see the colors very well in the above pictures, but still like the idea of test first. I hope you can post some closeup pictures later. Had to turn my head sideways to see what was written on the paper.
-
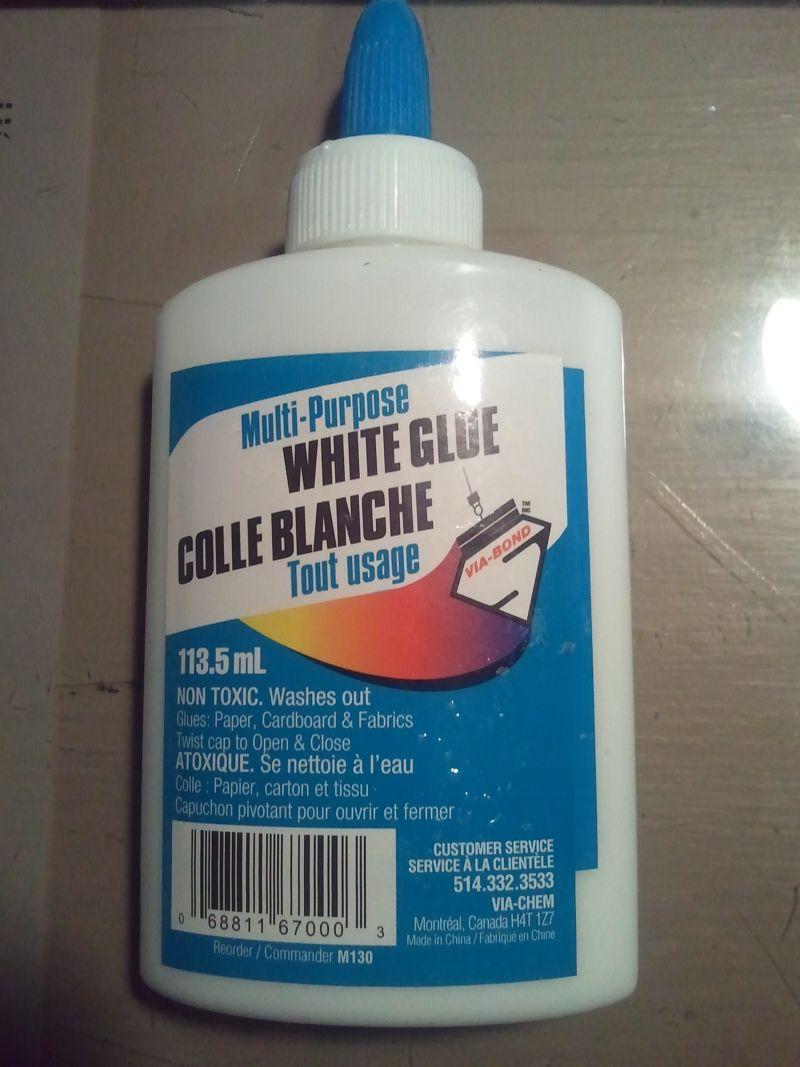
42rocker and Russ Thanks for the great tip. I will have to give that a try in the future. Too late to change it over right now. I was very careful when I put in on not to distort and of the frame paper. I will be cutting them out tomorrow and will update you as to how it went. Any particular brand of rubber cement to use?
-
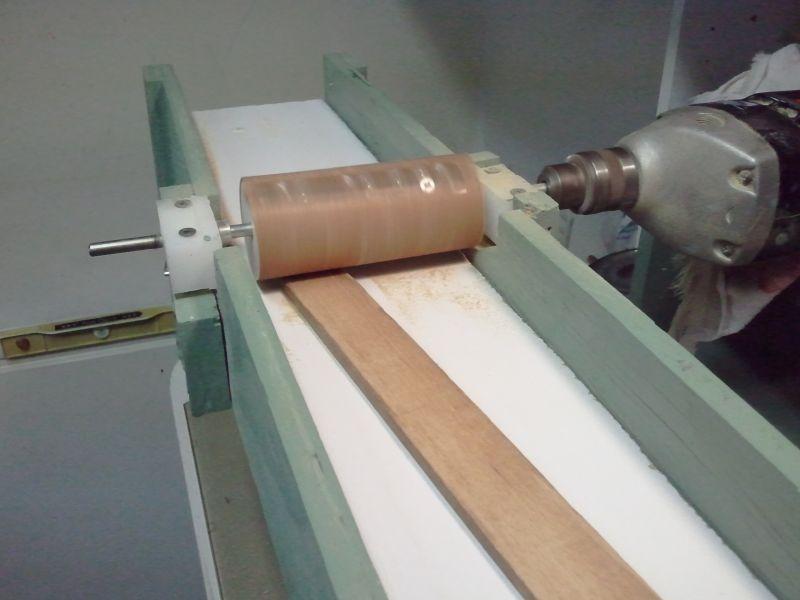
Snowmans As far as the masking tape goes. I hope it will work without tearing. I placed glue on the masking tape and then after placing the templates I smeared another layer over the templates and let them dry over night and a day. So will will see if it works. I will let you know. Pete38 and Bob The thickness sander worked good until the drum broke under all that sanding. Had to build a better drum and used my DIY Homemade lathe to turn the drum down. It worked great also. Should work good for turning my pillars and such. Grant Just pick up a used Craftsman Scroll Saw (16") today for $35.00. Going to clean it up and put a new blade in it and try it out on some sample pieces before I cut out the frame pieces. I think that would be a great idea first. Will let you know how it works later.
-
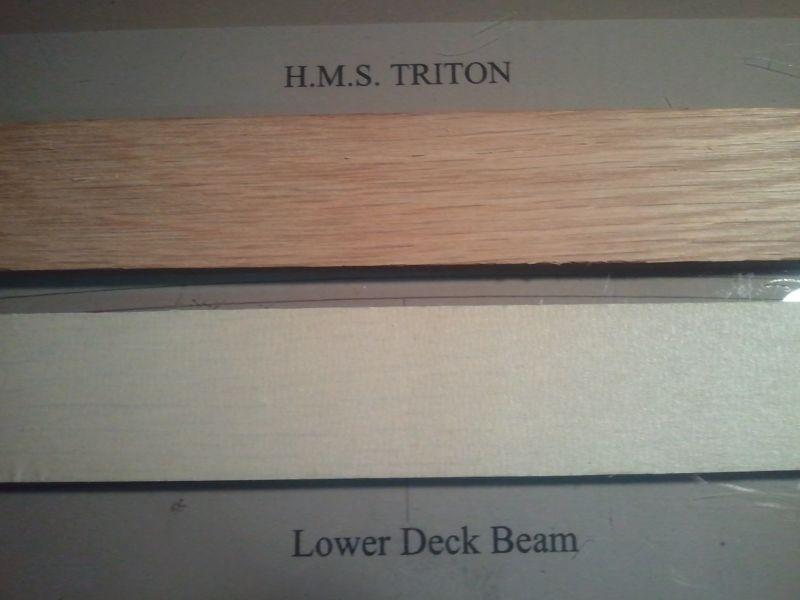
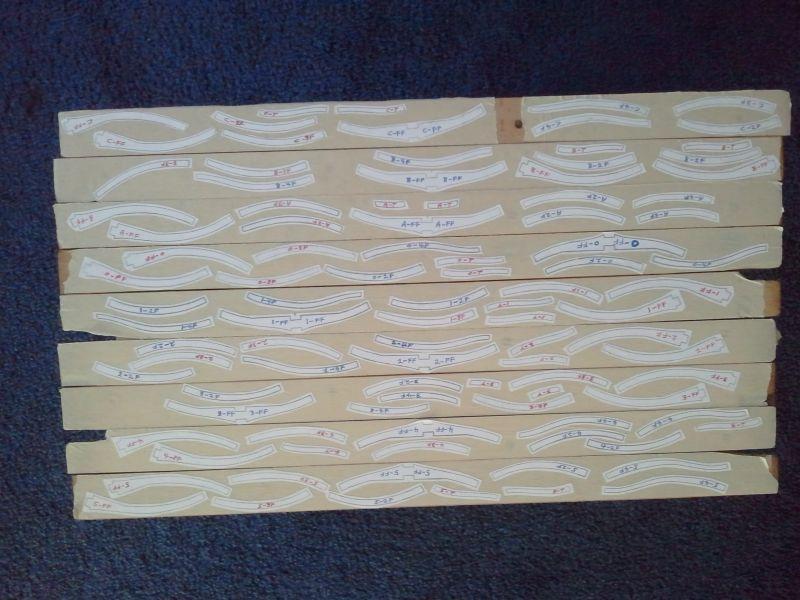
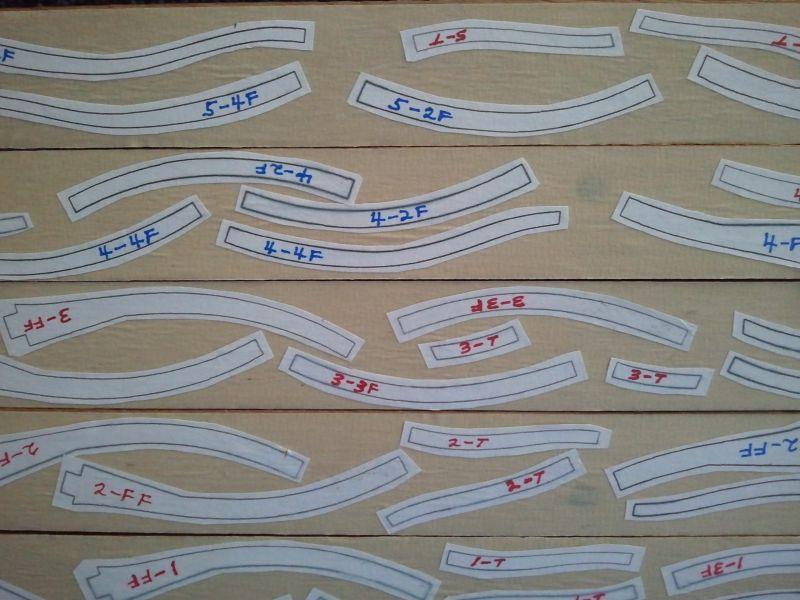
I've been busy in the garage making sawdust with my home-built mini thickness sander. I had a setback when the sanding drum broke on me and I had to make another one. You always build a better one the second time around. As I mentioned before the wood is from an old recliner rocker that I ripped to size and then put through my thickness sander. Thickness Sander Once I got the wood to the right thickness, I put masking tape on each piece. I then cut out all of the frames template pieces and then ran some paper glue on top of the masking tape and laid out all of the frame template pieces on each board. This is the glue that I used. I used masking tape on top of the wood so that after I cut the frame parts out with the jigsaw and sand them to the proper shape, I will be able to just peel the masking paper off and leave clean bare wood. No scraping glue off of the wood I hope. Here is a picture of all the frames template pieces laid out and glued onto each board ready to be cut. Closeup of same. Well that's all for now. Next step will be to cut all of the pieces out and do some sanding and then make the frames. I will post as I go along.

-
Pete38 and Russ Thanks for the information, I have placed it in my Things to Know database.
-
Grant Beautiful work on the guns. If I were your son I would be very proud to receive such a gift. I can only hope that I will do such a great job on mine when the time come to do my first guns. Where did you find all the information on the guns? Is there somewhere on MSW that has all the information with regards to dimensions for all the guns sizes? I mean for turning them on the lathe, brass rod size, scale size and barrel sizes, 9 Pound, 12 Pound and such or did you find the information from an outside source. I think that info would be great to have in my things to know database.
-
Larry It's looking really nice. How long did you soak your beams for and how long did you let them dry before using them?
-
Thanks Dan Now I know how to make my log look better with explanations of the photos. I'm using Spectrum and I don't seem to see an Edit button at all, but I do have Post and More Reply Options. I used More Reply Options and it worked just fine. The only edit button I see is after I make a post, I have an option to edit if I want to.
-
Karl Nice to see you back. Thank you so much for re-posting your build. Beautiful work.
- 662 replies
-
- 1
-

-
- bonhomme richard
- frigate
- (and 1 more)
-
Sorry Bob. It must have been my bad eye site.
-
Grant That's fantastic information to have. Thank you so much. I see that I will be following all of your postings..
-
Bob It's looking great. I like your clamps you are using. I will have to make some. Your planking looks great too. Maybe it my eyes, but on the lower gun deck beam on the right hand side, it looks like the beam has a split in it. Does it? I zoomed in on the beam but it's still hard to tell. Just thought I would bring it to your attention.
-
If anyone is interested in CA glues, the link below has a lot of information on the different types of glues and the bonding times and materials they can be used on. Look at - The What and How of Adhesives link on that page. http://www.greatplanes.com/accys/gpmr6001.html
-
Grant Thanks for teaching me how to do that. I have wire and will have to give it a try. But, so many other things to do first.
-
Good topic Larry. I'm fairly new to MSW also and I too was wondering which glues to use and how to apply them. I will be following this post closely. Thanks for bringing it up for discussion.
-
Beautiful build. Thank you for sharing it. I have learned a lot from it.
-
It's good that you're going to to some testing first. Could you post some pictures of your staining samples when you have some? I would like to see them as I was thinking the same thing, using toothpicks on my build.
-
Remco They look nice, but not the ones I was thinking about. Same principle though.
-
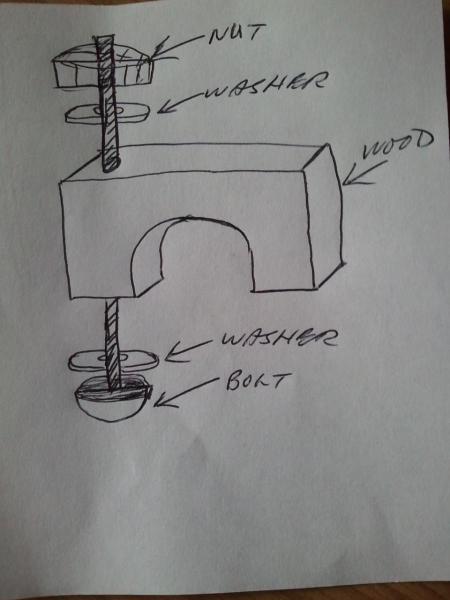
Mark I know what you mean there, but I think it was just the washers that held it in place on the underside and on the top of the frame. The washers being big enough to straddle the two frames. The wood piece just big enough to go between the frames.
-
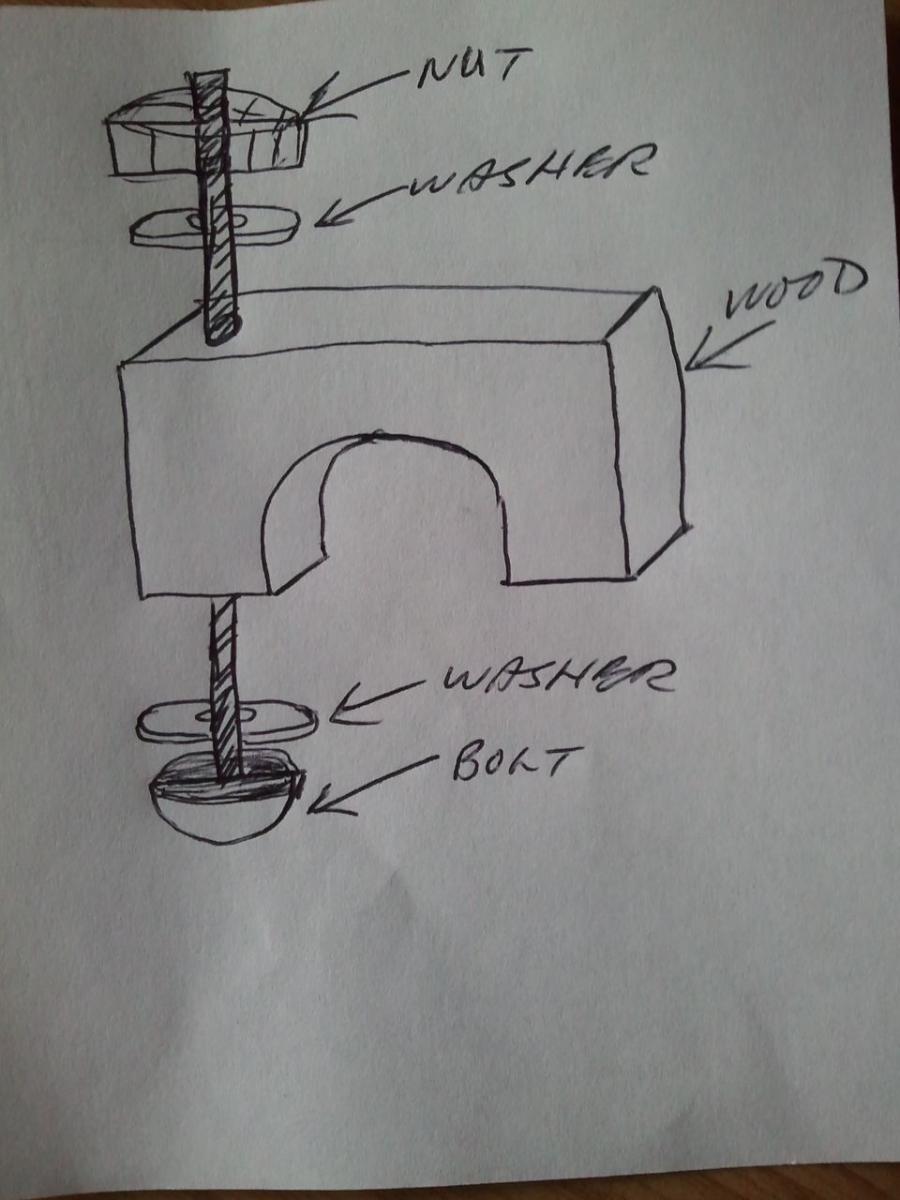
The clamps that I was thinking about were something like the picture below. I'm not a very good artist. I know that I saw something like this somewhere on the old site. It was used by placing between the frames to hold down the planking while gluing in place or whatever else. I thought it was a great little clamp and would like to make some. Which I will do. Anyway, if anyone has some pictures of clamping devices they have made, please share. Thanks
-
Alex You're right. Danny Vadas has made some nice clamps and has pictures of them under his HMS Vulture build. He does mention that someday he will make a post on how he made them. That would be nice to have.
-
Mark I checked EdT's Naiad log and I did see a couple of clamps that looked homemade and very nice, but they were not the ones that I was searching for. By the way, I like the way the new site looks and handles. I was able to look up his posts very easy.
-
I thought that I might start to make a few homemade mini clamps to use for shipbuilding and I remember that on the old site I came across a wooden clamp that was in the shape of a C and used a bolt and washer and a nut. It was used in some way in the framing process. Do you think I can find it now? No. I have done a Google search for images etc... I can't find at all. So, I thought why not place a post on MSW and lets see all of the mini or not so mini clamping systems that the users have made. So lets see if we can help each other and show some pictures and share some ideas. I sure would like to see some of the contractions that members have come up with. Sorry, I can't be the first because I haven't made one yet,
-
Bleaching your wood
Long9Ron replied to JPett's topic in Building, Framing, Planking and plating a ships hull and deck
Sam I think that would me a great idea to have that information in the database. But, it's up to the admins. I look forward to seeing your post, but only when you can find time to do it. Information like that is so valuable to have as a reference. -
It's looks good. I'm a little ways behind you. I'm still working on getting the frames ready.