HOLIDAY DONATION DRIVE - SUPPORT MSW - DO YOUR PART TO KEEP THIS GREAT FORUM GOING! (Only 24 donations so far out of 49,000 members - C'mon guys!)
×


CiscoH
-
Posts
379 -
Joined
-
Last visited
Content Type
Profiles
Forums
Gallery
Events
Everything posted by CiscoH
-
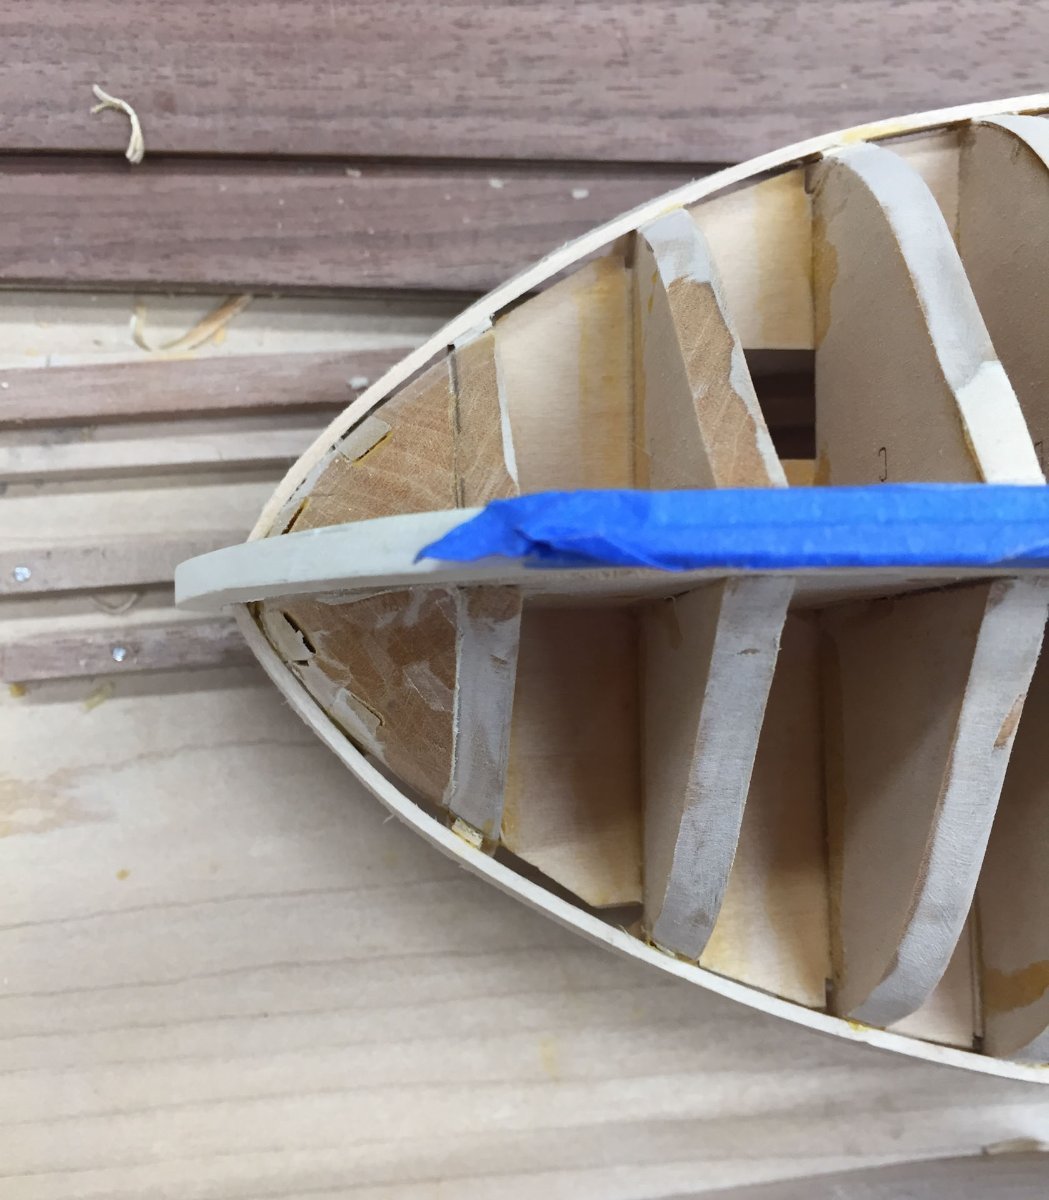
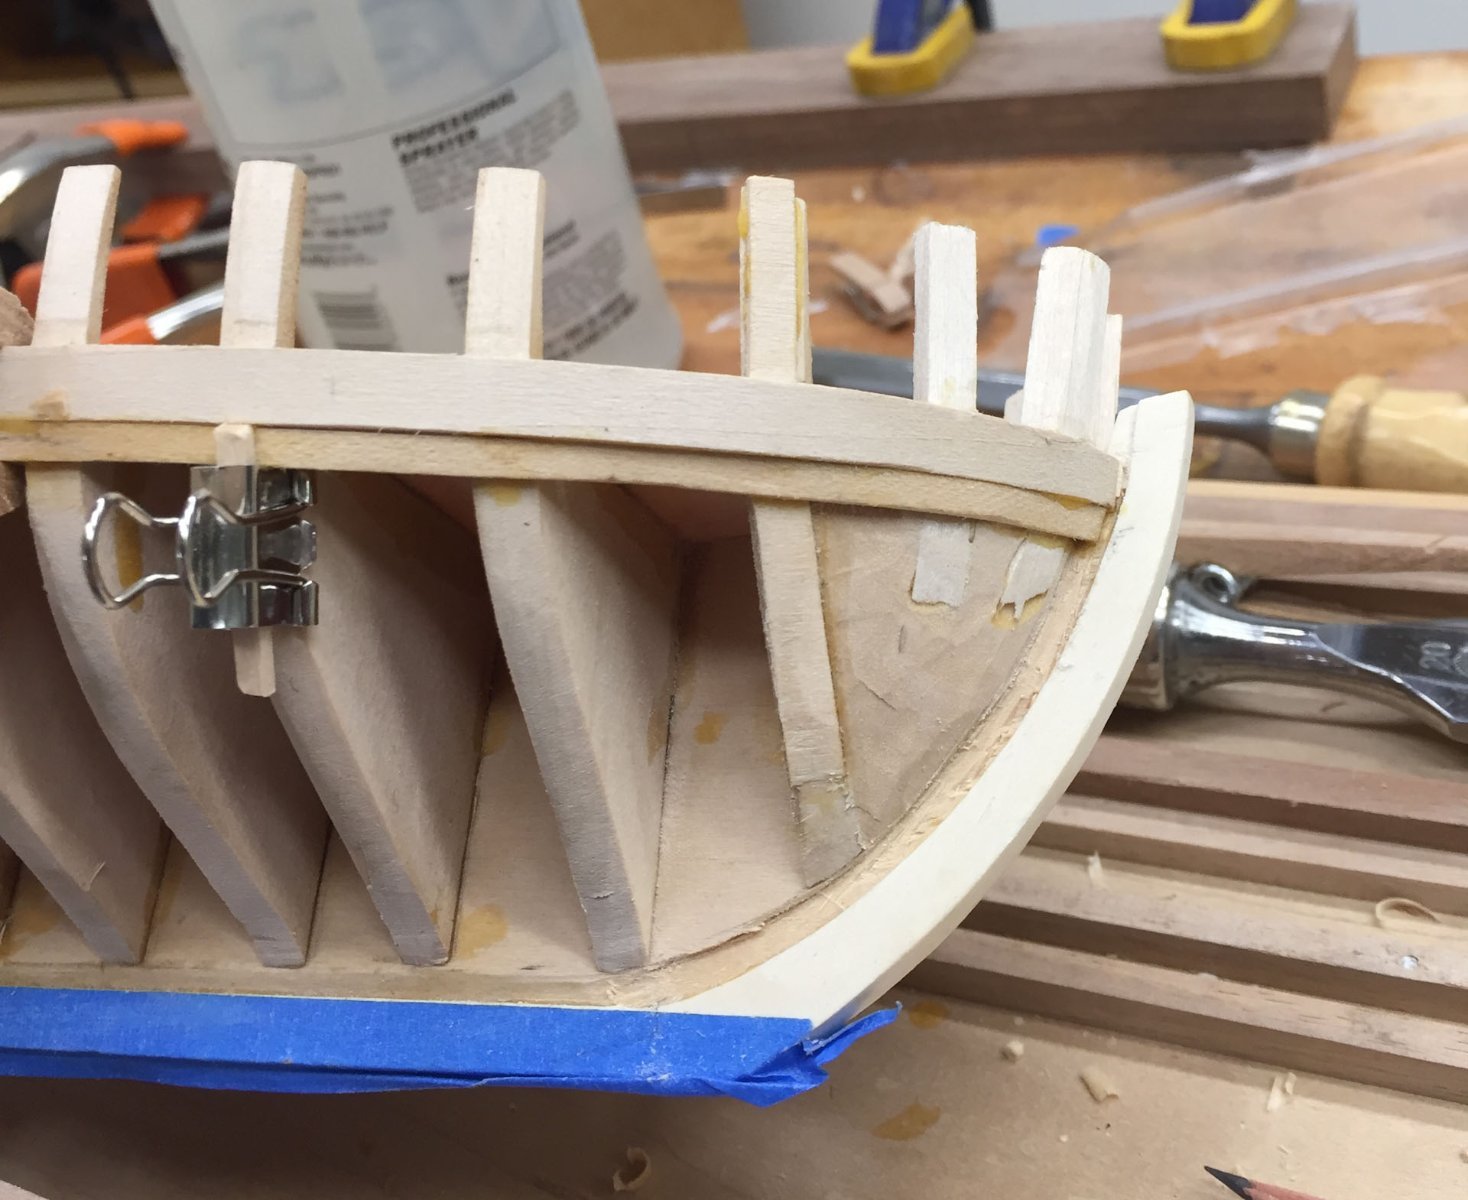
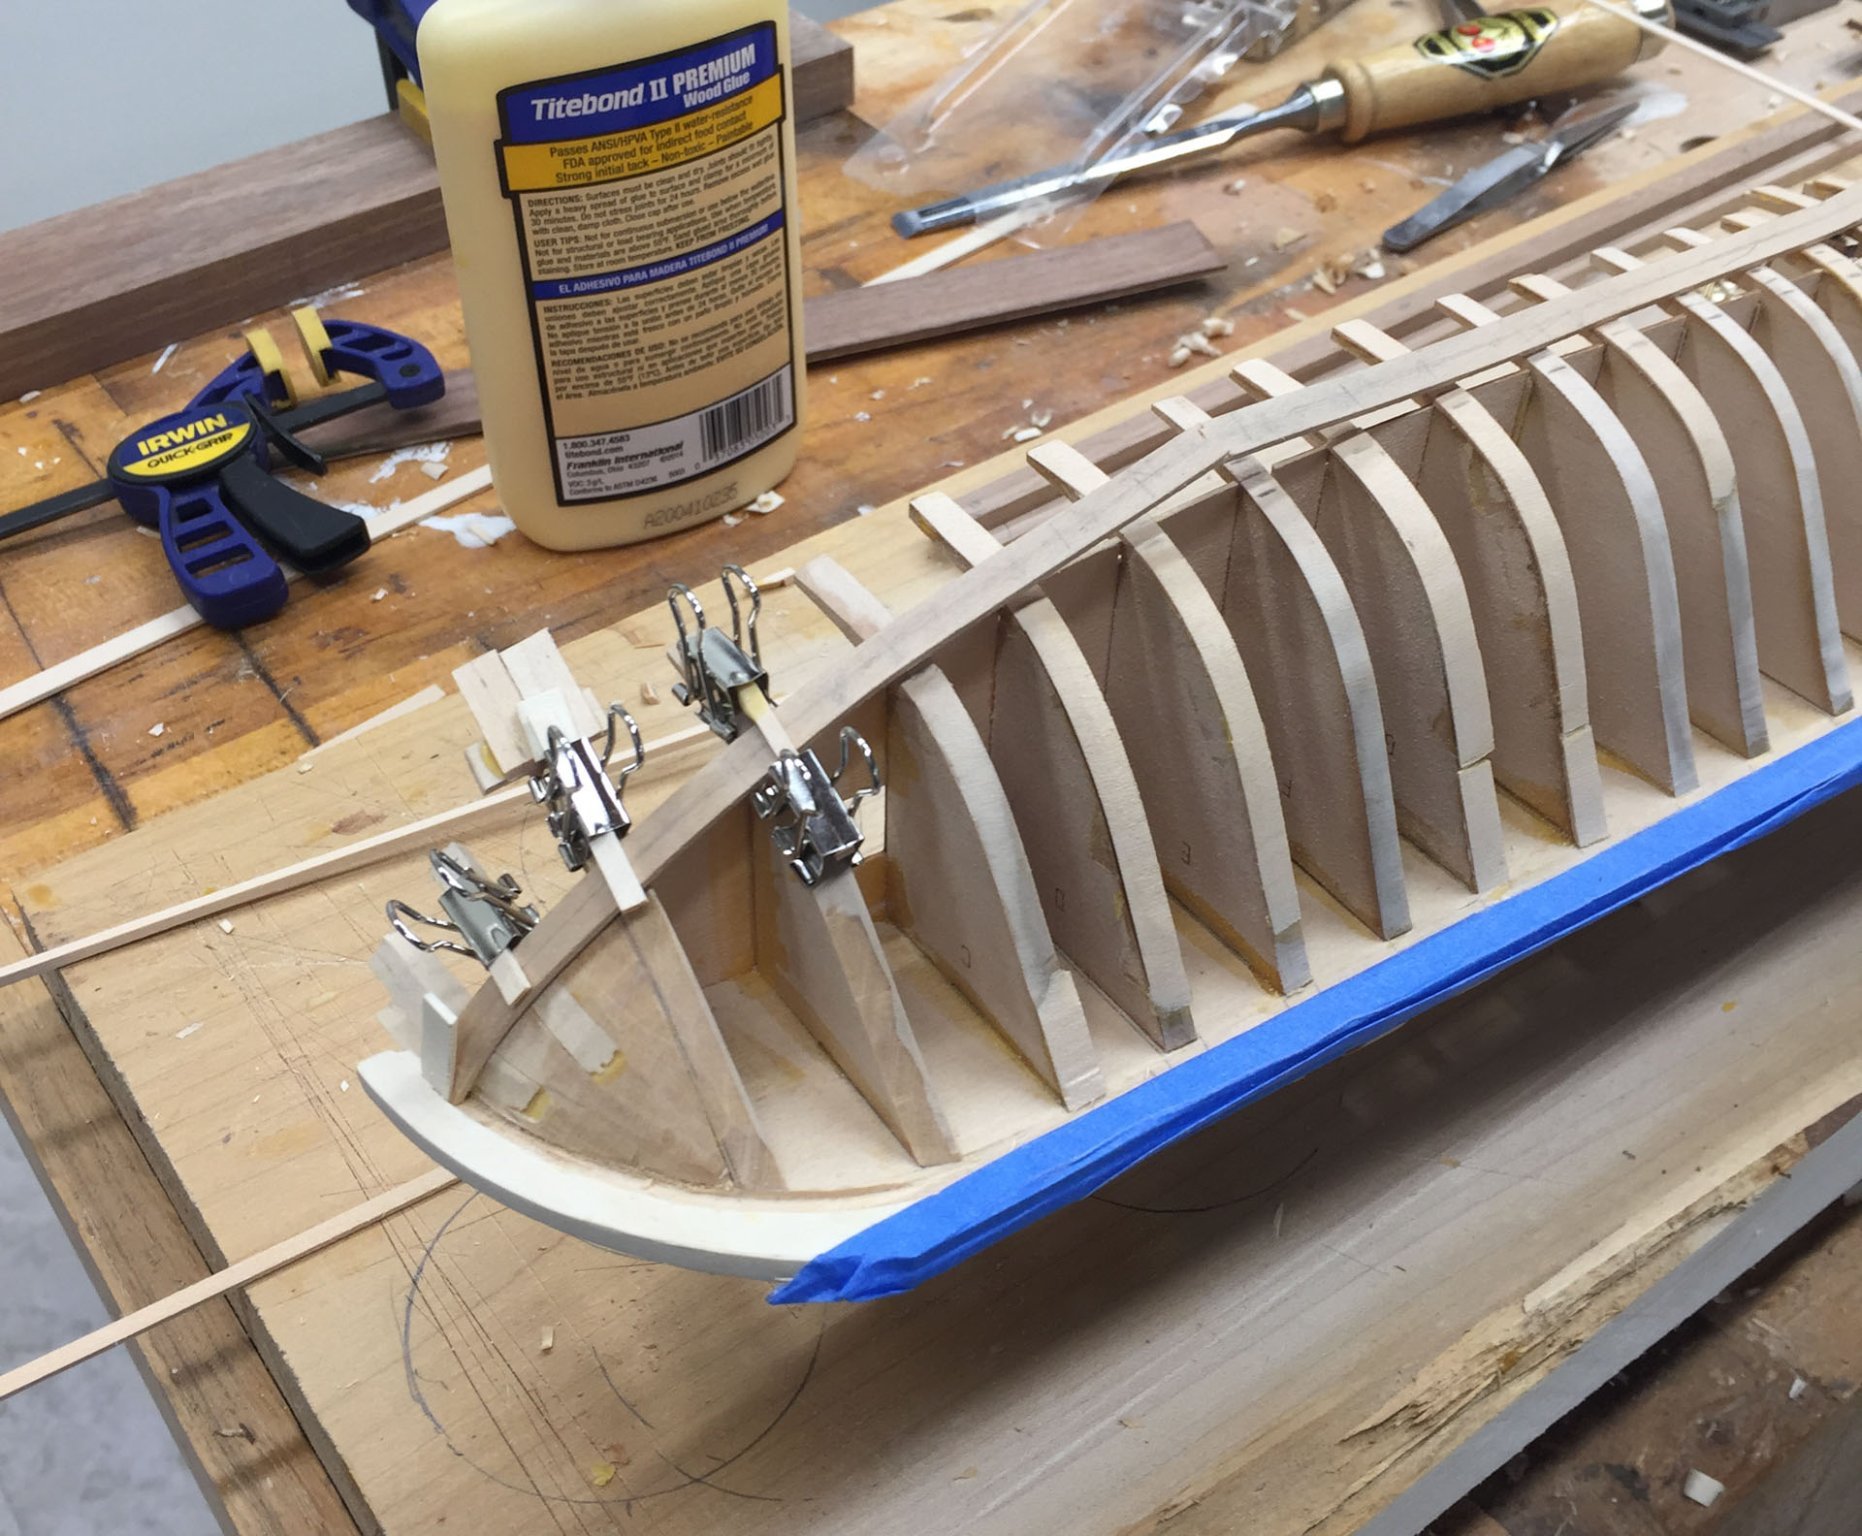
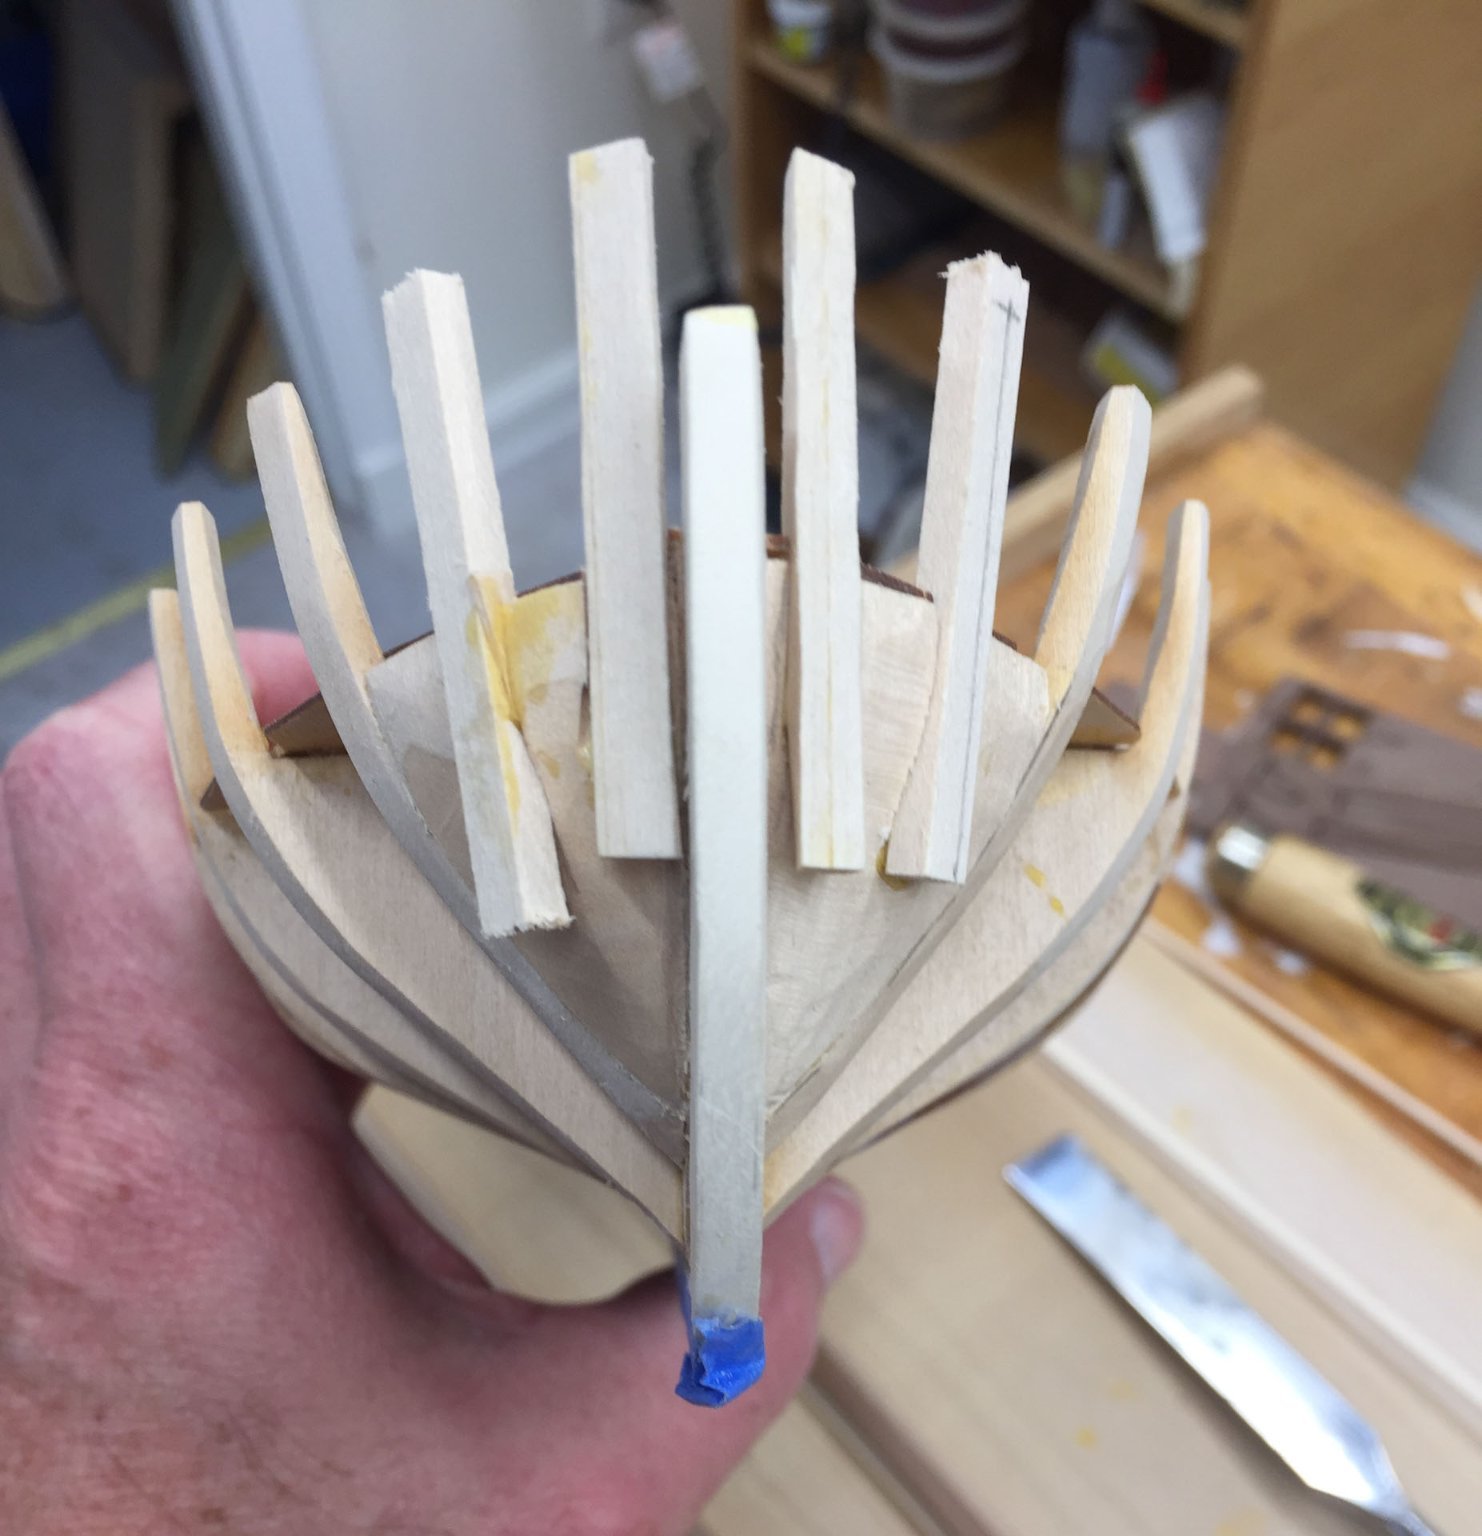
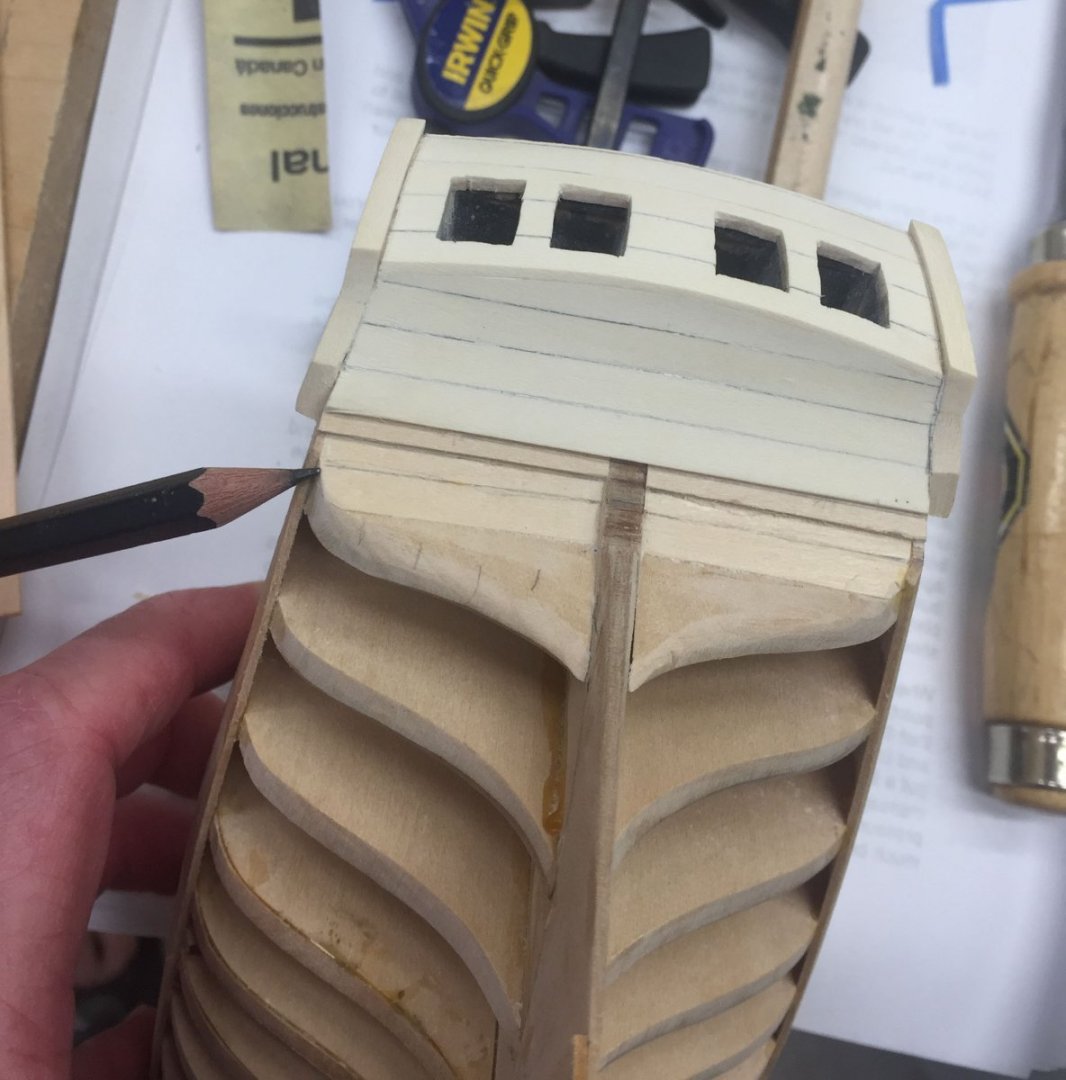
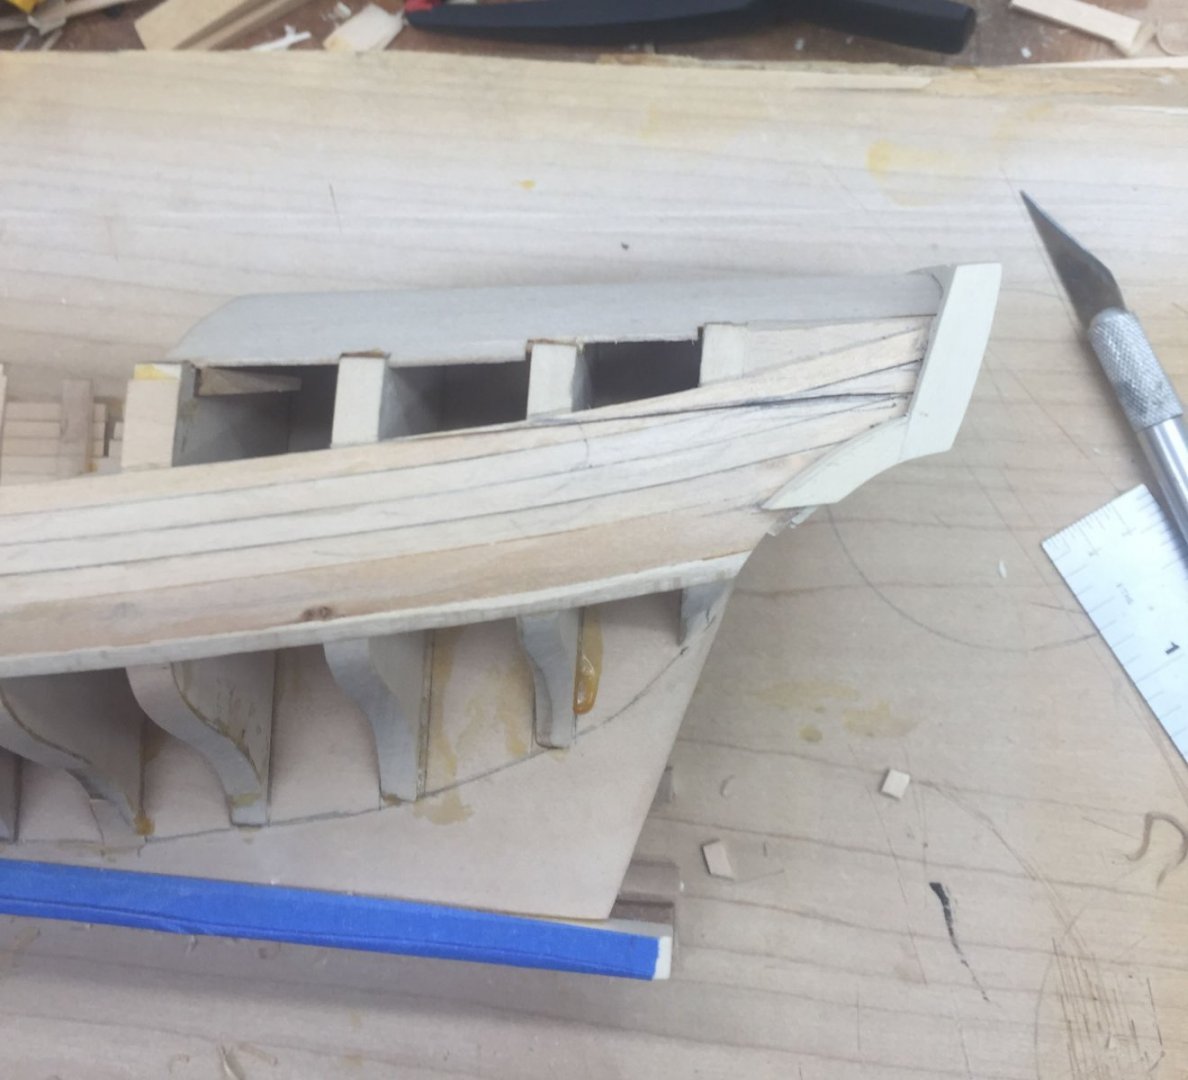
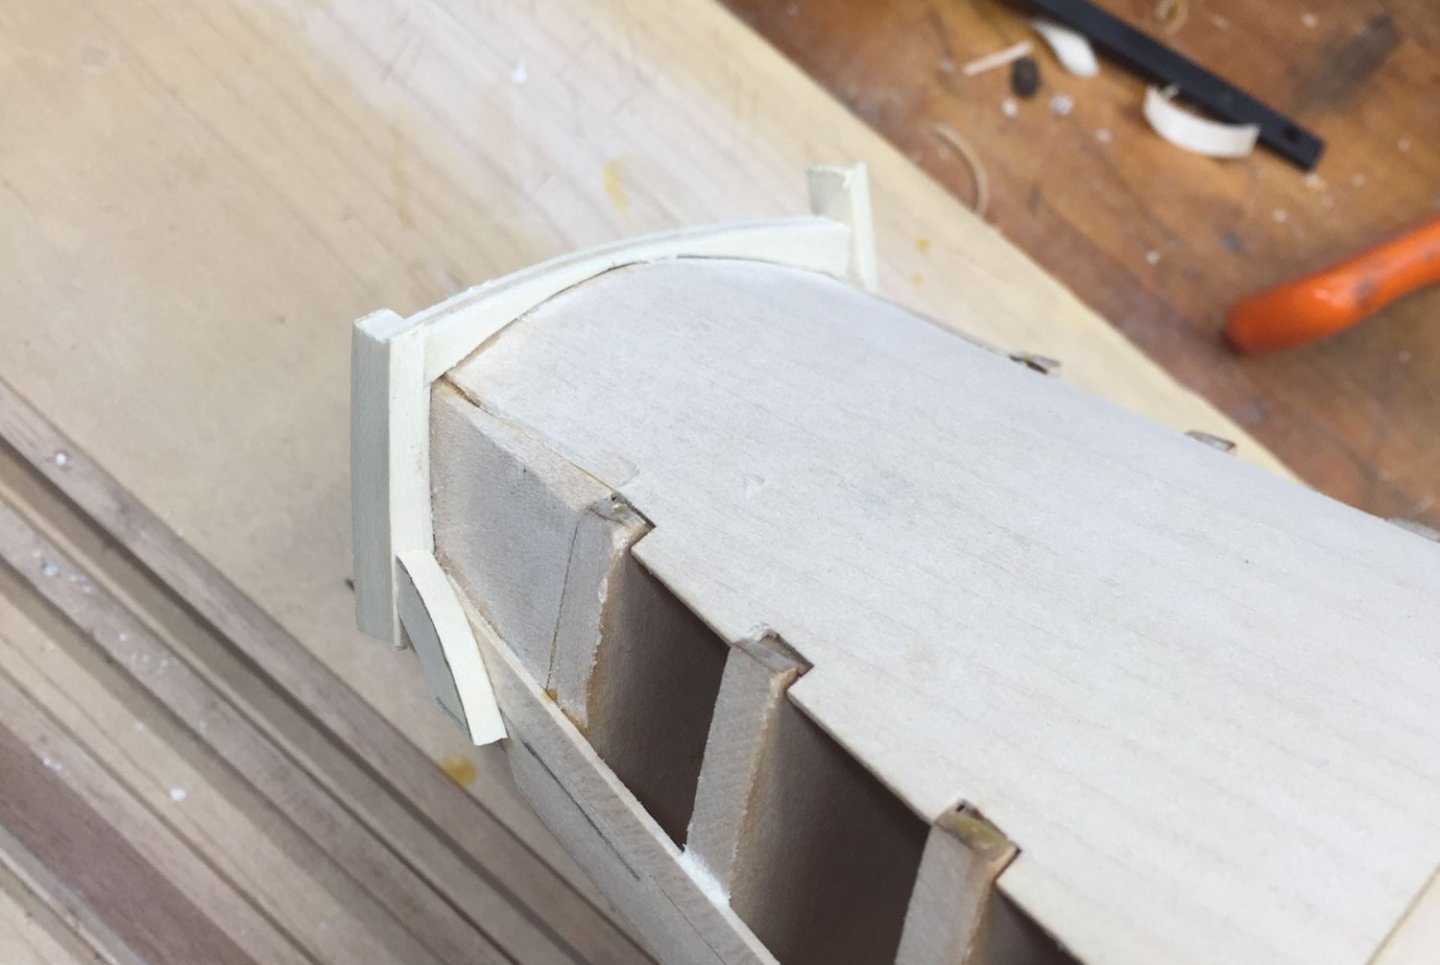
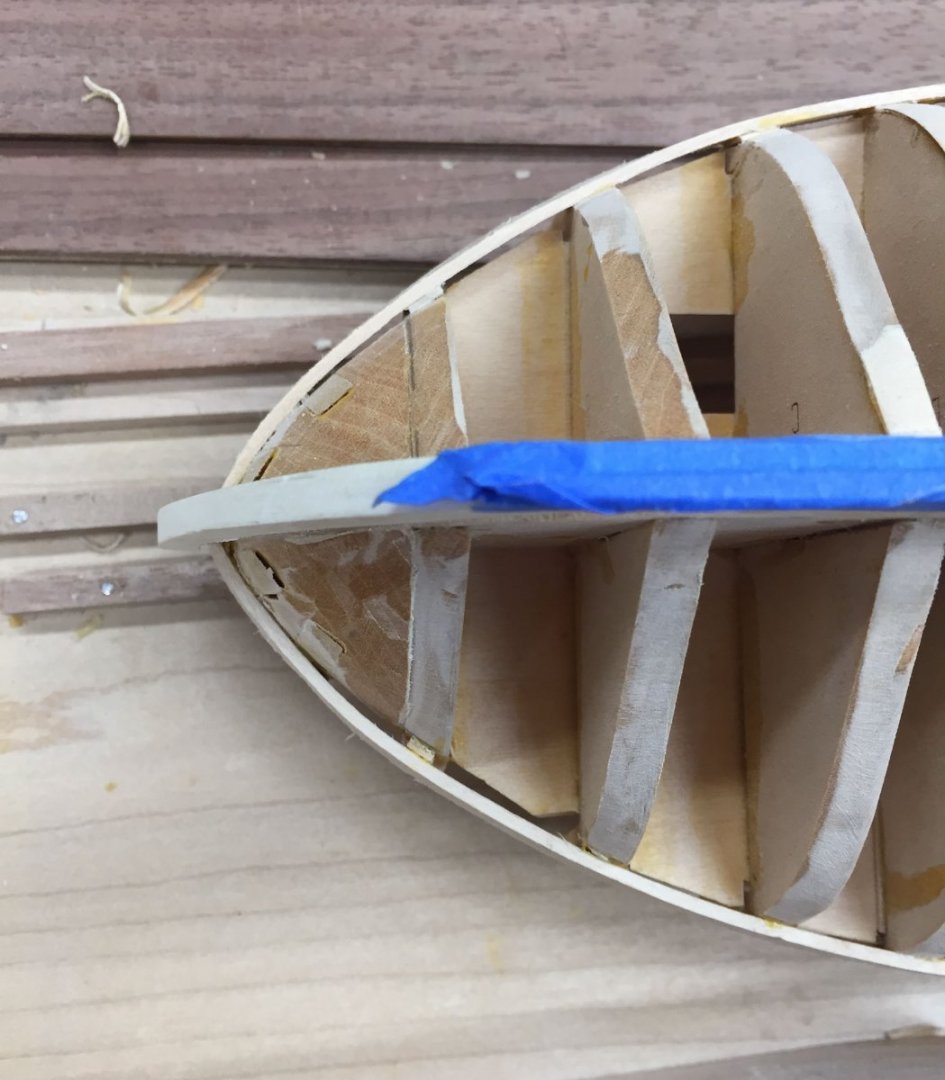
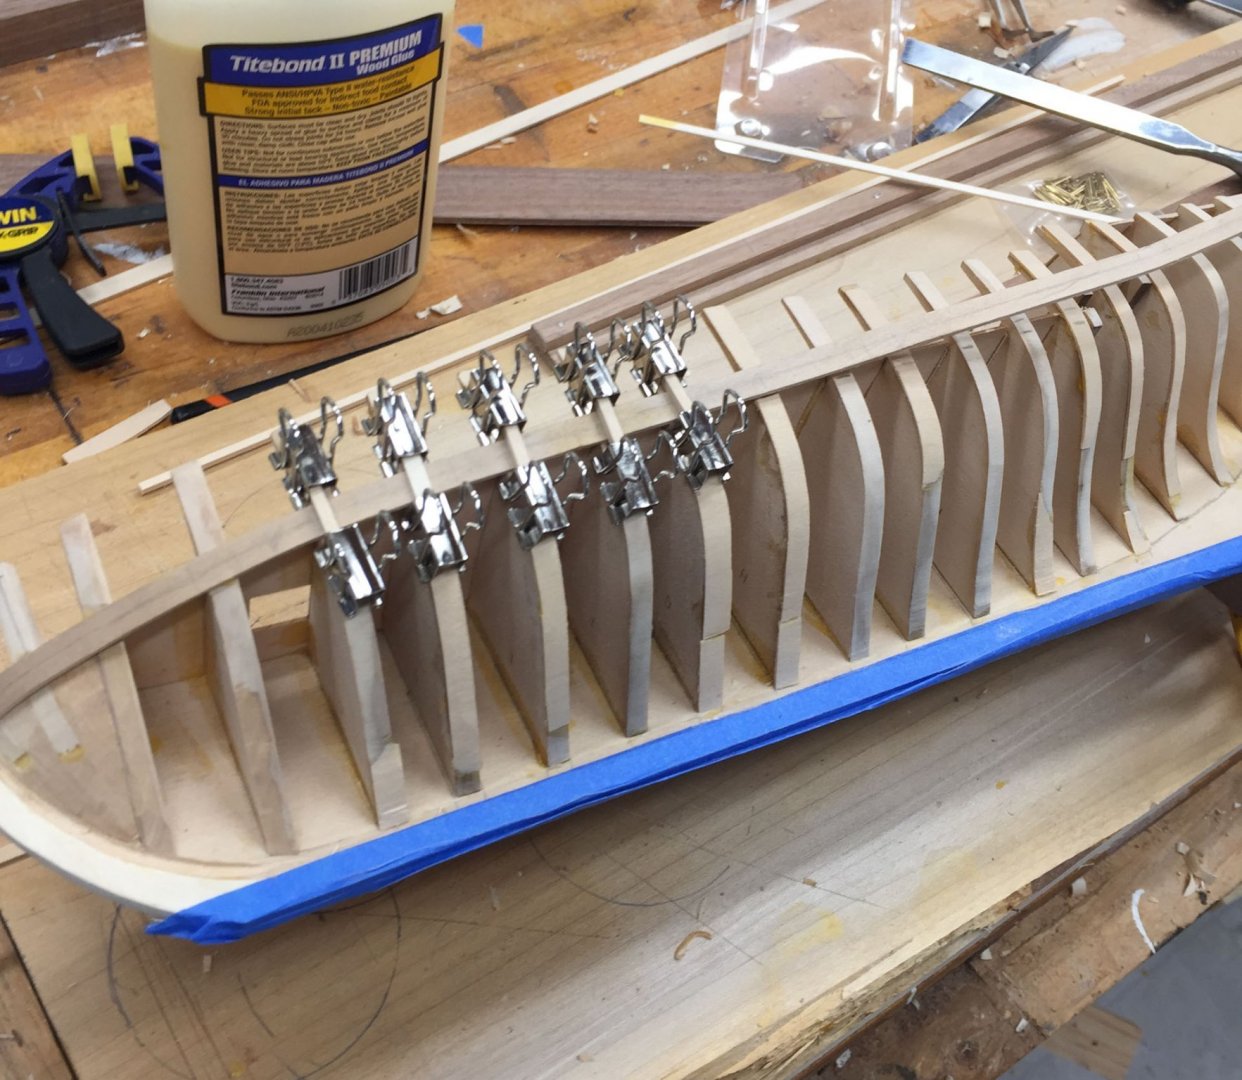
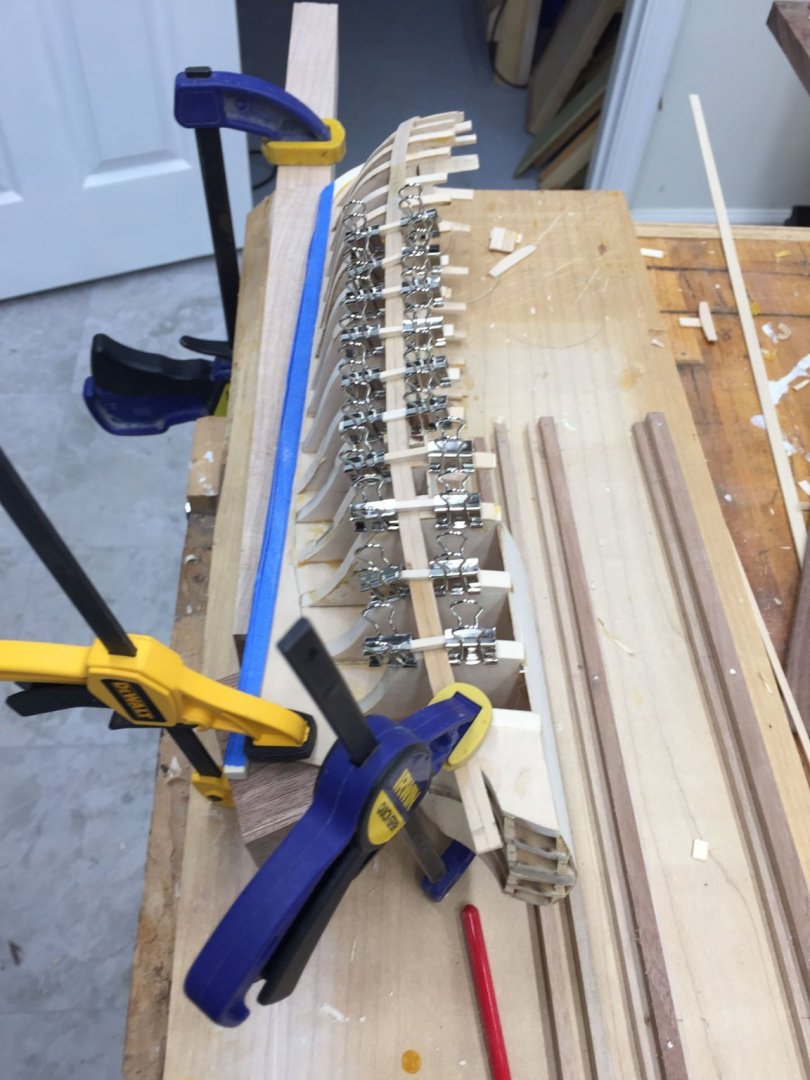
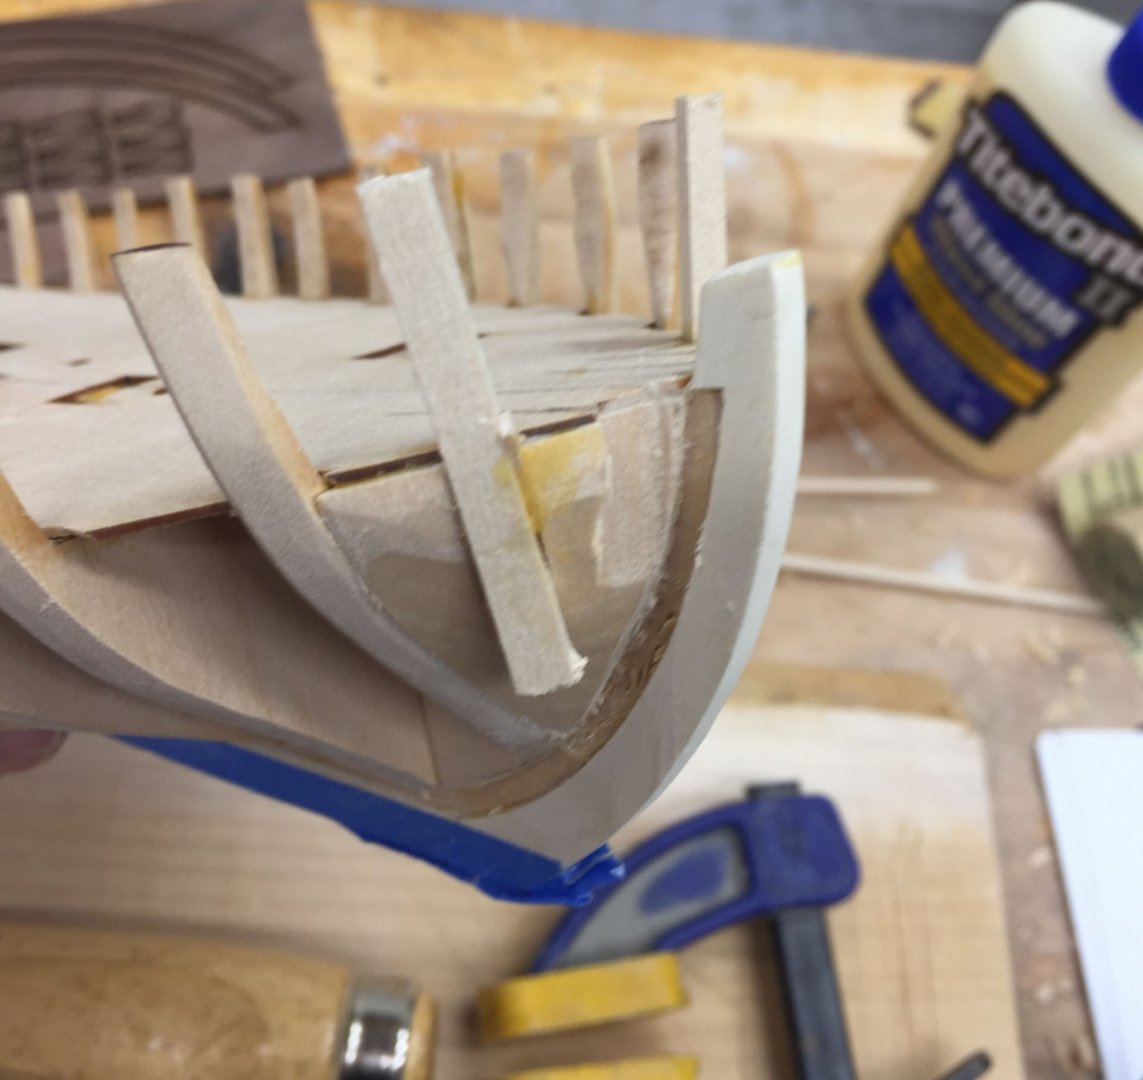
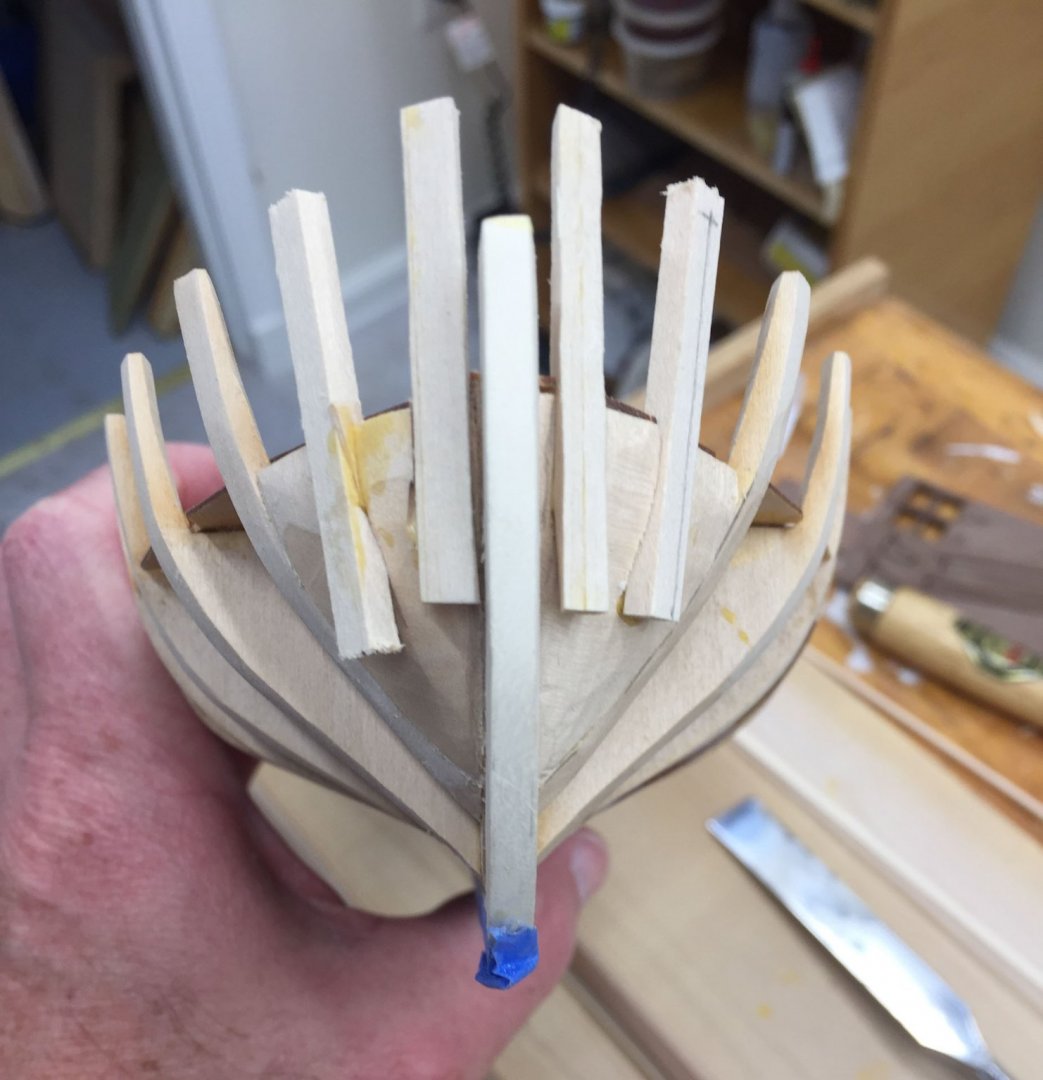
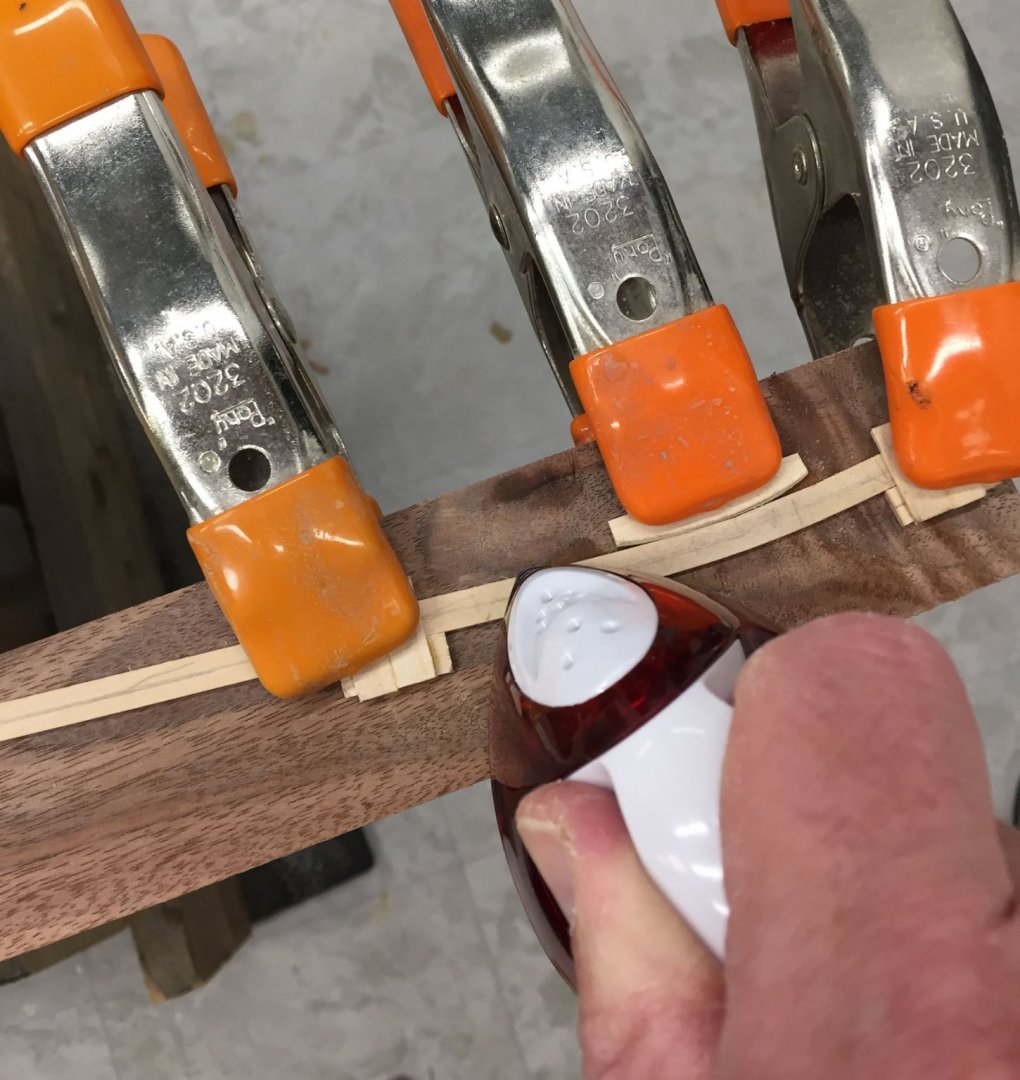
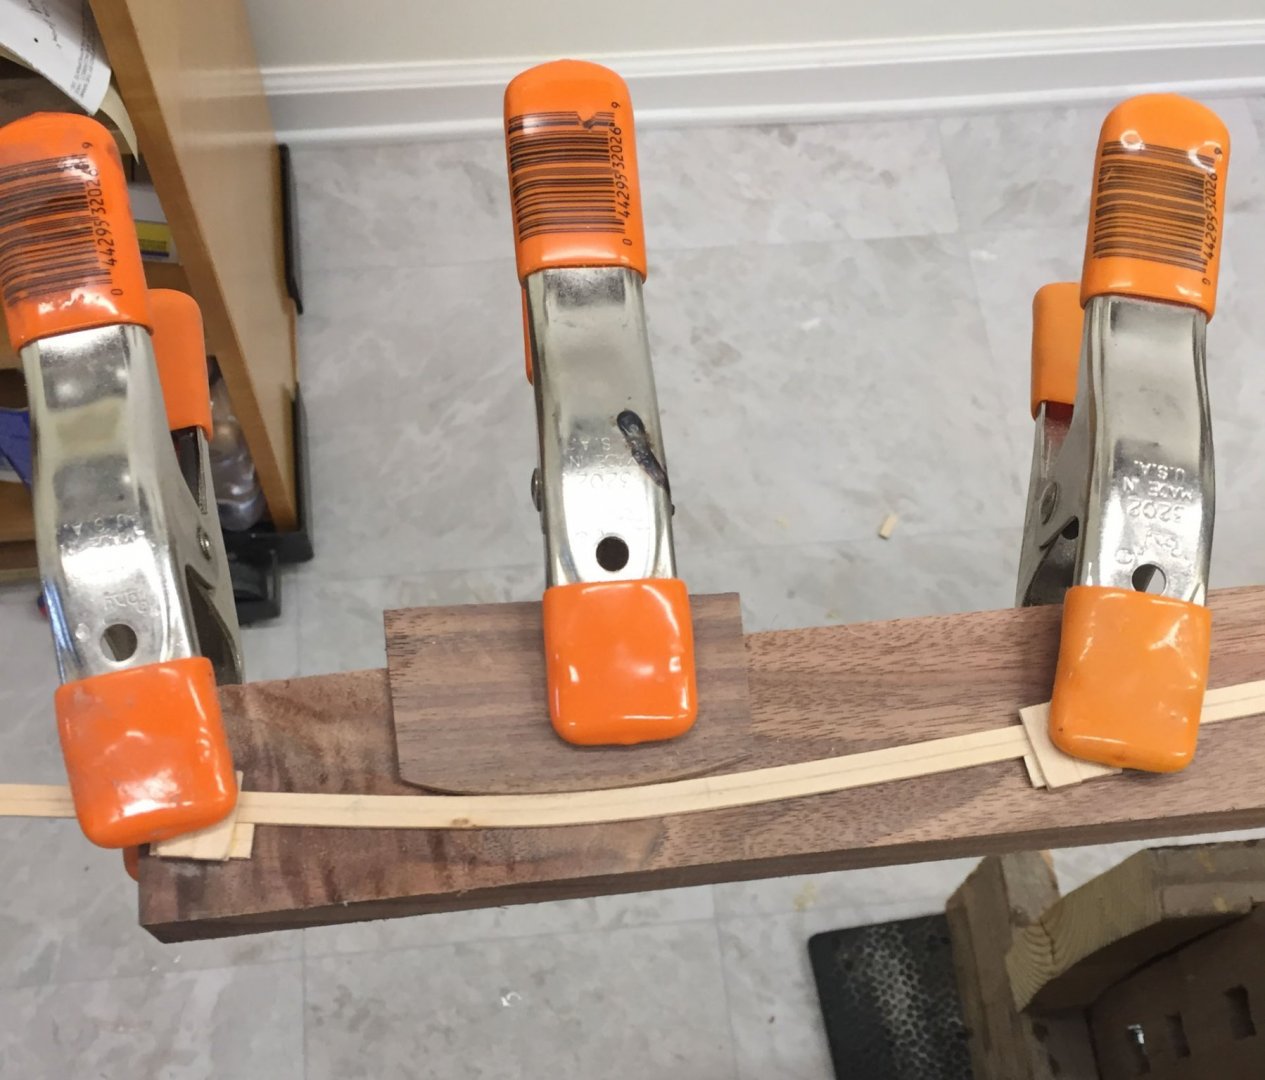
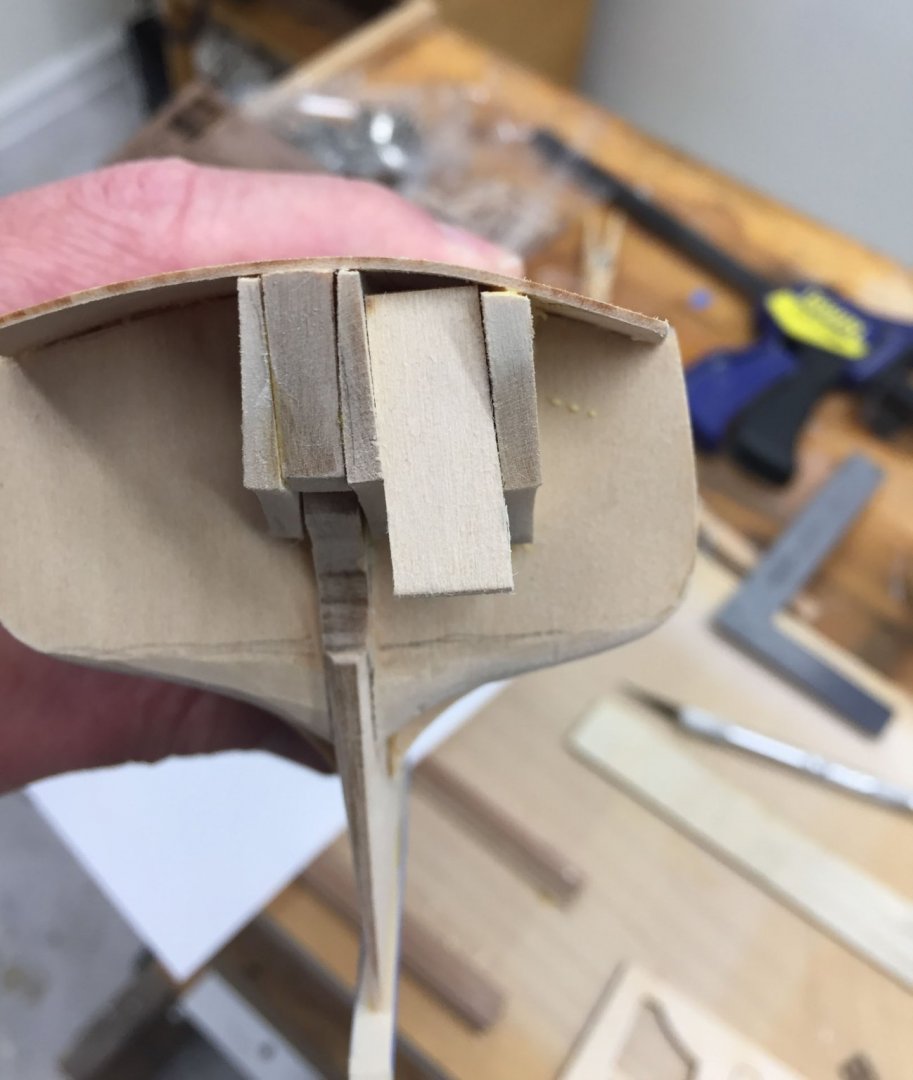
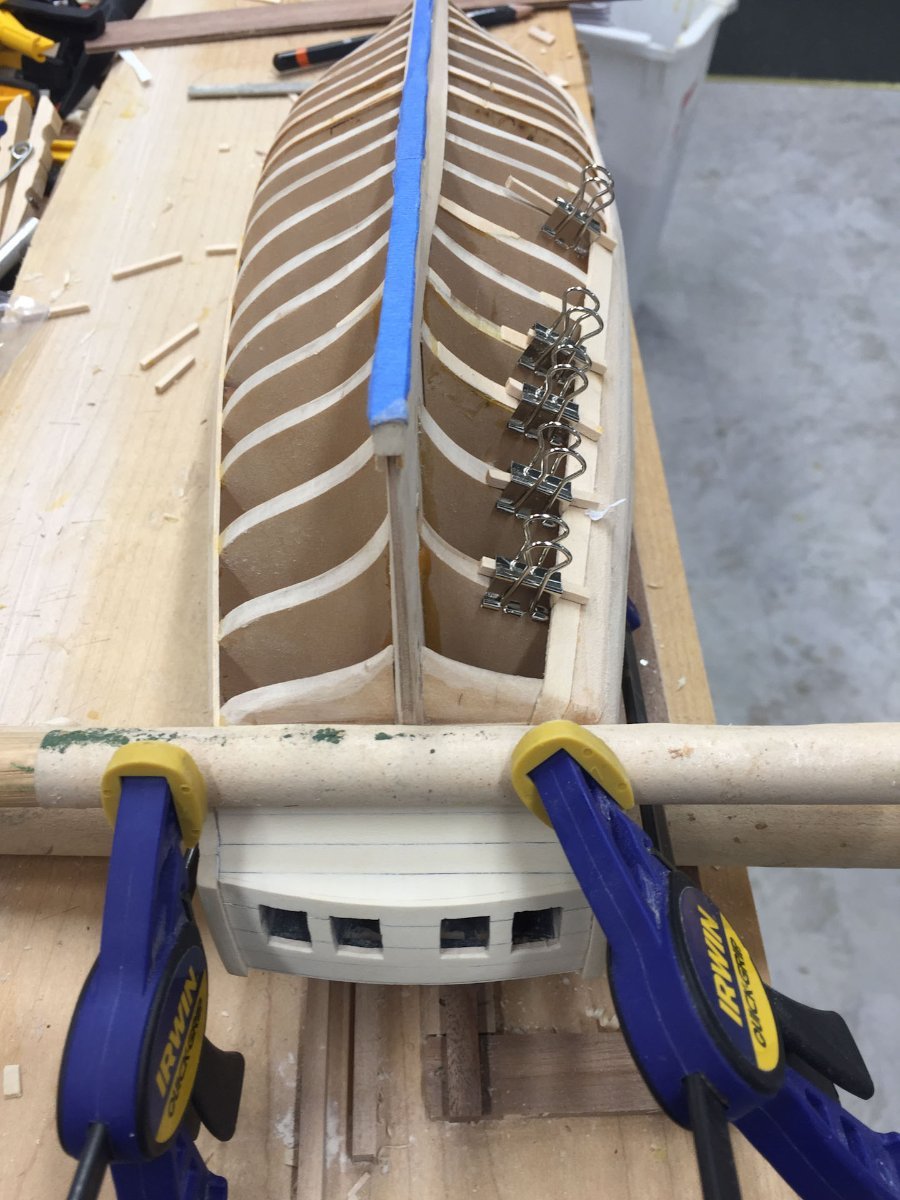
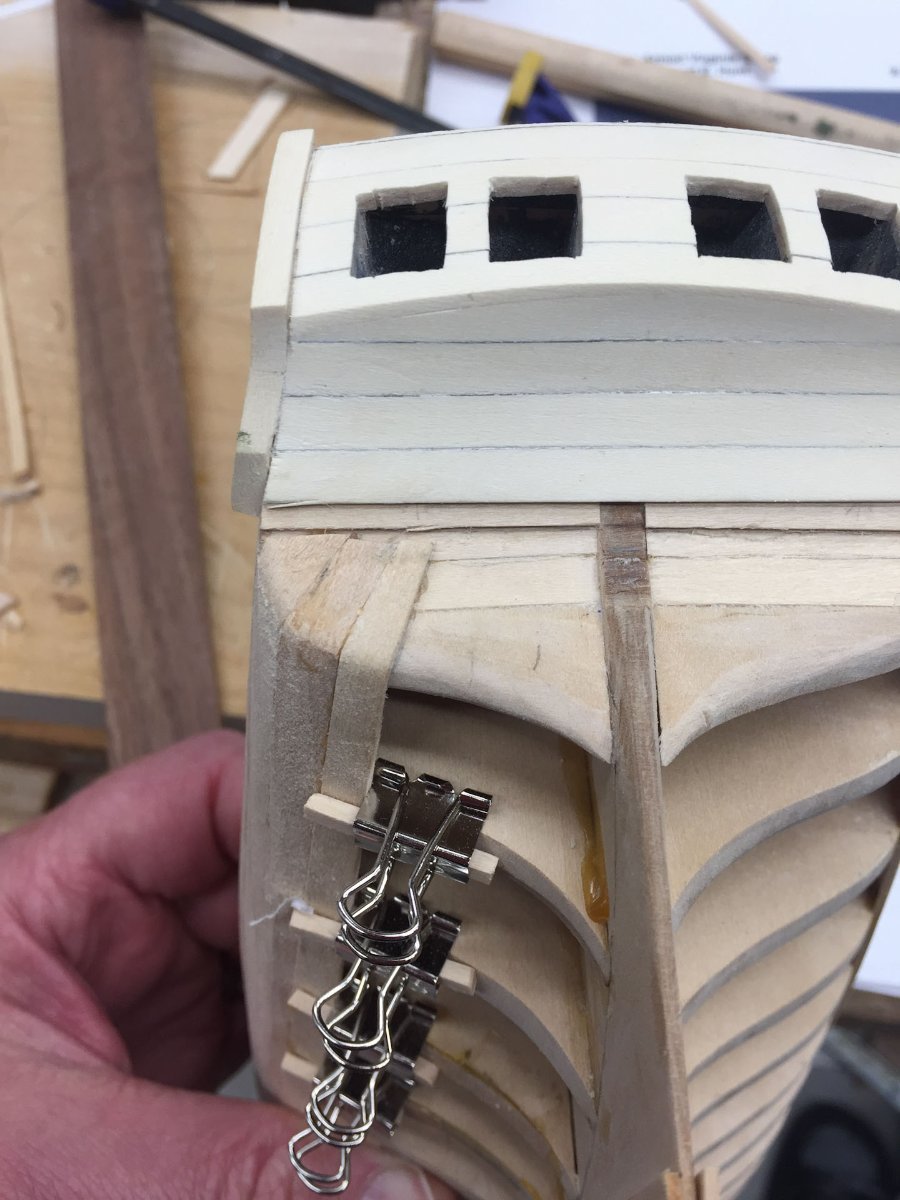
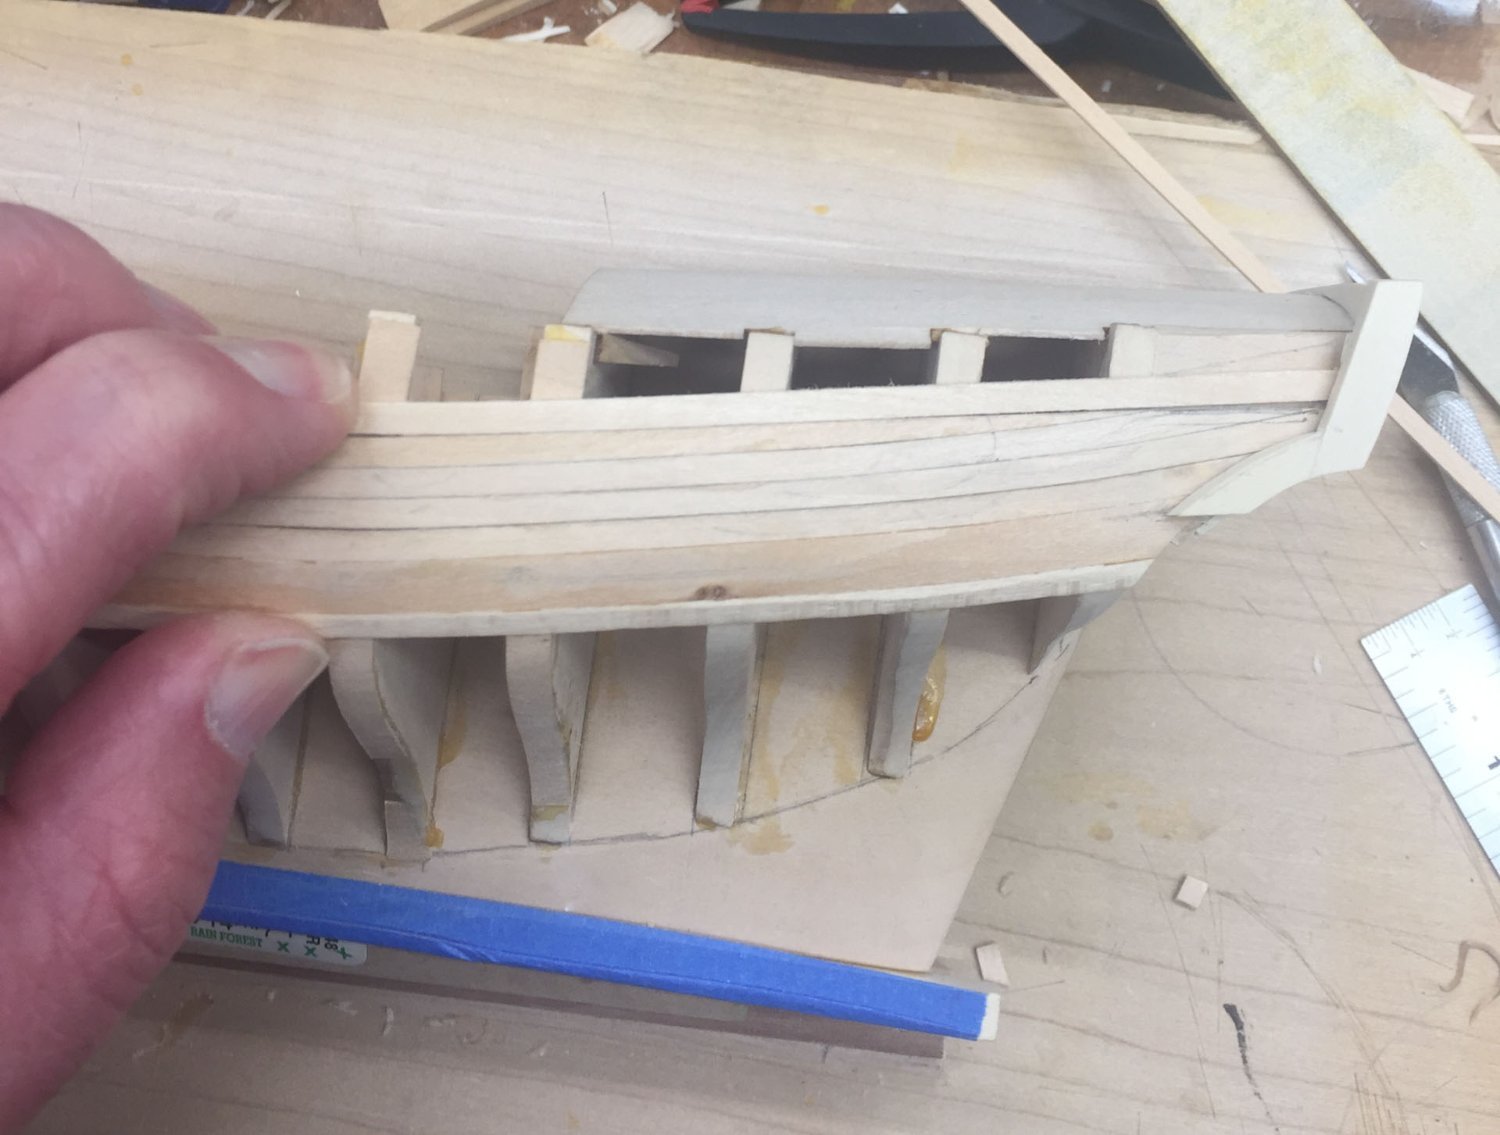
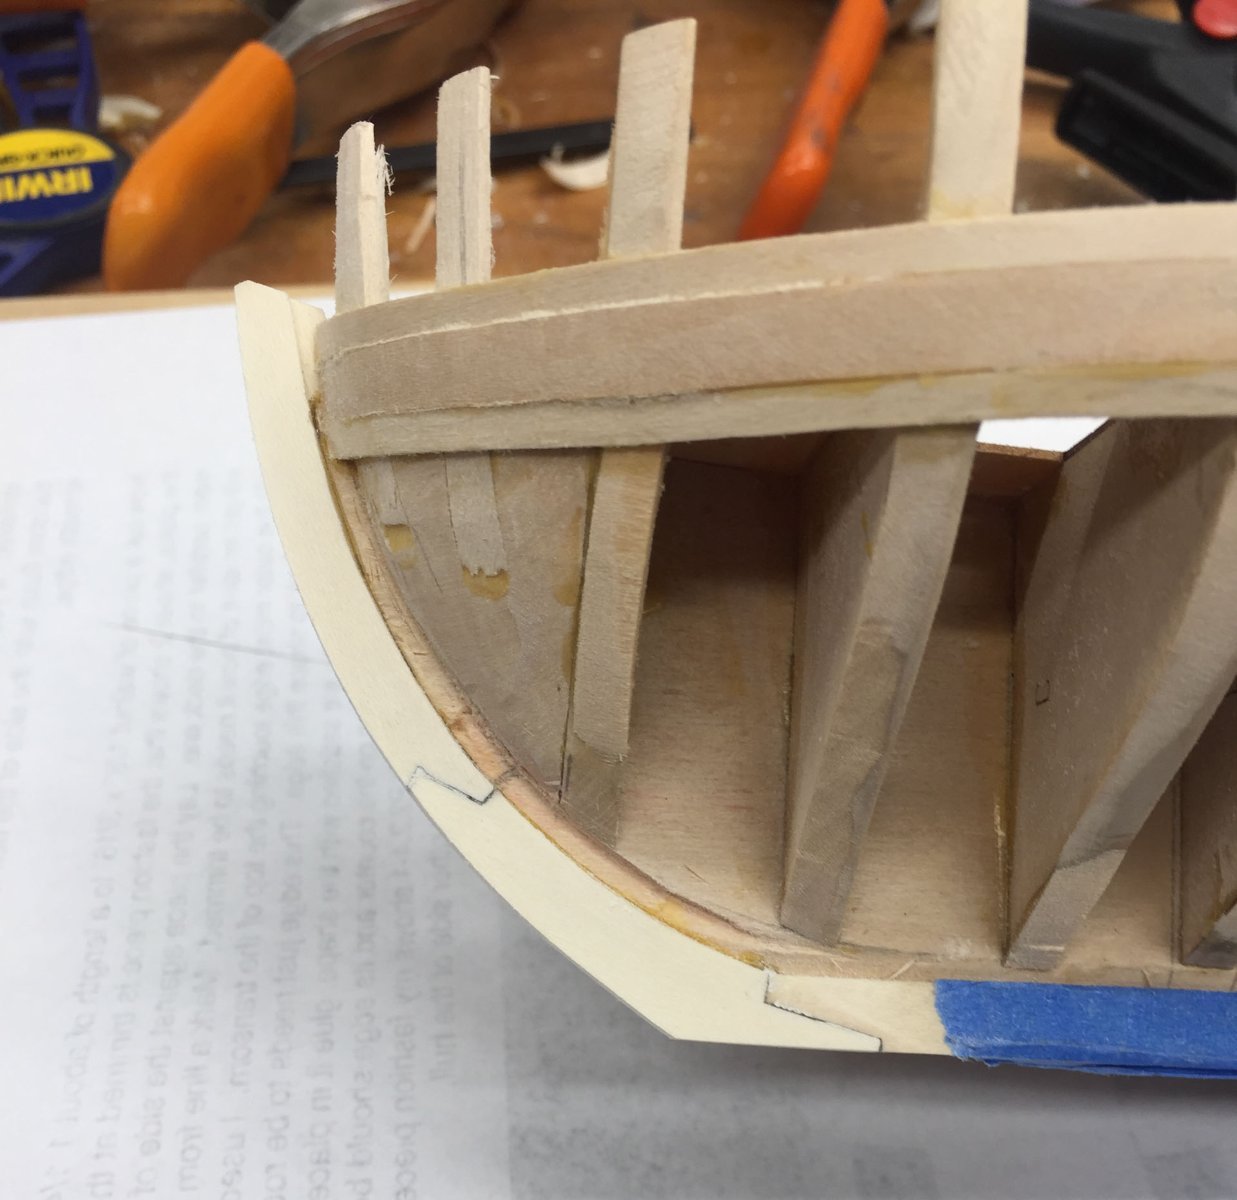
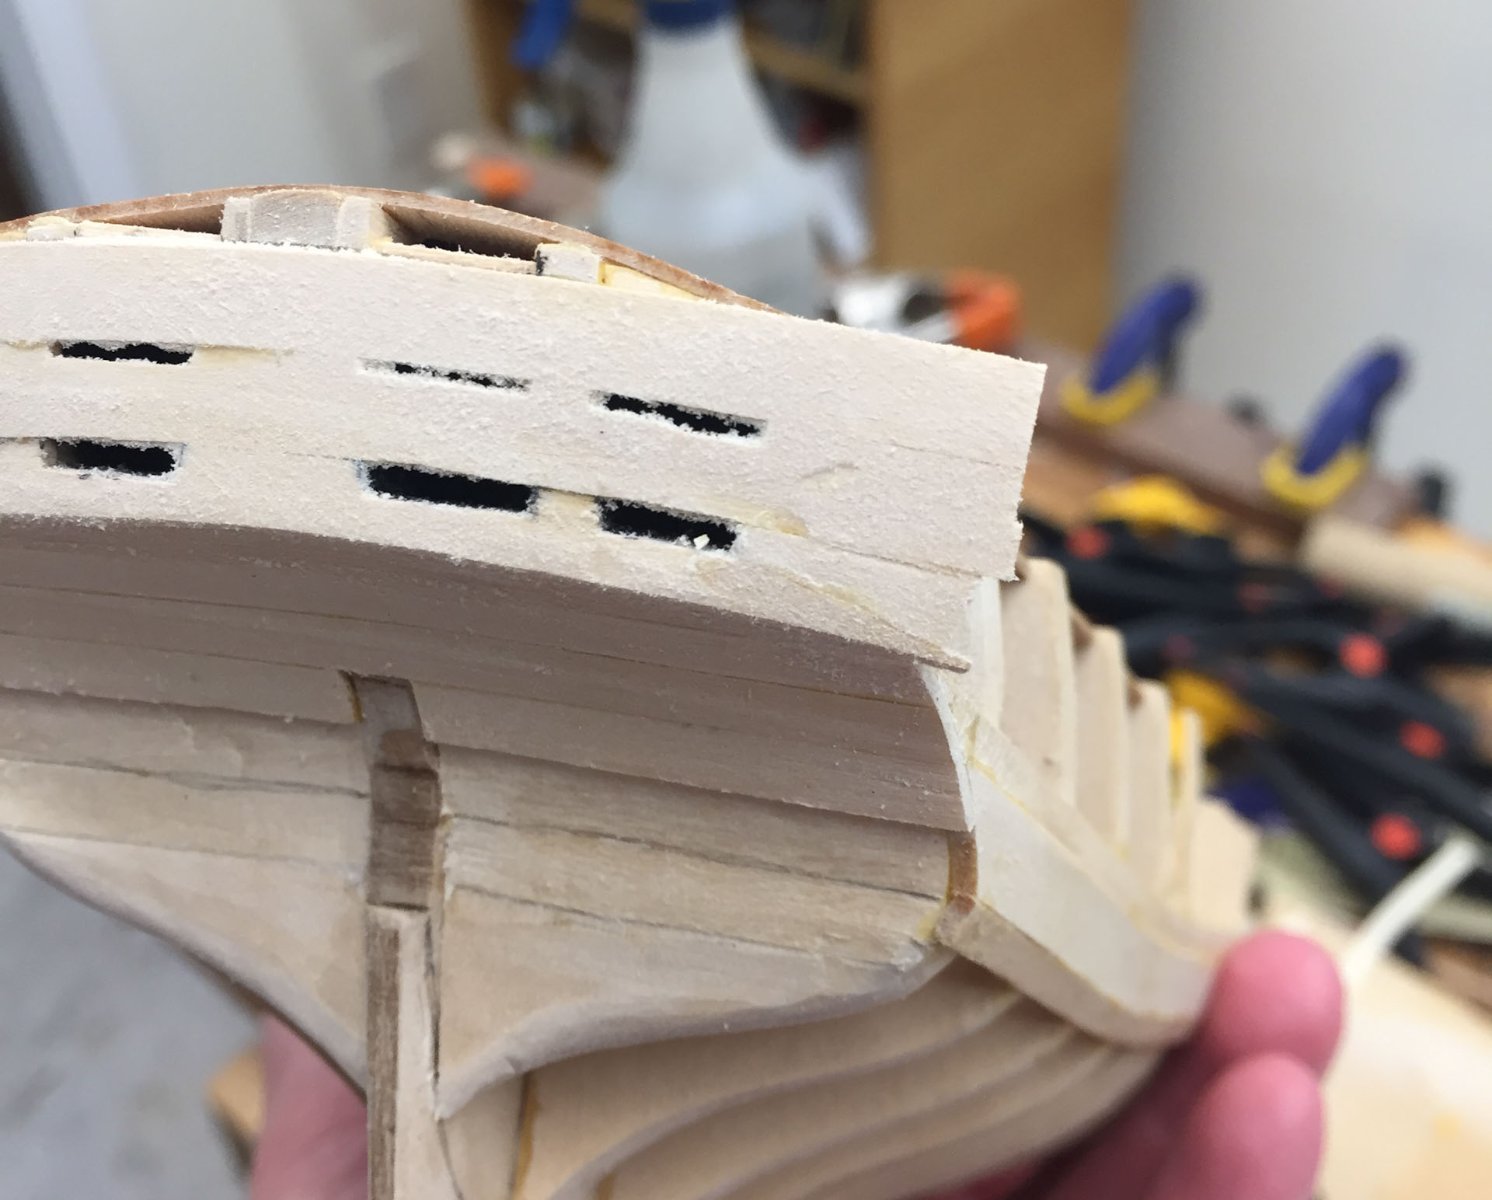
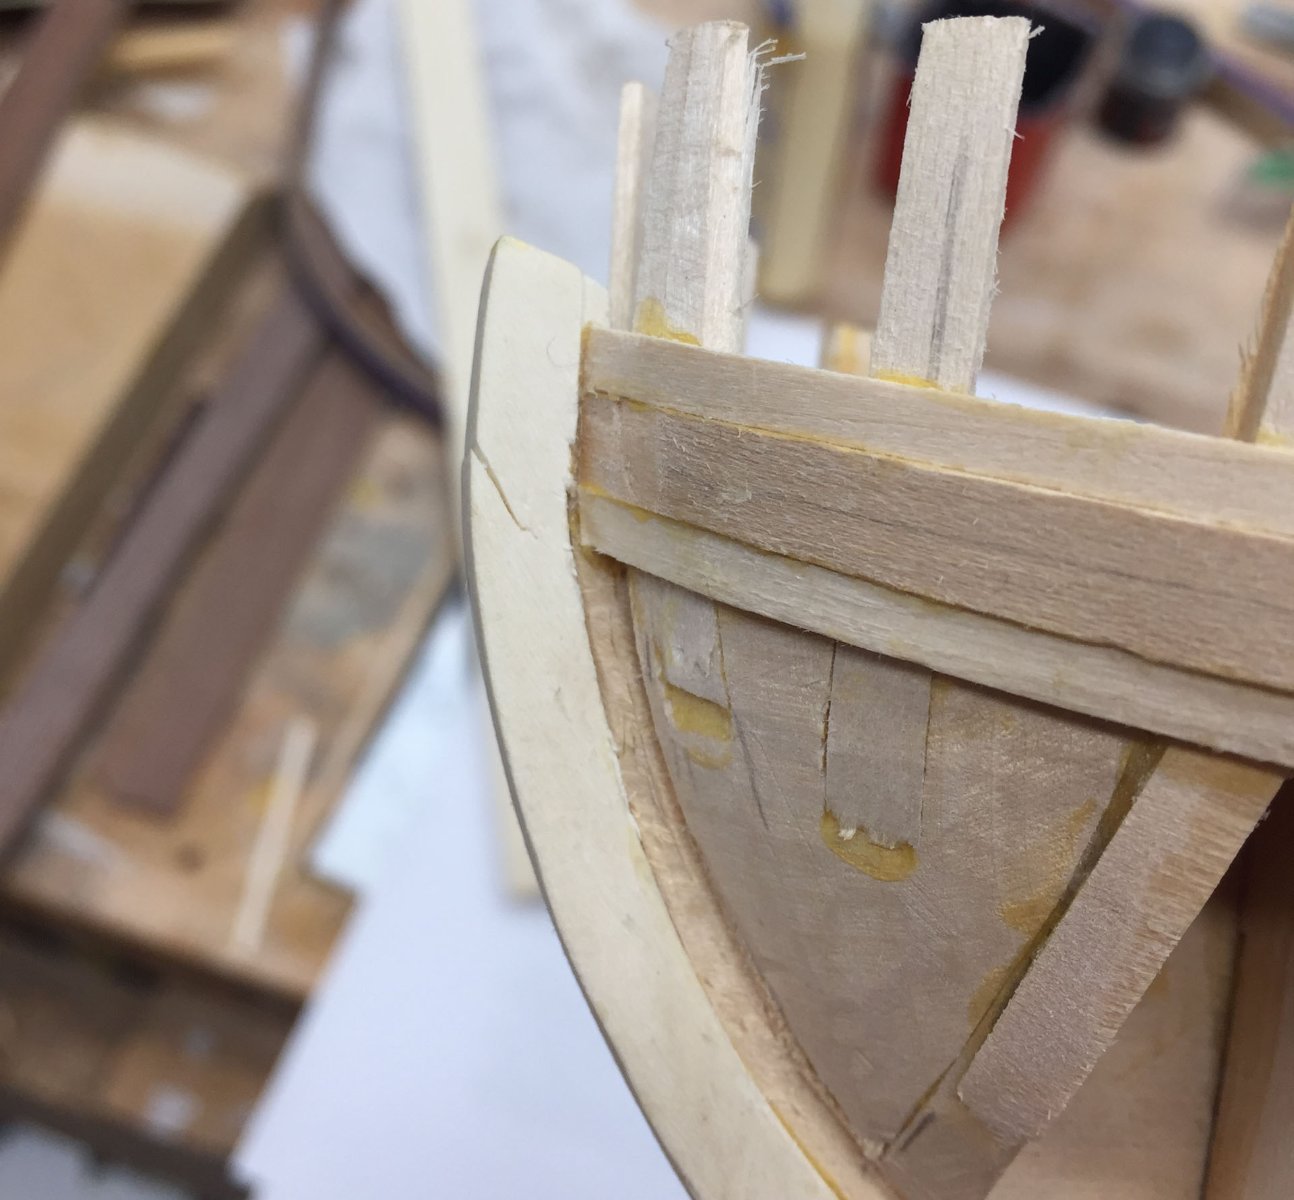
 At last! An update. Work has been out of control and very stressful and the Shipyard has suffered. So. Planking the lower hull. I have planked only 1 hull before, Chuck's Model Shipways 18th century longboat. On that build I planked the upper strakes, then the garboard, then filled in the middle. There was a lot of bending in the prow planks above the garboard and I felt like I was missing something even though it turned out fine, possibly because the lower part was painted white so you can't see the lower runs of planking well. Like many before I am using my first layer of planking on the AVS as practice for the second layer. Making life a bit more complex is too many sets of directions. The instructions that come with the kit go over spiling. The practicum also uses spiling for the first layer with soaking in water/ bending but its different enough to be confusing. (I don't know what the practicum uses for the top layer - I haven't read that far ahead yet.) And like many I have been using the Chuck heat/mini iron method more and more. After some thinking I decided to follow the practicum order of planking. But first I had to remove the lowest 1/8" strake I accidentally thought I was supposed to add (in this post I didn't take a pic of this strake before removal). The practicum directs you to add 1/4" sequential strakes that sharply bend upwards around the transom. Eventually these 1/4" strakes should cover the transom from the lateral wale strake to the sternpost. My pencil indicates the line that marks the top of these strakes. I had purposely not filled in the lowest transverse transom plank so that I could bend the hull planks around the tight curve of the transom, glue them down, then trim them all together. The next thing I figured out is I couldn't use heat to bend the 1/4" planks around the transom- it was too tight of a bend and the wood just broke. But leaving the plank end soaking for a few hours in water softened it up enough that it would bend without heat. I clamped the ends in place - it turns out that a dowel clamped across the transom works the best to hold things in place until they dry. The next thing I figured out is the angles involved mean a hull plank will not bend around the transom perfectly so that it lines up with the previously bent plank. You have to trim it some which makes the end of the plank narrower. The below pic hopefully makes that clear-er. This means it will probably take more than 5 planks to reach the sternpost in the middle. Which is fine. Which leads to the next question- making the hull planks have a regular run without a ridiculous number of stealers or planks dying into each other. For this lower layer there is so much to learn I am not using paper strips and battens, as I said, but I will try and eyeball it. The practicum directs one to spile each plank. This leads to each plank having varied widths all along its length, taking the place I suppose of using tic strips. But its not very clear what the end result should be. I have been leaving the hull planks full width along the body and tapering them about 50% at the stem, paying attention to not allowing anything to cup upwards at the hard stem curve. This leads to bending in 2 dimensions the traditional Chuck way which works very well here. I did the first hull strake as a single piece of wood which was unnecessarily challenging. The next ones I am breaking into 2 or 3 pieces to make it easier to fit. I am avoiding having the breaks be in a vertical line at the same middle bulkhead. And the final topic- Garboard Strake Anxiety. There is not a whole lot of information on how to do this properly. When I built the 18th century longboat the directions said to end the garboard just past the stem/keel joint. I did that but in all the subsequent pics my ship didn't look like Chuck's and the above strakes had to be sharply bent downwards. I'm still not sure i did this correctly. The planking primer on this website has the cryptic note that "many beginners let their garboard strake go too high up the stem." But it doesn't say how you determine what is too high or low so not much help. After much time lost in analysis I decided to go with Less Think More Do. The practicum has you spile it, making the middle section narrower than the ends, which I did on the starboard side just to practice. This was glued down after some shaping. The port side I used a full width plank, spiled only on the tip, and glued that down. I plan to finish the inner planking to figure out which I like better. It is dawning on me that there is, relatively speaking, a narrow space for the plank tips at the stem, medium space amidships, and a lot of space at the stern. And thats enough for tonight. Stay tuned as Planking Optimism meets You Shoulda Read the Directions Better. thanks for reading, Cisco


-
Ron I have been slowly working my way through your entire build. Simply amazing, and goes to show you can do high end work with basic tools. Thank you again for reposting (and editing) your pre-2013 work it is very helpful to us beginners. cisco
-
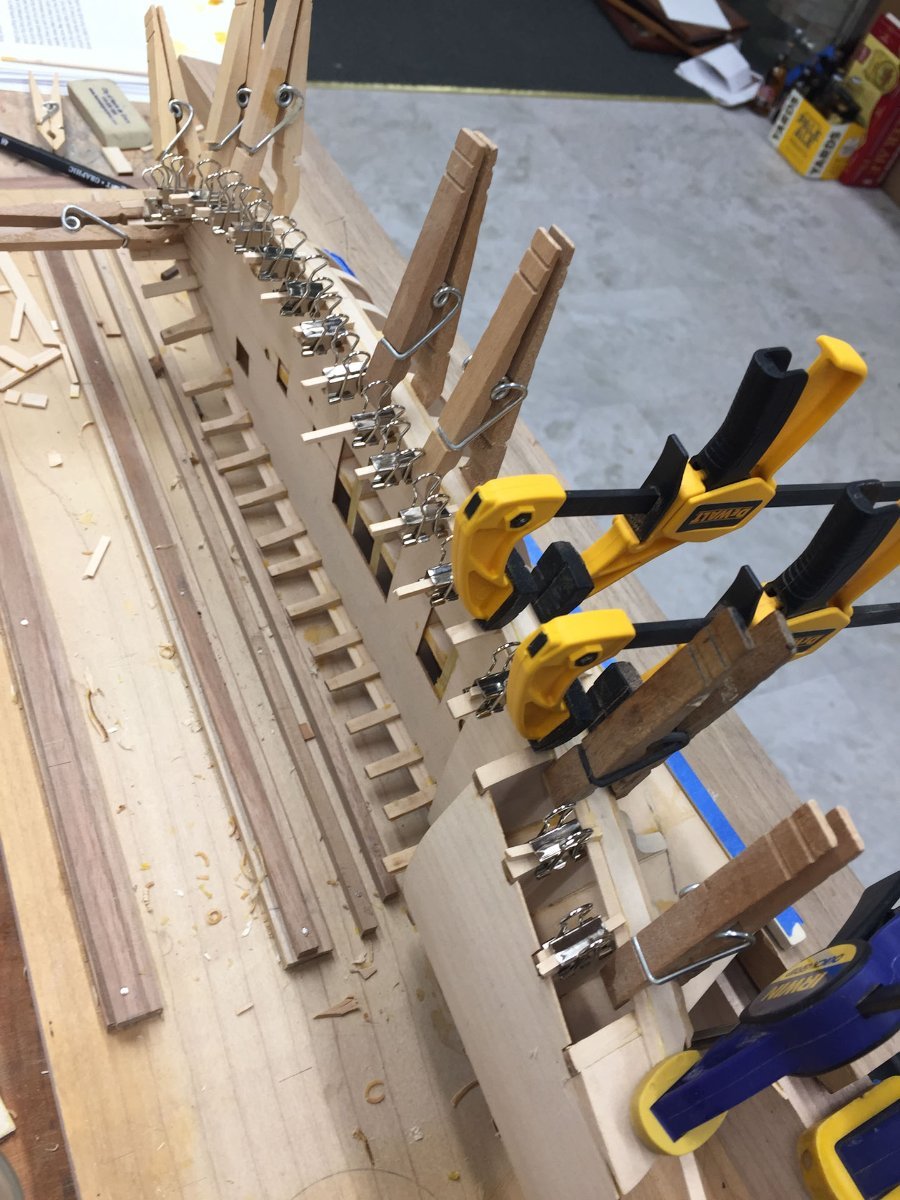
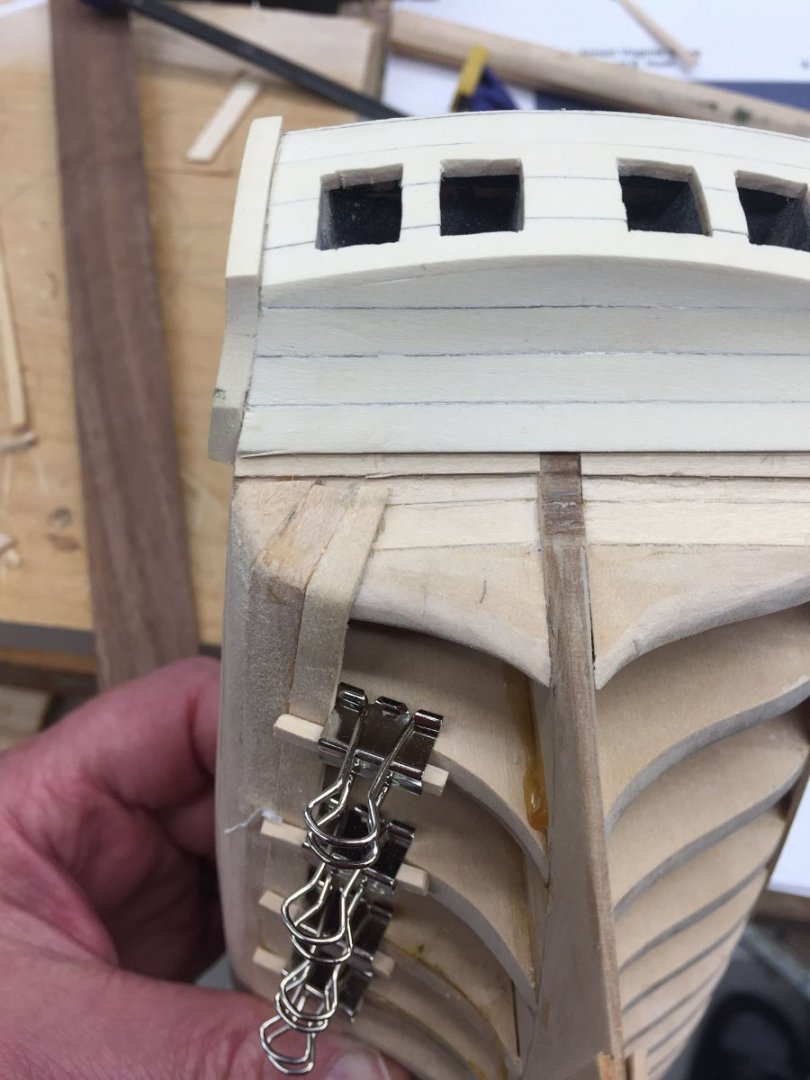
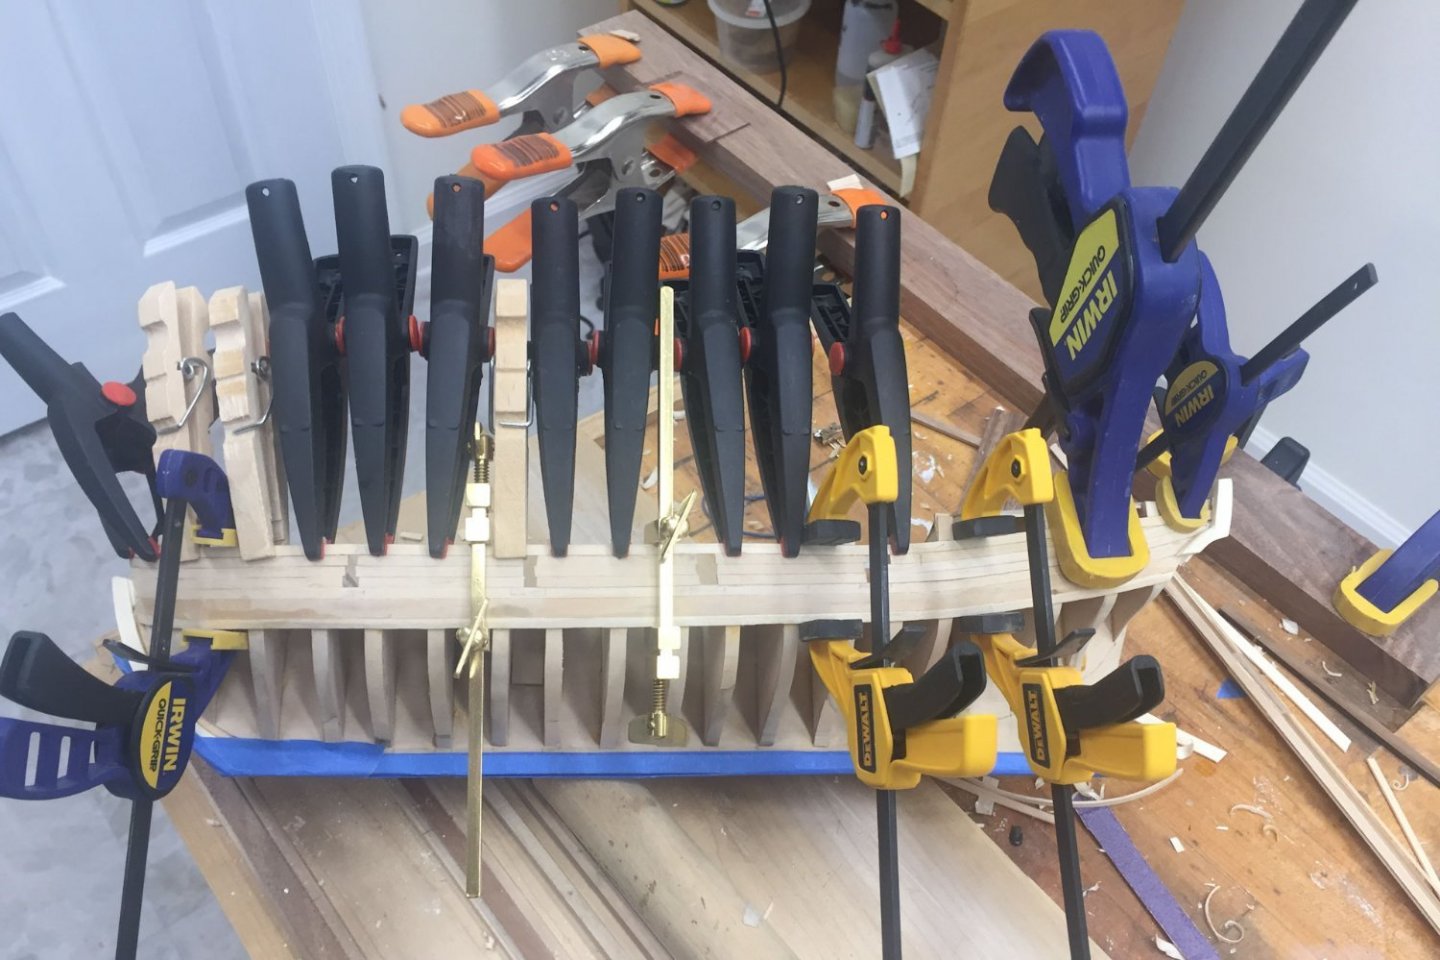
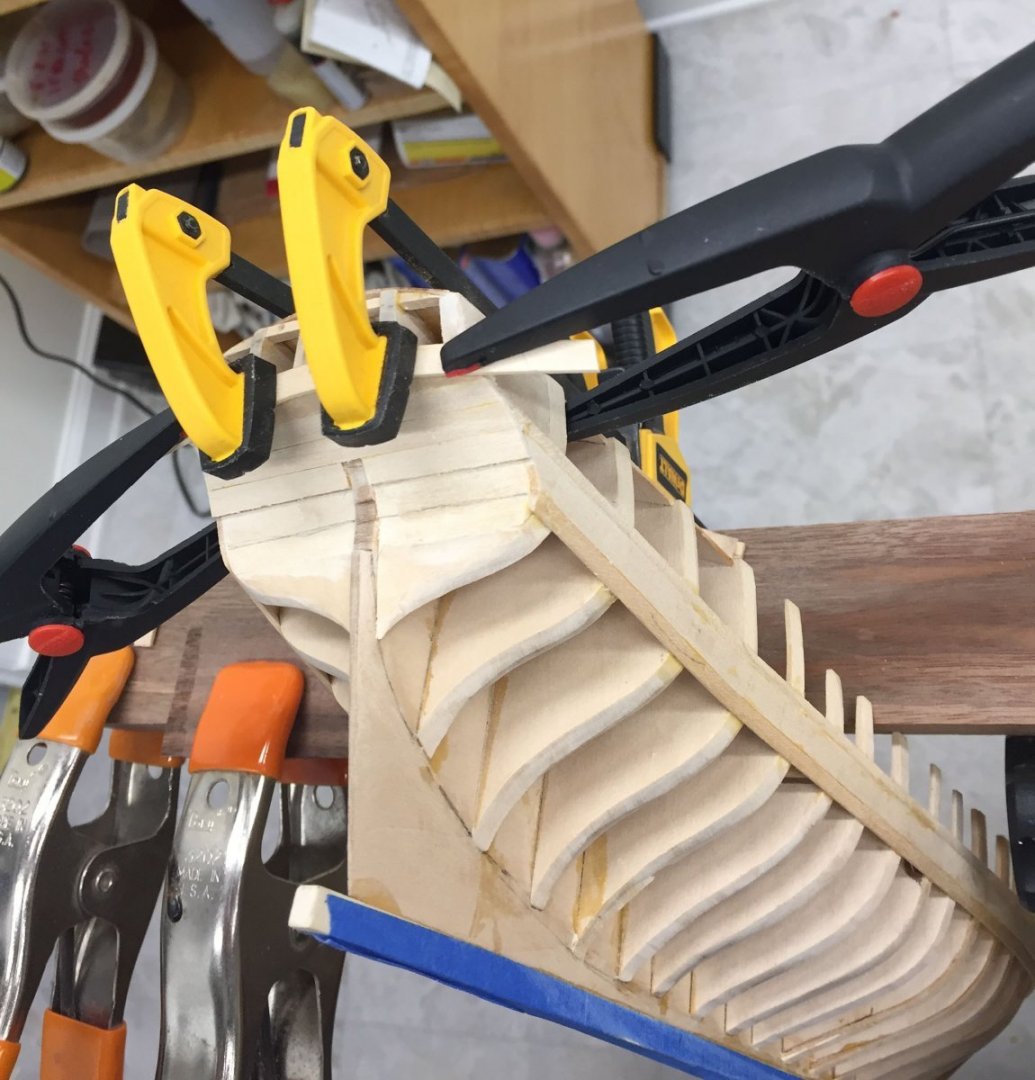
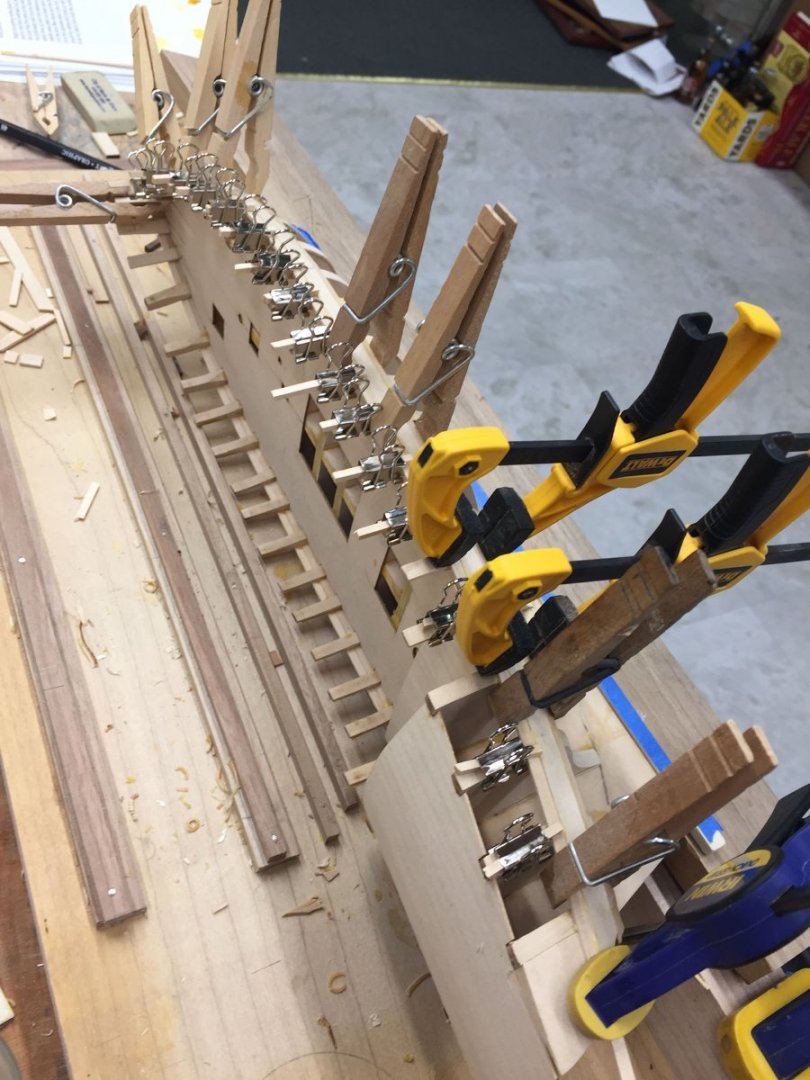
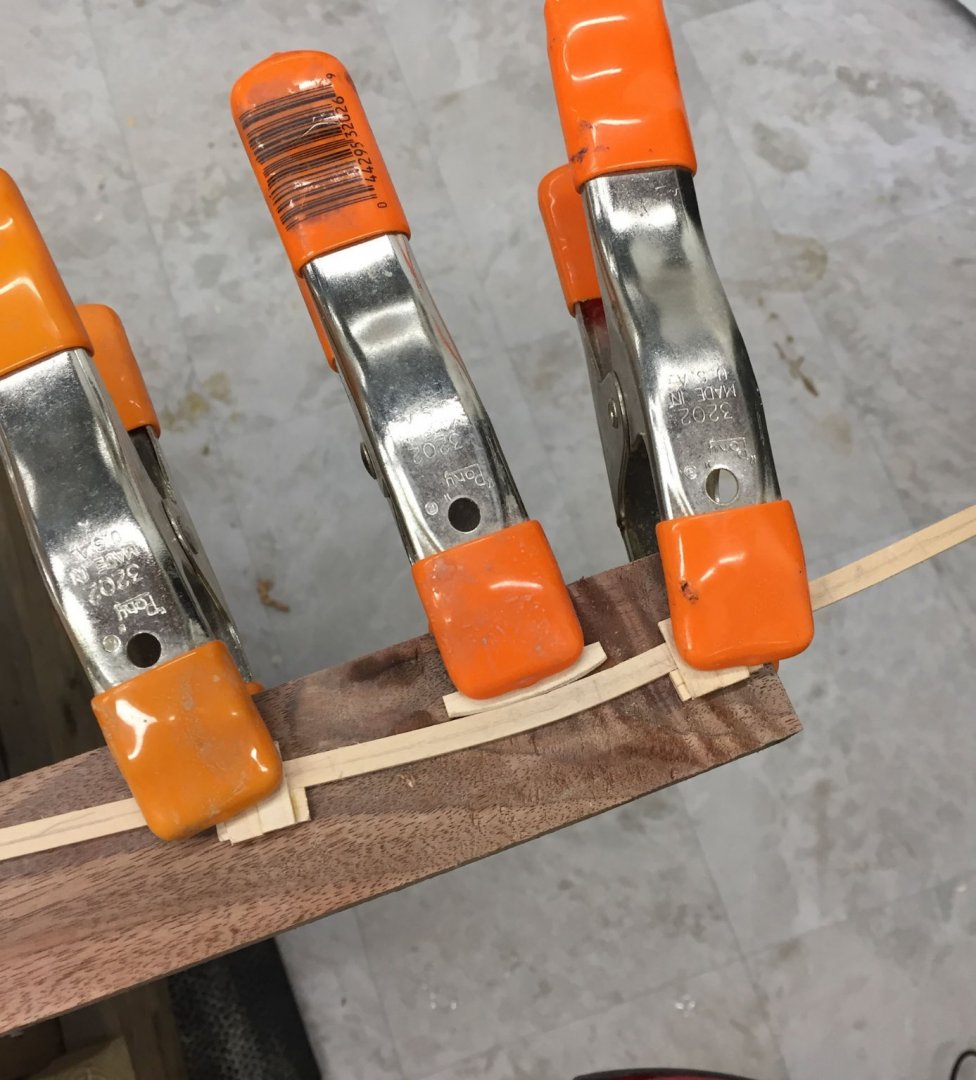
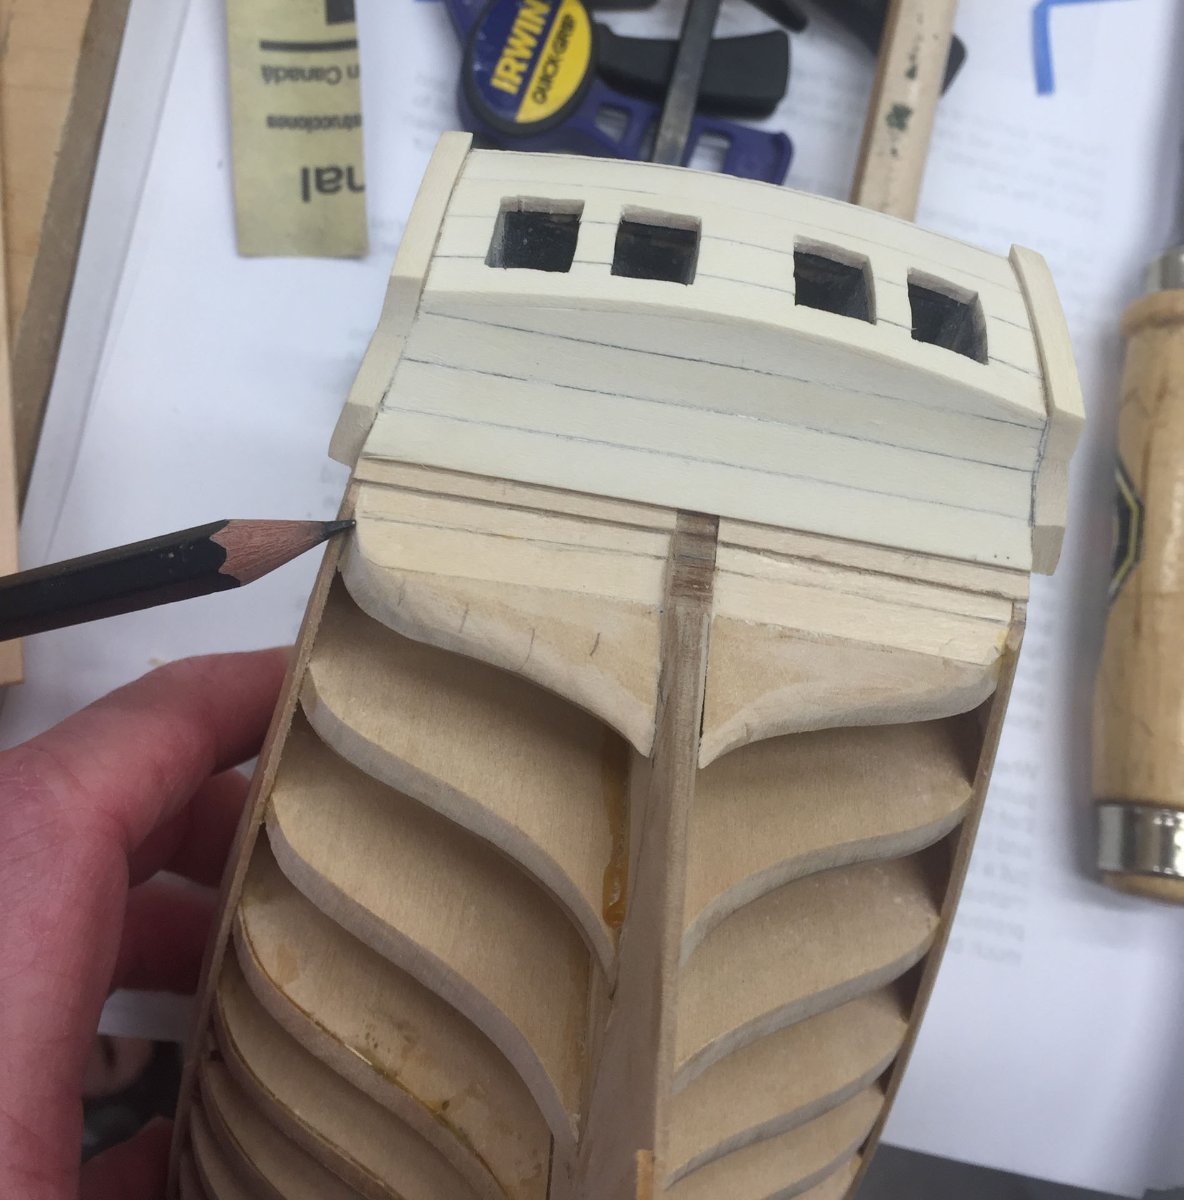
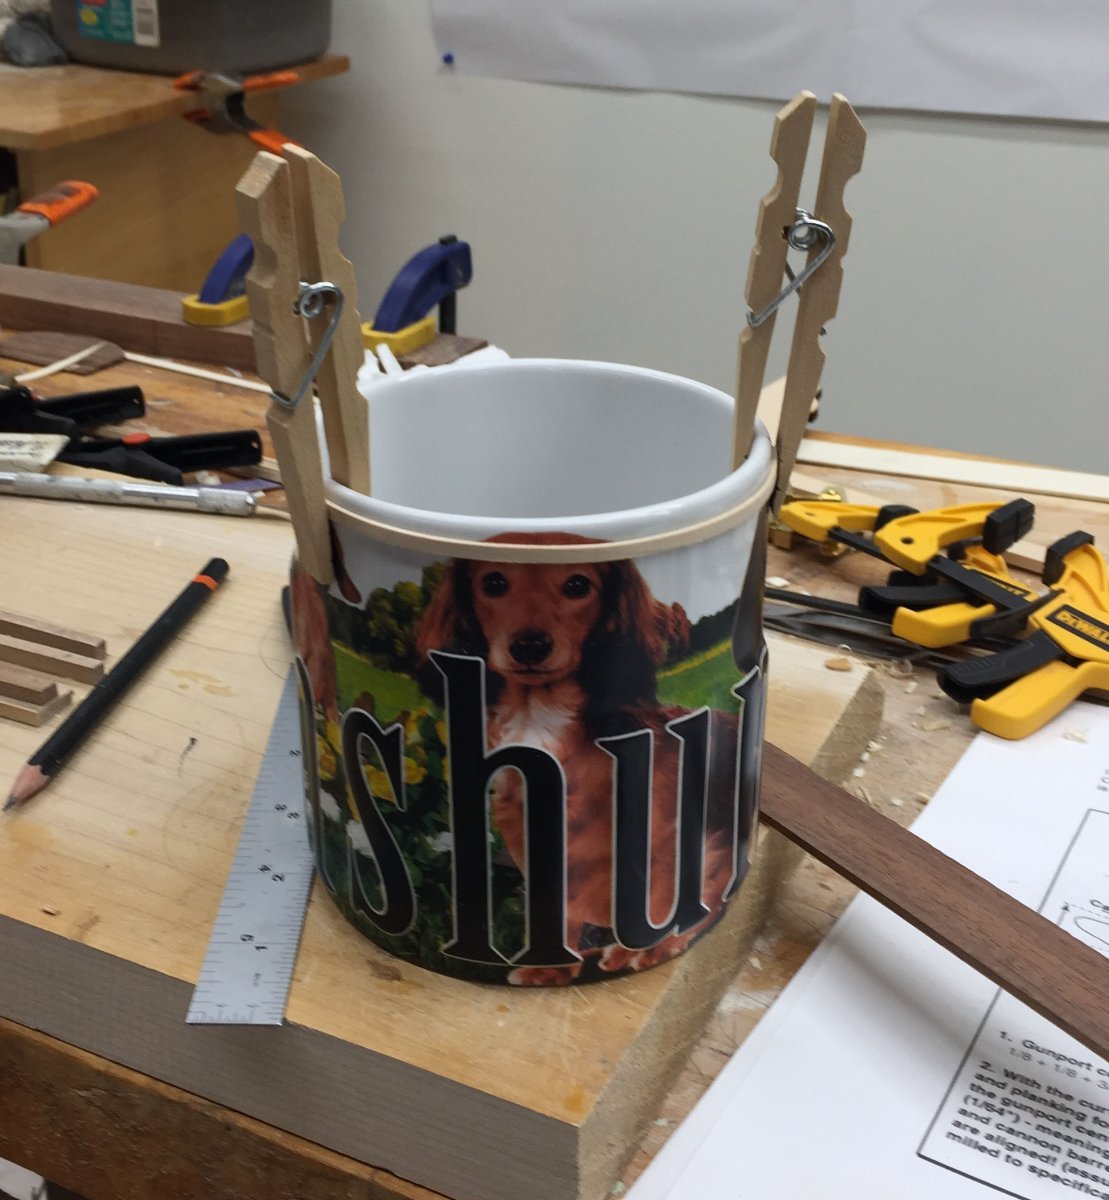
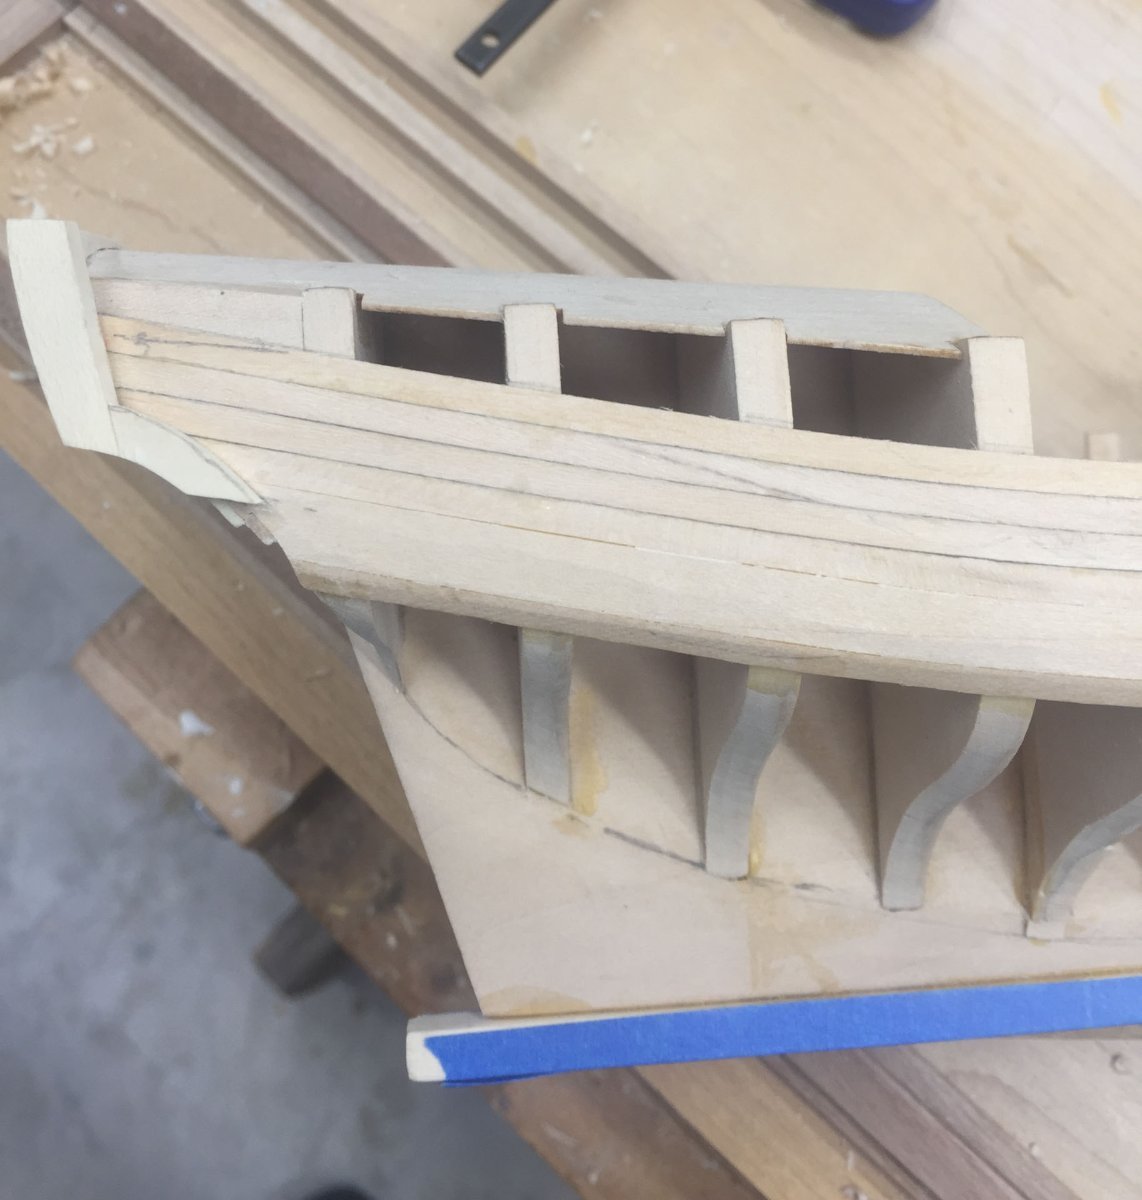
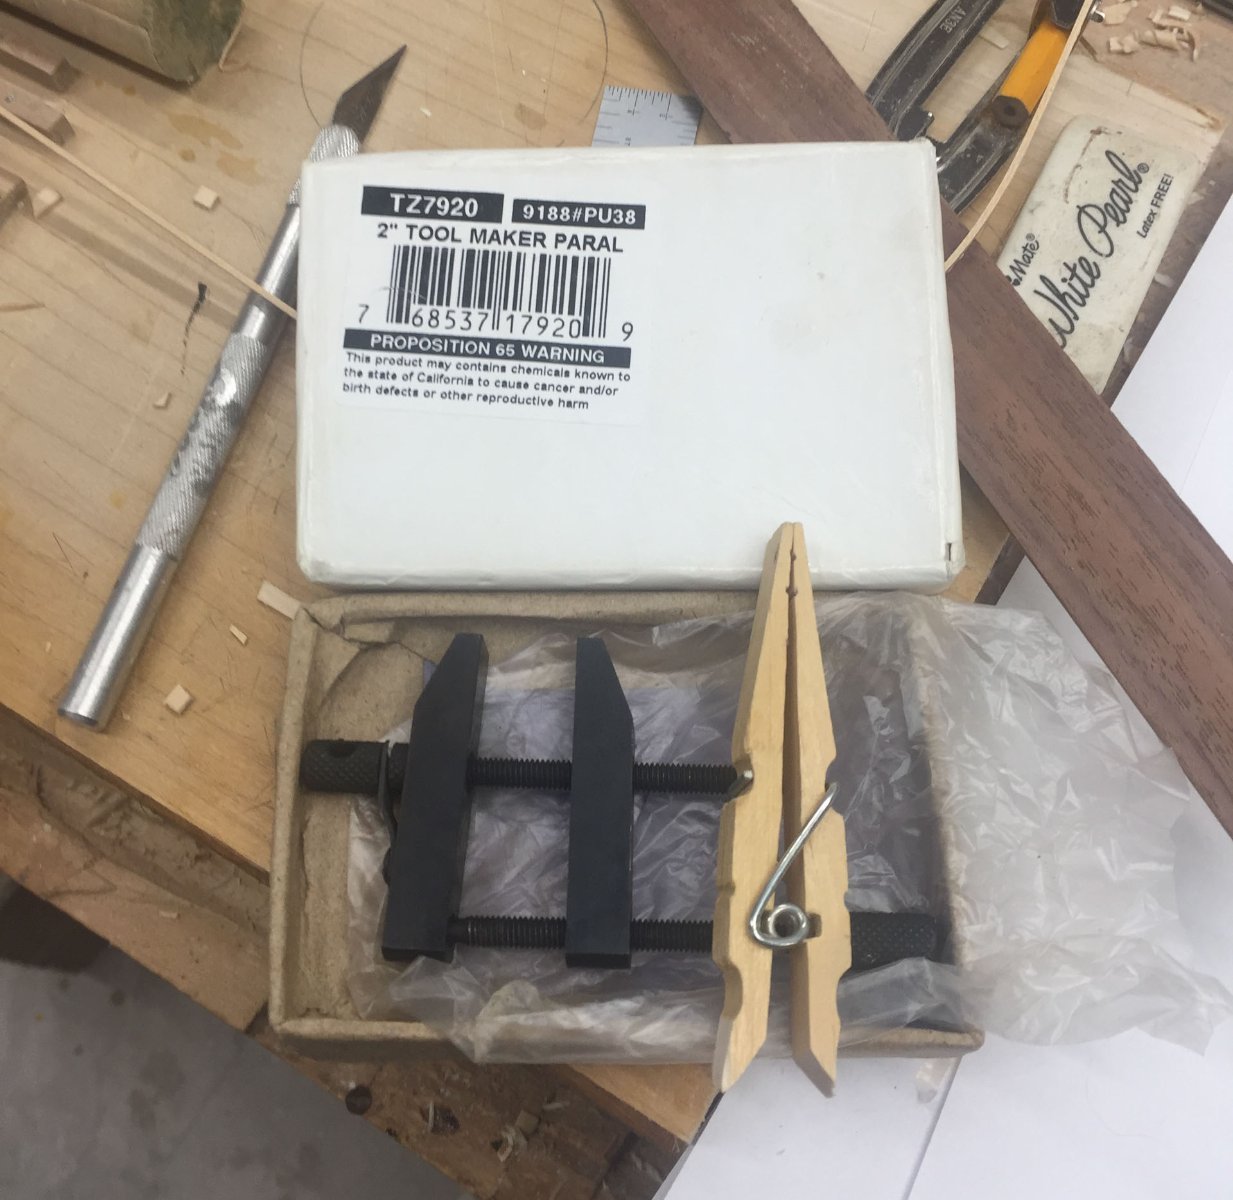
Happy Sunday, I don't watch football so time for an update. Work progresses slowly in the dockyard . I have been adding planks up the bulwarks at one a day pacing. I know a lot of people use superglue but I have Trust Issues and still rely on regular glue- at present the yellow version made by gorilla glue which dries only faintly yellow and has a great initial tack. But you still have to leave it for a couple hours to dry. Following the practicum I added 3 strips of planking up the bulwarks with overlap into the cannon ports that will be trimmed later. Curved bending for the prow planking was done with my trusty dachshund mug. Once I got ready to add the top bulwark strip that would form the "lintel" of the gunports I found an issue- At the fashion piece the planking ended up different heights on each side and overall swooping up way too high. I used a compass to measure from the top of the cabin down and roughly drew a line in pencil, which you can see below on the top plank just forward of the fashion piece. On the port side the planks came up even higher; per the practicum the planks should be roughly parallel with the roof of the great cabin; my version is almost diagonal. So after roughly drawing a straight line I clamped a strip even with the top of the planking next to the tiny quarterdeck and cut along it with my xacto which worked surprisingly well. Then I cut out the triangle and test fitted the lintel strip. I had to sand some to remove a small hump but it looked better and more parallel to the roof. Then after bending the strip to fit I used every small clamp I own to hold it in place. Ands that drying as I type. I am doing the same procedure to the other side tomorrow. Speaking of clamps. I have been trying different ones; the black spring Bessy clamps work really well. The reversed clothespins also work well. The brass ones in the pic above are only ok; they adjust fine but are heavy and don't have any "spring," so its easy to leave them either too loose and they fall off or too tight and then you got dents. The squeezy clamps work well; I like the dewalts better because the head doesn't move when pressure is applied. The irwins, which are cheaper, have some play in the head which makes it hard to clamp using the tips. I ordered the below black metal screw clamps which are not so great; too big and heavy and hard to screw. And I'm afraid to oil the screws because I know all the oil will end up wicking into my model. They had another smaller size which in hindsight I should have gotten instead. Thats it for updates. Thanks for reading. Cisco


-
Great planking job Andy. I was wondering where you got the small black miniature screw clamps in the first and third pictures of your first post. I can't find them, or maybe my google description isn't right. thanks, cisco
-
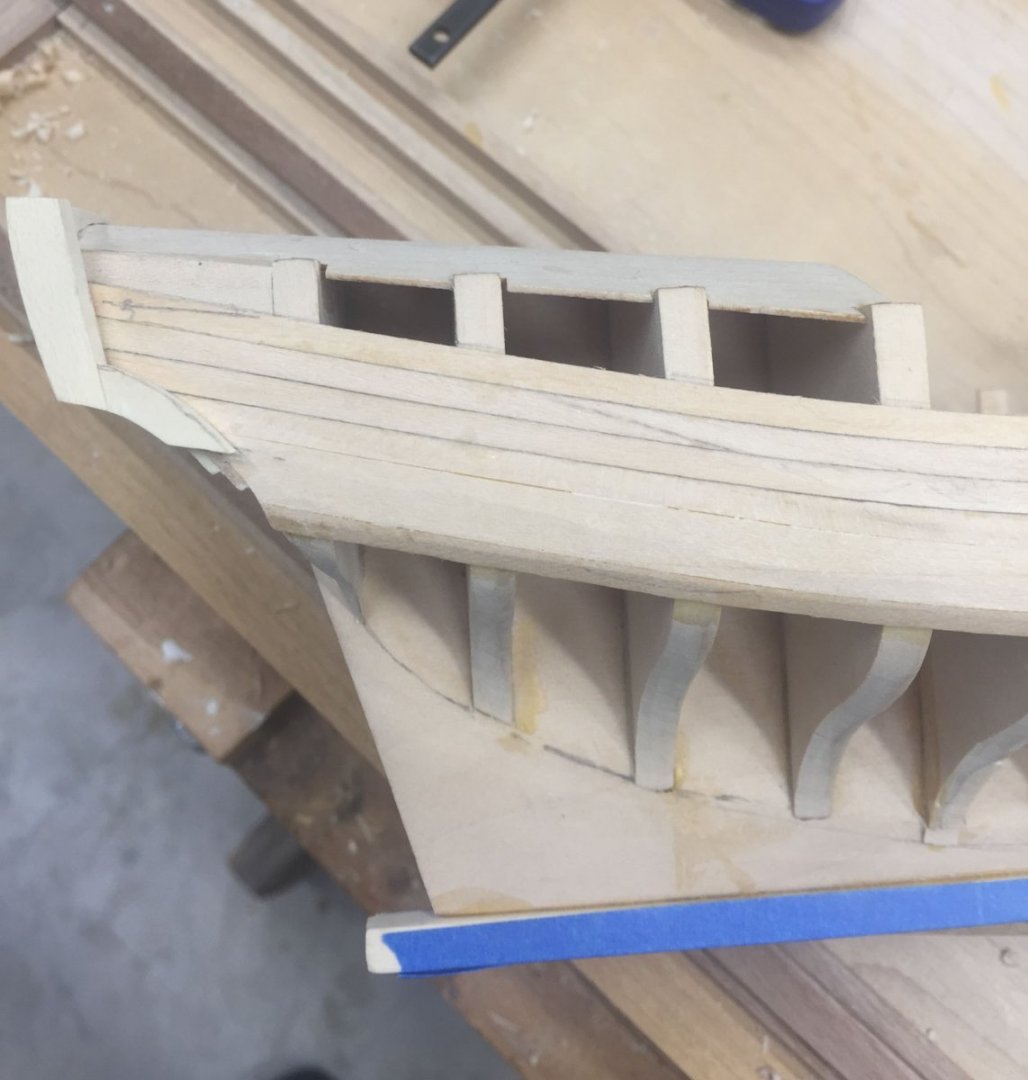
Been a while! I took the kids sledding so they're crashed out in their rooms, wife's away riding her horse, time for an update. First off, based on a MSW recommendation, I got Legacy of a Ship Model by Rob Napier and it is simply stunning. He documents taking apart and repairing the model HMS Princess Royal which is owned by the Naval Academy. Its dense text but just un-put-downable if you have interest in the construction of the original models. One very surprising thing he documents is the original builders often made complex parts out of 1 single piece of wood, where any (sane) modern modelist would build up pieces. Especially decking, which was often a large single very thin piece of wood with planks scribed on and outlined with ink, and some crazy bulkheads that had entire doors, paneling and all, scribed on. I have been skeptical of some kits that have lasered planking and bulkheads burned on as a modern shortcut, but apparently I am way wrong. Back to the AVS, humbe as she may be, I decided to fix the cracked stem (see last photo of my last post). I had glued it on with Titebond II and although I read these glues are reversible I had never tried it myself. Turns out its remarkably (scarily) easy. I applied some alcohol with a qtip, blowdryered for a minute, and the glue softened and I could remove the stem piece no problems intact. It turned out the top 1/3 of the curved stem wasn't actually touching the bulkhead former and the glue hadn't stuck there so maybe its doubly good I removed it. I traced the outline of a new stem from the original walnut stem the kit came with onto my holly piece and filed and sanded to try and get a tight fit. It was challenging; I made the bottom half first and could go back and forth sanding, test, sand, etc, but once it was glued on fitting the top half was a lot more work. But its pretty tight now and I call good enough, move on. It was very easy to round the edges of the scarf joins and make them fit perfect on one side and be big and gappy on the other. Learning curve. The stem still needs to be thinned some but I'm sure I'll ding it over time so will wait until planking is done for a final sand. Next I fitted the fashion pieces which took a lot longer than planned due to worry I would remove something that later shouldn't have been taken away. The Practicum shows the fashion pieces essentially flush with the entirety of the sides of the quarterdeck while the instructions from the AVS kit definitely shows a small gap between the fashion piece and the outside of the Qdeck at the top dorsal portion. After some hand wringing and studying pictures over and over I proceeded as per the AVS instructions. First off I cut then sanded my excess transom planking to shape. If I had followed the Practicum the curve of the outer edges of the transom, which essentially follow the lateral sides of the windows, would have been much closer together at the top. Then I put a very slight bend in my holly stock pieces so they fit the gentle curve, hard to see here, of the lateral transom and glued them on. Then I added the lower curvey fashion pieces, sanded then so the ventral part was even with the curved counter, and trimmed the bottoms so they are level with future wale. Once planking is done I will sand them thinner; for now I'm leaving them thick so when I inevitably ding them it can be sanded out. And thats where we are. Next up is continuing the first planking. Hard to believe I have done what i feel to be a ton of work and still not done with Chapter 2. Five? more chapters to go I think. Take care y'all, thanks for reading, Cisco


-
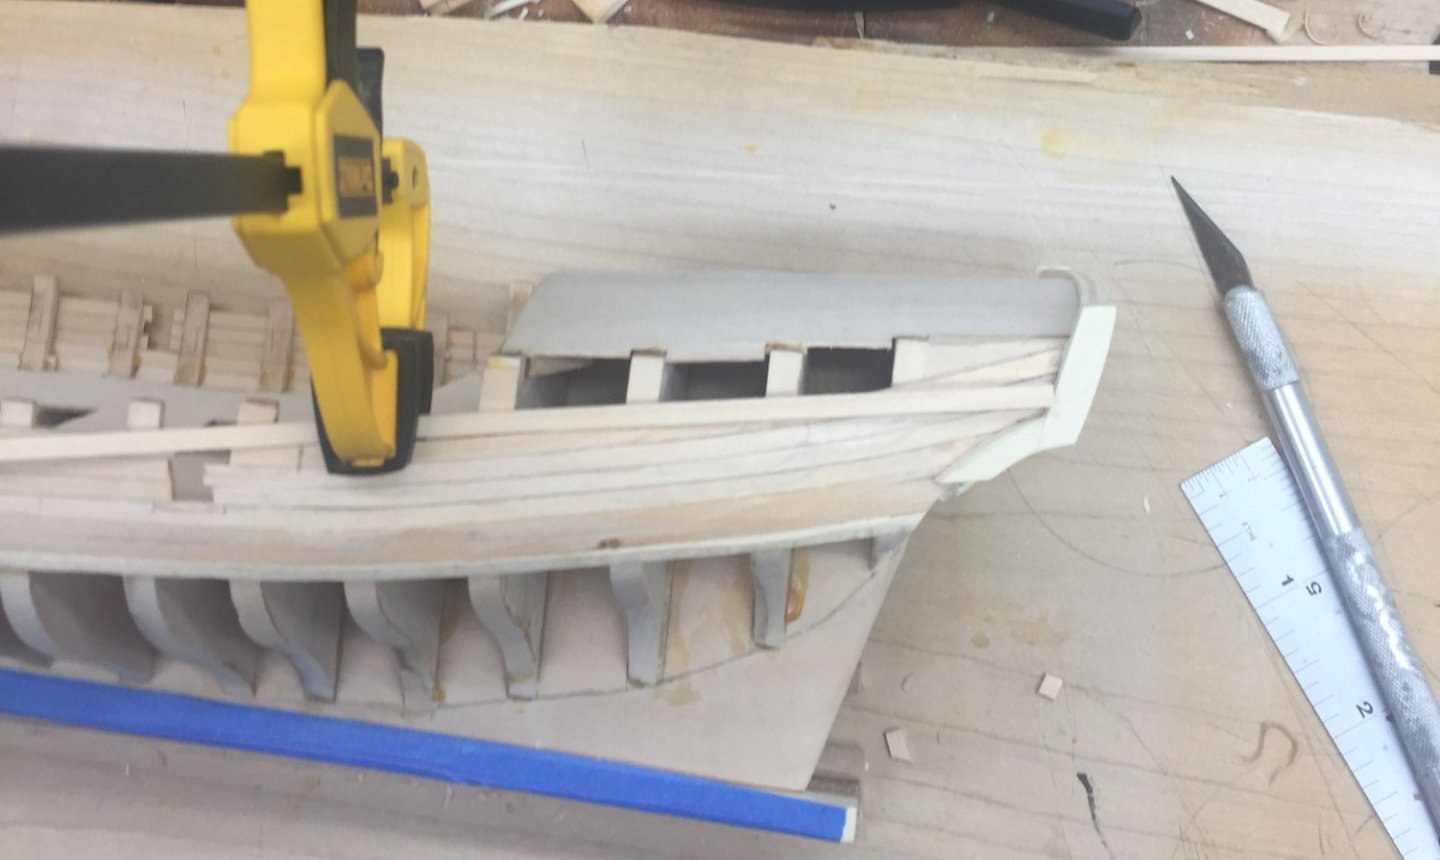
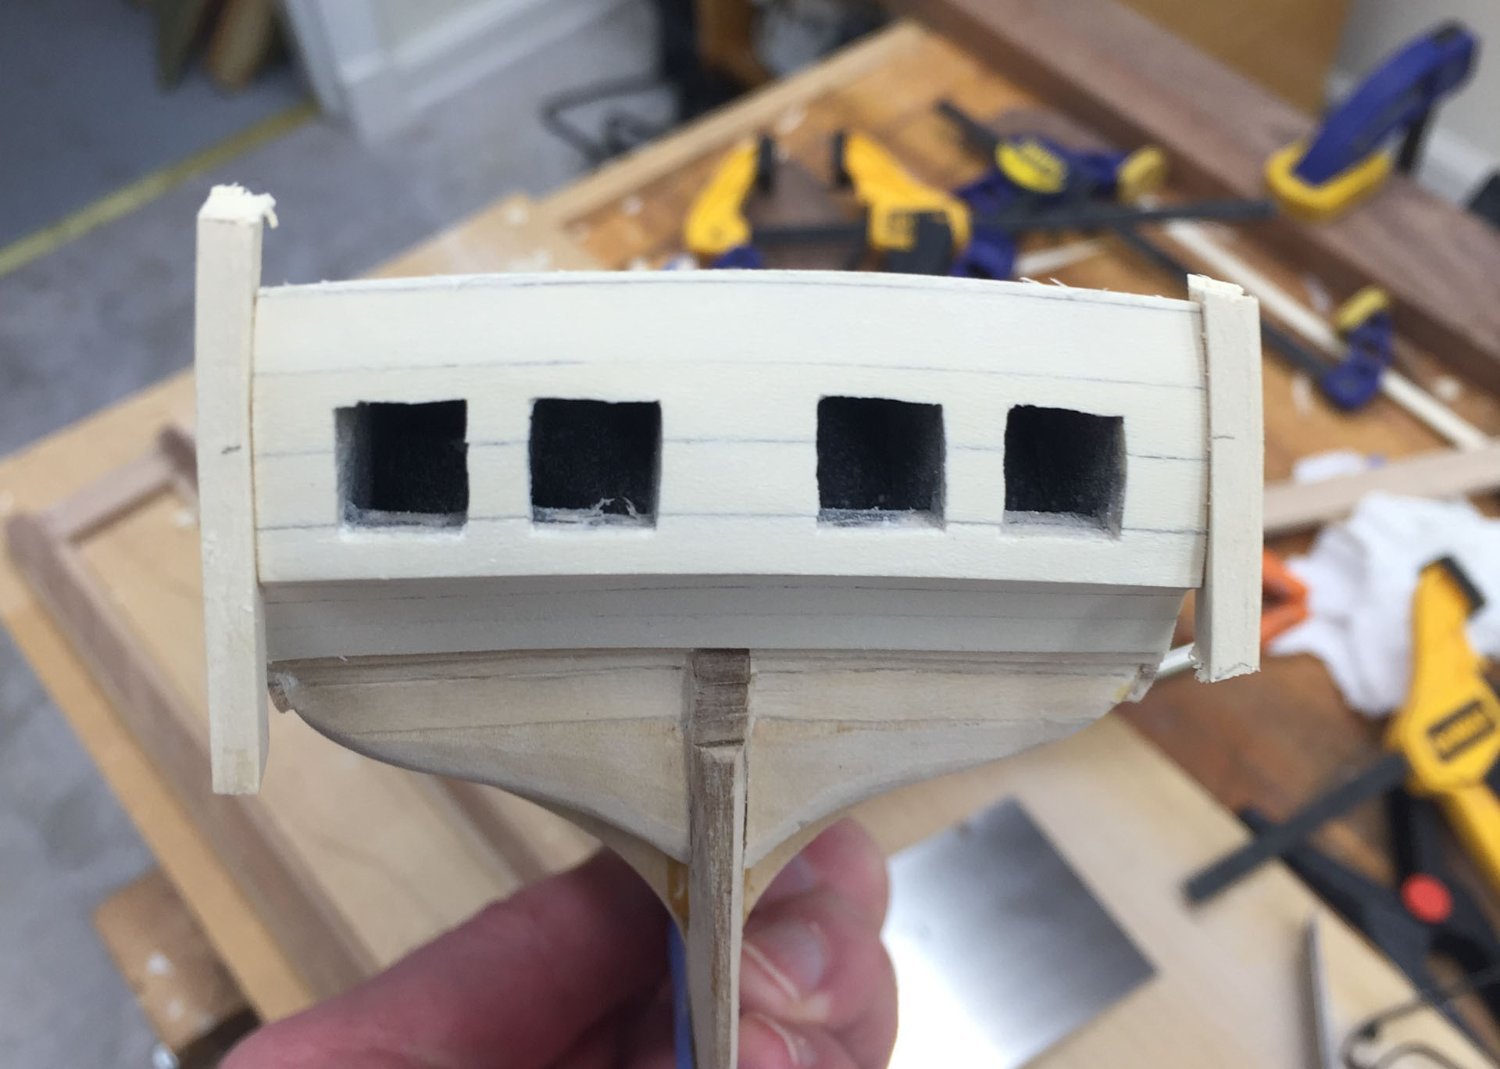
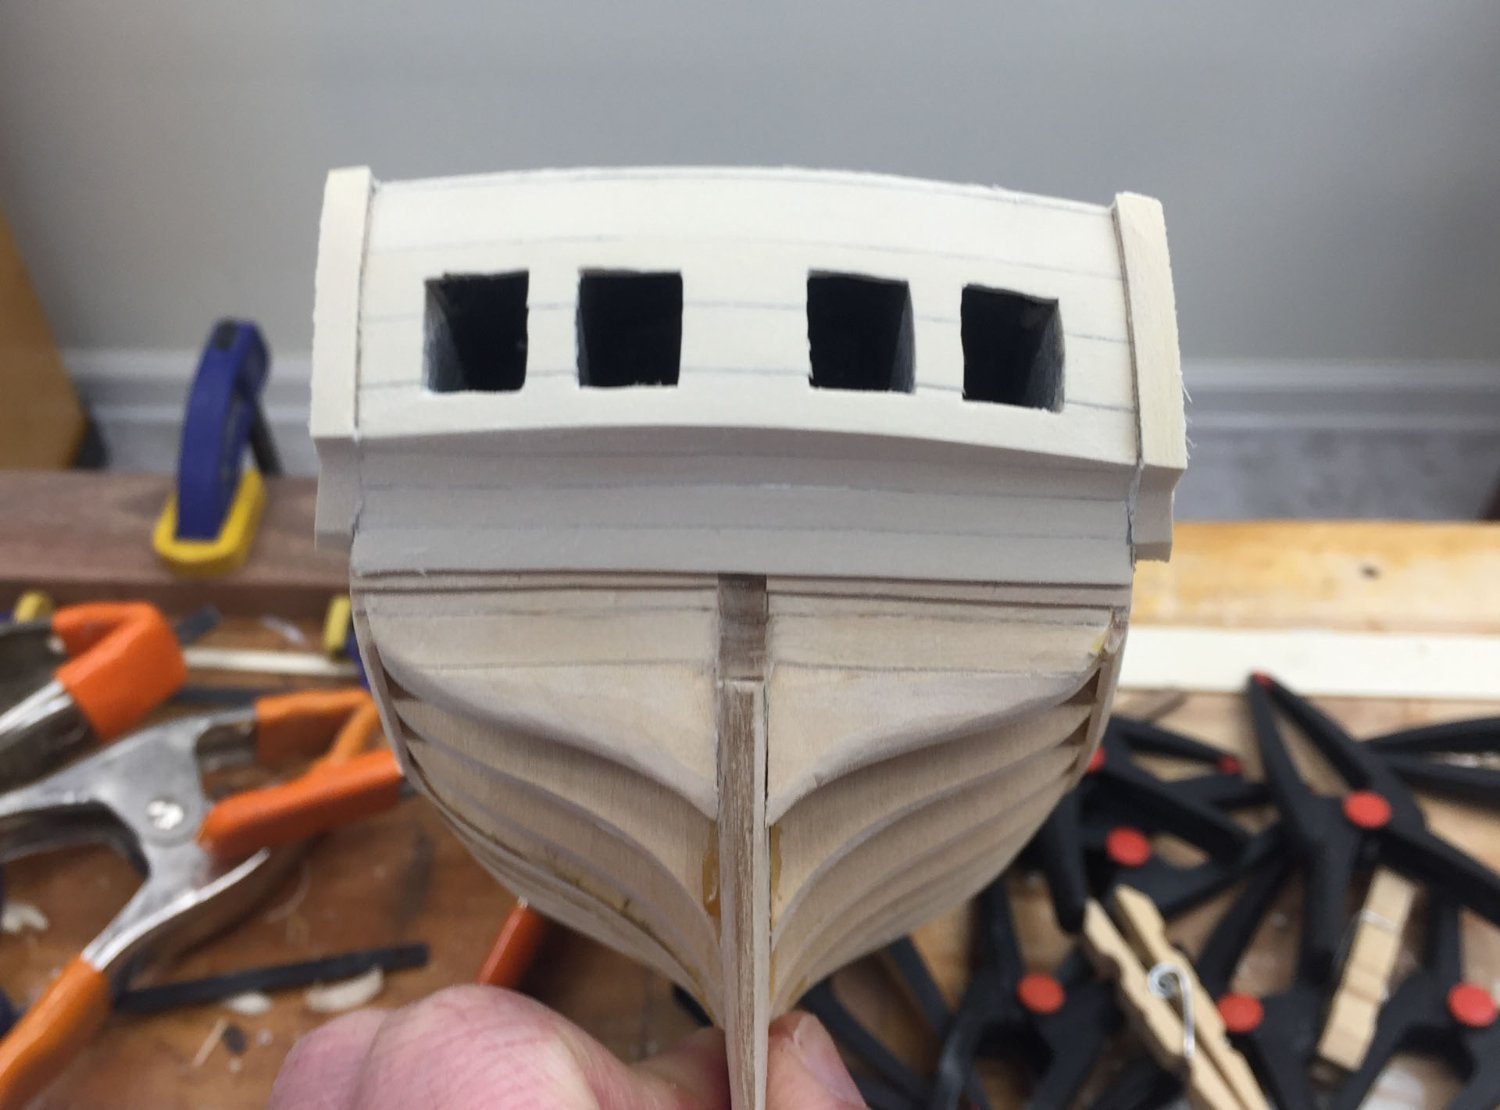
First off, thank you for the kind encouragement Overworked724. I am following your Syren closely; and I especially appreciate the many how-to pics. Its nice to have a community! And now this weekend's update. Some steps forward, some back. The good things first- 1) Planked the counter. I found it easier to leave the planks long for glue-up, then trim. I didn't put in the last lower 1.5 planks because I was concerned about the junction between the hull planking where it does that tight upright twist. I'm trying to think of ways to make this hull planking/counter junction look even, and I am thinking I could plank the hull, smooth the ends of the planks flat straight across the lower counter, then add the last counter planks. We'll see. The planking looks uneven in the pic but on the ship it looks ok. I trimmed it flush and started on the transom. 2 notes here- I purchased 4 of the Bessey 2" clamps I have seen many other models use and they work great! Only thing I could ask for is a little less "springiness" as they can dent the basswood esp if its damp from bending but thats a quibble. I just ordered a herd more from Acmetools for about 3$ each and well worth it. second thing is terminology. I was having a lot of trouble remembering Counter vs Transom, until I realized the Counter is curved and C shaped while the Transom is flat. Memory mnemonics are the best. Following the practium I placed the lowest transom plank and cut out the window openings. Then I remembered to paint the inside window wells black. And finally I added more planks to the transom. I thought it would be easier to glue each plank before cutting out the window opening. And then while maneuvering clamps I managed to drop the model about 3 feet down onto the floor. Clamps, chips of wood went flying. It seemed bad. But not too terrible it turns out. Some of the transom planks that I had left long broke off on the sides. In the above pic you can one of my repairs- there is a wedge of wood on the right side between the lowest and next up plank just lateral to the window hole. Since everything gets a second layer of planking not a big deal. I decided to not add the windows until later as I want to make basic window frames that overlap the openings with a 4 pane window panel inset and I'm sure I will put my fingers through them at some point. And the window holes will probly make good clamping points. But I later found I had cracked the stem which is a little more difficult. I had managed to glue the initial 3 planks to the stem and they seem to be exerting enough force to pull the gap open, and its an awkward place to clamp. In Feldman's book his stem is actually 2 pieces not 1 like the Model Shipways version and this could be my sign to cut out the broken bit and remake the stem into 2 pieces. That basswood has a lot of fuzz in the closeups. You can't really see it macro. So thats where I am. Take care everyone, Cisco


-
Hey FarmerJon- great planking job! I agree its not a kit for total beginners But it is a good introduction to planking which is never going to be easy. I had a hellacious time getting the bends correct on the planks above the garboard strake which I can see you already did a better job of. And after sanding in one area my bow planking got a bit translucent. I believe I used sandpaper wrapped around a curved piece of wood ("J" shaped) where I sanded up and down with the curly J portion. Took a while but good control. Keep the updates coming Cisco
-
i just decided to stall on adding my margin planks on my AVS so i cant help with that question. Great SpaceWolf though!
- 562 replies
-
- 2
-

-
- vanguard models
- alert
- (and 2 more)
-
Thanks Paul. I think youre right and I will leave the extensions as is for now, and wait to install the waterways until after I've planked the exterior. I saw in some AVS logs people also filled in the entirety of spacing between the gunports (where the oarports go, Cheerful I dont think has these). This seems easier to do before the extensions are thinned. So that means the stern is next. AND... the fashion pieces. I'm prepared for an epic struggle. Cisco
-
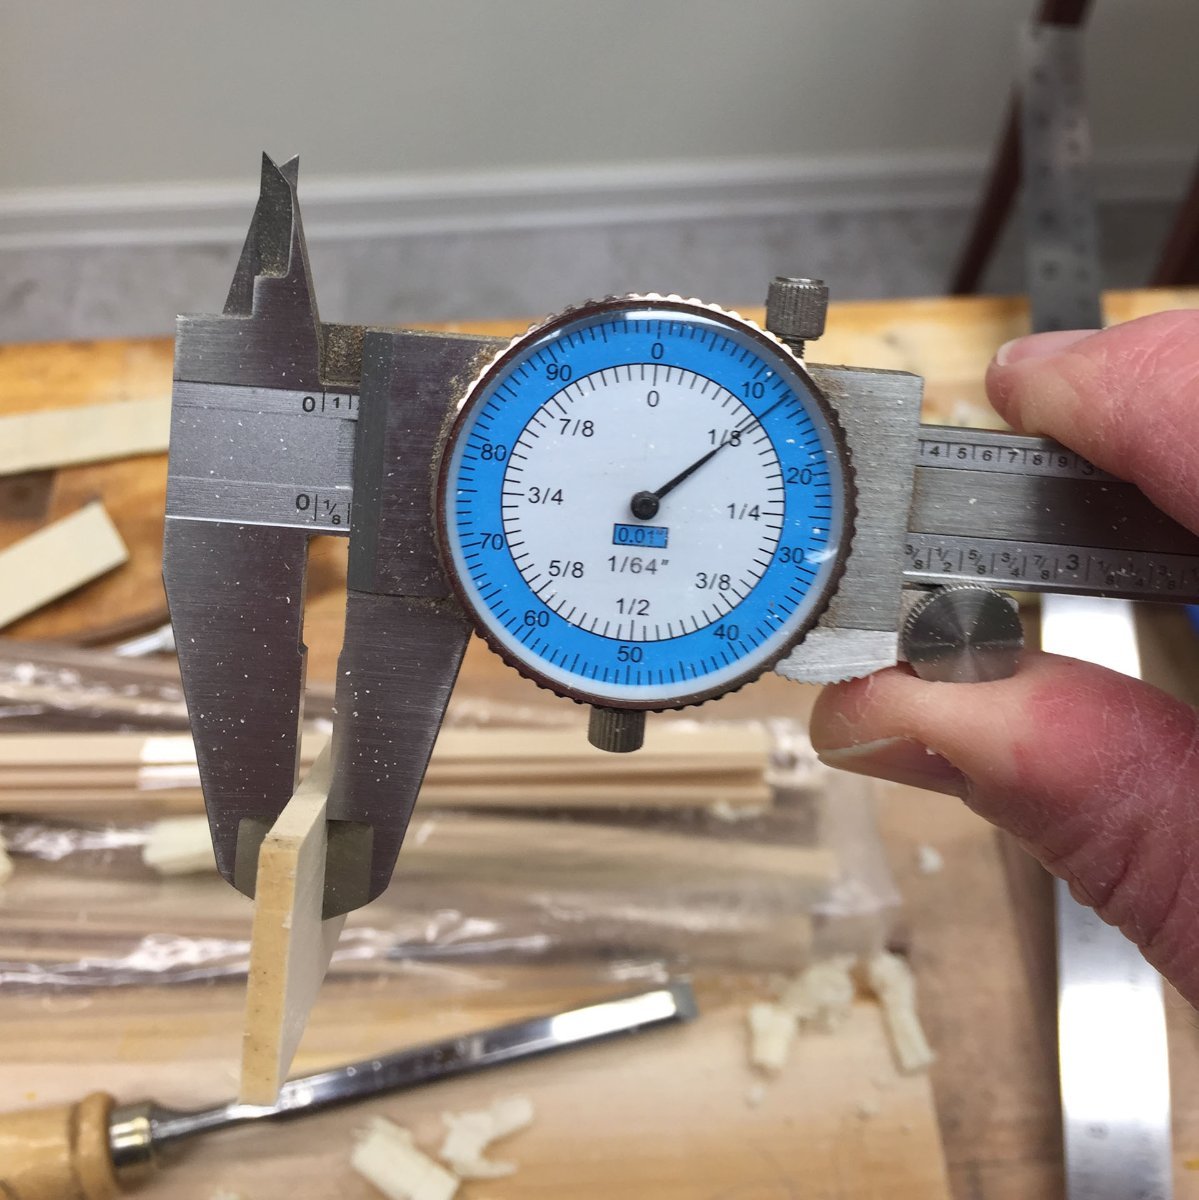
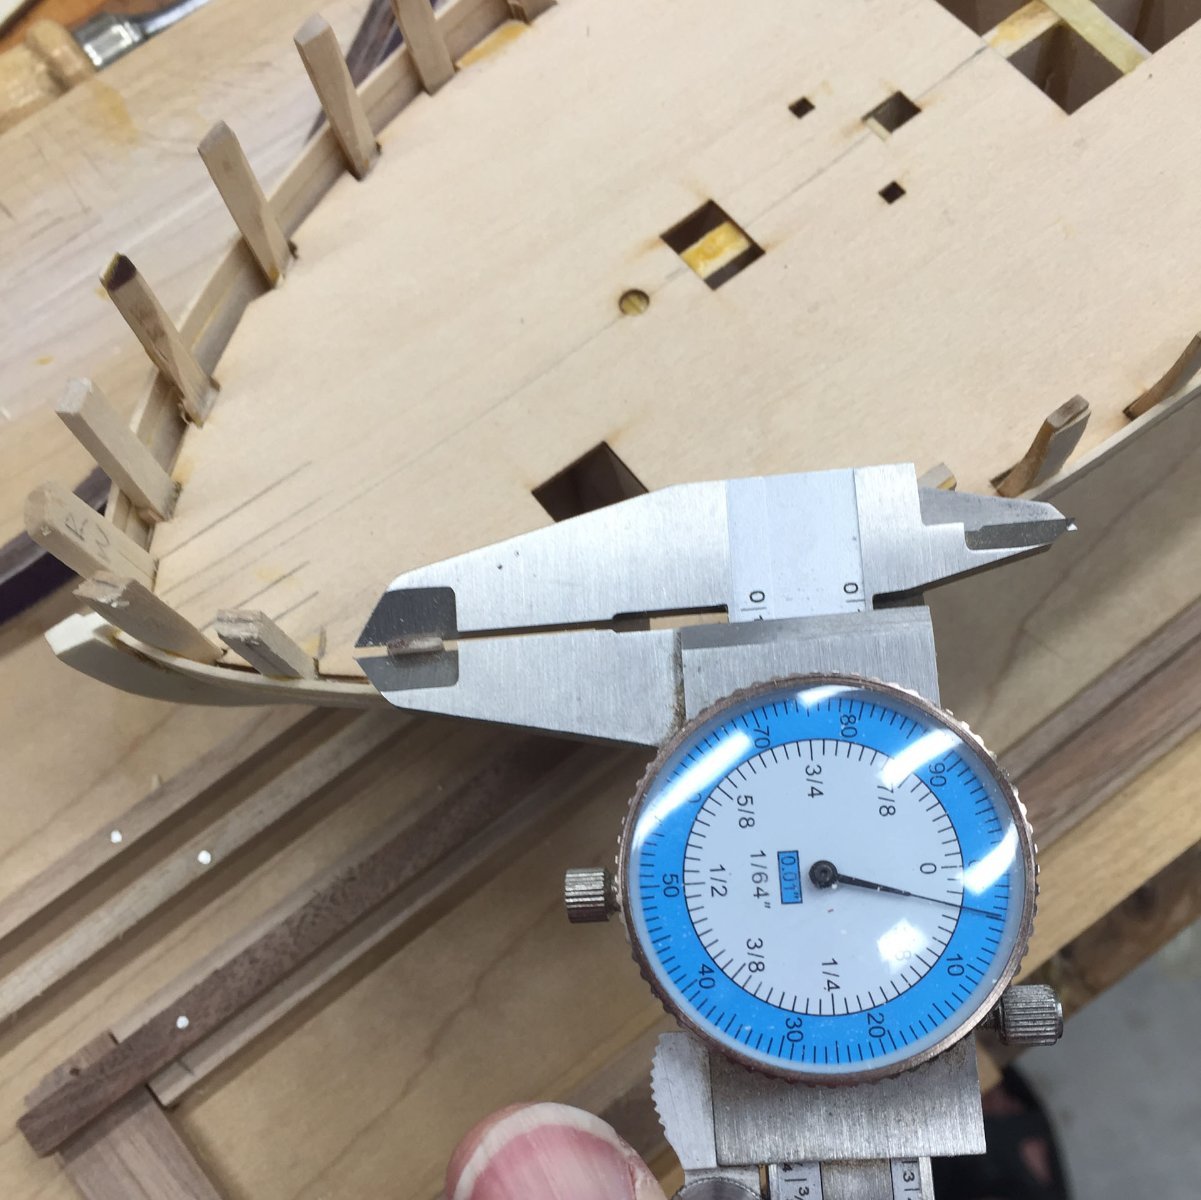
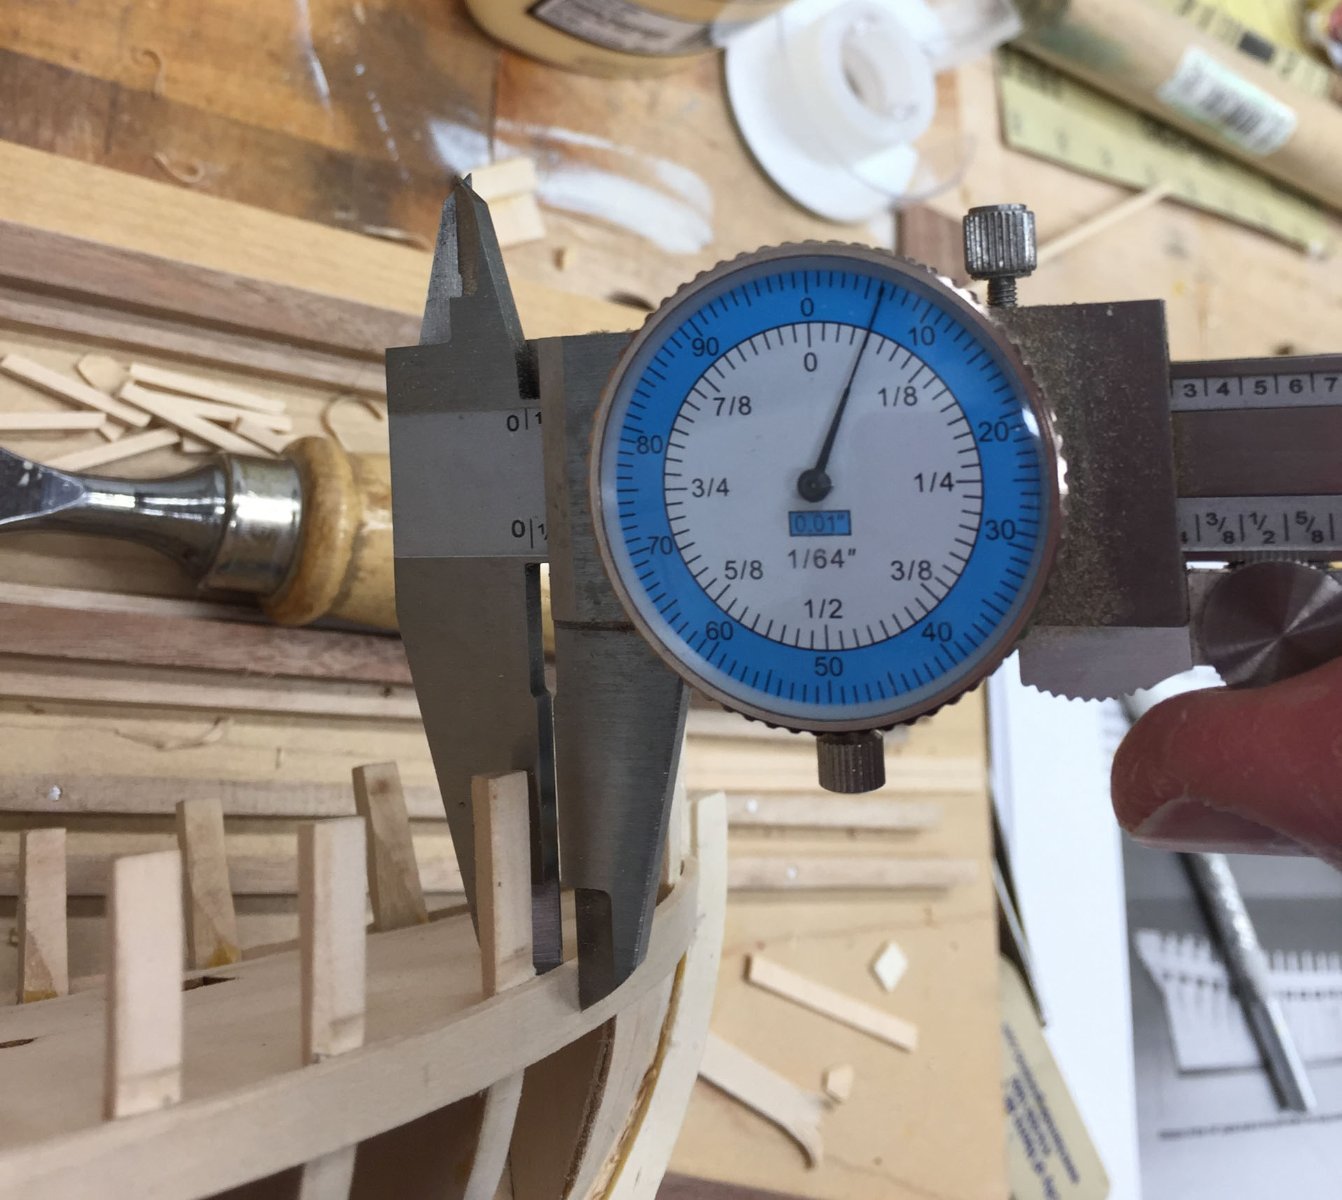
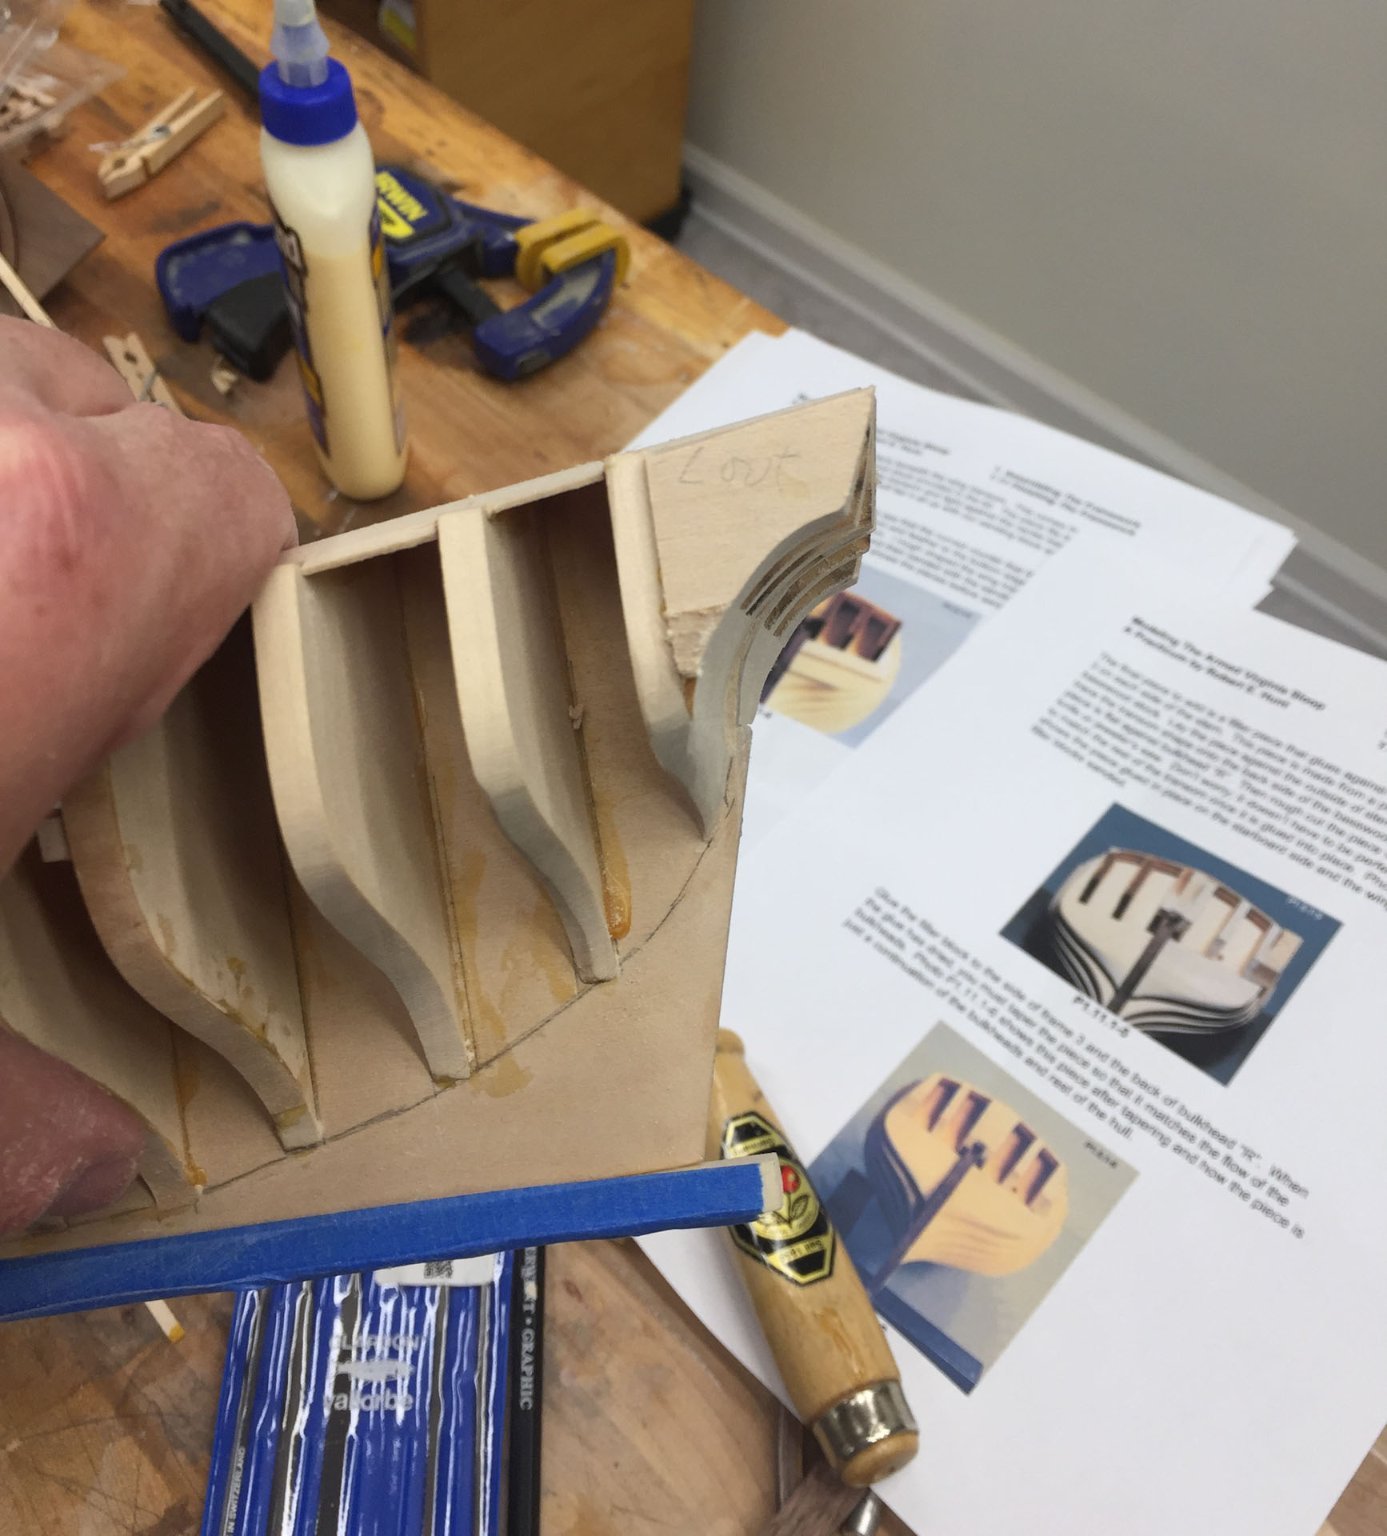
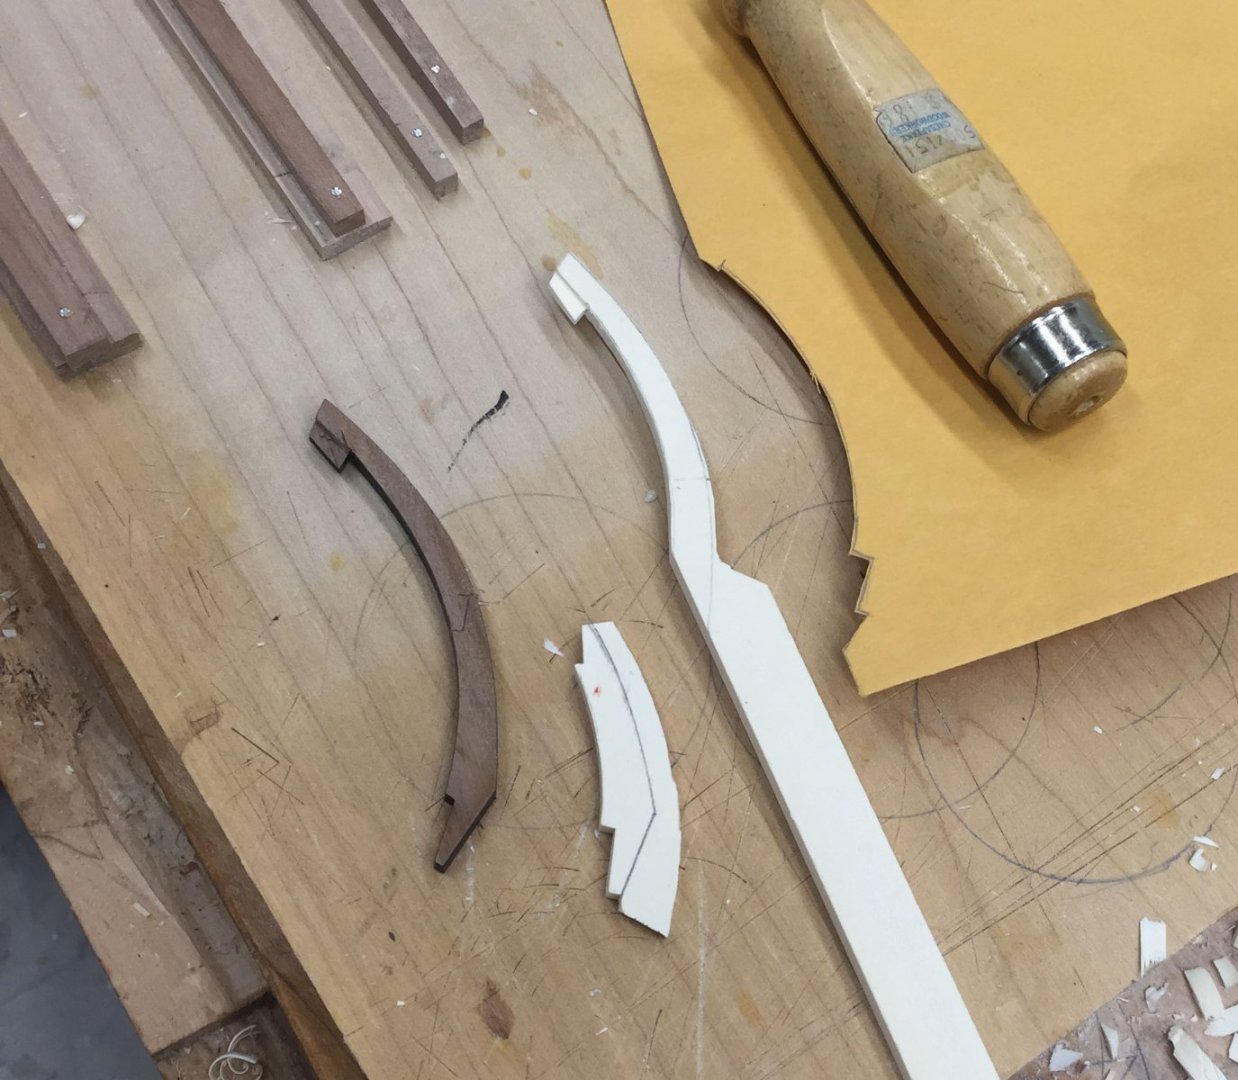
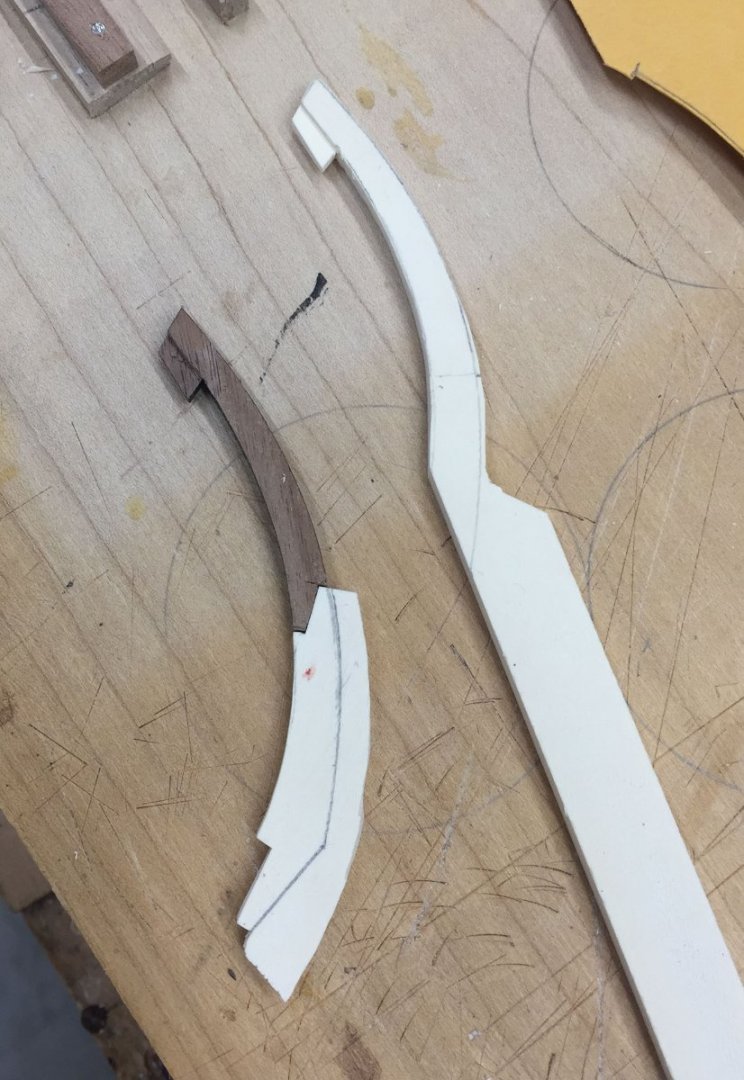
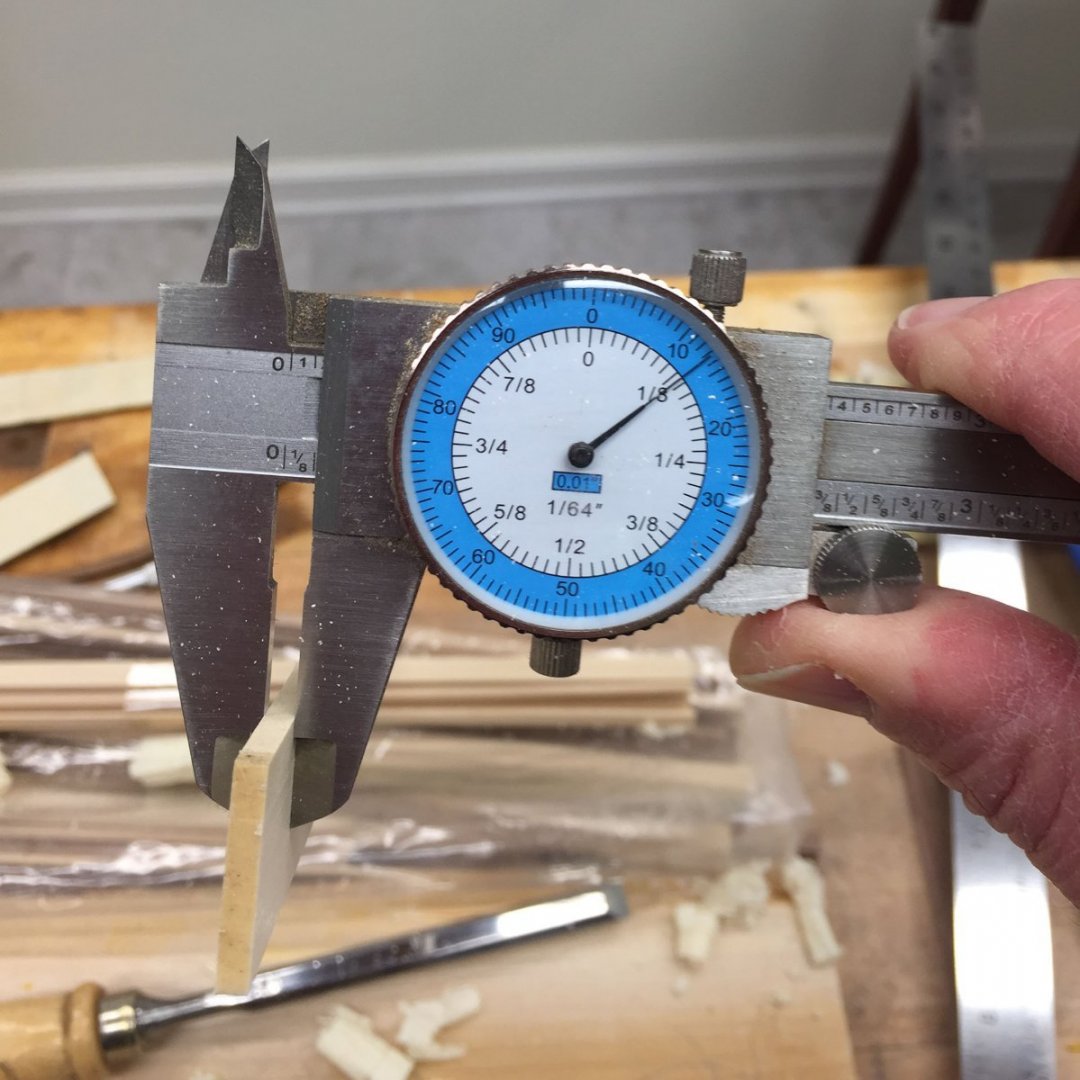
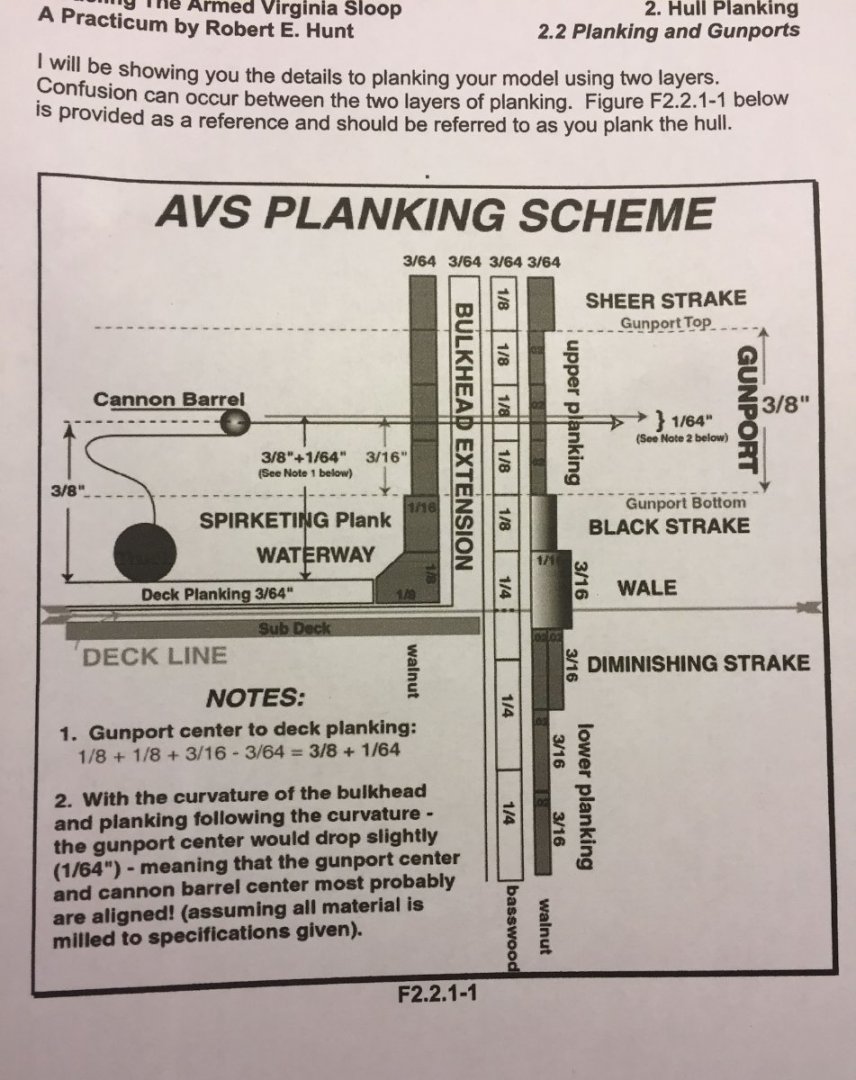
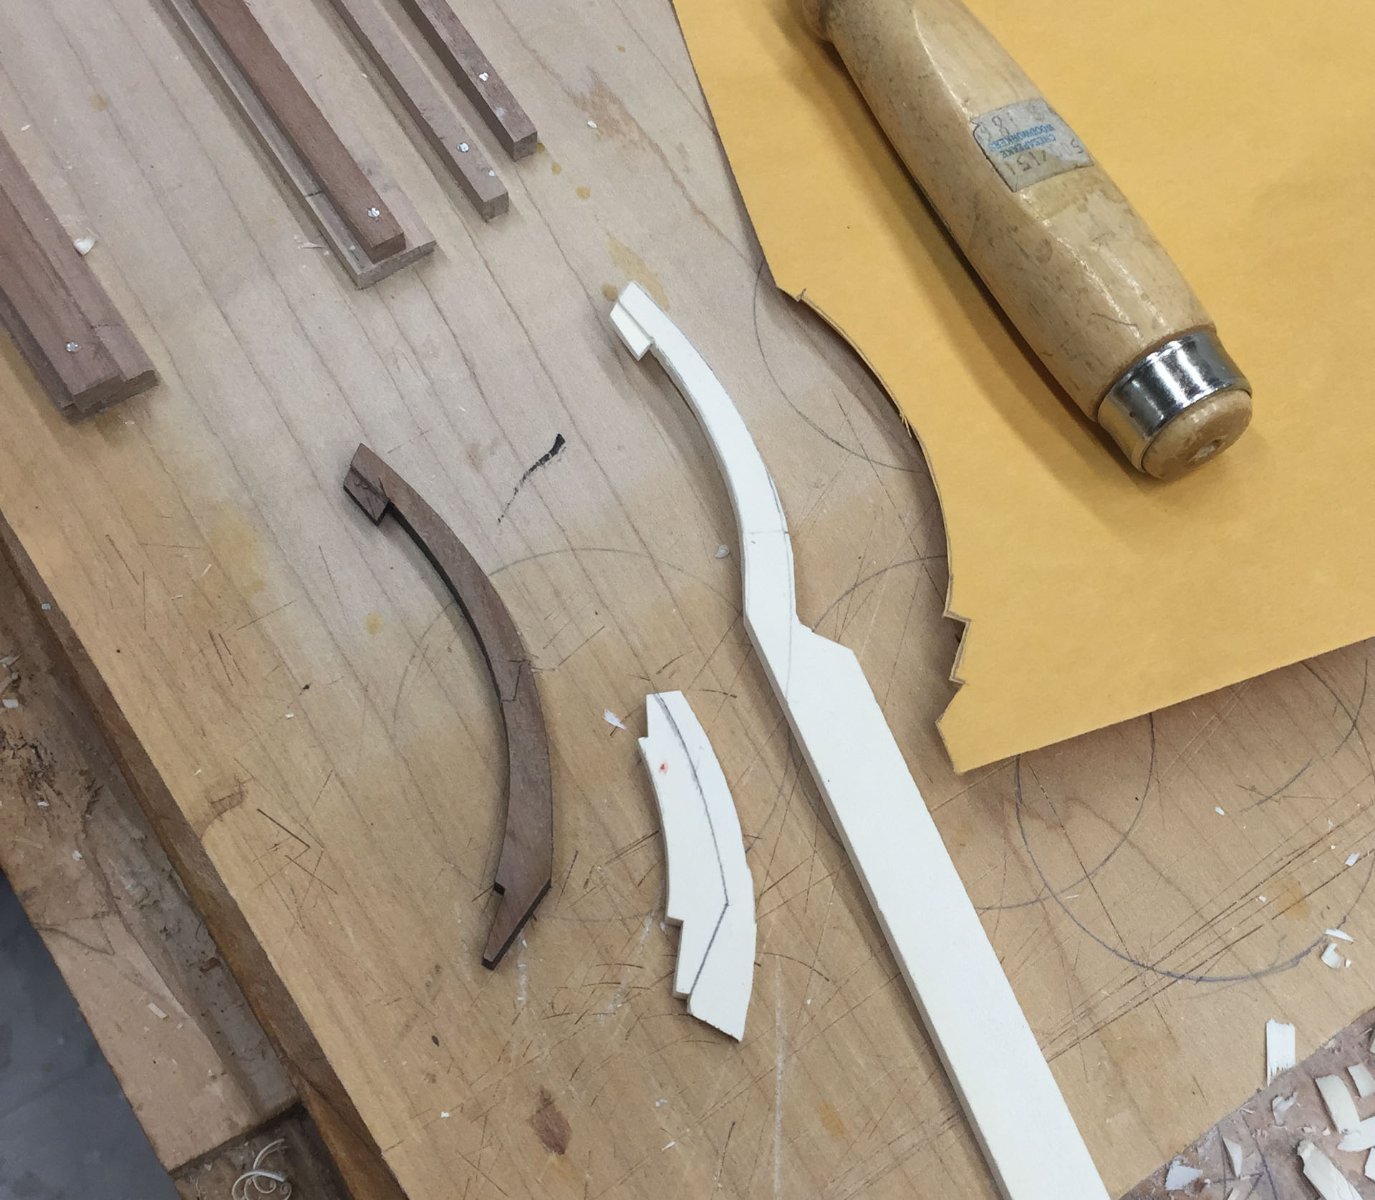
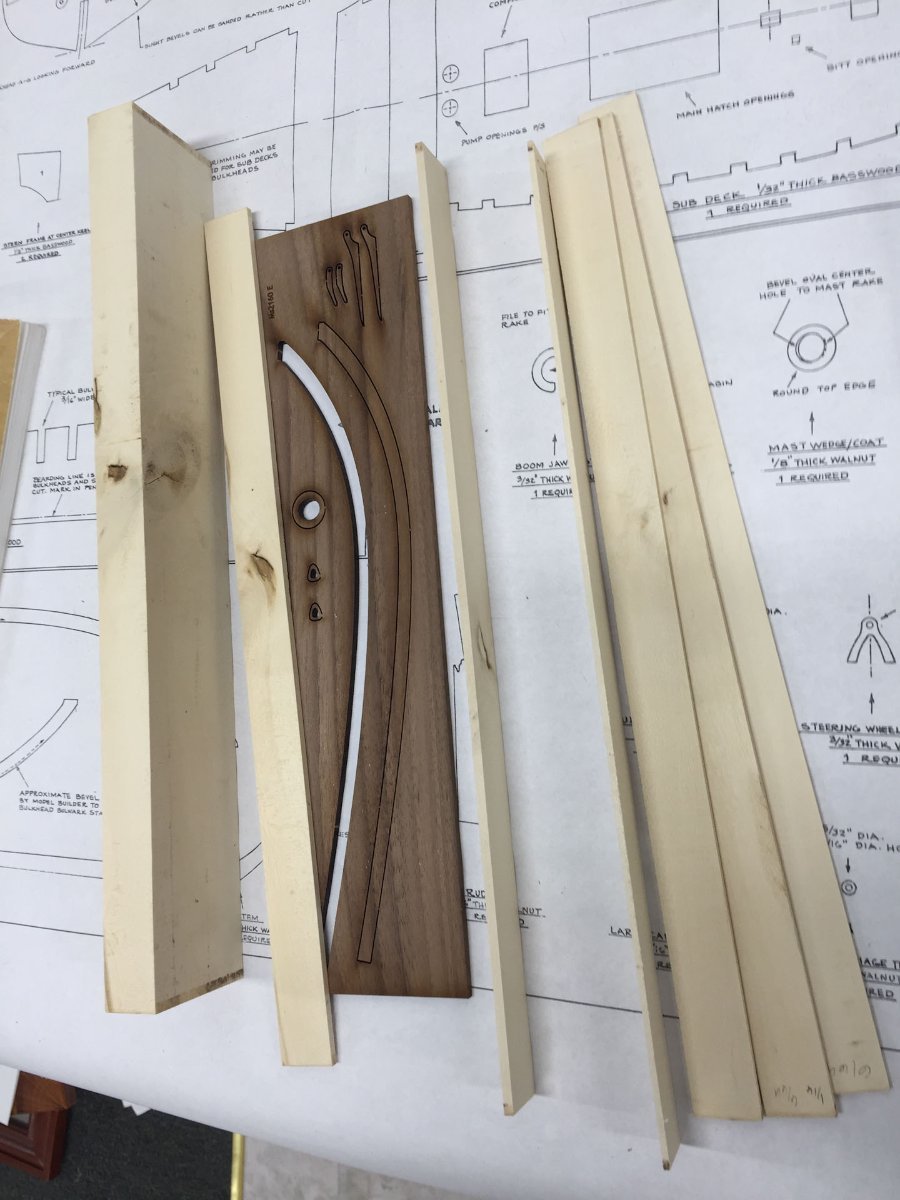
A much quicker than usual update! Mostly because I was off work yesterday and now I have a question- Progress so far- I want to make my decking and waterway out of Holly, so first step was cutting my Holly billet into strips. Woodworking is my other hobby so I already have a bandsaw. I set the fence so it was a little wider than than laser cut walnut that came with the kit. Except after cutting 3 strips of Holly I realized I had the wrong strip of walnut; I picked out the piece with the cap rails which is thinner (1/16") than the waterways strip (1/8"). In my defense they looked very similar. Also its freezing in the garage (16 degree F) and I was hurrying. Below is the billet, then the correctly cut 1/8" (+ a little more) holly strips next to the correct walnut strip, and on the right the 4 strips of holly cut too thin. They will find use I'm sure somewhere else. You can see there's a knot in the middle of the holly billet but I think dividing up the waterway into 2 pieces each I can cut out what I need. To final surface the holly strips and bring them to 1/8" thickness I reused my blockplane jig. It was made to surface the stem and keel which were 3/16" thick, but luckily the kit comes with lots of strips of basswood of all different sizes. So i used some to shim the holly strips up, blockplaned 1 side a few passes, then turned the strip over and did the other side. Then just keep flipping and taking a shaving until final thickness reached. It went a lot easier than I had planned. So finally I reach my question. The practicum illustration of the gunport planking, pictured in my last post, clearly shows the bulkhead extensions to be 3/64" thick. The practicum also says to sand down the knighthead and timberhead extensions to 3/64". He makes no (written) mention that I could find of the other bulkhead extensions, and his picture in the practicum shows them clearly unthinned and much thicker than 3/64" after his waterway is installed. I reviewed some of the MSW AVS logs and it seemed like no one had thinned any other bulkhead extensions except the bow ones. And I think I remember Chuck saying somewhere that having fat gunports was a common mistake. So I took the front 3 bulkhead extensions to 3/64", that seemed uncontroversial at least. The grain dives outwards on the kit bulkhead extensions so I promptly split the 3rd one starboard side and had to reglue it. So now I am deciding on thin all the bulkhead extensions to 3/64", which is pretty skinny, or thin them to a regular but "thicker" thickness which is what the practicum photo, but not the practicum illustration, shows. Any advice would be appreciated. Thanks for reading, and all you in the Mideastern USA hope you had a great snowstorm. Yesterday off from work was great but my kids were off school as well (less great) and they're off today as well and they really need to go back. Cisco


_edited.thumb.jpg.737a57e5db1ee12723f04d71213b7e9a.jpg)


-
That looks fantastic. Thank you again for your thorough explanation and pics, it really helps newbies like me. Also its just beautiful to look at
-
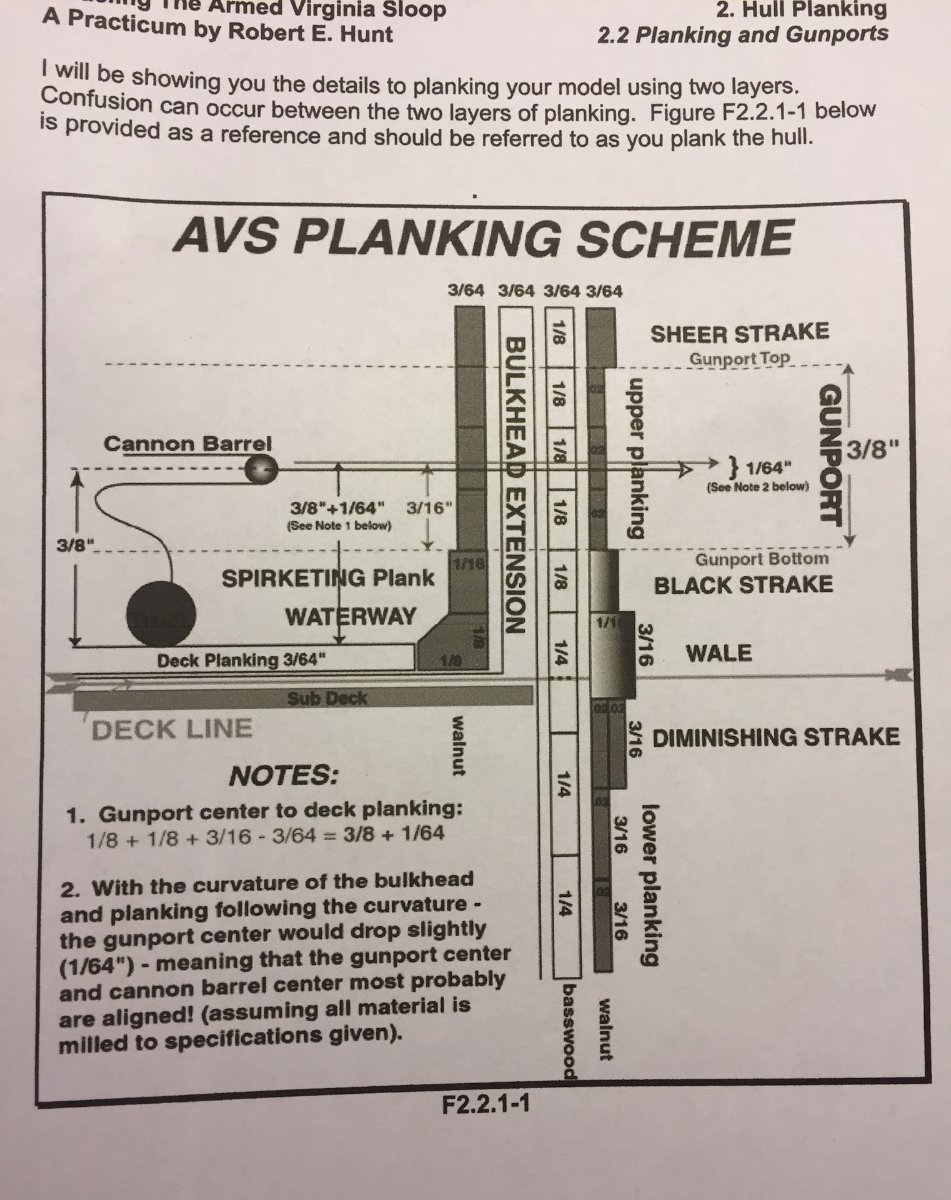
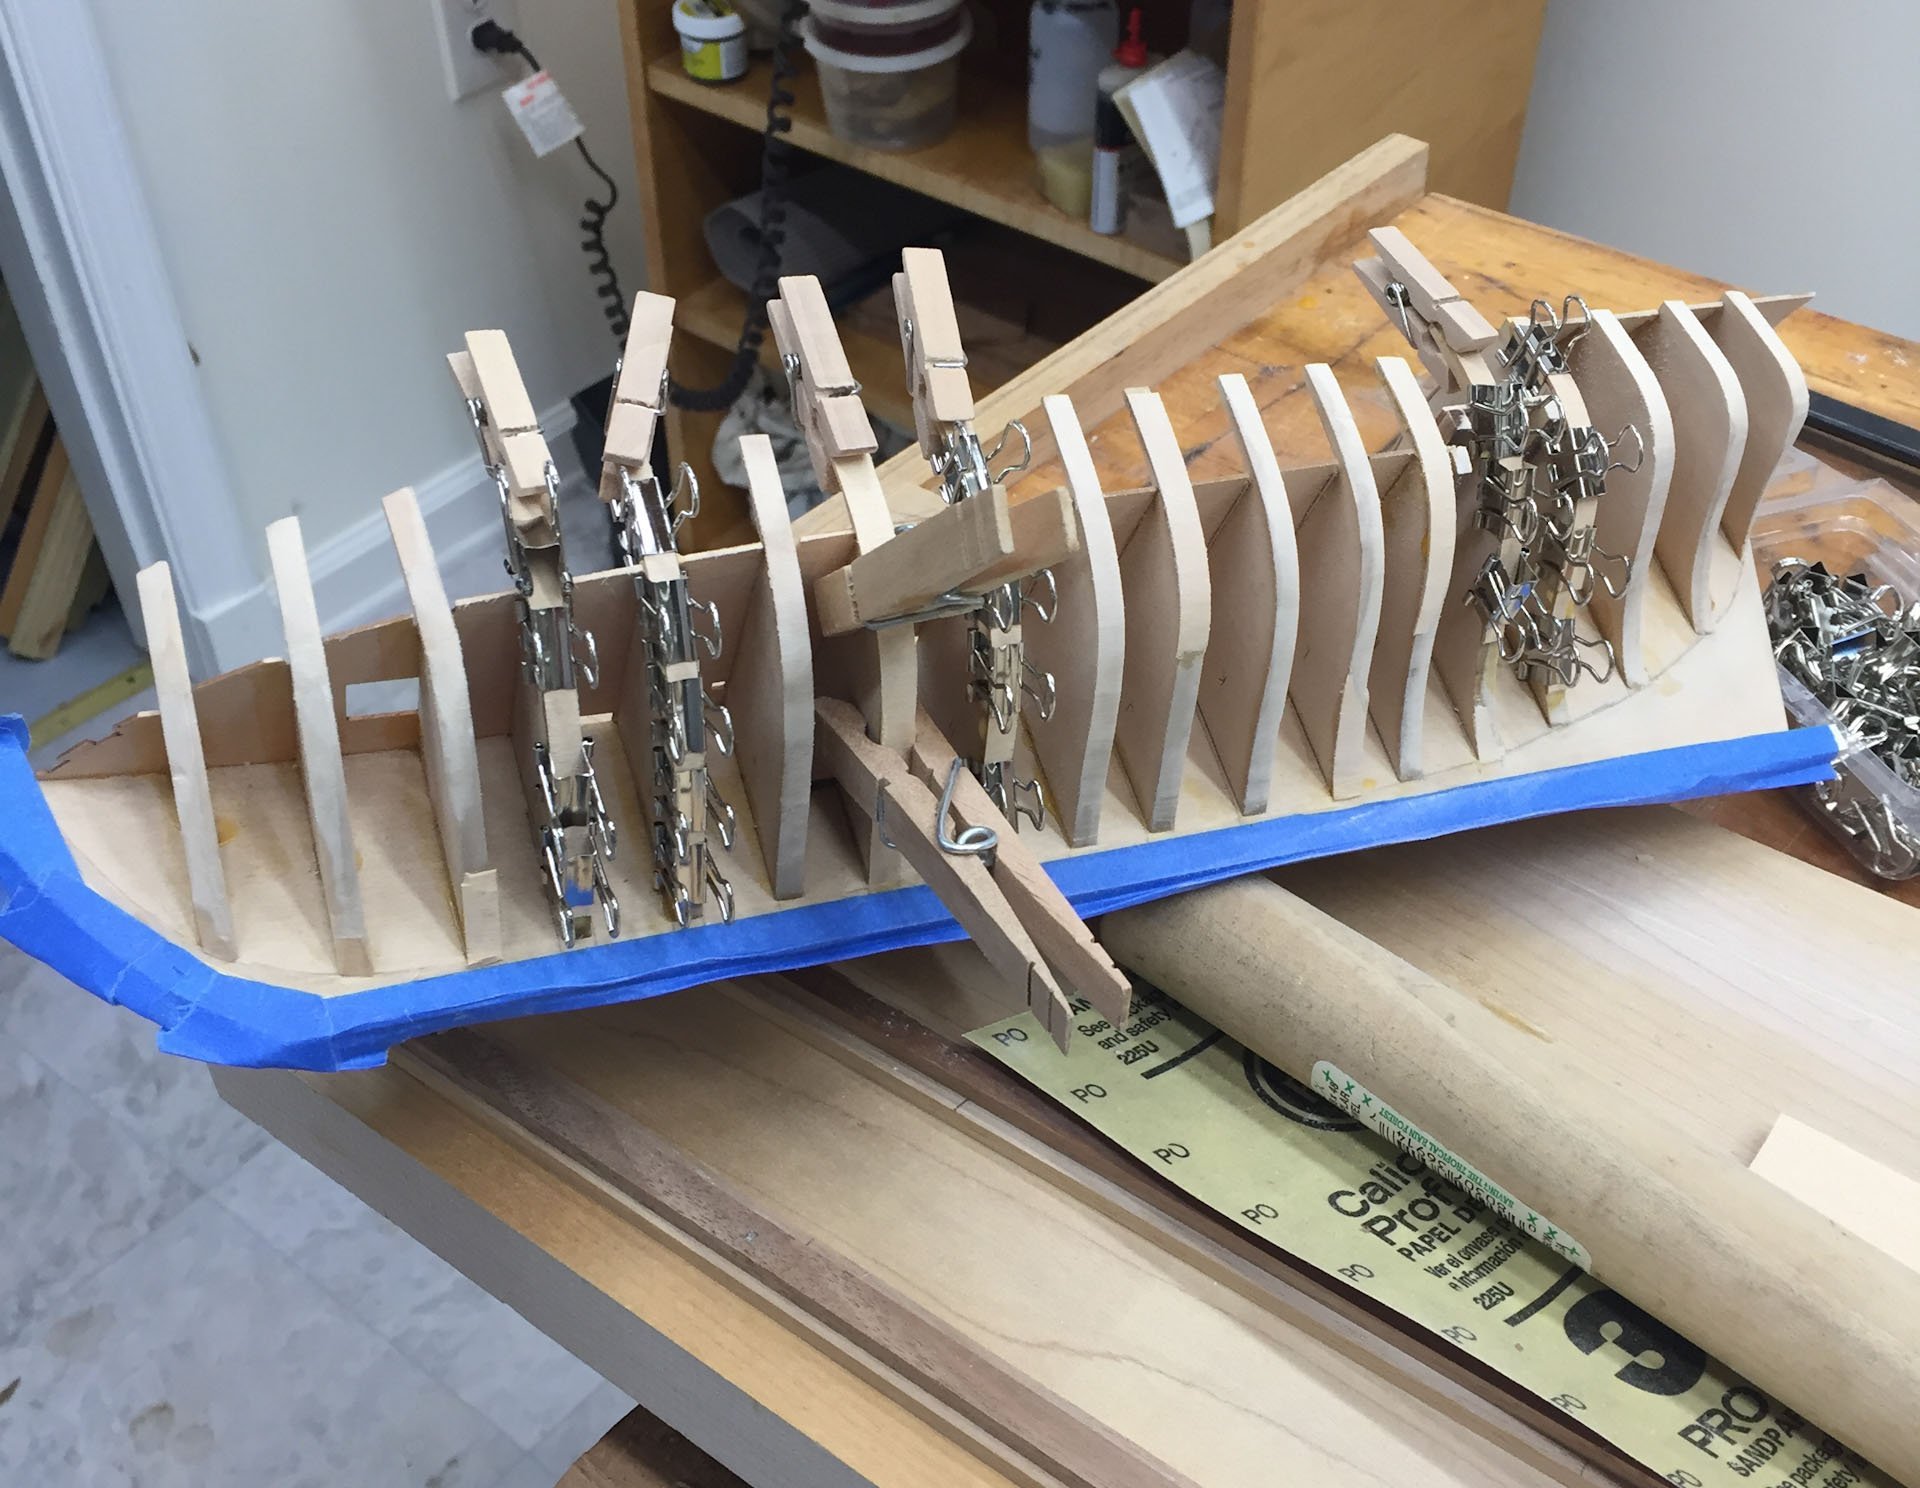
Good evening ModelShipworlders. Thank you to all who have read and liked my posts, I appreciate it. My last 2 weeks have been spent trying to up my planking game, and if mistakes are a sign of progress the I've had some success. Following Bob Hunt's practicum (I thought) I attached the first line of planking just at the deckline to stabilize the bulkhead extensions from breaking. This involves attaching an 1/4" wide by 3/64" deep plank overlapping each side of the subdeck, and a single 1/8" x 3/64" plank above it on each side. I attached the 1/4" wide plank in my last post, go me, and then found some issues. First off the whole "bend downwards to make the plank fit on the curve of the prow" makes a lot more sense to me. Now. You can see in my fist pic that there is a gap that I filled with some scrap basswood between the plank and the first bulkheads which I originally thought was because I hadn't faired the bulkheads enough. But in hindsight I realize I probably didn't bend the plank upwards enough as well. And then I found my second mistake. Reading other logs I have scoffed at people who have used the wrong sized wood strips, how hard can it be to mess that up? Well when I was adding my second strip it seemed a bit thinner than my first strip, so I measured it and somehow I managed to pick out strips 4/64" (1/16") thick instead of 3/64". So maybe that was part of why they were so challenging to bend. So not a lot of harm done and maybe practicing on a harder strip of wood will make the others easier. I added the next strip of planking, 1/8" x 3/64", this time the correct size, but I somehow thought the directions said to add a strip both above and below the original plank, instead of just a single strip above the original plank. So I added a strip below the original plank, and this one I bent with a better curve downwards at the bow and upwards at the stern so it followed both the original plank and the downward curve of the bow bulkheads pretty well. I did both lower planks, then started attaching the 1/8" x 3/64" strip above the original plank. I was getting more confident at this point and glued most of the strip on in one go. There is a slight gap which you can't see in the pictures between planks at the upwards bend at the level of the quarterdeck. I think my bending jig compressed the wood here a little making a divot that only showed up now. But this is why a first planking is helpful - I am learning a lot about what to look out for on the show second planking. It was at this point that I re-read this section in Bob Hunt's practicum and figured out I had mistakenly added the 1/8" lower plank. I think the practicum really proves it worth in the following picture which illustrates all the planking and thicknesses at the deckline. Even if it kept leading to "aw man..." moments. Admins if I can't post this please remove it- And here finally I am gluing the other side. I also learned its time to buy some bigger clamps as clothes pins won't open any wider. And thats it for tonight. Next up is thinning the bulkhead extensions and adding the waterway. I'm doing mine in Holly and I'm planning on having one or two scarfed joints instead of single big curved pieces that run from the quarterdeck to the bow. Loosely based on Cheerful's waterways. This time I will try and read the directions, too. Thanks for reading, Cisco.


-
Can you show how you are shaping and cutting the plates at the curvy areas, like where the planking meets the stem? I haven't coppered anything yet but it seems to me this is the real test and in the distressingly close up, no flaw left unseen, super micro photos your joints look super clean. Also. What 3 books on ship modeling did you get from Santa Claus? In case I missed any...
-
i’m a total newbie as well. cant help with the planking fan as i havent done that yet but if you check my Armed Virginia Sloop log i show my bending station a lá Chuck and it is simple and works great. Sorry i havent figured out how to post links yet
- 362 replies
-
- 1
-
-
- Amati
- Lady Nelson
- (and 2 more)
-
great job on the windows! i completely agree they make a huge difference. i’m working on the AVS and i always felt the kit supplied windows look very thick and unnatural. based on your posts it seems it wont be trivial to do my scratch versions and i’m now prepared for many re-dos. and i have to order some mica sheets
-
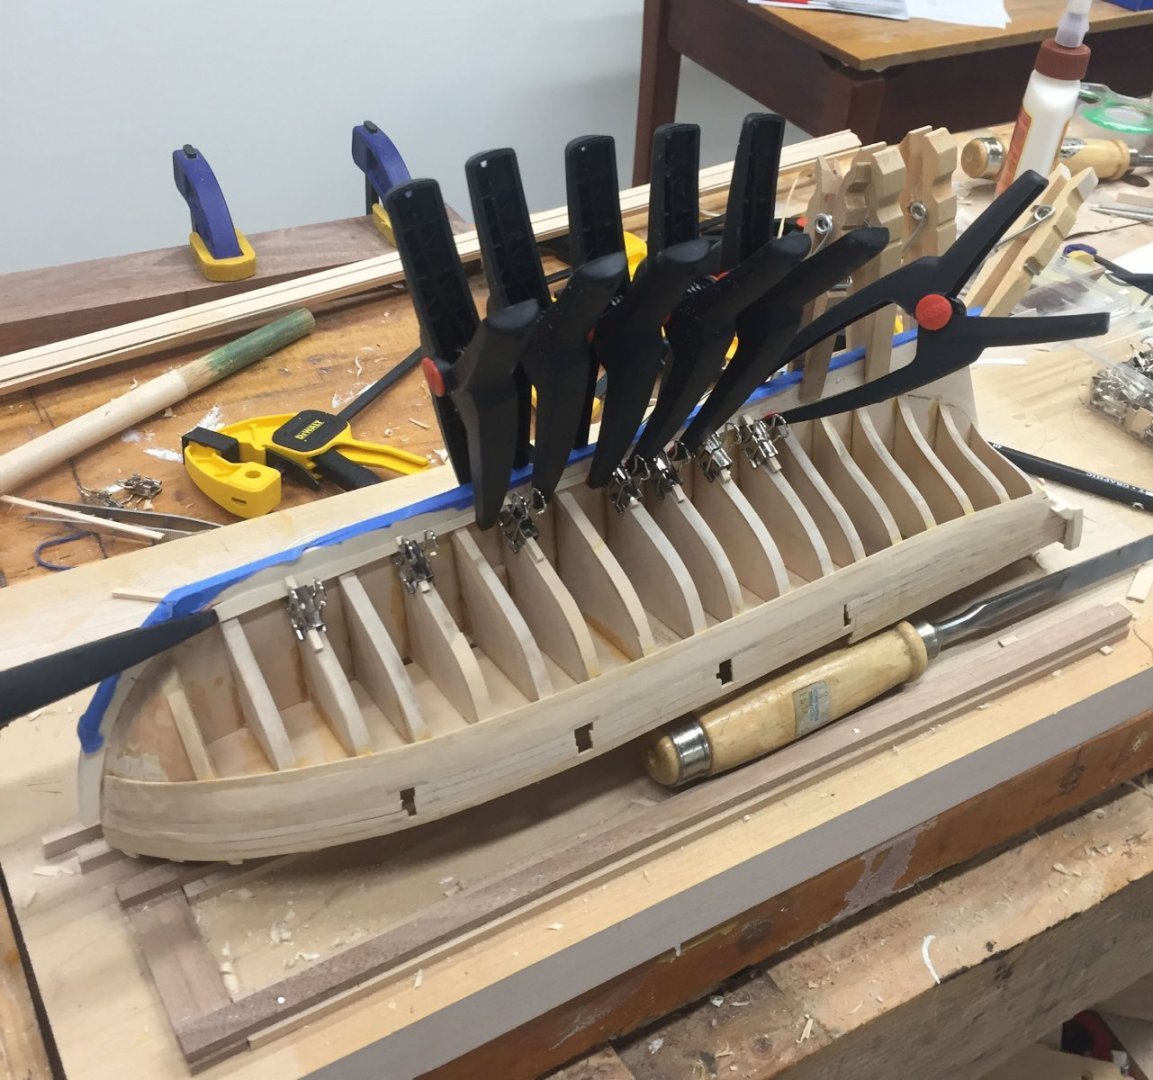
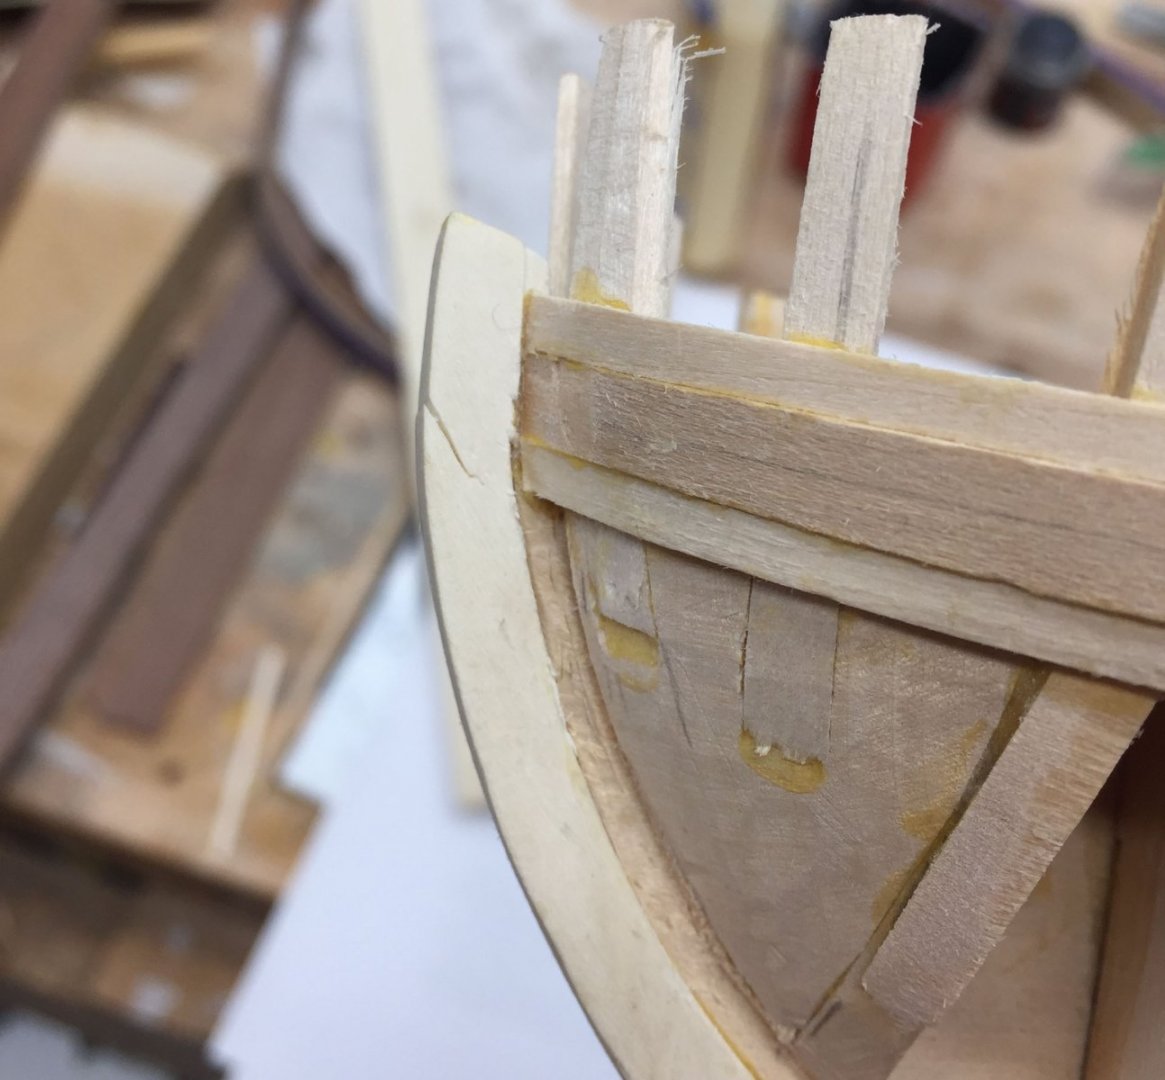
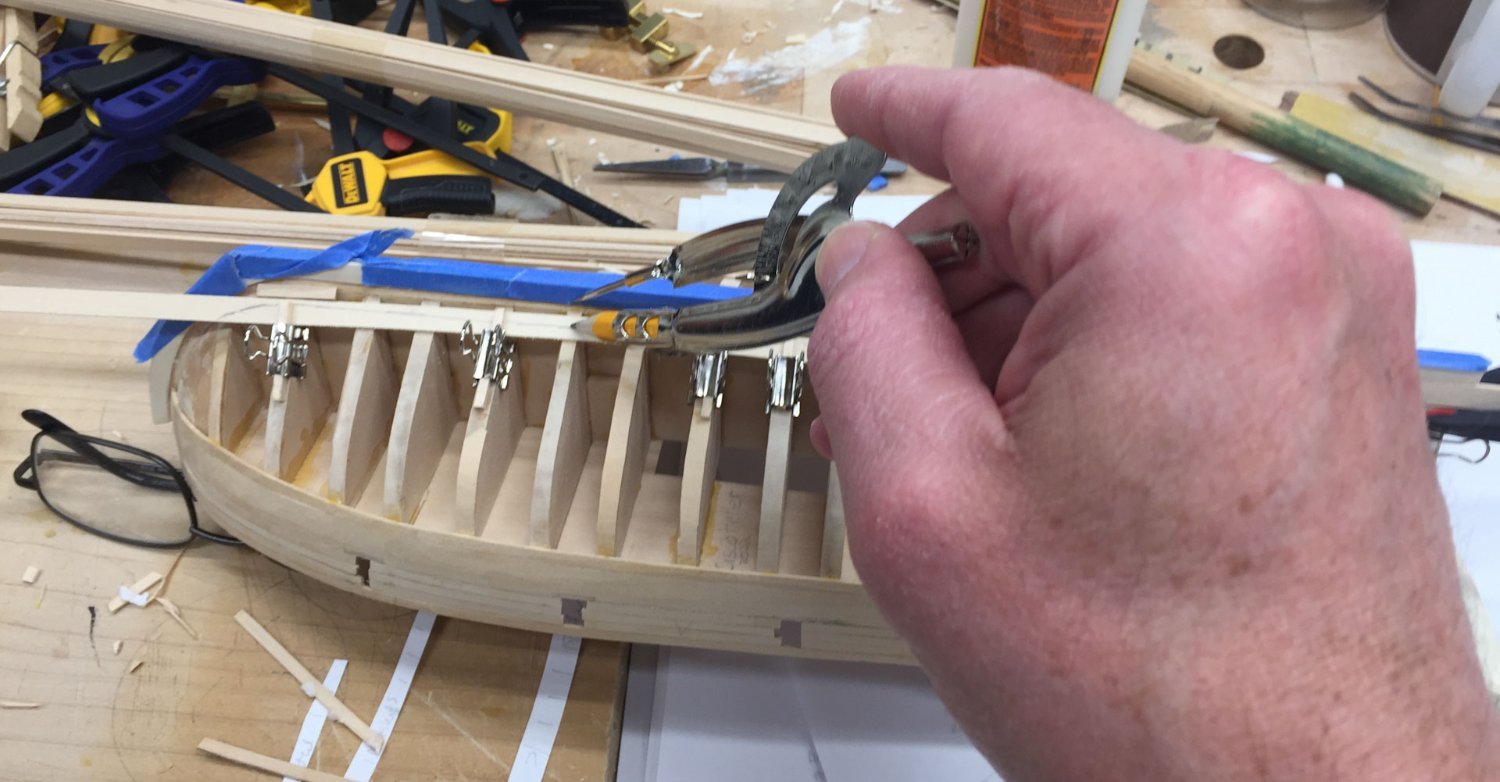
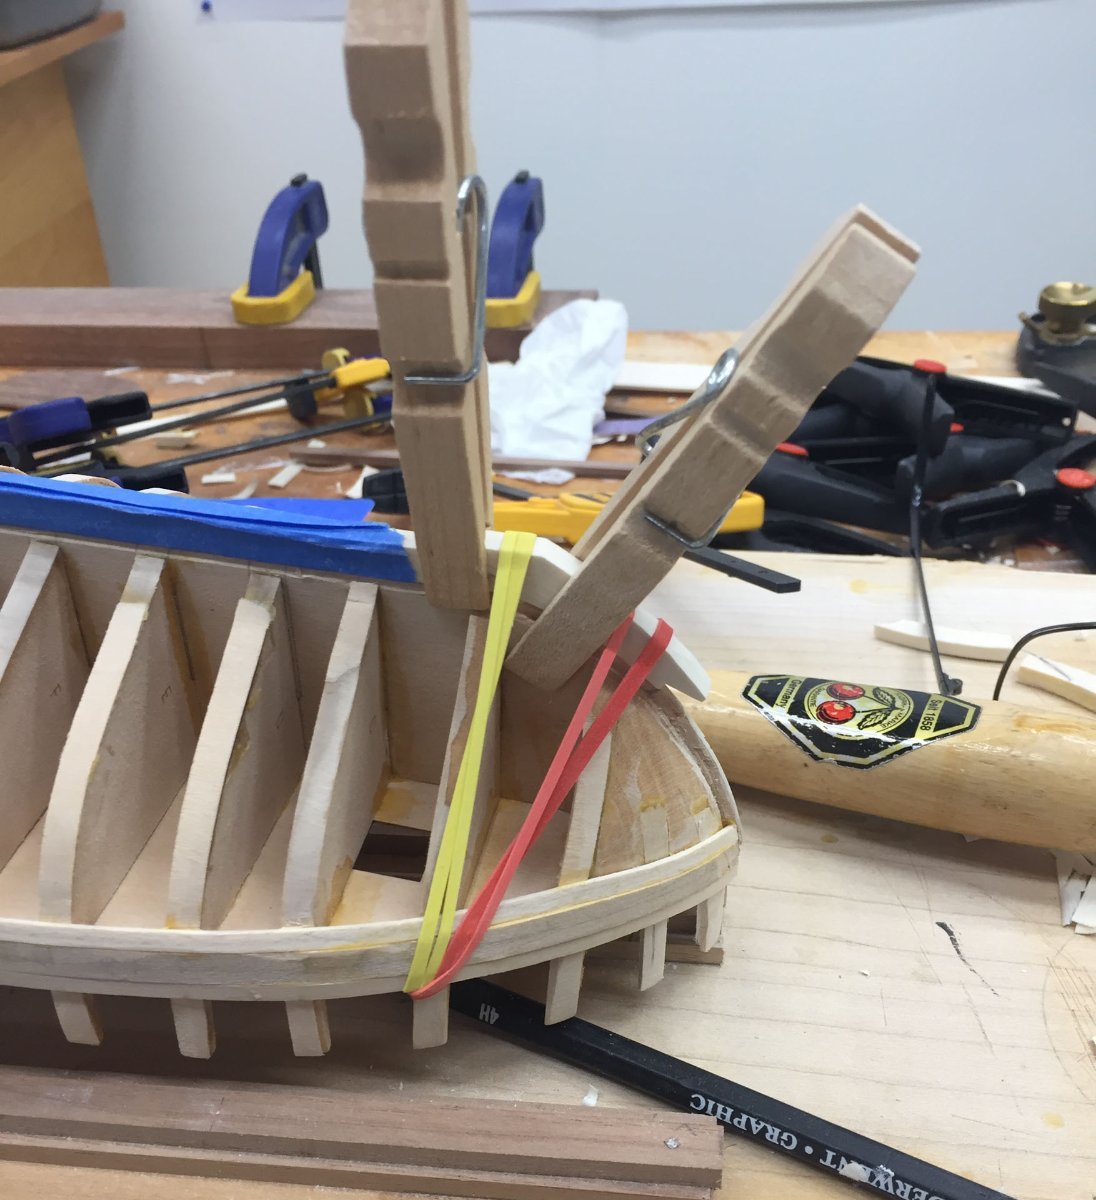
So on to attaching the first plank. Like basically everyone I found out my fairing of the bulkheads wasn't as great as I thought. Not shown in these pics but I had to slip a tiny piece of wood into a gap between the first bulkhead and the plank. You can see my clamping method which worked pretty well, especially as I had spent so much time trying to bend the strip to be very close to my penciled lines on the bulkheads. Due to Timidity I attached 5 bulkheads at a time, allowed them to dry, and then evaluated my technique. I also found out that if you are using heat to make the plank bendy you can dry it out so much that even a little bend can break it (See below pic on about 6th bulkead). But the break glued back fine. I used a piece of my second planking (Holly) as a wedge in rabbit joint at the top of the stem to make sure there will be enough space down the road. The aft end of the plank is very exciting- it curves upwards and inwards, and the final 1 cm also twists to follow the transom edges. Before gluing the last few inches I wetted the strip and twisted the end while using the travel iron. Couldn't take a picture I don't have enough hands but it worked really well. I also wetted the outside of the plank as I attached it in the hopes it would swell a little and curve inwards, and not break like it did amidships. And thats the state of the union. Have a great night, thanks for reading, Cisco

-
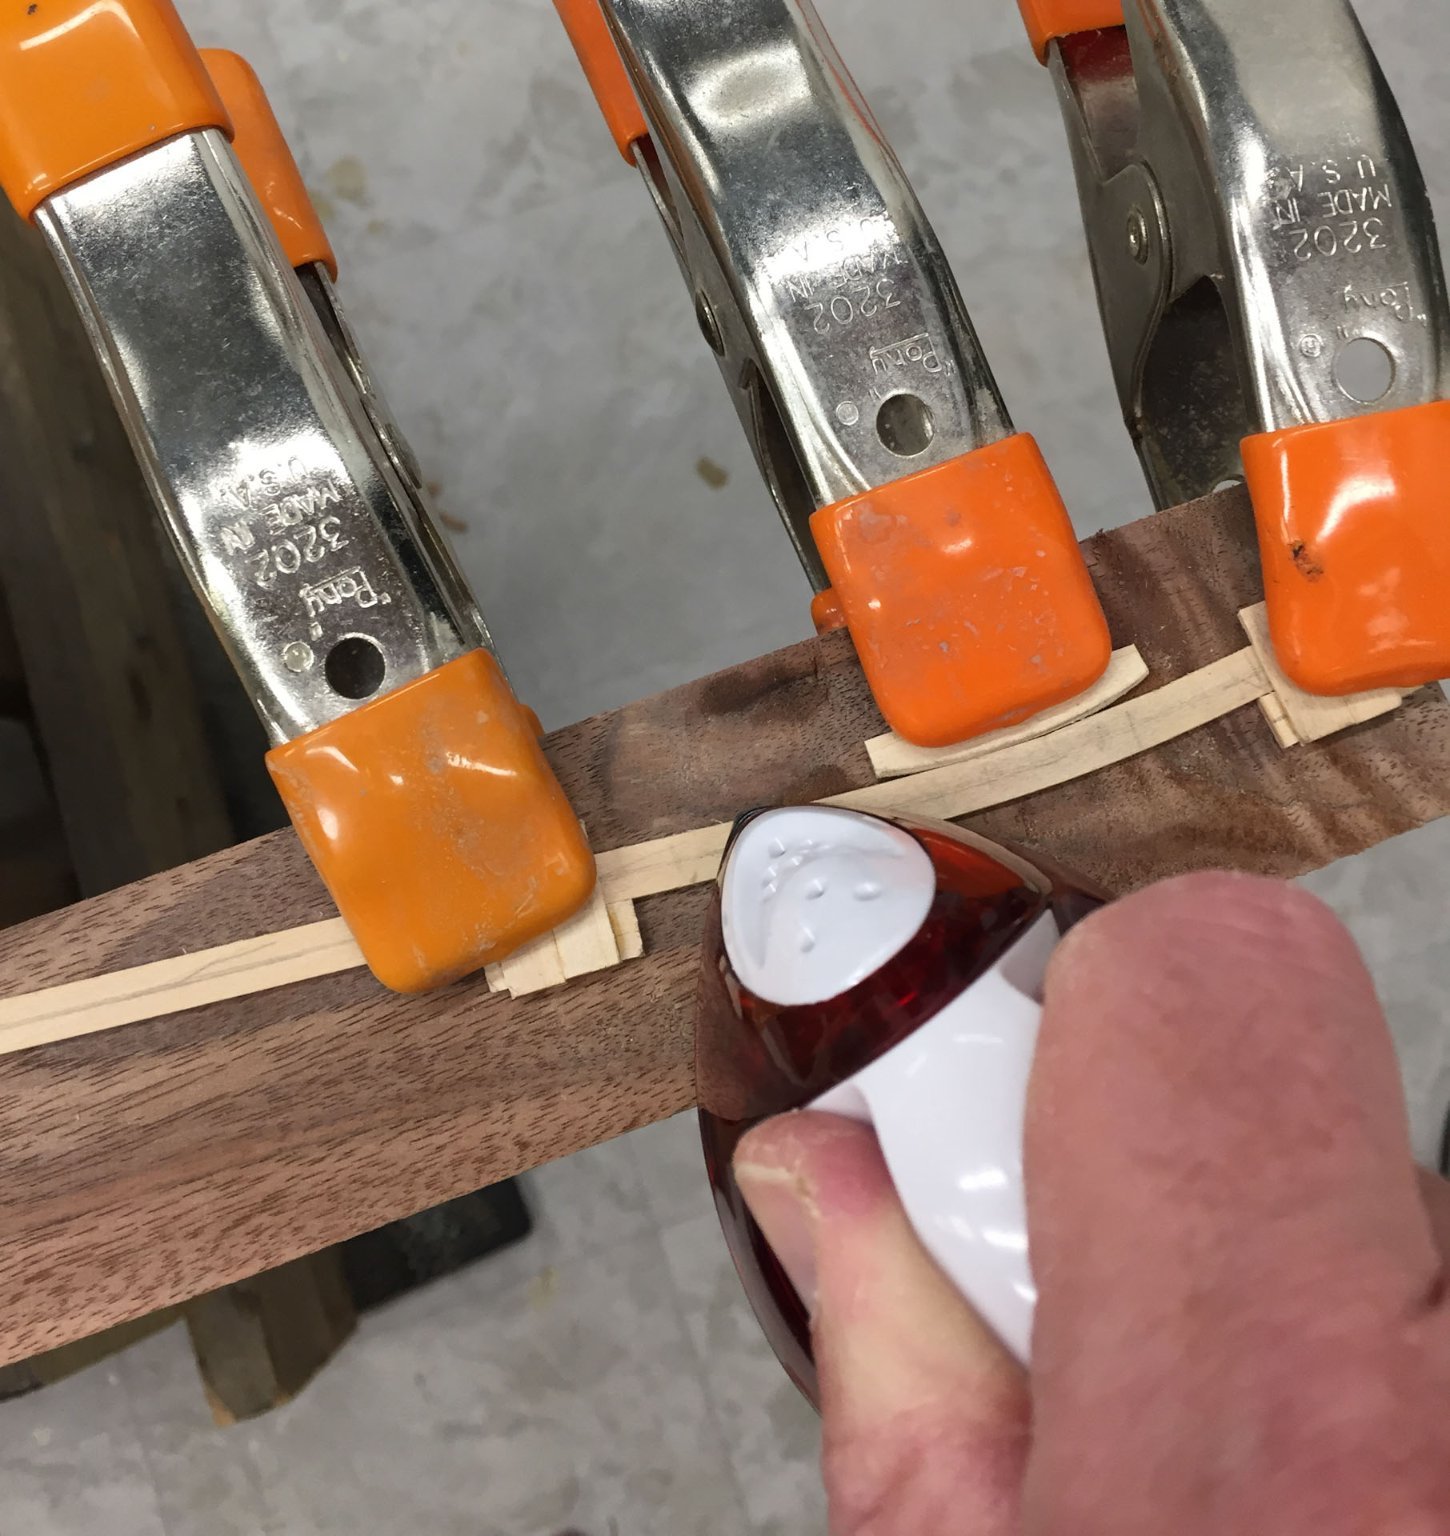
This update has been long delayed because I wanted to triumphantly post after easily putting on my first plank, Chuck makes it look so easy. Getting the plank bent so I was happy with it took a LOT longer than I planned. So 2 posts follow. First I cut and filed square the slots for the knightheads and timberheads. This is a sort of deviation from Mr Hunt's practicum; he shows cutting a stopped notch for each head; like some of the other AVS logs I cut the notch all the way through which seemed much easier to cut and should provide more glue surface. Its hard to get the notch perfectly flat though, the heads tended to rock a little but after gluing seemed solid enough. I chose to shape them after gluing. A small wedge made the starboard timberhead more secure. Sorry the first pic is a little out of focus. After filing down the Heads so they seemed to follow the deck sweep it was on to shaping the first plank. I rewatched Chuck's planking tutorials, made myself some planking holdey pieces, got out my travel iron and went to work. Below is my Bending Station Mark I. I bent the strip and fixed it with the shown clamps, wetted the basswood strip with a small amount of water wiped on with my finger, then used my warmed up travel iron to run along the strip until the water was evaporated. In the Practicum you mark the deck line on the outside of the bulkhead extensions, then add 2 more marks, one 1/8" above and another 1/8" below this mark. Then you mark the planking strip down the middle, and align this mark with the deck line. I reversed the mark on the planking strip it should have been facing inwards, but no biggie. The strip bends dorsally just aft of the main deck and is supposed to end with its lower edge on the joint between the wing transom and the filling piece. This is a pretty hefty upwards bend. I ended up replacing the rounded piece of wood I bent the plank around on the Bending Station (basswood in the above pics) with a bigger and more gently rounded piece of walnut in the below pics. I kept getting too sharp of a bend, then I had the bend it the exact opposite direction an inch aft, and my strip was looking very wavy. I had figured on a learning curve and this one strip took my free time over 2 weeks. I was aiming to have a strip, per Chuck's directions, that would stay in place with only finger pressure and not have to be super clamped into submission. more soon, thanks for reading, Cisco
-
I am currently building Model Shipways Armed Virginia Sloop and I got Bob Hunt's practicum. So far it has been very helpful, in part because the supplied kit directions are so 1970's. I think many people (including me) use his practicum's for their first model. As i have not tried to contact Mr Hunt can't comment on his responses.
-
Hey Overworked724- your build is amazing. The scratched galleries especially. A word of caution- we use sharpies a lot at work and my experience is the black ones fade considerably (not exposed to any sunlight just LED lights) in a few years. I don't know if its the same with the red ones but it might be something to paint instead.
-
Thats a lot of progress for 1 post Jason. What did you use to accent the joints in your deck planking?
-
I use shellac almost exclusively on my woodworking projects. While I think it looks best after 0000 steel wool you can also use any of the synthetic abrasive pads, like the scotchbrite green or blue sponges, if leaving metal bits is a concern. But its probably not an issue unless you have a coarse wood that can catch strands, or possibly if you use a water-based polyurethane as a top layer.
- 91 replies
-
- 3
-
-
- Speedy
- Vanguard Models
- (and 1 more)
-
Thanks Gregory. I was aware of the post, although I'd forgotten who'd posted it. GuntherMT's AVS is one of my inspirations. Although his work is so clean its a bit depressing...
-
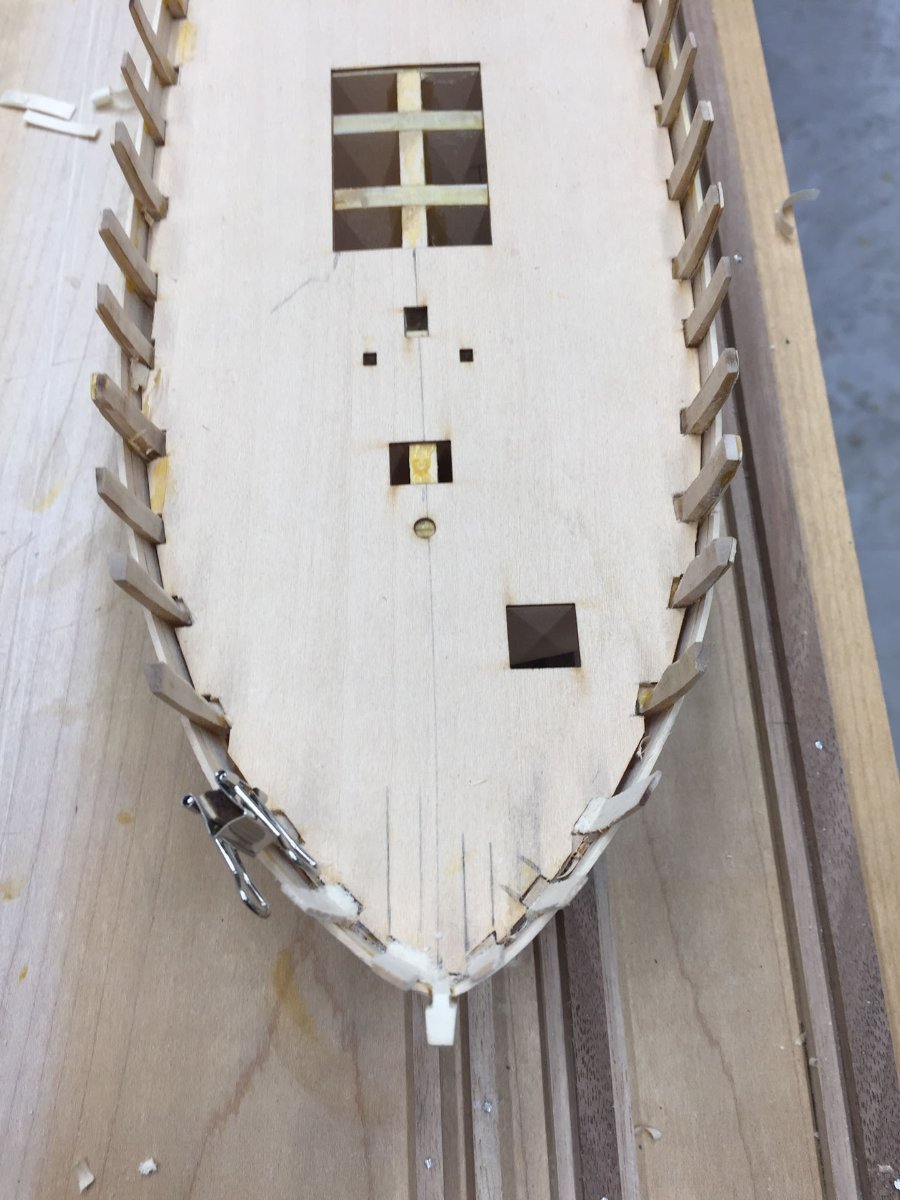
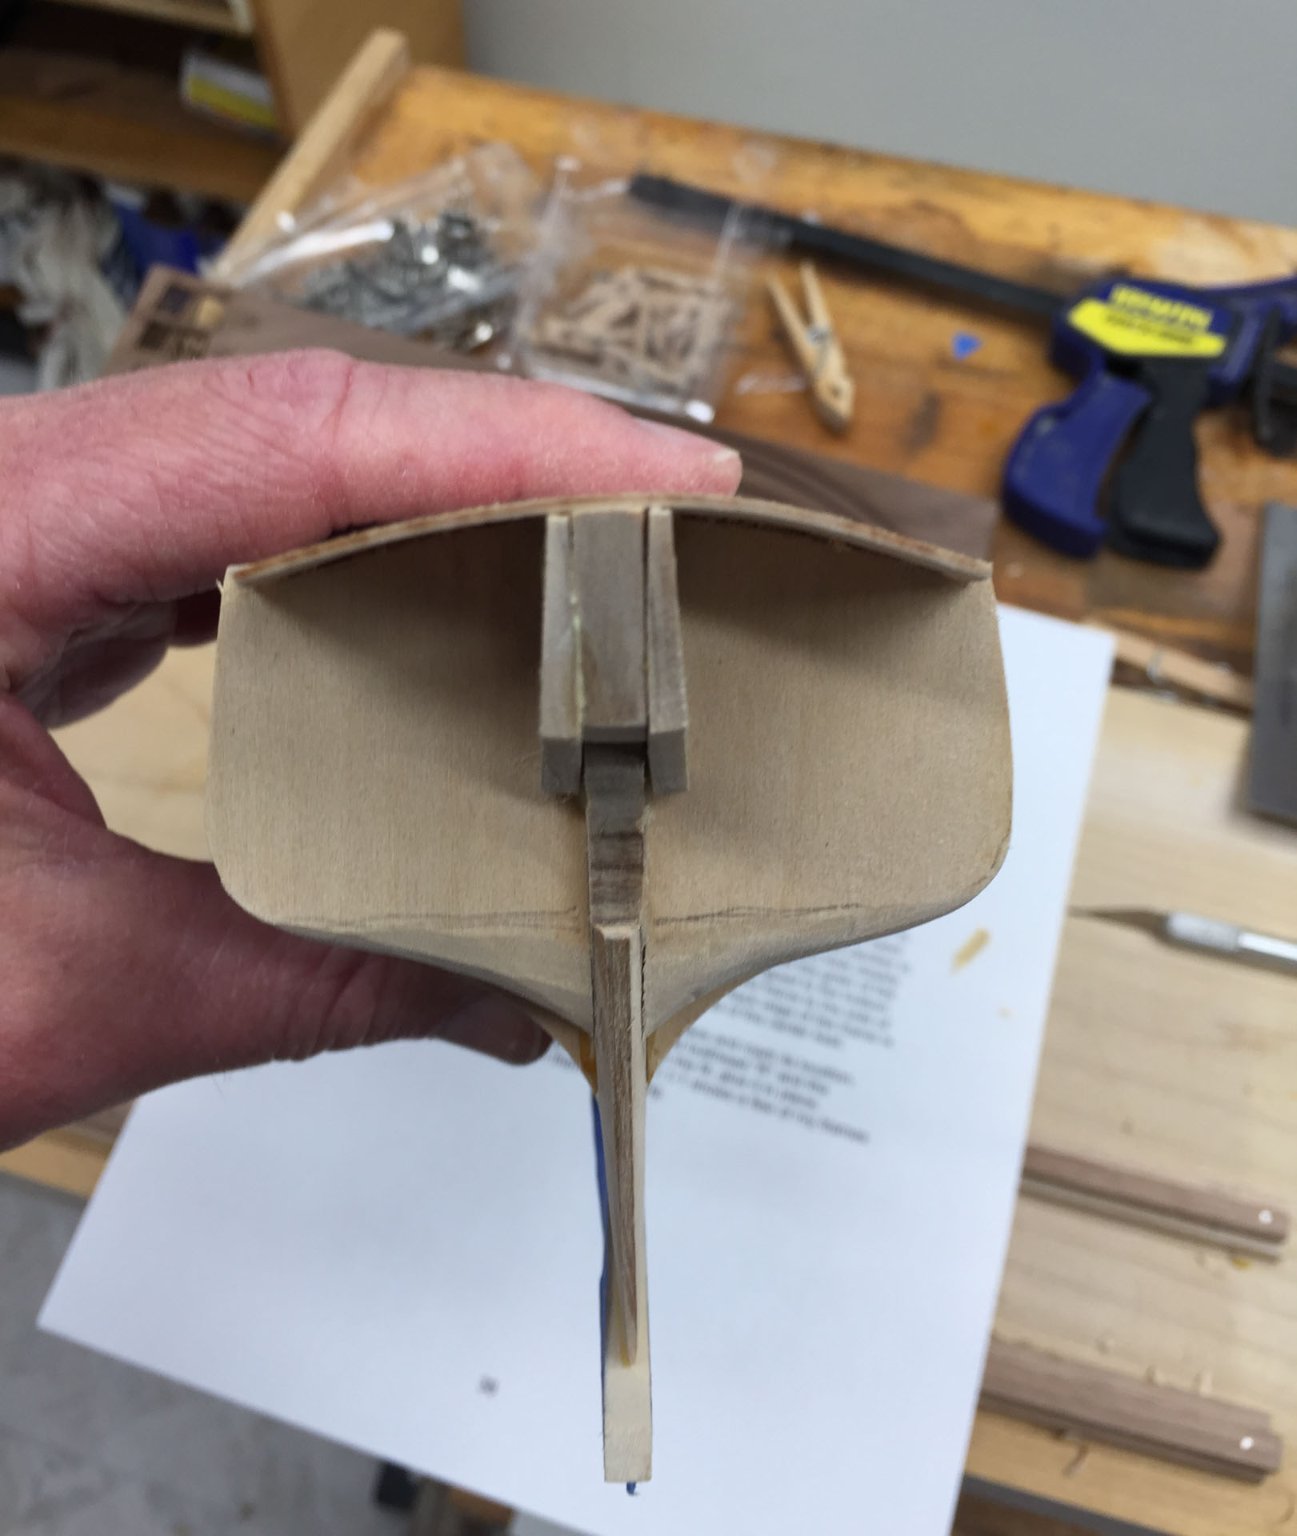
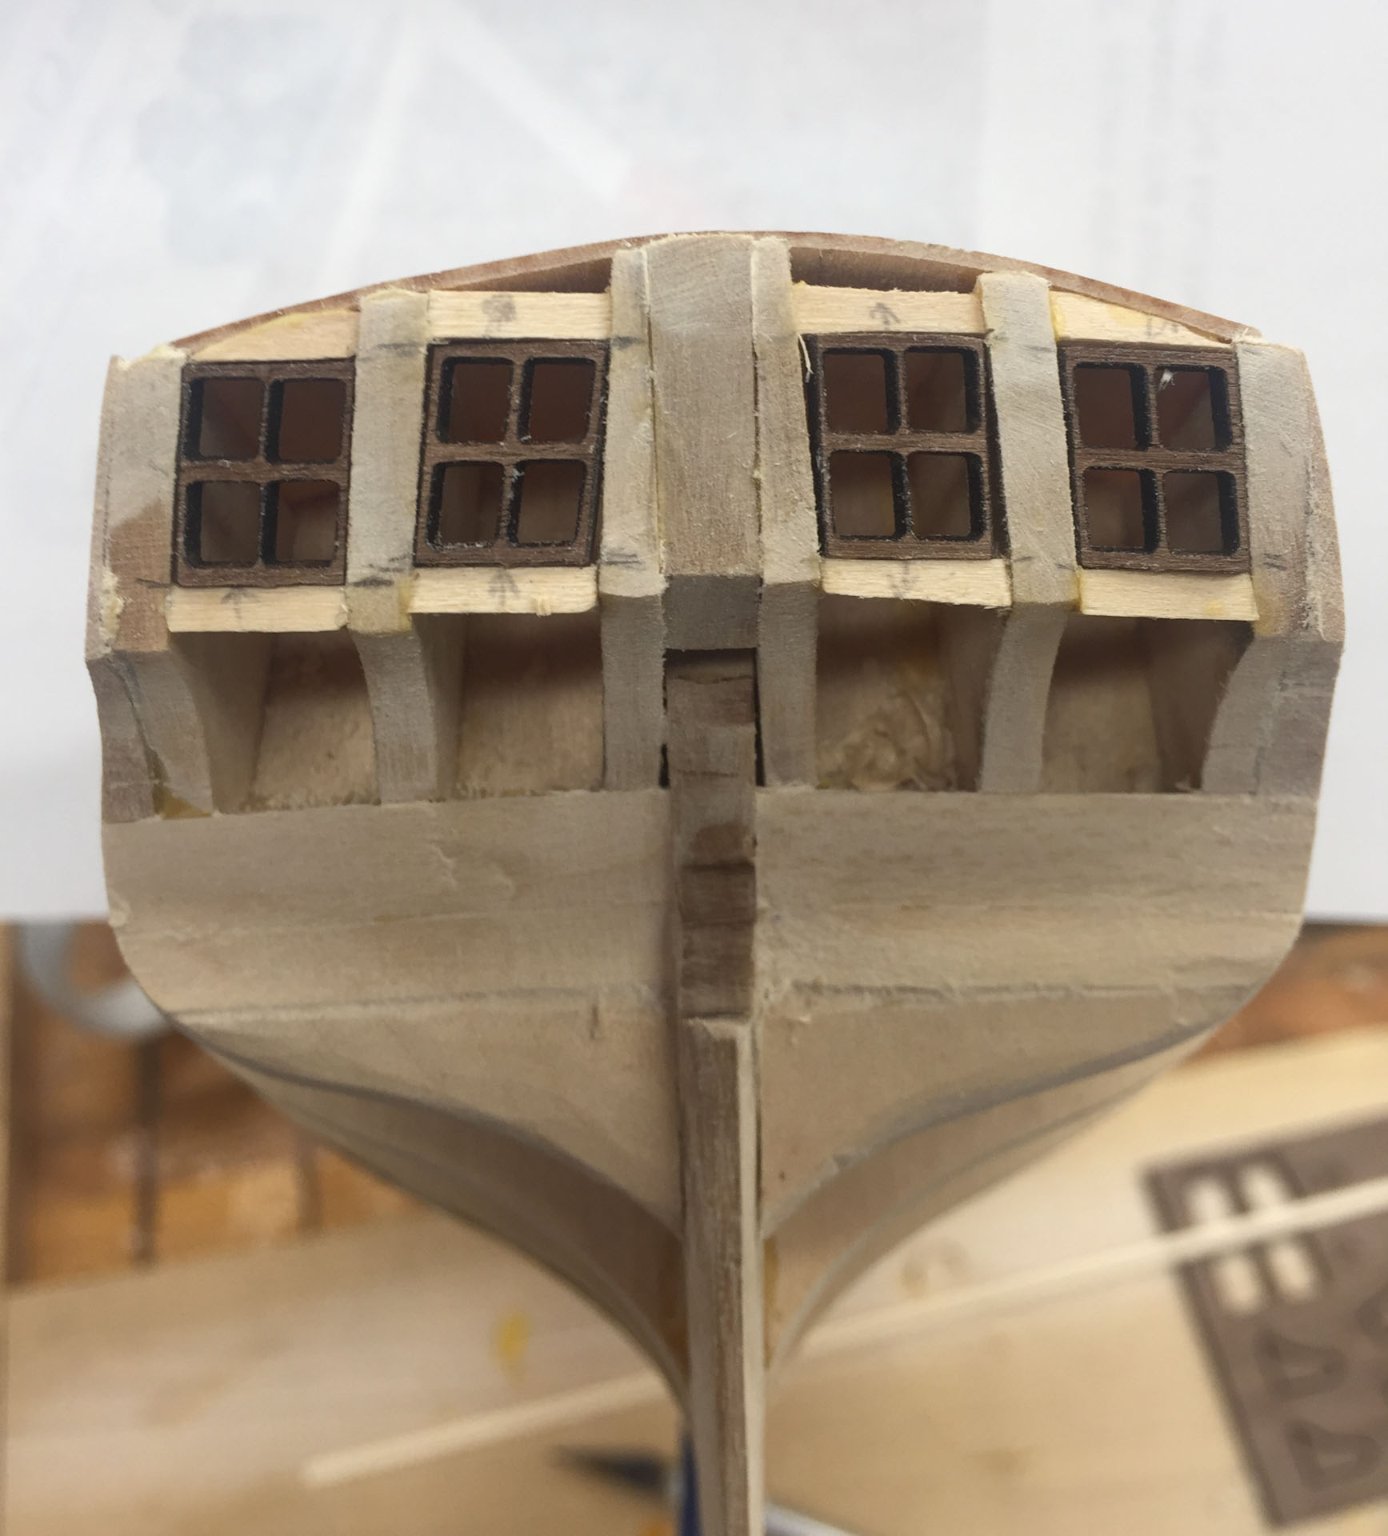
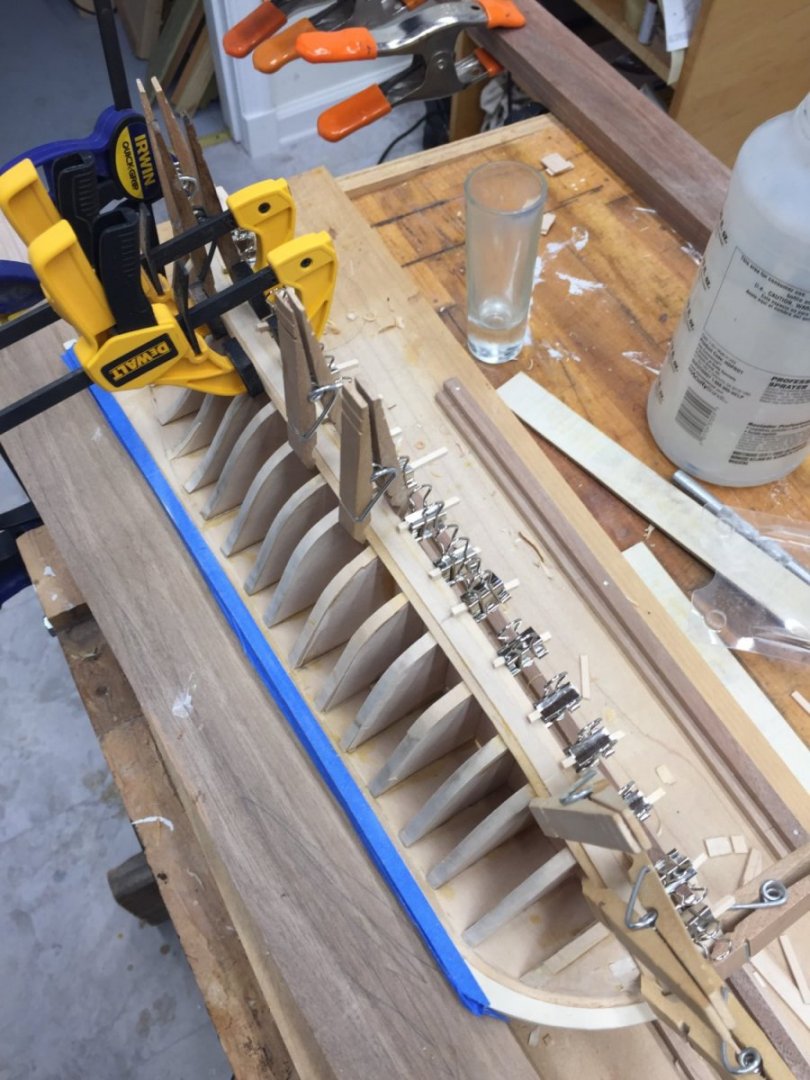
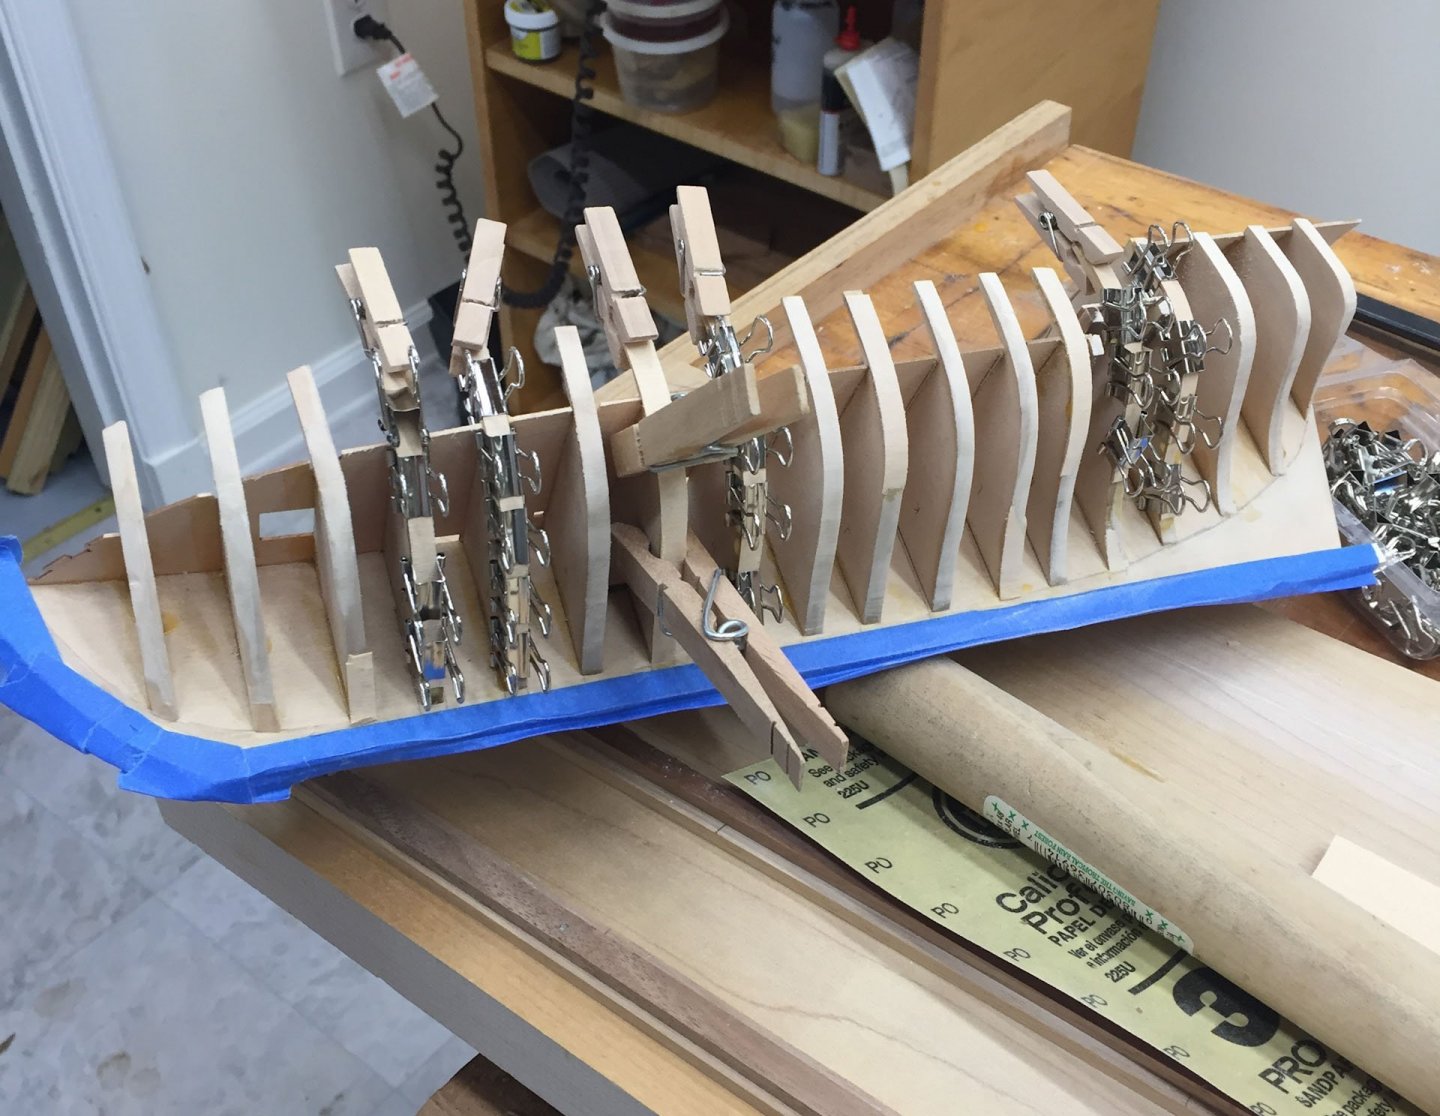
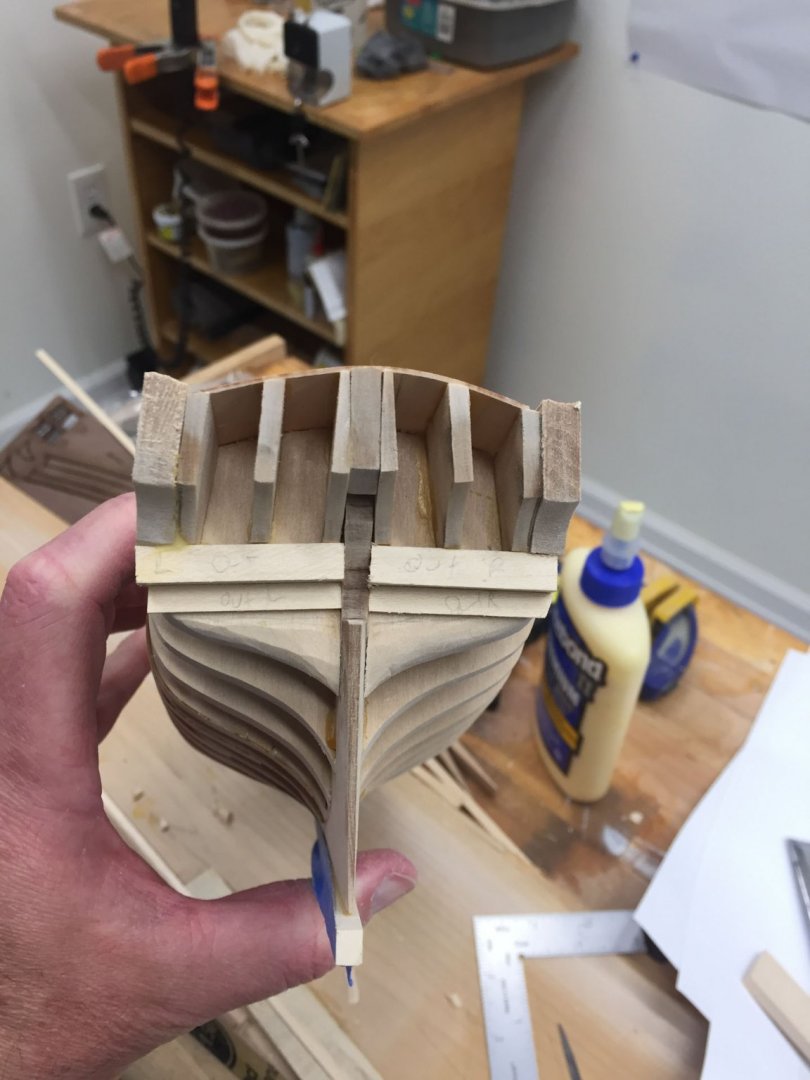
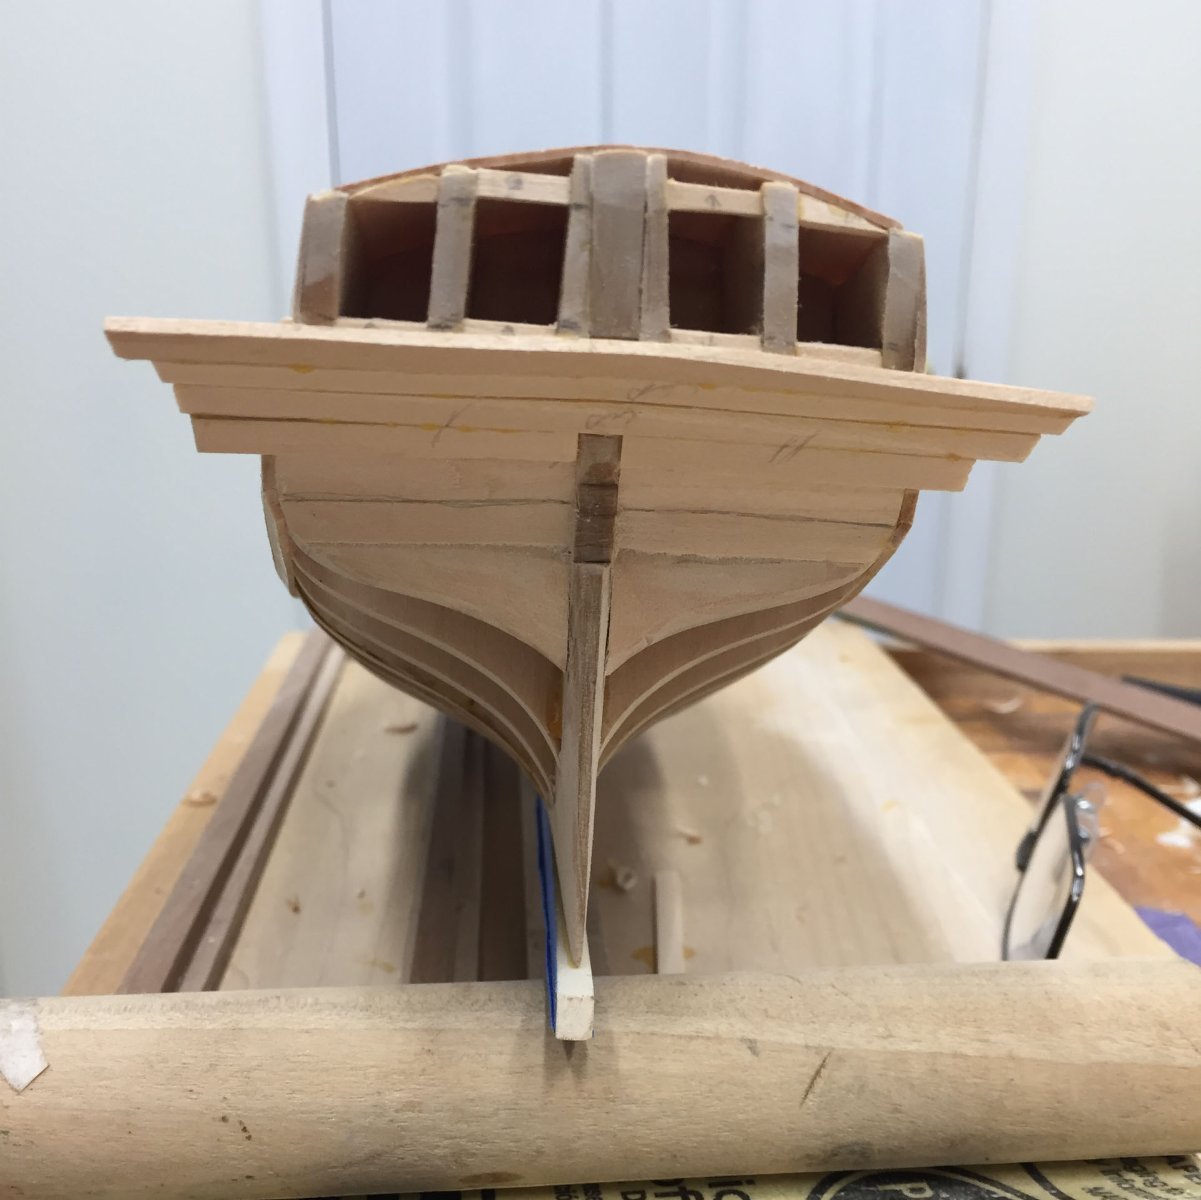
I am way overdue an update, although it doesn't look like I did much. First off I had to fair the bulkheads and it seemed like every other one needed shimming. I kept laying a batten longwise and comparing, trying for a smooth rounded "bulge" as opposed to the accordian-like ripple I started with. I had to finally stop fairing before I sanded away the entire model. Next up was the framing for the stern transom. Oddly enough in the practicum Mr Hunt did taper the 2 innermost stern frames; luckily this was noticed and addressed by enough MSW buildlogs that I remembered. I made a spacer the size of the window frames and used it to keep the stern frames the same distance apart. After adding the stern frames I the upper wing transoms and the lower filler blocks, along with whatever the blocks of wood on the sides of the transom are called. Then I carved and sanded the transom/counter area so it was round from the side view, and flushed the side transom blocks trying to keep a nice sweep by laying my batten along the sides. Finally I added the window header and sills. Something about the parallelogram windows placed on an upward curve has always looked off to me. The windows supplied by the kit are slightly different; the inside ones seem to have more of a tilt than the outside ones. I am going to try and scratch my windows as the kit ones look chunky to me, and I'm sure there will be some adjustment in placement, but that is Future Cisco's problem. And thats it for tonight! May your holidays be full of comforting family drama and no real drama. Cisco


_edited.jpg.fd0aeadad46f759aaa7f30563986a141.jpg)