MORE HANDBOOKS ARE ON THEIR WAY! We will let you know when they get here.
×


CiscoH
-
Posts
375 -
Joined
-
Last visited
Content Type
Profiles
Forums
Gallery
Events
Everything posted by CiscoH
-
 but on the up side i got to read from your first post all the way to today. its great seeing many years work all at once. keep up the posts they are very good thanks cisco
 -
your shellac finish looks so good! deep vibrant colour without obscuring the wood. a while ago you asked how long mixed shellac lasts. its usually a few weeks, maybe a month or 2. eventually it gets gummy and wont fully dry out when put on a surface. anyway, great looking hull. thanks for posting cisco
-
pre-ordered👍🏽
-
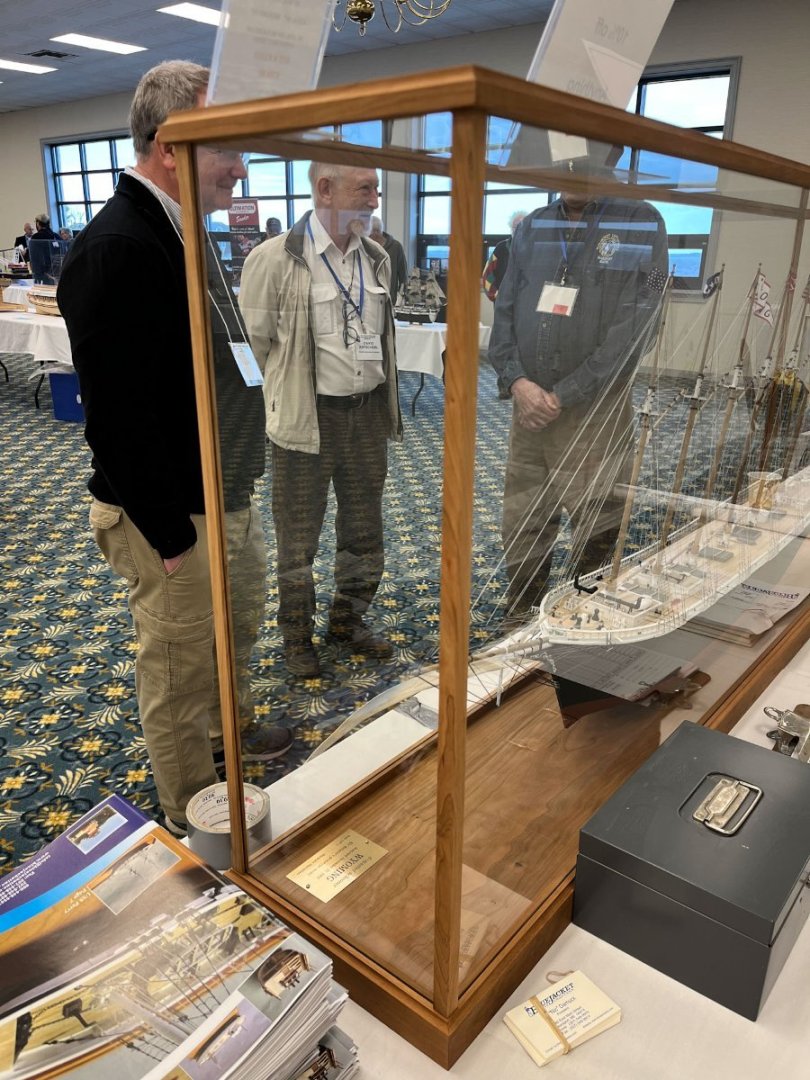
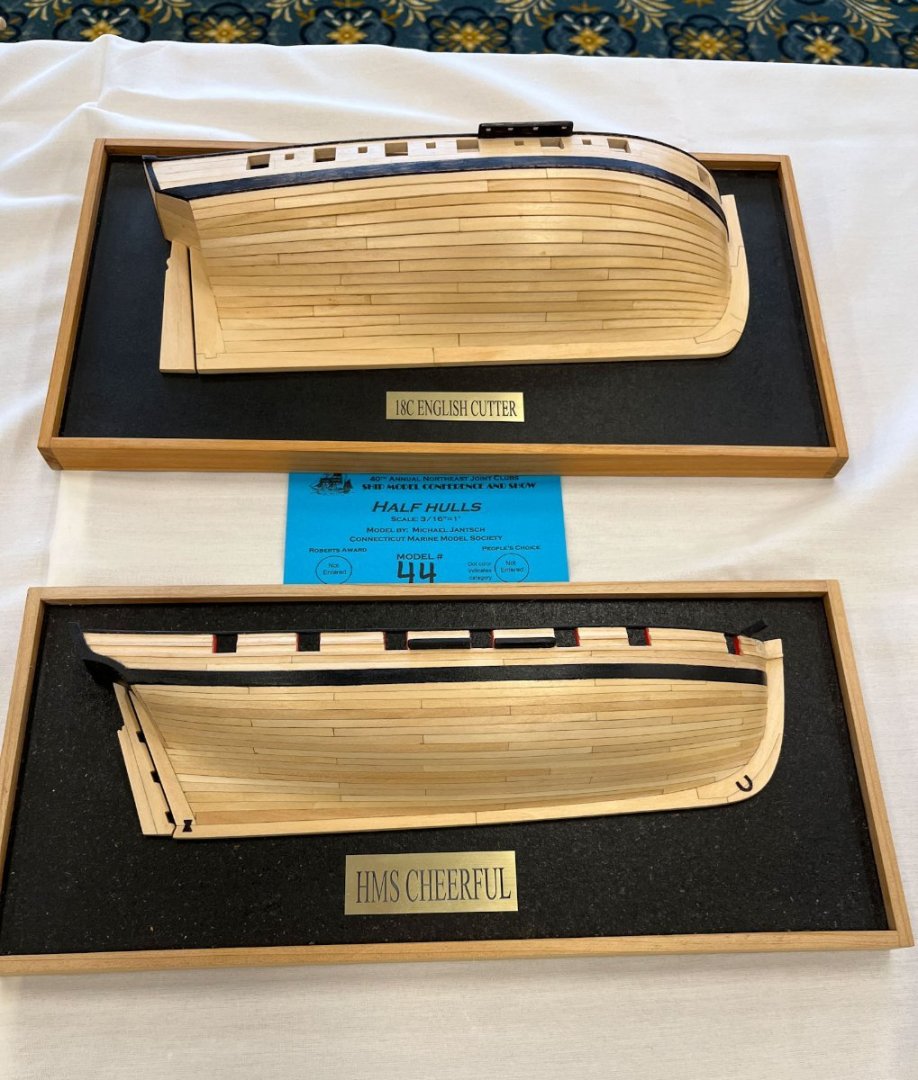
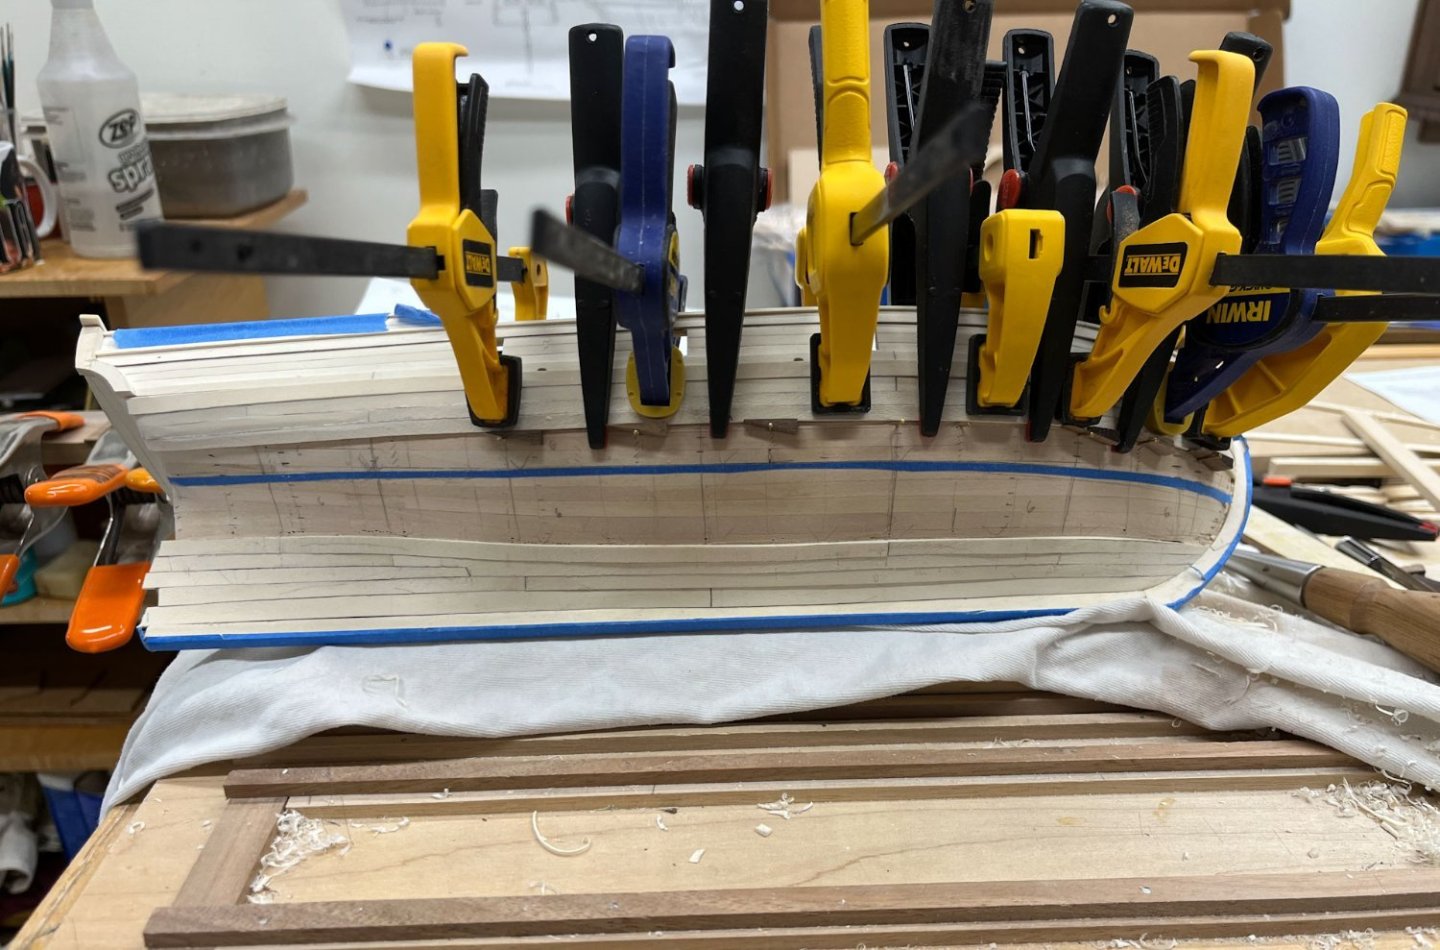
Thanks for the kind words Alistair and B.E. They are appreciated! Last weekend my fellow shipbuilder Jason Long and I made the 5 hour car trip to Connecticut for the 40th Annual Joint Clubs Meeting. Despite raining all the way up and most of the way home it was great fun to rub shoulders with lots of accomplished builders and see some truly amazing models. We decided to go out for lunch to The Yolk Cafe which had to be the most colourful local hangout I have ever been to. And the end presentation talk was fascinating, especially the final ship he talked about that appears on greek pottery exactly as it looked on the sea floor. I think the lady who goes by Shiphotographer took pictures of all the models and she usually posts them so I didn't take too many photos. I liked BlueJacket's case, which it turns out they sell. Its very clean and minimal, with classic molding. I noticed when downloading my pic that David Antscherl was in the background; that was totally by accident. I also really liked the two half hulls; the top one was clinker built! At my present skill level I build clinker style by accident only. My AVS proceeds slow and steady as I work through the top band. I am finding it somewhat challenging to get tight seams and butt joints. Not helping is my planking stock, which I cut myself. The edges have to be squared up and I haven't found a perfect method yet doing it by hand. Also I am constantly out thinking myself making the edges too angled one way or another. The holly, being a white wood with minimal grain, can be really hard to see edges. And I will never do a 2 layer planking again; not having easy access to the bulkheads makes clamping more difficult. Clearly I have many excuses. Here's where I am as of this morning: I recently ordered Dave's Hayling Hoy book which I find great reading. But on page 80 he states "Shaped planks should lie on the frame without stress and not require pins or other methods of forcing into place." So I have a little way to go until my learning curve starts to flatten out. Have a great weekend! Cisco
-
I saw the model in person (hope I've got the right model/builder) on Saturday. No flaws anywhere! And set up next to Chuck's Winchelsea. A bold, and warranted, move.
- 642 replies
-
- 4
-

-
- winchelsea
- Syren Ship Model Company
- (and 1 more)
-
Alistair what did you use for caulking on the holly main deck? I have been using pencil which is a subtle line; yours looks more pronounced thx cisco
-
Yessir Aliluke. I am using water based polyurethane (that won't yellow even though the wood eventually will to some extent) to have the clearest finish possible. I am visualizing an entire ship made from holly, as close to a bone ship model as I can get with wood. It may look good, it may look "interesting...", we'll see. And if I get frustrated i can always fall back on thick coats of black paint to hide all my sins.
-
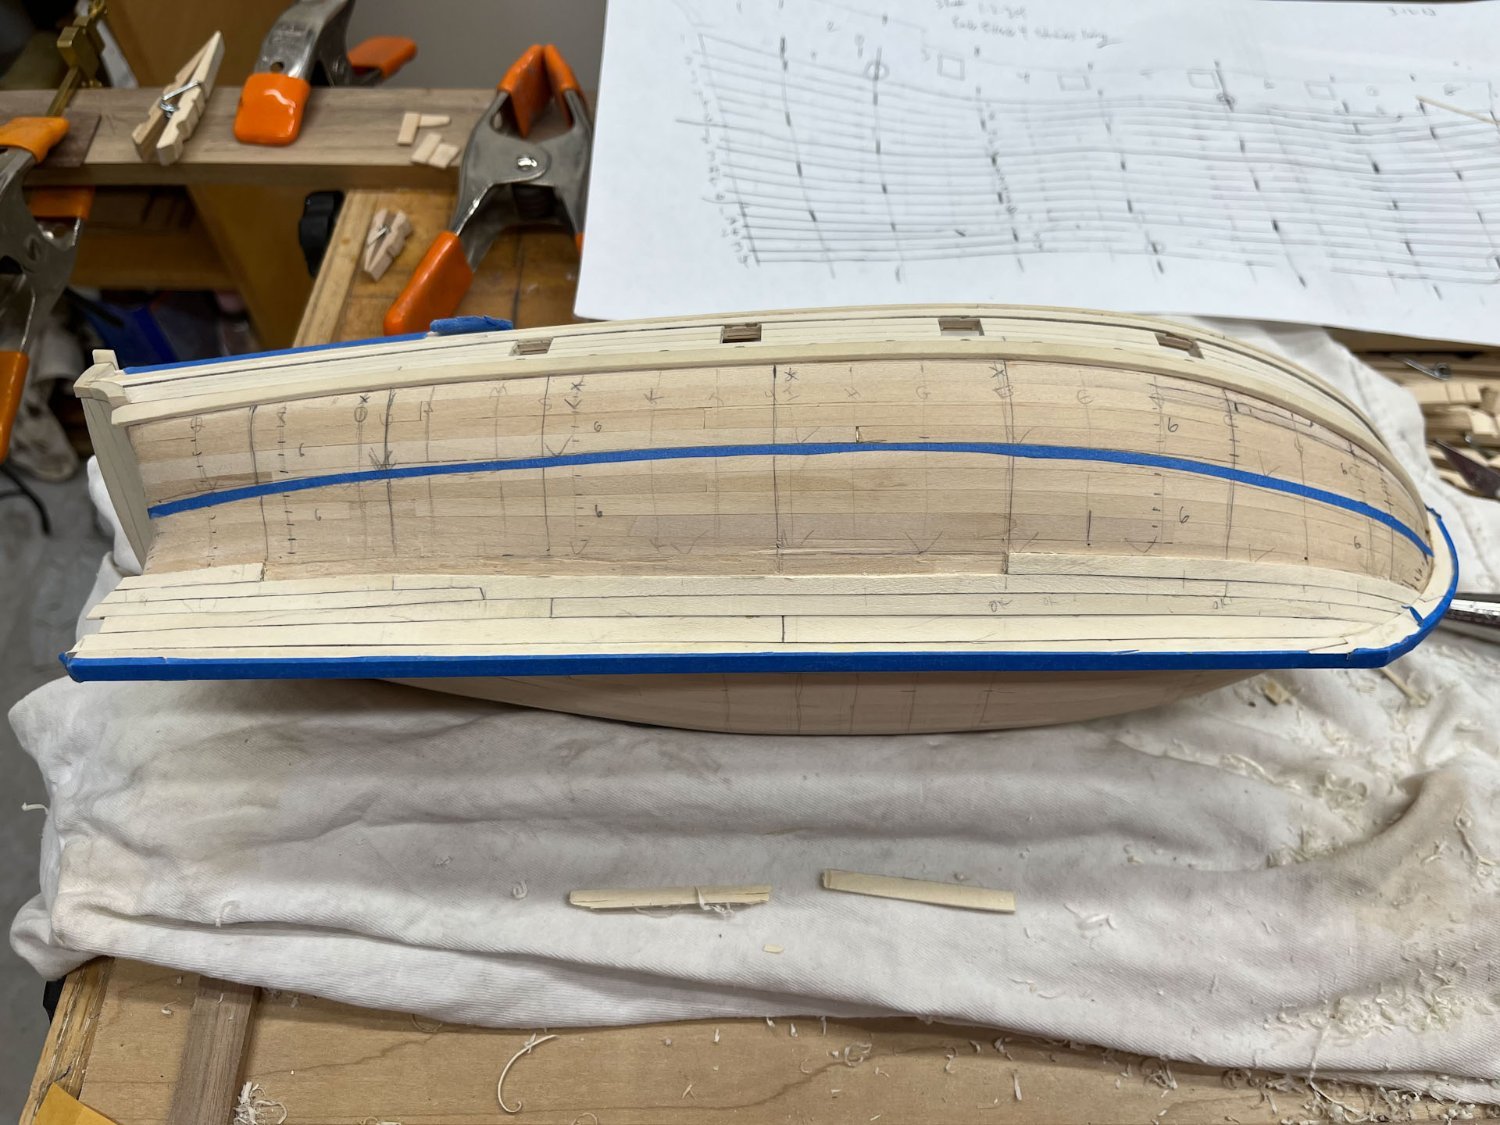
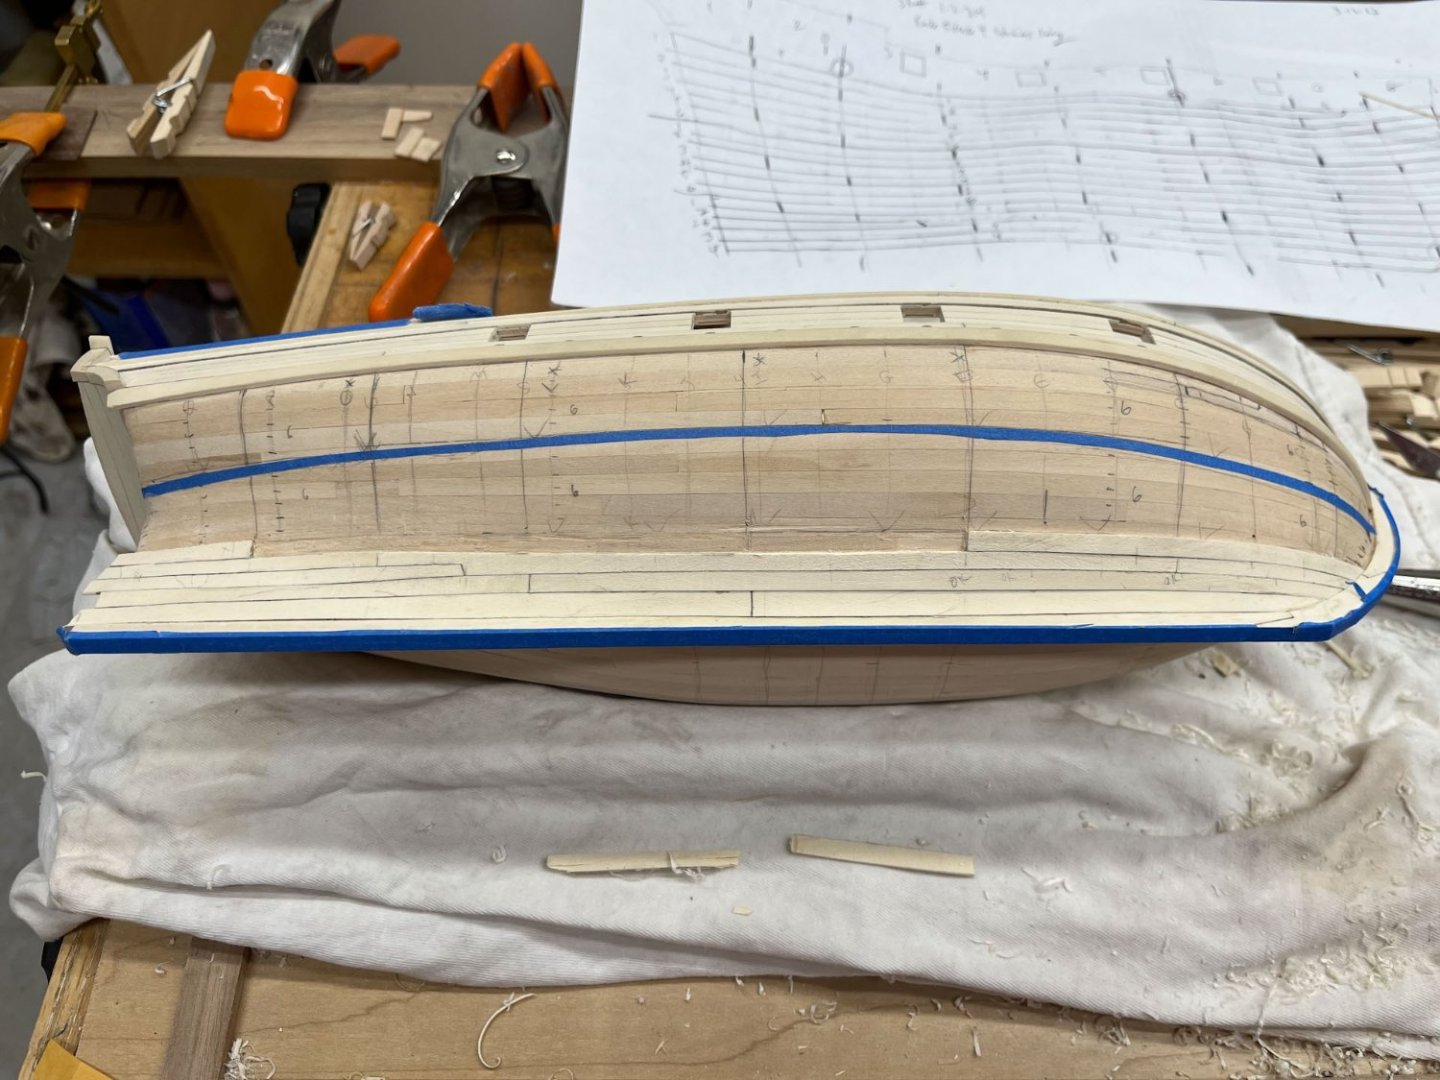
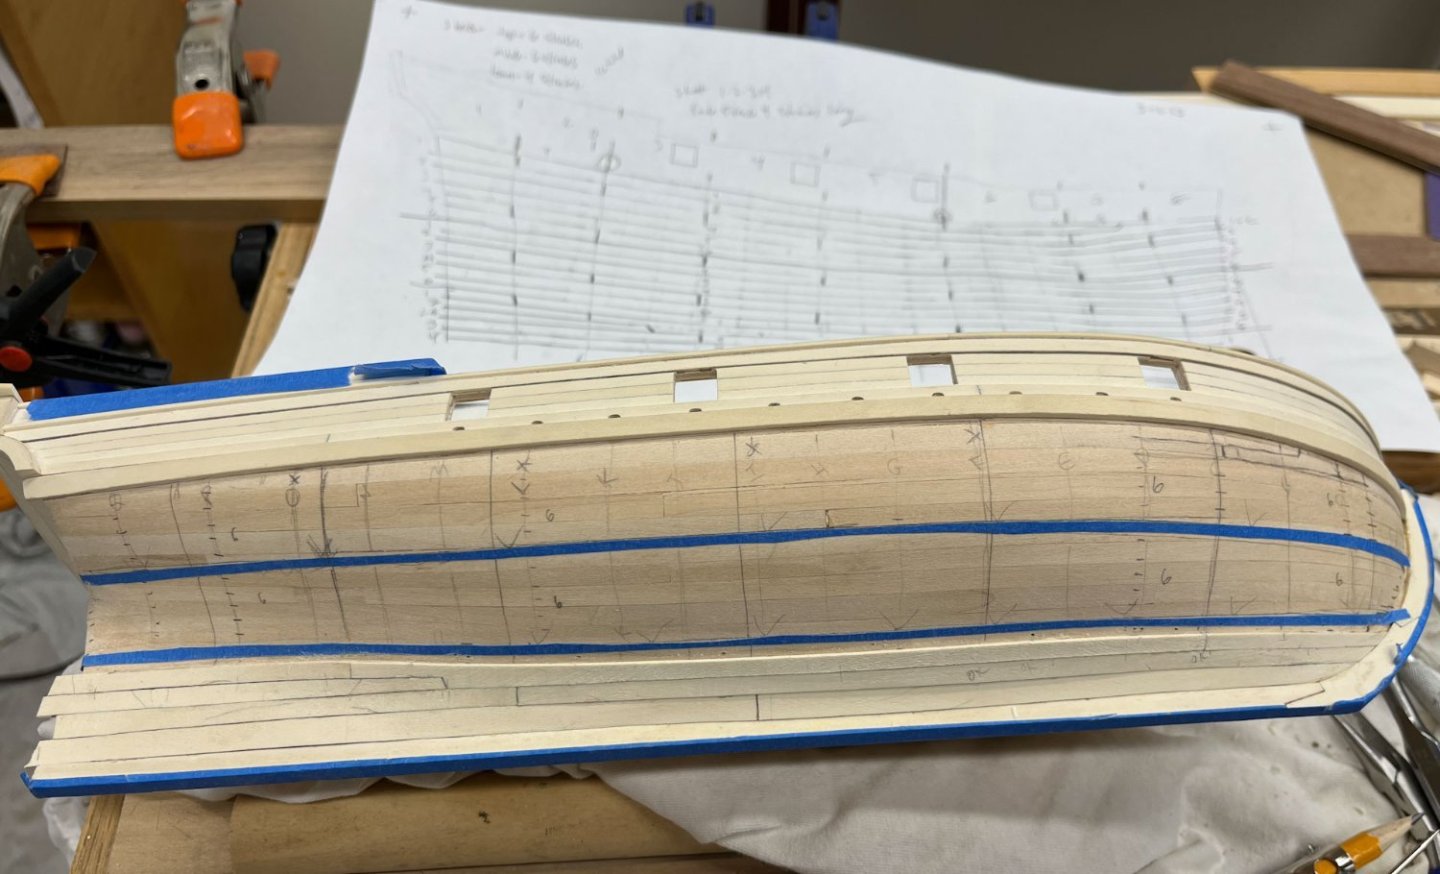
Thanks for the positive feedback Ron, and for getting me to page 4. I'm not anywhere near your level but its something to aim for. Good Morning fellow shipbuilders. This week I have 5 almost identical pictures which I promise I won't do again. It was an instructive week though. First off I finished my lower belt and was feeling pretty good. I stayed very close to all my pre-penciled tick-strip widths and managed the stern stealer without gaps. The planks are slightly different thicknesses due to me hand-slicing from various pieces of stock and haven't been sanded yet so your eye picks up on the penciled overhangs, making them look like gaps. No gaps so far. Life was good until I realized my 3 butt shift planking pattern was, looking at my model in the above pic, a 2 butt shift. Looking at my planking plan, which I kept right next to the model so I wouldn't screw it up, I realized I screwed it up. The butt joints of the topmost plank on the plan was correct, but not on my model. Leave it be or deconstruction? After a day to feel sorry for myself I decided to pull it. After cutting a new butt-joint in the proper place (this meant luckily I wouldn't have to re-do the stem section) I got my denatured alcohol and a qtip and selectively painted the middle of the offending plank. I was worried the alcohol would be a mass destruction event and all the surrounding planks would release which thankfully didn't seem to happen. I did have a little trouble with the edge joint which came a way ragged in some areas and had to be smoothed with a file. I was worried about making this middle plank which has to be the exact correct length. In the past I seemed to trim them a little too long, or more often they fit perfect until I put glue on, then the planks seemed to magically get longer. So I aimed for a tight fit, sneaking up by filing a tiny bit off at the butt ends at a time. I also couldn't perfectly smooth the few ragged areas where the planks edge-glued together so had to file the mirror shape into the new plank's edges at 2 areas. The stern end of the new plank had a curve and a twist in the same section which I did first by edge bending with a travel iron, then twisting with a blowdrier. Somehow this worked; in the past the blowdrier usually let me add a twist but straightened out any previous bends. Guess the planking gods were feeling merciful. Wedges are as always my friend. There are a lot of holes because I couldn't find the underlying bulwarks right away. Pins in planks only are too wobbly. And here it is after drying, butt joints in the correct place. The replacement plank was a little thicker than the plank below it so there is a shadow line enhanced by my overhead lighting. Not a gap or bulge. Cause I ainte redoing this. Now have to pack up the family and off to breakfast with my parents. Next I start the upper belt, as per Dan's recommendation. Anyone coming to the 40th annual show in CT I will see you there. Jason (JLong) and I are carpooling up the night before. Have a happy Sunday and thanks for reading and leaving positive comments and politely overlooking the dumb stuff I've done. Cisco

-
thanks Paul. the pin and wedge system shown above works better for me than anything else i’ve tried. also still not to page 4 drat it all
-
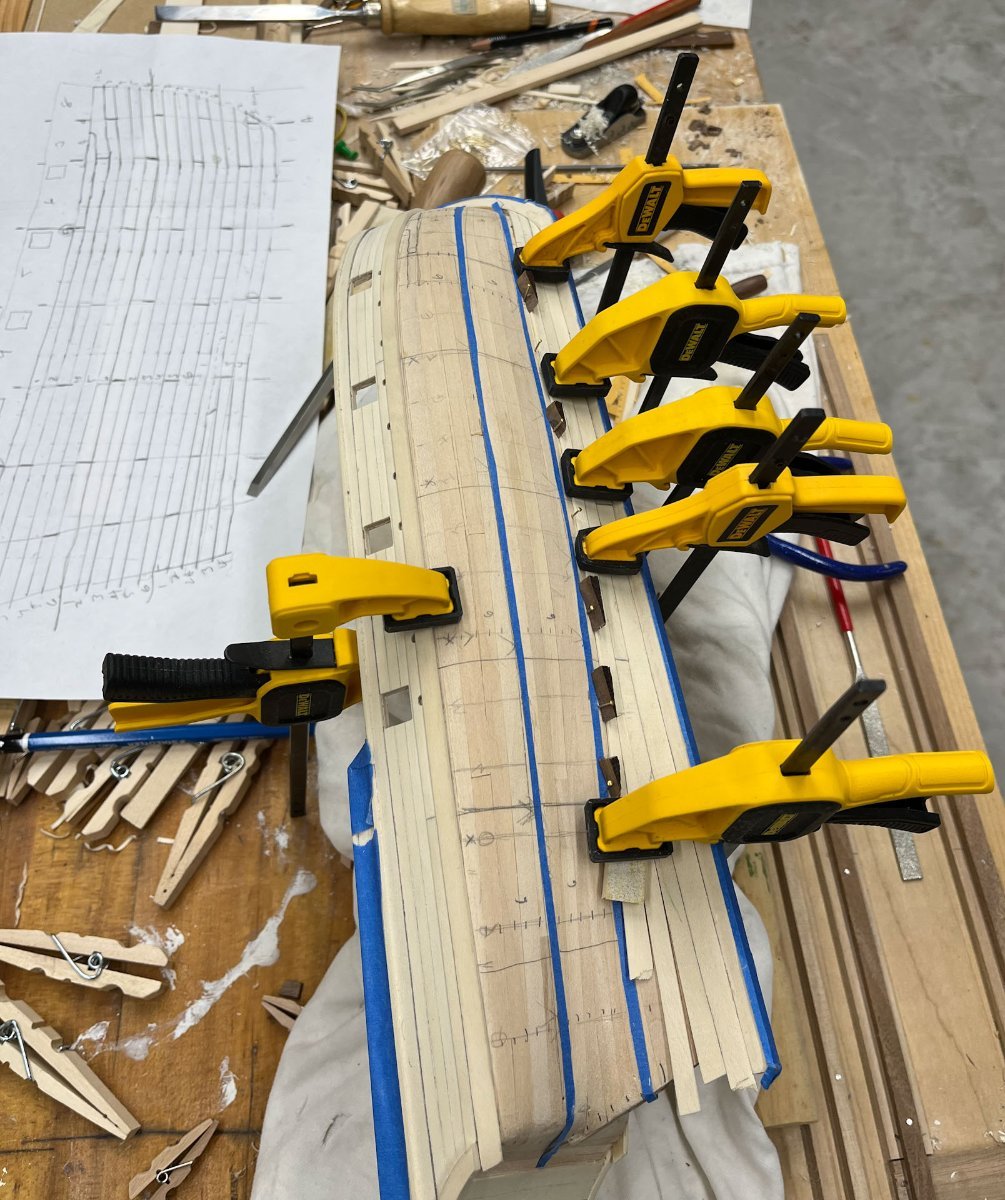
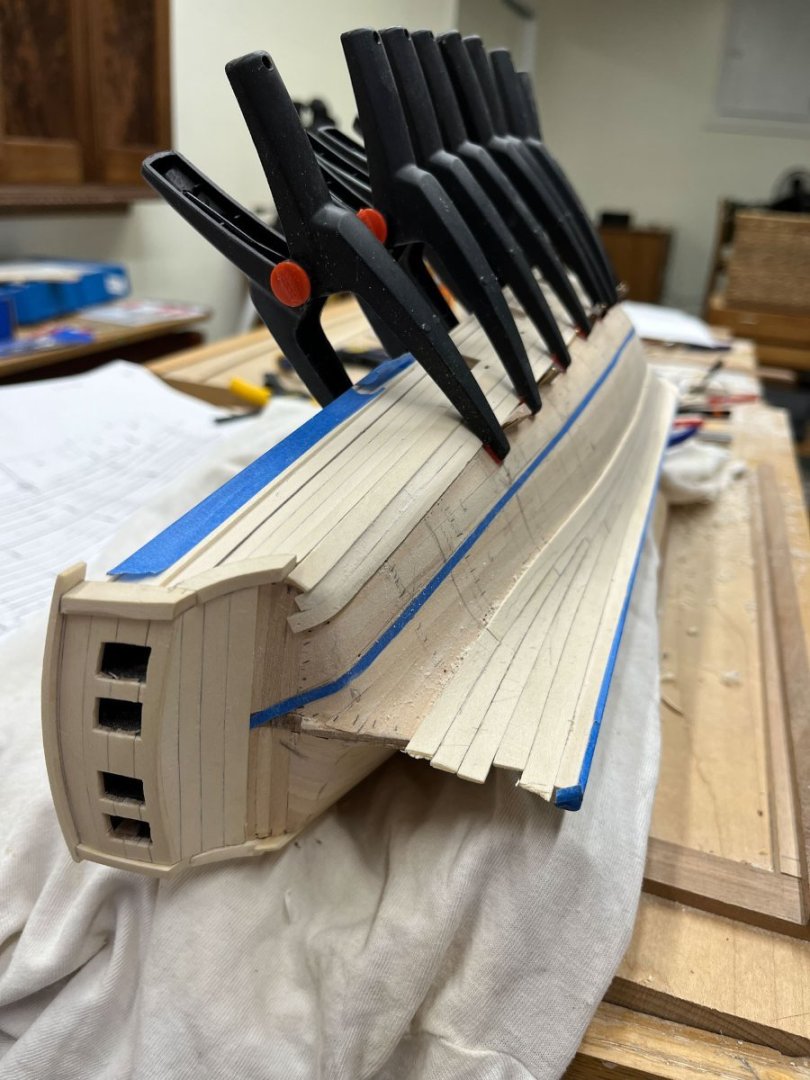
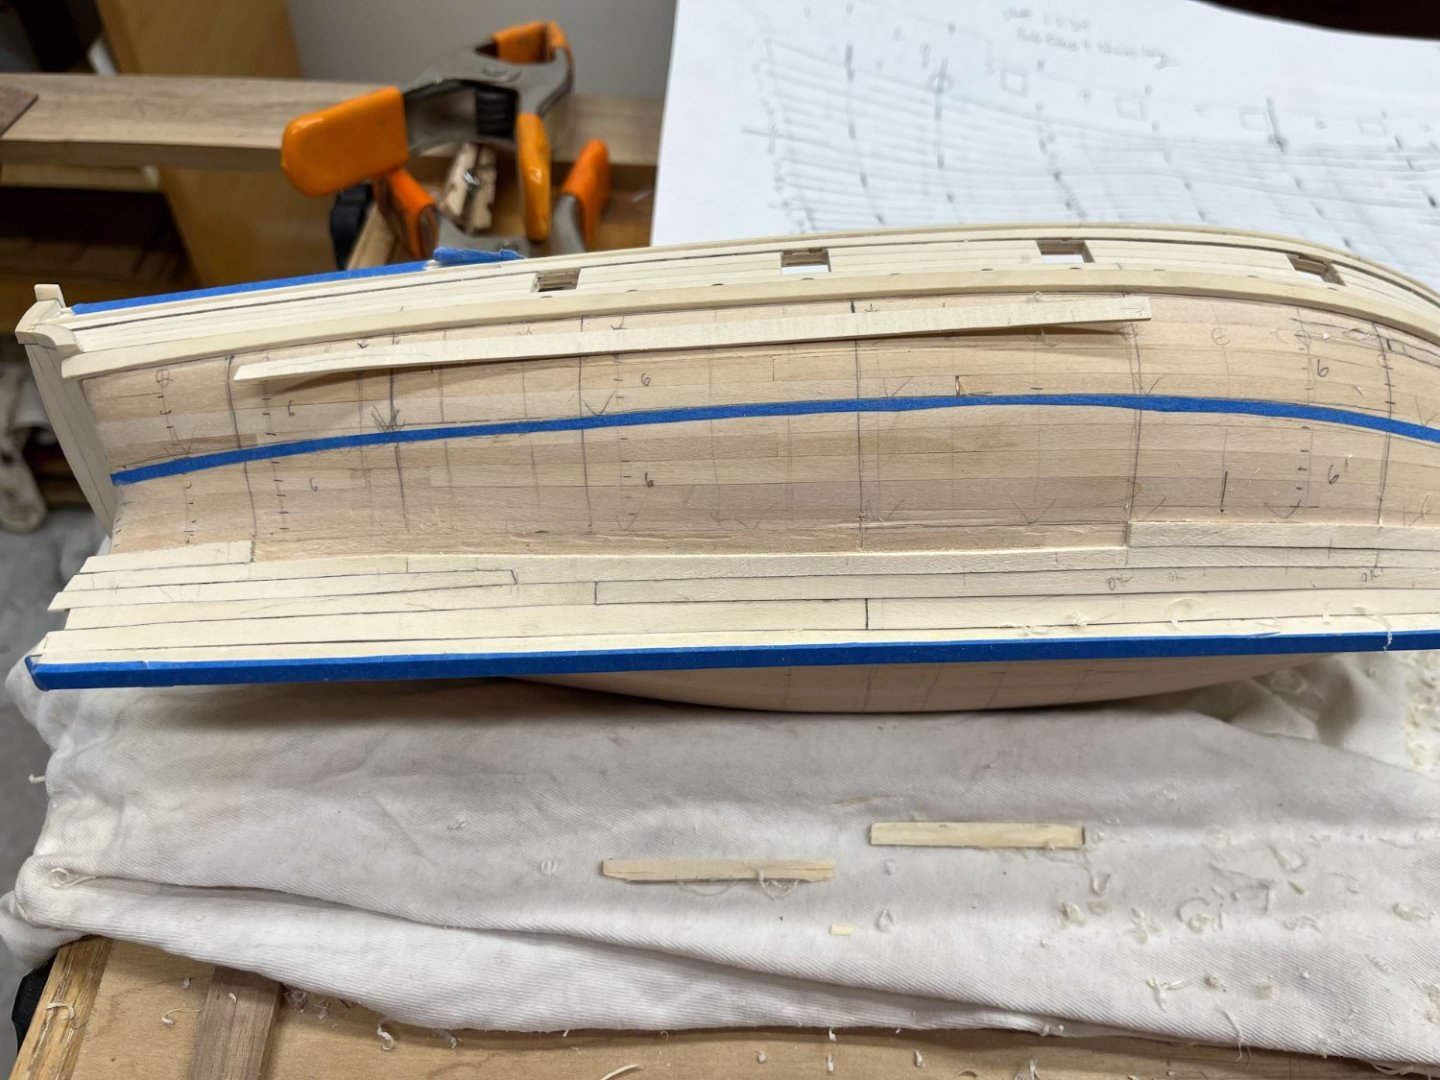
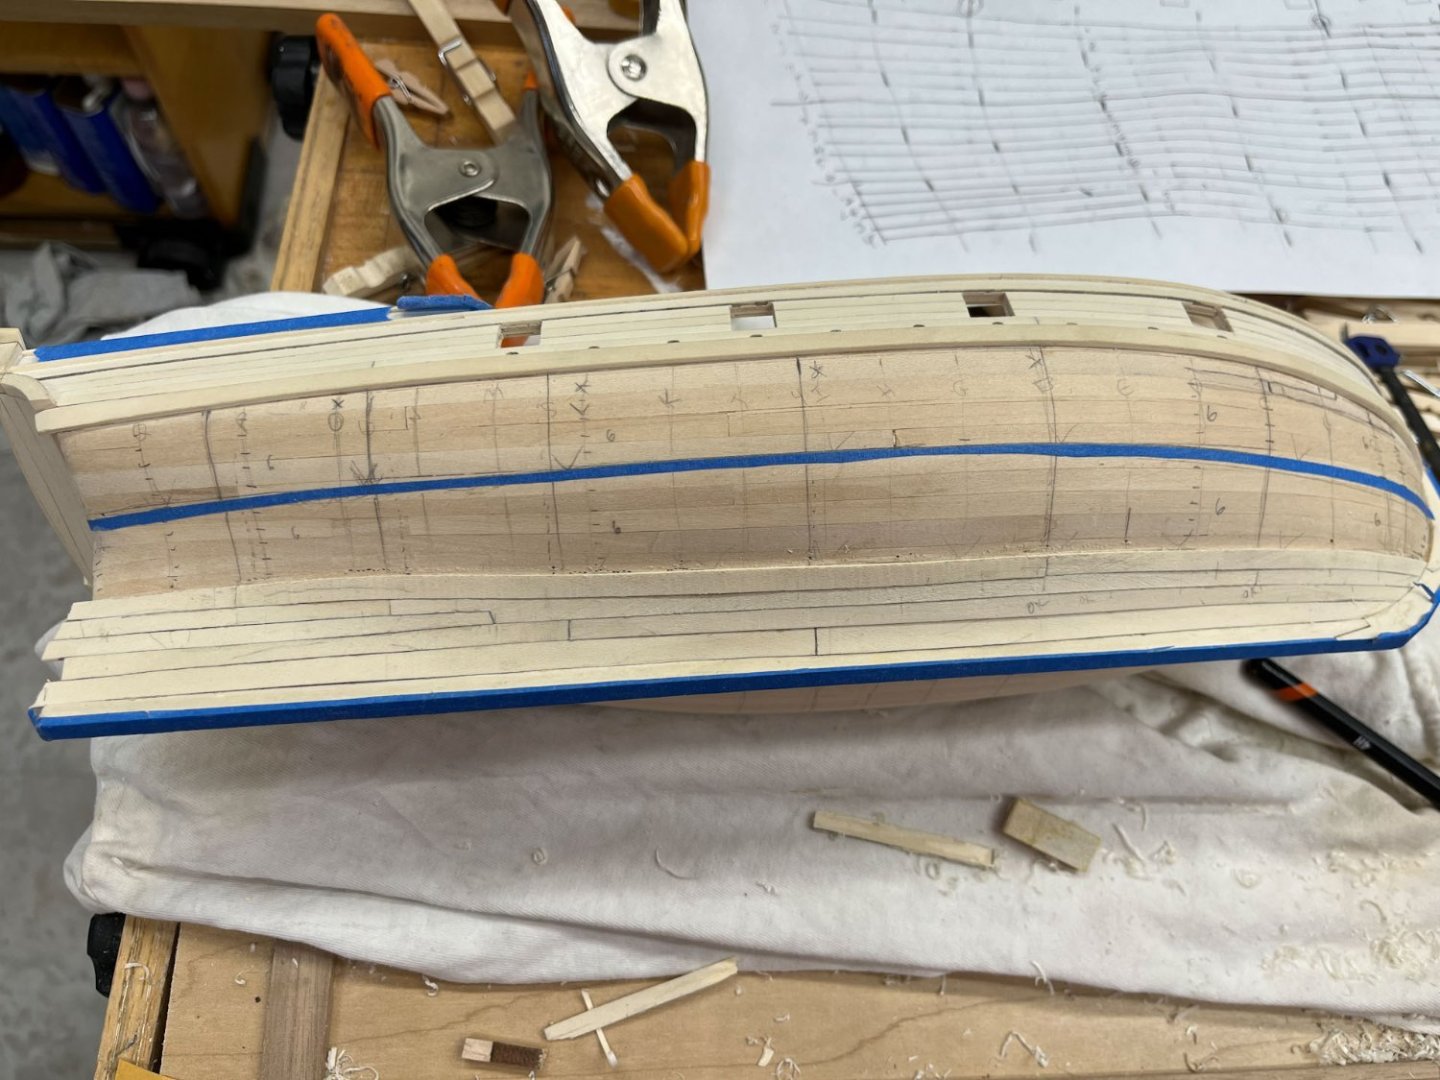
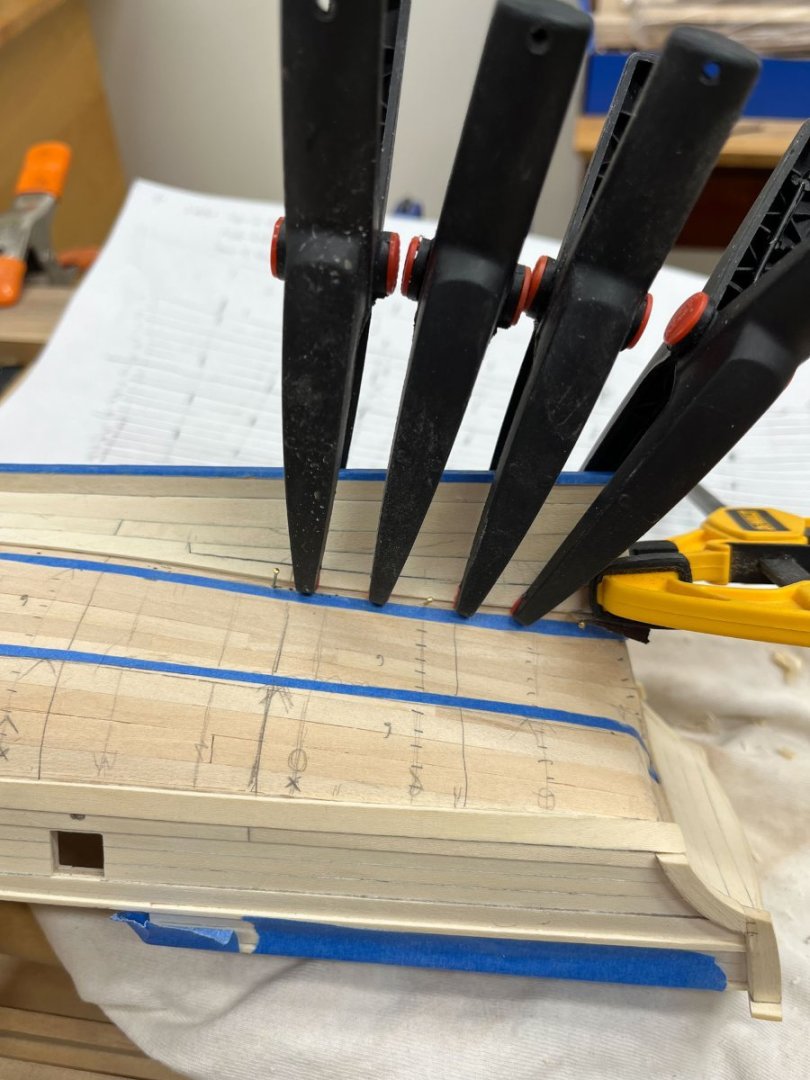
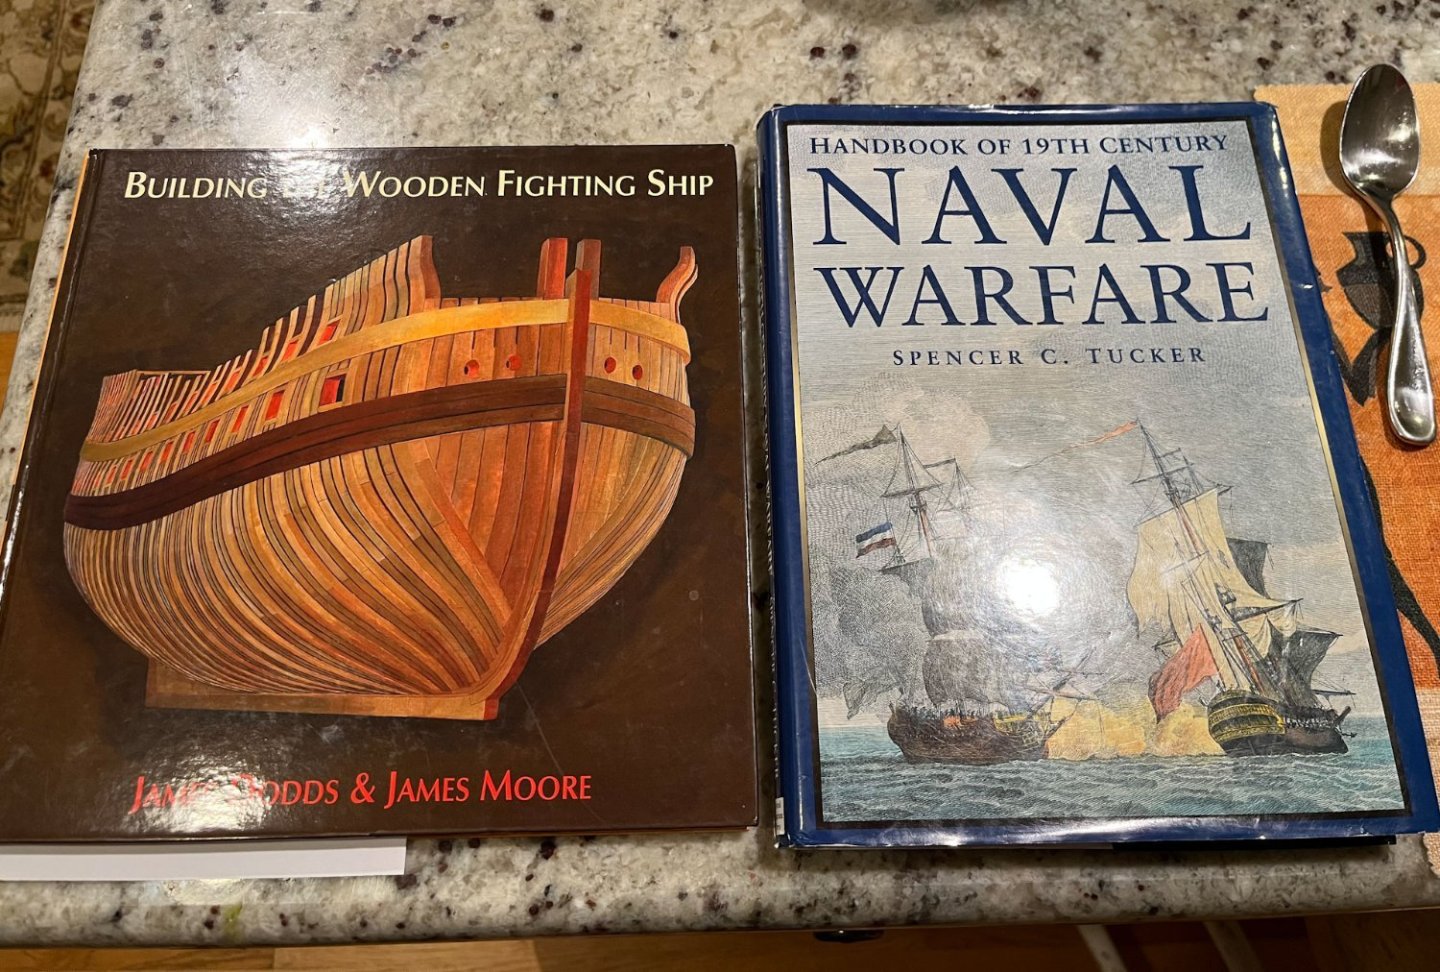
Good Evening fellow builders! The more I go to work the more I like model shipbuilding. And I'm hoping this update may push my log through to page 4. When you're almost to the end of the page it takes a while to scroll down. Aliluke- I went over your log many times before choosing to do my AVS. Your version is beautiful! As I recall you lost the text in the Great Crash of '13 and re-posted pics to MSW Take 2. I built Model Shipway's 18th century longboat and thought the blocks and rope the kit provided were ok, once I filed the edges of the blocks round instead of leaving them square. For this endevour I hope to push it up a notch and get aftermarket rope from Chuck or Ropes of Scale. Or better yet make my own! I took an Admiralty course with Greg, Chuck, and Dave last year on ropemaking. Have to at least try... but thats going to be future Cisco's problem. Ditto for the blocks. Dan I appreciate you checking in on my progress. I messaged you a while ago about using bone and you were very helpful; I am still planning on using some bone in this build for the deck furniture. Thats another learning curve to struggle through; I'm not up to trying bone planking yet. Thank you for your planking pic tutorial- as you suggested I am planning on doing the bottom belt first, then the top, then fill in the middle. I agree it might be easier to put in stealers to shift planking to follow a straight line, versus my plan of shifting planking to make the stealers fit. For now I'm following my current drawing, but based on how that goes I may alter the other side. By the way that last plank you made that fits over the stealer, in your last picture- that is impressive Sir. Fitting a straight plank on 2 sides without big gaps gives me fits, nevermind one with a dogleg. And this weeks progress- 3 whole rows of planking and hardly any pondering. I still like my wedges to push planks snug. The pins that came with the kit are handy as stops for the wedges, as long as they are pushed through planking into a bulwark. Otherwise they bend sideways and the wedges pop out which is frustrating. And so far the DeWalt clamps reach. These planks I have been starting out with wider stock and shaving them down to a little fat, then bending with both a travel iron and a hairdryer, then final fitting on the bottom edge with files, then bring to final width with my Veritas MiniPlane. I realize the above pic looks like big gaps at the stern but thats ok. One of those planks is a stealer which isn't glued in, on the other most of it will be trimmed off. In the above pic the plank above the stealer was hard to clamp. None of the wedges wanted to stay put and kept popping off, I think because the plank had a twist that wasn't perfectly bent, so when I clamped one end it levered the other end just enough. You can see my pins but only 1 wedge (under the dewalt clamp). Still, it eventually worked. Here's the current state with 3 of the 4 rows of planks put in the bottom belt. The final layer of this belt will come up to the top of the blue tape. So far it looks like the plan I came up with last post, and my but joints are where I wanted/drew them. Thats all the planking excitement for this week. I got 2 books last month (I have to strictly ration myself otherwise the house would be full of books and no room for people). Building the Wooden Fighting Ship is pretty good, lots of pictures, I learned a lot. Naval Warfare is also good, although most of the book is really about the advent of steam power and the transition from wooden to metal hulls. So the cover is a bit deceiving. Ok my wife's cats are galloping through my office, knocking over stacks of books and manacing my Legos so its time to go shoo them out. Until next time have a great evening! Cisco

-
i wasnt sure what i could write that didn’t sound superior or patronizing, which i certainly dont mean to be. if i’m seeing the picture correctly the planks are all even width, a nice curve into the bow, and regularly spaced butt joints. some broken plank tips at that severe bend that seems to happen right before inserting into the bow rabbit. i find it challenging (ok, a PITA) making those 3 dimensional bends at the bow. live and learn, then move on. and by posting youre helping everyone who reads your log. like me.
-
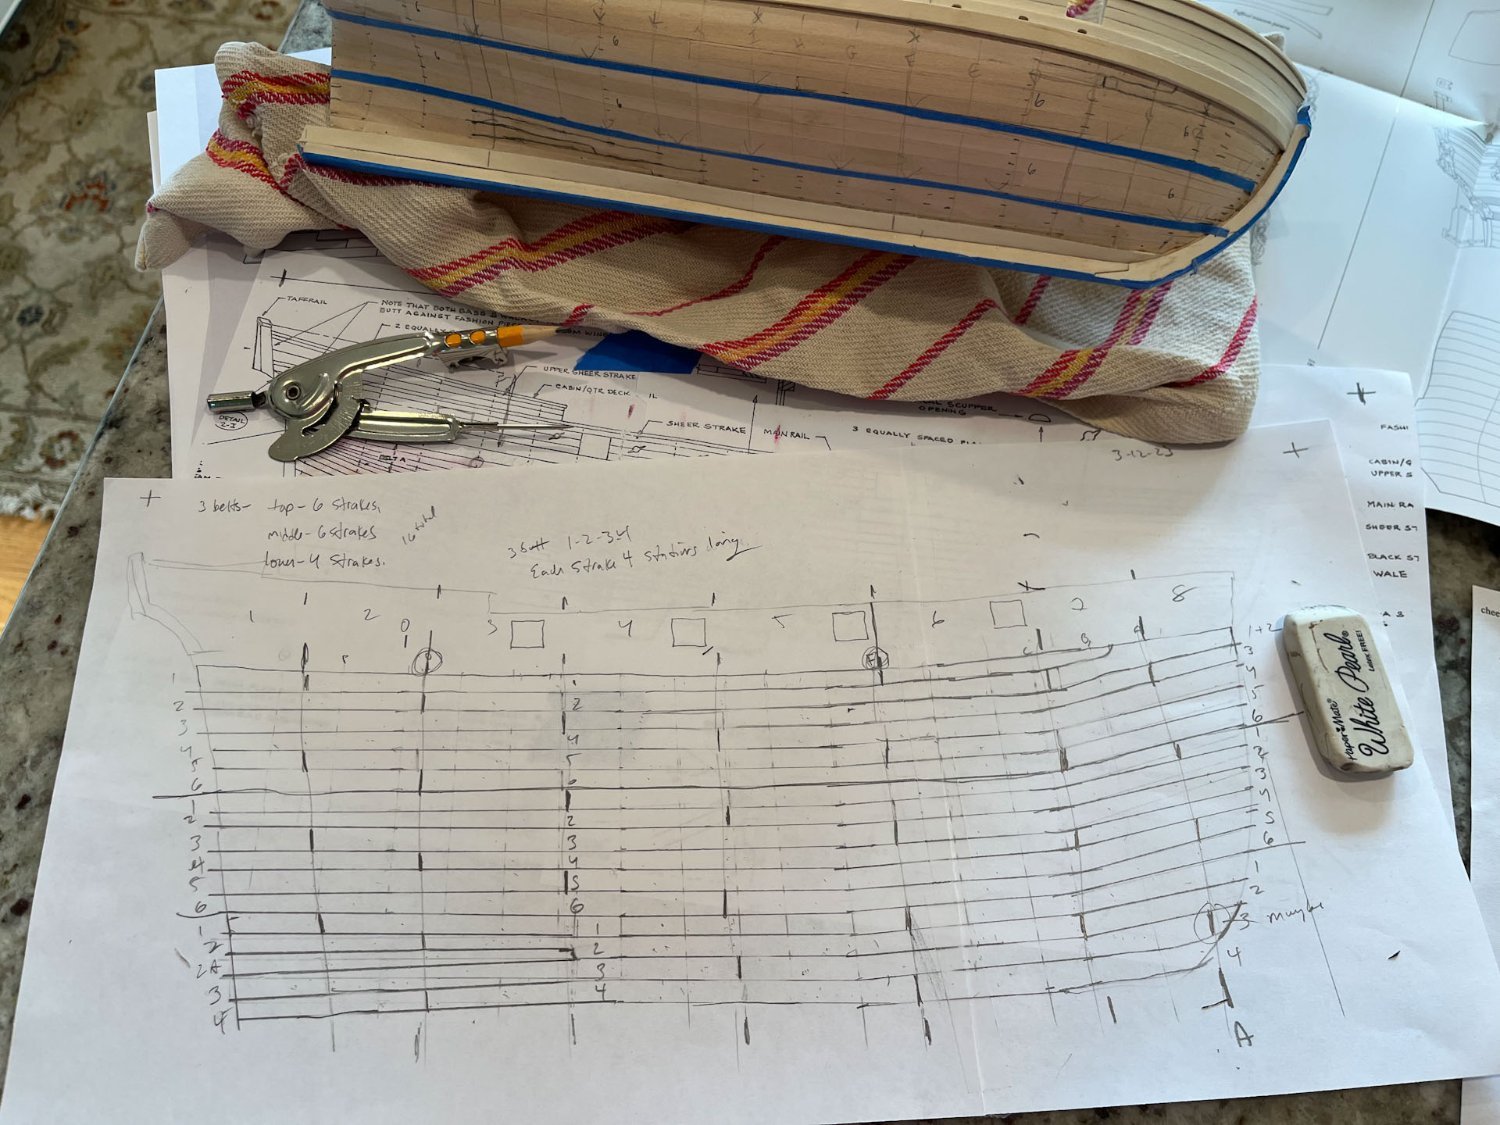
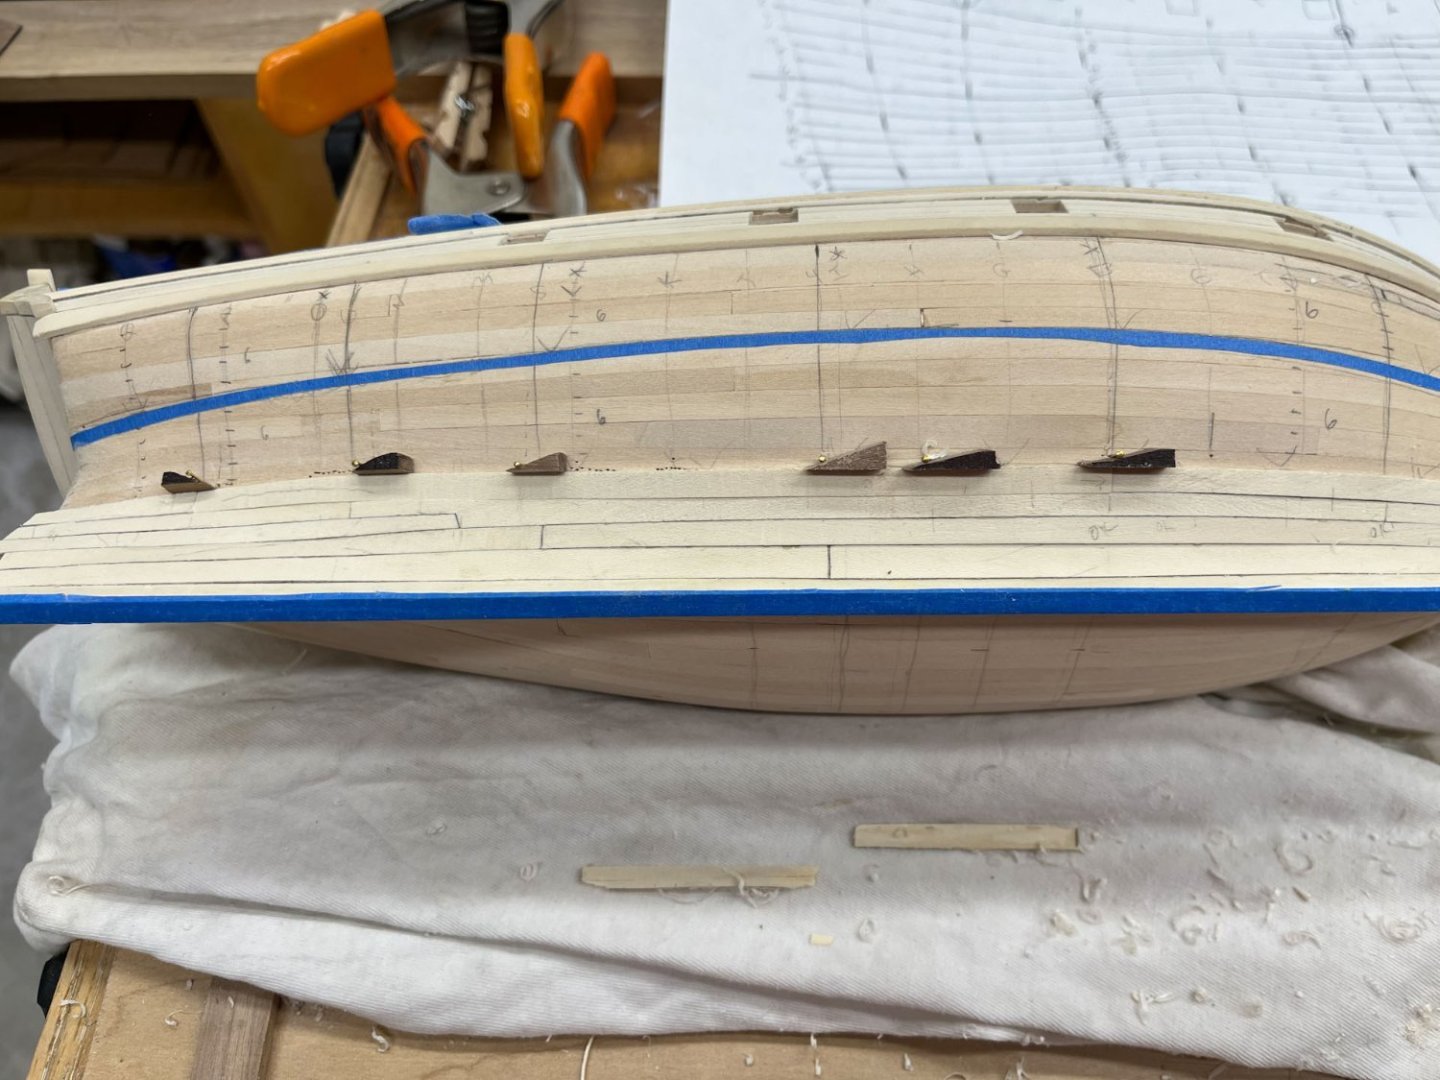
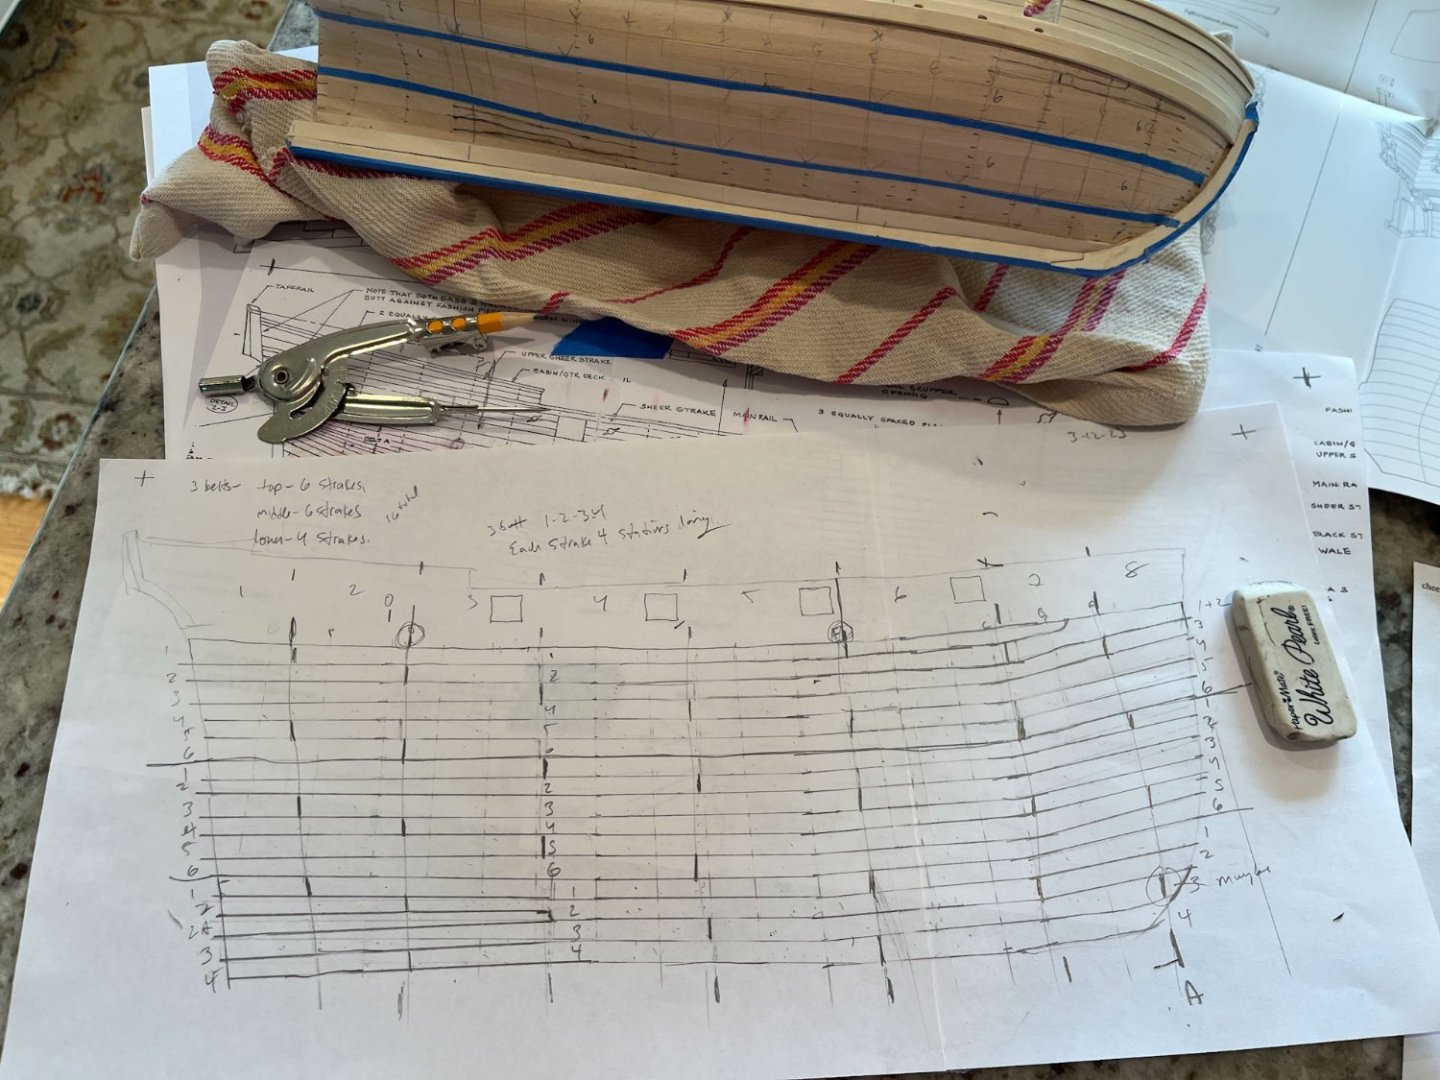
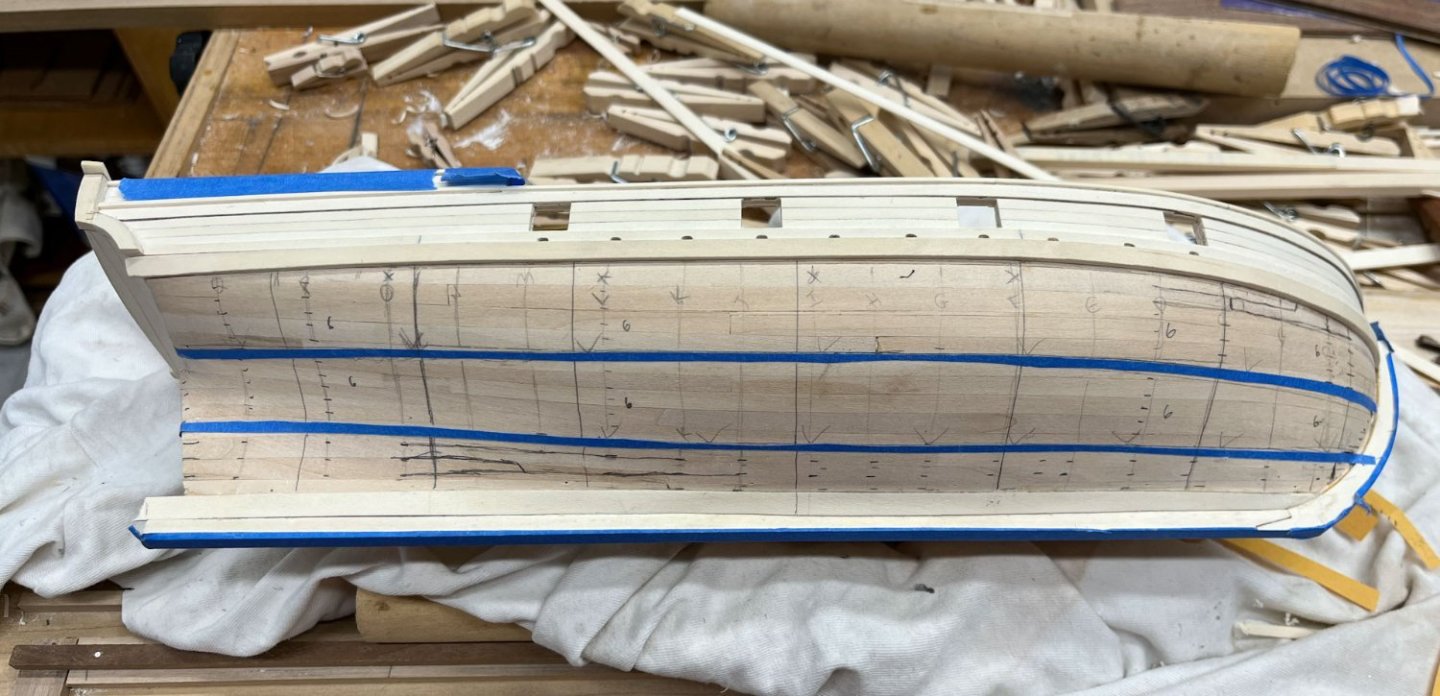
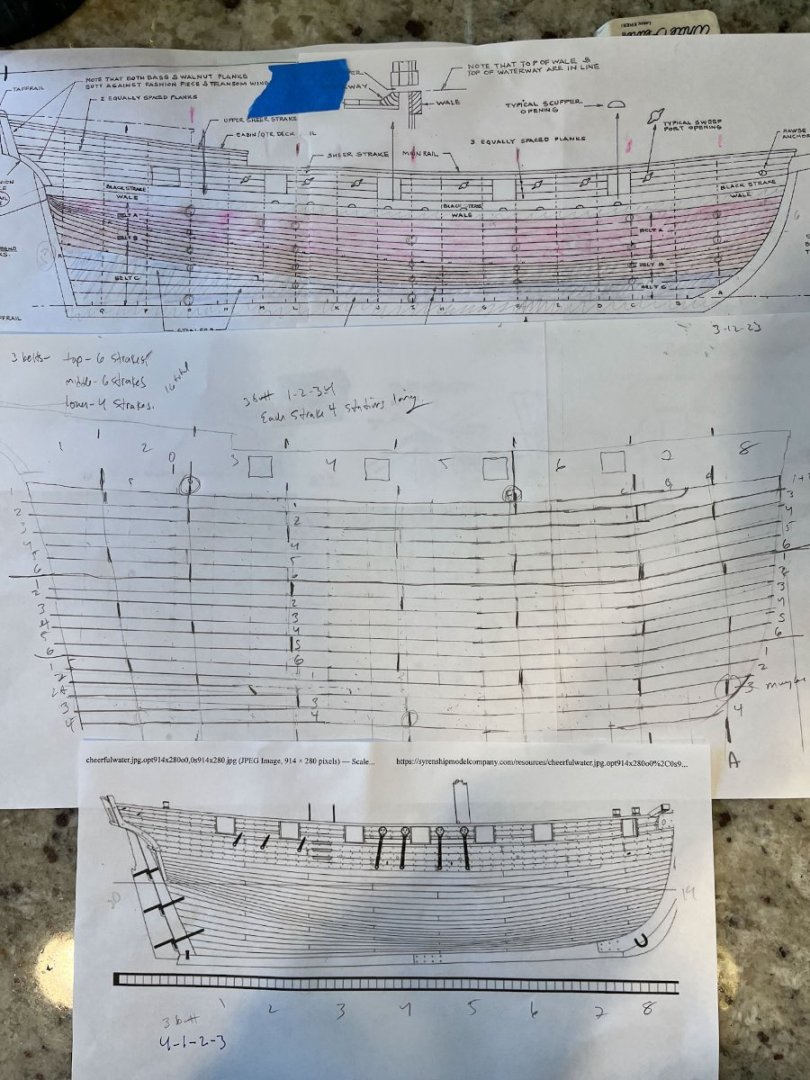
Good Day-After-St Patrick's-Day-Afternoon Model Shipworlders. Wife is downstate working, kids are presently quiet, time for an update. I got exactly nothing accomplished on my hull BUT I did a lot of thinking. mikiek- I followed (some) of your advice for the garboard strake. After attaching it I sighted down the hull and trimmed the stem portion some where it raised up, aiming for a mostly straight run. I had read about proportional dividers but I was worried they wouldn't work well on curved surfaces. So I am sticking with paper tick strips; always reliable on a curve and immediately either lost or mixed with 15 other strips so you can't tell which one you were just using. jason- I made the garboard about 1.25-1.5x my regular plank width. I may make the next plank up a little wider than the rest; sometimes what I plan doesn't survive contact with the enemy. Your question about plank butt separation - see long rambling discourse below- is why I haven't added a single plank to my AVS last 2 weeks. So planking and butt separation. I didn't understand any of it and had to do several searches, downloads, and looking in my library of books stacked on my office floor. I also discovered that many ships had hull planking plans which were very helpful. Chuck's Cheerful has one, and I looked over Speedwells since it came as a fold out with one of the books. A couple things emerged from my podering: 1) Although there is crossover, most of the plank butt separation rules seem to be for planking the deck, not the hull. The diagrams imply evenly spaced deck beams with wide spaces in between. Unless you want your deck planking to end in-between beams all your butt joints have to be over one these deck beams. This provides some design constraint. But the hull is almost solid wood; so if you wanted to you could have almost any length plank and have a frame member to attach it to. Presumably to keep enterprising shipwrights from entirely planking ships with 1 foot offcuts, rules existed dictating butt spacing for the hull, determined by strength, available stock, and insurance companies. 2) Whichever hull Butt pattern you are using seems to depend on 2 factors. One is how many butt joints each line of planking can have. I called these Station Lines (what would be the deck beams if you were planking the deck; a lot of diagrams call the longest plank length L and divide it into 4 or 5 sections, each of those sections is what I am calling station lines). The second is Butt Spacing- how many unbroken planks (looking vertically) there are between butt joints on the same frame member. Far as I can tell 3 Butt means 3 unbroken planks, 4 Butt means 4 unbroken planks. I don't know if theres a 5 Butt; I found a 2 Butt plan by Katsumoto which was presumably for the deck not hull. You can designate how long the next plank will be once you figure out the system; one I found worked out to 5-2-4-1-3 for a 4 butt with 5 station lines; I found a 3 butt with 4 station lines that came out as 4-3-1-2. Then looking at Cheerful's planking plan (thank you Chuck) its a pretty simple 3 Butt 1-2-3-4 pattern. Ultimately I decided to try and use his plan. After trying to mark butt joints on my AVS sheer plan I concluded it was too busy a picture and instead constructed my own crude planking plan, similar to Speedwells. In these diagrams all the planks are made about the same width so you can focus on just the butt joints. Like Cheerful's plan I divided my AVS into 8 sections (7 station lines). Cheeful's butt lines correspond with the fore edge of each gunport. The butt lines extended vertically into the gunport planking as well, and I had earlier already arbitrarily made 2 butt joints in my black strake. The front butt joint was perfectly aligned with the fore edge of the AVS's front gunport (luck; I didn't plan it) but the aft joint was too far forward by a small margin. I'm not remaking the black strake at this stage of the game so my station lines at the stern end are not perfectly equal. But I'll take it. Here's version one of my planking plan Measuring at the stem I felt a stealer would help which was easy to copy from Cheerful. Then I got into all sorts of problems with the stern. The original plans for the AVS show 2 stern stealers but after measuring I felt one would work. Originally I placed the foremost portion of the stealer on a butt joint, but this made the next lower plank and the garboard only had 2 full boards between butt joints instead of 3. See the above picture. This bugged me too much to accept and Cheerful doesn't have any stern stealers so i couldn't cheat and copy my way out. Finally I realized that stealers start inbetween station lines and don't line up with the butt joints. So you can ignore them in terms of butt joint placement. I shifted my stern stealer backwards to halfway between station lines; i could also have moved it forward a 1/2 station line (dotted extension line on the below plan). And finally I drew my station lines (dark pencil) onto the AVS' hull. The faint lines are the actual bulwarks. That was a ton of work for no actual planking being done. Now I have a good idea of planking width and butt joint placement and I will never do another model without a planking diagram made up. Next week I hope to present some Actual Planking! thanks for reading Cisco

-
movin right along Jason! looks great
-
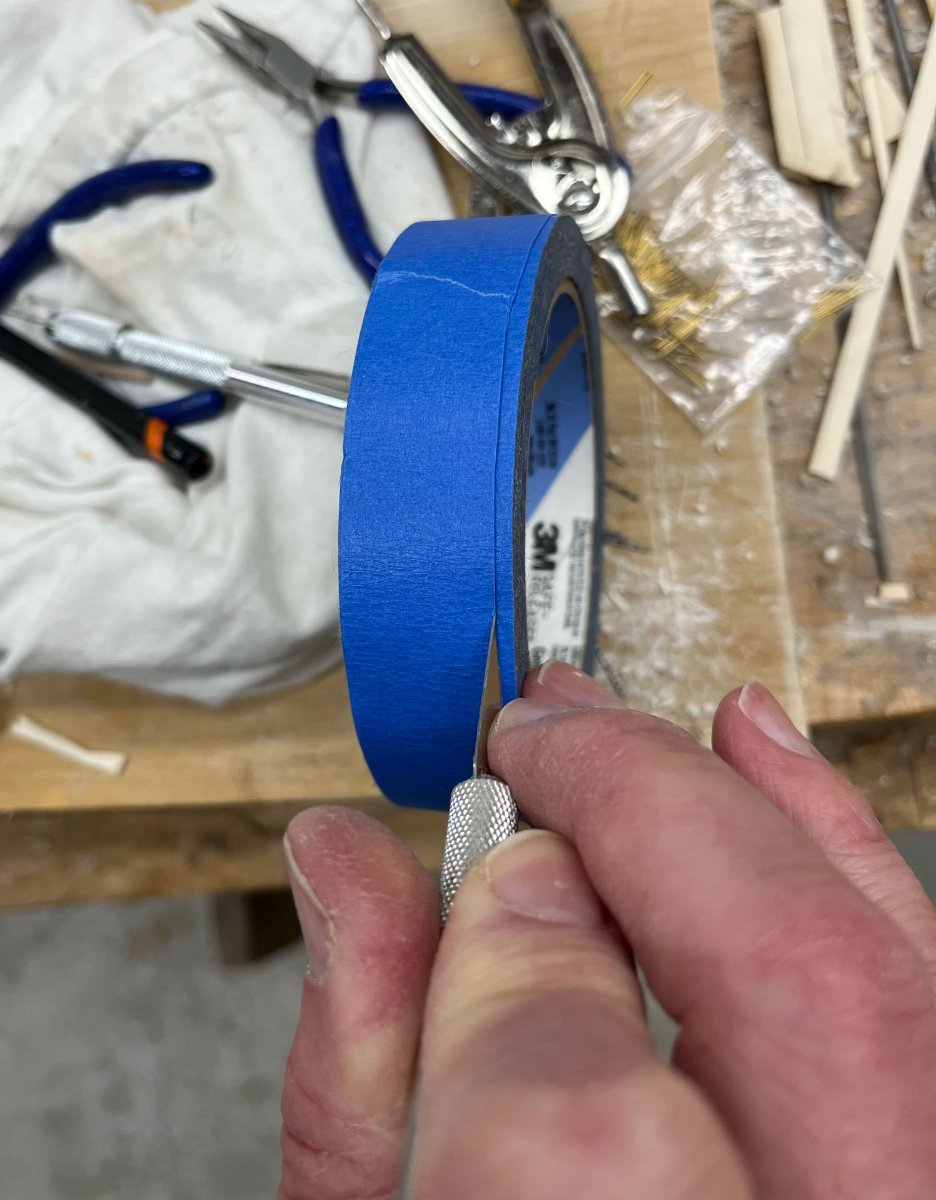
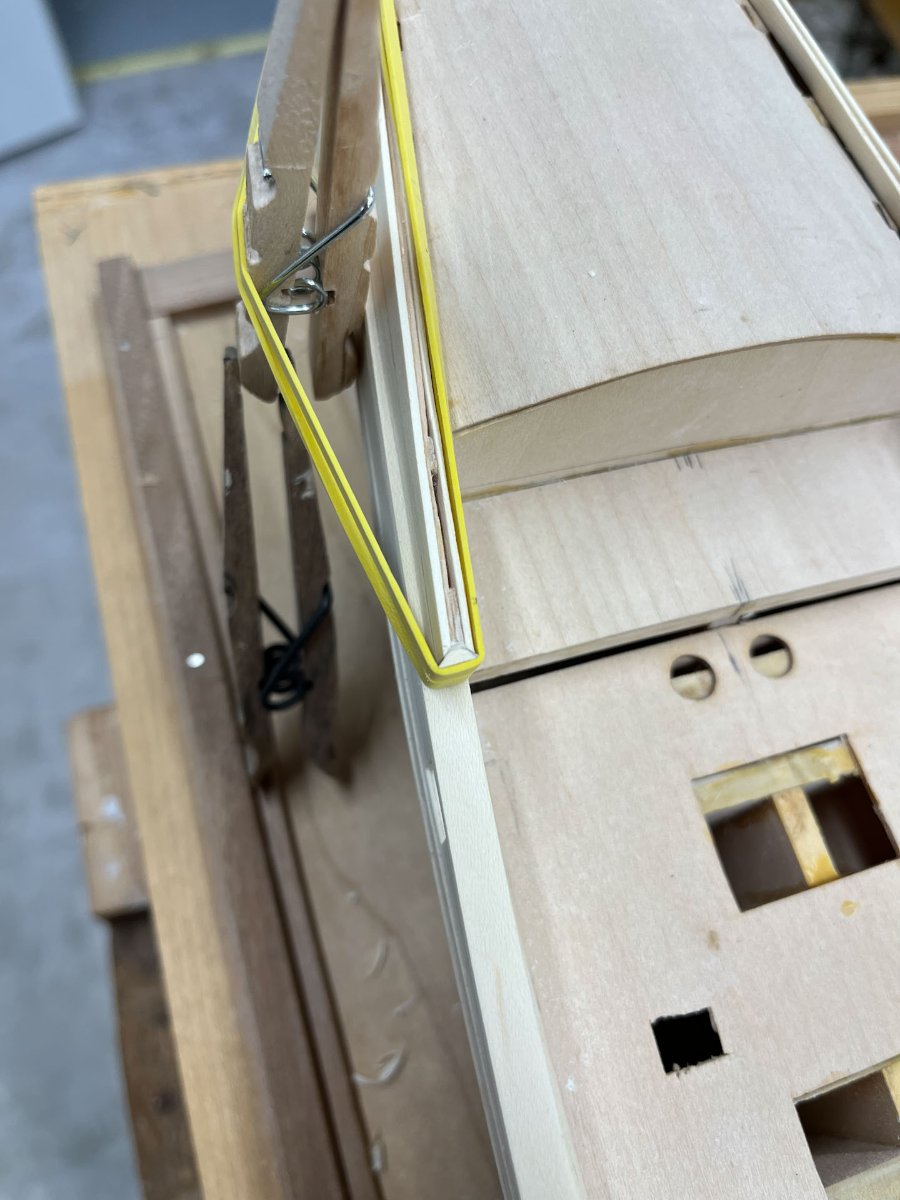
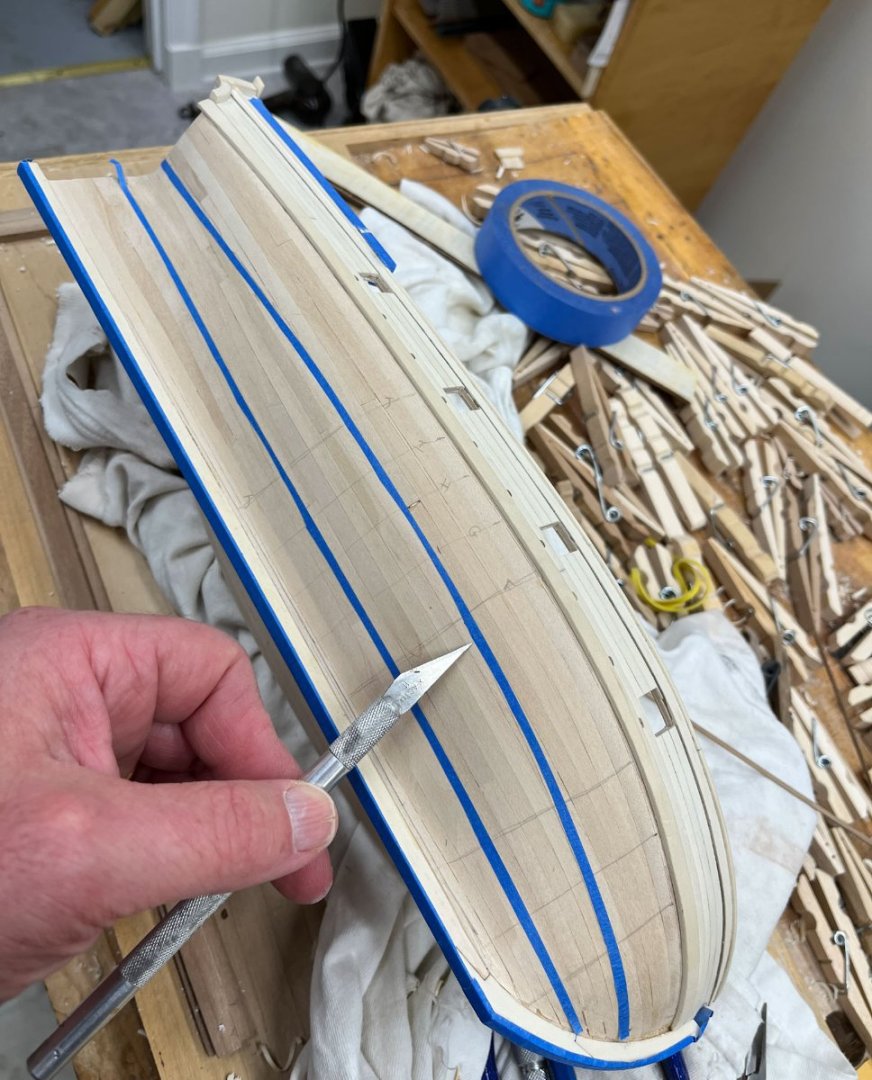
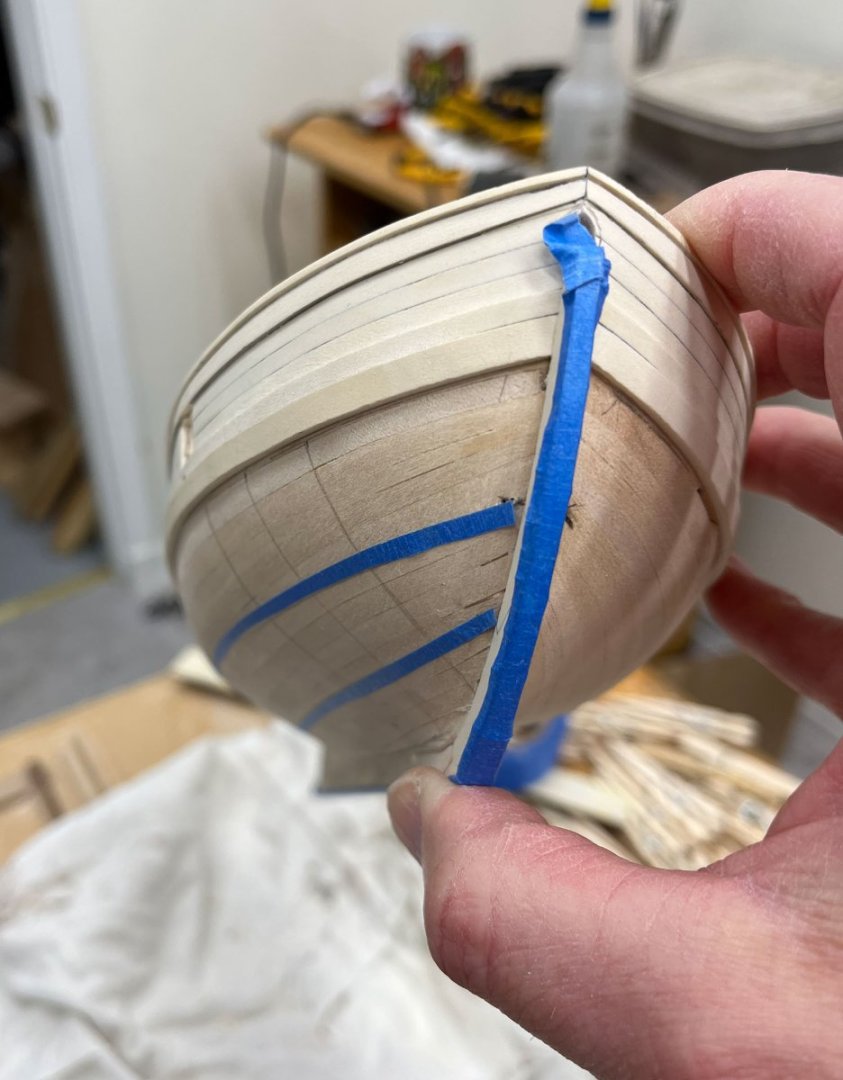
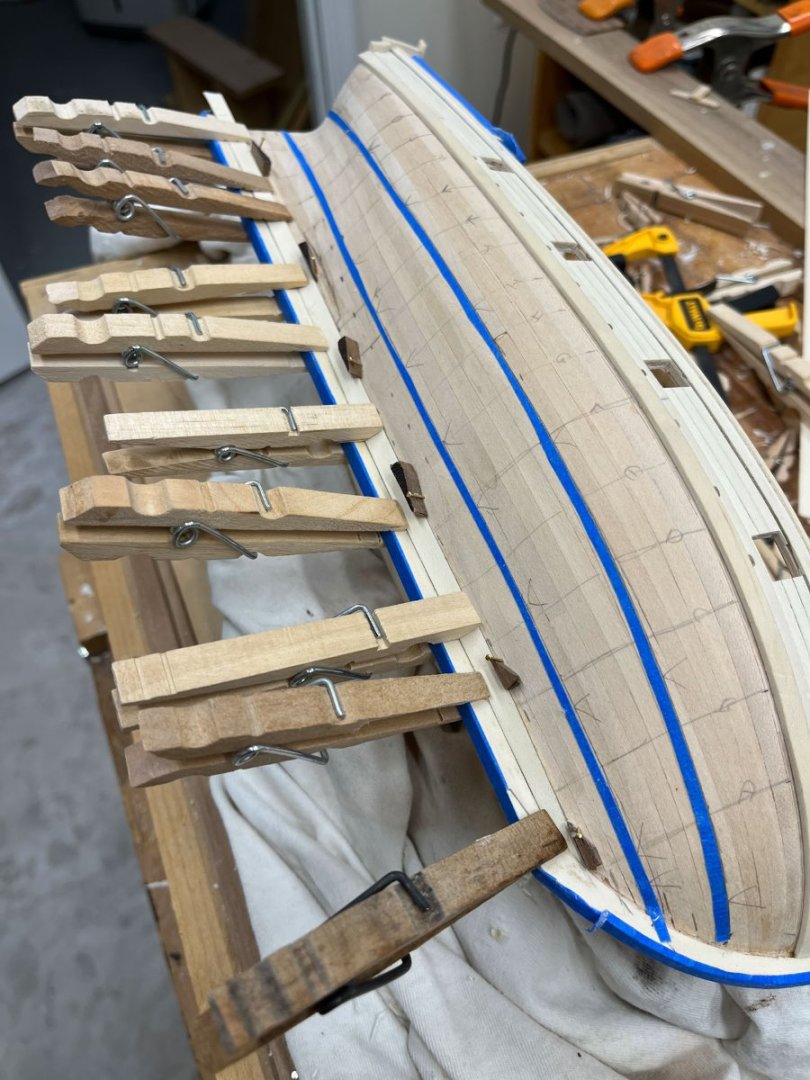
Good evening fellow shipbuilders! I have been at an impasse for several weeks- paralysis by analysis- over the size and placement of the garboard strake in my second planking. But first I had to divide the hull into 3 planking zones of aprox equal size, as per the plans. I have seen many different iterations of marking the hull; string, pencil, various tapes, or simply winging it. I settled on using a thin strip of bluetape. I cut it as in the following pic, using my fingers as a fence, which if you use the factory outside of the strip as your line works well. The cut side of the strip was too wavy no matter how careful I was. The bluetape sticks pretty well and is easy to see. This was the first time I'd tried fairing a planking line; It was cool how a straight line from the side had a lot of points and bumps looking at it from the stem. In the below pic I am using the top of the tape as my edge, not the bottom. Adjustment was easy; I slid a scalpel blade underneath the tape and gently edged it up or down. It took a few tweaks to look good from all angles; its also pretty easy to overthink it and keep adjusting. After a while I had to force myself to stop fixing it. And then the dreaded garboard strake. According to the Model Shipway's directions the lower belt is divided into 3 planks. The garboard is supposed to be wider than the rest of the hull planks, but then I got confused. Some of what I've read (yellow cover planking booklet by Model Shipways) say the bottom 2 planks are significantly wider than the rest. Somewhere else I read only the garboard is wider. Some sources have the garboard shaped fishlike, the plans make it look the same width the length of the ship, I was getting deluged by too much information. So in the end I made it one long plank, narrowing at the stem so the tip doesn't push upwards, and about 1.25 "standard" planking widths wide the rest of the ship. I want to put in separate planks in each row but figuring out a planking arrangement became too much so I did one long plank. I will probably score horizontal lines to simulate separate planks. In hindsight 2 layers of planking is more of a pain than I thought it'd be. You lose the convenient bulwarks to clamp to, and since I use yellow glue not superglue I had to figure out a clamp strategy. The first layer had filled the convenient keel rabbit, so I tried cutting a new rabbit into the keel/underplanking junction with mixed results. Won't do that again; easier to butt joint the second layer to the keel. As I've done in the past I used brass pins and wedges to keep the garboard tight to the keel. The holes will be covered by the next row. I prebent the garboard by soaking the end and clamping the tip diagonally around a dowel. This formed a nice curve that was mostly trimmed away, but the tip fit perfect. Aggressive clamping to push the tip into the stem in the past led to dents in the wood so this worked a lot better. The second twist about 2/3 back was easier; wet the plank and clamp it in place without glue for the night. And here is the garboard in its final test clamp, no glue yet. Of course once I added glue the clothespins completely changed their character and started slipping off and I couldn't find all the wedges and I decided maybe try this other clamp, but where? did I put it, etc, and it didn't go quite as smooth as I planned, but thats usually what happens. Thats it for tonite. I hope this first plank is the worst and rest go a little easier. thanks for reading and have a great evening cisco

-
Rick; my longboat is a different kit, confusingly also made by model shipways. its 1:48 scale (i think) and done by Chuck Pasaro. the scroll work is printed on paper that comes with the kit and is simply glued on. Chuck’s directions focus on bending the planks with water and heat, versus spiling like you are doing. the directions are a free download on the modelshipway’s website and are worth reading.
-
that looks great!
-
Welcome Ghost029! this was also my first build, although i didnt know about MSW at the time so i didnt make a buildlog. Chuck’s directions are really good which is great because a lot of shipmodel plans are sparse confusing text poorly translated from some other language. mostly follow the supplied directions and you will be good. I recommend looking up Chuck’s monograph on this site for Plank Bending as a supplement to the kit directions. good luck!
-
thank you Dusan!
-
Can you show a picture of your scrapers? And maybe a brief note on how you made them?
-
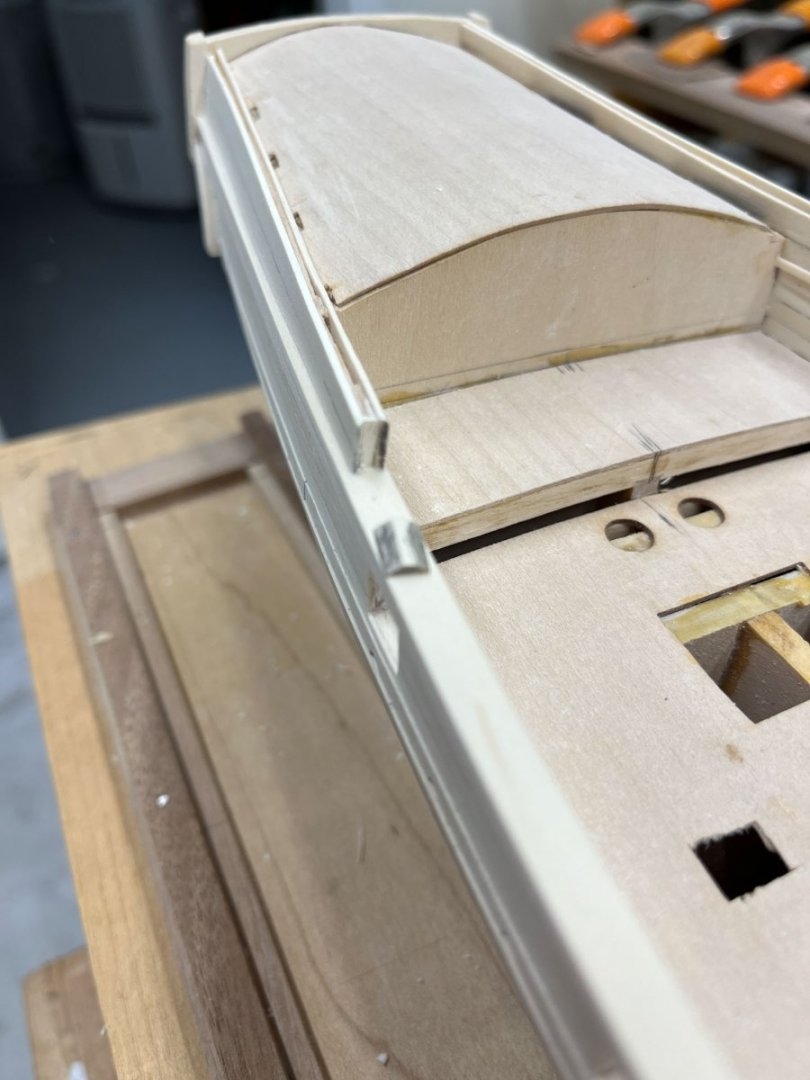
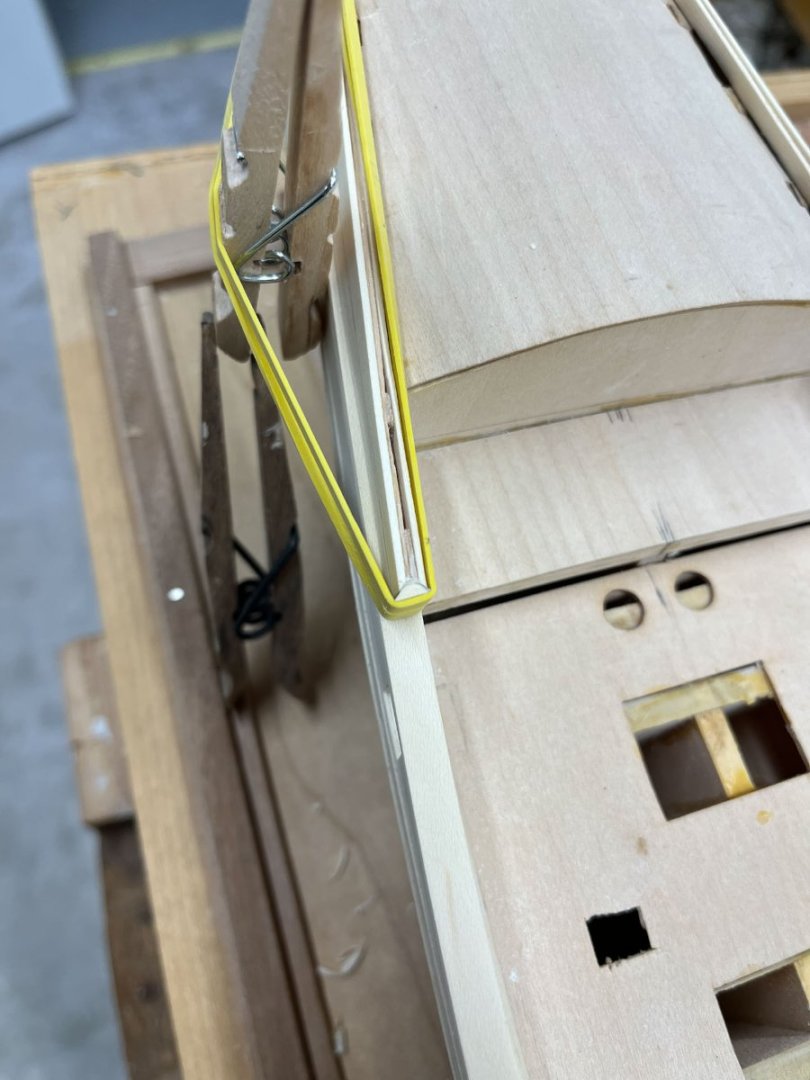
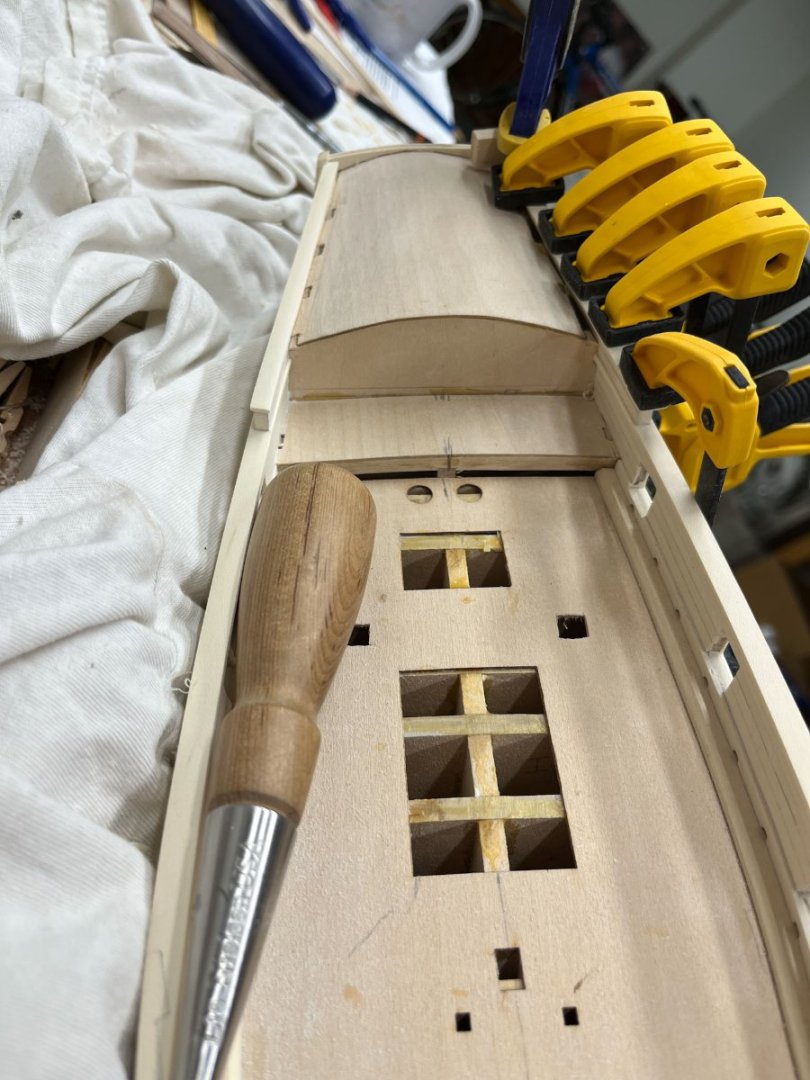
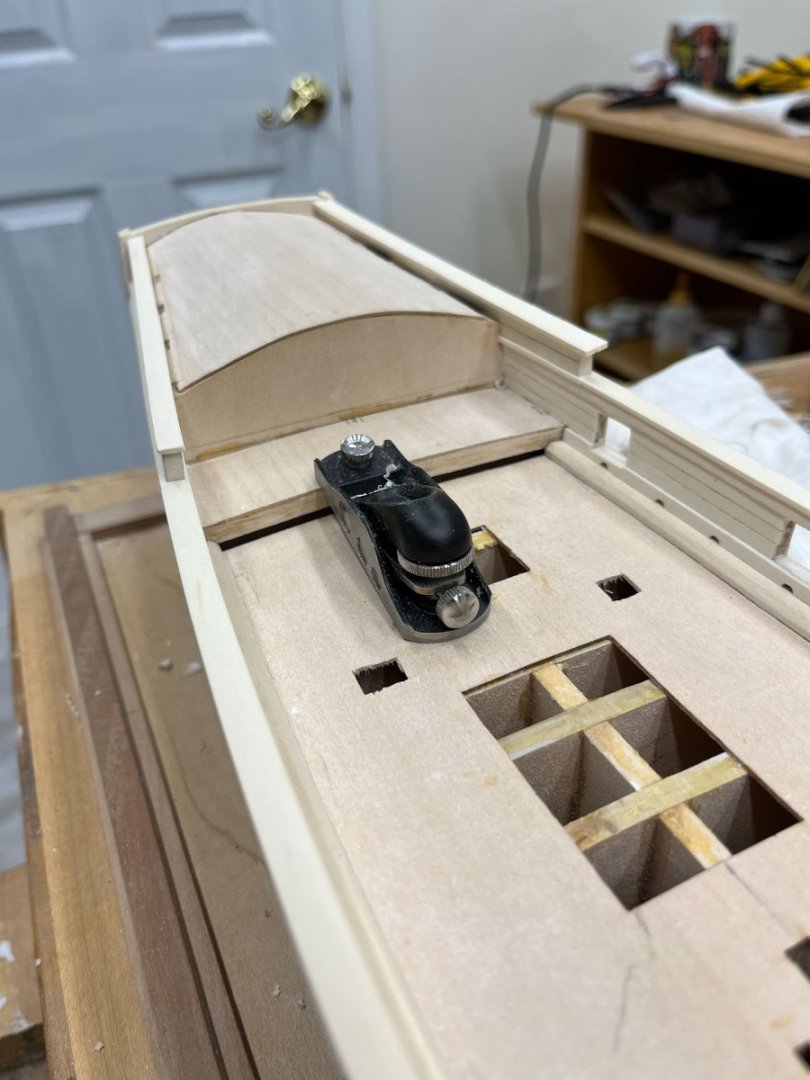
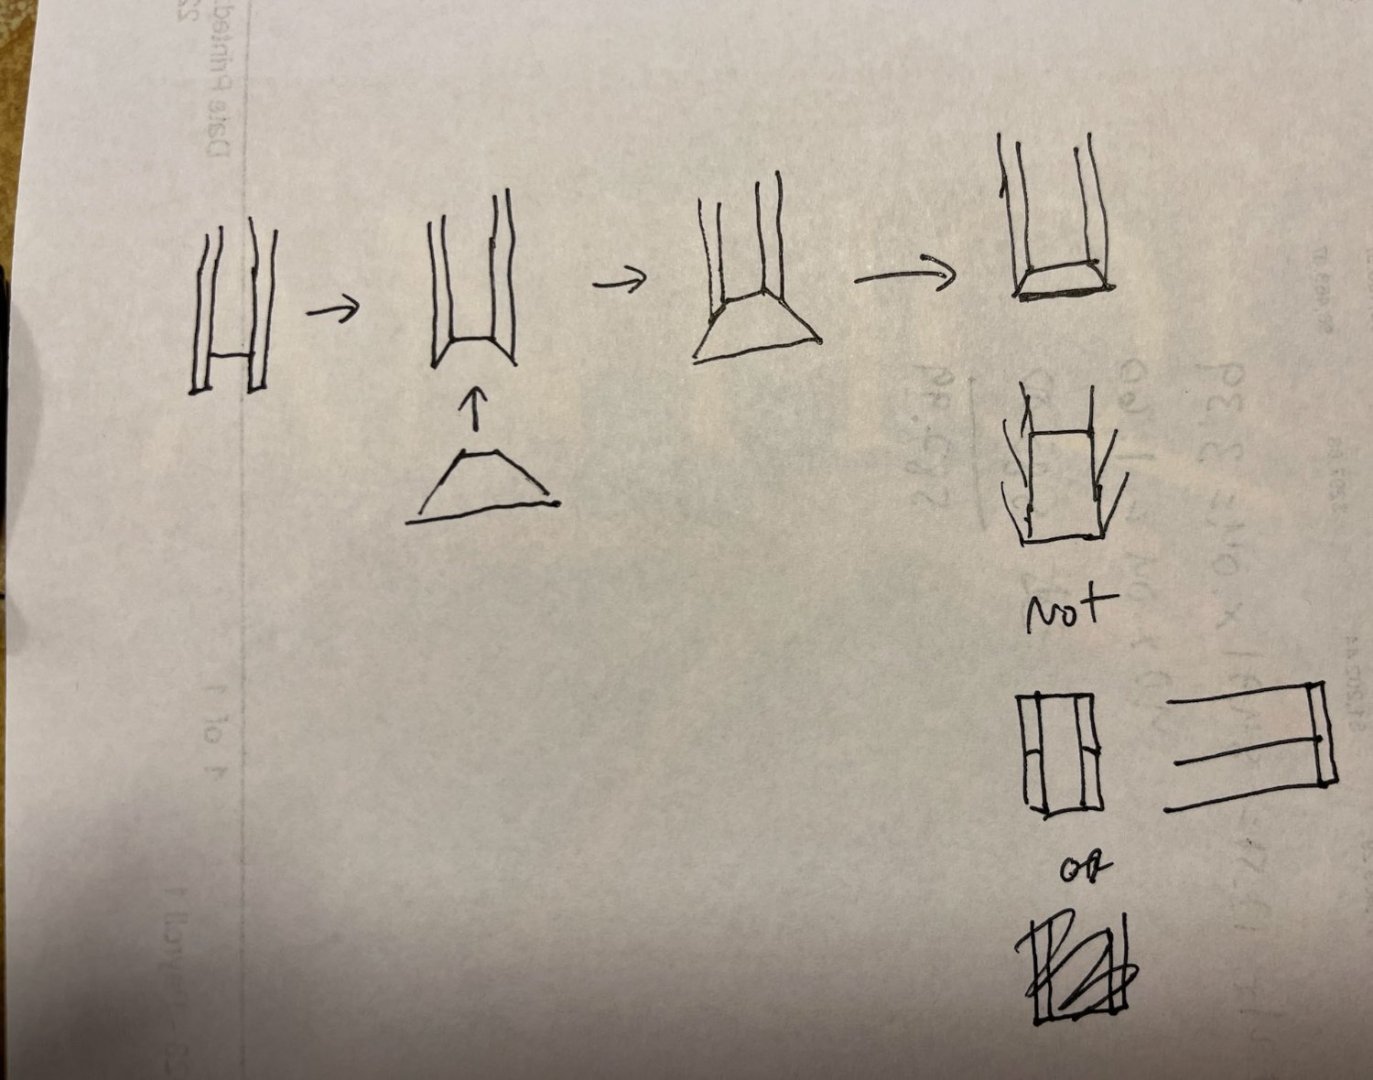
Good Evening Shipworlders! My almost neighbor Jason (JLong) posting got me motivated to bring my log up to date. Hobby peer pressure, I guess. My main problem to solve this post was how to make the fore end of the quarterdeck railing look to my satisfaction. The plans show the outside and inside bulwark planking just ending with the cut ends of the boards, which I assume is how it was actually done. This shows end grain wood which my obsessive brain was having a lot of trouble with. So I came up with a plan to not show any endgrain that worked very well. More importantly it was pretty easy so a good skill to store away. The below doodle shows what I tried to do. I was drawing as if the viewer was standing above the ship. First i trimmed the outboard and inboard Qdeck planking so they were about a 45 degree angle to the bulwark. Then i made an oversize wedge to fit this space. I found that making a small wedge was almost impossible to fit well, but a big wedge was much easier. I penciled the edges, which i wanted to show, and glued the wedges in place. Once the glue dried I trimmed most of the excess with a chisel, then used a 220 sanding stick to sneak up. Here's the starbaord side before glueup. My camera does an excellent job focusing on whatever I'm not trying to take a pic of, sorry about that. Its a funky piece to clamp; rubber bands worked best for me. the oversize wedge is much clearer here. I even made the grain of the wedge follow the grain of the planking so there's no crossgrain conflict. Totally unnecessary at this scale but satisfying. Once dry I glued on the qrtdeck caprail and trimmed down the edges. And here she is with both caprails on. The port side still needs to be trimmed down. And I included the Veritas miniplane because I have been using it constantly. A great tool. I just wish it had a tighter mouth like its big brothers... Next up is the Taffrail, hopefully not too exciting. Then, planking the lower hull. Way more exciting. Thank you for all who have Liked my log. It really helps knowing others who share this problem are watching, sympathizing, and not being too critical. Have a great night Cisco
-
ok thats just ridiculous! amazing work Matthias
-
Tim- planking looks great! the garboard always gives me fits getting it to not curve upwards. And then when i get it fitted its always uneven to its opposite when seen stern-on. you seem to have both these tasks done perfect. and keeping the garboard flush with the keel without a rabbit. mine would have had tiny gaps. i wonder if adding a plug or another bulwark, even if its removed later, at the stem would help provide purchase. thats a compound plank bending area with a lot going on and i would worry it’ll be hard to get good edge to edge planking without more underlying support. i ended up with some translucent bow planking on my 18th century whaleboat after sanding due to unevenness. anyway my two ¢. keep up the great work this is a very interesting project cisco
-
I would absolutely break those doors due to being unable to resist playing with them repeatedly. a fine job!