MORE HANDBOOKS ARE ON THEIR WAY! We will let you know when they get here.
×


CiscoH
-
Posts
375 -
Joined
-
Last visited
Content Type
Profiles
Forums
Gallery
Events
Everything posted by CiscoH
-
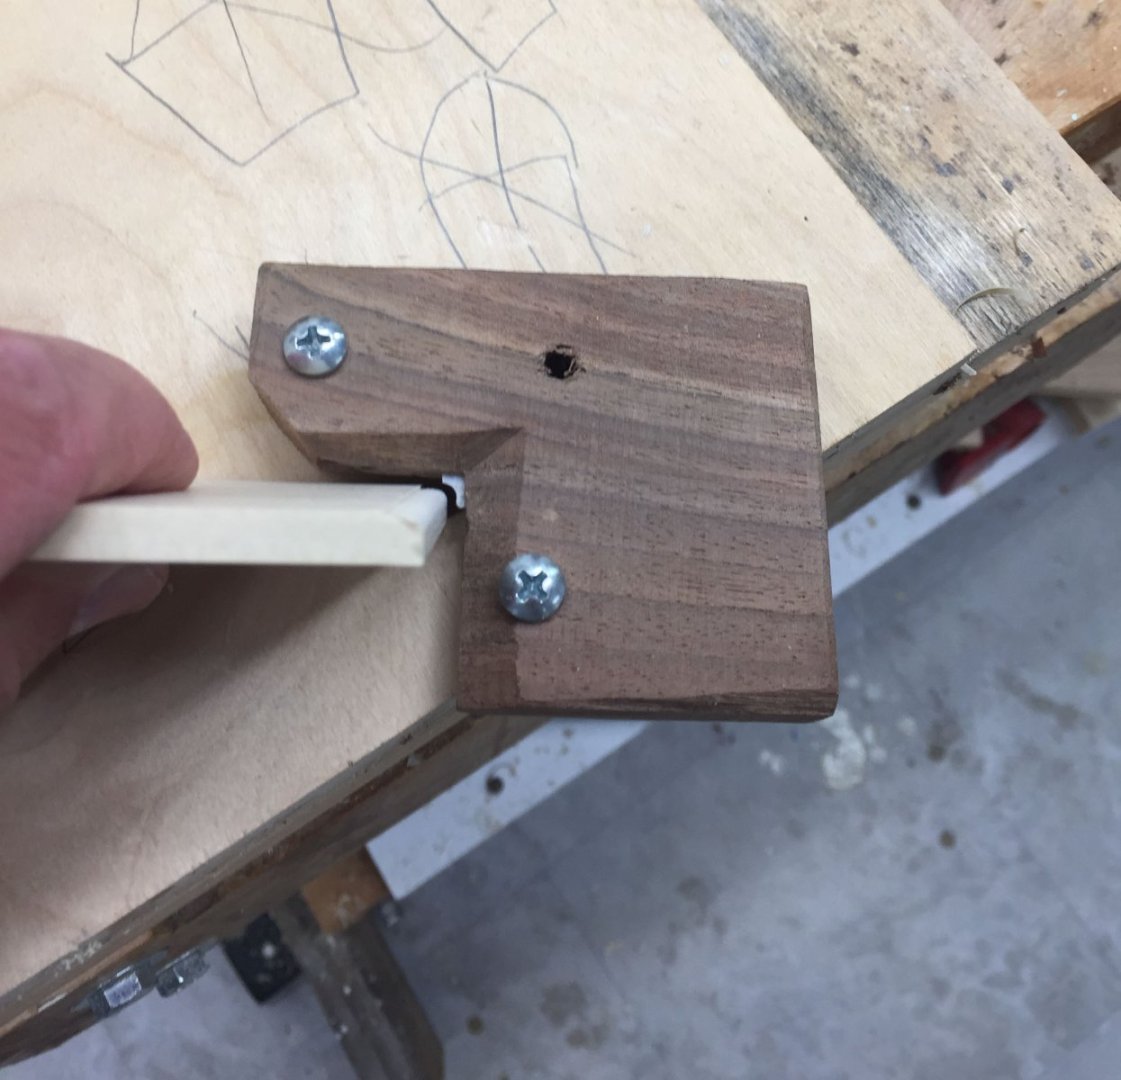
 src/Sam- sorry about the long delay responding. I can't easly find where I said LunchBox plane, but usually that means a 12" tabletop planer that you plug in, mine is a Dewalt I got at Home Depot years ago that still runs great. But for finish stuff you need hand tools; I've had several 2 Cherries chisels for a long time and we get along very well. As long as I don't forget to sharpen then.
 -
Mustafa- looks great! where are the cannons from? and is that beech you are using for the carriages?
-
Michele- any pictures of the carving process? thx Cisco
-
Mike- i’m not aware of any Delaware modeling clubs. There is one in Philly which is probably close to you, and a new jersey club but i think theyre based in the northern part of the state.
if i ever retire starting a local club is on my list. but thats gonna be years in the future
-
alright Greg I have it from a reliable source youve done more work. Pics please; esp close ups of the stern where i’m trying to figure out how far down the fashion pieces go. Great planking job by the way- did you use pencil for caulking on the holly deck?
-
Paul you are a speedy builder! can u do some sideshots of your binder clamps? they look like they work better the ones i’ve been Mcgyvering. also what glue are you using for the planking?
-
Are you using heat (small travel iron or a hairdryer) while bending? you can get away with a lot more stretching than with water alone. having said that i think youd have to join several sections to make it look realistic and i like your bending jig
-
Tarjack- its been years- any progress to report?
-
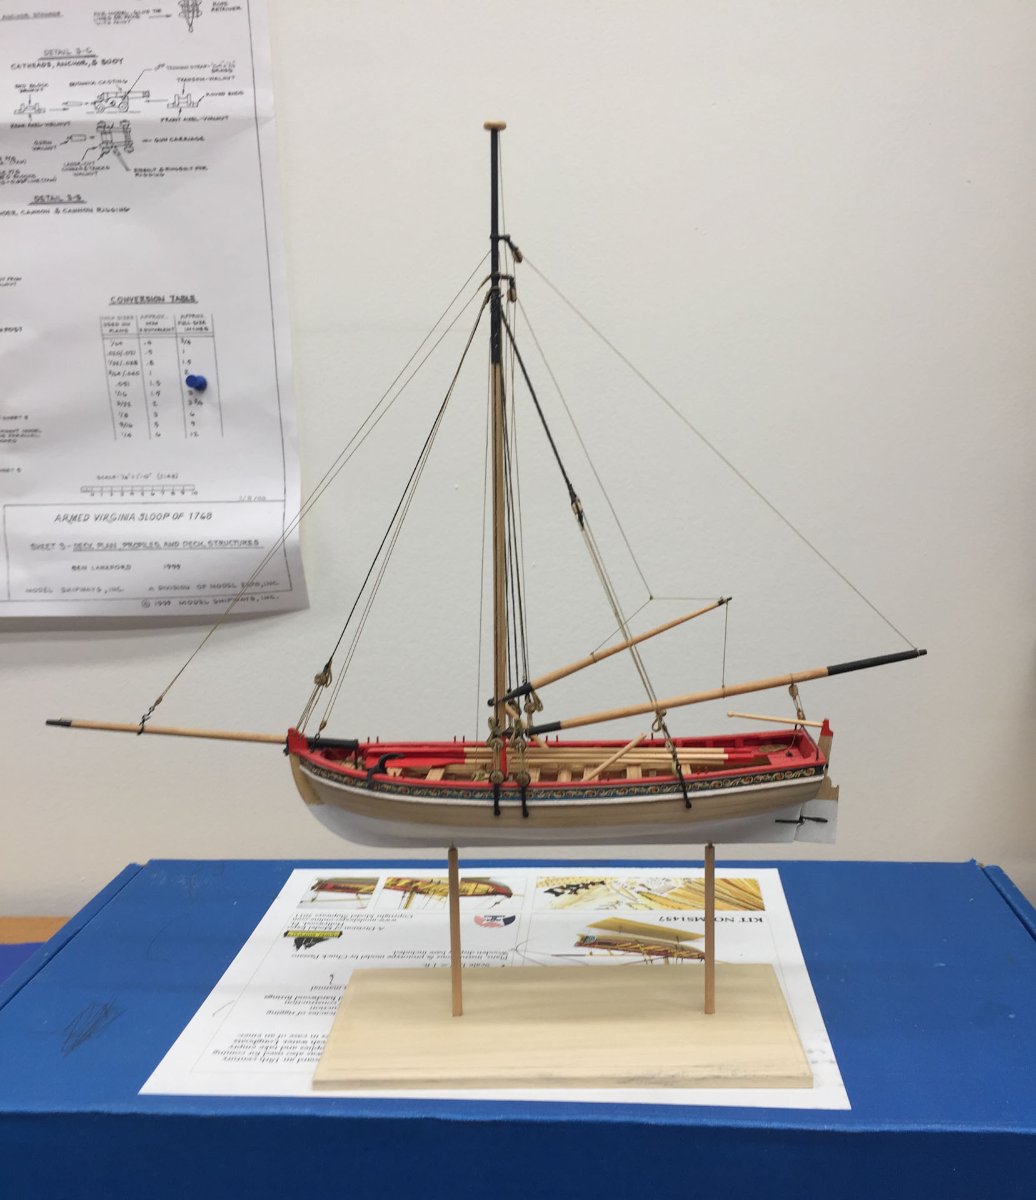
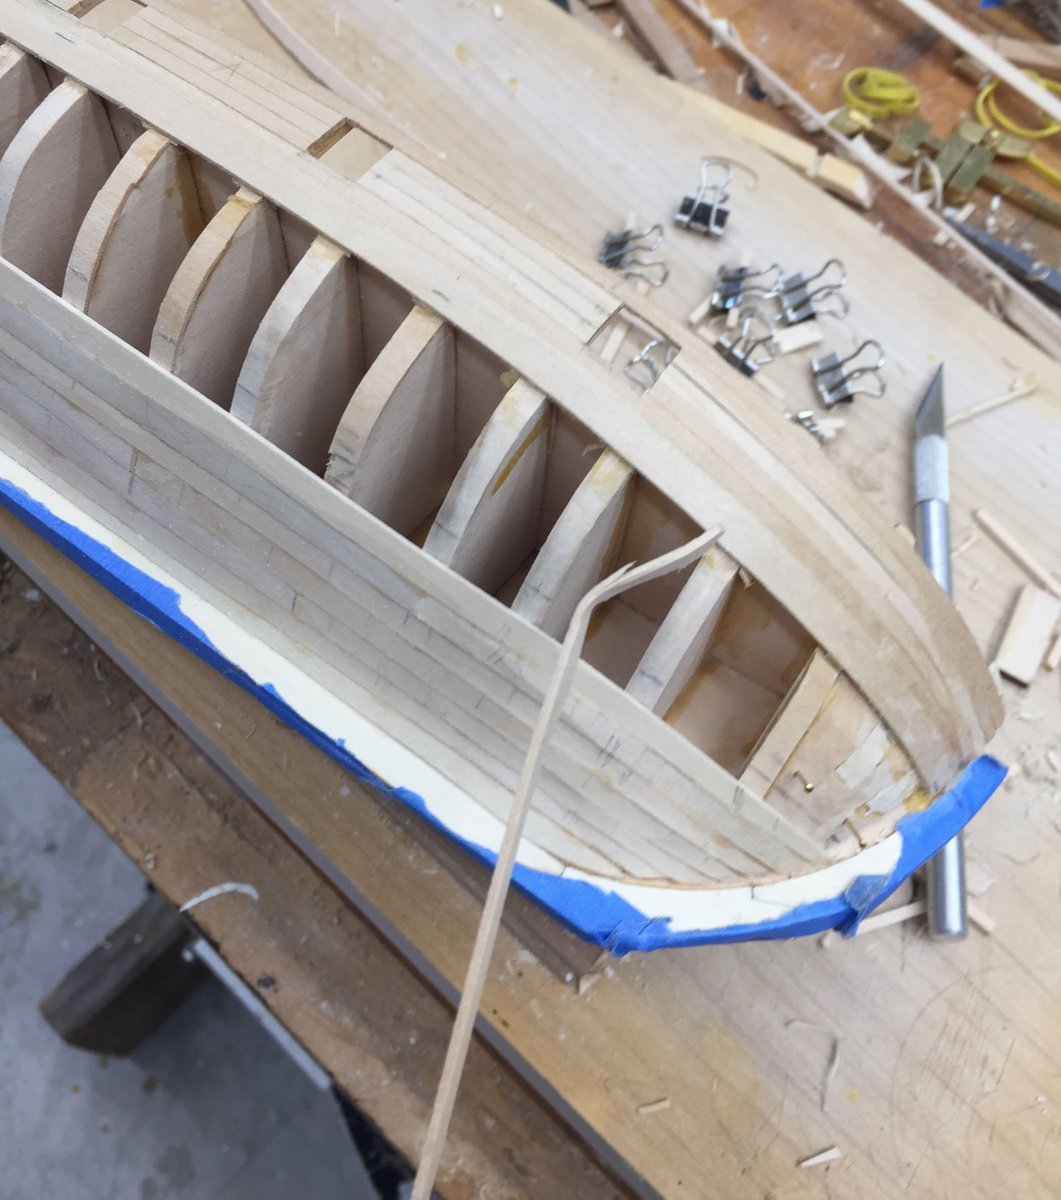
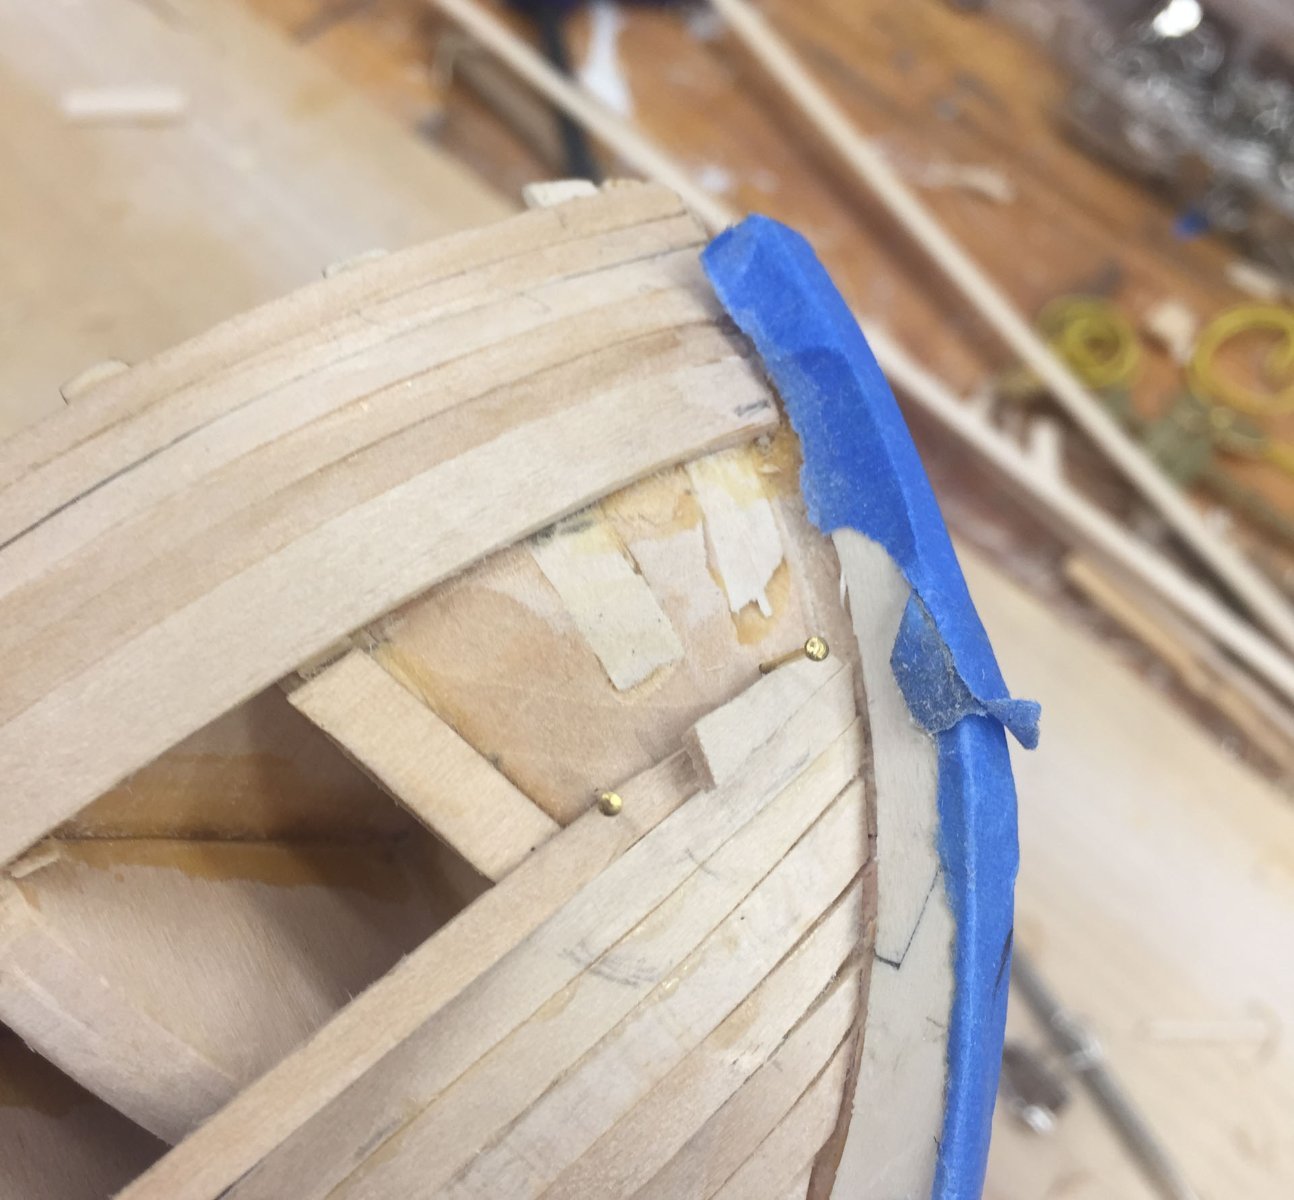
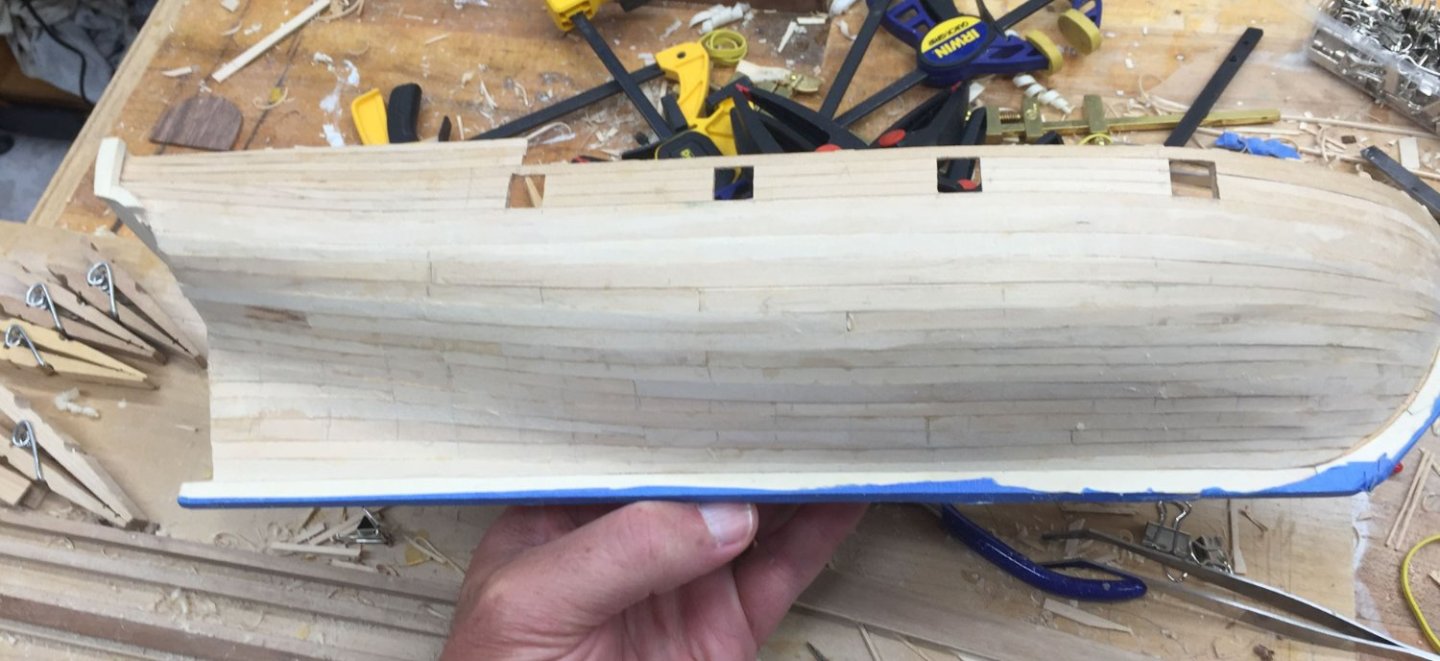
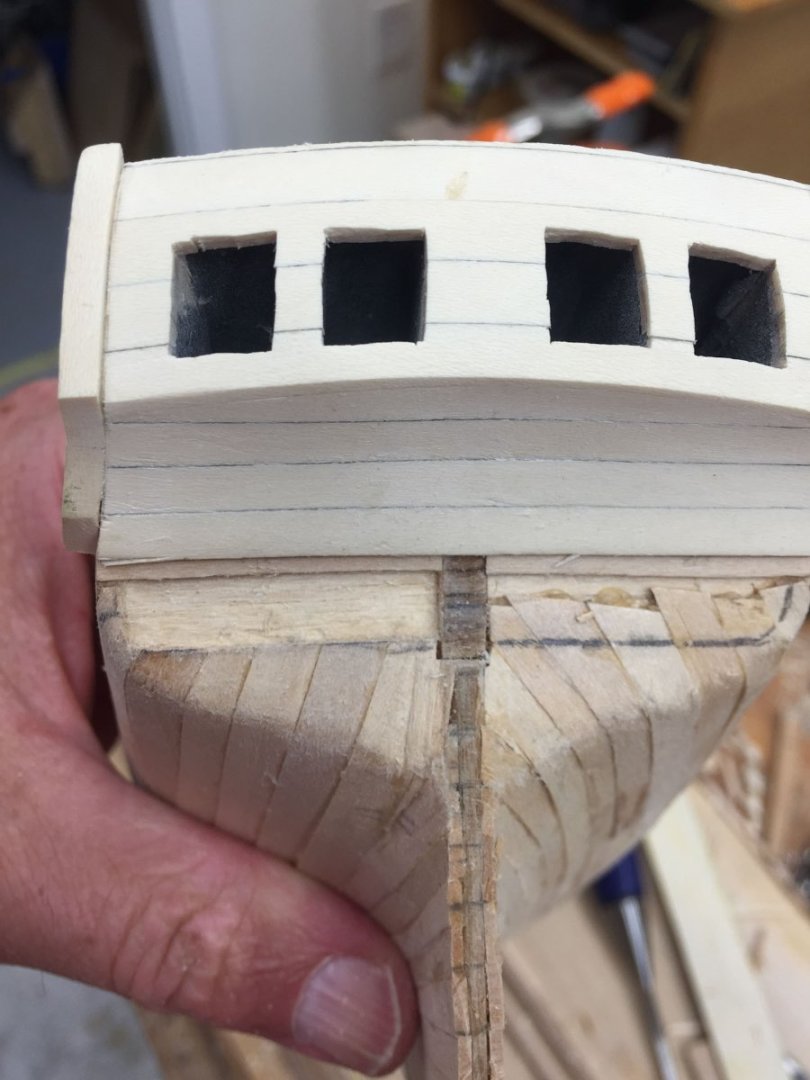
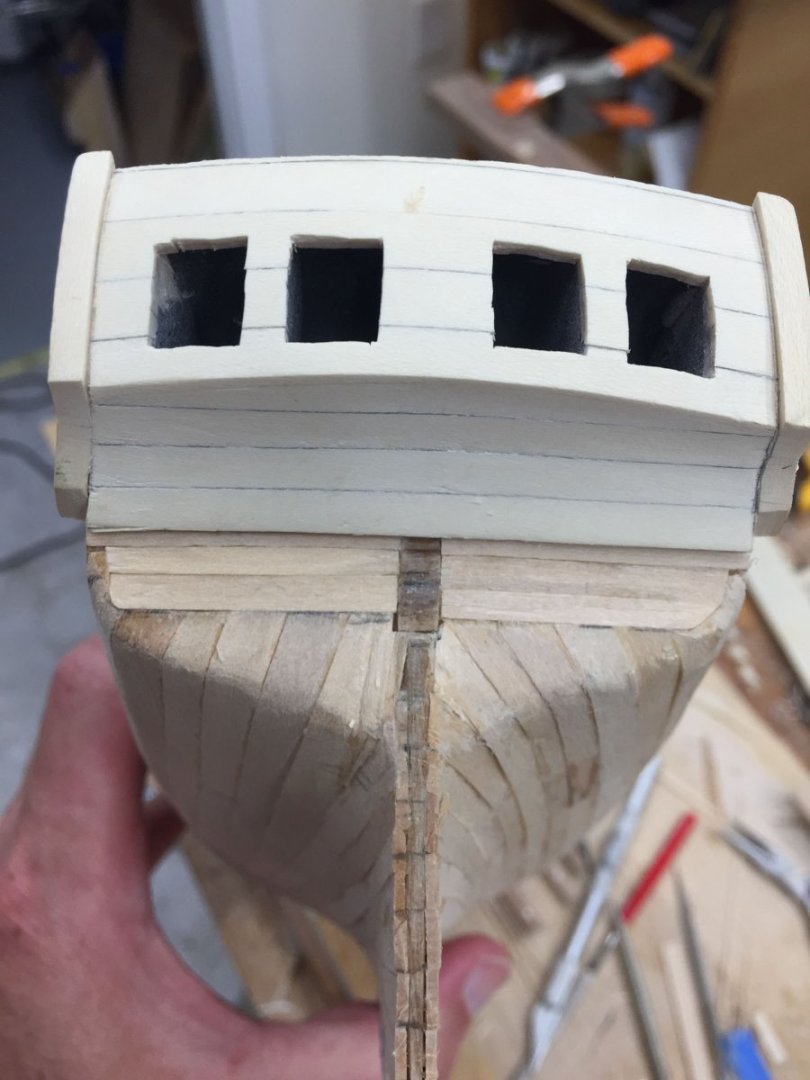
First, thank you guys for comments and likes. Keeps me going knowing someone is reading these posts. Jason, who lives pretty close, I hope to get to hang out soon. Mikiek I am contemplating your method of yellow/superglue for second planking. Dan/Shipmodel thank you for your responses and advice. I am hoping to incorporate some bone details in this model, maybe a binnacle to start. Baby steps... In my last post I mentioned I was trying to power through finishing first planking. I had a hit a bit of a rut trying to make everything perfect and it was time to move on. So now I have officially finished first planking even if I resorted to wide planks. I had left the counter planking unfinished so I could roll the stern planking upwards, trim the ends flush, and then insert the final 2 counter planks. I thought that might be a better plan than trying to cut each stern plank individually. I don't know how some people get such perfect straight intersections! Below I used a compass to trace a pencil line parallel to the bottom counter. I found it easiest to cut by hand along the pencil line with an xacto, going very shallow and deepening it repeatedly. Then I used a 1/4" chisel to pare the waste away working down from the top. Slow n steady. I eventually cleared all the waste wood on the left side. I found it easier to glue two narrower strips vs one wide one because the space I am filling is concave. Below is both sides excavated, glued, and filled. Of course it'll all be covered by the second planking but I think the stern plank/counter intersection looks tight which is what I was aiming for. Next is sanding and more sanding and then some sanding to smooth it all out. In other news I managed a late entry into this year's Admiralty Workshops (someone cancelled and I was on the wait list) so I will learn how to make rope with Chuck. At my usual glacial building pace odds are I will forget everything by the time I get to rigging but if I keep good notes maybe some of it will stick. And at the end we get a tour with the curator of the Naval Academy Museum; that is just freaking cool! well goodnight all and thanks for reading Cisco

-
Ted- great series of posts! i really like your documenting how you built your fixtures. very helpful to the rest of us keep it going! thx cisco
-
Looking really good Fred. Cheerful is my next planned project, assuming finishing the AVS doesn’t do me in. I will follow with interest and thanks for posting
-
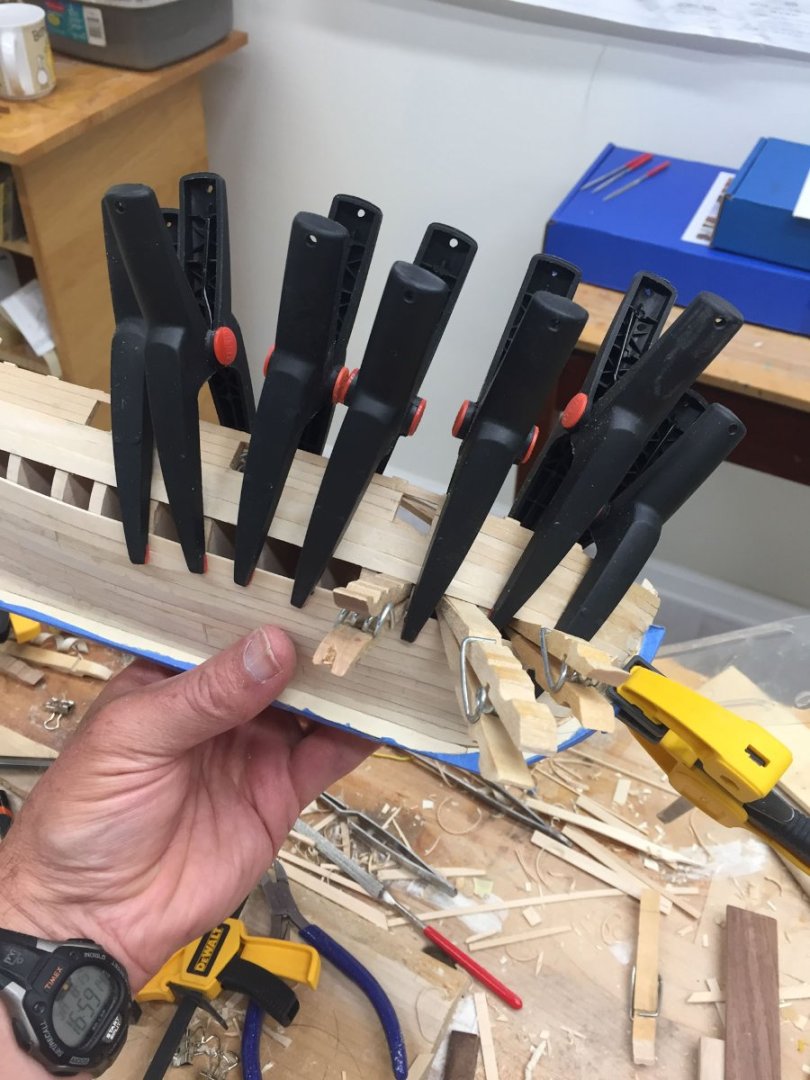
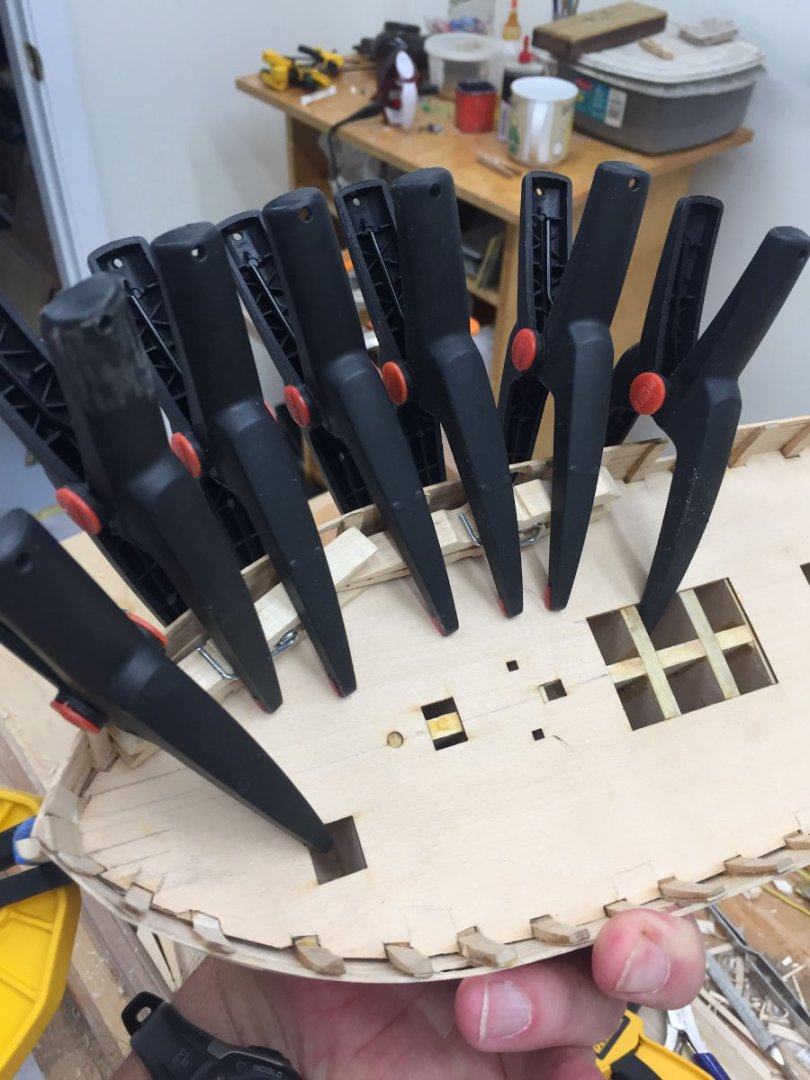
Greetings fellow Ship Modelers! The heat here in Delaware finally relented and we could go outside again without heatstroke. Went to ModelCon last weekend which was fun but brief as I had my 7 year old son with and he was hot and bored bored bored. Thank you to the 2 guys who entertained him for a few minutes while I met/talked to Chuck - great guy, very social, and he dealt with a complete stranger walking up acting like I knew him with remarkable calmness. I suspect it happens often. I brought and displayed for a few hours my 18th Century Longboat (you can see it in one of Chuck's photos looking forlorn between 2 enormous model battleships) and while it didn't draw a crowd hopefully someone(s) appreciated it. Then my son and I toured the battleship New Jersey, pretty cool, and went across the river to tour the Olympia and the submarine whose name escapes me before deciding it was way to hot for humans and heading home. With my AVS I had an epiphany and changed gears some. I realized that if don't make more progress I risk bogging down and never finishing. Its not a race but without some forward momentum she might become an unfinished hull in a box in a closet somewhere. And THAT would be tragic. So I stopped trying to make perfect planks mimicking the second planking and instead decided to fill in the rest of the first planking with wider wood strips to make it go a bit faster. So far I have been using yellow GorillaGlue which has good tack but has to be clamped. I know many use and are happy with superglue but my previous background in woodworking really regarded superglue as a method for tiny repairs but not to be trusted for actual gluing. Maybe I'll start experimenting but not for this build. Clamping has been problematic at this center area of the planking because nothing easily reaches and the gap is small. And so far I have resisted screwing or pinning into the bulkheads as some do. So the one thing I did discover this post is pretty simple- putting something on the deck to provide a bearing surface for the spring clamps works really well! In the pic below I put 2 clothes pins on the deck against the bow planking and they provided a perfect grippy area for the spring clamps. Without them the clamps just sproinged out of position and it was getting very frustrating. Here's the outside shot; you can see its an awkward place to clamp. And my metal spring paperclip things I used for the other planks now won't fit in the narrow space. Its hard to see through the clamp forest but the last 2 rows are with wide planks but again this is first planking so no one will ever see it. Hope you all are well! Thanks for reading Cisco
-
Seriously cool Brad! the ship and the workarea.
-
and any pics of your work area? i wondered about traveling after retirement in a similar fashion but was worried my hobbies would suffer from lack of space. but obviously you have made it work
-
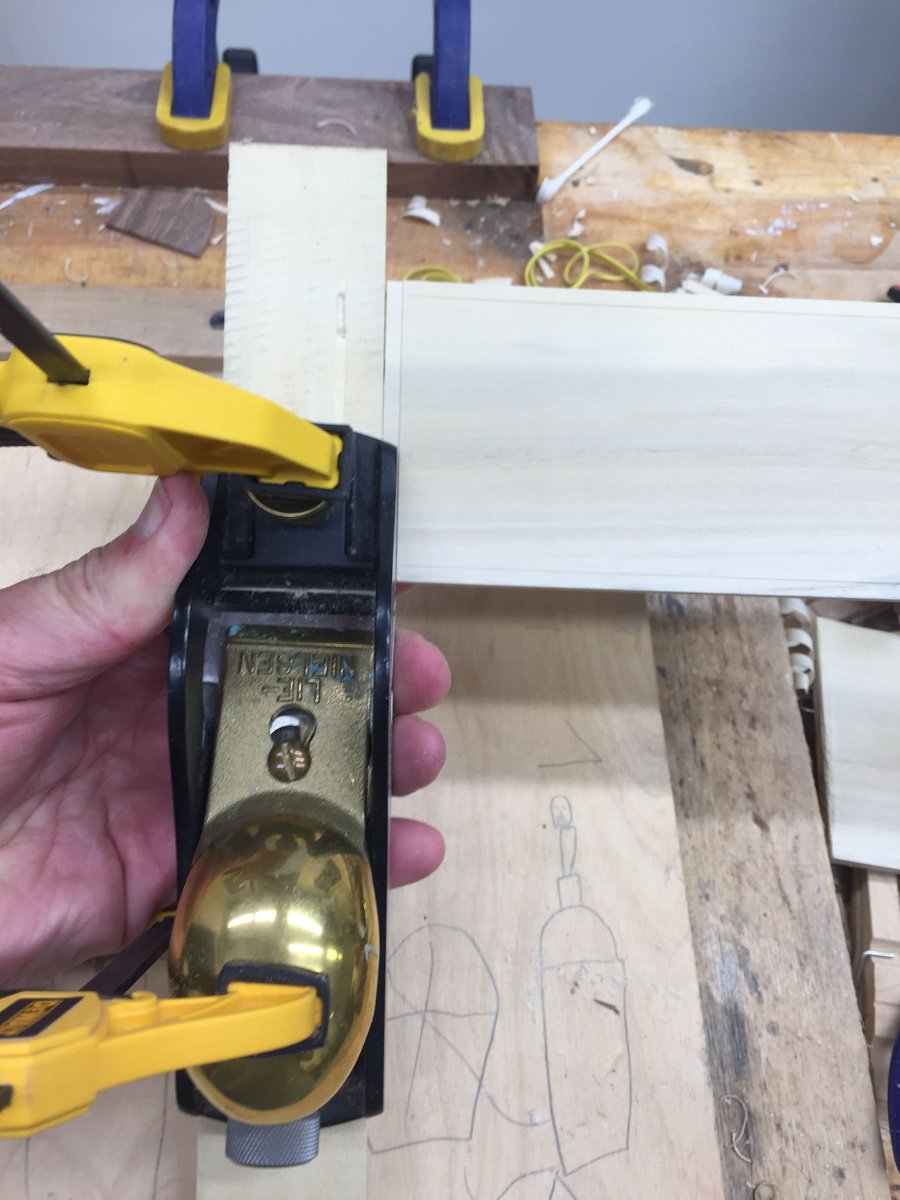
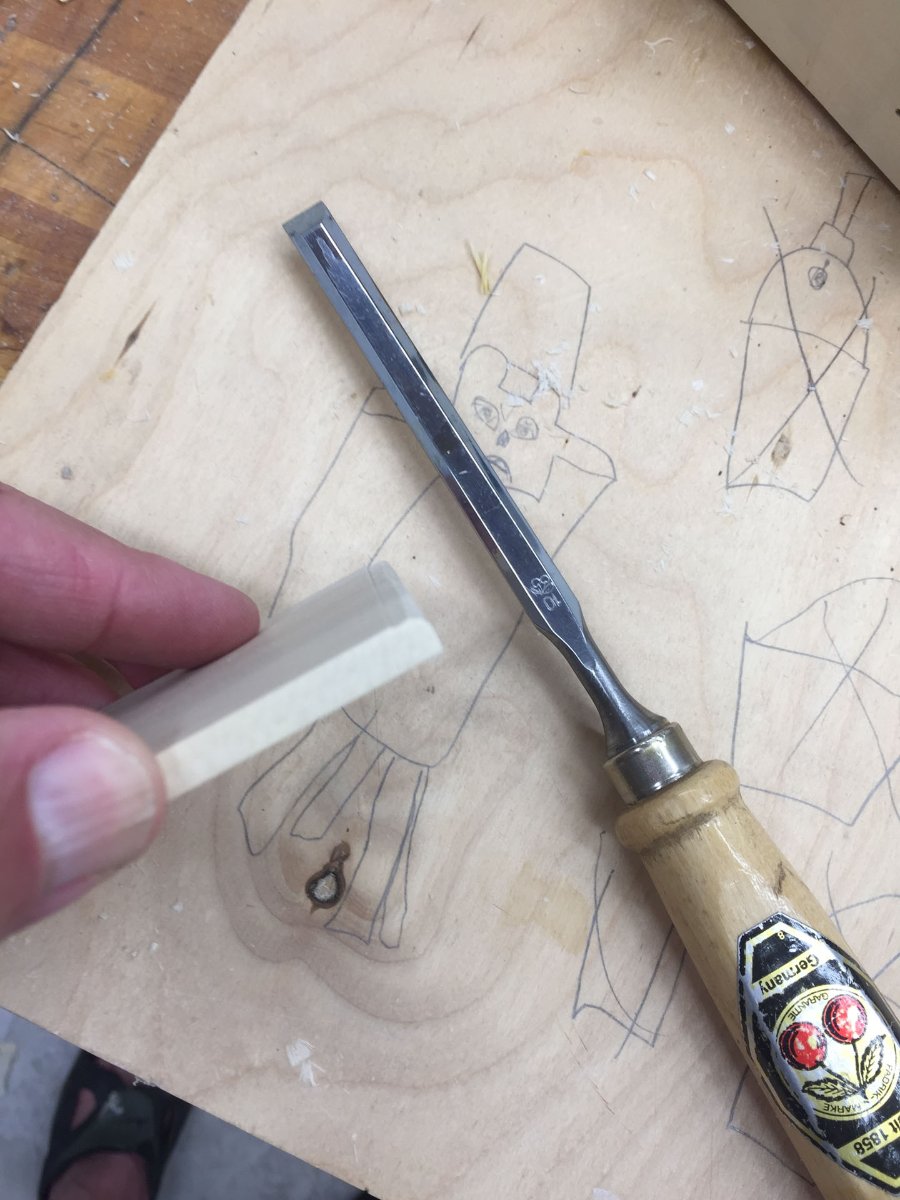
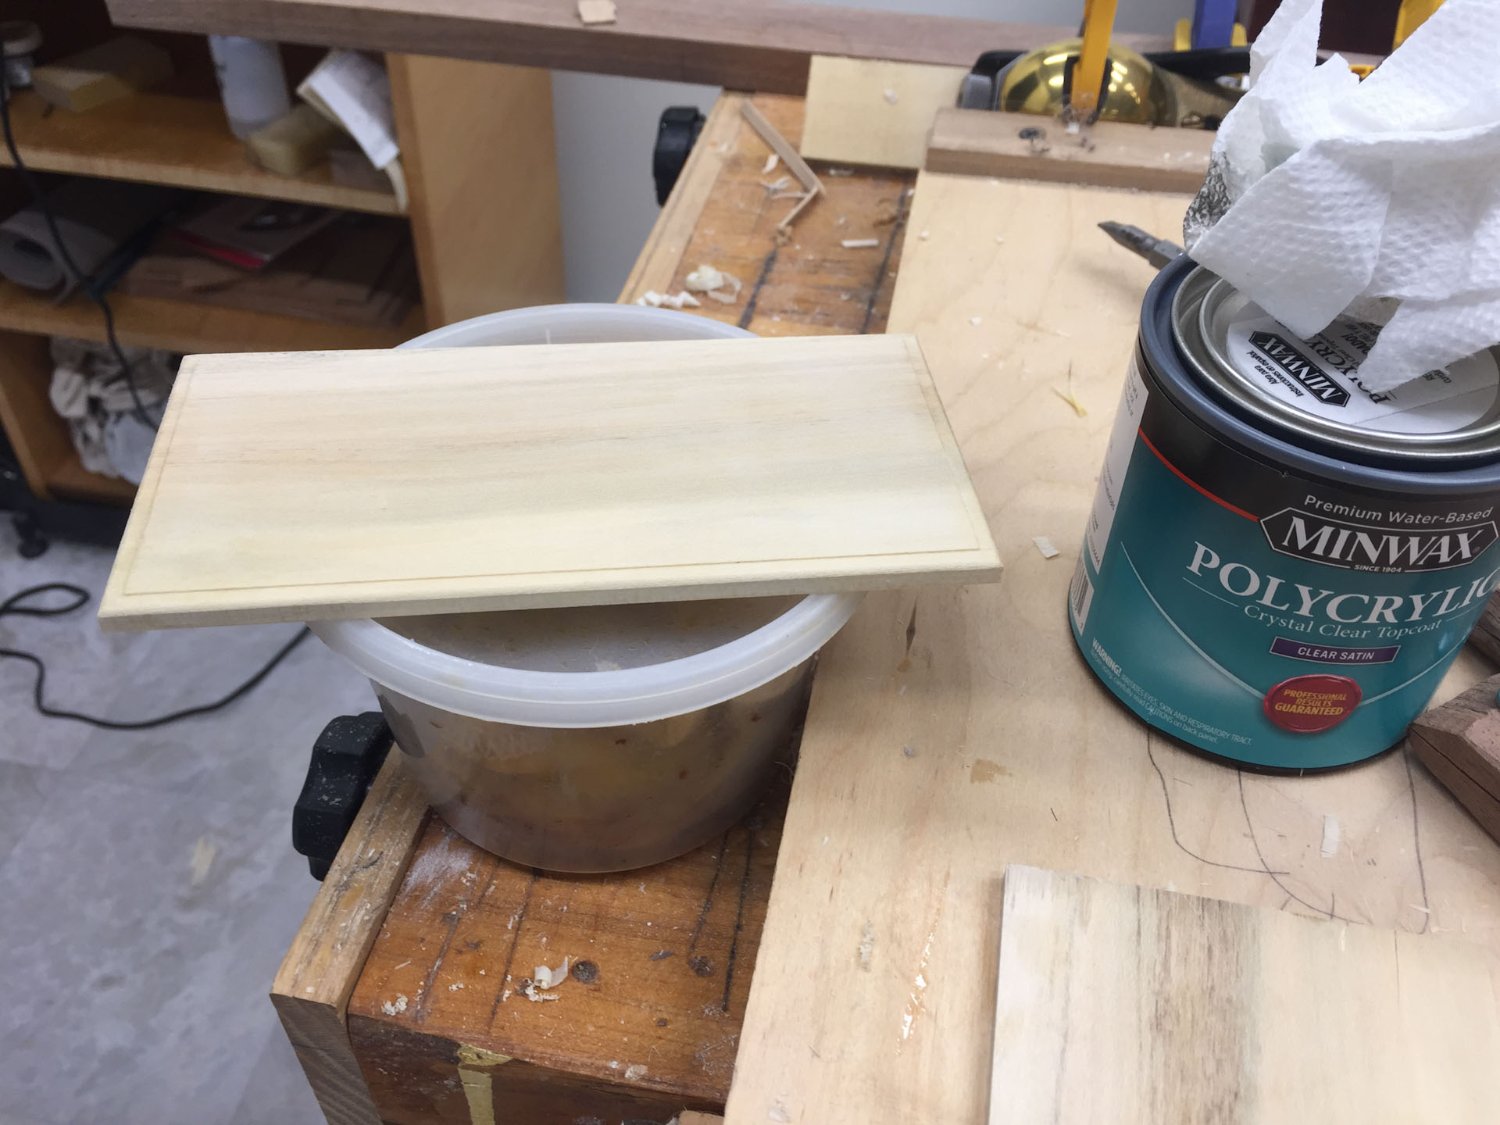
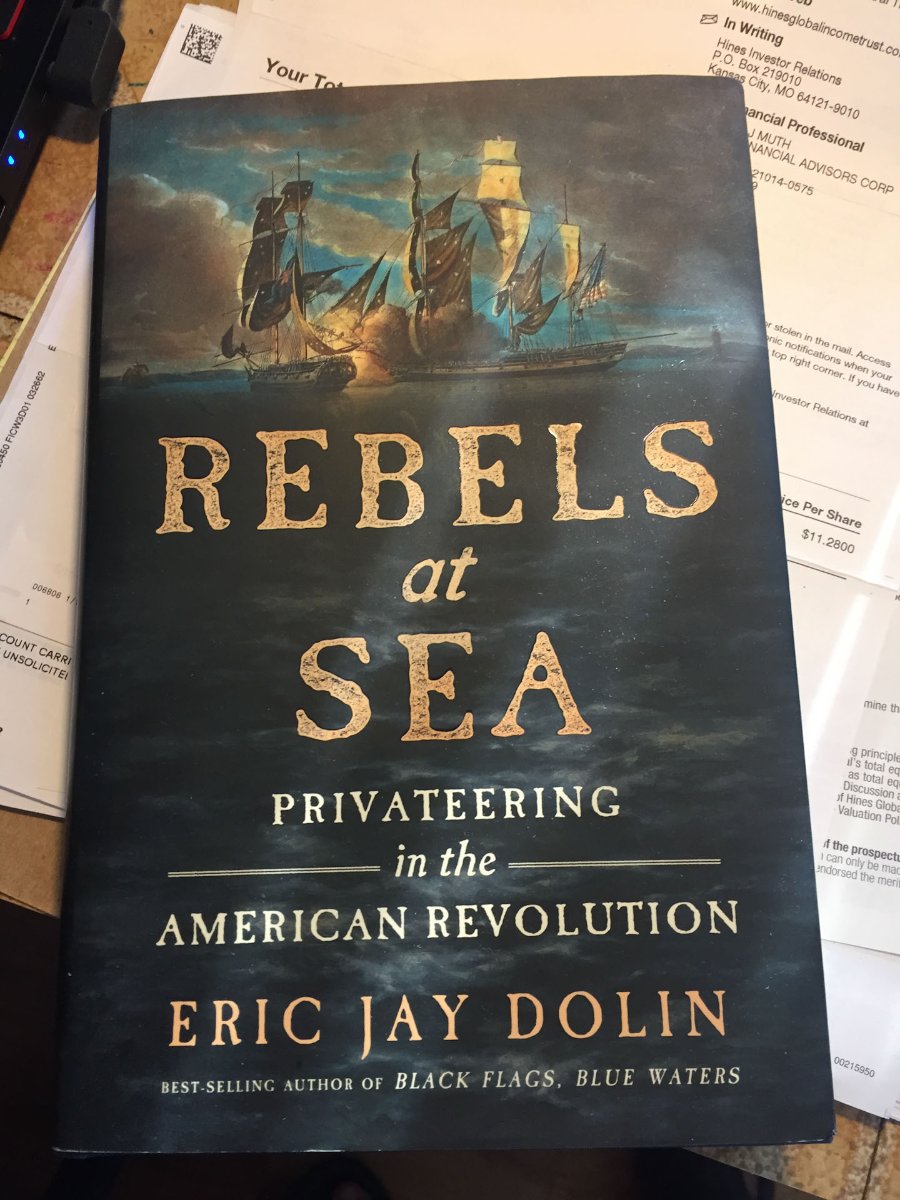
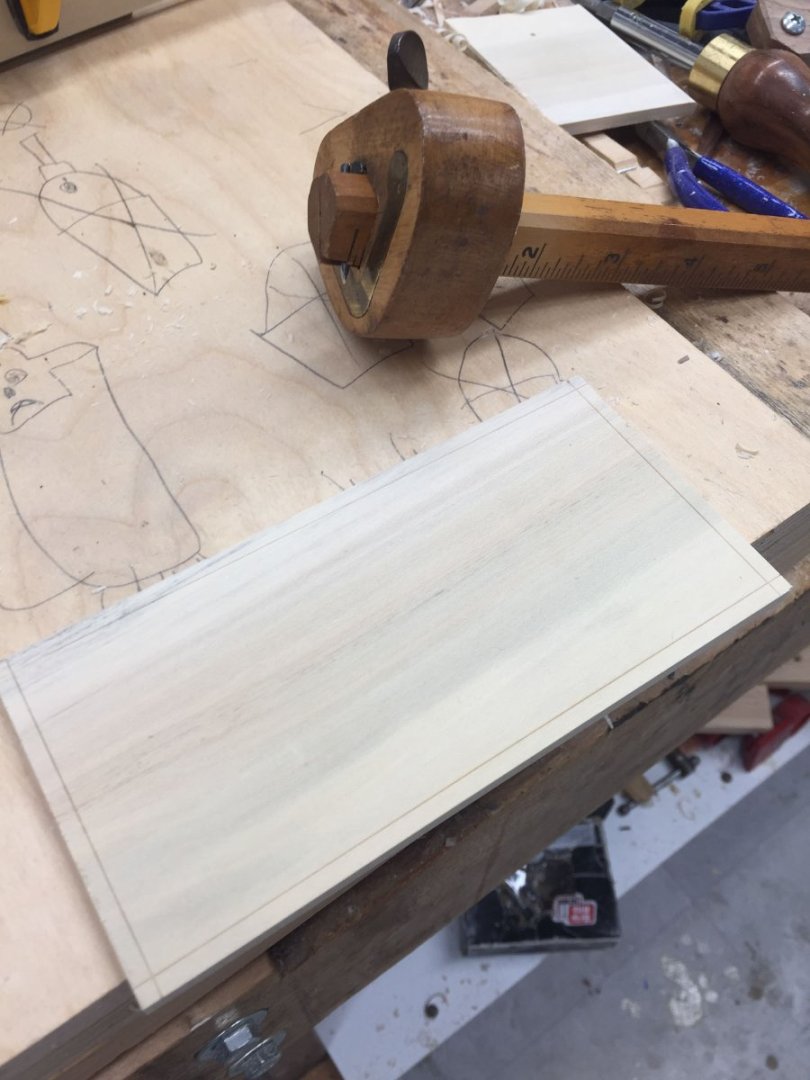
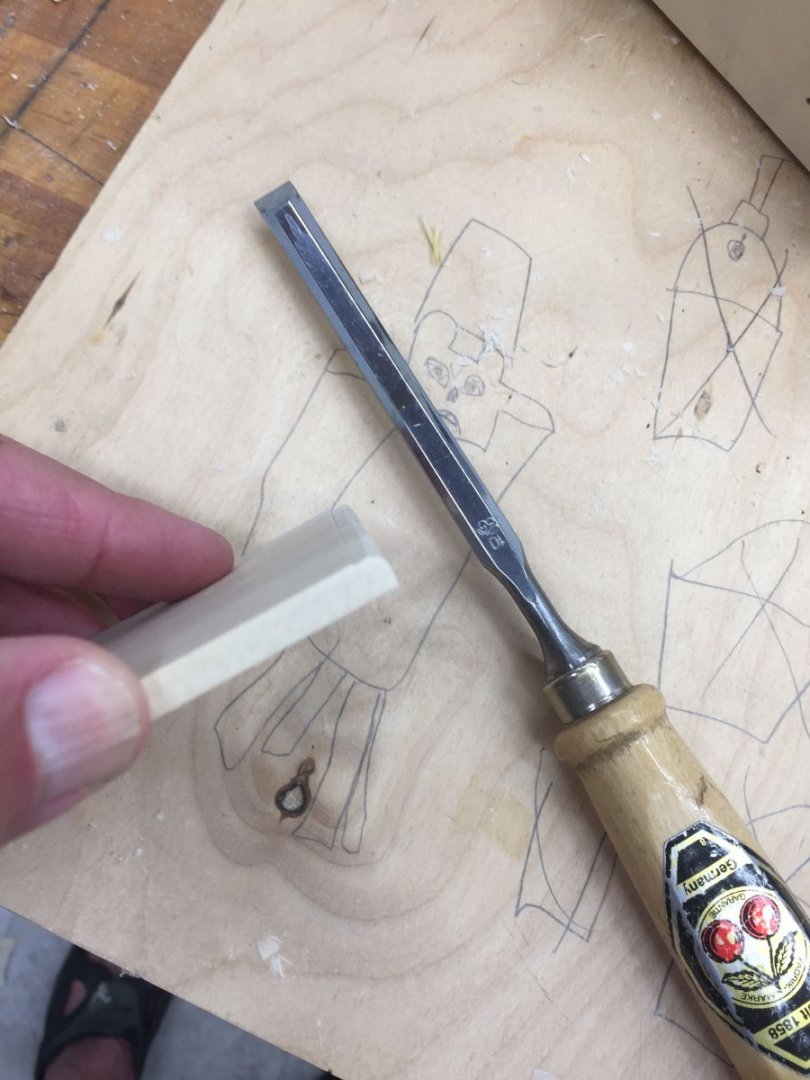
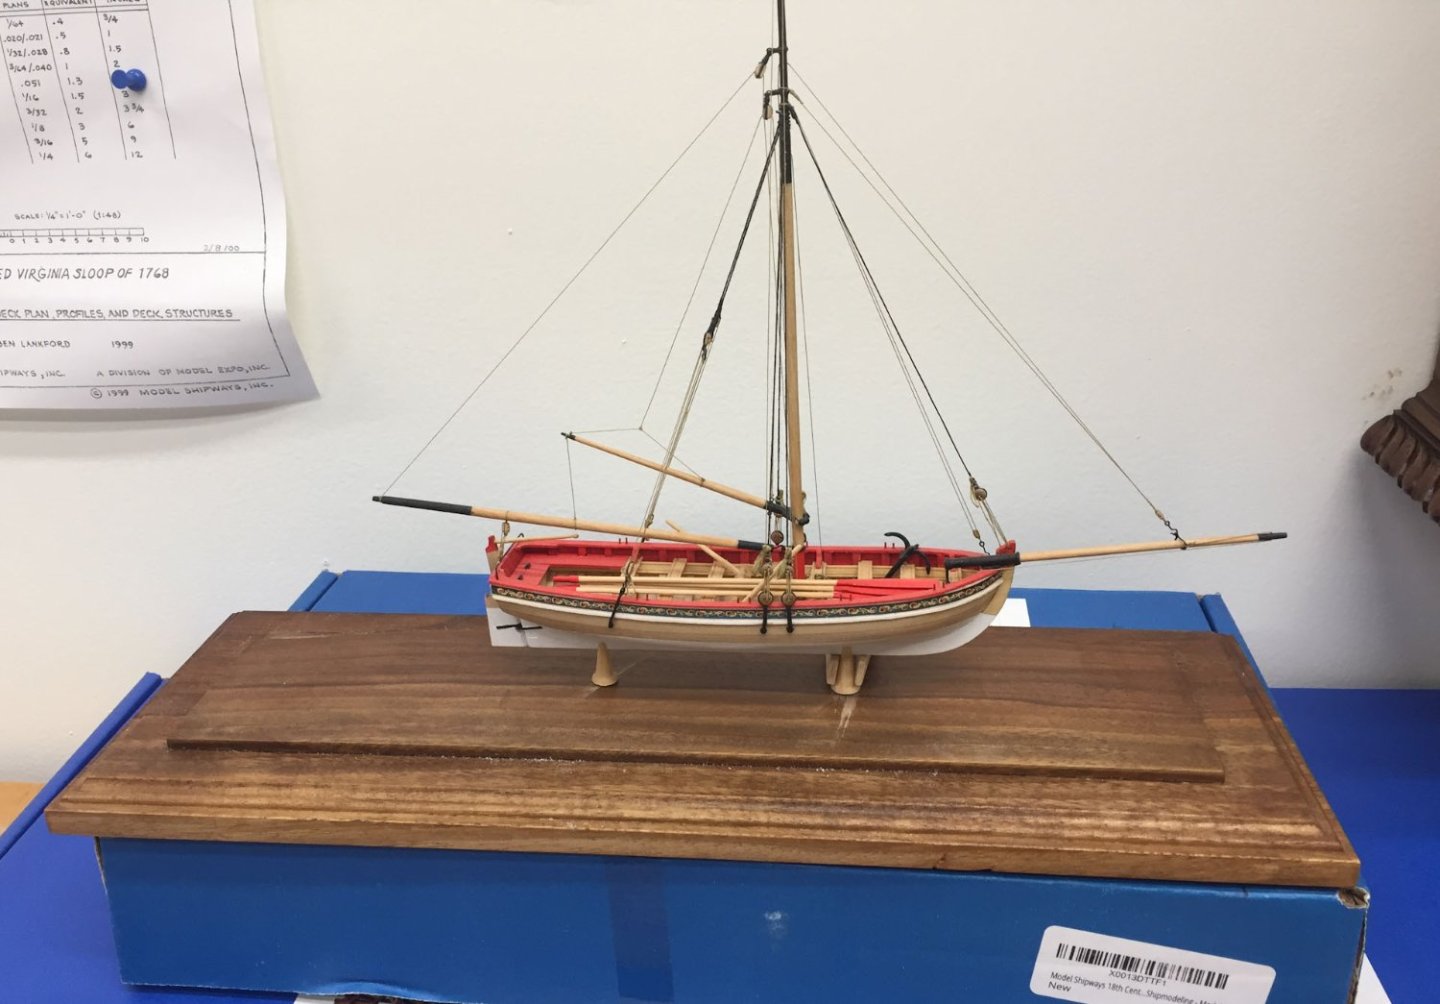
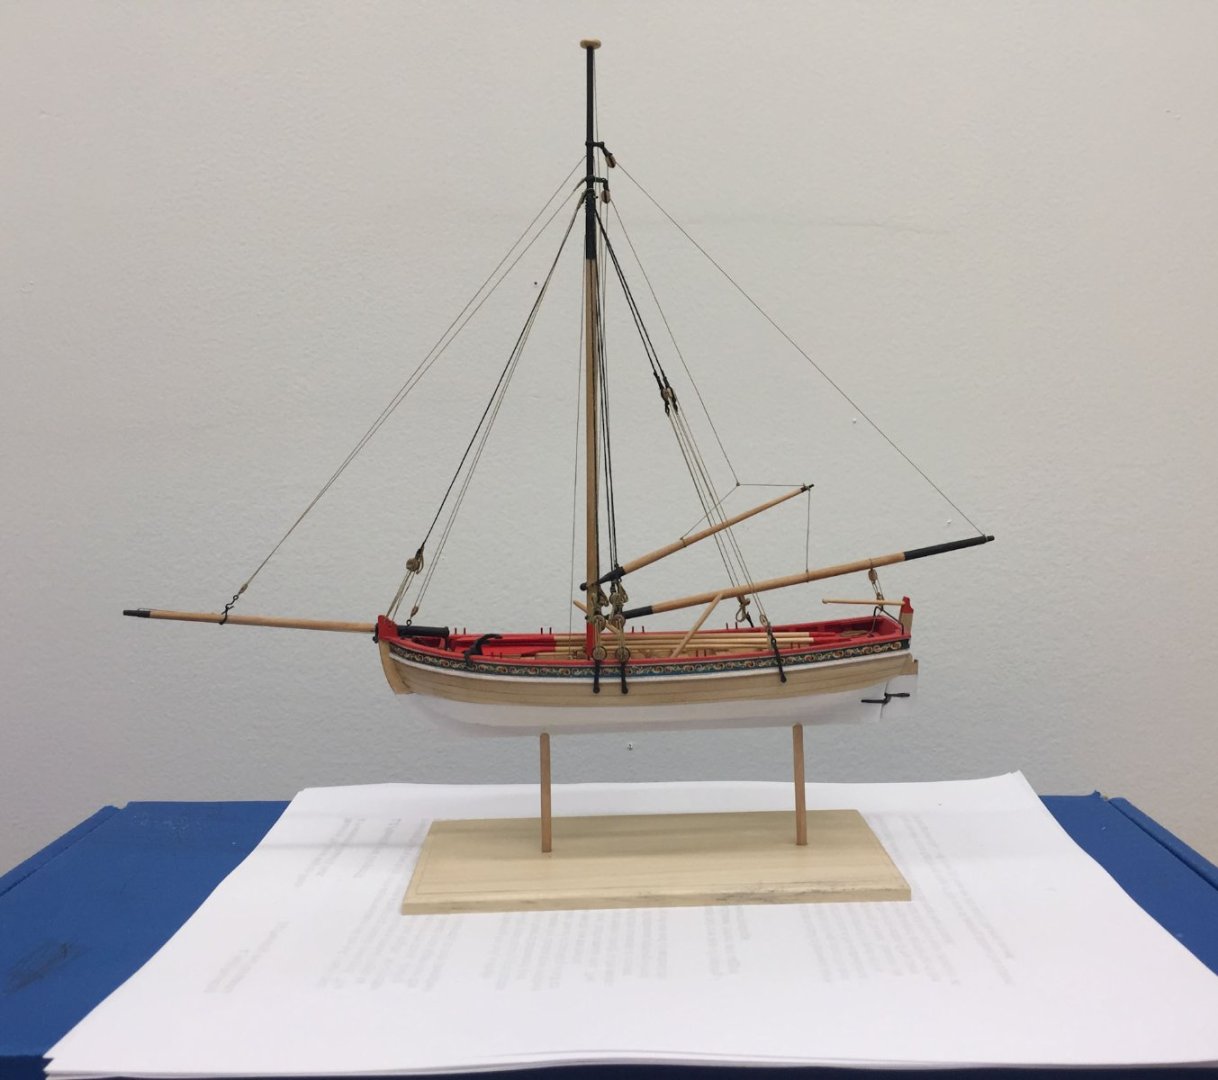
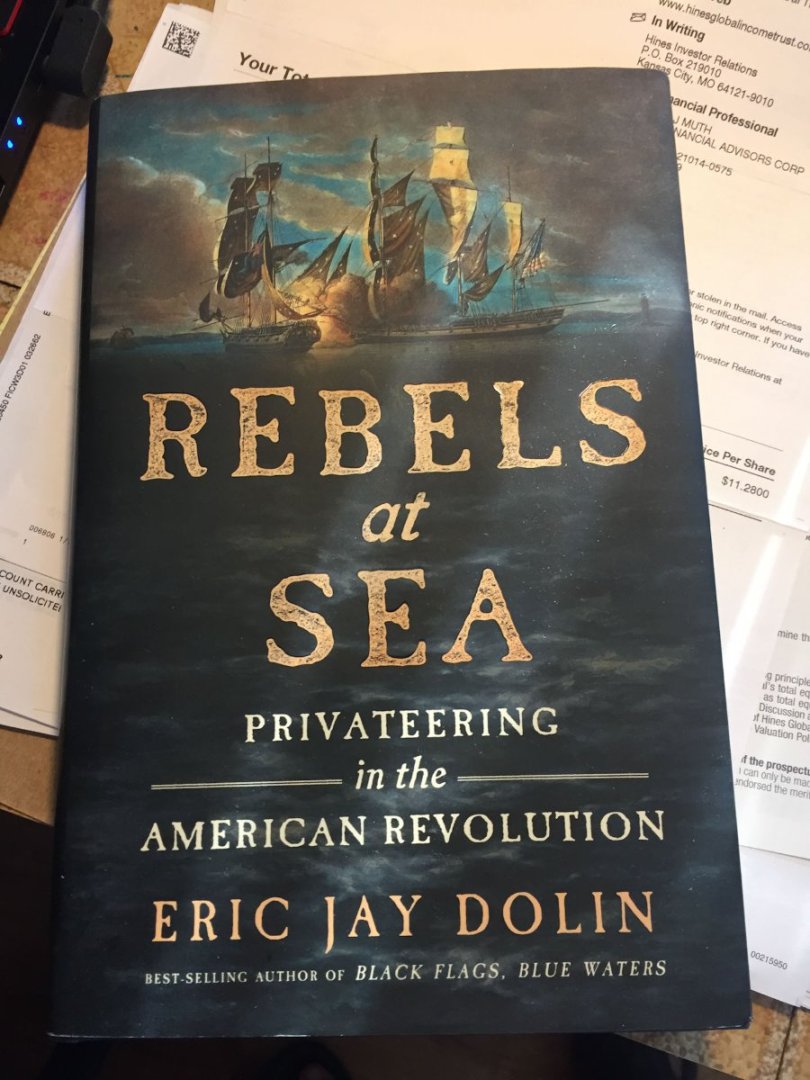
Happy weekend! My update today includes absolutely nothing about my AVS and starts with this book: Pretty good, not too deep, entertaining. I bought it and then saw it at my local library the next week. Mr Dolin includes a substantial bibliography for his many quotes. Next up, assuming nothing happens between now and tomorrow morning, I am attending my first ever ModelCon in Philly. And to up my stress levels I am participating by displaying my first ever (so far my only ever) shipmodel, Model Shipway's 18th Century Longboat. I initially made a substantial base with 2 levels and an ogee border which in hindsight totally overpowered the model. So last 2 days I have been making a newer small base more along the lines of the box picture. Here is the original base (after I had already sawn off the posts holding up the ship so there has been some damage). Its made of walnut. I wanted a lighter wood but I felt the kit block of basswood was too light and flimsy. So I cut out a piece of holly I had been saving for years that turned out to be not dried properly so it spalted and turned a greyish cast. Useless for planking but a good test subject for making a base. The pictures in the Longboat instruction manual looked like there was a small rabbit or bullnose on the edges of Chuck's base. How he did this wasn't covered in the text so I did my best. This detail is very shallow. Initially I made a scratch stock but it tore out on the crossgrain. So I cut the borders of the fillet with my mortise gauge: The I cut the fillet with my rabbit block plane with a piece of wood clamped on as a fence After cutting all 4 sides I started the roundover with my chisel I found if I removed most of the crossgrain material first with the chisel there was little tearout when using the scratchstock to finish the roundover Home stretch. I finished the base with waterbased polyurethane wiped on with a papertowel. This was a practice run for when I plank the AVS with holly as I wanted to try a finish that doesn't impart any colour change to the wood. It worked great. I smoothed off nibs by rubbing the dry surface with a papertowel. In the future I may try a synthetic pad as well but it was getting late and I had to get this done by tomorrow. I remade the posts next. Previously I had tried to form the tapering posts by chucking them in my drill and shaping with files. The finished products looked kinda squat and didn't exactly match. This time I used a dowel from the kit, cut simple holes in the base with my drill and friction fit the posts. I drilled holes into the top side of the posts and used cut-off wire nails to reinforce the post/ship connection. Version 1 was too tall Version 2 looked better to my eye so I used a touch of epoxy to connect the ship to the posts, touched up the white paint, and called it a night. And thats it. Hope to see some of you at the ModelCon tomorrow! Cisco


-
as a very new modeler i am struggling with the same bending planks around the sharp curve of the transom below the counter on my Armed Virginia Sloop. So far i have found Chuck Passaro’s videos the most helpful for sideways bending. But to form the sharp bend inwards below the counter i have found soaking the end of the wood overnight in water then clamping the plank in place until it dries works best for me. i use an oversize plank so i can remove a lot of wood to make it fit better. and i still lose 25-50% of my attempts to breakage.
-
that looks great! and yes the last plank is always a funky hourglass shape
-
looks great!
-
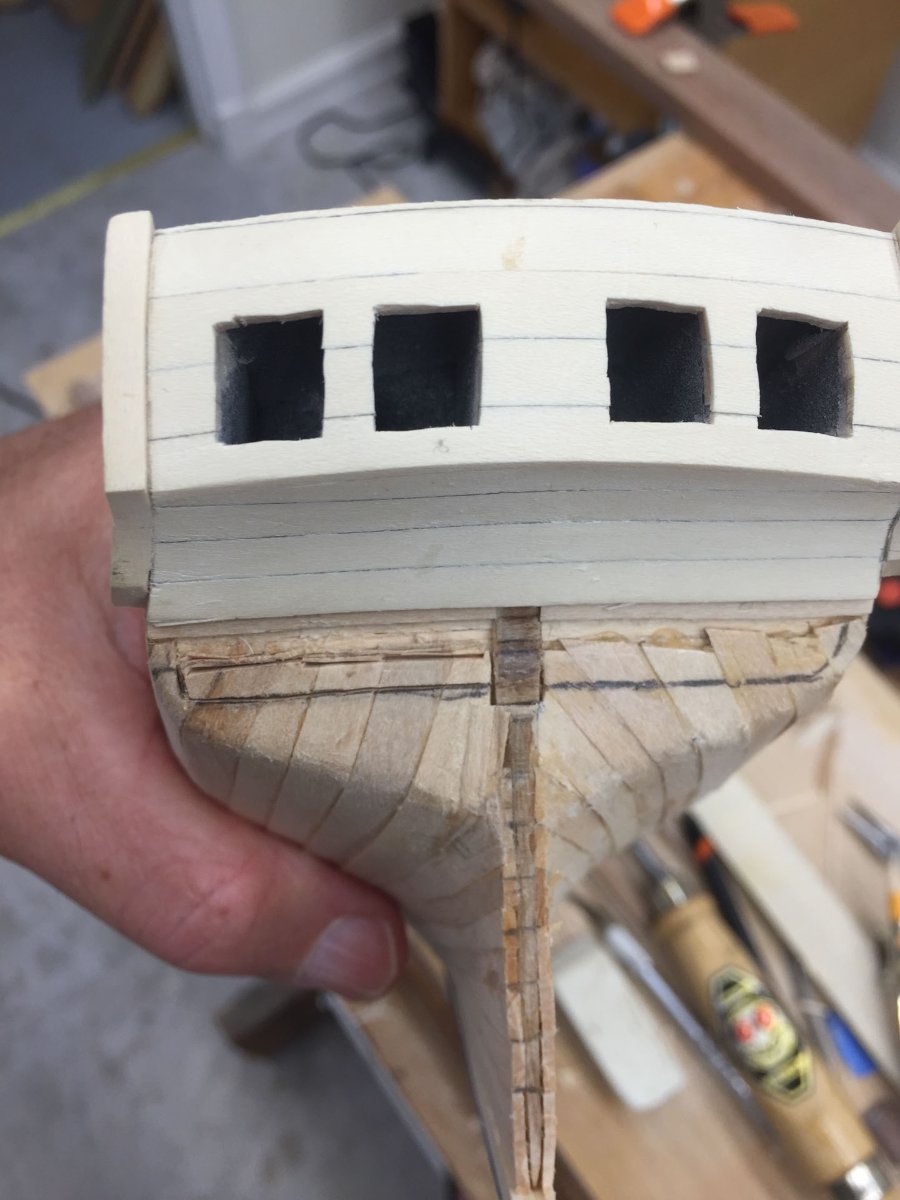
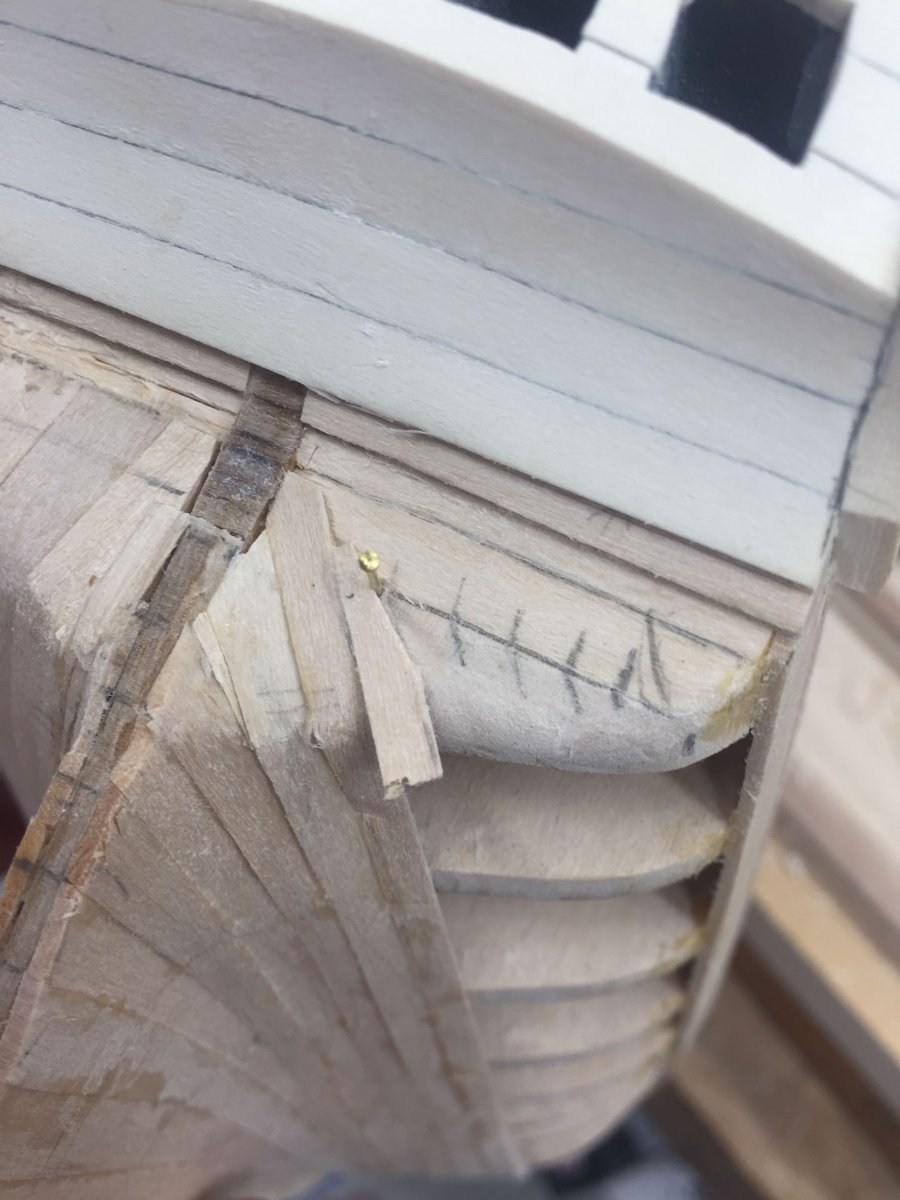
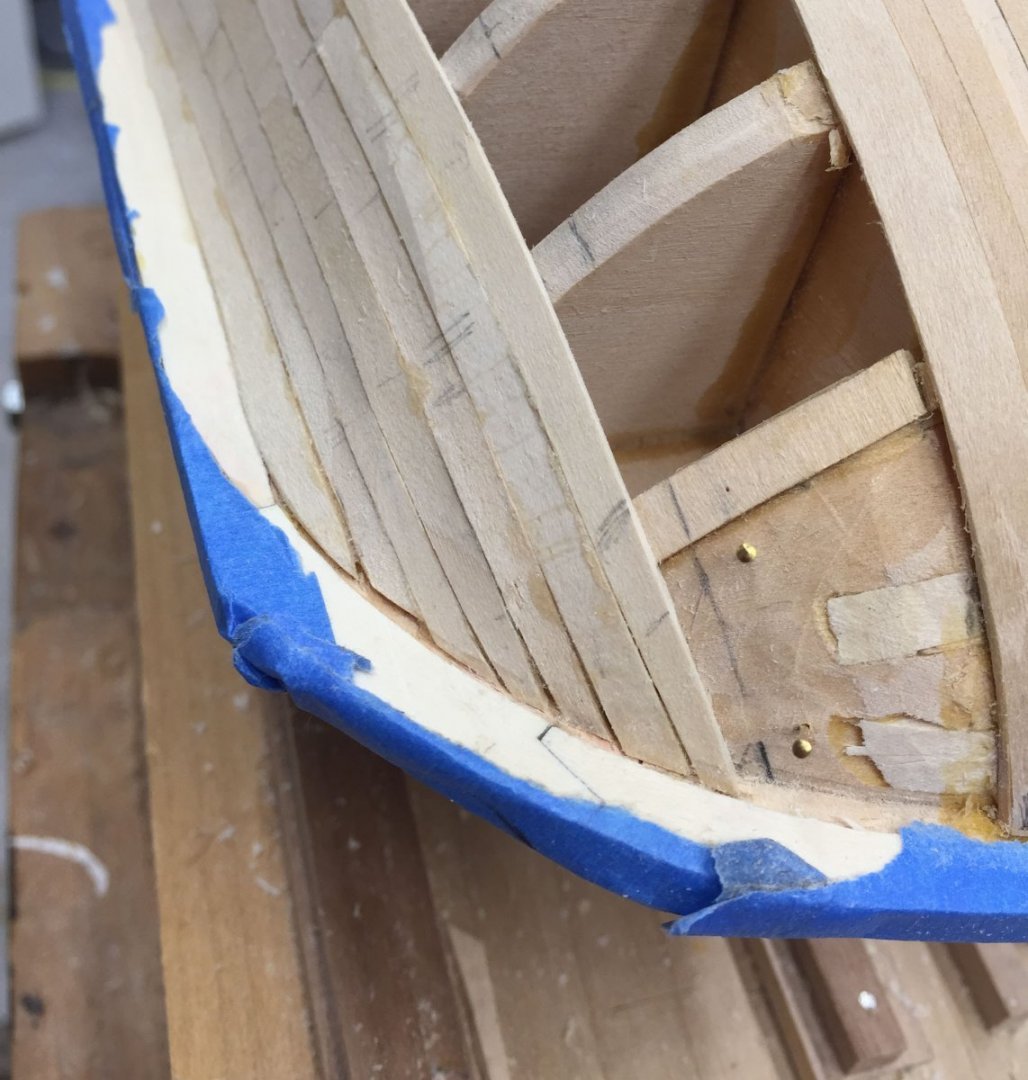
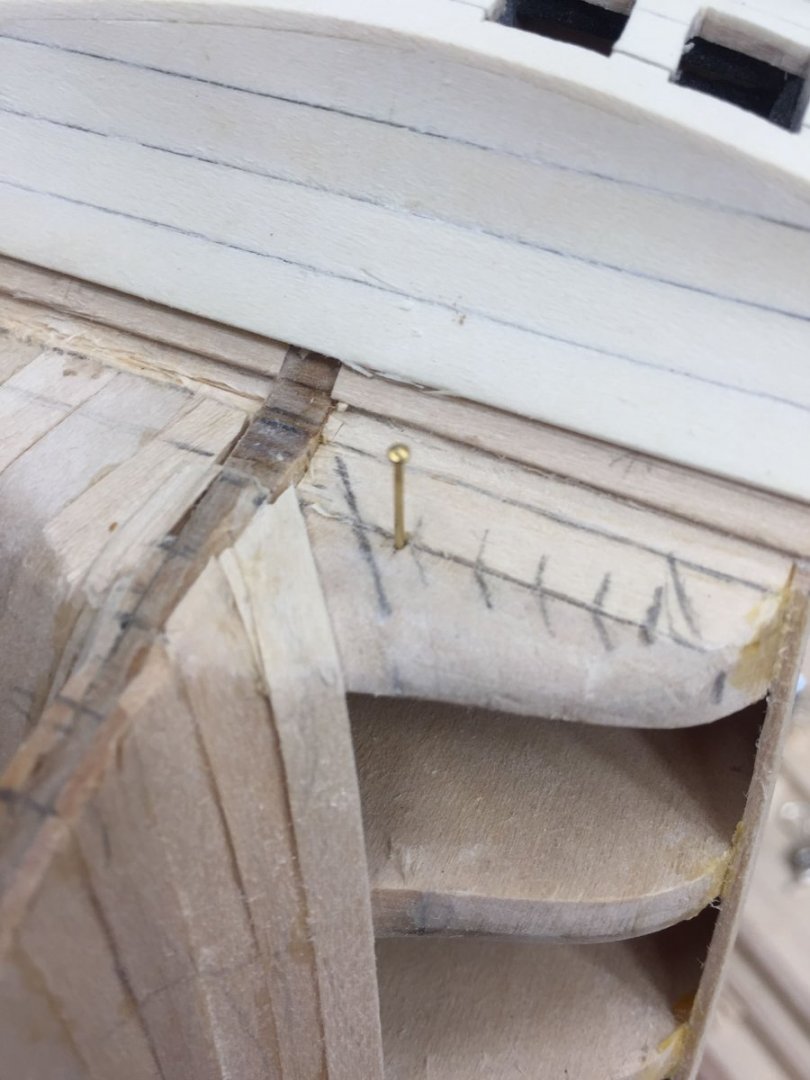
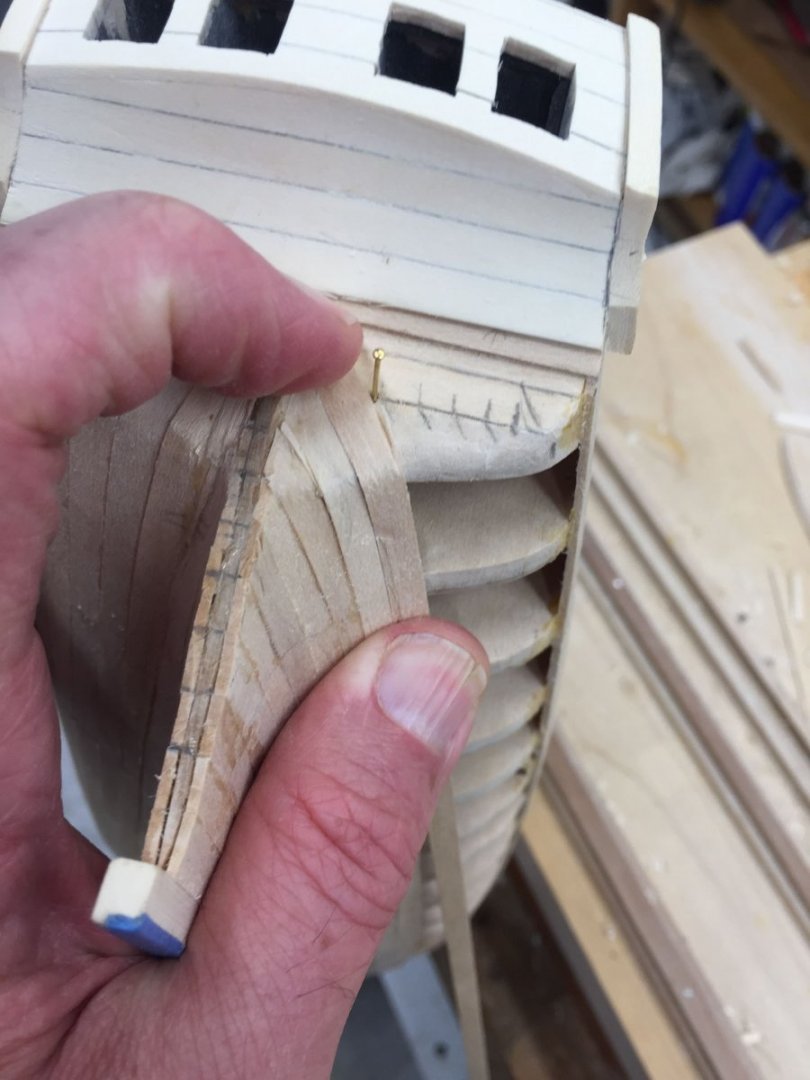
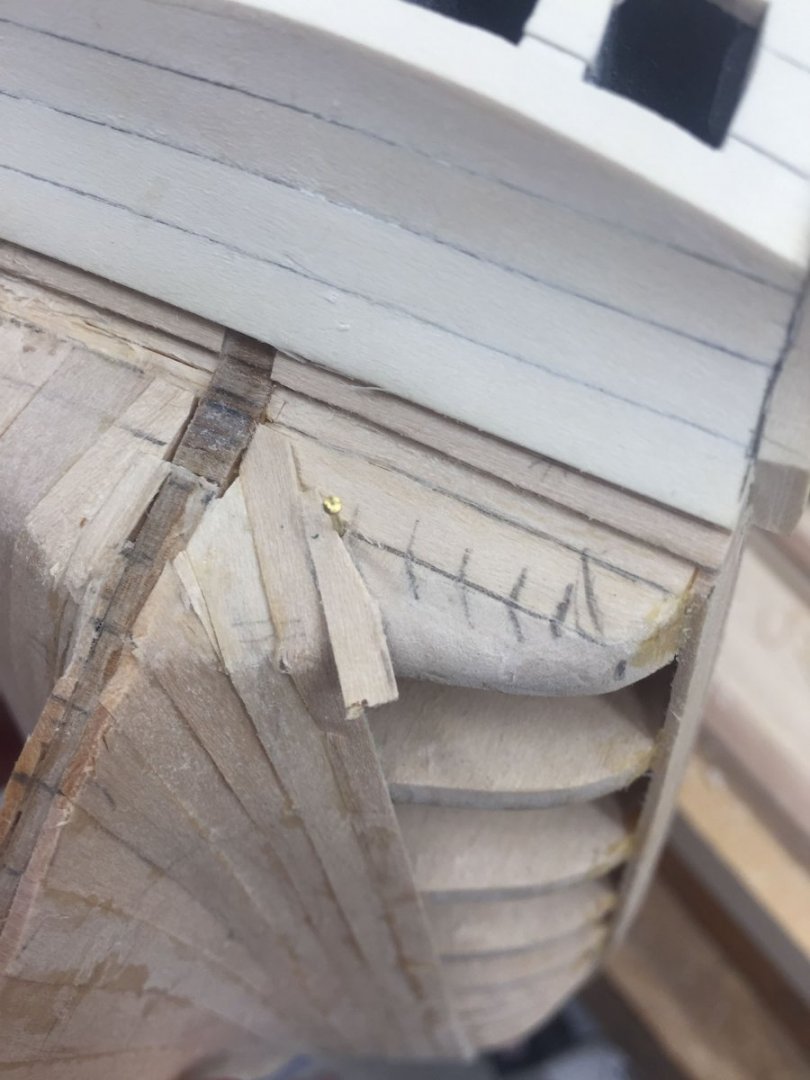
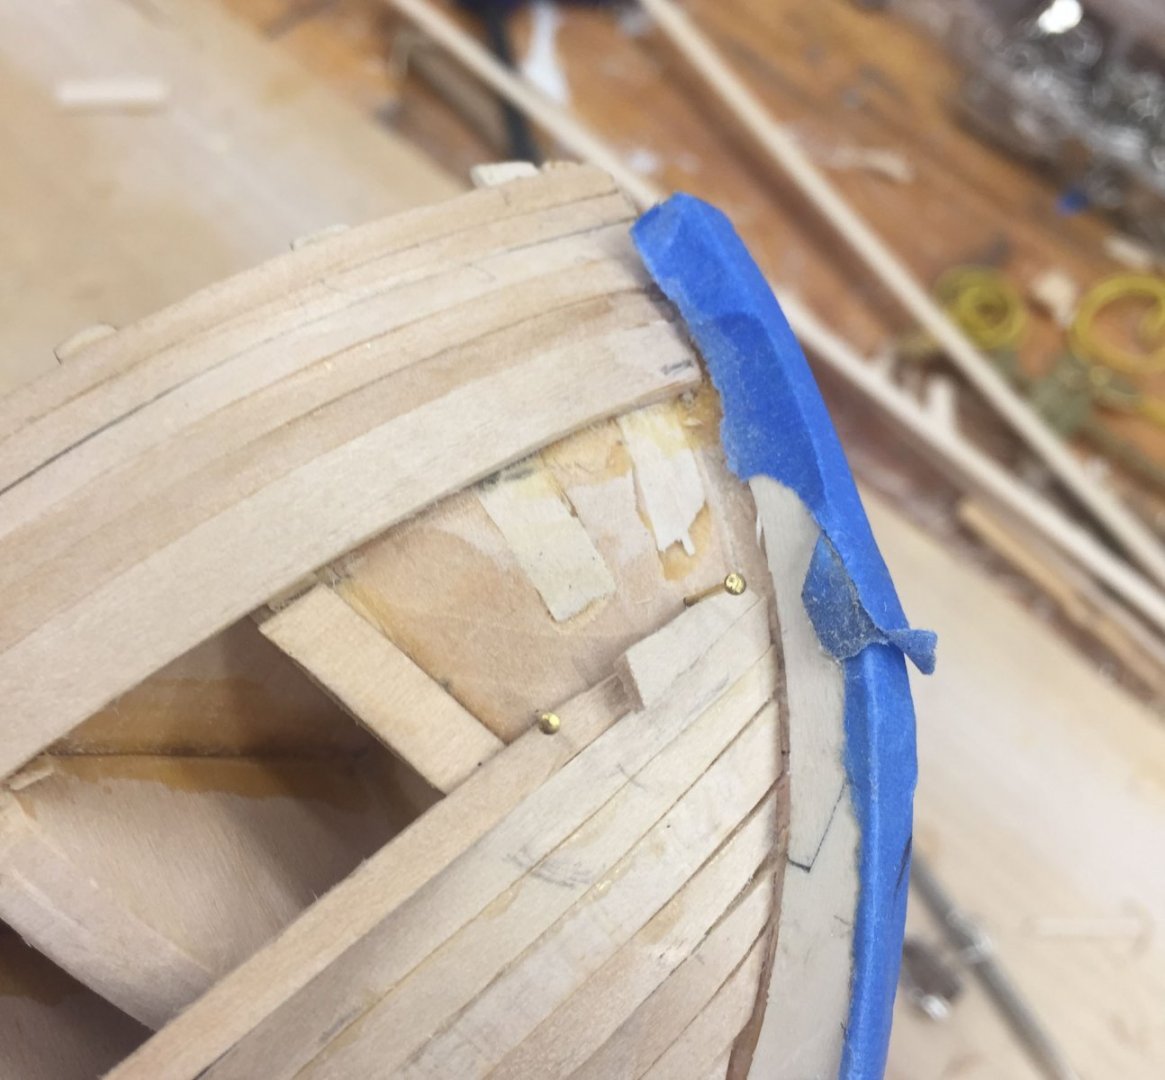
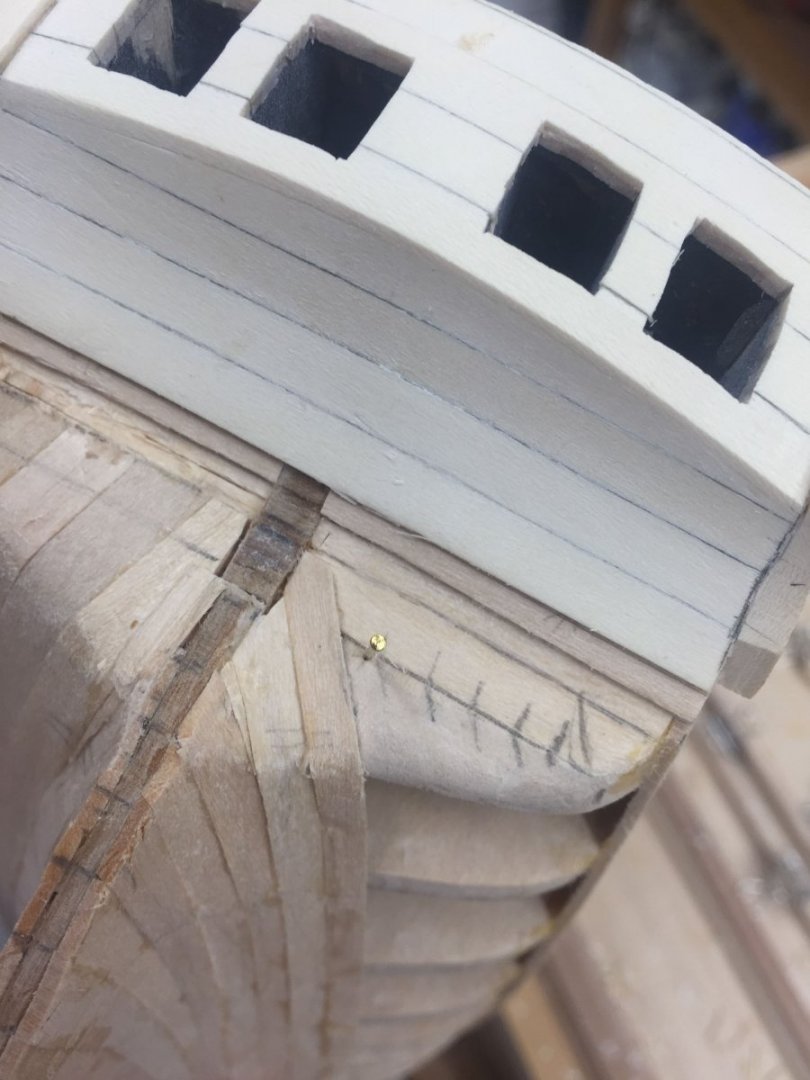
I was posting comments on a build log and the author asked if I had my own log for the AVS and I said "yes," and then I realized I hadn't posted in weeks. Work goes knuts once the summer starts and takes more and more of my energy. But enough whining lets have at it- So I haven't been happy with my port side first planking. As you can see lots of gaps at the prow which for some reason didn't seem to occur on the starboard side. Whenever I clamped at the prow the plank would slide upwards and leave a gap and each time I thought I had pushed it back but once everything was dry there it was. I am at the end of this band of planks so I wanted to get my head back in the game and fix it for the final band. And I didn't want a gap forming at the stern end where the plank curves up into the counter, which it always tries to do. You can see in the pic below I had to add a tiny wedge to close the gap in the last plank. There will be a second planking on top and I already work at the speed of Government Bureaucracy so I am not alcoholing off my mistakes but I want to get my technique better. My method of getting the steep bend in the stern plank is to leave the tip of the plank in water overnight and the next day very slowly bend it around and clamp it in place until it dries. The problem with this plank is it needs to bend sideways AND backwards, a 2 dimensional bend. When I have pre-bent it sideways (a la Chuck) and then put it in water to soften it for the backwards bend the water undoes the first bend. So this time I tried wetting and clamping in place a much wider plank than what the final dimension calls for so I could trim it down. Below is the plank after drying, it splintered a bit due to the extreme bend. BUT when I lay it in place there was enough extra plank so i could shape the sideways curve by strategic wood removal instead of bending it into place. To keep the gaps from opening up I tried using wedges and the little brass pins that come with the kit. That worked great. Here the stern plank is in place after after shaping and narrowing. The glue has already dried; this was a post-op demo shot. And here is the stern plank, with 2 wedges, And the final result, no gaps that I could see and the stern I call that Good Enough. I haven't sanded yet so it'll look better I promise. 6 planks in the final band, after I add the plank below the strake which also has a tight curve to navigate. I worry my stern wood removal technique wouldn't work in wood with a strong grain lines, like the alaska yellow cedar, because you would see the grain runout. But I'm planning on my second planking being holly, which conveniently doesn't show grain. Thanks for reading, I apologize for the myriad close ups of basically 1 plank but hopefully it will help someone else including Future Me when I've forgotten how I did this. Cisco


-
I do have a log, not yet updated this month. at present i think its the only one for the AVS currently active on this website, but there are at least 15? or so that have been done here in the past. i got the practicum which is helpful, too
-
I just read your entire log juhu- masterfully done! Thank you for posting
- 104 replies
-
- 1
-

-
- Bluejacket Shipcrafters
- smuggler
- (and 1 more)
-
that half-lap jig is genius. I assume there is fine sandpaper on the bottom face of the block. Do you cut the shoulder of the half lap with the hobby knife and then sand up to it? and how are you rabbiting your planks?
-
looks great Sluicemaster! I don’t fully understand why a kit would have you plank 3 layers. My Armed Virginia Sloop has 2 layers and it has been helpful learning how to (and how not to) plank on the first layer but in the future I really only want one layer. Chuck’s planking videos were a game changer for me too keep up the great work
-
This looks like an excellent project for the First Timer* Great job Paul I am impressed * haha no
- 55 replies
-
- 2
-

-
- Nordlandsbaaden
- Billing Boats
- (and 1 more)