HOLIDAY DONATION DRIVE - SUPPORT MSW - DO YOUR PART TO KEEP THIS GREAT FORUM GOING! (Only 24 donations so far out of 49,000 members - C'mon guys!)
×


Peter Cane
-
Posts
240 -
Joined
-
Last visited
Content Type
Profiles
Forums
Gallery
Events
Everything posted by Peter Cane
-
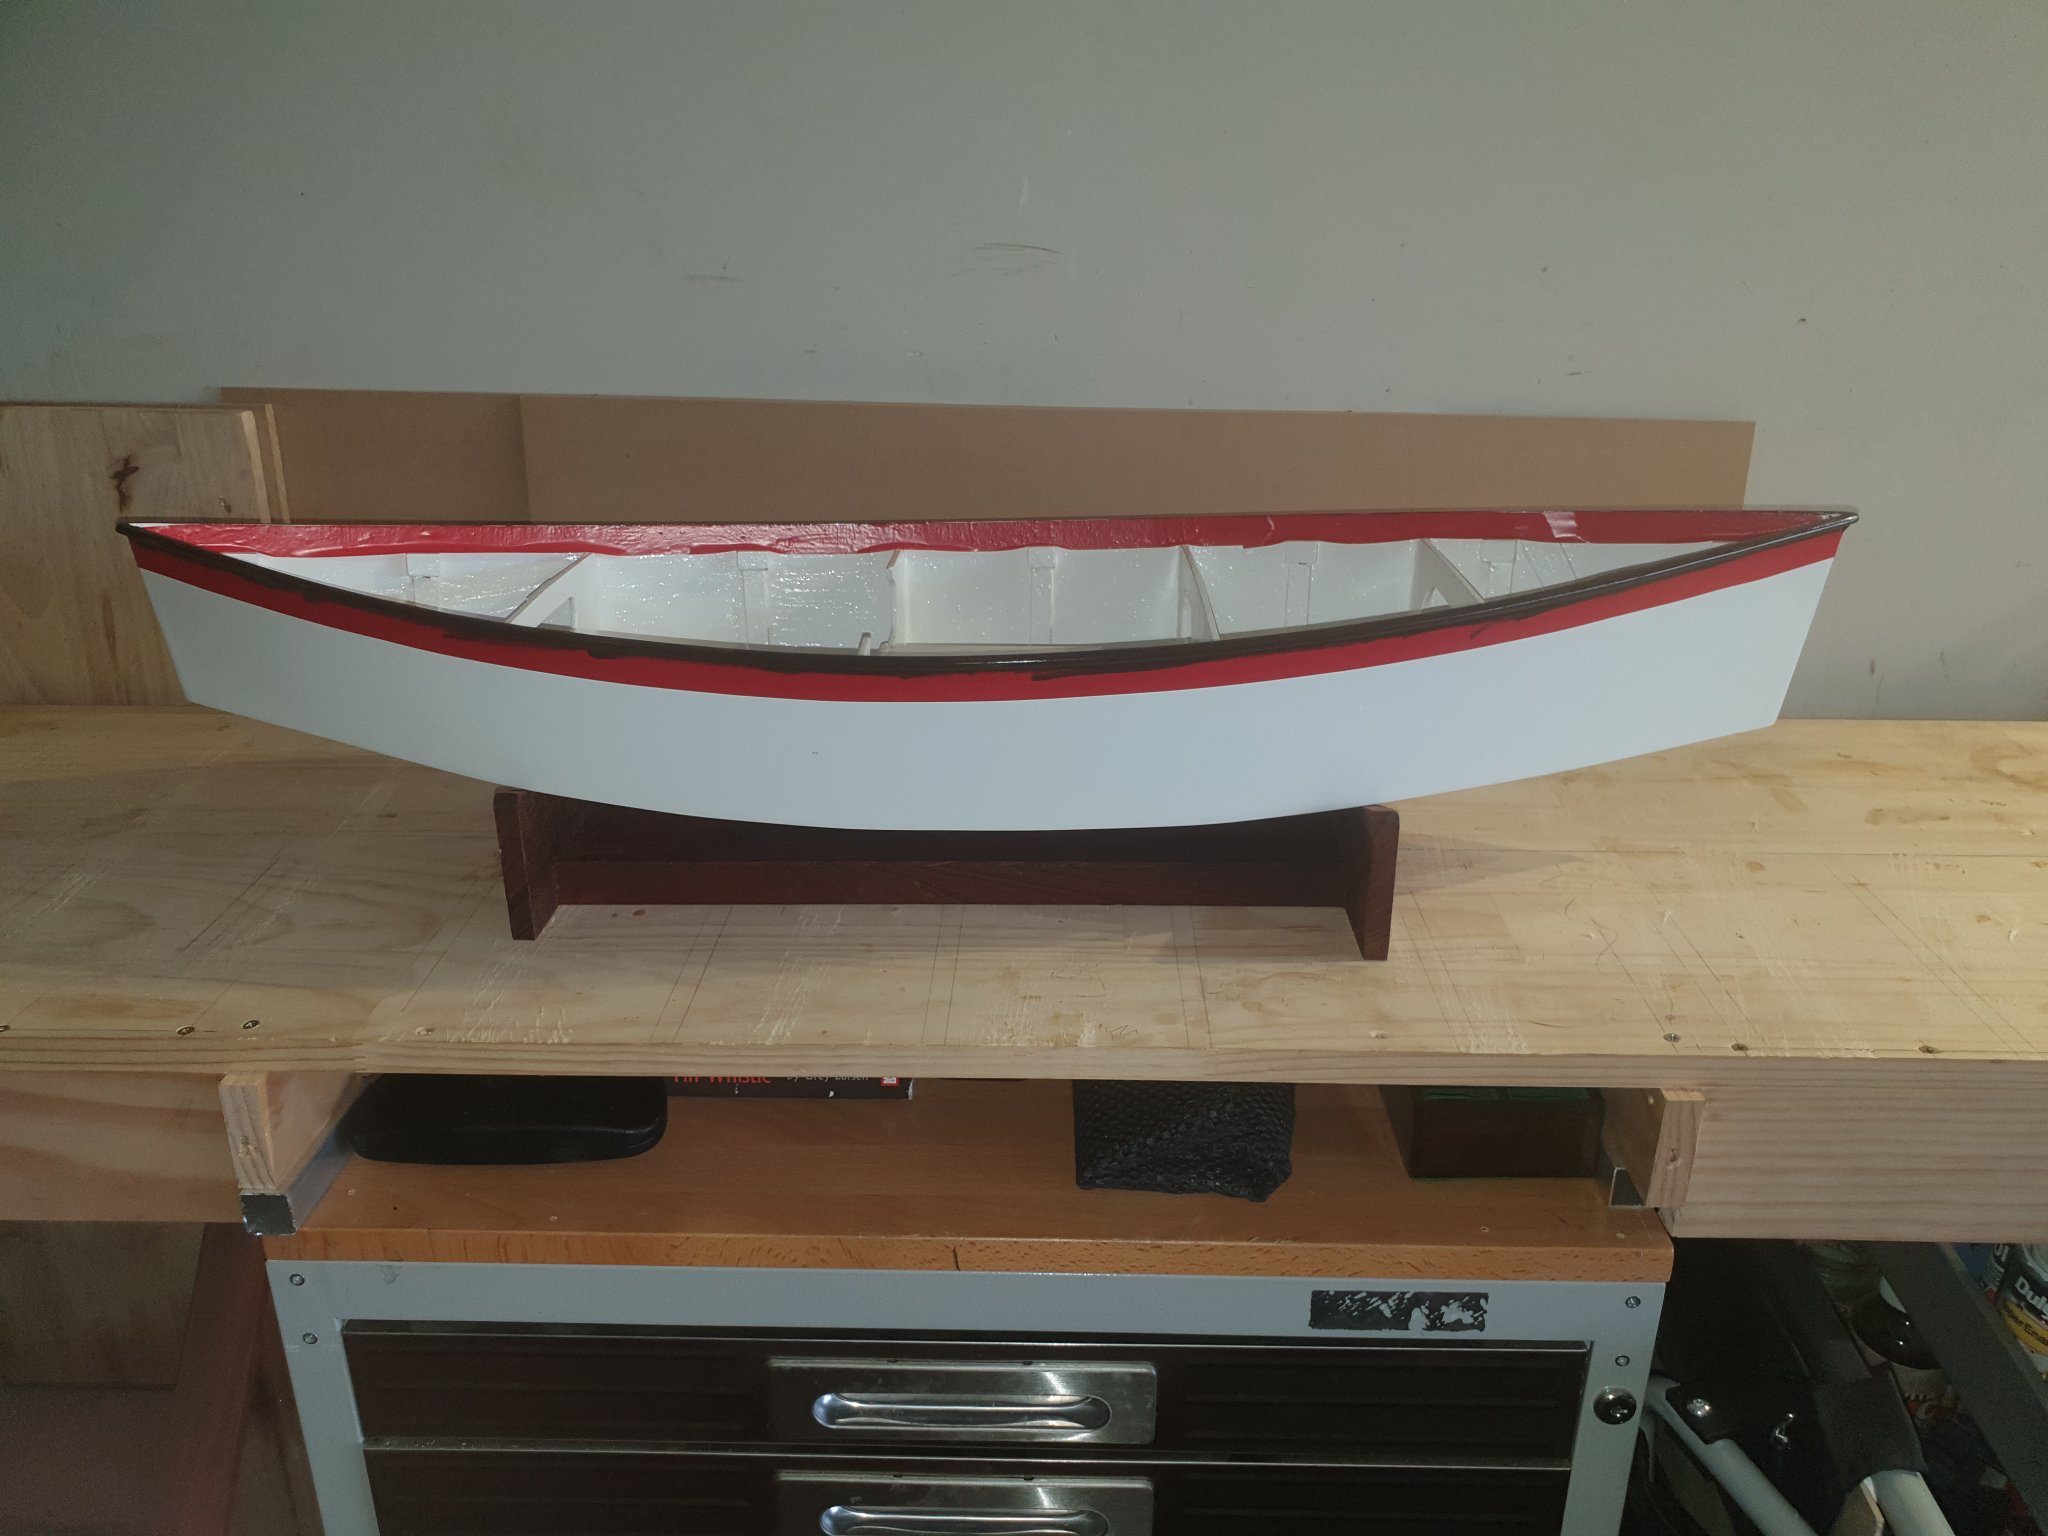
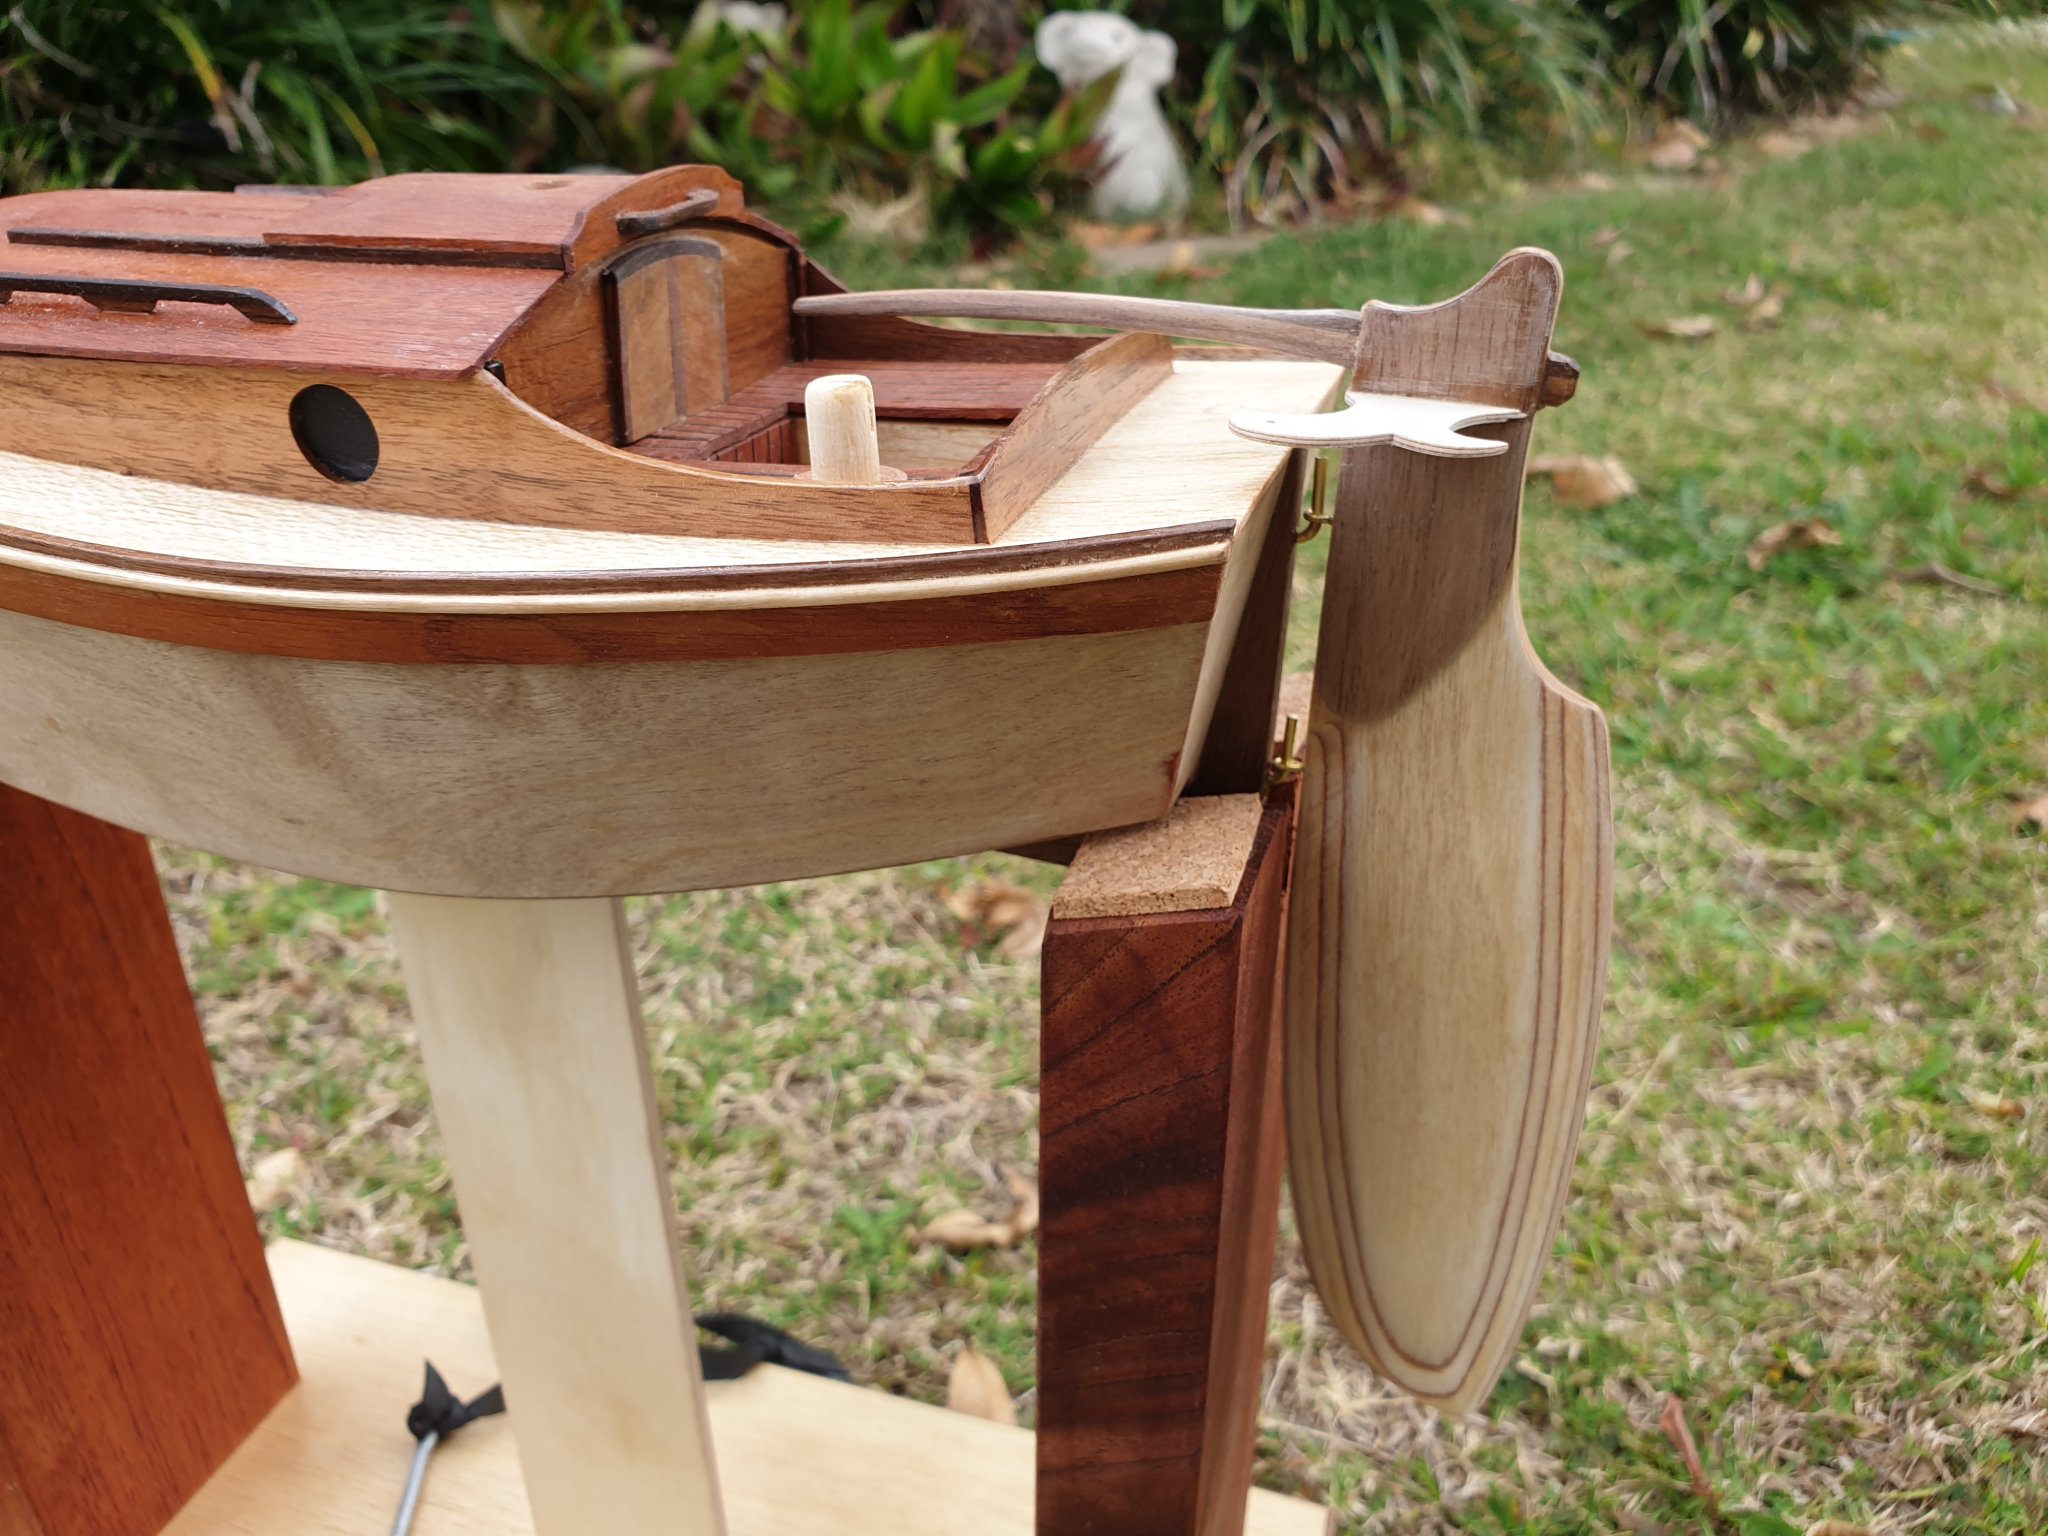
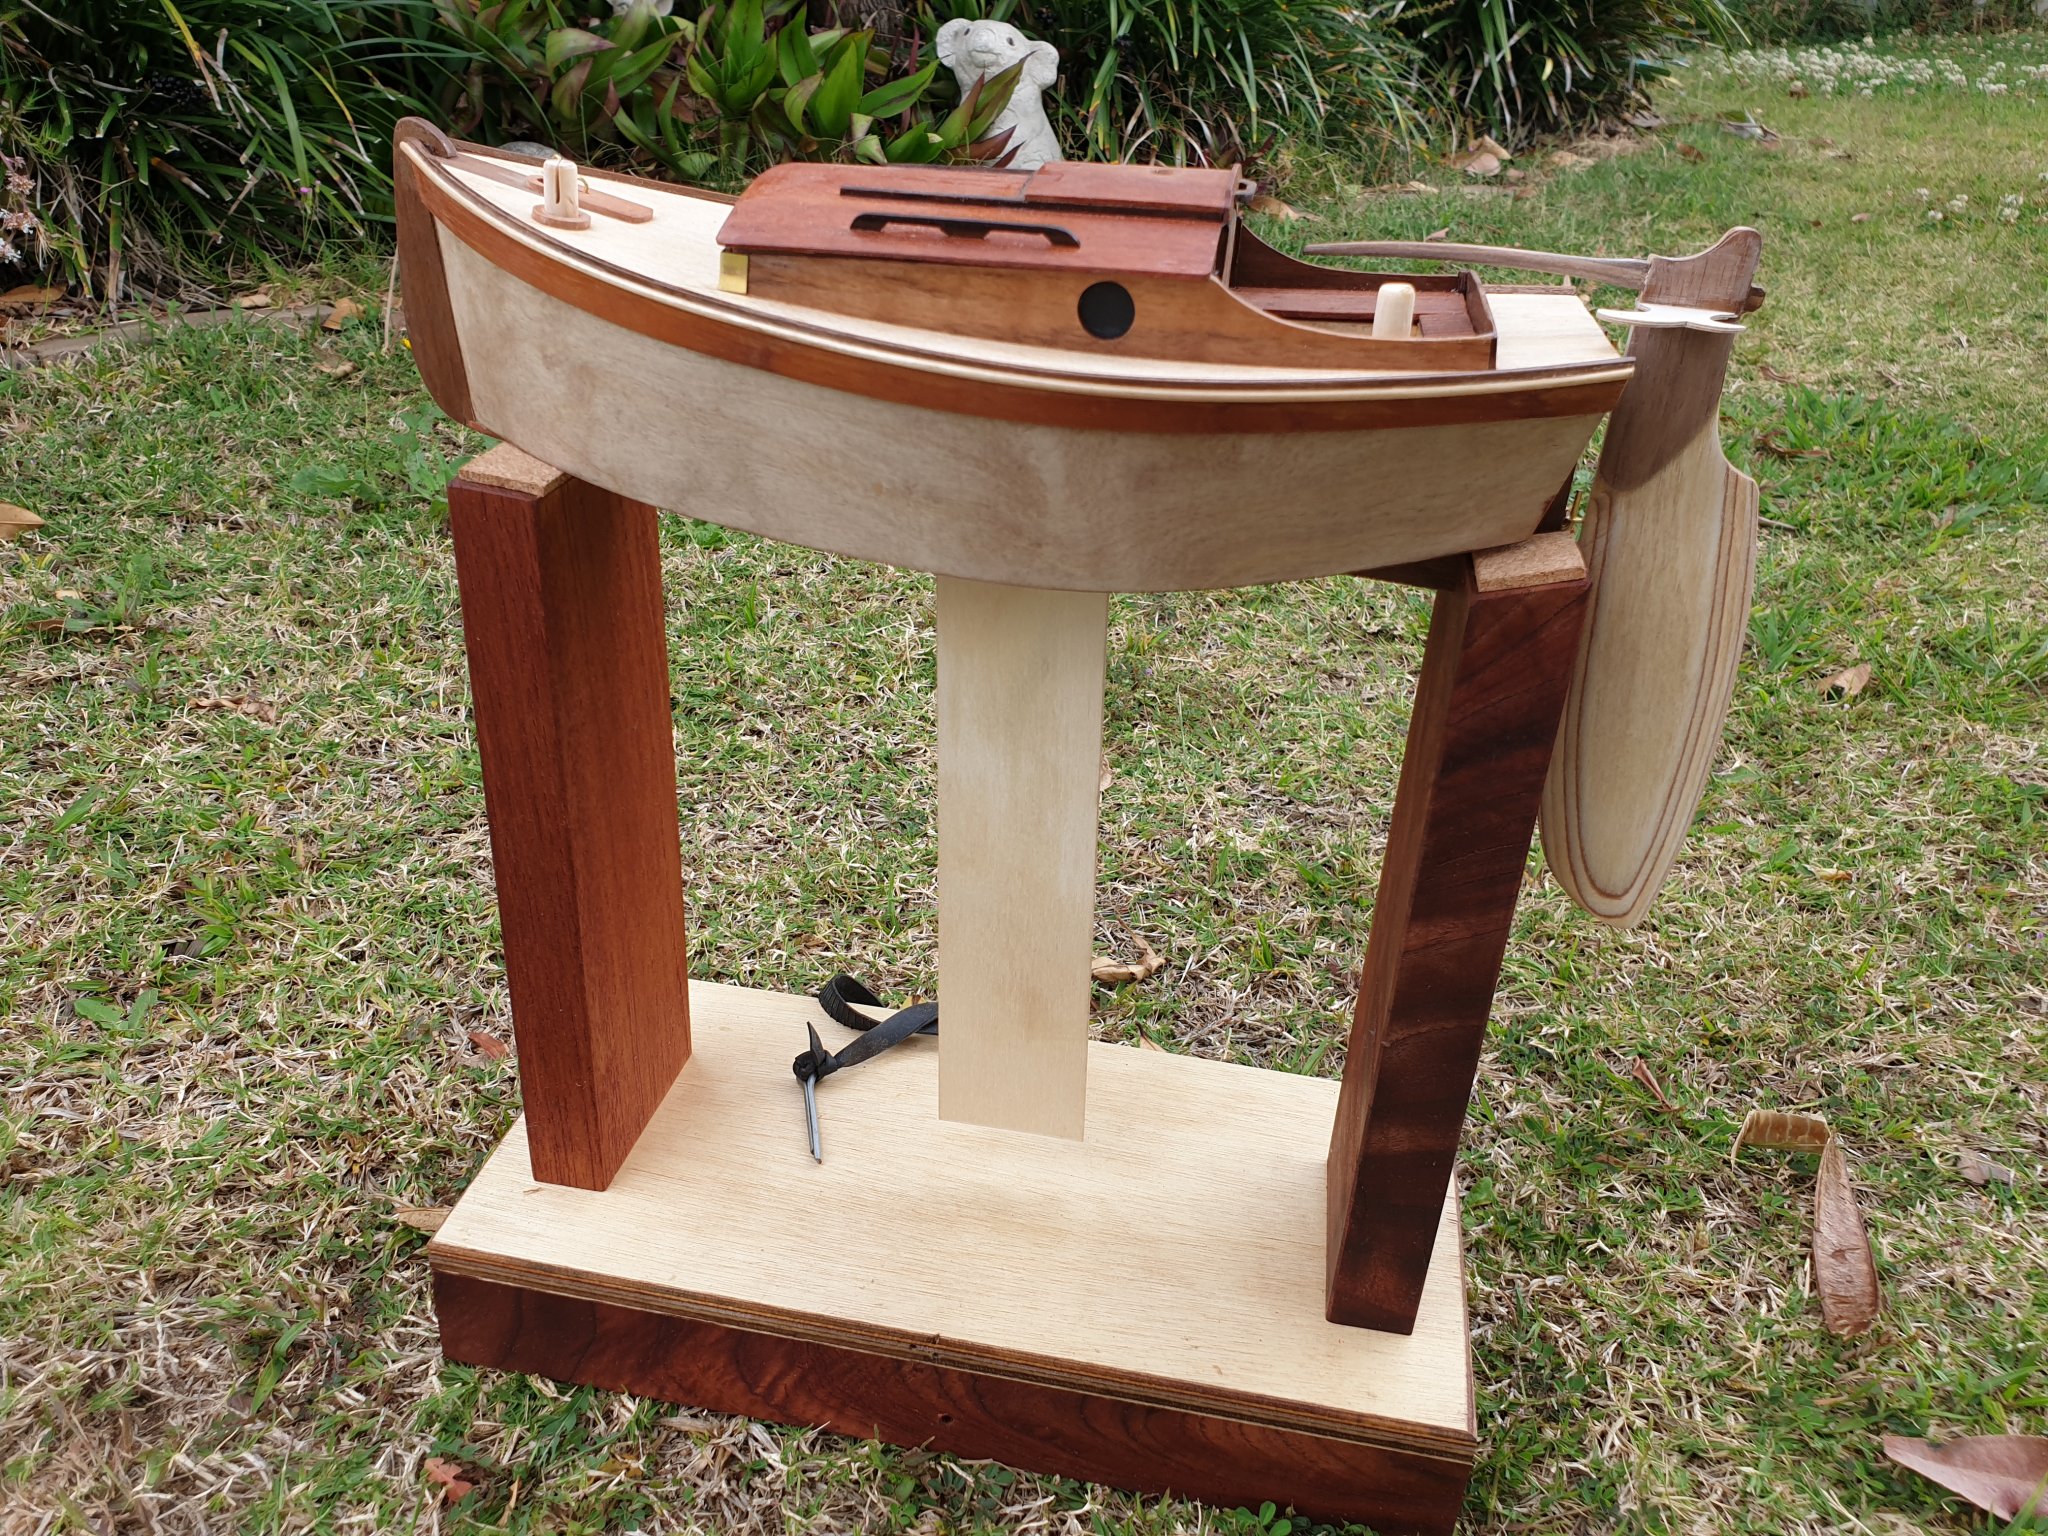
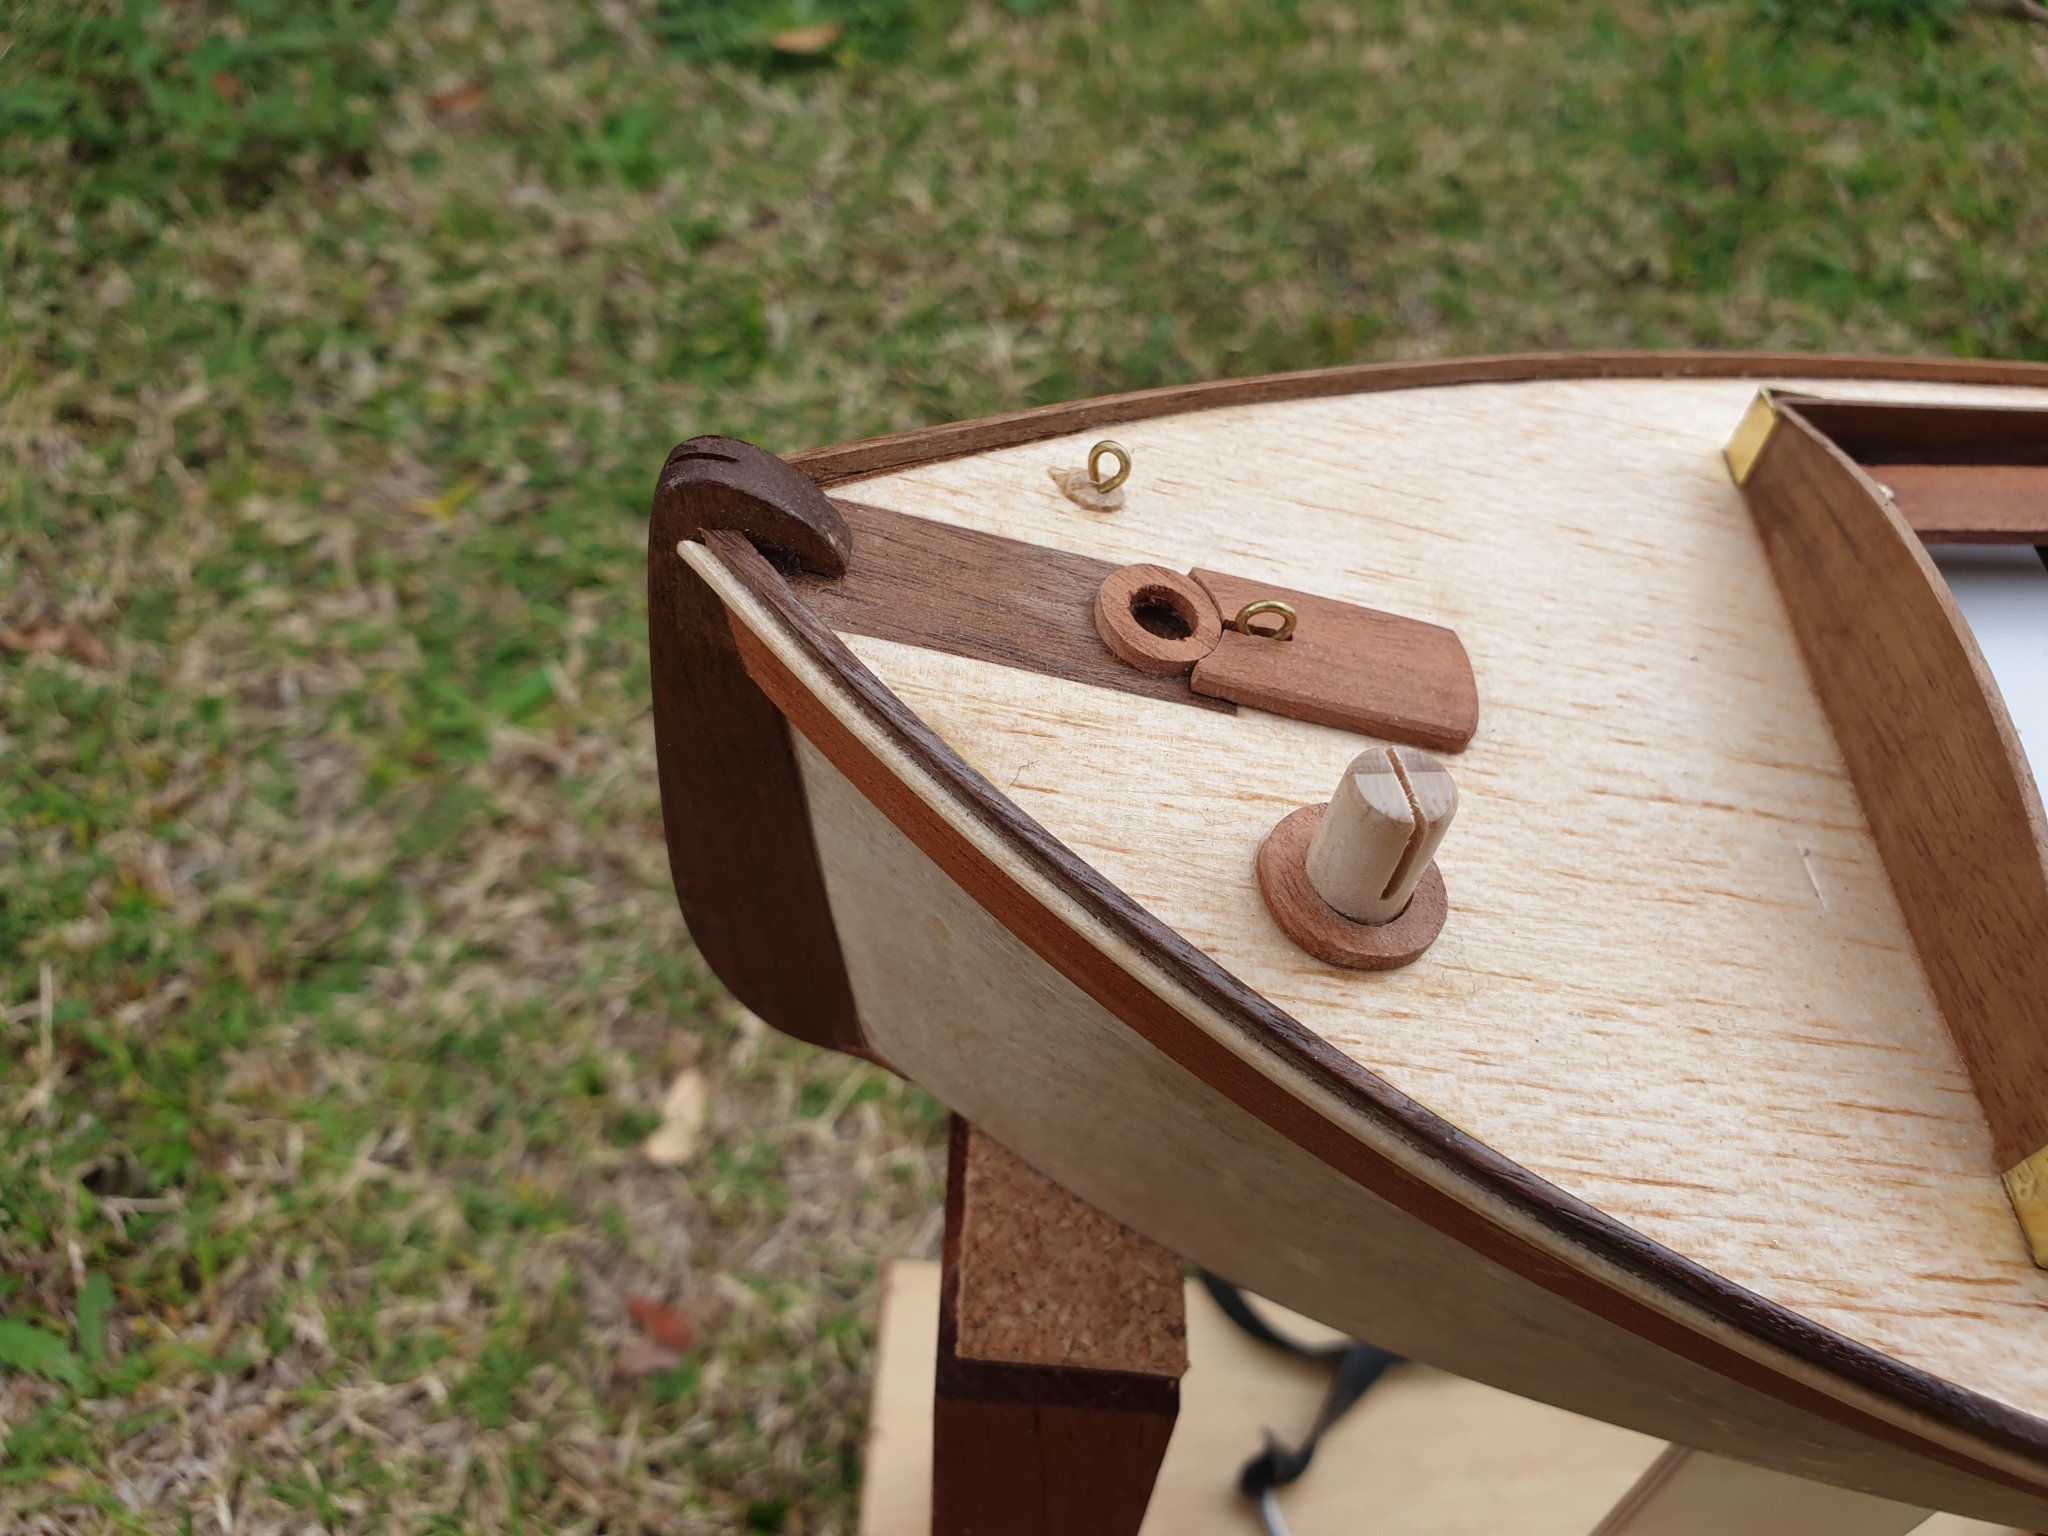
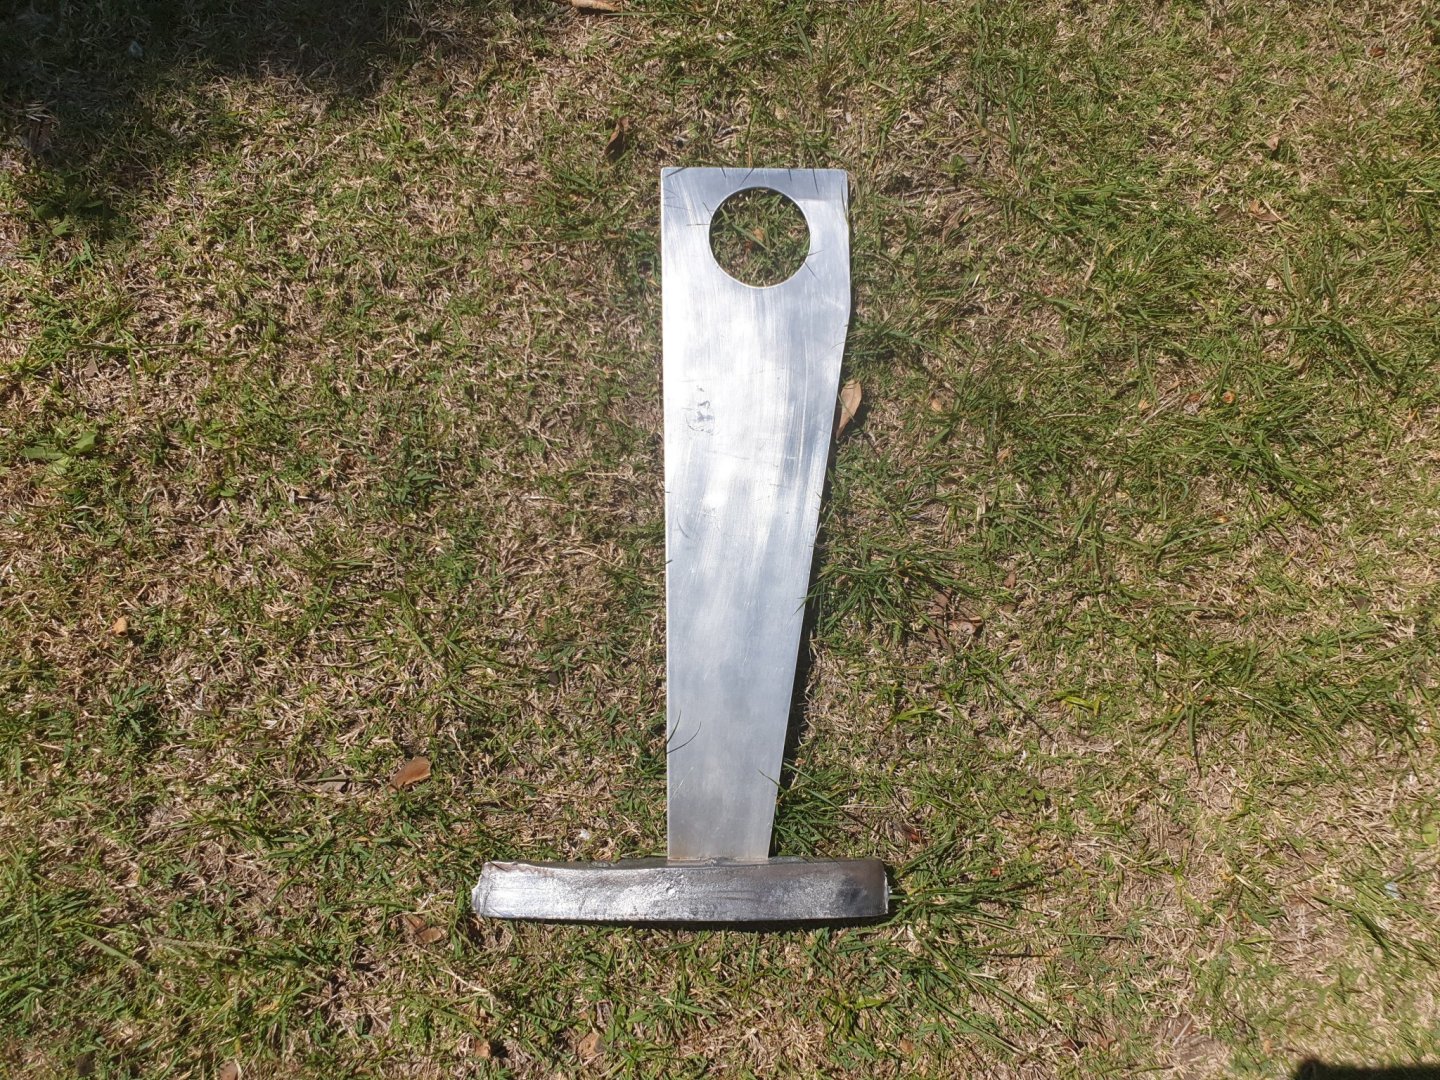
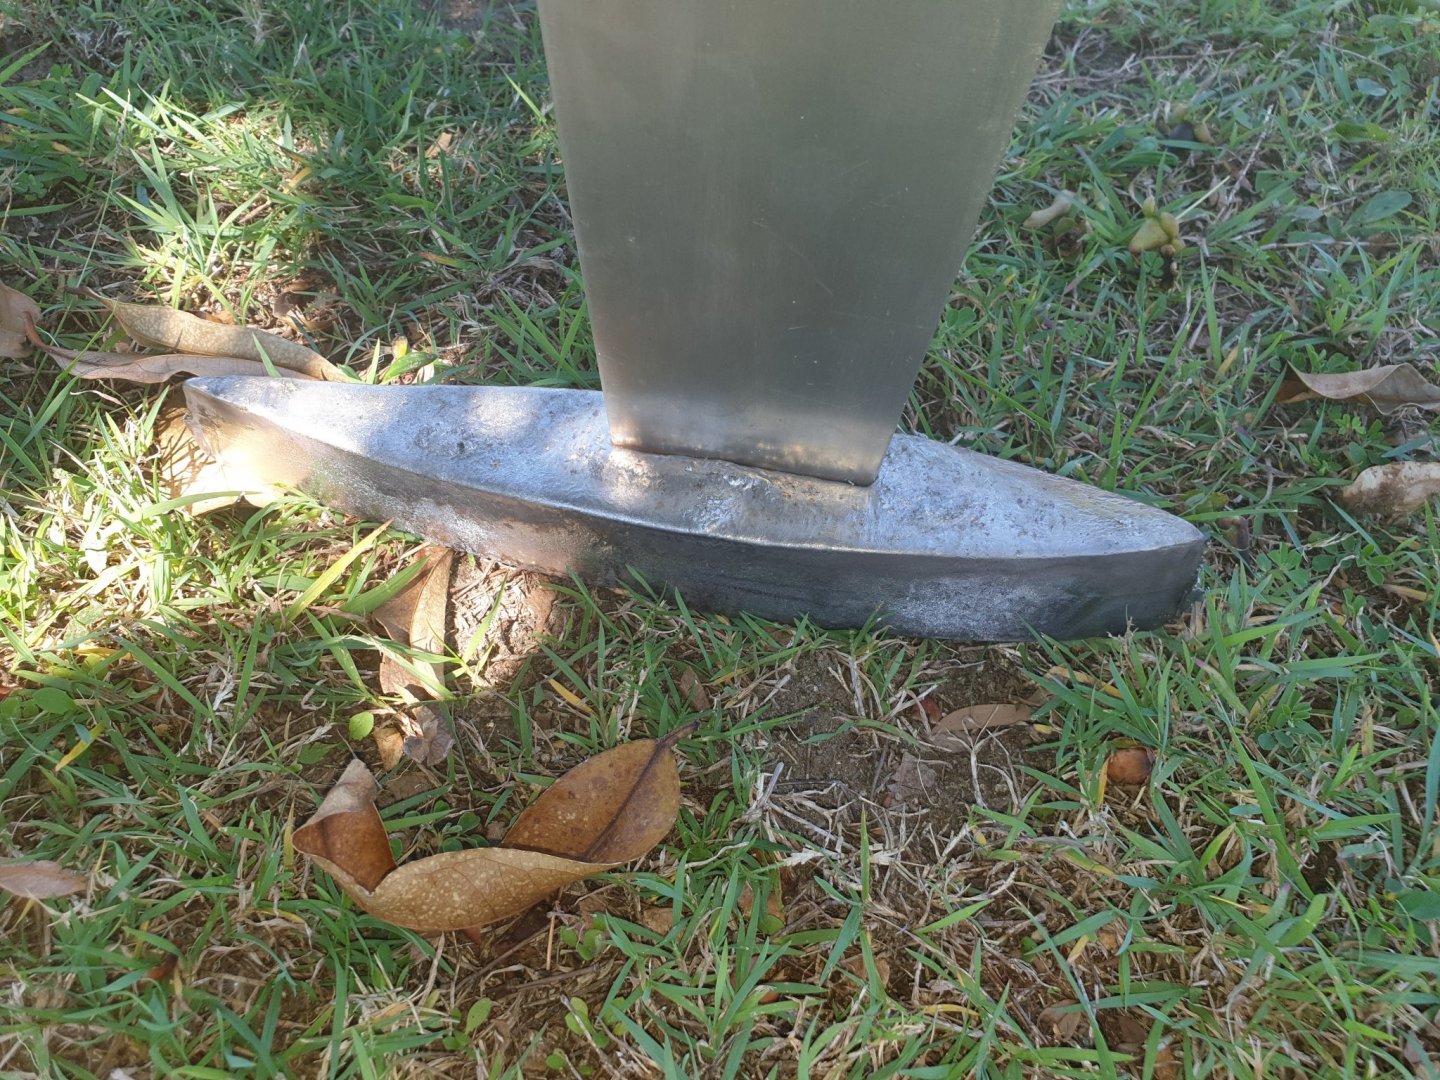
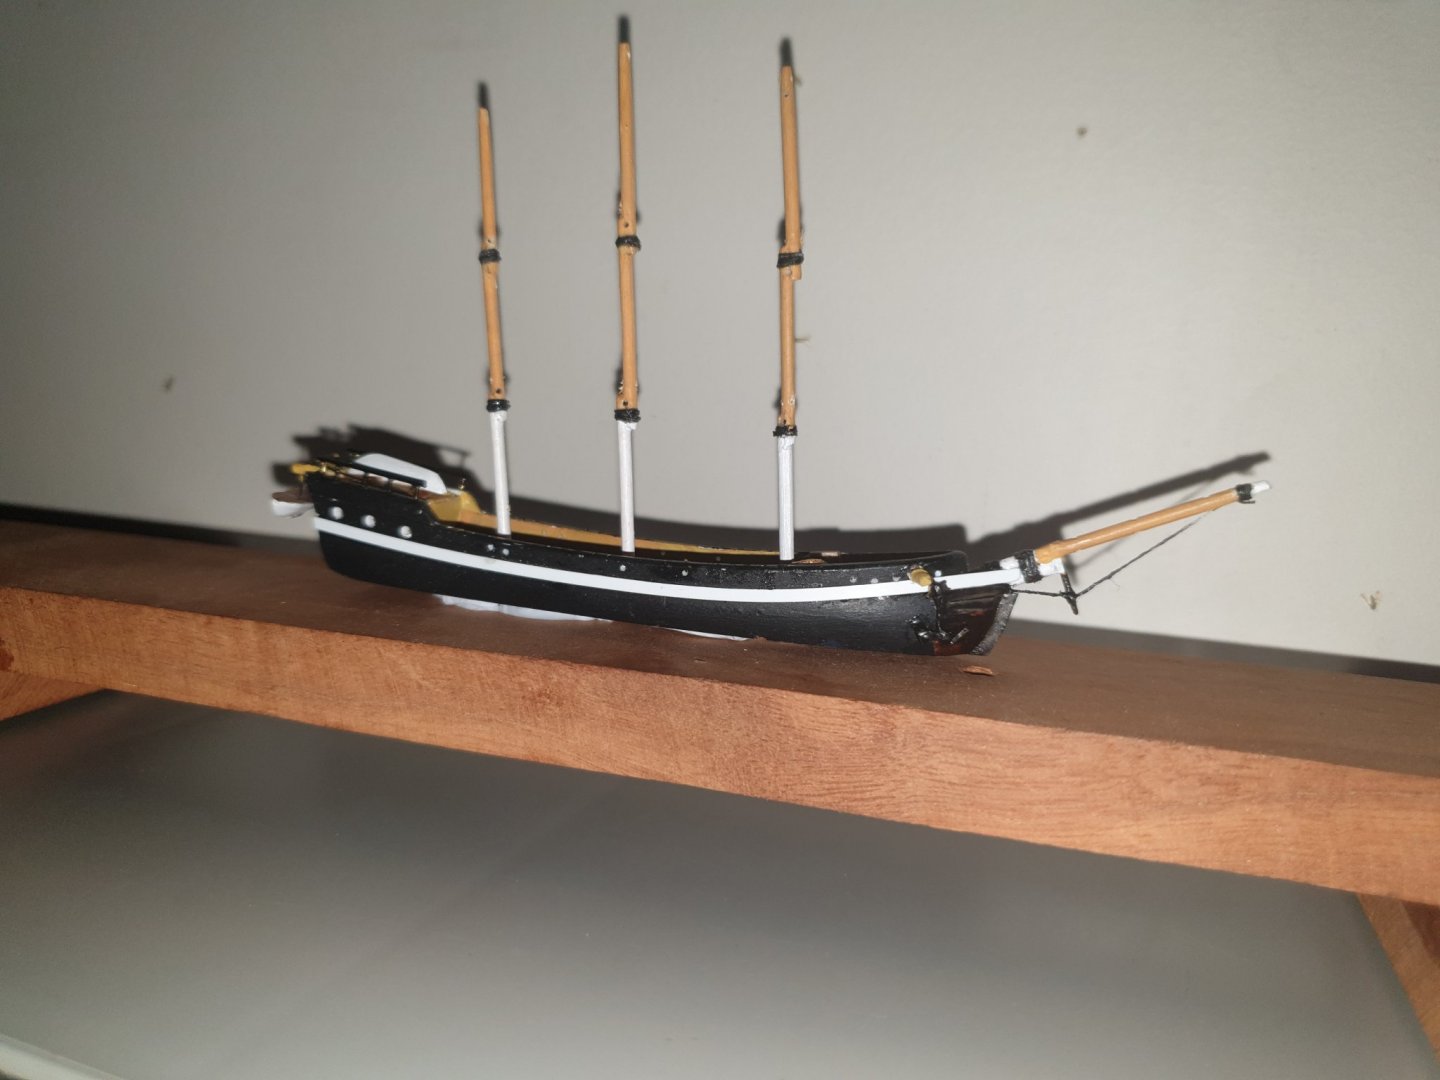
I have removed the masking tape to reveal the chocolate coloured rubbing strip. The hatches are now complete ( without handles) and are a nice tight fit. The jib stay is now apparant. The deck now fits the boat. By design, the sail winch fits perfectly between the bearers. By design and having made the mould from wood for the lead casting as per plan , the fin with its cast lead bulb materialised favourably so much so that the whole model can ballance on its lead keel as per photo. ( without a blast from wind when least expected.) There was a blast that sent Emma floorwards with a few scars to prove it....hey ho!! It weighs 8lbs but needs to be 6 lbs. I will adjust the differerence. Here are the pics. Pete.
-
Nils I like your chimney very much. It was well worth the effort. Because I am as enthused as you about your boat , I have an idea ( again ) As you know I am into rc sailing versions of boats and have come across some you tubes of rc boats with sound and smoke. After some research I have found some brilliant sound and smoke modules. One in particular is programmable to make the sound of a host of engines and on one of the settings it would sound near on like a tuc tuc boat engjne. There is also an Australian design smoke unit which runs off cheap baby oil instead of the expensive stuff. The unit is favourably priced. I was thinking..... With a little bit of your " boat stand " redesigning you could make the stand say 50mm higher and mount both units and batteries underneath and run two tubes. One to the stove and one to the exhaust. The speaker unit of course will be built into the stand. You coukd also run leds to have lights where you want them etc etc. Sorry to interfere but it would make the model more exceptional than it already is!. Pete
-
Greetings from North Yorkshire, England
Peter Cane replied to Niallmhor's topic in New member Introductions
Cannot say who with. I must stay on topic and talk boats otherwise other users will get jarred orf. It was nice to hear that the REME still exist but we must be tactful. Arte et Marte. Pete Ps....but I can tell you.... Beagle is not yet bottled! -
No I have not done that. Maybe I could give it a thinned down rusty wash of matt enamel. Failing that, somewhere I have some Tamiya weathering powders that I used for my model trains. Good idea!...I will give it a try. Pete
-
Greetings from North Yorkshire, England
Peter Cane replied to Niallmhor's topic in New member Introductions
Wallace..see you avatar/ picture cropping uo every now and then.. Would that be a 578 you rode or 434? If you were in 13 years then you would have ridden both. I was a gun fitter!!!! Pete ( the one that fudged up Bluenose, built two Brandos and trying again to get HMS Beagle in a bottle. (This must be a REME retirement home. I know our vms would not renew a pack unless a crate of Herfies were offered or the thing just happened to vor at a pub!!!! Those were the days ) Back to boats. -
I have now painted the bow of the ship and stepped the masts using seccotine glue on the hinges. The anchor is also black now which is a pity after all that work it can barely be seen. Pete
-
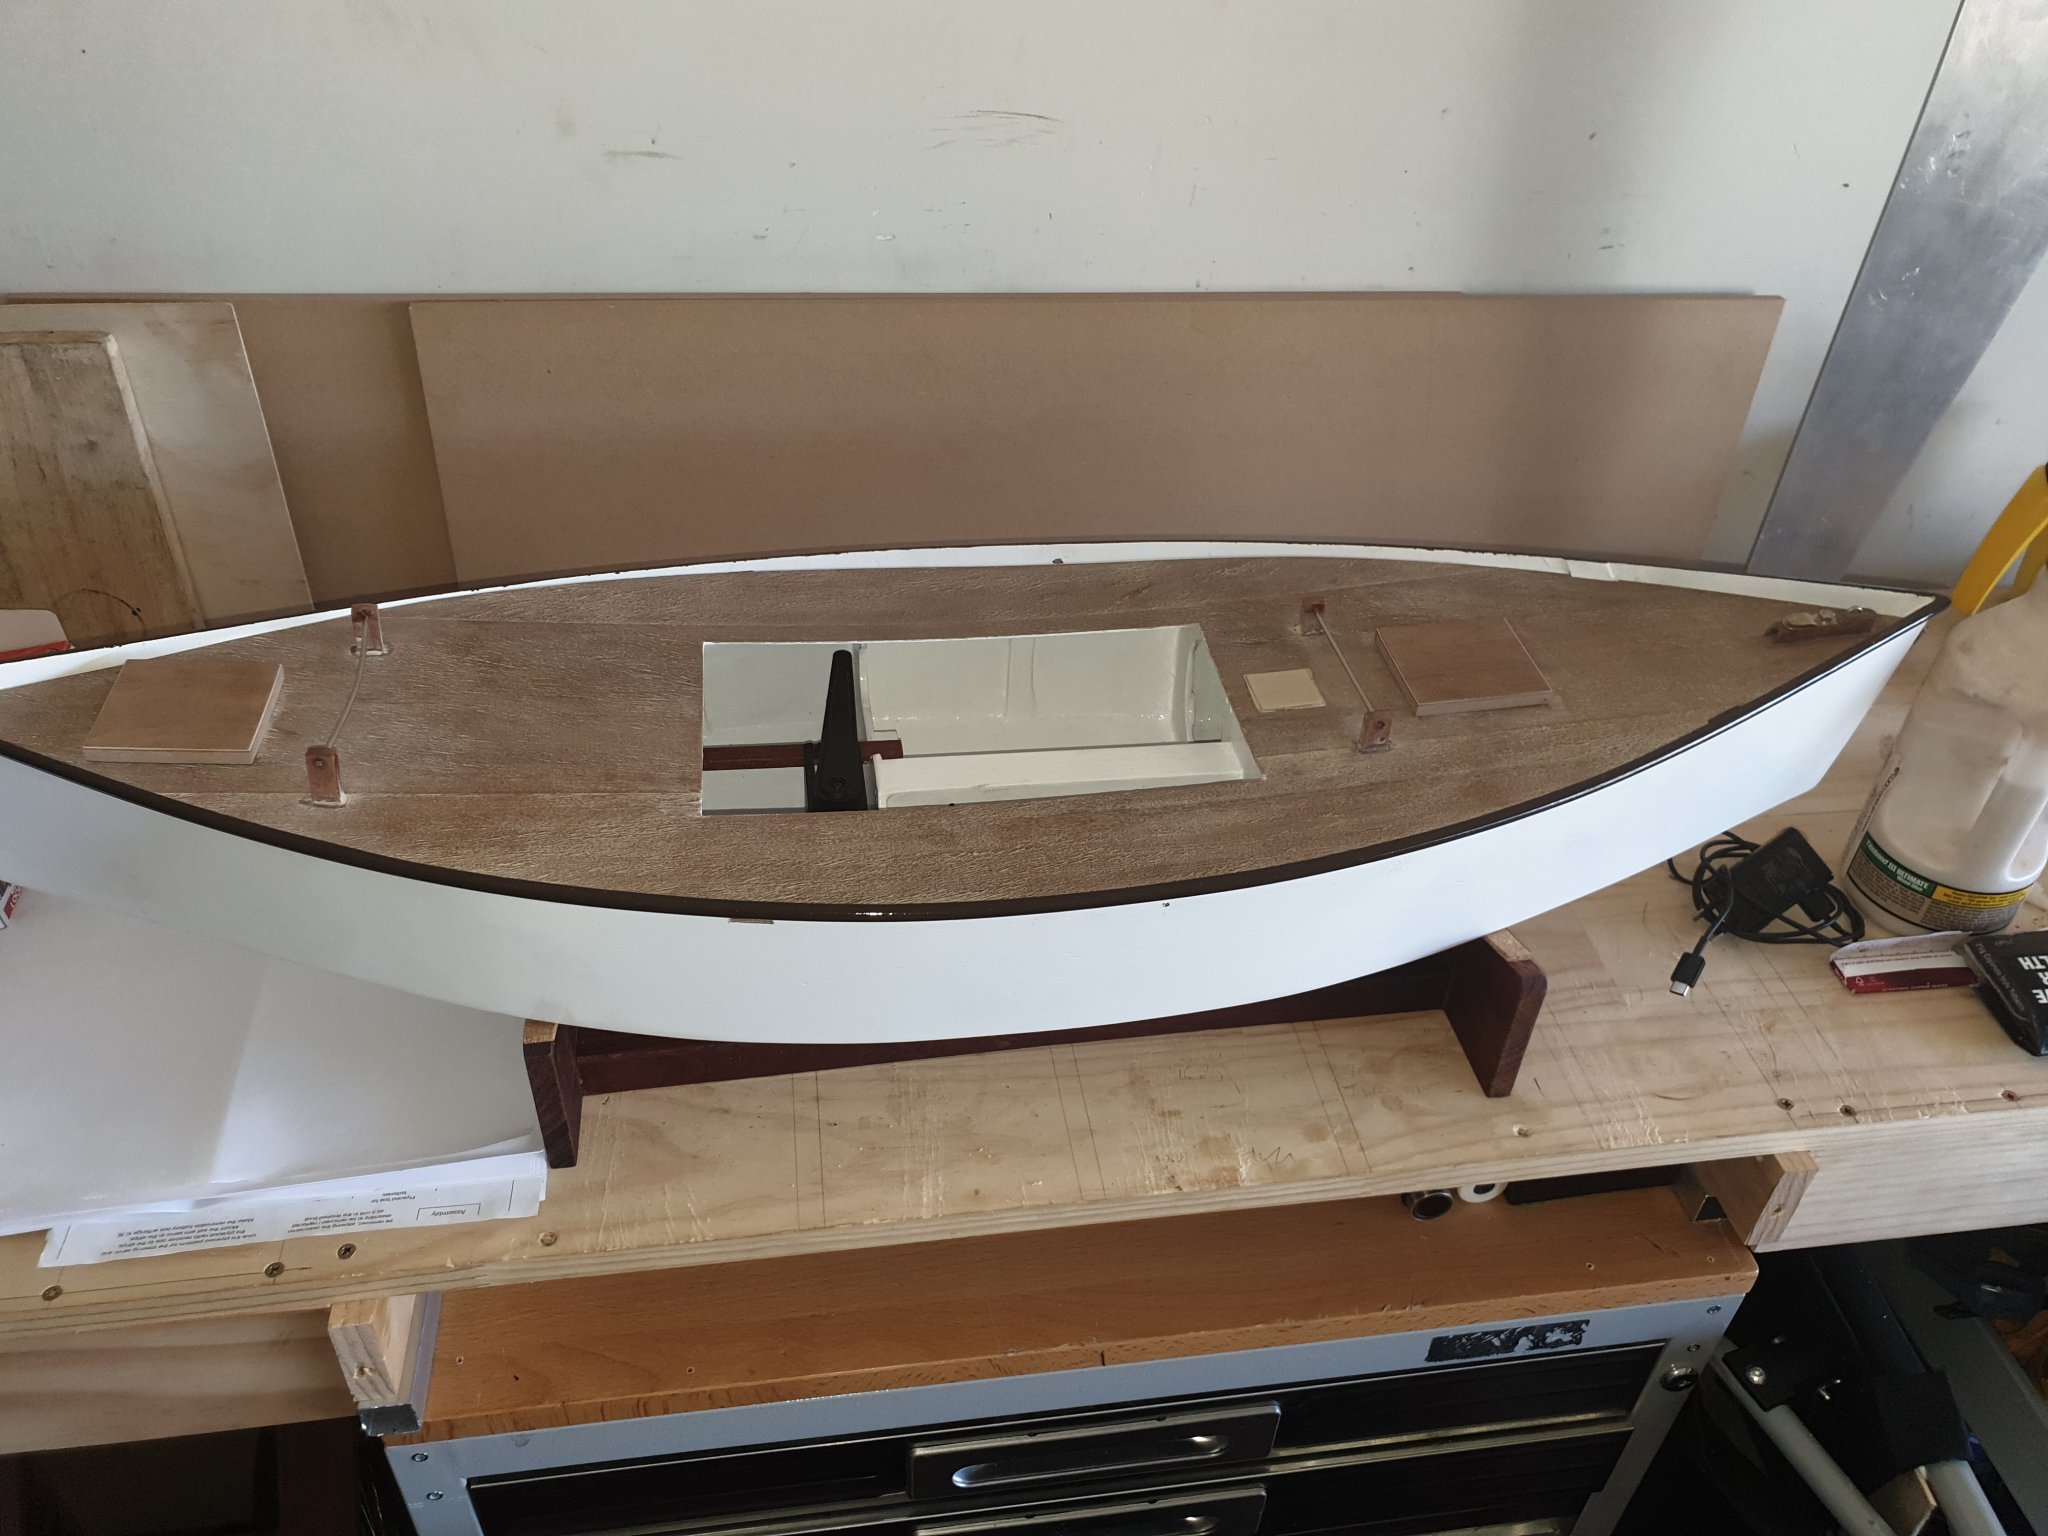
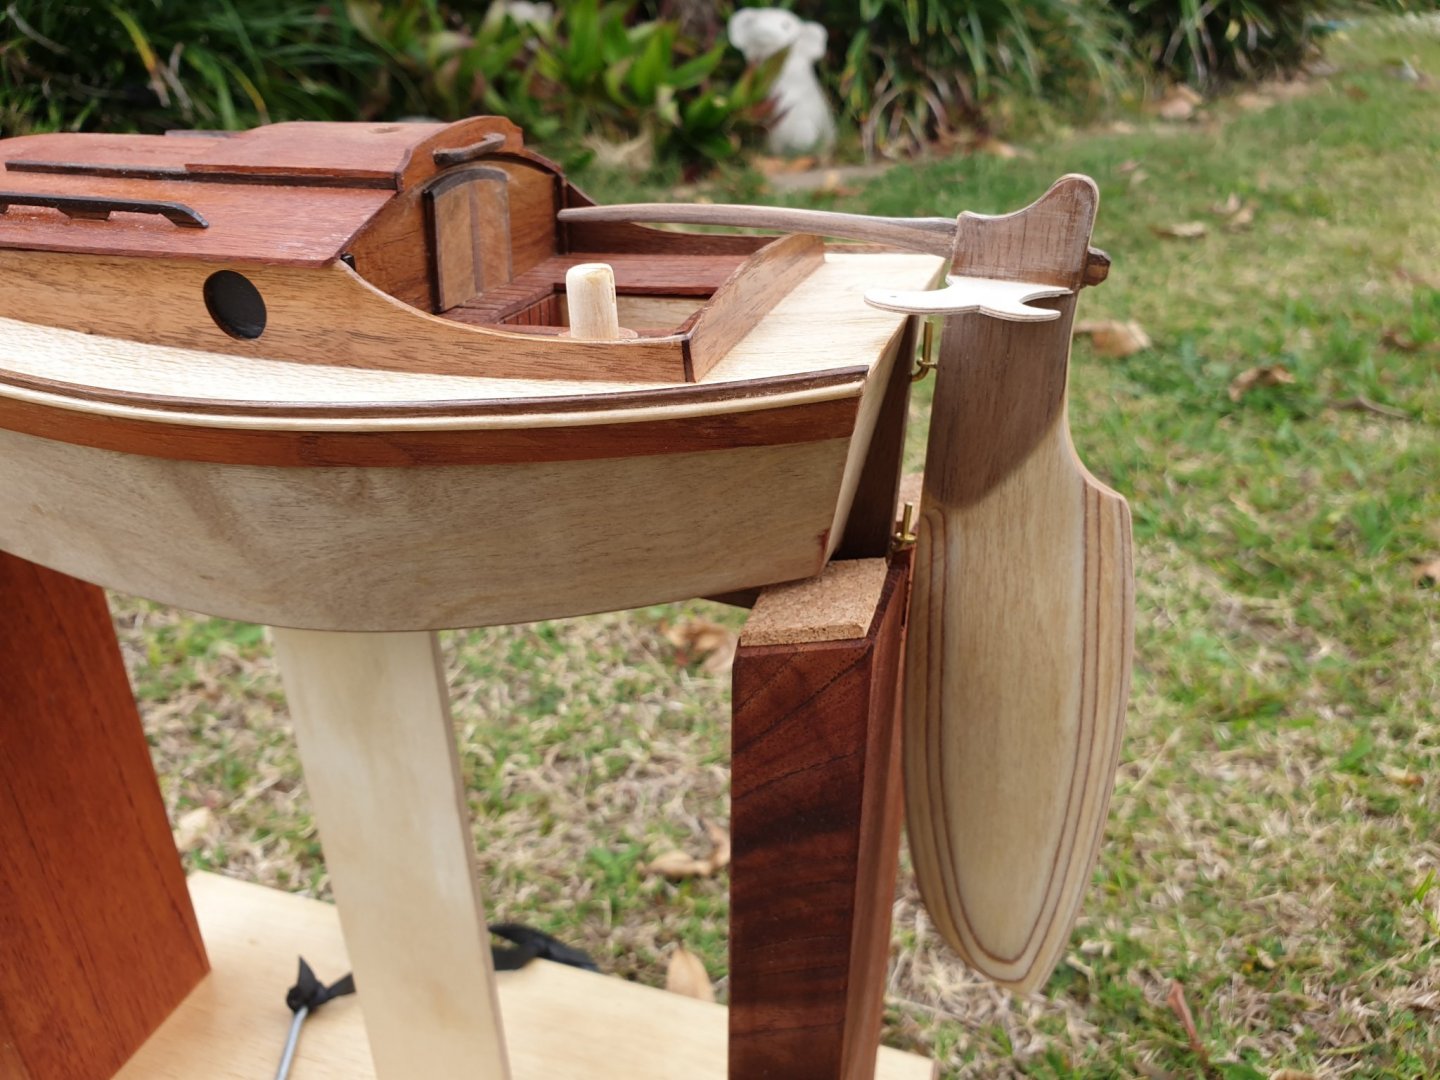
I have made two stands for Emma. The one you see above which is to help with the build and then display. The other one is a folding tressle that holds her steady at the pond side with keel attached. I will not picture that as I am sure you know what I am referring to. Pete
-
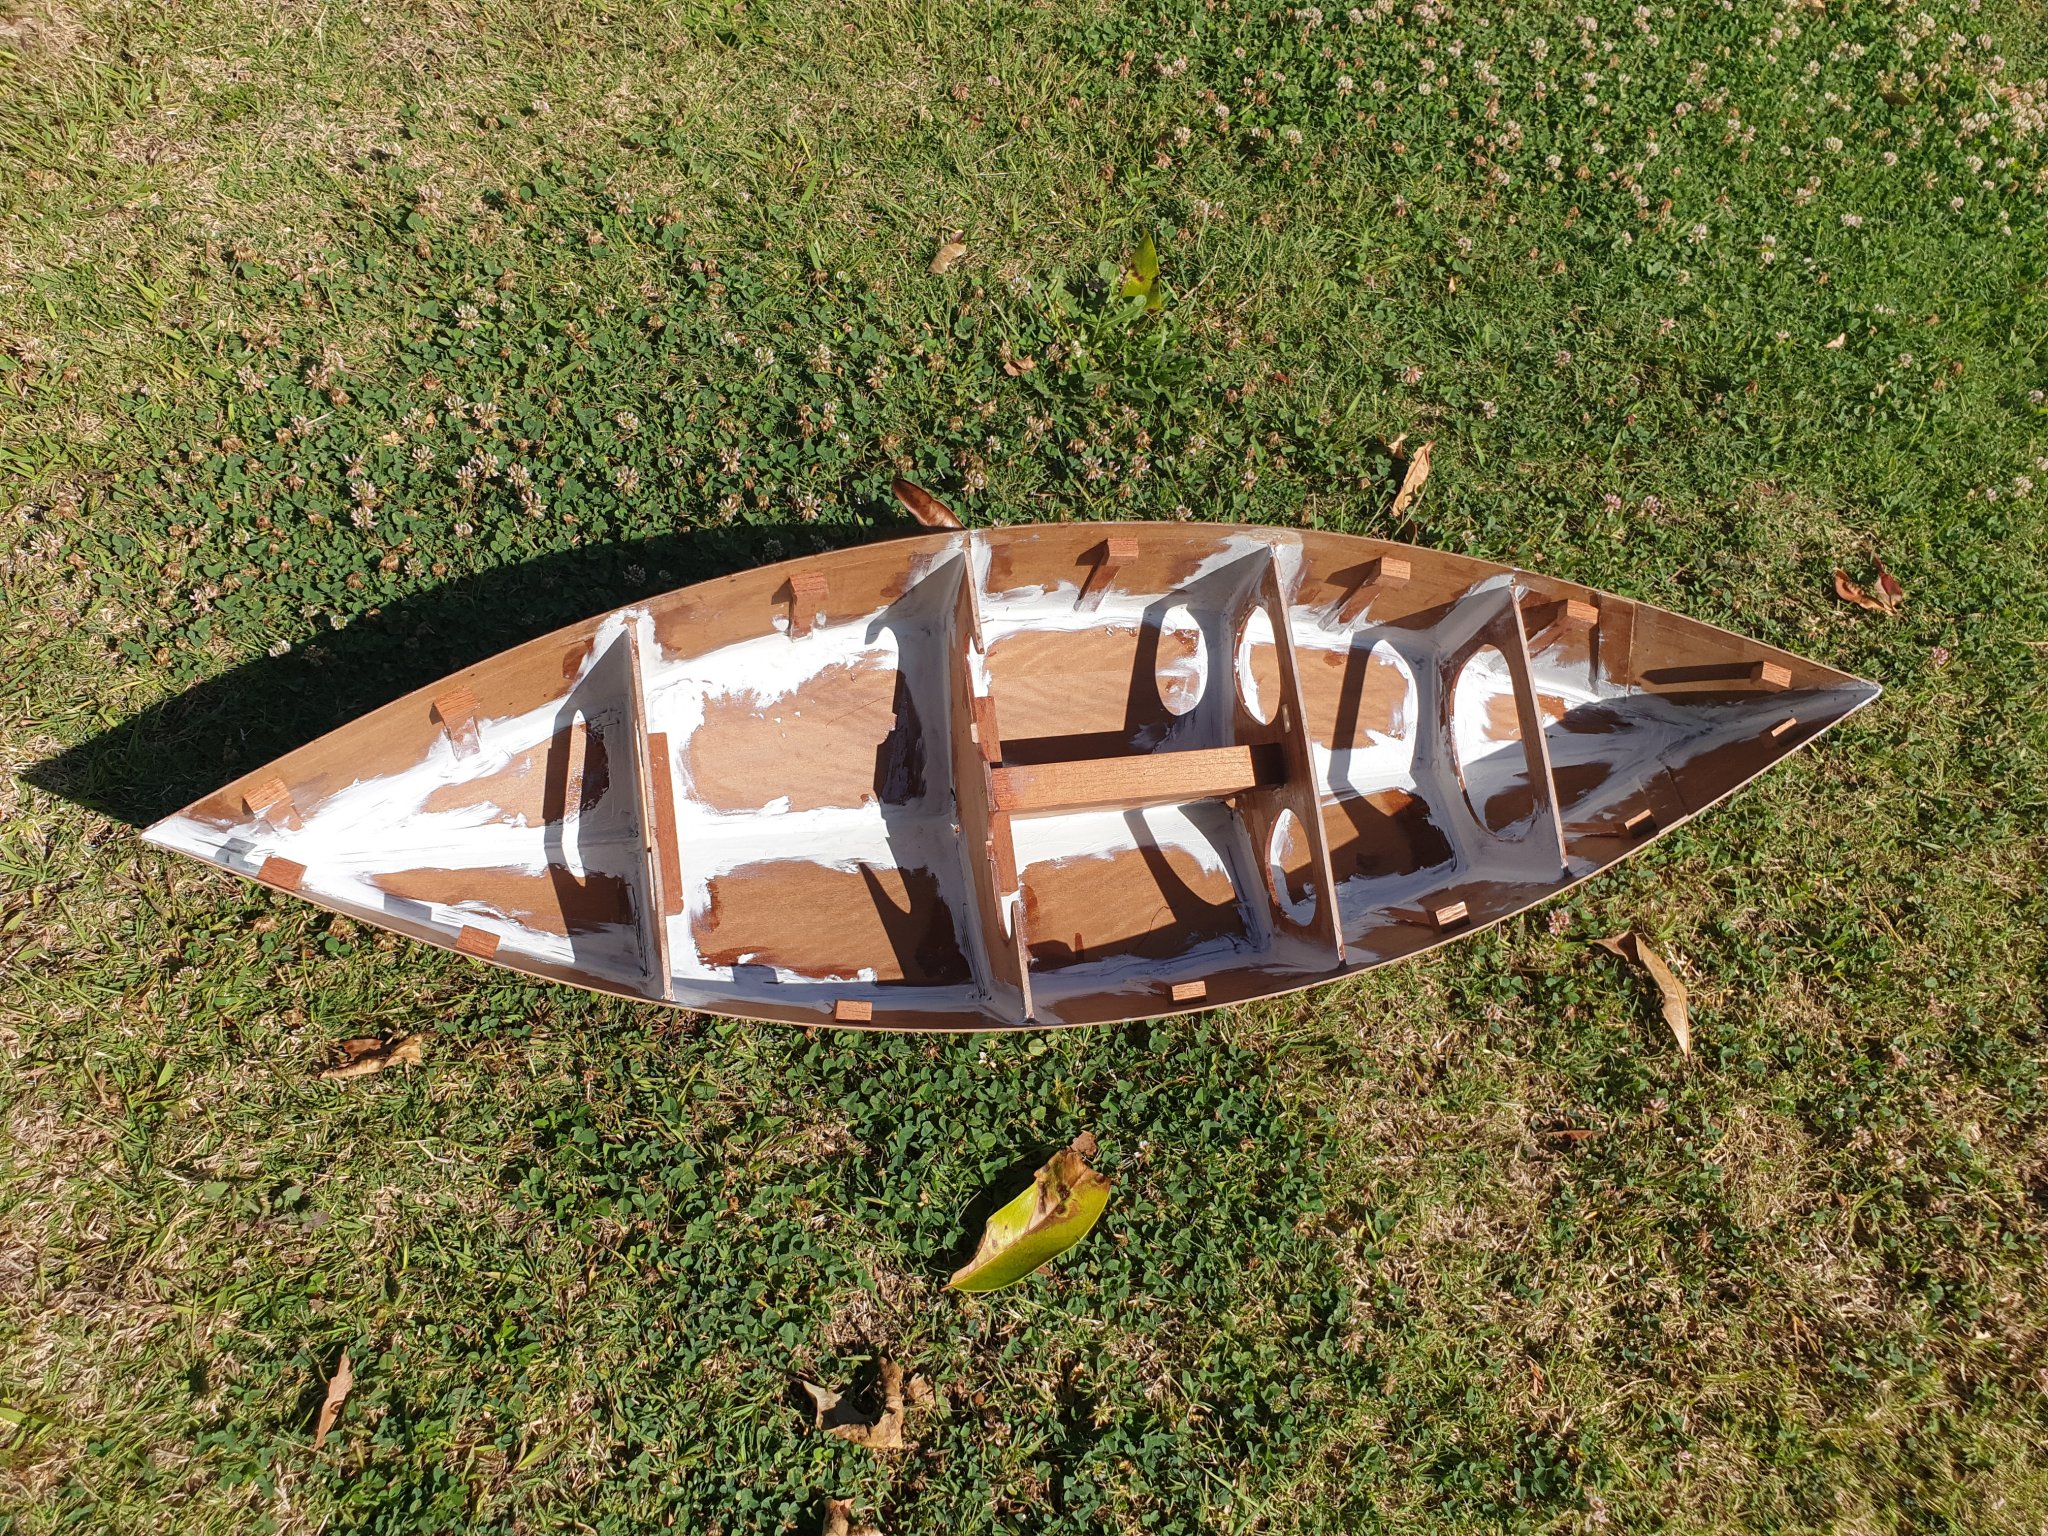
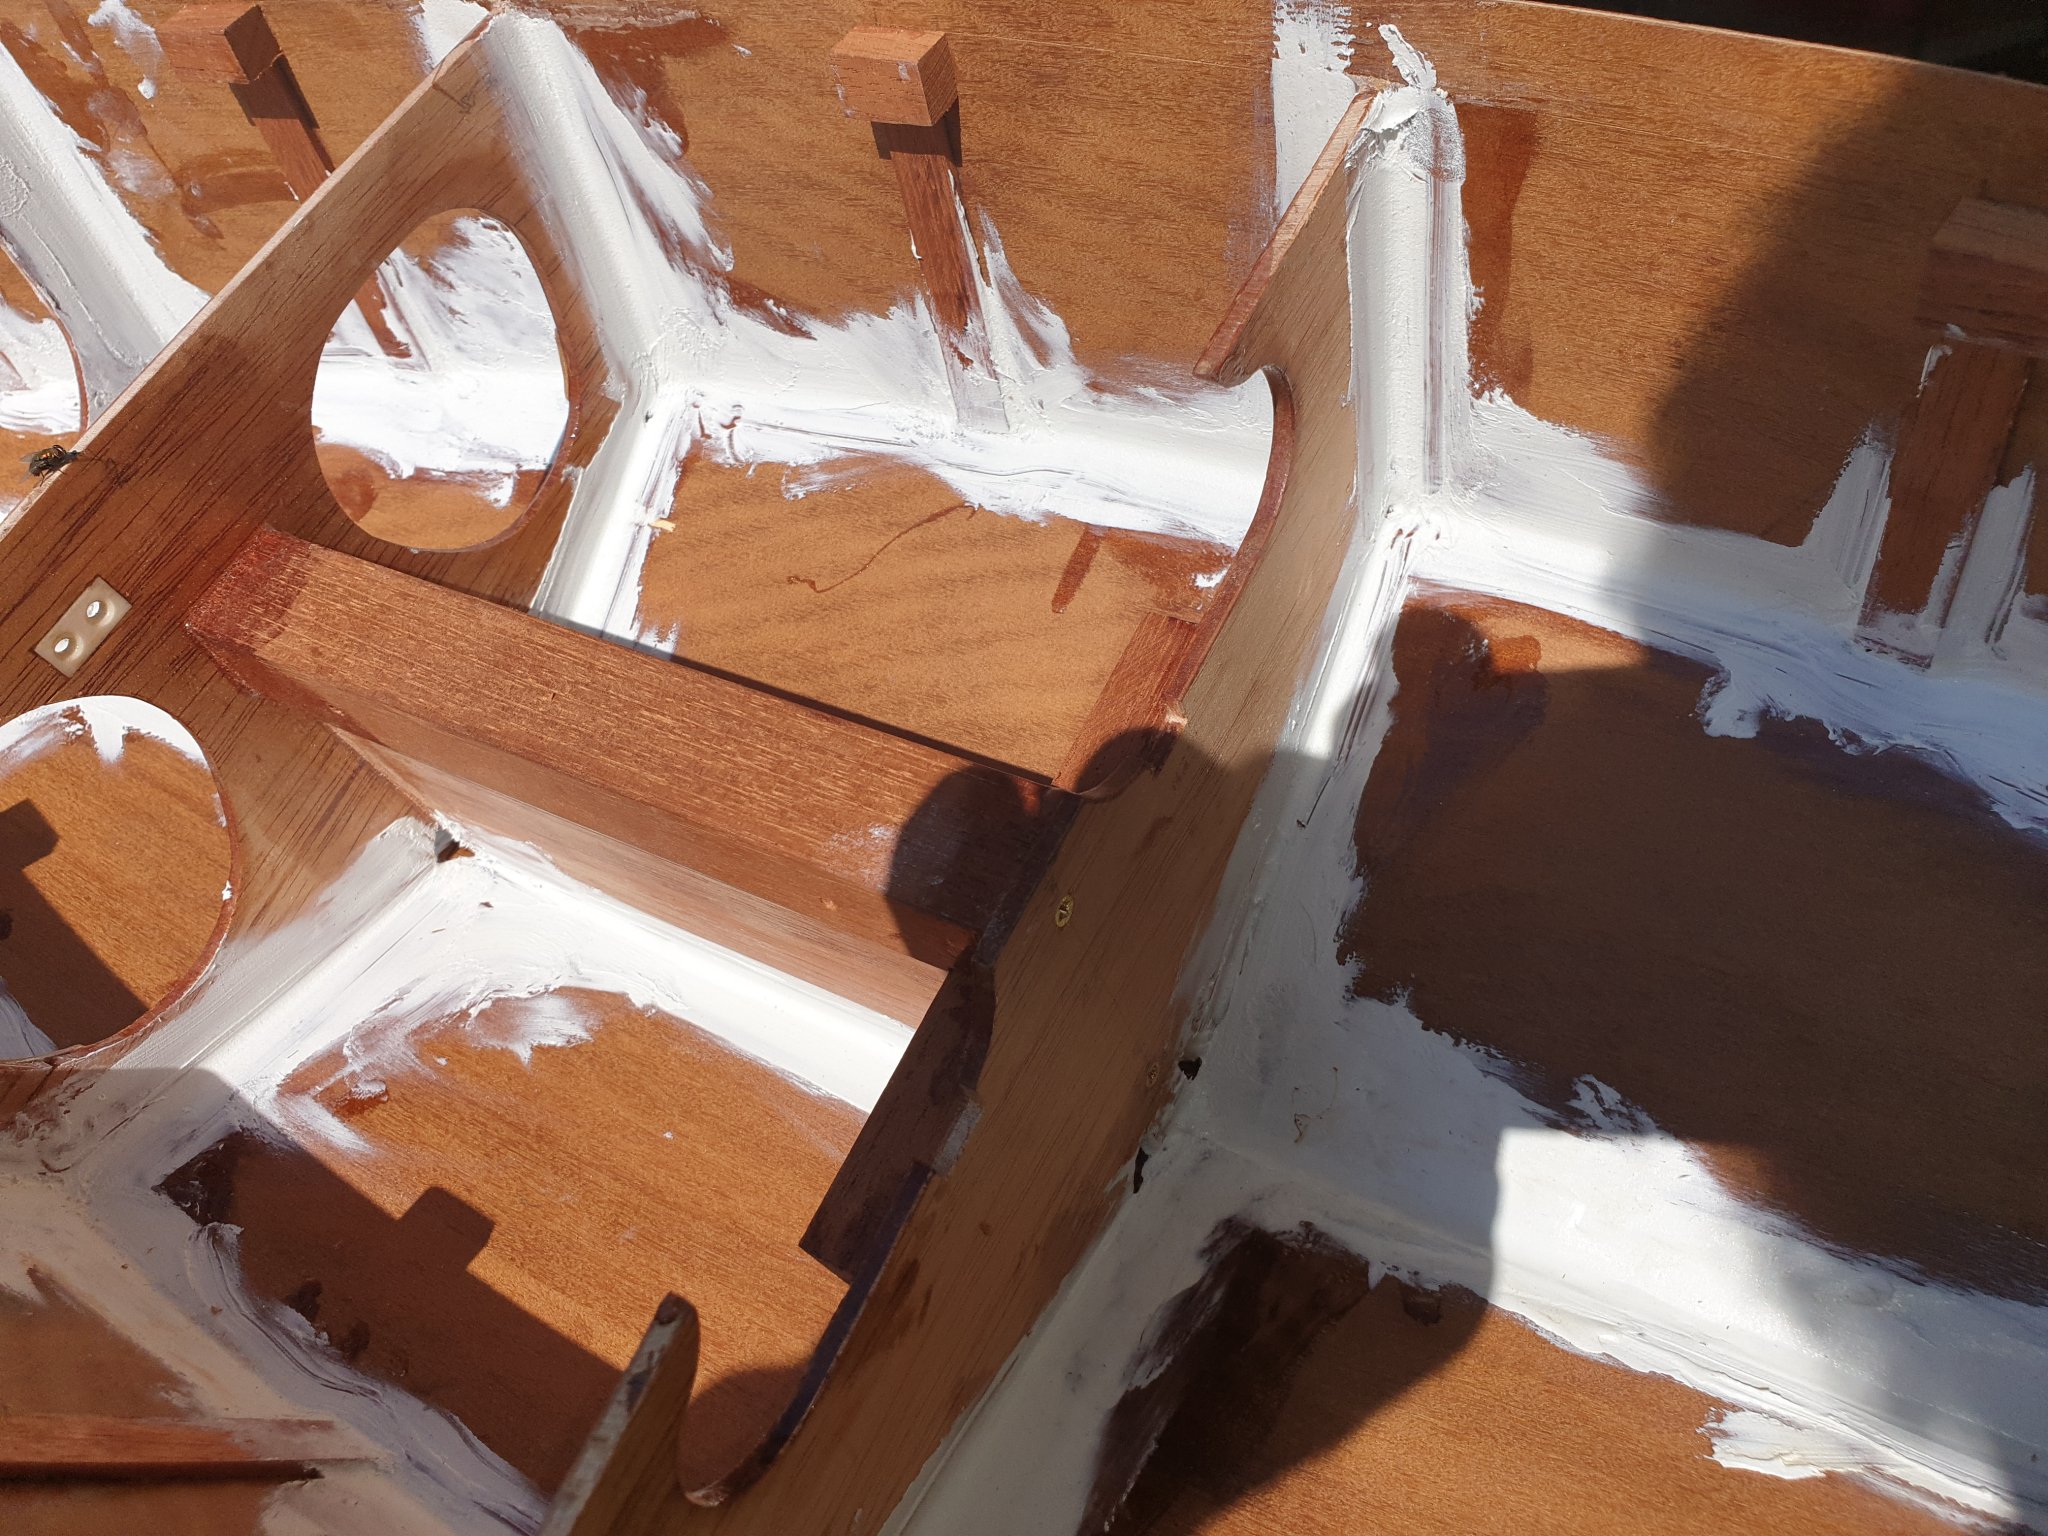
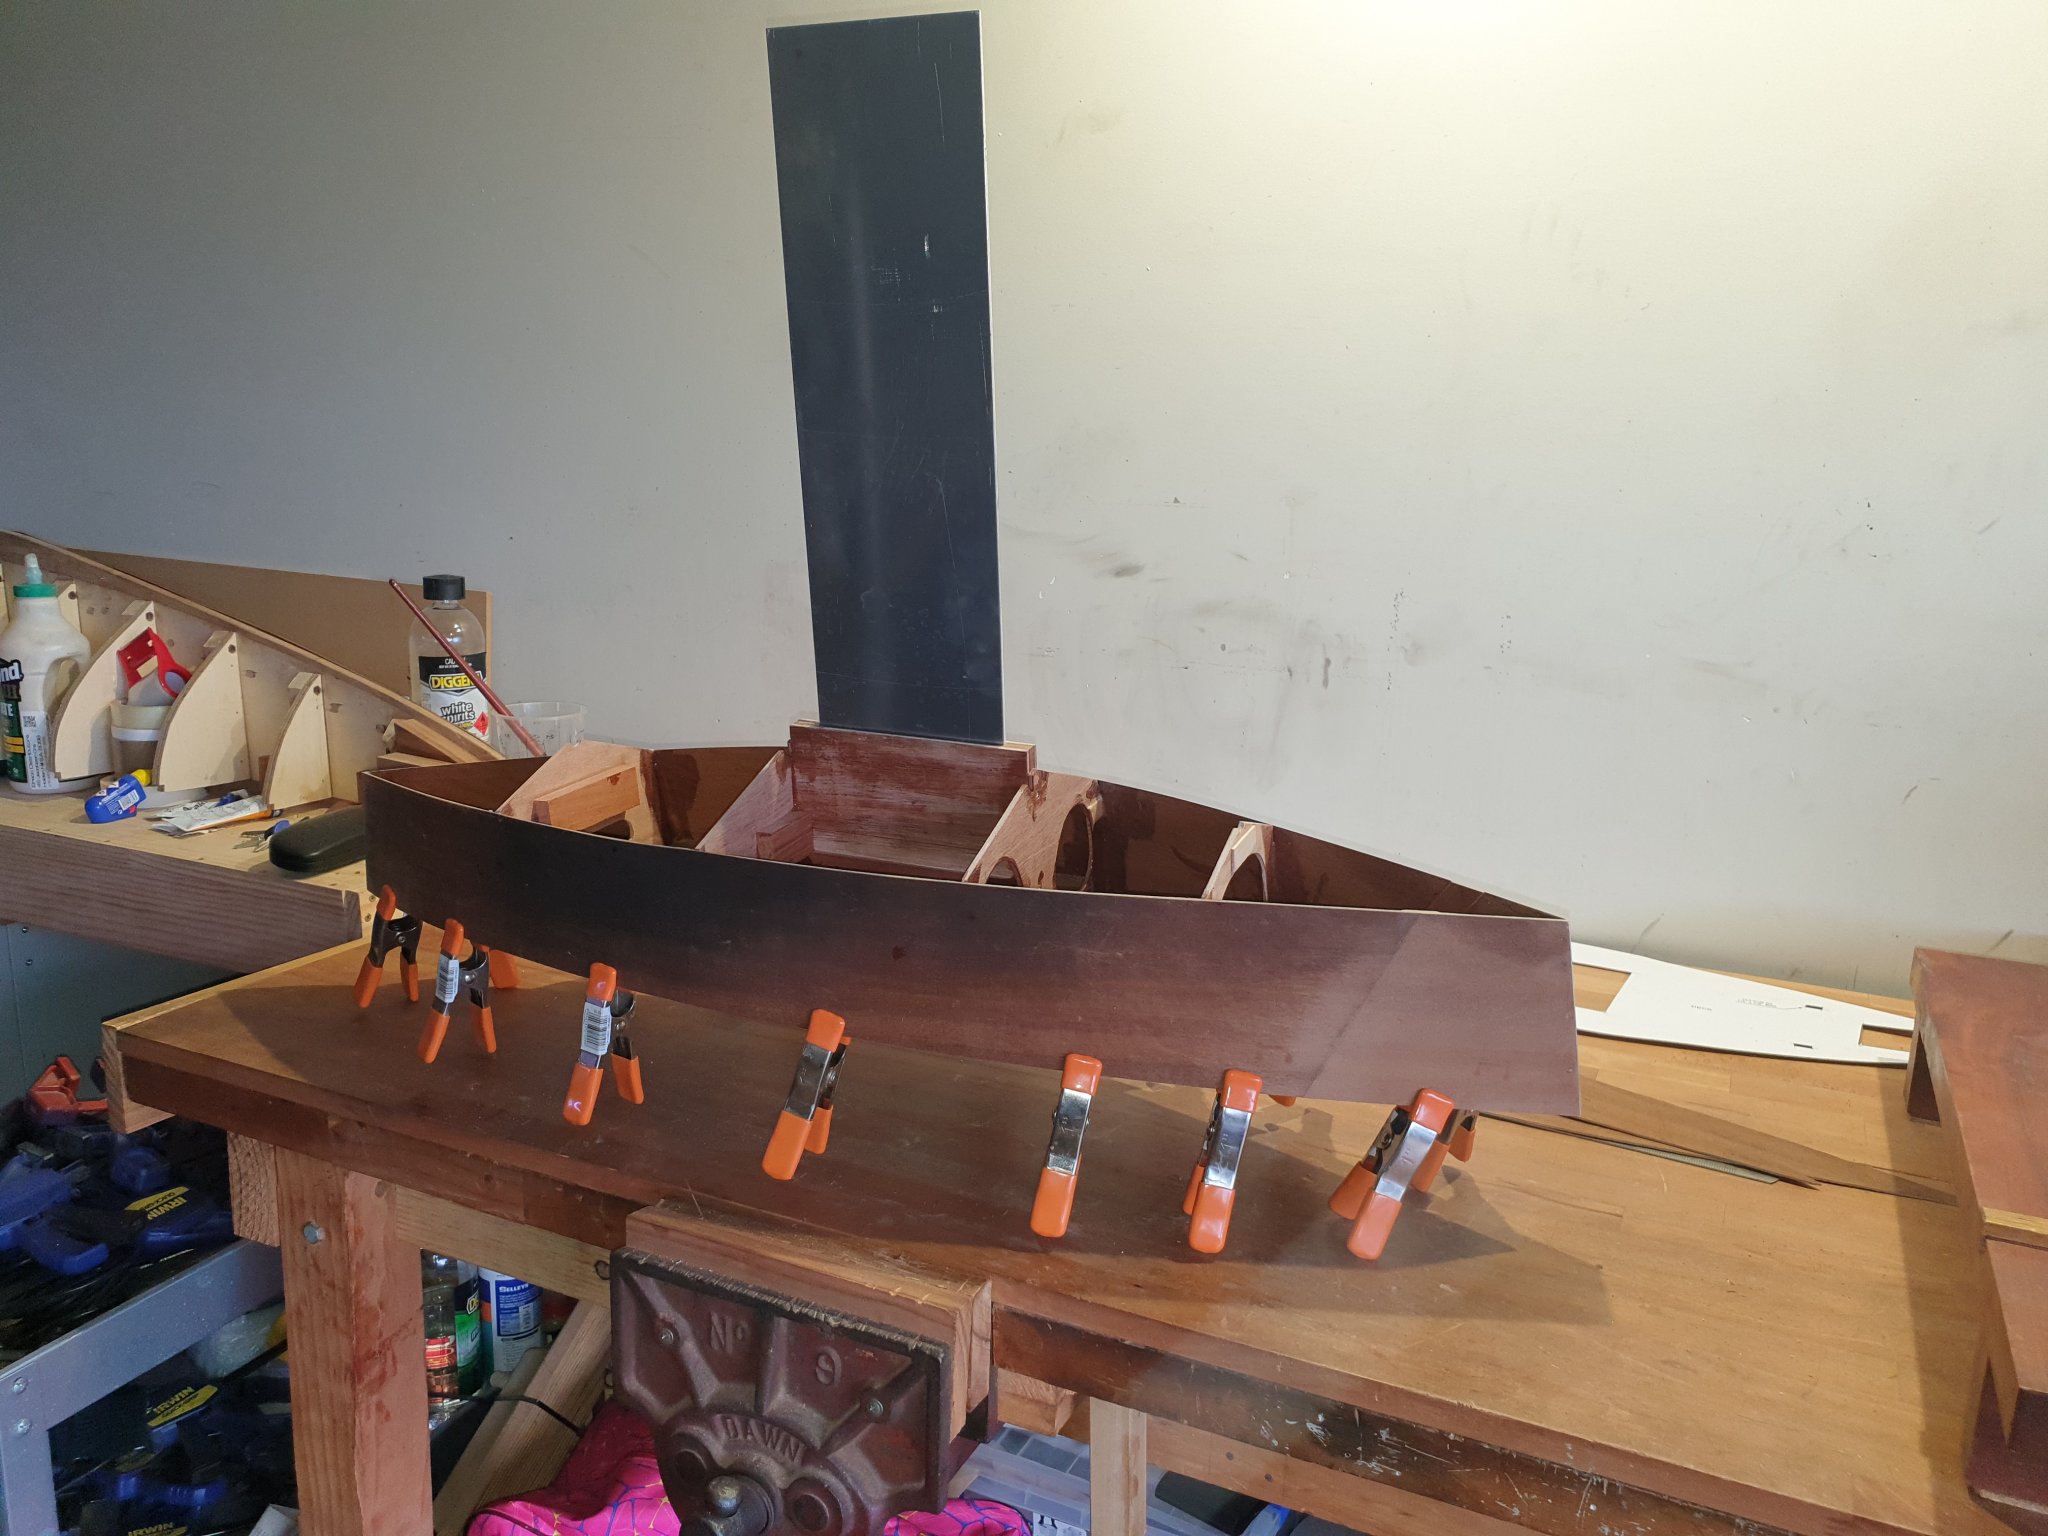
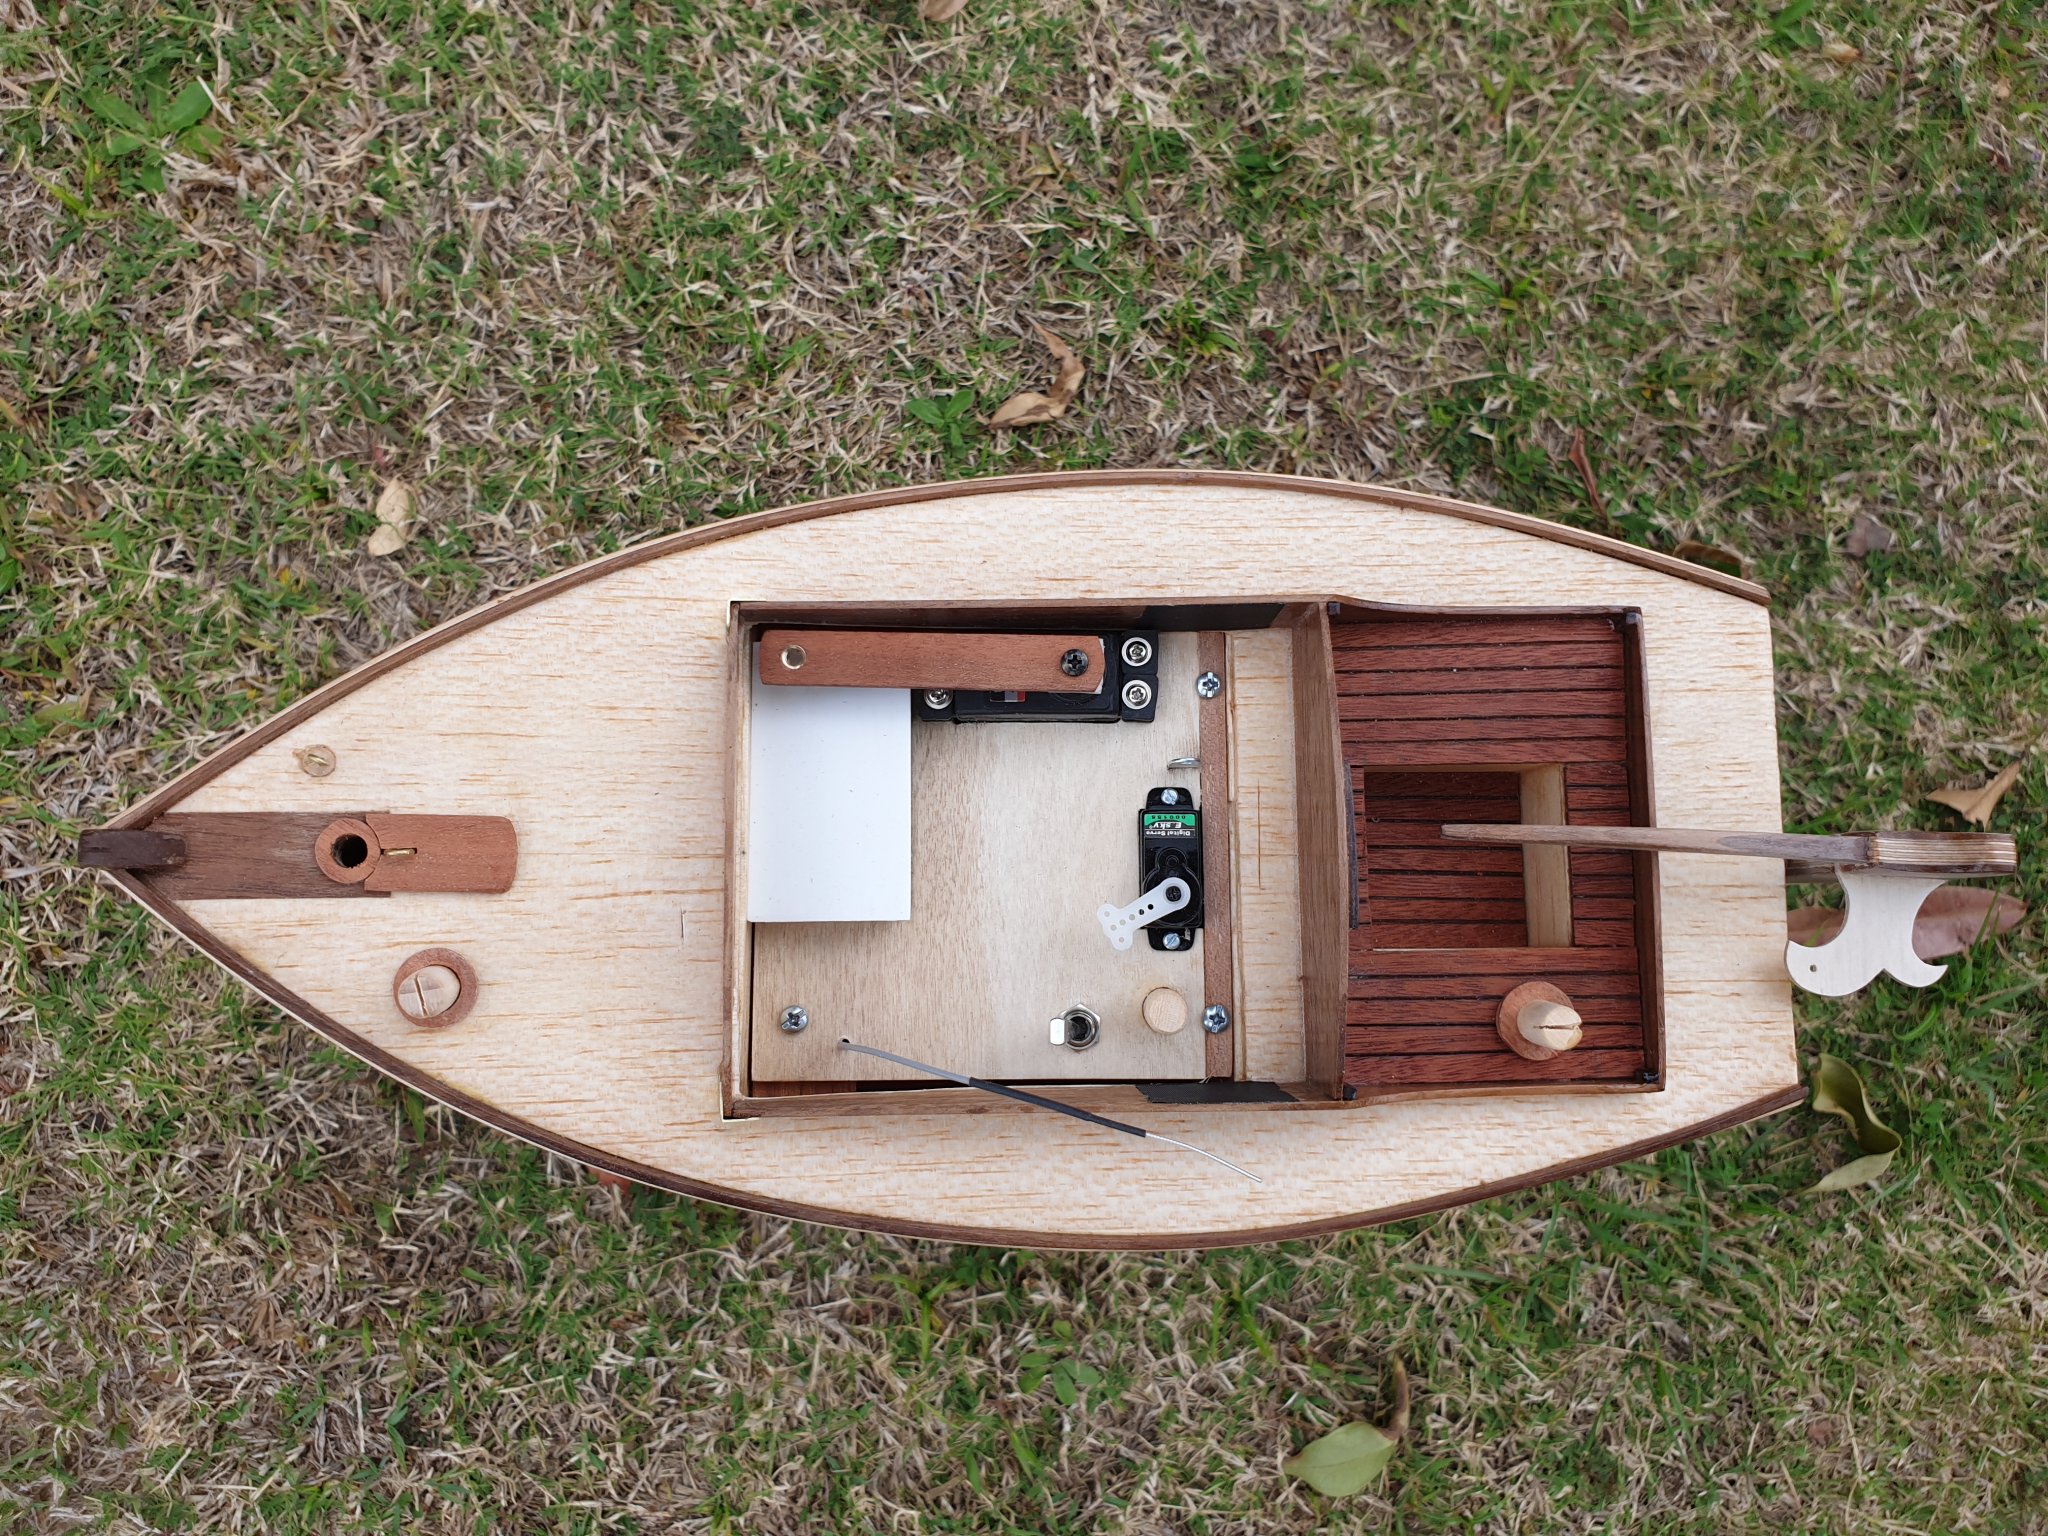
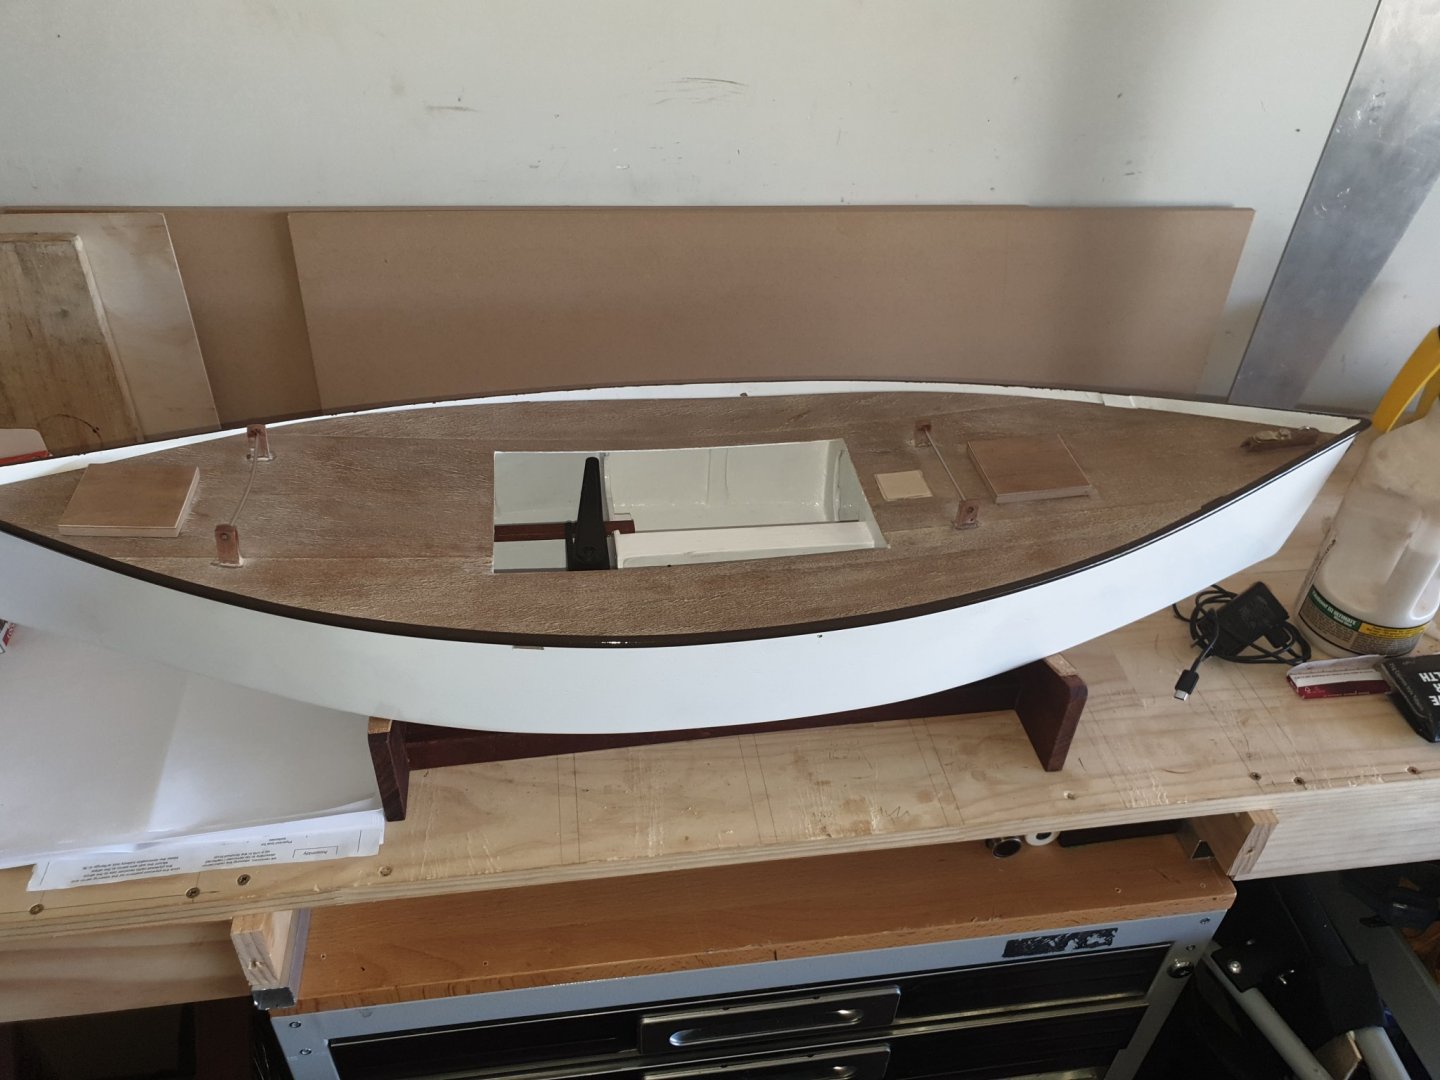
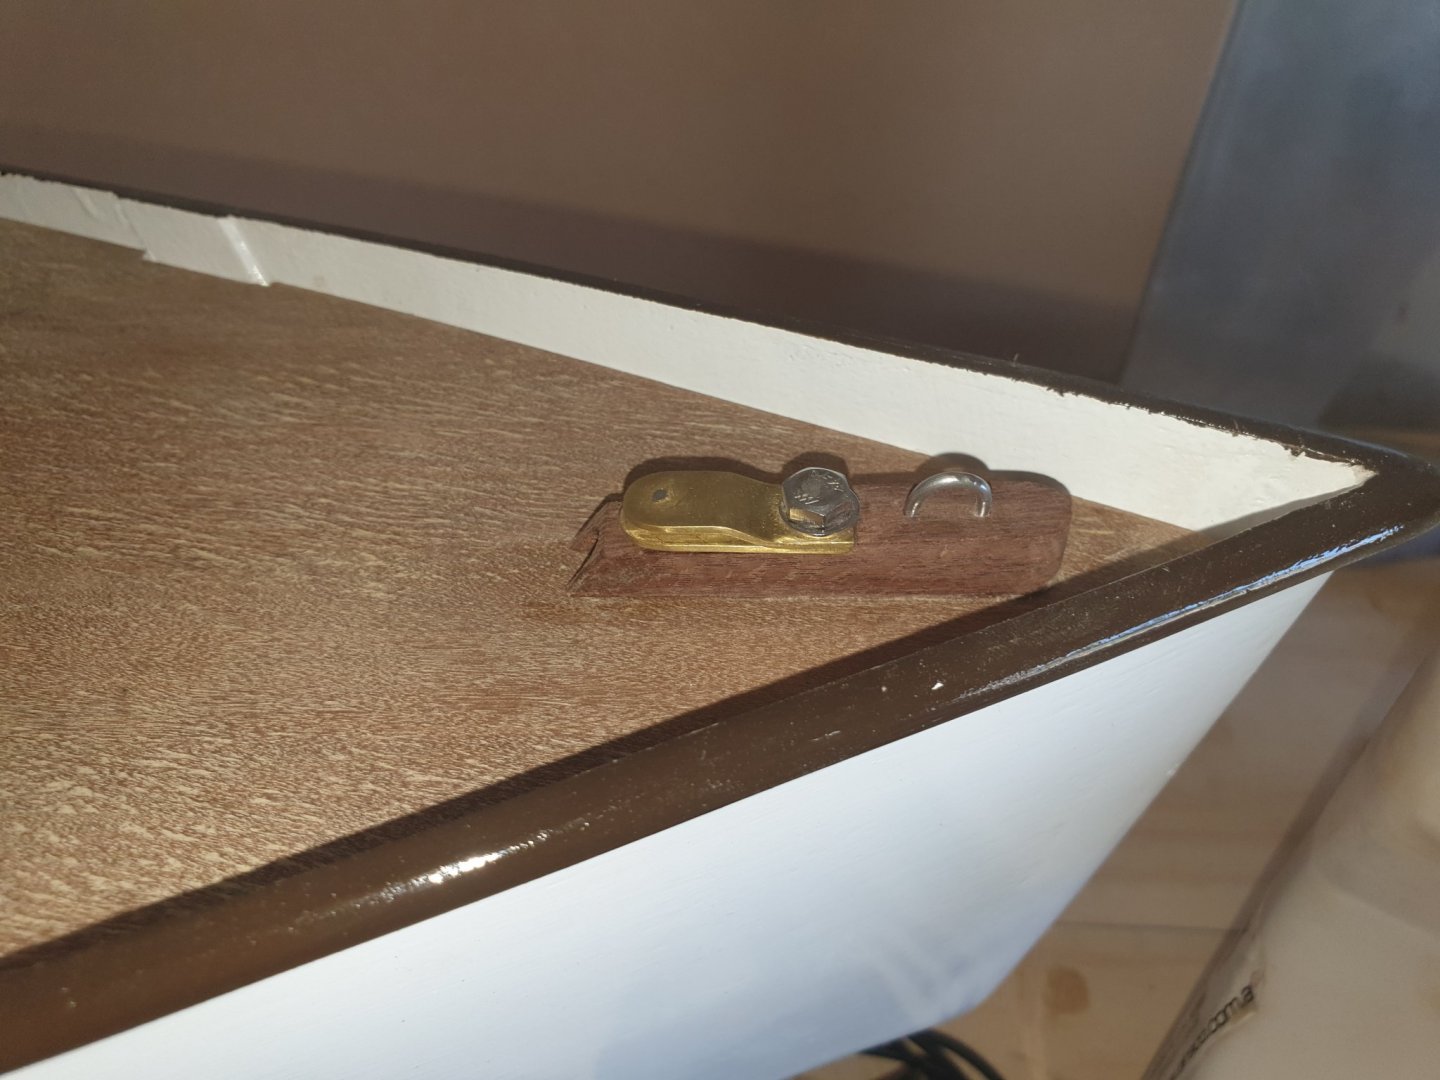
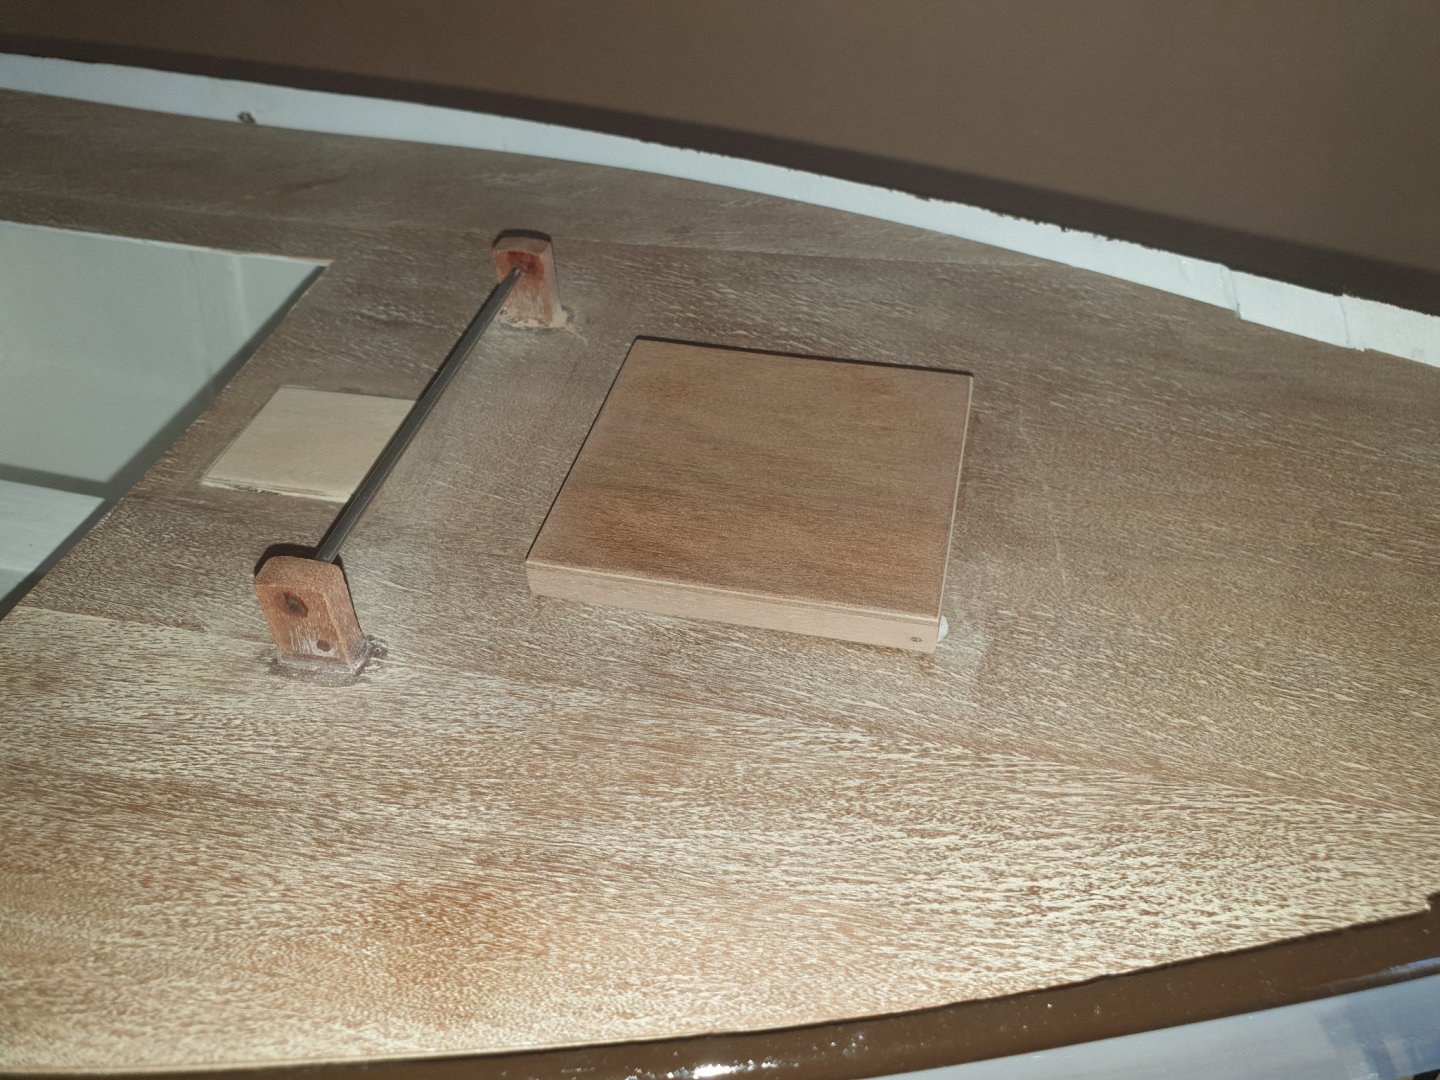
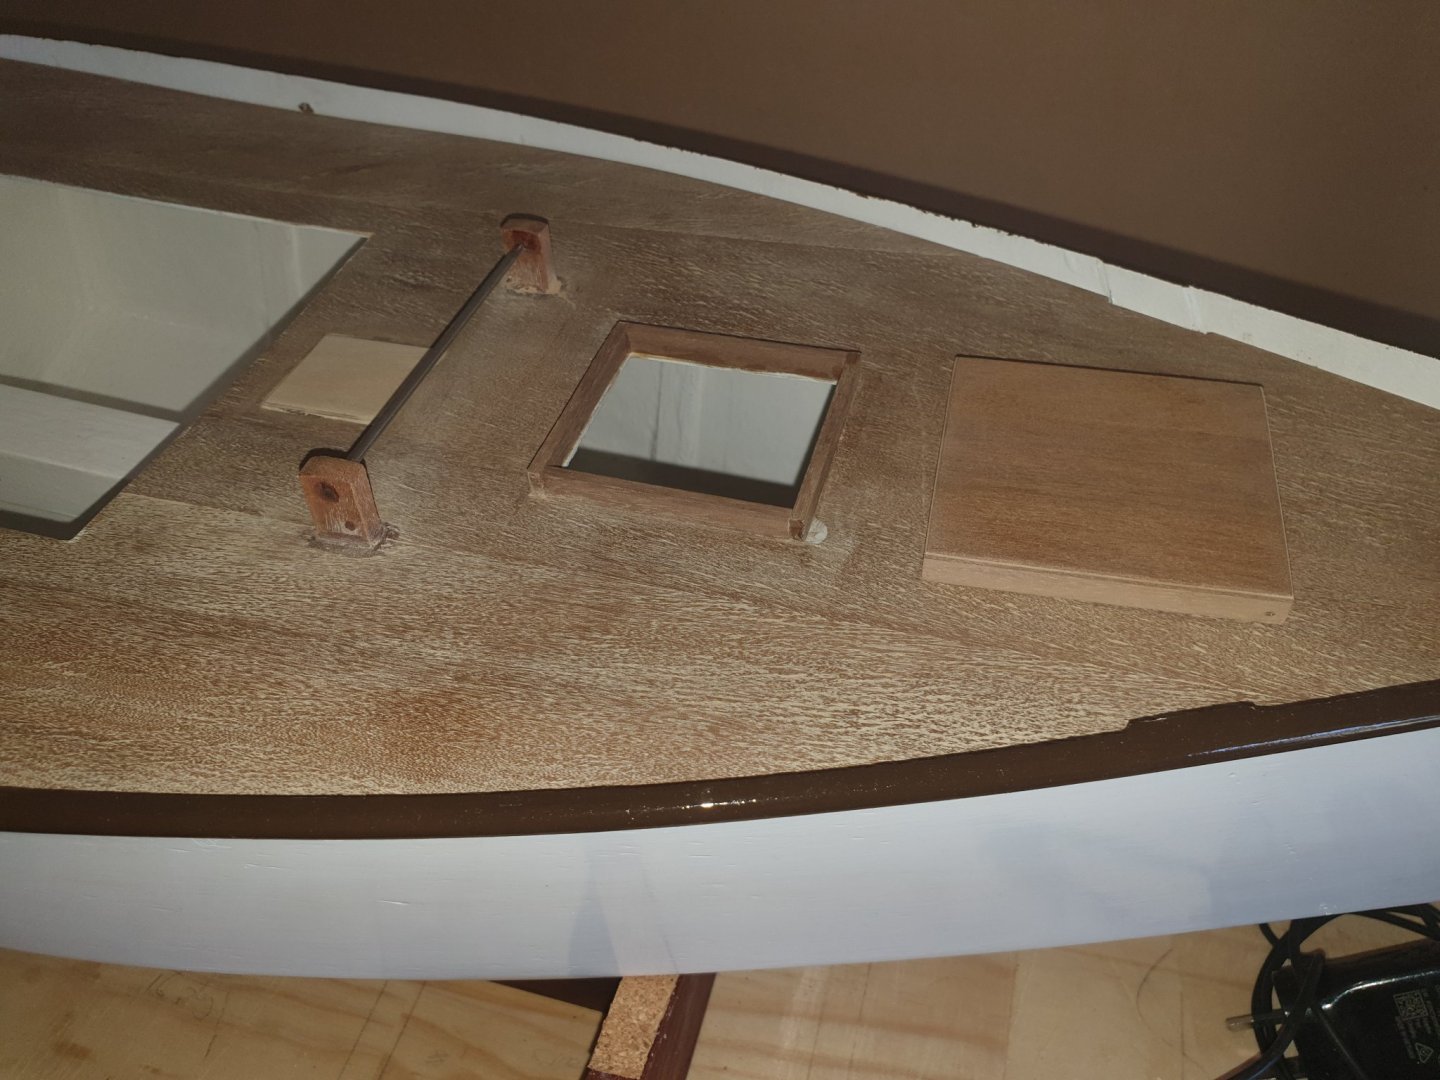
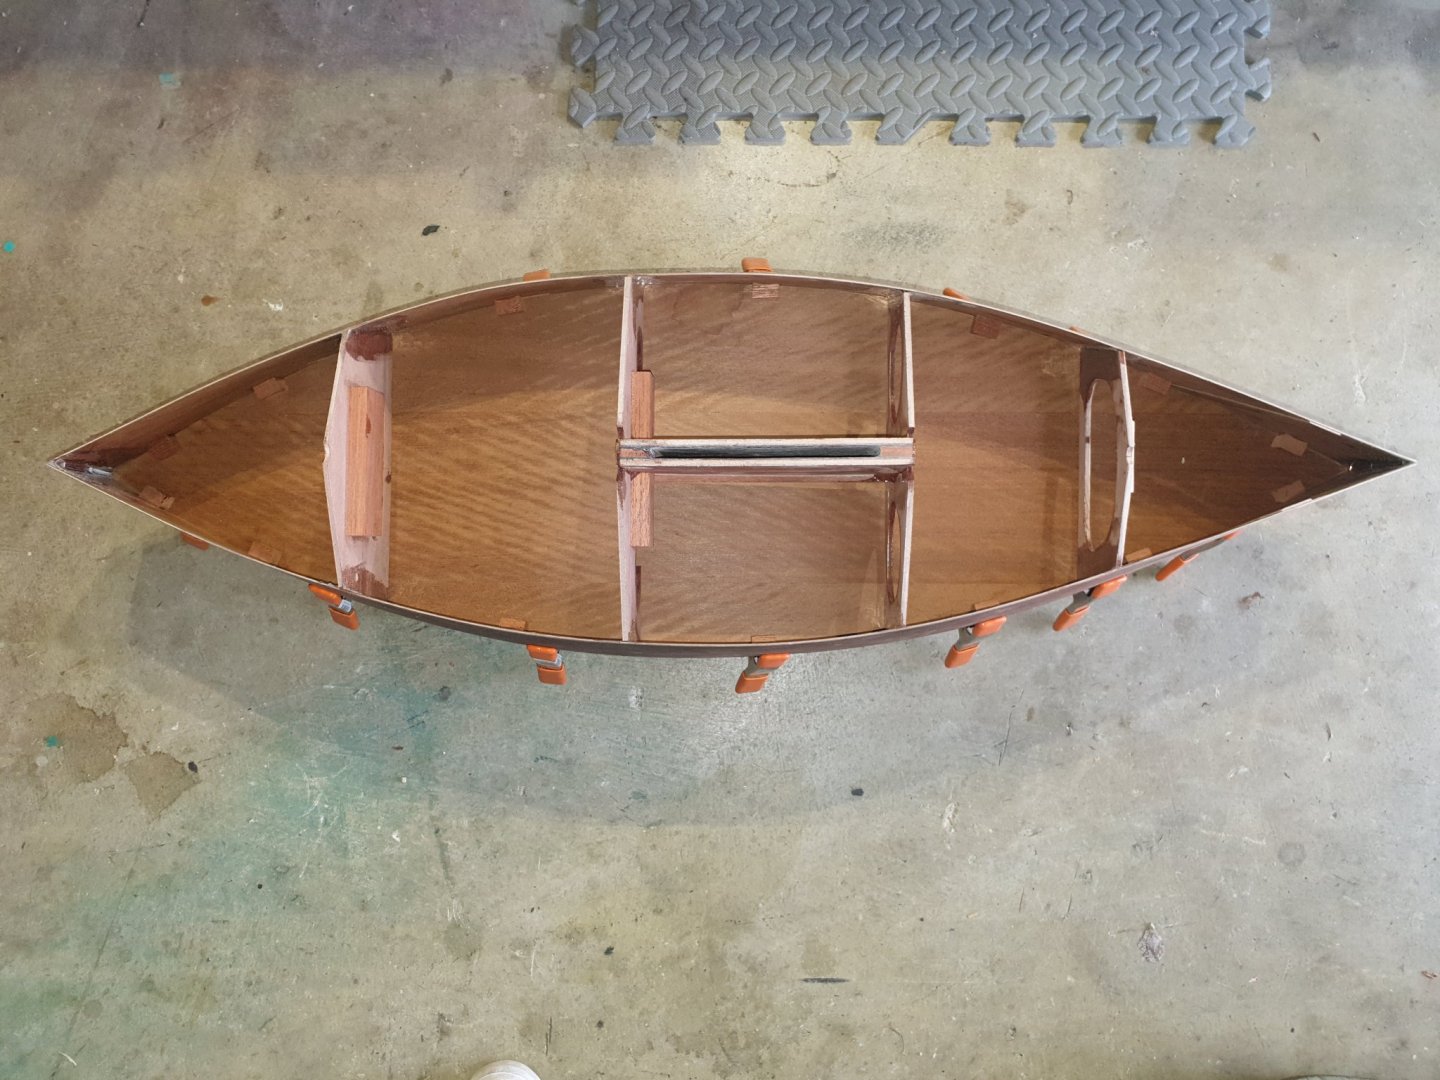
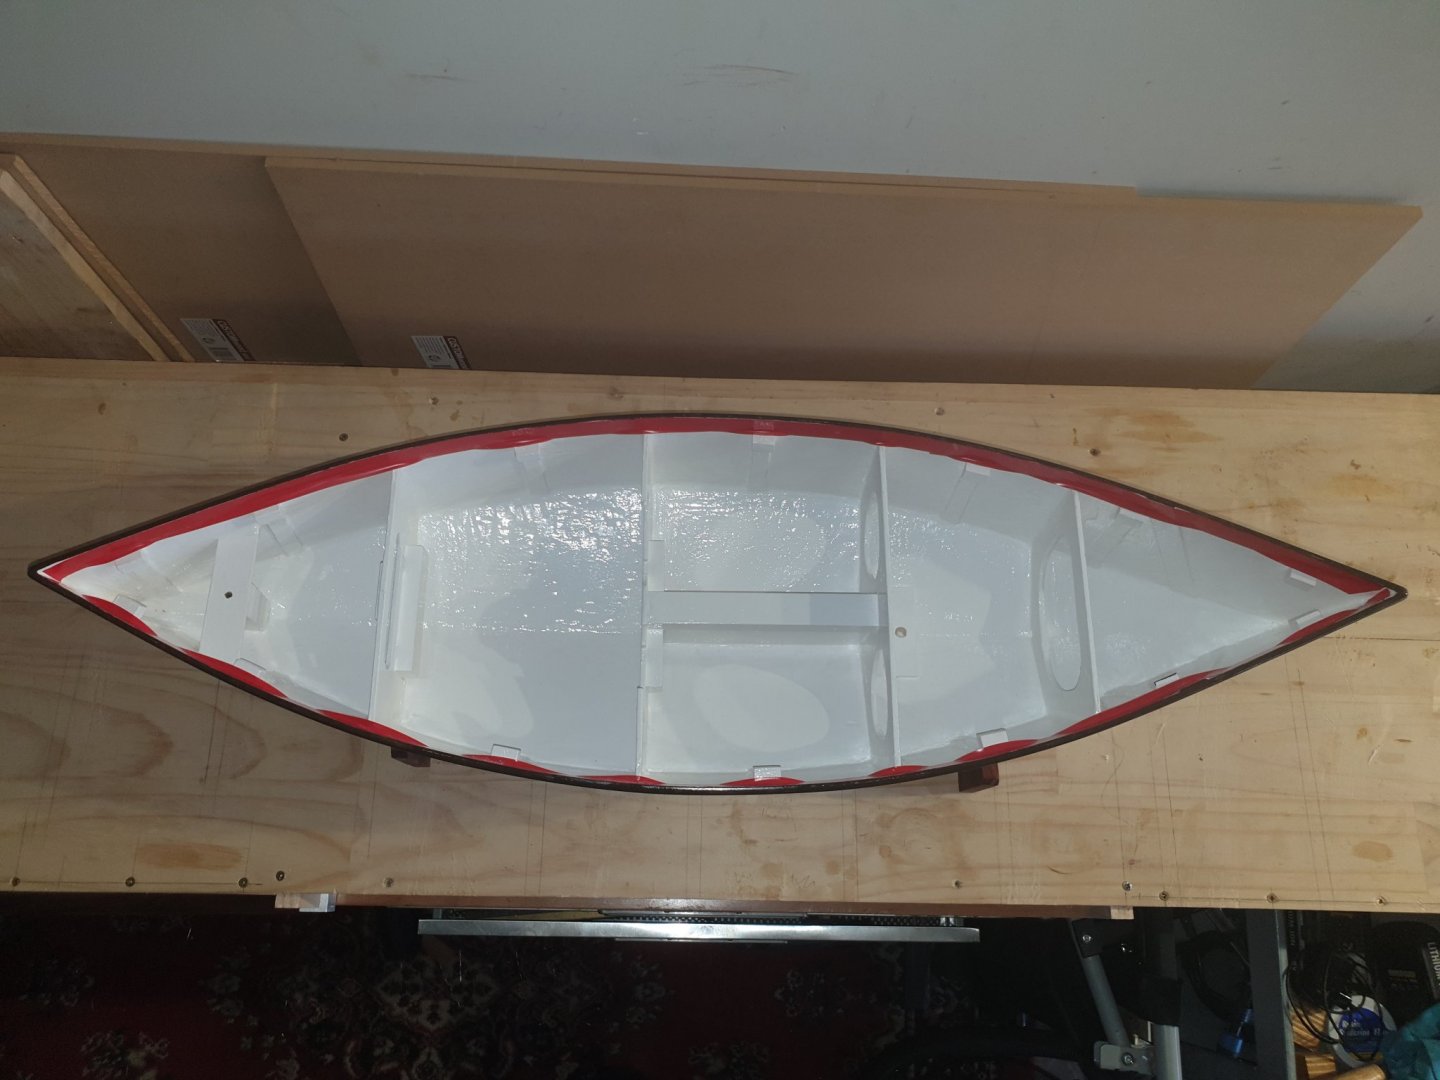
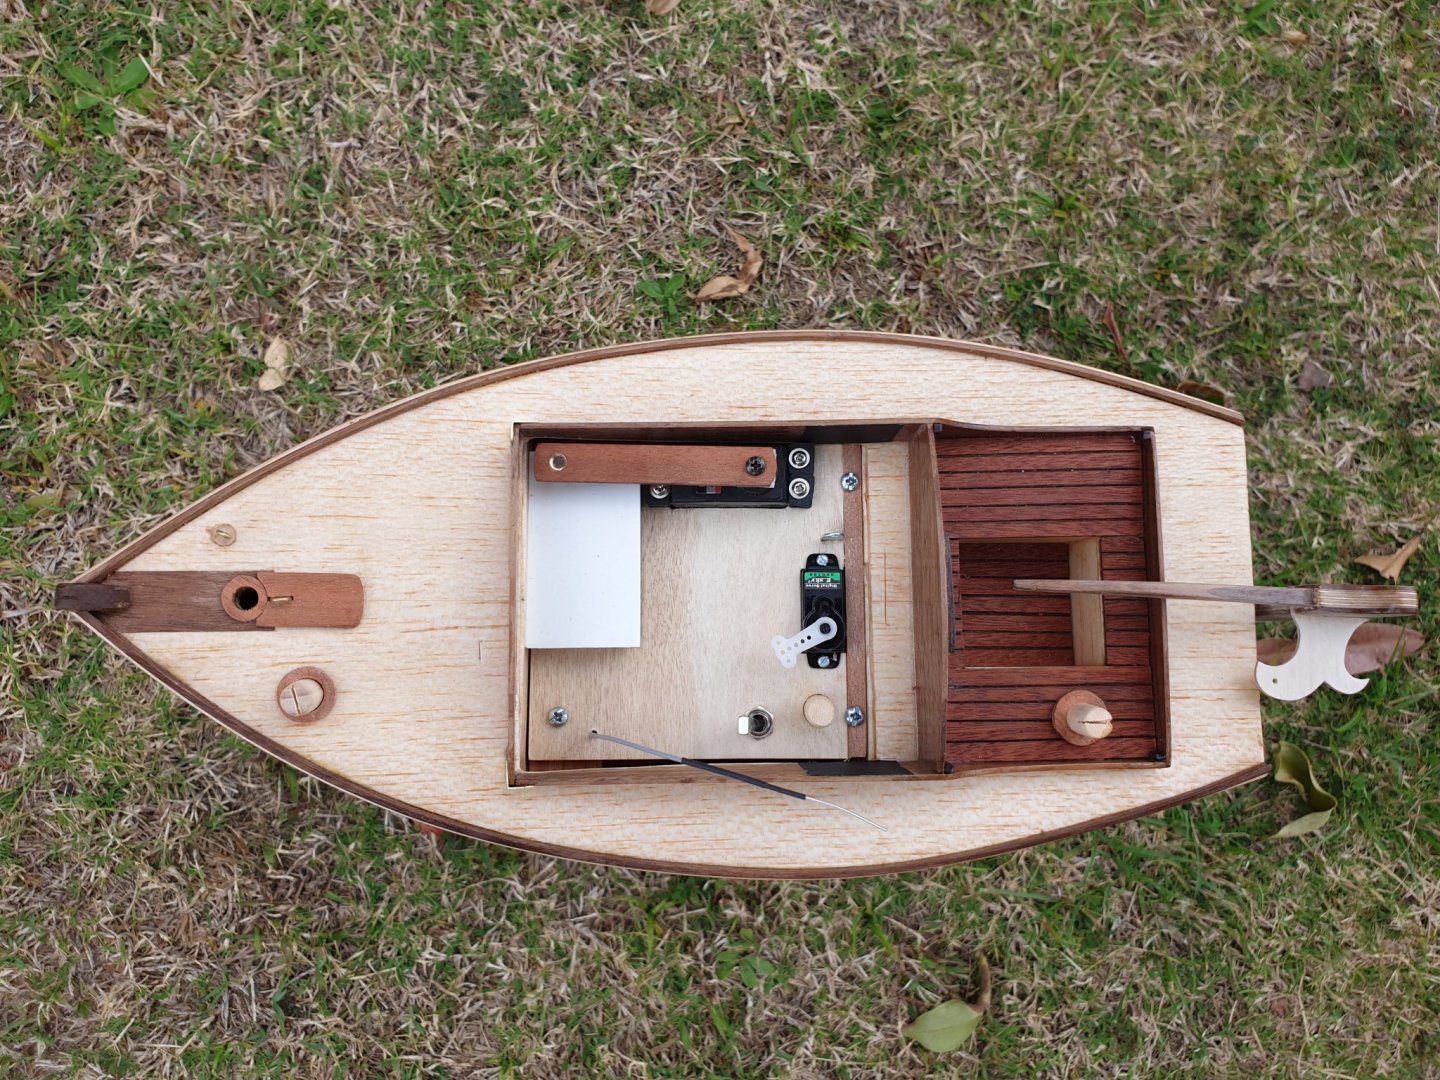
It was advised at this point to brush penetrating epoxy on the bottom of the deck and inside the hull to seal it. I being a tight skin flint used several coats of thinned Dulux undercoat followed by eight coats of Dulux high gloss. That oughta do it! I have got to the stage now whereas the gunwales have been masked off with red tape and then painted with chocolate coloured enamel. I have done two coats and will do four in total. I find waiting for paint to dry frustratingly tedious. I suppose it could be worse by me sitting in front of it and watching it dry!! All of the cut outs within the hull have already catered for the fitting of the two beams that hold all the radio and winch servo etc. You can see to the left of the forward centre bulkhed two small holes. These are for the winch lines. The holes were cut into a block of bone and the bone block then glued into its cut out in the bulkhead. So this is where I am right now. All that untidy epoxy putty now hidden with paint. Phew!!!.....that did bug me to realise that I can really mess things up without trying. But as a kind person said to me........." Pete.....what goes on in a captain's boat hull is his business only" I will remember that one next time I do a boo boo. I hate fudging things up but hey....it happenz!!! Pete


-
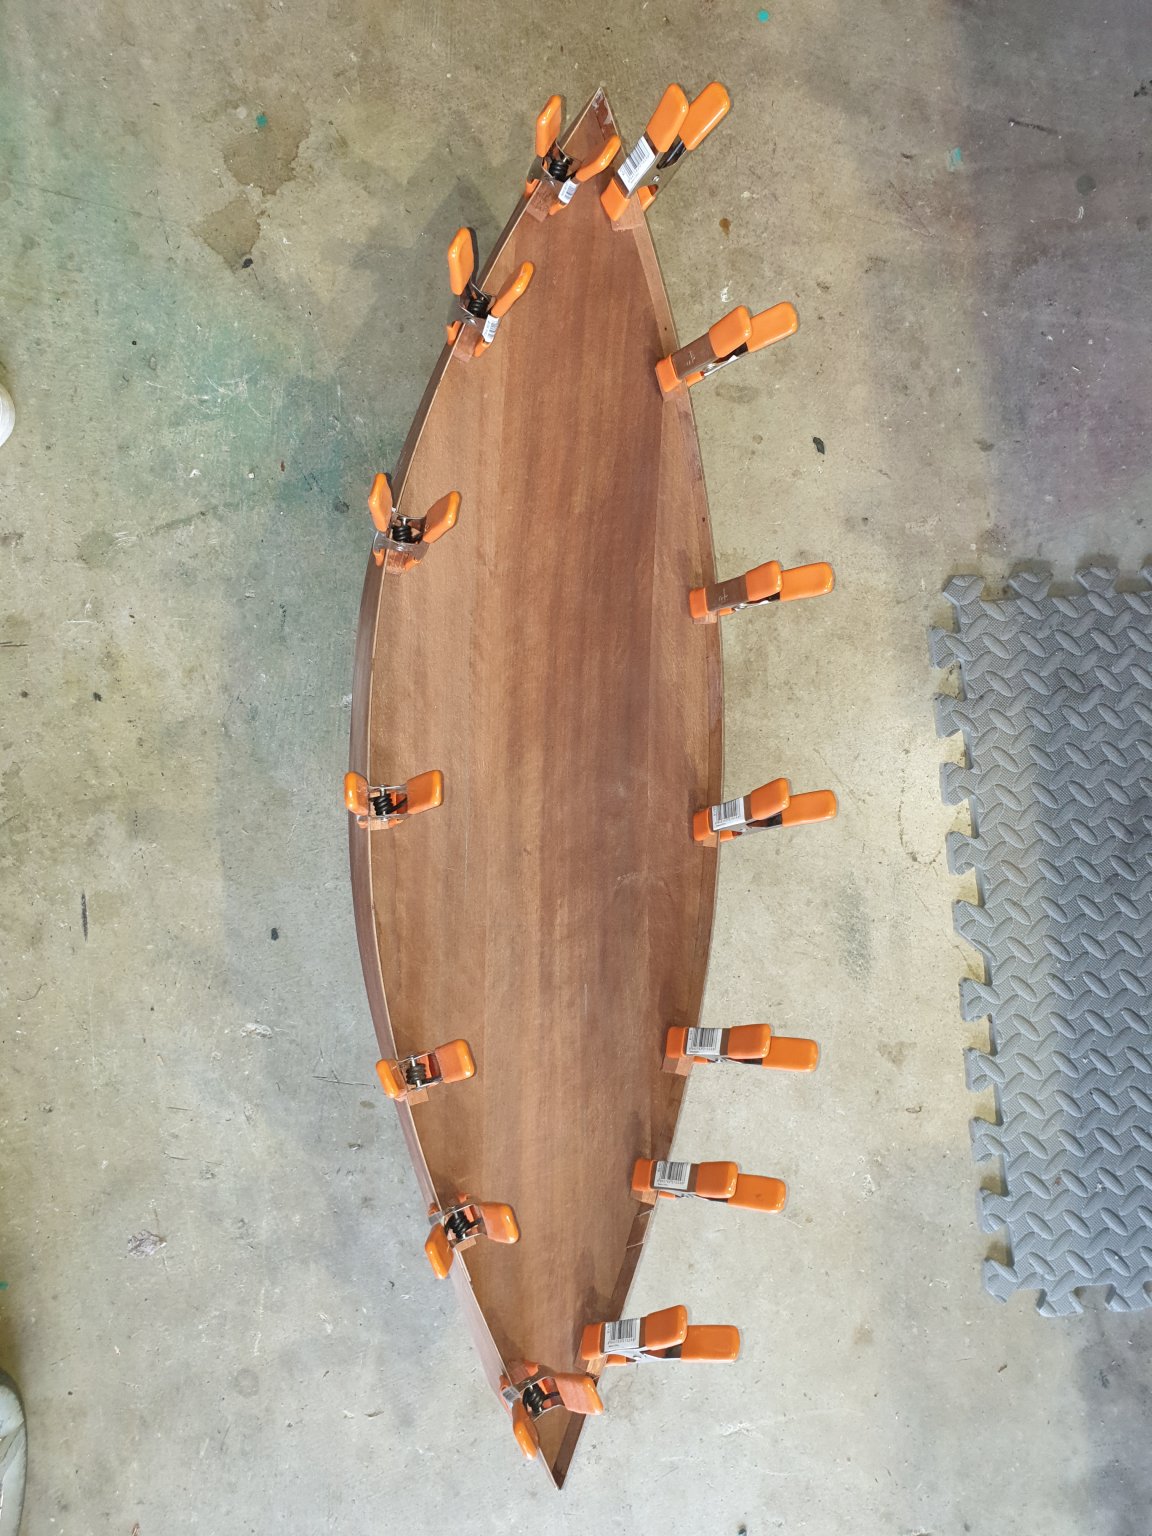
The deck was cut out and dry fitted into position before the bottom skins were added. This was to hold the shape. Next, the hull was epoxy puttied along every joint to firm yet another fillet. The wire was removed from the bow and stern and the holes filled with epoxy putty. Gary did a lovely clean job with the epoxy putty using shaped sticks like lolly pop sticks to form the fillet. I ignored ( forgot ) this and made an awful mess that hurt my pride!!


-
If you woukd like to see Emma sailing then go on to you tube and Type in " Emma, rc sailing sloop by Gary Webb". Gary has quite a few vids out there now on how to do this and that with boats he has dedigned. Gary is a full scale boat builder and exceptional modeller. He models to very clear cut clean lines with practicalities coming foremost. I ordered up the plans from USA electronically so received them pdf and had them printed out to the correct size. Emma is a very simple hard chine boat and made from door skins as opposed to the really expensive 3mm birch ply from the model shops. So she is rugged but cheap to build. I cut out the four bulkhead patterns from the plan. I leave around 6mm on the perifery ( sorry my false teeth fell out saying that so I ended up spelling it wrongly). Then glued onto the ply and fretted out with my electric fret saw. The crotch of this hull is to build the fin box first and then glue it to the centre two bulkheads. The sides if the fin box were first treated with fibre glass matting for water proofing and strength. The centre two bulkheads were then glued on to it. The crotch was first C A glued to hold it together and then a fillet of 5 minute epoxy applied on every joint. Strong as an ox!. The sides of the hull had three small holes drilled biw and stern to enable the two sides to be stitched together with copper wire from an earth cable. After stitching, the sides were held apart and the crotch unit CA d in its marked position. It was then epoxy filleted at all joints. Finally the two other bulkheads were fitted in thr same fashion. The hull bottoms were then cut out and glued on using the same procedure.


-
Thank you all for your reassuring comments all of which are taken on board. My son (48 ) is mad keen to see it sail and wants to see it finished. I have learnt a heck of a lot just building the two little Brando footys on another thread alongside another build " Emma" a hard chine rc designed one metre length schooner which I will start a new thread on. I have had many arguements with son trying to explain to him all that you have written above and more. But he is not having any of it and is convinced it will sail. I think NOT .....because it is already 10 kg in weight. More importantly, the way it is built with 13mm thick marine ply bulkheads will surely render it almost a submarine by the time its finished. Son did hit me with the idea of turning it into a plug and make a fibre glass hull. We have discussed this and yes it will be possible but clearly a false keel will be a must, I would have to work out somehow where the C of G is. Also as stated above, the masts would have to be shorter by a considerable amount. So in the end we will not have a scale Bluenose but something pretending to be a scale Bluenose! I have decided that if he wants to carry on with it then " Go ahead" with all the warts an all and brain aches. I offered to help but he must take the lead and accept the chance of failure due to lack of knowledge. I do not even know enough about it myself and I have been a modeller 60 odd years but not too many boats!! I am happy to continue doing " Emma"' , to gain more knowledge and to learn more and then maybe help him with Bluenose. A fibre glass hull would be the only saviour of this project, save using the bulkheads and adding steam shaped ribs somehow fixed to them but removable. Then to plank it and remove the hull from the mould very similar to how Jond did it. The hull would end up fractionally larger than planned but to be honest that would not worry me. Thanks again for all your help and suggestions to save her. She is not at the dump yet!!! So we are listening!!! Pete and son Damian.
-
That sounds better as I am a pensioner. I am a bit confused as it is advertised as an e book. I would prefer however, a hard copy second hand. Where would I look? Pete
-
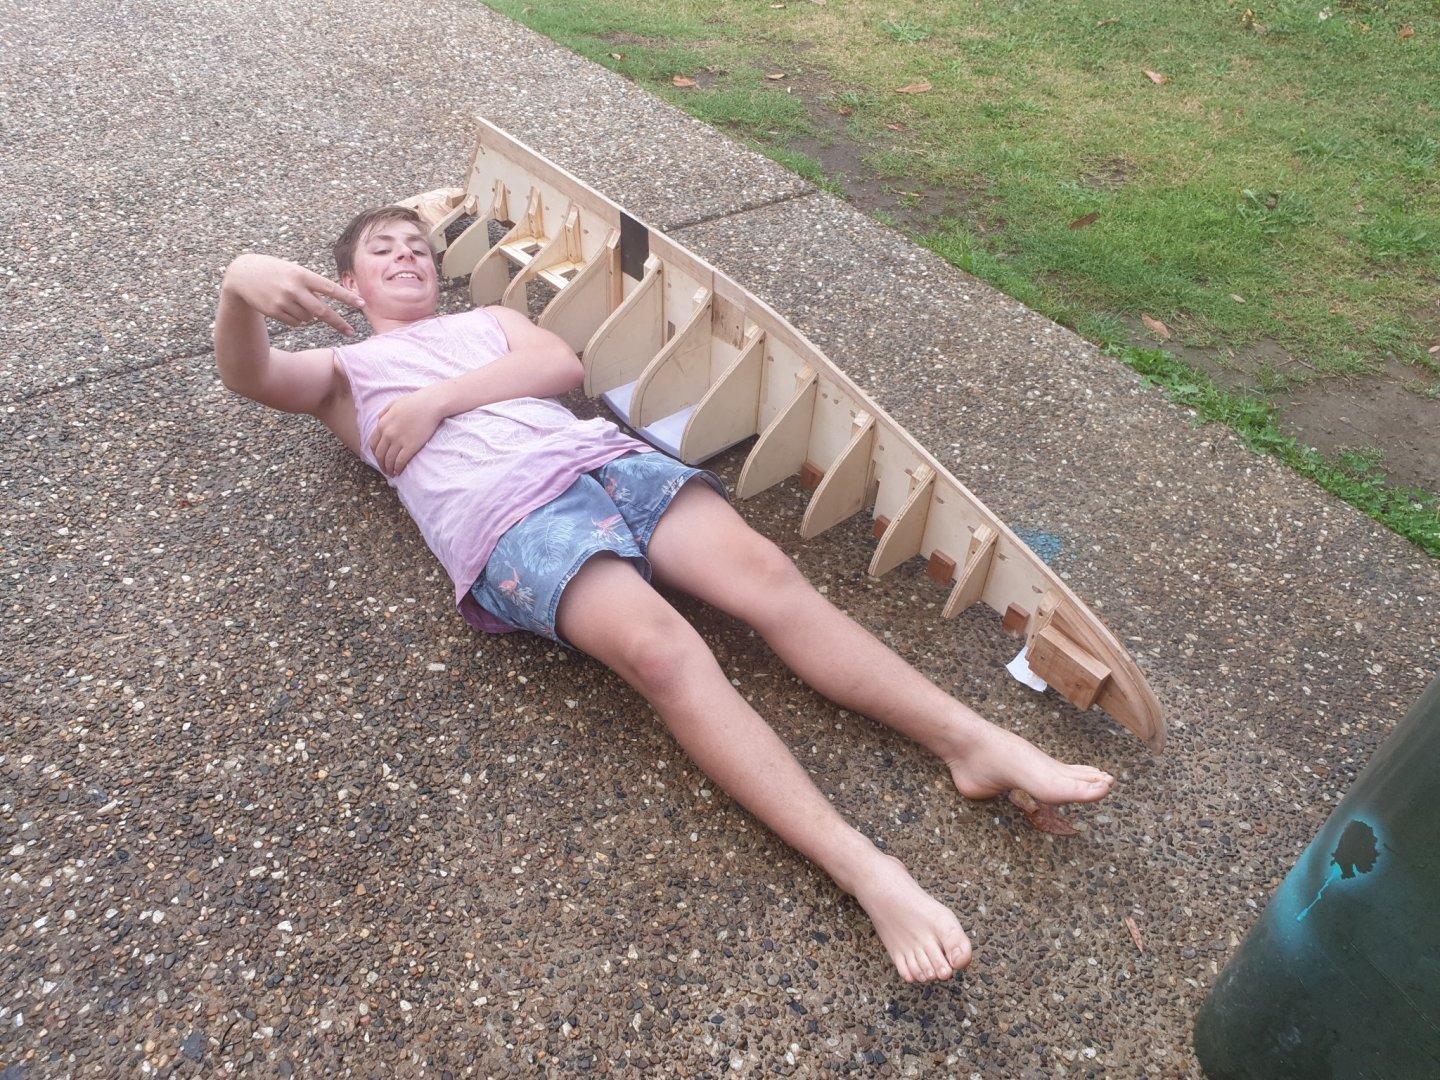
After much thought indeed I have decided to abandon project. There are many reasons. 1 I do not have the knowledge to scale down a prototype drawing to enable a working RC scale model. 2 I should have researched more fully. 3 I have listened to experienced modellers and full scale boat builders about the basic requirements for a successful rc sailing model and I have gone about this with enthusiasm but total lack of know how. 4 It is going to end up simply far too heavy the way it is built. It weighs 10 kg already . I include pics of my grandson laying alongside on the wet pavement to appreciate scale. Poor boy but he willingly laid there when told to. 5 If I were to proceed it would weigh at least double and the waterline would end up near the gunwales. 6 I am happy to build boats but I prefer to build designs that are proven and tested as that I believe is my path to success. I am happy now that the worries with Bluenose are at an end. I am also happy that I have cut it off the building board and weighed it at this stage as it has affirmed my apprehensions...Too heavy! I am also a folk singer and this decision falls alongside one of my favourite singer/ songwriter songs... A lessson too late for the learning by Tom Paxton. Anyway good bye Bluenose. I am not sad but rejoice in building new projects that are achievable. Here are a few pics of Bluennose before it goes to the dump and also a few pics of my new build called Emma. It is nearly one metre long, hard chine, build from door skins and designed by Gary Webb an American modeller and full scale boat builder. You dont get better than that! I have much pleasure in building her. I am aware that most of you model static models so I hope you can appreciate my take on it. I may open up an Emma thread if there is any interest. Thanks for your time. Pete

-
Hi Nils. I have not forgotten you but for some reason my answers did not get through. Now I am answering direct on the forum it should register okay. I like all your fine details. The stove was a good find. All the other details are glorious. Some while back you had some etched fish. Will you use them do you think? Pete
-
Can anyone help me with which knots to tie when rigging up a yacht like above. I am really brain teased when it comes to knots. I have learnt so far to do a reef, bowline and a round turn and two half hitches. When instructions say to " lash" this to that, what knot do I use? Nearly every knot on the boat is a reef knot or a granny and then super glued to stop it falling apart. For example ....I need to fasten a piece of chord/ twine to an eyelet.....which knot please? Pete
-
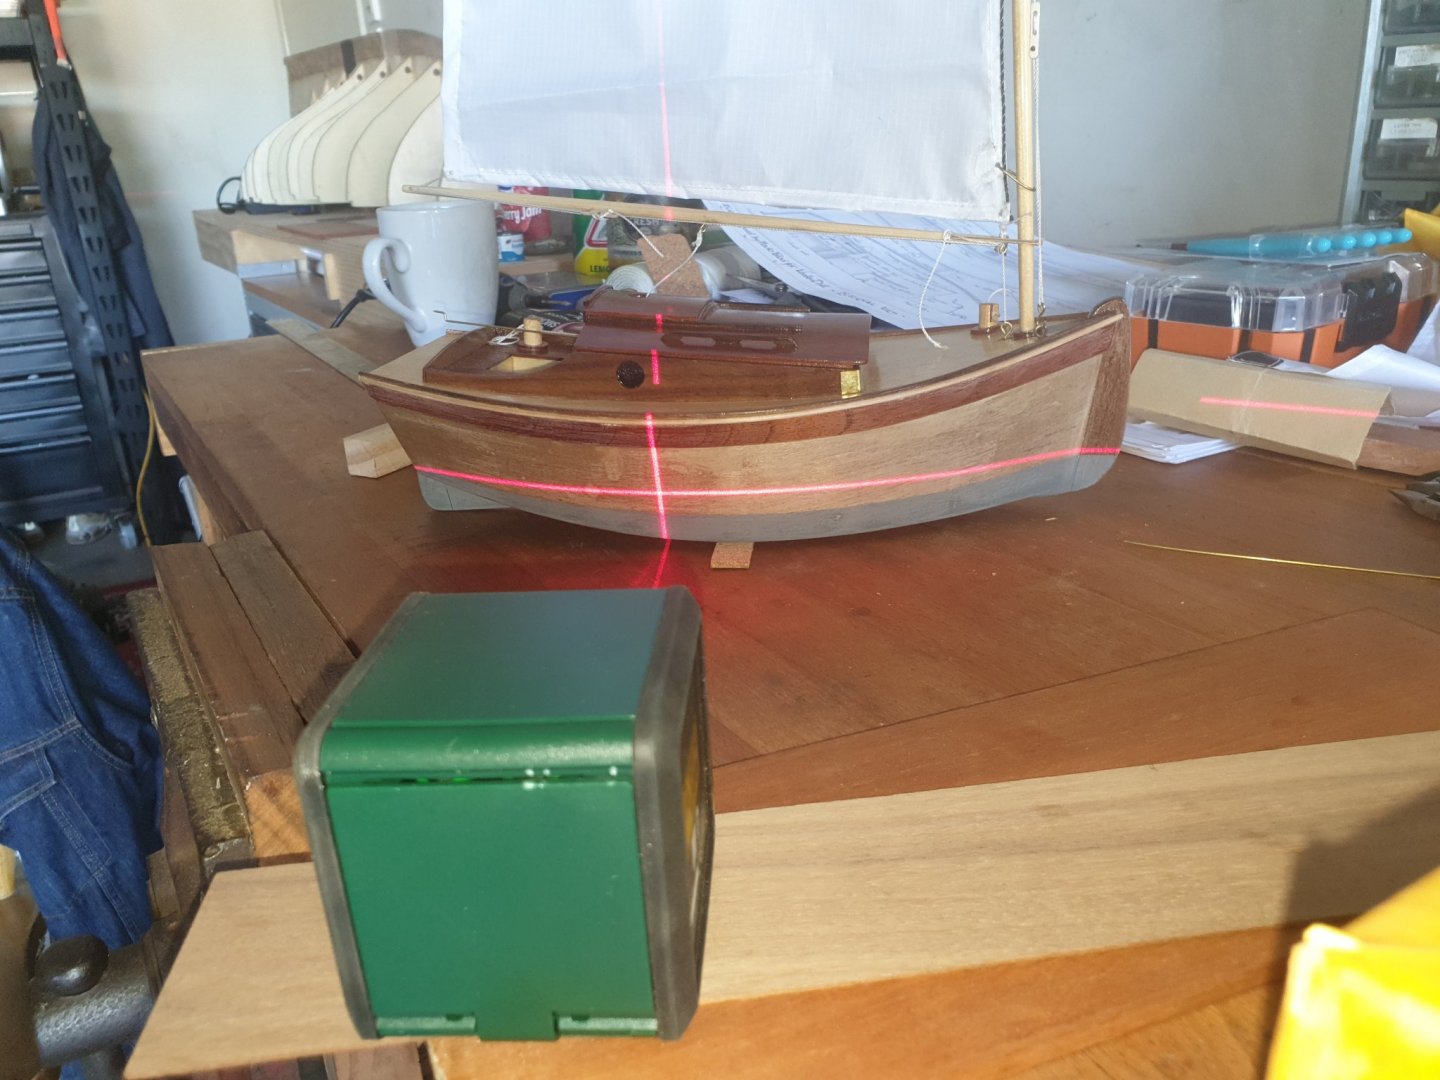
Trying to remark the waterline to where it should be was a challenge as I could not mark it with a pencil onto a varnished hull. My son came up with the idea of using a laser beam. It worked great. I held the boat steady whilst he put the masking tape on. Got to have been done before but we were chuffed to have thought of it. Pete
-
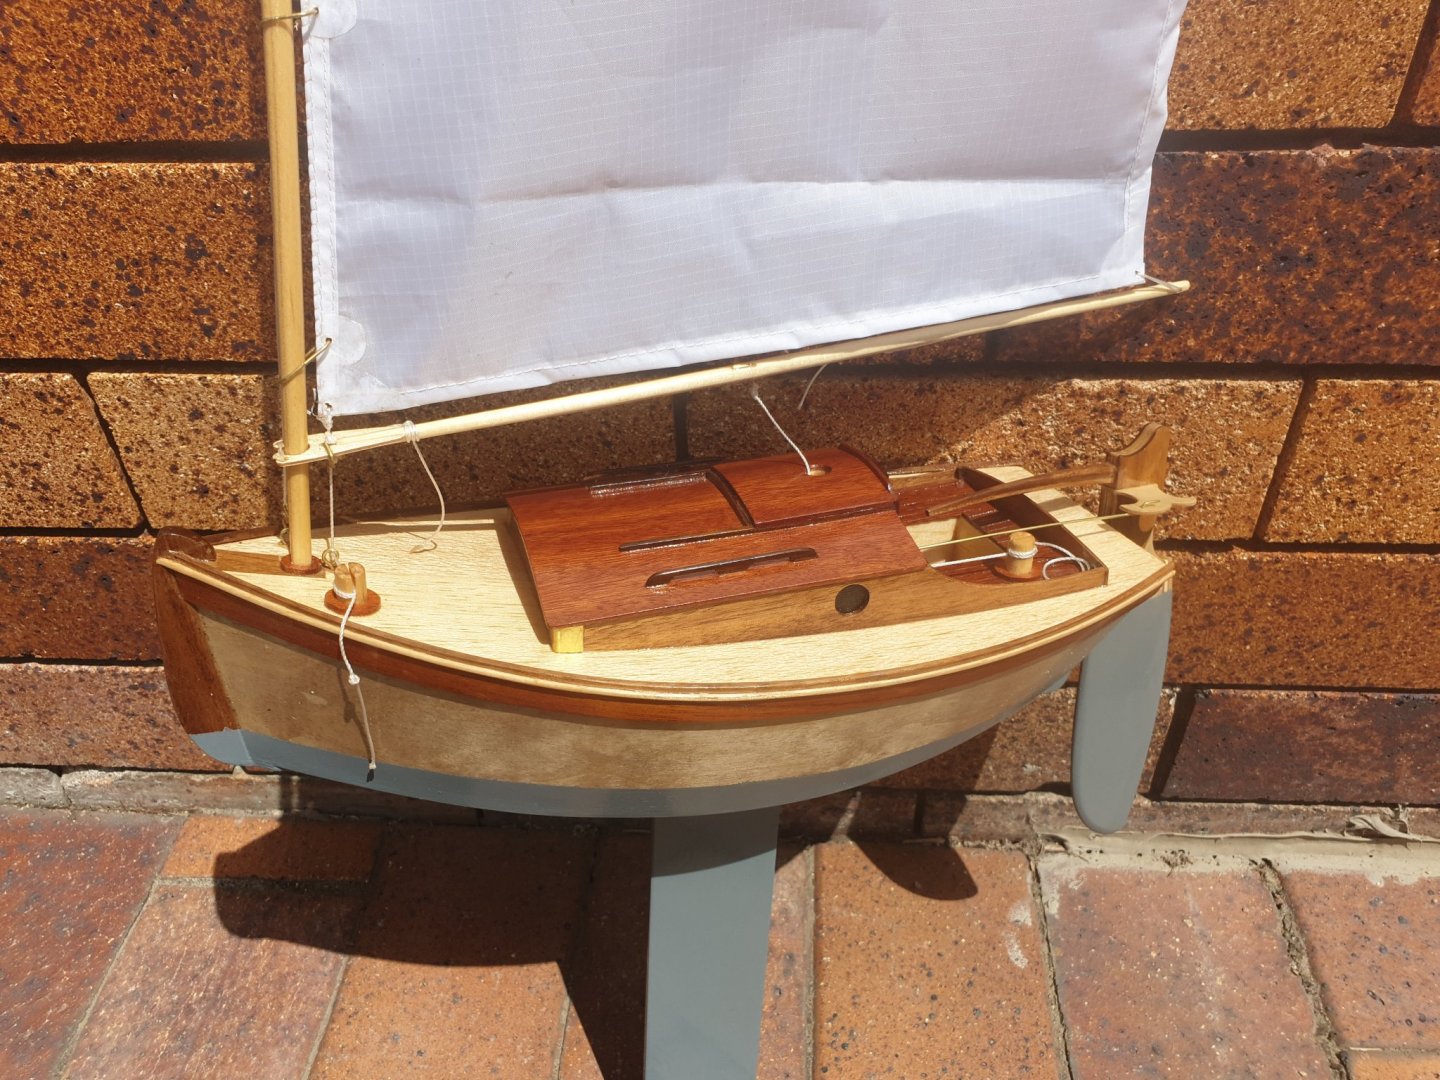
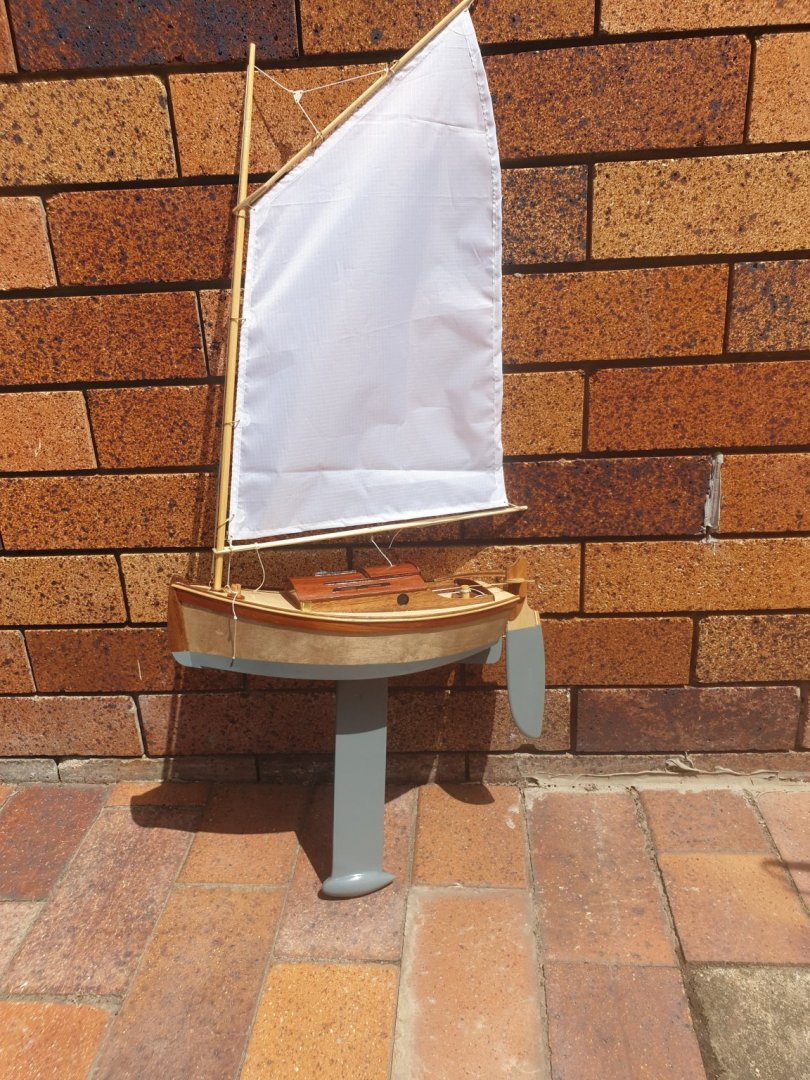
He she is finished and test sailed in the swimming pool. Not much wind though. I did not like the gloss grey bottom so I am repainting it matt rust colour.
-
Wow!!! I love the curves over the beam. I bet you are smiling now Nils. I want on . I want one !!! Got the book and thats a start. Pete
-
Hi Nils. I find being able to speak openly increasingly difficult especially with these days of political correctness but my overuling instinct is honestly. I absolutely cannot say I like something if I do not as that is against my ethos. If I do like something I tend to over praise but that is just me as I have been immensley pleased by something or someone. Yes I criticised the quality if the brass castings because as soon as I saw them my instinct said "Ahhh no!!!" I think I have critisised in a positive way as you are now thinking of going for turned brass port holes and to be honest i do not think you will regret it. I am pleased you took what I wrote in the spirit it was intended and that is...." How your boat looks when finished ". Geert. It is absolutely okay to disagree and I am really pleased you do. Hearing all points of view opens up the mind to different concepts and solutions and creates interest. My solution is but only one idea. Pete
-
Nils. I like the beech liner. It sets it all off. The boat is starting to look busy now which is all good news. I like the sliding hatch within its brass runners. Neat job there. Re the brass cast port holes. If I were to say I liked them, I would be a hypocrite. So I must be honest with you. I do not like them. I like the principle of brass port holes and have seen some lovely examples of turned port holes in brass that look splendid. The ones I saw are made by a guy in the UK who has all the CNC machines to do them. He is reasonably priced as well. They are non opening . You have spent so much time,thought, energy and expert modelling techniques on this wonderful model I think those particular port holes are not up to your standards! Oh dear...i think i have just lost a friend by telling the truth about what i think? Pete
-
advice on restoring pond yacht
Peter Cane replied to Commodore53's topic in Masting, rigging and sails
Old pond yachts sounds very interesting to me. Did you get your answer? Would you be kind and post a picture of the yacht requiring repair? Many thanks Pete -
The radio gear, cleats, eyes, and rudders have now been added. The other Brando has had the same treatment. I am busy now making the masts , Gaffs and booms. Pete.


-
Thanks for your good advice. I will not abandon ship but shelf it until I know better what I am doing and have built a few more simpler sailing yachts with RC and winches. If I can think of a way of lightening it, I will feel better about it. The rudder will have to be redesigned so that it isn't angled but straight. It will have to be a lot larger than the scale version. How large the keel and rudder must be will be found out literally by trial and error in a swimming pool with me in it!! I need to hit upon some kind of electric tool that will grind/ saw/ hack away the vast majority of the bulkhead and keel after the hull is planned. Pete
-
I I was swallowed by the deep. Pete.